#Movavi Video Converter
Explore tagged Tumblr posts
Visit Tumblr Blog
Explore Tumblr blogs with no restrictions, modern design and the best experience.
Last Seen Tumblr Blogs


Fun Fact
In February 2021, Tumblr had 518.6 million blog accounts.
Note
Hello. 🥺I hope you can still remember me! 😂 would you mind provide me the specific tutorial on how to make these HQ gifs especially this post: https://www.tumblr.com/sinnersmovie/781373995991826432/the-pitt-2025-created-by-r-scott?source=share ? 🥺 the quality is really nice! I have the problem of gif making, the thing is that I have followed many tutorials on how to make HQ gifs but it always turn out differently even tho I follow every step.. I am too confused. Literally, so desperate to fix the problem 😭 not sure what did I do wrong..
yes, hi!!! so, for this gifset from the pitt, i can walk you through my process on capturing footage and coloring, but if what you're struggling with is quality, the most important part is the file and definition of the footage you're working with.
i personally almost exclusively use 1080p footage with a decent file size. a file can be HD and still vary in size from a couple hundred megabytes to several gigabytes. this will also depend on the length of the episodes (half-hour episodes vs. an hour-plus). since we're talking specifically about my gifs of the pitt, my DLs of the episodes are all in the 2-3.5gb range, give or take.
i know there are gifmakers that swear by 4k footage and i certainly won't deny that gifs made from 4k files are stunning, but i've already spent a lot of money on external hard drives and don't have the space to spare for the frankly massive sizes of 4k movies and tv. besides, most 1080p quality gifs turn out perfectly well!
below the cut, i'll show you how i capture, gif, and color scenes from the pitt like this:

note: this tutorial is beginner-oriented!
step 1a: once you obtain your file (this is not a piracy tutorial lmao, but if you google "piracy reddit" you can find a lot of reputable suggestions for sites to peruse), it's time to screencap or clip the scene(s) you want to gif. i would say that, from what i've seen, most gifmakers use screencaps, but i highly prefer taking short video clips (which i keep and usually label for future use/reference), so i'll be showing you that version. if you would prefer to screencap, please check the "beginner tutorials" tag on my resource blog @gifmakerresource
step 1b. i only use windows pcs, so i can't give any specialized info regarding macs, just as a disclaimer. i use the program VLC Media Player, both for clipping scenes and as my regular media player on both my laptop and my desktop. to initially set up vlc's recording capabilities, i used this website (please just ignore all their annoying advertising for movavi).
step 1c. now that vlc is set up to record footage played through it, i open my video clip (ctrl+o) and navigate to the scene i ultimately want to gif. i typically recommend recording an extra 5-10 seconds before and after the clip, especially if you need to convert the clip afterwards.
step 1d (optional). depending on the file format of your episode, you may need to convert the clips you take before photoshop will accept them. for example, a vast majority of the files i download are mkv files, but photoshop works best with mp4 files. for this, i use another program called HandBrake. once downloaded, i add whatever file(s) i need to convert, select the appropriate preset (which is almost always "Super HQ 1080p30 Surround" to maintain as much of the original quality as possible). you can select where the converted files automatically save for organization purposes, just like with vlc.
step 2. now that we have the clip we want to turn into a gif, it's time to bring it into photoshop. to do so, select file -> import video frames to layers. once you select your video clip, photoshop will pop up with a little media player with a few controls. here's what that looks like:

the box on the left that i've highlighted is what you'll adjust depending on whether you want to load in the entire clip or a specific range of the clip. with the way i clip scenes, i have quite literally NEVER used "from beginning to end." instead, i use the toggles on either side of the progress bar (circled in red) to select a specific range. you don't have to be overly precise with this as you can always delete extra frames, so i'll navigate using those little arrows until i roughly have the shot i want to turn into one gif and click okay. i would not recommend checking "limit to every x frames" because while this can help with file size, it will make your gif appear choppy. make sure "make frame animation" is checked.
this is what photoshop looks like after clicking OK:

across the bottom are the frames. make sure that "forever" is selected at the bottom left rather than once or three times. this makes sure that wherever you post your gif, it will play continuously. the 0.04 below each frame is the frame rate -- at this setting, each frame plays for four tenths of a second. this might vary depending on your source material, but i HIGHLY recommend using 0.05-0.06. we're not going to worry about that yet, though, so don't bother changing it right now.
over on the right under "layers" are, you guessed it, each frame's corresponding layer. now, i could go more in-depth on this, but i don't gif using frame animation. i used to a very long time ago (over ten years ago), but i use a series of actions to convert to timeline animation. before doing that, however, i execute a couple more steps first.
step 3 (optional). i may be a slob irl, but i'm extremely organized and neat on my computers, so the first thing i do is use an action i created to select all the layers and put them into a group. to manually do this, you can either click on the first (or last) layer and then click on the last (or first) while holding down shift OR you can go to select -> all layers OR you can use the keyboard shortcut alt+ctrl+a. i just turned this process into an action to save time.
step 4 (optional). delete any excess frames. because i don't bother with being extremely precise with photoshop's media player, i usually have to trim off extra frames at the beginning and/or end of my gif. to delete frames, select the first frame and either hold down control and click each one or hold down shift and click the last one to select everything in between. once the frames you want to delete are selected, click the little trashcan below the frames (near the left side just before the horizontal scrollbar).
note: to watch your gif at any time, simply press the spacebar. press it again to pause.
step 5. while everyone's process is different, i prefer to crop my gif to its final proportions here. there's nothing wrong with doing it later, but sharpening and coloring can take longer at larger dimensions. the width of a single gif in a row on tumblr needs to be 540px. two gifs in a row are both 268px wide. three gifs in a row are 177px, thus making tumblr's gutters (the small transparent spaces separating gifs) 4px.
step 6. this is when i sharpen my gif and convert it to timeline animation. when it comes to sharpening, i think everyone probably does it a little differently. here's how i sharpen my gifs (which i turned into an action to save time) and here's the sharpening tutorials tag on my resource blog. as with most things gifmaking-related, i recommend trial and error. try different things until you find what you like! once again, to save time, i turned that sharpening tutorial (and its base sharpening) and the timeline conversion into a single action.
to convert your gif from frame animation to timeline, you need to select all your layers and all your frames and select "convert to video timeline" from the menu after clicking these three lines:
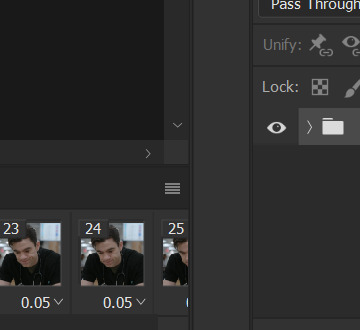
this is what i have once i've run my action to sharpen and convert:

you can adjust how zoomed in your timeline is with the slider at the bottom and if you're having issues with playback (though especially with larger/longer gifs, it always takes a while to load before playing smoothly) click the gear icon near the top of this screenshot and make sure it's set to 100% and to loop playback.

(group 2 is my vivid sharpening per the tutorial i linked, so if you don't use that, yours won't look exactly like this.)
step 7. time for my favorite part: coloring! now, i'd recommend taking a look at coloring tutorials as every show and every movie is going to be different. even separate scenes in the same episode can have totally different lighting. i have a bad good habit of saving just about every psd (photoshop file that contains all coloring adjustment layers), so there are times where i can just reuse a coloring i've already made rather than having to color each gifset from scratch, but you might be surprised just how much i DO color from scratch.
in several of my other gif tutorials, i explain and go step-by-step through my entire coloring process and why i use the adjustment layers i use, but as i said, what works for one scene may not work for another, so the best thing i can recommend is to familiarize yourself with commonly-utilized adjustment layers. play around with them, see what each one does, and over time, you'll be able to recognize which ones to use and when to use them. the adjustment layers i use are brightness/contrast, curves, selective color, channel mixer, gradient map, vibrance, hue/saturation, photo filter, levels, and exposure. the bolded ones are the ones i use on almost every single coloring.
on the navigation page on my resource blog, you can find a lot of tutorials that are specific to one or more types of adjustment layers and i encourage you to check those out as well as explore the navigation page itself.
here's an overview of my coloring for the pitt:

and here's a visualization for you of what each layer does:


(top to bottom, left to right) no coloring, brightness/contrast, adding curves, adding selective color 1 (black, neutrals, and white), adding selective color 2 (blue and cyan), adding gradient map (b&w set to 25%), fully colored, without vivid sharpening, and a comparison of the original to the full-coloring.
step 8. it's time to save! i HIGHLY recommend using this save action from @anyataylorjoy as it's a total lifesaver. if you save your gif right from here, photoshop will automatically set your frame rate to 0.07. while i used to gif at 0.07, i cannot believe how slow and choppy that looks now. all of my gifs are now 0.05, which is what this action does in part. without this action, you'd have to save your gif here and then open that file, change your frame rate, and re-save.
once this action has finished running, you go to file -> export -> save for web (legacy). here are my save settings, which do make a difference:

just remember, to be uploaded to tumblr, a single gif must be below 10mb in size. # of frames, #of colors, and dimensions all play a big part in the size of your gif. here's the finished gif at 540px:

to sum up, what's most important when trying to make high-quality gifs is the quality of your footage. generally, the larger the file size the better, but you do not have to use 4k instead of 1080p. and a 3gb 1080p file will likely look higher quality than a 300mb 1080p file. sharpening and coloring go into it, yes, but they're probably not going to make or break your gif.
as always, if you have additional questions or need clarification on any part of this tutorial, please let me know! i don't believe in gatekeeping and will always help to the best of my ability (it just might take me a few days).
26 notes
·
View notes
Text

Welcome to Funny Anime Face World.
Hi! I'm Moonie, your senpai for funny face/reaction screencaps!
On this blog, you can see daily funny face screencaps from old-school anime as far back as the 1960s to current series and movies.
Aside from that, I occasionally share animated gifs, profile pics, videos, and funny face stamps. Almost everything uploaded here is SFW, with the most extreme being no more than a PG-13 equivalent.
Not only will you be entertained, but you will also discover hidden gems from the wide variety of anime featured here. Feel free to use any screencaps to make your own edits or memes. Giving credit is not required, but mentioning the blog is a nice thing to do and a great help as it lets others know about it.
---------------------------------
The three special features that make my screenshot blog unique are:
1: I capture all screencaps myself. My sources are streaming rips, blu-rays, DVDs and VHS for some older anime.
2: I've been capturing funny face-related screenshots for over a decade and have amassed a collection of over 245,000 (not kidding!) as of 11/10/24.
3: All screencap posts list the title of the anime it is from, and sometimes even the episode number, year, and episode title!
-----------------------------------
FAQ:
Q: Can you send me screencaps?
A: No sorry. If there is a particular one you want, you will have to save it from this blog.
Q: Do you post screencaps from "insert non-anime here"?
A: I only post from sources that are recognized as anime on websites such as MyAnimelist, Anichart, or Anime News Network.
The only exception is anime-styled video games.
Software I use.
Adobe Photoshop
Adobe Premiere
VirtualdDub 2
Movavi Video Converter
#funny anime face world#acro trip#laid back camp#dandadan#dan da dan#yuru camp#kaju noichigo#ayase momo#momo ayase#berry blossom
9 notes
·
View notes
Note
in what program you make those gifs?
Let me preface my answer with some context. I originally came from video editing. You remember those edits/tributes/whatever we call them these days of characters and shows to music on Youtube? Today they are much shorter and more technical as well as on instagram and TikTok. Anyway, that was my entry into fan works and what I was familiar with for ten years before I started this blog. So unless you also come from video editing, my approach is neither the best nor the easiest, and I don't know whether I would recommend it. I'm just too lazy and too old to learn another way when this one serves me well.
I work with Vegas Pro 22 for the video files which I edit (format, sharpness, contrast, saturation and whatever) and then render. These video files I then convert with Movavi Video Converter into gifs.
3 notes
·
View notes
Text
Oh now that I finished it, this is my final process (minus the troubleshooting, installing programs, the stuff that didn't work, etc) now that I know what works and what doesnt:
Boot XP in Boxes
PrtSc record the drawing process (lews ref was ~~1 hr 30 min)
Convert webM to mp4 using handbrake (abt 1-2 hrs)
Move recording to thumb drive from Linux laptop to Windows desktop
Put it in Movavi free trial for editing
Making Movavi preview high definition and full screen
Record the edited video using game tab
Take gametab recording and trim the excess before and after with the windows media player trim feature
Upload to youtube
Download from YouTube using Newpipe
Upload to tumblr
💀👍
3 notes
·
View notes
Text
0 notes
Text
How to Convert AVI to MOV Effortlessly
Some types of video files aren't changing as quickly as the devices that play them. Even though AVI has been a popular file since the 1990s, it doesn't work well with macOS and Apple apps. That's why you may be looking for a solution to change AVI to MOV without losing quality or wasting your time. The good news is that there are dedicated programs to help you with the issue. We've put together three handy solutions that you can use for this purpose. Each of them works well for its own purpose. So keep reading and pick a program that works well for you.

#1 — Movavi Video Converter
Movavi Video Converter is a top choice for those looking to convert videos with zero stress or hassle. When using the tool, you will hardly have any questions on how to convert AVI to MOV — the process is straightforward. The software has been an excellent helper for both personal and work-related tasks. Fast processing, a wealth of configuration options, and an easy-to-navigate interface are its win-win features.
To convert AVI to MOV with Movavi Video Converter, follow these steps:
Download and install software — Visit the Movavi website and download the appropriate version of the program for your Windows or Mac computer. Install the software by following the on-screen instructions.
Add your AVI files — Launch Movavi Video Converter. Hit “Add Media” and select “Add Video,” or simply drag and drop your AVI assets into the program window. You can add multiple videos for batch conversion.
Select MOV as the output format — In the formats menu, choose MOV as your desired output format. You can also adjust settings such as bitrate, resolution (including HD and 4K), and codec if needed.
Choose the output folder — Click the “Save to” button to specify where the converted files will be saved.
Convert the files — Click the “Convert” button to start the conversion process. Once finished, your MOV files will be saved in the chosen folder.
You can also use Movavi’s online converter for smaller files: just upload your AVI, select MOV as the format, and download the result when ready. This process ensures high-quality, compatible MOV files ready for playback or editing, especially on Apple devices and software.
#2 — AnyMP4 Video Converter Ultimate
If you are using a high-end camera or editing movies in 4K, then quality is really crucial. This is where AnyMP4 Video Converter Ultimate comes in handy. Designed with compatibility for latest video technologies and a focus on preserving maximum quality, this tool is strong.
To convert AVI to MOV with AnyMP4 Video Converter Ultimate, follow these steps:
Download and install — Download AnyMP4 Video Converter Ultimate from the official website and install it on your PC.
Upload the target AVI files — Launch the program. Click the “Add Files” button to deliver your AVI videos to the program.
Pick MOV as output format — Click the format icon next to your imported AVI file. In the format list, select MOV as the output format. You can also adjust video resolution, encoder, and quality as per your needs.
Set output folder — Choose where you want to save the converted files by setting the output folder.
Convert — Click the “Convert All” button to convert files without a watermark. The process is quick, and your MOV files will be ready in seconds.
Follow these steps to ensure fast, high-quality conversion from AVI to MOV. It is suitable for playback or editing on a wide range of devices and platforms
#3 — EaseUS VideoKit
Some people don't work with video every day. If you are one of those who only need to change an AVI file once for it to work on an iPhone or in iMovie, EaseUS VideoKit is the best tool for you. It is simple, flexible, and easy to use.
To convert AVI to MOV with EaseUS VideoKit, follow these steps:
Download and install EaseUS VideoKit — Get the software from the official EaseUS website and install it on your personal computer.
Add AVI files — Launch EaseUS VideoKit. Click “Choose Files,” drag your AVI files into the interface, or use the + button to add them.
Select MOV as output format — Click on “Settings” or the format option next to your file. Choose MOV as the target format. The program will also give you an option to customize video quality, resolution, encoder, frame rate, and bitrate.
Set output folder — Choose the destination folder for your converted files.
Enable high-speed conversion — If needed, enable the high-speed conversion option for faster processing.
Start conversion — Click “Convert” to initiate the process. The software will convert your AVI files to MOV quickly, maintaining the original quality.
This workflow makes converting AVI to MOV with EaseUS VideoKit simple and efficient. It is suitable for both beginners and advanced users.
Choose Your Preferred Solution
Have a batch of files to convert? Not sure what solution to use? Now, you have a list of options to consider. Do not waste your time researching the market. Jump on the video conversion task right away!
0 notes
Text
how to use movavi video suite
Unlocking Creativity: A Comprehensive Guide to Using Movavi PC Video Suite In the rapidly evolving world of digital content creation, having the right set of tools can make all the difference. Movavi Video Suite offers a comprehensive set of features that cater to both beginner and professional videographers. From editing and converting to screen recording and more, here’s how you can harness…

View On WordPress
0 notes
Text
0 notes
Text
https://www.airionvez.com
Top 5 Image to Video Converter Software.|AIRionvez
1. AIRionvez[AIRionvez](https://www.airionvez.com) is known for its user-friendly interface and powerful features, making it ideal for both beginners and professionals. It offers advanced editing tools, high-quality output, and cloud integration for seamless collaboration.
2. Canva[Canva](https://www.canva.com) extends its design capabilities to video creation with a drag-and-drop editor, extensive template library, and rich media resources. It's perfect for creative and collaborative projects.
3. Animoto[Animoto](https://animoto.com) provides automated video creation, customizable templates, and social media integration. It's great for producing professional-quality videos quickly and easily.
4. Adobe Spark[Adobe Spark](https://spark.adobe.com) offers professional templates, branding options, and voiceover capabilities. As part of Adobe Creative Cloud, it integrates seamlessly with other Adobe products.
5. Movavi Slideshow Maker[Movavi Slideshow Maker](https://www.movavi.com/slideshow-maker/) is dedicated to turning images into compelling slideshows and videos. It features creative effects, a built-in music library, and easy export options.
AIRionvez|AI Rionvez|Ai-rionvez|AI
0 notes
Text
Movavi Video Converter Crack 2024 + Activation Key [Latest]
0 notes
Text
Movavi Video Converter and Movavi Screen Recorder: New Practical Features Added
http://dlvr.it/TCCFVb
0 notes
Note
Hey I know your probably soooo busy but I was wondering how you make your giffs I was looking into making my own for some of my very niche tv shows just for my own Pinterest boards. And yours are just so beautiful.
Thank you
Bea:)
Thank you for liking my gifs. My way is certainly not the best but the one that works for me and is comparatively quick (gif making is always time intensive). If you want extremely high quality ones, you should probably learn Photoshop. I personally came from video editing before joining the gif makers, so I know my way around video editing software a bit and so I work with Vegas 18 (I think it is 18 but version number doesn't really matter for gif making tbh). I then put that edited and rendered video file into Movavi Video Converter which turns the .mp4 into .gif.
Some things I try to do is match my frame numbers between video rendering and gif making and I also add a bit of saturation and contrast to many shows. Since I want to showcase the costumes, I don't really go into the coloring at all if I can help it.
Tldr: I use video editing software and a video to gif converter.
3 notes
·
View notes
Text
Movavi Video Converter and Movavi Screen Recorder: New Practical Features Added
http://dlvr.it/TCCF1m
0 notes
Text
Movavi Video Converter and Movavi Screen Recorder: New Practical Features Added
http://dlvr.it/TCCDx4
0 notes
Text
Movavi Video Converter and Movavi Screen Recorder: New Practical Features Added
http://dlvr.it/TCC9c4
0 notes
Text
Movavi Video Converter and Movavi Screen Recorder: New Practical Features Added
http://dlvr.it/TCC7X6
0 notes