#Npm install from github tree
Explore tagged Tumblr posts
Visit Tumblr Blog
Explore Tumblr blogs with no restrictions, modern design and the best experience.
Last Seen Tumblr Blogs


Fun Fact
In 2020, Tumblr had 29.4 million users in the US.
Text
Npm install from github tree

NPM INSTALL FROM GITHUB TREE INSTALL
NPM INSTALL FROM GITHUB TREE FREE
You can develop numerous projects with Node.js like single-page applications (SPA), social media applications, static sites, online payment systems, hardware projects, blogs, mobile apps, real-time chat apps, APIs, eCommerce apps, and many more. You don't need to assemble these building blocks from scratch and instead, you can focus on the core of your application.ĭue to other features like Node's efficient caching ability, multiple hosting providers, and cross-platform availability, it's no surprise that it's so popular among developers.
NPM INSTALL FROM GITHUB TREE FREE
If you want to add any feature or building blocks to your application, there's a high probability that an open-source, free library is already available to you. Node.js has one of the largest ecosystems of open source libraries available. Node applications use JavaScript-if you're a frontend developer and know JavaScript, you can reuse those skills and transition to a Full-Stack Developer.
NPM INSTALL FROM GITHUB TREE INSTALL
PS C:UsersshutezDocumentsSimple EmotionCodesedemo.tk> npm install git+ssh://:SimpleEmotion/node-call -analytics.git0.4. It's used in production by large companies like Netflix, LinkedIn, PayPal, Trello, Uber, eBay, NASA, etc. The other 3 repositories have the same format for the install command. It can also be used for building super-fast, highly scalable services. It's easy to get started with Node, and it's great for prototyping and agile development. You can build standalone applications with Node.js, but it's most often used to build back-end services. Node.js is a JavaScript runtime built on Chrome's V8 JavaScript engine. What Is Node.js and Why Is it So Popular? Luckily, it's compatible with nearly all operating systems-Windows included.įollow this step-by-step guide to install Node.js and start building your first applications on Windows.
If is provided, it will be used to clone exactly that commit. Authentication module written in TypeScript providing authentication utilities and JWT methods. I am getting following error on npm installġ8 verbose stack TypeError: Cannot read property 'match' of undefined 18 verbose stack at tarballToVersion (/home/rahul/.nvm/versions/node/v12.16.3/lib/node_modules/npm/lib/install/inflate-shrinkwrap.js:87:20) 18 verbose stack at inflatableChild (/home/rahul/.nvm/versions/node/v12.16.3/lib/node_modules/npm/lib/install/inflate-shrinkwrap.js:99:22) 18 verbose stack at /home/rahul/.nvm/versions/node/v12.16.3/lib/node_modules/npm/lib/install/inflate-shrinkwrap.js:55:12 18 verbose stack at tr圜atcher (/home/rahul/.nvm/versions/node/v12.16.3/lib/node_modules/npm/node_modules/bluebird/js/release/util.js:16:23) 18 verbose stack at Object.gotValue (/home/rahul/.nvm/versions/node/v12.16.3/lib/node_modules/npm/node_modules/bluebird/js/release/reduce.js:155:18) 18 verbose stack at Object.gotAccum (/home/rahul/.nvm/versions/node/v12.16.3/lib/node_modules/npm/node_modules/bluebird/js/release/reduce.js:144:25) 18 verbose stack at 圜atcher (/home/rahul/.nvm/versions/node/v12.16.3/lib/node_modules/npm/node_modules/bluebird/js/release/util.js:16:23) 18 verbose stack at Promise._settlePromiseFromHandler (/home/rahul/.nvm/versions/node/v12.16.3/lib/node_modules/npm/node_modules/bluebird/js/release/promise.js:517:31) 18 verbose stack at Promise._settlePromise (/home/rahul/.nvm/versions/node/v12.16.3/lib/node_modules/npm/node_modules/bluebird/js/release/promise.js:574:18) 18 verbose stack at Promise._settlePromise0 (/home/rahul/.nvm/versions/node/v12.16.3/lib/node_modules/npm/node_modules/bluebird/js/release/promise.js:619:10) 18 verbose stack at Promise._settlePromises (/home/rahul/.nvm/versions/node/v12.16.3/lib/node_modules/npm/node_modules/bluebird/js/release/promise.js:699:18) 18 verbose stack at _drainQueueStep (/home/rahul/.nvm/versions/node/v12.16.3/lib/node_modules/npm/node_modules/bluebird/js/release/async.js:138:12) 18 verbose stack at _drainQueue (/home/rahul/.nvm/versions/node/v12.16.3/lib/node_modules/npm/node_modules/bluebird/js/release/async.js:131:9) 18 verbose stack at Async._drainQueues (/home/rahul/.nvm/versions/node/v12.16.3/lib/node_modules/npm/node_modules/bluebird/js/release/async.js:147:5) 18 verbose stack at (/home/rahul/.nvm/versions/node/v12.16.3/lib/node_modules/npm/node_modules/bluebird/js/release/async.It may seem obvious, but installing Node.js is the first step to building cool Node.js applications. npm install /: npm install github:/: Install the package at by attempting to clone it using git.
0 notes
Text
npm v7 Series - Introduction
>> Arborist Deep Dive
Quite a lot has happened in npm since our last update way back in 2019. We're overdue for a status update on npm v7.
Despite some massive distracting changes (some unfortunate, some very fortunate), development work has been proceeding steadily.
Yesterday, Edward Thomson presented a demo of a few of the features coming in npm v7 at GitHub Satellite. The Q&A session was awesome, and it was clear that a lot of you are excited for this update to the npm CLI, and have a lot of questions that unfortunately couldn't be adequately answered in such a short time.
This post started as a brief update on what we've been doing, intended to go live along with the talk, but it got long. So, instead, this is the first post, with more to come, where I take you all through some of the major changes coming in npm v7, the thinking and motivation behind them, and how they might affect you and your work.
Vision
npm v7 is based on a handful of technical and user experience principles, and each post in this series will tie back to one or more of these in some way.
Reduce noise that is not actionable. Or, in other words "make npm yell at you less". We've gone through the entire project from the data management to the presentation layers, stripping output that doesn't provide worthwhile information.
Manage your packages for you. There are a handful of places in npm where v6 and earlier versions sort of throw up their hands and make you fix stuff by yourself. But npm is a package manager! It shouldn't make you manage packages, that's its job!
Strict separation of concerns. Moving forward, the npm CLI itself is becoming strictly the user-interface layer, and we've moved out all complex tree management and registry interactions to @npmcli/arborist, pacote, and the various libnpm* modules.
Be as fast as possible while behaving correctly. The key to fast software is to do as little as possible, including doing as little waiting as possible. From the refactor to use Minipass streams to refactoring out a decade's worth of compatibility fixes for long-dead Node.js versions, npm v7 is leaner and faster because it's lazier.
If we know the right thing to do, let's not yell at you to do it. Let's just do it for you, and do it all the way the first time. That's what npm loves you means. It means taking care of you and your project like a good and faithful assistant, only troubling you to get involved when absolutely necessary.
Coming Attractions
In the coming npm v7 posts, we'll cover:
A deep dive on Arborist, the tree management and analysis utility that does a lot of heavy lifting in npm v7.
Updates and impacts from some of the major refactoring that's happened in the npm CLI dependency stack over the last year.
Automatically installing peerDependencies: why, how, and what you might want to be aware of.
Improvements to the performance, effectiveness, and UI of npm audit.
Updates to the package-lock.json format, added handling for yarn.lock files, and why we are going to keep using package-lock.json.
Support for acceptDependencies
Changes to how npm handles install scripts (RFC0021 RFC0022 and RFC0024)
Fixing the "noisy chokidar/fsevents" problem, and how this is related to npm fund.
Updates to permission handling while running as root.
Dropping the --depth config in npm update and npm outdated.
Changes to config options (especially, config options that determine what gets installed).
Improvements to the handling of "files" in package.json.
Workspaces
Overrides
Staged publishes
And, presumably, updates about the beta and eventual GA releases, because this is going to take a minute :)
RFC Process
The npm CLI team has been running an open RFC process for the last several months now, and the impact on our development process has been great.
Usually, writing the code is the easy part. The hard part is all the thinking and talking that goes into making sure we're writing code for a feature that users will benefit from, and that we've explored the edge cases well enough to be confident we're not overlooking something important.
If you're interested in getting involved with npm's design process, we want you to participate! Building something like this is a team effort, and we all benefit from getting a broad range of perspectives from our community.
Is there something that you really wish npm would do, or do differently, or stop doing? Head over to npm/rfcs and give us a proposal. Obviously the more engaged and thorough you can be, the more easy it'll be for us to get it done, but every great idea has to start somewhere, so don't feel like you have to have all the answers before you begin :)
Thanks!
If there's something you'd like to see covered around npm v7, you can post an issue on the npm/npm-v7-blog repo.
Stay tuned for more from us, and I hope these posts prove to be fun and informative!
>> Arborist Deep Dive
9 notes
·
View notes
Text
React dist unpkg

#React dist unpkg how to#
#React dist unpkg install#
#React dist unpkg code#
#React dist unpkg code#
To lint your code, run the tests, and create code coverage reports: npm run full-test Requirementsreact-vis makes use of ES6 array methods such as.
#React dist unpkg install#
DevelopmentTo develop on this component, install the dependencies and then build and watch the static files: npm install & npm run startOnce complete, you can view the component's example in your browser (will open automatically).Īny changes you make to the example code will run the compiler to build the files again. Sunbursts about making sunburst diagrams. Parallel Coordinates about making parallel coordinate charts.
#React dist unpkg how to#
Scales and Data about how the attributes can be adjusted.Īnimations about how to tweak animations in the library. #4 More informationTake a look at the folder with examples or check out some docs: The global reactVis object will now be available for you to play around. If you're working in a non-node environment, you can also directly include the bundle and compiled style using basic html tags. … and add the following code to your render function: Import the necessary components from the library. Here's an example of importing only the legends "~react-vis/dist/styles/legends" This helps minimize the size of the outputted CSS. You can also select only the styles you want to use. npm install react-vis -saveInclude the built main CSS file in your HTML page or via "~react-vis/dist/style" react-vis supports the React's lifecycle and doesn't create unnecessary nodes. The library provides a set of defaults which can be overridden by the custom user's settings. This provides a high level of control of chart layout for applications that need it. For instance, separate X and Y axis components. react-vis provides a set of basic building blocks for different charts. react-vis doesn't require any deep knowledge of data visualization libraries to start building your first visualizations. This project initially started as a mozilla-services project.OverviewA collection of react components to render common data visualization charts, such as line/area/bar charts, heat maps, scatterplots, contour plots, hexagon heatmaps, pie and donut charts, sunbursts, radar charts, parallel coordinates, and tree maps. Title: Ĭonst log = (type) => (console, type) įor more information on what themes we support, see Using Themes. You'll also need to alias the default export property to use the Form component: const Form = fault Note: The CDN version does not embed react or react-dom. You can also install react-jsonschema-form (the 1.x version) which works with React 15+. Then import the dependency as follows: import Form from latest version requires React 16+. Installation ¶įirst install the dependency from npm: $ npm install -save React-jsonschema-form also comes with tools such as uiSchema and other form props to customize the look and feel of the form beyond the default themes. If you have a priori knowledge of your data and want a toolkit for generating forms for it, you might look elsewhere. If you want to generate a form for any data, sight unseen, simply given a JSON schema, react-jsonschema-form may be for you. React-jsonschema-form is meant to automatically generate a React form based on a JSON Schema. A simple React component capable of building HTML forms out of a JSON schema.Ī live playground is hosted on GitHub Pages:
0 notes
Text
How to Deploy a Node.js App – From Server Setup to Production
In this tutorial, we are going to learn everything we need to know before deploying a Node app to a production server.
We will start by renting a server on Digital Ocean. Then we'll configure this server, connect to it, install Nginx and configure it, pull or create our Node app, and run it as a process.
As you can see, there is a lot to do and it will be an action-packed tutorial. So let's get started without wasting any time.
You should have some basic knowledge on how the Terminal works and how to work in Vi/Vim before getting started. If you are not familiar with basic commands, I would advise you to read up on them a bit.
I will run the commands in MacOS. If you want to follow this tutorial in Windows, you can use Powershell or some other Unix emulator of your choice.
Although I will use Node.js as the platform of our example application, most of the steps are the same for any web application.
Why Digital Ocean?
I choose Digital Ocean because it is cheap and the interface is really easy to use, compared to the likes of AWS. Also, a $100 credit is included in the GitHub student pack so you do not have to pay anything for a couple of months. It is ideal for deploying a course or hobby project.
It has a concept called Droplets, which is basically your share of a server. You can think of the server as an apartment in which you own or rent a flat.
Droplets work with the help of Virtual Machines which run on the server. So a Droplet is your Virtual Machine on a shared server. Since it is a VM, its CPU and memory share can be easily increased, usually by throwing more money at your provider.
How to Create a Digital Ocean Project

I am assuming that you have already signed up and logged in to Digital Ocean before proceeding. We should first create a project that will contain our droplets. Let's click on the new project button on the left side menu. It will ask you to name your project.

Enter whatever name you want. It will also ask you if you want to move any resources, but for now just click Skip – we will create the droplet later.
How to Create a Droplet on Digital Ocean
Let's create our droplet by clicking the Get Started button.

After clicking the button, it will ask us to choose a VM image.

Choosing an Image
On this page, I will select Ubuntu 20.04 since it is the latest LTS version at the time I am writing this post. LTS means "Long Term Support". It is best to go with the LTS version for actual projects, because the provider guarantees that it will be supported and maintained for a long time. This means you will not have problems in the long run.
I have chosen Ubuntu, and would recommend it to you since it is the most commonly used Linux distribution. This means it's also the easiest to find answers to your future questions.
You can also choose to have a Dedicated CPU if you need it. If you are building your own startup or any business project, I would recommend reading this post which contains detailed instructions about how to pick the right option for you.
I will go with the cheapest option in this case.
Then you will need to select a Datacenter region. You should pick the one that is closest to you to minimize network delay.

Select a Datacenter
Next let's select SSH Keys as the Authentication Method, since it is much more secure than basic password authentication.

Authentication Method
To connect to the server we need to generate a new SSH key on our own device and add it to Digital Ocean.
How to Generate an SSH Key
I will generate the key on my macOS device. If you are using Windows you can refer to this article. Open your terminal and move into the ssh folder:
cd ~/.ssh
Then create your SSH key:
ssh-keygen
If your computer says that it does not know this command, you should install it via brew.

It will ask you to name the file and enter a passphrase. Do not enter a name, just press enter and go with the defaults. You should have these files generated. I have named mine digital-ocean-ssh in this screenshot, so do not get confused by that.
❯ lsid_dsa id_rsa known_hosts
Our public key is the id_dsa and the id_rsa is our private key. If you forget which one is private, you can always print one of them to see.
How to Add Your SSH Key to Digital Ocean
Now we want to copy our public key and upload it to Digital Ocean so they will know which key to use in authentication.

Copy this whole key including the ssh-rsa part.
Click on "New SSH Key":

Paste the key in the textbox that appears after you click the button and you should see your SSH key.

How to Connect to the Server
We will use the terminal to connect to our server with SSH. You can also take a look at Termius for a nice interface if you want.
Run this command in your terminal after replacing the IP_ADDRESS with your server's IP address (you can look it up from Digital Ocean's panel).
ssh root@IP_ADDRESS
If everything goes well, now you should be in the server's terminal. We have successfully connected to server. If there is any error, you can debug it by running the command with the "-v" option or "-vv" for even more verbosity.
How to Set Up the Server
We need to do some initial setup before deploying the Node app to the server.
Update and Upgrade Software
We want to update the server's software to make sure we are using the latest versions.
Many servers are vulnerable to attacks because they are using older versions of software with known vulnerabilities. Attackers can search for the vulnerabilities in those software and try to exploit them in order to gain access to your server.
You can update Ubuntu's software using the "apt update" command.
apt updateHit:1 https://repos.insights.digitalocean.com/apt/do-agent main InReleaseGet:2 http://mirrors.digitalocean.com/ubuntu focal InRelease [265 kB] Hit:3 http://mirrors.digitalocean.com/ubuntu focal-updates InRelease Get:4 http://security.ubuntu.com/ubuntu focal-security InRelease [109 kB]Hit:5 http://mirrors.digitalocean.com/ubuntu focal-backports InReleaseFetched 374 kB in 1s (662 kB/s) Reading package lists... DoneBuilding dependency tree Reading state information... Done96 packages can be upgraded. Run 'apt list --upgradable' to see them.
If you read the message, it says that "96 packages can be upgraded". We have installed the new software packages but we have not upgraded our software to those versions yet.
To do that, let's run another command:
apt upgrade
Type y when it prompts you and it will upgrade the software.
Create a User
We have connected to the server as the root user (the user with the highest privileges). Being the root is dangerous and can open us up to vulnerabilities.
Therefore we should create a new user and not run commands as root. Replace $username with a username of your choice.
whoamiroot
adduser $username
You need to enter a password for the user. After that point, it will ask a bunch of questions, so just input y until the prompting is over.
The new user has been created but we also need to add this new user to the "sudo" group so that we can perform any action we need.
usermod -aG sudo $USERNAME
We add group with the -aG (add group) option, and we add the group name sudo to our username.
We are still root, so let's switch our user to the newly created user, using the su (switch user) command.
su $USERNAME
After this point, if you run whoami command, you should see your username. You can confirm the existence of the sudo group by running this command:
sudo cat /var/log/auth.log
Only superusers can view this file and OS will ask for your user password after you run this command.
Copy the SSH Key
We have successfully created the user but we have not enabled SSH login for this new user yet.
Therefore, we have to copy the public key that we previously created on our local computer and paste it into this user's SSH folder so SSH can know which key should it use to authenticate our new user.
mkdir -p ~/.ssh
The -p argument creates the directory if it does not exist.
vi ~/.ssh/authorized_keys
We will use vi or vim to create a file and call it authorized_keys.
Copy your public key (`id_dsa` file) then press "i" to go into insert mode. Then just paste it into this file with CMD + V.
Press esc to quit insert mode, type :wq to save and quit.
If you have any problems about using Vim-Vi, you can check out one of the many tutorials that explain how to use it.
Connect to Server as New User
Now we should be able to connect to the server without any problems using ssh. You can use this command to connect, just remember to insert your username and IP_ADDRESS.
ssh $USERNAME@IP_ADDRESS
If you are having any problems at this point, you should just delete the droplet and start over. It does not take a lot of time to start over but debugging server problems can be difficult.
How to Disable Root Login
It is a good practice to disable Root login as a security precaution, so let's do that now.
It can be useful to change the file permission just in case so that we won't run into problems regarding permissions in the future.
chmod 644 ~/.ssh/authorized_keys
Let's now open our sshd_config file:
sudo vi /etc/ssh/sshd_config
Find this line and change the yes to no in the same way we did earlier with vi.
PermitRootLogin no
Save and quit vi.
How to Install Node.js and Git
We can now go ahead and install Node.js and Git:
sudo apt install nodejs npm
sudo apt install git
We are now ready to create a Node app and run it. You can either pull your Node project from Github or create a Node app here just to test if it works.
Move to a directory of your choice and create an "app.js" file:
sudo vi app.js
You can paste the following snippet into your app.js file:
const express = require('express');const app = express();const port = 3000;app.get('/', (req, res) => { res.send('Hello World');});app.listen(port, () => console.log(`Example app listening on port ${port}!`));
Now we can run it with the command:
node app.js
You should see "Example app listening on port 3000!" on your terminal.
We can confirm that it is working by sending a request to our server:
GET http://IP_ADDRESS:3000/
Send this request either from an HTTP client like Postman or your browser and you should see the "Hello World" message.
At this point, you should notice that something is wrong: Regular users do not know how to send requests to port 3000.
We should redirect the requests that come to our web server from our IP to port 3000. We can accomplish this with the help of Nginx.

How to Install and Configure Nginx
We will use Nginx as a Reverse Proxy to redirect the requests to our Node app.

Nginx as a Reverse Proxy
Let's install Nginx:
sudo apt install nginx
Start the Nginx service:
sudo service nginx start
We can test to see if it is working by sending a request to our server's IP address from the browser. Type your server's IP address to your browser and you should see this:

It is important to know that Nginx serves from "/var/www/html" by default and you can find this HTML file in that directory as well.
I also advise you to create a folder under "/var/www", call it app, and move your Node app to that folder so it will be easy to find.
How to Configure the Nginx Reverse Proxy
We will edit the Nginx config file to configure a reverse proxy:
sudo vi /etc/nginx/sites-available/default
In this file you need to find the location / block and change it as follows:
location / { # First attempt to serve request as file, then # as directory, then fall back to displaying a 404. proxy_pass http://127.0.0.1:3000/; }
The proxy_pass directive proxies the request to a specified port. We give the port that our Node application is running on.
Let's restart Nginx so the changes can take effect:
sudo service nginx reload
After this step, we should be able to see the message when we send a request to our server. Congratulations, we have completed the minimum number of steps to deploy a Node app!

But I still advise you to complete the following bonus step as well, as I believe it's quite important.
If you can't see the hello world message, you can check if your app and Nginx are running and restart them.
How to Run your App as a Process
We do not want to start our application manually every time something goes wrong and our app crashes. We want it to restart on its own. Also, whenever the server starts, our app should start too.
To make this happen, we can use PM2. Let's install PM2 and configure it.
sudo npm i -g pm2
We are installing pm2 globally by using the "-g" option so that it will be accessible from every folder.
pm2 start app.js
This makes sure that the app will restart if it exits due to an error.
Let's save the current process list.
pm2 save
We also need to convert it to a daemon that runs whenever the system starts:
pm2 startup systemd
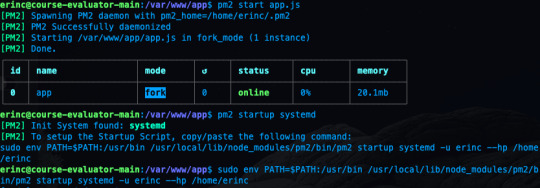
As a reminder, in this tutorial, I'm using the commands for Ubuntu. If you are using any other Linux distro, you should replace systemd in this command.
We can confirm that the service is getting restarted by rebooting the server and sending a request without running app.js by hand:
sudo reboot
After sending a request as we did earlier, you should be able to see the hello world message.
Conclusion
In this tutorial we started from scratch, rented a server for ourselves, connected to it, and configured it in a way that it serves our Node.js app from port 80.
If you have followed along and were able to complete all steps, congratulations! You can be proud of yourself, as this was not the easiest topic :). I hope that you have learned a lot. Thank you for your time.
I am planning to explore this topic further by connecting the server to a domain name, then connecting it to CircleCI for continuous integration. I'll also go through the required steps to make your Node.js/React app production ready. This post had already gotten long enough, though, so those topics are reserved for another post :)
If you have enjoyed reading and want to get informed about my future posts, you can subscribe to my personal blog. You can see my previous posts there if you are interested in reading more. I usually write about web development-related topics.
0 notes
Photo

Web Developer Workflow Tools: A Beginner’s Guide
Here's a primer for the tools all web developers should get to know, from basic Bash commands to web browser add-ons that will debug your web apps and automate navigation tests, plus continuous integrations pipelines.
Keep in mind this article is intended to cover the tools that the largest number of web developers will share a need to learn, not a comprehensive listing. So don't get too mad if your favorite tool isn't here! (For example, I intentionally left out WYSIWYG website builders 😉.)
Command Line
The command line is an interface that allows you to interact with the operating system through a console, and it can go a very long way to facilitate and even automate tedious and routine tasks.
You shouldn't be afraid of getting your hands dirty with the console. The time you'll spend learning some basic scripting will most definitely pay off.
Bash Tools (Linux, macOS)

Bash is the most popular shell for the "Unix-like" operating systems such as Linux and macOS.
Your mastery — or at the very minimum, a basic knowledge — of the Bash shell can save you a lot of time. Things like locating and renaming files, finding and replacing text strings, can literally take just a few seconds with commands like locate and grep with sed, respectively.
Become proficient in Bash by reading the Bash Quick Start Guide.
PowerShell (Windows)

PowerShell is the "bash-like" task automation and configuration management framework from Microsoft. It comes with a command-line similar to that of the [Command Prompt](https://ift.tt/1GmS2n8 (CMD)), but it also includes modules and a proper scripting language. But keep in mind that scripting is PowerShell in nothing like scripting in Bash. Except for a few exceptions, the commands have entirely different names, meaning that you'll need to learn these separately.
PowerShell 7 (under development) is intended as a successor to PowerShell Core 6, which was introduced as a successor to PowerShell 5. Who knows, folks at Microsoft might figure the naming thing out by version 8 or 9. 🤷♂️
Cygwin (also Windows)

You missed the Bash on Windows? Miss it no more! For those of you used to the power of the Bash shell but working regularly on a Windows environment, there's an alternative.
Cygwin is a POSIX-compatible environment that runs natively on Microsoft Windows, where the installation directory behaves like the root and follows a similar directory layout to that found in Unix-like systems.
Code Editors
You almost certainly know what a source-code editor is, but you might not know about some of their power features, such git integration.
There are integrated development environments (IDEs) such as NetBeans and Eclipse — but they're bloated with features we mostly won't care about anyway.
As web developers, we're more inclined towards cross-platform tools. Let's take a look at a few of them.
Atom

Not surprisingly, as it's developed by GitHub, Atom has the finest embedded Git control of any text editor, specifically aimed for GitHub repositories.
But that's not all. The "hackable text editor for the 21st Century" is incredibly easy to customize (see the docs), and a rich packages and themes ecosystem has flourished around it. Be sure to check out the blog and discussion forums to see what's been cooking, as there are plenty of regular updates.
Sublime Text

Sublime Text is the oldest product in this list (it's been around since 2008), and the only one that's not free. It's still very popular, and was the first editor to introduce many of the features we considered a given today in any decent code editor, such as "goto anything", "goto definition", and "multiple selections", among others.
It also has a companion Git client with a very sleek interface, Sublime Merge, introduced in 2018.
Visual Studio Code

Visual Studio Code (not to be confused with Visual Studio is another very popular code editor right now, which includes power features such as:
IntelliSense, which provides smart completions based on variable types, function definitions, and imported modules.
Inline debugging to analyze coding issues right from within the editor.
Version control with Git commands built-in (learn how to use version control).
Extensions and customization which run in separate processes, ensuring they won't slow down the editor (learn more about extensions).
Cloud integration with Microsoft Azure to deploy and host sites, store and query relational and document based data, and scale with serverless computing.
Read our Visual Studio Code power user's guide to become a VS Code pro, and dive even deeper with the book Visual Studio Code: End-to-End Editing and Debugging Tools for Web Developers.
The Runners Up
Although not so popular, Brackets is worth mentioning, as it’s primarily focused on web development, with a very interesting feature called Live Preview, which gives real-time connection to your browser to instantly visualize changes to CSS and HTML on screen.
Notepad++ is a drop-in replacement for Windows Notepad, very minimalist and lacking some power features we mentioned such as Git integration, but it's still a powerful, lightweight application to edit code.
Command Line–Based
As for commaind line–based editors, you've got Emacs and Vim … and endless flame wars about which one is better!
Browser Tools — Debugging, Debugging, Debugging
The web development tools shipped by some browsers aren’t quite website builders or IDEs, as they neither assist in the direct creation of a web page nor are a replacement for a code editor. Rather, they help to test the user interface (UI) of the project you're working on.
Back in the day, you’d need a number of extensions to make for a decent debugging environment, but nowadays most browsers have great built-in tools to help web developers.
Some tools you can expect to find:
A DOM inspector to edit HTML and CSS code directly on the document object model (DOM), view event listeners, and set DOM mutation breakpoints.
A console to view and filter log messages, inspect JavaScript objects and DOM nodes, and run JavaScript code in the context of the active window or frame.
A debugger to control the execution flow stepping through code, and set watches and breakpoints.
A network monitor to inspect requests and responses from the network and browser cache, including asynchronous XMLHttpRequest (XHR) — all of which can be very useful to identify bottlenecks.
An accessibility inspector to access the page's accessibility (a11y) tree, allowing you to check what's missing or otherwise what needs attention to make your site available to as many people as possible.
Performance measurement to profile execution time and system resources required by the site and walk JavaScript call stacks.
Memory measurement to track memory consumption and compare heap snapshots at different stages of the code execution.
A storage manager to handle cached data, cookies, web storage, and even IndexedDB structured data.
A service worker manager to handle and debug service workers with updates, unregisters, and start/stop of individual workers.
An emulator to test for different screen resolutions, and even different location coordinates.
Chrome DevTools

Google Chrome comes with a comprehensive and incredibly well-documented set called DevTools.
In fact, it's a good idea to visit Google's Tools for Web Developers, as you’ll find plenty of useful resources.
Firefox Developer Tools

Firefox first introduced the DOM inspector in version 3, and ever since then its Developer Tools are a state-of-the-art set that comes with extra goodies such as Eyedropper, taking screenshots, and rulers, to name a few.
Likewise, the Mozilla Developer Network (MDN) is a mandatory resource for web developers.
Safari Developer Tools

Because of its lack of features and poor support to web developers, Apple Safari is a pain to work with, and, like Internet Explorer back in the day, it would be nice not to have to deal with it. But you just have to.
It does ship Web Development Tools that aren't nearly as comprehensive as the aforementioned ones, and all the documentation you'll get is what someone may have written over a lunch break. (Yes, that's all there is.)
Others
Even Microsoft Edge, the successor of infamous Internet Explorer, has a decent set of Developer Tools!
And if you fancy good old Opera, check this Stack Exchange answer to see how you open its developer tools.
Learn the Chrome and Firefox DevTools with Browser Devtool Secrets.
JavaScript Tools

Since the arrival of Node.js (the runtime environment that executes JavaScript code outside the web browser), JavaScript has been used not only to enhance user interfaces but to write command-line tools and for server-side scripting programs, effectively establishing the "JavaScript everywhere" paradigm.
Consequently a whole ecosystem has emerged around it, and here are some tools you need to know.
npm

The Node package manager (npm) claims to be "the world’s largest software registry", and it’s an essential tool as it is the main way to distribute JavaScript code these days.
As listed on its website, you can use npm to:
The post Web Developer Workflow Tools: A Beginner’s Guide appeared first on SitePoint.
by Lucero del Alba via SitePoint https://ift.tt/2xDn8PA
0 notes
Photo

AWS Cloud Development Kit(AWS CDK)でEC2インスタンスを立ち上げてみる https://ift.tt/2khBZZm
AWS Cloud Development Kit(AWS CDK)の利用ノウハウを増やすべく、EC2インスタンスを立ち上げてみました。 公式ドキュメントやGitHubのソースを眺めたらだいたいは実装できるのですが、ハマりポイントがちらほらとありました。
AWS Cloud Development Kit(AWS CDK)ってなんぞ?という方は下記をご参考ください。
AWS クラウド開発キット (CDK) – TypeScript と Python 用がご利用可能に | Amazon Web Services ブログ https://aws.amazon.com/jp/blogs/news/aws-cloud-development-kit-cdk-typescript-and-python-are-now-generally-available/
前提
AWSアカウントがある
AWS CLIが利用できる
Node.jsがインストール済み
AWS CDKのインストール
AWS CDKのコマンドが利用できるようにするため、aws-cdkをインストールします。 リリース後も頻繁にアップデートされていますので、インストール済みの方も最新バージョンか確認しておくと良いかもです。
> node -v v10.11.0 > npm -v 6.10.1 > npm i -g aws-cdk # fishの場合 > exec fish -l > cdk --version 1.2.0 (build 6b763b7)
AWS CDKプロジェクト作成
cdk コマンドでプロジェクトを作成します。言語はTypeScriptを利用します。
> mkdir use-cdk-ec2 > cd use-cdk-ec2 > cdk init app --language=typescript Applying project template app for typescript Initializing a new git repository... Executing npm install... npm notice created a lockfile as package-lock.json. You should commit this file. npm WARN [email protected] No repository field. npm WARN [email protected] No license field. # Useful commands * `npm run build` compile typescript to js * `npm run watch` watch for changes and compile * `cdk deploy` deploy this stack to your default AWS account/region * `cdk diff` compare deployed stack with current state * `cdk synth` emits the synthesized CloudFormation template
cdk initコマンドを実行すると以下のようにファイルが自動生成されました。 コマンド実行したディレクトリの名前が反映されました。
> tree . -L 2 . ├── README.md ├── bin │ └── use-cdk-ec2.ts ├── cdk.json ├── lib │ └── use-cdk-ec2-stack.ts ├── node_modules (略) ├── package-lock.json ├── package.json └── tsconfig.json 3 directories, 5 files
@aws-cdk/aws-ec2のインストール
@aws-cdk/aws-ec2をインストールして利用できるようにします。
aws-cdk/packages/@aws-cdk/aws-ec2 at master · aws/aws-cdk https://github.com/aws/aws-cdk/tree/master/packages/%40aws-cdk/aws-ec2
> npm install -s @aws-cdk/aws-ec2 + @aws-cdk/[email protected] added 4 packages from 1 contributor and audited 538 packages in 8.417s found 0 vulnerabilities
実装する
@aws-cdk/aws-ec2を利用してEC2インスタンスが立ち上がるように実装します。 EC2インスタンスを立ち上げるには、VPC、サブネット、セキュリティグループが必要になります。
bin/use-cdk-ec2.ts
#!/usr/bin/env node import 'source-map-support/register'; import cdk = require('@aws-cdk/core'); import { UseCdkEc2Stack } from '../lib/use-cdk-ec2-stack'; const app = new cdk.App(); new UseCdkEc2Stack(app, 'UseCdkEc2Stack', { env: { account: process.env.CDK_DEFAULT_ACCOUNT, region: process.env.CDK_DEFAULT_REGION } });
lib/use-cdk-ec2-stack.ts
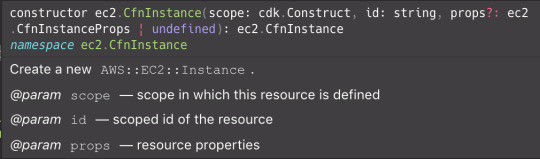
import cdk = require('@aws-cdk/core'); import ec2 = require('@aws-cdk/aws-ec2/lib'); export class UseCdkEc2Stack extends cdk.Stack { constructor(scope: cdk.Construct, id: string, props?: cdk.StackProps) { super(scope, id, props); let vpc = ec2.Vpc.fromLookup(this, 'VPC', { vpcId: this.node.tryGetContext('vpc_id') }); const cidrIp = this.node.tryGetContext('cidr_ip'); const securityGroup = new ec2.SecurityGroup(this, 'SecurityGroup', { vpc }); securityGroup.addEgressRule(ec2.Peer.anyIpv4(), ec2.Port.allTraffic()); securityGroup.addIngressRule(ec2.Peer.ipv4(cidrIp), ec2.Port.tcp(22)); let ec2Instance = new ec2.CfnInstance(this, 'myInstance', { imageId: new ec2.AmazonLinuxImage().getImage(this).imageId, instanceType: new ec2.InstanceType('t3.small').toString(), networkInterfaces: [{ associatePublicIpAddress: true, deviceIndex: '0', groupSet: [securityGroup.securityGroupId], subnetId: vpc.publicSubnets[0].subnetId }], keyName: this.node.tryGetContext('key_pair') }); new cdk.CfnOutput(this, 'Id', { value: ec2Instance.ref }); new cdk.CfnOutput(this, 'PublicIp', { value: ec2Instance.attrPublicIp }); } }
実装のポイントをいくつか上げてみます。
既存VPCをインポートする
VPCはAWS CDKで作成することもできますが、既存のVPCをインポートすることもできます。下記は実装例となります。
aws-cdk/integ.import-default-vpc.lit.ts at master · aws/aws-cdk https://github.com/aws/aws-cdk/blob/master/packages/%40aws-cdk/aws-ec2/test/integ.import-default-vpc.lit.ts
ec2.Vpc.fromLookup() を利用してインポートしますが、その場合スタックのインスタンス作成時にアカウントとリージョン情報を渡す必要があります。そうするとAWS CDKが指定されたアカウント、リージョンからVPCの情報を取得してくれます。
bin/use-cdk-ec2.ts
#!/usr/bin/env node import 'source-map-support/register'; import cdk = require('@aws-cdk/core'); import { UseCdkEc2Stack } from '../lib/use-cdk-ec2-stack'; const app = new cdk.App(); new UseCdkEc2Stack(app, 'UseCdkEc2Stack', { env: { account: process.env.CDK_DEFAULT_ACCOUNT, region: process.env.CDK_DEFAULT_REGION } });
envを指定しないと以下のようなエラーが発生します。
> cdk synth Cannot retrieve value from context provider vpc-provider since account/region are not specified at the stack level. Either configure 'env' with explicit account and region when you define your stack, or use the environment variables 'CDK_DEFAULT_ACCOUNT' and 'CDK_DEFAULT_REGION' to inherit environment information from the CLI (not recommended for production stacks) Subprocess exited with error 1
envについて詳しくはこちらが参考になります。
Environments – AWS Cloud Development Kit (AWS CDK) https://docs.aws.amazon.com/cdk/latest/guide/environments.html
ec2.Vpc.fromLookupの第3パラメータでVPCの絞り込み条件が指定できます。詳細は下記が詳しいです。
interface VpcLookupOptions · AWS CDK https://docs.aws.amazon.com/cdk/api/latest/docs/@aws-cdk_aws-ec2.VpcLookupOptions.html
今回は、vpcIdを指定します。
lib/use-cdk-ec2-stack.ts
(略) let vpc = ec2.Vpc.fromLookup(this, 'VPC', { vpcId: this.node.tryGetContext('vpc_id') }); (略)
scopeでなくthisを指定する
cdk.Stackを継承したクラス内で各リソースを定義するのに、第一パラメータにscope: cdk.Constructを指定する必要がありますが、個々で指定するべきは、クラスのconstructorにあるscopeではなく、thisを渡す必要があります。 VS Codeを利用しているとメソッドの説明でscopeとあるので、つい指定してしまいがちですが、エラーになります。
詳細は下記を参考ください。
TODO:リンク貼る
> cdk synth -v (略) No stack could be identified for the construct at path Subprocess exited with error 1 Error: Subprocess exited with error 1 at ChildProcess.proc.on.code (/Users/xxx/.anyenv/envs/ndenv/versions/v10.11.0/lib/node_modules/aws-cdk/lib/api/cxapp/exec.ts:110:23) at ChildProcess.emit (events.js:182:13) at ChildProcess.EventEmitter.emit (domain.js:442:20) at Process.ChildProcess._handle.onexit (internal/child_process.js:240:12)
外部から値を指定するにはContextを利用する
実装に含めたくない値がある場合、cdkコマンドの--context(または -c)オプションで指定することができます。 実装ではthis.node.tryGetContext('KEY')で値が取得できます。
値が複数ある場合、--context(または -c)オプションを複数指定します。
> cdk synth \ -c KEY=VALUE \ -c KEY2=VALUE2
EC2インスタンスのパラメータ指定
EC2インスタンスはec2.CfnInstanceクラスを利用して定義します。パラメータについては下記が詳しかったです。 この辺を把握するにはCFnの利用経験がないとちょっと厳しいかもしれません。
Interface CfnInstanceProps https://docs.aws.amazon.com/cdk/api/latest/typescript/api/aws-ec2/cfninstanceprops.html#aws_ec2_CfnInstanceProps
デプロイしてみる
実装ができたらデプロイしてみます。環境変数に設定するAWSアカウント番号(12桁の数値)とリージョン、--contextオプションで指定する既存VPCのIDやキーペア、SSHアクセスを許可するIPアドレスについては各自のを指定してください。
cdkコマンドを実行する前にnpm run buildを忘れないようにしましょう。(大敗
> npm run build > [email protected] build /Users/kai/dev/aws/cdk/use-cdk-ec2 > tsc > export CDK_DEFAULT_ACCOUNT=999999999999 > export CDK_DEFAULT_REGION=us-east-1 > cdk deploy \ -c vpc_id=vpc-xxxxxxxx \ -c key_pair=cdk-test-ec2-key \ -c cidr_ip=xxx.xxx.xxx.xxx/32 This deployment will make potentially sensitive changes according to your current security approval level (--require-approval broadening). Please confirm you intend to make the following modifications: Security Group Changes ┌───┬──────────────────────────┬─────┬────────────┬────────────────────┐ │ │ Group │ Dir │ Protocol │ Peer │ ├───┼──────────────────────────┼─────┼────────────┼────────────────────┤ │ + │ ${SecurityGroup.GroupId} │ In │ TCP 22 │ xxx.xxx.xxx.xxx/32 │ │ + │ ${SecurityGroup.GroupId} │ Out │ Everything │ Everyone (IPv4) │ └───┴──────────────────────────┴─────┴────────────┴────────────────────┘ (NOTE: There may be security-related changes not in this list. See http://bit.ly/cdk-2EhF7Np) Do you wish to deploy these changes (y/n)? y UseCdkEc2Stack: deploying... UseCdkEc2Stack: creating CloudFormation changeset... 0/4 | 15:22:17 | CREATE_IN_PROGRESS | AWS::EC2::SecurityGroup | SecurityGroup (SecurityGroupDD263621) 0/4 | 15:22:17 | CREATE_IN_PROGRESS | AWS::CDK::Metadata | CDKMetadata 0/4 | 15:22:20 | CREATE_IN_PROGRESS | AWS::CDK::Metadata | CDKMetadata Resource creation Initiated 1/4 | 15:22:20 | CREATE_COMPLETE | AWS::CDK::Metadata | CDKMetadata 1/4 | 15:22:22 | CREATE_IN_PROGRESS | AWS::EC2::SecurityGroup | SecurityGroup (SecurityGroupDD263621) Resource creation Initiated 2/4 | 15:22:23 | CREATE_COMPLETE | AWS::EC2::SecurityGroup | SecurityGroup (SecurityGroupDD263621) 2/4 | 15:22:26 | CREATE_IN_PROGRESS | AWS::EC2::Instance | myInstance 2/4 | 15:22:27 | CREATE_IN_PROGRESS | AWS::EC2::Instance | myInstance Resource creation Initiated 3/4 | 15:22:43 | CREATE_COMPLETE | AWS::EC2::Instance | myInstance 4/4 | 15:22:45 | CREATE_COMPLETE | AWS::CloudFormation::Stack | UseCdkEc2Stack

︎ UseCdkEc2Stack Outputs: UseCdkEc2Stack.PublicIp = xxx.xxx.xxx.xxx UseCdkEc2Stack.Id = i-xxxxxxxxxxxxxxxxx Stack ARN: arn:aws:cloudformation:us-east-1:999999999999:stack/UseCdkEc2Stack/59b2a500-b292-11e9-8257-12505ef78976
デプロイできたらSSHアクセスしてみます。
> ssh -i cdk-test-ec2-key \ [email protected] The authenticity of host 'xxx.xxx.xxx.xxx (xxx.xxx.xxx.xxx)' can't be established. ECDSA key fingerprint is SHA256:xxx. Are you sure you want to continue connecting (yes/no)? yes Warning: Permanently added 'xxx.xxx.xxx.xxx' (ECDSA) to the list of known hosts. __| __|_ ) _| ( / Amazon Linux AMI ___|\___|___| https://aws.amazon.com/amazon-linux-ami/2018.03-release-notes/ 10 package(s) needed for security, out of 13 available Run "sudo yum update" to apply all updates. [ec2-user@ip-xxx-xxx-xxx-xxx ~]$
やったぜ。
後片付け
検証が済んだらスタックを削除しておきます。
> cdk destroy \ -c vpc_id=vpc-xxxxxxxx Are you sure you want to delete: UseCdkEc2Stack (y/n)? y UseCdkEc2Stack: destroying... 0 | 15:27:57 | DELETE_IN_PROGRESS | AWS::CloudFormation::Stack | UseCdkEc2Stack User Initiated 0 | 15:27:59 | DELETE_IN_PROGRESS | AWS::CDK::Metadata | CDKMetadata 0 | 15:27:59 | DELETE_IN_PROGRESS | AWS::EC2::Instance | myInstance 1 | 15:28:01 | DELETE_COMPLETE | AWS::CDK::Metadata | CDKMetadata
︎ UseCdkEc2Stack: destroyed
cdk destroyコマンドの-cオプションでvpc_idをつけないと下記のエラーが発生しました。 おそらく、cdk destroyコマンド実行時にもec2.Vpc.fromLookupが走ってしまうためみたいです。チョットフベン
> cdk destroy The filter 'null' is invalid
まとめ
@aws-cdk/aws-ec2パッケージのREADMEにEC2インスタンスについて記載がなく、それがむしろ気になって実装してみましたが、情報を調べつつの実装となり手間取りました。ただ、日頃からプログラミングする人であれば、慣れたらYAMLやJSONで定義するよりもスムーズに実装できる感がありました。
参考
AWS クラウド開発キット (CDK) – TypeScript と Python 用がご利用可能に | Amazon Web Services ブログ https://aws.amazon.com/jp/blogs/news/aws-cloud-development-kit-cdk-typescript-and-python-are-now-generally-available/
aws-cdk/packages/@aws-cdk/aws-ec2 at master · aws/aws-cdk https://github.com/aws/aws-cdk/tree/master/packages/%40aws-cdk/aws-ec2
aws-cdk/integ.import-default-vpc.lit.ts at master · aws/aws-cdk https://github.com/aws/aws-cdk/blob/master/packages/%40aws-cdk/aws-ec2/test/integ.import-default-vpc.lit.ts
Environments – AWS Cloud Development Kit (AWS CDK) https://docs.aws.amazon.com/cdk/latest/guide/environments.html
Vpc.from_lookup in v0.36 (python): Cannot retrieve value from context provider vpc-provider since account/region are not specified at the stack level · Issue #3082 · aws/aws-cdk https://github.com/aws/aws-cdk/issues/3082
interface VpcLookupOptions · AWS CDK https://docs.aws.amazon.com/cdk/api/latest/docs/@aws-cdk_aws-ec2.VpcLookupOptions.html
TODO:リンク貼る
Interface CfnInstanceProps https://docs.aws.amazon.com/cdk/api/latest/typescript/api/aws-ec2/cfninstanceprops.html#aws_ec2_CfnInstanceProps
元記事はこちら
「AWS Cloud Development Kit(AWS CDK)でEC2インスタンスを立ち上げてみる」
September 02, 2019 at 02:00PM
0 notes
Text
Right click publish quickly to Azure App Services with VS Code extensions and zipdeploy
I wanted to see what was the fastest way to get an ASP.NET Core web site up (for free) on Azure. First, I could use Visual Studio Community (which is free), and just right click Publish, sign into Azure, and make a free Web App and I'm cool. But I also wanted to see what it was like on Visual Studio Code (which would work on Linux, etc)
I downloaded these things. This is 10-15 min tops for download AND install. Likely less on a fast connection.
VS Code https://code.visualstudio.com
.NET Core https://dotnet.microsoft.com
Azure App Service extension for VS Code
C# extension for VS Code (NOTE: this will get automatically recommended to you anyway when you open a .cs file for the first time.
This also assumes you have a free Azure account https://azure.microsoft.com/free/
I made a new ASP.NET web site with "dotnet new razor" at the command line. The Azure App Service extension makes a new Azure icon appear on the left of VS Code. I can see my subscription(s) and any sites I've made before. I can right-click the top of the tree or just click the + plus sign.
TRICK: The default mode of the Azure App Service extension is "basic" mode. This is fine for messing around, but it will assume a bunch of things. You don't have control over the location (it'll pick a nearby one) or really anything. Again, it's fine. However, if you DO want explicit prompts for name, location, OS, runtime, etc you can turn on "appService.advanced" in File | Preferences | Settings (or Ctrl+,). Don't feel you need to, but know it's possible.
Now, in my opinion, deploying apps (.NET Core, Node, or otherwise) directly from source can be a little confusing, and it doesn't really scale for anything other than proofs of concept. There's usually a "build" step, and ideally you'll have a CI/CD (Continuous Integration/Continuous Deployment) pipeline for anything of any real size. It's easier than you think - you can likely get a basic DevOps pipeline up in a hour or so. I commit to GitHub and it just deploys to Azure.
That said, a quickie deploy has value so I wanted to do it. You can do a "git deploy" to Azure where Azure is a git remote and you just "git push azure master" but...you're pushing source and Azure "builds" it in Azure App Service using a thing called Kudu. That means it'll run npm install, dotnet restore, etc, it'll take some time. You could deploy a container to Azure and just push it to a Container Registry, then spin up the container.
However, Azure also has a little known but rather clever "zipdeploy" feature. Once you've configured your Azure App Service for zipdeployment as a source, you can just POST a new ZIP deployment with Curl!
curl -X POST -u <deployment_user> --data-binary @"<zip_file_path>" https://<app_name>.scm.azurewebsites.net/api/zipdeploy
You might find that weird, or you might find it elegant. If it's the latter, use it. If it's the former, don't. You can even do it with minimal or no downtime by deploying to a staging slot and use Auto Swap.
I'm going to use the Azure App Service extension in VS Code and it's going to hide all of this and it'll just publish in one click.
Here's the important part if you want it to just work and work easily. You'll want to deploy from a folder that represents your published app. That means your app in a state that it's ready to go.
With .NET Core, the easiest way is to dotnet publish. Then I'm right clicking on that publish folder as seen in this screenshot.
That will actually make a file .vscode/settings.json that will tell VS Code's Azure App Service extension what folder to deploy from in the future, thereby simplifying things.
{ "appService.defaultWebAppToDeploy": "/subscriptions/GUID/resourceGroups/appsvc_rg_Windows_CentralUS/providers/Microsoft.Web/sites/fancyweb1", "appService.deploySubpath": "bin\\Debug\\netcoreapp2.2\\publish" }
Below you can see the dialog that pops up "Always deploy the workspace ___ to ___" if you click Yes that will create the setting above specific to your application.
Now when I deploy, I can right click from anyway and it will zipdeploy right to my site. Note the log below.
With this extension I can even right click and "Start Streaming Logs" and get output of the logs of your Azure App Service as it runs, right in the output pane of VS Code.
This will make things pretty easy for my simplest sites and proofs of concept. Give it a try!
Sponsor: Get the latest JetBrains Rider for remote debugging via SSH, SQL injections, a new Search Everywhere popup, and improved Unity support.
© 2018 Scott Hanselman. All rights reserved.


0 notes
Text
Using Dotfiles for Managing Development and Many Other Magical Things
Howdy folks! 🎉 I'm Simon Owen, and over the years, I've loved being a part of and learning from the dotfiles community. I spend a lot of time teaching developers and running workshops. In those sessions, demonstrating how I set up my development environment is often one of things that folks appreciated the most.
Dotfiles are a key part of my development environment. Haven’t heard of them? Well, even if you have, it’s a good idea to walk through what they are and the benefits of using them.
Last year, I set myself a goal to create a screencast series. If you like this article and want to find out more, please subscribe to the mailing list and get the download link. If you really like it, you can also 🦄 donate here! 🦄
A dot-what-file?
If you’re hearing about dotfiles for the first time, it’s totally fine to be confused about what they are and what they do. I recall that it took me a considerable amount of time before I realized a dotfile is simply a file that has a dot in front of the file name!
There are two common examples of dotfiles. First, the ones you might already be familiar with are those often found at the root of many open source projects — for example, .editorconfig contains code editor preferences to help maintain consistent coding styles for a project. You may also have seen .stylelintrc and .eslintrc floating around, which set CSS and JavaScript rules, respectively.
Second (and the ones we’re looking at today), are dotfiles that can live at the root level of a user directory (i.e. /Users/<username> ). One such dotfile is .aliases, which contains custom named commands that can speed up work in the Terminal. Another is .bash_prompt, which is used to change the $ in Terminal to something a little more fun. In my case, I set it so this dude pops up to make me smile when things get tough:
༼ つ ◕_◕ ༽つ
Hopefully, you’re already starting to get a good sense of how useful dotfiles can be. They’re sort of like hidden gems (literally, since they’re hidden from views by default) that unlock superpowers for your machine to help with development. We’re talking about automation, optimizations, and efficient workflows, among other things.
First, I want to give props to the dotfiles community
Before we dig into dotfiles, it’s worth calling out how great the community behind them is. When I first forked Paul Irish’s dotfile repo, there was a lot going on in there I didn’t understand. Mathias Bynens and Paul Irish helped me immensely by answering questions about the code and it was their willingness to help that served as one of the reasons I became drawn to both the concept and the community.
Sometimes, I’ll post something to the community that I’d like to automate, but can’t figure it out for the life of me. And, without fail, I’ll get a helpful reply. Case in point: Eric Czarny wrote an app for me to automate my Spectacle settings and Mathias also contributed a code snippet. How cool is that?!
Then there are things like macOS updates. The dotfiles community is often on top of this and provide useful advice on GitHub comments regarding anything that no longer works or other useful information. You can then amend your dotfiles accordingly, such as adding the following code that increases the sound quality for Bluetooth headphones/headsets:
defaults write com.apple.BluetoothAudioAgent "Apple Bitpool Min (editable)" -int 40
Digging into dotfiles
The code example above might look a bit familiar to you. It’s along the same lines as this often-used one to show hidden files:
defaults write com.apple.finder AppleShowAllFiles -bool true
...or this one to add spaces to the dock:
defaults write com.apple.dock persistent-apps -array-add '{"tile-type"="spacer-tile";}'; killall Dock
These commands can be pasted directly into the Terminal. As you might expect, something like -bool true will change a boolean value from false to true and reset the command for later use.
If you’e like me and have a lot of these commands, then this is where the .macos (previously .osx) dotfile becomes especially useful. Instead of copying and pasting each command individually, we can automate and run all of them in one go.
Let’s walk through some examples
There are so many awesome things we can do in dotfiles. Here are some practical use cases that I rely on for my day-to-day work.
Setting aliases for default commands (.aliases)
Navigating between directories in the Terminal can be cumbersome and it’s easy to get lost in cd madness.
We can replace the standard “change directory" (cd) command with a custom command in the .aliases dotfile. For example, use this alias to ditch the cd prefix altogether when using the command cd .. to move up a directory in favor of .. by itself.
alias ..="cd .."
Sure, it’s only dropping two letters, but how much easier is that to remember?

We can do the same thing to make shortcuts to certain directories:
alias dl="cd ~/Downloads"
Or, create aliases for shorthand command tasks:
alias hs="hexo serve"

Oh, here’s another one! List only directories:
alias lsd="ls -lF ${colorflag} | grep --color=never '^d'"
Make a custom bash prompt for a personal touch to the Terminal (.bash_prompt)
I referenced this a little earlier, but here’s how I turned my bash prompt ($) into a little dude that’s way more fun to look at it. This is done directly in the .bash_prompt dotfile.
PS1="༼ つ ◕_◕ ༽つ"
Create Git shortcuts to speed up commits (.gitconfig)
We can make it a little more efficient to commit all changes at once in the .gitconfig dotfile. Using ca is a lot more concise than !git add -A && git commit -av .
ca = !git add -A && git commit -av
Another handy shortcut: find commits by commit message.
fm = "!f() { git log --pretty=format:'%C(yellow)%h %Cblue%ad %Creset%s%Cgreen [%cn] %Cred%d' --decorate --date=short --grep=$1; }; f"
Automate common Homebrew tasks (brew.sh)
Use Homebrew for package management? Although not strictly a dotfile (it doesn’t have a dot before the file name), Homebrew gives us the brew.sh shell script file. This file automates the installation and management of Apps and Tools:
brew install git brew install tree brew cask install google-chrome brew cask install iterm2 brew cask install sublime-text
Protect your Git credentials (.extra)
Hide information you don't want to share publicly in one file in a private repo and bring it in for you alone. For example, a good idea for this file is anything that’s specific to you, such as your Git credentials. This will prevent people from cloning, running your dotfiles, then committing as you!
# Git credentials # Not in the repository, to prevent people from accidentally committing under my name GIT_AUTHOR_NAME="Simon Owen" GIT_COMMITTER_NAME="$GIT_AUTHOR_NAME" git config --global user.name "$GIT_AUTHOR_NAME" GIT_AUTHOR_EMAIL="<ADD-YOUR-EMAIL-HERE>" GIT_COMMITTER_EMAIL="$GIT_AUTHOR_EMAIL" git config --global user.email "$GIT_AUTHOR_EMAIL"
Write custom functions for tasks (.functions)
Dotfiles are more than shortcuts and aliases. We can also make custom functions in .functions that do more advanced lifting. For example, create a new directory and change directory to it:
function mkd() { mkdir -p "$@" && cd "$_"; }
Or, we can open a given location in Finder with a one-letter command (o):
function o() { if [ $#-eq 0 ]; then open .; else open "$@"; fi; }
Specify your $PATH and keep private (.path)
$PATH allows the running of executable files. Instead of navigating to each path manually in Terminal, here we can set the file paths so they can run the executable files directly. It might be the case that this file contains sensitive information. As such, this file is often kept in a private repo.
Here’s an example adding ~/utils to the $PATH:
export PATH="$HOME/utils:$PATH"
Force Vim to use a particular theme (.vimrc)
Editor config files are great for ensuring consistent formatting across projects, but we can also tell a Vim editor to use a specific theme in a .vimrc file:
" Use the Solarized Dark theme set background=dark colorscheme solarized let g:solarized_termtrans=1
Bonus: Helpful Terminal recipes for macOS
OK, so here’s a little bit of a bonus for Mac users that isn’t related to dotfiles, but are things we can do in the Terminal to give macOS superpowers to do pretty awesome things that make day-to-day use a little easier and more pleasant.
First off, we can show hidden files by default in the Finder so dotfiles are visible all the time by typing this into the Terminal:
defaults write com.apple.finder AppleShowAllFiles -bool true
Find the way that scrollbars toggle on and off in Finder jarring? Let’s make them visible at all times:
defaults write NSGlobalDomain AppleShowScrollBars -string "Always"
By default, macOS checks for software updates once per week. But maybe we want to check once a day or at some other interval:
defaults write com.apple.SoftwareUpdate ScheduleFrequency -int 1
You know how holding down on a keyboard key repeats that character? Well, it repeats at a determined speed that we can supercharge to blazingly fast:
defaults write NSGlobalDomain KeyRepeat -int 0
Some people love the way macOS includes a box shadow when taking a screenshot of a window. Others don’t. Here’s how to turn it off:
defaults write com.apple.screencapture disable-shadow -bool true
And, in this example, we can automate the size of icons in the Dock:
defaults write com.apple.dock tilesize -int 36
This is only the tip of the iceberg! In my screencast series I go over more than one hundred of them.
Conclusion
Web development is increasingly more complicated as time goes on. We all have ways of making our development workflow a little easier and comfortable based on personal preferences.
You may be a seasoned developer and aware of such things as Node, npm, and Git but still find yourself stuck in a Terminal window with a bunch of errors. Or, you might be starting out and find these, and other tools, complex and tough to grasp.
Either way, hopefully knowing more about dotfiles and what they’re capable of doing gives you a new weapon in your arsenal to make your development environment tailored to you, speed up your workflow and give your machine added superpowers!
As a reminder, my screencast series will give you more tips and tricks, plus a good idea of how to get your development environment set up. This is the first in the series. Going forwards, I'm going to look at expanding on it, so please let me know if there's anything else you'd like me to cover!
The post Using Dotfiles for Managing Development and Many Other Magical Things appeared first on CSS-Tricks.
😉SiliconWebX | 🌐CSS-Tricks
0 notes
Text
Hit The Ground Running With Vue.js And Firestore
Hit The Ground Running With Vue.js And Firestore
Lukas van Driel
2018-04-06T12:00:33+02:002018-04-06T10:25:31+00:00
Google Firebase has a new data storage possibility called ‘Firestore’ (currently in beta stage) which builds on the success of the Firebase Realtime Database but adds some nifty features. In this article, we’ll set up the basics of a web app using Vue.js and Firestore.
Let’s say you have this great idea for a new product (e.g. the next Twitter, Facebook, or Instagram, because we can never have too much social, right?). To start off, you want to make a prototype or Minimum Viable Product (MVP) of this product. The goal is to build the core of the app as fast as possible so you can show it to users and get feedback and analyze usage. The emphasis is heavily on development speed and quick iterating.
But before we start building, our amazing product needs a name. Let’s call it “Amazeballs.” It’s going to be legen — wait for it — dary!
Here’s a shot of how I envision it:

The legendary Amazeballs app
Our Amazeballs app is — of course — all about sharing cheesy tidbits of your personal life with friends, in so-called Balls. At the top is a form for posting Balls, below that are your friends’ Balls.
When building an MVP, you’ll need tooling that gives you the power to quickly implement the key features as well as the flexibility to quickly add and change features later on. My choice falls on Vue.js as it’s a Javascript-rendering framework, backed by the Firebase suite (by Google) and its new real-time database called Firestore.
“You must unlearn what you have learned!” Meet the brand new episode of SmashingConf San Francisco with smart front-end tricks and UX techniques. Featuring Yiying Lu, Aarron Draplin, Smashing Yoda, and many others. Tickets now on sale. April 17-18.
Check the speakers →
Firestore can directly be accessed using normal HTTP methods which makes it a full backend-as-a-service solution in which you don’t have to manage any of your own servers but still store data online.
Sounds powerful and daunting, but no sweat, I’ll guide you through the steps of creating and hosting this new web app. Notice how big the scrollbar is on this page; there’s not a huge amount of steps to it. Also, if you want to know where to put each of the code snippets in a code repository, you can see a fully running version of Amazeballs on github.
Let’s Start
We’re starting out with Vue.js. It’s great for Javascript beginners, as you start out with HTML and gradually add logic to it. But don’t underestimate; it packs a lot of powerful features. This combination makes it my first choice for a front-end framework.
Vue.js has a command-line interface (CLI) for scaffolding projects. We’ll use that to get the bare-bones set-up quickly. First, install the CLI, then use it to create a new project based on the “webpack-simple” template.
npm install -g vue-cli vue init webpack-simple amazeballs
If you follow the steps on the screen (npm install and npm run dev) a browser will open with a big Vue.js logo.
Congrats! That was easy.
Next up, we need to create a Firebase project. Head on over to https://console.firebase.google.com/ and create a project. A project starts out in the free Spark plan, which gives you a limited database (1 GB data, 50K reads per day) and 1 GB of hosting. This is more than enough for our MVP, and easily upgradable when the app gains traction.
Click on the ‘Add Firebase to your web app’ to display the config that you need. We’ll use this config in our application, but in a nice Vue.js manner using shared state.
First npm install firebase, then create a file called src/store.js. This is the spot that we’re going to put the shared state in so that each Vue.js component can access it independently of the component tree. Below is the content of the file. The state only contains some placeholders for now.
import Vue from 'vue'; import firebase from 'firebase/app'; import 'firebase/firestore'; // Initialize Firebase, copy this from the cloud console // Or use mine :) var config = { apiKey: "AIzaSyDlRxHKYbuCOW25uCEN2mnAAgnholag8tU", authDomain: "amazeballs-by-q42.firebaseapp.com", databaseURL: "https://amazeballs-by-q42.firebaseio.com", projectId: "amazeballs-by-q42", storageBucket: "amazeballs-by-q42.appspot.com", messagingSenderId: "972553621573" }; firebase.initializeApp(config); // The shared state object that any vue component can get access to. // Has some placeholders that we’ll use further on! export const store = { ballsInFeed: null, currentUser: null, writeBall: (message) => console.log(message) };
Now we’ll add the Firebase parts. One piece of code to get the data from the Firestore:
// a reference to the Balls collection const ballsCollection = firebase.firestore() .collection('balls'); // onSnapshot is executed every time the data // in the underlying firestore collection changes // It will get passed an array of references to // the documents that match your query ballsCollection .onSnapshot((ballsRef) => { const balls = []; ballsRef.forEach((doc) => { const ball = doc.data(); ball.id = doc.id; balls.push(ball); }); store.ballsInFeed = balls; });
And then replace the writeBall function with one that actually executes a write:
writeBall: (message) => ballsCollection.add({ createdOn: new Date(), author: store.currentUser, message })
Notice how the two are completely decoupled. When you insert into a collection, the onSnapshot is triggered because you’ve inserted an item. This makes state management a lot easier.
Now you have a shared state object that any Vue.js component can easily get access to. Let’s put it to good use.
Is your pattern library up to date today? Alla Kholmatova has just finished a fully fledged book on Design Systems and how to get them right. With common traps, gotchas and the lessons she learned. Hardcover, eBook. Just sayin'.
Table of Contents →

Post Stuff!
First, let’s find out who the current user is.
Firebase has authentication APIs that help you with the grunt of the work of getting to know your user. Enable the appropriate ones on the Firebase Console in Authentication → Sign In Method. For now, I’m going to use Google Login — with a very non-fancy button.

Authentication with Google Login
Firebase doesn’t give you any interface help, so you’ll have to create your own “Login with Google/Facebook/Twitter” buttons, and/or username/password input fields. Your login component will probably look a bit like this:
<template> <div> <button @click.prevent="signInWithGoogle">Log in with Google</button> </div> </template> <script> import firebase from 'firebase/app'; import 'firebase/auth'; export default { methods: { signInWithGoogle() { var provider = new firebase.auth.GoogleAuthProvider(); firebase.auth().signInWithPopup(provider); } } } </script>
Now there’s one more piece of the login puzzle, and that’s getting the currentUser variable in the store. Add these lines to your store.js:
// When a user logs in or out, save that in the store firebase.auth().onAuthStateChanged((user) => { store.currentUser = user; });
Due to these three lines, every time the currently-logged-in user changes (logs in or out), store.currentUser also changes. Let’s post some Balls!

Login state is stored in the store.js file
The input form is a separate Vue.js component that is hooked up to the writeBall function in our store, like this:
<template> <form @submit.prevent="formPost"> <textarea v-model="message" /> <input type="submit" value="DUNK!" /> </form> </template> <script> import { store } from './store'; export default { data() { return { message: null, }; }, methods: { formPost() { store.writeBall(this.message); } }, } </script>
Awesome! Now people can log in and start posting Balls. But wait, we’re missing authorization. We want you to only be able to post Balls yourself, and that’s where Firestore Rules come in. They’re made up of Javascript-ish code that defines access privileges to the database. You can enter them via the Firestore console, but you can also use the Firebase CLI to install them from a file on disk. Install and run it like this:
npm install -g firebase-tools firebase login firebase init firestore
You’ll get a file named firestore.rules where you can add authorization for your app. We want every user to be able to insert their own balls, but not to insert or edit someone else’s. The below example do nicely. It allows everyone to read all documents in the database, but you can only insert if you’re logged in, and the inserted resource has a field “author” that is the same as the currently logged in user.
service cloud.firestore { match /databases/{database}/documents { match /{document=**} { allow read: if true; allow create: if request.auth.uid != null && request.auth.uid == request.resource.data.author; } } }
It looks like just a few lines of code, but it’s very powerful and can get complex very quickly. Firebase is working on better tooling around this part, but for now, it’s trial-and-error until it behaves the way you want.
If you run firebase deploy, the Firestore rules will be deployed and securing your production data in seconds.
Adding Server Logic
On your homepage, you want to see a timeline with your friends’ Balls. Depending on how you want to determine which Balls a user sees, performing this query directly on the database could be a performance bottleneck. An alternative is to create a Firebase Cloud Function that activates on every posted Ball and appends it to the walls of all the author’s friends. This way it’s asynchronous, non-blocking and eventually consistent. Or in other words, it’ll get there.
To keep the examples simple, I’ll do a small demo of listening to created Balls and modifying their message. Not because this is particularly useful, but to show you how easy it is to get cloud functions up-and-running.
const functions = require('firebase-functions'); exports.createBall = functions.firestore .document('balls/{ballId}') .onCreate(event => { var createdMessage = event.data.get('message'); return event.data.ref.set({ message: createdMessage + ', yo!' }, {merge: true}); });
Oh, wait, I forgot to tell you where to write this code.
firebase init functions
This creates the functions directory with an index.js. That’s the file you can write your own Cloud Functions in. Or copy-paste mine if you’re very impressed by it.
Cloud Functions give you a nice spot to decouple different parts of your application and have them asynchronously communicate. Or, in architectural drawing style:

Asynchronous communication between the different components of your application
Last Step: Deployment
Firebase has its Hosting option available for this, and you can use it via the Firebase CLI.
firebase init hosting
Choose distas a public directory, and then ‘Yes’ to rewrite all URLs to index.html. This last option allows you to use vue-router to manage pretty URLs within your app.
Now there’s a small hurdle: the dist folder doesn’t contain an index.html file that points to the right build of your code. To fix this, add an npm script to your package.json:
{ "scripts": { "deploy": "npm run build && mkdir dist/dist && mv dist/*.* dist/dist/ && cp index.html dist/ && firebase deploy" } }
Now just run npm deploy, and the Firebase CLI will show you the URL of your hosted code!
When To Use This Architecture
This setup is perfect for an MVP. By the third time you’ve done this, you’ll have a working web app in minutes — backed by a scalable database that is hosted for free. You can immediately start building features.
Also, there’s a lot of space to grow. If Cloud Functions aren’t powerful enough, you can fall back to a traditional API running on docker in Google Cloud for instance. Also, you can upgrade your Vue.js architecture with vue-router and vuex, and use the power of webpack that’s included in the vue-cli template.
It’s not all rainbows and unicorns, though. The most notorious caveat is the fact that your clients are immediately talking to your database. There’s no middleware layer that you can use to transform the raw data into a format that’s easier for the client. So, you have to store it in a client-friendly way. Whenever your clients request change, you’re going to find it pretty difficult to run data migrations on Firebase. For that, you’ll need to write a custom Firestore client that reads every record, transforms it, and writes it back.
Take time to decide on your data model. If you need to change your data model later on, data migration is your only option.
So what are examples of projects using these tools? Amongst the big names that use Vue.js are Laravel, GitLab and (for the Dutch) nu.nl. Firestore is still in beta, so not a lot of active users there yet, but the Firebase suite is already being used by National Public Radio, Shazam, and others. I’ve seen colleagues implement Firebase for the Unity-based game Road Warriors that was downloaded over a million times in the first five days. It can take quite some load, and it’s very versatile with clients for web, native mobile, Unity, and so on.
Where Do I Sign Up?!
If you want to learn more, consider the following resources:
Working sample containing all of the above code
Documentation on Vue.js, vue-router, vue-cli
Documentation on Firebase
An entertaining way to get to know Firebase better — their YouTube Blog
Happy coding!

(da, ra, hj, il)
0 notes
Text
Hit The Ground Running With Vue.js And Firestore
Hit The Ground Running With Vue.js And Firestore
Lukas van Driel
2018-04-06T12:00:33+02:00 2018-04-06T10:19:43+00:00
Google Firebase has a new data storage possibility called ‘Firestore’ (currently in beta stage) which builds on the success of the Firebase Realtime Database but adds some nifty features. In this article, we’ll set up the basics of a web app using Vue.js and Firestore.
Let’s say you have this great idea for a new product (e.g. the next Twitter, Facebook, or Instagram, because we can never have too much social, right?). To start off, you want to make a prototype or Minimum Viable Product (MVP) of this product. The goal is to build the core of the app as fast as possible so you can show it to users and get feedback and analyze usage. The emphasis is heavily on development speed and quick iterating.
But before we start building, our amazing product needs a name. Let’s call it “Amazeballs.” It’s going to be legen — wait for it — dary!
Here’s a shot of how I envision it:

The legendary Amazeballs app
Our Amazeballs app is — of course — all about sharing cheesy tidbits of your personal life with friends, in so-called Balls. At the top is a form for posting Balls, below that are your friends’ Balls.
When building an MVP, you’ll need tooling that gives you the power to quickly implement the key features as well as the flexibility to quickly add and change features later on. My choice falls on Vue.js as it’s a Javascript-rendering framework, backed by the Firebase suite (by Google) and its new real-time database called Firestore.
“You must unlearn what you have learned!” Meet the brand new episode of SmashingConf San Francisco with smart front-end tricks and UX techniques. Featuring Yiying Lu, Aarron Draplin, Smashing Yoda, and many others. Tickets now on sale. April 17-18.
Check the speakers →
Firestore can directly be accessed using normal HTTP methods which makes it a full backend-as-a-service solution in which you don’t have to manage any of your own servers but still store data online.
Sounds powerful and daunting, but no sweat, I’ll guide you through the steps of creating and hosting this new web app. Notice how big the scrollbar is on this page; there’s not a huge amount of steps to it. Also, if you want to know where to put each of the code snippets in a code repository, you can see a fully running version of Amazeballs on github.
Let’s Start
We’re starting out with Vue.js. It’s great for Javascript beginners, as you start out with HTML and gradually add logic to it. But don’t underestimate; it packs a lot of powerful features. This combination makes it my first choice for a front-end framework.
Vue.js has a command-line interface (CLI) for scaffolding projects. We’ll use that to get the bare-bones set-up quickly. First, install the CLI, then use it to create a new project based on the “webpack-simple” template.
npm install -g vue-cli vue init webpack-simple amazeballs
If you follow the steps on the screen (npm install and npm run dev) a browser will open with a big Vue.js logo.
Congrats! That was easy.
Next up, we need to create a Firebase project. Head on over to https://console.firebase.google.com/ and create a project. A project starts out in the free Spark plan, which gives you a limited database (1 GB data, 50K reads per day) and 1 GB of hosting. This is more than enough for our MVP, and easily upgradable when the app gains traction.
Click on the ‘Add Firebase to your web app’ to display the config that you need. We’ll use this config in our application, but in a nice Vue.js manner using shared state.
First npm install firebase, then create a file called src/store.js. This is the spot that we’re going to put the shared state in so that each Vue.js component can access it independently of the component tree. Below is the content of the file. The state only contains some placeholders for now.
import Vue from 'vue'; import firebase from 'firebase/app'; import 'firebase/firestore'; // Initialize Firebase, copy this from the cloud console // Or use mine :) var config = { apiKey: "AIzaSyDlRxHKYbuCOW25uCEN2mnAAgnholag8tU", authDomain: "amazeballs-by-q42.firebaseapp.com", databaseURL: "https://amazeballs-by-q42.firebaseio.com", projectId: "amazeballs-by-q42", storageBucket: "amazeballs-by-q42.appspot.com", messagingSenderId: "972553621573" }; firebase.initializeApp(config); // The shared state object that any vue component can get access to. // Has some placeholders that we’ll use further on! export const store = { ballsInFeed: null, currentUser: null, writeBall: (message) => console.log(message) };
Now we’ll add the Firebase parts. One piece of code to get the data from the Firestore:
// a reference to the Balls collection const ballsCollection = firebase.firestore() .collection('balls'); // onSnapshot is executed every time the data // in the underlying firestore collection changes // It will get passed an array of references to // the documents that match your query ballsCollection .onSnapshot((ballsRef) => { const balls = []; ballsRef.forEach((doc) => { const ball = doc.data(); ball.id = doc.id; balls.push(ball); }); store.ballsInFeed = balls; });
And then replace the writeBall function with one that actually executes a write:
writeBall: (message) => ballsCollection.add({ createdOn: new Date(), author: store.currentUser, message })
Notice how the two are completely decoupled. When you insert into a collection, the onSnapshot is triggered because you’ve inserted an item. This makes state management a lot easier.
Now you have a shared state object that any Vue.js component can easily get access to. Let’s put it to good use.
Is your pattern library up to date today? Alla Kholmatova has just finished a fully fledged book on Design Systems and how to get them right. With common traps, gotchas and the lessons she learned. Hardcover, eBook. Just sayin'.
Table of Contents →

Post Stuff!
First, let’s find out who the current user is.
Firebase has authentication APIs that help you with the grunt of the work of getting to know your user. Enable the appropriate ones on the Firebase Console in Authentication → Sign In Method. For now, I’m going to use Google Login — with a very non-fancy button.

Authentication with Google Login
Firebase doesn’t give you any interface help, so you’ll have to create your own “Login with Google/Facebook/Twitter” buttons, and/or username/password input fields. Your login component will probably look a bit like this:
<template> <div> <button @click.prevent="signInWithGoogle">Log in with Google</button> </div> </template> <script> import firebase from 'firebase/app'; import 'firebase/auth'; export default { methods: { signInWithGoogle() { var provider = new firebase.auth.GoogleAuthProvider(); firebase.auth().signInWithPopup(provider); } } } </script>
Now there’s one more piece of the login puzzle, and that’s getting the currentUser variable in the store. Add these lines to your store.js:
// When a user logs in or out, save that in the store firebase.auth().onAuthStateChanged((user) => { store.currentUser = user; });
Due to these three lines, every time the currently-logged-in user changes (logs in or out), store.currentUser also changes. Let’s post some Balls!

Login state is stored in the store.js file
The input form is a separate Vue.js component that is hooked up to the writeBall function in our store, like this:
<template> <form @submit.prevent="formPost"> <textarea v-model="message" /> <input type="submit" value="DUNK!" /> </form> </template> <script> import { store } from './store'; export default { data() { return { message: null, }; }, methods: { formPost() { store.writeBall(this.message); } }, } </script>
Awesome! Now people can log in and start posting Balls. But wait, we’re missing authorization. We want you to only be able to post Balls yourself, and that’s where Firestore Rules come in. They’re made up of Javascript-ish code that defines access privileges to the database. You can enter them via the Firestore console, but you can also use the Firebase CLI to install them from a file on disk. Install and run it like this:
npm install -g firebase-tools firebase login firebase init firestore
You’ll get a file named firestore.rules where you can add authorization for your app. We want every user to be able to insert their own balls, but not to insert or edit someone else’s. The below example do nicely. It allows everyone to read all documents in the database, but you can only insert if you’re logged in, and the inserted resource has a field “author” that is the same as the currently logged in user.
service cloud.firestore { match /databases/{database}/documents { match /{document=**} { allow read: if true; allow create: if request.auth.uid != null && request.auth.uid == request.resource.data.author; } } }
It looks like just a few lines of code, but it’s very powerful and can get complex very quickly. Firebase is working on better tooling around this part, but for now, it’s trial-and-error until it behaves the way you want.
If you run firebase deploy, the Firestore rules will be deployed and securing your production data in seconds.
Adding Server Logic
On your homepage, you want to see a timeline with your friends’ Balls. Depending on how you want to determine which Balls a user sees, performing this query directly on the database could be a performance bottleneck. An alternative is to create a Firebase Cloud Function that activates on every posted Ball and appends it to the walls of all the author’s friends. This way it’s asynchronous, non-blocking and eventually consistent. Or in other words, it’ll get there.
To keep the examples simple, I’ll do a small demo of listening to created Balls and modifying their message. Not because this is particularly useful, but to show you how easy it is to get cloud functions up-and-running.
const functions = require('firebase-functions'); exports.createBall = functions.firestore .document('balls/{ballId}') .onCreate(event => { var createdMessage = event.data.get('message'); return event.data.ref.set({ message: createdMessage + ', yo!' }, {merge: true}); });
Oh, wait, I forgot to tell you where to write this code.
firebase init functions
This creates the functions directory with an index.js. That’s the file you can write your own Cloud Functions in. Or copy-paste mine if you’re very impressed by it.
Cloud Functions give you a nice spot to decouple different parts of your application and have them asynchronously communicate. Or, in architectural drawing style:

Asynchronous communication between the different components of your application
Last Step: Deployment
Firebase has its Hosting option available for this, and you can use it via the Firebase CLI.
firebase init hosting
Choose distas a public directory, and then ‘Yes’ to rewrite all URLs to index.html. This last option allows you to use vue-router to manage pretty URLs within your app.
Now there’s a small hurdle: the dist folder doesn’t contain an index.html file that points to the right build of your code. To fix this, add an npm script to your package.json:
{ "scripts": { "deploy": "npm run build && mkdir dist/dist && mv dist/*.* dist/dist/ && cp index.html dist/ && firebase deploy" } }
Now just run npm deploy, and the Firebase CLI will show you the URL of your hosted code!
When To Use This Architecture
This setup is perfect for an MVP. By the third time you’ve done this, you’ll have a working web app in minutes — backed by a scalable database that is hosted for free. You can immediately start building features.
Also, there’s a lot of space to grow. If Cloud Functions aren’t powerful enough, you can fall back to a traditional API running on docker in Google Cloud for instance. Also, you can upgrade your Vue.js architecture with vue-router and vuex, and use the power of webpack that’s included in the vue-cli template.
It’s not all rainbows and unicorns, though. The most notorious caveat is the fact that your clients are immediately talking to your database. There’s no middleware layer that you can use to transform the raw data into a format that’s easier for the client. So, you have to store it in a client-friendly way. Whenever your clients request change, you’re going to find it pretty difficult to run data migrations on Firebase. For that, you’ll need to write a custom Firestore client that reads every record, transforms it, and writes it back.
Take time to decide on your data model. If you need to change your data model later on, data migration is your only option.
So what are examples of projects using these tools? Amongst the big names that use Vue.js are Laravel, GitLab and (for the Dutch) nu.nl. Firestore is still in beta, so not a lot of active users there yet, but the Firebase suite is already being used by National Public Radio, Shazam, and others. I’ve seen colleagues implement Firebase for the Unity-based game Road Warriors that was downloaded over a million times in the first five days. It can take quite some load, and it’s very versatile with clients for web, native mobile, Unity, and so on.
Where Do I Sign Up?!
If you want to learn more, consider the following resources:
Working sample containing all of the above code
Documentation on Vue.js, vue-router, vue-cli
Documentation on Firebase
An entertaining way to get to know Firebase better — their YouTube Blog
Happy coding!

(da, ra, hj, il)
0 notes
Text
This year in JavaScript: 2018 in review and npm’s predictions for 2019
This study is adapted from my presentation npm and the Future of JavaScript. No data is perfect; if you have questions about ours you can read about the methodology used to gather this data.
npm has over 10 million users who download well over 30 billion packages every month. On an average Tuesday—npm’s busiest day—users download more than 1.3 billion packages of open source JavaScript. This gives us a lot of information about what JavaScript users are up to. On top of that data, in partnership with the Node.js Foundation and the JS Foundation we survey of over 16,000 developers to ask what they’re up to.
From these two sources, we’ve uncovered some insights about the makeup of the npm community, as well as information about what the community considers to be best practices. This will help you make your technical choices in 2019.
JavaScript is the world’s most popular programming language
It’s no news to anyone that JavaScript is incredibly popular these days. Stack Overflow’s 2018 developer survey has JavaScript as the most popular programming language (with fellow web languages HTML and CSS at the #2 and #3 spots). GitHub’s most recent Octoverse infographic ranks languages by the number of pull requests received, and JavaScript is the top there, too.

The total number of JavaScript developers is hard to estimate. Slashdata’s 2018 survey suggests there were 9.7M by the end of 2017 and growing quickly, meaning there are well over 10M at this point. npm’s own estimates suggest there are over 10M npm users, and we see similarly rapid growth. There are JavaScript developers who do not yet use npm, but as a percentage of all JavaScript developers they are quite small, possibly fewer than 10%.
The npm Registry contributes to the popularity of JavaScript
Without question, JavaScript’s popularity is driven by its ubiquity as the only language directly usable for developing web applications. However, a fascinating paper by Leo Meyerovich and Ariel Rabkin at Berkeley studied the factors contributing to programming language adoption and found that, overall, the availability of open-source libraries relevant to the task at hand was the most important factor in selecting a programming language.

Our own survey data support the conclusions of this study. The most common reason respondents gave for choosing JavaScript was the number of libraries available.

With over 836,000 libraries currently available, npm is the largest single collection of open-source libraries in the world, by a significant margin—although JavaScript’s tendency towards smaller libraries means this comparison isn’t entirely apples-to-apples. Regardless, this enormous reservoir of open source code means that the popularity of JavaScript and npm works both ways: the language gains popularity because of the Registry, and vice versa.

npm is used to build every kind of application
We asked users where the JavaScript they write is used. An overwhelming 93% of respondents said that they write code for the web, with a still-substantial 70% saying they write JavaScript that runs on servers, i.e., Node.js. However, many other application areas including Internet of Things (IoT), desktop applications, native mobile applications, and others saw substantial numbers of users, too.

This is a significant change for those of us who work at npm, Inc. and maintain the npm command-line tool. npm was invented to serve the needs of server-side app developers, and the needs of web developers are different. Becoming a majority-web platform has meant changing our priorities, which has ledto new features like package locking by default.
npm is essential to web development
When npm, Inc. started in 2014, a tree of a few dozen JavaScript packages was typical. These days, the average modern web application has over 1000 modules, and trees of over 2000 modules are not uncommon. In fact, 97% of the code in a modern web application comes from npm. An individual developer is responsible only for the final 3% that makes their application unique and useful.
This is a huge success story for code reuse, for the strength of the npm community, and for open source in general. The time saved by not re-inventing the code in thousands of modules is saving millions of developers hundreds of millions of coding-hours.
npm has focused on security in 2018
To a great many developers, npm has simply become the way you build a website. This is a responsibility we take seriously. In our survey, 77% of developers said they were concerned about the quality and security of the open source libraries they used, and a worrying 52% said the tools currently available were inadequate. We went into more depth on these results in our post Attitudes to Security in the JavaScript community earlier this year.
In April, we announced that we acquired ^Lift Security and their product, the Node Security Platform. Today, the NSP is integrated directly into npm, and every install of npm includes security audits that notify users if they are installing insecure modules. We also furnish tools to easily correct these vulnerabilities by automatically installing secure versions of their modules. In addition, users of npm Enterprise and paid npm Organizations users receive notifications of embargoed vulnerabilities not yet publicly disclosed.
The demographics of npm users
The basic demographics of our survey respondents are covered in our methodology post, but there are several important facts worth highlighting:
1. We are mostly new. 25% have been using JavaScript for less than 2 years, and 51% have been using npm for less than 2 years. This is a side effect of the community doubling in size in that time!
2. We are mostly self-taught. 69% of npm users mostly taught themselves JavaScript, with the next highest being 22% who learned on the job.

We don’t just write JavaScript. People who use npm aren’t always strictly JavaScript developers—30% each report writing Java, PHP, and Python, and smaller numbers of lots of other languages.
We don’t just work at “tech” companies. 55% of npm users describe themselves as working at a company that wouldn’t be considered a “tech” company.
There are also some ways that npm users don’t differ from the general population of software developers, which is itself interesting. For example, npm users work at every size of company, in roughly the same proportion as those companies exist. JavaScript isn’t a “big company” or a “small company” tech. npm users also are evenly distributed across every industry, as well as other demographics such as age and education level.
Everybody would like less tooling
JavaScript in 2018 is somewhat notorious for requiring a lot of tooling to get going, which is quite a reversal from the situation in 2014, when Node.js was considered an “everything included” framework. Today, most developers wouldn’t consider Node to be a framework at all. True to that, all of our survey respondents would like to see less tooling, less configuration required to get started, and better documentation of the tools that do exist. But what tools?
We went in-depth into the popularity of JavaScript frameworks in our “State of JavaScript Frameworks” series (part 1, part 2, part 3) earlier this year. We won’t reiterate all the findings of that analysis, but rather dive into a few updates of what’s changed in the 9 months since then.
As a reminder, it’s important to understand the “share of registry” metric we are using here: a “flat” graph in this case means strong growth, just not growth relative to the growth of the registry, which is always growing quickly.
React’s growth has slowed

React continues to dominate the web scene. Over 60% of npm’s survey respondents say they are using React, and it has grown further since then. However, that growth in 2018 has been slower than in 2017.
Angular downloads have stayed flat

The two major flavors of Angular combined have stayed roughly flat in terms of market share.
Ember’s popularity has rebounded

In a very unusual phenomenon, Ember’s popularity, which appeared to be declining, has continued a strong rebound. By September, more than twice as many developers were using Ember as at the beginning of the year. We’re going to keep a close eye on this story, but we think Ember’s resurgence is part of the explanation for the slowdown in React.
Vue’s strong growth has continued

Vue was already growing quickly and that continued in 2018. Many Vue users report that they picked it over React because in their opinion it’s easier to get started while maintaining extensibility. Our current theory is that React’s growth has been slowed by many newer users picking Vue.
GraphQL continues hyper-growth

GraphQL, tracked by its most popular client library Apollo, continues to explode in popularity. We think it’s going to be a technical force to reckon with in 2019.
Transpilers rule, led by Babel—and a surprise: TypeScript

Babel is familiar to any React user as the tool used to transpile React’s next-generation JavaScript into the currently-supported JavaScript standards. In line with React’s 60% market share, 65% of npm users report using Babel. (It also has uses outside of the React ecosystem.)
Something of a surprise, however, was TypeScript, with 46% of survey respondents reporting they use Microsoft’s the type-checked JavaScript variant. This is major adoption for a tool of this kind and might signal a sea change in how developers write JavaScript. We are definitely going to be asking more questions about TypeScript usage in the next version of our survey.
npm’s predictions for 2019
It’s always difficult to make predictions about an ecosystem as huge, varied, and fast-changing as JavaScript, but our data has led us to make a few predictions for 2019 that we think we can commit to.
1. You will abandon one of your current tools. Frameworks and tools don’t last in JavaScript. The average framework has a phase of peak popularity of 3–5 years, followed by years of slow decline as people maintain legacy applications but move to newer frameworks for new work. Be prepared to learn new frameworks, and don’t hold on to your current tools too tightly.
2. Despite a slowdown in growth, React will be the dominant framework in 2019. 60% market share for a web framework is unheard-of, and that’s partly because React isn’t a full framework, just part of one. This allows it to flexibly cover more use-cases. But for building a web app in 2019, more people will use React than anything else, and that will result in a big advantage in terms of tutorials, advice, and bug fixes.
3. You’ll need to learn GraphQL. It might be too early to put GraphQL into production, especially if your API is already done, but 2019 is the year you should get your mind around the concepts of GraphQL. There’s a good chance you’ll be using them in new projects later in the year and in 2020.
4. Somebody on your team will bring in TypeScript. 46% adoption implies that TypeScript is more than just a tool for enthusiasts. Real people are getting real value out of the extra safety provided by type-checking. Especially if you’re a member of a larger team, consider adopting TypeScript into your 2019 projects.
Stay tuned
One prediction we’re very confident in making is that this community will continue to rapidly grow and expand the capabilities of JavaScript. As it grows, we’ll be documenting new trends and sharing our insights with the community. You can follow along by subscribing to our weekly newsletter and following us on Twitter.
19 notes
·
View notes
Text
Hit The Ground Running With Vue.js And Firestore
Hit The Ground Running With Vue.js And Firestore
Lukas van Driel
2018-04-06T12:00:33+02:002018-04-06T10:25:31+00:00
Google Firebase has a new data storage possibility called ‘Firestore’ (currently in beta stage) which builds on the success of the Firebase Realtime Database but adds some nifty features. In this article, we’ll set up the basics of a web app using Vue.js and Firestore.
Let’s say you have this great idea for a new product (e.g. the next Twitter, Facebook, or Instagram, because we can never have too much social, right?). To start off, you want to make a prototype or Minimum Viable Product (MVP) of this product. The goal is to build the core of the app as fast as possible so you can show it to users and get feedback and analyze usage. The emphasis is heavily on development speed and quick iterating.
But before we start building, our amazing product needs a name. Let’s call it “Amazeballs.” It’s going to be legen — wait for it — dary!
Here’s a shot of how I envision it:
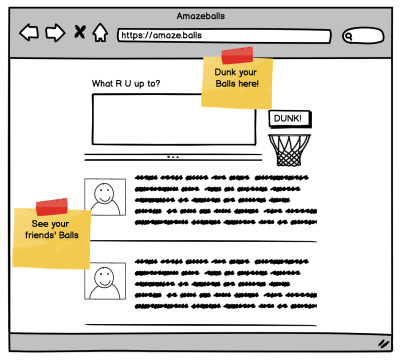
The legendary Amazeballs app
Our Amazeballs app is — of course — all about sharing cheesy tidbits of your personal life with friends, in so-called Balls. At the top is a form for posting Balls, below that are your friends’ Balls.
When building an MVP, you’ll need tooling that gives you the power to quickly implement the key features as well as the flexibility to quickly add and change features later on. My choice falls on Vue.js as it’s a Javascript-rendering framework, backed by the Firebase suite (by Google) and its new real-time database called Firestore.
“You must unlearn what you have learned!” Meet the brand new episode of SmashingConf San Francisco with smart front-end tricks and UX techniques. Featuring Yiying Lu, Aarron Draplin, Smashing Yoda, and many others. Tickets now on sale. April 17-18.
Check the speakers →
Firestore can directly be accessed using normal HTTP methods which makes it a full backend-as-a-service solution in which you don’t have to manage any of your own servers but still store data online.
Sounds powerful and daunting, but no sweat, I’ll guide you through the steps of creating and hosting this new web app. Notice how big the scrollbar is on this page; there’s not a huge amount of steps to it. Also, if you want to know where to put each of the code snippets in a code repository, you can see a fully running version of Amazeballs on github.
Let’s Start
We’re starting out with Vue.js. It’s great for Javascript beginners, as you start out with HTML and gradually add logic to it. But don’t underestimate; it packs a lot of powerful features. This combination makes it my first choice for a front-end framework.
Vue.js has a command-line interface (CLI) for scaffolding projects. We’ll use that to get the bare-bones set-up quickly. First, install the CLI, then use it to create a new project based on the “webpack-simple” template.
npm install -g vue-cli vue init webpack-simple amazeballs
If you follow the steps on the screen (npm install and npm run dev) a browser will open with a big Vue.js logo.
Congrats! That was easy.
Next up, we need to create a Firebase project. Head on over to https://console.firebase.google.com/ and create a project. A project starts out in the free Spark plan, which gives you a limited database (1 GB data, 50K reads per day) and 1 GB of hosting. This is more than enough for our MVP, and easily upgradable when the app gains traction.
Click on the ‘Add Firebase to your web app’ to display the config that you need. We’ll use this config in our application, but in a nice Vue.js manner using shared state.
First npm install firebase, then create a file called src/store.js. This is the spot that we’re going to put the shared state in so that each Vue.js component can access it independently of the component tree. Below is the content of the file. The state only contains some placeholders for now.
import Vue from 'vue'; import firebase from 'firebase/app'; import 'firebase/firestore'; // Initialize Firebase, copy this from the cloud console // Or use mine :) var config = { apiKey: "AIzaSyDlRxHKYbuCOW25uCEN2mnAAgnholag8tU", authDomain: "amazeballs-by-q42.firebaseapp.com", databaseURL: "https://amazeballs-by-q42.firebaseio.com", projectId: "amazeballs-by-q42", storageBucket: "amazeballs-by-q42.appspot.com", messagingSenderId: "972553621573" }; firebase.initializeApp(config); // The shared state object that any vue component can get access to. // Has some placeholders that we’ll use further on! export const store = { ballsInFeed: null, currentUser: null, writeBall: (message) => console.log(message) };
Now we’ll add the Firebase parts. One piece of code to get the data from the Firestore:
// a reference to the Balls collection const ballsCollection = firebase.firestore() .collection('balls'); // onSnapshot is executed every time the data // in the underlying firestore collection changes // It will get passed an array of references to // the documents that match your query ballsCollection .onSnapshot((ballsRef) => { const balls = []; ballsRef.forEach((doc) => { const ball = doc.data(); ball.id = doc.id; balls.push(ball); }); store.ballsInFeed = balls; });
And then replace the writeBall function with one that actually executes a write:
writeBall: (message) => ballsCollection.add({ createdOn: new Date(), author: store.currentUser, message })
Notice how the two are completely decoupled. When you insert into a collection, the onSnapshot is triggered because you’ve inserted an item. This makes state management a lot easier.
Now you have a shared state object that any Vue.js component can easily get access to. Let’s put it to good use.
Is your pattern library up to date today? Alla Kholmatova has just finished a fully fledged book on Design Systems and how to get them right. With common traps, gotchas and the lessons she learned. Hardcover, eBook. Just sayin'.
Table of Contents →

Post Stuff!
First, let’s find out who the current user is.
Firebase has authentication APIs that help you with the grunt of the work of getting to know your user. Enable the appropriate ones on the Firebase Console in Authentication → Sign In Method. For now, I’m going to use Google Login — with a very non-fancy button.

Authentication with Google Login
Firebase doesn’t give you any interface help, so you’ll have to create your own “Login with Google/Facebook/Twitter” buttons, and/or username/password input fields. Your login component will probably look a bit like this:
<template> <div> <button @click.prevent="signInWithGoogle">Log in with Google</button> </div> </template> <script> import firebase from 'firebase/app'; import 'firebase/auth'; export default { methods: { signInWithGoogle() { var provider = new firebase.auth.GoogleAuthProvider(); firebase.auth().signInWithPopup(provider); } } } </script>
Now there’s one more piece of the login puzzle, and that’s getting the currentUser variable in the store. Add these lines to your store.js:
// When a user logs in or out, save that in the store firebase.auth().onAuthStateChanged((user) => { store.currentUser = user; });
Due to these three lines, every time the currently-logged-in user changes (logs in or out), store.currentUser also changes. Let’s post some Balls!

Login state is stored in the store.js file
The input form is a separate Vue.js component that is hooked up to the writeBall function in our store, like this:
<template> <form @submit.prevent="formPost"> <textarea v-model="message" /> <input type="submit" value="DUNK!" /> </form> </template> <script> import { store } from './store'; export default { data() { return { message: null, }; }, methods: { formPost() { store.writeBall(this.message); } }, } </script>
Awesome! Now people can log in and start posting Balls. But wait, we’re missing authorization. We want you to only be able to post Balls yourself, and that’s where Firestore Rules come in. They’re made up of Javascript-ish code that defines access privileges to the database. You can enter them via the Firestore console, but you can also use the Firebase CLI to install them from a file on disk. Install and run it like this:
npm install -g firebase-tools firebase login firebase init firestore
You’ll get a file named firestore.rules where you can add authorization for your app. We want every user to be able to insert their own balls, but not to insert or edit someone else’s. The below example do nicely. It allows everyone to read all documents in the database, but you can only insert if you’re logged in, and the inserted resource has a field “author” that is the same as the currently logged in user.
service cloud.firestore { match /databases/{database}/documents { match /{document=**} { allow read: if true; allow create: if request.auth.uid != null && request.auth.uid == request.resource.data.author; } } }
It looks like just a few lines of code, but it’s very powerful and can get complex very quickly. Firebase is working on better tooling around this part, but for now, it’s trial-and-error until it behaves the way you want.
If you run firebase deploy, the Firestore rules will be deployed and securing your production data in seconds.
Adding Server Logic
On your homepage, you want to see a timeline with your friends’ Balls. Depending on how you want to determine which Balls a user sees, performing this query directly on the database could be a performance bottleneck. An alternative is to create a Firebase Cloud Function that activates on every posted Ball and appends it to the walls of all the author’s friends. This way it’s asynchronous, non-blocking and eventually consistent. Or in other words, it’ll get there.
To keep the examples simple, I’ll do a small demo of listening to created Balls and modifying their message. Not because this is particularly useful, but to show you how easy it is to get cloud functions up-and-running.
const functions = require('firebase-functions'); exports.createBall = functions.firestore .document('balls/{ballId}') .onCreate(event => { var createdMessage = event.data.get('message'); return event.data.ref.set({ message: createdMessage + ', yo!' }, {merge: true}); });
Oh, wait, I forgot to tell you where to write this code.
firebase init functions
This creates the functions directory with an index.js. That’s the file you can write your own Cloud Functions in. Or copy-paste mine if you’re very impressed by it.
Cloud Functions give you a nice spot to decouple different parts of your application and have them asynchronously communicate. Or, in architectural drawing style:

Asynchronous communication between the different components of your application
Last Step: Deployment
Firebase has its Hosting option available for this, and you can use it via the Firebase CLI.
firebase init hosting
Choose distas a public directory, and then ‘Yes’ to rewrite all URLs to index.html. This last option allows you to use vue-router to manage pretty URLs within your app.
Now there’s a small hurdle: the dist folder doesn’t contain an index.html file that points to the right build of your code. To fix this, add an npm script to your package.json:
{ "scripts": { "deploy": "npm run build && mkdir dist/dist && mv dist/*.* dist/dist/ && cp index.html dist/ && firebase deploy" } }
Now just run npm deploy, and the Firebase CLI will show you the URL of your hosted code!
When To Use This Architecture
This setup is perfect for an MVP. By the third time you’ve done this, you’ll have a working web app in minutes — backed by a scalable database that is hosted for free. You can immediately start building features.
Also, there’s a lot of space to grow. If Cloud Functions aren’t powerful enough, you can fall back to a traditional API running on docker in Google Cloud for instance. Also, you can upgrade your Vue.js architecture with vue-router and vuex, and use the power of webpack that’s included in the vue-cli template.
It’s not all rainbows and unicorns, though. The most notorious caveat is the fact that your clients are immediately talking to your database. There’s no middleware layer that you can use to transform the raw data into a format that’s easier for the client. So, you have to store it in a client-friendly way. Whenever your clients request change, you’re going to find it pretty difficult to run data migrations on Firebase. For that, you’ll need to write a custom Firestore client that reads every record, transforms it, and writes it back.
Take time to decide on your data model. If you need to change your data model later on, data migration is your only option.
So what are examples of projects using these tools? Amongst the big names that use Vue.js are Laravel, GitLab and (for the Dutch) nu.nl. Firestore is still in beta, so not a lot of active users there yet, but the Firebase suite is already being used by National Public Radio, Shazam, and others. I’ve seen colleagues implement Firebase for the Unity-based game Road Warriors that was downloaded over a million times in the first five days. It can take quite some load, and it’s very versatile with clients for web, native mobile, Unity, and so on.
Where Do I Sign Up?!
If you want to learn more, consider the following resources:
Working sample containing all of the above code
Documentation on Vue.js, vue-router, vue-cli
Documentation on Firebase
An entertaining way to get to know Firebase better — their YouTube Blog
Happy coding!

(da, ra, hj, il)
0 notes
Text
Getting Started with React - A modern, project-based guide for beginners (including hooks!)
So you want to learn React eh? This guide will walk through everything you need to know when getting started with React. We'll get set up, explain the "hows and whys" behind the basic concepts, and build a small project which pulls data from an API to see everything in action.
This will be a long one, so skip/re-read sections as you need using the "Jump to Section" links below. With that out of the way, grab a drink, buckle up, and let's get started.
Jump to Section
Prerequisites
You don't need to know any React before reading. There are a few things you will need to be familiar with if you want to get the most out of this getting started with React guide:
Basic JavaScript
React is a JavaScript library, so it makes sense to know JavaScript before learning React right? Don't worry, you won't need to know JavaScript inside out - you only need to know the basics:
Variables, functions, data types
Arrays and Objects
ES6 Syntax (using let & const, Arrow Functions, Destructuring Assignment, classes, importing/exporting, etc)
How JavaScript is used to manipulate the DOM
Basic HTML
In React, we use what's called JSX to create the HTML for our webpages. We'll explain JSX in depth later, for now make sure you have a good foundation when it comes to HTML:
How to structure HTML (how to nest elements and so on)
HTML attributes (i.e "id", "class", "onclick" and so on)
Subscribe to get my latest book "React-Ready JavaScript" which will help you get ramped up on the JavaScript you need before getting started with React!
Development Environment
The first thing we're going to do is set up a development environment. If you already setup Node.js and installed Visual Studio Code (or your preferred IDE), you can go ahead and skip to the next section [ADD LINK TO NEXT SECTION HERE]
Node.js
Go here and download the right package for your OS (Mac/windows etc)
When the installation completes, open a terminal and type this command:
node -v
This should show output the version of node you just installed:

This means that the node command works and node has installed successfully - hurray! If you see any errors, try reinstalling Node from the package you downloaded and retry the command again.
Visual Studio Code
Visual studio code is a popular open-source IDE that works well for frontend development. There are a bunch of others you can try - see what your favourite is and download that if you prefer. For now, we'll run with VS Code.
Click here and download the version for your platform:
Follow the installation steps, and you should be good to go. Go ahead and fire up Visual Studio Code.
That's enough development setup for now. There are other nice things you can install (VS Code extensions etc) but we don't need those right now -We're here to learn React!
Creating a React App
The next step is to create a React project. Lucky for us, the fine folk at Facebook have made this really simple. All we have to do is run a command within our terminal:
npx create-react-app my-app
This creates a project for us called "my-app" and sets everything up automatically. Pretty cool.
Go ahead and open up a terminal in the directory you want to create your app, e.g a "projects" folder, and run the command. Let the terminal do its thing, and after a while, this will complete and show you some commands:

Notice the create-react-app output has told us what we need to do to start the app. Go ahead and run the commands in your terminal:
cd my-app yarn start
This will start a development server and open up a web browser for you:
You've just set up your first React App! If you want to learn more about what's going on, (check out the "create-react-app" GitHub:)[https://github.com/facebook/create-react-app]
Exploring Create React App
Open up Visual Studio code (or whatever IDE you installed) and select File > Open… and select the my-app folder that was just created for us using create-react-app. This will open up our shiny new react app in the IDE, so we can write some code!
You should see the project structure to the right:

Look at all that stuff! Don’t worry too much about a lot of it, it’s mostly boilerplate code and config that we won’t be touching too much in this tutorial — phew! However since you’re a curious developer, let’s have a look at the project tree and see what we have:
Node Modules
This is where our packages go that we install through NPM (Node Package Manager). If you’re not familiar with NPM, it’s a glorious place where we can share code (usually open source) that other developers can use instead of writing their own.
Instead of using script tags like we do in traditional HTML, we install these modules as part of the application. Then, we use an import statement to access the code from that module. We’ll see this in action later.
Public Folder
This is where our bundled code goes. When we are ready to deploy our app, we run a ** build script**and the final files go in here. This will typically be our HTML, JavaScript, and CSS files. This is the folder we dump onto a web server somewhere, so that we can let users see our app via a URL
Index.html
The index.html is the entry point, or the first thing the web browser loads when a user navigates to the URL hosting our app.
If we look at the file, it’s a just a normal HTML file with normal HTML stuff that you will hopefully be familiar with. If we look at the body — it’s empty. React will dynamically convert our React code into HTML and load it here, in the “root” div.
With that out of the way, let’s look at the juicy parts — the code.
Our First Component
Open up App.js from the project tree. This is the Main component in our application. This is the first component to get rendered. It’s the “big cheese” of components.
The first thing we’re going to do in our big cheese component is delete everything, and build our very own component from scratch, to better understand what’s going on.
Now that we have a nice blank slate to play with we will start by importing react. This brings the React library into scope and gives us access to all the lovely features:
import React from "react";
Next we will declare a function. We’ll use ES6 arrow functions here. That’s more or less what a “component” is - a function with some logic and markup. We’re also going to export this function so we can use it elsewhere:
const App = () => { } export default App;
Within our function we want to write return(). This is what get’s returned from this component, and contains our markup which gets converted and rendered as HTML.
Finally let’s add a <div> with a <h1> title tag. Our finished component looks like this:
import React from "react"; const App = () => { return ( <div> <h1>Hello React World</h1> <h2> This is our first React App - isn't it marvellous?! </h2> </div> ); } export default App;
Now you’re probably thinking woah! HTML in a function? What is this madness? Even though it looks like HTML, it’s actually something called JSX (JavaScript XML). This basically allows us to mix JavaScript and HTML together.
This might seem a bit strange. We originally learned front end development by separating our HTML and JavaScript (and even CSS). Yet JavaScript and the way we design apps has evolved, and keeping everything together in the same “component” makes it easier to maintain and reuse our code.
Let’s see this in action. Open your terminal and run
npm start
This should open the browser and you should see the app running.
Congrats! You’ve just created your first component!
JSX
You probably have some question marks floating above your head when thinking about this JSX thing. Let’s take a deeper look into this.
return ( <div> <h1>Hello React World</h1> <h2> This is our first React App - isn't it marvellous?! </h2> </div> );
This looks like HTML, but it’s not. This is JSX! Even though it looks like normal HTML, what’s happening behind the scenes is that React is creating the element tree, using this syntax:
React.createElement(component, props, ...children)
component: The HTML element you wish to created, i.e h1, div etc
props: any props you wish to pass to that component (we’ll talk about props later)
children: An array of HTML elements that are nested within this element
So, the same component we have just created can be written as so:
const App = () => { return ( React.createElement( "div", null, React.createElement("h1", null, "Hello React World"), React.createElement( "h2", null, "This is our first React App - isn't it marvellous?!" ) ) ); }
Which looks a bit nasty (it was even nastier trying to type it out). If you trace through it carefully, you can see we are creating a div element, which has no props (indicated by passing null as a second argument). Lastly we are creating 2 more elements using the createElement syntax - our H1 and our H2 elements.
If you’ve been playing with JavaScript for a while, you might have noticed that this is similar to document.createElement. And it is! This is a JavaScript library after all!
This is the advantage of JSX in React - it lets us write HTML like syntax, without the messy React.createElement() stuff.
In the real world, React developers almost exclusively use JSX to write their code. No, this section wasn’t a waste of time - it’s always good to understand what happens under the hood. Knowledge is power (and less questions in my inbox)!
Making things dynamic
So we’ve seen JSX, and gotten over our fear of it (hopefully). But what’s the point? Why use this JSX thing, when we could just use HTML? They look the same? Right?
Good question my friend! Well, if we remember what JSX stands for - JavaScript XML. This means we can use JavaScript to make things dynamic. Our previous example looks like so:
const App = () => { return ( <div> <h1>Hello React World</h1> <h2>This is our first React App - isn't it marvellous?!</h2> </div> ); }
Now let’s say we want to make our text more dynamic. Firstly let’s add a variable to hold our message:
cont message = "This is my first variable rendered in JSX!"
Now to add JavaScript to this, we use ** curly braces**:
const App = () => { const message = "This is my first variable rendered in JSX!"; return ( <div> <h1>Hello React World</h1> <h2>{message}</h2> </div> ); }
If you run this in the browser, you’ll notice the text of our message variable appears. Go ahead and change the message variable text to something else and watch the magic happen.
We use curly braces to tell the compiler “execute this code as JavaScript”. If we didn’t have curly braces, the message variable wouldn't get executed as JavaScript and instead, the text “message” would appear on the screen. Try this out and see!
Handling Events
The same approach can be taken when with handling events. When using JSX, React gives us access to event listeners you may already be familiar with: onClick, onPress, onSubmit and so on.
Let’s say we want to display an alert when the message is clicked. Firstly, we add the onClick property to our h2 tag.
The onClick property accepts a function (in other words, we pass a function as an argument. This function will call the alert like so:
const App = () => { const message = "This is my first variable rendered in JSX!"; return ( <div> <h1>Hello React World</h1> <h2 onClick={()=> alert("you clicked the message!")}>{message}</h2> </div> ); }
Notice how we use a arrow function here to create a nice, concise inline function. If you’re not familiar with this syntax, make sure to checkout my book where I cover this and more here.
Again, notice how we have put this code within curly braces, to ensure the function gets executed as JavaScript.
Calling functions
So we looked at inline functions in the last example. Since JSX is JavaScript, we can create and reference functions outside of the return block. Our last example could look like this:
const App = () => { const message = "This is my first variable rendered in JSX!"; const handleClick = () =>{ alert("you clicked the message!"); } return ( <div> <h1>Hello React World</h1> <h2 onClick={handleClick}>{message}</h2> </div> ); }
Notice how we created a function called handleClick which alerts the message. Instead of using an inline function, we reference this function in our onClick property. Try this out and see what happens.
These are just some examples as to how we can use JavaScript to make things dynamic, and hopefully shows you the power of JSX. We’ll deepen our understandings later as we build out an example, so don't worry if some things don’t make sense just yet!
How a Component gets Rendered
Hopefully I’ve cleared up some of the questions you might have around JSX. The next thing you might be wondering is — how does a component get rendered? Where? When?
Let’s start at the beginning. If you look back to our file structure we have an index.js file. This is the first file to run (we often call this an “Entry Point”). This is typically by convention — you can change the entry point if you want, but for now we’ll leave it alone.
If we dig into the file, you’ll notice we have this line:
ReactDOM.render(<App />, document.getElementById("root"));
Notice we have document.getElementById(“root”) - finally some normal looking JavaScript! This gets the root element from the DOM using plain ol’ JavaScript, and renders our App Component within it. Our App component is imported like so:
import App from "./App"
Remember we exported our app component in App.js. This lets other files/components import and use our App component.
So where does the root element come from? Well, remember our index.html file in the public folder? This index.html file is the first HTML file to get loaded when the website loads
Within it we have a div with an ID of root, which is empty. This is where React loads our components. Let’s have a look at this in the dev tools.
Open up Chrome (or whatever browser you use) and inspect the dev tools. You’ll see somewhere in the tree a div with id=“root”, as well as the HTML rendered from our App component. Pretty cool!

Quick Summary
Before moving on, let’s quickly summarise what we’ve learned so far:
We have an index.html file, which is the skeleton of our web app
When the app starts, index.html loads, and imports our App Component
The JSX in the App component get’s converted to HTML, which is then rendered in the index.html file at the root div
Now that we have our feet wet with React, and have a better understanding of how things fit together, let’s build an example application using what we have learned so far. We’ll also learn some common React features that will help you well on to the road to getting started with React. Let’s go!
Our contacts list will display a number of a contacts, including their name, email, age and avatar (or, profile image). We’ll build this up gradually, eventually pulling data from an API. How exciting!
Get the styles
Since this is a React tutorial, we’re going to focus on the inner workings of React and not worry about creating nice styles. In your source folder, create a new file styles.css and paste in the following code:
.contact-card { display: flex; padding: 10px; color: #ffffff; background-color: rgb(42, 84, 104); font-family: "Segoe UI", Tahoma, Geneva, Verdana, sans-serif; box-shadow: 10px 10px 25px -16px rgba(0, 0, 0, 0.75); border-radius: 10px; max-width: 500px; max-height: 125px; margin-bottom: 10px; } .contact-card p { margin-left: 10px; margin-top: 0; } button { margin-left: 10px; margin-bottom: 10px; }
Next, go into App.js and import the stylesheet like so:
import "./styles.css";
While we’re still in App.js, let’s add the basic JSX to get our layout for the contact card in place. Remove everything from the return statement and add the following:
<div className="contact-card"> <img src="https://via.placeholder.com/150" alt="profile" /> <div className="user-details"> <p>Name: Jenny Han</p> <p>Email: [email protected]</p> <p>Age: 25</p> </div> </div>
All we’re doing here is creating a div to “wrap” the contact card details, adding an image (the image will use a placeholder taken from the web for now), and adding a few p tags to hold the details we need in the contact card. Finally we’re adding some CSS classes taken from styles.css;
NOTE: to reference CSS classes, we need to use the className keyword. This is because we are writing JSX, and “class” is a reserved word in JavaScript.
Here’s what we have so far in our App.js file:
import React from "react"; import "./styles.css"; const App = () => { return ( <div className="contact-card"> <img src="https://via.placeholder.com/150" alt="profile" /> <div className="user-details"> <p>Name: Jenny Han</p> <p>Email: [email protected]</p> <p>Age: 25</p> </div> </div> ); }
If you run this in the browser, you should see something similar to the following:

OK so we have our contact card! However it’s not very reusable. We know that we are going to need to reuse this code if we want to render more than one card, so it makes sense to break this out into it’s own component
NOTE - To make it easier to follow, I am going to a put all the components we make into App.js . In the real world it would be better to split these different components into their own files, and import/export them where appropriate.
Just beneath the App function, create a new function called ContactCard, and copy the JSX from App to ContactCard like so:
const ContactCard = () => { return ( <div className="contact-card"> <img src="https://via.placeholder.com/150" alt="profile" /> <div className="user-details"> <p>Name: Jenny Han</p> <p>Email: [email protected]</p> <p>Age: 25</p> </div> </div> ); };
Again, a component in React is just a function that returns some JSX. Now that we’ve moved our JSX to the ContactCard we can use this component within our main App component:
const App = () => { return ( <> <ContactCard /> </> ); }
We use our own components like any old HTML/JSX tag. We just put the name of our component in angle brackets. Our App.js file should look like this:
// App.js import React from "react"; import "./styles.css"; const App = () => { return ( <> <ContactCard /> </> ); }; const ContactCard = () => { return ( <div className="contact-card"> <img src="https://via.placeholder.com/150" alt="profile" /> <div className="user-details"> <p>Name: Jenny Han</p> <p>Email: [email protected]</p> <p>Age: 25</p> </div> </div> ); };
Now if you run this in the browser, things will look the same as they did before - which is what we want. We now have a ContactCard component that we can use as many times as we like:
const App = () => { return ( <> <ContactCard /> <ContactCard /> <ContactCard /> </> ); };
Update the App component to include another 2 ContactCard components. The above example will render 3 contact cards in the browser. Go and check it out!
Think of this like a “stamp” on the page. Every ContactCard component we add is another “stamp” and renders the same markup on the page
Let’s talk about State - the useState Hook
If you’ve been getting started with React already, you may have heard of the term state. State is quite a big deal in React. So what is it?
State is basically an object that represents a part of an app that can change, which the UI “reacts” to. State can be anything; objects, booleans, arrays, strings or integers
Let’s take an example.
Some people who appear in our contact list are shy and do not want their age being displayed until a button is clicked. We can store whether the age should be shown or not in state by using the useState hook within the component. Which looks like this:
const [showAge, setShowAge] = useState(false);
“what the hell is going on here?” Let me explain.
The useState object gives us a variable with the current value, and a function that lets us change that value. When we call useState we can define an initialvalue (in this case, false).
We use destructuring assignment on the useState hook to get these. You don’t have to worry about destructuring assignment right now, just remember that the first variable lets us access the state value, the second one lets us change it.
Go ahead and add the above code snippet to the ContactCard component like so:
const ContactCard = () => { const [showAge, setShowAge] = useState(false); return ( <div className="contact-card"> <img src="https://via.placeholder.com/150" alt="profile" /> <div className="user-details"> <p>Name: Jenny Han</p> <p>Email: [email protected]</p> <p>Age: 25</p> </div> </div> ); };
Now we have a state object, how do we use it? Well, we can reference the showAge variable like any other variable. In this case, we want to _only show the age if the showAge variable is true.
We can do this using the ternary operator :
{showAge === true ? <p>Age: 25</p> : null}
This example reads as if the showAge variable is true, render the age, if not, render nothing.
Go ahead and add this to the ContactCard component, like so:
const ContactCard = () => { const [showAge, setShowAge] = useState(false); return ( <div className="contact-card"> <img src="https://via.placeholder.com/150" alt="profile" /> <div className="user-details"> <p>Name: Jenny Han</p> <p>Email: [email protected]</p> {showAge === true ? <p>Age: 25</p> : null} </div> </div> ); };
Now, if you run the app in the browser, you’ll see the age disappears - that’s because our showAge variable has been initialised with false. If we initialise our showAge variable with true:
const [showAge, setShowAge] = useState(true);
The age will appear on the contact card. Nice! Although, its not great — we don’t want to change the code whenever we want to show the age on the contact card!
Before we look at how to dynamically change our showAge variable, lets tidy the code a bit. Go ahead and replace this line:
{showAge === true ? <p>Age: 25</p> : null}
With:
{showAge && <p>Age: 25</p> }
This gives the same result, just in a more concise way.
TIP: Shorten code where it makes sense to, don’t feel like you have to shorten every line of code you write! Readability should come first.
Updating State
Ok back to updating state. If we remember back, the useState() hook gives us a function to update the state. Let’s wire this up to a button, which, when clicked, will toggle showing the age on the contact card.
We can do this with the following:
<button onClick={() => setShowAge(!showAge)}> Toggle Age </button>
What this is doing is calling the setShowAge function (which we get from the useState hook) to change the value of show age to the opposite of what it currently is.
NOTE: I’m using the Arrow Function syntax here to pass a function to the onClick property. If you’re not familiar we this, a quick reminder that you can get my [book where I discuss the important bits of JavaScript to know before React here].
When the state updates, React will re-render the component and since the value of showAge is true, the age will be displayed.
If the user clicks the button again, this will set showAge to false, React will re-render the component, and the age will be hidden:

Look at our fancy toggle in action!
TIP: Whenever the components state changes, React will re-render the component with the new state
Notice how even though we have 3 ContactCard components being rendered, when we click the button the age only displays for one of the cards, and not all of them. This is because state belongs to the individual component. In other words, each ContactCard component that renders is a copy, and has its own state/data.
Introducing Props
So now we have a lovely new ContactCard component that we’re reusing a few times. Although its not really reusable, since the name, email, age and avatar are the same for each of our components. Oh dear! We can make this data more dynamic with what are called props.
Since you’re just getting started with React, you can think ofProps as data that gets passed to a component, which the component can then use. For example, we can pass in our avatar , ** email**, name and age as props to our Contact Card component like so:
<ContactCard avatar="https://via.placeholder.com/150" name="Jenny Han" email="[email protected]" age={25} />
As you can see, we define a prop by giving it a name. Eg. name and using the equals to assign some value to that prop e.g Jenny Han.
We can have as many props as we want, and we can name these props whatever we want, so they’re pretty flexible.
Props can hold different types of data, i.e strings, numbers, booleans, objects, arrays and so on.
NOTE: Props must be defined using quoted text (e.g name=“Jenny Han”) or within braces (e.g age={25}. If we leave out the braces for anything other than strings things start to break - age=25 );
Go ahead and replace the current ContactCard components within our App component with the following:
<ContactCard avatar="https://via.placeholder.com/150" name="Jenny Han" email="[email protected]" age={25} /> <ContactCard avatar="https://via.placeholder.com/150" name="Jason Long" email="[email protected]" age={45} /> <ContactCard avatar="https://via.placeholder.com/150" name="Peter Pan" email="[email protected]" age={100} />
All we’re doing here is passing the data that the component needs to each component as props. Notice how the data is different for each component.
Using Props within a component
We’ve sent a bunch of props down to the ContactCard component, so let’s tell the ** ContactCard** how to use them.
Until now, our ** ContactCard** function doesn’t accept any parameters. React, being the magical thing that it is, automatically puts all our props into a lovely props object, that gets passed into the component:
const ContactCard = props => { //...other code };
Notice the props variable. This is an object containing the props we defined previously. We can access our defined props by using the dot notation like so:
const ContactCard = props => { console.log(props.avatar); console.log(props.name); console.log(props.email); console.log(props.age); //...other code };
Finally, we want to replace the hardcoded values in our JSX, with the values we receive from the props:
return ( <div className="contact-card"> <img src={props.avatar} alt="profile" /> <div className="user-details"> <p>Name: {props.name}</p> <p>Email: {props.email}</p> <button onClick={() => setShowAge(!showAge)}>Toggle Age </button> {showAge && <p>Age: {props.age}</p>} </div> </div> );
Notice how we have set the image source using whatever value we received from props. We did similar for name, email, and age. Also notice how we wrap this code in curly braces, so it gets executed as JavaScript.
Our final App.js file looks like this:
// App.js const App = () => { return ( <> <ContactCard avatar="https://via.placeholder.com/150" name="Jenny Han" email="[email protected]" age={25} /> <ContactCard avatar="https://via.placeholder.com/150" name="Jason Long" email="[email protected]" age={45} /> <ContactCard avatar="https://via.placeholder.com/150" name="Peter Pan" email="[email protected]" age={100} /> </> ); }; const ContactCard = props => { const [showAge, setShowAge] = useState(false); return ( <div className="contact-card"> <img src={props.avatar} alt="profile" /> <div className="user-details"> <p>Name: {props.name}</p> <p>Email: {props.email}</p> <button onClick={() => setShowAge(!showAge)}> Toggle Age </button> {showAge && <p>Age: {props.age}</p>} </div> </div> ); };
If you run this in the browser, you should see something similar to this:

Hurray! Our component works the same as before, but its now more dynamic. We can reuse the same ContactCard but passing in different data - whilst keeping the layout, styles, and state objects the same.
Rendering components from a List
Our contacts list is coming along nicely, we have some well crafted, reusable code so time to leave it alone right? Wrong! Let’s take it a step further.
In a real application, data usually comes in the form of an array of data, e.g after an API call. Let’s pretend we’ve made an API call to retrieve some users from a database and have received the following data:
const contacts = [ { name: "Jenny Han", email: "[email protected]", age: 25 }, { name: "Jason Long", email: "[email protected]", age: 45 }, { name: "Peter Pan", email: "[email protected]", age: 100 } ];
Paste this into the App() component at the top of the function. The eagled eye amongst you will notice how this data is similar to what we already have. But how we we turn this data into ContactCard components? Well, remember all those days you spent learning how to loop over an array using .map()? Now is the day we put that into action!
To display a list of components, we:
Loop over the array using .map()
For each item in the array, create a new ContactCard component
Pass the data from each object in the array to the ContactCard component as props
Let’s see how this works. In our appApp() component, replace the return statement with this:
return ( <> {contacts.map(contact => ( <ContactCard avatar="https://via.placeholder.com/150" name={contact.name} email={contact.email} age={contact.age} /> ))} </> );
As you can see, we map over the array. For each object in the array, we want to create a new ContactCard component. For the props, we want to take the name, email, and age from the current object the map function is on. In other words, from the contact variable.
NOTE: I’ve left the “avatar” prop alone, as this is the same for now - it’ll change later in the tutorial
And that’s it! Our App.js file looks like this:
//App.js const App = () => { const contacts = [ { name: "Jenny Han", email: "[email protected]", age: 25 }, { name: "Jason Long", email: "[email protected]", age: 45 }, { name: "Peter Pan", email: "[email protected]", age: 100 }, { name: "Amy McDonald", email: "[email protected]", age: 33 } ]; return ( <> {contacts.map(contact => ( <ContactCard avatar="https://via.placeholder.com/150" name={contact.name} email={contact.email} age={contact.age} /> ))} </> ); };
Run this in the browser and things should look the same. We haven’t change our ContactCard, merely changed where we got the data from. The cool thing about this is that if you added another row to the contacts array, the extra component will get rendered automatically- you don’t have to do anything else! Try this for yourself and see.
Pulling data from an API
We’ve got a nice looking React App now, nice and dynamic and things are working well. Which is a good place to be since we’re just getting started with React! But there are some tidy ups we need to make. In a real application, data will be pulled in from an API.
For the next part of the tutorial, we are going to get real contacts (when I say real contacts, I mean fake contacts - you know what I mean) from a real API: https://randomuser.me/. Feel free to browse the website and look at the response we will get back — this is where we will get our data to populate our components.
Firstly, let’s create a state variable to hold the data we get back from the API. Remember, state is good for holding that that can change. Our contacts list can definitely change!
In App.js, remove the contacts array add the following:
const [contacts, setContacts] = useState([]);
Here, we’re doing here is creating a state object, and initialising it to an empty Array. When we make the API call, we’ll update the state to contain a list of contacts. Since we named this state object contacts, our rendering logic within the JSX will look for this array instead (as opposed to the old contacts array we just deleted).
Next, let’s grab the data from the API. We’ll use the standard Fetch API. For now, we’ll log the data to the console. Add the following below the state object we just created:
fetch("https://randomuser.me/api/?results=3") .then(response => response.json()) .then(data => { console.log(data); });
All we’re doing here is:
Making a GET request to the randomuser API, asking for three results
Convert the response into JSON
Logging the JSON to the console.
If you run this in the browser, you’ll notice the ContactCard components no longer render - thats fine, we haven’t saved any new data to state yet, and our state variable is currently empty. If you look at the console (in your browser dev tools) you’ll notice the response object is logged. Which will look something like this:

You’ll see we have a results array, which has 3 objects. Each of these objects contain the details of a user (or a “Contact” in our case). This is similar to the contacts array we manually created ourselves in the previous section - just an array full of objects.
Let’s update our App components JSX to pick data from this object. Update the JSX like so:
return ( <> {contacts.map(contact => ( <ContactCard avatar={contact.picture.large} name={contact.name.first + " " + contact.name.last} email={contact.email} age={contact.dob.age} /> ))} </> );
This works similar to what we had before:
We are looping through the contacts variable (which, at the moment is an empty array)
When we eventually save the response to state (the next step) we look through each object in the array, for the appropriate things we need: in this case picture, name, email, and dob objects.
Next we want to store the results array in state, so our JSX can loop over it (using the map() function we seen previously) and render some lovely ContactCards. Within our fetch function, add the call to setContacts(data.results) like so:
fetch("https://randomuser.me/api/?results=3") .then(response => response.json()) .then(data => { console.log(data); setContacts(data.results); });
Our App component now looks like this:
//App.js const App = () => { const [contacts, setContacts] = useState([]); fetch("https://randomuser.me/api/?results=3") .then(response => response.json()) .then(data => { console.log(data); setContacts(data.results); }); return ( <> {contacts.map(contact => ( <ContactCard avatar={contact.picture.large} name={contact.name.first + " " + contact.name.last} email={contact.email} age={contact.dob.age} /> ))} </> ); };
If you save this, and run it in the browser, you’ll see something like this:

“WTF is going on everything is broken!”, don’t panic just yet (If you’re on a slower machine or just getting a bit freaked out, you can comment out the setContacts(data.results) line within the fetch function for now).
What’s happening here is that we’re stuck in a bit of a loop:
We make a call to fetch and get some data back
We then save this data to state
Remember, React does a re-render when the state changes
When the component re-renders, the fetch api call happens again, and sets the state
Since the state updated, the component re-renders again
After the component re-renders, fetch is called again…
You get the idea
So how do we stop this? We have to delete everything and start again. Nah just kidding, don’t run away yet. We can fix this with another built in React Hook - useEffect.
Introducing useEffect
The useEffect hook is a special hook that runs a function. By default, the useEffect hook runs on every re-render. However, we can configure it to only run under certain condition, e.g when a component mounts, or if a variable changes. The useEffect hook looks like this:
useEffect(() => { // code to run });
This will run every time. If we want to specify “only run once” we pass in an empty array as a second argument like so.
useEffect(() => { // code to run },[]); //<-- notice the empty array
This is called a dependency array. When the dependency array is empty, this means the useEffect function will only run when the component loads for the first time. For additional re-renders, the useEffect function is skipped.
This is a perfect place to put our API call, as we only want to get the data once, when the component loads. Go ahead and place a **useEffect()**function into our App component, and move the fetch API call into the useEffect function. Our App component now looks like this:
//App.js const App = () => { const [contacts, setContacts] = useState([]); useEffect(() => { fetch("https://randomuser.me/api/?results=3") .then(response => response.json()) .then(data => { setContacts(data.results); }); }, []); return ( <> {contacts.map(contact => ( <ContactCard avatar={contact.picture.large} name={contact.name.first + " " + contact.name.last} email={contact.email} age={contact.dob.age} /> ))} </> ); };
Now, if you run the code in your browser, you should see 3 contact cards appear! Refresh the page to see another randomised list of contacts:
Conclusion
Congrats! You just completed your first real-world app and laid the foundation to move onto more advanced topics.
Make sure to subscribe here to stay up to date with my latest React content, course discounts and early access, as well as some free stuff!
via freeCodeCamp.org https://ift.tt/2WAdIyb
0 notes
Photo

75 Zsh Commands, Plugins, Aliases and Tools
I spend a lot of my day in the terminal, and my shell of choice is Zsh — a highly customizable Unix shell that packs some very powerful features. As I’m a lazy developerTM, I’m always looking for ways to type less and to automate all the things. Luckily this is something that Zsh lends itself well to.
In this post, I’m going to share with you 75 commands, plugins, aliases and tools that will hopefully save you some keystrokes and make you more productive in your day-to-day work.
If you don't have Zsh installed on your machine, then check out this post, where I show you how to get up and running.
15 Things Zsh Can Do out of the Box
Zsh shares a lot of handy features with Bash. None of the following are unique to Zsh, but they're good to know nonetheless. I encourage you to start using the command line to perform operations such as those listed below. It might seem like more work than using a GUI at first, but once you get the hang of things, you'll never look back.
Entering cd from anywhere on the file system will bring you straight back to your home directory.
Entering !! will bring up the last command. This is handy if a command fails because it needs admin rights. In this case you can type sudo !!.
You can use && to chain multiple commands. For example, mkdir project && cd project && npm init -y.
Conditional execution is possible using ||. For example, git commit -m "whatever..." || echo "Commit failed".
Using a -p switch with the mkdir command will allow you to create parent directories as needed. Using brace expansion reduces repetition. For example, mkdir -p articles/jim/sitepoint/article{1,2,3}.
Set environment variables on a per-command basis like so: NODE_DEBUG=myapp node index.js. Or, on a per-session basis like so: export NODE_DEBUG=myapp. You can check it was set by typing echo $<variable-name>.
Pipe the output of one command into a second command. For example, cat /var/log/kern.log | less to make a long log readable, or history | grep ssh to search for any history entries containing "ssh".
You can open files in your editor from the terminal. For example, nano ~/.zshrc (nano), subl ~/.zshrc (Sublime Text), code ~/.zshrc (VS Code). If the file doesn't exist, it will be created when you press Save in the editor.
Navigation is an important skill to master. Don't just rely on your arrow keys. For example, Ctrl + a will take you to the beginning of a line.
Whereas Ctrl + e will take you to the end.
You can use Ctrl + w to delete one word (backwards).
Ctrl + u will remove everything from the cursor to the beginning of the line.
Ctrl + k will clear everything from the cursor to the end of the line. These last three can be undone with Ctrl + y.
You can copy text with Ctrl + Shift + c. This is much more elegant than right clicking and selecting Copy.
Conversely, you can paste copied text with Ctrl + shift + v.
Try to commit those key combos to memory. You'll be surprised at how often they come in handy.
15 Custom Aliases to Boost Your Productivity
Aliases are terminal shortcuts for regular commands. You can add them to your ~/.zshrc file, then reload your terminal (using source ~/.zshrc) for them to take effect.
The syntax for declaring a (simple) alias is as follows:
alias [alias-name]='[command]'
Aliases are great for often-used commands, long commands, or commands with a hard-to-remember syntax. Here are some of the ones I use on a regular basis:
A myip alias, which prints your current public IP address to the terminal: alias myip='curl http://ipecho.net/plain; echo'.
A distro alias to output information about your Linux distribution: alias distro='cat /etc/*-release'.
A reload alias, as I can never seem to remember how to reload my terminal: alias reload='source ~/.zshrc'.
An undo-git-reset alias: alias undo-git-reset-head="git reset 'HEAD@{1}'". This reverts the effects of running git reset HEAD~.
An alias to update package lists: alias sapu='sudo apt-get update'.
An alias to rerun the previous command with sudo: alias ffs='sudo !!'.
Because I’m lazy, I have aliased y to the yarn command: alias y='yarn'. This means I can clone a repo, then just type y to pull in all the dependencies. I learned this one from Scott Tolinski on Syntax.
Not one of the ones I use, but this alias blows away the node_modules folder and removes the package-lock.json file, before reinstalling a project's dependencies: alias yolo='rm -rf node_modules/ && rm package-lock.json && yarn install'. As you probably know, yolo stands for You Only Live Once.
An alias to open my .zshrc file for editing: alias zshconfig='subl $HOME/.zshrc'.
An alias to update the list of Ruby versions rbenv can install: alias update-available-rubies='cd ~/.rbenv/plugins/ruby-build && git pull'
An alias to kick off a server in your current directory (no npm packages required): alias server='python -m SimpleHTTPServer 8000'.
You can also create an alias to open documentation in your browser: alias npmhelp='firefox https://github.com/robbyrussell/oh-my-zsh/tree/master/plugins/npm'.
A global alias to pipe a command's output to less: alias -g L='| less'. You can use it like so: cat production.log L.
A global alias to pipe a command’s output to grep: alias -g G='| grep'. You can use it like so: history G ssh.
You can also use functions to create aliases. The following (taken from here) creates an alias that adds, commits, and pushes code to GitHub: bash function acp() { git add . git commit -m "$1" git push }
There are lots of places to find more ideas for aliases online. For example, this Hacker News discussion, or this post on command line productivity with Zsh.
The post 75 Zsh Commands, Plugins, Aliases and Tools appeared first on SitePoint.
by James Hibbard via SitePoint https://ift.tt/3amukxp
0 notes
Photo

Nuxt.jsとServerlessでdotenvを共有する http://bit.ly/2sgCX8z
Nuxt.jsとServerlessとで同じ.env ファイルを共有できるようにしてみました。
Nuxt.jsのプロジェクトは下記をベースにしています。
jeehyukwon/nuxt-serverless: Nuxt.js Serverless SSR Starter on AWS (Lambda + API Gateway + S3) with Serverless Framework https://github.com/jeehyukwon/nuxt-serverless
前提
AWSアカウントがある
serverlessがインストール・設定済み
node.js、npm(、yarn)がインストール済み
環境構築
とりあえず.env が共有できるよねーってことが確認できたら良いので、上記リポジトリをシンプルにしたものをベースにします。
kai-kou/nuxt-serverless at feature/no-use-s3 https://github.com/kai-kou/nuxt-serverless/tree/feature/no-use-s3
ベースにするリポジトリに関しては下記に利用方法をまとめています。
Nuxt.js(v2.2.0)+TypeScriptなアプリをAWS Lambda+αにデプロイしてみた(S3なし版) https://cloudpack.media/44910
今回のソースはGithubにアップしていますので、よろしければご参考ください。 https://github.com/kai-kou/nuxt-serverless/tree/feature/use-dotenv
> mkdir 任意のディレクトリ > cd 任意のディレクトリ > git clone https://github.com/kai-kou/nuxt-serverless.git > cd nuxt-serverless > git checkout feature/no-use-s3 > npm install
Nuxt.jsのプラグインを追加する
Nuxt.jsで.env から環境変数を読み込むことができるプラグインを利用させてもらいます。
nuxt-community/dotenv-module: Loads your .env file into your application context https://github.com/nuxt-community/dotenv-module
> npm install --save @nuxtjs/dotenv
.env ファイルを作成しておきます。
> touch .env
.env
HOGE=hoge
uxt.config.js に設定を追加します。
nuxt.config.js_一部抜粋
const express = require('express') const cookieParser = require('cookie-parser') require('dotenv').config() module.exports = { (略) modules: [ '@nuxtjs/dotenv', ], env: { HOGE: process.env.HOGE, }, }
vue ファイルで環境変数が利用できることを確認するのに、index.vue で を利用するようにします。 template内で としてもエラーになるのでご注意ください。
src/pages/index.vue
<template> <div class="page-index"> <h1>Nuxt Serverless Template </h1> <p></p> <nuxt-link to="/typescript">typescript</nuxt-link> <nuxt-link to="/nuxt">nuxt</nuxt-link> </div> </template> <script lang="ts"> import { Component, Vue } from 'nuxt-property-decorator' import { State } from 'vuex-class' @Component export default class PageIndex extends Vue { private get hoge(): string { return process.env.HOGE; } /** * You can fetch data from remote server with 'asyncData()' method */ private async asyncData() { return { message: 'Say Hello to Node.js 8.10 in AWS Lambda and Nuxt 2.0', } } /** * overide tags in <head> with 'head()' method */ private head() { return { title: 'Hello, Nuxt Serverless Template', } } @State((state) => state.version) private version: string } </script> <style lang="scss"> .page-index { h1 { color: #087f5b; } } </style>
実行して確認してみます。
> npm run dev > open http://localhost:3000/dev/

はい。hoge と表示されました。
Serverlessのプラグインを追加する
続いて、Serverlessでも.env が利用できるようにします。こちらもプラグインがありましたので、それを利用させてもらいます。
colynb/serverless-dotenv-plugin: Preload Environment Variables with Dotenv into Serverless https://github.com/colynb/serverless-dotenv-plugin#readme
> npm install --save-dev serverless-dotenv-plugin
serverless.yml で.env から環境変数を読み込めるようにします。環境変数は${env:HOGE} とすることでアクセスできるようになります。
serverless.yml_一部抜粋
service: nuxt-serverless # 1. Edit whole service name provider: name: aws runtime: nodejs8.10 stage: ${opt:stage, 'dev'} region: ap-northeast-1 # 2. Edit AWS region name environment: NODE_ENV: production HOGE: ${env:HOGE} (略) plugins: - serverless-offline - serverless-apigw-binary - serverless-dotenv-plugin
デプロイは割愛します。
ポイント
.env.{env} ファイルを取り扱うのにひと手間かかる
serverless-dotenv-pluginはenvironmentから.env.development や.env.production などのファイルを自動で探してくれるのですが、@nuxtjs/dotenvの方は、nuxt.config.js で指定する必要があります。
nuxt.config.js_一部抜粋
modules: [ ['@nuxtjs/dotenv', { filename: '.env.development' }], ]
.env ファイルはコミットしないようにする
.gitnoreに追加してからコミットしましょう。.env の代わりに.env.example などサンプルとなるファイルをリポジトリに含めておけばどんな環境変数を利用するのかわかりやすくなります。
参考
nuxt-community/dotenv-module: Loads your .env file into your application context https://github.com/nuxt-community/dotenv-module
colynb/serverless-dotenv-plugin: Preload Environment Variables with Dotenv into Serverless https://github.com/colynb/serverless-dotenv-plugin#readme
Nuxt.js で dotenv を活用する – chatbox.blog https://chatboxinc.wordpress.com/2018/03/26/nuxt_js_with_dotenv/
API: env プロパティ – Nuxt.js https://ja.nuxtjs.org/api/configuration-env/
元記事はこちら
「Nuxt.jsとServerlessでdotenvを共有する」
January 09, 2019 at 04:00PM
0 notes
Text
How To Use Styled-Components In React
About The Author
Adebiyi Adedotun Lukman is a UI/Frontend Engineer based in Lagos, Nigeria who also happens to love UI/UX Design for the love of great software products. When … More about Adebiyi …
While the component-driven approach has ushered in a new frontier in the way we build web applications, it isn’t without its imperfections — one being its usability and scalability with CSS. This has given birth to a new way to construct and manage our styles in a component-specific manner, otherwise knows as CSS-in-JS.
Styled components are a CSS-in-JS tool that bridges the gap between components and styling, offering numerous features to get you up and running in styling components in a functional and reusable way. In this article, you’ll learn the basics of styled components and how to properly apply them to your React applications. You should have worked on React previously before going through this tutorial. If you’re looking for various options in styling React components, you can check out our previous post on the subject.
At the core of CSS is the capability to target any HTML element — globally — no matter its position in the DOM tree. This can be a hindrance when used with components, because components demand, to a reasonable extent, colocation (i.e. keeping assets such as states and styling) closer to where they’re used (known as localization).
In React’s own words, styled components are “visual primitives for components”, and their goal is to give us a flexible way to style components. The result is a tight coupling between components and their styles.
Note: Styled components are available both for React and React Native, and while you should definitely check out the React Native guide, our focus here will be on styled components for React.
Why Styled Components?
Apart from helping you to scope styles, styled components include the following features:
Automatic vendor prefixing You can use standard CSS properties, and styled components will add vendor prefixes should they be needed.
Unique class names Styled components are independent of each other, and you do not have to worry about their names because the library handles that for you.
Elimination of dead styles Styled components remove unused styles, even if they’re declared in your code.
and many more.
Installation
Installing styled components is easy. You can do it through a CDN or with a package manager such as Yarn…
yarn add styled-components
… or npm:
npm i styled-components
Our demo uses create-react-app.
Starting Out
Perhaps the first thing you’ll notice about styled components is their syntax, which can be daunting if you don’t understand the magic behind styled components. To put it briefly, styled components use JavaScript’s template literals to bridge the gap between components and styles. So, when you create a styled component, what you’re actually creating is a React component with styles. It looks like this:
import styled from "styled-components"; // Styled component named StyledButton const StyledButton = styled.button` background-color: black; font-size: 32px; color: white; `; function Component() { // Use it like any other component. return <StyledButton> Login </StyledButton>; }
Here, StyledButton is the styled component, and it will be rendered as an HTML button with the contained styles. styled is an internal utility method that transforms the styling from JavaScript into actual CSS.
In raw HTML and CSS, we would have this:
button { background-color: black; font-size: 32px; color: white; } <button> Login </button>
If styled components are React components, can we use props? Yes, we can.
Adapting Based on Props
Styled components are functional, so we can easily style elements dynamically. Let’s assume we have two types of buttons on our page, one with a black background, and the other blue. We do not have to create two styled components for them; we can adapt their styling based on their props.
import styled from "styled-components"; const StyledButton = styled.button` min-width: 200px; border: none; font-size: 18px; padding: 7px 10px; /* The resulting background color will be based on the bg props. */ background-color: ${props => props.bg === "black" ? "black" : "blue"; `; function Profile() { return ( <div> <StyledButton bg="black">Button A</StyledButton> <StyledButton bg="blue">Button B</StyledButton> </div> ) }
Because StyledButton is a React component that accepts props, we can assign a different background color based on the existence or value of the bg prop.
You’ll notice, though, that we haven’t given our button a type. Let’s do that:
function Profile() { return ( <> <StyledButton bg="black" type="button"> Button A </StyledButton> <StyledButton bg="blue" type="submit" onClick={() => alert("clicked")}> Button B </StyledButton> </> ); }
Styled components can differentiate between the types of props they receive. They know that type is an HTML attribute, so they actually render <button type="button">Button A</button>, while using the bg prop in their own processing. Notice how we attached an event handler, too?
Speaking of attributes, an extended syntax lets us manage props using the attrs constructor. Check this out:
const StyledContainer = styled.section.attrs((props) => ({ width: props.width || "100%", hasPadding: props.hasPadding || false, }))` --container-padding: 20px; width: ${(props) => props.width}; // Falls back to 100% padding: ${(props) => (props.hasPadding && "var(--container-padding)") || "none"}; `;
Notice how we don’t need a ternary when setting the width? That’s because we’ve already set a default for it with width: props.width || "100%",. Also, we used CSS custom properties because we can!
Note: If styled components are React components, and we can pass props, then can we also use states? The library’s GitHub account has an issue addressing this very matter.
Extending Styles
Let’s say you’re working on a landing page, and you’ve set your container to a certain max-width to keep things centered. You have a StyledContainer for that:
const StyledContainer = styled.section` max-width: 1024px; padding: 0 20px; margin: 0 auto; `;
Then, you discover that you need a smaller container, with padding of 10 pixels on both sides, instead of 20 pixels. Your first thought might be to create another styled component, and you’d be right, but it wouldn’t take any time before you realize that you are duplicating styles.
const StyledContainer = styled.section` max-width: 1024px; padding: 0 20px; margin: 0 auto; `; const StyledSmallContainer = styled.section` max-width: 1024px; padding: 0 10px; margin: 0 auto; `;
Before you go ahead and create StyledSmallContainer, like in the snippet above, let’s learn the way to reuse and inherit styles. It’s more or less like how the spread operator works:
const StyledContainer = styled.section` max-width: 1024px; padding: 0 20px; margin: 0 auto; `; // Inherit StyledContainer in StyledSmallConatiner const StyledSmallContainer = styled(StyledContainer)` padding: 0 10px; `; function Home() { return ( <StyledContainer> <h1>The secret is to be happy</h1> </StyledContainer> ); } function Contact() { return ( <StyledSmallContainer> <h1>The road goes on and on</h1> </StyledSmallContainer> ); }
In your StyledSmallContainer, you’ll get all of the styles from StyledContainer, but the padding will be overridden. Keep in mind that, ordinarily, you’ll get a section element rendered for StyledSmallContainer, because that’s what StyledContainer renders. But that doesn’t mean it’s carved in stone or unchangeable.
The “as” Polymorphic Prop
With the as polymorphic prop, you can swap the end element that gets rendered. One use case is when you inherit styles (as in the last example). If, for example, you’d prefer a div to a section for StyledSmallContainer, you can pass the as prop to your styled component with the value of your preferred element, like so:
function Home() { return ( <StyledContainer> <h1>It’s business, not personal</h1> </StyledContainer> ); } function Contact() { return ( <StyledSmallContainer as="div"> <h1>Never dribble when you can pass</h1> </StyledSmallContainer> ); }
Now, StyledSmallContainer will be rendered as a div. You could even have a custom component as your value:
function Home() { return ( <StyledContainer> <h1>It’s business, not personal</h1> </StyledContainer> ); } function Contact() { return ( <StyledSmallContainer as={StyledContainer}> <h1>Never dribble when you can pass</h1> </StyledSmallContainer> ); }
Don’t take it for granted.
SCSS-Like Syntax
The CSS preprocessor Stylis enables styled components to support SCSS-like syntax, such as nesting:
const StyledProfileCard = styled.div` border: 1px solid black; > .username { font-size: 20px; color: black; transition: 0.2s; &:hover { color: red; } + .dob { color: grey; } } `; function ProfileCard() { return ( <StyledProfileCard> <h1 className="username">John Doe</h1> <p className="dob"> Date: <span>12th October, 2013</span> </p> <p className="gender">Male</p> </StyledProfileCard> ); }
Animation
Styled components have a keyframes helper that assists with constructing (reusable) animation keyframes. The advantage here is that the keyframes will be detached from the styled components and can be exported and reused wherever needed.
import styled, {keyframes} from "styled-components"; const slideIn = keyframes` from { opacity: 0; } to { opacity: 1; } `; const Toast = styled.div` animation: ${slideIn} 0.5s cubic-bezier(0.4, 0, 0.2, 1) both; border-radius: 5px; padding: 20px; position: fixed; `;
Global Styling
While the original goal of CSS-in-JS and, by extension, styled components is scoping of styles, we can also leverage styled components’ global styling. Because we’re mostly working with scoped styles, you might think that’s an invariable factory setting, but you’d be wrong. Think about it: What really is scoping? It’s technically possible for us — in the name of global styling — to do something similar to this:
ReactDOM.render( <StyledApp> <App /> </StyledApp>, document.getElementById("root") );
But we already have a helper function — createGlobalStyle — whose sole reason for existence is global styling. So, why deny it its responsibility?
One thing we can use createGlobalStyle for is to normalize the CSS:
import {createGlobalStyle} from "styled-components"; const GlobalStyle = createGlobalStyle` /* Your css reset here */ `; // Use your GlobalStyle function App() { return ( <div> <GlobalStyle /> <Routes /> </div> ); }
Note: Styles created with createGlobalStyle do not accept any children. Learn more in the documentation.
At this point, you might be wondering why we should bother using createGlobalStlye at all. Here are a few reasons:
We can’t target anything outside of the root render without it (for example, html, body, etc.).
createGlobalStyle injects styles but does not render any actual elements. If you look at the last example closely, you’ll notice we didn’t specify any HTML element to render. This is cool because we might not actually need the element. After all, we’re concerned with global styles. We are targeting selectors at large, not specific elements.
createGlobalStyle is not scoped and can be rendered anywhere in our app and will be applicable as long as it’s in the DOM. Think about the concept, not the structure.
import {createGlobalStyle} from "styled-components"; const GlobalStyle = createGlobalStyle` /* Your css reset here */ .app-title { font-size: 40px; } `; const StyledNav = styled.nav` /* Your styles here */ `; function Nav({children}) { return ( <StyledNav> <GlobalStyle /> {children} </StyledNav> ); } function App() { return ( <div> <Nav> <h1 className="app-title">STYLED COMPONENTS</h1> </Nav> <Main /> <Footer /> </div> ); }
If you think about the structure, then app-title should not be styled as set in GlobalStyle. But it doesn’t work that way. Wherever you choose to render your GlobalStyle, it will be injected when your component is rendered.
Be careful: createGlobalStyles will only be rendered if and when it’s in the DOM.
CSS Helper
Already we’ve seen how to adapt styles based on props. What if we wanted to go a little further? The CSS helper function helps to achieve this. Let’s assume we have two text-input fields with states: empty and active, each with a different color. We can do this:
const StyledTextField = styled.input` color: ${(props) => (props.isEmpty ? "none" : "black")}; `;
All’s well. Subsequently, if we need to add another state of filled, we’d have to modify our styles:
const StyledTextField = styled.input` color: ${(props) => props.isEmpty ? "none" : props.active ? "purple" : "blue"}; `;
Now the ternary operation is growing in complexity. What if we add another state to our text-input fields later on? Or what if we want to give each state additional styles, other than color? Can you imagine cramping the styles into the ternary operation? The css helper comes in handy.
const StyledTextField = styled.input` width: 100%; height: 40px; ${(props) => (props.empty && css` color: none; backgroundcolor: white; `) || (props.active && css` color: black; backgroundcolor: whitesmoke; `)} `;
What we’ve done is sort of expanded our ternary syntax to accommodate more styles, and with a more understandable and organized syntax. If the previous statement seems wrong, it’s because the code is trying to do too much. So, let’s step back and refine:
const StyledTextField = styled.input` width: 100%; height: 40px; // 1. Empty state ${(props) => props.empty && css` color: none; backgroundcolor: white; `} // 2. Active state ${(props) => props.active && css` color: black; backgroundcolor: whitesmoke; `} // 3. Filled state ${(props) => props.filled && css` color: black; backgroundcolor: white; border: 1px solid green; `} `;
Our refinement splits the styling into three different manageable and easy-to-understand chunks. It’s a win.
StyleSheetManager
Like the CSS helper, StyleSheetManager is a helper method for modifying how styles are processed. It takes certain props — like disableVendorPrefixes (you can check out the full list) — that help you opt out of vendor prefixes from its subtree.
import styled, {StyleSheetManager} from "styled-components"; const StyledCard = styled.div` width: 200px; backgroundcolor: white; `; const StyledNav = styled.div` width: calc(100% - var(--side-nav-width)); `; function Profile() { return ( <div> <StyledNav /> <StyleSheetManager disableVendorPrefixes> <StyledCard> This is a card </StyledCard> </StyleSheetManager> </div> ); }
disableVendorPrefixes is passed as a prop to <StyleSheetManager>. So, the styled components wrapped by <StyleSheetManager> would be disabled, but not the ones in <StyledNav>.
Easier Debugging
When introducing styled components to one of my colleagues, one of their complaints was that it’s hard to locate a rendered element in the DOM — or in React Developer Tools, for that matter. This is one of the drawbacks of styled components: In trying to provide unique class names, it assigns unique hashes to elements, which happen to be cryptic, but it makes the displayName readable for easier debugging.
import React from "react"; import styled from "styled-components"; import "./App.css"; const LoginButton = styled.button` background-color: white; color: black; border: 1px solid red; `; function App() { return ( <div className="App"> <LoginButton>Login</LoginButton> </div> ); }
By default, styled components render LoginButton as <button class="LoginButton-xxxx xxxx">Login</button> in the DOM, and as LoginButton in React Developer Tools, which makes debugging easier. We can toggle the displayName boolean if we don’t want this behavior. This requires a Babel configuration.
Note: In the documentation, the package babel-plugin-styled-components is specified, as well as a .babelrc configuration file. The issue with this is that, because we’re using create-react-app, we can’t configure a lot of things unless we eject. This is where Babel macros come in.
We’ll need to install babel-plugin-macros with npm or Yarn, and then create a babel-plugin-macros.config.js at the root of our application, with the content:
module.exports = { styledComponents: { displayName: true, fileName: false, }, };
With the fileName value inverted, the displayName will be prefixed with the file name for even more unique precision.
We also now need to import from the macro:
// Before import styled from "styled-components"; // After import styled from "styled-components/macro";
Conclusion
Now that you can programmatically compose your CSS, do not abuse the freedom. For what it’s worth, do your very best to maintain sanity in your styled components. Don’t try to compose heavy conditionals, nor suppose that every thing should be a styled component. Also, do not over-abstract by creating nascent styled components for use cases that you are only guessing are somewhere around the corner.
Further Resources
Documentation, Styled Components
“Building a Reusable Component System with React.js and styled-components”, Lukas Gisder-Dubé
Usage with Next.js
Usage with Gatsby
(ks, ra, yk, al, il)
Website Design & SEO Delray Beach by DBL07.co
Delray Beach SEO
source http://www.scpie.org/how-to-use-styled-components-in-react/ source https://scpie1.blogspot.com/2020/07/how-to-use-styled-components-in-react.html
0 notes