#PasswordHashing
Explore tagged Tumblr posts
Visit Tumblr Blog
Explore Tumblr blogs with no restrictions, modern design and the best experience.
Last Seen Tumblr Blogs


Fun Fact
69% of Tumblr users are millennials.
Text
Brute Force Password Cracking Takes Longer - Don't Celebrate Yet

Brute force password cracking takes longer than ever, according to Hive Systems' latest audit. thttps://www.blogger.com/blog/post/edit/2393063772924596666/7373948891148112675
0 notes
Text
How to Secure Your Java Applications: Authentication, Encryption, and Best Practices

Introduction
Security is a critical concern in Java applications.
Overview of key security aspects: authentication, encryption, and best practices.
Importance of preventing unauthorized access, data breaches, and vulnerabilities.
1. Authentication in Java Applications
1.1 Role of Authentication
Ensures that only authorized users can access the application.
Prevents identity theft and unauthorized access.
1.2 Implementing Authentication in Java
1.2.1 Basic Authentication with Spring Security
java@Configuration @EnableWebSecurity public class SecurityConfig { @Bean public SecurityFilterChain securityFilterChain(HttpSecurity http) throws Exception { http.authorizeHttpRequests(auth -> auth .anyRequest().authenticated()) .httpBasic(Customizer.withDefaults()); return http.build(); } }
✅ Use Case: Protects REST APIs using Basic Authentication.
1.2.2 OAuth 2.0 with Spring Security
Secure APIs with OAuth 2.0 and JWT (JSON Web Tokens).
Integrate with Google, Facebook, or custom authorization servers.
Example: Configuring OAuth2 Loginjava@Configuration @EnableWebSecurity public class SecurityConfig { @Bean public SecurityFilterChain securityFilterChain(HttpSecurity http) throws Exception { http.oauth2Login(); return http.build(); } }
✅ Use Case: Implementing SSO (Single Sign-On).
2. Encrypting Data in Java
2.1 Why Encryption is Important
Protects sensitive information such as passwords, tokens, and user data.
Prevents data leakage in case of breaches.
2.2 Hashing Passwords with BCrypt
Avoid storing plain-text passwords.
Use BCrypt for secure hashing.
Example: Hashing a password using BCryptjavaimport org.springframework.security.crypto.bcrypt.BCryptPasswordEncoder;public class PasswordHashing { public static void main(String[] args) { BCryptPasswordEncoder encoder = new BCryptPasswordEncoder(); String hashedPassword = encoder.encode("securePassword123"); System.out.println("Hashed Password: " + hashedPassword); } }
✅ Use Case: Safely storing user passwords in databases.
2.3 AES Encryption for Data Protection
AES (Advanced Encryption Standard) is used for encrypting sensitive data.
Example: AES Encryption in Javajavaimport javax.crypto.Cipher; import javax.crypto.KeyGenerator; import javax.crypto.SecretKey; import java.util.Base64;public class AESEncryption { public static void main(String[] args) throws Exception { KeyGenerator keyGen = KeyGenerator.getInstance("AES"); keyGen.init(256); SecretKey secretKey = keyGen.generateKey(); Cipher cipher = Cipher.getInstance("AES"); cipher.init(Cipher.ENCRYPT_MODE, secretKey); byte[] encryptedData = cipher.doFinal("Sensitive Data".getBytes()); System.out.println("Encrypted: " + Base64.getEncoder().encodeToString(encryptedData)); } }
✅ Use Case: Encrypting credit card information in e-commerce applications.
3. Best Security Practices for Java Applications
3.1 Secure API Endpoints
Use HTTPS (SSL/TLS) to encrypt data transmission.
Validate and sanitize user inputs to prevent SQL Injection and XSS.
3.2 Secure Dependency Management
Regularly update dependencies to patch vulnerabilities.
Use OWASP Dependency-Check to identify security risks.
3.3 Implementing Role-Based Access Control (RBAC)
Restrict access permissions based on user roles.
java@Configuration @EnableWebSecurity public class SecurityConfig { @Bean public SecurityFilterChain securityFilterChain(HttpSecurity http) throws Exception { http.authorizeHttpRequests(auth -> auth .requestMatchers("/admin/**").hasRole("ADMIN") .anyRequest().authenticated()) .formLogin(Customizer.withDefaults()); return http.build(); } }
✅ Use Case: Restricting admin dashboard access.
3.4 Preventing CSRF (Cross-Site Request Forgery)
Use Spring Security CSRF protection (enabled by default).
Token-based authentication (JWT) can help mitigate CSRF risks.
3.5 Logging and Monitoring
Implement audit logging to track security events.
Use tools like ELK Stack (Elasticsearch, Logstash, Kibana) for monitoring.
Conclusion
Java applications need robust authentication, encryption, and security best practices.
Use Spring Security for authentication, AES for encryption, and RBAC for access control.
Stay updated with security patches and vulnerability scans.
WEBSITE: https://www.ficusoft.in/core-java-training-in-chennai/
0 notes
Photo
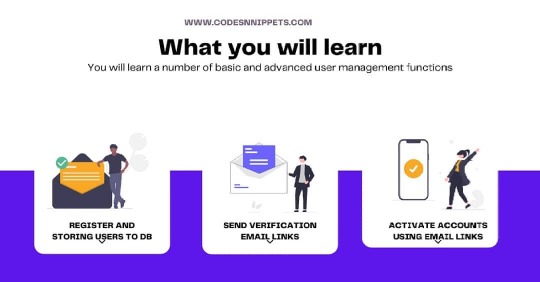
Learn how to design a User management system with Python and flask. It begins with deciding what parameters you need to store for your user model. But at the heart of it all is security. Securely storing user passwords by encryption and sending emails for verification covers half of Security requirements. Check out the latest posts at www.codesnnippets.com and download the project code files for free. #usermanagement #passwordhashing #emailverification #userauthentication #pythonframework #pythonprogramming #webdevelooment #tailwindcss #flask #flasklogin #flaskbcrypt #flasksqlalchemy #flaskmail #mysql #mysqldb #databasemanagement (at Lilongwe, Malawi) https://www.instagram.com/p/CRniy5sD6Pa/?utm_medium=tumblr
#usermanagement#passwordhashing#emailverification#userauthentication#pythonframework#pythonprogramming#webdevelooment#tailwindcss#flask#flasklogin#flaskbcrypt#flasksqlalchemy#flaskmail#mysql#mysqldb#databasemanagement
0 notes
Text
after significant early frustration w/ postgresql-simple[1], i’ve got everything up and running after putting a few hours into making it easy
unfortunately, it’s not one of those libraries where you give it your schema and it checks at compile time that all your queries are “valid” (postgresq-simple has no knowledge of the schema, you’re responsible for making sure that the type conversions work) but it gets things done
more than that, it has some decent typeclass machinery for making sure it’s easy for your queries to be well-typed
i use a lot of newtype wrappers around things (so I don’t accidentally compare PostID to UserIDs), and don’t have to write any boilerplate* to make them accessible to the DB so long as I stick only to composites and newtypes of existing DB structures[2], so I don’t even need to destructure those types when passing them in
i really wish there were some system where I could say “yeah my column is a Unique, I swear, give me only one or error” on the library side, but it’s not that hard to write a makeshift wrapper around that
it does require that you use either MonadIO or IO everywhere (it only returns results in IO) so unless you build a query wrapper (which, you probably should), your program may look like it’s threatening to launch nuclear missiles, which I consider the main strike against it as an everyday DB lib.
* Okay, I have to write deriving (Generic, FromRow, ToRow) or something, and need to make sure that I derive the right way (newtype for newtypes, anyclass for data types), and also consider if things are rows or fields, but that’s pretty simple!
[1]: it’s my preferred sql library for haskell, having tried persistent, esqueleto, and a bit of squeal; have not tried beam or opaleye,
[2]: I was worried this was going to be an issue, but it works with byteas and jsonbs well, with the presumable haskell level types already having appropriate instances for the sql en-and-de-coding
note: it’s a little frustrating to have to keep peeling and reassembling data types together, but postgresql-simple works much better if you have specific types for it, rather than your program types, I think this is the case for most DBs tho
example (this will probably show up poorly, sorry):
getUserByCreds (Credentials username pwdhash) = genericGet (Proxy @UserDB) (query, (username, pwdhash)) where query = "SELECT users.id, users.username, users.password_hash FROM users WHERE users.username = ? AND users.password_hash = ?"
Credentials takes in a Username and a PasswordHash, each of which is a newtype wrapper, one taking either String or Text (I forget, and I can just change the haskell implementation without doing a sql migration), the other a Bytestring, but neither of those needs to be unwrapped because of aforementioned typeclass machinery
The bit with the Proxy passes in a completely empty datatype, with a phantom type parameter of UserDB, which instructs the machinery to assemble my results with type UserDB (it could also just return a tuple containing all the components needed to construct a UserDB as well, the underlying haskell types (both UserDB and the tuple) are the “same” for the purposes of the sql type converter)
genericGet is just a little wrapper I wrote around the query function to match up with my app stack that factors out the Connection param of query into a MonadReader Connection m, which then gets consumed by my utils functions with either basic IO or my app stack
#haskell#effortpost#?#if you have any questions#/want to know what things look like on my end i'd be happy to say#things are pretty basic but I can easily insert and select with my haskell types against the actual db#rambling probably#I should organize this better but then I won't post it#I don't say this in the post since it's not that important#but the reason why I can just pass a string in is because of Haskell's overloadedstrings extension#so given a function from string -> A it can recognize a string literal as being of A#if you don't want to use it or want multiline sql then there's a quasiquoter#if you really need some powerful query construction there's a quasi quoter that also adds in antiqq capabilities
2 notes
·
View notes
Text
🔒 What is bcrypt and how does it work?
When it comes to securing sensitive information, such as user passwords, proper encryption is crucial. One popular method for password hashing is bcrypt. In this article, we will explore what bcrypt is, how it works, why it is preferred for password hashing, and how it compares to other algorithms like SHA256. We will also discuss the safety of bcrypt for password hashing.
Read on 👉 https://www.valevpn.com/post/what-is-bcrypt-and-how-does-it-work
bcrypt #CyberSecurity #encryption #PasswordHashing #SHA256 #privacy

0 notes
Text
golangでpassword hashするときの文字数メモ
golang.org/x/crypto/bcryptパッケージを使ってパスワードを生成するときの、文字数制限のメモ。
結論から,,,
生のパスワードが71字以下である必要がある。
チェック
パスワードハッシュと認証のコードは以下。
func passwordHash(pw string) (string, error) { hash, err := bcrypt.GenerateFromPassword([]byte(pw), bcrypt.DefaultCost) if err != nil { // failed to hash return "", err } return string(hash), err } func passwordVerify(hash, pw string) error { return bcrypt.CompareHashAndPassword([]byte(hash), []byte(pw)) }
以下で確認
// out: 2020/12/28 22:20:07 failed to verify func main() { pw := strings.Repeat("A", 71) hash, err := passwordHash(pw) if err != nil { panic(err) } err = passwordVerify(hash, pw+"some") if err != nil { log.Fatal("failed to verify") } log.Println("success to verify") }
// out: 2020/12/28 22:21:00 success to verify func main() { pw := strings.Repeat("A", 72) hash, err := passwordHash(pw) if err != nil { panic(err) } err = passwordVerify(hash, pw+"some") if err != nil { log.Fatal(err) } log.Println("success to verify") }
0 notes
Text
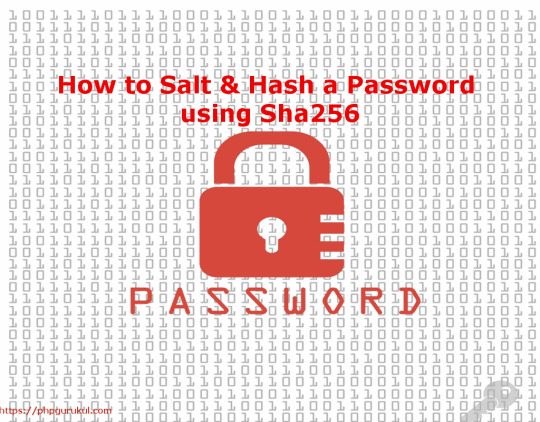
How to Salt and Hash a Password using Sha256 in PHP
In this tutorial we will learn How to Salt & Hash a Password with Sha256 in PHP. Syntax for Sha256 encryption $password=$_POST; $hasedpassword=hash('sha256',$password); Signup form A the time of signup encrypt the password with Sha256 then insert in to database . PDO | Registration Form .errorWrap { padding: 10px; margin: 0 0 20px 0; background: #fff; border-left: 4px solid #dd3d36; -webkit-box-shadow: 0 1px 1px 0 rgba(0,0,0,.1); box-shadow: 0 1px 1px 0 rgba(0,0,0,.1); } .succWrap{ padding: 10px; margin: 0 0 20px 0; background: #fff; border-left: 4px solid #5cb85c; -webkit-box-shadow: 0 1px 1px 0 rgba(0,0,0,.1); box-shadow: 0 1px 1px 0 rgba(0,0,0,.1); } function checkUsernameAvailability() { $("#loaderIcon").show(); jQuery.ajax({ url: "check_availability.php", data:'username='+$("#username").val(), type: "POST", success:function(data){ $("#username-availability-status").html(data); $("#loaderIcon").hide(); }, error:function (){ } }); } function checkEmailAvailability() { $("#loaderIcon").show(); jQuery.ajax({ url: "check_availability.php", data:'email='+$("#email").val(), type: "POST", success:function(data){ $("#email-availability-status").html(data); $("#loaderIcon").hide(); }, error:function (){ event.preventDefault(); } }); } #$salt #bcrypt #bcryptphplaravel #bcryptsalt #c#passwordhashing #checkingusernameandpasswordinphpusinghashes #codeigniterpassword_hash #commonpasswordhashes #drupalpasswordhashgenerator #hashastring #hashcheckeronline #hashemailaddressesindatabase #hashencryption #hashidentifieronline #hashpassword #hashpasswordphp #howarepasswordsstored #howdoespassword_verifywork #howtocomparehashedpasswords #howtoencryptpasswordinphp #howtohashanemaillist #howtohashpasswordinphp #howtousepassword_verifyinphp #javasha256hashwithsaltexample #javascripthashpassword #loginwithhashedpasswordphp #md5decryptphp #passwordencryptionanddecryptioninphp #passwordencryptioninphp #passwordencryptionmethods #passwordhash #passwordhashfunction #passwordhashgenerator #passwordhashonline #passwordhashphp #passwordhashphp7 #passwordhashphpstackoverflow #passwordhashingexplained #passwordhashingphp #passwordsaltgenerator #passwordsalting #passwordstoragebestpractices #passwordverifyphp #password_bcrypt #password_hash #password_hashdecrypt #password_hashdecryptphp #password_hashphp #password_verifycodeigniter #password_verifynotworkingphp7 #passwordhashphp #phpbcrypt #phpbcryptcost #phpcheckpassword #phpcrypt #phpcryptpassword #phpencryptpassword #phpgeneratesalt #phphash #phphashexample #phphashfunction #phphashpassword #phphashsalt #phphashwithsalt #phphashingfunctions #phpmd5 #phpmd5hash #phppassword #phppasswordencryption #phppasswordfunction #phppasswordhash #phppasswordhashgenerator #phppasswordhashing #phppasswordstorage #phppasswordverify #phppasswordverifyexample #phppasswordverifynotworking #phppassword_hash #phppassword_hashexample #phppassword_hashlength #phppassword_hashonline #phppassword_verifyreturnsfalse #phpsalt #phpsaltpassword #phpsha1 #phpsha256 #phpsimpleencryptdecrypt #saltandhashapasswordusingsha256inphp #salthash #saltedhashcracker #saltedpasswordhashing #saltingpasswords #securepasswordsphp #sha1hashgenerator #sha256hash #sha256hashgenerator #sha256php #sha256saltgenerator #texttohash #verifypasswordphp #whatispasswordhashing #whatissalting Read the full article
0 notes
Photo

API Authentication With Node.js
Building APIs is important; however, building secured APIs is also very important. In this tutorial, you learn how to build a secured API in Node.js. The authentication will be handled using tokens. Let's dive in.
Cookies vs. Tokens
Let's talk a little about cookies and tokens, to understand how they work and the differences between them.
Cookie-based authentication keeps an authentication record or session both on the server and the client side. In other words, it is stateful. The server keeps track of an active session in the database, while a cookie is created on the front-end to hold a session identifier.
In token-based authentication, every server request is accompanied by a token which is used by the server to verify the authenticity of the request. The server does not keep a record of which users are logged in. Token-based authentication is stateless.
In this tutorial, you will implement token-based authentication.
Setting Up an Express App
First, create a folder where you will be working from, and initialize npm. You can do so by running:
npm init -y
Use the package.json file I have below. It contains all the dependencies you will be making use of to build this application.
#package.json { "name": "api-auth", "version": "1.0.0", "description": "", "main": "index.js", "scripts": { "start-dev": "nodemon app.js", "test": "echo \"Error: no test specified\" && exit 1" }, "keywords": [], "author": "", "license": "ISC", "dependencies": { "bcryptjs": "^2.4.3", "body-parser": "^1.17.2", "express": "^4.15.4", "express-promise-router": "^2.0.0", "joi": "^10.6.0", "jsonwebtoken": "^8.0.0", "mongoose": "^4.11.10", "morgan": "^1.8.2", "nodemon": "^1.12.0", "passport": "^0.4.0", "passport-jwt": "^3.0.0", "passport-local": "^1.0.0" } }
Now you can install the dependencies by running:
npm install
You can go grab a cup of coffee as npm does its magic; you'll need it for this ride!
Create a new file called app.js. In this file, you will require some packages and do a bit of setup. Here is how it should look.
#app.js // 1 const express = require('express') const morgan = require('morgan') const bodyParser = require('body-parser') const mongoose = require('mongoose') const routes = require('./routes/users') // 2 mongoose.Promise = global.Promise mongoose.connect('mongodb://localhost:27017/api-auth') const app = express() // 3 app.use(morgan('dev')) app.use(bodyParser.json()) // 4 app.use('/users', routes) // 5 const port = process.env.PORT || 3000 app.listen(port) console.log(`Server listening at ${port}`)
This imports all dependencies you installed using NPM. Here you are requiring express, morgan, body-parser, and mongoose. Morgan is an HTTP logger for Node.js. Here, morgan will be used to log HTTP requests to your console. So you see something like this when requests are made: POST /users/signin 401 183.635 ms - -. You also require your routes (which will be created soon) and set it to routes.
Here you are setting mongoose to make use of ES6 promises.
Set up morgan and body-parser middleware. Body-parser makes incoming requests available in your req.body property.
Set up routes. With this, whenever a request is made to /users, the routes file which you required above and set to routes will be used.
You set port to the port of your environment or 3000 and then pass it to the listen function which is called on the app to start up your server. When the server starts, a log is sent to the console to show that the server has started.
It's time to get our model up and running.
Map Out the User Model
Your User model will do a few things:
Create a user schema.
Hash the user password.
Validate the password.
Time to see what that should look like in real code. Create a folder called models, and in the folder create a new file called user.js. The first thing you want to do is require the dependencies you will be making use of.
The dependencies you will need here include mongoose and bcryptjs.
You will need bcryptjs for the hashing of a user password. We will come to that, but for now just require the dependencies like so.
#models/user.js const mongoose = require('mongoose') const bcrypt = require('bcryptjs')
With that out of the way, you want to create your user schema. This is where mongoose comes in handy. Your schema will map to a MongoDB collection, defining how each document within the collection should be shaped. Here is how the schema for your current model should be structured.
#models/user.js ... const userSchema = new mongoose.Schema({ email: { type: String, required: true, unique: true, lowercase: true }, password: { type: String, required: true } })
In the above, you have just two fields: email and password. You are making both fields a type of String, and requiring them. The email also has an option of unique, as you will not want to different users signing up with the same email, and it is also important that the email is in lowercase.
The next part of your model will handle the hashing of the user password.
#models/user.js ... userSchema.pre('save', async function (next) { try { const salt = await bcrypt.genSalt(10) const passwordhash = await bcrypt.hash(this.password, salt) this.password = passwordhash next() } catch (error) { next(error) } })
The code above makes of bcryptjs to generate a salt. You also use bcryptjs to hash the user password by passing in the user's password and the salt you just generated. The newly hashed password gets stored as the password for the user. The pre hook function ensures this happens before a new record of the user is saved to the database. When the password has been successfully hashed, control is handed to the next middleware using the next() function, else an error is thrown.
Finally, you need to validate user password. This comes in handy when a user wants to sign in, unlike the above which happens for signing up.
In this part, you need to ensure a user who wants to sign in is rightly authenticated. So you create an instance method called isValidPassword(). In this method, you pass in the password the user entered and compare it with the password attributed to that user. The user is found using the email address s/he entered; you will see how this is handled soon. A new error is thrown if one is encountered.
#models/user.js ... userSchema.methods.isValidPassword = async function (newPassword) { try { return await bcrypt.compare(newPassword, this.password) } catch (error) { throw new Error(error) } } module.exports = mongoose.model('User', userSchema)
When that is all set and done, it is important you export the file as a module so it can be rightly required.
Up and Running With Passport
Passport provides a simple way to authenticate requests in Node.js. These requests go through what are called strategies. In this tutorial, you will implement two strategies.
Go ahead and create a file called passport.js in your working directory. Here is what mine looks like.
#passport.js // 1 const passport = require('passport') const JwtStrategy = require('passport-jwt').Strategy const { ExtractJwt } = require('passport-jwt') const LocalStrategy = require('passport-local').Strategy const { JWT_SECRET } = require('./config/index') const User = require('./models/user') // 2 passport.use(new JwtStrategy({ jwtFromRequest: ExtractJwt.fromHeader('authorization'), secretOrKey: JWT_SECRET }, async (payload, done) => { try { const user = User.findById(payload.sub) if (!user) { return done(null, false) } done(null, user) } catch(err) { done(err, false) } })) // 3 passport.use(new LocalStrategy({ usernameField: 'email' }, async (email, password, done) => { try { const user = await User.findOne({ email }) if (!user) { return done(null, false) } const isMatch = await user.isValidPassword(password) if (!isMatch) { return done(null, false) } done(null, user) } catch (error) { done(error, false) } }))
Require dependencies installed using NPM.
Creates a new instance of JwtStrategy. This object receives two important arguments: secretOrKey and jwtFromRequest. The secretOrKey will be the JWT secret key which you will create shortly. jwtFromRequest defines the token that will be sent in the request. In the above, the token will be extracted from the header of the request. Next, you do a validation to look for the right user, and an error gets thrown if the user is not found.
Create a new instance of LocalStrategy. By default, the LocalStrategy uses only the username and password parameters. Since you are making use of email, you have to set the usernameField to email. You use the email to find the user, and when the user is found, the isValidPassword() function which you created in the user model gets called. This method compares the password entered with the one stored in the database. The comparison is done using the bcryptjs compared method. Errors are thrown if any is encountered, else the user is returned.
Before you jump to setting your controllers and routes, you need to create the JWT secret key mentioned above. Create a new folder called config, and a file inside called index.js. You can make the file look like this.
#config/index.js module.exports = { JWT_SECRET: 'apiauthentication' }
User Controllers
The user controller gets called whenever a request is made to your routes. Here is how it should look.
#controllers/users.js // 1 const JWT = require('jsonwebtoken') const User = require('../models/user') const { JWT_SECRET } = require('../config/index') // 2 signToken = ((user) => { return JWT.sign({ iss: 'ApiAuth', sub: user.id, iat: new Date().getTime(), exp: new Date().setDate(new Date().getDate() + 1) }, JWT_SECRET) }) module.exports = { // 3 signup: async (req, res, next) => { console.log('UsersController.signup() called') const { email, password } = req.value.body const foundUser = await User.findOne({ email }) if (foundUser) { return res.status(403).json({ error: 'Email is already in use' }) } const newUser = new User({ email, password }) await newUser.save() const token = signToken(newUser) res.status(200).json({ token }) }, // 4 signin: async (req, res, next) => { const token = signToken(req.user) res.status(200).json({ token }) }, // 5 secret: async (req, res, next) => { res.json({ secret: "resource" }); } }
Require dependencies.
Here you are creating a new token for the user. To create the token, you need to create the payload, which contains the claims. Here you set the issuer, subject, expiration, and issued at. The creation of this token is saved in a function called signToken().
This is the sign-up action that gets called when creating a new user. The email and password are obtained from the body of the request. You need to check if a user with the same email exists, to ensure two users are not signed up with same email address. When that has been verified, the signToken() function gets called with the new user as an argument to create a new token.
This action handles the signing in of users. Here you simply pass in the user who is trying to sign in to the signToken() function that creates a new token.
You are using this function for a secret route that can only be accessed by users who have been authenticated.
Setting Up Routes
Before you create the main routes for your application, you will first create a route helper. Go ahead and create a new folder called helpers, and a file called routeHelpers.js. Here is how it should look.
#helpers/routeHelpers.js const Joi = require('joi') module.exports = { validateBody: (schema) => { return (req, res, next) => { const result = Joi.validate(req.body, schema) if (result.error) { return res.status(400).json(result.error) } if (!req.value) { req.value = {} } req.value['body'] = result.value next() } }, schemas: { authSchema: Joi.object().keys({ email: Joi.string().email().required(), password: Joi.string().required() }) } }
Here you are validating the body of requests sent by users. This will ensure that users enter the right details when signing up or in. The details to be validated are obtained from req.body.
The routes of your application will take this format.
#routes/users.js const express = require('express') const router = require('express-promise-router')() const passport = require('passport') const passportConf = require('../passport') const { validateBody, schemas } = require('../helpers/routeHelpers') const UsersController = require('../controllers/users') router.route('/signup') .post(validateBody(schemas.authSchema), UsersController.signup) router.route('/signin') .post(validateBody(schemas.authSchema), passport.authenticate('local', { session: false }), UsersController.signin) router.route('/secret') .get(passport.authenticate('jwt', { session: false }), UsersController.secret) module.exports = router
Save it in routes/users.js. In the above, you are authenticating each request, and then calling the respective controller action.
Now you can start up your server by running:
npm run start-dev
Open up postman and play around with your newly created API.
Conclusion
You can go further to integrate new features to the API. A simple Book API with CRUD actions with routes that need to be authenticated will do. In the tutorial, you learned how to build a fully fledged authenticated API.
If you’re looking for additional JavaScript resources to study or to use in your work, check out what we have available in the Envato marketplace.
by Chinedu Izuchukwu via Envato Tuts+ Code http://ift.tt/2xk3siq
6 notes
·
View notes
Text
Simple Identity In Asp.Net Core Tutorial from scratch part 1
New Post has been published on https://is.gd/d7mlXc
Simple Identity In Asp.Net Core Tutorial from scratch part 1

Asp.net core Identity used for a security-related feature in your asp.net core application.
Asp.net core identity is a membership system that adds a login functionality to our app.
It is a built-in membership system.
Uses of Asp.net core Identity
Is used to create, update, read and delete user accounts
Authentication and authorization
Is also used for password recovery
Two-factor authentication with SMS
Asp.net core Identity supports external login like Facebook, Google and Microsoft
Steps for Identity In Asp.Net Core
Step 1
Need to add IdentityDBContext instead of DbContext means In Your application DbContext class must inherits from IdentityDbContext class.

Now our code becomes
public class OurDbContext:IdentityDbContext public DbSet<Student> Students get; set; public OurDbContext(DbContextOptions<OurDbContext> options):base(options) protected override void OnModelCreating(ModelBuilder modelBuilder) modelBuilder.Seed();
The identityDbContext is present in namespace of Microsoft.AspNetCore.Identity.EntityFrameworkCore;
Now Why we inherit from IdentityDbContext instead of DbContext because it has all the DbSet properties that are used for managing the Identity-related table in underlying database.
Now we can see the inner details of the IdentityDbContext class you can see
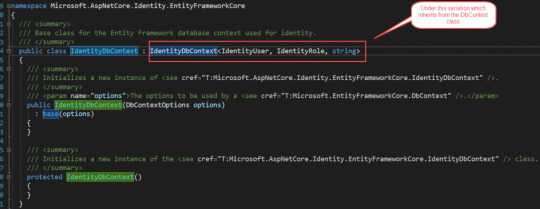
Our application works because it ultimately inherits from DbContext class.
Step 2:
Add identity services to our application. The services which are required are added to a startup.cs class file under the configureservices method.
services.AddIdentity<IdentityUser, IdentityRole>();
Now our configureservices method in a startup.cs class looks like below
public void ConfigureServices(IServiceCollection services) services.AddMvc(); services.AddTransient<IStudentRepository,StudentRepo>(); services.AddDbContextPool<OurDbContext>(options => options.UseSqlServer(_config.GetConnectionString("StudentDBString"))); services.AddIdentity<IdentityUser, IdentityRole>(); services.AddScoped<IStudentRepository, SQLStudentRepository>();
In this AddIdentity method first we pass IdentityUser as the first parameter so why we use this, because if you go to definition of this class you will find it inherits from IdentityUser<string> class and if you go further it will to that class you will know it uses the field like email, username and many more like below which is used to manage the properties of registered user class.
using System; namespace Microsoft.AspNetCore.Identity /// <summary>Represents a user in the identity system</summary> /// <typeparam name="TKey">The type used for the primary key for the user.</typeparam> public class IdentityUser<TKey> where TKey : IEquatable<TKey> /// <summary> /// Initializes a new instance of <see cref="T:Microsoft.AspNetCore.Identity.IdentityUser`1" />. /// </summary> public IdentityUser() /// <summary> /// Initializes a new instance of <see cref="T:Microsoft.AspNetCore.Identity.IdentityUser`1" />. /// </summary> /// <param name="userName">The user name.</param> public IdentityUser(string userName) : this() this.UserName = userName; /// <summary>Gets or sets the primary key for this user.</summary> [PersonalData] public virtual TKey Id get; set; /// <summary>Gets or sets the user name for this user.</summary> [ProtectedPersonalData] public virtual string UserName get; set; /// <summary>Gets or sets the normalized user name for this user.</summary> public virtual string NormalizedUserName get; set; /// <summary>Gets or sets the email address for this user.</summary> [ProtectedPersonalData] public virtual string Email get; set; /// <summary> /// Gets or sets the normalized email address for this user. /// </summary> public virtual string NormalizedEmail get; set; /// <summary> /// Gets or sets a flag indicating if a user has confirmed their email address. /// </summary> /// <value>True if the email address has been confirmed, otherwise false.</value> [PersonalData] public virtual bool EmailConfirmed get; set; /// <summary> /// Gets or sets a salted and hashed representation of the password for this user. /// </summary> public virtual string PasswordHash get; set; /// <summary> /// A random value that must change whenever a users credentials change (password changed, login removed) /// </summary> public virtual string SecurityStamp get; set; /// <summary> /// A random value that must change whenever a user is persisted to the store /// </summary> public virtual string ConcurrencyStamp get; set; = Guid.NewGuid().ToString(); /// <summary>Gets or sets a telephone number for the user.</summary> [ProtectedPersonalData] public virtual string PhoneNumber get; set; /// <summary> /// Gets or sets a flag indicating if a user has confirmed their telephone address. /// </summary> /// <value>True if the telephone number has been confirmed, otherwise false.</value> [PersonalData] public virtual bool PhoneNumberConfirmed get; set; /// <summary> /// Gets or sets a flag indicating if two factor authentication is enabled for this user. /// </summary> /// <value>True if 2fa is enabled, otherwise false.</value> [PersonalData] public virtual bool TwoFactorEnabled get; set; /// <summary> /// Gets or sets the date and time, in UTC, when any user lockout ends. /// </summary> /// <remarks>A value in the past means the user is not locked out.</remarks> public virtual DateTimeOffset? LockoutEnd get; set; /// <summary> /// Gets or sets a flag indicating if the user could be locked out. /// </summary> /// <value>True if the user could be locked out, otherwise false.</value> public virtual bool LockoutEnabled get; set; /// <summary> /// Gets or sets the number of failed login attempts for the current user. /// </summary> public virtual int AccessFailedCount get; set; /// <summary>Returns the username for this user.</summary> public override string ToString() return this.UserName;
So whatever properties are present in this class you have the corresponding column to underlying table.
But if you see in this class we have an only limited set of properties but in real-time scenario we might require some different fields to add these fields we can create another custom class and make sure that it is inherited from this IdentityUser class.
So in that class we can include additional properties which we required. And then remove this identityuser class from that configureservice AddIdentity method and add our new added class in that place.

IdentityRole: this is another built-in class provided by asp.net core identity system and it is used to manage user roles in the system.
AddEntityFrameworkStores: this is used for accessing or retrieving data from the underlying database table.
services.AddIdentity<IdentityUser, IdentityRole>() .AddEntityFrameworkStores<OurDbContext>();

Step 3:
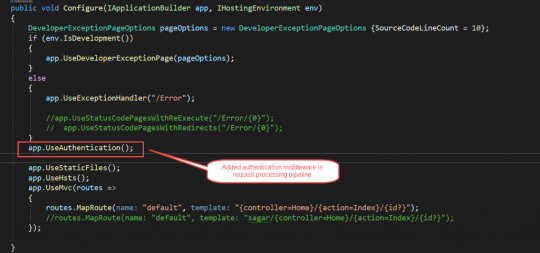
Add authentication middleware
To add authentication middleware in processing pipeline you need to add UseAuthentication extension in Configure method in configure service method in the startup.cs file. And also remember to add this before MVC middleware.
Now our code looks like this below
public void Configure(IApplicationBuilder app, IHostingEnvironment env) DeveloperExceptionPageOptions pageOptions = new DeveloperExceptionPageOptions SourceCodeLineCount = 10; if (env.IsDevelopment()) app.UseDeveloperExceptionPage(pageOptions); else app.UseExceptionHandler("/Error"); //app.UseStatusCodePagesWithReExecute("/Error/0"); // app.UseStatusCodePagesWithRedirects("/Error/0"); app.UseAuthentication(); app.UseStaticFiles(); app.UseHsts(); app.UseMvc(routes => routes.MapRoute(name: "default", template: "controller=Home/action=Index/id?"); //routes.MapRoute(name: "default", template: "sagar/controller=Home/action=Index/id?"); );
Step 4:
Now in this, we have added IdentityDbContext in our DB context class so we need to add migration command to use for migration.
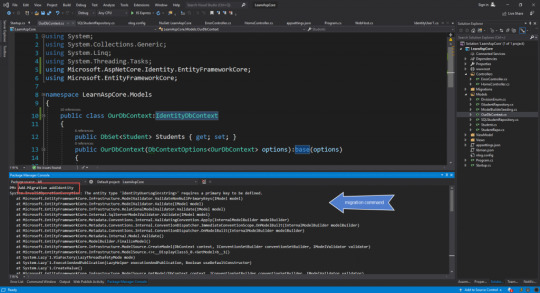
But doing this it will cause an error,
The entity type ‘IdentityUserLogin<string>’ requires a primary key to be defined.

The root cause of error in below class
public class OurDbContext:IdentityDbContext public DbSet<Student> Students get; set; public OurDbContext(DbContextOptions<OurDbContext> options):base(options) protected override void OnModelCreating(ModelBuilder modelBuilder) modelBuilder.Seed();
In this OnModelCreating method, we need to call base class OnModelCreating method why because keys are mapped here and we need to call this for that we use base keyword to access this and our code becomes.
public class OurDbContext:IdentityDbContext public DbSet<Student> Students get; set; public OurDbContext(DbContextOptions<OurDbContext> options):base(options) protected override void OnModelCreating(ModelBuilder modelBuilder) base.OnModelCreating(modelBuilder); modelBuilder.Seed();

Now again we run Migration command which is below in Package Manager Console
Add-Migration addIdentity

Below is the migration code snippet

After this, you need to fire another command to update the database
Update-database
Using this command we will able to add required tables in our database and after executing this command below tables were added in the database
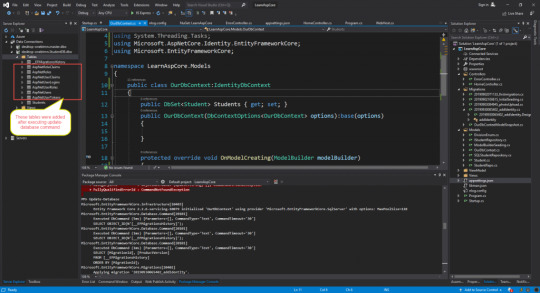
If you see the properties present in IdentityUser class were matching with the columns in AspNetUserLogins table see below image

For Entity Framework Part 1 Visit Link
For Entity Framework Part 2 Visit Link
For Entity Framework Code First Migration Visit Link
0 notes
Video
Building a phishing app from html and web hosting #networksecurity #passwordhasher #android #cybersecurityawareness https://www.instagram.com/p/BnDL_XjleLD/?utm_source=ig_tumblr_share&igshid=1korhr28gxp2p
0 notes
Text
Basic iOS Security: Keychain and Hashing
Update note: This tutorial has been updated for Xcode 9.2, Swift 4, iOS 11 and the iPhone X by Ryan Ackermann. The original tutorial was written by Chris Lowe.
One of the most important aspects of software development also happens to be considered one of the most mysterious and scary (and is thus avoided like the plague): application security. Users expect their applications to run correctly, keep their information private, and protect that information from potential threats.
In this tutorial, you will dive into the basics of iOS security. You’ll work with some basic cryptographic hashing methods to securely store user input in the iOS keychain – keeping your users’ data private and protected.
Apple has several APIs that will help keep your applications secure, and you’ll explore these while working with the keychain. In addition, you’ll use CryptoSwift – a well-reviewed, open-source library that implements cryptographic algorithms.
Getting Started
Use the Download Materials button at the top or bottom of this tutorial to download the starter project.
The sample app allows users to log in and see photos of their friends. Most of the app is already connected for you; your job is to secure the app.
Once you unzip the download materials, be sure to open Friendvatars.xcworkspace to properly include all the CocoaPod dependencies. Build and run to see that the app opens to a login screen:
Currently, nothing happens when you tap Sign In. This is because there isn’t a way to save the user’s credentials. That’s what you’re going to add first.
Why Security is Important
Before you dive into the code, you should understand why security in your application is necessary. The security of your application is especially critical if you’re storing private user data such as emails, passwords, or bank account information.
Why does Apple take security so seriously? From the photos you take, to the number of steps that were achieved during the day, your iPhone stores a lot of personal data. Keeping this data safe is very important.
Who are the attackers in the iOS ecosystem, and what do they want? An attacker might be a criminal, a business competitor, even a friend or relative. Not all attackers want the same thing. Some might want to cause damage or corrupt information, while others might want to see what presents they are getting for their birthdays.
It’s your job to make sure that the data being held by your application is protected against potential threats. Fortunately, Apple has built many strong APIs that simplify this task.
Apple’s Keychain
One of the most important security elements for Apple developers is the iOS Keychain, which is a specialized database for storing metadata and sensitive information. Using Keychain is the best practice for storing small pieces of data that are critical to your app such as secrets and passwords.
Why use the Keychain over simpler solutions? Wouldn’t storing the base-64 encoding the user’s password in UserDefaults be enough? Definitely not! It’s trivial for an attacker to recover a password stored that way. Security is difficult, and attempting your own custom solution is not a good idea. Even if your app is not for a financial institution, storing private user input should not be taken lightly.
Interacting with the Keychain directly is complicated, especially in Swift. You have to use the Security framework that is mostly written in C.
Fortunately, you can avoid using these low level APIs by borrowing a Swift wrapper from Apple’s sample code GenericKeychain. KeychainPasswordItem provides an easy-to-use Swift interface to the Keychain and is already included in the starter project.
Time to dive into code!
Using the Keychain
Open AuthViewController.swift. This view controller is responsible for the login form you saw initially. If you scroll down to the Actions section, you’ll notice that signInButtonPressed isn’t doing anything. Time to change that. Add the following to the bottom of the Helpers section:
private func signIn() { // 1 view.endEditing(true) // 2 guard let email = emailField.text, email.count > 0 else { return } guard let password = passwordField.text, password.count > 0 else { return } // 3 let name = UIDevice.current.name let user = User(name: name, email: email) }
Here’s what is going on:
You dismiss the keyboard to confirm that the user’s action did something.
You take the email and password the user input. If either is zero length, then you don’t want to continue. In a real world application, you should show the user an error here as well.
You assign a name to the user which, for purposes of this tutorial, you take from the device name.
Note: You can change the name of your Mac (used by the sim) by going to System Preferences ▸ Sharing and changing the computer’s name at the top. Additionally you can change your iPhone’s name by going to Settings ▸ General ▸ About ▸ Name.
Now add the following in signInButtonPressed:
signIn()
This calls your signIn method when signInButtonPressed is triggered.
Find textFieldShouldReturn and replace the break under case TextFieldTag.password.rawValue with:
signIn()
Now signIn() is called when the user taps return on the keyboard while the password field has focus and contains text.
signIn() is not complete yet. You still need to store the user object as well as the password. You’ll implement this in a helper class.
Open AuthController.swift, which is a static class that will hold the logic related to authentication for this app.
First, add the following at the top of the file above isSignedIn :
static let serviceName = "FriendvatarsService"
This defines the service name that will be used to identify the app’s data in the Keychain. To use this constant, create a signIn method at the end of the class like so:
class func signIn(_ user: User, password: String) throws { try KeychainPasswordItem(service: serviceName, account: user.email).savePassword(password) Settings.currentUser = user }
This method stores the user’s login information securely in the Keychain. It creates a KeychainPasswordItem with the service name you defined along with a unique identifier (account).
For this application, the user’s email is used as the identifier for the Keychain, but other examples could be a user ID or username that is unique. Finally, Settings.currentUser is set with user – this is stored in UserDefaults.
This method should not be considered complete! Storing the user’s password directly isn’t the best practice. For example, if an attacker compromised Apple’s Keychain, he could read your user’s passwords in plain text. A better solution is to store a hash built from the user’s identity.
At the top of AuthController.swift add the following below the Foundation import:
import CryptoSwift
CryptoSwift is one of the most popular collections of many standard cryptographic algorithms written in Swift. Cryptography is difficult and needs to be done correctly to be useful. Using a popular library for security means you don’t have to be responsible for the implementation of standardized hashing functions. The best cryptography is open to the public for review.
Note: Apple’s CommonCrypto framework provides many useful hashing functions for you, but it’s not easy to interact with it in Swift. This is why for this tutorial we opted for the CryptoSwift library.
Next add the following above signIn:
class func passwordHash(from email: String, password: String) -> String { let salt = "x4vV8bGgqqmQwgCoyXFQj+(o.nUNQhVP7ND" return "\(password).\(email).\(salt)".sha256() }
This method takes an email and password, and returns a hashed string. The salt is a unique string used to make common passwords, well, uncommon. sha256() is a CryptoSwift method that completes a type of SHA-2 hash on your input string.
In the example from earlier, an attacker who compromised Keychain would find this hash. The attacker might create a table of commonly used passwords and their hashes to compare against this hash. If you hashed just the user’s input without salting, and the password existed in the attackers hash table, the password would be compromised.
Incorporating a salt increases the complexity of the attack. Furthermore, you combine the user’s email and password with the salt to create a hash that won’t be easily cracked.
Note: For authentication with a server backend, the app and server would share the same salt. This allows them to build hashes in the same way and compare the two hashes to verify identity.
Back in signIn(_:password:), replace the line that calls savePassword with this:
let finalHash = passwordHash(from: user.email, password: password) try KeychainPasswordItem(service: serviceName, account: user.email).savePassword(finalHash)
signIn now stores a strong hash, rather than a raw password. Now it’s time to add this to the view controller.
Head back to AuthViewController.swift and add the following to the bottom of signIn():
do { try AuthController.signIn(user, password: password) } catch { print("Error signing in: \(error.localizedDescription)") }
Although this will store the user and save a hashed password, it’ll take a little more for the app to be signed in. AppController.swift needs a way to be notified when authentication changes.
You may have noticed that AuthController.swift has a static variable named isSignedIn. Currently, it’s always returning false even if the user signs in.
In AuthController.swift, update isSignedIn to:
static var isSignedIn: Bool { // 1 guard let currentUser = Settings.currentUser else { return false } do { // 2 let password = try KeychainPasswordItem(service: serviceName, account: currentUser.email).readPassword() return password.count > 0 } catch { return false } }
Here’s what’s going on:
Right away, you check the current user stored in UserDefaults. If no user exists, there won’t be an identifier to lookup the password hash from the Keychain, so you indicate they are not signed in.
You read the password hash from the Keychain, and if a password exists and isn’t blank, the user is considered logged in.
Now handleAuthState in AppController.swift will work correctly, but it would take a fresh app launch after signing in to update the UI correctly. Instead, a good way to notify the app of a state change such as authentication is through notifications.
Add the following to the bottom of AuthController.swift:
extension Notification.Name { static let loginStatusChanged = Notification.Name("com.razeware.auth.changed") }
It’s good practice to use a reverse domain identifier when composing custom notifications, which is usually derived from the app’s bundle identifier. Using a unique identifier can help when debugging so anything related to your notification stands out from other frameworks mentioned in your logs.
To use this custom notification name, add the following to the bottom of signIn(_:password:):
NotificationCenter.default.post(name: .loginStatusChanged, object: nil)
This will post a notification that can be observed by other parts of the application.
Inside of AppController.swift, add an init method above show(in:):
init() { NotificationCenter.default.addObserver( self, selector: #selector(handleAuthState), name: .loginStatusChanged, object: nil ) }
This will register AppController as an observer of your login notification. It will call handleAuthState when triggered.
Build and run. After signing in using any email and password combination, you’ll see the a list of friends:
You’ll notice that there aren’t any avatars, just names of friends. That’s not very pleasing to look at. You should probably sign out and forget about this unfinished app. Oh come on, even the sign out button doesn’t work. Time to leave a 1 star review and really give it to the developer!
Signing in works great, but there isn’t a way to sign out of the app. This is actually pretty easy to achieve, since there’s a notification that will signal any authentication state change.
Head back to AuthController.swift and add the following method below signIn(_:password:):
class func signOut() throws { // 1 guard let currentUser = Settings.currentUser else { return } // 2 try KeychainPasswordItem(service: serviceName, account: currentUser.email).deleteItem() // 3 Settings.currentUser = nil NotificationCenter.default.post(name: .loginStatusChanged, object: nil) }
This one is fairly simple but here’s the breakdown:
You check if you’ve stored a current user, and bail out early if you haven’t.
You delete the password hash from the Keychain.
You clear the user object and post the notification.
To wire this up, jump over to FriendsViewController.swift and add the following to the currently empty signOut:
try? AuthController.signOut()
Your new method is called to clear out the signed in user’s data when the Sign Out button is selected.
It’s a good idea to handle errors in your applications, but for the sake of this tutorial you’ll just ignore any error.
Build and run, then tap the Sign Out button.
Now you have a complete example of authentication working in an app!
Hashing
You did a great job getting authentication set up! However the fun isn’t over yet. Now you’ll address that blank space in front of the names in the friends view.
In FriendsViewController.swift, there is a list of User model objects displayed. You also want to show avatar images for each user in the view. Since there are only two attributes on the User, a name and email, how are you supposed to show an image?
It turns out there is a service that takes an email address and associates it with an avatar image: Gravatar! If you haven’t heard of Gravatar before, it’s commonly used on blogs and forums to globally associate an email address with an avatar. This simplifies things so that users don’t have to upload a new avatar to every forum or site they join.
Each of these users has an avatar associated with their email already. So the only thing you have to do is make a request to Gravatar and get their images. To do so, you’ll create a MD5 hash of their email to build the request URL.
If you look at the docs on Gravatar’s site, you’ll see you need a hashed email address to build a request. This will be a piece of cake since you can leverage CryptoSwift. Add the following, in place of the comment about Gravatar, in tableView(_:cellForRowAt:):
// 1 let emailHash = user.email.trimmingCharacters(in: .whitespacesAndNewlines) .lowercased() .md5() // 2 if let url = URL(string: "https://www.gravatar.com/avatar/" + emailHash) { URLSession.shared.dataTask(with: url) { data, response, error in guard let data = data, let image = UIImage(data: data) else { return } // 3 self.imageCache.setObject(image, forKey: user.email as NSString) DispatchQueue.main.async { // 4 self.tableView.reloadRows(at: [indexPath], with: .automatic) } }.resume() }
Here’s the breakdown:
First you normalize the email according to Gravatar’s docs, then you create a MD5 hash.
You construct the Gravatar URL and URLSession. You load a UIImage from the returned data.
You cache the image to avoid repeat fetches for an email address.
You reload the row in the table view so the avatar image shows up.
Build and run. Now you can view your friends’ avatar images and names:
Note: If your email returns the default white on blue G, then head over to Gravatar’s site and upload your own avatar and join your friends!
Where to Go From Here?
You now have a complete app the handles basic iOS security and authentication, and you can view avatars powered by Gravatar. You learned about the importance of security, about the iOS keychain and some best practices like storing hashes instead of plain text values. Hopefully, you also had a great time learning about this!
You can download the completed version of the project using the Download Materials button at the top or bottom of this tutorial.
If you’re interested in more ways to secure your applications, learn to use biometric sensors on the latest Apple products in this tutorial.
You can also read more about Apple’s Security framework if you want to really dig into the framework.
Finally, be sure to explore more security algorithms provided by CryptoSwift.
I hope you enjoyed this tutorial! If you have any questions or comments, please join the discussion below!
The post Basic iOS Security: Keychain and Hashing appeared first on Ray Wenderlich.
Basic iOS Security: Keychain and Hashing published first on https://medium.com/@koresol
0 notes
Text
Cannot save a customer that exists
When running this simple code to save an existing customer:
$customer = $this->customerRepository->get($row['email'], $this->storeManager->getWebsite()->getId()); $customer->setCustomAttribute('custom_attr', 'value'); $this->customerRepository->save($customer);
I was presented with the error:
Error: A customer with the same email already exists in an associated website.
And just to be clear; that customer was in the website specified by that ID. It was the correct ID.
I had to double-check to make sure I was using the right method to update a customer. Looking at the Customer API, it states:
/** * Create or update a customer. * * @param \Magento\Customer\Api\Data\CustomerInterface $customer * @param string $passwordHash * @return \Magento\Customer\Api\Data\CustomerInterface * @throws \Magento\Framework\Exception\InputException If bad input is provided * @throws \Magento\Framework\Exception\State\InputMismatchException If the provided email is already used * @throws \Magento\Framework\Exception\LocalizedException */ public function save(\Magento\Customer\Api\Data\CustomerInterface $customer, $passwordHash = null);
Why did I get that error message? Well, it turns out you can’t update a “system attribute” (check the “is_system” for the attribute in “customer_eav_attribute”), and this attribute had been created incorrectly as a system attribute.
Maybe I’m crazy, but I would have saved a some debugging time if the error message was, “You cannot update a system attribute using the Customer API. You are attempting to do that inserting a customer.”
0 notes