#Press Fit Connectors
Explore tagged Tumblr posts
Visit Tumblr Blog
Explore Tumblr blogs with no restrictions, modern design and the best experience.
Last Seen Tumblr Blogs


Fun Fact
Tumblr has 411 employees.
Text
Press Fit Connectors: Enabling Reliable and Durable Connections in Electronics Manufacturing

Automating Connections With Press Fit Technology Press connectors provide a simple yet robust method for creating secure electrical connections through automated assembly processes. By utilizing a press or insertion tool, press connectors can be rapidly installed with minimal labor costs compared to traditional wiring methods. This makes them well-suited for high-volume manufacturing environments where quick and reliable connections are essential. Press connectors work by using a mating male and female connection design where the male pin is pressed or inserted into the female housing. The housing features a series of contact beams that flex inward during insertion of the pin. Once the pin is fully seated, the contact beams resiliently grip the pin to hold it securely in place without the need for soldering or crimping. Some key advantages of this press-in joining technology include: - Speed of installation. Press fit connectors can typically be installed in less than a second using automated insertion tools, significantly increasing throughput compared to hand-wiring methods. This reduces assembly time and costs. - Secure, vibration-resistant connections. When fully seated, press fit connections experience contacting pressures of around 40 pounds per square inch, ensuring a tight grip that withstands shock, vibration, and thermal cycling better than loose wire connections. - No heat or complex tooling required. Press Fit Connectorsutilize cold metal-to-metal joining, avoiding the use of soldering irons or crimping tools and heat that could damage sensitive components. Simple automated press tools suffice. - Repeatable connections. The consistent mechanical joining process of press fits provides highly repeatable connections from one unit to the next, improving product quality and reliability compared to hand-wired versions. - Ease of inspection. Fully seated press fit connections are self-locking so visual inspection confirms proper installation. Any missing or loose connections are obvious. - Compatibility with automated assembly. The simple press-in action is easily implemented using pick-and-place robots, conveyor-based presses, or other automated assembly equipment suited to high-volume manufacturing environments. Variations in Press Fit Designs While the general principle of press connectors remains the same, connector manufacturers have developed various innovative designs optimized for different application needs. Some common variations include: - Board-to-board connectors. Often used to make connections between circuit boards stacked vertically in enclosures. Board-to-board press fits feature male pins on one board that press directly into plated-through holes on the mating board below. - Box-header connectors. House receptacles or sockets in an insulating box or header, commonly used for applications like motor controls that need to break out many individual connections. The box speeds assembly and adds grip retention. - Power connectors. Larger press fit connectors may be designed to handle heavier loads like battery connections. Overmolded plastic housings provide strain relief while metal inserts securely join high-current power pins. - Compact right-angle connectors. Useful in space-constrained designs, right-angle press fits allow headers and receptacles to mate vertically instead of inserting straight inline. This saves valuable board area. - Water-resistant connectors. Gaskets and seals incorporated into the connector housing design provide an extra level of protection against moisture ingress for applications demanding an IP rating. Get more insights on Press Fit Connectors
Priya Pandey is a dynamic and passionate editor with over three years of expertise in content editing and proofreading. Holding a bachelor's degree in biotechnology, Priya has a knack for making the content engaging. Her diverse portfolio includes editing documents across different industries, including food and beverages, information and technology, healthcare, chemical and materials, etc. Priya's meticulous attention to detail and commitment to excellence make her an invaluable asset in the world of content creation and refinement.
(LinkedIn- https://www.linkedin.com/in/priya-pandey-8417a8173/)
#Press Fit Connectors#PCB#Electronic Components#Mechanical Assembly#Solderless#Reliability#High Retention Force#Automotive#Aerospace#Telecommunications
0 notes
Text
pexetesal
Welcome to PexEtesal - Your Premier Destination for PEX-AL-PEX Pipe Fittings
At PexEtesal, accessible at www.pexetesal.ir, we specialize in the production and distribution of high-quality brass fittings specifically designed for PEX-AL-PEX pipes. Our extensive range includes press fittings, couplings, and threaded fittings, tailored to meet diverse plumbing, heating, and cooling needs.
Located in Hamedan, we pride ourselves on delivering reliable and cost-effective solutions that simplify installations for both hot and cold water systems, as well as complete plumbing refurbishments. Our products are available in various sizes to accommodate any project requirements.
Discover the superior quality and durability of our PEX-AL-PEX pipe fittings and take advantage of our easy purchasing options. For bulk orders and more information, please visit our website: www.pexetesal.ir.
Join the growing network of satisfied customers who have chosen PexEtesal for their plumbing and heating solutions.
#اتصالات PEX-AL-PEX#اتصالات لولهکشی برنجی#راهحلهای لولهکشی پنج لایه#اتصالات پرسی و کوپلی#کانکتورهای رزوهای#محصولات لولهکشی مطمئن#تجهیزات لولهکشی همدان#اتصالات گرمایش و سرمایش#پخش عمده PEX-AL-PEX#اتصالات برنجی مقرونبهصرفه#PEX-AL-PEX fittings#Brass pipe fittings#PEX-AL-PEX plumbing solutions#Press and coupling fittings#Threaded pipe connectors#Reliable plumbing products#Hamedan plumbing supplies#Heating and cooling fittings#Wholesale PEX-AL-PEX#Affordable brass connections
1 note
·
View note
Text
StCMO Lore | Part 2
I changed Watchdog Ford's motivation for going into the multiverse and I think this narrative is far more fitting, with the added benefit of being angsty as all hell.
Part 1 | Part 2 | Part 3 | Part 4

Stanford Pines began his obsessive search for a solution soon after, determined to undo what had been done. But Death could not be reversed, nor could it be threatened or bribed. So Stanley Pines remained in Death’s tender embrace and, in his growing desperation, Stanford Pines began to explore other means of getting his brother back.
He left no stone unturned and eventually stumbled across the multiverse theory. A theory which suggests that our universe is not the only one, and that there may be countless other universes existing alongside it, each potentially with its own laws of physics and properties, essentially creating a "multiverse" where our universe is just one part of a much larger cosmic structure.
An idea began to form.
After getting his first PhD in evolutionary biology, Stanford Pines immediately pursued a degree in physics. In the meantime, Fiddleford found a job and bought an apartment near campus so he could look after Ford, who had begun to neglect both his health and hygiene in favor of pouring all his time and attention into turning his idea into reality.
When Stanford graduated early yet again, they moved to Gravity Falls together, where the barrier between Dimensions was weaker, and began to build a portal that could tear a hole between the two. Fiddleford was reluctant, suspecting that Stanford’s intentions were far from innocent or scientific in nature. But Stanford would do it with or without him, so Fiddleford assisted in order to keep him from working himself to death.
Ford also had a side project that he had started working on in college, his premonitions and sensitivity to changes in the universe leading him to experiment with harnessing those frequencies and applying them to his ability to see glimpses of the future in an unconscious state, increasing their strength with an amplifier so he could see into the future whenever and wherever he pleased.
He very nearly rendered himself braindead on multiple occasions.
When Fiddleford found out about Project Prescience, by quite literally walking in on one of Stanford’s tests, he aided Stanford in repurposing a biker helmet in order to implant the amplifier and external neural connectors into the frame. Once activated with a press of a discrete button on the side of the helmet, the system amplified Stanford’s premonitions to visions of future pathways.
Refining the tech takes Stanford and Fiddleford four years, but it’s ready by the time the portal is finished. They test it before Stanford gears up to go through, successfully entering the multiverse in an alternate dimension identical to his own except Gravity Fall was never founded. He stands in the middle of a forest where the Shack would’ve been, using the built-in communication device in his helmet to keep Fiddleford updated.
Stanford returns to his dimension and they shut down the portal, working on a way to shield their dimension from outside forces. Stanford designs a strong spell using unicorn hair to erect a barrier around their dimension, as well as performing a ritual on himself so he can come and go from his dimension as he pleases.
Also, Stanford convinces Fiddleford to build the memory gun by arguing that he could remain anonymous by using it on anyone who discovered his true identity. Unfortunately, Stanford intends to go behind Fiddleford’s back and use it to steal a Stanley from another Dimension. The memory gun still has an addictive quality, but only when it's used on the same person several times, but Stanford usually only has to use it on someone once.
#gravity falls#somebody to call my own au#lore#ford pines#stanford pines#fiddleford mcgucket#writing
83 notes
·
View notes
Text
How to Make: Electronic Wings for Cosplay

Hello Everyone! It's been a while since I last uploaded a written tutorial on here and since I just finished and wore my Dame Aylin cosplay this last weekend it seemed appropriate to jump back in with a tutorial on one of the costume pieces!
Her wings were the star of the show this weekend and I know a lot of people were curious about how I made them! A huge source of knowledge and inspiration behind these wings was this video by Axceleration, I made a few changes to the frame shape and electrical circuitry for mine but her tutorial was a huge stepping stone to give me the confidence to tackle them myself!

Health and Safety:
When working with Sintraboard (as well as other thermoplastics) it is incredibly important you wear a respirator as well as goggles when heating, moulding and cutting it. The fumes this plastic will give off when heated up are no joke! Make sure you're in a well-ventilated space!
Basic tool safety knowledge is also really important! wearing gloves when using power tools can be more dangerous in most situations, so always be aware of where your hands are vs where the tools are. Always cut away from yourself and take things slowly, don't panic.
Electrical safety! You're working with live wires and circuitry! make sure your hands are dry, you aren't touching the bare wires at any point when they are connected to a power source, and if you choose to solder anything, make sure you're wearing heat-proof gloves and a mask in a ventilated space!
Tools
Wire stripper
Screwdriver and wrench
Dremel - I recommend the Dremel 3000 rotary tool personally! Some essential Dremel bits you'll need for this include, a sanding bit, drill bit (smaller or same size as your screws/bolts), and a small/narrow cutting bit. These will usually come with the Dremel!
Heat Gun (A hairdryer will not get hot enough to heat the Sintraboard!!)
Pipe cutter (alternatively you can use a hacksaw for this!)
Hacksaw
Ruler
Scissors (for cutting fabric straps)
Materials
Heat shrink Tubing
2 core electrical wire
switch (you want a three position, six pin switch, like this one, even better if it has the Screws on the pins! otherwise you'll need a soldering kits to solder the wires to the pins.
2x 8AA 12v Battery Holders
2x 12v Linear Actuators (Mine had a stroke length of 100mm)
21.5mm PVC Pipes (I got 2x 3m Lengths)
2x 21.5mm PVC Pipe straight couplers
6mm 8"x12" Sintraboard
Nuts/Bolts/Screws (I used M5 bolts for the base & Actuator connectors and M6 screws to attach the hinges to the pipes! You'll need Washers for every Nut & Bolt!)
Hinges (I used 2.5cm wide hinges that were skinny but long so they would just about fit along the PVC pipe! 3" gate hinges would work!)
50 metre Polythene Jiffy foam roll (in retrospect this was ALOT of foam, you could definitely get away with maybe a 20-30 metre roll! I now have a load leftover XD)
16 AA Batteries (I used 16 and had enough for the whole day with them on, I think They'd probably be enough for another half a day-full day too! but have spares just in case!)
Webbing strap ( I went for grey to match my base suit colour!)
Buckle - as wide as the webbing strap you use!
3 metres of white cotton fabric (or whatever colour wings youre going for!)
Optional
Zipties (for cleaning up the wires)
Lets Go!
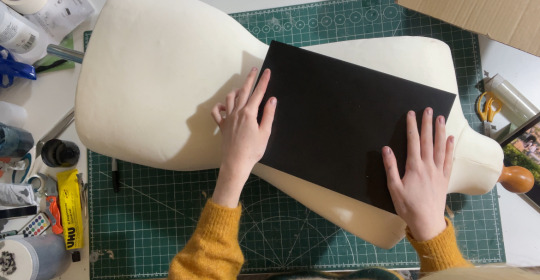
Sintraboard is this wonderfully stable thermoplastic that is relatively easy to cut into (with the right tools) and when heated allows you to mould its shape! I started by using a mannequin and heating the Sintraboard with a heat gun for a few minutes to make it pliable, I recommend using gloves for this part as the materials gets VERY HOT! Press the board into the shape of the mannequin's back, taking note of the edges especially! you want this board to sit as comfortably to your body shape as possible as it makes a huge difference to how long you can wearing the wings for in this backplate is comfy!
Once shaped, I placed it against my back to make sure it was a good fit, heating again and making any alterations I needed (again don't place bright hot plastic to your bare skin! wear protective clothes and wait till its slightly cooler to do this, with the help of a friend!). I then took a hacksaw and rounded the corners, before sanding the edges with my Dremel! Try to avoid cutting off loads, just enough to make things less likely to snag.
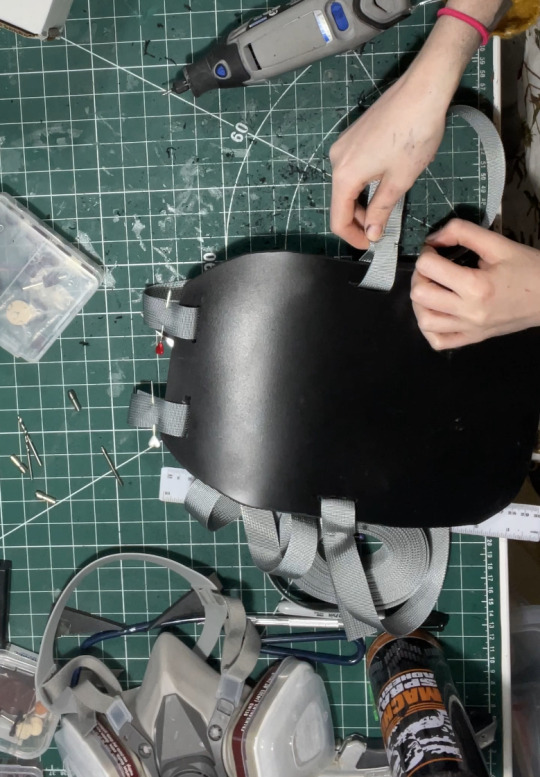
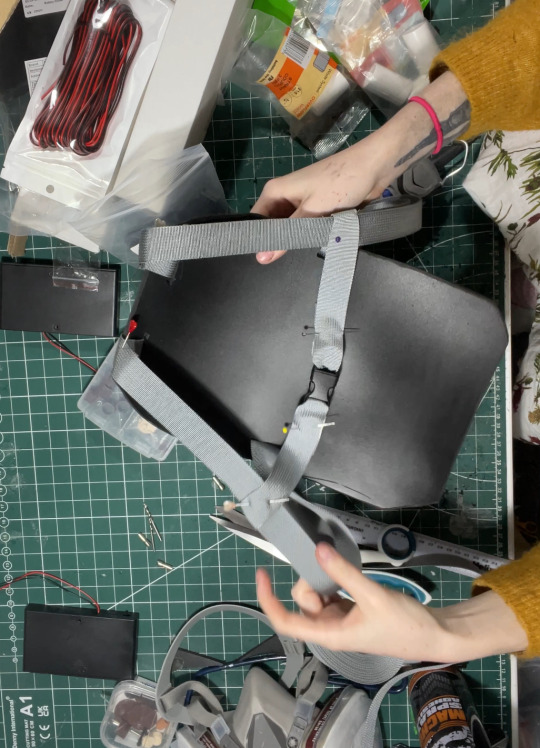
3. I then cut in four holes, wide enough to feed my webbing strap through, two at the top and one on either side below where my arms would sit! I measured the webbing strap by firstly feeding them through the top holes and pinning them, and then bring the strap over my should to everything sits where it should and seeing where the strap hits the side hole and cutting the length there! you'll also want a strap that attaches across the chest, meeting in the centre with a buckle!
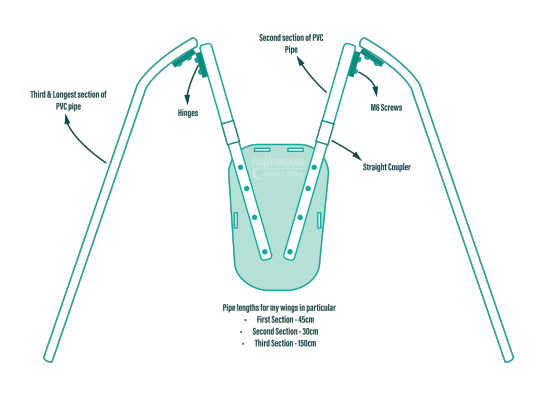
4. After sewing the straps closed I was able to move onto the PVC pipe structure! This may change slightly depending on the finished shape you want but I needed the PVC pipes to come out from inside a breastplate so had a particularly angle as well as character references to work with! I began by heating the pipe over my heat gun and flattening a portion of it under a heavy object so it would sit much more flush against the backboard and sit better underneath my breastplate before moving onto securing the first portion of the structure to the backplate. This mainly involved lots of try-ons and measuring to make sure the angles were correct and symmetrical and was quite fiddly but well-worth the effort! I'll include a diagram of the general shape I went with below:
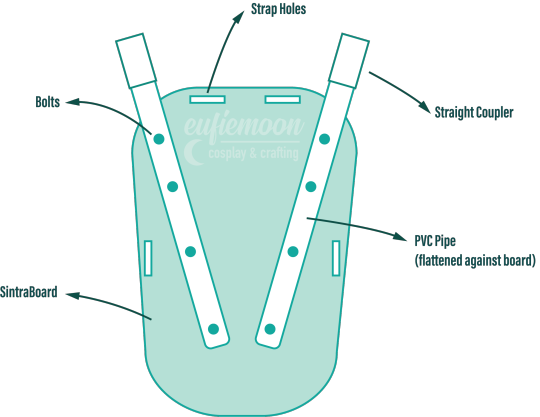
5. I wanted my wings to be relatively modular for ease of travel so I needed to make sure certain portions of them could come away from other parts easily, so I popped a straight coupler on the top of the pipes that were attach to the breastplate, this also meant I could slot the breastplate over these shorter pipes and wear everything correctly! Then these second pipes slot on and at the other end they are attached via hinges to the longest portion of the pipe 'skeleton', Diagram below:
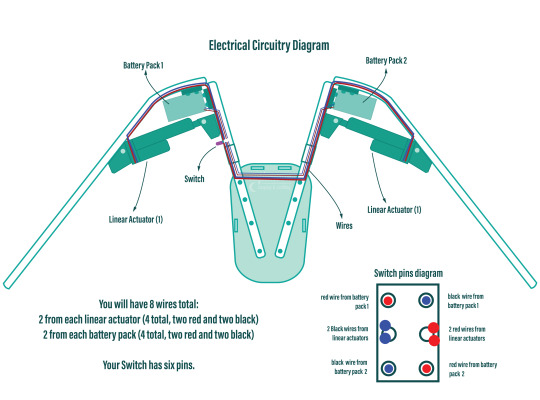
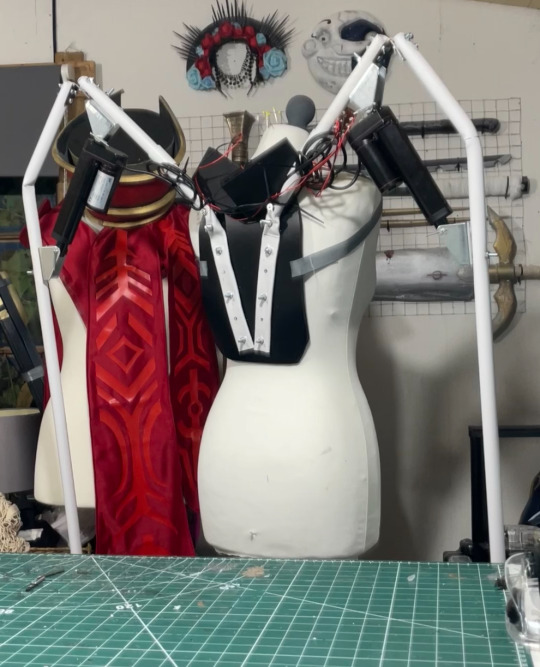
6. Now that the skeleton was put together, it's time for the electrical stuff! It's a good idea to figure out where your circuit is going to lay on the skeleton - consider if you want the battery packs mounted the the backplate or, like me, put them inside the actual wings in removeable pockets for easy access and removal for battery changes. all your wires will go through the switch so deciding where you want to place that is very important! Mine was placed just over my shoulder on the front side, mounted to the PVC pipe with a metal cover I drilled a hole into to slip the switch through and then drill through the pipe.
I've included another diagram below that explains all the electrical circuitry, including which wires go on which pins on the switch!
Important to note: The linear actuators need to be placed and bolted into the PVC pipes at *exactly* the same angle on each side, any slight deviation will lead to the wings going up wonkily! So take your time and make as many adjustments as necessary.
7. You can extend your wires by adding on the electrical wire, just match the colours, and put heat shrink tubing over the connections to hide the live wires! I ended up zip-tying the wires into organised bundles once the wings were done to help keep everything safe from snags.
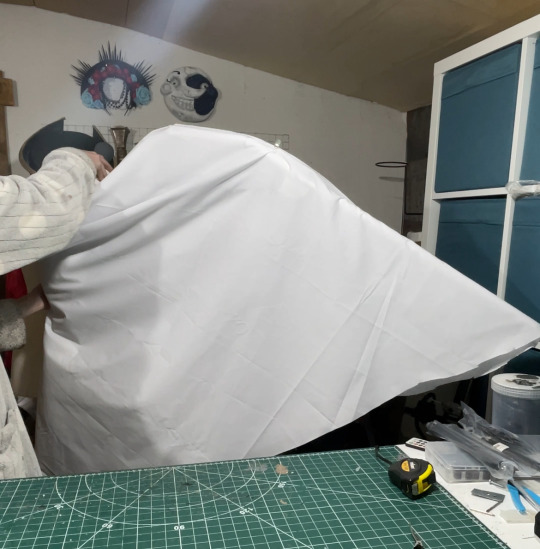
8. Now its time for the Wings themselves! I drafted my base pattern by just draping the white cotton fabric I had over the wing when it was fully extended. I then pinned the wings to the shape I wanted them to be along the bottom before cutting along the pins. I ran the fabric through my sewing machine to close the bottom edge, leaving a gap wide enough by the wing base so I could slip the wing on and off, closing it with velcro. I also added little fabric pockets inside of these to hold my battery packs, which also connected via velcro for easy removal!
9. Now that I had a wing base I was able to begin making feathers! I cut out a total of 800 feathers out of polythene jiffy roll for these wings, in 6 different styles and using real life bird wings to dictate the shapes I used and where I placed them. I ended up hot gluing every individual feather onto the white fabric base, going row by row until every side was covered, the wing covers themselves are super light because of the foam feathers and they shine light through them in a really magical way!
Optional: I also ended up going over these feathers with my airbrush and some super light beige paint to help darken the shadows, this is entirely optional and may change depending on the wings you're looking to make!
When in neutral position and in extended position the wings looks like this:

Mine had a wingspan of about 7ft total when fully extended but when in neutral position they were fairly close to my own proportions! mainly staying behind me and weren't much of a problem in a packed con hall!

Photo by: Helloimfran (on Instagram and Twitter)
I hope this tutorial helped and if there are any questions about anything in specific don't hesitate to reach out at [email protected] or on my instagram or twitter (@eufiemoon)
Happy Crafting!

#cosplay#cosplayer#cosplaying#baldurs gate iii#baldur’s gate 3#baldurs gate 3#bg3#dame aylin#aylin x isobel#bg3 aylin#cosplay tutorial#Wings#fantasy#tutorial#cosplay help#cosplay tips
166 notes
·
View notes
Text
How to Change Your Apple Watch Band: A Stylish Upgrade in Minutes

Your Apple Watch isn’t just a timekeeper or fitness tracker—it’s an extension of your personality. One of the best things about owning an Apple Watch is the ability to change the band quickly and easily, letting you adapt your look to any occasion, outfit, or activity. Whether you're switching to a sport watch band for your workout, or dressing things up with a leather strap for a night out, knowing how to change the band is essential.
Here’s a simple, easy-to-follow guide to help you do it like a pro.
🕵️♀️ Step 1: Check Your Watch and Band Size
Before you get started, make sure the new band you plan to use is compatible with your Apple Watch. Look at the back of your watch case—you’ll find a small engraving that tells you the case size (e.g., 40mm, 44mm, 45mm). Only use bands that match this size for a secure and proper fit.
✅ Tip: Some newer models are cross-compatible with older sizes. For example, 41mm bands often fit both 40mm and 38mm watches.
🧼 Step 2: Prepare a Soft, Clean Surface
Place your Apple Watch face down on a microfiber cloth or soft mat to prevent scratching the display or case. Remove the watch from your wrist before starting.
🔓 Step 3: Locate and Press the Band Release Buttons
On the back of the Apple Watch, near where the bands connect to the case, you’ll find two small oval buttons—one at the top, one at the bottom. These are the band release buttons.
Press and hold one of these buttons with your fingertip. This unlocks the band mechanism and allows you to slide the band out.
↔️ Step 4: Slide the Band Out
While holding down the release button, gently slide the band to the left or right until it detaches from the watch. The band should come out smoothly without resistance. Repeat this step for the other side.
⚠️ Warning: If the band doesn’t slide out easily, don’t force it. Make sure the button is pressed fully, and try again.
🔄 Step 5: Attach Your New Band
Take your new band and align the connector with the slot on the watch. Slide it in gently until you feel or hear a soft click, which means the band is securely locked in place.
Make sure both sides are firmly attached before wearing the watch again. You shouldn't need to press the release button to insert a new band—it will automatically snap into place if properly aligned.
🖐️ Wearing on the Other Wrist?
If you want to wear your watch on your other wrist, or with the Digital Crown on the opposite side, you can adjust the screen orientation:
Open the Watch app on your iPhone
Tap General > Orientation
Choose your wrist and preferred Digital Crown position
This flexibility is great for left-handed users or for changing your watch style entirely.
🧽 Band Maintenance Tips
To make your bands last longer and stay fresh, give them regular care:
Silicone bands: Clean with warm water and gentle soap
Leather bands: Wipe with a dry cloth, avoid moisture
Metal bands: Use a dry microfiber cloth or soft brush for deeper cleaning
Fabric/ Nylon bands: Hand wash gently and air dry
Avoid using harsh chemicals, especially on natural materials like leather.
🎯 Final Thought: A Small Change, A Big Impact
Changing your Apple Watch band takes just a few seconds, but it can completely transform your look. From sporty to sophisticated, casual to professional, the right band sets the tone. Now that you know how to switch them out with ease, you can build a collection and match your Apple Watch to your mood, wardrobe, or even the season.
Ready for a new look? Time to try that bold color or elegant finish you've been eyeing.
3 notes
·
View notes
Note
not me whos been trying to ignore my desire of getting into mixtapes and physical media due to cost of entry getring tempted again

Ok, here's what you're gunna do. I want you to find whateva kind of clearance or thrift- whatever the hell store, go to the electronics section. you're gonna look and loot for some tape decks. they come in all sorta sizes and shapes, some are bigger than stacks a' bricks and some will fit right in yer hand. choose whatever fits your budget and space, just make sure it seems to work by plugging it into the wall and seeing if it rewinds and fast forwards but most importantly, has a mic or "input" port, that's the key. make sure it also comes with RCA connectors, aux cord adapters for said connectors, and speakers so you can listen to what you're putting on the mixtape. if you can't find it, go online, check wherever you want and there's even a site online that is selling em for less than 100 USD. Now once you get that in order, get yourself some cassettes, some blank ones. if you're looking for nothin fancy, Maxell UR has some pretty decent ones, they're 45 minutes on each side, and have all clear cases so customization is standard. however, if you want somethin on the fancier and more decorative side, duplication.ca is a great place for getting pre-loaded colorful cassettes, boxes, j cards, you get it. once you have everything needed, plug all the corresponding cords into the left and right, output is where the sound goes out, so plug that cord into the speakers, and input is how the sound goes in, so plug that into wherever, phone, computer, vinyl you get it. If it's a small, hand-sized cassette recorder, usually you don't need the RCA connectors, they already have an aux cord mic and a speaker. now insert the cassette, press pause on the deck, press record, and until you have your music ready, unpause and play the music so it's recorded on. Remember: physical media is key to the preservation of all media, whether it be songs unavailable online or that show you used to watch as a kid that you can't find nowadays. nothing should be tossed out and forgotten because of its inconvenience compared to current technologies.
13 notes
·
View notes
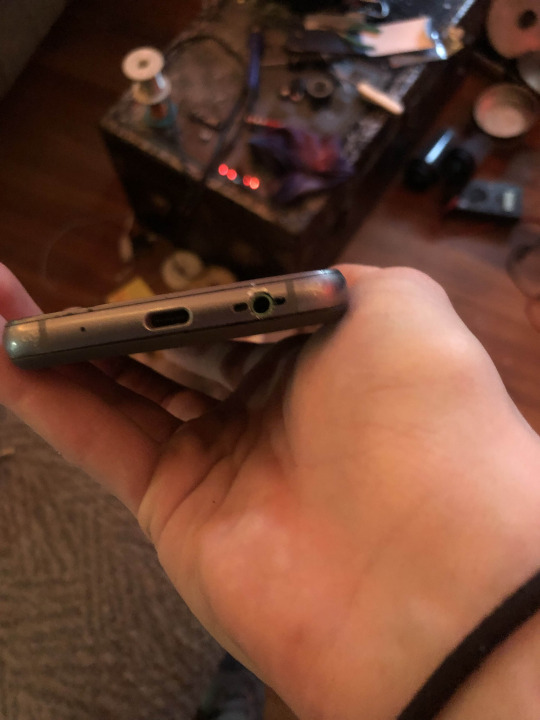
Text
Putting a headphone jack in a Fairphone 4
TLDR with this procedure you sacrifice the lower loudspeaker, but the upper one will still behave as normal. Calls and other audio seem to work just fine. There is some interference from internals that gets picked up by amplified speakers, I'm sure there's a way to filter it, this is mainly a proof of concept. This is not really a guide and I do not guarantee anything at all.
I really liked my Fairphone 4 except that it didn't have a 3.5mm jack like normal phones used to have. And my car has never heard of Bluetooth. So I started joking about drilling a hole in it.
I found this green TRS jack on a USB DAC and found it would fit inside. I took this photo with a DSi camera. Originally I thought I might be able to fit both the jack and the speaker, and I had this elaborate plan to make a cut in the mainboard and move the vibrating motor elsewhere,

but decided against it because I had no idea what losing that one contact would do. I did a test and found no major issues with removing the bottom loudspeaker. If I needed the phone to be loud, I'd hook something else up anyway. I bought a second loudspeaker and horrendously dissected it.

I used a knife. If you do this you should absolutely use a dremel tool and not a knife. Unless you don't have a dremel tool
The plan is, remove the speaker part. You do not have to completely de-laminate the two layers of plastic. Just this section of the bottom layer. The top layer has pretty colors and conductive tape and contacts for mysterious purposes. Maybe antenna.

Next, you must drill the hole. We're not quite sure what the case is made of, but it probably involves aluminum. I had a drill press and clamps, but I went to my friend's house. He doesn't have clamps or many drill bits, but he knows metal. The jack barrel was like 5.1mm in outer diameter, and after lamenting that all our bits were in imperial, we settled on a 7/32". We removed all components from the chassis including mainboard and screen before drilling.
Here, we went for a hole that was centered on the middle hole of the speaker grill. However, if you do this, you will need to also remove some more metal, because the jack will need to be kind of submerged in the floor. We also had to sand down one side of the jack paper thin to make it sit flat against the back of the screen module. In hindsight, I should have marked where the jack wanted to sit before drilling. This would have us drill at the edge of the case, but it would be closed off by the phone's back cover anyway so it wouldn't matter. Just plan out your hole instead of eyeballing it.
Unfortunately, we did not get any pictures of the fit after we were done. Probably for the best, so no one has to see the metal carnage.
Once it was in place, it was time to wire it. The speaker module presses a flat flex cable up against these two contacts on the board.
I originally managed to solder to the flat cable, but then made a mistake and tore the pads, so I ended up soldering directly to those spring pins on the mainboard. I used magnet wire for everything. I just connected both the L and R pins of the jack to this one speaker output because I didn't feel like probing out the top speaker connector and running wire up there just yet. Ideally I would have a switched jack that interrupts the top speaker, but that's for later. I might salvage something from an Apple device, their jacks tend to be compact.
Hot glued the thing in place, and this is the end result. It works just great with passive headphones. I'll upload a demo video when I get the chance, I've already used my 1 video. I wish I had taken better pictures, but it wasn't very convenient.
The caveats in the beginning apply. It's also way too loud because it's meant to drive a speaker, and it's balanced for that too. I might be able to put a resistor divider on there to reduce the output volume and let a louder signal drown out the interference a bit better?
I have no idea if this is a thing people do, putting audio jacks in their phones. But I would think that replacing the speaker like this would work on a lot of different phones. Maybe worth trying?
6 notes
·
View notes
Note
Io Saturnalia! Can we get some Petra/Variks fic?
Joke's on you, I'm into it 👉👉But it's still a very crackish pairing so it definitely counts!
At the beginning of the Wolf Rebellion, Petra Venj had no friends at the Tower. No friends in the Reef, either, not after what she'd done — except for one. Variks, The Loyal embodied his title in each letter and message sent, in every after-work radio conversation back at the tiny City dormitory she'd been granted as a part of her employment agreement. His voice alone was reassurance against the jeering rumors, veiled hostility that might've been tolerable if it was open; at least then she'd have something to confront.
She had no doubt that, had eliksni and humanity been on good terms, he would have come in person, been a warm face among the unwelcoming masses.
This is what compels her to make the journey to Europa, swapping the Ceres Galliot for a less conspicuous ride before exiting Vestian space. Petra covers the Queen's insignia on her cold-weather suit when she deplanes, huddling into the fur lining of her hood as snow bats at her bluing cheeks and gathers on her lashes. She half-sprints to the coms station, thankful there are no patrolling guardians in sight.
She knocks heavily enough to be heard through the howling wind, but amicably enough – she hopes – to be non-threatening. The door creaks open, and she holds her breath.
Variks startles — and almost as quickly collapses into a defeated sag. "Petra . . . are you here to—"
"I'm not here to arrest you," she says, softly resting a gloved hand on the furred collar of his cloak. He wheezes a relieved sigh, standing a bit taller with it. Touches her shoulder, ushering her inside.
She notices the empty socket where his left prosthetic was attached. Lifts it to take a closer look, and finds the connectors destroyed.
"What happened?"
"Eramis," he mutters.
"Take me to her — I'll thaw and dock her myself." It's an empty, nonsense threat made in the heat of anger, but in that moment she might've carried through on it given the opportunity.
He looks at her, tired. "My fights shouldn't be yours."
"They should be … they were. Variks, it's not right you have to live in exile. I miss being on the same side as you. I miss you."
He tugs her into an embrace, his lower hands resting loosely against her back, his upper right draped loosely across her shoulder. She wraps her arms around his body in a furiously tight hug, face pressed to the rough weave of his tabard, hands grasping at the tail of his cloak.
"We still are."
She looks up, and he dabs away the tears gathering at the corner of her eye. His fingertips linger a moment at her cheekbone, four eyes locking on one.
At once she bounds upward and he catches under her thighs, lifting her face-to-face. She presses her forehead against his, fingers stroking the sides of his face as he does the same. She kisses first between his eyes, next at the soft juncture between his lower jaws, her own fitting perfectly in the gap. He reciprocates, softly fluttering mandibles across her lips, as she deepens the kiss against his open mouth.
They remain locked in each other's arms and mouths. Ignoring the cold and circumstances, it felt like the old days: the times of bored indiscretion in the Vestian Outpost; the euphoric jubilation when Oryx was knocked from his throne; the desperate good-luck wishes before dangerous missions. They rest awhile in the soft glow of each other's warmth and the modest camp fireplace, reminiscing about the past and catching up on what they missed.
6 notes
·
View notes
Text
Step into it

The paramedic stands tall, his demeanor confident and matter-of-fact. As he begins to demonstrate, he speaks calmly, his voice echoing the discipline and routine of his profession.
Paramedic: "Morning rituals are crucial in our line of work. They set the tone for the day, ensuring we are focused, disciplined, and ready for any challenge. Now, observe closely."
He picks up the Latwoski Mark 6 Chastity Cage, a sleek device with advanced technology woven seamlessly into its design.
Paramedic: "Step one: Insert the testicles into the designated chamber. The fit is snug but comfortable, and it's crucial for stability during our missions."
He does this with practiced ease, showcasing the device's two-chamber design.
Paramedic: "Step two: Secure the penis in its compartment. The device automatically adjusts to ensure comfort while maintaining the required level of restriction."
His movements are precise, displaying the device's intuitive design.
Paramedic: "Step three: Activate the self-cleaning system. Hygiene is paramount, and the Mark 6 ensures cleanliness without any extra effort on our part."
He presses a button, and a soft hum emanates from the device, indicating the cleaning process has begun.
Paramedic: "Step four: Fasten the device securely. Once locked, it's tamper-proof, ensuring compliance with the regulations. Safety and discipline go hand in hand."
He attaches the device, demonstrating the sturdy locking mechanism.

Paramedic: "Lastly, the device seamlessly integrates with our armor. The anal connector and diaper function ensure that, once suited up, we are prepared for any situation, with no distractions or vulnerabilities."
He reaches for his red paramedic uniform, the armor suit waiting nearby, and begins dressing, the chastity cage fitting seamlessly into the ensemble.
Paramedic: "And there you have it. This routine isn't just a necessity; it's a testament to our commitment and professionalism. We wear our gear with pride, understanding that it represents not just our discipline but our dedication to serving others. Now, let's face the day with focus and resolve. Duty calls, and we're always ready."

Paramedic: "Lastly, check the health surveillance display on your HUD. It should show green indicators, indicating proper connection and vital signs monitoring. And that's it! With the Latwoski Mark 6, we're ready for duty, focused and dedicated to providing the best care possible."
With that, he salutes, showcasing the unwavering spirit of a paramedic, disciplined and dedicated to their mission.
3 notes
·
View notes
Text
"Why Wire-to-Board Connectors Matter in Today's Tech Landscape"
In the ever-evolving landscape of electronics and electrical engineering, wire-to-board (WTB) connectors are fundamental components that provide a secure, efficient link between a set of discrete wires and a printed circuit board (PCB). Despite their small size, these connectors are indispensable in a wide range of applications—from consumer electronics and automotive systems to industrial machinery and telecommunications.Get more news about Wire-to-board Connector,you can vist our website!
What Are Wire-to-Board Connectors? Wire-to-board connectors are used to route electrical signals or power from individual wires onto a printed circuit board. Unlike board-to-board connectors that facilitate connections between PCBs or wire-to-wire connectors that link individual wire sets, WTB connectors interface directly between a cable harness and the board, typically through soldering or press-fit terminals. This facilitates modular design, ease of maintenance, and scalable manufacturing.
They consist of two primary components: the plug (housing the wires) and the receptacle or header (mounted on the PCB). These connectors are available in various pitches (the center-to-center spacing between pins) and configurations (vertical or right-angle orientations), making them adaptable for a variety of design constraints and spatial limitations.
Key Features and Considerations Designers and engineers often evaluate several critical factors when selecting WTB connectors:
Current and Voltage Ratings: Depending on the application, connectors must meet safety and performance thresholds.
Pitch Size: Fine-pitch connectors (≤1 mm) allow for compact design, while larger pitches offer greater robustness.
Locking Mechanisms: Latch or friction locks ensure secure connections that resist vibration or accidental disconnection.
Material and Plating: Contact materials, often copper alloys with gold or tin plating, influence conductivity and longevity.
Environmental Resilience: Some WTB connectors are designed for harsh environments with resistance to moisture, dust, or high temperature.
Applications Across Industries The versatility of wire-to-board connectors is reflected in their widespread use across diverse industries:
Consumer Electronics: Used in smartphones, laptops, and wearable devices for internal signal and power connections.
Automotive: Essential for infotainment systems, sensors, and electronic control units (ECUs), where compact, vibration-resistant connectors are critical.
Medical Equipment: Connectors must meet stringent reliability and safety standards in devices like diagnostic equipment and patient monitors.
Industrial Automation: WTB connectors facilitate modular assembly and simplify maintenance for sensors, controllers, and interface devices.
Trends and Innovations Modern trends push the boundaries of connector miniaturization and performance. As electronic devices become more compact and sophisticated, the demand for high-density connectors with increased signal integrity and EMI shielding continues to grow. Additionally, some manufacturers are integrating features like surface-mount technology (SMT) compatibility and automated cable termination to streamline production and assembly.
Another key trend is the development of eco-friendly, RoHS-compliant connectors to meet global environmental standards while ensuring high performance. With the rise of Industry 4.0 and the Internet of Things (IoT), wire-to-board connectors are playing an increasingly strategic role in enabling smart, connected systems.
Conclusion Although often overlooked compared to high-profile semiconductors or processors, wire-to-board connectors are vital enablers of modern electronic innovation. Their reliability, precision, and adaptability allow designers to build smaller, more powerful, and more efficient systems. As technology continues to advance, the humble WTB connector will remain a quiet but essential hero in the background—connecting ideas to reality, one circuit at a time.
0 notes
Link
LED light-fitted furniture, such as beds, TV units, mirrors, and display cabinets from ARV Furniture, combines style with smart functionality. To maintain both the lights and the furniture's overall condition, follow these smart care tips:
✅ 1. Dust Regularly with a Soft Cloth Use a microfiber or lint-free cloth to gently dust around the LED lights and surrounding surfaces.
Avoid using wet cloths directly on light strips or electrical parts.
✅ 2. Keep Moisture Away Never allow water or liquid cleaners near the LED components.
If cleaning glass or glossy panels, spray cleaner on a cloth, not directly on the furniture.
✅ 3. Check Power Source and Connections Inspect plugs, USB ports, or switch wiring monthly to ensure everything is secure.
Avoid overloading power outlets where LED furniture is connected.
✅ 4. Use Only Compatible Bulbs or Strips If the LED strip or bulb needs replacement, consult the ARV Furniture manual or your product's documentation for the correct voltage and type.
Do not substitute with low-quality or incompatible LED products.
✅ 5. Avoid Heat Exposure Keep the furniture away from heating vents, fireplaces, or direct sunlight, as this may reduce LED lifespan or damage wiring.
✅ 6. Handle with Care During Moves When shifting furniture, disconnect all LED components first.
Ensure wires and connectors are not pinched or stretched during relocation.
✅ 7. Use a Surge Protector Connect LED-fitted furniture to a surge protector to avoid damage during power fluctuations or lightning storms.
✅ 8. Clean Remote Controls and Switches Safely If the LED lights come with a remote, clean it gently with a dry cloth.
Avoid pressing buttons too hard or exposing the remote to spills.
✅ 9. Avoid Prolonged Usage Turn off the LED lights when not needed to prolong their lifespan and conserve energy.
✅ 10. Contact ARV Furniture for LED Repairs If you notice flickering, dimming, or non-functional lighting, contact ARV Furniture in Mississauga for proper service or part replacement.
TIP: Keep the furniture's instruction manual or warranty details handy—it can be helpful when addressing any LED-related issue.
0 notes
Text
0 notes
Text
Price: [price_with_discount] (as of [price_update_date] - Details) [ad_1] SENZER----VOICE FOR GAME, VICTORY FOR YOU SENZER SG500----A professional gaming headset for gamers: Surround Sound delivery can provide more subtle sound for better gaming experience. The noise cancelling mic can pick up your voice loud and clear. Detachable foam ear cushion makes it better for sanitation consideration. And foldable design makes it space-saving and stylish. Specification: Brand: SENZERModel: SG500Speaker Frequency range: 20Hz~20KHzSpeaker Sensitivity: 110dB±3dbSpeaker impedance:21Ω±15%Phase: L/R Phase CongruencyRated input: 20mWMaximum input: 50mWL/R BALANCED: ≤3dB (at 1kHz) Connector type: 3.5mm plugHow to make it work? [PC] Plug 1-to-2 3.5mm splitter cable into the input and microphone input separately of your desktop. (USB plug for RGB LED Lights) [PS4] 1. Insert 3.5mm plug cable into the controller. 2. Long press ps4 button and go to system setting. 3. Go to ‘PERIPHERAL MACHINE’, ‘ADJUST SOUND AND DEVICES, Change ‘Output to the headphones’ to ‘All Sound’. [Xbox one] The gaming headset can be used directly if your xbox one controller has 3.5mm interface. Otherwise, ‘MS ADAPTER’ will be needed.(Not included) [NS] The gaming headset can be used directly on the 3.5mm jack of NS. [FOLDABLE & DETACHABLE EAR PADS]: Features flexible headphones with telescopic arms and detachable ear pads. The headphones fold inside the arm, making them perfect for easy storage and travelling and the ear pads are magnetic, allowing them to be conveniently attached and removed, making them easier to clean and maintain compared with other headphones. [COMFORTABLE LIGHTWEIGHT DESIGN]: Comfortable for kids and adults alike, the detachable memory foam ear cushions are extremely lightweight, allowing for up to 8 hours usage without excess pressure build up, meaning you won't feel any discomfort even after many hours of gaming. The overall weight is only 0.66lb; approximately 40% lighter than standard gaming headsets. [NOISE CANCELLING ANTI-STATIC MICROPHONE]: The bendable microphone arm can be fixed to any position to ensure the clearest voice pick-up, and filters out surrounding environmental noise and eliminates static. The Senzer SG500 noise cancelling headset with microphone provides real-time in game chat without delay, making it easier to communicate with team-mates, friends and family without unnecessary interruptions. SURROUND SOUND CAPABLE: Proven to enhance your gaming performance, this surround sound gaming headset gives you crystal clear audio and provides you a truly immersive video game experience. Pick up the direction of gunfire, vehicles and voices more clearly, as well as enjoying a more enhanced audio experience as subtle sounds like footsteps, wind and rain are projected with more clarity and precision. [PLUG AND PLAY MULTI-PLATFORM COMPATIBILITY]: Works with most modern devices which include a 3.5mm jack like PlayStation 4, Xbox One (Older version requires adaptor), Apple Mac, Laptop, PC & Mobile. No drivers or downloads required, simply Plug & Play, making it the ideal headset for travelling or as a gift, safe in the knowledge it will fit a multitude of devices. [ad_2]
0 notes
Text
Hydraulic Pipe Compression Fitting: Reliable Connections for High-Pressure Systems
Hydraulic systems rely on robust, leak-proof connections to function efficiently under high pressure. One of the most dependable solutions for connecting hydraulic pipes is the hydraulic pipe compression fitting. These fittings are essential components in fluid power applications across various industries, ensuring a secure and tight seal without the need for welding or soldering.
What is a Hydraulic Pipe Compression Fitting?
A hydraulic pipe compression fitting is a mechanical connector used to join sections of pipe or tubing in hydraulic systems. It works by compressing a metal ferrule against the pipe or tube as a nut is tightened, creating a strong and leak-free connection.
Key Components of a Compression Fitting
Body: The main part of the fitting where the pipe inserts.
Ferrule(s): Metal rings that deform under pressure to form a tight seal around the pipe.
Nut: The component that compresses the ferrule onto the pipe when tightened.
Features of Hydraulic Compression Fittings
Leak-Proof Seal: Provides a secure, tight connection even under high pressures.
Easy Installation: No need for special tools, welding, or threading.
Reusable: Many compression fittings can be disassembled and reused.
Vibration Resistant: Maintains seal integrity in systems prone to vibration.
Corrosion Resistant: Often made from stainless steel, brass, or coated carbon steel to withstand harsh environments.
Applications of Hydraulic Pipe Compression Fittings
Industrial Machinery: For transmitting hydraulic fluid in presses, pumps, and cylinders.
Construction Equipment: Used in excavators, loaders, and cranes for fluid power transmission.
Automotive and Aerospace: In brake lines, fuel systems, and hydraulically actuated components.
Agricultural Machinery: Ensures efficient hydraulic function in tractors and harvesters.
Marine and Offshore Systems: Used in hydraulic steering and engine systems in corrosive environments.
Types of Hydraulic Compression Fittings
Single Ferrule Fittings: Common in low to medium pressure systems.
Double Ferrule Fittings: Provides extra sealing and holding power in high-pressure systems.
Straight, Elbow, and Tee Fittings: Available in various shapes to accommodate complex piping layouts.
Material Options
Stainless Steel: Ideal for high-pressure and corrosive environments.
Brass: Used in lower-pressure or non-corrosive applications.
Carbon Steel: Common in industrial applications for its strength and cost-effectiveness.
Benefits of Using Compression Fittings in Hydraulic Systems
Time-Saving Installation
No Need for Heat or Threading
Compact and Space-Saving
Minimal Maintenance
Versatile for Various Pipe Sizes and Materials
Choosing the Right Fitting
To select the correct hydraulic pipe compression fitting, consider:
Pipe/tube material and size
Operating pressure and temperature
Type of hydraulic fluid
Environmental conditions (corrosion, vibration, etc.)
Required flow rate and system layout
Maintenance Tips
Always check for wear or corrosion before reassembly.
Ensure proper torque when tightening the nut to avoid under- or over-compression.
Replace worn ferrules to maintain sealing efficiency.
Final Thoughts
hydraulic pipe compression fitting are crucial components in maintaining the integrity and performance of hydraulic systems. Their ease of use, reliability under pressure, and adaptability make them the go-to solution for many engineers and technicians. Whether in manufacturing, construction, or transportation, these fittings help ensure seamless fluid flow and system safety.
0 notes
Text
Elevate Your Home Workouts with Smart Dumbbell Accessories
Fitness Innovation Begins with the Right Tools A home workout space can quickly evolve from simple to powerful with just a few strategic additions. Many fitness enthusiasts overlook the impact that small accessories can make in maximizing gains and improving safety. One of the best ways to upgrade a setup is to Buy Dumbbell Weight Clamps Bundle, a decision that ensures both stability and flexibility in strength training. These clamps reduce interruptions during workouts and provide peace of mind when lifting heavier weights. Consistent use of secure, reliable gear can greatly improve workout results and efficiency.
How Weight Clamp Bundles Enhance Performance For lifters who are serious about progression and safety, the decision to Buy Dumbbell Weight Clamps Bundle makes long-term sense. Weight clamps offer stability, reduce shifting, and allow faster changes between sets. This creates smoother transitions in circuit training, enabling focused routines without wasted time. Using a quality clamp bundle helps ensure that plates remain securely in place throughout even the most intense training sessions. This level of consistency supports gradual strength building while minimizing the risk of equipment-related accidents, which can derail progress and reduce motivation over time.
The Shift Toward Modular and Adaptable Fitness Gear As more people bring their workouts into the home, there's growing demand for space-saving equipment that still delivers gym-quality performance. Adjustable dumbbells, compact machines, and smart accessories are leading this transformation. Versatile tools make it easier to train multiple muscle groups without filling a room with bulky gear. Fitness solutions that offer modularity and durability are ideal for anyone aiming to maintain or improve fitness without compromising space or comfort. Accessories that support this trend are not only practical but also essential to long-term consistency in home-based fitness journeys.
What Makes the Dumbbell Bar Connector a Game-Changer A Dumbbell Bar Connector offers a clever and compact way to transform two dumbbells into a single barbell. This tool enables users to expand their exercise options without investing in entirely separate equipment. The Dumbbell Bar Connector is especially useful for compound exercises such as deadlifts, bench presses, or squats, giving lifters greater range in a limited workout environment. Instead of switching between multiple types of equipment, users can rely on a single adjustable solution that saves space and supports advanced strength routines, all while maintaining structural stability.
Why Versatile Equipment is the Future of Home Fitness The versatility of tools like the Dumbbell Bar Connector reflects a wider shift toward compact and multi-functional workout gear. As more individuals adopt hybrid workout routines that blend strength, endurance, and functional training, adaptable equipment becomes essential. Connectors allow for dynamic exercises without needing a full barbell set, making strength training more accessible to people in smaller living spaces. Fitness goals become more achievable when the right accessories are available, promoting consistency, proper technique, and safety through well-designed and easy-to-use gear.
Investing in Smarter Fitness Essentials People who build home gyms are making a long-term investment in health and personal development. Thoughtful purchases such as durable clamps and adaptable connectors—support this investment by providing reliable, safe equipment that evolves with training goals. Choosing high-quality gear reduces the need for constant replacements and prevents unnecessary injuries. The goal is to create a workout space that encourages effort, supports improvement, and adapts to changing needs over time. With access to compact, multifunctional equipment, individuals can maintain routines and progress in strength without visiting a commercial gym.
0 notes
Text
The Power Behind Precision – Cross Shaft Presses from Mankoo Engineering
In the ever-evolving world of metal forming and fabrication, precision, power, and durability are non-negotiable. Industries that depend on high-performance machinery require equipment that not only delivers consistent results but also stands the test of time. Among the champions of such innovation is Mankoo Engineering, a trusted name in the manufacturing of Cross Shaft Power Presses.

For decades, Mankoo Presses has been at the forefront of designing and building machines that redefine quality and efficiency in metal stamping. With their robust engineering and commitment to innovation, Mankoo’s Cross Shaft Power Presses have become a preferred choice for businesses across the automotive, appliance, hardware, and metal component manufacturing sectors.
What Is a Cross Shaft Power Press?
A Cross Shaft Power Press is a mechanical press driven by a crankshaft that is mounted perpendicular to the ram slide. Unlike traditional single crank presses, the cross shaft design offers better force distribution, enhanced frame rigidity, and higher accuracy during stamping and forming operations.
These presses are ideal for applications requiring:
Precision punching and blanking
Sheet metal forming
Progressive die operations
Deep drawing processes
Mankoo’s Cross Shaft Presses are tailored to meet these needs with superior structural design and performance reliability.
Why Choose Mankoo Presses?
1. Engineering Excellence
Mankoo Engineering is known for its unwavering dedication to quality. Every Cross Shaft Press is built using premium-grade materials and subjected to stringent quality control at each stage of production. The result? Machines that operate with unparalleled stability, even under the most demanding conditions.
2. State-of-the-Art Design
Mankoo’s design philosophy combines mechanical innovation with practical functionality. The cross shaft mechanism distributes the load more evenly across the frame, reducing deflection and enhancing tool life. The press also features:
High torque flywheels
Precision-machined gear systems
Hydraulic overload protection
Wet clutch and brake systems for smooth operation
These features ensure consistent performance and minimal downtime, a must for modern production lines.
3. Customization and Flexibility
Every production line has unique requirements. Mankoo understands this and offers a range of tonnages and configurations in its cross shaft series. Whether you need a compact press for precision parts or a heavy-duty unit for bulk production, Mankoo delivers solutions that fit your application.
Additionally, Mankoo’s engineering team is open to custom specifications, making it possible to tailor machines to your exact needs.
Applications of Mankoo Cross Shaft Presses
Mankoo’s machines are trusted by manufacturers in:
Automotive industry – for components like clutch plates, brackets, and body parts
Electrical and electronics – for precision stamping of connectors and terminals
Home appliances – for manufacturing of panels, frames, and enclosures
Hardware and tools – for forming of latches, hinges, and other hardware parts
The versatility of Mankoo’s Cross Shaft Presses makes them a powerful asset across diverse sectors.
Superior Build, Seamless Operation
One of the standout features of Mankoo Cross Shaft Presses is the solid H-frame construction, which provides unmatched rigidity. This design eliminates vibration during operation, which enhances tool alignment and product accuracy.
The double crankshaft drive system improves balance and ensures synchronized movement of the ram. Paired with lubrication systems, centralized control panels, and operator-friendly interfaces, Mankoo presses are as efficient as they are easy to operate.
Safety First
Mankoo integrates a suite of advanced safety features in its machines, including:
Safety guards and enclosures
Emergency stop systems
Hydraulic overload protectors
Digital fault detection and alarms
These features ensure a secure working environment while preventing machine damage due to overload or misfeeds.
Global Reach, Local Commitment
While Mankoo Presses is proudly based in India, its reputation transcends borders. The company has a strong footprint in Asia, the Middle East, Africa, and Europe, with clients ranging from small workshops to multinational manufacturers.
Mankoo backs every machine with comprehensive support, including:
On-site installation
Operator training
Spare parts availability
Preventive maintenance packages
This dedication to after-sales service has earned Mankoo a loyal and growing global clientele.
Sustainability in Manufacturing
In today’s age, sustainability is just as important as efficiency. Mankoo ensures that its machines are built for energy efficiency and reduced operational noise, while also minimizing waste through high-precision performance.
By reducing the need for rework and scrap, Mankoo Cross Shaft Power Presses help manufacturers maintain lean, eco-conscious production lines.
Conclusion
Mankoo Engineering’s Cross Shaft Power Presses are not just machines—they are the backbone of precision metal forming for modern industry. With robust construction, smart design, operator safety, and unmatched reliability, Mankoo continues to lead the way in power press innovation.
If you’re looking to upgrade your production capabilities or enhance forming precision, Mankoo Cross Shaft Power Presses are the ultimate solution. Experience the perfect blend of power and precision—only with Mankoo.
#power press machine#ctype power press#hframe power press machine#cross shaft press#cross shaft power press machine
0 notes