#Printing machine exporter
Explore tagged Tumblr posts
Visit Tumblr Blog
Explore Tumblr blogs with no restrictions, modern design and the best experience.
Last Seen Tumblr Blogs


Fun Fact
130K people were victims of a chain letter scam that affected Tumblr in May 2011.
Text
Lamination machines have become a part of modern industries where the functionality and aesthetic value of materials are improved. KEW ENGG. & MFG. PVT. LTD. is a leading machinery manufacturer, offering high-quality lamination machines that meet diverse industrial requirements with excellent quality and performance.
#kewengg#machine#manufacturer#machinery#industry#industrial#exporter#supplier#machinemanufacture#laminationmachine#lamination#printing machine'
3 notes
·
View notes
Text
Pad Printing Machine
We are a Pad Printing Machine Manufacturers & Exporters in Gujarat, India. Jash Packaging Machinery's Pad Printing Machine is a high-precision and efficient printing solution geared toward the needs of modern industrial printing. It is ideal for printing on irregular surfaces, thus ideal for branding, labelling, and marking in various industries, and it comes with a semi-automatic operation that makes its application very easy while ensuring its quality standard and accuracy are at a high level.

#Pad Printing Machine#Pad Printing Machine exporters#Pad Printing Machine Manufacturers#Pad Printing Machine exporters in Gujarat#Pad Printing Machine Manufacturers in Gujarat#Pad Printing Machine exporters in India#Pad Printing Machine Manufacturers in India
0 notes
Text
Air Compressor Spare Parts Exporter in India
The name that pops up first in the search for the top air compressor spare parts exporter in India would be Digoma Enterprise. We are proud to supply excellent spare parts that are trusted by industries across the country, as our products ensure proper functioning of an air compressor in different sectors.
As a leading exporter, we offer reliable and efficient spare parts. We source the best materials for manufacturing parts that endure heavy use and even demanding environments. Our customers appreciate the durability and performance of our products, making us a top choice in the market.
At Digoma Enterprise, the satisfaction of our customers is given utmost priority. We have put in every effort to deliver our spare parts right on time, irrespective of how long you are from India. Our wide product range ensures that we can cater to specific needs for any one customer. This dedication towards quality and service has made us the best exporter for air compressor spare parts in India.
#best air compressor spare parts#best quality crankshafts#best crankshafts#quality products#3d printing#handcrafted#best supplier#best air compressors#machine learning#resources#top air compressor spare parts exporter in India
0 notes
Text
UV Lamps for Printing Machines – Leading Dealers and Distributors
In today’s fast-paced printing industry, UV lamps play a crucial role in ensuring high-quality, fast, and efficient printing processes. Printing machine uv lamps dealers in lakdikapul or other techniques, UV lamps provide the precision and durability necessary to deliver professional-grade results. These specialized lamps cure inks and coatings quickly, resulting in vibrant, durable prints that meet modern industry demands.
Understanding UV Lamps for Printing Machines
UV lamps are used in printing machines to dry inks and coatings almost instantaneously through a process called ultraviolet curing. These lamps emit a powerful ultraviolet light that triggers a photochemical reaction, solidifying the ink or coating without the need for heat or extended drying times. This allows for faster production speeds and enhanced durability, making UV printing a top choice for commercial applications, such as packaging, labels, and high-volume marketing materials.
The Importance of Quality UV Lamps in Offset Printing
For ir lamps for offset printing machines in gouliguda, the use of high-performance UV lamps ensures that the printed material maintains sharpness, brightness, and durability. This is particularly important for businesses producing large quantities of high-resolution prints. A quality UV lamp can enhance the curing speed and reduce potential issues such as smudging, fading, or uneven finishes.
Trusted UV Lamp Distributors and Traders
If you are looking for trusted UV lamp dealers for printing machines, it’s essential to work with reputable suppliers who specialize in printing UV lamps. Leading printing UV lamps distributors offer a variety of options tailored to different printing machines, ensuring you get the right fit for your specific needs.
Moreover, some top offset printing UV lamps traders in hyderabad not only provide UV lamps but also offer after-sales services, such as maintenance, lamp replacement, and technical support. By working with experienced distributors and traders, businesses can ensure their printing machines operate at optimal performance, reducing downtime and enhancing the quality of every print run.
Why Choose UV Lamps for Printing?
Faster Drying Times: UV lamps cure ink instantly, enabling faster printing speeds.
Eco-Friendly: UV curing eliminates the need for solvent-based inks, reducing environmental impact.
High Durability: Prints cured with UV lamps are more resistant to scratching, fading, and other forms of wear and tear.
In conclusion, for any business in need of high-performance UV lamps for printing machines, partnering with reliable printing UV lamps distributors and offset printing UV lamps traders ensures a consistent supply of quality products that can enhance productivity and print quality.
#printing machine uv lamps dealers in lakdikapul#offset printing uv lamps exporters in lakdikapul#ir replacement lamps for offset printing#offset printing uv lamps suppliers in hyderabad#printing uv lamps distributors in gouliguda#printing machine uv lamps dealers#offset printing uv lamps traders#offset printing uv lamps exporters#offset printing ir lamps traders#offset printing ir lamps exporters
0 notes
Text
youtube
Disposable Syringe Production Plant
Thank You for watching my Video Laxmi Enterprises is the leading manufacturer, retailer,importer, exporter and service provider of , Egg tray machine, Disposable Syringe Production Plant etc.
#Laxmi Enterprises is the leading manufacturer#retailer#importer#exporter and service provider of#machines & equipment molds syringe assembly machine barrel printing machine blister packing machine needle assembly machine insulin sy#Youtube
0 notes
Text


So I started a new (very ambitious) embroidery project!
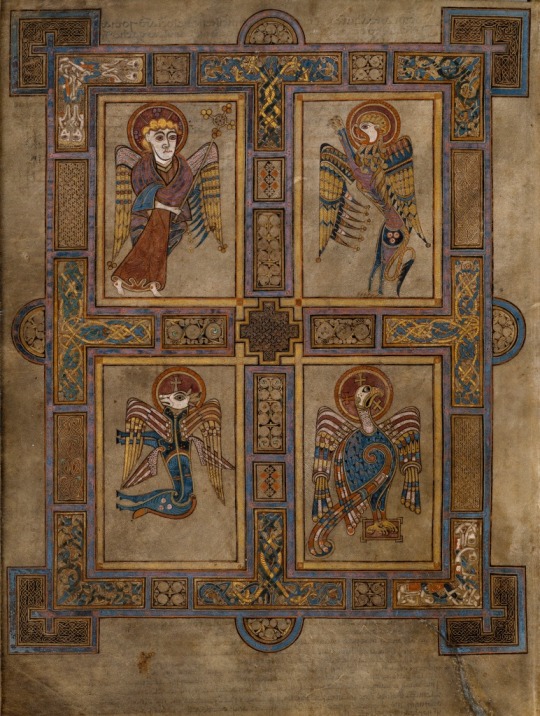
This project is going to be a doozy! I love this little figure from the Book of Kells, and I’ve been wanting to embroidery medieval miniatures from the Book of Kells for a long time, so why not now? I downloaded high quality images from the Book of Kells off of the Trinity College Dublin Library website, and located this little guy on Folio 27v. (Image 4) This figure is the Eagle meant to represent St. John the Evangelist and the ascension of Christ into heaven. I am not religious, but I did grow up Catholic (and in an Irish family) and I’ve long been a really passionate medievalist. I think that these illuminated manuscripts are super fucking cool, and I love medieval Irish art, so here I am.
I’ve only just started stitching (had to watch some very boring lectures for my least favorite grad school class of all time, so it was a good way to keep my hands busy!) I also at the last minute decided to do some metallic gold thread in some areas that I know are covered with gold leaf in the original image. I am choosing to use metallic thread despite the fact that I know it is Satan’s embroidery supply. I did one tiny cross with it already (see Image 3) and I am already regretting it, but it’s too late now lmao.
If I make it through this project maybe I'll do the other 3 Evangelists from Folio 27v. Will update as I go along!
Images:
Image 1: My embroidery set up laying on top of my bed spread. The bed spread is a quilt that my late grandmother made and machine embroidered back in the 1970s, when machine embroidery was hot and new. My set up includes:
Hoop
Project box that contains all of the threads I'll be using for the project, my thimble, my thread scissors, some tape to tape down loose threads on spindles, and my needles in a "pincushion" that's just a tiny ball of yarn.
My iPad for looking at the original image (and playing tunes!)
My color block reference image and my color sheet
Image 2: Close up on the color block and color sheet
Image 3: Result of my first 1:45 of stitching while listening to very boring lectures for my least favorite grad school class of all time.
Image 4: The original image, Folio 27v of the Book of Kells.
How did I get here (at the start line)? an extremely detailed step-by-step (under the cut because this post is already long af)
Downloaded the full size image of Folio 27v
Cut St. John out of the image using the pen tool in Photoshop and moved it to a new document with a clear background.
Pasted St. John into a blank high res procreate document.
Did a rough digital tracing of the image in procreate with my iPad and Apple Pencil.
Exported tracing back to my computer.
Opened tracing in Illustrator and made it into a vector. Took forever because I fucked up my procreate settings RIP.
Turned Vector into live paint object.
Opened original image in PS, and used eyedropper tool to select colors in original document. Compared those colors to the colors that I had in my stash (wanted to use mostly if not all from my stash rather than buying new floss).
Used threadcolors.com to get the hex codes for the selected threads. Made a spreadsheet of the selected colors for my reference. Printed out spreadsheet.
Colored the image using the paint bucket tool (and recolor artwork options) with the colors corresponding to selected threads. Saved Illustrator document.
Opened illustrator document in PS, gave it a solid white background and exported it as PDF.
Printed out initial copy of PDF image on blank printer paper to see if it was the right size. It wasn’t lol, so I made it bigger (super easy with vector images!) Printed test copy #2 and it was the right size.
Iron chosen fabric and stretch in Phillips head screw tightened hoop.
Printed the PDF image on Sulky Fabri-solvy, cut to size, and adhere to the surface of the stretched fabric.
Stitch, all single stranded….
total materials thus far:
Sulky Fabric Solvy
Embroidery Floss
Needles
Laptop with Photoshop, Illustrator, and Apple Numbers
The internet
iPad with Procreate and Apple Pencil
Printer
Cream colored fabric
Iron and ironing board
Scissors
Copy paper
8 notes
·
View notes
Note
Hey, saw your reblog of the post about flyers being a good way to reach not-so-online folks. Do you have any examples to draw on for inspiration? I'm no graphic designer so appreciate some examples. No matter what I promise not to use Comic Sans or Arial. 😀
Ironically, Comic Sans and Arial are some of the best font choices because they're easier for people with dyslexia to read! They're also widely available on most machines, so if you're going to send an editable version to other folks to print on a home computer, they'll generally render correctly. (you can also export a PDF and force it to do the same if you don't want them to edit)
Some sample full page flyers.


This is a two up, where I printed on a single page and split the page in half for hanging

Conveniently, one of the things in the twoup is the same as the full page. We did a smaller, less detailed one for this as it was a mini-event, so we hang in a much more limited area where folks likely already knew a lot of details about the venue as they walked past it.
It's not obvious with these, but generally the smallest text on here is 14 point. These are all in Arial.
The initial header is at least 34 point and some are up to 50, if I had space. The subheading is generally in range of 20-30
Bigger is better! People are generally going to see these while walking so need a really big, clear headline to get attention. You still want to keep it overall large because often walkers are older folks who may not have their reading glasses with them. GO BIG.
Less is more for this type of flyer.
Event Title
date and location
Other info
That's it! That's the basics! Use declarative sentence. One clause per sentence. If you can present things in a list, even better!
If you're doing a BIG event that had sponsors and stuff, you'll want to use fancier posters with their logos and stuff in prime locations and then these little guys that are just "event, date, location" in outdoor locations with low traffic.
If printing at home, buy yourself a light colored pack of card stock in a bright color. I personally use a safety orange. If you're getting them copied somewhere, spring for the card stock. It'll withstand getting rained on a few times and if it's pinned to an indoor bulletin board, you can hang with a single pin without worrying about it curling.
If it's going to be a flyer for recurring event or just info about a local resource like where the food pantry is, put a small "hung on X/y/z" on the very bottom. Some places require a date on posters for hanging and they'll take them down after a certain point to make sure they're still current. If you date them, they may stay up longer, because they know when they were hung instead of going on vibes of "oh that's been here forever" and it was actually only two weeks.
QR codes are something some people like on posters, but I personally am old and suspicious about anything I can't see the destination URL on, so don't use them. If you do use them, look at the place generating them carefully. If you can't figure out how they make their money making free QR codes... you're the product. Be suspicious, don't sell out folks data via QR code data harvesting.
My top spots for hanging flyers:
Bulletin boards at grocery stores
Laundromats
Coffee shop
Library (you will probably have to take it to circulation for approval, so make sure its All Ages appropriate as there are free range children in that library)
trailhead or parking pulloff by a trail.
Transfer station/dump (you may need approval there as it's town property, but you will get ONLY town residents there. It's worth asking at the booth! Same rules as library.)
Good luck with the flyers!
10 notes
·
View notes
Text
For those of you who wondered how I made my stickers
So how I made my stickers I did not make them in a website like canva or anything like that or got them printed I actually made them all by myself with a few things that I got off Amazon So first you need to get a good sticker paper or the one that you can afford I spent like $25 for a pack of 100 glossy sheets and it was called printable vinyl sticker paper for inkjet printer

This is the brand I use I think you can use whatever brand but use what is best for you You can use mat you can use glossy I use glossy because I like shiny stickers and it makes them pop when I put sparkles on them
Next you will need to have a printer I have an HP inkjet printer also before you get your sticker paper make sure you know what type of printer you have Because some certain types of printers do not support certain types of sticker paper because it can jam the printer and maybe even break your printer so make sure you check that this print paper works for your printer

This right here is my printer that I normally use Just a basic ink jet but also make sure that your printer also supports colored ink as well because if not you're just going to have a bunch of black and white stickers
Then have a drawing program whether that is procreate, fire alpaca, Adobe, CSP, both Paint tool sai's, ect. Whatever drawing program you like to use Just make sure that you can make it transparent in the background when you are ready So you can export it to a different type of program if you decide to do it that way I don't do it that way I actually print it through my drawing program also another tidbit do not use colors that are overly bright especially for using the type of glossy paper I use I learned from experience overly bright colors will make it look washed out and it will not pop so try to make sure you use medium to darks if you can and add lots of shading also make sure you have your line art dark as well so it can show the image well as well I just know from mistakes I've made in the past It's all trial and error my friends
Next how I do it as I make my stickers waterproof I use mod podge I used to spray on stuff I use the gloss spray on I don't use the mat because I don't like Matte stickers And I bought mine off of Amazon for about 10 bucks but it does last me a while except for the times I had a big sticker order then I used a lot more of it but yeah all you need is like a quick little coat I like to make it as my "save" button So my image does not get scratched up and scuffed up because with my type of sticker paper if I'm not careful the image will get all scuffed up which is why I spray so I can preserve the image.

This is the one I use It's lasted me for a good amount of projects also you only need like one or two coats like light coats don't go too heavy-handed or it can make your paper curl and that's something that you do not want and if it does curl put a heavy book on it for a few minutes and it should straighten up enough for you to put the laminate on also make sure you're in a well ventilated area if you are going to spray I recommend doing it outside but if you have to do it inside open a window make sure it's well ventilated and wear a mask You do not want to be breathing in this
Speaking of laminate That's what I use next I use sparkly laminate after the spray has dried and everything I put laminate on it since I do not have a laminate machine or anything I do everything by hand which is not easy to put laminate by hand laminate sheets are like these sticker sheets I use The ones I use are called Cosrk premium holographic laminate sheets And I bought those on Amazon for about 10 bucks each but it does come with a lot of laminate sheets in different styles in one pack You just choose which styles you prefer also it says this in the description but some people tend to forget you cannot print on these laminate sheets It will jack your printer up these are meant to put over an image not to print on an image there was a lot of reviews that said that it didn't work on their printer and I'm like yeah because you didn't use the product right lol So if you do get this product please make sure that you do not print on it it will really mess up your printer


Here's a brand an example of how the laminate looks like also another tip Make sure you keep it in a cool area If the area is way too warm they will curl up and if they do that make sure you just place a heavy book on it and hopefully it flattens out enough which comes on to putting it on the stickers this is a very delicate process because you can mess it up real easily if you are not careful especially if you do not have a machine to help you put the laminate on So I gently pull the laminate off Make sure there's no air bubbles or anything and if you do get air bubbles there are like tools to help get air bubbles out I don't know what the thing is called I think it's like a scraper I don't have that because I get frustrated with it and plus I learned enough to not get bubbles on my stuff anymore but I know what helps is I quickly gently put it on over it like quickly and gently Don't even press it down and then I quickly put a heavy book on it and usually that has worked for me like for a few minutes I put a heavy book on it and then the laminate is straight it barely has any bubbles and that's just the method it works out for me If you have another method try it out
And now for the final which is to put another coat of spray on there to make sure they're waterproof and protected I recommend putting about two coats like the last time light coats And then let him wait for a few seconds until they're not tacky anymore and then once they're all dried up you just cut them out since I don't have a cutter I cut them by hand which is not the easiest either especially if it's a unique shape but I try to cut him the best as I can I'm hopefully one day I can get a sticker cutter but until that day comes I'm going to do everything by hand lol So I hope that answers some of y'all's questions about how I make stickers If you have any more questions don't be afraid to ask me I will be more than happy to help out as you can only say so much on a blog post lol


Here's some sticker examples of the process lol also a little bit of fan art with those stickers And my graphic design skills
#stickers#how I make stickers#artists on tumblr#some fan art stickers#sticker tutorial of sorts#i love stickers
8 notes
·
View notes
Text
Nickel Rotary Screen & Nickel Screen Engraving Chemical Manufacturer, Supplier & Export in India
Welcome to Roopa Screen Private Limited. We are one of the most recognized and leading manufacturers, suppliers and exporters of various engraving products, rotary screen printing machine, nickel rotary screen, textile spares.
We are technically advanced and well equipped with manufacturing facilities, we are competent of fabricating and offering a wide range of engraving products, rotary screen printing machine, nickel rotary screen, textile spares and nickel screen engraving chemicals like photo emulsion for rotary screens. Our range of machines are known for their durability, efficiency, precision, technical superiority and are also easy to operate.

2 notes
·
View notes
Text
guys the digital nightmare is real. ive been trying to do stuff for a project but almost everything has gone wrong in some way. here’s a portion of the list detailing the times technology has failed me ;-;
CRT won’t display picture Tv won’t turn on properly Kept losing THE ONE CHARGER There was a dvd stuck in the back of the crt??? Couldn’t set up the dvd reader/burner Didn’t burn the dvd at all Burned the dvd incorrectly Couldn’t get scaling to match for printing Couldn’t even correctly draw with vectors Procreate dreams keeps goofing around Couldn’t set up a dvd menu right Couldn’t even open the dvd menu maker software Was struggling to export the sticker drawings Couldn’t find the file File was found but wouldn’t upload Had to fight a P D F FILE Printed while forgetting margins are a thing Couldn’t get the sticker cutter (machine) to pair (And before that couldn’t open the app because it had to update then go with the process of making an account) Couldn’t scale correctly again Cut incorrectly +5 times (Lost the charger again) Decided to finally calibrate the machine™️ but I was yet again struggling to print the sheet Printer was straight up offline Saved the file onto a flash drive but the printer didn’t pick up the pdf file Cried internally and tried to watch a YouTube video to guide me through this only for it to never load…
the current vibe
#twrp#twrp band#digital nightmare#NEVER BACK DOWN NEVER WHAT?!#*sobbing* never give up!!!#had the futon song playing in the background the whole time I was suffering#All of this for my little goobers. Will post about them later#smile force
8 notes
·
View notes
Text
Air Compressor Spare Parts Exporter
Digoma Enterprise is one of the best air compressor spare parts exporters, as they are quality-conscious and customer-care-oriented. It supplies an enormous number of spare parts compatible with different models and brands of air compressors, making it your one-stop shop for all compressor needs.
The strong and sturdy spare parts supplied here enhance the performance of air compressors. Compression devices are well-working devices and rarely break after they are bought from Digoma because of the strict quality of products the company is providing.
Other than this, they also come to realize that their parts are competitively priced, and to the business, they become a low-cost option. Many companies have relied on Digoma Enterprise for their air compressor spare parts, confident that the products would be of high quality, answering the needs of the customers. This obviously speaks volumes for their dedication to quality because they are one of the best in this export market.
#best crankshafts#best air compressor spare parts#best quality crankshafts#quality products#3d printing#best supplier#best air compressors#handcrafted#machine learning#resources#best air compressor spare parts exporters
0 notes
Text
Today, cloth inspection machines are no longer a luxury, but a smart investment for someone serious about the quality of their fabrics. At Krishna Engineering Works, you receive advanced, reliable machines that save you time and cost, thereby guaranteeing flawless delivery every time.
#krishnaengineeringworks#machine#manufacturer#machinery#export#supplier#industry#industrial#machines#clothinspectionmachines#inspectionmachine#textiles#textileindustry
2 notes
·
View notes
Text
Embers & To-do list (progress update)
February 24
(Cross-posted from Patreon)
I folded and am about to awl Embers-- vol 1-- my husband's birthday present for next month. I noticed so many mistakes on the typesetting, which is from May of 2023. The good news? I don't have to go through the painstaking process of changing the word doc, exporting the PDF, imposing it, downloading it, and printing again-- I can just live with the issues!
Mainly a spacing issue in the first chapter, all the new chapter pages having left-aligned page numbers, and a weird issue with the drop cap spacing. All things I can live with.
Unfortunately the margins are fucked. Plenty of top and bottom and even fore edge margin for me to trim, but it's going to be very slightly awkward on the inner margins due to the sewing. Still perfectly readable, though.
I didn't print a test signature BECAUSE I wasn't willing to change anything (long ass process described above) and I'm happy to live with the mistakes *because* this is something that's not leading my house.
I reread a small bit but caught myself... XD Embers has incredible re-readability so it's a great choice to bind.
After I get stabby, I'm gonna press the signatures overnight to reduce swell. Then sew! Typesetting, which used to be easy to me, is recently a pain in my ass. I find that with doing my day job on the computer (temporary work from home situation) and doing college on the computer, I don't wanna fucking touch it for bookbinding. The practical side of things, however, is nice. I wish I was past the typesetting stage on any of my "owed" projects; the two free paperbacks folks won (Domino and Mouse's).
I've included a picture of my silly to do list that let's me visually track progress on these projects. The first free paperback was easy because it was a fic I'd bound before. Only minor adjustments needed. I'm going to think long and hard about doing so many at once, ever again! Haha. It would have been fine if not compounded by the holidays and IRL work issues, actually-- but I've found it's the height of foolishness to make plans based on my *top* speed at completion things. Fall of last year, I was breezing by everything, and getting everything done soso fast!
Hopefully after this hill, and the break I plan on taking that I can see in the distance, I'll be able to be Speedy™️ once again.
As an aside, I can't remember if I mentioned, all the stickers and bookmarks (and tea and earrings) were mailed out earlier in the week, so February prizes are a bit early this month! Enjoy!
Domino project: 2/20
Mouse: 0/20
Embers: 6/20
Technological struggles: I bought affinity publishing last year when it was on sale, but this week when i tried to upgrade to using it instead of Word for typesetting (high learning curve but highlt recommended program for bookbinding), it crashed twice. The "why" is not a mystery. My laptop has been operating at almost maximum disc space, memory, and cpu, so I drug out my older but nicer laptop.
Re-installed a clean copy of the operating system, ordered a new battery, and have been slowly working my way over. It's a more heavy duty machine and despite being older, has better specs. So that's also been slowing me down. Every time I have spoons to do typesetting (or write), I run headfirst into these difficulties, and by the time I've made progress there, the spoons are gone.
However, slow and steady progress IS being made. I've pretty much vowed to keep trucking on with Word until I finish my current roster of projects, then fuck around with Affinity when I get 5 seconds.
Anyway, long post! Many update. Some progress.


2 notes
·
View notes
Text
So if you're at all curious about how we do the 3D printing for the Mabinogi models it's actually kinda cool in a really dumb way.
First we rip the old game files and upload them into Blender 2.78 where I can then import them as a PMG and export them as a proper OBJ since most things outside of Mabinogi have no clue what a PMG is suppose to look like. The models often have big squares where transparent textures should be and are horrifying with a bunch of flat planes everywhere. They are far too thin to print and generally have a lot of clipping and other potential problems.
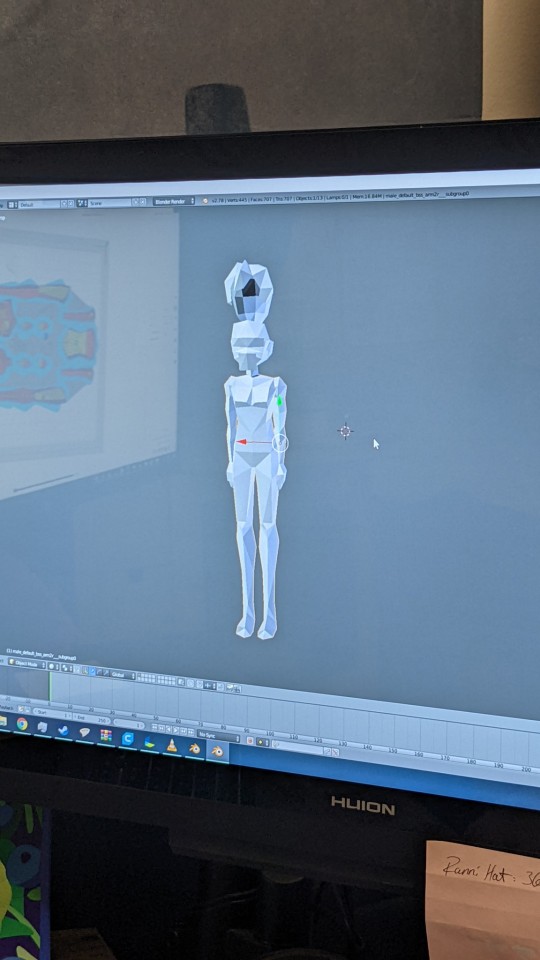
After I export it from 2.78 I can import the newly exported OBJ file in 3.1 where I can now directly edit and fix the model, in this case I'm adding pegs and peg holes to limbs so they can be accurately attached to the body as well as filling in thin areas, and fixing any clipping issues or random holes/non-existent planes that would otherwise be covered by a texture. It's important to remember these files were not designed with printing in mind, so they work just fine being loaded into a game with textures and transparency and floating parts connected by code, but when you try to print them you're going to have a ton of issues.
Here I've aligned everything to be printed in such a way as to make it as easy as possible to print without too many supports as to reduce time and filament cost per print.
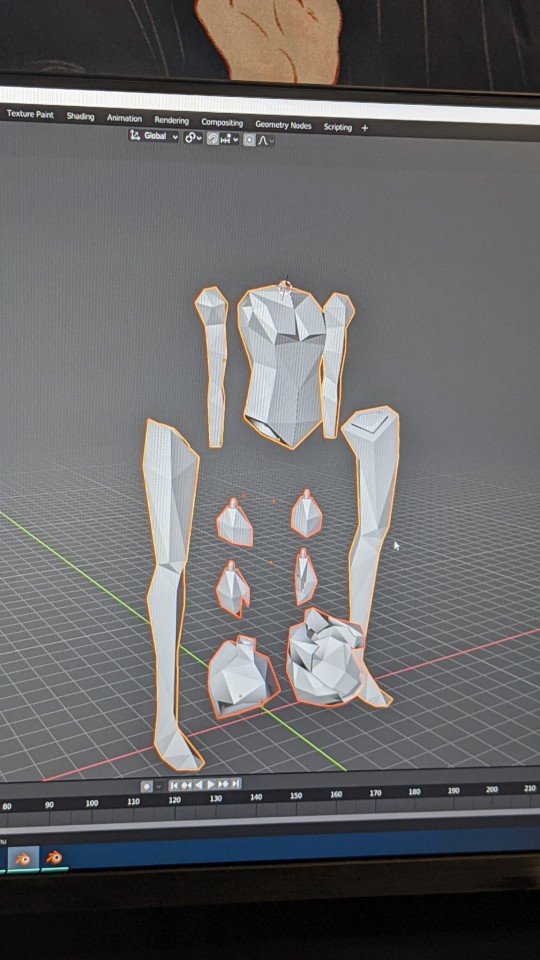
I actually had to end up slicing the whole thing in half and mirror it as to reduce the sheer amount of work I'd have to do converting it to something we refer to as "thick and printable"
Speaking of which, once I'm done editing and fixing the model so it can actually be properly printed, I load it into Cura and figure out the best size and settings,
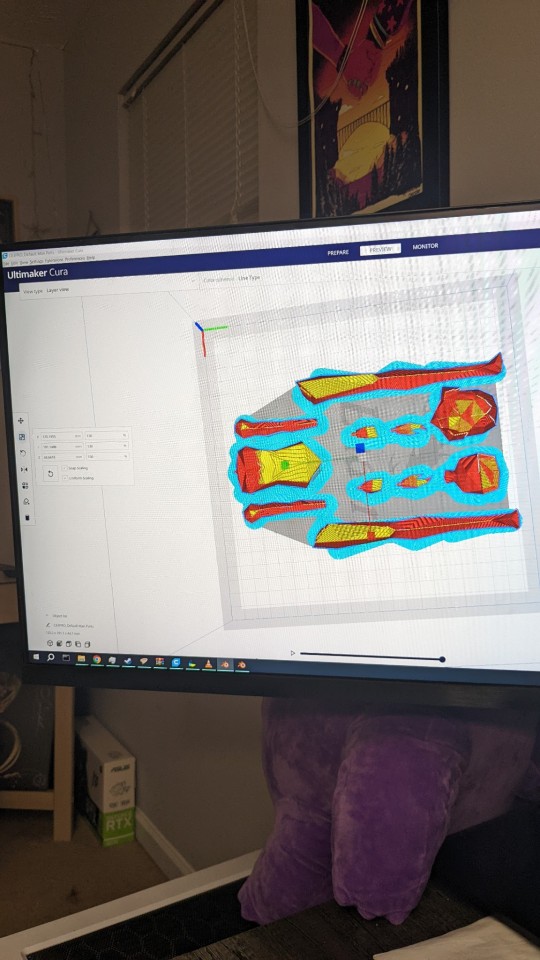
I figured out the settings to get the model to print at roughly 6-7 inches give or take .5 should my calculations be correct here.
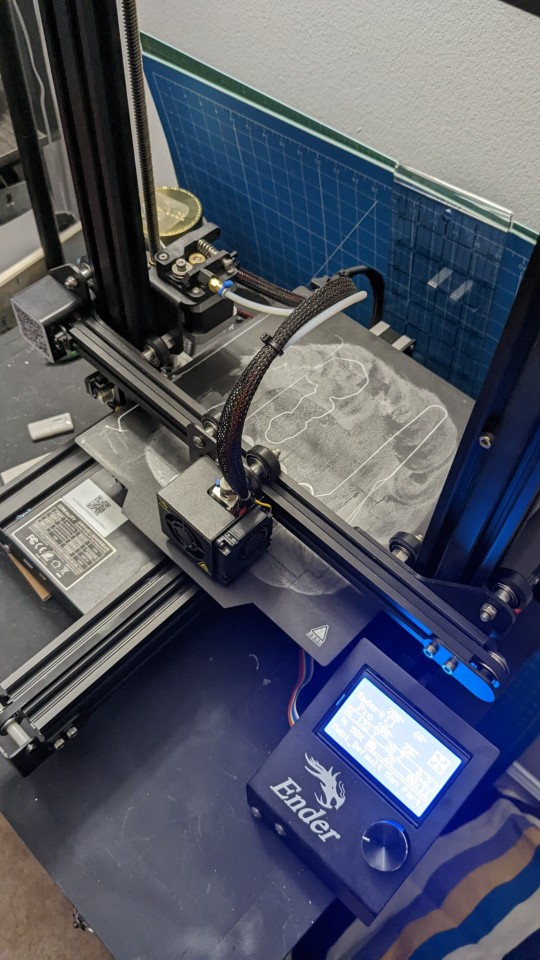
The fun part of printing these is that your print can screw up horribly if the bed isn't level, if the bed isn't hot enough or is too hot, if the nozzle is too hot or not hot enough, if the machine is moving too fast or too slow, if you didn't glue the surface well enough, if you didn't let the glue set long enough, if the machine happens to clog, or just about any other bullshit reason the machine might throw at you. The result of which is that you have to babysit the machine for a lot of the early stages to make sure everything is working, unfortunately it looks as though a lot of it isn't sticking or is sticking incorrectly however I'm going to give it a few layers to potentially correct itself as it sometimes manages to and for now it's only building the raft and supports so nothing too important has been entirely lost if it does fix itself. The image you're seeing above is from 11 minutes into the print.
And this image is current at 50 minutes in, amazingly showing everything printing just as it should.
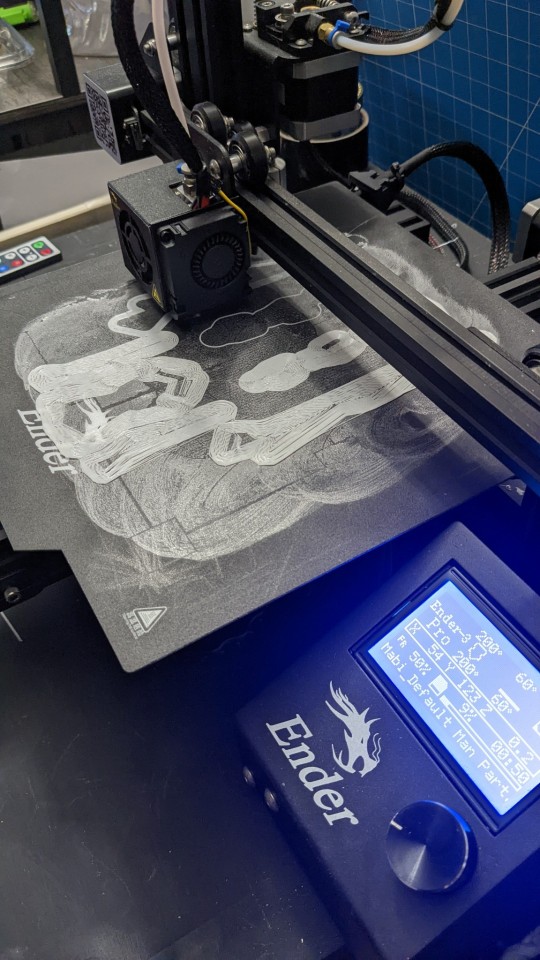
This print is projected to be roughly 10 hours long according to the machine however I'm predicting closer to 15 - 17 since the computers prediction at 50% speed was 14 and I'm running it 50% slower than that (I guess I technically could have just said 25% total speed but it's literally 50% of the 50%)
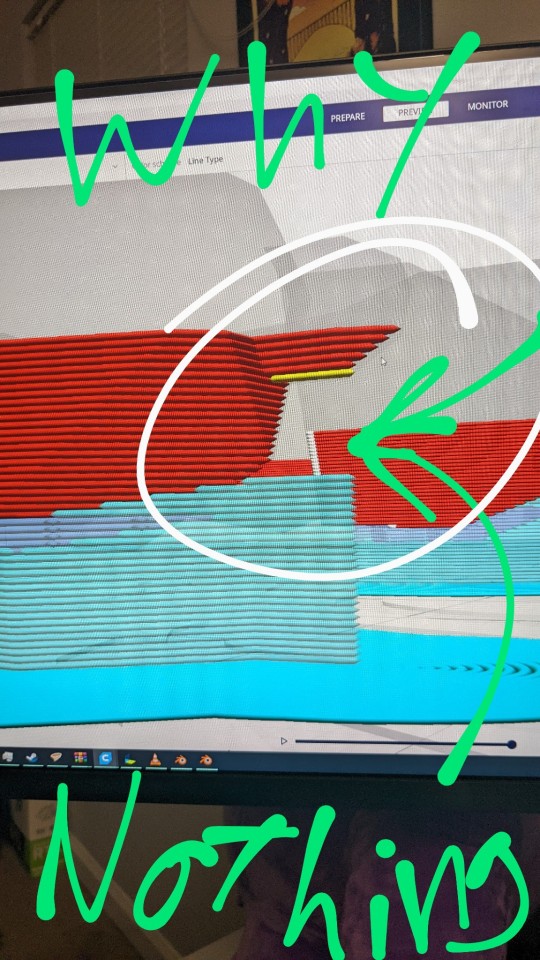
The only thing I'm worried about is how it's not projecting any supports for the pegs somehow, it just expects to print on thin air...
This confuses me greatly
3 notes
·
View notes
Text
Disrupt
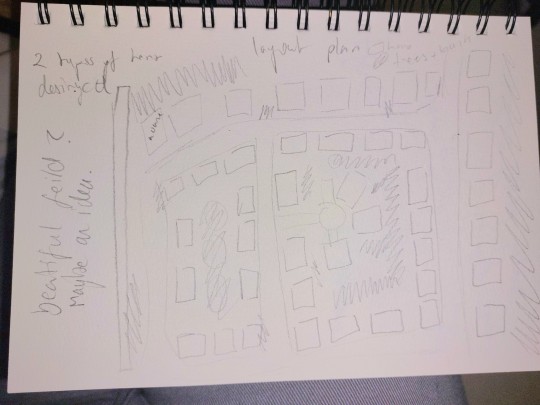
I had a really cool idea of instead of painting a simple of housing estate I would actually construct one from scratch! This idea came form my Poem which I am using as a primary source.
I started my doing the 3d proning workshop which we made a keychain and I learned how to use blender. I used blender to make my models. I made two houses on big one and one small one. I wanted the small one to almost look like when little monopoly house cause ei thought it would be fun. I kept to simplicity as this is my first time ever doing this.
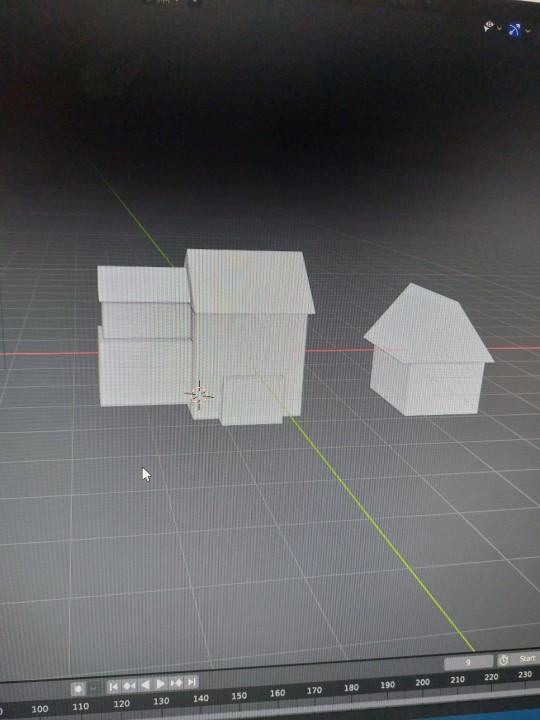
Houses in blender!!!
I also learned how to export the file into the 3d printer which wasn't that hard with the help of that as card. I also learned how to unload and load the machines filliments. I had some trouble but in the end I managed to start it getting printed! 44 little houses here I come!!

Plan is to try and get this done today or tomorrow. I will stick on the houses of a massive page and try to recreate this housing estate that I drew which I got inspiration from from other housing states around me!
2 notes
·
View notes
Text
so what's happening here?
okay. so first off - i changed the main's url a while back and then realised 'wait if that's not using this one then i can put it back here' i intend to dedicate most of my spoons today to fixing links - if it's been more than 8 hours since this post was made and you find a broken link, please tell me
but anyway. we are reincarnating (i still got the long covid but trying to make it easier on me this go around)
what's changing? well, i intend to have two different types of builds here: - adaptations - direct adaptations of a character, presented without description as the original character's should suffice. for example, gym leaders and danganronpa characters would likely fall here. instead of characterisation notes, i'll just have ideas of how to integrate them. (this doesn't necessarily mean all the human characters will be human though. that's boring) - inspirations - the majority of existing builds fall under this. examples being basically any mon that isn't a specific one like guildmaster wigglytuff. these will have characterisation notes though perhaps not as in-depth as they used to - long covid messed that one up a bit.
and what's new?
i'll be making example sheets, probably using MPMB's pdfs. i say probably because they need adobe acrobat, so don't run natively on linux and i can't get them to run through wine - but they look so good i've set up a win10 virtual machine just to use them - why this over beyond? beyond still hasn't implemented some stuff properly, and the exported pdfs require scrolling in some fields in my experience which means no printing - why this over dicecloud? again, pdf export reasons - you can't export it in any easily readable way - why this over insert any other pdf here? this one does the maths for me :v
if these sheets don't work out for me i'll be using dicecloud for the maths and just copying stuff into another pdf. if they do work out i'll put a proper payment in for them; i appreciate PWYW for letting you try them out first too
generally these will be level 5 or 6 to play around with how i see them.
i have no schedule for this currently. i'm mostly posting this to try and force brain into it - the adhd stuff is. Going - but hopefully i'll get /somewhere/ next month.
i also intend to update all the existing builds. mostly just making sheets for them, but some of them there's cool new stuff they can use on heroforge. as such, i'll be preparing them, and once i have enough i'll start queueing them and updating their links once i do
regarding homebrew - my friend's homebrew i've used for a couple isn't available currently, so i'll adapt them to new roles. scrafty's going to be the hardest, but i can deal i do intend to look and see what homebrew is set up for whichever sheets i end up going with - it won't be the main focus but it will give some inspiration...
but yeah. tl;dr long covid + adhd are kicking my heck but we stay silly :3
2 notes
·
View notes