#Program to view msg files on pc
Explore tagged Tumblr posts
Visit Tumblr Blog
Explore Tumblr blogs with no restrictions, modern design and the best experience.
Last Seen Tumblr Blogs


Fun Fact
Total funding amounts to $125.3M.
Text
Program to view msg files on pc

PROGRAM TO VIEW MSG FILES ON PC INSTALL
PROGRAM TO VIEW MSG FILES ON PC WINDOWS 10
PROGRAM TO VIEW MSG FILES ON PC SOFTWARE
PROGRAM TO VIEW MSG FILES ON PC PC
PROGRAM TO VIEW MSG FILES ON PC FREE
NOTE: Check with your system administrator or Internet service provider to determine the required settings for Dial-Up Networking and TCP/IP. If any additional protocols are necessary, add the protocols by using the Network tool in Control Panel. If you are prompted to restart Windows, do so. NOTE: If you cleared the Virtual Private Networking check box in step 4, click to select it. When you are prompted to restart Windows, do so.Ĭlick Details, and then click to select the Dial-Up Networking check box. NOTE: If you receive the Ndiswan.vxd error message, click to clear the Virtual Private Networking check box only.
PROGRAM TO VIEW MSG FILES ON PC PC
In Control Panel, double-click Add/Remove Programs.Ĭlick the Windows Setup tab, and then click Communications.Ĭlick Details, and then click to clear the Dial-Up Networking check box. Supports viewing message on iCloud on PC/Mac and selective downloading of message from iCloud Backups Allows users to view files before downloading iCloud Backups to PC for Free. To do so, follow these steps:Ĭlick Start, point to Settings, and then click Control Panel. Download softwareName and enjoy it on your iPhone, iPad, and iPod touch. To resolve this problem, remove and then reinstall Dial-Up Networking. Read reviews, compare customer ratings, see screenshots, and learn more about softwareName. Do the same for Network Adapter properties information if a network adapter is listed in Network properties. NOTE: If you have previously set up Dial-Up Networking and have added items such as phone numbers, TCP/IP settings, and other protocols, record the information before you remove the Dial-Up adapter. When the computer is restarted, the files are requested and cannot be found. The Dial-Up Networking files are not copied to the hard disk but the file names are added to the registry.
PROGRAM TO VIEW MSG FILES ON PC INSTALL
This problem can occur if you install Dial-Up Networking, Dial-Up Adapter, or Virtual Private Networking and then cancel Setup while the Copying Files dialog box is displayed. Two additional dialog boxes may appear informing you that the following two files cannot be found:Īfter you acknowledge these error messages, Windows starts normally but without Dial-Up Networking functionality. The following files are listed as missing: If you still want to use the application associated with this device file, try reinstalling that application to replace the missing file. The Windows registry or SYSTEM.INI file refers to this device, but the device file no longer exists. MSG File Viewer is fast and safe program.Cannot find a device file that may be needed to run Windows or a Windows application.MSG Reader is easy to use for both home and technical users.Easily read both files and folders from Microsoft Outlook.It's the biggest advantage is that it supports both ANSI & UNICODE file formats.
PROGRAM TO VIEW MSG FILES ON PC WINDOWS 10
Supports Windows 10 & all the below versions- Windows8, Windows8.1, Windows7, Windows XP, Windows Vista, NT etc.
Capable to view header details, images and all the information.
Now, you can easily open Outlook MSG messages with. MSG File Viewer supports to view multiple MSG files at once.
PROGRAM TO VIEW MSG FILES ON PC FREE
You can easily view unlimited email files by using. Free MSG Viewer is the effective solution to open MSG files without Outlook. Successfully works with large number of MSG files.MSG file Reader maintains unread status or read status of emails.
PROGRAM TO VIEW MSG FILES ON PC SOFTWARE
This software can be used for forensic purpose.
Download and run easily, no installation compulsory.
Outlook Installation is not necessary to View/Open MSG emails.
MSG Viewer able to View and Open MSG files along with attachments. Access and view iPhone files, like photos, videos, contacts, messages, and more, on PC or Mac Transfer files between an iOS device and a computer Transfer data from one iPhone/iPad to another Therefore, whether you are using a Mac or PC, you can view your iPhone messages on the computer with the help of EaseUS MobiMover.
The MSG File Reader helps to overcome the problem for viewing MSG files without modification. Coolutils Mail Viewer is a free MSG viewer software for Windows. By using this MSG Opener you can easily view the emails content with proper information. 5 Best Free MSG Viewer Software For Windows Coolutils Mail Viewer. MSG Viewer allows you to read & open MSG files without Outlook Installation.
0 notes
Text
UEFI hacking malware
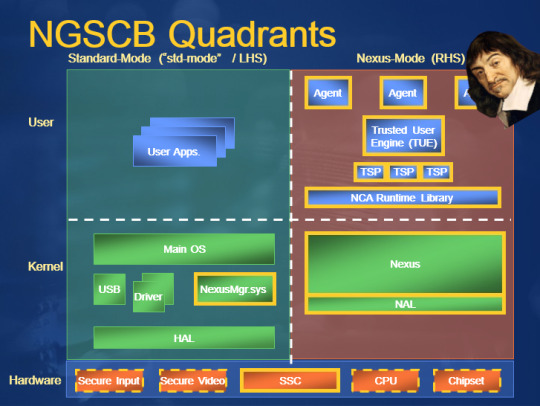
Security researchers are alarmed: the already-notorious Trickbot malware has been spottied probing infected computers to find out which version of UEFI they're running. This is read as evidence that Trickbot has figured out how to pull off a really scary feat.
To understand why, you have to understand UEFI: a fascinating, deep, philosophical change to our view of computers, trust, and the knowability of the universe. It's a tale of hard choices, paternalism, and the race to secure the digital realm as it merges with the physical.
Computers were once standalone: a central processing unit that might be augmented by some co-processors for specialized processes, like a graphics card or even a math co-processor.
These co-pros were subordinate to the CPU though. You'd turn on the computer and it would read a very small set of hardcoded instructions telling it how to access a floppy disk or other storage medium for the rest of the boot sequence, the stuff needed to boot the system.
The hardwired instructions were in a ROM that had one job: wake up and feed some instructions to the "computer" telling it what to do, then go back to sleep. But there's a philosophical conundrum here.
Because the world of computing is adversarial and networked computing is doubly so: there are people who want your computer to do things that are antithetical to your interests, like steal your data or spy on you or encrypt all your files and demand ransom.
To stop this, you need to be able to examine the programs running on your computer and terminate the malicious ones. And therein lies the rub: when you instruct your computer to examine its own workings, how do you know if you can trust it?
In 1983, Ken Thompson (co-creator of C, Unix, etc) was awarded a Turing Award ("computer science's Nobel Prize"). He gave a fucking bombshell of an acceptance speech, called "Reflections on Trusting Trust."
https://www.cs.cmu.edu/~rdriley/487/papers/Thompson_1984_ReflectionsonTrustingTrust.pdf
Thompson revealed that he had created a backdoor for himself that didn't just live in Unix, but in the C compiler that people made to create new Unix systems.
Here's what that means: when you write a program, you produce "high-level code" with instructions like "printf("Hello, World!");". Once your program is done, you turn it into machine code, a series of much shorter instructions that your CPU understands ("mov dx, msg" etc).
Most programmers can't read this machine code, and even for those who can, it's a hard slog. In general, we write our code, compile it and run it, but we don't examine it. With nontrivial programs, looking at the machine code is very, very hard.
Compilers are treated as intrinsically trustworthy. Give 'em some source, they spit out a binary, you run the binary. Sometimes there are compiler bugs, sure, and compiler improvements can be a big deal. But compilers are infrastructure: inscrutable and forgotten.
Here's what Thompson did: he hid a program in his compiler that would check to see whether you were compiling an operating system or a compiler. If you were compiling an OS, it hid a secret login for him inside of it.
If you were compiling a compiler, it hid the program that looked for compilers or operating systems inside of it.
Think about what this means: every OS you compiled had an intentional security defect that the OS itself couldn't detect.
If you suspected that your compiler was up to no good and wrote your own compiler, it would be compromised as soon as you compiled it. What Thompson did was ask us to contemplate what we meant when we "trusted" something.
It was a move straight out of Rene Descartes, the reasoning that leads up to "I think therefore I am." Descartes' "Discourse on the Method" asks how we can know things about the universe.
He points out that sometimes he thinks he senses something but is wrong - he dreams, he hallucinates, he misapprehends.
If all our reasoning depends on the impressions we get from our senses, and if our senses are sometimes faulty, how can we reason at all?
Descartes wants a point of certainty, one thing he *knows* to be absolutely true. He makes the case that if you can be certain of one thing, you can anchor everything else to this point and build up a massive edifice of trustable knowledge that all hangs off of this anchor.
Thompson is basically saying, "You thought you had descartesed your way into a trustable computing universe because of the axiom that I would never poison your lowest-level, most fundamental tools.
"*Wrong*.
"Bwahahahaha."
(But, you know, in a nice way: an object lesson to serve as a wake-up call before computers fully merged with the physical world to form a global, species-wide digital nervous system whose untrustworthy low-level parts were foolishly, implicitly trusted).
But processors were expensive and computers were exploding. PCs running consumer operating systems like Windows and Mac OS (and more exotic ones like GNU/Linux and various Unices) proliferated, and they all shared this flawed security model.
They all relied on the operating system to be a faithful reporter of the computer's internals, and operated on the assumption that they could use programs supervised by the OS to detect and terminate malicious programs.
But starting in 1999, Ken Thompson's revenge was visited upon the computing world. Greg Hoglund released Ntrootkit, a proof-of-concept malware that attacked Windows itself, so that the operating system would lie to antivirus programs about what it was doing and seeing.
In Decartesspeak, your computer could no longer trust its senses, so it could no longer reason. The nub of trust, the piton driven into the mountainface, was made insecure and the whole thing collapsed. Security researchers at big companies like Microsoft took this to heart.
In 2002, Peter Biddle and his team from Microsoft came to EFF to show us a new model for computing: "Trusted Computing" (codenamed "Palladium").
https://web.archive.org/web/20020805211111/https://www.microsoft.com/presspass/features/2002/jul02/0724palladiumwp.asp
Palladium proposed to give computers back their nub of Descartesian certainty. It would use a co-processor, but unlike a graphics card or a math co-pro, it would run before the CPU woke up and did its thing.
And unlike a ROM, it wouldn't just load up the boot sequence and go back to sleep.
This chip - today called a "Secure Enclave" or a "Trusted Platform Module" (etc) - would have real computing power, and it would remain available to the CPU at all times.
Inside the chip was a bunch of cool cryptographic stuff that provided the nub of certainty. At the start of the boot, the TPM would pull the first stages of the boot-code off of the drive, along with a cryptographic signature.
A quick crypto aside:
Crypto is code that mixes a key (a secret known to the user) with text to produce a scrambled text (a "ciphertext") that can only be descrambled by the key.
Dual-key crypto has two keys. What one scrambles, the other descrambles (and vice-versa).
With dual-key crypto, you keep one key secret (the "private key") and you publish the other one (the "public key"). If you scramble something with a private key, then anyone can descramble it with your public key and know it came from you.
If you scramble it *twice*, first with your private key and then with your friend's public key, then they can tell it came from you (because only your private key's ciphertexts can be descrambled with your public key).
And *you* can be certain that only they can read it (because only their private key can descramble messages that were scrambled with their public key).
Code-signing uses dual-key crypto to validate who published some code.
Microsoft can make a shorter version of its code (like a fingerprint) and then you scramble it with its private key. The OS that came with your computer has a copy of MSFT's public key. When you get an OS update, you can descramble the fingerprint with that built-in key.
If it matches the update, then you know that Microsoft signed it and it hasn't been tampered with on its way to you. If you trust Microsoft, you can run the update.
But...What if a virus replaces Microsoft's public keys with its own?
That's where Palladium's TPM comes in. It's got the keys hardcoded into it. Programs running on the CPU can only ask the TPM to do very limited things like ask it to sign some text, or to check the signature on some text.
It's a kind of god-chip, running below the most privileged level of user-accessible operations. By design, you - the owner of the computer - can demand things of it that it is technically capable of doing, and it can refuse you, and you can't override it.
That way, programs running even in the most privileged mode can't compromise it.
Back to our boot sequence: the TPM fetches some startup code from the disk along with a signature, and checks to see whether the OS has been signed by its manufacturer.
If not, it halts and shows you a scary error message. Game over, Ken Thompson!
It is a very cool idea, but it's also very scary, because the chip doesn't take orders from Descartes' omnibenevolent God.
It takes orders from Microsoft, a rapacious monopolist with a history of complicity with human rights abuses. Right from that very first meeting the brilliant EFF technologist Seth Schoen spotted this (and made the Descartes comparison):
https://web.archive.org/web/20021004125515/http://vitanuova.loyalty.org/2002-07-05.html
Seth identified a way of having your cake and eating it too: he proposed a hypothetical thing called an "owner override" - a physical switch that, when depressed, could be used to change which public keys lived in the chip.
This would allow owners of computers to decide who they trusted and would defend them against malware. But what it *wouldn't* do is defend tech companies shareholders against the owner of the computer - it wouldn't facilitate DRM.
"Owner override" is a litmus test: are you Descartes' God, or Thompson's Satan?
Do you want computers to allow their owners to know the truth? Or do you want computers to bluepill their owners, lock them in a matrix where you get to decide what is true?
A month later, I published a multi-award-winning sf story called "0wnz0red" in Salon that tried to dramatize the stakes here.
https://www.salon.com/2002/08/28/0wnz0red/
Despite Seth's technical clarity and my attempts at dramatization, owner override did not get incorporated into trusted computing architectures.
Trusted computing took years to become commonplace in PCs. In the interim, rootkits proliferated. Three years after the Palladium paper, Sony-BMG deliberately turned 6m audio CDs into rootkit vectors that would silently alter your OS when you played them from a CD drive.
The Sony rootkit broke your OS so that any filename starting with $SYS$ didn't show up in file listings, $SYS$ programs wouldn't show up in the process monitor. Accompanying the rootkit was a startup program (starting with $SYS$) that broke CD ripping.
Sony infected hundreds of thousands of US gov and mil networks. Malware authors - naturally enough - added $SYS$ to the files corresponding with their viruses, so that antivirus software (which depends on the OS for information about files and processes) couldn't detect it.
It was an incredibly reckless, depraved act, and it wasn't the last. Criminals, spies and corporations continued to produce rootkits to attack their adversaries (victims, rival states, customers) and trusted computing came to the rescue.
Today, trusted computing is widely used by the world's largest tech companies to force customers to use their app stores, their OSes, their printer ink, their spare parts. It's in medical implants, cars, tractors and kitchen appliances.
None of this stuff has an owner override. In 2012, I gave a talk to Google, Defcon and the Long Now Foundation about the crisis of owner override, called "The Coming Civil War Over General Purpose Computing."
https://memex.craphound.com/2012/08/23/the-coming-civil-war-over-general-purpose-computing/
It proposed a way that owner override, combined with trusted computing, could allow users to resist both state and corporate power, and it warned that a lack of technological self-determination opened the door to a parade of horribles.
Because once you have a system that is designed to override owners - and not the other way around - then anyone who commands that system can, by design, do things that the user can't discern or prevent.
This is the *real* trolley problem when it comes to autonomous vehicles: not "who should a car sacrifice in a dangerous situation?" but rather, "what happens when a car that is designed to sometimes kill its owner is compromised by Bad Guys?"
https://this.deakin.edu.au/self-improvement/car-wars
The thing is, trusted computing with an owner override is pretty magical. Take the Introspection Engine, a co-processor in a fancy Iphone case designed by Edward Snowden and Bunnie Huang. It's designed to catch otherwise undetectable mobile malware.
https://www.tjoe.org/pub/direct-radio-introspection/release/2
You see, your phone doesn't just run Ios or Android; the part that interfaces with the phone system - be baseband radio - runs an ancient, horribly insecure OS, and if it is infected, it can trick your phone's senses, so that it can no longer reason.
The Introspection Engine is a small circuit board that sandwiches between your phone's mainboard and its case, making electrical contact with all the systems that carry network traffic.
This daughterboard has a ribbon cable that snakes out of the SIM slot and into a slightly chunky phone case that has a little open source hardward chip with fully auditable code and an OLED display.
This second computer monitors the electrical signals traveling on the phone's network buses and tells you what's going on. This is a user-accessible god-chip, a way for you to know whether your phone is hallucinating when it tells you that it isn't leaking your data.
That's why it's called an "Introspection Engine." It lets your phone perch at an objective remove and understand how it is thinking.
(If all this sounds familiar, it's because it plays a major role in ATTACK SURFACE, the third Little Brother book)
https://attacksurface.com
The reason the Introspection Engine is so exciting is that it is exceptional. The standard model for trusted computing is that it treats everyone *except* the manufacturer as its adversary - including you, the owner of the device.
This opens up many different sets of risks, all of which have been obvious since 1999's Ntrootkit, and undeniable since 2005's Sony Rootkit.
I. The manufacturer might not have your interests at heart.
In 2016, HP shipped a fake security update to its printers, tricking users into installing a system that rejected their third-party ink, forcing them to pay monopoly prices for HP products.
https://www.eff.org/deeplinks/2020/11/ink-stained-wretches-battle-soul-digital-freedom-taking-place-inside-your-printer
II. An insider at the company may not have your interests at heart.
Multiple "insider threat" attacks have been executed against users. Employees at AT&T, T-Mobile, even Roblox have accepted bribes to attack users on behalf of criminals.
https://www.vice.com/en/article/qj4ddw/hacker-bribed-roblox-insider-accessed-user-data-reset-passwords
III. A government may order the company to attack its users.
In 2017 Apple removed all working VPNs from its Chinese app stores, as part of the Chinese state's mass surveillance program (1m members of religious minorities were subsequently sent to concentration camps).
Apple's trusted computing prevents users from loading apps that aren't in its app stores, meaning that Apple's decisions about which apps you can run on your Iphone are binding on you, even if you disagree.
https://www.reuters.com/article/us-china-apple-vpn/apple-says-it-is-removing-vpn-services-from-china-app-store-idUSKBN1AE0BQ
IV. Third parties may exploit a defect in the trusted computing system and attack users in undetectable ways that users can't prevent.
By design, TPMs can't be field updated, so if there's a defect in them, it can't be patched.
Checkm8 exploits a defect in eight generations Apple's mobile TPM. It's a proof-of-concept released to demonstrate a vulnerability, not malware (thankfully).
https://checkm8.info/
But there have been scattered, frightening instances of malware that attacks the TPM - that suborns the mind of God so that your computer ceases to be able to reason. To date, these have all been associated with state actors who used them surgicially.
State actors know that the efficacy of their cyberweapons is tied to secrecy: once a rival government knows that a system is vulnerable, they'll fix it or stop using it or put it behind a firewall, so these tools are typically used parsimoniously.
But criminals are a different matter (and now, at long last, we're coming back to Trickbot and UEFI) (thanks for hanging in there).
UEFI ("You-Eff-Ee") is a trusted computing that computer manufacturers use to prevent unauthorized OSes from running on the PCs they sell you.
Mostly, they use this to prevent malicious OSes from running on the hardware they manufacture, but there have been scattered instances of it being used for monopolistic purposes: to prevent you from replacing their OS with another one (usually a flavor of GNU/Linux).
UEFI is god-mode for your computer, and a compromise to it would be a Sony Rootkit event, but 15 years later, in a world where systems are more widespread and used for more critical applications from driving power-plants to handling multimillion-dollar transactions.
Trickbot is very sophisticated malware generally believed to be run by criminals, not a government. Like a lot of modern malware, there's a mechanism for updating it in the field with new capabilities - both attacks and defenses.
And Trickbot has been observed in the wild probing infected systems' UEFI. This leads security researchers to believe that Trickbot's authors have figured out how to compromise UEFI on some systems.
https://www.wired.com/story/trickbot-botnet-uefi-firmware/
Now, no one has actually observed UEFI being compromised, nor has anyone captured any UEFI-compromising Trickbot code. The thinking goes that Trickbot only downloads the UEFI code when it finds a vulnerable system.
Running in UEFI would make Trickbot largely undetectable and undeletable. Even wiping and restoring the OS wouldn't do it. Remember, TPMs are designed to be unpatchable and tamper-resistant. The physical hardware is designed to break forever if you try to swap it out.
If this is indeed what's going on, it's the first instance in which a trusted computing module was used to attack users by criminals (not governments or the manufacturer and its insiders). And Trickbot's owners are really bad people.
They've hired out to the North Korean state to steal from multinationals; they've installed ransomware in big companies, and while their footprint has waned, they once controlled 1,000,000 infected systems.
You can check your UEFI to see if it's vulnerable to tampering:
https://eclypsium.com/2019/10/23/protecting-system-firmware-storage/
and also determine whether it has been compromised:
https://eclypsium.com/2020/10/14/protecting-your-organizations-from-mosaicregressor-and-other-uefi-implants/
But this isn't the end, it's just getting started. As Seth Schoen warned us in 2002, the paternalistic mode of computing has a huge, Ken Thompson-shaped hole in it: it requires you trust the benevolence of a manufacturer, and, crucially, they know you don't have a choice.
If companies knew that you *could* alter whom you trusted, they would have to work to earn and keep your trust. If governments knew that ordering a company to compromise on TPMs, they'd understand that their targets would simply shift tactics if they made that order.
Some users would make foolish decisions about whom to trust, but they would also have recourse when a trusted system was revealed to be defective. This is a fight that's into its third decade, and the stakes have never been higher.
Sadly, we are no closer to owner override than we were in 2002.
23 notes
·
View notes
Text
Microsoft Outlook For Mac Free Download 2010

Along with the rise of the internet's popularity, emailing has become a common practice of both personal and professional communications. Outlook is just one of the manyemail service providers available in the market.
Outlookis Microsoft's email child, available for both PC and Mac users through its web app or software. Much like its competitors, this application offers all the tools needed to compose, send, and receive emails. Here's a detailed rundown of all of Outlook's features and performance.
Ample features and email experience
Outlook offers the basic function of sending and receiving emails just as much as its competition. What sets it apart are the many features that make your email experience even better.
Outlook is Microsoft's email server for Office 365. You can get it with the complete office suite or access it online. It offers the basic function of sending and receiving emails just as much as its competition. What sets it apart are the many features that make your email experience even better.


Get the most up-to-date version of Outlook and enjoy email, calendar, and contacts in one place. Upgrade to Microsoft 365 today. Create Groups to discuss, collaborate, and share files and notes with others. Use Skype for Business voice and video calls for real-time decisions. Improved conversation. Microsoft Outlook for Android helps millions of users connect all their email accounts, calendars and files in one convenient spot. With intelligent email, calendar reminders and contacts, Outlook for Android lets you do more from one powerful inbox. Email friends, family and colleagues from multiple accounts on one app and see what matters most first with the Focused inbox that keeps the. Outlook 2010 free download - Microsoft Outlook Express, MSG Viewer for Outlook, Microsoft Outlook 2019, and many more programs.
There are two types of rules in Outlook for Mac: server rules and client rules. Server rules If you are using a Microsoft Exchange account managed by Microsoft Exchange Server 2010 SP1 or later, you can use Outlook for Mac to create and edit server-based rules.In the Rules box of Outlook for Mac, server rules are grouped by account under Server Rules in the left pane. Microsoft outlook 2010 free download - Microsoft Outlook Express, Microsoft Outlook 2019, Microsoft Office 2011, and many more programs.
Overview of Outlook
At first glance, Outlook is like any other email suite: simple design, straightforward look. You cancompose emails in rich text and bold, highlight, underline your message however you want. Format your emails easily with tools available to insert tables, links, lists, and change font colors in one neatly arranged toolbar.
When opening emails, Outlook shows a new tab to view the entire message on the app itself. Use its Immersive Reader feature to see the email in full screen or preview photo attachments in a slideshow before deciding which one to download or save.
Keeping you organized
Outlook keeps things organized by providing you several options to sort your emails. Why get lost thru labels when you can create folders to classify emails as you see fit? You can alsoplace tags to easily categorize emails accordingly.
Its search feature is but another feature that distinguishes Outlook from other email providers. You can filter emails by file size, making it easier to offload unnecessary emails and avoid exceeding the memory limit.

Outlook products
While this email application comes with Microsoft Office 365, users can still get an Outlook account by signing up on their website. You'll get 15GB worth of email storage space the same as any other email service provider on the web. If you download the Outlook app, you can get a whopping 50 GB worth of storage great for sending and receiving emails with large file attachments.

Apart from the email suite, Outlook also comes with Microsoft's Calendar application to help you easily schedule meetings and appointments. This application notifies you ahead of your sessions so that you are in the loop, always. Outlook also helps you manage contacts using the People application.
Where can you run this program?
Outlook runs on several devices, including Windows and Mac computers. Its web-based application allows you to access your email even on others' desktops. This email suite also offers apps supported by both Android and iOS devices so that you can manage your inbox on the go using your smartphone or your iPad. Finally, this popular Microsoft program can be downloaded on Windows Mobile or integrated into numerous business systems and applications, including Skype, Evernote, Paypal, Yelp, and many more. Truly ideal for any type of user.
Is there a better alternative?
There are plenty of alternative global communications software to Outlook. If you need to use an email suite mostly for personal use, Google's Gmail is a good choice. It's free and can be accessed through any web browser or its app on Android and iOS. It also offers the same amount of storage as that of the free Outlook account, allowing messages with up to 50 MB of file attachments.
For company and business use, Workplace by Facebook is another effective communication tool that gives a more instant experience. It's a somewhat spitting image of the social media website, except for the fact that it's a central communication hub for staff and managers to use in their day-to-day work.
Download Microsoft Outlook 2010 Full
Our take
From the looks of it, Outlook is definitely worth giving a shot. The best features include classifying emails by folders and tags, as well as sorting out email through file size. Speed and performance will not be a problem for those using the desktop version, and the interface is clear and easy to understand.
Should you download it?
Yes. Microsoft's Outlook is packed with so many features that cannot be found in other email clients in the market. While you will have to shell out a little more in order to get all its features, it will definitely be worth the investment. So, if you're a fan of keeping your inbox organized and personalized, then Outlook is the tool for you.
Install Microsoft Outlook 2013 Free
2010
1 note
·
View note
Text
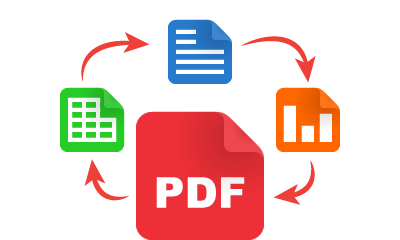
Three Best Free Document Converter Software Programs
For PDF, DOCX, XLSX, TIF, WPS and More
A document converter is a form of record converter that changes one kind of record report format, which include PDF, XLSX, DOCX, TIF, or TXT, into another kind. If you are not able to open or edit a document due to the fact you don't have a software that supports it, converters can help.
Every program indexed underneath is freeware. We have not included any trialware or shareware converters.
To store a PDF to a Microsoft Word document format like DOCX, see our list of the excellent unfastened PDF to Word converters. Check out: xdtowp.co
01 of 03
Zamzar
What We Like Converts loads of record kinds.
Works with video, images, audio, ebooks, and song documents.
Special request option for conversions of report types not listed.
What We Don't Like Heavy web site traffic can postpone conversions.
Limited to 2 report conversions every 24 hours.
Our Review of Zamzar Zamzar is an online record converter service that helps many common phrase processing, spreadsheet, presentation, and other file formats.
You can convert documents which might be as huge as 50 MB.
Input Formats: CSV, DJVU, DOC, DOCX, EML, EPS, KEY, KEY.ZIP, MPP, MSG, NUMBERS, NUMBERS.ZIP, ODP, ODS, ODT, PAGES, PAGES.ZIP, PDF, PPS, PPSX, PPT, PPTX, PS, PUB, RTF, TXT, VSD, WKS, WPD, WPS, XLR, XLS, XLSX, and XPS
Output Formats: CSV, DOC, HTML, MDB, ODP, ODS, ODT, PDF, PPT, PS, RTF, TIF, TXT, XLS, XLSX, and XML
Zamzar additionally supports report to MP3 conversion, that means it features as an internet text-to-speech device. Several image codecs also are supported as output options for many styles of files, as is the SWF video layout.
Not all output codecs are to be had for all input codecs. For example, you can't convert DOC to PUB.
Zamzar will paintings with any running gadget that supports a web browser, consisting of all variations of Windows, Linux, and macOS. All you want to do is upload the report to the website online.
Visit Zamzar
02 of 03
FileZigZag
FileZigZag document record converter What We Like Simple interface and clean to use.
File sizes up to 150 MB for registered customers, 50 MB for unregistered.
Registration isn't required.
What We Don't Like File conversion can be a good deal slower than others.
Registered users get hold of precedence for conversions.
Free customers are restrained to 10 conversions per day.
Our Review of FileZigZag FileZigZag is some other on line report converter provider with a view to convert most commonplace report, spreadsheet, and different comparable codecs.
Input Formats: ODT, SXW, DOC, RTF, XHTML, TXT, HTML, HTM, OTT, STW, SDW, SXC, ODS, XLS, OTS, STC, XLT, SDC, ODG, OTG, SDA, SXI, ODP, PDF, PPT, POT, STI, OTP, EPS, DOCX, DOCM, DOTX, DOTM, XLSB, XLSM, XLSX, XLTM, XLTX, PPTM, PPTX, POTM, and POTX
Output Formats: CSV, DOC, EPS, HTML, ODG, ODP, ODS, ODT, OTG, OTP, OTS, OTT, PDF, POT, PPT, RTF, SDA, SDC, SDW, STC, STI, STW, SXC, SXD, SXI, SXW, TXT, VOR, XHTML, XLS, and XLT
FileZigZag also accepts several photograph codecs as inputs and outputs but does now not act as an OCR device. There are also numerous enter codecs we indexed above that don't export to every output layout.
We like how simple it is to apply FileZigZag, and top of that, it could convert huge report files (sincerely massive files are supported if you pay).
Much like Zamzar, FileZigZag may be used from any internet browser on any working device.
Visit FileZigZag
03 of 03
Doxillion record converter in Windows 7
What We Like Multiple file conversions straight away.
Windows and Mac software variations to be had.
What We Don't Like Software set up required.
Doxillion is every other loose file converter that helps famous record sorts. Unlike the 2 converters above, Doxillion is an real application you have to installation in your pc before you can convert any files.
Input Formats: DOCX, DOC, HTML, HTM, MHT, MHTML, ODT, RTF, PAGES, EPUB, FB2, MOBI, PRC, EML, TXT, WPD, WP, WPS, PDF, CSV, JPEG/JPG, BMP, GIF, PCX, PNG, PNM, PSD, RAS, TGA, TIF, and WBMP
Output Formats: DOC, DOCX, HTML, ODT, PDF, RTF, TXT, and XML
You can upload whole folders complete of documents or just pick out unique documents that you want to be converted.
Up to three proper-click on menus may be added to Windows Explorer. What this does is permit you to right-click a report and convert it quick while not having to first open the Doxillion software.
1 note
·
View note
Text
Free Mri Viewer Mac

Free Mri Viewer Software For Mac
Free Mri Viewer Mac
Dicom Viewer Download Windows 10
Free Image Viewer free image viewer is a unique and feature rich Image DWG Viewer View AutoCAD drawings with this free DWG/DXF/DWF viewer. Image32 View and Share Xrays, CT Scans, MRIs, and more. OsiriX MD is specially created to aid in the navigation and visualization of multidimensional and multimodality images. It can function as a 2D, 3D, 4D and 5D viewer, while also supporting all modern rendering methods: multiplanar reconstruction, volume rendering, surface rendering and maximum intensity.
Image32 v.1.1.1View and Share Xrays, CT Scans, MRIs, and more. Fast, Simple, Secure. For Patients: Take Control of your Medical Images. Securely Backup all your imaging in one place. Learn about your Exposure to Radiation.
Source Viewer v.1Source Viewer is a php coded web page allowing you to display the html and php source code of files on your server directly in a browser. It's free of charge.
PageRank Viewer for Mac v.1.0PageRank Viewer for Mac can display the Google pageranks of up to 20 websites a time.
RationalPlan Project Viewer for Mac v.5.3.7811RationalPlan Project Viewer is a free project scheduling software viewer, the perfect solution for anyone (from project stakeholders to team workers) to view your projects in detail.
Seavus Project Viewer v.2016Seavus Project Viewer is a MS® Project viewer that allows users to open, view and print project plans (.mpp files) apart from MS® Project. Project managers create plans in MS® Project, whereas team members view those plans in Seavus Project Viewer.
MS Project Viewer for Mac v.3.1.3MOOS Project Viewer is a Microsoft Project viewer that can open any MS Project file type (.mpp, .mpt, .mpx, .xml) for any Microsoft Project version (2000, 2003, 2007 and 2010). Available views: WBS, Gantt chart, task sheet, resource sheet, calendars ..
WMF Viewer and Convertor for Mac v.2.6.3The program is graphics viewer which helps you to view WMF on Mac, and convert them to numerous vector and raster formats including PDF(vector), EPS, JPG, GIF, TIF, PSD, PICT, PNG, BMP, SGI. You can navigate through the images in a folder using ..
MOOS Project Viewer for Mac OS v.2.2A Microsoft Project viewer that can open any MS Project file type (.mpp, .mpt, .mpx, .xml) for any Microsoft Project version (2000, 2003, 2007). Available views: WBS, Gantt chart, Tracking Gantt, Task Usage, Resource Sheet, Resource Usage.It is ..
Crystal Reports Viewer for Mac OS v.2008A free standalone .rpt file viewer that allows you to open, view, and explore interactive reports straight from your desktop. Whether you work online or not, you can create customized views of the data without the need for a report designer or ..
Outlook MSG Viewer for Mac OS v.1.1Outlook MSG Viewer is a Mac-only program which allows you to view Microsoft Outlook .MSG files seamlessly inside your Mac mail client (Apple Mail, Entourage, etc.). This is especially handy if youve imported your Microsoft Outlook e-mails from a PC ..
NoteShare Viewer for Mac OS v.1.7.5Free viewer application to view NoteTaker and NoteShare notebooks. - Compatibility update for the new NoteShare v1.7.5 and NoteTaker v2.2.4 releases.
WMF Viewer for Mac OS v.2.6.3With this Wmf Viewer, you can view WMF on Mac, and convert them to numerous vector and raster formats including PDF(vector), EPS(vector), JPEG, GIF, TIFF, 8BPS(Photoshop), PNG, PNTG, BMP, SGI. You can navigate through the images in a folder using navigati ..
Molegro Molecular Viewer for Mac OS v.2.1A free cross-platform application for visualization of molecules and Molegro Virtual Docker results. Molegro Molecular Viewer offers a high-quality visualization tool combined with a user interface experience focusing on usability and productivity.
MOOS Project Viewer for Mac OS X v.2.6.2MOOS Project Viewer is an easy-to-use Microsoft Project viewer that can help you open any Microsoft Project file type (.mpp, .mpt, .mpx, .xml) for any MS Project version. The application features WBS, Gantt chart, task sheet, resource sheet and ..
Steelray Project Viewer for Mac OS X v.4.4.3.0Steelray Project Viewer is a Windows application that lets you open, print, search, and export Microsoft Project mpp files and view the information in them without requiring Microsoft Project. Supports all standard views from Microsoft Project ..
Seavus Project Viewer™ v.10.1.0Seavus Project Viewer is a MS® Project viewer that allows users to open, view and print project plans (.mpp files) apart from MS® Project. Project managers create plans in MS® Project, whereas team members view those plans in Seavus Project Viewer.
GroupDocs.Viewer for .NET v.2.9.0HMTL5 document viewer for displaying over 50 types of documents within your .NET (ASP.NET, C#, VB.NET) apps. Supported formats include: PDF and Microsoft Word documents, Excel spreadsheets, PowerPoint slides, Visio diagrams, CAD and raster images.
GroupDocs.Viewer for Java v.2.8.0HMTL5 document viewer library for displaying 50+ types of documents and images within your Java apps. Supported formats include: PDF, Microsoft Word and Excel documents, PowerPoint presentations, Visio diagrams, CAD and raster images.
IFotosoft Photo Viewer Free for Mac v.2.2.3670Super fast photo viewer software with wonderful experience, supports almost all photos formats and RAW files, batch process and effective touch up features for photo browsing. Different picture viewing modes to meet all your requirements.
IFotosoft Photo Viewer for Mac v.2.2.4770Super fast photo viewer software with wonderful experience, supports almost all photos formats and RAW files, batch process and effective touch up features for photo browsing. Different picture viewing modes to meet all your requirements.
You asked: How do I load an MRI cd on my Mac? There are two reasons why you may be having difficulty and both must be present to impede your attempting to do so: A. Usually the image will have the software on the CD to view it. I would presume it is for windows only. Put it in a windows computer. Don't bother trying to download other viewers as it probably needs its own software. The software is available for free and is designed so as to enable viewing of this images in a manner that is compliant and at the same time effective from a network or from a VPN. Other Platform The amount of effort required to deliver radiology is really immense and a thing that requires heavy investing for the development phase to be.
Mri Viewer software by TitlePopularityFreewareLinuxMac
MS Project Viewer for Mac MOOS Project Viewer is a Microsoft Project viewer that
Image32 View and Share Xrays, CT Scans, MRIs, and more. Fast,
RationalPlan Project Viewer for Mac RationalPlan Project Viewer is a free project scheduling
Seavus Project Viewer Seavus Project Viewer is a MS® Project viewer that
Microspot DWG Viewer for Mac OS A product based on Microspot MacDraft Professional which
MOOS Project Viewer for Mac OS X MOOS Project Viewer is an easy-to-use Microsoft Project
MedDream DICOM Viewer MedDream DICOM Viewer is HTML5 zero-footprint ready to
JasViewer report viewer 4 jasper reports Jasper Report Viewer . Runs jasper files, and prompts user
Crystal Reports Viewer for Mac OS A free standalone .rpt file viewer that allows you to
Source Viewer Source Viewer is a php coded web page allowing you to
Visit (email protected) for more of the top downloads here at WinSite!
MicroDicom DICOM viewer
Latest version
Room design app for macbook. Installation package:
MicroDicom DICOM viewer 3.8.1 x86 (4.17 MB 2020-11-25) MicroDicom DICOM viewer 3.8.1 x64 (4.78 MB 2020-11-25)
Portable zip package(no installation required):
MicroDicom DICOM viewer 3.8.1 x86 zip (4.91 MB 2020-11-25) MicroDicom DICOM viewer 3.8.1 x64 zip (5.80 MB 2020-11-25)
Autorun package for CD/DVD/USB: MicroDicom DICOM viewer CD/DVD 3.8.1 (10.6 MB 2020-11-25)
MicroDicom Shell Extension
Latest version Universal installation package for x86 and x64: MicroDicom Shell extension 3.0.0 (2.49 MB 2020-06-07)
Program For Viewing Mri Images On Mac Keyboard
Sample DICOM images
Program For Viewing Mri Images On Mac Os
You can download some sample DICOM images from here.
Free Mri Viewer Software For Mac
Program For Viewing Mri Images On Macbook Pro
Free Mri Viewer Mac
DICOM sample images were temporarily removed.
MicroDicom DICOM viewer older versions:
Dicom Viewer Download Windows 10
Program For Viewing Mri Images On Mac Computers
You can download older versions of MicroDicom DICOM viewer here
0 notes
Text
Sending Wireless Vibration and Temperature Sensor Data to Excel Using Node-RED
Things used in this project
IoT Long Range Wireless Temperature Humidity Sensor with power source Battery Or External DC.
Zigmo/Router for PC
XAMPP
PC/Laptop with an OS installed or Any IoT Embedded Device.
Story
Introducing NCD’s Long Range IoT Industrial wireless vibration and temperature sensor, boasting up to a 2-mile range the use of a wireless mesh networking structure. Incorporating a precision 16-bit vibration and temperature sensor, this device transmits incredibly accurate vibration and temperature records at consumer-described durations.

For the duration of Power-Up, this vibration sensor learns “normal” base-line vibration from the monitored device. This base-line vibration is subtracted from regular sampled vibration readings to improve applicable vibration data. Preferably, the monitored device must be off even as the sensor is mastering. Once the sensor stabilizes and starts sending information, the device/equipment being monitored can be powered on. This business IoT wireless vibration sensor samples 3-axis of vibration data for 100ms after which calculate RMS, maximum, and minimal vibration readings. This sensor combines these records with temperature data in a data packet and transmits the result to modems and gateways in the wireless variety. Once the transmission is complete, the vibration sensor is going lower back to sleep, therefore minimizing power consumption.
Powered by using just 2 AA batteries and operational life of 500,000 wireless transmissions, a ten years battery life can be expected relying on environmental conditions and the data transmission interval. Optionally, this sensor may be externally powered, making it a perfect choice for wireless vibration monitoring device for industrial equipment. With an open communication protocol, this sensor transmits hardware-encrypted data that may be included with just about any control system or gateway. Data can be transmitted to a laptop, a raspberry pi, to Losant IoT cloud, microsoft® azure® IoT, and an embedded gadget all at the equal time. Sensor parameters and wireless transmission settings can be modified using labview® tracking software on a computer pc.

Long-Range Wireless Mesh Modem with USB Interface

Setting up Node-Red
The sensor and Zigmo/Router come pre-programmed and work out of the box. In this section, we will set up a sensor and Zigmo link and start receiving data on our PC.
Resources Required
IoT Long Range Wireless Vibration and Temperature Sensor with power source Battery Or External DC.
Zigmo/Router for PC
PC/Laptop with an OS installed or Any IoT Embedded Device
Steps to install NODE-RED
Now that you have sensors running, we need a way to do something useful with that data.
First of all, you’ll have to install Node-RED.
Once that’s done, you’ll need to enter your command line, or Power Shell for Windows users, navigate to the directory Node-RED is installed in.
Now type “npm i ncd-red-wireless node-red-dashboard“. This will install the nodes required to receive data from your wireless sensors and you can start Node-RED once this is done.
To start node server write node-red in the command prompt or terminal and press enter.
Setting up the nodes
Assuming at this point you’ve started up Node-RED, you should be able to open a browser and navigate to http://localhost:1880, this will open up the flow builder that is the heart of the Node-RED experience.
Steps to build the flow
At this point you’ll be viewing a large blank flow with a long list of nodes on the left-hand side, this sidebar is called the palette.

Go ahead and drag a Wireless Gateway node over to your flow canvas to get started.

ncd-red-wireless provides the nodes that manage the serial connection, parse incoming sensor data, filter it by specific parameters, and allow you to configure the wireless sensors.
Finding your wireless sensors
Once you’ve added the node you’ll be able to view the info tab, which contains information about the node’s functionality, this tab is well-populated for most node-red packages and contains valuable information, many times you will not need to view any other documentation outside of the info tab, so keep it in mind while you are building your flows if you have a question about how a node works. The next thing we need to do is configure the node, when you first add it you’ll notice that there is a small triangle on the top right corner next to a blue dot, the triangle indicates that the node needs additional configuration, the blue dot indicates that the node has not yet been deployed as part of the flow.
Double click on the node to open up the configuration options.

Click on the pencil icon next to the Serial Device field to configure your USB router, this will open a second configuration panel that only has a few options.

Click on the magnifying glass next to the Serial Port field and select the port that corresponds with your router, then click the “Add” button on top. The Serial Device field will now be populated based on that selection, and you can click “Done”, you now have direct access to your wireless sensors! To view the data coming in.

Now go back to your palette and type “debug” into the search field at the top, grab one of these nodes and drag it to the right of your Wireless Gateway

Double click on it and change “msg.” to “complete msg object” click done

Now draw a line between the two nodes, and click “Deploy” on the top right of the window...

Working with the data
Now out of your wireless sensors data is gathered and it is output to the “debug” tab, this “debug tab” is placed within the right sidebar subsequent to the information tab. To see the information are available in to hit the reset button. In node-red records is surpassed among nodes in a JSON packet. When the msg object comes into the debug tab you may make bigger it to view the overall list of information that comes with it. This is extraordinarily useful in case you need to quickly see which sensors are checking in. The other issue this node gives is an easy way to interchange your router to the network identity that devices in configuration mode document on, simply hit the button on the left of the node and the tool will switch to the configuration network, hit it once more to return it to listening mode. Once we get the wi-fi tool nodes set up, they may be set to routinely configure a sensor whilst it enters configuration mode, so it’s always available to maintain such gateway nodes present at the flow for speedy configuring a device.

Adding the wireless sensors
we need to separate wireless sensor records domestically in order that we are able to display it, we could use a switch node to split out the messages from the gateway based totally on the mac address with or sensor type, but as I referred to, the wireless nodes truly incorporate extra functionality for configuring the sensors, so we’ll start with them to give you an extra entire image of how those structures can work. In case you haven’t already seen packets coming in from both of your sensors, cross in advance and hit the reset button on the only that hasn’t stated. While a sensor assessment in thru any serial device configuration node, the mac address and kind of sensor is cached in a pool so we are able to quickly find it for the duration of this next step.
Grab a Wireless Node from the palette and drag it onto the flow, double click on it to get it configured

Select the serial device from the drop-down that you used for the Wireless Gateway, now click the magnifying glass next to “Mac Address” and select one of the available options.


You’ll notice this automatically sets the sensor type for you, you can also give it a name to make it easier to identify. As noted in the info tab, the Serial Device for Config field is optional, and we won’t worry about it right now. The node you have just added effectively works as a filter on incoming sensor data, only passing through data for the mac address, or sensor type if no mac address is present.
Now go back to your palette and type “debug” into the search field at the top, grab one of these nodes and drag it to the right of your Wireless Gateway

Double click on it and click done.

Adding Function Nodes
The function node is used to run JavaScript code against the msg object. The function node accepts a msg object as input and can return 0 or more message objects as output. This message object must have a payload property (msg.payload) and usually has other properties depending on the proceeding nodes.
Now grab a “function” node from the palette, and place it to the right of the Vib/Temp node.

Double click on the node to open up the edit options.
Here you have to write little javascript code to create a condition, so at particular temperature value email alert will be sent to the respective email id

var rms_x = msg.payload.rms_x;var rms_y = msg.payload.rms_y;var rms_z = msg.payload.rms_z;var max_x = msg.payload.max_x;var max_y = msg.payload.max_y;var max_z = msg.payload.max_z;var min_x = msg.payload.min_x;var min_y = msg.payload.min_y;var min_z = msg.payload.min_z;var temperature = msg.payload.temperature;var d = new Date();var time = d.toLocaleTimeString();var m ={'Time':time, 'RMS_X':rms_x, 'RMS_Y':rms_y, 'RMS_Z':rms_z, 'MAX_X':max_x, 'MAX_Y':max_y, 'MAX_Z':max_z, 'MIN_X':min_x, 'MIN_Y':min_y, 'MIN_Z':min_z, 'Temperature':temperature};return {payload:m};
Now grab a CSV node from the palette and place it to the right of the function node, it will convert the values CSV format i.e comma-separated values.

Now double click on it and type the column names separated by comma and output as “a message per row” as shown in the picture below.

Now go back to your palette and type “file” into the search field at the top, grab the one which shows “Writes msg.payload” to store the values and place it right to the CSV node. You can also attach the debug node to check the out of the file node.

Double click on it to edit the file node, enter the file name where you want to store the values as shown in the figure.

Now connect all the wires and click on the deploy button.


OUTPUT
Now you can check the excel output

Node-RED Flow
[{"id":"196a9fe1.7ccfd","type":"tab","label":"Flow 10","disabled":false,"info":""},{"id":"7d4721bf.a16ae","type":"ncd-gateway-node","z":"196a9fe1.7ccfd","name":"","connection":"dd330f73.d38c4","x":120,"y":80,"wires":[["7c4cff18.6dec1"]]},{"id":"8afeb9de.1b6c58","type":"ncd-wireless-node","z":"196a9fe1.7ccfd","name":"","connection":"22543864.0ebf38","config_comm":"4fd1b36a.f61a0c","addr":"","sensor_type":"8","auto_config":true,"node_id":0,"delay":"900000","destination":"0000FFFF","power":4,"retries":10,"pan_id":"7FFF","change_enabled":"","change_pr":"0","change_interval":"0","cm_calibration":"60.6","bp_altitude":"0","bp_pressure":"0","bp_temp_prec":"0","bp_press_prec":"0","amgt_accel":"0","amgt_mag":"0","amgt_gyro":"0","impact_accel":"0","impact_data_rate":"4","impact_threshold":25,"impact_duration":1,"activ_interr_x":1,"activ_interr_y":2,"activ_interr_z":4,"activ_interr_op":8,"filtering":0,"data_rate":5,"time_series":0,"reading_type":1,"x":80,"y":240,"wires":[["c98be87e.aa1ff8","5a9846ac.6f6408"]]},{"id":"7c4cff18.6dec1","type":"debug","z":"196a9fe1.7ccfd","name":"","active":false,"tosidebar":true,"console":false,"tostatus":false,"complete":"payload","targetType":"msg","x":460,"y":80,"wires":[]},{"id":"c98be87e.aa1ff8","type":"debug","z":"196a9fe1.7ccfd","name":"","active":false,"tosidebar":true,"console":false,"tostatus":false,"complete":"false","x":260,"y":400,"wires":[]},{"id":"5a9846ac.6f6408","type":"function","z":"196a9fe1.7ccfd","name":"Function","func":"var rms_x = msg.payload.rms_x;\nvar rms_y = msg.payload.rms_y;\nvar rms_z = msg.payload.rms_z;\nvar max_x = msg.payload.max_x;\nvar max_y = msg.payload.max_y;\nvar max_z = msg.payload.max_z;\nvar min_x = msg.payload.min_x;\nvar min_y = msg.payload.min_y;\nvar min_z = msg.payload.min_z;\nvar temperature = msg.payload.temperature;\nvar d = new Date();\nvar time = d.toLocaleTimeString();\nvar m ={'Time':time, 'RMS_X':rms_x, 'RMS_Y':rms_y, 'RMS_Z':rms_z, 'MAX_X':max_x, 'MAX_Y':max_y, 'MAX_Z':max_z, 'MIN_X':min_x, 'MIN_Y':min_y, 'MIN_Z':min_z, 'Temperature':temperature};\nreturn {payload:m};","outputs":1,"noerr":0,"x":280,"y":240,"wires":[["61edf644.9b33e8"]]},{"id":"61edf644.9b33e8","type":"csv","z":"196a9fe1.7ccfd","name":"","sep":",","hdrin":true,"hdrout":"","multi":"one","ret":"\\n","temp":"Time,RMS_X,RMS_Y,RMS_Z,MAX_X,MAX_Y,MAX_Z,MIN_X,MIN_Y,MIN_Z,Temperature","skip":"1","x":490,"y":240,"wires":[["85aa32da.0c053"]]},{"id":"85aa32da.0c053","type":"file","z":"196a9fe1.7ccfd","name":"Excel_Output","filename":"\"C:\\Users\\dcube\\Desktop\\node-red vibration sensor\\Excel\\Output.xlsx\"","appendNewline":true,"createDir":true,"overwriteFile":"false","encoding":"utf8","x":690,"y":240,"wires":[[]]},{"id":"dd330f73.d38c4","type":"ncd-gateway-config","z":"","name":"","comm_type":"serial","ip_address":"","tcp_port":"2101","port":"COM6","baudRate":"115200","pan_id":"7fff","rssi":false},{"id":"22543864.0ebf38","type":"ncd-gateway-config","z":"","name":"","comm_type":"serial","ip_address":"","tcp_port":"2101","port":"COM6","baudRate":"115200","pan_id":"7fff","rssi":false},{"id":"4fd1b36a.f61a0c","type":"ncd-gateway-config","z":"","name":"","comm_type":"serial","ip_address":"","tcp_port":"2101","port":"COM6","baudRate":"115200","pan_id":"7fff","rssi":false}]
0 notes
Text
Vaisala Oyj Port Devices Driver Download For Windows

Download Vaisala USB Instrument 5.4.24 from our website for free. The common filename for the program's installer is USBFinder.exe. The program lies within Development Tools, more precisely Help. The most popular versions among the program users are 5.4 and 1.0. Free vaisala mi70 driver updates download software at UpdateStar. Vaisala Oyj - Shareware. Download, and update your PC's device drivers for you. DRIVERS GPRS MODEM G2403U FOR WINDOWS VISTA DOWNLOAD. Using lan cable modem. Mp 700 series gps rugged wireless modem at command. Cellphones networking modules supplier, one home network, wwan wireless wide area network, commands reference guide, mtk gprs modem speed.
License: All 1 2 | Free
Vaisala Oyj Port Devices Driver Download For Windows 10
NMEA Converter is a product to convert various types of Data NMEA to UDP Converter UDP to NMEA Converter(Reserved) Gps to HDT Converter(Reserved) NMEA to KML Converter(Reserved) NMEA to KMZ Converter(Reserved) KML to NMEA Converter(Reserved) KMZ to NMEA Converter(Reserved)
Category: Audio / MP3 Search Tools Publisher: NMEAsoft, License: Demo, Price: USD $29.00, File Size: 509.0 KB Platform: Windows
Gps Express provides a feature rich interface to serial NMEA-0183 protocol Data and works with most NMEA-0183 devices, including Gps Receivers. Gps Express is available in three versions (Standard, Professional, Graphical). STANDARD displays the title, value, and units for each parameter. Manual,Scan operation. Navigation buttons. Manual,automatic sentence..
Category: Utilities Publisher: Steelwater Solutions Corporation, License: Shareware, Price: USD $65.00, File Size: 2.1 MB Platform: Windows
XML Converter Standard is a set of XML Data conversion software tools to interactively create XML Data transformation. XML Converter unites Data from ODBC, MS SQL Server, Oracle, MySQL databases, or from MS Office files into XML documents. It gives you ability to predefine XML transformation template scenario to create an XML with your particular..
Category: Software Development / Tools & Editors Publisher: RustemSoft, License: Shareware, Price: USD $99.99, File Size: 2.5 MB Platform: Windows
Right-click on your photos and view all EXIF Data. Easy to use utility that shows hidden Data about your photos. Features: EXIF 2 compliant, shows all EXIF Data, Gps coordinates, Works with Windows 7, Vista and XP, Easy-to-use application, just right-click on your JPEG photos and select properties.
Category: Multimedia & Design / Media Management Publisher: Coder1 Software, License: Freeware, Price: USD $0.00, File Size: 412.0 KB Platform: Windows
Altova MapForce Enterprise Edition is a scalable Data mapping, integration, and ETL tool. This award-winning application lets you visually map Data between any combination of XML, database, EDI, XBRL, flat file, Excel, JSON, and/or Web service, then transforms Data instantly or generates royalty-free XSLT, XQuery, Java, C++, or C# code for execution of recurrent..
Category: Web Authoring / XML/CSS Utilities Publisher: Altova, Inc., License: Demo, Price: USD $999.00, EUR799, File Size: 122.1 MB Platform: Windows
Altova MapForce Professional Edition is a graphical Data mapping tool for transforming between XML, database, and flat file formats. This award-winning visual Data mapper converts Data instantly or autogenerates royalty-free XSLT, XQuery, Java, C++, or C# code for execution of recurrent conversions. Numerous functions come standard (filter, concatenate, sum, etc.), and you..
Category: Business & Finance / Database Management Publisher: Altova, Inc., License: Demo, Price: USD $499.00, EUR399, File Size: 110.5 MB Platform: Windows
T2K Pro integrates the rich world of GIS datasets and transfers your Geographic information Data into Google earth. T2K Pro handles rich Data types and access large volumes of geographic Data stored in files and databases; T2K PRO handles raster (imagery), Vector Map Data and Gps Tracks/ Waypoints/ Routes. Tiles2kml Pro provides a complete suite of conversion..
Category: Multimedia & Design / Authoring Tools Publisher: Tiles2kml, License: Demo, Price: USD $90.00, File Size: 20.9 MB Platform: Windows
Opanda PowerExif is a professional tool to edit Exif Data in images. As the best assistant to edit & modify images information for photographers, image pickers, PowerExif allows to edit & modify all Exif Data freely. Not only you could manage and record photographic Data and GpsData of images, but also you could keep maxium 60,000 characters as..
Category: Multimedia & Design / Image Editing Publisher: Opanda Studio, License: Shareware, Price: USD $89.99, File Size: 1.2 MB Platform: Windows
WAB Converter software is dual format Converter software to convert Outlook Express Address book contact to Outlook or in Excel. It work smoothly and speedy. The conversions process finish automatically without loss of any contact Data and well this software also maintain all ConverterData in alphabetic order Main Key features of WAB..

Category: Utilities / File & Disk Management Publisher: Convert WAB to XLS, License: Shareware, Price: USD $39.00, File Size: 2.5 MB Platform: Windows
WAB to PST Exporter Tool is a simple and on the spot Windows Address Book Converter program. With WAB to PST Conversion users can export Windows Address Book to Outlook contacts or in Excel and maintain all ConverterData in alphabetical order. WAB Conversion Tool successfully supports to convert contacts for Outlook Express to Outlook all version. WAB to PST conversion..
Category: Utilities / File & Disk Management Publisher: How to Export WAB File, License: Shareware, Price: USD $39.00, File Size: 2.5 MB Platform: Windows
SondeMonitor decodes the messages from both analogue (6-tone) radiosondes (Vaisala RS80 series) and digital radiosondes (Vaisala RS92SGP and RS92AGP series) using a simple UHF scanner receiver and the soundcard of a PC or laptop. SondeMonitor generates a Data file of the raw sample frequency Data from analogue radiosondes and the raw hex Data from digital..
Category: Business & Finance / Calculators Publisher: Sonic, License: Shareware, Price: USD $0.00, File Size: 0 Platform: Windows
datAxe is a flexible Converter to solve all your needs between serial Data and TCP/IP networks on Windows computers. datAxe software package makes serial Data from your PC available on TCP/IP-based networks and makes TCP/IP Data available on physical and virtual serial ports of your PC. datAxe supports two transport Data stream protocols: Raw Connection and..
Category: Internet Publisher: LabF, License: Shareware, Price: USD $120.00, File Size: 3.6 MB Platform: Windows
76783; N 34° 16. 179', W 116° 46. 07'; and N 34° 16' 10.
Category: Home & Education / Sports Publisher: ALMSys, Inc., License: Freeware, Price: USD $0.00, File Size: 929.9 KB Platform: Windows
mini BMP to Form Data OCR Converter is the best tool for you to convert scanned PDF files, normal PDF files and scanned Image files to editable Excel documents. mini BMP to Form Data OCR Converter does batch convert scanned documents to editable MS Excel documents on the fly. mini BMP to Form Data OCR Converter features: 1. BMP to Form Data..
Category: Utilities / Command Line Utilities Publisher: miniPDF.com Inc, License: Shareware, Price: USD $79.95, File Size: 12.7 MB Platform: Windows, Other
Advanced XML Converter is a set of XML Data transformation software tools to interactively create XML Data conversion. XML Converter converts Data from csv, ODBC, MS SQL Server, Oracle, MySQL databases, or from MS Office files(excel, docx) into XML documents. It gives you ability to predefine XML transformation template scenario to create an XML with your..

Category: Software Development / Databases & Networks Publisher: RustemSoft, License: Shareware, Price: USD $99.99, File Size: 3.0 MB Platform: Windows
To triumphant conversion of OST file use Enstella OST file Converter tool which safely convert outlook entire Data into PST file format. Advance OST to PST Recovery software remarkably fix OST file errors and then recovers emails from corrupted OST file with all emails metadata- to, bcc, cc, date, time and subject etc. With the abet of OST extractor program user can able to..
Category: Utilities / File & Disk Management Publisher: Convert OST to PST Tool, License: Shareware, Price: USD $99.00, EUR74, File Size: 3.4 MB Platform: Windows
Want a quick solution to move MDaemon mailboxes to PST, then you can give a try to ABC Amber MDaemon Converter, one the best MDaemon Data files conversion tool. A multi-purpose utility, MDaemon Converter easily convert MDaemon mailboxes to PST, MSG, MBOX, PDF, HTML, RTF, EML, EMLX and MBX. Not only this, the software singlehandedly saves MDaemon backup, by converting all..
Category: Utilities / File Compression Publisher: ProcessText Group, License: Shareware, Price: USD $299.00, File Size: 16.7 MB Platform: Windows
MarshallSoft Gps Component C/C++ and .NET toolkit reads and decodes industry standard Gps NMEA 183 navigation sentences from the RS232 serial port as well as computes great circle distances and bearings. Features include: - Supports both 32-bit and 64-bit Windows. - Uses the Windows API for serial port input. No special Windows driver is required. - Runs as a background..
Category: Software Development / Components & Libraries Publisher: MarshallSoft Computing, License: Shareware, Price: USD $115.00, File Size: 561.6 KB Platform: Windows
With this Suite consisting of Sothink iPod Video Converter and DVD EZWorkshop, you can rip DVD and convert other formats of video to iPod video, copy DVD, author DVD, etc. Sothink iPod Video Converter helps you convert various videos and movie DVD to iPod video. Comparing with other software which have the same function, its converting speed is truly faster. And the picture..
Category: Multimedia & Design Publisher: SourceTec Software, License: Shareware, Price: USD $43.95, File Size: 10.0 MB Platform: Windows
Geocode digital images with latitude, longitude, altitude, and direction information when collecting GIS field Data. RoboGEO stamps this information onto the actual photo or writes it to the EXIF headers, allowing you to permanently geotag and link your photos to the Gps coordinates. All writing to the EXIF and IPTC headers is lossless and all of the existing comments (including..
Category: Multimedia & Design Publisher: Pretek, Inc., License: Demo, Price: USD $34.95, File Size: 6.4 MB Platform: Windows
The Universal Database Converter transfers complete database Data structures, Data repositories, and indices from one database system to another. Table relationships with primary and foreign keys are also taken into account and transferred into the target system. Thus the Universal Database Converter enables flexible and adaptive handling of various database..
Category: Business & Finance Publisher: [email protected], License: Freeware, Price: USD $0.00, File Size: 2.9 MB Platform: Windows
MarshallSoft Gps Component VB (and VB.NET) library toolkit (MGC4VB) reads and decodes industry standard Gps NMEA 183 sentences from the RS232 serial port as well as computing great circle distances and bearings. Features of MGC4VB include: The most current GpsData is always available on demand * Runs as a background thread unattended * Works with Bluetooth virtual..
Vaisala Oyj Port Devices Driver Download For Windows
Drivers st microelectronics. Category: Software Development Publisher: MarshallSoft Computing, License: Shareware, Price: USD $105.00, File Size: 233.4 KB Platform: Windows
Exif Pilot Pro is EXIF aditor that allows you to: - View EXIF, EXIF Gps and IPTC Data. - Edit some Makernote tags. - Edit, create EXIF, EXIF Gps and IPTC Data. - Import/export from/to XML format. - Import/export from/to MS Excel files. - Import/export from/to a text file in CSV format. - Edit batches of images. - Edit, create EXIF and IPTC Data..
Category: Multimedia & Design / Authoring Tools Publisher: Two Pilots, License: Shareware, Price: USD $39.95, File Size: 2.4 MB Platform: Windows
Want to recover Data from OST file to PST file format in well manner then get perfect OST file recovery software. With OST to PST recovery utility user can easily repair damaged OST file Data and recover deleted emails from OST file with all emails metadata- to, bcc, cc, date, time and subject etc. Enstella OST file viewer utility allow users to view Data from OST file and..
Category: Software Development / Help File Utilities Publisher: OST to PST, License: Shareware, Price: USD $99.00, EUR74, File Size: 3.4 MB Platform: Windows
MarshallSoft Gps Component Visual Basic and .NET toolkit to read and decode industry standard Gps NMEA 183 navigation sentences from the RS232 serial port as well as computes great circle distances and bearings. Features include: - Supports both 32-bit and 64-bit Windows. - Uses the Windows API for serial port input. No special Windows driver is required. - Runs as a..
Category: Software Development / Components & Libraries Publisher: MarshallSoft Computing, License: Shareware, Price: USD $115.00, File Size: 476.8 KB Platform: Windows
Vaisala Oyj – Shareware – Windows
Overview
Vaisala USB Instrument Driver is a Shareware software in the category Miscellaneous developed by Vaisala Oyj.
Vaisala Oyj Port Devices Driver Download For Windows 8.1
The latest version of Vaisala USB Instrument Driver is currently unknown. It was initially added to our database on 06/06/2010.
Vaisala USB Instrument Driver runs on the following operating systems: Windows.
Vaisala USB Instrument Driver has not been rated by our users yet.
Drivers thrustmaster input devices speed sensor. Write a review for Vaisala USB Instrument Driver!
Vaisala Oyj Port Devices Driver Download For Windows Xp
02/13/2021 SGP Baltie 3 3.0.71.121 02/13/2021 カスペルスキー VPN 21.2.16.590 02/13/2021 PlayGames клиент 1.0.9 02/13/2021 Command & Conquer Remastered Collection 1.153.11.25007 02/13/2021 Kate's Video Cutter (free) 6.317
02/10/2021 Adobe updates available 02/10/2021 Firefox 85.0.2 update fixes startup problem 02/09/2021 Microsoft Patchday February 2021 02/09/2021 Updates for Chromium-based browsers now available 02/08/2021 Find the best browser extensions to protect your privacy
Vaisala Oyj Port Devices Driver Download For Windows 7
» vaisala usb device driver
» vaisala driver
» vaisala usb finder
» vaisala pilote usb
» vaisalia instrument drivers
» vaisala usb instrument devices
» visala usb instrument driver
» vaisara usb driver
» download vaisala instruement driver
» vaisala usb ケーブルドライバー
0 notes
Text
SaferCCTV(TM) HDMI TV Stick Anycast M2 Plus Miracast/ Chromecast HD 1080P TV Stick Wireless WiFi Display Dongle for IOS Apple iPhone iPad Android Smartphone Windows Mac
SaferCCTV(TM) HDMI TV Stick Anycast M2 Plus Miracast/ Chromecast HD 1080P TV Stick Wireless WiFi Display Dongle for IOS Apple iPhone iPad Android Smartphone Windows Mac
Do not miss this chance to get this product on most inexpensive worth.
Pros:
1. For Android 0S: Assist Android OS four.2 or above(Telephone Working System: Android telephone). For IOS: Assist IOS 7.zero to I0S 10 (Gadgets: For all iPhone mannequin after iPhone4 / all iPad mannequin after iPad 2 / all iPod contact after iPod contact 4th technology)
2. Assist WPS perform, can quick join with Router and AP compurgation. Assist On-line & native (content material wi-fi). Assist Youtube On TV and so forth. Assist PDF/ MS Phrase/ MS Excel/ MS PowerPoint/ Keynotes, and so forth
three. Customers additionally might mirror on-line contents on Chrome to HDTV, when enjoying 3D MSG (Movement Sensing Sport), you could possibly use the pill as the sport management, and revel in it with the massive TV display screen( Play video games, view native photographs & movies, watch movies and flicks, browse the web, and so forth out of your iPhone to your HDTV utilizing airplay by way of Anycast dongle)
four. Wi-fi interconnection, as much as 10 meters wi-fi transmission vary, extraordinarily steady and dependable. Mini, light-weight, handy for journey
5. Assist Airmirror/ DLNA/ Airplay/ Miracast to sync forged picture/ video/ music/ workplace file/ internet browser/ stay digital camera from iPhone/ Android Smartphone/ pill PC to giant display screen TV/ Projector by WiFi, excellent for PPT presentation and video assembly
Get this SaferCCTV(TM) HDMI TV Stick Anycast M2 Plus Miracast/ Chromecast HD 1080P TV Stick Wi-fi WiFi Show Dongle for IOS Apple iPhone iPad Android Smartphone Home windows Mac
1.Be aware: (1)Please make it possible for your telephone/ pad system help Miracast/ DLNA perform before you purchase it. (2)Assist automobile HDMI interface. You possibly can join your telephone to automobile display screen in wi-fi to share Baidu or Google map info. Assist synchronization enjoying of audio and video.
2.Specification: (1)DDR3: 256MB (2)Nand Flash: No (three)OS: Linux three.zero.eight (four)GPU: 3D GPU 1 x mali 400 (5)Assist Miracast, DLNA, Airmirror, Airplay (6)System Assist: Home windows, Mac OS, IOS, Android OS (7)CPU: Single Core ARM Cortex A9 Rockchip RK2928 1.2 GHz
three.System Requirement: (1)Working distance: As much as 10m (2)Assist Photograph Format: JPEG/ BMP (three)Wi-Fi: 802.11b/g/n 150Mbps 2.4GHz (four)Decision supported: WVGA ~ 1080P (5)Interface: HDMI 1.four x1; Micro USBx1 (6)Storage: Not less than 40MB free area wanted (7)Show: Video/ Audio/ Photograph/ Workplace file/ Web site (eight)TV/ Projector: Assist TV/ Projector with HDMI output interface (9)Assist Audio Format: MP1/ MP2/ MP3/ WMA/ OGG/ ADPCM-WAV/ PCM-WAV/ AAC (10)Assist Video Format: AVI/ DIVX/ MKV/ TS/ DAT/ MPG/ MPEG1,2,four/ MP4/ RM/ RMVB/ WMV (11)Workplace Software program (Show Presentation): PDF/ MS Phrase/ MS Excel/ MS PowerPoint/ Keynotes (12)Decision supported: for iPhone (430 * 320 ~ 1136 * 640); for iPad (1024 * 768 ~ 2048 * 1536) (13)On-line streaming: Youtube, Hulu Plus, IDMB, Quickflix, Household On TV and so forth. Distant controller: Assist by Telephone/ Labtop/ Pill PC.
It’s all the time higher to purchase SaferCCTV(TM) HDMI TV Stick Anycast M2 Plus Miracast/ Chromecast HD 1080P TV Stick Wi-fi WiFi Show Dongle for IOS Apple iPhone iPad Android Smartphone Home windows Mac from the the chief on this eCommerce business. They’ve proved their capability in delivering high quality service after shopping for incredible merchandise from them.
The post SaferCCTV(TM) HDMI TV Stick Anycast M2 Plus Miracast/ Chromecast HD 1080P TV Stick Wireless WiFi Display Dongle for IOS Apple iPhone iPad Android Smartphone Windows Mac appeared first on IPCAMVOX.
from SaferCCTV(TM) HDMI TV Stick Anycast M2 Plus Miracast/ Chromecast HD 1080P TV Stick Wireless WiFi Display Dongle for IOS Apple iPhone iPad Android Smartphone Windows Mac
0 notes
Text
Wireless Vibration and Temperature to MySQL using Node-RED
Things used in this project
IoT Long Range Wireless Temperature Humidity Sensor with power source Battery Or External DC.
Zigmo/Router for PC
XAMPP
PC/Laptop with an OS installed or Any IoT Embedded Device.
Story
Introducing NCD’s Long Range IoT Industrial wireless vibration and temperature sensor, boasting up to a 2-mile range the use of a wireless mesh networking structure. Incorporating a precision 16-bit vibration and temperature sensor, this device transmits incredibly accurate vibration and temperature records at consumer-described duration.

For the duration of Power-Up, this vibration sensor learns “normal” base-line vibration from the monitored device. This base-line vibration is subtracted from regular sampled vibration readings to improve applicable vibration data. Preferably, the monitored device must be off even as the sensor is mastering. Once the sensor stabilizes and starts sending information, the device/equipment being monitored can be powered on. This business IoT wireless vibration sensor samples 3-axis of vibration data for 100ms after which calculate RMS, maximum, and minimal vibration readings. This sensor combines these records with temperature data in a data packet and transmits the result to modems and gateways in the wi-fi variety. Once the transmission is complete, the vibration sensor is going lower back to sleep, therefore minimizing power consumption.
Powered by using just 2 AA batteries and operational life of 500,000 wireless transmissions, a ten years battery life can be expected relying on environmental conditions and the data transmission interval. Optionally, this sensor may be externally powered, making it a perfect choice for wireless vibration monitoring device for industrial equipment. With an open communication protocol, this sensor transmits hardware-encrypted data that may be included with just about any control system or gateway. Data can be transmitted to a laptop, a raspberry pi, to Losant IoT cloud, microsoft® azure® IoT, and an embedded gadget all at the equal time. Sensor parameters and wireless transmission settings can be modified using labview® tracking software on a computer pc.
Long-Range Wireless Mesh Modem with USB Interface

Resources Required
IoT Long Range Wireless Vibration and Temperature Sensor with power source Battery Or External DC.
Zigmo/Router for PC
PC/Laptop with an OS installed or Any IoT Embedded Device
Setting up XAMPP
XAMPP is most prevailing, free an open-source cross-platform which is one solution to run your web services. XAMPP is developed by ApacheFriends which released in May 2002. XAMPP Stands for Cross-Platform(X), Apache(A), MySQL(M) also Sometimes (M) refers to MariaDB, PHP(P) and Pearl(P).
xampp allows you to work on a local server and test local copies of websites using PHP code and MySQL databases. Once xampp is active, you can access your local copy with a browser using an URL like http://localhost/ or http://127.0.0.1/
Downloading and Installing XAMPP
Go to XAMPP web site and download the installer based on your operating system. Installation should be similar to a normal software installation you do in your operating system.
When installing, there would be an option to select whether you want to run Apache and MySQL as services. If you chose it, Apache and MySQL will start at system boot-up which may not need if your computer is tight with memory resources or if you are not doing PHP development frequently. You can change these settings after installation.
Starting Apache and MySQL
Go to the location where you installed XAMPP (usually C:\Program Files\xampp) and double click on XAMPP Control Panel (xampp-control.exe). This will bring you the following screen. Click on Start buttons next to Apache and MySQL for starting them.

Now open up your browser and type http://localhost/ or http://127.0.0.1/

This will open up the following page. Click on the phpMyAdmin.

This will bring you the following screen. Now click on the “New” button as shown in the picture below to create a new database.

Now create a new database as shown in the picture below.

Now create a table to visualize data as shown in the picture below.

Now name the first column as “id”.

Now scroll to the right side of the screen you will see “A_I Comments” i.e. Auto Increments and it is used setting primary key which uniquely identifies each record within the table. Click on the checkbox below it.

This will bring you the following screen. Now click on the “Go” button.

Now enter the values of other columns Name = rms_x, Type = DECIMAL, Length/Values = 10,2(i.e up to 2 decimal points) and similarly for all other values and in the last column, you can show created time and click on the save button as shown in the picture below.

Now click on your database name to expand it and it will show your table name, then click on it to view how data is shown, as shown in the picture below.

That’s all with the setting up of XAMPP.
Setting up Node-Red.
The sensor and Zigmo/Router come pre-programmed and work out of the box. In this section, we will set up a sensor and Zigmo link and start receiving data on our PC
Steps to install NODE-RED
Now that you have sensors running, we need a way to do something useful with that data.
First of all, you’ll have to install Node-RED.
Once that’s done, you’ll need to enter your command line, or Power Shell for Windows users, navigate to the directory Node-RED is installed in.
Now type “npm i ncd-red-wireless node-red-dashboard“. This will install the nodes required to receive data from your wireless sensors and you can start Node-RED once this is done.
To start node server write node-red in the command prompt or terminal and press enter.
Setting up the nodes
Assuming at this point you’ve started up Node-RED, you should be able to open a browser and navigate to http://localhost:1880, this will open up the flow builder that is the heart of the Node-RED experience.
Steps to build the flow
At this point you’ll be viewing a large blank flow with a long list of nodes on the left-hand side, this sidebar is called the palette.

Go ahead and drag a Wireless Gateway node over to your flow canvas to get started.

ncd-red-wireless Provides the nodes that manage the serial connection, parse incoming sensor data, filter it by specific parameters, and allow you to configure the wireless sensors.
Finding your wireless sensors
Once you’ve added the node you’ll be able to view the info tab, which contains information about the node’s functionality, this tab is well-populated for most node-red packages and contains valuable information, many times you will not need to view any other documentation outside of the info tab, so keep it in mind while you are building your flows if you have a question about how a node works. The next thing we need to do is configure the node, when you first add it you’ll notice that there is a small triangle on the top right corner next to a blue dot, the triangle indicates that the node needs additional configuration, the blue dot indicates that the node has not yet been deployed as part of the flow.
Double click on the node to open up the configuration options.

Click on the pencil icon next to the Serial Device field to configure your USB router, this will open a second configuration panel that only has a few options.

Click on the magnifying glass next to the Serial Port field and select the port that corresponds with your router, then click the “Add” button on top. The Serial Device field will now be populated based on that selection, and you can click “Done”, you now have direct access to your wireless sensors! To view the data coming in.

Now go back to your palette and type “debug” into the search field at the top, grab one of these nodes and drag it to the right of your Wireless Gateway.

Double click on it and change “msg.” to “complete msg object” click done.

Now draw a line between the two nodes, and click “Deploy” on the top right of the window...

Working with the data
Now out of your wireless sensors data is gathered and it is output to the “debug” tab, this “debug tab” is placed within the right sidebar subsequent to the information tab. To see the information are available in to hit the reset button. In node-red records is surpassed among nodes in a JSON packet. When the msg object comes into the debug tab you may make bigger it to view the overall list of information that comes with it. This is extraordinarily useful in case you need to quickly see which sensors are checking in. The other issue this node gives is an easy way to interchange your router to the network identity that devices in configuration mode document on, simply hit the button on the left of the node and the tool will switch to the configuration network, hit it once more to return it to listening mode. Once we get the wireless device nodes set up, they may be set to routinely configure a sensor whilst it enters configuration mode, so it’s always available to maintain such gateway nodes present at the flow for speedy configuring a device.

Adding the wireless sensors
we need to separate wireless sensor records domestically in order that we are able to display it, we could use a switch node to split out the messages from the gateway based totally on the mac address with or sensor type, but as I referred to, the wireless nodes truly incorporate extra functionality for configuring the sensors, so we’ll start with them to give you an extra entire image of how those structures can work. In case you haven’t already seen packets coming in from both of your sensors, cross in advance and hit the reset button on the only that hasn’t stated. While a sensor assessment in thru any serial device configuration node, the mac address and kind of sensor is cached in a pool so we are able to quickly find it for the duration of this next step.
Grab a Wireless Node from the palette and drag it onto the flow, double click on it to get it configured.

Select the serial device from the drop-down that you used for the Wireless Gateway, now click the magnifying glass next to “Mac Address” and select one of the available options.


You’ll notice this automatically sets the sensor type for you, you can also give it a name to make it easier to identify. As noted in the info tab, the Serial Device for Config field is optional, and we won’t worry about it right now. The node you have just added effectively works as a filter on incoming sensor data, only passing through data for the mac address, or sensor type if no mac address is present.
Now go back to your palette and type “debug” into the search field at the top, grab one of these nodes and drag it to the right of your Wireless Gateway.

Double click on it and click done.

Adding Function Nodes
The function node is used to run JavaScript code against the msg object. The function node accepts a msg object as input and can return 0 or more message objects as output. This message object must have a payload property (msg.payload) and usually has other properties depending on the proceeding nodes.
Now grab a “function” node from the palette, and place it to the right of the Vib/Temp node.

Double click on the node to open up the configuration options.
Here you have to write little javascript code to create a condition, so the data is sent to the MySQL database.

rms_x = msg.payload.rms_xrms_y = msg.payload.rms_yrms_z = msg.payload.rms_zmax_x = msg.payload.max_xmax_y = msg.payload.max_ymax_z = msg.payload.max_zmin_x = msg.payload.min_xmin_y = msg.payload.min_ymin_z = msg.payload.min_ztemperature = msg.payload.temperaturemsg.topic = "INSERT INTO vibration_temperature ( `rms_x`, `rms_y`, `rms_z`, `max_x`, `max_y`, `max_z`, `min_x`, `min_y`, `min_z`, `temperature`) VALUES ( "+ rms_x +", "+ rms_y +", "+ rms_z +", "+ max_x +", "+ max_y +", "+ max_z +", "+ min_x +", "+ min_y +", "+ min_z +", "+ temperature +");"return msg;
Now you have to add “MySQL” node to store data, check your palette if it is present there or you can click on the three bars present right side of deploy button as shown in the picture below.

Now click on the “Manage palette” button.

Now search for MySQL and click on the ‘install’ button as shown in the picture.

Once it's done, you’ll see “mysql” node is present in the palette.
Now grab the “mysql” node from the palette and double click on it to open up configuration options.

Write your database name as you created earlier and give a name to it, then click on the pencil icon next to the Database to edit sqldatabase node.

Now add User = root i.e by default in the xampp and password is blank. You can also create user and password enter that here, then enter your database name and time zone(optional) and then click update and done.

Now you’ll see your database node shows connected, Now connect all the wires as shown in the picture.

Now hit the deploy button and you’ll database node shows “ok”, its means data is sending.

OUTPUT
Here you can visualize the data coming in.

Node-RED Flow
https://github.com/ncdcommunity/Sending-IoT-Wireless-Vibration-and-Temperature-data-to-MySQL/blob/master/node_red_flow.json
0 notes
Text
Sending IoT Long Range Wireless Temperature and Humidity Sensor Data to Google sheet
Things used in this project
IoT Long Range Wireless Temperature Humidity Sensor with power source Battery Or External DC.
Zigmo/Router for PC
PC/Laptop with an OS installed or Any IoT Embedded Device.
Story
Introducing NCD’s long-range wireless temperature humidity sensor, boasting up to a 28 Mile range using a wireless mesh networking architecture. Incorporating the Honeywell HIH9130 temperature humidity sensor transmits highly accurate temperature and humidity samples at user-defined intervals.
The on-board temperature sensor is rated for -25°C to 85°C or -13°F to 185°F and the humidity sensor is rated for 0 to 100% RH. It can be powered by just 2 AA batteries and an operational lifetime of 500, 000 wireless transmissions. Battery life can be extended up to 10 years depending on environmental conditions and the data transmission interval. Optionally, this sensor may be externally powered.
With an open communication protocol, this IoT wireless temperature humidity product can be integrated with just about any control system or gateway. Data can be transmitted to a PC, a Raspberry Pi, to Microsoft Azure® IoT, or Arduino. Sensor parameters and wireless transmission settings can be changed on the go using the open communication protocol providing maximum configurability depending on the intended application.
The long-range, price, accuracy, battery life and security features of Long Range Wireless Temperature Humidity Sensor make it an affordable choice which exceeds the requirements for most of the industrial as well as consumer market applications.
Setting up Node-RED
The sensor and Zigmo/Router come pre-programmed and work out of the box. In this section, we will set up a sensor and Zigmo link and start receiving data on our PC.
Steps to install Node-RED
Now that you have sensors running, we need a way to do something useful with that data.
First of all, you’ll have to install Node-RED.
Once that’s done, you’ll need to enter your command line, or Power Shell for Windows users, navigate to the directory Node-RED is installed in.
Now type “npm I ncd-red-wireless node-red-dashboard“. This will install the nodes required to receive data from your wireless sensors and you can start Node-RED once this is done.
To start node server write Node-RED in the command prompt or terminal and press enter.
Setting up the nodes
Assuming at this point you’ve started up Node-RED, you should be able to open a browser and navigate to http://localhost:1880, this will open up the flow builder that is the heart of the Node-RED experience.
Steps to build the flow
At this point you’ll be viewing a large blank flow with a long list of nodes on the left-hand side, this sidebar is called the palette.

Go ahead and drag a Wireless Gateway node over to your flow canvas to get started.

ncd-red-wireless Provides the nodes that manage the serial connection, parse incoming sensor data, filter it by specific parameters, and allow you to configure the wireless sensors.
Finding your wireless sensors
Once you’ve added the node you’ll be able to view the info tab, which contains information about the node’s functionality, this tab is well-populated for most Node-RED packages and contains valuable information, many times you will not need to view any other documentation outside of the info tab, so keep it in mind while you are building your flows if you have a question about how a node works. The next thing we need to do is configure the node, when you first add it you’ll notice that there is a small triangle on the top right corner next to a blue dot, the triangle indicates that the node needs additional configuration, the blue dot indicates that the node has not yet been deployed as part of the flow.
Double click on the node to open up the configuration options.

Click on the pencil icon next to the Serial Device field to configure your USB router, this will open a second configuration panel that only has a few options.

Click on the magnifying glass next to the Serial Port field and select the port that corresponds with your router, then click the “Add” button on top. The Serial Device field will now be populated based on that selection, and you can click “Done”, you now have direct access to your wireless sensors! To view the data coming in.

Now go back to your palette and type “debug” into the search field at the top, grab one of these nodes and drag it to the right of your Wireless Gateway.

Double click on it and change “msg.” to “complete msg object” click done.

Now draw a line between the two nodes, and click “Deploy” on the top right of the window...

Working with the data
Now out of your wireless sensors data is gathered and it is output to the “debug” tab, this “debug tab” is placed within the right sidebar subsequent to the information tab. To see the information are available in to hit the reset button. In Node-RED records is surpassed among nodes in a JSON packet. When the msg object comes into the debug tab you may make bigger it to view the overall list of information that comes with it. This is extraordinarily useful in case you need to quickly see which sensors are checking in. The other issue this node gives is an easy way to interchange your router to the network identity that devices in configuration mode document on, simply hit the button on the left of the node and the tool will switch to the configuration network, hit it once more to return it to listening mode. Once we get the wi-fi tool nodes set up, they may be set to routinely configure a sensor whilst it enters configuration mode, so it’s always available to maintain such gateway nodes present at the flow for speedy configuring a device.
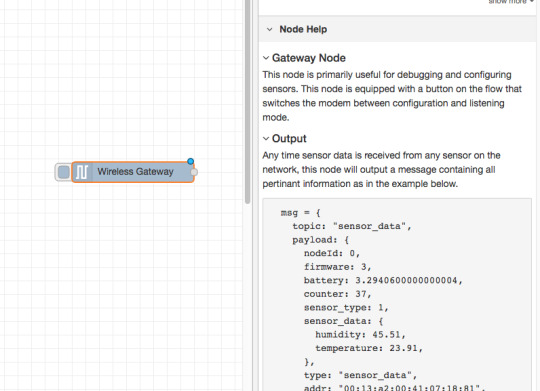
Adding the wireless sensors
we need to separate wireless sensor records domestically in order that we are able to display it, we could use a switch node to split out the messages from the gateway based totally on the mac address with or sensor type, but as I referred to, the wireless nodes truly incorporate extra functionality for configuring the sensors, so we’ll start with them to give you an extra entire image of how those structures can work. In case you haven’t already seen packets coming in from both of your sensors, cross in advance and hit the reset button on the only that hasn’t stated. While a sensor assessment in thru any serial device configuration node, the mac address and kind of sensor is cached in a pool so we are able to quickly find it for the duration of this next step.
Grab a Wireless Node from the palette and drag it onto the flow, double click on it to get it configured.

select the serial device from the drop-down that you used for the Wireless Gateway, now click the magnifying glass next to “Mac Address” and select one of the available options.


You’ll notice this automatically sets the sensor type for you, you can also give it a name to make it easier to identify. As noted in the info tab, the Serial Device for Config field is optional, and we won’t worry about it right now. The node you have just added effectively works as a filter on incoming sensor data, only passing through data for the mac address, or sensor type if no mac address is present.
Now go back to your palette and type “debug” into the search field at the top, grab one of these nodes and drag it to the right of your Wireless Gateway.

Double click on it and click done.

Adding Function Nodes
The function node is used to run JavaScript code against the msg object. The function node accepts a msg object as input and can return 0 or more message objects as output. This message object must have a payload property (msg.payload) and usually has other properties depending on the proceeding nodes.
Now grab a “function” node from the palette, and place it to the right of the Temp/Hum node.

Double click on the node to open up the configuration options.
Here you have to write little javascript code to create a condition, so the temperature and humidity values will be written in the excel.

Now Add “http request” node from the palette.

If you double click on it edit http node, you’ll see a “URL” field, here you have to enter the respective link of the google sheet.
Now create a google sheet to store the values of temperature and humidity.
Steps to create a google sheet.
First, open up your browser and type www.google.com and sign up in google account if you haven’t signed in, then click on the six dots on the left of your picture.

Now click on “Drive” to open the google drive.

Click on New>More>Google Forms>Blank Form.

Here you’ll see an untitled form, Give it some title as shown in the picture.

Now edit question as Temperature and click on the “+” button to add another question for humidity.

Enter question as Humidity to take humidity values.

Now click on the Three dots beside your picture as shown in the picture below.

Now click on the “Get pre-filled link”.

Now enter random values to temperature and humidity fields and click Get a link.

Now paste that link in notepad.

Edit that link as shown in the picture below.

Now go back to form and click on RESPONSES and then click on the google sheet icon as shown in the picture below.

Create a new spreadsheet.

Here you are able to see a new spreadsheet, then give it some name as shown in the pictures below.

Here you can visualize the values of temperature and humidity.

Now go back to node-red and double click on http request node to edit it, then copy the URL from the notepad that you have saved and paste it in the URL field as shown in the figure.

You can also attach debug node to check the output the http node.
Now connect all the wires.

Click on Deploy button to get them out on the google sheet.

OUTPUT
Now to go google spreadsheet and you’ll see values are coming.

Code
node_red_flowJSONHere you can download the JSON file of theFlow
[{"id":"92f30be3.3a0078","type":"tab","label":"Flow 7","disabled":false,"info":""},{"id":"866b699f.a2bd78","type":"ncd-gateway-node","z":"92f30be3.3a0078","name":"","connection":"258e5fea.00897","x":130,"y":60,"wires":[["21995762.9035e8"]]},{"id":"229131a1.83a27e","type":"ncd-wireless-node","z":"92f30be3.3a0078","name":"","connection":"c92dec1c.7fc9","config_comm":"50e22a9e.060f74","addr":"","sensor_type":"1","auto_config":"","node_id":0,"delay":300,"destination":"0000FFFF","power":4,"retries":10,"pan_id":"7FFF","change_enabled":"","change_pr":"0","change_interval":"0","cm_calibration":"60.6","bp_altitude":"0","bp_pressure":"0","bp_temp_prec":"0","bp_press_prec":"0","amgt_accel":"0","amgt_mag":"0","amgt_gyro":"0","impact_accel":"0","impact_data_rate":"4","impact_threshold":25,"impact_duration":1,"activ_interr_x":1,"activ_interr_y":2,"activ_interr_z":4,"activ_interr_op":8,"filtering":0,"data_rate":5,"time_series":0,"reading_type":1,"x":120,"y":200,"wires":[["b18f406a.4096c","5f33b485.de23dc"]]},{"id":"21995762.9035e8","type":"debug","z":"92f30be3.3a0078","name":"","active":false,"tosidebar":true,"console":false,"tostatus":false,"complete":"true","targetType":"full","x":350,"y":60,"wires":[]},{"id":"5f33b485.de23dc","type":"function","z":"92f30be3.3a0078","name":"","func":"msg.payload = {};\nmsg.payload.temperature = parseFloat(msg.data.sensor_data.temperature);\nmsg.payload.humidity = parseFloat(msg.data.sensor_data.humidity);\nreturn msg;","outputs":1,"noerr":0,"x":350,"y":200,"wires":[["b767a18e.49953"]]},{"id":"b767a18e.49953","type":"http request","z":"92f30be3.3a0078","name":"","method":"GET","ret":"txt","paytoqs":true,"url":"https://docs.google.com/forms/d/e/1FAIpQLScXkrmzylTmf7PF9hbLOhSuPTqY3aWvtUCxsDBYbHu8gFS9ww/formResponse?usp=pp_url&entry.709938653={{payload.temperature}}&entry.1914503780={{payload.humidity}}","tls":"","proxy":"","authType":"basic","x":570,"y":200,"wires":[["3fd243af.cc72fc"]]},{"id":"3fd243af.cc72fc","type":"debug","z":"92f30be3.3a0078","name":"","active":true,"tosidebar":true,"console":false,"tostatus":false,"complete":"true","targetType":"full","x":730,"y":300,"wires":[]},{"id":"b18f406a.4096c","type":"debug","z":"92f30be3.3a0078","name":"","active":false,"tosidebar":true,"console":false,"tostatus":false,"complete":"true","targetType":"full","x":230,"y":380,"wires":[]},{"id":"258e5fea.00897","type":"ncd-gateway-config","z":"","name":"","comm_type":"serial","ip_address":"","tcp_port":"2101","port":"COM6","baudRate":"115200","pan_id":"7fff","rssi":false},{"id":"c92dec1c.7fc9","type":"ncd-gateway-config","z":"","name":"","comm_type":"serial","ip_address":"","tcp_port":"2101","port":"COM6","baudRate":"115200","pan_id":"7fff","rssi":false},{"id":"50e22a9e.060f74","type":"ncd-gateway-config","z":"","name":"","comm_type":"serial","ip_address":"","tcp_port":"2101","port":"COM6","baudRate":"115200","pan_id":"7fff","rssi":false}]
0 notes
Text
Sending data of wireless Temperature and Humidity sensor to Excel
Things used in this project
IoT Long Range Wireless Temperature Humidity Sensor with power source Battery Or External DC.
Zigmo/Router for PC
PC/Laptop with an OS installed or Any IoT Embedded Device.
Story
Introducing NCD’s long-range wireless temperature humidity sensor, boasting up to a 28 Mile range using a wireless mesh networking architecture. Incorporating the Honeywell HIH9130 temperature humidity sensor transmits highly accurate temperature and humidity samples at user-defined intervals.
The on-board temperature sensor is rated for -25°C to 85°C or -13°F to 185°F and the humidity sensor is rated for 0 to 100% RH. It can be powered by just 2 AA batteries and an operational lifetime of 500, 000 wireless transmissions. Battery life can be extended up to 10 years depending on environmental conditions and the data transmission interval. Optionally, this sensor may be externally powered.
With an open communication protocol, this IoT wireless temperature humidity product can be integrated with just about any control system or gateway. Data can be transmitted to a PC, a Raspberry Pi, to Microsoft Azure® IoT, or Arduino. Sensor parameters and wireless transmission settings can be changed on the go using the open communication protocol providing maximum configurability depending on the intended application.
The long-range, price, accuracy, battery life and security features of Long Range Wireless Temperature Humidity Sensor make it an affordable choice which exceeds the requirements for most of the industrial as well as consumer market applications.
Setting up Node-RED
The sensor and Zigmo/Router come pre-programmed and work out of the box. In this section, we will set up a sensor and Zigmo link and start receiving data on our PC.
Steps to install Node-RED
Now that you have sensors running, we need a way to do something useful with that data.
First of all, you’ll have to install Node-RED.
Once that’s done, you’ll need to enter your command line, or Power Shell for Windows users, navigate to the directory Node-RED is installed in.
Now type “npm I ncd-red-wireless node-red-dashboard“. This will install the nodes required to receive data from your wireless sensors and you can start Node-RED once this is done.
To start node server write Node-RED in the command prompt or terminal and press enter.
Setting up the nodes
Assuming at this point you’ve started up Node-RED, you should be able to open a browser and navigate to http://localhost:1880, this will open up the flow builder that is the heart of the Node-RED experience.
Steps to build the flow
At this point you’ll be viewing a large blank flow with a long list of nodes on the left-hand side, this sidebar is called the palette.

Go ahead and drag a Wireless Gateway node over to your flow canvas to get started.

ncd-red-wireless Provides the nodes that manage the serial connection, parse incoming sensor data, filter it by specific parameters, and allow you to configure the wireless sensors.
Finding your wireless sensors
Once you’ve added the node you’ll be able to view the info tab, which contains information about the node’s functionality, this tab is well-populated for most Node-RED packages and contains valuable information, many times you will not need to view any other documentation outside of the info tab, so keep it in mind while you are building your flows if you have a question about how a node works. The next thing we need to do is configure the node, when you first add it you’ll notice that there is a small triangle on the top right corner next to a blue dot, the triangle indicates that the node needs additional configuration, the blue dot indicates that the node has not yet been deployed as part of the flow.
Double click on the node to open up the configuration options.

Click on the pencil icon next to the Serial Device field to configure your USB router, this will open a second configuration panel that only has a few options.
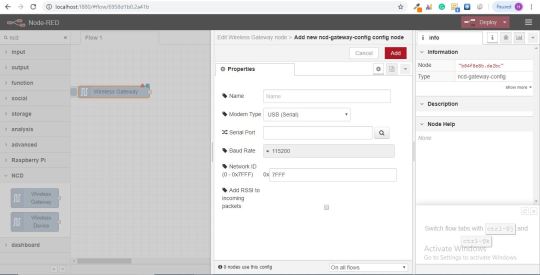
Click on the magnifying glass next to the Serial Port field and select the port that corresponds with your router, then click the “Add” button on top. The Serial Device field will now be populated based on that selection, and you can click “Done”, you now have direct access to your wireless sensors! To view the data coming in.
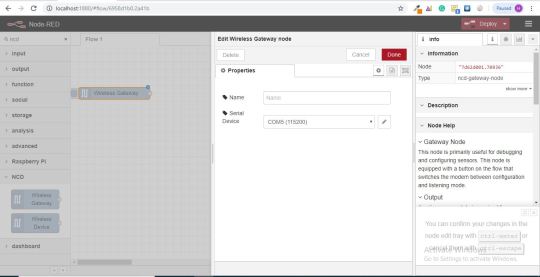
Now go back to your palette and type “debug” into the search field at the top, grab one of these nodes and drag it to the right of your Wireless Gateway.

Double click on it and change “msg.” to “complete msg object” click done.

Now draw a line between the two nodes, and click “Deploy” on the top right of the window...

Working with the data
Now out of your wireless sensors data is gathered and it is output to the “debug” tab, this “debug tab” is placed within the right sidebar subsequent to the information tab. To see the information are available in to hit the reset button. In Node-RED records is surpassed among nodes in a JSON packet. When the msg object comes into the debug tab you may make bigger it to view the overall list of information that comes with it. This is extraordinarily useful in case you need to quickly see which sensors are checking in. The other issue this node gives is an easy way to interchange your router to the network identity that devices in configuration mode document on, simply hit the button on the left of the node and the tool will switch to the configuration network, hit it once more to return it to listening mode. Once we get the wi-fi tool nodes set up, they may be set to routinely configure a sensor whilst it enters configuration mode, so it’s always available to maintain such gateway nodes present at the flow for speedy configuring a device.

Adding the wireless sensors
we need to separate wireless sensor records domestically in order that we are able to display it, we could use a switch node to split out the messages from the gateway based totally on the mac address with or sensor type, but as I referred to, the wireless nodes truly incorporate extra functionality for configuring the sensors, so we’ll start with them to give you an extra entire image of how those structures can work. In case you haven’t already seen packets coming in from both of your sensors, cross in advance and hit the reset button on the only that hasn’t stated. While a sensor assessment in thru any serial device configuration node, the mac address and kind of sensor is cached in a pool so we are able to quickly find it for the duration of this next step.
Grab a Wireless Node from the palette and drag it onto the flow, double click on it to get it configured.
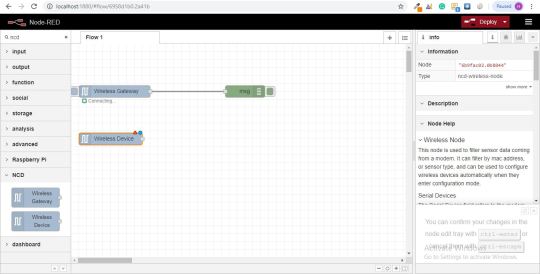
select the serial device from the drop-down that you used for the Wireless Gateway, now click the magnifying glass next to “Mac Address” and select one of the available options.
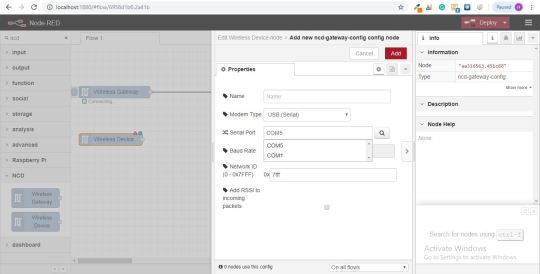

You’ll notice this automatically sets the sensor type for you, you can also give it a name to make it easier to identify. As noted in the info tab, the Serial Device for Config field is optional, and we won’t worry about it right now. The node you have just added effectively works as a filter on incoming sensor data, only passing through data for the mac address, or sensor type if no mac address is present.
Now go back to your palette and type “debug” into the search field at the top, grab one of these nodes and drag it to the right of your Wireless Gateway.

Double click on it and click done.
Adding Function Nodes
The function node is used to run JavaScript code against the msg object. The function node accepts a msg object as input and can return 0 or more message objects as output. This message object must have a payload property (msg.payload) and usually has other properties depending on the proceeding nodes.
Now grab a “function” node from the palette, and place it to the right of the Temp/Hum node.
Double click on the node to open up the configuration options.
Here you have to write little javascript code to create a condition, so the temperature and humidity values will be written in the excel.
Now grab a CSV node from the palette and place it to the right of the function node, it will convert the values CSV format i.e comma-separated values.
Now double click on it and type the column names separated by comma and output as “a message per row” as shown in the picture below.
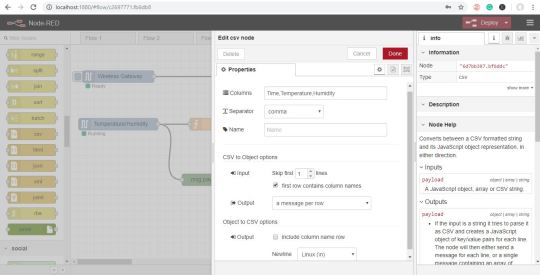
Now go back to your palette and type “file” into the search field at the top, grab the one which shows “Writes msg.payload” to store the values and place it right to the CSV node. You can also attach the debug node to check the out of the file node.
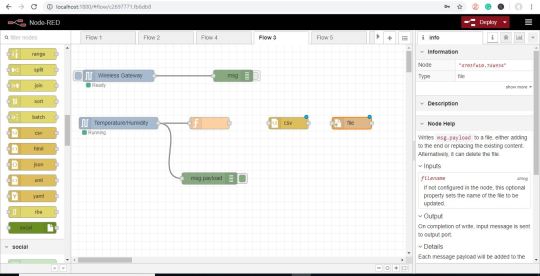
Double click on it to edit the file node, enter the file name where you want to store the values as shown in the figure.
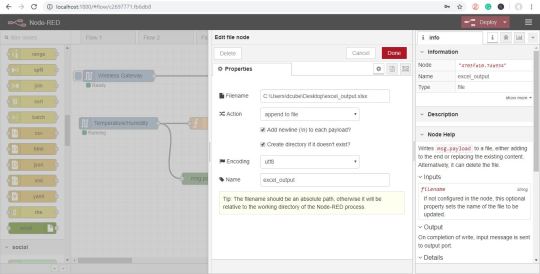
Now connect all the wires and click on the deploy button.
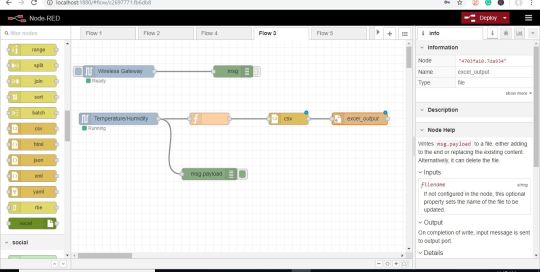
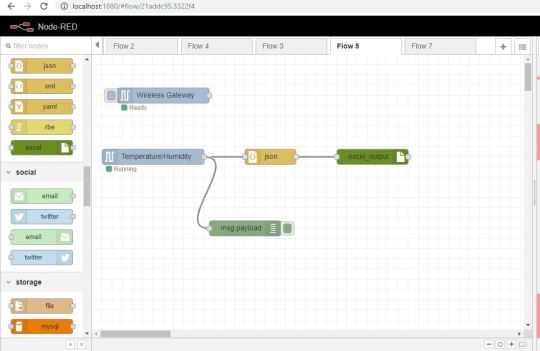
OUTPUT
Here you can check the excel output.
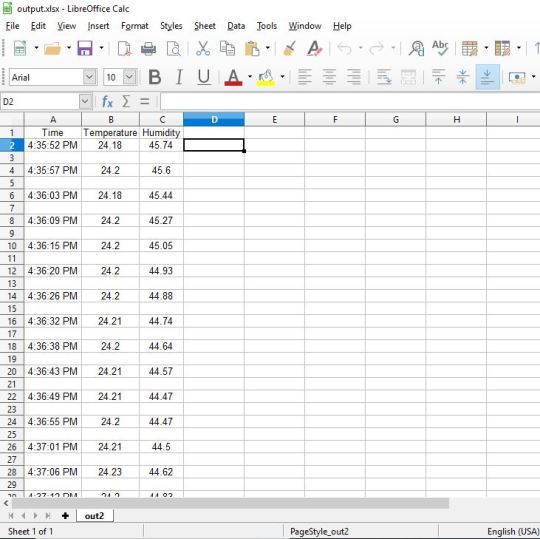
Node-red_flow_json
[{"id":"c2697771.fb6db8","type":"tab","label":"Flow 3","disabled":false,"info":""},{"id":"2ecc9d14.42a2a2","type":"ncd-gateway-node","z":"c2697771.fb6db8","name":"","connection":"7cc0565b.898ba8","x":120,"y":80,"wires":[["f0354fde.82ef1"]]},{"id":"f0354fde.82ef1","type":"debug","z":"c2697771.fb6db8","name":"","active":false,"tosidebar":true,"console":false,"tostatus":false,"complete":"true","targetType":"full","x":410,"y":80,"wires":[]},{"id":"176a6bea.9967a4","type":"ncd-wireless-node","z":"c2697771.fb6db8","name":"","connection":"3a63a78.66c7858","config_comm":"be3e53dd.346c8","addr":"","sensor_type":"1","auto_config":"","node_id":0,"delay":300,"destination":"0000FFFF","power":4,"retries":10,"pan_id":"7FFF","change_enabled":"","change_pr":"0","change_interval":"0","cm_calibration":"60.6","bp_altitude":"0","bp_pressure":"0","bp_temp_prec":"0","bp_press_prec":"0","amgt_accel":"0","amgt_mag":"0","amgt_gyro":"0","impact_accel":"0","impact_data_rate":"4","impact_threshold":25,"impact_duration":1,"activ_interr_x":1,"activ_interr_y":2,"activ_interr_z":4,"activ_interr_op":8,"filtering":0,"data_rate":5,"time_series":0,"reading_type":1,"x":120,"y":200,"wires":[["2b6528b9.6a3a78","390e7f7.e94e48"]]},{"id":"2b6528b9.6a3a78","type":"function","z":"c2697771.fb6db8","name":"","func":"var temperature = msg.payload.temperature\nvar humidity = msg.payload.humidity\nvar d = new Date();\nvar time = d.toLocaleTimeString();\nvar m ={'Time':time,'Temperature':temperature,'Humidity':humidity};\nreturn {payload:m};","outputs":1,"noerr":0,"x":350,"y":200,"wires":[["6d7bb397.bf6ddc"]]},{"id":"390e7f7.e94e48","type":"debug","z":"c2697771.fb6db8","name":"","active":true,"tosidebar":true,"console":false,"tostatus":false,"complete":"payload","targetType":"msg","x":350,"y":340,"wires":[]},{"id":"6d7bb397.bf6ddc","type":"csv","z":"c2697771.fb6db8","name":"","sep":",","hdrin":true,"hdrout":"","multi":"one","ret":"\\n","temp":"Time,Temperature,Humidity","skip":"1","x":550,"y":200,"wires":[["4703fa10.7da934"]]},{"id":"4703fa10.7da934","type":"file","z":"c2697771.fb6db8","name":"excel_output","filename":"C:\\Users\\dcube\\Desktop\\excel_output.xlsx","appendNewline":true,"createDir":true,"overwriteFile":"false","encoding":"utf8","x":730,"y":200,"wires":[[]]},{"id":"7cc0565b.898ba8","type":"ncd-gateway-config","z":"","name":"","comm_type":"serial","ip_address":"","tcp_port":"2101","port":"COM6","baudRate":"115200","pan_id":"7fff","rssi":false},{"id":"3a63a78.66c7858","type":"ncd-gateway-config","z":"","name":"","comm_type":"serial","ip_address":"","tcp_port":"2101","port":"COM6","baudRate":"115200","pan_id":"7fff","rssi":false},{"id":"be3e53dd.346c8","type":"ncd-gateway-config","z":"","name":"","comm_type":"serial","ip_address":"","tcp_port":"2101","port":"COM6","baudRate":"115200","pan_id":"7fff","rssi":false}]
Also, there is another way to send the data to excel by using “JSON” node and “excel” node.
First of all, close the terminal or command prompt if you were doing with the above method.
Then you have to install excel node to store the data.
So you’ll need to enter your command line, or Power Shell for Windows users, navigate to the directory Node-RED is installed in.
Now type “npm install node-red-contrib-excel“. This will install the “excel” node required to store data from your wireless sensors and you can start Node-RED once this is done.
To start node server write node-red in the command prompt or terminal and press enter.
Now open a browser and navigate to http://localhost:1880 to open the flow builder.
Now the steps are the same up to adding the wireless sensor.
To build the flow same as shown above up to adding the wireless sensor.
Then grab the JSON node from the palette and place it right to the Temperature/Humidity node.
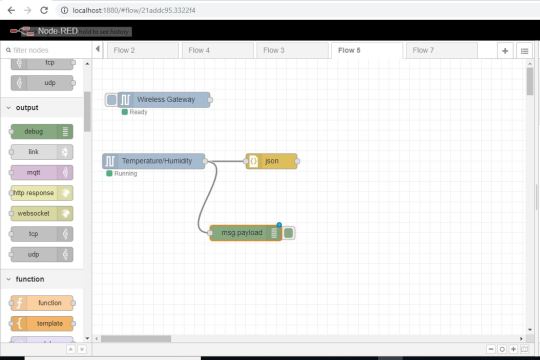
Double click on it edit JSON node, edit it as shown in the picture below and click done.
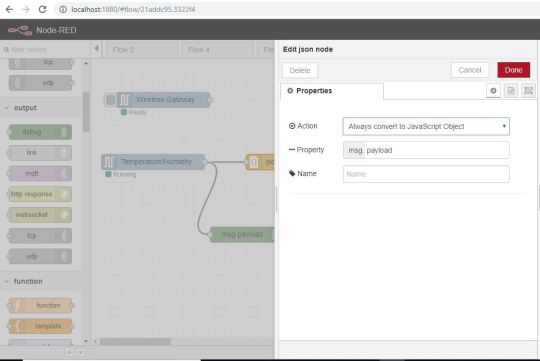
Now grab the “excel” node that you have installed from the palette and place it to the right of “JSON” node.
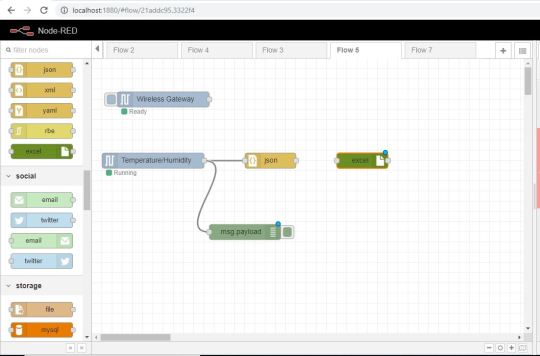
Double click on it to enter the file name where you want to store the temp/hum data and click done.
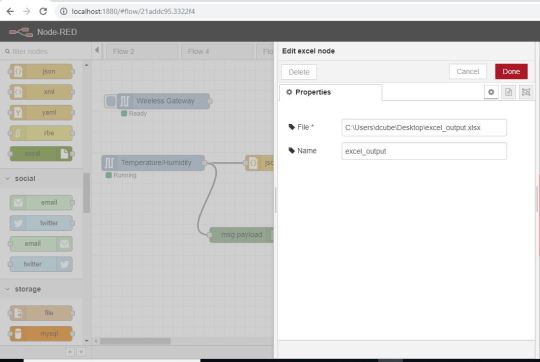
Now connect all the wires and hit the “deploy” button.
OUTPUT

But the limitation with excel node is that it overwrites the data in a single row.
Node-red Flow Excel node
[{"id":"21addc95.3322f4","type":"tab","label":"Flow 5","disabled":false,"info":""},{"id":"df396104.3078b","type":"ncd-gateway-node","z":"21addc95.3322f4","name":"","connection":"b2933c2.fec5dc","x":140,"y":80,"wires":[[]]},{"id":"b938e310.ba4ef","type":"ncd-wireless-node","z":"21addc95.3322f4","name":"","connection":"220af376.1c24cc","config_comm":"fb46f24e.c4341","addr":"","sensor_type":"1","auto_config":"","node_id":0,"delay":300,"destination":"0000FFFF","power":4,"retries":10,"pan_id":"7FFF","change_enabled":"","change_pr":"0","change_interval":"0","cm_calibration":"60.6","bp_altitude":"0","bp_pressure":"0","bp_temp_prec":"0","bp_press_prec":"0","amgt_accel":"0","amgt_mag":"0","amgt_gyro":"0","impact_accel":"0","impact_data_rate":"4","impact_threshold":25,"impact_duration":1,"activ_interr_x":1,"activ_interr_y":2,"activ_interr_z":4,"activ_interr_op":8,"filtering":0,"data_rate":5,"time_series":0,"reading_type":1,"x":120,"y":200,"wires":[["169f12eb.2edaad","47ed6c99.4d9f54"]]},{"id":"169f12eb.2edaad","type":"json","z":"21addc95.3322f4","name":"","property":"payload","action":"obj","pretty":false,"x":350,"y":200,"wires":[["d98f712.f8b199"]]},{"id":"47ed6c99.4d9f54","type":"debug","z":"21addc95.3322f4","name":"","active":true,"tosidebar":true,"console":false,"tostatus":false,"complete":"payload","targetType":"msg","x":300,"y":340,"wires":[]},{"id":"d98f712.f8b199","type":"excel","z":"21addc95.3322f4","name":"excel_output","file":"C:\\Users\\dcube\\Desktop\\excel_output.xlsx","x":550,"y":200,"wires":[[]]},{"id":"b2933c2.fec5dc","type":"ncd-gateway-config","z":"","name":"","comm_type":"serial","ip_address":"","tcp_port":"2101","port":"COM6","baudRate":"115200","pan_id":"7fff","rssi":false},{"id":"220af376.1c24cc","type":"ncd-gateway-config","z":"","name":"","comm_type":"serial","ip_address":"","tcp_port":"2101","port":"COM6","baudRate":"115200","pan_id":"7fff","rssi":false},{"id":"fb46f24e.c4341","type":"ncd-gateway-config","z":"","name":"","comm_type":"serial","ip_address":"","tcp_port":"2101","port":"COM6","baudRate":"115200","pan_id":"7fff","rssi":false}]
0 notes
Text
Sending-Data-of-IOT-Wireless-Temperature-and-Humidity-Sensor-to-MySQL
We are using here NCD’s Temperature and Humidity sensor, but the steps stay the equal for any of the NCD product, so if you have other NCD wireless sensors, experience free to observe alongside besides. By means of the stop of this text, you need to have a stable understanding of how to set up the sensors, configure node-red, and see the data on a dashboard like the one pictured right here.

IoT Long Range Wireless Temperature and Humidity Sensor
Introducing NCD’s long-range wireless temperature humidity sensor, boasting up to a 28 Mile range using a wireless mesh networking architecture. Incorporating the Honeywell HIH9130 temperature humidity sensor transmits highly accurate temperature and humidity samples at user-defined intervals.
The on-board temperature sensor is rated for -25°C to 85°C or -13°F to 185°F and the humidity sensor is rated for 0 to 100% RH. It can be powered by just 2 AA batteries and an operational lifetime of 500,000 wireless transmissions. Battery life can be extended up to 10 years depending on environmental conditions and the data transmission interval. Optionally, this sensor may be externally powered.
With an open communication protocol, this IoT wireless temperature humidity product can be integrated with just about any control system or gateway. Data can be transmitted to a PC, a Raspberry Pi, to Microsoft Azure® IoT, or Arduino. Sensor parameters and wireless transmission settings can be changed on the go using the open communication protocol providing maximum configurability depending on the intended application.
The long-range, price, accuracy, battery life and security features of Long Range Wireless Temperature Humidity Sensor make it an affordable choice which exceeds the requirements for most of the industrial as well as consumer market applications.

Long-Range Wireless Mesh Modem with USB Interface
Zigmo Wireless Communication Mesh Networking is simply the hottest wireless technology of our time period. It’s fast, it’s very easy to use, highly reliable, and self-healing. Three components are required for the ZigBee Mesh Network, the Coordinator ©, the Router (R) and the Endpoint (E). Your computer can speak to a ZigBee Mesh Network using a Coordinator. Think of the Coordinator as the interface to a Wireless Mesh Network. NCD Coordinators are equipped with a USB Interface. This Zigmo mounts as a Serial Port on your computer, and you will develop software that sends Serial commands at 115.2K Baud. The primary job of a router is to bridge the wireless gap between your computer (the Coordinator) and the device (Endpoint). If the Coordinator cannot speak to the Endpoint device because it is out of range, a Router can be used to bridge the two devices together. Endpoints are simply devices. With regard to NCD products, Endpoints can be relay controllers, data collection devices, PWM devices, and much more.

Resources Required
IoT Long Range Wireless Temperature Humidity Sensor with power source Battery Or External DC.
Zigmo/Router for PC
XAMPP
PC/Laptop with an OS installed or Any IoT Embedded Device.
Setting up XAMPP
XAMPP is most prevailing, free an open-source cross-platform which is one solution to run your web services. XAMPP is developed by ApacheFriends which released in May 2002. XAMPP Stands for Cross-Platform(X), Apache(A), MySQL(M) also Sometimes (M) refers to MariaDB, PHP(P) and Pearl(P).
XAMPP allows you to work on a local server and test local copies of websites using PHP code and MySQL databases. Once XAMPP is active, you can access your local copy with a browser using an URL like http://localhost/ or http://127.0.0.1/
Downloading and Installing XAMPP
Go to XAMPP web site and download the installer based on your operating system. Installation should be similar to a normal software installation you do in your operating system.
When installing, there would be an option to select whether you want to run Apache and MySQL as services. If you chose it, Apache and MySQL will start at system boot-up which may not need if your computer is tight with memory resources or if you are not doing PHP development frequently. You can change these settings after installation.
Starting Apache and MySQL
Go to the location where you installed XAMPP (usually C:\Program Files\xampp) and double click on XAMPP Control Panel (xampp-control.exe). This will bring you the following screen. Click on Start buttons next to Apache and MySQL for starting them.
Now open up your browser and type http://localhost/ or http://127.0.0.1/
This will open up the following page. Click on the phpMyAdmin.
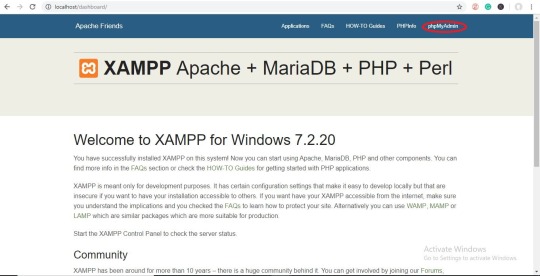
This will bring you the following screen. Now click on the “New” button as shown in the picture below to create a new database.

Now create a new database as shown in the picture below.
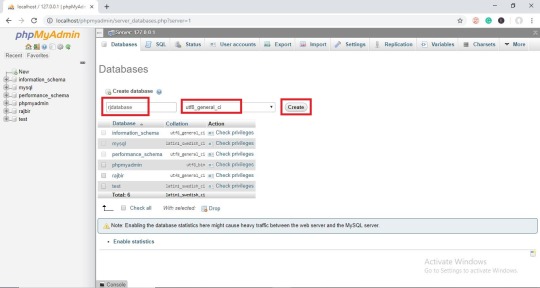
Now create a table to visualize data as shown in the picture below.

Now name the first column as “id”.
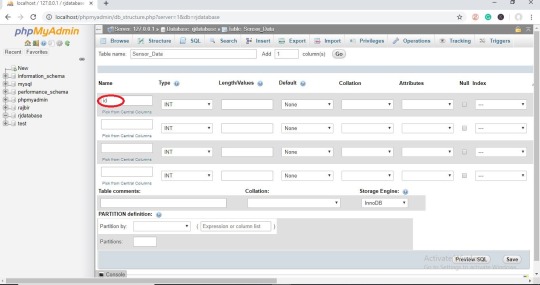
Now scroll to the right side of the screen you will see “A_I Comments” i.e. Auto Increments and it is used setting primary key which uniquely identifies each record within the table. Click on the checkbox below it.
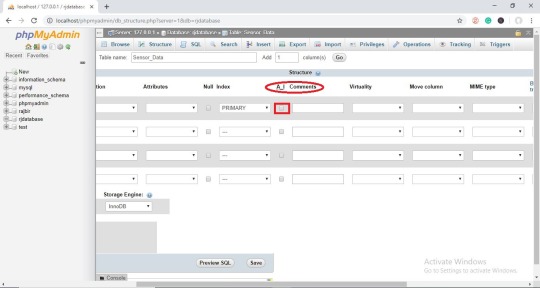
This will bring you the following screen. Now click on the “Go” button.
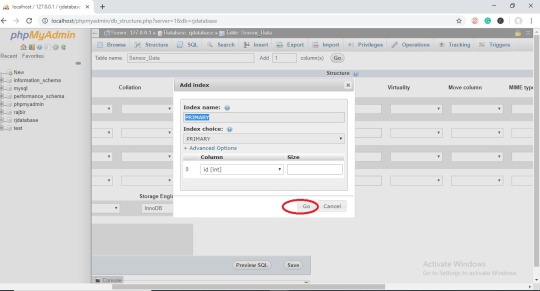
Now enter the values of other three columns Name = temperature, Type = DECIMAL, Length/Values = 10,2(i.e up to 2 decimal points) and similarly for humidity and in the last column you can show created time and click on the save button as shown in the picture below.
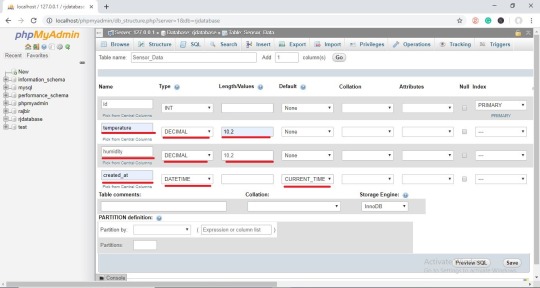
Now click on your database name to expand it and it will show your table name, then click on it to view how data is shown, as shown in the picture below.
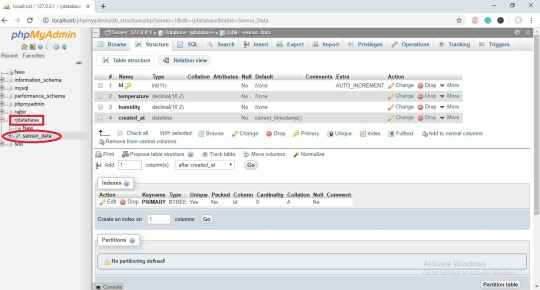
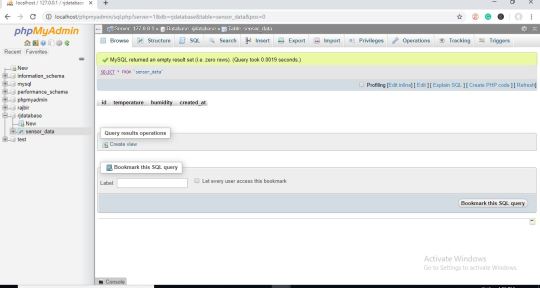
That’s all with the setting up of XAMPP.
Setting up Node-Red.
The sensor and Zigmo/Router come pre-programmed and work out of the box. In this section, we will set up a sensor and Zigmo link and start receiving data on our PC.
Steps to install NODE-RED
Now that you have sensors running, we need a way to do something useful with that data.
First of all, you’ll have to install Node-RED.
Once that’s done, you’ll need to enter your command line, or Power Shell for Windows users, navigate to the directory Node-RED is installed in.
Now type “npm i ncd-red-wireless node-red-dashboard“. This will install the nodes required to receive data from your wireless sensors and you can start Node-RED once this is done.
To start node server write node-red in the command prompt or terminal and press enter.
Setting up the nodes
Assuming at this point you’ve started up Node-RED, you should be able to open a browser and navigate to http://localhost:1880, this will open up the flow builder that is the heart of the Node-RED experience.
Steps to build the flow
At this point you’ll be viewing a large blank flow with a long list of nodes on the left-hand side, this sidebar is called the palette.

Go ahead and drag a Wireless Gateway node over to your flow canvas to get started.
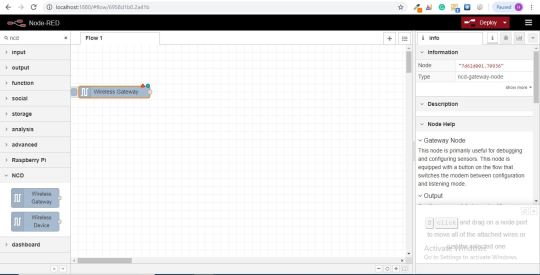
ncd-red-wireless Provides the nodes that manage the serial connection, parse incoming sensor data, filter it by specific parameters, and allow you to configure the wireless sensors.
Finding your wireless sensors
Once you’ve added the node you’ll be able to view the info tab, which contains information about the node’s functionality, this tab is well-populated for most node-red packages and contains valuable information, many times you will not need to view any other documentation outside of the info tab, so keep it in mind while you are building your flows if you have a question about how a node works. The next thing we need to do is configure the node, when you first add it you’ll notice that there is a small triangle on the top right corner next to a blue dot, the triangle indicates that the node needs additional configuration, the blue dot indicates that the node has not yet been deployed as part of the flow.
Double click on the node to open up the configuration options.
Click on the pencil icon next to the Serial Device field to configure your USB router, this will open a second configuration panel that only has a few options.
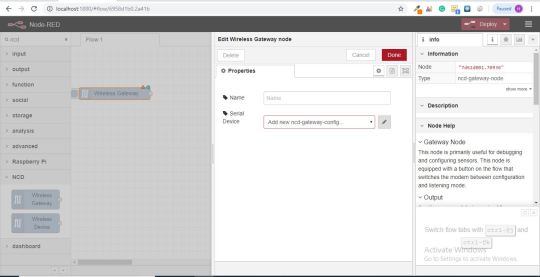
Click on the magnifying glass next to the Serial Port field and select the port that corresponds with your router, then click the “Add” button on top.

The Serial Device field will now be populated based on that selection, and you can click “Done”, you now have direct access to your wireless sensors! To view the data coming in.

Now go back to your palette and type “debug” into the search field at the top, grab one of these nodes and drag it to the right of your Wireless Gateway.
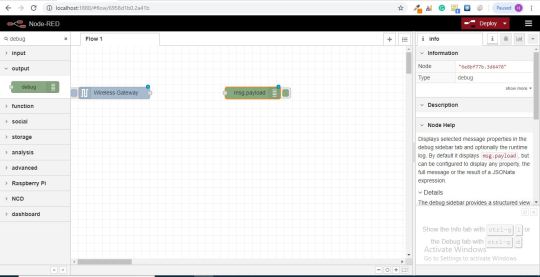
Double click on it and change “msg.” to “complete msg object” click done.
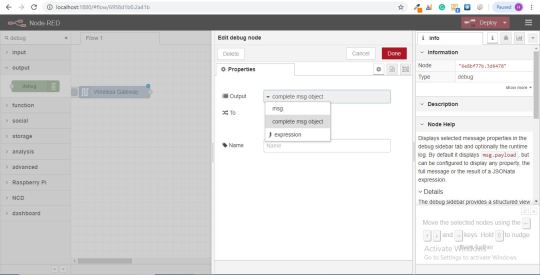
Now draw a line between the two nodes, and click “Deploy” on the top right of the window...
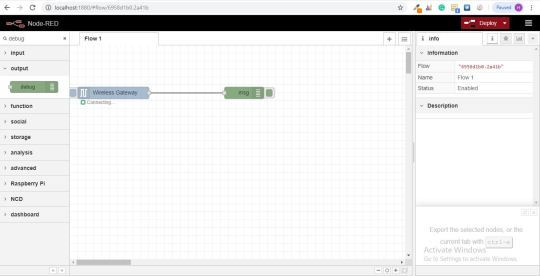
Working with the data
Now out of your wireless sensors data is gathered and it is output to the “debug” tab, this “debug tab” is placed within the right sidebar subsequent to the information tab. To see the information are available in to hit the reset button. In node-red records is surpassed among nodes in a JSON packet. When the msg object comes into the debug tab you may make bigger it to view the overall list of information that comes with it. This is extraordinarily useful in case you need to quickly see which sensors are checking in. The other issue this node gives is an easy way to interchange your router to the network identity that devices in configuration mode document on, simply hit the button on the left of the node and the tool will switch to the configuration network, hit it once more to return it to listening mode. Once we get the wi-fi tool nodes set up, they may be set to routinely configure a sensor whilst it enters configuration mode, so it’s always available to maintain such gateway nodes present at the flow for speedy configuring a device.

Adding the wireless sensors
we need to separate wireless sensor records domestically in order that we are able to display it, we could use a switch node to split out the messages from the gateway based totally on the mac address with or sensor type, but as I referred to, the wireless nodes truly incorporate extra functionality for configuring the sensors, so we’ll start with them to give you an extra entire image of how those structures can work. In case you haven’t already seen packets coming in from both of your sensors, cross in advance and hit the reset button on the only that hasn’t stated. While a sensor assessment in thru any serial device configuration node, the mac address and kind of sensor is cached in a pool so we are able to quickly find it for the duration of this next step.
Grab a Wireless Node from the palette and drag it onto the flow, double click on it to get it configured.

Select the serial device from the drop-down that you used for the Wireless Gateway, now click the magnifying glass next to “Mac Address” and select one of the available options.

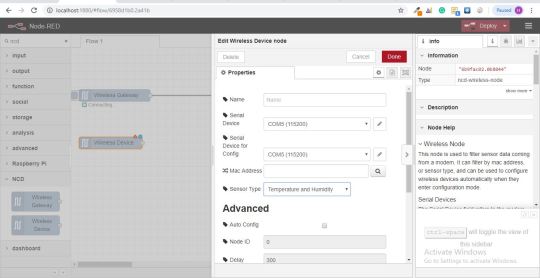
You’ll notice this automatically sets the sensor type for you, you can also give it a name to make it easier to identify. As noted in the info tab, the Serial Device for Config field is optional, and we won’t worry about it right now. The node you have just added effectively works as a filter on incoming sensor data, only passing through data for the mac address, or sensor type if no mac address is present.
Now go back to your palette and type “debug” into the search field at the top, grab one of these nodes and drag it to the right of your Wireless Gateway.
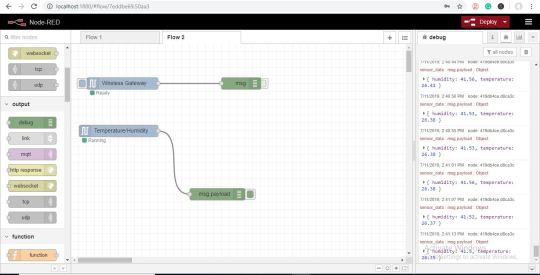
Double click on it and click done

Adding Function Nodes
The function node is used to run JavaScript code against the msg object. The function node accepts a msg object as input and can return 0 or more message objects as output. This message object must have a payload property (msg.payload) and usually has other properties depending on the proceeding nodes.
Now grab a “function” node from the palette, and place it to the right of the Temp/Hum node.
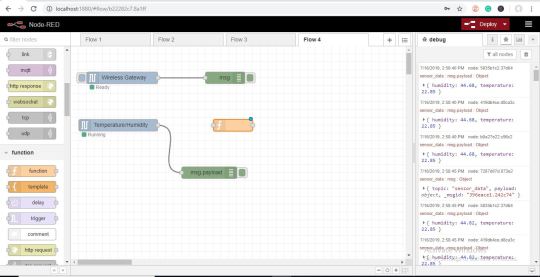
Double click on the node to open up the configuration options.
Here you have to write little javascript code to create a condition, so the data is sent to the MySQL database.
Now you have added “MySQL” node to store data, check your palette if it is present there or you can click on the three bars present right side of deploy button as shown in the picture below.
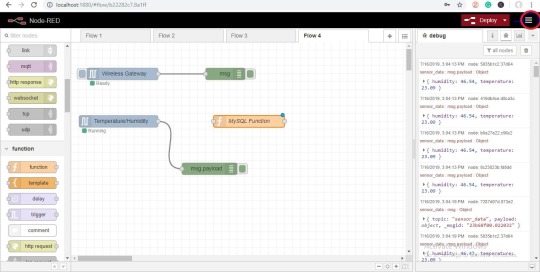
Now click on the “Manage palette” button.
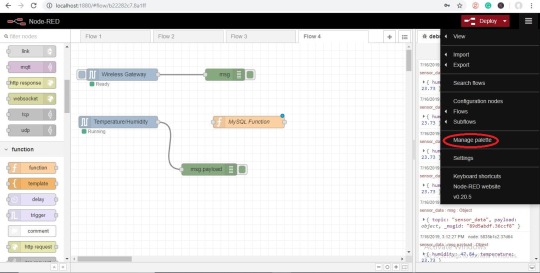
Now search for mysql and click on the ‘install’ button as shown in the picture.
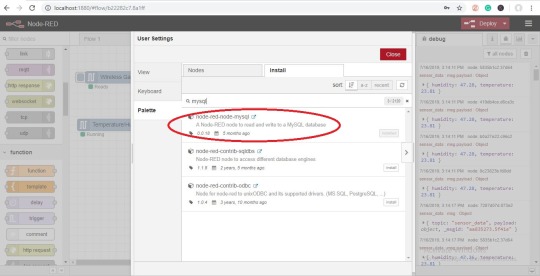
Once it is done, you’ll see “mysql” node is present in the palette.
Now grab the “mysql” node from the palette and double click on it to open up configuration options.
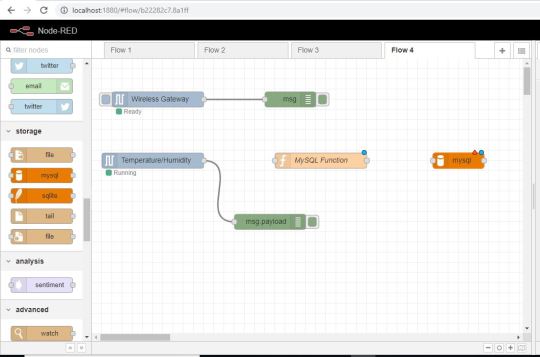
Write your database name as you created earlier and give a name to it, then click on the pencil icon next to the Database to edit the sqldatabase node.
Now add User = root i.e by default in the xampp and password is blank. You can also create user and password enter that here, then enter your database name and time zone(optional) and then click update and done.
Now you’ll see your database node shows connected.
Now connect all the wires as shown in the picture.
Now hit the deploy button and you’ll database node shows “ok”, its means data is sending.
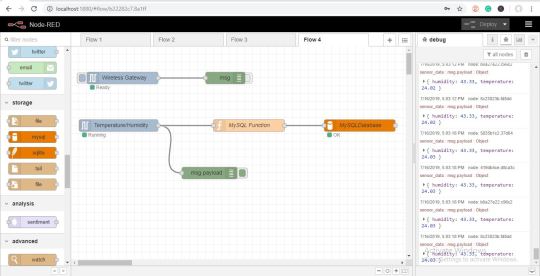
OUTPUT
Here you can visualize the data coming in.
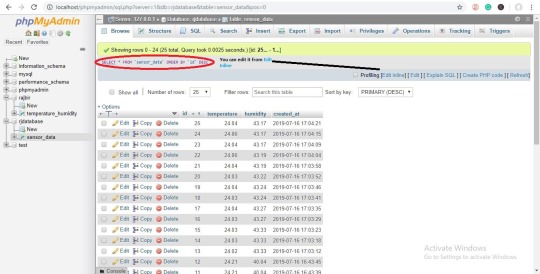
Node_Red_FLOW
https://github.com/ncdcommunity/Sending-Data-of-OT-Wireless-Temperature-and-Humidity-Sensor-to-MySQL/blob/master/node-red%20Sql_flow.json
0 notes
Text
SaferCCTV(TM) HDMI TV Stick Anycast M2 Plus Miracast/ Chromecast HD 1080P TV Stick Wireless WiFi Display Dongle for IOS Apple iPhone iPad Android Smartphone Windows Mac
SaferCCTV(TM) HDMI TV Stick Anycast M2 Plus Miracast/ Chromecast HD 1080P TV Stick Wireless WiFi Display Dongle for IOS Apple iPhone iPad Android Smartphone Windows Mac
Do not miss this chance to get this product on most inexpensive worth.
Pros:
1. For Android 0S: Assist Android OS four.2 or above(Telephone Working System: Android telephone). For IOS: Assist IOS 7.zero to I0S 10 (Gadgets: For all iPhone mannequin after iPhone4 / all iPad mannequin after iPad 2 / all iPod contact after iPod contact 4th technology)
2. Assist WPS perform, can quick join with Router and AP compurgation. Assist On-line & native (content material wi-fi). Assist Youtube On TV and so forth. Assist PDF/ MS Phrase/ MS Excel/ MS PowerPoint/ Keynotes, and so forth
three. Customers additionally might mirror on-line contents on Chrome to HDTV, when enjoying 3D MSG (Movement Sensing Sport), you could possibly use the pill as the sport management, and revel in it with the massive TV display screen( Play video games, view native photographs & movies, watch movies and flicks, browse the web, and so forth out of your iPhone to your HDTV utilizing airplay by way of Anycast dongle)
four. Wi-fi interconnection, as much as 10 meters wi-fi transmission vary, extraordinarily steady and dependable. Mini, light-weight, handy for journey
5. Assist Airmirror/ DLNA/ Airplay/ Miracast to sync forged picture/ video/ music/ workplace file/ internet browser/ stay digital camera from iPhone/ Android Smartphone/ pill PC to giant display screen TV/ Projector by WiFi, excellent for PPT presentation and video assembly
Get this SaferCCTV(TM) HDMI TV Stick Anycast M2 Plus Miracast/ Chromecast HD 1080P TV Stick Wi-fi WiFi Show Dongle for IOS Apple iPhone iPad Android Smartphone Home windows Mac
1.Be aware: (1)Please make it possible for your telephone/ pad system help Miracast/ DLNA perform before you purchase it. (2)Assist automobile HDMI interface. You possibly can join your telephone to automobile display screen in wi-fi to share Baidu or Google map info. Assist synchronization enjoying of audio and video.
2.Specification: (1)DDR3: 256MB (2)Nand Flash: No (three)OS: Linux three.zero.eight (four)GPU: 3D GPU 1 x mali 400 (5)Assist Miracast, DLNA, Airmirror, Airplay (6)System Assist: Home windows, Mac OS, IOS, Android OS (7)CPU: Single Core ARM Cortex A9 Rockchip RK2928 1.2 GHz
three.System Requirement: (1)Working distance: As much as 10m (2)Assist Photograph Format: JPEG/ BMP (three)Wi-Fi: 802.11b/g/n 150Mbps 2.4GHz (four)Decision supported: WVGA ~ 1080P (5)Interface: HDMI 1.four x1; Micro USBx1 (6)Storage: Not less than 40MB free area wanted (7)Show: Video/ Audio/ Photograph/ Workplace file/ Web site (eight)TV/ Projector: Assist TV/ Projector with HDMI output interface (9)Assist Audio Format: MP1/ MP2/ MP3/ WMA/ OGG/ ADPCM-WAV/ PCM-WAV/ AAC (10)Assist Video Format: AVI/ DIVX/ MKV/ TS/ DAT/ MPG/ MPEG1,2,four/ MP4/ RM/ RMVB/ WMV (11)Workplace Software program (Show Presentation): PDF/ MS Phrase/ MS Excel/ MS PowerPoint/ Keynotes (12)Decision supported: for iPhone (430 * 320 ~ 1136 * 640); for iPad (1024 * 768 ~ 2048 * 1536) (13)On-line streaming: Youtube, Hulu Plus, IDMB, Quickflix, Household On TV and so forth. Distant controller: Assist by Telephone/ Labtop/ Pill PC.
It’s all the time higher to purchase SaferCCTV(TM) HDMI TV Stick Anycast M2 Plus Miracast/ Chromecast HD 1080P TV Stick Wi-fi WiFi Show Dongle for IOS Apple iPhone iPad Android Smartphone Home windows Mac from the the chief on this eCommerce business. They’ve proved their capability in delivering high quality service after shopping for incredible merchandise from them.
The post SaferCCTV(TM) HDMI TV Stick Anycast M2 Plus Miracast/ Chromecast HD 1080P TV Stick Wireless WiFi Display Dongle for IOS Apple iPhone iPad Android Smartphone Windows Mac appeared first on IPCAMVOX.
from SaferCCTV(TM) HDMI TV Stick Anycast M2 Plus Miracast/ Chromecast HD 1080P TV Stick Wireless WiFi Display Dongle for IOS Apple iPhone iPad Android Smartphone Windows Mac
0 notes