#Publish Nuget package to devops artifacts
Explore tagged Tumblr posts
Visit Tumblr Blog
Explore Tumblr blogs with no restrictions, modern design and the best experience.
Last Seen Tumblr Blogs


Fun Fact
Mobile US users spent an average of 115.8 minutes on Tumblr app monthly.
Text
Unable to load the service index for source azure devops
Unable to load the service index for source azure devops
While creating Nuget package through Azure DevOps pipeline and adding the package to the Artifacts, you might get the following or similar errors: error NU1301: Unable to load the service index for source https://pkgs.dev.azure.com/MyEnterpriseApps/_packaging/SchemaRegistry%40Local/nuget/v3/index.json This could usually happen when you’re Publishing the package to Nuget in a separate job or…
View On WordPress
#Azure Devops#Publish Nuget package to devops artifacts#Unable to load the service index for source azure devops
0 notes
Text
The Azure DevOps
Developers, project managers, and contributors collaborate to create software in an Azure DevOps-supported environment. Organizations can create and improve products more quickly with it than they can with traditional software development methods. You can work in the cloud or on-premises by utilizing Azure DevOps Services or Azure DevOps Server. For further information, see the differences between Azure DevOps Services and Azure DevOps Server. Azure Artifacts
With the help of Azure Artifacts, developers have access to fully integrated package management, making it simple to add and remove packages from a network's operating system.
You may easily consume and publish many types of packages with this Azure software. The various package types that Artifacts supports are listed below:
Build artifacts
NuGet
npm
Maven
PyPl
Universal Packages
Symbols
youtube
1 note
·
View note
Text
Introduction to Azure Pipelines
Technology adaptation is an ongoing procedure. The main aim is to tone down human efforts. People endeavors to attain the best results that enhance productivity and eases out the process. However, this could be dealt with efficiently with the help of various tools. This is the point where the need for Microsoft’s Azure DevOps-SaaS arises.
Microsoft Azure DevOps came into existence in 2018, implying that it has been in this industry for a long. Its origin could be traced through Visual Studio Team System that was launched in 2006.
What is Azure DevOps?
Azure DevOps refers to a comprehensive tool that provides different services considering software development lifecycle. Few advantages of Azure DevOps Services you ought to focus on:
Azure boards allow agile planning, power BI visualization, other standard reporting tools, and tracking work items.
Azure pipelines deal with Continuous Integration and Continuous Deployment with the help of Kubernetes and containers.
Azure Repos offers support to cloud-hosted personal storage.
Azure Artifacts provides package management support to various public and private sources like npm, Maven, NuGet, and Python.
Azure Test Plans to offer an investigation of different testing solutions and integrated planning.
A fully-featured and mature model, the goal of Microsoft Azure DevOps is to assist businesses to multitask.
What are Azure Pipelines?
Azure DevOps is an automated procedure that helps developers build, compile, and employ their codes on various platforms. It is a compatible delivery tool, similar to open-source CodeShip or Jenkins. The main purpose of Azure Pipelines is that no human interference is required. Thus, all the chances are accomplished automatically. As when there is human involvement, there is a window of errors. Hence, with the help of automation, everything works conveniently.
Azure Pipeline can be classified as:
Source control
Build tools
Package creation
Configuration management
Monitoring
Azure DevOps Pipelines are used with various applications like Java, Go, .Net, Python, XCode, Node.js, and C++. In addition to this, Azure Pipelines considers Azure Repos, Bitbucket, Github, Subversion, etc. It also carries out deliveries through the test and classification of codes to suitable targets.
Azure DevOps Pipeline Terminology
Continuous Integration
Continuous Integration detects issues in the initial stages of the development process. The benefit is, it is quite easy to amend the errors at the beginning itself. Moreover, the developers can cross-check the code for Testing and detect bugs or issues. The basic advantages comprise of the following:
Small tweaks simplify the merging of codes.
Feasible for the team to check what each one is dealing with.
Detect errors and resolve them.
Constant merging of codes and Testing.
Eases the Integration process for better productivity.
Continuous Delivery
Continuous Delivery enables the developers to deliver the latest features, configure changes, and resolve bugs faster. Routine deliveries are also provided by CD pipelines according to the requirement. The main advantages are:
Reduced release risks
Faster bug fixes
Feasible delivery
Continuous Testing
Continuous Testing refers to the procedure of managing continuous tests. No matter if the app is on the cloud or on-premise, it is convenient to automate the build-deploy-test workflows, select technologies, and test changes faster and efficiently. Continuous Testing assists in detecting issues during the development procedure. Moreover, CT and TFS keep a regular check on the app.
Pillars of Azure DevOps
To start and function, the Azure DevOps pipeline needs a trigger.
The pipeline ranges from single to multiple environments as it has various stages.
Each stage is assigned particular jobs in the pipelines.
Each job functions on a specific agent.
The step could be a task or anything.
The only condition is that it should be in the form of a pre-bundled script, which functions as a published artifact.
Run published files in groups called artifacts.
Packages format
Publish Maven, NuGet or npm packages so others can consume them. You can even rely on various package management tools.
Necessities to use Azure Pipelines
An Azure DevOps organization
To have required source codes stores
Features of Azure DevOps
Language friendly
Build, test, etc., and runs parallel on macOS, Windows, and Linux.
Kubernetes
Easily develops and deploys Containers and Kubernetes to hosts.
Extensible
Explore and implement tasks and tests to Slack extensions.
Cloud Deployment
Execute continuous delivery of the software to the cloud.
Benefits of Azure DevOps Speed
DevOps enables teams to release updates faster.
Rapid Delivery
Azure DevOps immediately deploys the cloud.
Reliability
You can stay updated about real-time performances.
Scalability
It assists in managing development efficiently.
Efficient collaboration
Azure DevOps permits us to collaborate efficiently.
Security
Automated compliance policies define and track compliance.
Artifacts in Azure Pipeline
Artifacts are files comprising of machine instructions rather than human intervention codes. It offers safe and quick binary packages which could be used at ease. Feed is similar to package containers that assist in publishing and consumption.
Cost of Azure DevOps
Azure dwells on two sorts of costs: individual services and user license services.
Individual services need users to possess one CI/CD dealt by Microsoft. The users can opt for up to 2GB of storage of azure artifacts.
User licenses focus on two types of plans: a simple plan and a simple plan with testing. The simple plan comprises basic features and is cost-free for the initial five users. Later, you ought to pay approximately $6 every month. The latter requires you to pay $52 every month from the initial stage itself.
Winding-up
It is really important to get the hang of Azure Pipelines before using Azure DevOps services. The system uses different operations during optimizations. The procedure uniformly divides workflows into various possible formats with the help of Azure. You can even hire reliable developers to manage your Azure projects without hassle
0 notes
Text
Azure artifacts
Azure artifacts Azure artifacts Today’s national news headlines in english Azure artifacts Azure artifacts Azure Artifacts is an extension that makes it easy to discover, install, and publish NuGet, npm, and Maven packages in Azure DevOps. It’s deeply integrated with other hubs like Build so that package management can become a seamless part of your existing workflows. Prerequisites Visual…

View On WordPress
0 notes
Text
Setting up Azure DevOps CI/CD for a .NET Core 3.1 Web App hosted in Azure App Service for Linux
Following up on my post last week on moving from App Service on Windows to App Service on Linux, I wanted to make sure I had a clean CI/CD (Continuous Integration/Continuous Deployment) pipeline for all my sites. I'm using Azure DevOps because it's basically free. You get 1800 build minutes a month FREE and I'm not even close to using it with three occasionally-updated sites building on it.
Last Post: I updated one of my websites from ASP.NET Core 2.2 to the latest LTS (Long Term Support) version of ASP.NET Core 3.1 this week. I want to do the same with my podcast site AND move it to Linux at the same time. Azure App Service for Linux has some very good pricing and allowed me to move over to a Premium v2 plan from Standard which gives me double the memory at 35% off.
Setting up on Azure DevOps is easy and just like signing up for Azure you'll use your Microsoft ID. Mine is my gmail/gsuite, in fact. You can also login with GitHub creds. It's also nice if your project makes NuGet packages as there's an integrated NuGet Server that others can consume libraries from downstream before (if) you publish them publicly.
I set up one of my sites with Azure DevOps a while back in about an hour using their visual drag and drop Pipeline system which looked like this:
There's some controversy as some folks REALLY like the "classic" pipeline while others like the YAML (Yet Another Markup Language, IMHO) style. YAML doesn't have all the features of the original pipeline yet, but it's close. It's primary advantage is that the pipeline definition exists as a single .YAML file and can be checked-in with your source code. That way someone (you, whomever) could import your GitHub or DevOps Git repository and it includes everything it needs to build and optionally deploy the app.
The Azure DevOps team is one of the most organized and transparent teams with a published roadmap that's super detailed and they announce their sprint numbers in the app itself as it's updated which is pretty cool.
When YAML includes a nice visual interface on top of it, it'll be time for everyone to jump but regardless I wanted to make my sites more self-contained. I may try using GitHub Actions at some point and comparing them as well.
Migrating from Classic Pipelines to YAML Pipelines
If you have one, you can go to an existing pipeline in DevOps and click View YAML and get some YAML that will get you most of the way there but often includes some missing context or variables. The resulting YAML in my opinion isn't going to be as clean as what you can do from scratch, but it's worth looking at.
In decided to disable/pause my original pipeline and make a new one in parallel. Then I opened them side by side and recreated it. This let me learn more and the result ended up cleaner than I'd expected.
The YAML editor has a half-assed (sorry) visual designer on the right that basically has Tasks that will write a little chunk of YAML for you, but:
Once it's placed you're on your own
You can't edit it or modify it visually. It's text now.
If your cursor has the insert point in the wrong place it'll mess up your YAML
It's not smart
But it does provide a catalog of options and it does jumpstart things. Here's my YAML to build and publish a zip file (artifact) of my podcast site. Note that my podcast site is three projects, the site, a utility library, and some tests. I found these docs useful for building ASP.NET Core apps.
You'll see it triggers builds on the main branch. "Main" is the name of my primary GitHub branch. Yours likely differs.
It uses Ubuntu to do the build and it builds in Release mode. II
I install the .NET 3.1.x SDK for building my app, and I build it, then run the tests based on a globbing *tests pattern.
I do a self-contained publish using -r linux-x64 because I know my target App Service is Linux (it's cheaper) and it goes to the ArtifactStagingDirectory and I name it "hanselminutes." At this point it's a zip file in a folder in the sky.
Here it is:
trigger: - main pool: vmImage: 'ubuntu-latest' variables: buildConfiguration: 'Release' steps: - task: UseDotNet@2 displayName: ".NET Core 3.1.x" inputs: version: '3.1.x' packageType: sdk - task: UseDotNet@2 inputs: version: '3.1.x' - script: dotnet build --configuration $(buildConfiguration) displayName: 'dotnet build $(buildConfiguration)' - task: DotNetCoreCLI@2 displayName: "Test" inputs: command: test projects: '**/*tests/*.csproj' arguments: '--configuration $(buildConfiguration)' - task: DotNetCoreCLI@2 displayName: "Publish" inputs: command: 'publish' publishWebProjects: true arguments: '-r linux-x64 --configuration $(BuildConfiguration) --output $(Build.ArtifactStagingDirectory)' zipAfterPublish: true - task: PublishBuildArtifacts@1 displayName: "Upload Artifacts" inputs: pathtoPublish: '$(Build.ArtifactStagingDirectory)' artifactName: 'hanselminutes'
Next I move to the release pipeline. Now, you can also do the actual Azure Publish to a Web App/App Service from a YAML Build Pipeline. I suppose that's fine if your site/project is simple. I wanted to have dev/test/staging so I have a separate Release Pipeline.
The Release Pipelines system in Azure DevOps can pull an "Artifact" from anywhere - GitHub, DevOps itself natch, Jenkins, Docker Hub, whatever. I set mine up with a Continuous Deployment Trigger that makes a new release every time a build is available. I could also do Releases manually, with specific tags, scheduled, or gated if I'd liked.
Mine is super easy since it's just a website. It's got a single task in the Release Pipeline that does an Azure App Service Deploy. I can also deploy to a slot like Staging, then check it out, and then swap to Production later.
There's nice integration between Azure DevOps and the Azure Portal so I can see within Azure in the Deployment Center of my App Service that my deployments are working:
I've found this all to be a good use of my staycation and even though I'm just a one-person company I've been able to get a very nice automated build system set up at very low cost (GitHub free account for a private repo, 1800 free Azure DevOps minutes, and an App Service for Linux plan) A basic starts at $13 with 1.75Gb of RAM but I'm planning on moving all my sites over to a single big P1v2 with 3.5G of RAM and an SSD for around $80 a month. That should get all of my ~20 sites under one roof for a price/perf I can handle.
Sponsor: Like C#? We do too! That’s why we've developed a fast, smart, cross-platform .NET IDE which gives you even more coding power. Clever code analysis, rich code completion, instant search and navigation, an advanced debugger... With JetBrains Rider, everything you need is at your fingertips. Code C# at the speed of thought on Linux, Mac, or Windows. Try JetBrains Rider today!
© 2019 Scott Hanselman. All rights reserved.


Setting up Azure DevOps CI/CD for a .NET Core 3.1 Web App hosted in Azure App Service for Linux published first on http://7elementswd.tumblr.com/
0 notes
Text
Setting up Azure DevOps CI/CD for a .NET Core 3.1 Web App hosted in Azure App Service for Linux
Following up on my post last week on moving from App Service on Windows to App Service on Linux, I wanted to make sure I had a clean CI/CD (Continuous Integration/Continuous Deployment) pipeline for all my sites. I'm using Azure DevOps because it's basically free. You get 1800 build minutes a month FREE and I'm not even close to using it with three occasionally-updated sites building on it.
Last Post: I updated one of my websites from ASP.NET Core 2.2 to the latest LTS (Long Term Support) version of ASP.NET Core 3.1 this week. I want to do the same with my podcast site AND move it to Linux at the same time. Azure App Service for Linux has some very good pricing and allowed me to move over to a Premium v2 plan from Standard which gives me double the memory at 35% off.
Setting up on Azure DevOps is easy and just like signing up for Azure you'll use your Microsoft ID. Mine is my gmail/gsuite, in fact. You can also login with GitHub creds. It's also nice if your project makes NuGet packages as there's an integrated NuGet Server that others can consume libraries from downstream before (if) you publish them publicly.
I set up one of my sites with Azure DevOps a while back in about an hour using their visual drag and drop Pipeline system which looked like this:
There's some controversy as some folks REALLY like the "classic" pipeline while others like the YAML (Yet Another Markup Language, IMHO) style. YAML doesn't have all the features of the original pipeline yet, but it's close. It's primary advantage is that the pipeline definition exists as a single .YAML file and can be checked-in with your source code. That way someone (you, whomever) could import your GitHub or DevOps Git repository and it includes everything it needs to build and optionally deploy the app.
The Azure DevOps team is one of the most organized and transparent teams with a published roadmap that's super detailed and they announce their sprint numbers in the app itself as it's updated which is pretty cool.
When YAML includes a nice visual interface on top of it, it'll be time for everyone to jump but regardless I wanted to make my sites more self-contained. I may try using GitHub Actions at some point and comparing them as well.
Migrating from Classic Pipelines to YAML Pipelines
If you have one, you can go to an existing pipeline in DevOps and click View YAML and get some YAML that will get you most of the way there but often includes some missing context or variables. The resulting YAML in my opinion isn't going to be as clean as what you can do from scratch, but it's worth looking at.
In decided to disable/pause my original pipeline and make a new one in parallel. Then I opened them side by side and recreated it. This let me learn more and the result ended up cleaner than I'd expected.
The YAML editor has a half-assed (sorry) visual designer on the right that basically has Tasks that will write a little chunk of YAML for you, but:
Once it's placed you're on your own
You can't edit it or modify it visually. It's text now.
If your cursor has the insert point in the wrong place it'll mess up your YAML
It's not smart
But it does provide a catalog of options and it does jumpstart things. Here's my YAML to build and publish a zip file (artifact) of my podcast site. Note that my podcast site is three projects, the site, a utility library, and some tests. I found these docs useful for building ASP.NET Core apps.
You'll see it triggers builds on the main branch. "Main" is the name of my primary GitHub branch. Yours likely differs.
It uses Ubuntu to do the build and it builds in Release mode. II
I install the .NET 3.1.x SDK for building my app, and I build it, then run the tests based on a globbing *tests pattern.
I do a self-contained publish using -r linux-x64 because I know my target App Service is Linux (it's cheaper) and it goes to the ArtifactStagingDirectory and I name it "hanselminutes." At this point it's a zip file in a folder in the sky.
Here it is:
trigger: - main pool: vmImage: 'ubuntu-latest' variables: buildConfiguration: 'Release' steps: - task: UseDotNet@2 displayName: ".NET Core 3.1.x" inputs: version: '3.1.x' packageType: sdk - task: UseDotNet@2 inputs: version: '3.1.x' - script: dotnet build --configuration $(buildConfiguration) displayName: 'dotnet build $(buildConfiguration)' - task: DotNetCoreCLI@2 displayName: "Test" inputs: command: test projects: '**/*tests/*.csproj' arguments: '--configuration $(buildConfiguration)' - task: DotNetCoreCLI@2 displayName: "Publish" inputs: command: 'publish' publishWebProjects: true arguments: '-r linux-x64 --configuration $(BuildConfiguration) --output $(Build.ArtifactStagingDirectory)' zipAfterPublish: true - task: PublishBuildArtifacts@1 displayName: "Upload Artifacts" inputs: pathtoPublish: '$(Build.ArtifactStagingDirectory)' artifactName: 'hanselminutes'
Next I move to the release pipeline. Now, you can also do the actual Azure Publish to a Web App/App Service from a YAML Build Pipeline. I suppose that's fine if your site/project is simple. I wanted to have dev/test/staging so I have a separate Release Pipeline.
The Release Pipelines system in Azure DevOps can pull an "Artifact" from anywhere - GitHub, DevOps itself natch, Jenkins, Docker Hub, whatever. I set mine up with a Continuous Deployment Trigger that makes a new release every time a build is available. I could also do Releases manually, with specific tags, scheduled, or gated if I'd liked.
Mine is super easy since it's just a website. It's got a single task in the Release Pipeline that does an Azure App Service Deploy. I can also deploy to a slot like Staging, then check it out, and then swap to Production later.
There's nice integration between Azure DevOps and the Azure Portal so I can see within Azure in the Deployment Center of my App Service that my deployments are working:
I've found this all to be a good use of my staycation and even though I'm just a one-person company I've been able to get a very nice automated build system set up at very low cost (GitHub free account for a private repo, 1800 free Azure DevOps minutes, and an App Service for Linux plan) A basic starts at $13 with 1.75Gb of RAM but I'm planning on moving all my sites over to a single big P1v2 with 3.5G of RAM and an SSD for around $80 a month. That should get all of my ~20 sites under one roof for a price/perf I can handle.
Sponsor: Like C#? We do too! That’s why we've developed a fast, smart, cross-platform .NET IDE which gives you even more coding power. Clever code analysis, rich code completion, instant search and navigation, an advanced debugger... With JetBrains Rider, everything you need is at your fingertips. Code C# at the speed of thought on Linux, Mac, or Windows. Try JetBrains Rider today!
© 2019 Scott Hanselman. All rights reserved.


Setting up Azure DevOps CI/CD for a .NET Core 3.1 Web App hosted in Azure App Service for Linux published first on https://deskbysnafu.tumblr.com/
0 notes
Text
Azure DevOps Continuous Build/Deploy/Test with ASP.NET Core 2.2 Preview in One Hour
I've been doing Continuous Integration and Deployment for well over 13 years. We used a lot of custom scripts and a lovely tool called CruiseControl.NET to check out, build, test, and deploy our code.
However, it's easy to get lulled into complacency. To get lazy. I don't set up Automated Continuous Integration and Deployment for all my little projects. But I should.
I was manually deploying a change to my podcast website this evening via a git deploy to Azure App Service. Pushing to Azure this way via Git uses "Kudu" to actually build the site. However, earlier this week I was also trying to update my site to .NET Core 2.2 which is in preview. Plus I have Unit Tests that aren't getting run during deploy.
So look at it this way. My simple little podcast website with a few tests and the desire to use a preview .NET Core SDK means I've outgrown a basic "git push to prod" for deploy.
I remembered that Azure DevOps (formerly VSTS) is out and offers free unlimited minutes for open source projects. I have no excuse for my sloppy builds and manual deploys. It also has unlimited free private repos, although I'm happy at GitHub and have no reason to move.
It usually takes me 5-10 minutes for a manual build/test/deploy, so I gave myself an hour to see if I could get this same process automated in Azure DevOps. I've never used this before and I wanted to see if I could do it quickly, and if it was intuitive.
Let's review my goals.
My source is in GitHub
Build my ASP.NET Core 2.2 Web Site
I want to build with .NET Core 2.2 which is currently in Preview.
Run my xUnit Unit Tests
I have some Selenium Unit Tests that can't run in the cloud (at least, I haven't figured it out yet) so I need them skipped.
Deploy the resulting site to product in my Azure App Service
Cool. So I make a project and point Azure DevOps at my GitHub.
They have a number of starter templates, so I was pleasantly surprised I didn't need manually build my Build Configuration myself. I'll pick ASP.NET app. I could pick Azure Web App for ASP.NET but I wanted a little more control.
Now I've got a basic build pipeline. You can see it will use NuGet, get the packages, build the app, test the assemblies (if there are tests...more on that later) and the publish (zip) the build artifacts.
I then clicked Save & Queue...and it failed. Why? It says that I'm targeting .NET Core 2.2 and it doesn't support anything over 2.1. Shoot.
Fortunately there's a pipeline element that I can add called ".NET Core Tool Installer" that will get specific versions of the .NET Core SDK.
NOTE: I've emailed the team that ".NET Tool Installer" is the wrong name. A .NET Tool is a totally different thing. This task should be called the ".NET Core SDK Installer." Because it wasn't, it took me a minute to find it and figure out what it does.
I'm using the SDK Agent version 2.22.2.100-preview2-009404 so I put that string into the properties.
At this point it builds, but I get a test error.
There's two problems with the tests. When I look at the logs I can see that the "testadapter.dll" that comes with xunit is mistakenly being pulled into the test runner! Why? Because the "Test Files" spec includes a VERY greedy glob in the form of **\*test*.dll. Perhaps testadapter shouldn't include the word test, but then it wouldn't be well-named.
**\$(BuildConfiguration)\**\*test*.dll !**\obj\**
My test DLLs are all named with "tests" in the filename so I'll change the glob to "**\$(BuildConfiguration)\**\*tests*.dll" to cast a less-wide net.
I have four Selenium Tests for my ASP.NET Core site but I don't want them to run when the tests are run in a Docker Container or, in this case, in the Cloud. (Until I figure out how)
I use SkippableFacts from XUnit and do this:
public static class AreWe { public static bool InDockerOrBuildServer { get { string retVal = Environment.GetEnvironmentVariable("DOTNET_RUNNING_IN_CONTAINER"); string retVal2 = Environment.GetEnvironmentVariable("AGENT_NAME"); return ( (String.Compare(retVal, Boolean.TrueString, ignoreCase: true) == 0) || (String.IsNullOrWhiteSpace(retVal2) == false)); } } }
Don't tease me. I like it. Now I can skip tests that I don't want running.
if (AreWe.InDockerOrBuildServer) return;
Now my tests run and I get a nice series of charts to show that fact.
I have it building and tests running.
I could add the Deployment Step to the Build but Azure DevOps Pipelines includes a better way. I make a Release Pipeline that is separate. It takes Artifacts as input and runs n number of Stages.
I take the Artifact from the Build (the zipped up binaries) and pass them through the pipeline into the Azure App Service Deploy step.
Here's the deployment in progress.
Cool! Now that it works and deploys, I can turn on Continuous Integration Build Triggers (via an automatic GitHub webhook) as well as Continuous Deployment triggers.
Azure DevOps even includes badges that I can add to my readme.md so I always know by looking at GitHub if my site builds AND if it has successfully deployed.
Now I can see each release as it happens and if it's successful or not.
To top it all off, now that I have all this data and these pipelines, I even put together a nice little dashboard in about a minute to show Deployment Status and Test Trends.
When I combine the DevOps Dashboard with my main Azure Dashboard I'm amazed at how much information I can get in so little effort. Consider that my podcast (my little business) is a one-person shop. And how I have a CI/CD pipeline with integrated testing gates that deploys worldwide. Many years ago this would have required a team and a lot of custom code.
Today it took an hour. Awesome.
Sponsor: Copy: Rider 2018.2 is here! Publishing to IIS, Docker support in the debugger, built-in spell checking, MacBook Touch Bar support, full C# 7.3 support, advanced Unity support, and more.
© 2018 Scott Hanselman. All rights reserved.


0 notes
Text
Microsoft splits VSTS five ways to build new Azure DevOps platform

Enlarge / Azure DevOps Pipeline. (credit: Microsoft)
Visual Studio Team Services (VSTS), Microsoft's application lifecycle management system, is to undergo a major shake-up and rebranding. Instead of a single Visual Studio-branded service, it's being split into five separate Azure-branded services, under the banner Azure DevOps.
The five components:
Azure Pipelines, a continuous integration, testing, and deployment system that can connect to any Git repository
Azure Boards, a work tracking system with Kanban boards, dashboards, reporting
Azure Artifacts, a hosting facility for Maven, npm, and NuGet packages
Azure Repos, a cloud-hosted private Git repository service
Azure Test Plans, for managing tests and capturing data about defects.
VSTS has been broken up in this way to further Microsoft's ambition of making its developer tooling useful to any development process and workflow, regardless of language or platform. The division into individual components should make it easier for developers to adopt portions of the Azure DevOps platform, without requiring them to go "all in" on VSTS. The reduced scope of each component means that it's cheaper than the VSTS pricing, making incremental adoption more palatable. For example, a Pipelines process could build and test a Node.js service from a GitHub repository and then deploy to a container on Amazon's AWS cloud, without requiring use of any of the other Azure DevOps components.
Read 3 remaining paragraphs | Comments
Microsoft splits VSTS five ways to build new Azure DevOps platform published first on https://medium.com/@CPUCHamp
0 notes
Text
Microsoft splits VSTS five ways to build new Azure DevOps platform

Enlarge / Azure DevOps Pipeline. (credit: Microsoft)
Visual Studio Team Services (VSTS), Microsoft's application lifecycle management system, is to undergo a major shake-up and rebranding. Instead of a single Visual Studio-branded service, it's being split into five separate Azure-branded services, under the banner Azure DevOps.
The five components:
Azure Pipelines, a continuous integration, testing, and deployment system that can connect to any Git repository
Azure Boards, a work tracking system with Kanban boards, dashboards, reporting
Azure Artifacts, a hosting facility for Maven, npm, and NuGet packages
Azure Repos, a cloud-hosted private Git repository service
Azure Test Plans, for managing tests and capturing data about defects.
VSTS has been broken up in this way to further Microsoft's ambition of making its developer tooling useful to any development process and workflow, regardless of language or platform. The division into individual components should make it easier for developers to adopt portions of the Azure DevOps platform, without requiring them to go "all in" on VSTS. The reduced scope of each component means that it's cheaper than the VSTS pricing, making incremental adoption more palatable. For example, a Pipelines process could build and test a Node.js service from a GitHub repository and then deploy to a container on Amazon's AWS cloud, without requiring use of any of the other Azure DevOps components.
Read 3 remaining paragraphs | Comments
Microsoft splits VSTS five ways to build new Azure DevOps platform published first on https://thelaptopguru.tumblr.com/
0 notes
Text
Microsoft splits VSTS five ways to build new Azure DevOps platform

Enlarge / Azure DevOps Pipeline. (credit: Microsoft)
Visual Studio Team Services (VSTS), Microsoft's application lifecycle management system, is to undergo a major shake-up and rebranding. Instead of a single Visual Studio-branded service, it's being split into five separate Azure-branded services, under the banner Azure DevOps.
The five components:
Azure Pipelines, a continuous integration, testing, and deployment system that can connect to any Git repository
Azure Boards, a work tracking system with Kanban boards, dashboards, reporting
Azure Artifacts, a hosting facility for Maven, npm, and NuGet packages
Azure Repos, a cloud-hosted private Git repository service
Azure Test Plans, for managing tests and capturing data about defects.
VSTS has been broken up in this way to further Microsoft's ambition of making its developer tooling useful to any development process and workflow, regardless of language or platform. The division into individual components should make it easier for developers to adopt portions of the Azure DevOps platform, without requiring them to go "all in" on VSTS. The reduced scope of each component means that it's cheaper than the VSTS pricing, making incremental adoption more palatable. For example, a Pipelines process could build and test a Node.js service from a GitHub repository and then deploy to a container on Amazon's AWS cloud, without requiring use of any of the other Azure DevOps components.
Read 3 remaining paragraphs | Comments
Microsoft splits VSTS five ways to build new Azure DevOps platform published first on https://medium.com/@HDDMagReview
0 notes
Text

In the recent time, there has been a new wave in the software industry. Techies have already build lot technologies, frameworks, programming languages, and platform, so the next big question is In the recent time, there has been a new wave in the software industry. Techies have already build lot technologies, frameworks, programming languages, and platform, so the next big question is
HOW CAN WE REDUCE THE GO TO MARKET TIME?
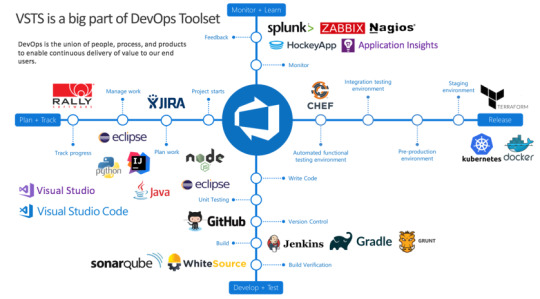
Cloud on boarding in past few years has really revolutionized the industry and also given a concrete answer to this question. Now in order to push code from developers machine to cloud/on-prem infrastructure, there are a lot of tools and platform available in the market such as Jenkins, Octopus Deploy, Teamcity, VSTS etc. Being a developer what I look for is which tool/ technique can get the job done with efficiency, reliability and min effort.As when we are on client projects we have limited time, and be it any developer he will appreciate max of his time to spend on client’s business requirements understanding, development, and testing than configuring build/release tools 🙂
I have tried my hands around few of the listed tools, I would say each of them be it Jenkins/Octopus Deploy/Teamcity/VSTS have their own strength and weakness. In totality and that’s totally my personal opinion which many might differ, VSTS has all the tools and features which can speed up to go to market route for any project/technology with least effort.
I already assume that you have a VSTS account, if not it simple go to VSTS create a new account. You will need a hotmail/outlook account for that.

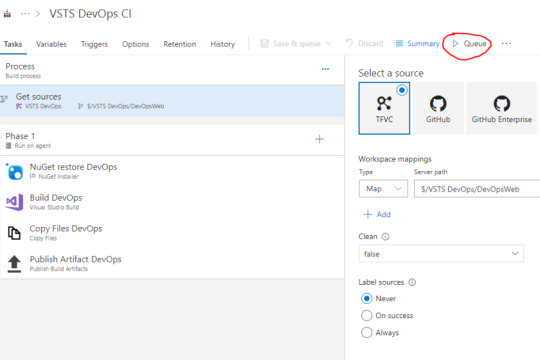
Once done you will have VSTS collection created for you, with MyFirstProject as default project. We will create a new project by the name VSTS Devops using New Project button
Below is a quick guide how we can configure a project for VSTS Continuous Integration, for demo purpose I am using ASP.NET MVC project. But if you are building project in any technology/ platform such as .NET/Java/Mobile/Docker etc VSTS has full support for each.
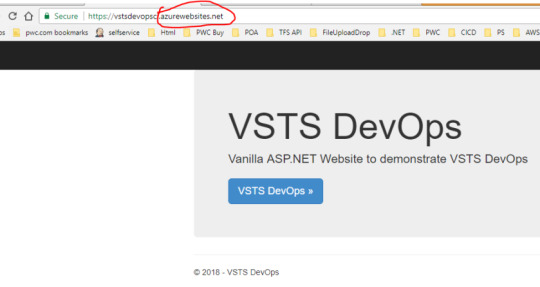
Lets create a simple vanilla ASP.NET MVC project. Build and run. I have made some text changes in default template of Index page as below.
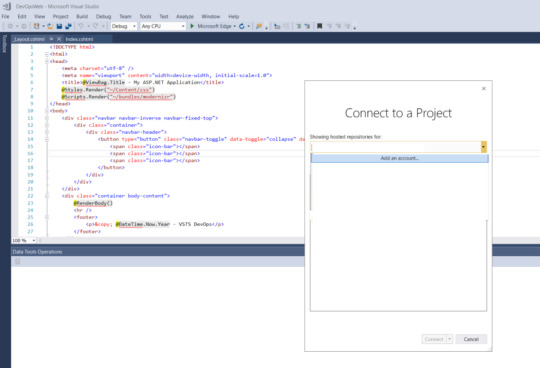
Connect Visual Studio to VSTS using Team Explorer


Connect using your VSTS credentials
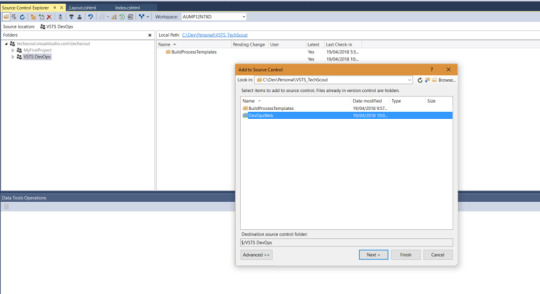
Go to solution control explorer and right click in right pane and select Add Items to Folder
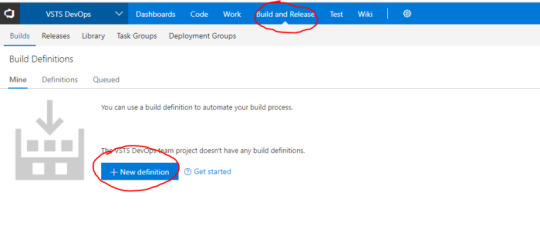
Once the code is checked in from VS, you can navigate to VSTS and select code Menu item from breadcrumb

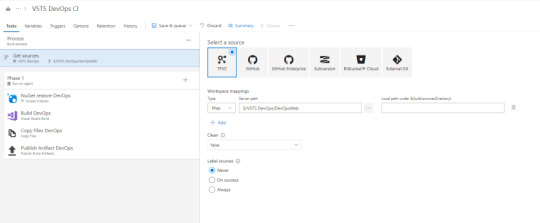
Go to Build tab now and click New definition
Select code source location and folder path to project folder. You have a wide range of option to select source code location i.e. GitHub,GitHub Enterprise, Subversion, Bitbucket and External Git. I have already posted a blog how you can use Github source control to integrate with VSTS DevOps


Now we will select Build Template. VSTS out of the vox gives you a long list ready made templates which you can use off the shelf to configure VSTS CI as in image below. In our case we will select and Empty template and configure it for our project.

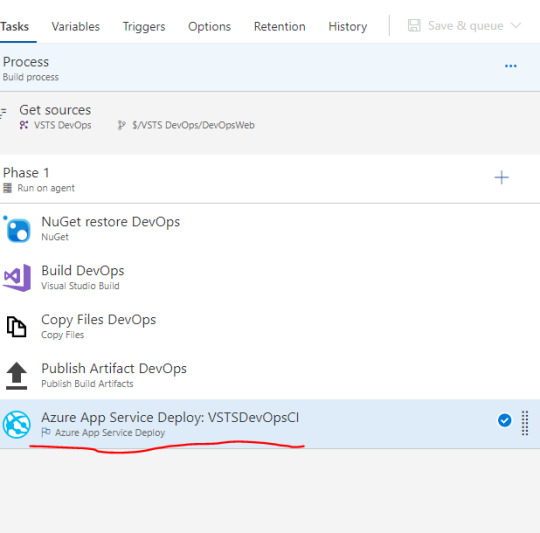
Lets add few task to our definition. Just like any .net project build first needs Nuget packages, then Build executed and finally on success the artifacts are pushed to either debug or release folder in bin. Similarly we will add Nuget Task, VS Build task, Copy Build Files task and Publish Files task to build a simple template for build and packaging of our MVC project.
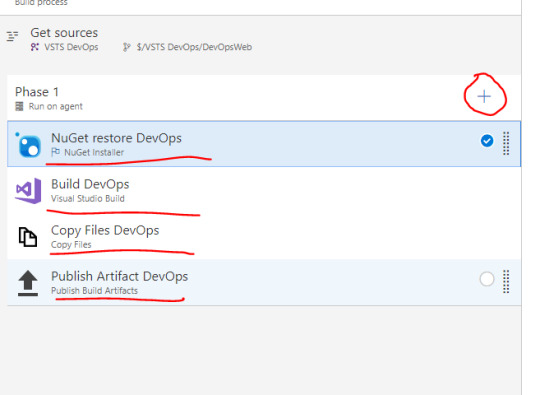
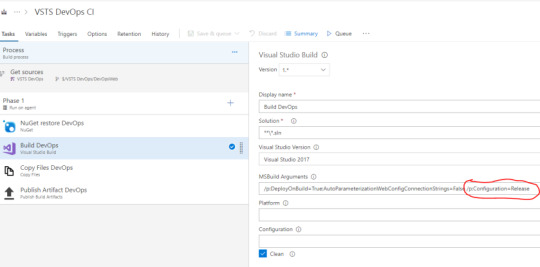
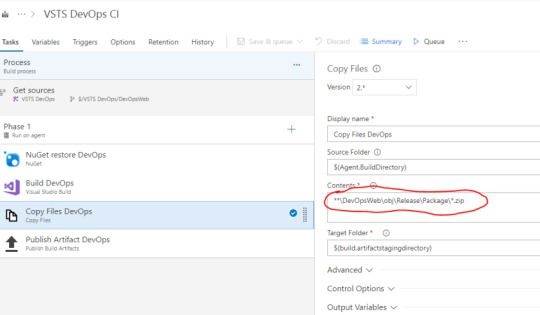
Let now configure each of the task selected as below:


As in step 9 we have already configured all the task, next step to text if all the configuration works as desired. If they do at the end of build we will have a success result and in the build result we will have artifact tab available with deployable artifacts.

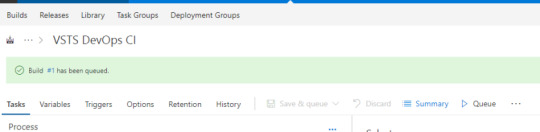
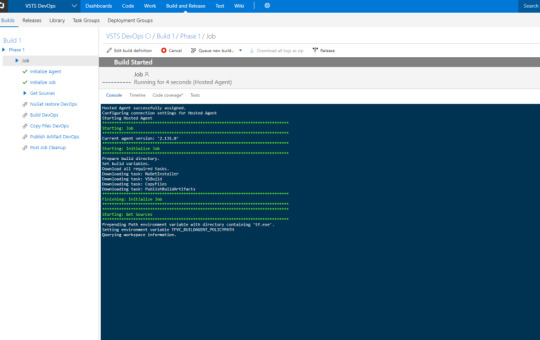
Below is the screenshot for build logs pushed in real-time to browser. This is really helpful as it gives details about what is happening behind the scene and what task is currently in execution
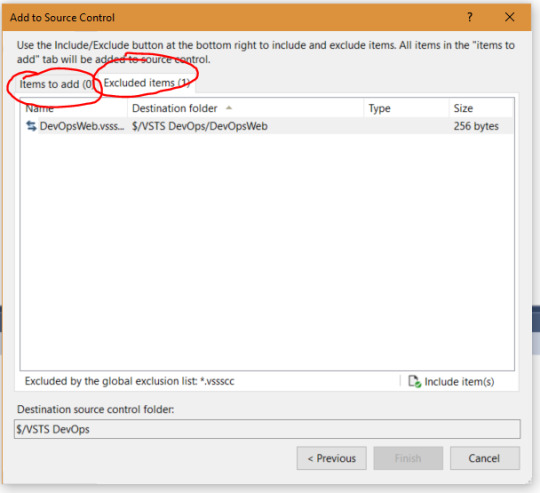
In our first build nuget restore failed.

What it states is it is unable to restore few of the packages from Nuget repo. A quick work around is when you check in code in step 3, check in all the Included and Excluded files as below
Next build request succeeds
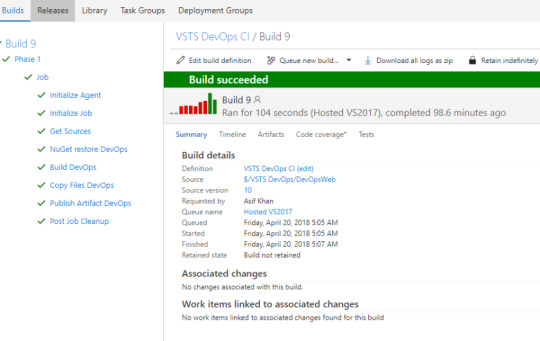
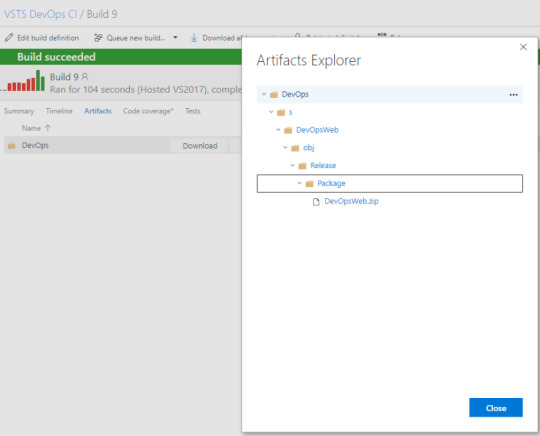
Now if we navigate to Artifacts tab we will get Download and Explore option. If we explore we can see the artifacts packaged as zip
With this we have achieved as successful Continuous Integration implementation. If you want to push the envelope a bit more next step is implement deployment. Including deployment in CI can be a valid scenario but not always preferred.It is valid for cases where you do not need any workflow for release or you do not have multiple controlled release environment. In order to implement release it’s simple we just need to add a release task, for this demo purpose we will take the MV Website artifacts and deploy in azure web app.
First is you need to add a new APP service to azure, for demo we are adding VSTSDevOpsCI. If you do not have an account it is simple just create new Azure account (please do use same Hotmail/outlook account details you created above, this will make things easy in further), you will get $250 credits to your subscription as complimentary for first month. Add a new Web App.

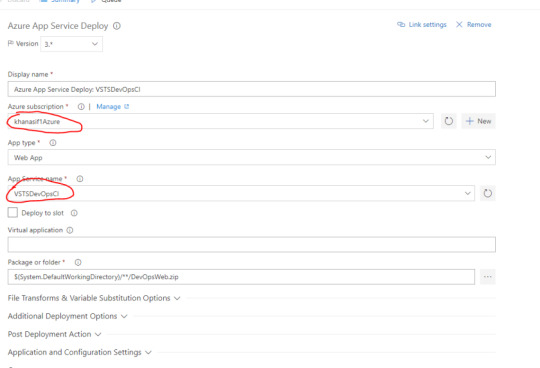
Next you need to link your azure account to VSTS. In Azure subscription item under Azure App Service Deploy task. Click Manage. Click new Service endpoint select Azure Resource Manager

Once your Azure account is connected to VSTS. You can access all resources in your Azure subscription using server endpoint created in VSTS.
Add a new Azure App Service task to build definition
Lets configure the task. We have select the same endpoint as created in step 2. This populate VSTSDevOpsCI app service in pick list. Also the package folder path is $(System.DefaultWorkingDirectory): Refers current build directory path on server ** : Refers to check all folder till you find DevOpsWeb.zip
Let try to queue a new build if all goes well will have the MVC website deployed to VSTSDevOpsCI app service after CI complets.

As you can check the URL the website is running in Azure
In order to do a quick test, let’s make some changes in our VS code and check in again it should update the website in azure.
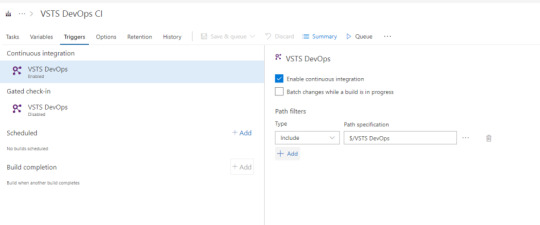
Not yets there now……. In order to accomplish above release per check in requirement we need to update a simple setting in build definition as below. Go to trigger tab and check Enable continuous integration checkbox
Lets update the code in VS and checkin.

Build gets queue as soon as checkin complets
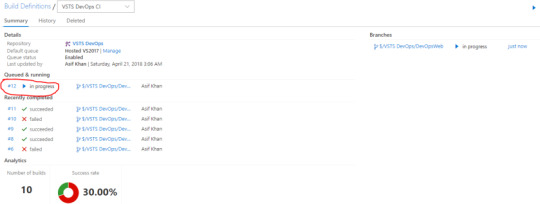
As below the Build #12 is successful

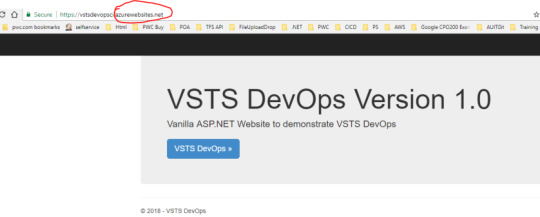
So lets got azure website now to check if the changes are reflected, yes it does the heading has Version 1.0 added.
Summary: As you can see it’s very simple to configure CI in VSTS and if your project has simple release plan then release can be integrated to same build definition. Now if you have a question around, that all this looks cool but I do not want to deploy my artifacts in Azure, I want to deploy in AWS or OnPrem server. There are wide range of solution to this problem: you can download artifacts using VSTS apis using automated tool and deploy in desired environment, better way is you can get a copy of VSTS build agent setup for your collection you can install the agent on one of your AWS/ OnPrem server and then instead of using Azure as deployment point you can use File transfer task or Powershell task to deploy in desired IIS folder on desired server. Avenues are endless VSTS is very matured now and VSTS team has already address most of regular CICD challenges experience by any project team. If you don’t get an off the shelf task for your requirement you always have powershell/batch task options to build one.
HAPPY CODING………..
VSTS DevOps: Quick guide to setup VSTS Continuous Integration In the recent time, there has been a new wave in the software industry. Techies have already build lot technologies, frameworks, programming languages, and platform, so the next big question is In the recent time, there has been a new wave in the software industry.
0 notes
Link
NuGet package is a recommended way to move and deploy projects through DevOps infrastructure for database and other types of projects. It is a Microsoft based solution that is especially convenient when said infrastructure contains different environments like development, QA/testing or production environment.
Another feature that comes with NuGet packages is project versioning and it is a native part of the NuGet file naming principle.
For creating, handling and moving NuGet packages across environments several methods can be used. NuGet package handling is natively supported in Visual Studio as Package Manager extension or a standalone NuGet utility can be used for this purpose and all that is functional in conjunction with NuGet repository solutions.
ApexSQL DevOps toolkit, a SQL database continuous integration (CI) and continuous delivery (CD) solution, in all its instances, also has built-in NuGet package management solution to collect output artifacts for easy review and deploy management.
The Concept
ApexSQL DevOps toolkit consists of configurable steps that are used for creating database CI and CD pipelines. This set of steps implies the ability to build, test, review, provision and deploy SQL database projects.
Every step, when executed, provides some kind of output artifact, whether that is an execution summary, review report or some type of SQL script (e.g. build script, synchronization script, etc.). Outputs are stored in a folder which location can be customized within available options:
Output artifacts could not necessarily be stored in a NuGet package. For that purpose, the “Include output in package” option exists in every step that generates some output. Database deployment best practices indicate that every artifact should be stored in a package, therefore, this option is checked by default when starting a new step configuration.
If “Include output in package” is checked, a NuGet package file definition will be required. This is done in the Data sources section with selecting the NuGet data source type:
A NuGet package file definition is created as the data source. The configuration requires only the package ID (with data source name identifier), without the package version number:
The version number will be automatically assigned based on the pipeline build counter settings:
After the NuGet data source is created it can be consumed in a step if “Include output in package” is checked:
Use case
All steps provide relevant information as outputs that will help review a project workflow and troubleshoot issues. Creating and relaying a NuGet package with this information to a relevant person can be quite an organizational perk.
While working with a continuous integration pipeline the steps dedicated for this pipeline and their outputs would be:
Build step – builds a database from a provided source and outputs a Build summary (BuildSummary.txt) and a build SQL script (%data_source_name%_Build_script.sql). Build summary contains source and target connection messages generated by the ApexSQL Build tool and a set of SQL engine messages relative to executed SQL statements from the build script.
Populate step – generates synthetic test data to populate tables created with the Build step. It outputs information (Populate_summary.txt) about which tables are populated, with how many rows and if there are any issues encountered during the population test. It also creates a synthetic data population script in case it needs a review to check what kind of data was generated and possibly caused an issue, or it eventually provides the means for manual execution on another target.
Audit step – implements table auditing triggers on newly introduced tables if required. Output (Audit_summary.txt) gives information about which tables got triggers implemented and what type of triggers.
Review step – applies database project checkup against custom rulebase for coding best practices. It generates a detailed report (Enforce_report.html) on found issues, their impact level, where are they located and what type of issues. An additional summary is also created (Enforce_summary.txt) for a brief summary of what objects were processed.
Test step – Executes database unit tests against the built database. It generates a report (Test_summary.txt) on which unit tests were applied, their pass/fail status and a percentage of success.
Document step – creates database documentation, full or only with differences between current database project version and another database version. The output is database documentation (Documentation.chm) containing all information considering objects, properties, object scripts, etc. Another output file (Document_summary.txt) represents a brief overview of which objects were processed and included in the documentation.
Package step – the most important step in a continuous integration pipeline. As output, it creates a database script folder with scripted objects from the current database project. A package containing these scripts can be considered ready for synchronization and deployment of a new database version from the current project.
It’s worth noting that all summaries outputted by steps can be accessed from within the application, so for execution troubleshooting, direct access to output folder would not be necessary:
After a NuGet package with a database project is created there are several ways to store it and use it for deployment:
Importing package from local artifact repository (folder)
This is the usual way to prepare a package for manual deployment within a local network environment (with local area network infrastructure and shared folders). This means that further management of project deployment can be done on the same PC or on another with ApexSQL DevOps toolkit output location shared and mapped as a network drive on remote PC.
When a NuGet package is created and saved in a local repository a new NuGet type data source should be created but this time full path and file name for the desired package should be provided in order to consume existing NuGet:
In addition to creating the input data source, another NuGet data source type should be created (e.g. named “CD”) to store outputs from continuous delivery pipeline steps which will process imported NuGet and create new outputs:
The final output of such pipeline will be a deployment package that contains synchronization SQL script which will update the database version. Steps and their outputs are:
Sync step – generates a schema synchronization script (SchemaSync_script.sql) based on the comparison between the database project and the target database. It creates also a schema difference report (SchemaSync_report.html) and comparison summary (SchemaSync_summary.log). Sync step also provides base elements for pre and post-deployment validation, an option that can be used in the Deploy step for deployment validation. This consists of the “SchemaSync_source_scripts” folder with copy of new, the project version of database and “SchemaSync_target_scripts”, a scripted version of the target database at the moment of synchronization script creation, and the respective summaries for those folder creation operations.
Technically, the Sync step will unpack imported NuGet package data source, process comparison between a database that was stored and extracted from package and a target database, generate previously described outputs and store them in a new package (the “CD” package):
Sync data step – generates a data synchronization script in case the database project is carrying some static data updates. Expected outputs are data synchronization script (DataSync_script.sql), data difference report (DataSync_report.html), data comparison summary (DataSync_summary.log) and a log with possible warnings (SyncWarnings.log)
Importing package from NuGet feed
To import a NuGet from an online feed first it has to be published to that feed. Publishing NuGet packages is done with the Publish step. This step should be used at the end of a pipeline and will need a NuGet type data source as input (the same used to store that pipeline outputs), the URL to NuGet feed (in this example the GitHub based NuGet gallery is used) and the API key that provides access to the designated gallery:
Using GitHub as NuGet package feed has its merits by allowing the package repository to be completely private compared to NuGet.org gallery but in comparison, it doesn’t provide API key which is required for the Publish step to upload the package. Obtaining the API key requires creating a NuGet source configuration with access credentials.
Creation of that configuration looks like this:
nuget sources Add -Name “SomeCustomSourceName” -Source “https://ift.tt/2MFX7nKOWNER/index.json” -UserName USERNAME -Password TOKEN
Where:
OWNER is a GitHub project owner (usually GitHub account name)
USERNAME is the login user for GitHub account
TOKEN is the replacement for password and its creation is explained here: Creating a personal access token for the command line
After that an API key can be assigned with the following command:
nuget setapikey CustomAPIKey -Source https://ift.tt/2MFX7nKOWNER/index.json
With this configuration done and proper parameters are provided for the Publish step, after its execution, the package will be present in the gallery with its ID and version number (note that package ID, i.e. given NuGet file name, has to correspond to existing GitHub repository name):
Now a NuGet type data source can be created with provided URL and package name and version to be pulled from the gallery and used as input on continuous delivery steps. Note that if only package ID is provided and version omitted, the latest version will be pulled:
The step outputs will be handled the same way as in the situation previously described for local NuGet packages
Streaming a NuGet package from continuous integration to continuous delivery steps
It is possible to create a full pipeline that will use both sets of continuous integration and continuous delivery steps. In that case, the Package step will be used as usual but positioned in between the sets of steps to isolate and store database object scripts as explained previously:
In that kind of sequence, Sync steps are added after the Package step and active NuGet will be used as input:
Again, it is recommended that Sync steps use the second NuGet type data source to store outputted synchronization scripts:
In this scenario, the Deploy step, which executes synchronization scripts, can be placed in another pipeline to execute it upon demand and in that case, previously explained NuGet sourcing method #1 and #2 can be used. Alternately the Deploy step can be used at the end of combined continuous integration and continuous delivery pipeline and streamed NuGet outputted from Sync steps can be used as input, the same way as for Package to Sync step transition. Naturally, this kind of full automation will prevent a manual review of generated outputs before deployment of changes but automated execution stops on found errors will somewhat compensate this.
ApexSQL DevOps compatibility
Considering that the ApexSQL DevOps toolkit has several variations, based on integration choice, the compatibility considering the usage of NuGet packages is present. This means that a NuGet generated as output in one ApexSQL DevOps toolkit solution can be used as input in another solution.
For example, a NuGet file created and published with the standalone Web dashboard solution during a continuous integration process can be used as input in a continuous delivery pipeline created with TeamCity plugin for deployment.
Conclusion
Based on the methodology explained in this article, it is easy to conclude that using NuGets in many ways increases the versatility of a database deployment process with ApexSQL DevOps toolkit and review management for each project or build version.
0 notes
Text
NEWS Beitrag von SEO & Google Marketing - Businesspläne - Finanzierungsvermittlung
New Post has been published on http://www.igg-gmbh.de/ein-kleiner-schritt-fuer-einen-menschen-aber-ein-gewaltiger-sprung-fuer-die-c-community/
Ein kleiner Schritt für einen Menschen, aber ein gewaltiger Sprung für die C++ Community
nn n n n
Napa, Kalifornien (ots/PRNewswire) – JFrog bringt Enterprise Software Distribution nach C/C++, mit Conan Repositorys auf Bintray
JFrog, der DevOps Beschleuniger und Hersteller der Lösung zur Verwaltung von Binaries, gibt bekannt, dass JFrog Bintray, die universelle Distribution-Plattform des Unternehmens, jetzt auch Conan Repositorys für C/C++ Benutzer unterstützt.
(Logo: http://photos.prnewswire.com/prnh/20141103/714835-a )
(Photo: http://mma.prnewswire.com/media/516181/JFrog_community.jpg )
Enterprise-Firmen haben Millionen von Zeilen C/C++ Code in Ihrem Software-Bestand. Auf der anderen Seite verknüpft die heutige IoT-Welt umfangreichen C/C++ Code. Ein zentrales C/C++ Repository zu nutzen ist eine Voraussetzung, um Releases von C/C++ Code mit in den DevOps-Flow aufzunehmen.
Als Teil seiner umfassenden Lösung versetzt JFrog die weltweite C/C++ Community in die Lage ihre Software schneller und komfortabler bereitzustellen. Nach der Acquisition von Conan.io im letzten November hatte JFrog Unterstützung for Conan Repositories in JFrog Artifactory aufgenommen. Ab heute wird auch JFrog Bintray Unterstützung für C/C++ Entwickler und End-to-End Lösungen für die Distribution von Conan C/C++ Pakete bereitstellen.
Conan ist ein Open Source C/C++ Package Manager, das eine Lösung anbietet, um Herausforderungen bezüglich Binärkompatibilität deutlich reduziert und gleichzeitig die wesentlichen Systeme adressiert. Conan hilft C und C++ Entwickler dabei, Ihre C/C++ Anwendungen und Abhängigkeiten über Plattformen hinweg zu automatisieren. Tausende von Entwicklern nutzen bereits Conan in Produktion und können nun auch Conan zusammen mit Bintray nutzen.
Bintray ist der weltweit größte Hub für Binaries. Er unterstützt die Verteilung von populären Paketierungsmechanismen aufbauend auf Maven, Gradle, Ivy, SBT, und andere, der über zwei Milliarden Downloads im Monat zählt. JFrog Bintray unterstützt alle wesentlichen Paketierungsformate, allen voran Docker Registries, CocoaPods, Chef, Puppet, Bower, Vagrant, Git LFS, PyPi, Debian, npm, RubyGems, RPM, Opkg, NuGet, PHP Composer. Nun, mit der Unterstützung von Conan, wird es zudem auch eine qualitativ-hochwertige Verteilung von C/C++ Paketen unterstützen.
Das für Bintray native CDN, mit US und Europäischen Clustern, wird den C/C++ Entwicklern Enterprise-level Performance und Verfügbarkeit anbieten, wobei die Daten über mehrere Cloud Provider repliziert werden.
JFrog Bintray integriert mit den bestehenden DevOps-Lösungen von C/C++ Entwicklern, wie zum Beispiel Continuous Integration Pipelines sowie internen Repositories. Ein reichhaltiges REST API ermöglicht die Kontrolle über jeden Schritt der Softwareverteilung, Zugriffsverwaltung, Sammlung von Logs and Statistiken, und vieles mehr. Darüber hinaus wird feinkörnige Zugriffskontrolle für View, Upload und Download von Privaten Repositories angeboten.
\“Über vier Millionen C/C++ Entwickler in der Welt haben nun eine ganzheitliche Lösung, die alle Anforderungen von Binary-Management erfüllt, angefangen mit der Entwicklung hin zur Verteilung auf unterschiedlichen Devices der Endbenutzer\“, sagt Shlomi Ben Haim, JFrog CEO und Co-Founder. \“Bintray ist ein kritischer Bestandteil des DevOps-Ecosystems, das von C/C++ Entwickler genutzt werden kann um die Auslieferungen von Software zu beschleunigen während Security und Qualität gewahrt bleiben.\“
Neben der Unterstützung von Conan Repositories bietet JFrog nun auch öffentliche C/C++ Conan Repositories an, damit Bintray Benutzer kostenlos ihre Conan Pakete hochladen können. Gemäß dem Erfolg von JCenter, das voll von Bintray verwaltet wird und das größte Paket-Repository für Java-Pakete wurde, wird JFrog nun auch Angebot und Qualität des öffentlichen Conan Repository conan.io in das Bintray Conan Repository integrieren.
\“Bintray ist bereits die führende öffentliche Ressource für Binärpakete. Mit der Bereitstellung des Conan Repository und der Integration von Conan C/C++ Paketen in die öffentlichen conan.io Repositories wird Bintray der umfangreichste Hub für Open Source Software und die ultimative Ressource für C/C++ und Java-Entwickler\“ sagt Conan Co-Gründer, Diego Rodriguez-Losada.
Dies war eine Mitteilung von JFrog von swampUP, JFrog\’s jährlicher User Conference aus dem Napa Valley.
Über JFrog:
Mit mehr als 3500 Kunden und über zwei Milliarden monatlicher Downloads bietet JFrog die führende Plattform an für das Management und Verteilung von Software-Binaries. Die Produkte von JFrog, JFrog Artifactory, das Universal Artifact Repository; JFrog Bintray, die Universal Distribution Platform; JFrog Mission Control, das Universal DevOps Flow Management; und JFrog Xray, der Universal Component Analyzer, werden weltweit von DevOps Engineers genutzt und sind verfügbar als Open-Source, On-Premise, und SaaS Cloud Solution. Der Kundenstamm beinhaltet weltweite Topmarken, zum Beispiel Amazon, Google,Uber, Netflix, EMC, Cisco, Oracle, Adobe, und VMware. Die Firma ist in Privatbesitz und wird geführt aus Kalifornien, Frankreich und Israel. Mehr Informationen unter jfrog.com.
JFrog Media Contact: nnLauren PerrynnBlonde 2.0 for [email protected]
Pressekontakt:
+1-617-686-5924
n
0 notes
Text
Artifacts in devops
Artifacts in devops Artifacts in devops News websites Artifacts in devops Artifacts in devops Azure Artifacts is an extension that makes it easy to discover, install, and publish NuGet, npm, and Maven packages in Azure DevOps. It’s deeply integrated with other hubs like Build so that package management can become a seamless part of your existing workflows. Prerequisites Visual Studio 2017 or…

View On WordPress
0 notes
Text
Microsoft splits VSTS five ways to build new Azure DevOps platform

Enlarge / Azure DevOps Pipeline. (credit: Microsoft)
Visual Studio Team Services (VSTS), Microsoft's application lifecycle management system, is to undergo a major shake-up and rebranding. Instead of a single Visual Studio-branded service, it's being split into five separate Azure-branded services, under the banner Azure DevOps.
The five components:
Azure Pipelines, a continuous integration, testing, and deployment system that can connect to any Git repository
Azure Boards, a work tracking system with Kanban boards, dashboards, reporting
Azure Artifacts, a hosting facility for Maven, npm, and NuGet packages
Azure Repos, a cloud-hosted private Git repository service
Azure Test Plans, for managing tests and capturing data about defects.
VSTS has been broken up in this way to further Microsoft's ambition of making its developer tooling useful to any development process and workflow, regardless of language or platform. The division into individual components should make it easier for developers to adopt portions of the Azure DevOps platform, without requiring them to go "all in" on VSTS. The reduced scope of each component means that it's cheaper than the VSTS pricing, making incremental adoption more palatable. For example, a Pipelines process could build and test a Node.js service from a GitHub repository and then deploy to a container on Amazon's AWS cloud, without requiring use of any of the other Azure DevOps components.
Read 3 remaining paragraphs | Comments
Microsoft splits VSTS five ways to build new Azure DevOps platform published first on https://medium.com/@CPUCHamp
0 notes
Text
Microsoft splits VSTS five ways to build new Azure DevOps platform

Enlarge / Azure DevOps Pipeline. (credit: Microsoft)
Visual Studio Team Services (VSTS), Microsoft's application lifecycle management system, is to undergo a major shake-up and rebranding. Instead of a single Visual Studio-branded service, it's being split into five separate Azure-branded services, under the banner Azure DevOps.
The five components:
Azure Pipelines, a continuous integration, testing, and deployment system that can connect to any Git repository
Azure Boards, a work tracking system with Kanban boards, dashboards, reporting
Azure Artifacts, a hosting facility for Maven, npm, and NuGet packages
Azure Repos, a cloud-hosted private Git repository service
Azure Test Plans, for managing tests and capturing data about defects.
VSTS has been broken up in this way to further Microsoft's ambition of making its developer tooling useful to any development process and workflow, regardless of language or platform. The division into individual components should make it easier for developers to adopt portions of the Azure DevOps platform, without requiring them to go "all in" on VSTS. The reduced scope of each component means that it's cheaper than the VSTS pricing, making incremental adoption more palatable. For example, a Pipelines process could build and test a Node.js service from a GitHub repository and then deploy to a container on Amazon's AWS cloud, without requiring use of any of the other Azure DevOps components.
Read 3 remaining paragraphs | Comments
Microsoft splits VSTS five ways to build new Azure DevOps platform published first on https://medium.com/@CPUCHamp
0 notes