#RDP on Android
Explore tagged Tumblr posts
Visit Tumblr Blog
Explore Tumblr blogs with no restrictions, modern design and the best experience.
Last Seen Tumblr Blogs


Fun Fact
130K people were victims of a chain letter scam that affected Tumblr in May 2011.
Text


there was a thing circulating on twitter towards the end of last year about your favourite chars from FGs. i turned mine into an october drawing challenge but only got this far.
oh well.
#sub zero#cable#chun li#android 21#yoshitora#beowulf#k'#mortal kombat#marvel vs capcom#street figher#dragonball fighterz#samurai shodown#skullgirls#king of fighters#fanart#RDP#samuraiblack
42 notes
·
View notes
Text
Unlocking the Ultimate Gaming Experience: Exploring BlueStack RDP and Android Emulator on VPS

Buy RDP: The Gateway to Seamless Connectivity
Before delving into the intricacies of gaming on a VPS, it’s essential to understand the foundation upon which it is built: Remote Desktop Protocol (RDP). With the ability to buy RDP services, gamers gain access to a powerful tool that enables them to remotely connect to and control another computer over a network connection. This technology forms the backbone of many modern gaming setups, offering unparalleled flexibility and convenience.
Gaming RDP: Redefining the Gaming Landscape
Gaming RDP takes the concept of remote desktop services to the next level, catering specifically to the needs of gamers. By harnessing the power of gaming-oriented RDP solutions, enthusiasts can enjoy lag-free gameplay, high-definition graphics, and seamless control from anywhere in the world. Whether it’s accessing your gaming rig while traveling or collaborating with friends in multiplayer adventures, gaming RDP offers unparalleled freedom and accessibility.
BlueStack RDP: Bridging the Gap Between PC and Mobile Gaming

Android Emulator on VPS: Unleashing the Power of Virtualization
At the heart of this innovative gaming setup lies the concept of running an Android emulator on a Virtual Private Server. By virtualizing the Android operating system on a remote server, gamers can harness the full potential of their VPS hardware to run mobile apps and games with unparalleled speed and efficiency. This approach eliminates the need for expensive mobile devices while offering superior performance and compatibility. Whether it’s exploring the vast library of Android games or testing new apps, the possibilities are endless with an Android emulator on VPS.
Buy RDP: Empowering Gamers Worldwide
The ability to buy RDP services has democratized gaming in ways previously thought impossible. No longer confined by hardware limitations or geographical boundaries, gamers from all walks of life can access high-performance gaming environments with ease. Whether you’re a seasoned pro or a casual enthusiast, the power of RDP opens doors to a world of gaming opportunities.
Gaming RDP: Where Performance Meets Convenience
In the fast-paced world of gaming, performance is paramount. With gaming RDP, players can enjoy the best of both worlds — uncompromising performance and unparalleled convenience. Say goodbye to hardware upgrades and compatibility issues, and hello to a seamless gaming experience that follows you wherever you go. With gaming RDP, the only limit is your imagination.
BlueStack RDP: Redefining Mobile Gaming
Mobile gaming has come a long way since its inception, but there’s always been a gap between the mobile and PC gaming experience. With BlueStack RDP, that gap is finally bridged. By harnessing the power of emulation on a VPS, gamers can enjoy their favorite mobile titles with the precision and performance of a PC setup. From strategy games to first-person shooters, the possibilities are endless with BlueStack RDP.
Android Emulator on VPS: The Future of Gaming
As technology continues to evolve, so too does the landscape of gaming. The concept of running an Android emulator on a VPS is a testament to this evolution, offering gamers a glimpse into the future of gaming. With the power of virtualization at their fingertips, players can explore new worlds, conquer epic quests, and connect with fellow gamers like never before. The future of gaming is here, and it’s powered by Android emulators on VPS.
In conclusion, the integration of RDP services, BlueStack RDP, and Android emulators on VPS represents a paradigm shift in the world of gaming. With unparalleled performance, flexibility, and accessibility, this innovative approach unlocks a world of possibilities for gamers worldwide. Whether you’re a casual player or a competitive enthusiast, the future of gaming has never looked brighter.
0 notes
Text
Harness the Power of Your Android Phone for DevOps Success
Unlocking DevOps Potential: Transform Your Android Device into a Robust Management Hub
In today's fast-paced digital environment, the ability to monitor and manage systems remotely is crucial for maintaining optimal performance and quick incident response. Surprisingly, your Android phone can be much more than just a communication device; it can serve as a powerful tool in your DevOps toolkit. Leveraging various apps and techniques, you can transform your mobile device into a portable, efficient system administration hub that supports your development and operations teams. This article explores how your Android phone can become an indispensable part of your DevOps strategy, enabling real-time server alerts, remote management, and DIY monitoring solutions.
One of the key advantages of using an Android device for DevOps tasks is mobility. Unlike traditional desktop or server-based tools, a smartphone offers unmatched portability, allowing you to stay connected and responsive from anywhere. With the right set of applications, you can receive server alerts directly on your device, ensuring you are immediately notified of any issues that require attention. For example, apps like Server Monitoring and Termius enable you to SSH into servers, execute commands, and check logs—all from the comfort of your mobile device.
Remote system administration becomes easier with dedicated apps that support multiple protocols, such as SSH, RDP, and VNC. These tools allow you to troubleshoot problems, restart services, or perform configuration changes without needing physical access to servers. This agility is essential for DevOps teams that need to respond swiftly to incidents or deploy updates on the fly. Additionally, many apps integrate alerting systems that can push notifications directly to your Android device whenever predefined thresholds are exceeded or failures occur.
DIY monitoring solutions further enhance your Android-powered DevOps setup. By utilizing open-source tools like Nagios, Zabbix, or Prometheus, you can configure custom dashboards accessible via mobile browsers or dedicated apps. These dashboards provide real-time metrics on server health, network traffic, and application performance. With some technical know-how, you can set up a lightweight, cost-effective monitoring system that fits your specific needs. Moreover, automation tools such as Tasker or Automate can be scripted to trigger actions based on certain alerts, further streamlining your incident response workflow.
Integrating your Android device into your DevOps pipeline allows for continuous monitoring and rapid response, which ultimately results in higher system availability and improved user experience. This approach also reduces dependency on traditional desktop tools, enabling you to be productive from anywhere at any time. Whether you're a developer, system administrator, or operations engineer, your Android phone can serve as a versatile, reliable companion in maintaining robust, resilient systems.
In conclusion, transforming your Android phone into a powerful DevOps tool is not only feasible but highly advantageous. With the right set of applications and configurations, you can achieve comprehensive remote system management, proactive server alerting, and custom monitoring solutions—all from your mobile device. Embrace this approach and experience greater agility, faster incident resolution, and a more flexible work environment. To learn more about maximizing your Android device for DevOps, explore this android phone as devops tool.
0 notes
Text
“How RHosting Helps Developers Run Heavy Software on Lightweight Devices”
In an era of digital nomadism and lean tech stacks, many developers prefer lightweight laptops and minimal setups. But development often demands heavy-duty software—IDEs like Visual Studio, data analysis tools, virtual machines, container platforms, and more. The dilemma? Lightweight devices often can’t handle the workload.
That’s where RHosting’s smart RDP solution becomes a game-changer.
🧠 The Challenge: Power-Hungry Tools on Underpowered Hardware
Developers often face:
Limited CPU/RAM on personal machines
High-latency or lag with traditional remote tools
Inability to run resource-intensive IDEs, emulators, or databases locally
Security risks when transferring sensitive code or client data
This makes coding on the go—or even from home—frustrating and inefficient.
🚀 The RHosting Solution: Power in the Cloud, Access Anywhere
RHosting turns any lightweight laptop or tablet into a development powerhouse by offloading compute-intensive tasks to high-performance cloud Windows servers.
Here’s how it works:
⚙️ 1. High-Performance Cloud Servers
Spin up a cloud-based Windows environment with:
Multi-core CPUs
Generous RAM and SSD storage
Preinstalled dev tools or full customization
GPU-accelerated options (on request)
This means you can run VS Code, Android Studio, Docker, Jupyter Notebooks, or even data-heavy scripts without taxing your personal device.
🔐 2. Secure, Low-Latency Remote Access
Unlike traditional RDP, RHosting uses proprietary protocols optimized for real-time responsiveness and security:
Encrypted sessions with MFA
Fast frame rendering, even on low bandwidth
Clipboard, file transfer, and peripheral support
Developers can code, debug, and deploy as if they were sitting in front of a powerful desktop—from a Chromebook or tablet.
🛠 3. Application-Level Access (Only What You Need)
RHosting lets users access only specific apps or environments, reducing distractions and security risks.
Example: A front-end dev can access Figma, a browser, and VS Code. A data engineer gets Jupyter, Python, and data folders—nothing more.
📂 4. Folder-Level Permissions for Teams
Collaborating on a project? You can assign custom access to codebases, test environments, and shared folders—great for dev teams, agencies, or open-source contributors.
💡 Ideal Use Cases
Freelance developers working across devices
Students and coding bootcampers without high-end laptops
Remote teams collaborating on shared codebases
Enterprise developers with strict security policies
🧩 Real World: A Developer’s Day with RHosting
Log in from a thin-and-light laptop
Launch a remote Windows server with all dev tools preloaded
Run a heavy build or simulate a test environment
Save work to cloud storage, shut down server to save costs
Resume from any device—no sync issues, no lag
🎯 Conclusion: Light Device, Heavy Performance
With RHosting, your hardware no longer limits your coding potential. Whether you're building the next big app or debugging legacy systems, you can access enterprise-grade compute power securely from anywhere.
So if you’re tired of hearing your laptop fans scream every time you hit “build,” it’s time to switch to RHosting—because the smartest developers know where to offload their load.
0 notes
Text
Reliable VPS for Android Emulator Hosting
Need a stable and powerful setup for running Android emulators like Bluestacks or Nox? The VPS for Android Emulator by Petrosky is built to deliver high performance, fast response times, and 24/7 uptime. Ideal for developers, automation users, and mobile gamers, this VPS offers full root access, SSD storage, and customizable specs. Run multiple emulator instances without lag and access your environment from anywhere using Remote Desktop Protocol (RDP). With Petrosky, you get secure, scalable infrastructure designed specifically for Android emulation. Upgrade your experience with a VPS that’s made for real-world performance.
0 notes
Text
Boost Your Performance: Why You Should Use a VPS for BlueStacks
In 2025, Android emulation continues to rise in popularity—whether it’s for mobile gaming, app development, or social media automation. One of the most well-known Android emulators is BlueStacks, which allows users to run Android apps on Windows and macOS. However, running BlueStacks on a standard PC or laptop can strain your system’s resources and limit performance. That’s where a VPS for BlueStacks comes into play.
Using a Virtual Private Server (VPS) to run BlueStacks can significantly enhance your experience, offering improved speed, reliability, and scalability. Whether you’re a mobile gamer, digital marketer, or developer, this guide will explain exactly why you should use a VPS for BlueStacks and how it can boost your performance in 2025.
What Is BlueStacks?
BlueStacks is a powerful Android emulator that replicates the Android operating system on desktop environments. It enables users to download and run apps from the Google Play Store, making it ideal for:
Playing mobile games like PUBG Mobile, Clash of Clans, or Call of Duty Mobile on a larger screen.
Automating social media tasks using tools like Instagram bots.
Testing Android apps during development.
Running messaging apps like WhatsApp or Telegram in a more manageable desktop setting.
While it’s incredibly functional, BlueStacks is also resource-intensive, requiring significant CPU, RAM, and GPU capacity. This is where many users run into trouble, especially when multitasking or running multiple instances.
What Is a VPS?
A Virtual Private Server (VPS) is a virtual machine hosted on a powerful physical server, offering dedicated resources like CPU, RAM, storage, and bandwidth. Unlike shared hosting, a VPS gives you administrative (root) access, customizable configurations, and isolated environments.
In simple terms, a VPS is like having your own computer in the cloud—with more power, more uptime, and greater control.
Why Use a VPS for BlueStacks?
1. Boosted Performance
Running BlueStacks on a VPS means you’re no longer dependent on your personal device’s hardware limitations. High-performance VPS providers offer specs like:
Multi-core CPUs (Intel Xeon or AMD EPYC)
SSD or NVMe storage
Dedicated RAM
High-speed internet (1Gbps+)
This allows BlueStacks to run smoother, load faster, and handle more apps or game instances at once without lag.
2. 24/7 Uptime and Remote Access
Need BlueStacks running automation scripts or games around the clock? A VPS can stay online 24/7 without relying on your home internet or power supply. With remote desktop access (via RDP or VNC), you can log in from any device—PC, laptop, or even mobile—and manage BlueStacks anytime, anywhere.
This is especially useful for:
Farming resources in games
Running bots or scheduled tasks
Managing multiple accounts
3. Run Multiple Instances Efficiently
BlueStacks includes a Multi-Instance Manager, which lets you run several Android environments at once. On a VPS, you can take full advantage of this feature thanks to increased system resources.
Gamers use this to run multiple characters or accounts in parallel. Marketers can test different automation tools or accounts simultaneously without being throttled by local hardware.
4. Reduce Wear and Tear on Your Personal Device
Running heavy applications like BlueStacks can overheat laptops, drain battery life, and degrade performance over time. Using a VPS shifts the load to the cloud, keeping your personal system free for other tasks—or even offline while BlueStacks continues running remotely.
5. Scalability for Professional Use
As your needs grow—whether you’re automating more tasks, launching more apps, or running more accounts—you can easily scale your VPS plan. Most providers offer scalable packages that allow you to:
Upgrade CPU or RAM without downtime
Add more disk space
Expand bandwidth
This makes a VPS for BlueStacks ideal for professional users who need flexibility and power on demand.
6. Improved Security and Isolation
Many privacy-conscious users prefer VPS hosting for the isolation and control it offers. You can:
Install custom firewalls or antivirus
Use a VPN to anonymize activity
Keep app data separate from your personal machine
This is a game-changer if you’re running sensitive scripts or accounts and want to reduce risk.
How to Set Up BlueStacks on a VPS
Setting up BlueStacks on a VPS is easier than you might think:
Choose a Windows VPS provider – Look for specs like 8+ GB RAM, GPU acceleration (if available), and SSD storage.
Access the VPS – Use Remote Desktop Protocol (RDP) to log into your virtual server.
Download BlueStacks – Visit the official BlueStacks website and install the version suited for your needs.
Customize settings – Allocate CPU and RAM resources to BlueStacks for optimal performance.
Install and run apps – Begin using your Android apps with full performance, privacy, and uptime benefits.
Some VPS providers even offer pre-installed BlueStacks images to make setup even faster.
Ideal Users for BlueStacks VPS Hosting
Mobile gamers who want lag-free gameplay and multi-instance farming.
Social media marketers running bots, schedulers, or multiple accounts.
Android app developers testing software in a clean, isolated environment.
Automation enthusiasts who need round-the-clock uptime.
Privacy-focused users looking for secure, cloud-based operations.
Final Thoughts
Using a VPS for BlueStacks in 2025 is more than just a performance boost—it’s a strategic upgrade that enables better speed, uptime, scalability, and privacy. Whether you’re gaming, marketing, or developing, a VPS ensures that BlueStacks runs smoother, faster, and more securely than ever before.
If you’re tired of lag, crashes, or resource constraints on your local device, it’s time to move your Android emulation to the cloud. With the right VPS, BlueStacks becomes a powerful, always-on tool tailored for high-performance tasks.
0 notes
Text
FileMaker und PHP (Teil 1 Server Einrichtung)
FileMaker kann seine Daten problemlos auf verschiedenen Clients auf Mac OS, Windows, iOS oder gar Android darstellen. Was passiert aber wenn dem Nutzer dem ich die Daten zur Verfügung stellen möchte keinen FileMaker-Client besitzt oder installieren möchte bzw. darf. Was ist wenn unzählige Nutzer sich nur kurzzeitig auf einem FileMaker System einlochen um Daten zu erfassen oder zu administrieren? Dann benötigen wir eine Lösung im Web-Browser. Na das ist ja mit FileMaker eigentlich kein Problem. Es braucht ja nichts mal einen Server. Die entsprechende Datei einfach über einen Client oder über einen FileMaker Server per IWP zur Verfügung stellen. Das geht extrem schnell, die zu sehenden Webseiten werden einfach innerhalb von FileMaker editiert. Aber diese Lösung stellt einen vor verschieden Probleme.
z.B.
-keine Passwortsterne
-kein Return um die Webseite zu aktualisieren
-läuft nicht innerhalb eines Frames
-Button des Browsers für VOR und ZURÜCK können bei Benutzung
dazu führen das Benutzer im falschen Datensatz landen.
-Nur eine Einstiegs-Seite für die Datenbank
Diese Liste kann noch um einige Punkte erweitert werden, aber sind das die Punkte für die sich keine wirkliche Ersatzlösung findet. Also dann nutzen wir halt einfach FileMaker in Kombination mit PHP. Da ich persönlich immer auf einem Remote-Server (FileMaker 11 oder 12 Adv. auf auf Windows Shared Hyper-V VM) entwickle habe ich die endsprechenden Vorraussetzungen schon geschaffen um PHP mit FileMaker zu kombinieren.
Die Einrichtung des FileMaker Servers ist eigentlich über die Einsatzplanung und den Wizzard des FileMaker Servers leicht zu bewerkstelligen und soll nicht Thema der kleinen Einführung sein.

Wichtig ist das nach der Einrichtung des Servers die entsprechenden PHP Eigenschaften als OK gekennzeichnet sind. Die Entscheidung ob man den vorhandenen IIS oder einen Apache Server nutzt bleibt einem überlassen. Ich persönlich nutze den schon vorhandenen IIS.
Um später schnellen Zugriff auf den Ordner der die PHP Dateien enthält zu haben sollte man sich einen FTP Zugang einrichten. Ich nutze dafür FileZilla. Damit umgehe ich die ganze relativ komplexe Einrichtung des FTP Zuganges über den IIS-Manager.
Einfach den Server installieren, danach einen User einrichten und diesem ein Verzeichnis zuordnen und zum Home Verzeichnis erklären.
Als Home Verzeichnis dient dabei der Ordner in den wir unsere PHP Dateien legen werden. Standard ist beim IIS das Verzeichnis C:inetpubwwwroot…. und den Ordner wwwroot legen wir dann einfach einen Projektordner mit der Bezeichnung unserer Wahl.
Nun sind wir soweit das wir unsere Werkzeuge für die PHP Bearbeitung und auch den FileMaker Client für die Nutzung mit dem Server vorbereiten. Als erstes benötigen wir natürlich eine Datei die wir über den FileMaker Server zur Verfügung stellen können. Wichtig ist dabei das wir dieser Datei die Berechtigung für den Zugriff über PHP zuweisen. Dies geschieht über Ablage/Verwalten/Sicherheit/Konten/Berechtigung bearbeiten. Dabei benötigt z.B. der User „WEB“ den Zugriff über Acres via PHP Web Publishing (fmphp).

Anschliessend schiebe ich die Datei entweder per FTP oder einfach über den RDP Client über mein Remote-Zugriff auf den Server. Dort einfach über die FileMaker-Server Konsole zur Verfügung stellen.
Ich persönlich nutze für die Bearbeitung der PHP Dateien eine IDE mit der Bezeichnung PHPStorm. Diese besitzt den Vorteil eines integrierten FTP-Clients. Somit kann ich jede Änderung einer Datei Offline durchführen und sofort per Upload in meinen Projektordner laden. In einem extern geöffneten Browser habe ich dann immer die Möglichkeit sofort den Erfolg oder Misserfolg meiner Arbeit zu begutachten.
Voraussetzung?
Erstellen Sie erstmal ein neues Projekt innerhalb der IDE, legen einen Offline Projektordner fest. Anschliessend können Sie unter Toll/Deployment/Configuration einen FTP Zugang anlegen. Wichtig ist nachdem dieser Zugang funktioniert unter Mappings die Ofline Dateien und die Online Dateien zusammenzuführen. Dabei legen Sie den Local Path und Web Path fest.
z.B.
Local Path: /Users/ronny/Documents/PHP-Developer/PHPStorm/TNM/FileTNM2
Web Path: /FileTNM2/FileTNM2
Deployment Pat: FileTNM2
Nun steht dem automatischen Upload der Dateien nichts mehr im Weg.
Was benötigen wir sonst noch? Die FileMaker API s oder Klassen. Diese befinden sich auf dem Server im Ordner C:Program FilesFileMakerFileMaker ServerWeb Publishingpublishing-enginephp. Von dort kopieren wir uns den Ordner FileMaker und die Datei FileMaker.php in unseren Projektordner.
0 notes
Text
Everythinng You Need To Know About RDP - Remote Desktop Protocol
Remote Desktop Protocol (RDP) is a powerful tool that has revolutionized how we connect, manage, and access remote computers. Whether you are an IT professional managing multiple servers, a business owner accessing your office computer from home, or a tech enthusiast curious about remote computing, RDP offers a convenient and secure way to connect remotely. If you want to buy RDP Admin, eldernode.com provides many solutions tailored to your needs. This article will delve into what RDP is, how it works, its benefits, security considerations, and how you can use it effectively. What is RDP? RDP is simply Remote Desktop Protocol, a proprietary protocol developed by Microsoft that enables users to connect to another computer on a network connection. The protocol is designed to provide remote access to a desktop interface, allowing users to control and manage the remote machine as if they were physically present. RDP is built into Windows operating systems, but clients are also available for macOS, Linux, Android, and iOS, making it a versatile tool for cross-platform remote access. How Does RDP Work? RDP works by transmitting the remote computer's screen to the local computer and sending back keyboard and mouse inputs from the local computer to the remote one. Here’s a basic overview of the process: - Initiation: The user on the local machine opens the RDP client and enters the IP address or hostname of the remote computer they wish to connect to. They must also enter valid credentials (username and password) to authenticate the connection. - Establishment of Connection: Once the credentials are verified, an encrypted connection is established between the local and remote computers. This is achieved through network protocols, primarily the Transmission Control Protocol (TCP) and User Datagram Protocol (UDP). - Data Transmission: The remote computer sends the graphical interface to the local machine, displayed in the RDP client window. The local machine sends back user inputs (keyboard strokes, mouse clicks) to the remote computer, allowing the user to control the remote desktop. - Session Management: RDP supports multiple sessions, meaning several users can connect to a remote server simultaneously. Each user gets an isolated session, which they can customize without affecting others. - Disconnection: The session can be terminated by either the user or the remote computer; at this point, the connection is closed, and any open applications on the remote desktop remain running unless explicitly closed. Benefits of RDP RDP offers numerous benefits, making it a popular choice for remote access and management: - Convenience: With RDP, users can access their desktop and applications from anywhere with an internet connection. This flexibility primarily benefits businesses with remote workers or IT professionals managing servers in different locations. - Cost-Effective: RDP eliminates the need for physical presence, reducing travel costs and downtime. It also enables centralized IT infrastructure management, reducing the need for multiple licenses or physical machines. - Resource Efficiency: RDP allows users to access powerful remote servers from low-powered local devices. This means even a lightweight laptop or tablet can control a high-performance server, saving on hardware costs. - Multi-Platform Support: RDP is not limited to Windows; it supports a wide range of operating systems, making it a versatile solution for businesses with diverse IT environments. - Security: RDP provides secure access to remote systems with features like Network Level Authentication (NLA), encryption, and session monitoring. Security Considerations While RDP is a powerful tool, it comes with security risks that must be managed carefully. Here are some critical security considerations: - Brute Force Attacks: RDP servers exposed to the internet are often targeted by brute force attacks, where attackers try numerous username and password combinations to gain unauthorized access. Using strong passwords and enabling account lockout policies is essential to mitigate this risk. - Unpatched Vulnerabilities: Like any software, RDP can have vulnerabilities that attackers can exploit. Keeping your RDP server updated with the latest patches and security updates is crucial. - Encryption: Ensure your RDP connection is encrypted to prevent eavesdropping on your data. RDP uses 128-bit encryption by default, but you can configure it to use stronger encryption protocols. - Network Level Authentication (NLA): NLA requires users to authenticate before establishing a session, reducing the risk of unauthorized access. Make sure NLA is enabled on your RDP server. - Firewall Configuration: Restrict access to your RDP server by configuring firewalls to allow only specific IP addresses or using VPNs to create a secure tunnel. - Multi-Factor Authentication (MFA): Adding an extra layer of security with MFA makes it much harder for attackers to gain access, even if they obtain your password. How to Set Up RDP Setting up RDP on a Windows machine is relatively simple. Here’s a step-by-step guide: 1. Enable RDP on the Remote Computer - Go to System Properties on the remote computer. - Under the Remote tab, check the box that says "Allow remote connections to this computer." - Choose users who can connect remotely. By default, administrators have access, but you can add other users as needed. 2. Configure Firewall Rules - Ensure that the Windows Firewall (or any other firewall) allows RDP connections. You can create an inbound rule for port 3389 (the default RDP port). 3. Set Up the RDP Client - On your local machine, open the Remote Desktop Connection client. - Enter the IP address or hostname of the remote computer. - Enter your username and password to authenticate and connect. 4. Advanced Configuration - Consider changing the default RDP port from 3389 to another for enhanced security. - Use a Virtual Private Network (VPN) to securely connect to the remote desktop, especially if you’re accessing it online. Everyday Use Cases for RDP RDP is widely used in various scenarios across different industries. Here are some everyday use cases: - Remote Work: With the rise of remote work, many businesses rely on RDP to provide employees access to their office desktops and applications from home. - IT Support and Management: IT professionals use RDP to manage servers, provide remote support, and troubleshoot issues without being physically present. - Education: Educational institutions use RDP to provide students and staff access to specialized software and lab environments from any location. - Healthcare: RDP enables healthcare professionals to securely access patient records, medical software, and other resources from different locations. - Software Development and Testing: Developers use RDP to test software on different environments and configurations without needing multiple physical machines. Alternatives to RDP While RDP is a popular choice for remote access, there are other protocols and tools available that might better suit specific needs: - Virtual Network Computing (VNC): VNC is an open-source protocol that provides similar functionality to RDP but is platform-agnostic and doesn't require a Windows machine. - TeamViewer: A commercial remote access tool that is easy to set up and use, especially for non-technical users. It supports cross-platform connections and is widely used for remote support. - AnyDesk: A lightweight remote desktop tool that offers fast connections, even on slow networks. It’s beneficial for remote work and support. - Citrix Virtual Apps and Desktops: A more advanced solution for businesses that must deploy and manage virtual desktops and applications on a large scale. Conclusion Remote Desktop Protocol (RDP) is a versatile and powerful remote access and management tool. Its ability to connect users to their desktops and applications from anywhere makes it indispensable in today’s increasingly remote and distributed work environments. However, with its benefits come security risks that must be carefully managed. By understanding how RDP works, implementing best practices for security, and considering alternatives when necessary, you can harness the full potential of RDP while keeping your systems safe and secure. Whether you're a business owner, IT professional, or tech-savvy individual, mastering RDP can give you the flexibility and efficiency needed to stay connected and productive digitally. Read the full article
0 notes
Text
Best Remote Desktop Software for Mac 2024
In this internet-centric world, almost everything is connected to your devices in one way or another. In times like these, a reliable remote connection is a must. Because you never know when you need to connect your device when you are far away. And especially if you are a Mac user, high-performance software is required to handle large files & quality software. Today, many remote desktop software are available for Mac to control your device from anywhere in the world. With this, we aim to find the best remote desktop software for Mac in 2024.
Best Remote Desktop Software for Mac 2024
TeamViewer
TeamViewer has been a favorite among users for its ease of use and robust features. With TeamViewer, you can access your Mac remotely from anywhere with an internet connection. Its cross-platform compatibility allows you to connect to Windows, Linux, and mobile devices effortlessly. Moreover, TeamViewer offers secure remote access with end-to-end encryption to ensure your data remains safe during transmission. Provide remote support, collaborate on projects, or access files on the go - TeamViewer is really one of the best remote desktop software for Mac.
Chrome Remote Desktop
Are you looking for a simple remote desktop solution? Chrome Remote Desktop is worth considering. As an extension for Google Chrome, it smoothly integrates with your browser, making it easy to set up & use. With Chrome Remote Desktop, you can access your Mac from Chrome running on any device - Windows, Linux, and Chrome OS. Also, it offers secure remote access using Google's infrastructure, giving you peace of mind when working remotely.
Remote Desktop Manager
Remote Desktop Manager is a complete solution for managing all your remote connections in one place. Connect to Mac, Windows, Linux, or virtual machines - Remote Desktop Manager has all the desired tools & features. It supports numerous protocols such as RDP, SSH, VNC, and Telnet - making it suitable for IT professionals. With features like credential management, session recording, and multi-monitor support - Remote Desktop Manager offers unparalleled flexibility and control over your remote connections.
AnyDesk
Known for its high-speed performance & low latency, AnyDesk is another popular choice for remote desktop access. With AnyDesk, you can remotely control your Mac from anywhere with minimal lag due to its compression algorithms. Moreover, AnyDesk provides security with TLS 1.2 encryption and RSA 2048 asymmetric key exchange to protect your data from unauthorized access. Working from home or traveling, AnyDesk gives you a smooth remote desktop experience.
Splashtop
Splashtop offers a range of remote desktop solutions tailored to different use cases - personal use, enterprise-level deployments, and high-performance work. With Splashtop, you can access your Mac from any device, including Windows, Mac, iOS, Android, and Chromebook. Its high-performance engine delivers responsive remote access, even over low-bandwidth connections. Splashtop also provides advanced features like file transfer, remote printing, and session recording, making it a versatile choice for remote work.
Microsoft Remote Desktop
Microsoft Remote Desktop is an excellent choice for Mac users who need to connect to Windows-based systems. This software enables remote Windows desktop access from your Mac device. It has a robust interface for customizing your remote desktop experience according to your preferences. Microsoft Remote Desktop supports remote audio and video streaming for multimedia applications and virtual meetings.
RealVNC
RealVNC is one of the best remote desktop software for Mac. It offers both cloud-based and on-premises solutions. With RealVNC, you can securely access your Mac from anywhere using any device. The encryption & authentication mechanisms are unique features of RealVNC. It also supports multi-platform connectivity for connecting Mac, Windows, Linux, and Raspberry Pi devices. RealVNC can provide enterprise-grade features like centralized deployment, user authentication, and audit logging when needed.
Conclusion
Having the right remote desktop software for your Mac is essential if you work from a distance. Security, features, and ease of work - are the factors you should consider in a remote desktop software for Mac. You must ensure that these things align with your requirements. From the above list, you can choose any software. All are the best remote desktop software for Mac in 2024.
0 notes
Text
Gaming RDP for Low-End Hardware: BlueStacks RDP and More
As technology advances, so does the demand for high-performance gaming experiences. However, not everyone has access to high-end hardware to support the latest games.
This is where Remote Desktop Protocol (RDP) gaming comes in, allowing users to access powerful gaming servers from their low-end devices.
In this article, we will explore the benefits of RDP gaming, specifically for BlueStacks RDP, and how it can enhance your gaming experience.
What is BlueStacks RDP?
BlueStacks RDP is a cloud-based Android gaming platform that allows users to select and play games from the 2 million+ games available in the BlueStacks library. It is a low-latency, high-quality game streaming service that can be accessed from various devices, including low-end hardware. Benefits of BlueStacks RDP for Low-End HardwareBlueStacks RDP offers several benefits for low-end hardware users, including:
High-Performance Gaming: With BlueStacks RDP, users can access powerful gaming servers that can handle the demands of high-performance games, even if their local hardware is not up to the task.
Compatibility: BlueStacks RDP supports a wide range of devices and operating systems, including Windows, macOS, Android, and iOS. This means that users can access their favorite games from any device, regardless of its hardware specifications.
Cost-Effective: BlueStacks RDP is a cost-effective solution for low-end hardware users who want to enjoy high-performance gaming without investing in expensive hardware.
Easy Setup: BlueStacks RDP is easy to set up and use, with a simple interface that allows users to select and play games with just a few clicks.
Customizable Settings: BlueStacks RDP offers customizable settings that allow users to adjust the performance and graphics to their liking, ensuring a smooth and enjoyable gaming experience.
How to Set Up BlueStacks RDP for Low-End HardwareSetting up BlueStacks RDP for low-end hardware is a straightforward process. Here are the steps:
Sign up for a BlueStacks RDP account: Visit the BlueStacks RDP website and sign up for a free account.
Download and install the BlueStacks RDP client: Download the BlueStacks RDP client for your device and install it.
Launch the BlueStacks RDP client: Launch the BlueStacks RDP client and sign in with your account credentials.
Select and play games: Browse the BlueStacks RDP library and select the games you want to play. The games will be streamed from the cloud to your device, ensuring a high-performance gaming experience.
Other RDP Gaming Options for Low-End HardwareWhile BlueStacks RDP is a popular option for low-end hardware users, there are other RDP gaming services available as well. Here are a few options:
Xbox Cloud Gaming: Microsoft’s cloud-based Xbox game-streaming technology offers a wide range of games that can be played on mobile devices or Chrome web browsers.
NVIDIA GeForce NOW: NVIDIA’s cloud-based gaming service offers high-performance gaming on a variety of devices, including low-end hardware.
Amazon Luna: Amazon’s cloud-based gaming service offers a wide range of games that can be played on various devices and browsers.
Shadow: A fully-featured, cloud-based, high-end computer that offers performance capable of competing with a local PC.
RDP gaming is a great option for low-end hardware users who want to enjoy high-performance gaming without investing in expensive hardware. BlueStacks RDP is a popular and cost-effective option that offers a wide range of games and customizable settings. With its easy setup and compatibility with various devices, BlueStacks RDP is a great choice for low-end hardware users who want to enjoy high-performance gaming.
0 notes
Text
Enhance Your Gaming Experience with BlueStack RDP and Android Emulator on VPS

What is RDP and Why Buy RDP?
RDP, or Remote Desktop Protocol, is a proprietary protocol developed by Microsoft that allows users to access and control a remote computer over a network connection. Buying RDP services allows users to access their desktop environment from anywhere in the world, enabling seamless collaboration, remote work capabilities, and enhanced productivity. Whether you’re a business professional needing access to your work computer from home or a gamer seeking to optimize your gaming setup, investing in RDP solutions can offer unparalleled convenience and efficiency.
Elevating Gaming Experience with Gaming RDP
For avid gamers, having a reliable and high-performance gaming setup is crucial to enjoying immersive gaming experiences. Gaming RDP services cater specifically to the gaming community, offering optimized virtual environments with powerful hardware configurations. By investing in Gaming RDP, gamers can access dedicated resources such as high-end GPUs and CPUs, low-latency connections, and ample storage space, ensuring smooth gameplay and graphics-intensive performance. Whether you’re competing in multiplayer battles or exploring vast virtual worlds, Gaming RDP can take your gaming experience to the next level.
Unlocking Android Gaming Potential with BlueStack RDP
Harnessing the Power of Android Emulator on VPS
Android Emulator on VPS brings the convenience of virtualized Android environments to the realm of Virtual Private Servers. By running Android Emulator on VPS, users can create and customize virtual instances of Android devices within their VPS infrastructure. This allows for a wide range of applications, from testing Android apps to running mobile games on a scalable and efficient platform. With the flexibility and scalability of VPS technology, Android Emulator on VPS offers a cost-effective solution for developers, gamers, and businesses alike.
Conclusion
In a world where connectivity and flexibility are paramount, investing in RDP solutions such as Gaming RDP, BlueStack RDP, and Android Emulator on VPS can offer immense benefits. Whether you’re a business professional seeking remote work capabilities or a gamer looking to optimize your gaming setup, the versatility and performance of these solutions can elevate your digital experience to new heights. By harnessing the power of remote desktop technology, you can unlock new possibilities and streamline your workflow, ultimately enhancing productivity, connectivity, and enjoyment in the digital age.
0 notes
Text
Unleashing Windows: A Guide to Accessing Windows Applications on Your Android Device
Accessing Windows applications on an Android device can be achieved through various methods. Here are a few approaches you can consider:
Remote Desktop Connection:
Use a Remote Desktop Protocol (RDP) app on your Android device, such as Microsoft Remote Desktop or any other third-party RDP app.
Ensure that Remote Desktop is enabled on your Windows computer. You can enable it by going to "Settings" > "System" > "Remote Desktop" on Windows.
Open the RDP app on your Android device, enter the IP address or hostname of your Windows computer, and log in with your credentials.
You'll see your Windows desktop on your Android device, and you can use Windows applications as if you were sitting in front of your computer.
Virtualization Apps:
Use virtualization apps like VirtualBox or VMware to create a virtual machine running Windows on your Android device.
Install the Windows applications within the virtual machine.
This method requires more resources and might not be as straightforward as remote desktop access.
WINE on Android:
WINE is a compatibility layer that allows running Windows applications on non-Windows operating systems.
There are Android applications like Wine for Android or Wine 3.0 that let you install and run certain Windows applications on your Android device.
Cloud-Based Services:
Consider cloud-based services like Microsoft Azure or Amazon AWS, where you can set up a virtual machine running Windows.
Access the virtual machine using an RDP app on your Android device.
Note: When accessing Windows applications on Android, factors like network speed, security, and compatibility need to be considered. Additionally, ensure that you comply with licensing agreements for the Windows applications you are using.
Choose the method that best suits your requirements and technical expertise. Always prioritize security, especially when accessing remote systems or using third-party applications.
0 notes
Text
“The Ultimate RDP Checklist: What to Look for in Remote Access Software”
In today’s hybrid and remote-first business environment, having reliable Remote Desktop Protocol (RDP) software isn’t optional—it’s essential. But with so many options in the market, how do you choose the right one?
Whether you're a system administrator, a business owner, or a startup founder, this ultimate RDP checklist will help you evaluate the features that matter most—and explain why RHosting checks all the boxes.
🔐 1. Security First: Encryption & Access Controls
Must-have:
End-to-end encryption (TLS/SSL)
Two-factor authentication (2FA)
Brute-force attack protection
IP filtering and whitelisting
Why it matters: Your remote desktop solution is a gateway to your servers. Security lapses can lead to massive data breaches. Choose software that prioritizes cybersecurity by design.
✅ RHosting delivers enterprise-grade encryption, 2FA, and granular user-level access for peace of mind.
⚙️ 2. Application-Level Access
Must-have:
Restrict access to only specific applications
Prevent users from accessing the full desktop
Why it matters: Not every user needs full server access. Limit exposure and reduce the chance of accidental (or intentional) damage.
✅ RHosting lets you assign individual apps to users—great for contractors, part-timers, and clients.
🗂 3. Granular Folder-Level Permissions
Must-have:
Assign folder-level access based on user roles
Read/write permissions customization
Why it matters: Need-to-know access prevents data leaks and keeps sensitive information restricted to authorized users.
✅ RHosting offers a highly configurable control panel to define folder-level rules across departments.
🚀 4. Performance & Speed
Must-have:
Low latency connections
Optimized for bandwidth efficiency
Fast load times for large apps and files
Why it matters: Lag can destroy productivity. Ensure your RDP software is optimized for both speed and heavy use.
✅ RHosting is designed for high performance—even with resource-intensive applications like development tools or data analysis software.
📲 5. Device & OS Compatibility
Must-have:
Windows, macOS, Linux, iOS, and Android support
Web-based access option
Why it matters: Your team likely uses multiple devices. Cross-platform support ensures everyone can work from anywhere.
✅ RHosting offers multi-device compatibility with browser-based login, eliminating software installs.
🔧 6. No Hardware Configuration Required
Must-have:
Cloud-hosted RDP service
Plug-and-play setup
No need for on-premise servers
Why it matters: Startups and small businesses shouldn’t need an IT department to deploy remote access. Look for a provider that offers a zero-hardware setup.
✅ RHosting is fully cloud-based—no server setup or firewall configurations required.
📊 7. Scalability & Flexibility
Must-have:
Easy to add/remove users
Scalable storage and processing power
Pricing that grows with your needs
Why it matters: Your RDP solution should grow as your team grows—without disruption.
✅ RHosting allows on-demand scaling and user management via an intuitive dashboard.
🛠 8. Admin Tools & Analytics
Must-have:
Centralized admin dashboard
User activity logs and access history
Real-time monitoring
Why it matters: Admins need insight into who accessed what, when, and from where—especially for audits and compliance.
✅ RHosting delivers full visibility with real-time logs and activity reports.
✅ Conclusion: Not All RDP Software Is Created Equal
The best RDP solution isn’t just about connecting to a remote machine—it’s about security, performance, control, and user experience.
Use this checklist to compare your current or potential provider. If you're ready for a smarter, more secure way to work remotely, RHosting is your answer.
🚀 Ready to experience remote access without compromise?
Sign up for a free trial of RHosting and discover why IT teams, startups, and enterprises trust us to power their remote work.
0 notes
Text
Boost Your Performance: Why You Should Use a VPS for BlueStacks
In 2025, Android emulation continues to rise in popularity—whether it’s for mobile gaming, app development, or social media automation. One of the most well-known Android emulators is BlueStacks, which allows users to run Android apps on Windows and macOS. However, running BlueStacks on a standard PC or laptop can strain your system’s resources and limit performance. That’s where a VPS for BlueStacks comes into play.
Using a Virtual Private Server (VPS) to run BlueStacks can significantly enhance your experience, offering improved speed, reliability, and scalability. Whether you're a mobile gamer, digital marketer, or developer, this guide will explain exactly why you should use a VPS for BlueStacks and how it can boost your performance in 2025.
What Is BlueStacks?
BlueStacks is a powerful Android emulator that replicates the Android operating system on desktop environments. It enables users to download and run apps from the Google Play Store, making it ideal for:
Playing mobile games like PUBG Mobile, Clash of Clans, or Call of Duty Mobile on a larger screen.
Automating social media tasks using tools like Instagram bots.
Testing Android apps during development.
Running messaging apps like WhatsApp or Telegram in a more manageable desktop setting.
While it’s incredibly functional, BlueStacks is also resource-intensive, requiring significant CPU, RAM, and GPU capacity. This is where many users run into trouble, especially when multitasking or running multiple instances.
What Is a VPS?
A Virtual Private Server (VPS) is a virtual machine hosted on a powerful physical server, offering dedicated resources like CPU, RAM, storage, and bandwidth. Unlike shared hosting, a VPS gives you administrative (root) access, customizable configurations, and isolated environments.
In simple terms, a VPS is like having your own computer in the cloud—with more power, more uptime, and greater control.
Why Use a VPS for BlueStacks?
1. Boosted Performance
Running BlueStacks on a VPS means you're no longer dependent on your personal device’s hardware limitations. High-performance VPS providers offer specs like:
Multi-core CPUs (Intel Xeon or AMD EPYC)
SSD or NVMe storage
Dedicated RAM
High-speed internet (1Gbps+)
This allows BlueStacks to run smoother, load faster, and handle more apps or game instances at once without lag.
2. 24/7 Uptime and Remote Access
Need BlueStacks running automation scripts or games around the clock? A VPS can stay online 24/7 without relying on your home internet or power supply. With remote desktop access (via RDP or VNC), you can log in from any device—PC, laptop, or even mobile—and manage BlueStacks anytime, anywhere.
This is especially useful for:
Farming resources in games
Running bots or scheduled tasks
Managing multiple accounts
3. Run Multiple Instances Efficiently
BlueStacks includes a Multi-Instance Manager, which lets you run several Android environments at once. On a VPS, you can take full advantage of this feature thanks to increased system resources.
Gamers use this to run multiple characters or accounts in parallel. Marketers can test different automation tools or accounts simultaneously without being throttled by local hardware.
4. Reduce Wear and Tear on Your Personal Device
Running heavy applications like BlueStacks can overheat laptops, drain battery life, and degrade performance over time. Using a VPS shifts the load to the cloud, keeping your personal system free for other tasks—or even offline while BlueStacks continues running remotely.
5. Scalability for Professional Use
As your needs grow—whether you're automating more tasks, launching more apps, or running more accounts—you can easily scale your VPS plan. Most providers offer scalable packages that allow you to:
Upgrade CPU or RAM without downtime
Add more disk space
Expand bandwidth
This makes a VPS for BlueStacks ideal for professional users who need flexibility and power on demand.
6. Improved Security and Isolation
Many privacy-conscious users prefer VPS hosting for the isolation and control it offers. You can:
Install custom firewalls or antivirus
Use a VPN to anonymize activity
Keep app data separate from your personal machine
This is a game-changer if you’re running sensitive scripts or accounts and want to reduce risk.
How to Set Up BlueStacks on a VPS
Setting up BlueStacks on a VPS is easier than you might think:
Choose a Windows VPS provider – Look for specs like 8+ GB RAM, GPU acceleration (if available), and SSD storage.
Access the VPS – Use Remote Desktop Protocol (RDP) to log into your virtual server.
Download BlueStacks – Visit the official BlueStacks website and install the version suited for your needs.
Customize settings – Allocate CPU and RAM resources to BlueStacks for optimal performance.
Install and run apps – Begin using your Android apps with full performance, privacy, and uptime benefits.
Some VPS providers even offer pre-installed BlueStacks images to make setup even faster.
Ideal Users for BlueStacks VPS Hosting
Mobile gamers who want lag-free gameplay and multi-instance farming.
Social media marketers running bots, schedulers, or multiple accounts.
Android app developers testing software in a clean, isolated environment.
Automation enthusiasts who need round-the-clock uptime.
Privacy-focused users looking for secure, cloud-based operations.
Final Thoughts
Using a VPS for BlueStacks in 2025 is more than just a performance boost—it’s a strategic upgrade that enables better speed, uptime, scalability, and privacy. Whether you’re gaming, marketing, or developing, a VPS ensures that BlueStacks runs smoother, faster, and more securely than ever before.
If you're tired of lag, crashes, or resource constraints on your local device, it's time to move your Android emulation to the cloud. With the right VPS, BlueStacks becomes a powerful, always-on tool tailored for high-performance tasks.
0 notes
Text
How to connect RDP on Android? Free RDP for Android

Welcome to RDPHostings, in this article you will get to know “How to connect to RDP on Android”. This article is going to be the most comprehensive one and go through each and every step so that you can connect to RDP on Android. And, all the below-mentioned steps apply on Windows Server 2022, Windows Server 2019, Android 7.0 or later. Through this article, we guarantee you that your RDP connection on android will be strong and you can get the supported application on Google Play Store.
How to Download the Remote Desktop client on Android? Follow the below steps in order to download your Remote Desktop client for Android devices.

Download the Remote desktop client and install it on your Android Device
Run the application on your android
Now, add an RDP connection that allows you to directly get connected to your free RDP server.
youtube
How To Add a Remote Desktop connection?
When you have finally installed the Android device client on your device, you can easily access remote resources.
Before adding a connection, you need to set up your PC to accept remote connections.

To add a remote desktop connection:
Tap + then tap desktop
Fill up the name of the remote PC where you can see the PC name. You can also enter the PC IP address.
Select the username in order to use the Remote PC
Pick Enter every time for the user to ask for your details every time you connect to the remote PC.
Select Add the user account to save an account that you use frequently so you don’t have to enter credentials every time you sign in.
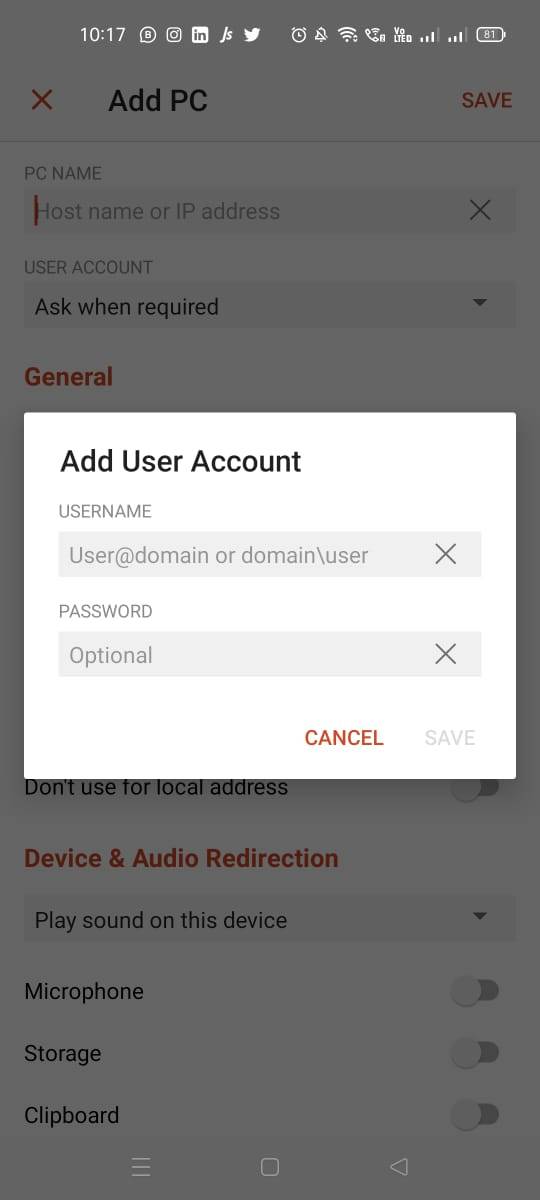
4. Tap on Show additional options to set the following optional parameters: 1. In Friendly name, enter a name that is easy to remember. 2. The Gateway is the Remote Desktop gateway you’ll use to connect to a computer from an external network. 3. The sound you can choose to play sound on your local devices. 4. Customise display resolution when turned off, the resolution assigned in global settings is used. 5. Swap mouse buttons switch the commands sent by right and left mouse gestures. 6. Connecting to the admin session lets you connect to an admin session on the remote PC. 7. Redirecting local storage enables local storage redirection. This setting is disabled by default.
Tap on same when you are done.
Also read: Free RDP Hosting For Students
Conclusion Now, let us wrap up the article which was about how to connect to RDP on Android. You must follow each and every step in order to set up your Free RDP server.
Else you can bookmark our blog which will help you with the further details you might need if you need to know more about RDP Hosting.
1 note
·
View note
Photo


husband and wife
51 notes
·
View notes