#Remove view Web Version Button in Blogger
Text
Remove View Web Version Button in Blogger
#Remove view Web Version Button in Blogger#View web version ko remove Kaise Kare#How to remove view Web Version link#Delete view Web Version Blogger blog#Hide view Web Version blogspot blog
0 notes
Text
15 Large File Transfer Solutions in 2021
The transfer of large files has become more and more frequent. With the continuous development of the market economy, the ties between countries and regions are close, the development of the commodity economy, large file transfer, and large data transfer are frequent, so large file transfer is required The service is mainly used for sending and transferring large files.
1. Jumpshare
Jumpshare allows you to send files up to 250 MB using their free account, but if you upgrade to their paid plan, you can send files of any size. You only need to upload the file and they will provide you with a link to share the file.
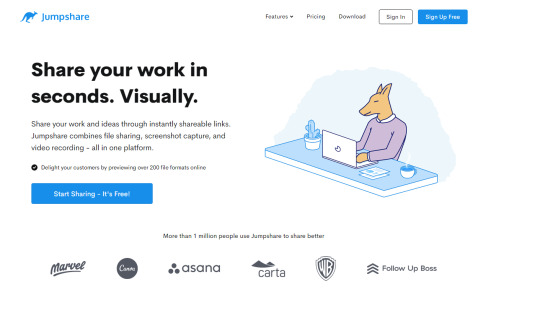
Unlike all other competitors, they have a very good application on both Windows and Mac that allows you to easily share files, folders, and documents.
2. Securely Send
Securely Send allows anyone to transfer large files securely. Sending a file is as simple as entering the email address to which you want to send the file, attaching the file to be sent, and clicking "Send". Safe sending saves the tedious work of sending large files. You can be sure that your documents have been received.

A free account allows you to send three each month, with a maximum file size of 200MB. There are basic, standard, and premium paid plans that allow you to send more content each month and increase the maximum file size allowed.
3. BITzen
BITzen is an online service that allows you to quickly, safely, and reliably receive files from others or send files to others in any format. This service is aimed at companies that need to send files to and receive files from clients or collaborators, but others can also use it for personal purposes. You do not need to install any software to use this service, and you can use its free service almost immediately after signing up for the free plan.
The free account provides 1GB of storage space, the monthly transfer limit is 2GB, and the maximum file size is 2GB. There are 3 payment plans also available for users.
4. Kicksend
Most of your relatives are not on social networks, and shared folders are too complicated for what they actually want to do: view your photos. Kicksend is specially designed for them. They make it easy for parents to use without technical support or training.
You can also quickly and easily order beautiful, high-quality prints for yourself and your loved ones on Kicksend. You choose the print, and they choose the store (CVS, Target, or Walgreens). One hour from your phone to their hands. Always be ready to frame and cherish memories.
Kicksend can help you release your email inbox and everyone else's email. All your pictures are stored securely on Kicksend, so you can view and download them privately from any device anytime, anywhere.
5. YouSendIt
YouSendIt has millions of registered users in 193 countries/regions, accounting for 98% of the Fortune 500, and is the preferred document collaboration service for consumers and businesses. The company's online services range from simple file sharing to complete collaboration services, allowing users to safely share, sign, and access content on any mobile device or PC.
The free Lite plan provides 2 GB of storage space, five electronic signatures, and maximum file size of 50 MB.
6. WeTransfer
WeTransfer is a free platform that can transfer large digital files up to 2GB per transfer. They can transfer any type of files, such as presentations, photos, videos, music, documents, etc. Without registration, the file can be used for two weeks.
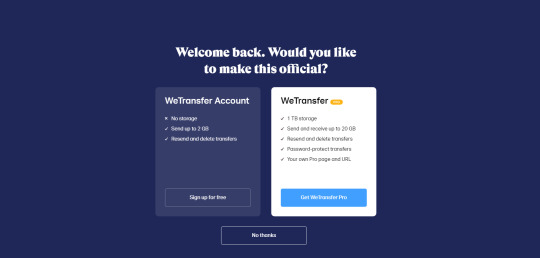
They are supported by advertisements displayed as wallpapers on the WeTransfer website. They also sell WeTransfer channels, which allow you to have your own wallpaper, no ads, unique WeTransfer URL, personal background in emails, and files available for a month instead of two weeks.
7. TransferBigFiles
TransferBigFiles makes it very easy to send and share large files that are usually too large to be sent via email. It does this by allowing you to upload files to our server and send a link to the page where the recipient can then retrieve the file (if you are the recipient, you can retrieve it yourself).
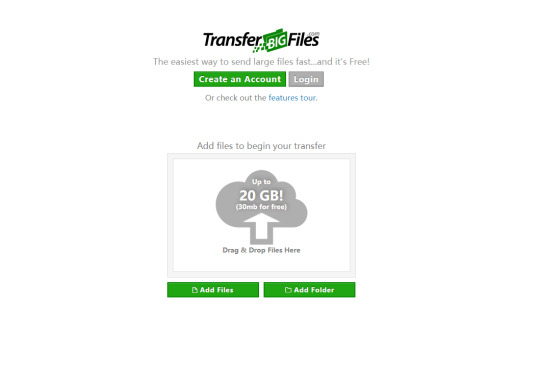
You do not need to register to use the website for free. This free account allows you to send files up to 100MB in size, and most email systems have a maximum file size of 10MB to 25MB. The free account keeps files for five days.
If you want to take advantage of the new features, you can use premium paid accounts, such as personal inbox, transfer history, larger size limit, higher download limit, storage space, etc.
8. TitanFile
TitanFile allows you to drag and drop files from various sources and use any device to safely share them with your colleagues or customers anytime, anywhere.

Organizing information around people and public context, instead of organizing information around files and folders, makes finding files easier and more intuitive.
TitanFile transfers files through a secure connection and stores them encrypted in a secure facility.
Their free basic plan is perfect for basic use and supports uploading files up to 100MB. You will also get a 7-day audit trail and 5 communication channels. If you need more features, there are also paid professional plans and enterprise plans.
9. MailBigFile
MailBigFile allows you to send large files when you cannot send mail via regular email. It is web-based, so there is no need to download software and it is easy to use. The free service allows you to upload files up to 300MB per file. These files can be used for 10 days. Each file can have one recipient, and each file can be downloaded up to 20 times. The free service has no permanent storage space.

If you need higher limits and more features, there are other paid plans.
10. Pando
Pando is a free file sharing software that uses the hosted peer-to-peer (P2P) technology they designed to quickly and easily download, stream and share large files and folders (up to 1GB). It allows you to use any email to send large files and folders without registration. Pando bypasses the email attachment restriction with small .pando attachments and will never block your inbox.
You can also embed the Pando package into any website (including MySpace, Facebook, Blogger, WordPress, Typepad, Xanga, and LiveJournal), share directly to IM, Facebook or Twitter, and publish downloadable videos and photos.
Use any IM client (such as Google Talk and Skype) to share files and folders (maximum 1GB) with others. Just create a Pando link and paste it into IM to go offline. Your recipients simply click the link to get the content sent.
11. SendThisFile
SendThisFile is a powerful file transfer service that uses the functions of the Internet to modernize and simplify the sending and receiving of large files. It provides you with simple and fast file transfer and avoids complexity through our easy-to-use file upload page (where progress can be monitored). All transfers include the comprehensive encryption and security of SendThisFile, and end-to-end 128-bit encrypted file transfers can be created without configuring a single setting.
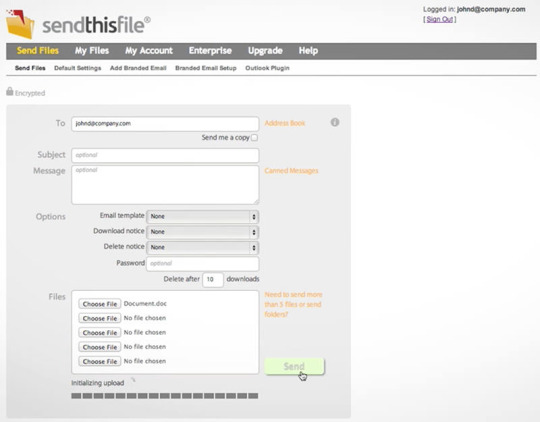
The free account allows you to send files with a maximum size of 2GB to one recipient at a time. These files can be downloaded for three days and can be transferred securely using 128-bit SSL. You can also use their FileBox to get photos from your friends and family.
They also offer paid accounts that provide higher limits and additional features.
12. JustBeamIt
JustBeamIt is a Beta version service that can transfer files very easily. Just drag the file to the drop zone, which is the area under the heading with the parachute. You can also select files by clicking on the parachute. Then, click the "Create Link" button to generate a unique download link to share with the recipient of the file. After the file is uploaded, a "wait" indication will be displayed until the recipient connects to the page and downloads the file.
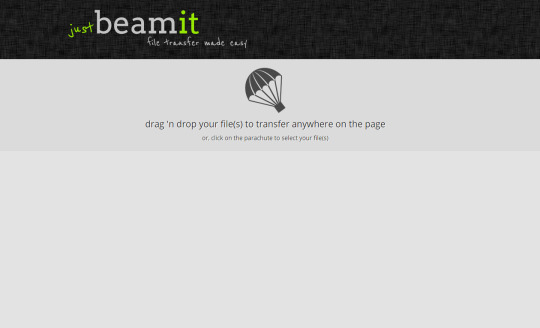
The only disadvantage of this method is that, as the sender, you cannot leave the page before the download is complete. Once you and your recipient both leave the page, the transfer link becomes useless. If the recipient encounters file problems, they must restart the process.
13. Pastebin
Pastebin is a free web service where you can paste text to share with your friends, family, and even colleagues, and keep it for a while. In addition, you can choose how long to keep a specific post because it will be automatically deleted after a specified period of time.
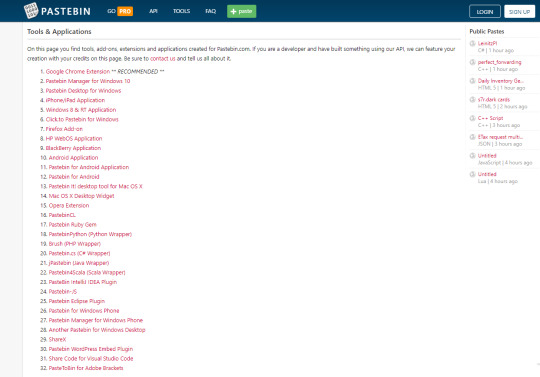
You can also choose to keep the paste public or private. The private paste is only visible to people you choose to share the link with. All this is free, no need to download or install any software.
They also provide a program called Pastebin Desktop, which allows you to take full advantage of your Pastebin.com account directly from the desktop. The program places an icon in the system tray, allowing you to access the entire application.
14. GSplit
GSplit is a free and reliable file splitting program for Windows that allows you to split larger files (greater than 4GB) into a group, such as self-extracting archives, Zip archives, disk images, photos, music, videos, and backup files. Smaller files are called fragments. These clips are easier to send via email (forget about the additional file size restrictions imposed by some ISPs, pop3, SMTP, and other email servers), and can be uploaded to hosting accounts with file size restrictions, file delivery services, and online files Host the site and share it with friends, colleagues or other users via the network and the Internet.

You can choose one of the following two ways to split files: disk partition (which is automatically calculated by GSplit as a set of files of different sizes based on the available disk space, and immediately saved to an expandable removable disk) or blocked ( Split into a group) split files of the same size).
File fragments can also make them self-unifying. To this end, GSplit created a small independent executable file that puts all the parts back together. The executable file provides your users with an intuitive Windows interface, and its appearance can be customized according to your needs. Therefore, split files can be restored without GSplit.
You can also store file attributes (such as file date and attributes) and restore them. GSplit also provides a quick check (size, offset, CRC32) function to detect file damage and assure you that the user successfully restored the file. When a block is damaged, you will be notified, so you only need to get a new copy of the block, not the entire copy.
A portable version of GSplit is also available without installation. Run the portable file splitter directly from any removable disk (such as a USB flash drive). The settings are also saved directly on the storage medium instead of on the computer.
15. Raysync
The Raysync lagre file transfer solution is dedicated to meeting the data transfer needs of enterprises or external partners, providing efficient and controllable accelerated transfer of large files, ultra-long distance, transnational network data transfer, safe distribution of file assets, file management and organizational authority management, Supports local deployment and cloud services, and provides enterprises with safe, stable, efficient and convenient large file interactive technical support and services.
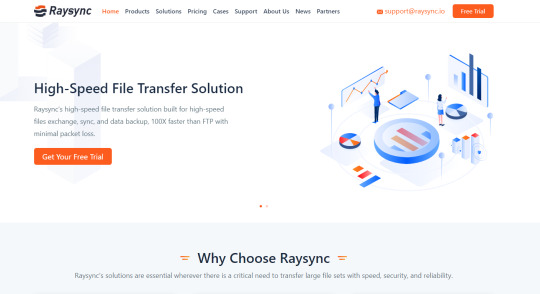
Raysync is an enterprise-level file-accelerated transfer management platform, which realizes various transfer needs such as efficient and controllable large file transfer, long-distance accelerated transfer, transnational transfer, and cross-border transfer for enterprises. It perfectly replaces the file transfer protocol FTP and realizes enterprise data transfer management. 100% efficient operation.
Article From:
https://www.raysync.io/news/15-large-file-transfer-solutions-in-2021
0 notes
Text
Norton.com/setup | Secure your Device with Norton | Norton setup
Norton.com/setup holds the top position among the other cybersecurity leaders in the world. It offers highly advanced antiviruses and security software that help computer users to protect their data against cyberattacks, privatized their identity, and roam around the digital world freely. To meet the diverse security requirements of individuals and businesses, Norton.com/setup offers a range of antiviruses and security services.
You can view them all by visiting the Norton website www.norton.com setup. What’s common in all the Norton antiviruses is that they all need to be downloaded, installed, and activated on the device. One mandatory thing that is required to perform these three operations is the Norton setup enter product key. You get this key with your purchase, no matter online or offline.
So, if you have already redeemed this Norton setup enter product key and want to know the steps to download, install, and activate the security product, then check out the information given below:
Pre-requisites to Norton Setup install
Even if you have a Norton Setup Enter product key ready (which is required for the download and activation of the antivirus), there are a few more factors that should be taken into consideration. These are:
Storage space- Make sure your Windows, Mac, Android, or iOS device has sufficient storage space to accommodate Norton setup file and the antivirus.
Turn off the firewall- If you are downloading the antivirus on a Windows PC, then it is recommended to turn off the Windows firewall for a while to avoid any issue. (Don’t forget to turn it on after Norton installation)
Remove previously installed antivirus- Make sure your system has no antivirus or security software installed on it. If it has, then remove or uninstall it.
System Requirements- Verify whether your system meets the required specifications or not.

Steps to Download Norton Setup
Open any web browser and visit norton.com/setup
Enter the 25-character product
Sign in to your Norton Account with the registered email ID and password
If you don’t have a Norton account, then click Create a new account at Norton.com/setup
Provide the details required for Norton account sign up
Click Sign up to finish
Now, click the Download button
Wait until the download process finishes!
Steps to Install Norton Setup
Depending on your web browser, do any of the following:
Internet Explorer or Microsoft Edge browser: Click Run
Mozilla Firefox or Safari: Double-click the downloaded file from the download folder
Google Chrome: Double-click the setup file that you downloaded
In the User Account Control Wizard, click Continue
Read the license terms and conditions
Hit continue
Wait until the installation finishes!
Steps to Activate Norton Setup
Open the installed Norton antivirus
In the Main Window, click Help
Enter the Norton activation key
Follow the on-screen instructions, and click Activate
If you see an activation notification in the notification panel, then simply click
that. Enter the product key and click Activate.

How to download Norton Setup for free?
In case, if you want to download a free trial version of the Norton antivirus, then implement the below-mentioned steps:
Go to the Norton website
Search for the Norton product you want to avail a 30-days trial of
Please note that not every Norton antivirus has a trial version. Therefore, you have to choose from the list of products that are available for the same.
Click “Get a free trial version”
Let the Norton setup download
Now, run the setup file
Follow the instructions displayed on the screen to install the antivirus
You are good to go!
No Norton activation key is required when you install a Norton 30-days free trial version. This version will remain active for one month only.
from WordPress https://ift.tt/3eATzxz
via Blogger https://ift.tt/3hfHboH
0 notes
Text
Everything You Need to Know About Kodi and Steps on How to Use It
Kodi is one of the most popular computer applications that can convert your computers, laptops, or handsets into a virtual hub for playing audios, videos, or slideshows. It is compatible with all the major operating systems like iOS, Android, Linux, Windows, and macOS and can run a vast number of file formats. Kodi is a free program with which users can access music, movies, and TV shows. It was formerly known as XBMC. While Kodi doesn’t have content of its own, it provides access to music, movies, and even games via a highly customizable interface. The accessed media can be hosted on your system’s hard drive or somewhere on the internet. The media can also be accessed on networks like Blu-ray Disc or DVD.

How to Create Options Like Kodi TV or Kodi Music With the Help of Add-Ons
Some people might have their personalized multimedia hub to play their desired content. However, others use applications to view or listen to the limitless amount of content available for streaming. The content available on the web can be accessed with the help of Kodi add-ons. To install the add-ons, you will have to download the compatible version of Kodi according to your platform. It is recommended to install the latest version of the application on your system before you download add-ons.
The majority of Kodi add-ons are housed in repositories that make distribution simpler for both host and the user looking to browse or install one or more of these packages. Kodi has two types of repositories: Official and Unofficial. The Official repositories are maintained by the Kodi Team, while the Unofficial repositories are hosted and maintained by a third-party. The methods for procuring add-ons from both of these repositories is very different. We have mentioned below, steps for both the installations.
Installing Official Kodi Add-ons
To install the Official Kodi Add-ons, you need to install the Kodi app firstly. Once you have installed the app, you may follow the procedure given below:
Open it and select the “Add-ons” option, which will appear on the left menu.
Select the “Install from repository” option.
You will be redirected to a list of dozens of folders on Kodi’s official repository. You will see a wide range of add-on categories that will allow you to stream video and audio content, play games, and view images.
You can select the add-on which interests you. Once you select any particular add-on, you will be taken to the details screen for that add-on. You will have to click on the Install button, which you will see on the bottom of the page. Once you install the add-on, it will appear in your Kodi application, where you can launch it by using an “Open” button. The installed add-ons can also be disabled or removed from the main screen if they are no longer required.
Installing Unofficial Kodi Add-ons
As we have already discussed that the Unofficial Kodi Add-ons are hosted and administered by third-party. So, they may contain some security issues or malware. However, if you still want to install the Unofficial Kodi Add-ons, you may follow the steps mentioned below:
Once you have installed the Kodi app, open it.
Click on the “Settings” button, which you will find on the top left corner below the Kodi logo.
Once you click on the Settings, the system interface will now be visible. Click on the option “System Settings.”
On the lower left-hand corner, you will see an option “Standard,” double-tap on it, so that it may show you “Expert.”
Once you have done that, click on the “Add-ons” option, which will appear on the left menu.
Then click on the “Unknown Sources.” You will see a message regarding the possible risks involved when this setting will be enabled. To continue, click on “Yes.”
Once you have done that, return to Kodi’s main screen by pressing the escape key on your keyboard and then selecting the “File Manager” option, double tap on “Add Source.” Doing this will enable an “Add file source” dialog box over the main Kodi window.
Select the option labeled “None.” You will now be prompted to the path of the repository which you want to add.
Once you are done entering the URL, press the “OK” button.
Enter the name of the repository in the field marked “Enter a name for this media source” and click “OK.”
Once you are done with that, you will return to the “File Manager” where you will find the newly created source in the list.
Press the escape button on your keyboard twice, and it will return you to the main screen of Kodi. There, select “Add-ons” and select the package icon from the top left corner of the screen.
Click on the “Install from zip file.”
Once you do that, a new window will appear over the Kodi’s main screen. There you will have to enter the source name you entered in the 10th step. Once you enter the source name, you will be presented with a set of folders, where you will have to navigate to the appropriate path and choose a .zip file from the repository you want to install. Your installation procedure will get completed in a minute.
Once the repository gets installed, you will get a confirmation message on the top right corner of the screen.
There you need to click on the “Install from repository,” and a list of available repositories will now get displayed on your screen. Click on the newly installed repository.
Once you are done with that, you will be presented with a list of add-ons or a list of categories or sub-categories containing packages in each of them. Search for the desired add-on and click on its name to open its details, and after doing that, click on the “Install” button to add that particular add-on.
Once the add-on gets downloaded, you will see a notification in the top right corner of you Kodi’s main screen, and also, a checkmark will appear next to the name of that particular add-on, which you have downloaded.
You will now be redirected back to the main screen of add-ons. You can launch your newly downloaded add-on by clicking “Open.” This add-on can also be accessed later on, from the “Add-ons” section, which you will find on Kodi’s home screen.
Eva Winget is an avid technical blogger, a magazine, a publisher of guides at 2020-directory and a professional cyber security analyst.. Through her writing, she aims to educate people about the dangers and threats lurking in the digital world.
SOURCE: Everything You Need to Know About Kodi and Steps on How to Use It
0 notes
Text
BeTheme - Responsive Multi-Purpose WordPress Theme
New Post has been published on https://babesgobananas.com/betheme-responsive-multi-purpose-wordpress-theme/
BeTheme - Responsive Multi-Purpose WordPress Theme
Latest Version 21.2.6 – June 24, 2019 – view changelog
WordPress 5.2 Ready
WooCommerce 3.6 Ready
GDPR Ready


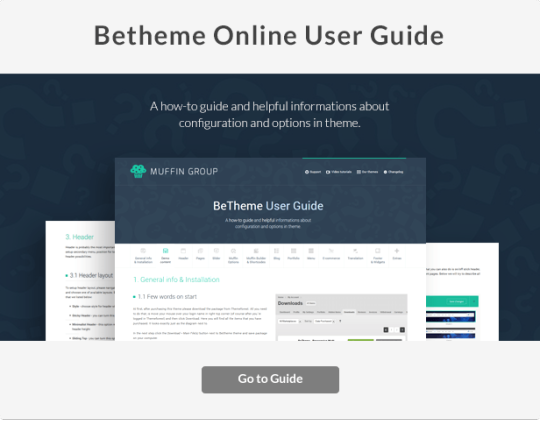
BeTheme is the best product we ever did. This is more than just WordPress theme. Such advanced options panel and Drag&Drop builder tool give unlimited possibilities. To show you how theme works, we have created 15 thematic websites so you can see how amazing this product is.
It can not be described with any words. You must see it!

Be is full of different pre-built websites so you can easily import any demo website within seconds at 1 click. Constantly we add new demos at users requests. So far we created websites for: electric, veterinarian, loan agency, charity agency, sitter, moving company, barber, health magazine, book writer, plumber, art agency, interior design company, webmaster, application, seo agency, university, event company, developer, car rental, band, gym, designer, marketing agency, hosting company, travel agency, real estate company, photographer, renovator, small business company, hotel, mechanic, lawyer, school, shop and much more. If you have own idea for great homepage, please do not hestitate and tell us about that. We consider all your ideas!
450+ pre-built websites
BeTheme, 960px Blogger, Accountant, Active, Advertisement Agency, Agency, Agro, Animals, App, Aquapark, Architect, Art, Artist, ASG, Baker, Band, Bar, Bike Rental, Biolab, Beauty, Billiard, Bistro, Black&White, Book, Boutique, Buddy, Builder, Burger, Business, Call Center, Car, Carver, Carpenter, Car Rental, Casino, Charity, Church, Cleaner, Clinic, Club, Coaching, Coffee, Congress, Copywriter, Corporation, Cosmetics, Craft Beer, Creative, Constructor, Decor, Dentist, Design, Detailing, Developer, Dietitian, Digital, Disco, DJ, Driving, eBook, Eco, Electric, Energy, Estate, Event, Exposure, Extreme, Factory, Farmer, Fashion, Finance, Fireplace, Firm, Fit, Fix, Flower, Freelancer, Furniture, Garden, Glasses, Good Food, Golf, Guest House, Gym, Handmade, Handyman, Herbal, HiFi, Holding, Home, Horse Riding, Hotel, Hosting, HR, Ice Cream, Industry, Insurance, Interactive, Interior, Investment, IT Service, Jet, Jeweler, Journey, Journalist, Karting, Kebab, Kindergarten, KravMaga, Lab, Landing, Language School, Launch, Lawyer, Library, Lifestyle, Loans, Logistics, Makeup, Marketing, Massage, Mechanic, Media, Medic, Mining, Model, Moto, Movie, Moving, Museum, Music, NGO, Notebook, Onepage, Painter, Parallax, Party, Perfume, Pets, Pharmacy, Photo, Pizza, Play, Plumber, Pole Dance, Politics, Portfolio, PR Agency, Press, Print, Profile, Recipes, Records, Renovate, Restaurant, Resume, Retouch, Safari, School, Science, Security, SEO, Shop, Simple, Sitter, Sketch, Ski, Smart, Smart Home, Snapshot, Software, Spa, Space, Sport, Steak House, Stone, Store, Story, Surfing, Surveyor, Sushi, Tailor, Tattoo, Taxi, Tea, Technic, Theater, Tiles, Tourist, Toy, Training, Transfer, Translator, Transport, Travel, Tuning, Typo, Underwater, University, Vet, Video, Vision, Voyager, VPN, Wallet, Watch, Web Design, Webmaster, Wedding, Wildlife, Wine, Writer, Xmas, Yoga, Zoo
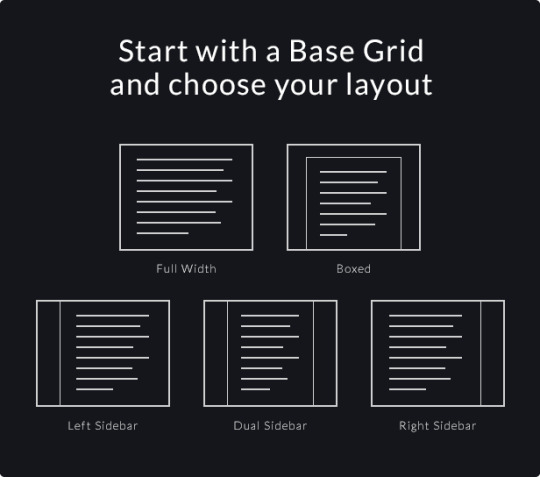
4 different grid layouts: 1240px Boxed, 960px Boxed, 1240px Full Width, 960px Full Width
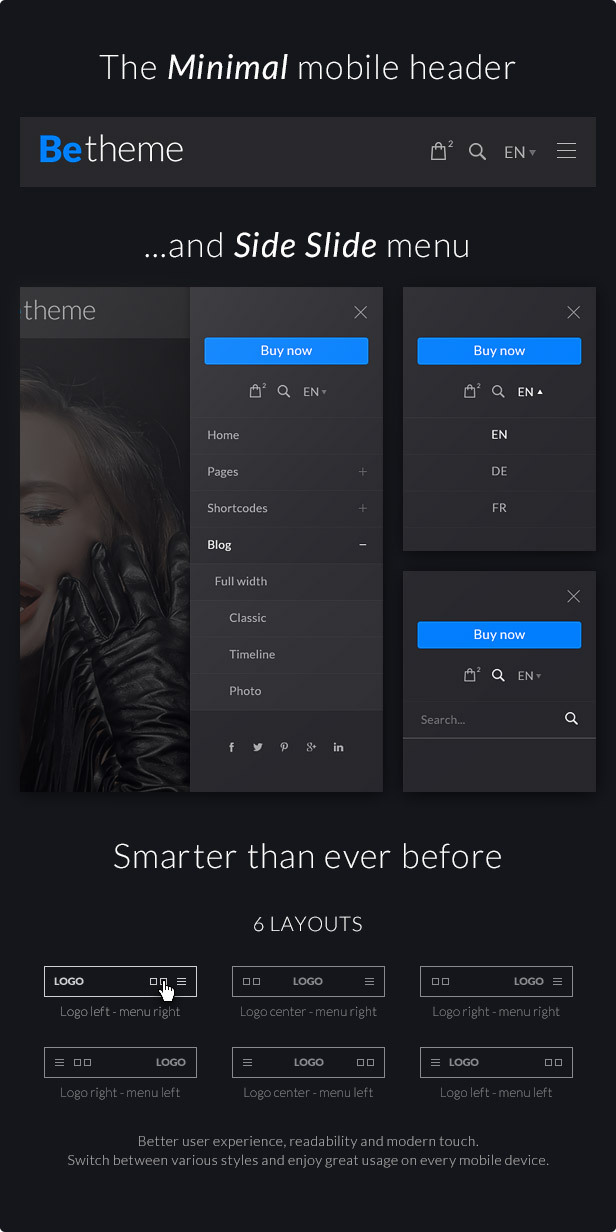
Widgetized Top Area (click on arrow in right top corner to see how it works)
Awesome Layouts Generator
unlimited layouts for pages
choose between different logos, headers, layouts, grids or skins
basically this option allow to create unlimited totally different pages around one website/domain
Unlimited menus (you can choose different menus for different pages)
Customizable entry effects on scroll (choose between 22 different entry effects)
Custom Font Uploader (upload any font you want and use for website)
7 different header versions (Modern, Classic, Stack: Left, Stack: Center, Stack: Right, Simple & Empty)
Under Construction / Maintenance Mode & Blank Page
12 predefined skins
One page website possibility with nice scroll effect
Smooth & reliable parallax effect – click here to see example
1 Click Skin Generator
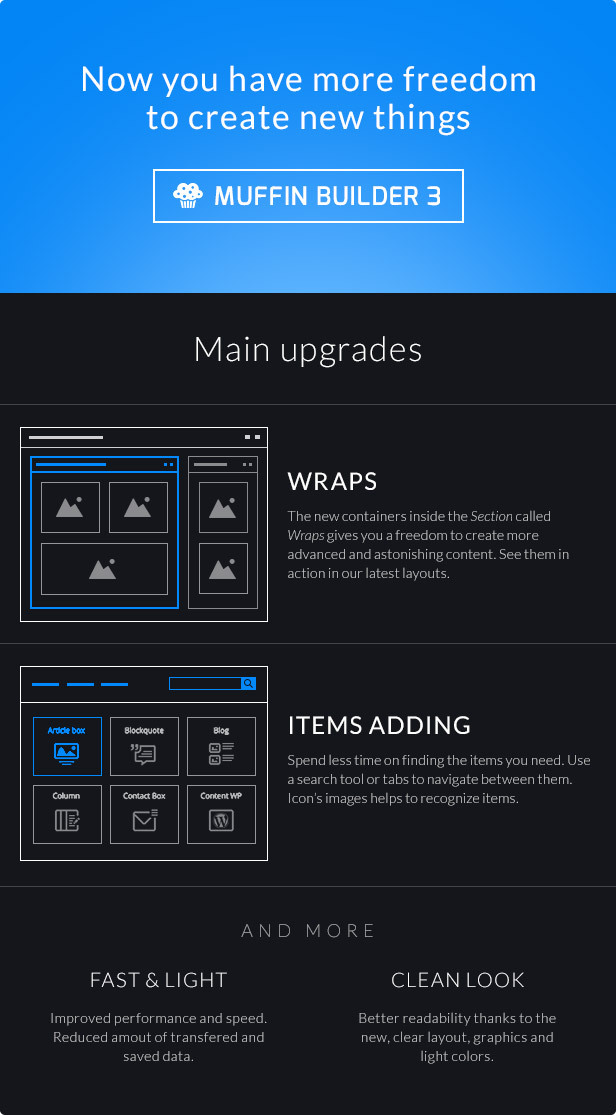
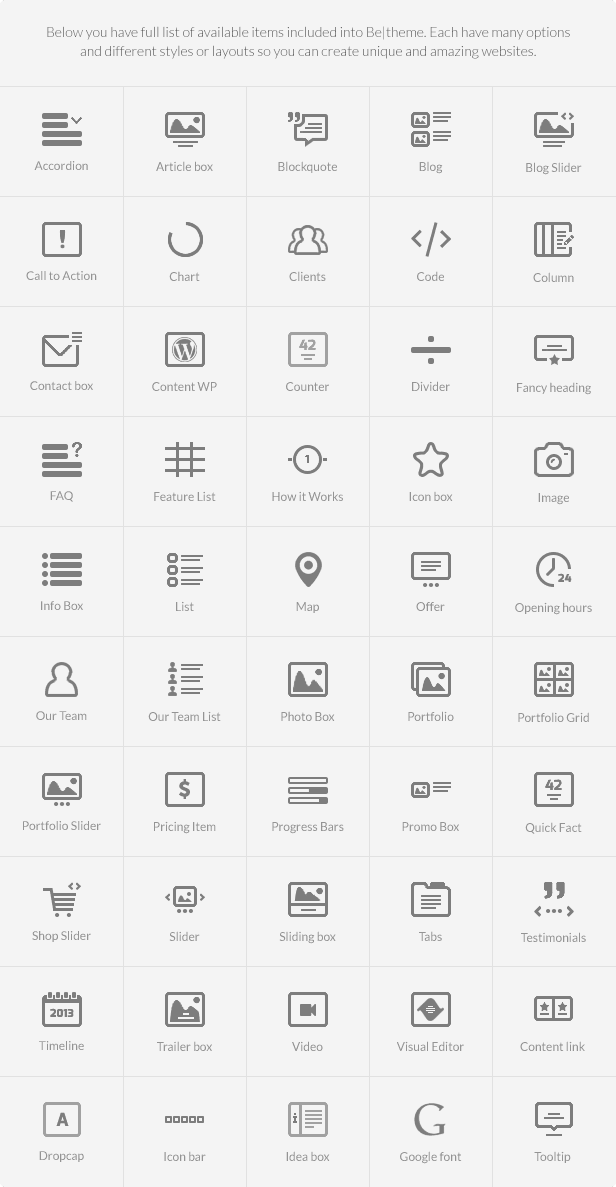
Over 200 Muffin Builder and shortcodes items included
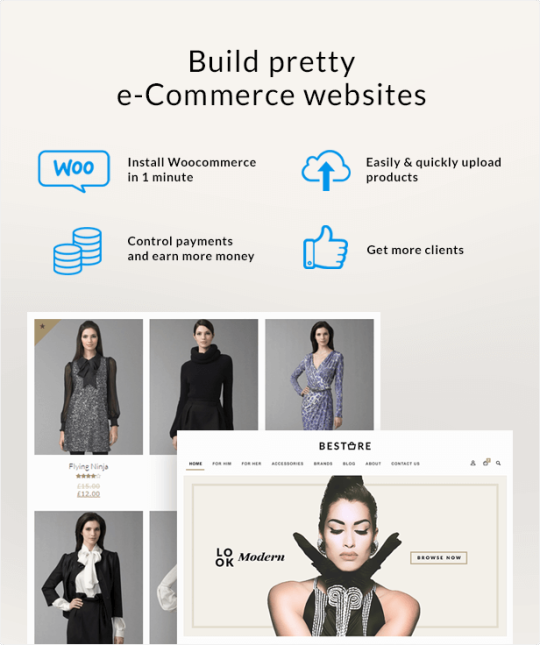
WooCommerce ready – create own e-commerce store
WordPress Multilingual Ready – build multilingual website – (WPML plugin is not included)
Built-in translator
Mega Menu
Setup rows and columns
Use titles under columns or not
Icons in menu items are available
Muffin Builder splitted on sections
Sticky Header – can be turned on/off from admin panel
Fully Responsive – just check how great it works on mobile devices
Retina Ready – Looks great on tablets and mobile devices
Tap To Call for mobile devices
Contact Form 7 plugin included and styled for theme
Set up as many different forms as you want
Choose between things like Captcha, checkboxes, select inputs and much more…
Most Popular form plugin all around the world
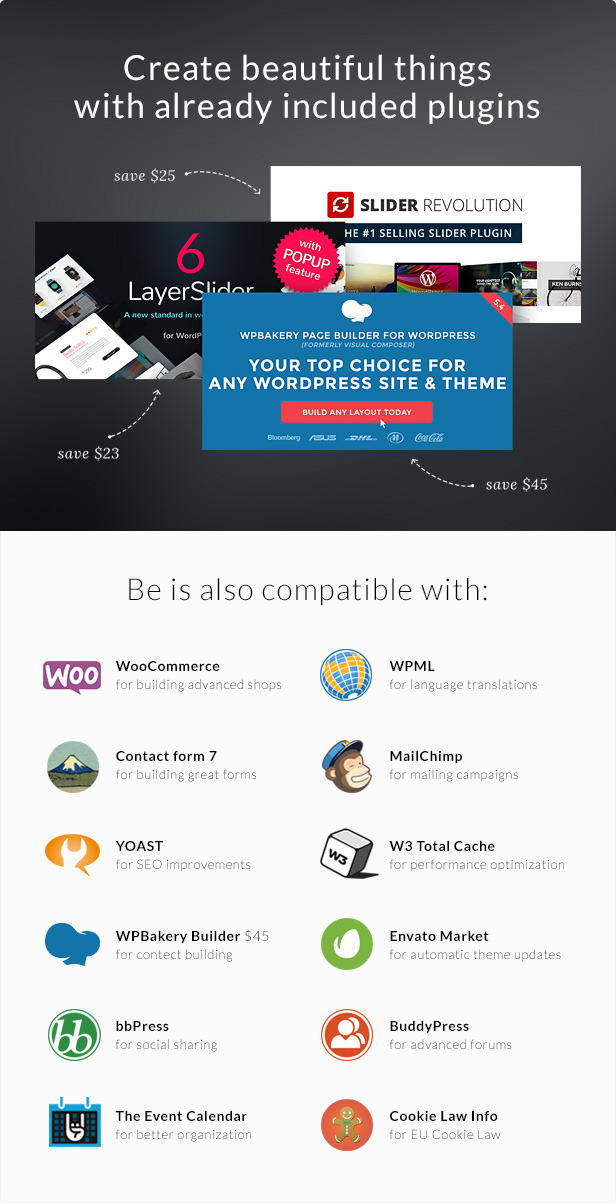
Revolution Slider included – $19 value
Sliders can be set up for each page
100% fully responsive & swipe enabled
Choose between 24 different transitions for each slide
Choose between full-width & boxed layout (960px or 1240px)
Youtube & Vimeo videos support
Set slider controls, animation times, shadows, thumbnails and much more…
Drag & Drop captions
Unlimited slides
Set up any slides you want (image/images, video/videos, flying objects, text, Buttons, links, backgrounds and whatever you can imagine)
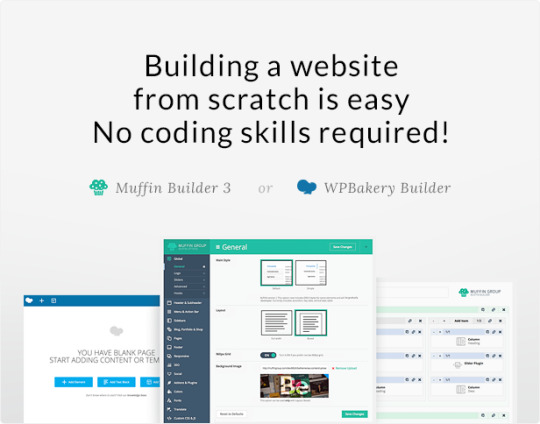
Awesome Drag & Drop Muffin Builder
Fast & Easy to use
Available for Pages, Posts and Portfolio
Over 40 items included with many different layouts (over 200 different looking items in total)
Change sizes, positions and much more…
Amazing Muffin Options
Change color for each element you see
Choose between 4 predefined skins or create your own
Turn on/off responsive version by one click
Choose layout (boxed or full width)
Change phone & email in header withing seconds
Choose between different layouts with one click
Turn on/off Sticky Header Menu
Use built-in SEO fields
Unlimited sidebars
Choose fonts for each text on page (you can use Latin, Cyrilic and many other types of font)
Built-in translator (translate anything you want on page with our built-in translator)
Choose between backgrounds images, colors, etc.
Upload logo & favicon in few seconds
Blog options support
Portfolio options support
Custom CSS support
and much more…
Visual Composer plugin with frontend and backend editor included ($28 value)
3 Different Blog Layouts
4 Different Portfolio Layouts
Translation ready – with included .po /.mo files or our built-in translator
Child Theme compatible
Fully customizable – easily change the color of nearly every element you see
Over 300 vector icons included
Easy to use for any type of website
100% Responsive Design (turn it on/off by one click)
200+ Shortcodes (include Muffin Builder items and text shortcodes)
Easy & fast to configure
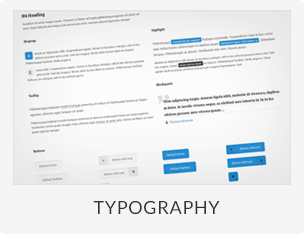
Choose between columns, maps, our team, blockquotes, buttons and much more…
Your page will be ready within few minutes
Tested compatibility with
Spot.IM chat plugin
WP Mobile Detect
600+ Google Fonts included
SEO ready
Built-in SEO fields (use them or turn them off)
Compatible with plugins like All in One SEO or Yoast
Many pre-built Pages
Contact page
About us page
Carrers page
Error 404 page
Features page
Gallery page
Help center page
How it works page
Our team page
Press page
Pricing page
Sidebar page
and much more…
Unlimited sidebars for pages
6 built-in custom widgets
Muffin Flickr
Muffin Menu
Muffin Recent Comments
Muffin Recent Posts
Muffin Tag Cloud
Revolution Slider widget
Subheader background images support
Custom logo, Retina logo & favicon support
Dedicated subpages
Google Maps support – Google Maps Platform billing account is required
Grid Based Layout
Social media icons
Custom footer menu
Built-in breadcrumbs
HTML5 / CSS3
Cross browser compatible
Clean commented code
Full documentation included
HD Narrated videos
18 PSD files with UI Kit included
Layered homepage PSD-file included into package
XML file with demo content
Outstanding support for customers

https://photodune.net
https://www.flickr.com
Please note: Images and icons used in our demo site are not included to the theme package.


To help all our customers we already started with the support forum.
It`s main advantage is the ability to easily search all the content and adding attachments. Before add a post on forum you need to register (Item Purchase Code is necessary).
We offer support for our customers Mon-Fri 8:00am-6:00pm (GMT +1) – we are located in Europe.
We reply on all questions within 24 hours (forums, tickets, private messages).
If you have any problems with registration please use contact form in right bottom section of our profile.
We inform also that we`re not replying on support question in comments.
Support forum: https://forum.muffingroup.com/betheme


Changelog
Version 21.2.6 – June 24, 2019
* Added: Icon shortcode - Color attribute (color="") * Fixed: Header Builder plugin + One Page - Hash smooth navigation * Improved: Theme Registration and Updates - Secure connection via https only * Pre-built website: Bar 3, Code 2 - changelog.html - functions.php - style.css - functions/admin/class-mfn-api.php - functions/builder/class-mfn-builder-fields.php - functions/importer/css/style.css - functions/importer/images/demos.jpg - functions/importer/demos.php - functions/tinymce/plugin.js - functions/theme-shortcodes.php - js/scripts.js
Version 21.2.5 – June 14, 2019
* Added: Muffin Icons - Medium * Updated: Google Fonts list - 916 fonts available * Pre-built website: Event 4, Dentist 3 - changelog.html - functions.php - style.css - css/base.css - fonts - functions/importer/css/style.css - functions/importer/images/demos.jpg - functions/importer/demos.php - muffin-options/fields/icon/field_icon.php - muffin-options/fonts.php
Version 21.2.4 – June 7, 2019
* Fixed: Slider item - Removed redundant image shadow * Pre-built website: Design 3, Sitter 2 - changelog.html - functions.php - style.css - css/shortcodes.css - functions/importer/css/style.css - functions/importer/images/demos.jpg - functions/importer/demos.php
Version 21.2.3 – June 3, 2019
* Added: Shop - Single Product - Rating click - Scroll to reviews tab and open it * Fixed: Blog - Filters - Filter by author - Show users with 'contributor' role * Improved: Forms - Input & Textarea - Slightly increased font size and font size * Pre-built website: Psychologist, Photo 2 - changelog.html - functions.php - style.css - css/shortcodes.css - css/woocommerce.css - functions/admin/class-mfn-api.php - functions/builder/class-mfn-builder-fields.php - functions/importer/css/style.css - functions/importer/images/demos.jpg - functions/importer/demos.php - functions/theme-functions.php - functions/theme-shortcodes.php - js/scripts.js

Source
0 notes
Text
Comprehensive Market Samurai Review – The Evergreen Keyword Research Tool
Every seasoned internet marketer or blogger knows the value of keyword research for SEO. Without the necessary keyword data, the efforts to rank in the first pages of search engines can be a grope in the dark, achieving little to zero success. Because manual keyword research and analysis can be tiring and time-consuming, many online businesses utilize the effectiveness of software. These tools automate parts of the process to rank in search engines and help to shorten the time it

takes to realize SEO results.
While there are many keyword tools out there, there’s one that has earned the respect of marketers and blog owners alike; Market Samurai. The program contains the tools to help you find the most appropriate keywords for your niche, assess the market for the keyword, publish content, and promote your websites. In this Market Samurai review, I will show you what the software offers so you can decide for yourself whether to use it or not.
What is Market Samurai and Why is it So Popular?
It’s all-inclusive and powerful keyword research and analysis tool. The product was developed by an Australian software company, Noble Samurai, slightly more than a decade ago. The too has been updated severally over the years and the current version offers a lot more than what the earlier ones did.
Market Samurai is a downloadable software that’s available for both PC and Mac users without any compatibility issues. What makes the product such a valuable tool for online entrepreneurs? To answer that question, we would need to understand the importance of keywords. And there’s no better way to do that than having a look at the following statistics:
Around 90% of keywords experience so much competition online that using them may never guarantee you a slot in the first pages of Google, Yahoo or Bing. Again, internet entrepreneurs who rarely carry out market research for keywords risk plunging their sites into this competitive market. The result? They never occupy a position worth taking pride in when it comes to serch results. It can be demoralizing, especially when you’ve spent time and money on SEO for those keywords.
About 90% of keywords attract so little traffic that using them can never bring you any significant amount of traffic. Focusing on those keywords would be not only a waste of time but also resources. Internet entrepreneurs who don’t take keyword research seriously or those who consider that hard work( and it is) risk falling into this trap of “little traffic” keywords.
An equal percentage of the keywords will bring visitors to your site- but not real customers. You get a sizeable amount of traffic, but the sales remain low- too low to match your SEO efforts. You may feel like giving up when the problem all along happens to be the use of keywords that don’t target a buying audience.
The primary issue with the three scenarios above is often the lack of proper research for keywords and the markets in which to use them. Market Samurai is designed to help you avoid those mistakes- and it does that superbly. The ways the software enables you to achieve success are varied and include:
Providing you with keywords that offer the most promising as well as quick results. There’s a part on the platform that does specifically that.
Researching and suggesting the markets that are worth getting into and those that you need to avoid. That narrows down your options and lessens the chances of you venturing into markets that are likely to disappoint.
Finding markets that do not present stiff SEO competition and those that do so you can know where to invest and where not to. Because competition is what causes many online ventures to fail, this analysis is essential before you can make any move in your online business projects.
Giving you a hint of what chances you stand for the efforts to rank a particular keyword in the first pages of search engines. It allows you to make an informed decision and maximizes that chances to succeed in your SEO campaigns
Suggesting topics to base your content on and finding the relevant content. It relieves you of the hassle to research and create the content to post
Helping you publish content. It makes everything about the process to improve your rankings easier and the time you take to accomplish that shorter
Scouring the internet and finding places to create backlinks. Also, providing you with an idea of how many backlinks you need and where to get the most quality ones. You end up not doing a lot manually which makes the project to improve SEO quicker and less tiring
And much more…
Now that we’ve seen how Market Samurai helps you to succeed in your online ventures, you might be interested to know the software achieves that. In other words, the tools that you will have access to on the platform.
The Features of Market Samurai
A Market Samurai download opens up a new world of reports that you can use to make digital marketing decisions. The software offers you access to 8 different tools, each with a specific function in your SEO campaigns. They are:
1. The Keyword Research Module
It comprises two parts: keyword generation and keyword research. In the first phase, you get a list of keywords based on your topic or seed keyword. The tool allows you to modify the list by adding or removing some keywords. Once you’re finished with evaluating the list, you proceed to the next part by pressing the button to analyze keywords. That takes you to another window where you can access the following information.
SEO Traffic– it shows you the number of clicks a particular keyword would earn you if it made it to the first page of search engines
Total Searches– this part indicates the number of searches that were performed by users for a specific keyword. It includes the searches made in a day, week, and even month.
SEO competition– here, you get to see how many sites are competing for a specific keyword. It gives you a hint of how your website or content would perform if you tried to rank for that keyword
2. The SEO Competition Module
While the software’s research tool offers you a glimpse of the level of competition to expect, it doesn’t provide adequate information for that. It’s in this module that you get a full report that paints a clearer picture of the competition. The module does that by analyzing the first ten slots on a search engine’s results for the keywords. The data provided by the module includes on-page and off-page SEO for the ten sites, domain age, website size, the number of backlinks, and more.
With that kind and amount of information, you can choose whether to go on and use the keyword, find a different one, or improve your sites SEO to match the competition. It’s worth indicating that Market Samurai uses Majestic to obtain the data generated by this module. The results are color-coded, with red showing a high competition and green indicating low competition.

3. Domain Search Module
This tool is useful if you intend to build niche sites using the seed keywords. Here, you get the chance to use your keyword to search for a matching domain. The module performs the search for you, automatically, and what you get is a list of the many different domains to choose from. The tool allows you to input your preferred prefixes and suffixes for a customized domain name.
4. The Monetization Module
This tool favors affiliate marketers the most. Niche marketers, too, who feature products on their websites. The tool helps you to find affiliate products that match your selected keywords. It searches the major markets such as Amazon, PayDotCom, ClickBank, and Commission Junction. The tool also offers the functionality to create ads for your websites.
5. The Find Content Module
There are times when you don’t have the time to create content. It could even be that you’re experiencing a writer’s block or can’t find an exciting topic to write about. That’s where this tool comes in as useful. It searches for stock content from various article directories and selects the one that matches with your topic and keyword. You can republish that article on your website provided you acknowledge the source and don’t claim the article to be your own.
The places that the tool looks for content include web 2.0 sites, online forums, and others that contain keyword-relevant posts. To ensure the right content, the module allows you to view the articles it has sourced for you to see that they match your preferred topics and keywords. If satisfied, you go on to publish them.
6. The Publish Content Module
It’s a text editing tool that Market Samurai creators incorporated into the software to help with the publishing of content. The module is almost similar to the the usual Microsoft Word editor that you use on windows. However, this particular one comes optimized for WordPress posts.
To use this tool, you enter your WordPress credentials to log in to your site from Market Samurai after which you can copy and publish your content without any additional requirements. You can even add images and links. What’s more, the software stores a copy of the content in your computer so you can retrieve it if the need for that arises.
7. The Promotion Module
You’ve already identified the content to post and gone ahead to publish it. Now the task is to promote it to attract the relevant traffic. This tool helps you to do that by finding the sites to link to automatically. Using the module, you can create backlinks that would significantly boost your website’s ranking and traffic. You can choose to create those backlinks automatically, or you can generate the list of the relevant websites and do that manually.
8. The Rank Tracker Module
After you’ve researched keywords, selected the most suitable ones, published and promoted your content, you may need to track the performance. This part of the program offers a way to monitor all your keyword and page rankings in different search engines such as Google, Bing, and Yahoo. To enable this feature, you need to add your domain names alongside the keywords you’re looking to rank for. The software then uses that to track your standings.
The rank tracking module allows you to view current and past positions. That enables you to build a graph of your progress and understand how your website or business is doing in an easier way. Using this tool, you can determine the speed of your campaigns and determine whether everything is working out as anticipated or not.
Other Features of the Software
Apart from the tools that make up Market Samurai, there are the pages within the software that are worth mentioning. There’s the tab that takes you to the video tutorials. There are plenty of the guides there explaining everything from how to get started with the software to the instructions on the useage of the various features.
There’s also the support section where you can get all your questions regarding the software and its usage answered. You get access to FAQs on a tab named “knowledge base,” and a place to click and contact the customer care desk. While there may not be much to complain about when using Market Samurai, their support section lacks the convenience of making a phone call. You can only contact them online by submitting a ticket for your queries.
The Cost to Acquire Market Samurai
The standard price for MS is $149. However, you can act smart and take advantage of the discount that comes with the free trial. To get that, sign up for the 12-day free version of Market Samurai. You will get the offer to purchase the software for $97 before the first 5 days. That’s a cool $52 off the normal price.
One thing worth noting is that the price you pay to acquire MS is a one-time fee. You don’t pay anything more after that, yet you get to use all the features of the software for until you no longer need it- and which is almost unlikely. That’s in contrast with many SEO tools that subject you to a monthly or yearly fee. The price of Market Samurai is also competitive given the much you can achieve with the tool when compared to similar ones on the market.
Getting Started on Market Samurai
Market Samurai offers no challenge to use. You start by registering on the platform and paying the one-time fee of $149 or signing up for a free trial. You will then get mail that contains the link for Market Samurai download. The program requires you to have Adobe Air installed in your computer to run. Once you’ve performed the download and installation, entering your email and the activation key opens the program.
The first step involves entering your project name after which a new window pops up indicating the features the software offers. You can then proceed to generate keywords, filter them out according to suitability, research the markets and many other functions.
My Opinion of Market Samurai
Just like many other Market Samurai reviews, my opinion of the software is a positive one. I find it a complete package for anyone looking to advance their campaigns to rank high and boost traffic, regardless of whether they’re new in the world of internet entrepreneurship or not. The software contains every tool that’s required for keyword research and evaluation, backlinking automation, and other functionalities. Here is a summary of what I like about the program.
The Fast Results
Many of the people who use Market Samurai achieved results quickly. That’s attributable to the software’s ability to determine the keywords and markets that offer the best and most promising opportunities. Market Samurai also offers you a way to monitor your progress, and you can change tact in time to avoid what’s not working and adopt what provides results.
The Simple Interface
There’s no clutter, no ambiguous tabs, and no lengthy procedures. It doesn’t take time to master the usage of the platform which is an advantage when you’ve just downloaded it and don’t have a lot of time to sit through tons of tutorials. It’s a platform that I find suitable for those looking for a great SEO tool but one that’s not difficult to use.
The Innovative Rank Tracker
With Market Samurai, you do not track your rankings manually- and which can be hard work that also takes a lot of your time. The way the software does that for you is impressive and one of the many reasons I prefer Market Samurai over other keyword tools.
The Ability to Export Data to other Software
Market Samurai allows you to utilize and view the data it collects on other programs. You can export information about ranking and keyword competition to Excel and create useful graphs that provide a more convenient way to assess the data.
The Affordable Price
The fact that there are no monthly or yearly payments for the software is itself a plus, while the fair price of $149 is quite a bargain. That you can get Market Samurai for a discounted price of $97 is one of the reasons why you should consider signing up for a download.
The Windows and Mac Compatibility
Many of the SEO tools that I have come across are only compatible with the Windows OS. This one works on Mac machines as well. It means you won’t need to download any additional software if you use an Apple’s Mac computer.
The Personalized Support
Questions regarding the usage if the software or any other information are answered through email. While many would think this to be a bit slow when compared to a call or chat, I find it an advantage in some ways. The response you get is personalized and thorough, plus you always have the reference at your fingertips whenever you get stuck again.
What I Would Love to See Improved
Market Samurai is an excellent tool with many great features to help you improve your online presence and boost profits. However, it has its shortcomings which I will enumerate below.
The Slowness
That’s what many users experience when using MS especially when a module has to retrieve a vast amount of data. The software’s speed can be influenced by the type of machine you use and the quality of your internet connection, though, and you would need to take care of that. However, I still believe the creators of the software could do something to improve its performance in terms of speed. If you’re unable to resolve the problem at once, you could use this trick which has worked for many;
Avoid bombarding the software with too many requests at once. The best way to do that would be to divide your project into bits and feed those into the software one at a time. That way, the amount of data to be processed would be minimal and in line with the ability of both the software and your computer. Also, in resonance with the speed of the internet connection in your area of residence.
Final Comments
Market Samurai is a great tool to use for your keyword research and assessment. The software offers that and more, making your SEO efforts effective to the highest degree. It allows you to assess the markets for keyword relevance, competition, and other useful data. That helps you to avoid wasting your time and resources on projects that won’t bring results while maximizing on those that are likely to succeed.
Market Samurai is simple to use, with straightforward procedures to execute your SEO projects; from market and keyword research, domain acquisition, content publishing, to the promotion and results monitoring. The dashboard is less cluttered and beginner friendly. Besides that, you get access to audiovisual user guides that leave no stone unturned when it comes to the tutorials on using the program. The price is fair, too, and won’t harm your finances. If you’re a niche or affiliate marketer looking to build a profitable online business, I would recommend that you try out Market Samurai. It has helped many online business owners achieve the results they wished for.
from Internet Marketing Aficionado https://internetmarketingaficionado.com/comprehensive-market-samurai-review-the-evergreen-keyword-research-tool/
0 notes
Photo

how to remove view web version widget from blogger? https://www.helpforhindi.in/2019/01/remove-view-web-version-button-in-blogger.html https://www.instagram.com/p/BzBYpOgn5Tb/?igshid=hg2ob4kamhhg
0 notes
Text
Norton.com/setup | Secure your Device with Norton | Norton setup
Norton.com/setup holds the top position among the other cybersecurity leaders in the world. It offers highly advanced antiviruses and security software that help computer users to protect their data against cyberattacks, privatized their identity, and roam around the digital world freely. To meet the diverse security requirements of individuals and businesses, Norton.com/setup offers a range of antiviruses and security services.
You can view them all by visiting the Norton website www.norton.com setup. What’s common in all the Norton antiviruses is that they all need to be downloaded, installed, and activated on the device. One mandatory thing that is required to perform these three operations is the Norton setup enter product key. You get this key with your purchase, no matter online or offline.
So, if you have already redeemed this Norton setup enter product key and want to know the steps to download, install, and activate the security product, then check out the information given below:
Pre-requisites to Norton Setup install
Even if you have a Norton Setup Enter product key ready (which is required for the download and activation of the antivirus), there are a few more factors that should be taken into consideration. These are:
Storage space- Make sure your Windows, Mac, Android, or iOS device has sufficient storage space to accommodate Norton setup file and the antivirus.
Turn off the firewall- If you are downloading the antivirus on a Windows PC, then it is recommended to turn off the Windows firewall for a while to avoid any issue. (Don’t forget to turn it on after Norton installation)
Remove previously installed antivirus- Make sure your system has no antivirus or security software installed on it. If it has, then remove or uninstall it.
System Requirements- Verify whether your system meets the required specifications or not.
Steps to Download Norton Setup
Open any web browser and visit norton.com/setup
Enter the 25-character product
Sign in to your Norton Account with the registered email ID and password
If you don’t have a Norton account, then click Create a new account at Norton.com/setup
Provide the details required for Norton account sign up
Click Sign up to finish
Now, click the Download button
Wait until the download process finishes!
Steps to Install Norton Setup
Depending on your web browser, do any of the following:
Internet Explorer or Microsoft Edge browser: Click Run
Mozilla Firefox or Safari: Double-click the downloaded file from the download folder
Google Chrome: Double-click the setup file that you downloaded
In the User Account Control Wizard, click Continue
Read the license terms and conditions
Hit continue
Wait until the installation finishes!
Steps to Activate Norton Setup
Open the installed Norton antivirus
In the Main Window, click Help
Enter the Norton activation key
Follow the on-screen instructions, and click Activate
If you see an activation notification in the notification panel, then simply clickthat. Enter the product key and click Activate.
How to download Norton Setup for free?
In case, if you want to download a free trial version of the Norton antivirus, then implement the below-mentioned steps:
Go to the Norton website
Search for the Norton product you want to avail a 30-days trial of
Please note that not every Norton antivirus has a trial version. Therefore, you have to choose from the list of products that are available for the same.
Click “Get a free trial version”
Let the Norton setup download
Now, run the setup file
Follow the instructions displayed on the screen to install the antivirus
You are good to go!
No Norton activation key is required when you install a Norton 30-days free trial version. This version will remain active for one month only.
from Blogger http://quicksolvocom.blogspot.com/2020/07/nortoncomsetup-secure-your-device-with.html
0 notes
Text
Sitka - Modern WordPress Blog Theme
New Post has been published on https://intramate.com/wordpress-themes/sitka-modern-wordpress-blog-theme/
Sitka - Modern WordPress Blog Theme
LIVE PREVIEWGet it now for only $59
Meet Sitka. Our most powerful theme yet.
Chock-full of customization options yet effortlessly intuitive, Sitka is the perfect tool for WordPress beginners and seasoned bloggers alike. Wielding a wealth of interchangeable layouts, complete color & font options, numerous striking featured area designs, and much more, Sitka’s style possibilities are virtually endless. Travel, lifestyle, food, or fashion, Sitka’s flexibility makes it the ideal companion regardless of your passion. From bold to airy, minimal to dramatic, Sitka does it all.
GUTENBERG READY
Sitka is fully compatible with the Gutenberg block editor (WordPress 5.0+). You could even say they’re sort of a match made in heaven. Build pixel-perfect posts and pages using Gutenberg’s dynamic content block system which include exclusive Sitka stylings. Add your most frequently used colors to the Gutenberg color palette to easily access your favorite hues. Even more, Sitka includes a custom “Post Grid” Gutenberg block to artfully insert post previews of your choosing anywhere inside your posts or pages. With Sitka & Gutenberg, beautiful things happen.
1-CLICK DEMO IMPORT
Short on time or need some design inspiration? Get your site up and running lightning-fast with Sitka’s 1-click pre-built demo imports. Browse through and pick from an ever-growing portfolio of Sitka demos which showcase the nearly endless possibilities the theme can be configured into. And, with the 1-click demo importer, applying a pre-made Sitka demo to your site is literally a few clicks of the mouse away.
POST FORMATS & LAYOUTS
Frame your content spectacularly with 3 Post Format options – Standard, Video, or Gallery. Each Post Format offers specialized Post Layout options to create visual impact with various striking header styles. Further elevate the feel of each post by choosing from 3 Post Content Layouts to best suit its subject matter—Sidebar, Full-Width, or Narrow (no sidebar).
FEATURED AREA
Sitka’s featured areas pack a major punch! From elegant & understated to full-width stunners, have the first thing your visitors see be nothing short of impressive. Choose from 7 attractive featured area layouts to showcase your highlighted posts and pages.
100% RESPONSIVE
Rest assured that your site will shine on any screen or device with Sitka’s 100% responsive stylings. Want to see it in action? Visit any of Sitka’s demos (link to landing page here) via a mobile device to have the responsive experience first-hand.
BLOG LAYOUTS
Sitka includes 5 attractive blog feed layouts, many which offer further alternative styles.
Classic
1st Post Full + Grid
Grid
1st Post Full + List
List
Enable the sidebar on any layout option for a robust content feel or disable the sidebar for a more airy, wide arrangement.
WOOCOMMERCE COMPATIBLE
Dream of selling your physical or digital goods via your own webshop? With Sitka and WooCommerce, adding a shopfront to your site is a piece of cake! Exhibit your products in simple elegance with Sitka’s custom WooCommerce stylings and rest easy knowing you have the powerful WooCommerce e-commerce plugin doing the heavy-lifting.
PROMO BOXES
Promo Boxes are customizable boxes of content that include an image, title, & hyperlink of your choosing. They’re perfect as a Call-To-Action or a visual menu of sorts. Sitka’s unique Promo Boxes offer a stylish way for visitors to engage with featured content of your choosing. Easily create Promo Boxes in rows of 1-4 columns or choose its eye-catching Mixed Grid layout that’s sure to grab attention.
900+ GOOGLE FONTS
With more than 900 Google Fonts at your fingertips, easily change Sitka’s typography to suit your own type needs. Built-in font customization options make intuitively switch fonts throughout Sitka a breeze. No plugins or coding know-how needed!
TOTAL COLOR & TYPOGRAPHY CUSTOMIZATION
Sitka includes boatloads of built-in options to effortlessly change colors and text stylings throughout your site. Simply organized into theme sections, Sitka’s Customizer allows you to quickly and easily adjust theme elements’ color, font-size, font styles, and more.
PLUGIN-FRIENDLY
Sitka is fully compatible and optimized to work with popular WordPress plugins such as Yoast SEO, Contact Form 7, MailChimp for WordPress, Loco Translate, WooCommerce, and many more.
CUSTOM WIDGETS
Sitka comes with 5 unique & useful custom widgets to liven up the sidebar.
Sitka: About | A biographical widget to introduce yourself or your team. It can include an image, heading, sub-heading, text, & a signature image.
Sitka: Promo Box | A flexible image widget. Choose your desired image, title, & hyperlink. The height is adjustable.
Sitka: Post Widget | Display posts in 4 different layouts. Filter posts by a shared category or pick-and-choose specific posts to feature.
Sitka: Facebook Like Box | A widget that displays your Facebook Page details.
Sitka: Social Icons | Link visitors to your social media accounts via social icons. Set them to show in 1-5 columns.
SEO
Sitka’s coded to the latest SEO standards and is 100% compatible with the powerful & popular Yoast SEO plugin. Hand in hand, they’ll ensure your site is SEO amazing.
SUITABLE FOR ANY GENRE
It’s wealth of various layouts & customization options help make Sitka a perfect choice for any genre of content. Sitka’s broad featured areas just beg to showcase travel, food, or fashion images. The minimal, Narrow post layout is ideal for editorial or text-centric blogs. With Gutenberg’s dynamic block editor and Sitka’s custom Post Grid block, DIY & craft blogs’ creative content takes center stage. Lifestyle, technology, personal, art—whatever your passion, Sitka’s here to empower your expression.
LEGENDARY SUPPORT COVERAGE
Have questions with your theme? We’re here to help!
Sitka comes with 6-months of Solo Pine’s top-notch customer support to help you every step of the way. Feel free to visit our dedicated support site and open up a new ticket (https://solopine.ticksy.com/). All tickets are answered 365 days a year, 7 days a week.
ONLINE DOCUMENTATION
Check out our extensive online documentation
Changelog
Version 1.2.1 – February 28th, 2020
Fixed: Issue with Advanced Custom Fields Pro. If you update from 1.2 make sure you also update the Sitka Blocks plugin to 1.2.1
Version 1.2 – February 27th, 2020
New: Interior Design Demo – View Demo
New: Lifestyle Demo – View Demo
New: Header Layout – View Example
New: 2 Static Featured Areas – Create custom slides instead of using posts or pages Example 1 | Example 2
New: Option to show post header below featured image on post style 1
New: Font size setting for text logo on mobile
New: Image logo max-width setting for mobile
New: Image logo max-width setting for Header Layout 3
New: Additional color & typography settings for Promo Boxes
New: Instagram Footer title now links to Instagram account
New: Additional color & typography settings for Promo Boxes
New: Color option for border in Post Widget numbering
New: Color option for WooCommerce cart icon in header
New: Color option for border in Post Widget numbering
New: Option to hide featured image on Page style 1
New: Color option for border in Post Widget numbering
New: Font settings for Promo Box subtitle
New: Linkedin and Email share buttons now opens in a new tab
New: Added styling for WooCommerce Guteberg blocks
Fixed: Color options for Featured Area Arrows
Fixed: Cart icon now appears in the mobile menu on Header layout 3
Fixed: Changed “grid-template-rows” to “grid-auto-rows” to fix Promo box mixed layout height issue
Fixed: Removed ”#” from url when closing mobile menu
Fixed: Reduced top spacing on post layouts
Fixed: Gallery Block spacing issue
Fixed: Custom color palette not working for Heading Block
Fixed: If page is very short, Footer now stays at the bottom of the page
Fixed: Instagram Footer title reduced font size on mobile
Fixed: Added web-kit-appearance: none to submit buttons
Fixed: Only execute sticky.js if exists
Fixed: Added font-display:swap to FontAwesome
Fixed: Image Block Right Align margin issue
Fixed: Reduced margin between menu and some featured area layouts
Fixed: Added height auto to image logos
Fixed: Added web-kit-appearance: none to submit buttons
Fixed: Font size on image/gallery block captions
Update: Sitka Core plugin
Update: Sitka Blocks plugin
Version 1.1 – November 13th, 2019
New: Lifestyle Demo – View Demo
New: Promo Box Gutenberg Block – View Example
New: Color options for tags
New: Email social icon
New: Option to hide related post date
New: Option to set max width on footer logo
New: Option to change burger menu icon color
Fixed: Post widget big thumbnails
Fixed: Widget title spacing in Facebook and Search widgets
Fixed: Missing shop cart icon in header layout 2 & 3
Fixed: Missing function_exists around functions
Fixed: Footer spacing if no footer menu was assigned
Updated: Latest Advance Custom Fields PRO v5.8.7
Version 1.0.1 – October 24th, 2019
New: Option to hide/show elements on Grid and List Post layouts
New: A child theme folder to the Sitka download package
Fixed: Footer spacing if footer logo is deactivated
Fixed: Instagram footer spacing
Fixed: Issue where icons would not show if using a child theme
Fixed: Responsive video embeds if using classic editor
Fixed: Featured area images are now clickable
Updated: Latest Advance Custom Fields PRO v5.8.6
Thanks for checking out Sitka!
Feel free to contact us with any questions you may have. You’re the reason we’re here! We love any and all constructive feedback and even folks dropping in just to say hello.
If you love Sitka as much as we know you will, please remember to star rate it via your Downloads page!
Want to stay in touch?
Subscribe to our newsletter for releases & sales
Follow us on Facebook
Follow us on Twitter
Follow us on Instagram
LIVE PREVIEWGet it now for only $59
0 notes
Text
Adobe Dreamweaver CC 2020 Free Download
Adobe Dreamweaver CC 2020 Free Download Latest Version for Windows. The program and all fi
les are checked and installed manually before uploading, program is working perfectly fine without any problem. It is full offline installer standalone setup of Adobe Dreamweaver CC 2020 Free Download for supported version of windows.
Adobe Dreamweaver CC 2020 Overview
Adobe Dreamweaver CC a new version of the application designed to create professional websites. Software for web design Adobe Dreamweaver CC contains an intuitive visual interface that allows you to create and edit websites and mobile applications. Use “Fluid Grid Layouts” with cross-platform support for creating web pages. Before publishing, view the created layouts in the multiscreen viewport. You can also download ON1 Photo RAW 2020 14.
Responsive websites. Really fast. Dreamweaver CC gives you faster, easier ways to design, code, and publish websites and web applications that look amazing on any size screen. Quickly create and publish web pages almost anywhere with web design software that supports HTML, CSS, JavaScript, and more. You also may like to download Geometric NestingWorks 2019 SP2.0 for SOLIDWORKS.
Features of Adobe Dreamweaver CC 2020
Below are some amazing features you can experience after installation of Adobe Dreamweaver CC 2020 Free Download please keep in mind features may vary and totally depends if your system support them.
Download large files even faster with the advanced FTP data transfer tool. Save time when sending bundles of related files to publish projects.
“Rubber” layout. Create complex web publications and layouts without having to write numerous lines of code. “Rubber” layout – a dynamic tool for creating projects that change in accordance with the size of the screens of desktop computers and devices.
Integration with Adobe Business Catalyst. Use the integrated Business Catalyst palette in Dreamweaver software to connect and edit Web sites created in
Adobe Business Catalyst (purchased separately). Create e-commerce websites using a server solution.
Support for the mobile environment jQuery Mobile. Add complex interactive elements using jQuery code hints. jQuery makes it easy to add interactive elements to web pages. Quickly create websites with predefined templates for mobile phones.
PhoneGap support. Create and link original Android ™ and iOS applications with the new functionality of Adobe PhoneGap. Convert HTML code to mobile phone applications in Dreamweaver using the PhoneGap environment. Test the layouts with the emulator included in the package.
CSS3 transitions. Create an animation when you change the values of CSS properties, using transitions that allow you to create dynamic layouts. Use the ability to accurately control the development of Web projects when customizing page elements and creating expressive effects.
Interactive view. Check the pages before publishing using the WebKit rendering engine with support for HTML5 content. Create layouts that appear in the same quality in different browsers.
The Multi-Screen View pane. Create projects for smartphones, tablets and desktops using the panel “Multi-screen viewing”. Use media query support to create styles and visualize layouts on different devices.
New code editor. Create code even faster with a new, more flexible coding engine. Code hints help new users learn HTML, CSS, and other web standards, and visual tools such as automatic indenting, code highlighting, and changing font size help avoid errors and make it easier to read the code.
The working environment of the developer. A new working environment for developers with improved performance and an optimized interface speeds up the loading and opening of files and simplifies the work with projects.
Support for pre-processing CSS. Dreamweaver now supports basic CSS preprocessing tools, such as SASS, Less and SCSS. Functions such as highlighting the entire code with color, code hints, and compilation help save time and improve code quality.
Preview in the browser in real time. You no longer have to manually update the browser page – all changes are immediately displayed on the page.
Editing CSS while working with HTML. The new Quick Edit feature allows you to open the built-in CSS editor when working with an HTML file and quickly make the necessary changes.
Contextual documentation of CSS. The new Quick Help feature helps save time by displaying help documentation for the web platform with a description of the CSS properties directly in the Code view.
Multiple cursors for repetitive tasks. Now you can simultaneously write several lines of code to perform tasks such as creating bulleted lists, and to update or change several lines at once.
Modern interface. The interface Dreamweaver was optimized, taking into account the comments of thousands of users who participated in the beta test. A new, more intuitive, customizable interface provides quick access to menus and panels and includes a customizable context toolbar where only the necessary icons are displayed.
Color themes of the user interface. For ease of reading and editing the code, you can choose from four levels of contrast, from light to dark.
Improvements to Creative Cloud Assets. Backup and restore, add comments and view the version history of all of your Creative Cloud resources, mobile projects, files in Creative Cloud libraries, and resources created in CC applications for desktop computers.
Integration with the Typekit Marketplace. Get fonts from leading designers and use them in your Dreamweaver projects. Typekit supports the synchronization of fonts and web technologies that allow you to access the Marketplace fonts from any application and on any device.
System Requirements for Adobe Dreamweaver CC 2020
Before you install Adobe Dreamweaver CC 2020 Free Download you need to know if your pc meets recommended or minimum system requirements:
Operating system
Intel® Pentium® 4 or AMD Athlon® 64 processor
Microsoft® Windows® 7 with Service Pack 1, Windows 8 or Windows 8.1
1GB of RAM
1GB of available hard-disk space for installation; additional free space required during installation. Cannot install on removable flash storage devices
1280×1024 display with 16-bit video card
(Java™ Runtime Environment 1.6 (included
Adobe Dreamweaver CC 2020 Technical Setup Details
Software Full Name: Adobe Dreamweaver CC 2020
Setup File Name: PcWonderland.com_Adobe_Dreamweaver_2020_20_x64.zip
Size: 1 GB (because of constant update from back-end file size or name may vary)
Setup Type: Offline Installer / Full Standalone Setup
Compatibility Architecture: 64Bit (x64)
Adobe Dreamweaver CC 2020 Free Download
Click on below button to start Adobe Dreamweaver CC 2020 Free Download. This is complete offline installer and standalone setup for Adobe Dreamweaver CC 2020. This would be compatible with compatible version of windows.
How to Install Adobe Dreamweaver CC 2020
Extract the zip file using WinRAR or WinZip or by default Windows command.
Open Installer and accept the terms and then install program.
If you have any problem you can get help in Request Section.
How to Download Adobe Dreamweaver CC 2020
Click download button below and you will be redirected to next page.
On next page you need to wait for 10 seconds to get download button.
Click on download now button to start your download.
Enjoy and bookmark our website, visit us daily for latest and quality downloads.
If you have any software request, you can post it in our Request Section
via Blogger https://ift.tt/2N9xTyd
0 notes
Text
5 reasons why general software updates and patches are important
5 reasons why general software updates and patches are important

You’re probably no stranger to those little pop-up windows. They tell you software updates are available for your computer, laptop, tablet, or mobile device.
You might be tempted to click on that “Remind me later” button. Don’t do it. Or, at least don’t put off updating your software for long.
Software updates are important to your digital safety and cybersecurity. The sooner you update, the sooner you’ll feel confident your device is more secure — until the next update reminder.
Why are software updates so important? There are a lot of reasons. Here are 5 that show why it’s important to update software regularly.
1. Software updates do a lot of things
Software updates offer plenty of benefits. It’s all about revisions. These might include repairing security holes that have been discovered and fixing or removing computer bugs. Updates can add new features to your devices and remove outdated ones.
While you’re at it, it’s a good idea to make sure your operating system is running the latest version.
2. Updates help patch security flaws
Hackers love security flaws, also known as software vulnerabilities. A software vulnerability is a security hole or weakness found in a software program or operating system. Hackers can take advantage of the weakness by writing code to target the vulnerability. The code is packaged into malware — short for malicious software.
An exploit sometimes can infect your computer with no action on your part other than viewing a rogue website, opening a compromised message, or playing infected media.
What happens next? The malware can steal data saved on your device or allow the attacker to gain control over your computer and encrypt your files.
Software updates often include software patches. They cover the security holes to keep hackers out.
3. Software updates help protect your data
You probably keep a lot of documents and personal information on your devices. Your personally identifiable information — from emails to bank account information — is valuable to cybercriminals.
They can use it to commit crimes in your name or sell it on the dark web to enable others to commit crimes. If it’s a ransomware attack, they might encrypt your data. You might have to pay a ransom for an encryption key to get it back. Or, worse, you might pay a ransom and not get it back.
Updating your software and operating systems helps keep hackers out.
4. It’s not all about you
OK, cybersecurity is mostly about you, but you’ve got other people to think about, too. If your device gets a virus, you could pass it on to your friends, family, and business associates. That’s why you want to keep your software and systems updated.
A trusted security program such as Norton 360TM can help keep your devices secure. And that can potentially help all those people you interact with online. But it’s also important to know anti-virus protection isn’t enough to protect your devices against all cyberthreats
5. You deserve the latest and greatest
Updates not only patch security holes, but they can also add new features and improve existing ones. You don’t want to fall behind the times, right?
In that way, software updates really are all about you. Your software program may get a new shot of stability — no more crashing. Or an update might boost program performance — more speed. You deserve no less.
You could ignore those reminders to update your software, but you might be missing out on a lot, starting with your cybersecurity.
Another option? If you’re still not keen on clicking “Update now,” you may be able to configure your devices to update automatically. If so, your problem is solved.
via Blogger https://ift.tt/31cMRuX
0 notes
Link
Для владельцев форума на phpBB2 актуальны всякие нужные и полезные моды и примочки. Особенно востребованны моды загрузок, чата на профиль и для постинга. Есть всякие моды на форум phpBB2 и можно их скачать.
Если поискать по запросам:
топ загрузок мод в phpBB2
Fully Modded phpBB2
AutoMod (RUS)
File Attachment Mod phpBB2
Users Online Displayed on Site
Full Album Pack версии 1.4.1
Show Online In View Topic
Top Posters on Index
Who is active in which forum - Index
60_min_time_online
Add Last User Visit Date to Members List
ADD LAST USER VISIT DATE TO USER PROFILES
Add Site Index and Preview Site Index to Admin Navigation
Admin add users
Admin Hacks List Textfield
Admin Hacks List Xtra's
Admin ignore board disabled
Admin Registration Notify
Admin Userlist
Admin Voting
Admin_delete_user_with_all_postings_v.1.0.5
Admin_Email_List
Admin-Mods List Page
Advance Admin Index Stats
Advance Meta Tags
Advance Signature Divider Control
Advanced ACP
Advanced Board Disable
advanced closing after X posts mod
Advanced Countdown
Advanced forum rules
Advanced Karma Mod
Advanced Poll Icon
Advanced Report Hack
Advanced site map hack
Advanced User Search
advanced_post_time_edit_1_0_0
ALLOW GUEST VOTING
Always show 'edited by' 0.0.3
Arcade_Activities MOD
Attachment Mod Addon (View Attachments)
attachment_mod
Auto Activate Main Admin Account
Auto Un-ban Main Admin
Auto-Refresh Forum
Avatar Database Store & Resize
Avatar in memberlist
Avatar on index
Background Sound
Ban reasons
BasketBallGame
BBBorder
BBCode Buttons Organizer
BBcode center
BBcode Fade
BBcode Flip
BBCode Forumssearch
BBCode in forum Description
BBcode Scroll Left_Right_Up_Down
BBCode StrikeThrough
BBCode Sup & Sub
Bin Mod
Birthdays
Blogger Comments Hack
Board Login Info
Capitalization MOD v 1.02 UPDATED
Cash Mod
Categories Hierarchy
Change Forum Banner URL + link
Change forum version using ACP
Change Poster Mod
Changes the register form to prevent spam bots
COLOR GROUPS
Color Poll
Color Search for phpBB 2.0.10
Complete Header Mod
Config Secure
Config.php Protect
config_gen
Configurable online tracking time
Control Guests at ACP
Cool letters
Copy Post to Clipboard (never let the site eat a post)
Counter user access to a box of forum
Cpanel
CPanel User Email Account Signup
CRICCA-GUESTBOOK
Custom mass PM
Custom registration form
Custom.Registered.Email
Custom_Title_for_Quote_Boxes_1.3.3
Dales Signature MOD
DB MAINTENANCE MOD 1.3.8
db_update generator
DBQuery (DBQ) MOD
dead_link_check_1.0.1
Delete All Smileys
Digital Countdown MOD
display forum description in viewforum.php
Display Pagerank by URL
DISPLAY POSTER INFORMATION ONCE
display_first_message_as_title_v.1.1.0
Display_Usersonline
Double post merge
Easy Announce
Edit Post Date
Edit user posts via ACP
Edit_Attachments
Edit-Reason
email_on_errors_1.0
Enhanced Admin User Lookup
Enhanced IP Logger
Enhanced Poll
Error Redirect
External Forum Redirect version 2
ezPortal Box - Album stats
ezPortal By smartor
Fast Move
Feedback Mod
FileAnchor Mod
Filter Hack
Firefox Bypass
Fix Session Error
Flash banner for phpbb2
Force Email Update
Forum Clock
forum name under topic title in search result
Forumtitle as Weblink
FrEaK n l33t posting filter
Fully integrated shoutbox
Fully integrated shoutbox - Color Groups Add on
Geektools IP Whois
gitme
Give main admin authority back
global_announcement_1.2.9em
Glow and Shadow effects BBcode Hack
GoBack-link at error
google
Google AdSense Block
Google Bot Detector
Google Search BBCode
Google Visit Counter
Goto specific page
Gravatars
Group ModeratorZ
GuestReadPart
guestvote_mod
Hack List
Hidden Login
Hide Links
Host_My_Signature_1.0.1
how many days registered
Image in Ranks List MOD
image libre de droit
Image Resizer 4 Attachment Mod
image_attachment_table_gone
Include sender's name in private message notification
Indicate pictures
instant_post_redirect_1.3.0
Invisible Switch
keep unread
Last x hours registrations
last_5_registered_users
last_visit_1.2.10em
LatestUserStats
Links
Links on Index MOD
ListUsers MOD
Lock-Unlock in Posting Body
Main Admin Security
Make posted URL's Be underlined
members per memberlistpage
Minimum And Maximum Post Message Length
Mobile Online phpBB
mod-CH_214d_installed
MOD-keep_unread
mod-rss_feed
MOVE AVATAR GALLERY OUTSIDE PHPBB ROOT PATH
Move Message Overview
multiforums100
Multiple BBCode MOD
Multiple File Upload
Multiple_choice_voting_1.0.0
mw3 (Prevent Any Layout From Being Broken)
Name, Rank & Avatar in Center
NO THREAD STRETCH
Null Vote
Number Format Total Posts
Optimize Database
Page Fade mod
Page generation time for Admin only
Password Protection
Password security
Password-protected forums 0.5.1
Password-protected topics 0.2
Paypal Donation Block on ez portal
permissions_in_forum_management
php_SlideShow
PhpBB - OnMouseOver Hack
phpBB 2.0 style HTTP error messages
phpBB Blog
phpBB Database Cleaning
phpbb member webpage
phpBB Menu Manager
phpBB Search Engine Indexer
phpBB Wap Mod version 3.0BETA
phpBBlog
phpBBToGo
Play a sound when you get a new private message
PM Export
PM Info in Browser Status Bar
PM Notification Enhancer v1.0.1
pm_quick_reply
Portal Index on ACP Index
POST ASSOCIATOR
Post Count Resync
Post Remover
post_move_instead_deleting_1_0_1
Postmessage with a Flash Sound
ranking
ranks_in_faq_v1_0_2
Recent Topics (extended variation)
Refresh Mod
Register link on Login Page
Remove Signature From Guests
Report Posts
Resend Activation
Resize_Remote_Avatars_v1.1.2
Resync Forum Statistics
rss_feed.mod
Rules Management
Save Admin Userlist Sort Order
Search Engine Results
Search the Web MOD v3.0.0
Search Within FAQ
search_[un]lock
Serienboard - Spoiler BBcode Mod
Server Load Mod
Server Reponse Mod
Session Repair
Show Forum ID
Show Online In View Topic
Signature BBCode Controller
Signature Preview
Simple Quick Reply MOD
Simply Merge Threads
Site warning
SmartFeed
Smartor's Editor for phpBB2
Smilies Dropdown Menu MOD
Smilies Packager v0.5
smilies_list
Sms Sender
Split topic type
Stand Out Announcements!
Statistics Modification, Queries, Execution Time And GZIP Compression
Statistics_Mod
stats_&_info
Stickes to Pinned
Submit once
sudoku_1_0_4
Teampage
Template_make_filename Message Fix
Temporary_Membership_on_usergroups_1_0_1
Tic Tac Toe
Title bar and status bar scrolling message MOD
Top points on index or ezPortal
Top Posters on Index
Topic Description
Topic Start Date In Mod CP
Topiccount
Unhide MOD
Unincrement user posts
UploadPic
Useravatar_in_GroupCP
Username in modcp
Username or Email 1.0.4 Final
VB Style Quoting
vBulletin Style DHTML Menu
View Single Post
View you own profile (ezPortal add-on)
Vote in Locked Polls
wap_emulator_1.0.0
Weather Block
Who is active in which forum - Index
Without Underlining Nick MOD
Word Counter Button
WPM
Wrap Messages Mod
XtraColors
то можно найти все эти можно по определенным порталам посвященным именно поддержке владельцам phpBB2. Именно там можно скачать моды phpBB2, шкурки, ленгпаки, надстройки, а также набор смайликов.
Предоставляю вам сайты, где можно скачать все все все:
http://torrentpier-download.ru/
Вы ищите моды, иконки, смайлики для чатов и трекеров, шаблоны и, наконец, сами движки torrentpier?
Тогда Вы попали в нужное место. Можно скачать! Можно почитать как установить!
Хотите себе торрент-трекер и не знаете с чего начать?
У нас есть форум поддержки torrentpier, где есть моды, разнообразные скрипты и примочки для ваших проектов.Есть поддержка начинающим и бывалым. Есть собственные разработки вебдизайнеров. Есть описания выложенных движков и наборов смайликов. Собственный файловый архив (прямая ссылка скачать) движков, модов, шкурок, смайликов.
Кстати: на нашем форуме поддержки torrentpier вы найдете уникальные моды для форумов на phpBB2 и для трекеров 0.3.5 и SVN версий
http://torrentpier.bloginmydreams.ru/
Файловый Архив TorrentPier. Скачать движки phpBB2, торрентпиер и svn
0 notes
Text
Beginner’s Guide to Image SEO – Optimize Images for Search Engines
Are you looking to improve image SEO on your website? When optimized properly, image search can bring many new visitors to your website.
To benefit from image SEO, you need to help search engines find your images and index them for the right keywords.
In this beginner’s guide, we will show you how to optimize image SEO by following top best practices.
Here is a brief overview of what you’ll learn in this article.
Optimizing your images for SEO and Speed
What is Alt text?
Difference between Alt text vs title
Difference between alt text and caption
How to add alt text, title, and caption to images in WordPress
When to use captions for images
Disable attachment pages in WordPress
Additional tips to improve image SEO
Optimizing Your Images for SEO and Speed
Speed plays an important role in SEO and user experience. Search engines consistently rank fast websites higher. This is also true for the image search.
Images increase your overall page load time. They take longer to download than text, which means your page loads slower if there are several large image files to download.
You need to make sure that images on your site are optimized for web. This can be a little tricky to get used to since many beginners are not experts in graphics and image editing.
We have a handy guide on how to properly optimize images before uploading them to your website.
The best way to optimize images is by editing them on your computer using a photo editing software like Adobe Photoshop. This allows you to choose the right file format to create a small file size.
You can also use an image compression plugin for WordPress. These image optimizer plugins allow you to automatically reduce file size while uploading an image to WordPress.
What is Alt Text?
Alt text or alternative text is an HTML attribute added to the img tag which is used to display images on a web page. It looks like this in plain HTML code:
<img src="/fruitbasket.jpeg" alt="A fruit basket" />
It allows website owners to describe the image in plain text. The main purpose of the alternate text is to improve accessibility by enabling screen readers to read out the alt text for visually impaired users.
Alt text is also crucial for image SEO. It helps search engines understand the context of the image.
Modern search engines can recognize an image and it’s content by using artificial intelligence. However, they still rely on website owners to describe the image in their own words.
Alt text also accompanies images in Google image search, which helps users understand the image and improves your chances of getting more visitors.
Usually, alt text is not visible on your website. However if an image is broken or cannot be found, then your users will be able to see the alternate text with a broken image icon next to it.
What is the Difference Between Alt Text vs Title
Alt text is used for accessibility and image SEO, while title field is used internally by WordPress for media search.
WordPress inserts the alt tag in the actual code used to display the image. The title tag is stored in the database to find and display images.
In the past, WordPress inserted the title tag in the HTML code as well. However, it was not an ideal situation from the accessibility point of view, which is why they removed it.
What is the Difference Between Alt Text vs Caption
The alt text is used to describe the image for search engines and screen readers. On the other hand, the caption is used to describe the image for all users.
Alt text is not visible on your website while captions are visible below your images.
The alt text is crucial for better image SEO on your website. The caption is optional and can be used only when you need to provide additional information about the image to website visitors.
How to Add Alt Text, Title, and Caption to Images in WordPress
Alt text, title, and caption make up the image metadata that you can add to images when uploading them into WordPress.
When you add an image using the default image block, WordPress allows you to add caption and alt text for the image.
It automatically generates a title for the image from the file name. You can change the title by clicking on the edit button in the image block’s toolbar.
This will bring up the media uploader popup where you can enter your own custom title for the image.
You can also edit the alt tag and title for the images that you have already uploaded to WordPress. To do that, you need to visit Media » Library page and locate the image you want to edit.
Simply clicking on an image will bring up the attachment details popup where you can enter title, alt text, and caption.
Note: Changing an image’s alt tag or caption via Media Library will not change it in the posts and pages where the image is already used.
When to Use Captions for Images in WordPress
Captions allow you to provide additional details for an image to all your users. They are visible on the screen for all users including search engines and screen readers.
As you may have noticed that most websites don’t normally use captions with images in their blog posts or pages. That’s because captions are often not needed to explain an image.
Captions are more suitable in the following scenarios:
Family or event photos
Photos that need additional explanation describing the background story
Product image galleries
In most cases, you would be able to explain the image in the article content itself.
Disable Attachment Pages in WordPress
WordPress creates a page for all images you upload to your posts and pages. It is called the attachment page. This page just shows a larger version of the actual image and nothing else.
This can have a negative SEO impact on your search rankings. Search engines consider pages with little to no text as low quality or ‘thin content’.
This is why we recommend users to disable the attachment pages on your website.
The easiest way to do this is by installing and activating the Yoast SEO plugin. For more details, see our step by step guide on how to install a WordPress plugin.
Upon activation, it automatically turns off attachment URLs. You can also manually turn off attachment pages in WordPress by visiting SEO » Search Appearance page and clicking on the Media tab.
From here, make sure that the ‘Media & attachment URLs’ option is set to ‘Yes’.
If you are not using Yoast SEO plugin, then you can install the Attachment Pages Redirect plugin. This plugin simply redirects people visiting the attachment page to the post where the image is displayed.
You can also do this manually, by adding the following code to your theme’s functions.php file or a site-specific plugin.
function wpb_redirect_attachment_to_post() { if ( is_attachment() ) { global $post; if( empty( $post ) ) $post = get_queried_object(); if ($post->post_parent) { $link = get_permalink( $post->post_parent ); wp_redirect( $link, '301' ); exit(); } else { // What to do if parent post is not available wp_redirect( home_url(), '301' ); exit(); } } } add_action( 'template_redirect', 'wpb_redirect_attachment_to_post' );
Additional Tips to Improve Image SEO
Adding alt tag is not the only thing you can do to improve image SEO. Following are a few additional tips that you should keep in mind when adding images to your blog posts.
1. Write descriptive alt text
Many beginners often just use one or two words as alt text for the image. This makes the image too generic and harder to rank.
For example, instead of just ‘kittens’ use ‘Kittens playing with a yellow rubber duck’.
2. Use descriptive file names for your images
Instead of saving your images as DSC00434.jpeg, you need to name them properly. Think of the keywords that users will type in the search to find that particular image.
Be more specific and descriptive in your image file names. For example, red-wooden-house.jpeg is better than just house.jpeg.
3. Provide context to your images
Search engines are getting smarter every day. They can recognize and categorize images quite well. However, they need you to provide context to the image.
Your images need to be relevant to the overall topic of the post or page. It is also helpful to place the image near the most relevant text in your article.
4. Follow the SEO best practices
You also need to follow the overall SEO guidelines for your website. This improves your overall search rankings including image search.
5. Use original photographs and images
There are many free stock photography websites that you can use to find free images for your blog posts. However, the problem with stock photos is that they are used by thousands of websites.
Try to use original photographs or create quality images that are unique to your blog.
We know that most bloggers are not photographers or graphic designers. Luckily, there are some great online tools that you can use to create graphics for your websites.
We hope this article helped you learn about Image SEO for your website. You may also want to see our guide on how to fix common image issues in WordPress.
If you liked this article, then please subscribe to our YouTube Channel for WordPress video tutorials. You can also find us on Twitter and Facebook.
The post Beginner’s Guide to Image SEO – Optimize Images for Search Engines appeared first on WPBeginner.
😉SiliconWebX | 🌐WPBeginner
0 notes
Text
Beginner’s Guide to Image SEO – Optimize Images for Search Engines
Are you looking to improve image SEO on your website? When optimized properly, image search can bring many new visitors to your website.
To benefit from image SEO, you need to help search engines find your images and index them for the right keywords.
In this beginner’s guide, we will show you how to optimize image SEO by following top best practices.
Here is a brief overview of what you’ll learn in this article.
Optimizing your images for SEO and Speed
What is Alt text?
Difference between Alt text vs title
Difference between alt text and caption
How to add alt text, title, and caption to images in WordPress
When to use captions for images
Disable attachment pages in WordPress
Additional tips to improve image SEO
Optimizing Your Images for SEO and Speed
Speed plays an important role in SEO and user experience. Search engines consistently rank fast websites higher. This is also true for the image search.
Images increase your overall page load time. They take longer to download than text, which means your page loads slower if there are several large image files to download.
You need to make sure that images on your site are optimized for web. This can be a little tricky to get used to since many beginners are not experts in graphics and image editing.
We have a handy guide on how to properly optimize images before uploading them to your website.
The best way to optimize images is by editing them on your computer using a photo editing software like Adobe Photoshop. This allows you to choose the right file format to create a small file size.
You can also use an image compression plugin for WordPress. These image optimizer plugins allow you to automatically reduce file size while uploading an image to WordPress.
What is Alt Text?
Alt text or alternative text is an HTML attribute added to the img tag which is used to display images on a web page. It looks like this in plain HTML code:
<img src="/fruitbasket.jpeg" alt="A fruit basket" />
It allows website owners to describe the image in plain text. The main purpose of the alternate text is to improve accessibility by enabling screen readers to read out the alt text for visually impaired users.
Alt text is also crucial for image SEO. It helps search engines understand the context of the image.
Modern search engines can recognize an image and it’s content by using artificial intelligence. However, they still rely on website owners to describe the image in their own words.
Alt text also accompanies images in Google image search, which helps users understand the image and improves your chances of getting more visitors.
Usually, alt text is not visible on your website. However if an image is broken or cannot be found, then your users will be able to see the alternate text with a broken image icon next to it.
What is the Difference Between Alt Text vs Title
Alt text is used for accessibility and image SEO, while title field is used internally by WordPress for media search.
WordPress inserts the alt tag in the actual code used to display the image. The title tag is stored in the database to find and display images.
In the past, WordPress inserted the title tag in the HTML code as well. However, it was not an ideal situation from the accessibility point of view, which is why they removed it.
What is the Difference Between Alt Text vs Caption
The alt text is used to describe the image for search engines and screen readers. On the other hand, the caption is used to describe the image for all users.
Alt text is not visible on your website while captions are visible below your images.
The alt text is crucial for better image SEO on your website. The caption is optional and can be used only when you need to provide additional information about the image to website visitors.
How to Add Alt Text, Title, and Caption to Images in WordPress
Alt text, title, and caption make up the image metadata that you can add to images when uploading them into WordPress.
When you add an image using the default image block, WordPress allows you to add caption and alt text for the image.
It automatically generates a title for the image from the file name. You can change the title by clicking on the edit button in the image block’s toolbar.
This will bring up the media uploader popup where you can enter your own custom title for the image.
You can also edit the alt tag and title for the images that you have already uploaded to WordPress. To do that, you need to visit Media » Library page and locate the image you want to edit.
Simply clicking on an image will bring up the attachment details popup where you can enter title, alt text, and caption.
Note: Changing an image’s alt tag or caption via Media Library will not change it in the posts and pages where the image is already used.
When to Use Captions for Images in WordPress
Captions allow you to provide additional details for an image to all your users. They are visible on the screen for all users including search engines and screen readers.
As you may have noticed that most websites don’t normally use captions with images in their blog posts or pages. That’s because captions are often not needed to explain an image.
Captions are more suitable in the following scenarios:
Family or event photos
Photos that need additional explanation describing the background story
Product image galleries
In most cases, you would be able to explain the image in the article content itself.
Disable Attachment Pages in WordPress
WordPress creates a page for all images you upload to your posts and pages. It is called the attachment page. This page just shows a larger version of the actual image and nothing else.
This can have a negative SEO impact on your search rankings. Search engines consider pages with little to no text as low quality or ‘thin content’.
This is why we recommend users to disable the attachment pages on your website.
The easiest way to do this is by installing and activating the Yoast SEO plugin. For more details, see our step by step guide on how to install a WordPress plugin.
Upon activation, it automatically turns off attachment URLs. You can also manually turn off attachment pages in WordPress by visiting SEO » Search Appearance page and clicking on the Media tab.
From here, make sure that the ‘Media & attachment URLs’ option is set to ‘Yes’.
If you are not using Yoast SEO plugin, then you can install the Attachment Pages Redirect plugin. This plugin simply redirects people visiting the attachment page to the post where the image is displayed.
You can also do this manually, by adding the following code to your theme’s functions.php file or a site-specific plugin.
function wpb_redirect_attachment_to_post() { if ( is_attachment() ) { global $post; if( empty( $post ) ) $post = get_queried_object(); if ($post->post_parent) { $link = get_permalink( $post->post_parent ); wp_redirect( $link, '301' ); exit(); } else { // What to do if parent post is not available wp_redirect( home_url(), '301' ); exit(); } } } add_action( 'template_redirect', 'wpb_redirect_attachment_to_post' );
Additional Tips to Improve Image SEO
Adding alt tag is not the only thing you can do to improve image SEO. Following are a few additional tips that you should keep in mind when adding images to your blog posts.
1. Write descriptive alt text
Many beginners often just use one or two words as alt text for the image. This makes the image too generic and harder to rank.
For example, instead of just ‘kittens’ use ‘Kittens playing with a yellow rubber duck’.
2. Use descriptive file names for your images
Instead of saving your images as DSC00434.jpeg, you need to name them properly. Think of the keywords that users will type in the search to find that particular image.
Be more specific and descriptive in your image file names. For example, red-wooden-house.jpeg is better than just house.jpeg.
3. Provide context to your images
Search engines are getting smarter every day. They can recognize and categorize images quite well. However, they need you to provide context to the image.
Your images need to be relevant to the overall topic of the post or page. It is also helpful to place the image near the most relevant text in your article.
4. Follow the SEO best practices
You also need to follow the overall SEO guidelines for your website. This improves your overall search rankings including image search.
5. Use original photographs and images
There are many free stock photography websites that you can use to find free images for your blog posts. However, the problem with stock photos is that they are used by thousands of websites.
Try to use original photographs or create quality images that are unique to your blog.
We know that most bloggers are not photographers or graphic designers. Luckily, there are some great online tools that you can use to create graphics for your websites.
We hope this article helped you learn about Image SEO for your website. You may also want to see our guide on how to fix common image issues in WordPress.
If you liked this article, then please subscribe to our YouTube Channel for WordPress video tutorials. You can also find us on Twitter and Facebook.
The post Beginner’s Guide to Image SEO – Optimize Images for Search Engines appeared first on WPBeginner.
from WPBeginner https://www.wpbeginner.com/beginners-guide/image-seo-optimize-images-for-search-engines/
0 notes
Last Seen Blogs

musicals-own-myass
Sonja Morgan

ask-skeleton-family
Ask Dan and his Family.!

bluedragonfly678
BISH YOU THOUGHT

hasbunallah-wa-nimal-wakil-blog
Hasbunallah Wa Ni'mal Wakil

falcon1k
falcon1k