#SD Card Formatter
Text
The Ultimate Guide To Selecting The Right SD Card For Any Device

Are you trying to figure out which SD card is ideal for your device? If so, read this article and get all the info you want.
With so many various types of SD cards available, ranging in size, capacity, and speed, it can be difficult to choose the best one for your smartphone, tablet, or camera.
Beyond simply selecting the appropriate card, it is vital to properly format your SD card with tools such as SD Card Formatter to ensure peak performance.
This program helps you prepare your card for long-term use by reducing errors and ensuring that your device reads the card correctly.
In this article, we'll cover all the information you need to make the best choice and guarantee the longevity of your SD card.
Overview of SD Cards
Secure Digital cards, occasionally known as SD cards, are compact, portable storage units that are used to expand the capacity of a variety of devices, including cameras, tablets, and smartphones.
Because they exist in an array of sizes, capacities, and speed classes, they might be used for a variety of tasks, such as storing music and apps and high-quality photographs and videos.
The most common SD card types are:
Standard SD: the original size, typically found in outdated electronics and cameras.
microSD: A smaller SD card that is commonly seen in action cameras, tablets, and smartphones.
miniSD: An uncommon, intermediate size that is mostly out of usage today.
Additionally, in terms of their physical size, SD cards are classified based on their capacity and speed, which influence performance in tasks like video recording and photography. Choosing the right SD card offers maximum storage and performance for your device.
Things to be Consider Before Selecting an SD Card For a Device
1 - Consider the Device's Compatibility
It is imperative that you review the specifications of your device before making an SD card purchase. Utilizing an SD card that isn't compatible with your device could result in data loss or performance problems. The following are the primary SD card types:
Standard SD (Secure Digital): Most cameras make use of these.
microSD: The tiny size makes them ideally suited for smartphones and tablets.
miniSD: Rarely used but present on certain older devices.
Determine which type your device supports. Most DSLR and mirrorless cameras utilize full-size SD cards, although action cameras and drones might utilize microSD cards.
Some gadgets, such as smartphones and tablets, have constraints on the amount of storage they can manage, so always consult the manufacturer's guidelines.
2 - Storage Capacity
The next serious issue is capacity, which governs how much data can be stored. SD cards show up in several sizes.
SDHC (Secure Digital High Capacity): 4GB to 32GB
SDXC (Secure Digital Extended Capacity): 64GB to 2TB
For regular smartphone users, 32GB may be sufficient for images, apps, and videos.
However, if you're shooting 4K video, utilizing professional photography equipment, or storing huge amounts of media on your camera, you'll need an SDXC card with more than 64GB of storage.
Higher capacity cards are also suitable for archiving apps and media on tablets.
3 - Speed Class for Optimal Performance
SD card speed is crucial for devices that need to transport data quickly, like high-end cameras and tablets that play 4K videos. Here is an explanation of the speed classes.
Class 10: Works nicely with HD video and rapid photography.
UHS-I/II/III: Designed for 4K video and professional programs with faster data transmission rates.
Class 10 or UHS-I cards perform better for 4K video recording and application management on a vast majority of smartphones and tablets.
Professional photographers and videographers might consider using UHS-II or UHS-III for smoother operation.
4- Durability and Reliability
If you intend to use the SD card for anything that requires extreme weather, such as drones, action cameras, or environmental photography, be sure it is durable. Look for characteristics like these:
Waterproofing
Shock resistance
Temperature resistance
X-ray protection
These measures can protect your data from unintentional damage while also extending the card's lifespan. If you often move SD cards between devices or use them in unusual conditions, longevity is critical to avoiding data loss.
5 - Proper Formatting with SD Card Formatter
After selecting the appropriate SD card, formatting it correctly is critical. While most devices allow you to format your card, the SD Card Formatter tool provides better results.
6 - Brand Reputation and Warranty
When it comes to SD cards, stay with well-known manufacturers such as SanDisk, Samsung, Kingston, or Lexar. These manufacturers provide high-quality, dependable devices with warranties, guaranteeing that your data is preserved safely.
Choosing cheaper, lesser-known brands can result in data loss or corruption, which is a serious concern, especially if you're working with sensitive media files.
7 - Budget Considerations
When choosing an SD card, it is critical to strike a balance between cost and performance. While high-capacity and faster cards are usually more expensive, they offer better performance and durability, particularly for professional applications.
For casual users, a lesser-capacity, low-cost card from a trusted brand would suffice. However, if you are a professional photographer or routinely record 4K films, a higher-end card is worth the investment.
Conclusion
Choosing the ideal SD card entails understanding your device's compatibility, determining your storage requirements, and picking the appropriate speed class for maximum performance.
Tools like SD Card Formatter ensure that your card is correctly prepared, resulting in improved performance and a longer lifespan. Remember to invest in reputable companies since quality counts when it comes to protecting your data.
By focusing on these characteristics, you'll be better able to select an SD card that improves device performance while also protecting your data.
1 note
·
View note
Text
Okay now with that out of the way! Technical question for peeps on here
My old phone's micro sd card is 64 GB and I wanted to use it for my 3ds, but after plugging it into a usb adapter I can't even format the damn thing.
I think that card was encrypted on my old phone but due to forgetting that I didn't leave it in there when I factory reset my phone.
for additional information the screen was messed up but working enough that I knew I could factory format it via the safety feature where if it's powering up from being turned off it'll factory reset itself if the wrong password is entered enough times.
But yeah like it's not like I can just easily put the card back into the old phone and try to decrypt it due to it now being factory reset and also it's screen is busted so menuing to that would be a major challenge when I don't know what I'd be clicking on.
Is there a way to reformat this micro sd card if windows and another program like straight up don't know how to reformat it? I just tried the SD Association's own sd card formatter and it claims my card's capacity is 32 GB (actually 27.48 GB but a 32 GB card would read to have an actual capacity around that size)
5 notes
·
View notes
Text
chist. So my 3D printer has been insane for a while, and recently stopped working entirely. The fix was extremely easy but monoprice cobbled together the worst user manual ever that didn’t address any real issues. It tells you to contact their support email if you need help, which I did, and they never ever responded to my messages.
First issue: the printer (Monoprice mini SLA) stopped reading files I manually added to the 8GB SDHC card that came bundled with the printer. I could still add files via the shitty web UI (which still managed to add files to the SD card somehow?) so whatever. The thing was still usable so I just rolled with it while trying to get monoprice support to respond to me.
Second issue: I updated the printer’s firmware through the settings of the web UI. This update button does not seem to exist anymore so I don’t know what the deal was with that. Anyway, I got updated to firmware version 3.88. The install was corrupt and things started going wrong. I tried printing the same file 3 times but the print always stalled around 70 layers in and the printer screen would turn off. I gave up and went to bed for the night, but the next day the web UI was no longer usable. Whenever I tried to access it, the page would freeze and take the printer down with it.
Then I got sick and didn’t touch the printer for months but that takes us to this past week. I rip it apart to check all the cables and make sure nothing looks burnt out. Everything is fine.
I try formatting the original SDHC card. I try other SDHC cards, I partition them, wipe the partitions, format as FAT32, FAT16, NTFS. I use window’s disk management, diskpart, a special SD card formatter, nothing makes any of the cards work with the printer.
I go to google and see someone saying to use an SD card 4GB or under formatted as FAT. Ambiguous. That might mean better luck with an SD (opposed to SDHC) card. The page also says that monoprice does not support any firmware versions except the ones you can get from monoprice’s website. I check monoprice’s site. The latest supported firmware is 3.83. Why did the automatic update put me on 3.88 if it wasn’t supported? Also why doesn’t monoprice say anything about not using the update button on the web UI??
I get a 2GB SD card. I put the latest monoprice firmware on it. I stick the card in the printer. No files found. To cover all my bases I throw a print file on the card and put it back in the printer. One file found? So this card works? How does it see the print but not the firmware?
I do more googling. There’s a thread that says the firmware file MUST be named “update” for the printer to recognize it. The download direct from monoprice adds the firmware version to the file name (so the name is “3.83-update”), which makes it invisible on the printer’s menu. Changing the file name makes the file work. Monoprice’s site and their user guide say nothing about this.
I update the firmware to 3.83. It installs correctly. The web UI connects again and the printer can read SDHC cards again.
This was so stupid. If monoprice just added 2 sentences to their user manual saying to troubleshoot with a non-SDHC card and to only use their provided firmware files (after renaming them) this would have been super simple to resolve.
7 notes
·
View notes
Text
how to make a vpn server on raspberry pi
🔒🌍✨ Obtén 3 Meses GRATIS de VPN - Acceso a Internet Seguro y Privado en Todo el Mundo! Haz Clic Aquí ✨🌍🔒
how to make a vpn server on raspberry pi
Configuración VPN en Raspberry Pi
La Raspberry Pi es un dispositivo versátil y popular que se puede utilizar para una variedad de propósitos, incluida la configuración de una VPN para proteger tu privacidad y seguridad en línea. Configurar una VPN en tu Raspberry Pi puede ayudarte a cifrar tu conexión a Internet y proteger tus datos de miradas indiscretas.
Para comenzar, necesitarás instalar un software de servidor VPN en tu Raspberry Pi. OpenVPN es una de las opciones más populares y ampliamente utilizadas para este propósito. Puedes instalar OpenVPN siguiendo las instrucciones específicas para tu sistema operativo Raspberry Pi.
Una vez que hayas instalado el software de servidor VPN, deberás generar certificados de cliente y servidor, así como configurar los ajustes de seguridad y enrutamiento adecuados. Asegúrate de seguir paso a paso las instrucciones proporcionadas por el software de servidor VPN que elijas.
Después de configurar tu servidor VPN en la Raspberry Pi, podrás conectarte a él desde cualquier lugar con acceso a Internet. Simplemente necesitarás un cliente VPN compatible en tu dispositivo, como la aplicación OpenVPN, para establecer una conexión segura a tu Raspberry Pi.
En resumen, configurar una VPN en tu Raspberry Pi es un enfoque efectivo para proteger tu privacidad en línea y mantener seguros tus datos mientras navegas por la web. Investiga y sigue cuidadosamente las instrucciones específicas para tu configuración única, y estarás en camino de disfrutar de una conexión segura y protegida en todo momento.
Servidor VPN casero en Raspberry Pi
Un servidor VPN casero en Raspberry Pi es una excelente manera de proteger tu privacidad y seguridad en línea de forma económica y efectiva. Con la creciente preocupación por la seguridad cibernética, contar con tu propio servidor VPN puede proporcionarte una capa adicional de protección al navegar por internet.
La Raspberry Pi es un dispositivo de bajo costo y consumo de energía que se puede utilizar para crear un servidor VPN personalizado. Configurar tu servidor VPN en una Raspberry Pi te permite cifrar tu conexión a internet y ocultar tu dirección IP, lo que dificulta que los piratas informáticos rastreen tus actividades en línea.
Para configurar un servidor VPN en tu Raspberry Pi, necesitarás instalar software especializado y seguir algunos pasos técnicos. Aunque puede parecer complicado al principio, existen guías detalladas en línea que te pueden ayudar a configurar tu servidor VPN en poco tiempo.
Al crear tu propio servidor VPN casero en Raspberry Pi, tienes el control total sobre tus datos y tu privacidad en línea. Puedes acceder a contenidos geográficamente restringidos, proteger tus comunicaciones en redes Wi-Fi públicas y mantener tu información personal a salvo de posibles amenazas en internet.
En resumen, configurar un servidor VPN en una Raspberry Pi es una opción accesible y confiable para aquellos que buscan proteger su privacidad en línea y navegar de forma segura en el mundo digital actual. ¡Atrévete a dar el paso y protege tus datos con tu propio servidor VPN casero en Raspberry Pi!
Pasos para crear un servidor VPN en Raspberry Pi
Para aquellos que deseen tener control y seguridad sobre su propia red privada virtual (VPN, por sus siglas en inglés), crear un servidor VPN en una Raspberry Pi es una excelente opción. Este proceso puede ser un poco técnico, pero con los pasos adecuados, cualquier persona con conocimientos básicos de informática puede lograrlo.
El primer paso para crear un servidor VPN en Raspberry Pi es instalar el sistema operativo Raspbian en la Raspberry Pi, lo cual se puede hacer utilizando la herramienta de software SD Card Formatter y Etcher para grabar la imagen del sistema en una tarjeta SD.
Una vez que el sistema operativo esté instalado, es necesario configurar la Raspberry Pi para permitir el acceso remoto a través de SSH. Esto se puede hacer desde la configuración de la Raspberry Pi o utilizando comandos en la terminal.
El siguiente paso es instalar y configurar el software de servidor VPN en la Raspberry Pi. OpenVPN es una opción popular y se puede instalar fácilmente a través del gestor de paquetes de Raspbian.
Después de instalar el software, es necesario generar los certificados de seguridad y configurar los archivos de configuración del servidor VPN. Estos archivos contienen la información necesaria para que los clientes se conecten de forma segura al servidor.
Una vez completados estos pasos, el servidor VPN en Raspberry Pi estará listo para ser utilizado. Ahora los usuarios pueden conectarse de forma segura a su red privada desde cualquier lugar, protegiendo su información y navegación en internet.
Seguridad informática con VPN en Raspberry Pi
En la actualidad, la seguridad informática es una preocupación constante para usuarios y empresas. Una forma efectiva de proteger la información sensible y la privacidad en línea es mediante el uso de VPN (Redes Privadas Virtuales). Y ¿qué mejor manera de configurar una VPN que en una Raspberry Pi?
Una Raspberry Pi es un mini ordenador de bajo costo y versátil que se puede utilizar para una variedad de proyectos, incluyendo la configuración de una VPN para garantizar una conexión segura a Internet. Configurar una VPN en una Raspberry Pi no es una tarea difícil y ofrece una capa adicional de seguridad y privacidad en línea.
Para configurar una VPN en una Raspberry Pi, es necesario instalar el software de servidor VPN y seguir los pasos de configuración. Una vez instalada y configurada la VPN, los usuarios pueden conectarse a ella desde cualquier dispositivo compatible, lo que les permite navegar de forma segura y anónima en Internet.
Además de proteger la información personal y confidencial, una VPN en Raspberry Pi también puede ser útil para acceder a contenido restringido geográficamente, evadir la censura en línea y protegerse contra posibles ataques cibernéticos.
En resumen, la combinación de seguridad informática y Raspberry Pi para configurar una VPN es una excelente manera de proteger la información en línea y mantener la privacidad en un mundo cada vez más digitalizado y lleno de amenazas. ¡Asegura tu conexión y navega de forma segura con una VPN en Raspberry Pi!
Tutorial VPN para Raspberry Pi
Si estás buscando aumentar la seguridad y privacidad de tu Raspberry Pi, una excelente opción es utilizar una red privada virtual, más conocida como VPN. Con un tutorial VPN para Raspberry Pi, podrás proteger tus datos mientras navegas por internet y accedes a redes públicas.
Para comenzar, necesitarás un proveedor de servicios VPN confiable que sea compatible con Raspberry Pi. Una vez hayas seleccionado tu proveedor, deberás seguir los pasos para instalar el software en tu dispositivo. La mayoría de los proveedores ofrecen guías paso a paso muy fáciles de seguir, por lo que el proceso no debería ser complicado.
Una vez instalada la VPN en tu Raspberry Pi, podrás disfrutar de múltiples beneficios. Entre ellos, se encuentra la encriptación de tus datos, lo que impide que terceros puedan interceptar tu información personal. También podrás acceder a contenido restringido geográficamente y mejorar la privacidad de tu navegación.
Es importante recordar que una VPN puede afectar la velocidad de tu conexión a internet, aunque la mayoría de proveedores ofrecen servidores optimizados para minimizar este impacto. Así que, si buscas proteger tus datos y navegar de forma más segura en tu Raspberry Pi, un tutorial VPN es la solución ideal.
0 notes
Text
SD Memory Card Formatter v5.0.2 + Portable [Latest]
https://weacrack.com/?p=10174
SD Memory Card Formatter v5.0.2 + Portable [Latest] - https://weacrack.com/?p=10174 -
0 notes
Text
SD Memory Card Formatter for Linux
https://www.sdcard.org/downloads/sd-memory-card-formatter-for-linux/
Comments
0 notes
Text
Raspberry Pi for Beginners (Mac+PC)
Raspberry Pi for Beginners (Mac+PC)
Raspberry Pi for Beginners (Mac+PC)
Raspberry Pi is a small, low-cost computer that can be used for a variety of projects.
It is popular among beginners because it is easy to set up and use,
and it is also relatively inexpensive.
please you can click on the free links:

A Raspberry Pi board
A microSD card (with at least 8 GB of storage)
A power supply (to provide power to the Raspberry Pi)
A USB keyboard and mouse
A monitor with an HDMI input
An HDMI cable
A USB to micro-USB cable (to connect the power supply to the Raspberry Pi)
Once you have all the necessary components, you can follow these

Format the microSD card using a software like SD Card Formatter. Download the Raspberry Pi Operating System (Raspbian) from the official website and flash it to the SD card using a software like Raspberry Pi Imager.
Insert the microSD card into the Raspberry Pi board.
Connect the monitor, keyboard, and mouse to the Raspberry Pi.
Connect the power supply to the Raspberry Pi and turn it on.
Follow the on-screen instructions to complete the setup process.
Once the setup is complete, you can begin experimenting with the various features and
capabilities of the Raspberry Pi. There are many tutorials and resources available online to
help you get started with different projects and programming languages.
1 note
·
View note
Text
Mac formatter

#Mac formatter manual
#Mac formatter portable
#Mac formatter password
#Mac formatter mac
#Mac formatter portable
Cloud storage services like Google Drive or iCloud are probably the safest and most convenient options.If you buy an external drive-such as one of our recommended portable or desktop hard drives, portable solid-state drives, or USB 3.0 flash drives-you may need to reformat it to work with your operating system of choice, since different operating systems use different file systems to process data.Īlthough it’s true that any drive is compatible with both Windows and macOS once it’s formatted properly, most drives come preformatted for Windows out of the box. Make sure to back up irreplaceable files, such as photos, to another location. It’s a good idea to never use them for permanent storage. SD cards are amazing storage devices, but they wear out relatively quickly and can be a bit fragile. If your card still doesn’t work after formatting it, don’t be too disappointed.
#Mac formatter mac
However, when things go wrong, an initial format using your Mac can be a good way to get the card into shape, so that the device can read and format it in the first place. Most of the time it’s better to format the card using those built-in utilities. Keep in mind that many of these devices have their own built-in formatting utility. Whether that’s your phone, Nintendo Switch, DSLR, security camera, or any other device that accepts it. With your SD card formatted, you can now put it back into the device. After it’s done, your SD card should be ready to use.
#Mac formatter password
You may have to provide your administrator password and approve a few permissions before the format can commence. Select it, making sure it’s the right drive. In the left-hand pane, under external, look for your SD card.Open Spotlight Search (command + space) and search for Disk Utility.Plug in your SD card reader and insert the SD card into the appropriate slot.This is quick and easy to do, especially if you know what settings to choose: The native method of formatting an SD card on a Mac is to use the built-in Disk Utility. How to Format an SD Card on Mac Using the Disk Utility If you already have a dock with USB A ports then a standard USB SD card reader will work just fine.īe sure to get a card reader that can accept both full-size SD cards and the more common micro-SD type. So only go the more expensive route if you were in the market for a dock anyway. Card readers by themselves are pretty inexpensive, but docks can be quite pricey. If your Mac doesn’t have an SD card slot, you’ll need to buy a USB SD card reader or get a USB-C or Thunderbolt 3 dock that features one as one of its ports. Older MacBooks have built-in SD card slots, so using an SD card on such machines is straightforward. If you have a recent MacBook, you probably know that there are no ports on your computer besides two or four USB-C Thunderbolt 3 ports. What You Need to Format an SD Card on Mac These are only appropriate for internal Mac drives and external drives that will only be used with a Mac, where data integrity is also important.
#Mac formatter manual
Check the manual for the device the SD card is destined for to ensure you pick the optimal format.ĭon’t choose any of the macOS journaled formats. exFAT has the advantage of supporting file sizes larger than 4GB. Most devices and computer operating systems can read either of these formats. There are various formats that you can use for SD cards, but most of the time the correct choice is either FAT32 or exFAT. So next we’ll look at which format is best for an SD card. The main consideration is whether the device you’re going to use the SD card with can read that particular format or not. There are various format types, each with its pros and cons. You’ll also want to format an SD card when you need to use it with a device that needs a different format from the one the card currently uses. Making it a quick indicator of drive health. If the card is faulty, a format will usually fail. If the SD card is still physically fine, you can usually format it and keep using it.
0 notes
Text
Hp 4000n laserjet printers for sale in southern california

#Hp 4000n laserjet printers for sale in southern california pro#
#Hp 4000n laserjet printers for sale in southern california code#
#Hp 4000n laserjet printers for sale in southern california plus#
#Hp 4000n laserjet printers for sale in southern california professional#
Jetdirect card fail due to spike in networkīlue End caps broken on spindle. Printhead failing after 40ml due to air in Tube Systemīoot-up failure due to hard drive being corrupt Pinch roller assy: some of the rollers fall off then metal spring digs into feed roller.Ĭalibration failure at 30% or 70% line sensor failure. Select the ink icon and then select Image Quality Maintenance > Printhead Diagnostics Image. Image quality issues: Run Image Quality Test to show which printhead is not 100%. Roll housing right hand side tension spring breaking causing paper loading problems.
#Hp 4000n laserjet printers for sale in southern california plus#
Spindle (42″ Spindle 60″ Spindle) end breaking on edge causing judder on spindle plus media going out of line on long print runs. Media Blue Handle breaking causing handle to be loose and not releasing pinch rollers. Vacuum path holes blocked up due to ink in the holes causes reduction in holding media down. Ink vapors build up due to service station vent holes blocking up.
#Hp 4000n laserjet printers for sale in southern california code#
Other issues from this error code Carriage Belt worn (42″ Belt 60″ Belt) and Carriage Lubrication Felt dry and dirty.īlank display due to CPU fan failure and printer switching off after short time. 42″ tube System – 60″ Tube SystemĮrror 86:01 same as 87:01 Encoder strip (42″ Encoder 60″ Encoder) getting dirty! Encoder Strip becomes unreadable after user cleaning to many times and needs replacing. Take all consumables out, then switch printer back on.Įrror 24:10, Ink broken bag error, if ink has leaked over Tube System pcb you need to replace Tube System as this can be result from 24:10. Some random errors can be caused by faulty printhead /ink cartridge. (24″ Trailing Cbale / 42″ Trailing Cable)Įrror Code 21:10 – Service Station failure.Įrror Code 81:01 – Paper feed motor failure.Įrror Code 02:10, 02:13, 12:11 – Carriage Assembly failure.Įrror Code 05:10 – (Only applicable to HP DesignJet 800 Series) Formatter failure.īlue handle breaking (Pinch-Arm Mechanism) (24″ Encoder / 42″ Encoder)Įrror Code 11:11 – Trailing Cable badly connected or worn. Belt starts to breakup leaving belt dust inside printer and making clunking noise from motor with build up of rubber on gear.Įrror Code 86:01 – Dirty Encoder strip hard to clean replace. HP Designjet T1120 HD Multifunction Printer seriesĮrror Code 86:01 – Worn Carriage belt (24″ Belt / 42″ Belt).
#Hp 4000n laserjet printers for sale in southern california professional#
HP DesignJet professional photo-quality printersĭeliver impressive professional photo- and gallery-quality prints with the widest color gamut and superior gloss uniformity. Manage your highest printing demands, from simple CAD drawings in B&W to complex color images, with speed and quality. HP DesignJet large-format production printers HP DesignJet Z6800 Photo Production Printer HP DesignJet Z6200 Photo Production Printer HP DesignJet high-impact graphics printersĬreate eye-catching, high-quality applications-including POP signage, posters and banners-effortlessly and affordably.
#Hp 4000n laserjet printers for sale in southern california pro#
HP DesignJet HD Pro Multifunction Printer HP DesignJet SD Pro Multifunction Printer HP DesignJet T3500 Production Multifunction Printer series HP DesignJet T2530 Multifunction Printer series Print maps, technical drawings, and renders with precise line quality and crisp text – in color and black and white. Same-day onsite HP designjet repair includes inspectin, cleaning, lubricating and print head calibrationĬlean the complete Hewlett Packard LaserJet.Īdjust the designjet print head after exchanging the belt. Plotter or Large Format Printer problems we can fix: We provide fast, reliable and cost effective support for your printing and plotting equipment. We repair all models of HP Designjet plotters, ranging from the older types to the brand new Design Jets. Call us at 88 and lets us know your HP DesignJet model and the fault and/or the error code that is displaying and we will give you advice on this issue. Our certified experienced HP Designjet plotter technicians are local in Los Angeles, Orange County, San Bernardino County and Riverside County. If you are looking for a HP Designjet Plotter printer repair specialist in Southern California then its US.
0 notes
Text
Fat32 formatter

FAT32 FORMATTER FOR FREE
FAT32 FORMATTER INSTALL
FAT32 FORMATTER PORTABLE
What’s more, this free SD card formatter also provides many other disk management features. Then use it to format an SD card, micro SD card, USB flash drive, external hard drive, etc.
FAT32 FORMATTER INSTALL
You can fast download and install MiniTool Partition Wizard on your Windows 10 computer. MiniTool Partition Wizard is a free disk management tool for Windows. Format SD Card to FAT32 with MiniTool Partition Wizard
FAT32 FORMATTER FOR FREE
If you are stuck or need some help, send an email, and I will try to help as much as possible.How to Format a 64GB SD Card to FAT32 for Free – 3 Ways I hope this simple and easy Windows how-to guide helped you. The software will instantly format your drive in FAT32 format.Īs you can see, it is pretty simple to format drives in FAT32. You will receive a warning message telling you that you will lose all data in the drive that you are about to format. Once that is done, click on the “Start” button.Ĥ. If you want, you can change the drive name by entering a new name in the Volume Lable field. In my case, I want to format a USB drive in FAT32 format. Select the drive you want to format in FAT32 on the main screen.
FAT32 FORMATTER PORTABLE
Being portable software, there is no need to install it.Ģ. First, download FAT32 Format software from the official website and execute the downloaded exe file. If you are uncomfortable using the command prompt or PowerShell, you can use a free and portable software called FAT32 format.ġ. As soon as you press the Enter button, you will receive a “Format Complete” message. Once the formatting is complete, you will be asked to enter a new drive name. This is because the above command doesn’t do a quick format.Ĥ. Depending on the drive size, it can take some time to format the drive. In the PowerShell window, execute the below command while replacing Drive_Letter with the actual drive letter of the USB drive. Open PowerShell by searching for it in the start menu.Ģ. Like the Command Prompt, you can also use PowerShell to format a drive in FAT32 format.ġ. Use PowerShell to format a drive in FAT32 You have successfully formatted the drive in FAT32 file system format. After successfully formatting, you will receive a “Format complete” message. Once the FAT32 formatting is complete, you will be asked to enter a drive name. Depending on the drive’s size, the formatting process can take some time.ĥ. Don’t forget to replace “Drive_Letter” with the actual drive letter. In the Command Prompt window, execute the below command. Alternatively, you can also use the run command cmd.ģ. Once you have the drive letter, open Command Prompt from the Start menu. We are going to need it in the next step.Ģ. In File Explorer, identify your USB drive and note down the drive letter. First, plug in the USB drive-next, open File Explorer. Once you have the drive letter, we can use it to format the drive in FAT32.ġ. This is because we need the drive letter to target the drive. Since we are using the Command Prompt, you need to know the drive letter of the USB drive before formatting it. You can format large drives in FAT32 format with a single-line command in the Command Prompt.
Third-party software Command to format a drive in FAT32.
0 notes
Text
Android usb driver for mac os

#Android usb driver for mac os how to#
#Android usb driver for mac os for mac#
for users to manage digital devices not only the internal media but also external drives like hard disk, usb flash and more. Tool 1 - Disk Utility provided by Mac OS, the best free tool to format deviceĭisk Utility - the best free mac format and erase tool that is provided by Apple Inc.
#Android usb driver for mac os for mac#
Here is a list of disk or usb formatting tools for mac or ways of formatting disk/usb flash on MAC to get it done. HP USB Disk Format Tool Download for MAC.Is formatting permanent erasing for sd/usb stick or disk files?.Is FAT the same as FAT32 or EXFAT? (Which one to choose?).
#Android usb driver for mac os how to#
Guide - How to format a usb flash drive or hard disk on Mac.8 MAC Format tools to format usb/disk/sd with formatters.We would not expect this happen that you accidentally reformatted your disk/usb stick and then later found out you had just lost some important files.Īlso read: 5 best free backup software, or how to repair damaged usb drive on MAC Note: before any formatting or erasing the disk/pen drive, we would recommend you backup your data on your media that you want to format onto another device to avoid unintentionally data loss. Some users may also want to erase the privacy files on their device by getting it formatted, is formatting true erasing on MAC? Could formatted files be retrieved? We will explain all this in this content. Many users are looking for tools like " HP USB Disk Storage Format Tool for Mac", " Sandisk USB Format Tool Mac", " Kingston USB Format Tool Mac", " Lexar usb format tool mac", "sd card format tool mac" or "usb disk storage format tool mac" hoping that there are this kind of tools that could be used on Mac for formatting their hard drive or usb flash drive on MAC OS X, or sometimes you are searching for a bootable format tool on mac just as what HP Format Tool could perform the trick. 8 USB Disk Formatter/Format Tool Download for Mac iOS (Free + Paid)
1 note
·
View note
Text
Mazda toolbox will not reading sd card

#MAZDA TOOLBOX WILL NOT READING SD CARD INSTALL#
#MAZDA TOOLBOX WILL NOT READING SD CARD DRIVERS#
#MAZDA TOOLBOX WILL NOT READING SD CARD INSTALL#
*Please note, card is sent in standard memory card case, without retail packaging. more than likely your card was either damaged on installation or just died for no good reason, if you can get a new one, just download and install the info from the tom tom website to a new card, if its one of those. Install it in the computer and restart the computer.
#MAZDA TOOLBOX WILL NOT READING SD CARD DRIVERS#
Go to the support website and download the CARD READER driver under the DRIVERs section. Navigation system SD cards cannot be used/switched from one vehicle to another. Try a different SD card to see if it works. Note: the SD card can be used only in one car, once it is installed to the navigation system for the first time, it will be locked with cars VIN. To install - Please ensure you insert the card before switching on the engine. Part Number: BHP1-66-EZ1P / BHP166EZ1PĬountries Included: USA / Canada / Mexico Compatibility: » mazda update toolbox mazda toolbox » mazda toolbox carte sd » update mazda navigation sd card » mazda 5 anv2 sd-card tool installieren » mazda toolbox pour ma» jmb38x ms sd sd mmc xd card reader » sd memory card formatter 5.0.1 for sd » contacts from sim card to sd card » unitronics card sd card suite » mazda-epc2. Driver Alerts, Active Speed, Current Speed & Estimated Arrival Time. Supports Postcodes, Address, Coordinates. Bringing you maps, directions and more - all displayed on your car's touch screen. If there is no folder named loopdir on the SD card, repeat steps 4 to 9. If the SD card still is not recognised in HOME, open the removable disk drive on your computer. Remove the card from your Mazda NB1 and insert it into the card reader connected to your computer. Mazda's fully integrated Navigation SD card works seamlessly with your Mazda Connect system. Wait for a few seconds so that the card can be initialised by your Mazda NB1. exe file in your PC folder and run it from there. Start Mazda Toolbox Software & search for the recover option (there should be one, as you stored your backup of your license at the Mazda/NaviExtra-Servers - like described here: Mazda ). That one worked but there was no wizard so you have to find the. Insert the blank SD-card to your computer. The toolbox downloaded from the website wasn't compatible with my SD card and a dialogue box offered a different one. Wait a couple minutes then turn on the car and youre good to go. Mazda SD Card GPS Navigation 2022 BHP166EZ1P Mazda 3 Mazda 6 CX-3 CX-5 CX-9 MX-5 Miata Yay I updated my SD card, with a little help. Like some reviewers have said, just insert the card with the car off.
0 notes
Text
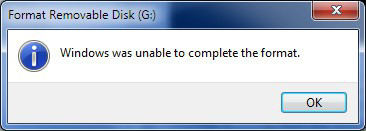
How to Fix Windows Was Unable to Format SD Card?
There are two situations when formatting SD card or USB drive: active or passive. For example, you may just want to free up the space, or Windows forces you to format the card for normal use.
In either case, the question now is that Windows was unable to complete the format. There is no doubt that your SD card or USB drive is in trouble. There are many cases when people are unable to format SD card or even get the storage device detected by the computer.
What may cause SD card/USB drive not formatting? Below are some common cases:
SD card or USB drive is infected by virus, leading to unfinished formatting.
SD card or USB drive is damaged/corrupted and Windows can’t format corrupted SD card.
Disk is write protected and you don’t have permission to make any changes to it.
Then what can we do to solve “Windows was unable to complete the format”? Here we list 6 methods to fix this problem.
1. Fix SD Card Not Formatting Using CMD
The full name of chkdsk is check disk. This tool creates and displays a disk status report based on the file system used by the detected partition. It also lists and corrects errors on disk.
Try these steps to solve Windows was unable to format SD card.
Step 1. Insert the SD card to a card reader and connect it to computer USB. When Windows prompts formatting, click “Cancel” and check the “Properties”. Use the tools in the Properties directly – Start checking. You will find it fails to check disk error.
Step 2. Click “Start” – “Run”, and enter “cmd” – “chkdsk E:/F” (E is the drive of SD card, and /F is the repair parameter).
Step 3. The DOS window closes automatically when the repair is completed. And the properties of the SD card show normally. (Note: It is not recommended to interrupt the CHKDSK process when using /f switch. The disk integrity after interruption is not guaranteed.)
This way will not lose any data, just repair the corrupted SD card.
2. Fix SD Card That Won’t Format Using SD Card Formatter Tool
General SD card repair tools and formatter tools belong to a type, which is forced formatting. This way is likely to repair your SD card, but it can damage the data.
If your SD card is certified product, the repair success rate is very high. This sort of software is more, mainly developed by SD card manufacturer, such as the famous SD card formatter tool.
If it still fails to access your SD card, then you might as well consider a new one. Download SD formatter and check step-by-step tutorial guide to format your SD card on Mac and Windows.
3. Update the Driver of Undetected SD Card
In case the computer system fails to detect your SD card in File Explorer, you may need to update the driver to get the device recognized again.
The problem usually happens on Windows 10, so we will learn how to fix it in a Windows 10 PC. Nevertheless, you can also find similar steps on Windows 7.
Step 1. Right-click on the Start menu of your PC and choose “Device Manager”.
Step 2. Look for your SD card under Disk drives or Universal Serial Bus controllers. You may find the name or brand of your SD card marked with yellow exclamation.
Step 3. Right-click on it and choose “Update driver”, then Search automatically for updated driver software.
Step 4. Check your SD card and access it. If necessary, restart your PC.
3. Assign a New Drive Letter to the Unreadable SD Card
When a removable disk, like an SD card or pen drive, is connected to a PC, then system usually assigns a drive letter to the disk automatically.
However, if the computer system doesn’t assign a unique drive letter to your SD card, then the memory card will not be readable.
In this case, we need to assign a new drive letter to the unreadable SD card to make it visible again.
Step 1. Right-click on the Start menu of your PC and choose “Disk Management”.
Step 2. In Disk Management, right-click on the SD card and choose “Change Drive Letter and Paths…”
Step 3. On the pop-up window, click “Change”, then select a unique letter for the SD card.
Step 4. Click OK to apply the change.
1 note
·
View note
Text
Format SD Card on Windows 10, Mac, Camera, CMD
Formatting your SD card before use is an important step for all photographers.
In this post, you’ll learn how to Format an SD Card and avoid corrupt and half-full cards before a shoot.
We cover formatting in Windows 10, Mac, in-camera (GoPro and DSLR), and using CMD.
Format an SD Card
Here are the specific steps for formatting your SD card in these different methods by downloading formatter.
Three of the following methods require you to connect directly to your computer.
If you need some help connecting, here are 4 ways to do this. And here’s how to overcome connection problems.
You’re not going to want to forget this step. If you just jump into the guides below and forget this step, you’ll lose all your photos and videos.
Please remember, once you reformat an SD card, all your media will be permanently gone.
Okay, with this reminder out of the way, let’s get on to successfully scrubbing your SD cards.
First, here’s what you’ll need:
Computer running Windows 10
Micro SD card adapter / USB micro SD card reader (If using micro SD card): To enable your computer to read your memory card, you’ll need an adapter (that will allow you to insert in an SD card port in your computer) or a micro SD card reader (that can be inserted in your USB port on your computer).
SD card port (built-in) or SD card reader: If using a standard size SD card, you’ll need a port in your computer, or a USB card reader.
Step 1- Insert your SD card into your computer, using either the SD card slot or USB port (with a reader). If the card isn’t recognized automatically, press Window Key + E. This will open File Explorer.
Step 2- Navigate to “This PC” in the left sidebar. Your SD card should be visible under this header.
Step 3- Right-click on your SD card and select “Format”.
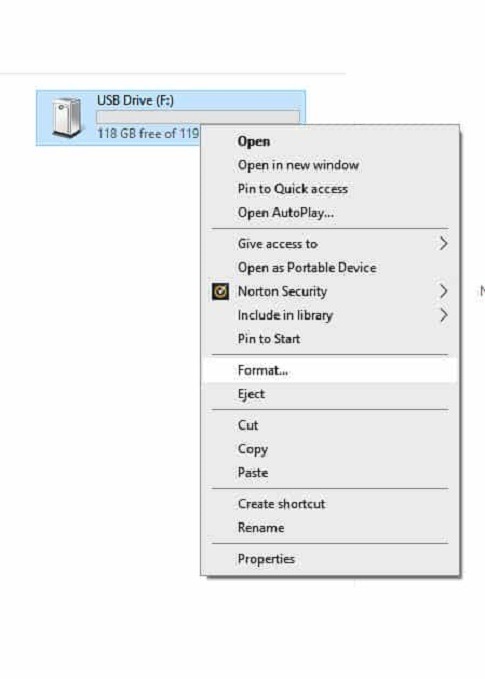
Step 4- Here you can add “Volume Label” and give a name to your SD card.
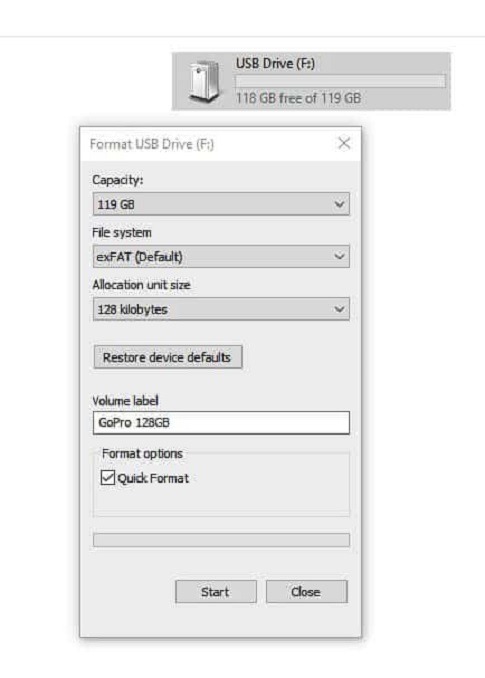
Step 5- You’ll see a warning message (Formatting will erase ALL data). Click OK (if you already backed up your photos and videos). Once it completes formatting, you’ll see the “Format Complete” window. Click OK to close the window.
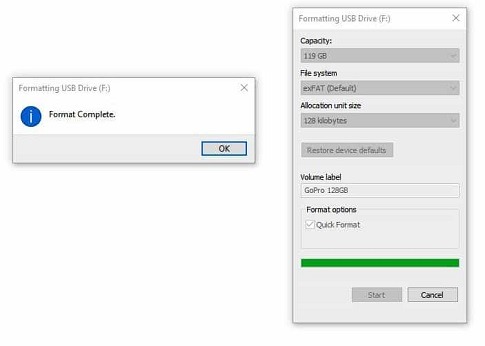
You have now successfully formatted your SD card using your Windows 10 computer.
You have now successfully formatted your SD card using your Windows 10 computer.
And you’re ready to head out on your next adventure with a fresh memory card.
You can also select “Restore Device Defaults” to factory reset the card to its original settings.
How to Format an SD Card on Mac?
Here’s how to format your SD card on your Mac computer. It’s also a very simple process.
Here’s what you’ll need:
Step 1- Mac computer
Step 1- SD card reader: If using a standard size SD card, you’ll need a USB SD card reader. If using a microSD card you will need either a MicroSD card adapter or USB microSD card, reader.
Step 2- Insert your SD card into your computer using your external card reader.
Step 3- Open Disk Utility. Navigate to your SD card. If it is a new card, it will probably be named “untitled” or “no-name”.
Step 4- Click the “Erase” tab. Then select “Format”. Choose MS-DOS (FAT32) if your card is 32GB or smaller. Select exFat if your card is 64GB or larger.
Step 5- You’ll see a confirmation message: “Are you sure you want to erase the partition “[your card name]?” Click “Erase”.
You have now successfully formatted your SD card on your Mac. See more on FAT32 / exFAT setting at the end of the post.
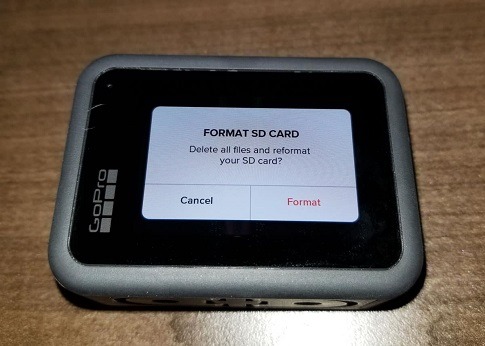
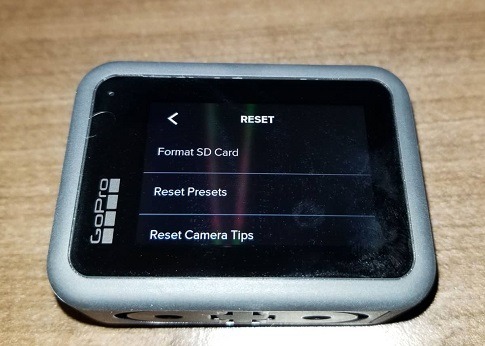
How to Format an SD Card on GoPro Camera?
It’s my preference to format SD cards inside of the camera. I feel more confident that they are set up correctly for that model.
GoPro cameras add a basic file structure when the card is formatted in-camera.
Unlike the first two options, you don’t really need any additional gear. You already own the camera and microSD card.
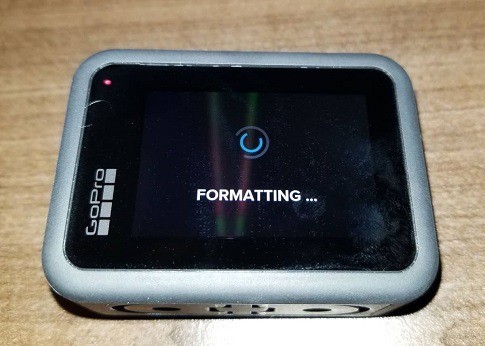
Here’s how to do it.
If you’re familiar with your camera, here’s how to format the card: Menu > Preferences > Reset > Format SD Card
Here is the step by step instructions. These instructions are for the Hero8 but will work almost identically for the previous models (especially the Hero5, Hero6, and Hero7 models).
Step 1- With the camera on, swipe down to view Menu.
Step 2- Tap Preferences.
Step 3- Scroll to the bottom and tap Reset
Step 4- Tap Format SD Card (Top option)
Step 5- Tap Format (confirming that you’ll delete all your files and reformat the card).
Congratulations! You just formatted your microSD card with your GoPro camera.
How to Format an SD Card on a Canon DSLR?
I prefer this method for formatting SD cards for my DSLR.
Because it is formatted inside the camera, I feel it will be less glitchy. And so far so good!
And just like the previous method, you don’t need any additional gear. You already own the camera and SD card.
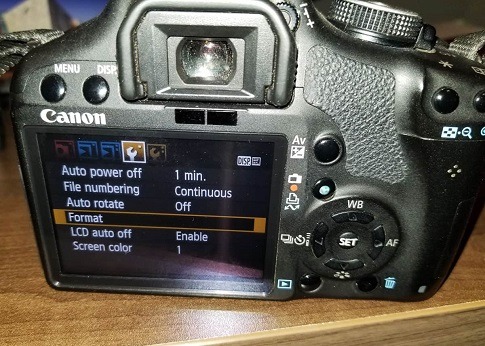
Here’s how to do it on a Canon DSLR. The settings for Nikon and other DSLR cameras will be very similar.
If you’re familiar with your Canon camera, here’s how to format the card: Menu > Camera Settings 1 tab > Format
Step 1- With the camera on, press the Menu button.
Step 2- Navigate to the Camera Settings 1 tab.
Step 3- Select Format
Step 4- Select OK to format your card.
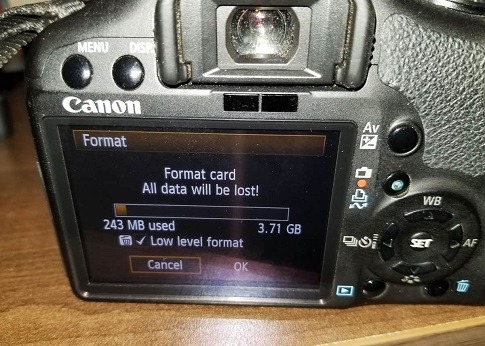
And there you have it. You have successfully formatted your SD card in your DSLR camera.
How to Format an SD Card Using CMD (Windows 10)?
This method is beyond my skill level. I haven’t done this, but I know lots of people like this option.
Here are the seven steps to format an SD card using CMD in Windows 10/8/7.
Step 1- Type cmd in the search box in Windows 10, and then you’ll get the best match Command Prompt. Right-click on it and choose “Run as administrator”.
Step 2- In the command prompt, type diskpart and press “Enter”.
Step 3- Type list disk to list all the available drives and press “Enter”.
Step 4- Type select disk + disk number ( for example, select disk 2) to select the SD card you want to format and press “Enter”.
Step 5- Type list volume and press “Enter”.
Step 6- Type select volume + volume number (or example, select volume 10) and press “Enter”.
Step 7- Type format fs=ntfs (or format fs=exfat) and press “Enter” to format the drive with NTFS or exFAT.
These steps are by the experts over at EaseUS.
I’ll be honest. I’m not sure why anyone would use this method. It is slower and more complicated than any of the other methods.
But now I need to give it a try.
It’s been many years since I ran Command Prompt for any reason.
#Downlaod Sd Card Formatter#SD Card Formatter#Free SD Card Formatter#Download Free Sd Formatter#Format Sd Card Free
0 notes
Text
mentally preparing to hack a 3ds. ughhh

0 notes
Text
ラズパイをケーブル1本で使えるようにする
目標
できるだけシンプルな環境でラズパイをセットアップできるようにする
用意したもの
PC(Windows10)
16GB SDHCカード
Raspberry Pi Zero WH
MicroUSBケーブル(OTG対応)
Wi-FiのSSIDとパスワード
SDカードについては、ラズパイが対応しているフォーマットがFAT32までなので、最大32GBまでしか使用できないことに注意すること。
インストールしたOS
Raspbian Buster Lite
(カーネルバージョン:4.19、リリース日:2019年09月26日)
手順
必要なソフト類をPCにインストールする
SDカードをフォーマットする
イメージファイルをSDカードに書き込む
SSHを有効にするための設定を加える
Wi-Fiに接続するための設定を加える
「config.txt」に設定を書き加える
「cmdline.txt」の内容を変更する
ラズパイを起動する
PCにラズパイを認識させる
Tera TermでラズパイとSSH接続する
1. 必要なソフト類をPCにインストールする
以下に、今回使用したソフト類をまとめる。
なお、各ソフト類のタイトルをクリックするとそのサイトに移動する。
Raspbian Buster Lite
ラズパイ用のOS。これがなきゃ何も始まらない。
今回はデスクトップ環境を使用しないため、Lite版(CUIのみ)のZIPファイルをダウンロードした。なお、ZIPファイルは解凍せずにそのままでよい。
SD Card Formatter(SDアソシエーション)
SDカードをフォーマット(初期化)するためのソフト。
エクスプローラーからもフォーマットが可能であるが、ラズパイ公式がこれを推奨してるっぽいので、あらかじめインストールしておく。
balena etcher(balena)
ラズパイSDカードにOSを書き込むためのソフト。
たったの2,3ステップでできちゃう優れもの。
ダウンロード後、インストールを完了しておく。
Pi Zero OTG Ethernet
ラズパイをPCに認識させるためのドライバー。
真ん中あたりで説明文中にいきなりダウンロードリンクが出てくる。
どこにあるか全然分かんねーよって人はこちら(ダウンロードリンク)。
使い方は後述する(ZIPファイルは解凍しておくこと)。
Tera Term
ラズパイと通信(SSH接続)するためのソフト。
SSH接続ができれば何でもよいが、Tera Termなら後々使える便利機能が備わっているので、これをインストールした。
2. SDカードをフォーマットする
SDカードをPCに入れ、先ほどインストールしたSD Card Formatterを開く。「カードの選択」でSDカードを選択し、クイックフォーマットを実行する。ボリュームラベルは空欄のままで構わない。

↑フォーマットボタンが完了すると情報を確認できる。ファイルシステムがFAT32であることを確認すること。
3. イメージファイルをSDカードに書き込む
SDカードのフォーマットが完了したら、balena Etcherを開く。左側の「Select image」ボタンを押し、先ほどダウンロードしたRaspbianのZIPファイルを選択する。

↑画像ではZIPファイルを解凍したimgファイルを選択しているが、ZIPファイルのままでも問題ない。
SDカードが正しく選択されていることを確認したら、「Flash!」ボタンを押し、完了するまで待つ。途中でSDカードが再認識され、エクスプローラーが開く場合があるが、書き込みが完了すれば自動的に認識が解除されるので、そのままにしておく。
4. SSHを有効にするための設定を加える
書き込みが完了したら、SDカードを一度PCから抜いて、再び入れる。このとき、「ドライブD:を使うにはフォーマットする必要があります。フォーマットしますか?」というメッセージが(なぜか2つ)表示されるが、「キャンセル」を選択する。その後表示されるエラーメッセージも無視して構わない。

↑ここでフォーマットしてしまっては意味がない。

↑これも気にしなくてよい。
エクスプローラーを開き、SDカードのルートディレクトリ(一番上の階層)に「ssh」という名前の空フォルダを作成する。

↑ファイルを何も選択していない状態で右クリック、「新規作成→テキスト ドキュメント」を順次選択し、名前を「新しいテキスト ドキュメント.txt」から「ssh」に変更する。

↑他のファイル名に拡張子がついていることを確認する。
このとき、 「拡張子を変更すると、ファイルが使えなくなる可能性があります。変更しますか?」という警告メッセージが表示されるるが、気にせず「はい」を選択する。

↑気にせず「はい」を押せる勇気を持って。
※デフォルトのファイル名の最後に「.txt」がついていなかった場合は、拡張子が非表示の設定になっている。このまま空ファイルを作成しようとしても「ssh.txt」が完成してしまい、ラズパイに読み込まれないので注意すること(解決方法の参考:google検索結果)。
5. Wi-Fiに接続するための設定を加える
次に、先程と同様の手順でルートディレクトリに「wpa_supplicant.conf」というファイルを新規作成する。そのファイルを開き、次のコードを入力する。
なお、「接続したいWi-FiのSSID」と「パスワード」は適宜書き換えること(""は残しておく)。
ctrl_interface=DIR=/var/run/wpa_supplicant GROUP=netdev
update_config=1
country=JP
network={
ssid=“接続したいWi-FiのSSID”
psk=“パスワード”
key_mgmt=WPA-PSK
}
6. 「config.txt」に設定を書き加える
SDカードに既にある「config.txt」を開き、最後に次のコードを書き加える。
dtoverlay=dwc2
これよりラズパイでOTG機能が有効になるっぽい。
7. 「cmdline.txt」の内容を変更する
次に、「cmdline.txt」を開き、途中にある ”rootwait ”の直後に、以下の文を挿入する。
modules-load=dwc2,g_ether
Raspbian Buster Liteの場合、cmdline.txtの中身は次のようになる。
console=serial0,115200 console=tty1 root=PARTUUID=6c586e13-02 rootfstype=ext4 elevator=deadline fsck.repair=yes rootwait modules-load=dwc2,g_ether quiet init=/usr/lib/raspi-config/init_resize.sh
8. ラズパイを起動する
ここまでできたらようやくPCからSDカードを取り外す。安全な取り外しを忘れずに。ラズパイのSDカードスロットにSDカードを入れ、MicroUSBケーブルをラズパイの2つあるポートのうち、基盤に白い文字で「USB」と書かれている方に繋ぎ、PCとラズパイを接続する。
ラズパイのボード上にある黄色いLEDが点滅しだすので、点灯に代わるまで待機する(途中でPCからUSBメモリを接続したときと同じ音が出るが、すぐには認識できないので焦らず待つ)。
9. PCにラズパイを認識させる
ラズパイの黄色いLEDが点滅に代わったら、PCでデバイスマネージャーを開き(開き方分からんって人はこちら)、ドライバの登録をする。
「ポート(COMとLPT)」の中にある「USB シリアル デバイス(COM〇)」(〇は番号)を右クリックして、「ドライバーの更新」を選択する。
ドライバーの検索方法に「コンピュータを参照してドライバー ソフトウェアを検索」を選択し、最初にダウンロードし、解凍した「Pi Zero OTG Ethernet」を指定する。
ドライバーの設定が完了すると、「ネットワーク アダプター」の「USB Ethernet/RNDIS Gadget」としてラズパイがPCに認識されるようになる。
10. Tera TermでラズパイとSSH接続する
いよいよラズパイとの通信を行う。Tera Termを開き、ホスト欄に「raspberrypi.local」を入力し、「OK」を押す。ここでしばらくして「無効なホスト」というエラー表示が出たら、ラズパイの方でSSHの準備ができていないので、しばらく待ってから再接続するとよい。

初回接続時は「セキュリティ警告」が出てくるので、「続行」を選択する。「SSH認証」が出てきたら、「ユーザ名」に「pi」、「パスフレーズ」に「raspberry」を入力して、「OK」を押す。いろんな英語がずらーっと出てきて、最後に「pi@raspberry:~$」と表示されていれば、無事完了である。

↑初回のみ出てくるセキュリティ警告。「既存の鍵を、新しい鍵で上書きする」にチェックを入れて「続行」を押すと、次回から表示されなくなる。

↑「ユーザ名」に"pi"、「パスフレーズ」に"raspberry"を入力する。初期のパスワードではセキュリティ上よろしくないので、後��変更しておくこと。

↑この画面が出たら無事完了!
おまけ:最初に実行するとよいコマンド
今回インストールしたOSは、現時点でラズパイのサイトから入手できる最新のものだが、細かいアップデートがある場合があるので、以下の二つのコマンドを「pi@raspberry:~$」に続いて入力、実行する。
sudo apt update
sudo apt upgrade
upgradeの方は、結構処理に時間がかかる(15分程度)。途中でYとかqとか押すところが出てくる。
おまけ2:再起動とシャットダウンの方法
ラズパイもPCの一種なので、いきなり電源を切るという行為は避けるべきである。以下に、CUIにおける再起動とシャットダウンのコマンドを示す。
sudo reboot
sudo poweroff
rebootの方は再起動コマンドで、実行するとTera Termは閉じるが、ラズパイのLEDが点灯し始めてから再度接続することができる。
poweroffはシャットダウンコマンドだが、PCとの接続が解除されてもしばらくはPCから給電を行っており、処理が終わっていないので、ラズパイのLEDが完全に消灯するまではケーブルを繋いだままにしておくこと。
1 note
·
View note
Last Seen Blogs

n-e-z-a-b-u-d-k-a
nezabudka

dadbodbobby
Bobby Nash’s Tummy Supremacy

drusalas-blog
DruSalas

mountainmoth
fight them with love

fabiotadeu
https://taggo.one/fabiotadeu