#SchemaTypes
Explore tagged Tumblr posts
Visit Tumblr Blog
Explore Tumblr blogs with no restrictions, modern design and the best experience.
Last Seen Tumblr Blogs


Fun Fact
Tumblr’s website traffic is steadily declining.
Text
Unlocking the Potential of Schema Markup: Your Comprehensive Guide to Seamless Communication with Search Engines. Explore How Schema Markup Functions, Optimize Visibility, and Choose the Ideal Schema Format for Your Needs. Elevate Your Online Presence with LBN Tech Solutions.
#SchemaMarkup #SchemaTypes #HowSchemaWorks #OnlineVisibility #DigitalMarketing #SearchEngineOptimization #TechGuide #DigitalPresence #SEOStrategy #TechInnovation #MarketingTips #OnlineStrategy #WebVisibility #SchemaSEO #TechTrends #SearchEngines #LBNTechSolutions
#SchemaMarkup#SchemaTypes#HowSchemaWorks#OnlineVisibility#DigitalMarketing#SearchEngineOptimization#TechGuide#DigitalPresence#SEOStrategy#TechInnovation#MarketingTips#OnlineStrategy#WebVisibility#SchemaSEO#TechTrends#SearchEngines#LBNTechSolutions
1 note
·
View note
Photo

#schemapost #schemamarkup #schemaforseo #schemainstagram #schematypes #benefitsofschema #facebookschemapost #topbloggerinindia #schemacode #googleschemacode #googletopbloggersinindia #schemacode# #schemabloggerspot
1 note
·
View note
Text
Uppdateringar i Aiai
Byte av mailleverantör
Vi har bytt mailleverantör för de mail vi skickar via Aiai t.ex. vid påminnelse om att godkänna tidrapport. Vi har bytt till Flowmailer som har sitt säte i EU.
Uppdaterat namn på kollektivavtal
Vi har uppdaterat Aiai med de nya namnet för Fremias (tidigare KFO) kollektivavtal. Det nya namnet som nu syns i Aiai är:
2710 FREMIA Personlig assistans 2020-2023
Schematyp har bytt kostnadsställe
Vi har justerat schematypen “kompledig” så att den medräknas i tjänstgöringsgraden.
Länk till Aiai har uppdaterats
Du vet väl att du kan länka till Aiai via en knapp på er hemsida? Knappen ser då ut som nedan och era kunder och assistenter kommer via knappen direkt till inloggningen för Aiai.

Följ dessa två steg för att lägga upp en länk till Aiai via er hemsida:
1. Kopiera texten här nedan:
<a href=“https://app.aiai.se” style=“border: none; text-decoration: none;“><img width=“140” height=“51"src=“https://app.aiai.se/bilder/aiai_login.png” /></a>
2. Kontakta webbansvariga på ert företag och klistra in texten där ni vill att knappen ska dyka upp. Klart!
Vi har uppdaterat utseendet på knappen, så om du redan har en länkning till Aiai enligt ovan kan det vara bra att se till att denna fungerar även nu efter förändringen, om inte, behöver du göra om stegen enligt ovan.
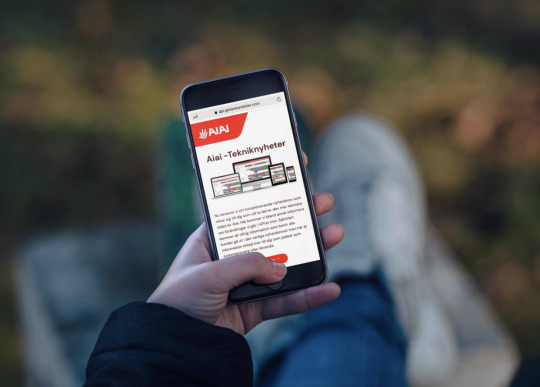
Aiai Tekniknyheter
Nu lanserar vi ett kompletterande nyhetsbrev som riktar sig till dig som vill ta del av den mer tekniska sidan av Aiai. Här kommer vi bland annat informera om förändringar vi gör i API:et mm.
Självklart kommer all viktig information som berör alla kunder gå ut i det vanliga nyhetsbrevet men här är informationen riktad mer till dig som jobbar som systemansvarig eller liknande. För att prenumerera på Aiai Tekniknyheter klickar du på länken nedan.
Börja prenumerera →
0 notes
Text
Höstens webbinarium
Webbinarierna är kostnadsfria i samarbete med Aiai

Från nyanställd till schemalagd
På detta webbinarium går vi steg för steg igenom hela processen från att du lägger in en ny medarbetare till att denne ska schemaläggas på ett pass. Vi visar vilka inställningar som är viktiga att göra innan det är dags för den första tidrapporteringen.
Datum: 7 September Tid: 11.00 - 11.45
Till anmälan
För arbetsledare – avstämning och kontroll
Detta webbinarium vänder sig till dig som är arbetsledare och som vill veta mer om hur du kan få en utökad kontroll över assistansen via rapporter och schemakontroll.
Datum: 20 September Tid: 11.00 - 11.45
Till anmälan
Personalhantering
Här får du får veta mer om hur du kan jobba med administrationen för din personal. Vi går bland annat igenom hur du kan registrera och söka kompetenser samt skriva anteckningar gällande din personal.
Datum: 23 September Tid: 11.00 - 11.45
Till anmälan
Hantera Beslut
På detta webbinarium går vi igenom hur du registrerar beslut under Inställningar/Beslut. Vi kommer även titta på uppföljning av beslut i Grundschemat, gällande schema och i rapporten för beslut.
Datum: 5 Oktober Tid: 11.00 - 11.45
Till anmälan
Avtal
På detta webbinarium berättar vi mer om funktionen avtal. Vi visar hur du enkelt kan skicka anställningsavtal för digital signering till medarbetare och hur du får en tydligt överblick över signerade avtal. Webbinariumet passar dig som är intresserad av eller som just ska börja använda funktionen avtal.
Datum: 7 Oktober Tid: kl 11.00 - 11.45
Till anmälan
Hantera vintertid i
Vill du veta mer om hur du ska hantera övergången till vintertid? På detta webbinarium går vi igenom hur tidrapporten påverkas av vintertiden.
Datum: 28 Oktober Tid: 11.00 - 11.45
Till anmälan
Rapporter
På detta webbinarium går vi igenom de rapporter som kan hjälpa dig att få en överblick över din verksamhet.
Datum: 10 November Tid: 11.00-11.45
Till anmälan
Administration av sjukfrånvaro
På detta webbinarium går vi igenom sjukhantering Vilka schematyper som finns för att hantera sjuk och hur du lägger in dem, vad visar rapporten Sjukintyg, vilken information innehåller Sjuklistan och hur kan du använda den och slutligen uppföljning av sjukdom i Export av data.
Datum: 16 November Tid: 11.00 - 11.45
Till anmälan
Ärendehantering
Med ärendehanteringen kan du få kontroll över alla företagets ärenden, du kan följa ärendet från start till mål och tilldela andra personer i organisationen arbetsuppgifter. På detta webbinarium går vi igenom hur ärendehantering fungerar samt ger tips hur du kan använda funktionen i olika situationer.
Datum: 30 November Tid: 11.00 - 11.45
Till anmälan
0 notes
Link
0 notes
Text
What's New in #Mongoose 5.9: SchemaType Default Options and Better Populate Limit https://t.co/flkQKbFudq #MongoDB https://t.co/PEyHPnXc4A
What's New in #Mongoose 5.9: SchemaType Default Options and Better Populate Limit https://t.co/flkQKbFudq #MongoDB pic.twitter.com/PEyHPnXc4A
— Macronimous.com (@macronimous) August 5, 2020
from Twitter https://twitter.com/macronimous August 06, 2020 at 12:22AM via IFTTT
0 notes
Photo

Fick väldigt dåliga nyheter igår angående mamma... Som tur var hjälpte det att ha ett skönt häng med dessa två innan jobbet. Serdar var också med ett tag, men han började tidigare än oss. Det är så skönt att vi har återgått till våra vanliga scheman! Jag älskar verkligen att börja 20:45. Speciellt på sommaren. Visst finns det fördelar och nackdelar med båda schemorna, men under sommaren kan jag inte tänka mig någon annan schematyp faktiskt. Dock älskar jag inte att jobba så många dagar som man behöver göra och avsaknaden av variationen med schemat jag har nu... Men man kan inte få allt här i livet. Så är det bara. Är iaf otroligt tacksam över att ha så fina människor runt omkring mig. När livet är hårt gör dessa allting lite bättre. Att alltid få skratta mycket, när det finns så mycket som inte är roligt i livet, är ett privilegium. Det är ovärderligt. Det är också väldigt najs att ha vänner som bor så nära mig. Man behöver inte planera hela tiden, utan det tar bara några minuter så kan alla vara på plats. So put your shades on. Look cool. And smile away the sorrow. . . . . . Tags: (på/i Malmskillnadstrappan)
0 notes
Text
Enhance your SEO strategy by diving into various schema markup types. Discover the potentials of Article, Blog, Local Business, and Recipe Schema to enrich your web content and boost your online visibility.
#SEOTips #SchemaMarkup #OnlineVisibility #DigitalMarketing #WebContent #SEOStrategy #ArticleSchema #BlogSchema #LocalBusinessSchema #RecipeSchema #SearchEngineOptimization #ContentStrategy #WebPresence #SchemaSEO #OnlineMarketing #SERPBoost #StructuredData #SchemaTypes #MarketingTips #ContentEnrichment #LBNTechSolutions
#SEOTips#SchemaMarkup#OnlineVisibility#DigitalMarketing#WebContent#SEOStrategy#ArticleSchema#BlogSchema#LocalBusinessSchema#RecipeSchema#SearchEngineOptimization#ContentStrategy#WebPresence#SchemaSEO#OnlineMarketing#SERPBoost#StructuredData#SchemaTypes#MarketingTips#ContentEnrichment#LBNTechSolutions
1 note
·
View note
Text
Schema helps search engines understand your content better, making it show up more effectively in search results. Learn why it's important for SEO, discover its types, and find out how using Schema Markup (Structured Data) on your site can boost your search engine strategy. Upgrade your SEO game today!
#SchemaMarkup #StructuredData #SEOStrategy #SearchEngineOptimization #SEOTips #SchemaSEO #DigitalMarketing #ContentStrategy #SchemaTypes #SERPBoost #LBNTechSolutions
#SchemaMarkup#StructuredData#SEOStrategy#SearchEngineOptimization#SEOTips#SchemaSEO#DigitalMarketing#ContentStrategy#SchemaTypes#SERPBoost#LBNTechSolutions
1 note
·
View note
Text
Nyheter i Aiai
Digitalt inskick av blankett FK3066
Nu det möjligt att digitalt via Aiai skicka blanketten FK3066 - Anmälan från arbetsgivare - uppgifter om en personlig assistent till Försäkringskassan.
Du hittar den nya funktionen på assistentens profilsida under den tidigare sektionen för FK3066.
För mer ingående information om funktionen se vårt tidigare nyhetsbrev här.
Här kan du se vår korta instruktionsfilm om den nya funktionen.
youtube
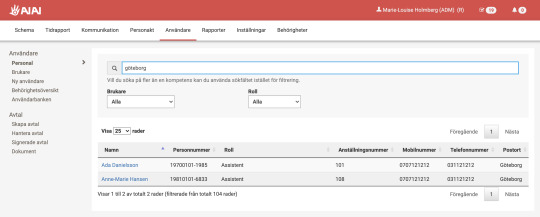
Söka på ort under användare
Nu är det möjligt att söka och sortera på ort under Användare - Personal i Aiai. Funktionen kan vara till hjälp när du till exempel behöver hitta en vikarie på en specifik ort. Skriv ortnamnet i sökfältet så kommer all personal på denna postort upp. Funktionen kräver att postorten är registrerad under assistentens profilsida.
Nytt utseende på pass i schemat
På lagda pass i schemat syns nu en svart etikett som visar vilken schematyp passet har. Uppdatering är ett steg på väg i våra kommande uppdateringar kring beslutshanteringen i Aiai. Framöver kommer det även vara synligt vilket beslut det enskilda passet är kopplat till.
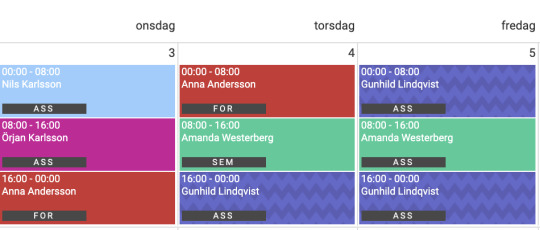
Så här kommer det se ut i schemat när den nya beslutshanteringen är på plats. Då syns både schematyp och till vilket beslut passet hör.

0 notes
Text
Nyheter i Aiai
Omkostnadsrapport, uppföljning av timmar som debiteras företaget
Vi lanserar nu en ny rapport som heter Omkostnader. I den nya rapporten kan du följa upp hur många timmar som har lagts på till exempel utbildningstid, introduktion eller tjänstledighet. I rapporten delas schematyperna upp på frånvaro- och närvarotid för varje brukare och visas under varsin flik. När du klickar på raden med timmar får du upp en detaljvy där du kan se exakt vilken schematyp som passen har. Den nya rapporten hittar du i menyn under Rapporter.
Registrera jouravbrott i Aiai
Om en assistent gjort ett avbrott under ett jourpass justeras detta enklast i tidrapporten. Nedan kan du se vår instruktionsfilm för jouravbrott, du kan också läsa mer om jouravbrott i kundportalen här.
youtube
0 notes
Text
Recreating the CodePen Gutenberg Embed Block for Sanity.io
Chris recently put out a neat CodePen Embed Block for the Gutenberg editor in WordPress. It allows you to embed a Pen just by dropping in its URL. From there, you get access to control the size, theme, and the default tabs that render on initial load. Super neat!
Having a live preview of the embedded Pen while writing is so handy!
But it got me thinking: How difficult would it be to recreate it with Sanity Studio’s Portable Text editor? (Spoiler: Not that difficult). Since I already knew how to do it, it took me under seven minutes from start to finish. This tutorial takes you through how to get up and running with a studio, and how to add the schemas and the custom preview component for a CodePen embed.
So this is me recreating @chriscoyier’s CodePen Gutenberg Block for @sanity_io’s rich text editor in less than 7min (3x video). Best thing is, you actually just store the structured data, making it queryable, future proof, and easy to integrate with whatever frontend you prefer. https://t.co/psPn6NtPjz pic.twitter.com/6aSGKerHfO
— knut (in SF 🇺🇸) (@kmelve) January 18, 2020
That felt so cool that I want to teach you how to do it as well. Let's dive right into it.
Getting Sanity Studio up and running locally
First, you'll need to install Sanity Studio locally on your machine. In this tutorial we will be using the blog studio that you can initiate from the command line, but you can also check out the different starters on sanity.io/create. You should be able to tag along with one of those too.
This tutorial assumes that you have a bit of knowledge of JavaScript. It will use a bit of React, but only a small part. You should have installed node and npm if you haven't already.
Oh, and you'll want the Sanity CLI, which you can snag with the command line:
npm install --global @sanity/cli
Once the installation is done, you can initiate a new Sanity Studio with a new project by running the command sanity init. It will let you log in with your Google or GitHub account (or make a new account with an email/password). Give your project a name and follow the instructions. When given the options for a project template, choose the blog one:
? Select project template Movie project (schema + sample data) E-commerce (schema + sample data) ❯ Blog (schema) Clean project with no predefined schemas
After completing the steps, change directory (cd) into the new project folder and open it in your favorite code editor. To start the developer server that will also hot reload your studio when you make changes, run sanity start. To stop this server, you press ctrl + C in most command line tools.
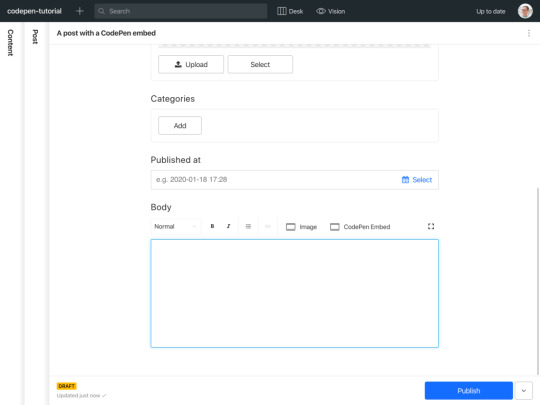
Adding the schemas for a CodePen embed
Schemas define which document types that are available in the Studio, and which input fields they have. These schemas are defined in JavaScript objects that you import into the schemas.js file, where they are exported as a function that the Studio translates into its UI. There's a lot you can do with these schemas, but in this tutorial, we will keep it reasonably simple.
Start with adding a new file inside /yourproject/schemas called codepen.js. Then type in this code:
export default { name: "codepen", type: "object", title: "CodePen Embed", fields: [ { name: "url", type: "url", title: "CodePen URL" } ] };
Then you can go to /yourproject/schemas/schema.js and add the following two lines of code to it:
import createSchema from "part:@sanity/base/schema-creator"; import schemaTypes from "all:part:@sanity/base/schema-type"; import blockContent from "./blockContent"; import category from "./category"; import post from "./post"; import author from "./author"; import codepen from "/codepen.js"; //
So what did we just do? Well, we have now made this CodePen object available as a type in other schemas in the Studio. In other words, you can now add type: 'codepen' to get those fields anywhere else in the schema code where you add fields. Adding this type to the rich text field is also our next step. Hang on!
Adding the CodePen field to the rich text editor
Before diving into the code bit, let us take a step back and look at what is going on in terms of the data formats we operate with, and how WordPress and Sanity differ slightly.
While Gutenberg stores rich text as JSON in its runtime (which is great!), what developers end up dealing with is mostly this content as HTML and JSON objects inside of HTML comments.
Sanity stores and distributes rich text content as Portable Text, which developers then serializes in their frontends. That means that you get fine-grained control over how rich text content is rendered by letting you use custom components for your favorite framework, either it's React, Vue, Svelte, or .NET, PHP, or even Markdown.
In other words, you store your content as structured data in Sanity’s backend, and then decide how you want to use the data inside your frontend components. But enough exposition, let's get back to the code!
Open /schemas/blockContent.js and notice that it's of the type array. Yes, rich text is an array of different types, where one of them has to be of the block type (in which text paragraphs are stored). So the simplest way of making rich text is the following schema definition:
export default { name: "body", type: "array", title: "Body", of: [ { type: "block" } ] };
Now, blockContent.js has a bunch of more stuff. You can see styles, lists, marks, and so on. All defining which properties should be available for the author. In the top array, there are two types block and image. We are going to add the third one, codepen:
export default { title: "Block Content", name: "blockContent", type: "array", of: [ { type: "block" // ... }, { type: "image", options: { hotspot: true } }, { type: "codepen" } ] };
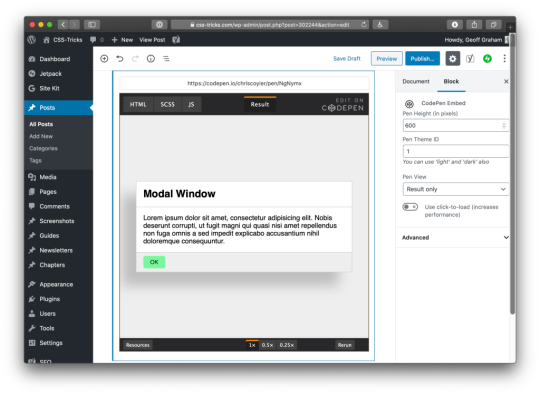
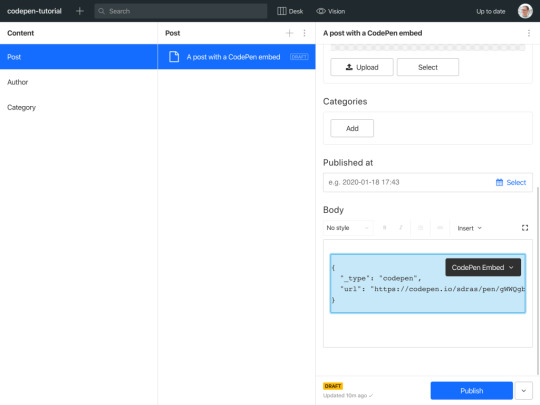
Save the file, and that's it! If you now run sanity start in your command line (assuming you haven't already), and open the Studio on https://localhost:3333, you should be able to find your new field in the rich text editor under the "post" type:
If you try out the new button, you'll get a modal with the URL field that you defined in the previous section. Feel free to add the URL from a cool CodePen that you have found. We will use this one from the legendary Sara Drasner; it's pretty cool.
CodePen Embed Fallback
Just showing the URL value in the editor isn't especially inspiring, though. So let's go ahead and add the actual CodePen embed so we can interact with it directly in the editor!
Adding the CodePen embed as a preview
Open /yourproject/schemas/codepen.js again. Now we are going to make a small React component for our preview. Start by importing React in the top, and the boilerplate for the React component that we will turn into the embed:
import React from "react"; const CodePenPreview = ({ value }) => { return <pre>{JSON.stringify(value, null, 2)}</pre>; }; export default { name: "codepen", type: "object", title: "CodePen Embed", fields: [ { name: "url", type: "url", title: "CodePen URL" } ] };
The JSON.stringify stuff is a temporary little way of outputting the incoming data in a readable manner. You could also use console.log(value), but who has time to open the developer console?
Now you must tell Sanity how to use this component for the preview. As well as which of the fields in the object it should select for the value in the preview component.
import React from "react"; const CodePenPreview = ({ value }) => { return <pre>{JSON.stringify(value, null, 2)}</pre>; }; export default { name: "codepen", type: "object", title: "CodePen Embed", preview: { select: { url: "url" }, component: CodePenPreview }, fields: [ { name: "url", type: "url", title: "CodePen URL" } ] };
The editor should look something like this after you saved your changes:
Cool! Now we want to take the url value and somehow integrate it with a CodePen embed. The easiest way to go about this is to fit the markup for CodePen’s iFrame embed, and fit into our preview component in React.
The original iFrame element will look like this:
<iframe height="265" style="width: 100%;" scrolling="no" title="React Animated Page Transitions" src="https://codepen.io/sdras/embed/gWWQgb?height=265&theme-id=dark&default-tab=js,result" frameborder="no" allowtransparency="true" allowfullscreen="true"> See the Pen <a href='https://codepen.io/sdras/pen/gWWQgb'>React Animated Page Transitions</a> by Sarah Drasner (<a href='https://codepen.io/sdras'>@sdras</a>) on <a href='https://codepen.io'>CodePen</a>. </iframe>
If we paste this snippet into our preview component, it will almost work. In order to make it JSX-compatible you'll have to some few changes to some of the HTML-attributes. Make sure that you change:
style="width: 100%;" to style=
frameborder="no" to frameBorder="no"
allow-transparency="true" to allowTransparency
allow-fullscreen="true" to allowFullScreen
You can remove the content (links, etc.) inside of the iframe, because it isn't particularly useful inside the studio. What we should end up with is something like this:
import React from "react"; import Codepen from "react-codepen-embed"; const CodePenPreview = ({ value }) => { return ( <iframe height="265" style= scrolling="no" title="React Animated Page Transitions" src="https://codepen.io/sdras/embed/gWWQgb?height=370&theme-id=dark&default-tab=js,result" frameBorder="no" allowTransparency allowFullScreen />); }; // ...
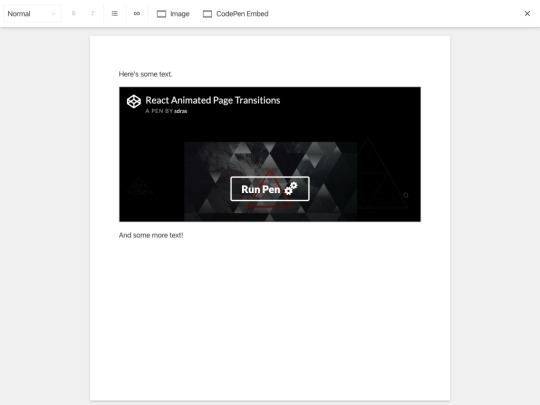
When saved, we should be able to see the CodePen embed inside the rich text editor:
Notice that the iFrame has an embed URL with some parameters for how it should be displayed. Of course, we could've asked someone to dive into CodePen to obtain this URL, but it's probably better for to use the regular one. We'll take the effort to reassemble into what we need:
The last part is to take the URL from the field, and get the hash and user out of it.
We split the URL string on forward slashes into an array. Then we use array destructuring to assign the different array elements to a variable. Since we only need the user and the hash we leave the other positions empty. This method isn't bulletproof, as it assumed a specific format for the URL, but it works for this example. Then we reassemble the embedUrl by using template literals.
import React from "react"; const CodePenPreview = ({ value }) => { const { url } = value; const splitURL = url.split("/"); // [ 'https:', '', 'codepen.io', 'sdras', 'pen', 'gWWQgb' ] const [, , , user, , hash] = splitURL; const embedUrl = `https://codepen.io/${user}/embed/${hash}?height=370&theme-id=dark&default-tab=result`; return ( <iframe height="370" style= scrolling="no" title="CodePen Embed" src={embedUrl} frameBorder="no" allowTransparency allowFullScreen /> ); }; // ...
Save the changes and voilá; we're pretty much done with the custom CodePen block!
Taking it further
Now, you probably noticed that Chris had put more settings into his custom block. Nothing is stopping us from doing the same! If we look up the documentation for the React CodePen embed component that we installed, we'll find a table of properties that it can take. We can add these as fields in the schema definition. For example, if we wanted to add the themeId, we could do it as follows:
import React from "react"; import Codepen from "react-codepen-embed"; const CodePenPreview = ({ value }) => { const { url, themeId = "dark" } = value; // <= add themeId here, default it to "dark" const splitURL = url.split("/"); // [ 'https:', '', 'codepen.io', 'sdras', 'pen', 'gWWQgb' ] const [, , , user, , hash] = splitURL; const embedUrl = `https://codepen.io/${user}/embed/${hash}?height=370&theme-id=${themeId}&default-tab=result`; // <= add themeId here return ( <iframe height="370" style= scrolling="no" title="CodePen Embed" src={embedUrl} frameBorder="no" allowTransparency allowFullScreen /> ); }; export default { name: "codepen", type: "object", title: "CodePen Embed", preview: { select: { url: "url", themeId: "themeId" // <= add themeId here }, component: CodePenPreview }, fields: [ { name: "url", type: "url", title: "CodePen URL" }, // Add the new field below { name: "themeId", type: "string", title: "Theme ID", description: 'You can use "light" and "dark" also.' } ] };
Conclusion
We just looked at how schemas for Sanity Studio work, and learned how to make previews for custom components to boot! Hopefully, you now know enough to make pretty much any custom component with a preview using these same principles. If you do, I would love to know about it either on Twitter or in the comments.
The post Recreating the CodePen Gutenberg Embed Block for Sanity.io appeared first on CSS-Tricks.
Recreating the CodePen Gutenberg Embed Block for Sanity.io published first on https://deskbysnafu.tumblr.com/
0 notes
Text
What's New in #Mongoose 5.9: SchemaType Default Options and Better Populate Limit https://t.co/IaF2NcwnEf #MongoDB https://t.co/PPY4E9uzmz
What's New in #Mongoose 5.9: SchemaType Default Options and Better Populate Limit https://t.co/IaF2NcwnEf #MongoDB pic.twitter.com/PPY4E9uzmz
— Macronimous.com (@macronimous) May 19, 2020
from Twitter https://twitter.com/macronimous May 20, 2020 at 02:25AM via IFTTT
0 notes
Text
Nyheter i Aiai
Företaget som kostnadsställe vid registrering av beslut - på plats i Aiai den 6 februari
Det kommer nu att vara möjligt att välja företaget som kostnadsställe vid registrering av beslut. Detta gör uppföljningen av kostnader som endast debiteras företaget enklare.
Hur går jag tillväga?
Registrera ett nytt beslut och namnge det.
Ange den period du vill följa upp företagstimmarna för.
Markera att beslutet ska ha kostnadsställe Företag.
Pass i schemat med schematyper som är kopplade till företaget såsom introduktion, utbildning, möte mm (se schematypslista för komplett information) kommer nu visas i beslutsrapporten. Framöver kommer det vara möjligt att differentiera de olika kostnaderna i olika beslut såsom utbildningar i ett beslut och introduktion i ett annat, i dagsläget kommer alla till ett och samma beslut.

Uppdateringar i Aiai Avtal - på plats i Aiai den 6 februari
Huvudadministratörer kan nu hantera alla avtal som är skapade i företaget. Det är en efterfrågad funktion som gör att arbetet i Aiai Avtal blir mer flexibelt och Huvudadministratören får en övergripande kontroll av alla avtal skapade i företaget.
Det har även tillkommit en Tabort-knapp vid varje signeringspart så att du som administratör enkelt ska kunna ta bort signeringsparter. Vi har laddat Aiai Avtal med ytterligare nya avtalsmallar. De nya mallarna ingår kostnadsfritt för alla kunder med Aiai Avtal. De nya mallarna är
Mall för bilavtal
Mall för nyckelkvittering
För företag som är anslutna till KFO finns följande mallar.
Upphörande av anställning så länge uppdraget varar
Besked om avskedande
Uppsägning pga. arbetsbrist
Bilaga (Anställning per arbetad timme)
Kontakta vår kundsupport om du vill aktivera de nya mallarna.
Vill du beställa Aiai Avtal? Fyll i dina kontaktuppgifter här så kontaktar vi dig och berättar mer.
0 notes
Text
Uppdatering av tidrapporten
Tidrapporten har uppdaterats i syfte att göra den mer läsbar och att spara papper i de fall den skrivs ut.
Utskriften av tidrapporten sker nu utan sidbrytningar för nya schematyper. Varje schematyp har en egen rad med delsumma och allt skrivs ut löpande för att generera så få sidor som möjligt.

0 notes
Text
Nyheter i Aiai
Uppdatering av meddelandesidan
Meddelandesidan har blivit mer överskådlig och det är nu lättare att välja mottagare.
Ny struktur för Aiai-tidrapporten
Den pdf som kan användas som löneunderlag i Aiai har fått ny struktur genom en mer tydlig uppdelning av kostnadsställen och schematyper med tillhörande delsummeringar.
Förbättringar i mailfunktionen
För att säkerställa minsta möjliga risk att e-post från Aiai fastnar i mottagarens spamfilter har vi bytt e-postleverantör.
Gallring
Enligt Socialstyrelsen ska personakter gallras (rensas) i de fall de har varit inaktiva längre än 24 månader. I Aiai nås funktionen Gallring via Personakten. Maila [email protected] om du vill veta mer om funktionen eller Aiai Personakt. Innan du börjar gallra rekommenderar vi att du läser igenom de lagar, föreskrifter och allmänna råd som är aktuella.
0 notes