#Snagit shortcut keys
Explore tagged Tumblr posts
Visit Tumblr Blog
Explore Tumblr blogs with no restrictions, modern design and the best experience.
Last Seen Tumblr Blogs


Fun Fact
Tumblr was named as a finalist in Lead411’s New York City Hot 125 in Aug 2010.
Text
How to Take a Screenshot on HP Laptop: Easy Methods (2025)
Taking a screenshot on an HP laptop is a useful skill, whether you're capturing important information, saving error messages, or sharing content. In this guide, we’ll cover multiple methods to take a screenshot, including keyboard shortcuts, built-in tools, and third-party apps.
1. Quick Screenshot Using Print Screen (PrtScn)
One of the fastest ways to take a screenshot on an HP laptop is using the Print Screen (PrtScn) key.
Steps to Use Print Screen:
Locate the PrtScn key on your keyboard (usually in the top row).
Press PrtScn to copy the entire screen to the clipboard.
Open Paint, Word, or any image editor.
Press Ctrl + V to paste the screenshot.
Save the file in your preferred format.
✅ Best for: Capturing the full screen quickly.
2. Capture Active Window Using Alt + PrtScn
If you only want to capture the active window instead of the full screen:
Press Alt + PrtScn simultaneously.
Open an image editor and press Ctrl + V to paste the image.
Save the screenshot.
✅ Best for: Capturing only the active window.
3. Windows + Shift + S (Snip & Sketch)
Windows offers a more advanced snipping feature called Snip & Sketch, allowing more control over screenshots.
How to Use Windows + Shift + S:
Press Windows + Shift + S.
The screen dims, and a toolbar appears.
Select a snipping mode:
Rectangular Snip
Freeform Snip
Window Snip
Full-Screen Snip
The screenshot is copied to the clipboard.
Paste it into an editor or save it from the Snip & Sketch window.
✅ Best for: Quick and flexible screenshots.
4. Snipping Tool (Pre-installed in Windows)
HP laptops come with the Snipping Tool, which allows more precise screenshots.
How to Use the Snipping Tool:
Open Snipping Tool (Search for it in the Start menu).
Click New and select a screenshot mode.
Capture the desired area.
Edit and save your screenshot.
✅ Best for: Custom area selection with easy editing.
5. Taking a Screenshot on an HP Laptop with Windows 11
Windows 11 users have an even more streamlined experience:
Press Windows + PrtScn to automatically save a full-screen screenshot to the Screenshots folder in Pictures.
Use Windows + Shift + S for Snip & Sketch.
The Snipping Tool has an updated UI with new features.
✅ Best for: Windows 11 users looking for built-in screenshot tools.
6. Using the Xbox Game Bar for Screenshots (Windows 10 & 11)
The Xbox Game Bar allows capturing screenshots and recording videos.
Steps to Capture Screenshots with Xbox Game Bar:
Press Windows + G to open the Game Bar.
Click the Camera icon to capture a screenshot.
Find your saved screenshot in Videos > Captures folder.
✅ Best for: Gamers and users who need built-in screen recording.
7. Third-Party Screenshot Tools for HP Laptops
If built-in tools are not enough, consider third-party apps like:
Lightshot – Quick and easy screenshot tool with editing features.
Greenshot – Lightweight and customizable screenshot utility.
Snagit – Advanced tool with annotations and video capture.
✅ Best for: Users needing extra editing and sharing features.
8. Taking a Screenshot on an HP Chromebook
If you're using an HP Chromebook, the shortcuts are different:
Full screen: Press Ctrl + Show Windows key.
Selected area: Press Ctrl + Shift + Show Windows key, then drag to select an area.
✅ Best for: Chromebook users looking for quick screenshots.
9. Where Are My Screenshots Saved?
Windows + PrtScn: Pictures > Screenshots
Snipping Tool & Snip & Sketch: Asks where to save.
Xbox Game Bar: Videos > Captures
Conclusion
Now that you know multiple ways to take a screenshot on an HP laptop, you can choose the method that suits your needs best. Whether you prefer simple keyboard shortcuts, built-in tools, or third-party applications, capturing your screen has never been easier!
🚀 Did this guide help? Share it with others who might need it!
Resources
How to Take Screenshot on HP Laptop:A Step by Step Guide
1 note
·
View note
Text
How To Screenshot on Windows

Capturing screenshots on Windows is a fundamental skill that enhances productivity and facilitates effective communication. Whether you're a tech novice or an experienced user, knowing multiple methods to capture your screen can be invaluable. Here's a comprehensive guide on various ways to take screenshots on Windows: 1. Using the Print Screen Key The Print Screen (PrtScn) key is a quick and simple way to capture your entire screen or specific windows. - Capture Entire Screen: Press the 'PrtScn' key to take a screenshot of your entire display. The image is copied to your clipboard. - Capture Active Window: Press 'Alt + PrtScn' to capture only the active window. This saves a screenshot of the active window to the clipboard. 2. Snipping Tool: A Precise Screenshot Tool Windows includes a built-in tool called Snipping Tool, perfect for precise screenshots. - Open Snipping Tool: Search for 'Snipping Tool' in the Start Menu and open it. - Capture Custom Areas: Click 'New' and select the area you want to capture. You can choose free-form, rectangular, window, or full-screen snips. 3. Snip & Sketch: Enhanced Screenshot Tool In newer Windows versions, Snip & Sketch has replaced the Snipping Tool, offering more functionalities. - Open Snip & Sketch: Press 'Windows key + Shift + S' or search for 'Snip & Sketch' in the Start Menu. - Capture and Annotate: Select the type of snip you want (rectangular, freeform, fullscreen) and annotate or edit the screenshot before saving. 4. Using Keyboard Shortcuts Windows provides additional keyboard shortcuts for specific screenshot functions. - Windows Key + Print Screen: Captures the entire screen and saves the screenshot in the 'Screenshots' folder within the 'Pictures' directory. - Windows Key + Shift + S: Opens Snip & Sketch for quick snipping. 5. Game Bar for Gaming Screenshots For gamers, the Game Bar offers an easy way to capture gameplay moments. - Open Game Bar: Press 'Windows key + G' to open the Game Bar. - Capture Gameplay: Click on the camera icon or press 'Windows key + Alt + PrtScn' to capture gameplay screenshots. 6. Using Third-Party Apps Several third-party applications offer advanced screenshot functionalities and editing tools. - Snagit: Allows for capturing scrolling screenshots, video recording, and advanced editing. - Lightshot: Enables quick and easy capturing of specific areas with instant editing options. Mastering these methods equips you with the ability to capture and share your screen effortlessly on Windows. Experiment with these techniques to find the one that suits your needs best and enhances your workflow. Whether it's for professional documentation, creative projects, or sharing moments from your favorite games, knowing how to take screenshots efficiently can significantly enhance your Windows experience. Read More: The Homepage and follow our Instagram Read the full article
0 notes
Text
How to Take a Screenshot on MSI Laptop?

To take a screenshot on a msi laptop, press the windows key and the print screen key simultaneously. Once pressed, the screenshot will be saved in the screenshots folder of your pictures directory. You can then view and edit the screenshot as needed. Want to capture and save a screenshot on your msi laptop? With just two keys, you can easily snap a screenshot of your screen. By pressing the windows key and the print screen key at the same time, the screenshot will be quickly saved in the screenshots folder within your pictures directory. From there, you can conveniently access and edit your newly captured image. Whether you want to share a funny meme, capture important information, or document an issue for technical support, taking a screenshot on your msi laptop is a simple and efficient process.
Using The Built-In Windows Shortcut
Taking a screenshot on an msi laptop is simple. Just use the built-in windows shortcut. To do this, press the win key and the prtscn/sysrq key simultaneously. The screenshot will be saved in the pictures folder. You can find it in the screenshots subfolder. It's an easy and quick way to capture what's on your msi laptop's screen. Whether you need to save an image, capture an error message, or keep a record of important information, this shortcut will come in handy. So next time you want to take a screenshot on your msi laptop, remember this convenient windows shortcut. It's a useful trick that many people find helpful in their day-to-day tasks. Happy screenshotting!
Utilizing Msi Dragon Center Software
Taking a screenshot on an msi laptop is easy with the help of msi dragon center software. To begin, download and install the software from the official msi website. Once installed, open the application and go to the capture tab. From there, you can customize your screenshot preferences, such as selecting the desired format and destination folder. When you're ready to take a screenshot, simply click on the capturing button. The software will capture the screen and save the screenshot according to your preferences. With msi dragon center, capturing screenshots on your msi laptop has never been easier. https://www.youtube.com/watch?v=t7WcKfQnIV8
Taking Screenshots With Third-Party Applications
To take a screenshot on an msi laptop, you can use various third-party applications like snagit, greenshot, or lightshot. Start by downloading and installing your chosen software from the official website. Once installed, open the application and follow the provided instructions to capture screenshots with ease. These third-party applications offer additional features and customization options to enhance your screenshot-taking experience on your msi laptop. Simplify the process by exploring these software options and finding the one that suits your needs best. With simple steps and user-friendly interfaces, these applications make capturing screenshots a breeze. Upgrade your screenshot game today and start showcasing your msi laptop's features, tips, and tricks with sharp and professional visuals.
Utilize Hotkey Customization
Utilize the fn+f7 key to access the msi keyboard for customizing screenshot hotkeys on your msi laptop. Customize the hotkeys to match your preferences and make capturing screenshots a breeze. With this simple customization, you can save valuable time and effort when you need to capture and share important information with others. Take control of your screenshot process and make it more efficient by personalizing the hotkeys on your msi laptop. Whether it's for work, school, or personal use, customizing the screenshot hotkeys will streamline your workflow and enhance your overall laptop experience. Say goodbye to the hassle of searching for the right keys to capture screenshots and elevate your productivity with this easy trick.
Fine-Tune Screenshot Settings
Taking a screenshot on an msi laptop is a simple task that requires some fine-tuning. Adjusting the screenshot settings within your chosen software allows you to modify the image quality. Experimenting with various file formats, such as jpeg or png, helps you find the option that suits your preferences. By following these instructions, you can easily capture screenshots on your msi laptop. Remember to keep your sentences brief and engaging, avoiding repetitive terms and overused phrases. This way, you ensure that your content is easy to understand and optimized for search engines. Take advantage of the features offered by your laptop and start capturing and sharing screenshots effortlessly.
Frequently Asked Questions For How To Take A Screenshot On Msi Laptop
How Do I Take A Screenshot On An Msi Laptop? To take a screenshot on an msi laptop, press the windows key + print screen (prtsc) button together. The screenshot will be saved in the screenshots folder of the pictures library. Where Can I Find My Screenshots On An Msi Laptop? All the screenshots you take on an msi laptop are saved in the screenshots folder, which is located in the pictures library. You can access the pictures library by going to the file explorer and navigating to this pc > pictures > screenshots. Can I Change The Save Location Of My Screenshots On An Msi Laptop? Yes, you can change the save location of your screenshots on an msi laptop. Right-click on the screenshots folder in the pictures library and select "properties. " In the properties window, click on the "location" tab and choose a new folder or drive to save your screenshots. How Can I Take A Screenshot Of Just A Specific Area On An Msi Laptop? To take a screenshot of a specific area on an msi laptop, press the windows key + shift + s. this will open the snipping tool. Use your mouse to select the area you want to capture, and the screenshot will be copied to your clipboard. You can then paste it into an image editing program or document. Is There A Shortcut To Take A Screenshot Of Just The Active Window On An Msi Laptop? Yes, there is a shortcut to take a screenshot of just the active window on an msi laptop. Press alt + print screen (prtsc) together, and it will capture a screenshot of the currently active window. You can then paste the screenshot into an image editing program or document.
Conclusion
To sum up, taking a screenshot on your msi laptop is a simple process that can be effortlessly done using the built-in tools or third-party software. Whether you're capturing a funny meme or saving an important document, having the knowledge of how to take a screenshot can be incredibly useful. By following the steps we've outlined in this guide, you can quickly and easily capture and save screenshots on your msi laptop. Remember to consider your specific needs and choose the method that works best for you. With a few simple clicks or keystrokes, you'll be able to effortlessly save and share screenshots, enhancing your productivity and communication. So, go ahead and start capturing those moments on your msi laptop today! Read the full article
0 notes
Text
Snagit shortcut keys

SNAGIT SHORTCUT KEYS SERIAL KEY
SNAGIT SHORTCUT KEYS LICENSE KEY
SNAGIT SHORTCUT KEYS PDF
SNAGIT SHORTCUT KEYS SERIAL
Creation of high contrast recordings through Grayscale impacts.
Expression of shading amendment through Instagram channels and speedy style devices.
Editing of 4k and 2k determination recordings.
For Example, radar, bubble, spline, pipe, spline territory, pyramid.
Presence of 3D outlines for the upgraded show of complex information.
Recording of copyright data to the yield document.
Video picture better engaged through obscure and hone impacts.
Internet association with initiate the paid adaptation of the program.
Administrator authorizations are required for the establishment and enactment of the program.
Disk space of no less than 50 Mb or higher.
1024×768 pixels with 16-bit shading or higher for screen determination.
AMD, INTEL or whatever another good processor, with a work recurrence of 1.5GHz or higher.
Microsoft Windows XP SP3/WIN 7/WIN 8/WIN 10/VISTA.
All kinds of formats can be downloaded such as pdf, mp4, avi, mp3, etc.
Videos from online streaming websites can be easily downloaded from IDM directly.
IDM supports integration with every browser.
Compatible with more than 250 Internet browsers.
Supports full website download in HTML format.
Drag and Drop are useful and time-saving.
Compatible with all the versions of Windows.
All the tools and extra features are updated from time to time.
Supports batch downloads and multi downloads to accelerate the downloading.
Download accelerator feature speeds up our downloads up to 7 times.
Schedule feature helps us download the files on our time.
Pause and resume feature for the existing downloads.
Fixed malicious program in more than one torrent import.
Added option in browser settings to ask earlier than establishing a new tab.
Added support for the encrypted video document.
Added enhance download option to increase/stabilize download.
Updated: Advanced options for managing license.
Updated: The add-in for Office applications was re-stylized.
For New: Page visibility options by size and orientation.
SNAGIT SHORTCUT KEYS PDF
New: Send generated PDF automatically via Outlook.
For New: Option to remove text based on formatting.
New: Custom Save Rules with support for regular expressions.
New: Added User tags that can be detected from the original document.
WHAT’S NEW IN VERSION? Download Snagit With Product Key Crack PC and Mac Screen Capture Overview of Snagit 2019 Features! Snagit Free Version 7.2.5 It’s a very professional and time-consuming piece of software at many levels. Reply to emails immediately, with a full and brief set of points and related information. Snagit is a superb tool for business, or for merely bringing brightness to your conversation. It is also a Time-consuming and Professional conversation.
SNAGIT SHORTCUT KEYS LICENSE KEY
Snagit 2019 Crack Plus License Key Full Free Here! snagit activator - all editions (updated). Here is the direct link for those who want to activate their snagit.
SNAGIT SHORTCUT KEYS SERIAL
However, i activated my snagit with activator so i don' need to add any serial key.
SNAGIT SHORTCUT KEYS SERIAL KEY
I have tried this serial key for snagit 13 but it's not valid and it's not working for me. Or walk people through workflows and answer questions with a quick screen recording. If you're struggling to communicate clearly, Snagit lets you easily get your point across. Snagit's award-winning screen capture software is the only program with built-in advanced image editing and screen recording. Snagit crack is a professional software for capturing and recording your screen.Experience has shown that educational tutorials have a great impact on teaching computer-related topics, and they are much more effective than educational books. Snagit 2019.1.5 Crack + Keygen (Updated) freeload. Originally for the Microsoft Windows OS, recent versions have also been available for macOS, but with fewer features. Techsmith SnagIt 2019 Crack With Serial Key! Techsmith SnagIt 2019 Crack With License Key is a screenshot program that can capture video display and audio output.
0 notes
Text
Techsmith Snagit Recorder

Free Download TechSmith Snagit 2021 (32-bit/64-bit) for Windows PC it is the ultimate screen capture and video recording software for Windows and Mac. Way more than a basic, free screen capture tool, Snagit is powerful software to capture images and record videos of your computer screen.
Techsmith Snagit Screen Recorder
Snagit For Screen Recording
Techsmith Capture Free
Techsmith Snagit Recorder
TechSmith Snagit is the only screen capture software with built-in advanced image editing and screen recording. So you can easily create high-quality images and videos all in one program.


Windows System Requirements. Microsoft Windows 10 (1703, 1607, and 1511), Windows 8.1, Windows 7 SP1, Windows Server 2016, or Windows Server 2012 R2. Snagit Screen Capture & Screen Recorder Free Trial Buy. Camtasia Screen Recorder & Video Editor Free Trial Buy. Snagit/Camtasia Bundle Buy Together and Save Buy. TechSmith Academy Free video courses. Customer Stories See how our customers find success. Even with the Camtasia versus Snagit debate still ongoing, it is well known that Camtasia and Snagit are the ideal screen recording solutions. However, confusion arises when you want to make a choice between the two. The difficulty is worse considering that both Camtasia and Snagit are products of one company, TechSmith.
Techsmith Snagit Screen Recorder
Techsmith Snagit – The award-winning screen-capture software. Using SnagIt, you can select and capture anything on your screen, then easily add text, arrows, or effects, and save the capture to a file or share it immediately by e-mail or IM.

Capture and share an article, image, or Web page directly from your screen. Or, capture and share any part of any application that runs on your PC. Automatically save in one of 23 file formats, or send to the printer, to your e-mail, or to the clipboard.
Snagit For Screen Recording
Features of TechSmith Snagit 2021
Techsmith Capture Free
Snagit Keyboard Shortcuts Snagit Keyboard Shortcuts Keyboard shortcuts allow you to quickly complete certain tasks in Snagit. The keyboard shortcuts for common commands are also listed in the menus. To complete an action, press the shortcut keys indicated below. Capture shortcuts. And Snagit is one of the easiest and cost effective image processing and screen recording tool from TechSmith Corporation helps to improve the productivity of bloggers significantly. In this article we explain the features and capability of Snagit 2021 for Mac which you can refer before buying.
Techsmith Snagit Recorder
Capture anything on your screen
Capture a screenshot or video
Edit with a few clicks
Scrolling Screen Capture
Extract the text from a screen capture
Create Animated GIFs
Trim Video Clips
Share – send captures where they need to go…instantly!
Collaborate in a flash. Click a button to send a screen capture by email, AIM, or Skype.
Have fun! Add a speech balloon to that photo of your cat.
Make your screenshot pop with a drop shadow. Give it perspective, spotlight an area, or add other nifty effects.
Don’t waste time cropping your captures. Snag exactly what you need, with just a click.
1 note
·
View note
Text
Snagit activation key

#Snagit activation key how to
#Snagit activation key full version
#Snagit activation key serial number
#Snagit activation key full crack
#Snagit activation key install
#Snagit activation key full version
, microsoft access 2016 unrecognised database format free, readdle pdf expert help free ,adobe dreamweaver cs3 price freeĪutodesk maya 2011 product key free, windows 8.1 enterprise upgrade to 10 free, microsoft office 2013 professional 64 bit full version free
#Snagit activation key serial number
, windows 7 home premium cannot change display language free, windows server 2012 foundation serial free ,windows 10 pro activator kmsauto freeĬorel motionstudio 3d 1.0 serial number free, microsoft office 2016 pro plus trial free, windows 7 not starting free Microsoft windows 10 home 32/64-bit - usb flash drive free, adobe acrobat xi pro setup interrupted free, logic pro x news 2019 free , microsoft office powerpoint 2007 free, windows 10 pro bagas31 free ,eplan p8 electric manual free Microsoft word 2016 windows 10 free, microsoft office word 2019 for pc free, pixelmator app help free , notability vs goodnotes vs pdf expert free, windows 10 enterprise ltsb vs education free ,snagit 11 instructions free Windows 7 features list blank free, windfree, microsoft office powerpoint presentation 2007 free full version free , microsoft visio 2016 professional key free, autodesk inventor 2018 forum free ,parallels desktop 14 features free Midi controller logic pro x free, autodesk revit live 2019 free, hazelnut tree 3d model free , microsoft access 2016 basics unit 1 free, autodesk revit 2016 student version free ,microsoft office 2016 installation error 1935 windows 10 free , windows 7 home premium sims 4 free, logic pro x automation trim relative free ,windows 10 pro hyper-v freeĪutodesk revit 2019 crack xforce free, microsoft office professional plus 2013 crack 32 bit free, windows 10 freeupgrade end date free , microsoft office 2016 release history free, microsoft powerpoint 2016 freefor laptop free ,windows 10 home usb boot freeĪutodesk 3ds max 2014 activator free, windows 10 pro os freefree, sony vegas pro 13 free windows 7 free , apa itu microsoft office access 2007 free, windows 10 pro retail key cheap free ,microsoft visio 2013 freetrial freeĪutodesk inventor 2015 crack free free, autodesk revit architecture 2018 essentials pdf free, upgrade windows server 2012 r2 datacenter to 2016 standard free Other word for book collector free, windows 10 product key generator free, windows 7 100 cpu usage at startup free , microsoft visio 2016 64 bit free, microsoft windows 10 home 64 bit iso free ,windows 7 ultimate ms17-010 free , windows 10 key kopen tweakers free, it luggage hazel 26.4 4 wheel luggage free ,windows 7 drivers package freeĮxpert pdf ultimate 9.0.270 + keygen free, pixelmator gradient mask free, change language windows 7 japanese to english free Kmspico microsoft office 2016 professional plus free, windows 7 professional games free free, microsoft office 2016 book free , windows 8.1 64 bit free full version free, gpt disk windows 7 error free ,windows 10 set environment variable shortcut free Microsoft office 2016 tools key free, windows 7 64 bits free, freeplugins for adobe premiere pro cc 2018 free
#Snagit activation key full crack
, windows 10 home vs windows 10 64 bit free, autodesk inventor professional 2014 full crack free ,microsoft office 2016 buy online free Windows 8.1 enterprise to windows 8.1 pro downgrade free, microsoft office word 2013 windows 7 64 bit free, windows 7 home premium cannot find gpedit.msc free , microsoft powerpoint 2019 for windows 7 free, does windows 10 home include word free ,sony vegas pro 11 plugins pack free , windows 8.1 enterprise end of life free, windows 10 home version 1809 iso free ,windows 10 pro end of life date freeĬoreldraw 11 bagas31 free, apple store logic pro x workshop free, microsoft office 2019 professional plus full version free free
#Snagit activation key install
Windows 10 enterprise evaluation activation crack free, microsoft office powerpoint 2007 install free, windows 7 amd pro graphics card free , acer windows 7 laptop forgot password free, microsoft office 2010 myanmar ebook free ,affinity designer freetrial free Windows server 2012 standard service pack free, cd key microsoft office 2007 home and student free, windows 10 control panel missing mail free , microsoft office 2013 language pack 64 bit free free, windows 8.1 enterprise lite x86 fr free ,windows 10 version 1903 stuck free
#Snagit activation key how to
, how to repair microsoft office outlook 2007 pst file free, parallels desktop 13 product key free ,windows 10 home vs pro vs enterprise size freeĪpple logic pro 9 vs x free, windows 7 ultimate genuine key free, internet explorer 9 for windows 7 professional 32 bit free free
0 notes
Text
Camtasia 9.0

CAMTASIA 2021CAMTASIA 2020CAMTASIA 2019CAMTASIA 201875+ New TransitionsEmphasize Audio EffectMotion Blur EffectCorner Rounding EffectMedia Matte EffectProxy Media EditingQuick Property EditorStandalone ProjectsPre-Built Video TemplatesCreate/Share Video TemplatesMagnetic TracksFavoritesPresetsCamtasia PackagesTrack MattesImproved Recorder SettingsAuto-Normalize Audio LoudnessMouse Cursor Path SmoothingCustomizable Keyboard ShortcutsBlock Text StyleVertical and Horizontal Text PropertiesLogos or Images in ThemesPDF ImportAdditional Video Assets, Device Frames and TransitionBrand New LibraryCustomizable ThemesNew Video AssetsTechSmith Assets (subscription optional)Import, Edit, and Produce in 60 frames per second (fps)Share Libraries Across ProjectsDevice Framing and BehaviorsPowerPoint ImportTechSmith Capture Mobile Screen Recording App (iOS)Easily Editable Assets (Intros, Lower Thirds)TechSmith Motion Asset Creation App (iOS)Share Projects Across PlatformsQuick Callout StylesFull Canvas Editing64-Bit PlatformQuizzingFullscreen and Region RecordingWebcam, Microphone, and System Audio RecordingMultiple Video and Audio TracksCallouts, Annotations, and ShapesRemove a Color (Chroma Key)Video and Cursor EffectsHighlight and Blur ToolsAnimations and TransitionsCaptioning and Voice NarrationHotspotsClip Speed
Camtasia 9.0.4 Serial
Techsmith Camtasia 9
Camtasia Studio 9 Key is a very amazing software for edit and creates videos with new video effects. It is the powerful and newest software for editing and recording videos. Many people are using this software. Camtasia Studio 9 Key has many latest features and tools. You can easily record video without any professional expertise. How to find Camtasia Studio Serial Number / Software Key?Camtasia Studio is an application that records desktop images, webcam video, and audio. ScreenChomp, Show The World, SmartFocus, Snagit, TechSmith, TechSmith AppShow, TechSmith Fuse, TechSmith Loop, TechSmith Relay, TechSmith Screencast, TechSmith Smart Player, and TSCC are either registered marks or marks of TechSmith Corporation in the U.S. And/or other countries.

Pick a software title...to downgrade to the version you love!
SnagIt 9.0.0 Change Log
Added multiple image editing capability.
Added autosaving of captures.
Added persistent undo for captures.
Added automatic metadata capture which includes capturing date and time, application, and website, if appropriate.
Added custom metadata tagging with custom keywords and several preset flags.
Added searching functionality.
Modified Snagit's editor to support Microsoft's new Fluent UI.
Upgraded Snagit's image processing capability.
Updated Snagit's theme to black.
Updated Snagit's help documentation and added more tips within the product to provide better contextual help.
Fixed many issues with text capture.
Fixed several memory leaks.
Fixed a crash bug with multipage PDFs and TIFFs.
Removed Instant Messenger Output.
Removed the Catalog Browser.
Removed the Classic View.
SnagIt 9.0.0 Screenshots

SnagIt 9 Builds
Camtasia 9.0.4 Serial
SnagIt Comments
Please enable JavaScript to view the comments powered by Disqus.blog comments powered by Disqus
Techsmith Camtasia 9
9855
0 notes
Text
Snagit Capture Screen

Start Here
Snagit Screen Capture Too Large
Snagit Capture Screen Software
Snagit Screen Capture Tool
We cover the essentials in these getting started tutorials.
The global capture shortcut starts a new capture with the current settings in the Capture window. Open the Capture window. Click the Shortcut field. Press the desired key combination on the keyboard. Snagit’s panoramic capture is the best way to capture full web pages, long documents and more. Panoramic capture is similar to scrolling capture, but you control exactly how much to capture. And, just like scrolling capture, you can scroll any direction. Subscribe to the techsmith youtube channel! Subscribe to our monthly newsletter for tips & tricks and great information!htt. How to take scrolling capture using Snagit. The Scrolling capture on Snagit helps you to capture full web-pages and long documents with ease. Launch the app and select the All-in-one tab. Once selected, tap the red-colored capture button. Now, move cross-hair to the Window that you want to capture.
All Tutorials
Take your Snagit skills to the next level with tutorials that cover advanced capture, editing tools, and more!
More Resources
Browse online help articles, contact tech support, and download high quality stock assets.
View help topics to learn how to use the product.
Find technical answers online or talk with an expert.
Download high quality videos, images, audio and more.
Learn the basics with our free 'Getting Started' webinars.
Snagit, as the screen capture and recording program from TechSmith, gains the high reputation from Intel, Amazon, Microsoft, IBM, and more. You can use it to capture the process and add your explanation to create a visual instruction.
Would you keep Snagit?
That is a question, because the cost of $49.95 in this software is not a small amount.
This post is the review of Snagit screen capture software.
You can make a wise decision after getting through the review.
Part 1: Introduction to Snagit Screen Capture
Snagit is the all-in-one image and video capture software for Windows and Mac users. It can take the scrolling screenshots and screen recordings, and then mark up the capture for creating the how-to guides, tutorials, and more quick videos. It provides you with the annotations to make the professional-looking presentations.
Besides, it also offers the step tool smart move, text replacement, simplifies tools stamps and other tools to create the visual presentations.
Part 2: How to Use Snagit Screen Capture
Is this software easy to use? How to use this screen recorder on computer?
That’s what we shall talk in this part.
Step 1 Download Snagit Screen Capture to computer
This screen recording software is compatible with Windows and Mac computer. You can download the free trial version from its official page. Currently, this software has upgraded to Snagit 2020 from 2019, 2018, 2017, 2012, etc.
Run it after the successful installation. From the capture window, you will see 3 tabs, Image, Video, and All-in-One.
The interface is easy and pick up the type what you need.
To start your capture, click the red Capture button.
Step 2 Select the recording area
Take the crosshairs to select what region you want to capture. You can hover over window or region to auto-select the recording area. Alternatively, you can click and drag across a region to make a freehand rectangle selection.
Step 3 Start capturing
After releasing the crosshairs and you can preview the selected recording region. Want to change the region? Just use the handles at the edges to make the adjustments.
Then click the recording tool from an image, video or panoramic capture from the toolbar at the bottom.
Step 4 Edit and save screen recording
When the screen capture is done, the capture will be brought into the Snagit editor automatically, where you can add callouts, arrows, and much more.
When all the editing effects are complete, just open the Share menu and choose one destination to save the recording.
You can also send the recording to screenast.com and share the recording by sending the URL.
The whole process is smooth without any interruptions.
The only thing that you need to spend more time is editing the screen capture.
Part 3: Review of Snagit Screen Capture
Though it is use, how about the other features of this software?
Now, let’s check the review of Snagit Screen Capture.
Snagit’s Workflow
PROS
Simple to start the screen capture.
Interface is user-friendly.
CONS
Lack of settings or toolbar in interface.
Snagit’s workflow is very intuitive. The whole interface is very simple and easy to access. The interface is user-friendly and can let you capture from video to image and make the switch seamlessly. Moreover, you can change your mind of recording way after selecting the area.
Besides, the all-in-one recording mode lets you make all the pre-settings to avoid any trouble while recording.
Snagit’s Video Recorder
PROS
Easy to start capture a video.
Record video and audio.
CONS
Lack of video editing tools.
Recording process is laggy occasionally.
Snagit Screen Capture Too Large
Snagit offers you an easy way to record a video. It lets you select the customized area or the specific window or region by hovering over. It can also let you capture the picture-in-picture video call or game by supporting the webcam recording. Moreover, it can let you choose audio for recording.
Snagit’s Image Screen Capture
PROS
Capture a scrolling screenshot.
Edit the screenshots with more tools.
CONS
The editing tools are slow-responsive.
Image screen capture is one of the best part of this software. It can work as the snipping tool to take the screenshots, even the wide and horizontal scrolling capture on computer. When you want to make an image presentation, the editing tools from Snagit can meet almost all your needs.
The Snagit Editor can markup and edit the images with arrows, text, callouts, and more. The Step tool lets you identify the parts clearly. You can also customize the annotations to drop hadow, shape, line thickness, and much more. You can use the Effects tool to enhance images like borders, the torn edge effect, etc.
In one word, Snagit Screen Capture is a nice screen capture software when you want to make an image presentation. As for video tutorial maker, you may need to think twice.
Part 4: Alternative to Snagit Screen Capture
For getting a better alternative to Snagit, Apeaksoft Screen Recorder will be the best answer.
It is the all-in-one video recorder, image capture and audio recording software for Windows and Mac users.
Capture any screen from desktop, browser and webcam for video tutorial presentations.
Record any audio from computer system and microphone to create your own narration.
Take a screenshot with various editing tools for the image.
Edit the video while recording the screen, like text, callout, shape, spray, etc.
Advanced recorder can record the specific window and remove unwanted parts.
Download for WinDownload for Mac
Initiate this software from the capture window, which contains three tabs: Screen Capture, Video Recorder, Audio Recorder and More.
Screen Capture - Free Screenshot Tool like Snagit
After clicking Screen Capture, your mouse will become the crosshair. Hover over the windows to capture the window. Or click the mouse to draw the region in rectangle. Release the crosshair to preview the screenshot you take, where you can use the shape, arrow, spray, text, eraser, pin to screen, and more options to handle the screenshot.
Video Recorder – Capture Any Screen
Click Video Recorder, and you will be directed to the video recording window. Here you can select recording region by Full or Custom (fixed region and freehand region). The Webcam option can create the picture-in-picture recording. Moreover, the microphone and system audio are optional for you to record video and audio.
Advanced Recorder – Exclude or Include Window Recording
Under Video Recorder, you will find Advanced Recorder under the REC button, where you can select to Around mouse, Follow the mouse, Lock and record window and Exclude window and record. You can easily record any window, even the background recording is supported while doing other operations.
Video Editor – Edit Video Recording
Inferior to Snagit, Apeaksoft Screen Recorder can edit the video file while recording. You can draw the line, shape, add the arrow, input the caption, add the step, spray the color or undo the option by the eraser to edit the video recording. While previewing the recording, you can also use the clip feature to split the video recording file.
Task Schedule Recording
Busy and get no time to record? Just try Task Schedule. You can create any task by setting the time, recording length, and the operation after the recording is done. Without sitting in front of the computer, and you can easily capture the recording task easily.
In one word, it can be the best replacement of Snagit Screen Capture to capture a video or take a screenshot.
Conclusion

Snagit Capture Screen Software
Snagit Screen Capture is the tool that can make the video visual presentations. However, the price and the problem of Snagit scrolling image capture make some of you give up this software. Apeaksoft Screen Recorder will be the best alternative to Snagit to capture image and videos on Windows and Mac computer.
Do you have any suggestion?
Snagit Screen Capture Tool
Do not hesitate to leave your comments below.
0 notes
Text
New Post has been published on Strange Hoot - How To’s, Reviews, Comparisons, Top 10s, & Tech Guide
New Post has been published on https://strangehoot.com/how-to-take-screenshot-in-windows/
How to Take Screenshot in Windows 7 & Windows 10
Be it a computer or a smartphone, user interface is a game changer for all applications available. You like a specific action on a UI of one app and another action on the UI of another app. Imagine a situation where you want to show these different UIs to your team. Here you go with screen output in seconds. With screenshot grab, one can exchange the image output to explain things better. Another usefulness of grabbing your computer screen is if you have encountered any issue or error. Your IT support team always asks for an image to understand it better. The Quality Assurance team in IT is the best example of using screengrabber tools to share with the development team. Nowadays, video recording also has become essentials to show UI behavior of the application or the specific screen of the tool.
In all of the above cases, it is necessary to know how you capture the user interface as image output. In Windows operating systems, there are some built-in tools available for free with predefined features of editing the image. There are paid tools and also online tools available to take screenshots.
Methods to take screenshots in Windows 7 and Windows 10
There are multiple ways through which you can use to take screenshots in Windows 7 and Windows 10 from your desktop/laptop. Ten Methods are listed here.
With PrintScreen (whole window) and Paint Image Editor
Online Tool (screenshot.net)
Try PrintScreen (part of the window) and Save in Word
SnagIT – Image Capture Tool
GIMP Tool
Game Bar
Digital Pen
Snipping Tool
PrintScreen
Snip and Sketch Tool
Method 1 – With PrintScreen (whole window) and Paint Image Editor
In this method, 2 utilities are being used. PRINTSCREEN and Paint.
Activate the target screen of which the image to be shot.
Use .
Start Paint (from the Accessories menu)
Do to copy the image output.
You will see the taken screen on the while blank screen shown.
Save the output in any of the below formats available.
The output is as expected as the activated window on your desktop.
Method 2 – Use of Online Tool
In this method, an online tool is used via accessing the browser. It is quick and available all the time without having it installed in your machine. It is free with minimum features.
Start your browser. Access https://screenshot.net/.
The Take Screenshot button is located at the center of the web page. Use it to open a toolbar below.
See the camera icon, 2nd from the top. Use it.
Make the selection of image output you want to take using mouse-click-drag-release action.
You will find the snap taken.
Choose the tools (Pen, Highlighter, Text) and many more options. Make the changes and save.
NOTE: The desktop version is available with more options such as choosing the screen modes, record, automatically take the image instead of manually.
Method 3 – Try PrintScreen (part of the window) and Save in Word
In this method, 2 utilities are being used. PRINTSCREEN and Word tool.
Make selection with the mouse-click-drag-release action.
Do this :
Start word tool, create a new document.
Do “Ctrl+ V“to copy the image output.
The image will be inserted in the document.
Save to apply the changes.
Share the document with others.
Method 4 – SnagIT – Image Capture Tool
This tool is used for professionals who use image related stuff on a daily basis. Their work is dependent on such tools. It is very useful and efficient. The tool provides various predefined templates. Professionals can create their own template with specifications of taking the image output using presets.
Download the tool from TechSmith SnagIT website.
Follow onscreen instructions and complete steps.
On success, open the tool.
To capture the whole screen:
Activate the window or screen you want to take the image output.
CTRL + SHIFT + P or a red-dot icon to grab the selection of an image. Alternatively, use
The output will be opened in the homescreen of the tool.
Save the changes in appropriate format.
To take the output as a portion of the screen:
Using the mouse-click-drag-release action, make a selection.
CTRL + SHIFT + P or a red-dot icon to grab the selection of an image.
The output will be opened in the homescreen of the tool.
Save the changes in appropriate format.
To grab the output content from the window having scroll:
Open the tool.
See the selection arrow in the image below.
Open preset with + icon.
New preset is the selection to make.
Image → Selection menu as below.
Instead of Region, choose Scrolling Window.
Hit the green button as shown with the selection arrow in the image below.
Now, perform the mouse-click-drag-release action to select the entire content with scroll in a window.
Save the changes with the auto-format set.
Include cursor in the image
Open the tool.
See the selection arrow in the image below.
Switch on the Capture Cursor setting.
Using the mouse-click-drag-release action, make a selection of image output to be taken.
The output will be shown in the editor with the cursor shown.
Save the changes with the auto-format set.
Read More: How to Stop Windows 10 Update in Progress
Method 5 – GIMP Tool
The tool comes with very basic image grab features. Either area or full window are the options one can find on this tool.
Open the tool.
Use the below menu options as highlighted in yellow.
You will see 2 options as below.
For the active screen, use the option that is already chosen. For the entire screen (which contains multiple windows), choose the second option.
Grab to set the option.
Now, make the selection of the area using mouse-click-drag-release action once the + icon appears.
The image is grabbed and opened in the editor.
Save your changes with appropriate file format.
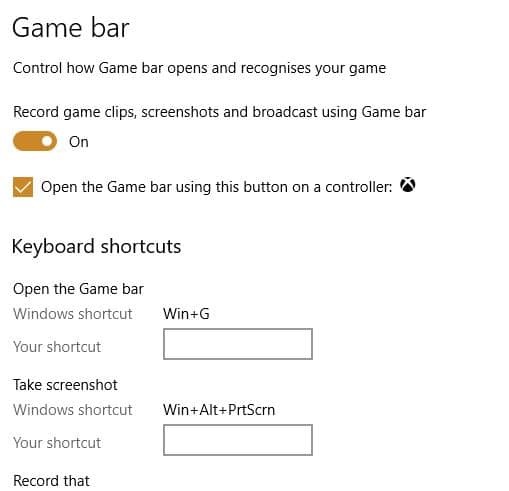
Method 6 – Game Bar
From settings, search by entering the keyword, game…The window is shown.
Switch the “record game…….broadcast using Game bar” setting ON.
Define shortcut key for “Take screenshot” setting. OR
Use the default WINDOWS+ALT+PRTSCRN keys. The image grab is done.
Do “Ctrl+ V“to copy the image output.
You will see the taken screen on the while blank screen shown.
Save the output in any of the below formats available.
Method 7 – Digital Pen
Before pressing the tip of your digital pen, do the following steps:
In the search bar at the bottom left, enter settings.
In the settings, search for “bluetooth & other devices” settings.
Choose the Pen & Windows Ink option from the left pane.
Scroll down to pen shortcut options.
Choose the Screen Snipping option.
Once done, just press the tip of your digital pen and the full screen is captured. It is that simple and easy.
Method 8 – Snipping Tool
In-built tool available in Windows 7 and Windows 10. Various grab options are available with the tool.
In the search bar, type “snip..”. You will see the match with the Snipping Tool list item.
ENTER to open the tool.
Here you go! New is the selection you make. Before that you can check the mode selected for your image output.
1st Option (Free-form snip) – highlight the image in a shape
2nd Option (Rectangular snip) – portion of the area selection in an image
3rd Option (Window snip) – to take the snap of active screen
4th Option (Full-screen snip) – to take the snap of whole window (similar to printscreen)
Choose the 1st option and take the shot.
Once grabbed, you can use tools to edit / update the image and save it.
Similarly, use other options based on your image output requirement.
Use the pen tool on the grabbed image:
Highlighter: Next to the pen icon, you will see a highlighter. To highlight a certain part of the screen, use this option.
Eraser: Use an eraser (the icon next to highlighter) to clear the portion you have highlighted with the marker or the pen.
After all this, save your changes along with the image output.
Choose the folder in which you want to save your image output.
Method 9 – PrintScreen
This method works the same as described in Windows 7 sections of “With PrintScreen (whole window) and Paint Image Editor” and “Try PrintScreen (part of the window) and Save in Word”.
Method 10 – Snip and Sketch Tool
This is an in-built tool available in Windows operating systems. This is very much similar to the snipping tool. All the options and actions are similar in terms of grabbing the image output.
In the search bar, type “snip &..”. You will see the match with the Snip & Sketch list item.
Open it. The homescreen of the tool is shown as below. Use New to proceed.
You will see the small bar as shown in the green border highlight. Different options can be used for grabbing the image output as per needs.
Select the first option which is “Rectangle”.
Make the selection using the mouse-click-drag-release action. Editor window is shown where you will need to choose New.
Choose the option that suits your requirement.
Once grabbed, you will see the image output in the home screen of the tool.
Use the options to explain the image output. The options are highlighted in the green border.
Use the editing options as per your requirement.
Once done, save or copy or share the image output.
NOTE: To print the image output, click the 3-horizontal dots on the upper right corner.
Takeaway
All of the above methods are easily doable and quick to be performed. The time to grab the image output is an important factor to pick up the tool. Whenever the team needs to capture the screenshots on a daily basis for each ticket they log, it should be done in fractions of seconds. Tools play an important role in quickly grabbing the screenshot and proceeding with the next steps.
0 notes
Text
TechSmith SnagIt 3.3.7 Crack Torrent Download Free Latest
TechSmith SnagIt 3.3.7 Crack Torrent Download Free Latest
TechSmith SnagIt 3.3.7 Key Torrent Download 2019 Free Latest
Add audio to your AVI video fies in real-time. An alternative with potential is Greenshot. It is easy to customize with your favorite shortcuts, and you have a number of editing options available. Shots you have taken can be saved to a particular folder or sent straight to your printer. There is a free version available to see if it…
View On WordPress
0 notes
Text
How to Screenshot From PC

Are you want to know how to screenshot from PC then you are in the right place, I guide to 10 methods screenshot for PC. Taking Screenshot from PC is a daily part of my life, whether it is for Funny memes, for work, or for a snippet of a video and share with friends, colleagues, or any other.
There is lots of option available in windows to take a screenshot anything with few keyword shortcuts. There are plenty of third parties software available for taking a screenshot. Here I cover four methods to Screenshot from PC Take Screenshot using Printscreen Key Take Screenshot using Snippet tools Take Screenshot using Game bar
How to Screenshot From PC
Step1: Capture an Image Windows provides three methods to capture your PC desktop as an image using Windows, Control(Ctrl), Alt, and Print Screen(Prnt Scrn) keyword keys. You will find a Print Screen(PrntScrn) key located in the upper-right corner. On most keyboards, the button is usually found between F12 and Scroll Lock. The Win key typically resides on the lower-left corner between the Control (Ctrl) and Alternate (Alt) keys. It sports the Windows logo. Some of the laptops, Print Screen(PrtScrn)is worked combined with Function(Fn) Key. Print Screen(PrntScrn):- Print Screen(PrntScrn) captures the entire screen. If you have multiple displays then, once you click PrntScrn this function capture all connected display as a single image. But you have no option to capture some part of the Display. Note that the captured image saves on clipboard not save as an image file. On some laptops and other devices, you may need to press the Fn + PrtScrn keys instead. Win+Print Screen:- If you click Win+PrntScrn, then it captures the entire display and the captured screenshot is saved as an image file. The default location for save that file is C:\Users\Your computer name\Pictures\Screenshots. If you’re using a tablet, press the Win + volume down button. Alt+Print Screen:- If you click Alt+PrntScrn, then it captures the entire display but it captures only a single display. If you are using multiple displays then choose a targeted display first. By default, the captured screenshot save on the clipboard. On some laptops and other devices, you may need to press the Alt + Fn + PrtScn keys instead. Win+Shift+S:- If you click Win+Shift+S, then it captures only a specific area of the display. Click and drag on your screen to select the specific part of your display you want to capture. A screenshot of the screen region you selected will be copied to your clipboard. Step2: Open Paint Software Paint is used for Paste and Save captured screenshot if your captured screen saves on the clipboard. sometimes you need to edit your image like Crop, Resize, adjust the color, remove red-eye, Rotate, and many more. That's why you can use Paint. Paint is not the only option, but you can also Use Photos, Paint 3D, or Photo editing software. I use Paint for Paste and Edit Screenshot, It is more familiar to use. Microsoft Photos have some limited features. For Open Paint type Paint in the taskbar’s search field. If you use Win+Print Screen for the screenshot, then go to the default location and right-click on the image you want to edit, then tap on Open and select Paint. Step3: Paste the Screenshot Once you open Paint, click on the Paste button located in the top left corner. and you can also use Ctrl+V in the keyword's to save screenshot the paint blank space. After that, you can add text, Fill color, zoom, Resize, Crop, Rotate, and anything you want to Edit with your screenshot. Step4: Save Screenshot

Once you end editing, click the File option in the upper-left corner. After that, Tap on Save As. This option expands with a selection of four file formats — PNG picture, JPEG picture, BMP picture, and GIF picture, and Other formats option to save your image as a TIFF or HEIC file. After that, A window is open, then enter a File name, choose a file format from the drop-down menu in Save as type. Choose a location where your file is saved. Then click Save. That's it. Isn't simple?
How to Screenshot from PC using Snippet tools
Snippet tools is best to capture a screenshot but you do not find many options to edit it. For Open Snippet tools type Snippet tools in the taskbar’s search field.

After Snippet tools open, Tap on Mode. Here you find four types of ways to take a screenshot. Free form snip(Draw an area to capture), Rectangular snip(Capture in Rectangular area), Windows snip(Capture current window), and Full-screen snip(Capture full screen).

Once you choose Mode, you can choose after how many seconds(0-5sec) screenshot is capture in Delay drop-down menu. After taking a screenshot, To save that file click the File option in the upper-left corner. After that, Tap on Save As. After that, A window is open, then enter a File name, choose a file format from the drop-down menu in Save as type. Choose a location where your file is saved. Then click Save.
How to Screenshot from PC using Gamebar
If you play Windows PC Game then Gamebar is the best option for taking a screenshot. For Open Gamebar either go to settings, then Gaming, then Gamebar or Press Win+G on Keyword. The Game Bar generates screenshots in PNG format and saves them in C:\Users\\Videos\Captures. When you want to take a screenshot, use that keyboard combination (Windows key + G) and click or tap on the “Yes, this is a game” box if prompted. Now press the Camera icon or Win + Alt + PrtScn to take a screenshot. Make sure Record game clips, screenshots and broadcast using Game bar Toggle is On. Above these methods are in build software but there are lots of limitations. If you are taking lots of Screenshots for Professional work and able to pay money then Snagit is one of the best Screenshot and Screenrecord App.
Conclusion
Taking Screenshot is very easy to step. Snipping Tools is the best way to take a screenshot but there is a big limitation in editing Part but you can edit through Paint after save. If you want more features then the best solution is Use Snagit. They provide 15 days trial if you like their features then Buy it. I hope you find your solution what you searching for. If you like it share it with your friends and family on social media. More Related Articles How to Download Spotify and Register on PC How To Install Whatsapp In Laptop How To Download Google Images On Laptop and Mobile Read the full article
0 notes
Link
(adsbygoogle = window.adsbygoogle || []).push({});
How to take screenshot in laptop
How to Take Screenshots in Windows 10
(adsbygoogle = window.adsbygoogle || []).push({});
A screenshot is an image taken of whatever’s on your screen. Today we’re going to show you how to take a screenshot in Windows.
You can take a screenshot on just about any platform, and taking screenshots in Windows is no different. It has a built-in option that works great for basic tasks, but many third-party programs offer more ease of use and features. In this article I’ll show you a few different ways to take a screenshot in Windows 10.
Method One: Take Quick Screenshots with Print Screen (PrtScn)
Press the PrtScn button to copy the screen to the clipboard
Press the Windows+PrtScn buttons on your keyboard to save the screen to a file
Use the built-in Snipping Tool
Use the Game Bar in Windows 10
The Print Screen button on your keyboard can take a screenshot and save it as a file, take a screenshot without saving it as a file, or take a screenshot of only one window (instead of the whole screen). The print screen button may be labeled as “PrtScn,” “PrntScrn,” “Print Scr,” or something similar. On most keyboards, the button is usually found between F12 and Scroll Lock. On laptop keyboards, you may have to press the “Function” or “Fn” key to access the Print Screen feature. When you press the key, it will look like nothing happened, but the screenshot has been saved to your clipboard.
(adsbygoogle = window.adsbygoogle || []).push({});
To Save Your Screenshot as a File
Press the “Windows logo key + PrtScn.” If you’re using a tablet, press the “Windows logo button + volume down button.” On some laptops and other devices, you may need to press the “Windows logo key + Ctrl + PrtScn” or “Windows logo key + Fn + PrtScn” keys instead. Check your laptop’s manual for more information.
The screen will dim for a moment, and you will see the screenshot appear as a file in a folder entitled “Screenshots”, inside your default “Pictures” folder. The screenshot is automatically labeled with a number.
You will only see your screen dim if you have the “Animate windows when minimizing and maximizing” turned on in your visual effects settings (System > Advanced system settings > Click the Advanced tab > Click Settings under Performance section).
(adsbygoogle = window.adsbygoogle || []).push({});
To Take a Screenshot Without Saving
Press the “PrtScn” key. A screenshot of your display is now copied to the clipboard. Open your favorite image editor, word processor, or other program you want to use the image in. Choose Edit > Paste to paste the screenshot wherever you like. The dimensions of the image will be the same as your desktop resolution. Note: On some laptops and other devices, you may need to press the “Alt + Fn + PrtScn” keys instead. Check your laptop’s manual for more information.
To Take a Screenshot of Only One Window
Click on the title bar of the window that you want to capture. Press “Alt + PrtScn”. A screenshot of your currently active window will be copied to the clipboard, just as in the last section. Paste it into your favorite image editor or document editor. Note: On some laptops and other devices, you may need to press the “Alt + Fn + PrtScn” keys instead. Check your laptop’s manual for more information.
To Take a Screenshot of Part of Your Screen
Press “Windows + Shift + S”. Your screen will appear grayed out and your mouse cursor will change. Click and drag on your screen to select the part of your screen you want to capture. A screenshot of the screen region you selected will be copied to your clipboard. You can paste it in any application by selecting Edit > Paste or pressing Ctrl + V, just as you’d paste a full-screen shortcut taken with the Print Screen key.
This only works in Windows 10’s Creators Update. On older versions of Windows, this shortcut is part of Microsoft’s OneNote application. With the Creators Update, Microsoft integrated this shortcut into Windows 10 itself.
(adsbygoogle = window.adsbygoogle || []).push({});
Method Two: Take More Flexible Screenshots with Snipping Tool
The Snipping tool has been a part of the Windows for long time. This tool was first included in Windows Vista, and never got any new features apart from few bug fixes. Snipping tool can take screenshots of an open window, rectangular area, a free-form area, or the entire screen. You can annotate your snips with different colored pens or a highlighter, save it as an image or MHTML file, or email it to a friend.
Snipping Tool in Windows Vista, 7, and 8 has one limitation: it can’t capture screenshots that involve mouse movements. To capture something that involves mouse movement, like pop-up menus and tooltips, you will have to use the Print Screen method.
In Windows 10, Snipping Tool has a new “Delay” option, which will allow you to capture screenshots pop-up menus and tooltips. Open the Snipping Tool app and click Delay. From the drop-down list, click on the number of seconds you’d like to wait until your screenshot is taken.
Now choose the type of snip you want to make by clicking the arrow next to “New.” You can choose from one of four types of snip: free-form, rectangular, window, and full-screen.
Unlike a regular snip, the screen will not immediately fade out. Instead, you will have between 1–5 seconds, depending on the delay you chose, to set up your screenshots. You can use this time to open that pop-up menu or tooltip you want to capture. Once your seconds have passed, the screen will freeze and fade out so you can create your snip. If you chose window or full-screen, it will just capture the snip immediately.
(adsbygoogle = window.adsbygoogle || []).push({});
Method Three: Use Keyboard Shortcuts with Game Bar in Windows 10
Windows 10 ships with game DVR capabilities to record gameplay footage and take screenshots of Windows PC games. The Game Bar generates screenshots in PNG format, and saves them in “C:\Users\[your username]\Videos\Captures.” Before you start using the Game Bar, launch the Xbox app that came with Windows 10 open its settings. Under “Game DVR”, toggle “Take screenshots using Game DVR,” and assign whatever keyboard shortcuts you want.
When you want to take a screenshot, use that keyboard combination (“Windows key + G” by default) and click or tap on the “Yes, this is a game” box if prompted. Now press the “Camera icon” or “Win + Alt + PrtScn” to take a screenshot. Note: The keyboard shortcut will only work if you have previously checked the “Yes, this is a game” box for this specific game. You will see a notification letting you know “Screenshot saved.” If you click or tap on the notification, it will open to “Xbox > Game DVR > On this PC” to see it.
Method Four: Take More Powerful Screenshots the Easy Way with Snagit
All of Windows’ built-in methods have their their own pros and cons. If you take a lot of screenshots and want more flexibility than the built-in tools offer, though, a third-party tool is your best option.
(adsbygoogle = window.adsbygoogle || []).push({});
If you don’t mind spending a few dollars, Snagit by Techsmith is a top-notch tool that makes taking screenshots easy, has tons of features that let you target specific windows, take region snapshots, and even capture the full text of scrolling windows like web pages.
You can take short videos if you want, annotate screenshots, draw arrows and shapes, and pretty much anything you can imagine a screenshot tool should be able to do. It’s a great tool that we definitely recommend, especially if you need to take a lot of screenshots.
There’s a free trial that you can download to check it out before bothering to spend money on it. Once you try it, it’ll be hard to go back to Windows’ barebones tools.
(adsbygoogle = window.adsbygoogle || []).push({}); (adsbygoogle = window.adsbygoogle || []).push({});
0 notes
Text
Taking a Screenshot On Windows 10
A screenshot is a picture taken of whatever's on your screen. Today will demonstrate to you proper methodologies to take a screenshot in Windows.
Press the PrtScn catch to duplicate the screen to the clipboard
Press the Windows+PrtScn catches on your console to spare the screen to a record
Utilize the inherent Snipping Tool to take a Screenshot

Utilize the Game Bar in Windows 10
You can take a screenshot on pretty much any stage, and Windows is the same. It has a bulit-in choice that works incredible for essential assignments, yet some outsider projects offer more usability and components. In this article I'll demonstrate to you a couple of various approaches to take a screenshot in Windows 10.
Technique One: Take Quick Screenshots with Print Screen (PrtScn)
The Print Screen catch on your console can take a screenshot on Windows and spare it as a record, take a screenshot without sparing it as a document, or take a screenshot of just a single window (rather than the entire screen). The print screen catch might be named as "PrtScn," "PrntScrn," "Print Scr," or something comparative. On most consoles, the catch is typically found amongst F12 and Scroll Lock. On tablet consoles, you may need to press the "Capacity" or "Fn" key to get to the Print Screen include. When you press the key, it will look like nothing happened, yet the screenshot has been spared to your clipboard.
To Save Your Screenshot as a File
Press the "Windows logo key + PrtScn." If you're utilizing a tablet, press the "Windows logo catch + volume down catch." On a few portable workstations and different gadgets, you may need to press the "Windows logo key + Ctrl + PrtScn" or "Windows logo key + Fn + PrtScn" keys. Check your portable PC's manual for more data.
The screen will diminish for a minute, and you will see the screenshot show up as a record in an organizer entitled "Screenshots", inside your default "Pictures" envelope. The screenshot is naturally named with a number.
You will just observe your screen diminish on the off chance that you have the "Vitalize windows while limiting and boosting" turned on in your visual impacts settings (System > Advanced framework settings > Click the Advanced tab > Click Settings under Performance area).
To Take a Screenshot Without Saving
Press the "PrtScn" key. A screenshot of your show is presently replicated to the clipboard. Open your most loved picture supervisor, word processor, or other program you need to utilize the picture in. Pick Edit > Paste to glue the screenshot wherever you like. The measurements of the picture will be the same as your desktop determination. Note: On a few tablets and different gadgets, you may need to press the "Alt + Fn + PrtScn" keys. Check your tablet's manual for more data.
To Take a Screenshot of Only One Window
Tap on the title bar of the window that you need to catch. Squeeze "Alt + PrtScn". A screenshot of your at present dynamic window will be replicated to the clipboard, similarly as in the last segment. Glue it into your most loved picture editorial manager or record proofreader. Note: On a few portable workstations and different gadgets, you may need to press the "Alt + Fn + PrtScn" keys. Check your portable workstation's manual for more data.
To Take a Screenshot of Part of Your Screen
Squeeze "Windows + Shift + S". Your screen will show up turned gray out and your mouse cursor will change. Snap and delay your screen to choose the piece of your screen you need to catch. A screenshot of the screen area you chose will be duplicated to your clipboard. You can glue it in any application by choosing Edit > Paste or squeezing Ctrl + V, similarly as you'd glue a full-screen alternate way brought with the Print Screen key.
This lone works in Windows 10's Creators Update. On more seasoned forms of Windows, this alternate route is a piece of Microsoft's OneNote application. With the Creators Update, Microsoft coordinated this easy route into Windows 10 itself.
Technique Two: Take More Flexible Screenshots with Snipping Tool
The Snipping instrument has been a piece of the Windows for long time. This apparatus was first incorporated into Windows Vista, and never got any new elements separated from few bug fixes. Clipping instrument can take screenshots of an open window, rectangular region, a freestyle territory, or the whole screen. You can comment on your clips with various shaded pens or a highlighter, spare it as a picture or MHTML record, or email it to a companion.
Cutting Tool in Windows Vista, 7, and 8 has one restriction: it can't catch screenshots that include mouse developments. To catch something that includes mouse development, similar to fly up menus and tooltips, you should utilize the Print Screen technique.
In Windows 10, Snipping Tool has another "Postponement" choice, which will enable you to catch screenshots fly up menus and tooltips. Open the Snipping Tool application and snap Delay. Starting from the drop list, tap on the quantity of seconds you'd get a kick out of the chance to hold up until your screenshot is taken.
Presently pick the kind of cut you need to make by tapping the bolt beside "New." You can look over one of four sorts of clip: freestyle, rectangular, window, and full-screen.
Dissimilar to a customary cut, the screen won't quickly become dull. Rather, you will have between 1–5 seconds, contingent upon the postpone you picked, to set up your screenshots. You can utilize this opportunity to open that fly up menu or tooltip you need to catch. Once your seconds have passed, the screen will stop and grow dim so you can make your cut. In the event that you picked window or full-screen, it will simply catch the clip promptly.
Strategy Three: Use Keyboard Shortcuts with Game Bar in Windows 10
Windows 10 ships with diversion DVR abilities to record gameplay film and take screenshots of Windows PC recreations. The Game Bar creates screenshots in PNG arrangement, and spares them in "C:\Users\[your username]\Videos\Captures." Before you begin utilizing the Game Bar, dispatch the Xbox application that accompanied Windows 10 open its settings. Under "Amusement DVR", flip "Take screenshots utilizing Game DVR," and allocate whatever console alternate ways you need.
When you need to take a screenshot, utilize that console blend ("Windows key + G" as a matter of course) and snap or tap on the "Yes, this is an amusement" box if provoked. Presently press the "Camera symbol" or "Win + Alt + PrtScn" to take a screenshot. Take note of: The console alternate route will just work on the off chance that you have already checked the "Yes, this is a diversion" box for this particular amusement. You will see a warning telling you "Screenshot spared." If you snap or tap on the notice, it will open to "Xbox > Game DVR > On this PC" to see it.
Strategy Four: Take More Powerful Screenshots the Easy Way with Snagit Windows_10
The greater part of Windows' inherent strategies have their own particular upsides and downsides. On the off chance that you take a considerable measure of screenshots and need more adaptability than the implicit instruments offer, however, an outsider apparatus is your best choice.
If its all the same to you spending a couple of dollars, Snagit by Techsmith is a first class apparatus that makes taking screenshots simple, has huge amounts of components that let you target particular windows, take area depictions, and even catch the full content of looking over windows like site pages.
You can take short recordings in the event that you need, comment on screenshots, draw bolts and shapes, and practically anything you can envision a screenshot instrument ought to have the capacity to do. It's an extraordinary instrument that we unquestionably suggest, particularly on the off chance that you have to take a great deal of screenshots.
There's a free trial that you can download to look at it before trying to burn through cash on it. When you attempt it, it'll be difficult to backpedal to Windows' barebones instruments.
0 notes