#System.Windows.Forms
Text
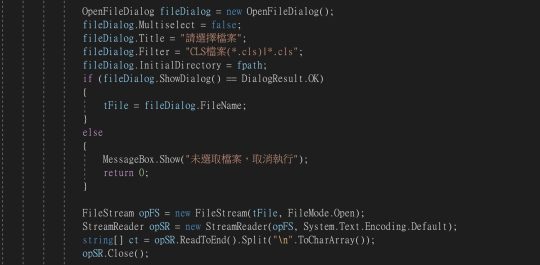
C# 使用 OpenFileDialog 開啟檔案
C# 使用 OpenFileDialog 開啟檔案
學習程式語言最重要的就是實踐,
只要實際操作演練過需要的功能,
就能夠從中學到經驗,
上次的 C# 教學介紹了使用主要 Interop 元件存取Excel 檔案,
今天則是要來介紹
C# 使用 OpenFileDialog 開啟檔案
其實微軟官方網站說明文件都寫得相當的詳細,
不愧為長久以來的軟體巨擘,
對於今天的 OpenFileDialog 當然也有詳細的說明與範例,
有興趣的人可以自行前往下載研究
要使用 OpenFileDialog 要先引入命名空間,
在 C# 程式中寫做:
using System.Windows.Forms;
這樣就能夠使用 OpenFileDialog這個類別的各種屬性與方法,
當然詳細的資訊在官方網站都有說明,
此處範例程式僅以當下的使用情境呼叫相應的屬性與方法
Multiselect ,以布林值表示 ( true 或者…
View On WordPress
#C入門#C教學#C範例程式#DialogResult.OK#FileName#Filter#InitialDirectory#Multiselect#OpenFileDialog 開啟檔案#System.Windows.Forms#Title#屬性與方法
0 notes
Text
I am getting the following error message when trying to use Sim Ripper and yes, I did download the most recent updated version. Details under the cut. I wanted to see if anyone else was having this issue before reporting it, or it is something I am doing.
See the end of this message for details on invoking
just-in-time (JIT) debugging instead of this dialog box.
Exception Text
System.NullReferenceException: Object reference not set to an instance of an object.
at TS4SimRipper.Form1.UpdateSlotTargets(String& errorList)
at TS4SimRipper.Form1.GetCurrentModel(Boolean skinOnly)
at TS4SimRipper.Form1.GetCurrentModel()
at TS4SimRipper.Form1.DisplaySim(SimData sim, SimOccult occultState)
at TS4SimRipper.Form1.sims_listBox_SelectedIndexChanged(Object sender, EventArgs e)
at System.Windows.Forms.ListBox.OnSelectedIndexChanged(EventArgs e)
at System.Windows.Forms.ListBox.WmReflectCommand(Message& m)
at System.Windows.Forms.ListBox.WndProc(Message& m)
at System.Windows.Forms.NativeWindow.Callback(IntPtr hWnd, Int32 msg, IntPtr wparam, IntPtr lparam)
Loaded Assemblies
mscorlib
Assembly Version: 4.0.0.0
Win32 Version: 4.8.9139.0 built by: NET481REL1LAST_B
CodeBase: file:///C:/Windows/Microsoft.NET/Framework64/v4.0.30319/mscorlib.dll
TS4SimRipper
Assembly Version: 1.0.0.0
Win32 Version: 1.0.0.0
CodeBase: file:///C:/Users/NATAL/Desktop/TS4SimRipper_3_14_2_0/TS4SimRipper.exe
System.Windows.Forms
Assembly Version: 4.0.0.0
Win32 Version: 4.8.9075.0 built by: NET481REL1LAST_C
CodeBase: file:///C:/WINDOWS/Microsoft.Net/assembly/GAC_MSIL/System.Windows.Forms/v4.0_4.0.0.0__b77a5c561934e089/System.Windows.Forms.dll
System
Assembly Version: 4.0.0.0
Win32 Version: 4.8.9139.0 built by: NET481REL1LAST_B
CodeBase: file:///C:/WINDOWS/Microsoft.Net/assembly/GAC_MSIL/System/v4.0_4.0.0.0__b77a5c561934e089/System.dll
System.Drawing
Assembly Version: 4.0.0.0
Win32 Version: 4.8.9032.0 built by: NET481REL1
CodeBase: file:///C:/WINDOWS/Microsoft.Net/assembly/GAC_MSIL/System.Drawing/v4.0_4.0.0.0__b03f5f7f11d50a3a/System.Drawing.dll
s4pi.Package
Assembly Version: 2002.10.2050.28502
Win32 Version: 2002.10.2050.28502
CodeBase: file:///C:/Users/NATAL/Desktop/TS4SimRipper_3_14_2_0/s4pi.Package.DLL
s4pi.Interfaces
Assembly Version: 2002.10.2049.28497
Win32 Version: 2002.10.2049.28497
CodeBase: file:///C:/Users/NATAL/Desktop/TS4SimRipper_3_14_2_0/s4pi.Interfaces.DLL
s4pi.Settings
Assembly Version: 2103.7.1628.20645
Win32 Version: 2103.7.1628.20645
CodeBase: file:///C:/Users/NATAL/Desktop/TS4SimRipper_3_14_2_0/s4pi.Settings.DLL
System.Core
Assembly Version: 4.0.0.0
Win32 Version: 4.8.9139.0 built by: NET481REL1LAST_B
CodeBase: file:///C:/WINDOWS/Microsoft.Net/assembly/GAC_MSIL/System.Core/v4.0_4.0.0.0__b77a5c561934e089/System.Core.dll
System.Configuration
Assembly Version: 4.0.0.0
Win32 Version: 4.8.9032.0 built by: NET481REL1
CodeBase: file:///C:/WINDOWS/Microsoft.Net/assembly/GAC_MSIL/System.Configuration/v4.0_4.0.0.0__b03f5f7f11d50a3a/System.Configuration.dll
System.Xml
Assembly Version: 4.0.0.0
Win32 Version: 4.8.9032.0 built by: NET481REL1
CodeBase: file:///C:/WINDOWS/Microsoft.Net/assembly/GAC_MSIL/System.Xml/v4.0_4.0.0.0__b77a5c561934e089/System.Xml.dll
WindowsFormsIntegration
Assembly Version: 4.0.0.0
Win32 Version: 4.8.9139.0 built by: NET481REL1LAST_B
CodeBase: file:///C:/WINDOWS/Microsoft.Net/assembly/GAC_MSIL/WindowsFormsIntegration/v4.0_4.0.0.0__31bf3856ad364e35/WindowsFormsIntegration.dll
PresentationFramework
Assembly Version: 4.0.0.0
Win32 Version: 4.8.9139.0
CodeBase: file:///C:/WINDOWS/Microsoft.Net/assembly/GAC_MSIL/PresentationFramework/v4.0_4.0.0.0__31bf3856ad364e35/PresentationFramework.dll
WindowsBase
Assembly Version: 4.0.0.0
Win32 Version: 4.8.9139.0 built by: NET481REL1LAST_B
CodeBase: file:///C:/WINDOWS/Microsoft.Net/assembly/GAC_MSIL/WindowsBase/v4.0_4.0.0.0__31bf3856ad364e35/WindowsBase.dll
PresentationCore
Assembly Version: 4.0.0.0
Win32 Version: 4.8.9139.0 built by: NET481REL1LAST_B
CodeBase: file:///C:/WINDOWS/Microsoft.Net/assembly/GAC_64/PresentationCore/v4.0_4.0.0.0__31bf3856ad364e35/PresentationCore.dll
System.Xaml
Assembly Version: 4.0.0.0
Win32 Version: 4.8.9139.0 built by: NET481REL1LAST_B
CodeBase: file:///C:/WINDOWS/Microsoft.Net/assembly/GAC_MSIL/System.Xaml/v4.0_4.0.0.0__b77a5c561934e089/System.Xaml.dll
PresentationFramework.Aero2
Assembly Version: 4.0.0.0
Win32 Version: 4.8.9032.0 built by: NET481REL1
CodeBase: file:///C:/WINDOWS/Microsoft.Net/assembly/GAC_MSIL/PresentationFramework.Aero2/v4.0_4.0.0.0__31bf3856ad364e35/PresentationFramework.Aero2.dll
Accessibility
Assembly Version: 4.0.0.0
Win32 Version: 4.8.9032.0 built by: NET481REL1
CodeBase: file:///C:/WINDOWS/Microsoft.Net/assembly/GAC_MSIL/Accessibility/v4.0_4.0.0.0__b03f5f7f11d50a3a/Accessibility.dll
PresentationFramework-SystemXml
Assembly Version: 4.0.0.0
Win32 Version: 4.8.9032.0
CodeBase: file:///C:/WINDOWS/Microsoft.Net/assembly/GAC_MSIL/PresentationFramework-SystemXml/v4.0_4.0.0.0__b77a5c561934e089/PresentationFramework-SystemXml.dll
protobuf-net
Assembly Version: 2.0.0.668
Win32 Version: 2.0.0.668
CodeBase: file:///C:/Users/NATAL/Desktop/TS4SimRipper_3_14_2_0/protobuf-net.DLL
DDSPanel
Assembly Version: 2002.10.2050.28504
Win32 Version: 2002.10.2050.28504
CodeBase: file:///C:/Users/NATAL/Desktop/TS4SimRipper_3_14_2_0/DDSPanel.DLL
s4pi.ImageResource
Assembly Version: 2104.21.1540.19202
Win32 Version: 2104.21.1540.19202
CodeBase: file:///C:/Users/NATAL/Desktop/TS4SimRipper_3_14_2_0/s4pi.ImageResource.DLL
JIT Debugging
To enable just-in-time (JIT) debugging, the .config file for this
application or computer (machine.config) must have the
jitDebugging value set in the system.windows.forms section.
The application must also be compiled with debugging
enabled.
For example:
When JIT debugging is enabled, any unhandled exception
will be sent to the JIT debugger registered on the computer
rather than be handled by this dialog box.
7 notes
·
View notes
Text
c# – Wheres the file-picker dialog in WPF?
There is no built-in control that has a textbox with a [Browse] button beside it. You gotta set that up yourself.
For a more feature complete answer, assume you have a Button BtnFileOpen and a textbox TxtFile. First you need to reference the System.Windows.Forms assembly from the references dialog (make sure you check mark it, double clicking it didnt seem to add it for me).
0 notes
Text
コントロールのレイアウトを一時中断して、パフォーマンスを向上させる
例えばコントロールの大きさが変わった時のように、コントロールのレイアウト(子コントロールの配置)の変更が必要になるかもしれない時、Layoutイベントが発生し、レイアウト操作(LayoutEngine.Layoutメソッド)が実行されます。このようなレイアウトロジックが実行される可能性があるのは、コントロールの大きさや位置、Zオーダー、表示/非表示が変更された時の他、コントロールに子コントロールが追加、削除された時などです。
レイアウトロジックが実行される操作を連続して複数行うと、無駄なレイアウト操作が多発し、パフォーマンスが低下する恐れがあります。特にフォームや親コントロールに複数の子コントロールを追加する時は要注意です。
これを防ぐには、一時的にレイアウトロジックの実行を停止させます。コントロールのレイアウトロジックを一時的に中断するにはControl.SuspendLayout…

View On WordPress
0 notes
Photo

using System;
using System.Collections.Generic;
using System.Linq;
using System.Threading.Tasks;
using System.Windows.Forms;
1 note
·
View note
Text
MySQL Connect Dialog
About a month ago, I published how you can connect to MySQL with a small form. One suggestion, or lets promote it to a request, from that post was: “Nice, but how do you create a reusable library for the MySQL Connection Dialog box?” That was a good question but I couldn’t get back until now to write a new blog post. This reusable MySQL connection dialog lets you remove MySQL connection data from the command-line history. This post also shows you how to create and test a Powershell Module. The first step to create a module requires that you set the proper %PSModulePath% environment variable. If you fail to do that, you can put it into a default PowerShell module location but that’s not too effective for testing. You launch the System Properties dialog and click the Environment Variables button: Then, you edit the PSModulePath environment variable in the bottom list of environment variables and add a new path to the PSModulePath. My development path in this example is: C:Datacit225mysqlpsmod I named the file the same as the function Get-Credentials.psm1 consistent with the Microsoft instructions for creating a PowerShell module and their instructions for Pascal case name with an approved verb and singular noun. Below is the code for the Get-Credentials.psm1 file: function Get-Credentials { # Add libraries for form components. Add-Type -AssemblyName System.Windows.Forms Add-Type -AssemblyName System.Drawing # Define a user credential form. $form = New-Object System.Windows.Forms.Form $form.Text = 'User Credential Form' $form.Size = New-Object System.Drawing.Size(300,240) $form.StartPosition = 'CenterScreen' # Define a button and assign it and its controls to a form. $loginButton = New-Object System.Windows.Forms.Button $loginButton.Location = New-Object System.Drawing.Point(60,160) $loginButton.Size = New-Object System.Drawing.Size(75,23) $loginButton.Text = 'Login' $loginButton.DialogResult = [System.Windows.Forms.DialogResult]::OK $form.AcceptButton = $loginButton $form.Controls.Add($loginButton) # Define a button and assign it and its controls to a form. $cancelButton = New-Object System.Windows.Forms.Button $cancelButton.Location = New-Object System.Drawing.Point(155,160) $cancelButton.Size = New-Object System.Drawing.Size(75,23) $cancelButton.Text = 'Cancel' $cancelButton.DialogResult = [System.Windows.Forms.DialogResult]::Cancel $form.CancelButton = $cancelButton $form.Controls.Add($cancelButton) # Define a label and assign it and its controls to a form. $userLabel = New-Object System.Windows.Forms.Label $userLabel.Location = New-Object System.Drawing.Point(30,15) $userLabel.Size = New-Object System.Drawing.Size(100,20) $userLabel.Text = 'Enter User Name:' $form.Controls.Add($userLabel) # Define a TextBox and assign it and its controls to a form. $userTextBox = New-Object System.Windows.Forms.TextBox $userTextBox.Location = New-Object System.Drawing.Point(140,15) $userTextBox.Size = New-Object System.Drawing.Size(100,20) $form.Controls.Add($userTextBox) # Define a label and assign it and its controls to a form. $pwdLabel = New-Object System.Windows.Forms.Label $pwdLabel.Location = New-Object System.Drawing.Point(30,40) $pwdLabel.Size = New-Object System.Drawing.Size(100,20) $pwdLabel.Text = 'Enter Password:' $form.Controls.Add($pwdLabel) # Define a TextBox and assign it and its controls to a form. $pwdTextBox = New-Object System.Windows.Forms.TextBox $pwdTextBox.Location = New-Object System.Drawing.Point(140,40) $pwdTextBox.Size = New-Object System.Drawing.Size(100,20) $pwdTextBox.PasswordChar = "*" $form.Controls.Add($pwdTextBox) # Define a label and assign it and its controls to a form. $hostLabel = New-Object System.Windows.Forms.Label $hostLabel.Location = New-Object System.Drawing.Point(30,65) $hostLabel.Size = New-Object System.Drawing.Size(100,20) $hostLabel.Text = 'Enter Hostname:' $form.Controls.Add($hostLabel) # Define a TextBox and assign it and its controls to a form. $hostTextBox = New-Object System.Windows.Forms.TextBox $hostTextBox.Location = New-Object System.Drawing.Point(140,65) $hostTextBox.Size = New-Object System.Drawing.Size(100,20) $form.Controls.Add($hostTextBox) # Define a label and assign it and its controls to a form. $portLabel = New-Object System.Windows.Forms.Label $portLabel.Location = New-Object System.Drawing.Point(30,90) $portLabel.Size = New-Object System.Drawing.Size(100,20) $portLabel.Text = 'Enter Port #:' $form.Controls.Add($portLabel) # Define a TextBox and assign it and its controls to a form. $portTextBox = New-Object System.Windows.Forms.TextBox $portTextBox.Location = New-Object System.Drawing.Point(140,90) $portTextBox.Size = New-Object System.Drawing.Size(100,20) $form.Controls.Add($portTextBox) # Define a label and assign it and its controls to a form. $dbLabel = New-Object System.Windows.Forms.Label $dbLabel.Location = New-Object System.Drawing.Point(30,115) $dbLabel.Size = New-Object System.Drawing.Size(100,20) $dbLabel.Text = 'Enter DB Name:' $form.Controls.Add($dbLabel) # Define a TextBox and assign it and its controls to a form. $dbTextBox = New-Object System.Windows.Forms.TextBox $dbTextBox.Location = New-Object System.Drawing.Point(140,115) $dbTextBox.Size = New-Object System.Drawing.Size(100,20) $form.Controls.Add($dbTextBox) $form.Topmost = $true $form.Add_Shown({$userTextBox.Select()}) $result = $form.ShowDialog() if ($result -eq [System.Windows.Forms.DialogResult]::OK) { # Assign inputs to connection variables. $uid = $userTextBox.Text $pwd = $pwdTextBox.Text $server = $hostTextBox.Text $port= $portTextBox.Text $dbName = $dbTextBox.Text # Declare connection string. $credentials = 'server=' + $server + ';port=' + $port + ';uid=' + $uid + ';pwd=' + $pwd + ';database=' + $dbName } else { $credentials = $null } return $credentials } You must create a Get-Connection directory in your C:Datacit225mysqlpsmod directory that you added to the PSModulePath. Then, you must put your module code in the Get-Connection subdirectory as the Get-Connection.psm1 module file. The test.ps1 script imports the Get-Credentials.psm1 PowerShell module, launches the MySQL Connection Dialog form and returns the connection string. The test.ps1 code is: # Import your custom module. Import-Module Get-Credentials # Test the Get-Credentials function. if (($credentials = Get-Credentials) -ne $undefinedVariable) { Write-Host($credentials) } You can test it from the local any directory with the following command-line: powershell .test.ps1 It should print something like this to the console: server=localhost;port=3306;uid=student;pwd=student;database=studentdb If you got this far, that’s great! You’re ready to test a connection to the MySQL database. Before you do that, you should create the same avenger table I used in the initial post and insert the same or some additional data. Connect to the any of your test databases and rung the following code to create the avenger table and nine rows of data. -- Create the avenger table. CREATE TABLE db_connect ( db_connect_id INT UNSIGNED PRIMARY KEY AUTO_INCREMENT , version VARCHAR(10) , user VARCHAR(24) , db_name VARCHAR(10)); -- Seed the avenger table with data. INSERT INTO avenger ( first_name, last_name, avenger ) VALUES ('Anthony', 'Stark', 'Iron Man') ,('Thor', 'Odinson', 'God of Thunder') ,('Steven', 'Rogers', 'Captain America') ,('Bruce', 'Banner', 'Hulk') ,('Clinton', 'Barton', 'Hawkeye') ,('Natasha', 'Romanoff', 'Black Widow') ,('Peter', 'Parker', 'Spiderman') ,('Steven', 'Strange', 'Dr. Strange') ,('Scott', 'Lange', 'Ant-man'); Now, let’s promote our use-case test.ps1 script to a testQuery.ps1 script, like: # Import your custom module. Import-Module Get-Credentials # Test the Get-Credentials function. if (($credentials = Get-Credentials) -ne $undefinedVariable) { # Connect to the libaray MySQL.Data.dll Add-Type -Path 'C:Program Files (x86)MySQLConnector NET 8.0Assembliesv4.5.2MySql.Data.dll' # Create a MySQL Database connection variable that qualifies: # [Driver]@ConnectionString # ============================================================ # You can assign the connection string before using it or # while using it, which is what we do below by assigning # literal values for the following names: # - server= or 127.0.0.1 for localhost # - uid= # - pwd= # - port= or 3306 for default port # - database= # ============================================================ $Connection = [MySql.Data.MySqlClient.MySqlConnection]@{ConnectionString=$credentials} $Connection.Open() # Define a MySQL Command Object for a non-query. $sqlCommand = New-Object MySql.Data.MySqlClient.MySqlCommand $sqlDataAdapter = New-Object MySql.Data.MySqlClient.MySqlDataAdapter $sqlDataSet = New-Object System.Data.DataSet # Assign the connection and command text to the MySQL command object. $sqlCommand.Connection = $Connection $sqlCommand.CommandText = 'SELECT CONCAT(first_name," ",last_name) AS full_name ' + ', avenger ' + 'FROM avenger' # Assign the connection and command text to the query method of # the data adapter object. $sqlDataAdapter.SelectCommand=$sqlCommand # Assign the tuples of data to a data set and return the number of rows fetched. $rowsFetched=$sqlDataAdapter.Fill($sqlDataSet, "data") # Print to console the data returned from the query. foreach($row in $sqlDataSet.tables[0]) { write-host "Avenger:" $row.avenger "is" $row.full_name } # Close the MySQL connection. $Connection.Close() } It should give you the MySQL Connection Dialog and with the correct credentials print the following to your console: Avenger: Iron Man is Anthony Stark Avenger: God of Thunder is Thor Odinson Avenger: Captain America is Steven Rogers Avenger: Hulk is Bruce Banner Avenger: Hawkeye is Clinton Barton Avenger: Black Widow is Natasha Romanoff Avenger: Spiderman is Peter Parker Avenger: Dr. Strange is Steven Strange Avenger: Ant-man is Scott Lange As always, I hope this helps those looking to exploit technology.
https://blog.mclaughlinsoftware.com/2021/05/21/mysql-connect-dialog/
0 notes
Text
C# Aritmatiksel Örnekler
C Sharp ile Aritmetiksel Örnekler sunmaya çalıştık.
Aşağıda verdiğimiz örnek ile bir işlem yaptık siz de bu örneği baz alarak işlem yapabilirsiniz.
using System;
using System.Collections.Generic;
using System.ComponentModel;
using System.Data;
using System.Drawing;
using System.Linq;
using System.Text;
using System.Threading.Tasks;
using System.Windows.Forms;
namespace…

View On WordPress
0 notes
Text
wpf – Open directory dialog
You can use the built-in FolderBrowserDialog class for this. Dont mind that its in the System.Windows.Forms namespace.using (var dialog = new System.Windows.Forms.FolderBrowserDialog()) { System.Windows.Forms.DialogResult result = dialog.ShowDialog(); }
If you want the window to be modal over some WPF window, see the question How to use a FolderBrowserDialog from a WPF application.
0 notes
Text
現在アクティブな(選択されている、フォーカスのある)コントロールを取得する、指定したコントロールをアクティブにする
ここでは、現在アクティブな(選択されている、フォーカスのある)コントロールを取得する方法と、指定したコントロールをアクティブにする(選択する、フォーカスを移動させる)方法について説明します。
現在アクティブなコントロールを取得する
現在アクティブなコントロールを取得するには、ContainerControl.ActiveControlプロパティを使用します。
フォームクラス内で、現在アクティブなコントロールを取得する例を示します。
VB.NET
'Imports System.Windows.Forms
'現在アクティブなコントロールを取得する
Dim c As Control = f.ActiveControl
If Not (c Is Nothing) Then
Console.WriteLine("現在アクティブなコントロールは、{0}です。",…

View On WordPress
0 notes
Text
Hướng dẫn INSERT hình ảnh vào SQL Server
BaĐể chèn vào và truy xuất hình ảnh từ cơ sở dữ liệu máy chủ SQL mà không cần sử dụng các thủ tục được lưu trữ và cũng để thực hiện các thao tác chèn, tìm kiếm, cập nhật và xóa và điều hướng các bản ghi.
Khi chúng ta muốn chèn hình ảnh vào cơ sở dữ liệu, trước tiên chúng ta phải tạo một bảng trong cơ sở dữ liệu, chúng ta có thể sử dụng kiểu dữ liệu 'image' hoặc 'binary' để lưu trữ hình ảnh.
create table student(sno int primary key,sname varchar(50),course varchar(50),fee money,photo image)
Truy vấn để tạo bảng trong ứng dụng của chúng ta
Thiết kế giao diện

Thiết kế biểu mẫu như trên với 1 control PictureBox, 1 control OpenFileDialog, 4 Labels, 4 control TextBox và 11 control Buttons.
Thuộc tính PictureBox1
BorderStyle = Cố định3D; SizeMode = StrechImage
Lưu ý rằng control OpenFileDialog xuất hiện bên dưới biểu mẫu (không phải trên biểu mẫu), có thể được sử dụng để duyệt hình ảnh.
Bắt đầu lập trình
using thư viện
using System.Data.SqlClient
Trong ứng dụng này, chúng ta sẽ tìm kiếm một bản ghi bằng cách lấy đầu vào từ InputBox. Đối với điều này, chúng tôi phải thêm tham chiếu đến Microsoft.VisualBasic.
Thêm tham chiếu vào 'Microsoft.VisualBasic'
Goto Project Menu -> Add Reference -> chọn 'Microsoft.VisualBasic' từ tab .NET.
Để sử dụng tham chiếu này, chúng tôi phải bao gồm không gian tên:
using Microsoft.VisualBasic
Chuyển đổi hình ảnh thành dữ liệu nhị phân
Chúng ta không thể lưu trữ hình ảnh trực tiếp vào cơ sở dữ liệu. Đối với điều này, chúng tôi có hai giải pháp:
Để lưu trữ vị trí của hình ảnh trong cơ sở dữ liệu
Chuyển đổi hình ảnh thành dữ liệu nhị phân và chèn dữ liệu nhị phân đó vào cơ sở dữ liệu và chuyển đổi dữ liệu đó trở lại hình ảnh trong khi truy xuất các bản ghi.
Nếu chúng ta lưu trữ vị trí của một hình ảnh trong cơ sở dữ liệu và giả sử nếu hình ảnh đó bị xóa hoặc di chuyển khỏi vị trí đó, chúng tôi sẽ gặp phải vấn đề khi truy xuất các bản ghi. Vì vậy, tốt hơn là chuyển đổi hình ảnh thành dữ liệu nhị phân và chèn dữ liệu nhị phân đó vào cơ sở dữ liệu và chuyển đổi lại thành hình ảnh trong khi truy xuất bản ghi.
Chúng ta có thể chuyển đổi một hình ảnh thành dữ liệu nhị phân bằng cách sử dụng
FileStream
MemoryStream
1. FileStream sử dụng vị trí tệp để chuyển đổi hình ảnh thành dữ liệu nhị phân mà chúng ta có thể / không cung cấp trong khi cập nhật bản ghi.
FileStream fs = new FileStream(openFileDialog1.FileName, FileMode.Open, FileAccess.Read);
byte[] photo_aray = new byte[fs.Length];
fs.Read(photo_aray, 0, photo_aray.Length);
2. Vì vậy, tốt hơn là sử dụng MemoryStream sử dụng hình ảnh trong PictureBox để chuyển đổi hình ảnh thành dữ liệu nhị phân.
MemoryStream ms = new MemoryStream();
pictureBox1.Image.Save(ms, ImageFormat.Jpeg);
byte[] photo_aray = new byte[ms.Length];
ms.Position = 0;
ms.Read(photo_aray, 0, photo_aray.Length);
Để sử dụng FileStream hoặc MemoryStream, chúng ta phải using thư viên:
using System.IO
OpenFileDialog Control
Chúng ta sử dụng điều khiển OpenFileDialog để duyệt các hình ảnh (ảnh) để chèn vào bản ghi
Tải chi tiết ràng buộc vào dataTable
Trong ứng dụng này. chúng ta sử dụng phương thức Find () để tìm kiếm một bản ghi, yêu cầu chi tiết về cột khóa chính, có thể được cung cấp bằng câu lệnh:
adapter.MissingSchemaAction = MissingSchemaAction.AddWithKey;
Trỏ tới bản ghi hiện tại trong dataTable
Sau khi tìm kiếm một bản ghi, chúng ta phải lấy chỉ mục của bản ghi đó để có thể điều hướng các bản ghi tiếp theo và trước đó.
rno= ds.Tables[0].Rows.IndexOf(drow);
code tham khảo
using System;
using System.Windows.Forms;
using System.Data;
using System.Data.SqlClient;
using System.Drawing;
using System.Drawing.Imaging;
using System.IO;
using Microsoft.VisualBasic;
namespace inserting_imgs
{
public partial class Form1 : Form
{
public Form1()
{
InitializeComponent();
}
SqlConnection con;
SqlCommand cmd;
SqlDataAdapter adapter;
DataSet ds; int rno = 0;
MemoryStream ms;
byte[] photo_aray;
private void Form1_Load(object sender, EventArgs e)
{
con = new SqlConnection("user id=sa;password=123;database=prash");
loaddata();
showdata();
}
void loaddata()
{
adapter = new SqlDataAdapter("select sno,sname,course,fee,photo from student", con);
adapter.MissingSchemaAction = MissingSchemaAction.AddWithKey;
ds = new DataSet(); adapter.Fill(ds, "student");
}
void showdata()
{
if (ds.Tables[0].Rows.Count > 0)
{
textBox1.Text = ds.Tables[0].Rows[rno][0].ToString();
textBox2.Text = ds.Tables[0].Rows[rno][1].ToString();
textBox3.Text = ds.Tables[0].Rows[rno][2].ToString();
textBox4.Text = ds.Tables[0].Rows[rno][3].ToString();
pictureBox1.Image = null;
if (ds.Tables[0].Rows[rno][4] != System.DBNull.Value)
{
photo_aray = (byte[])ds.Tables[0].Rows[rno][4];
MemoryStream ms = new MemoryStream(photo_aray);
pictureBox1.Image = Image.FromStream(ms);
}
}
else
MessageBox.Show("No Records");
}
private void browse_Click(object sender, EventArgs e)
{
openFileDialog1.Filter = "jpeg|*.jpg|bmp|*.bmp|all files|*.*";
DialogResult res = openFileDialog1.ShowDialog();
if (res == DialogResult.OK)
{
pictureBox1.Image = Image.FromFile(openFileDialog1.FileName);
}
}
private void newbtn_Click(object sender, EventArgs e)
{
cmd = new SqlCommand("select max(sno)+10 from student", con);
con.Open();
textBox1.Text = cmd.ExecuteScalar().ToString();
con.Close();
textBox2.Text = textBox3.Text = textBox4.Text = "";
pictureBox1.Image = null;
}
private void insert_Click(object sender, EventArgs e)
{
cmd = new SqlCommand("insert into student(sno,sname,course,fee,photo) values(" + textBox1.Text + ",'" +
textBox2.TabIndex + "','" + textBox3.Text + "'," + textBox4.Text + ",@photo)", con);
conv_photo();
con.Open();
int n = cmd.ExecuteNonQuery();
con.Close();
if (n > 0)
{
MessageBox.Show("record inserted");
loaddata();
}
else
MessageBox.Show("insertion failed");
}
void conv_photo()
{
//converting photo to binary data
if (pictureBox1.Image != null)
{
//using FileStream:(will not work while updating, if image is not changed)
//FileStream fs = new FileStream(openFileDialog1.FileName, FileMode.Open, FileAccess.Read);
//byte[] photo_aray = new byte[fs.Length];
//fs.Read(photo_aray, 0, photo_aray.Length);
//using MemoryStream:
ms = new MemoryStream();
pictureBox1.Image.Save(ms, ImageFormat.Jpeg);
byte[] photo_aray = new byte[ms.Length];
ms.Position = 0;
ms.Read(photo_aray, 0, photo_aray.Length);
cmd.Parameters.AddWithValue("@photo", photo_aray);
}
}
private void search_Click(object sender, EventArgs e)
{
try
{
int n = Convert.ToInt32(Interaction.InputBox("Enter sno:", "Search", "20", 100, 100));
DataRow drow;
drow = ds.Tables[0].Rows.Find(n);
if (drow != null)
{
rno = ds.Tables[0].Rows.IndexOf(drow);
textBox1.Text = drow[0].ToString();
textBox2.Text = drow[1].ToString();
textBox3.Text = drow[2].ToString();
textBox4.Text = drow[3].ToString();
pictureBox1.Image = null;
if (drow[4] != System.DBNull.Value)
{
photo_aray = (byte[])drow[4];
MemoryStream ms = new MemoryStream(photo_aray);
pictureBox1.Image = Image.FromStream(ms);
}
}
else
MessageBox.Show("Record Not Found");
}
catch
{
MessageBox.Show("Invalid Input");
}
}
private void update_Click(object sender, EventArgs e)
{
cmd = new SqlCommand("update student set sname='" + textBox2.Text + "', course='" + textBox3.Text + "', fee='" + textBox4.Text + "', photo=@photo where sno=" + textBox1.Text, con);
conv_photo();
con.Open();
int n = cmd.ExecuteNonQuery();
con.Close();
if (n > 0)
{
MessageBox.Show("Record Updated");
loaddata();
}
else
MessageBox.Show("Updation Failed");
}
private void delete_Click(object sender, EventArgs e)
{
cmd = new SqlCommand("delete from student where sno=" + textBox1.Text, con);
con.Open();
int n = cmd.ExecuteNonQuery();
con.Close();
if (n > 0)
{
MessageBox.Show("Record Deleted");
loaddata();
rno = 0;
showdata();
}
else
MessageBox.Show("Deletion Failed");
}
private void first_Click(object sender, EventArgs e)
{
rno = 0; showdata();
MessageBox.Show("First record");
}
private void previous_Click(object sender, EventArgs e)
{
if (rno > 0)
{
rno--; showdata();
}
else
MessageBox.Show("First record");
}
private void next_Click(object sender, EventArgs e)
{
if (rno < ds.Tables[0].Rows.Count - 1)
{
rno++; showdata();
}
else
MessageBox.Show("Last record");
}
private void last_Click(object sender, EventArgs e)
{
rno = ds.Tables[0].Rows.Count - 1;
showdata(); MessageBox.Show("Last record");
}
private void exit_Click(object sender, EventArgs e)
{
this.Close();
}
}
}
Bài viết gốc: https://www.c-sharpcorner.com/UploadFile/e628d9/inserting-retrieving-images-from-sql-server-database-without-using-stored-procedures/
0 notes
Text
Selamun aleyküm arkadaşlar tam gaz proje paylaşmaya devam C# Stok Takip Otomasyonu Access Veritabanı Proje Dosyası 2020 paylaşımını gerçekleştirdik.C# Otomasyon konusunda sitemizin içeriğini zenginleştirmeye devam ediyoruz.Umarım bu Emeklerimiz siz tarafından karşılık görüyordur.Projemizi alıp geliştirebilirsiniz , değiştirerek ödevlerinizde kullanabilir yada sadece inceleyebilirsiniz.
C# Stok Takip Otomasyonu Access Veritabanı Proje Dosyası 2020
Projemiz hakkında biraz bilgi verelim Projemiz sadece bir tasarım ile tasarlanmıştır.www.iconarchive.com iconlar indirilmiştir.https://www.onlinelogomaker.com/logomaker/# ile logolar tasarlanmış ,renkler ise https://material.io/resources/color/#!/?view.left=0&view.right=0 seçilmiştir.Bir anaform bulunmaktadır bu formun üzerinde diğer formlar açılmaktadır.
Projemizin indirme linkini vermeden önce biraz projemizin resimlerini inceleyelim.
#gallery-0-4 { margin: auto; } #gallery-0-4 .gallery-item { float: left; margin-top: 10px; text-align: center; width: 33%; } #gallery-0-4 img { border: 2px solid #cfcfcf; } #gallery-0-4 .gallery-caption { margin-left: 0; } /* see gallery_shortcode() in wp-includes/media.php */
Projemizi inşallah beğenmişsinizdir ve işinizi görür c# örnek otomasyonları sizden olumlu feedbackler geldiği sürece paylaşmaya devam edeceğiz.
[su_button url=”https://yadi.sk/d/RSH9t4CaWbmq2g” style=”noise” background=”#ce263c” size=”9″ wide=”yes” icon=”icon: arrow-up” desc=”Projelerimizi takip etmeyi unutmayın :)”]Stok Takip Otomasyonunu İndir ![/su_button]
Buradan projemizin görsellerini görebilirsiniz.Projemizi indirmeden önce bu bir ricadir lütfen instagram hesabımızı takip ediniz.
İnstagramda Bizi Takip Edin !instagramda lütfen bizi takip edin !
Örnek Kodlarımıza Bakabilirsiniz zor bi yanı yok !
using System; using System.Collections.Generic; using System.ComponentModel; using System.Data; using System.Drawing; using System.Linq; using System.Text; using System.Threading.Tasks; using System.Windows.Forms; using System.Data.OleDb; using System.IO; namespace Stok_Takip_Otomasyonu { public partial class Stok_İşlemleri : Form { string DosyaYolu, DosyaAdi = ""; public DataTable tablo = new DataTable(); public OleDbConnection bag = new OleDbConnection("Provider=Microsoft.ACE.OLEDB.12.0;Data Source=datam.accdb"); public OleDbDataAdapter adtr = new OleDbDataAdapter(); public OleDbCommand kmt = new OleDbCommand(); int id; private void Stok_İşlemleri_Load(object sender, EventArgs e) { listele(); } private void btnResimEkle_Click(object sender, EventArgs e) { if (DosyaAc.ShowDialog() == DialogResult.OK) { foreach (string i in DosyaAc.FileName.Split('\\')) { if (i.Contains(".jpg")) { DosyaAdi = i; } else if (i.Contains(".png")) { DosyaAdi = i; } else { DosyaYolu += i + "\\"; } } pictureBox1.ImageLocation = DosyaAc.FileName; } else { MessageBox.Show("Dosya Girmediniz!"); } } private void btnResimSil_Click(object sender, EventArgs e) { pictureBox1.ImageLocation = ""; DosyaAdi = ""; } private void btnStokEkle_Click(object sender, EventArgs e) { try { if (textBox1.Text.Trim() == "") errorProvider1.SetError(textBox1, "Boş geçilmez"); else errorProvider1.SetError(textBox1, ""); if (textBox2.Text.Trim() == "") errorProvider1.SetError(textBox2, "Boş geçilmez"); else errorProvider1.SetError(textBox2, ""); if (textBox3.Text.Trim() == "") errorProvider1.SetError(textBox3, "Boş geçilmez"); else errorProvider1.SetError(textBox3, ""); if (textBox4.Text.Trim() == "") errorProvider1.SetError(textBox4, "Boş geçilmez"); else errorProvider1.SetError(textBox4, ""); if (textBox5.Text.Trim() == "") errorProvider1.SetError(textBox5, "Boş geçilmez"); else errorProvider1.SetError(textBox5, ""); if (textBox1.Text.Trim() != "" && textBox2.Text.Trim() != "" && textBox3.Text.Trim() != "" && textBox4.Text.Trim() != "" && textBox5.Text.Trim() != "") { bag.Open(); kmt.Connection = bag; kmt.CommandText = "INSERT INTO stokbil(stokAdi,stokModeli,stokSeriNo,stokAdedi,stokTarih,kayitYapan,dosyaAdi,olcu_birimi,afiyat,sfiyat) VALUES ('" + textBox1.Text + "','" + textBox2.Text + "','" + textBox3.Text + "','" + textBox4.Text + "','" + dateTimePicker1.Text + "','" + textBox5.Text + "','" + DosyaAdi + "','" + comboBox1.Text + "','" + textBox7.Text + "','" + textBox8.Text + "') "; kmt.ExecuteNonQuery(); kmt.Dispose(); bag.Close(); for (int i = 0; i < this.Controls.Count; i++) { if (this.Controls[i] is TextBox) this.Controls[i].Text = ""; } listele(); if (DosyaAdi != "") File.WriteAllBytes(DosyaAdi, File.ReadAllBytes(DosyaAc.FileName)); MessageBox.Show("Kayıt İşlemi Tamamlandı ! ", "İşlem Sonucu", MessageBoxButtons.OK, MessageBoxIcon.Information); } } catch (Exception hata) { MessageBox.Show("Kayıtlı Seri No !" + hata); bag.Close(); } } private void btnStokSil_Click(object sender, EventArgs e) { try { DialogResult cevap; cevap = MessageBox.Show("Kaydı silmek istediğinizden eminmisiniz", "Uyarı", MessageBoxButtons.YesNo, MessageBoxIcon.Question); if (cevap == DialogResult.Yes && dataGridView1.CurrentRow.Cells[0].Value.ToString().Trim() != "") { bag.Open(); kmt.Connection = bag; kmt.CommandText = "DELETE from stokbil WHERE stokSeriNo='" + dataGridView1.CurrentRow.Cells[2].Value.ToString() + "' "; kmt.ExecuteNonQuery(); kmt.Dispose(); bag.Close(); listele(); } } catch { ; } } private void btnStokGuncelle_Click(object sender, EventArgs e) { if (textBox1.Text.Trim() != "" && textBox2.Text.Trim() != "" && textBox3.Text.Trim() != "" && textBox4.Text.Trim() != "" && textBox5.Text.Trim() != "") { string sorgu = "UPDATE stokbil SET stokAdi='" + textBox1.Text + "',stokModeli='" + textBox2.Text + "',stokSeriNo='" + textBox3.Text + "',stokAdedi='" + textBox4.Text + "',stokTarih='" + dateTimePicker1.Text + "',kayitYapan='" + textBox5.Text + "',dosyaAdi='" + DosyaAdi + "',olcu_birimi='" + comboBox1.Text + "',afiyat='" + textBox7.Text + "',sfiyat='" + textBox8.Text + "' WHERE id=" + id; OleDbCommand kmt = new OleDbCommand(sorgu, bag); bag.Open(); kmt.ExecuteNonQuery(); kmt.Dispose(); bag.Close(); listele(); if (DosyaAdi != "") File.WriteAllBytes(DosyaAdi, File.ReadAllBytes(DosyaAc.FileName)); MessageBox.Show("Güncelleme İşlemi Tamamlandı !", "Bilgi", MessageBoxButtons.OK, MessageBoxIcon.Information); } else { MessageBox.Show("Boş Alan Bırakmayınız !"); } } private void button2_Click(object sender, EventArgs e) { Stok_Kontrol stk = new Stok_Kontrol(); stk.Show(); this.Hide(); } private void button3_Click(object sender, EventArgs e) { this.Hide(); } private void dataGridView1_CellClick(object sender, DataGridViewCellEventArgs e) { textBox1.Text = dataGridView1.CurrentRow.Cells[0].Value.ToString(); textBox2.Text = dataGridView1.CurrentRow.Cells[1].Value.ToString(); textBox3.Text = dataGridView1.CurrentRow.Cells[2].Value.ToString(); textBox4.Text = dataGridView1.CurrentRow.Cells[3].Value.ToString(); textBox5.Text = dataGridView1.CurrentRow.Cells[5].Value.ToString(); //dateTimePicker1.Text = dataGridView1.CurrentRow.Cells[4].Value.ToString(); textBox7.Text = dataGridView1.CurrentRow.Cells[7].Value.ToString(); textBox8.Text = dataGridView1.CurrentRow.Cells[8].Value.ToString(); comboBox1.Text = dataGridView1.CurrentRow.Cells[6].Value.ToString(); try { kmt = new OleDbCommand("select * from stokbil where stokSeriNo='" + dataGridView1.CurrentRow.Cells[2].Value.ToString() + "'", bag); bag.Open(); OleDbDataReader oku = kmt.ExecuteReader(); oku.Read(); if (oku.HasRows) { pictureBox1.ImageLocation = oku[7].ToString(); id = Convert.ToInt32(oku[0].ToString()); } bag.Close(); } catch { bag.Close(); } } public void listele() { try { tablo.Clear(); bag.Open(); OleDbDataAdapter adtr = new OleDbDataAdapter("select stokAdi,stokModeli,stokSeriNo,stokAdedi,stokTarih,kayitYapan,olcu_birimi,afiyat,sfiyat From stokbil", bag); adtr.Fill(tablo); dataGridView1.DataSource = tablo; adtr.Dispose(); bag.Close(); try { dataGridView1.SelectionMode = DataGridViewSelectionMode.FullRowSelect; //datagridview1'deki tüm satırı seç dataGridView1.Columns[0].HeaderText = "STOK ADI"; //sütunlardaki textleri değiştirme dataGridView1.Columns[1].HeaderText = "STOK MODELİ"; dataGridView1.Columns[2].HeaderText = "STOK SERİNO"; dataGridView1.Columns[3].HeaderText = "STOK ADEDİ"; dataGridView1.Columns[4].HeaderText = "STOK TARİH"; dataGridView1.Columns[5].HeaderText = "KAYIT YAPAN"; dataGridView1.Columns[0].Width = 120; //genişlik dataGridView1.Columns[1].Width = 120; dataGridView1.Columns[2].Width = 120; dataGridView1.Columns[3].Width = 80; dataGridView1.Columns[4].Width = 100; dataGridView1.Columns[5].Width = 120; } catch { ; } } catch (Exception hata) { MessageBox.Show(hata.ToString()); } } public Stok_İşlemleri() { InitializeComponent(); } } }
C# Stok Takip Otomasyonu Access Veritabanı Proje Dosyası 2020 Selamun aleyküm arkadaşlar tam gaz proje paylaşmaya devam C# Stok Takip Otomasyonu Access Veritabanı Proje Dosyası 2020 paylaşımını gerçekleştirdik.C# Otomasyon konusunda sitemizin içeriğini zenginleştirmeye devam ediyoruz.Umarım bu Emeklerimiz siz tarafından karşılık görüyordur.Projemizi alıp geliştirebilirsiniz , değiştirerek ödevlerinizde kullanabilir yada sadece inceleyebilirsiniz.
0 notes
Text
Modding a 10 Year Old Game - Grand Theft Auto IV

(extremely sentimental intro)
My first foray into game development (if you could even call it that) was modding. I’ve always been a sucker for immersion and realism in games, and as a fan of RPG’s, I love the feeling of belonging to a virtual world, and being able to engage in open, dynamic gameplay. This is what mods do best, taking an existing game-world, rules, and limits, and extending them to allow for many more hours of exploration and interactivity.
In Fallout: New Vegas, I loved pretending to be some kind of nomadic gun merchant, roaming the deserts of Nevada and living life rough. In Skyrim, I spent hours as a high society landlord, buying and renting every house in Whiterun, and hiring bodyguards to do my bidding. In both games, I had already played the story missions, and gone through all the available guilds and side-quests. However, I still enjoyed being part of such detailed game environments. Mods allow players like myself to run right past the storyline and do whatever weird, niche activity we want.
modding GTA IV
Another title with a fantastic modding community behind it is Grand Theft Auto IV. A lot of people don’t like this game compared to the brighter, goofier titles in the GTA series, but personally, it’s always been my favorite. Even though the graphics have begun to show their age, GTA IV’s rendition of Liberty City feels so authentic.
I’m still shocked at the amount of detail Rockstar managed to pack inside this game. Cab drivers pour coffee out of their driver’s side windows, pedestrians throw cigarette butts on the sidewalk, people get into arguments and conversations all without any input from the player. The city feels incredibly alive, and carries on regardless. Liberty City is filthy, covered in a layer of grime, garbage and haze. Walking around places like Hove Beach evokes all of my favorite films like Taxi Driver, Donnie Brasco, and Lord of War.

With such an intricate city to roam around in, I always wanted mods to make GTA IV more realistic. Thankfully, there are a lot of mods available aimed at doing this. Unfortunately, as the game and modding community are almost a decade old, many of the forums and sites dedicated to modding GTA IV are no longer available. Thankfully, some sites like GTAinside, and GTAforums are still kicking.
Modding GTA IV requires a couple things. First of all, if you have it on Steam, you’ll want to downgrade the game to Version 1.0.7 or 1.0.4. Next, you’ll need something called a ScriptHook, and an ASI loader. Basically, these make it possible to load custom scripts into the game. A guide on how to install these can be found here. Once installed, you’ll have a scripts folder inside your game directory. Most mods for GTA IV are scripts, but things like effects or textures that have to do with actual game data will have more complex installations. Typically, you’ll have to overwrite files in the common directory, so be sure to make a backup before you do.
Now that you’re ready to add some mods to your game, the only annoying part is making sure they’re all compatible with each other and don’t crash the game. Since I love realism mods, a lot of the ones I found where from this list. I really recommend ones like Arrest Warrant, Bank Account, Interactivity, and Bleed & Heal. I’ve found it makes the game a lot more challenging when you really have to be careful of how you approach combat, and when you also can’t magically carry an entire arsenal of weapons.
my mod for GTA IV
One thing I always wanted in Grand Theft Auto IV was a riot mode. I’m still amazed Rockstar never had a cheat for this in IV or V like it did in San Andreas or Vice City. Looking around online, I found a couple good mods that attempted to implement this, namely Ambient Wars by “IronHide” and Crossfire by user “my ammo crate”.
Ambient Wars is extremely detailed and provides a lot of features, but unfortunately seems to crash quite a bit. It’s also not compatible with version 1.0.7 of the game, which is problematic. That being said, it does a lot of neat things like spawn drive-by crews, gangsters and police all over the city, making it a lot of fun to try and survive amidst the mayhem.
Crossfire is a smaller, less-robust mayhem mod, but does work pretty well. The script basically spawns groups of police and criminals in a radius around the player and makes them fight each other, with the player in the middle. While the script does what it’s supposed to , it has a lot of potential for more features - so I decided to make my mod an updated, better version of Crossfire.
You can find the source code for Crossfire here on my GitHub.
getting started
My script for GTA IV was pretty simple, but it did need a few things to work with the scripthook. First of all, you’ll need an IDE that can spit out a class library, or .DLL file - I use Visual Studio 2017.
You’ll also need to reference two libraries - ScriptHookDotNet.dll. I wrote my mod in C# so I used the .NET Scripthook, which can be found here. You will also need a reference to System.Windows.Forms.dll.
Starting out, you’ll need the following include statements before you start writing your code :
using System;
using System.Collections.Generic;
using System.Windows.Forms;
using GTA;
using GTA.Native;
Because we’re referencing the ScriptHook, we have access to the GTA library, which is really neat. Thankfully, RAGE is a great engine, and exposes a lot of handy functions that make modding pretty simple.
If you’re writing in C#, you’ll need to specify a namespace, and declare a class. Make sure your class extends Script. This is part of GTA’s library that allows our script to be run in the game:
namespace Mod
{
public class MyMod : Script
...
Scripts in GTA IV are run in-game in two ways. Firstly, they can specify a function to be run by a tick, which is specified in the script class’s constructor:
Interval = Settings.GetValueInteger("INTERVAL", "SETTINGS", 1000);
this.Tick += new EventHandler(Event_Tick);
Secondly, they can specify functions to be run on key presses.
BindKey(Settings.GetValueKey("Toggle Script", "SETTINGS", Keys.F10), new KeyPressDelegate(ScriptOn));
As you can see, in the first case, we’re setting our interval to one second (1000 ms). This means that the game will go into our script each second. The game also needs something to run, though. To satisfy this, we add an event handler to our interval tick, which is on the second line. Here, we are passing the function “Event_Tick” as the function the game will call every second.
In the second case, we are binding a key to a function. Using GTA’s BindKey function, we are assigning F10 to the function “ScriptOn”.
At this point, the mod is technically working. If you throw this empty script into the your scripts folder, the game will load it. Just press the ~ key at any time, and you’ll see a message in the console stating it’s been loaded. The console is really handy, as it will spew output if it encountered any errors.

writing the mod itself!
Now that we have the skeleton of the mod up and running, we can actually make it do stuff. For my mod, I wanted the functionality of Crossfire, but with more mayhem. I also noticed that Crossfire had a lot of trouble placing and spawning its NPC’s, which i’d like to fix.
Spawning a pedestrian in GTA IV is easy, and really just needs this function call:
Ped ped = World.CreatePed(Model model, Player.Character.GetOffsetPosition(new Vector3(float x, float y, 0.0f)).ToGround());
Basically, you have to specify what model you want to use for the pedestrian, and where you want it. Pedestrian is the class that GTA IV uses to describe any person in the game. Even the player class contains a Ped object, which has all kinds of handy information, like if the pedestrian is alive, driving a vehicle, speaking, etc.
Choosing a model for your pedestrian is easy - all you need is a string or hash to an existing model in game. Thankfully, there is a list of these online: https://gtamods.com/wiki/List_of_models_hashes. If you want to spawn a pedestrian who’s a fat cop, just put the string “M_M_FATCOP_01″ as your model.
As for the spawn location, you can spawn a pedestrian anywhere, but you’ll probably want them somewhere close to the player. Using the GetOffsetPosition function, you can specify a location relative to the player, and use the ToGround() function to ensure that the pedestrian wont spawn mid-air. This will attempt to place them on a surface nearby. CreatePed can still fail, though. If the game cant place a pedestrian, it will return a null pointer, so be sure to check that the Ped object you get isn’t null.
Another thing! Since this is a game engine, things like garbage collection are very important. RAGE probably uses a lot of smart pointers and weak pointers behind the scenes, so you can’t use the conventional check of == NULL to check if an object is available or not. Pedestrians are often deleted and removed from the memory heap, so if you want to check that a GTA game object still exists, use the .Exists() functions, rather than checking for a null pointer.
Once you have your pedestrian object, you can apply all kinds of things to it. Just be sure to call the function ped.BecomeMissionCharacter(), so the game doesn’t garbage collect your pedestrian. Keep in mind that when you die, all the pedestrians you made will be garbage collected. This is a good thing. If you spawn too many pedestrians, the game will crash, so keep that in mind too.
I’m still learning how the AI works in GTA IV, but you can define a lot of behavior with a few simple calls like this:
ped.RelationshipGroup = RelationshipGroup.Cop;
ped.ChangeRelationship(RelationshipGroup.Criminal, Relationship.Hate);
ped.ChangeRelationship(RelationshipGroup.Dealer, Relationship.Hate);
ped.ChangeRelationship(RelationshipGroup.Player, Relationship.Respect);
ped.MaxHealth = 100;
ped.Health = 100;
ped.Armor = 50;
In this code snippet, i’ve put the pedestrian in the Cop “relationship group”. This is GTA’s way of sorting NPC’s into criminals, civilians, and police. I’ve also told the pedestrian to hate any NPC who is in the Criminal or Dealer group, and to “respect” the player (because they kept shooting at me on sight).
I also gave the pedestrian a health threshold and some armor.
Now to give them more orders:
ped.Task.FightAgainstHatedTargets(200);
ped.Weapons.AssaultRifle_M4.Ammo = 999999;
Here, i’m telling the ped to fight against hated NPCs in a radius of 200 units. I also gave him an assault rifle with a ton of ammo. So there you have it, there’s a cop.

For the criminals, I added a couple other things to make things more interesting:
ped.RelationshipGroup = RelationshipGroup.Criminal;
ped.ChangeRelationship(RelationshipGroup.Cop, Relationship.Hate);
ped.ChangeRelationship(RelationshipGroup.Civillian_Male, Relationship.Hate);
ped.ChangeRelationship(RelationshipGroup.Civillian_Female, Relationship.Hate);
ped.ChangeRelationship(RelationshipGroup.Fireman, Relationship.Hate);
ped.ChangeRelationship(RelationshipGroup.Bum, Relationship.Hate);
ped.ChangeRelationship(RelationshipGroup.Medic, Relationship.Hate);
ped.ChangeRelationship(RelationshipGroup.Player, Relationship.Neutral);
ped.MaxHealth = 100;
ped.Health = 100;
ped.Armor = 0;
ped.WantedByPolice = true;
ped.StartKillingSpree(true);
Blip blip = ped.AttachBlip();
blips.Add(ped, blip);
As you can see, i’ve basically told the criminal pedestrian to hate literally everybody. This guy will open fire on anybody he sees. I also made him wanted by police, and to start a killing spree for maximum mayhem.
Now, police automatically have mini-map blips in the game, but criminals don’t. So, I attached a blip for the criminals. I also added the blip to a Dictionary that holds key-pairs of Pedestrians and Blips, so I can turn them off when the pedestrian dies. This way the map wont be flooded with the dots of fallen NPCs.
I also have a PedCollection for my pedestrians. This is a data structure provided by the GTA library meant for holding Pedestrian objects. I want to be able to keep track of every Pedestrian I spawn, and remove their blips when they die, etc.
what does the mod do?
The pedestrian spawning is really the meat and bones of the script. On top of that, I cap the total spawned and alive pedestrians at 64. Every tick, I do a “Cull”, where I go through and remove and dead pedestrians from the list, remove their blips, and allow for more space for new spawns. This way, the game never crashes and there’s always a steady flow of police and criminals running around.
I also implemented a wave system, so that three waves of criminals spawn, and then one wave of police. I did this because the criminals aren’t as well armed or armored, and get killed so quickly, while the police stay alive a lot longer.
One other feature I added is a weapon tier system. Each wave of goons is assigned a weapon tier (Melee, Pistols, Fully Armed). This way, one way has knives and baseball bats, while another has AK-47s, to mix things up.
When you start the mod using K+L, it spawns waves on a timer, and does cleanup in between. When you end the mod with L+K, or die, the script will do another cleanup, killing all spawned NPCs and removing any blips from the map. You can also use the mod without waves, by pressing F9 or F10 to spawn waves dynamically.
So that’s it! My mod used the Crossfire script as a starting point and turned it into more of a wave style format, with more weapon customization and better placement. I added a lot of randomization to the spawning, so that NPC’s aren’t spawning inside of each other, etc. I will be sure to post a video of gameplay soon.

If you want to try out my mod, you can download the script here!
happy modding!
0 notes
Text
Upload file with Powershell GUI
Upload file with Powershell GUI

In this post, we are going to dicuss about the file upload using the Powershell GUI. Instead of thinking highlevel, here i had split the three simple task to achieve the file upload functionality in the powershell.
Create Simple PowerShell UI for browsing the location of files with one textbox and two button type (upload & cancel) with help of system.Windows.Forms
In Browse button click event,…
View On WordPress
#powershell invoke-restmethod upload file#powershell invoke-webrequest upload file#powershell upload file ftp#powershell upload file http#powershell upload file multipart/form-data#powershell upload file to artifactory#powershell upload file to sharepoint online#powershell upload file to website#Upload file with Powershell GUI
0 notes
Text
Integrate Jenkins Automation Server in an eCATT Test Process
At the moment moves the focus in our development more to native apps of mobile devices. In this context it is my goal to integrate the test envinronment of this app development in our eCATT scripts. The colleguaes of app develpment uses Jenkins, a fantastic automation server which supports developers in continuous integration (CI). The developers don’t do their builds with Jenkins only, the do also developer tests. And from this perspective we expect a synergy effect between the development tests outside SAP and test automation inside SAP. In this scenario we use PowerShell as the bridge between Jenkins and the SAP backend. I described the way here, and an extension here. Here my steps to integrate Jenkins inside eCATT script at SAP backend: At first I installed Jenkins. An easy task, I used the web archive (war) and installed the plugins. In the next step I installed an additional plugin to execute PowerShell scripts in Jenkins build processes. Now I developed a tiny example remote enabled function module (RFM) at the SAP backend to receive a status and to store it in a table. FUNCTION YRFCTEST. *"---------------------------------------------------------------------- *"*"Lokale Schnittstelle: *" IMPORTING *" VALUE(IV_RESULT) TYPE BOOLEAN *"---------------------------------------------------------------------- DATA: ls_rfcresult TYPE YRFCRESULT . LS_RFCRESULT-TIMESTAMP = SY-DATUM && SY-UZEIT. LS_RFCRESULT-BUILD_RESULT = IV_RESULT. INSERT YRFCRESULT FROM ls_rfcresult. ENDFUNCTION. In the next step I developed a PowerShell script to set the status. This script uses dotNET connector (NCo) to connect the SAP system – you can find more information here. #-Begin----------------------------------------------------------------- #-Sub Load-NCo-------------------------------------------------------- Function Load-NCo { [String]$ScriptDir = "C:\NCo" If ([Environment]::Is64BitProcess) { [String]$Path = $ScriptDir + "\x64\" } Else { [String]$Path = $ScriptDir + "\x86\" } [String]$File = $Path + "sapnco.dll"; Add-Type -Path $File $File = $Path + "sapnco_utils.dll"; Add-Type -Path $File } #-Function Get-Destination-------------------------------------------- Function Get-Destination { #-Verbindungsparamter----------------------------------------------- $cfgParams = ` New-Object SAP.Middleware.Connector.RfcConfigParameters $cfgParams.Add($cfgParams::Name, "TEST") $cfgParams.Add($cfgParams::AppServerHost, "localhost") $cfgParams.Add($cfgParams::SystemNumber, "00") $cfgParams.Add($cfgParams::Client, "000") $cfgParams.Add($cfgParams::User, "BCUSER") $cfgParams.Add($cfgParams::Password, "minisap") Return [SAP.Middleware.Connector.RfcDestinationManager]::GetDestination($cfgParams) } #-Sub Invoke-SAPFunctionModule---------------------------------------- Function Invoke-SAPFunctionModule { $destination = Get-Destination #-Metadaten--------------------------------------------------------- $rfcFunction = ` $destination.Repository.CreateFunction("YRFCTEST") #-Importparameter setzen-------------------------------------------- $rfcFunction.SetValue("IV_RESULT", "X") #-Funktionsbaustein aufrufen---------------------------------------- $rfcFunction.Invoke($destination) } #-Sub Main------------------------------------------------------------ Function Main () { Load-NCo Invoke-SAPFunctionModule } #-Main---------------------------------------------------------------- Main #-Error routine------------------------------------------------------- Trap { [System.Reflection.Assembly]::LoadWithPartialName("System.Windows.Forms") > $Null [Void] [System.Windows.Forms.MessageBox]::Show( ` $_.Exception.GetType().FullName + ` [System.Environment]::NewLine + ` "Error at line " + $_.InvocationInfo.ScriptLineNumber + ` " in " + $_.InvocationInfo.ScriptName + ` [System.Environment]::NewLine + [System.Environment]::NewLine + ` $_.Exception.Message, "An Error Occurred", 0) Exit } #-End------------------------------------------------------------------- I integrated this script into my build process in Jenkins. And after I start the build process in Jenkins, I got my entry in the table in the SAP system. So far so well, on this way it is possible to send the result of a build process from Jenkins to an SAP system. Last but not least a PowerShell script to execute the build process via Jenkins remote API. #-Begin----------------------------------------------------------------- #-Sub Main-------------------------------------------------------------- Function Main() { $URI = "http://localhost:8090"; $User = "BCUSER"; $Password = "minisap"; $Headers = New-Object "System.Collections.Generic.Dictionary[[String],[String]]"; $Bytes = [System.Text.Encoding]::UTF8.GetBytes("$($User):$Password"); $Base64 = [System.Convert]::ToBase64String($Bytes); $Headers.Add("Authorization","Basic $Base64"); [xml]$Crumbs = Invoke-WebRequest "$URI/crumbIssuer/api/xml" ` -Method Get -Headers $Headers; $Headers.Add($Crumbs.defaultCrumbIssuer.crumbRequestField, ` $Crumbs.defaultCrumbIssuer.crumb); $Headers.Add("Accept", "application/xml"); $Result = Invoke-WebRequest -Uri "$URI/job/Test/build" ` -Method Post -Headers $Headers; } #-Main------------------------------------------------------------------ Main #-Error Routine--------------------------------------------------------- Trap { [System.Reflection.Assembly]::LoadWithPartialName("System.Windows.Forms") > $Null [Void] [System.Windows.Forms.MessageBox]::Show( ` $_.Exception.GetType().FullName + ` [System.Environment]::NewLine + ` "Error at line " + $_.InvocationInfo.ScriptLineNumber + ` " in " + $_.InvocationInfo.ScriptName + ` [System.Environment]::NewLine + [System.Environment]::NewLine + ` $_.Exception.Message, "An Error Occurred", 0) Exit } #-End------------------------------------------------------------------- And to close the circle you can call this PowerShell script from your eCATT script. It is possible to execute Jenkins build processes from eCATT. Also you can get a result from the asynchronous build process for further operations of the eCATT test script. It will be seen if this approach will work in practice. However, the prospect of this kind of integration itself is great. Enjoy it. Cheers Stefan http://bit.ly/2EAAfir #SAP #SAPCloud #AI
0 notes
Text
I’m writing C# code for a windows form calculator. I’ve gotten it all written a
I’m writing C# code for a windows form calculator. I’ve gotten it all written a
I’m writing C# code for a windows form calculator. I’ve gotten it all written and ready to run but I’m getting 4 errors:using System;using System.Collections.Generic;using System.ComponentModel;using System.Data;using System.Drawing;using System.Linq;using System.Text;using System.Windows.Forms;using System.Globalization;namespace Calculator{ public partial class Form1 : Form {I have error in…
View On WordPress
0 notes
Text
MySQL+Credentials
The first tutorial supplementing the MySQL Connector/NET Developer Guide showed you how to connect and run static INSERT statement. It was a barebones PowerShell script with the MySQL Connector. This post shows you how to run a PowerShell script that uses a dynamic form to gather the MySQL credentials and then run a static query. Below is the MySQL Credentials form. You enter the correct user name, password, hostname (or IP address), port, and database, like this: Here’s the complete code for this staticQuery.ps1 PowerShell script: # Add libraries for form components. Add-Type -AssemblyName System.Windows.Forms Add-Type -AssemblyName System.Drawing # Define a user credential form. $form = New-Object System.Windows.Forms.Form $form.Text = 'User Credential Form' $form.Size = New-Object System.Drawing.Size(300,240) $form.StartPosition = 'CenterScreen' # Define a button and assign it and its controls to a form. $loginButton = New-Object System.Windows.Forms.Button $loginButton.Location = New-Object System.Drawing.Point(60,160) $loginButton.Size = New-Object System.Drawing.Size(75,23) $loginButton.Text = 'Login' $loginButton.DialogResult = [System.Windows.Forms.DialogResult]::OK $form.AcceptButton = $loginButton $form.Controls.Add($loginButton) # Define a button and assign it and its controls to a form. $cancelButton = New-Object System.Windows.Forms.Button $cancelButton.Location = New-Object System.Drawing.Point(155,160) $cancelButton.Size = New-Object System.Drawing.Size(75,23) $cancelButton.Text = 'Cancel' $cancelButton.DialogResult = [System.Windows.Forms.DialogResult]::Cancel $form.CancelButton = $cancelButton $form.Controls.Add($cancelButton) # Define a label and assign it and its controls to a form. $userLabel = New-Object System.Windows.Forms.Label $userLabel.Location = New-Object System.Drawing.Point(30,15) $userLabel.Size = New-Object System.Drawing.Size(100,20) $userLabel.Text = 'Enter User Name:' $form.Controls.Add($userLabel) # Define a TextBox and assign it and its controls to a form. $userTextBox = New-Object System.Windows.Forms.TextBox $userTextBox.Location = New-Object System.Drawing.Point(140,15) $userTextBox.Size = New-Object System.Drawing.Size(100,20) $form.Controls.Add($userTextBox) # Define a label and assign it and its controls to a form. $pwdLabel = New-Object System.Windows.Forms.Label $pwdLabel.Location = New-Object System.Drawing.Point(30,40) $pwdLabel.Size = New-Object System.Drawing.Size(100,20) $pwdLabel.Text = 'Enter Password:' $form.Controls.Add($pwdLabel) # Define a TextBox and assign it and its controls to a form. $pwdTextBox = New-Object System.Windows.Forms.TextBox $pwdTextBox.Location = New-Object System.Drawing.Point(140,40) $pwdTextBox.Size = New-Object System.Drawing.Size(100,20) $pwdTextBox.PasswordChar = "*" $form.Controls.Add($pwdTextBox) # Define a label and assign it and its controls to a form. $hostLabel = New-Object System.Windows.Forms.Label $hostLabel.Location = New-Object System.Drawing.Point(30,65) $hostLabel.Size = New-Object System.Drawing.Size(100,20) $hostLabel.Text = 'Enter Hostname:' $form.Controls.Add($hostLabel) # Define a TextBox and assign it and its controls to a form. $hostTextBox = New-Object System.Windows.Forms.TextBox $hostTextBox.Location = New-Object System.Drawing.Point(140,65) $hostTextBox.Size = New-Object System.Drawing.Size(100,20) $form.Controls.Add($hostTextBox) # Define a label and assign it and its controls to a form. $portLabel = New-Object System.Windows.Forms.Label $portLabel.Location = New-Object System.Drawing.Point(30,90) $portLabel.Size = New-Object System.Drawing.Size(100,20) $portLabel.Text = 'Enter Port #:' $form.Controls.Add($portLabel) # Define a TextBox and assign it and its controls to a form. $portTextBox = New-Object System.Windows.Forms.TextBox $portTextBox.Location = New-Object System.Drawing.Point(140,90) $portTextBox.Size = New-Object System.Drawing.Size(100,20) $form.Controls.Add($portTextBox) # Define a label and assign it and its controls to a form. $dbLabel = New-Object System.Windows.Forms.Label $dbLabel.Location = New-Object System.Drawing.Point(30,115) $dbLabel.Size = New-Object System.Drawing.Size(100,20) $dbLabel.Text = 'Enter DB Name:' $form.Controls.Add($dbLabel) # Define a TextBox and assign it and its controls to a form. $dbTextBox = New-Object System.Windows.Forms.TextBox $dbTextBox.Location = New-Object System.Drawing.Point(140,115) $dbTextBox.Size = New-Object System.Drawing.Size(100,20) $form.Controls.Add($dbTextBox) $form.Topmost = $true $form.Add_Shown({$userTextBox.Select()}) $result = $form.ShowDialog() if ($result -eq [System.Windows.Forms.DialogResult]::OK) { # Assign inputs to connection variables. $uid = $userTextBox.Text $pwd = $pwdTextBox.Text $server = $hostTextBox.Text $port= $portTextBox.Text $dbName = $dbTextBox.Text # Declare connection string. $credentials = 'server=' + $server + ';port=' + $port + ';uid=' + $uid + ';pwd=' + $pwd + ';database=' + $dbName # Connect to the libaray MySQL.Data.dll Add-Type -Path 'C:Program Files (x86)MySQLConnector NET 8.0Assembliesv4.5.2MySql.Data.dll' # Create a MySQL Database connection variable that qualifies: # [Driver]@ConnectionString # ============================================================ # You can assign the connection string before using it or # while using it, which is what we do below by assigning # literal values for the following names: # - server= or 127.0.0.1 for localhost # - port= # - uid= # - pwd= # - database= # ============================================================ $Connection = [MySql.Data.MySqlClient.MySqlConnection]@{ConnectionString=$credentials} $Connection.Open() # Define a MySQL Command Object for a non-query. $sqlCommand = New-Object MySql.Data.MySqlClient.MySqlCommand $sqlDataAdapter = New-Object MySql.Data.MySqlClient.MySqlDataAdapter $sqlDataSet = New-Object System.Data.DataSet # Assign the connection and command text to the MySQL command object. $sqlCommand.Connection = $Connection $sqlCommand.CommandText = 'SELECT CONCAT(first_name," ",last_name) AS full_name ' + ', avenger ' + 'FROM avenger' # Assign the connection and command text to the query method of # the data adapter object. $sqlDataAdapter.SelectCommand=$sqlCommand # Assign the tuples of data to a data set and return the number of rows fetched. $rowsFetched=$sqlDataAdapter.Fill($sqlDataSet, "data") # Print to console the data returned from the query. foreach($row in $sqlDataSet.tables[0]) { write-host "Avenger:" $row.avenger "is" $row.full_name } # Close the MySQL connection. $Connection.Close() } I created an avenger table and populated it with six rows of data: -- Create the avenger table. CREATE TABLE db_connect ( db_connect_id INT UNSIGNED PRIMARY KEY AUTO_INCREMENT , version VARCHAR(10) , user VARCHAR(24) , db_name VARCHAR(10)); -- Seed the avenger table with data. INSERT INTO avenger ( first_name, last_name, avenger ) VALUES ('Anthony', 'Stark', 'Iron Man') ,('Thor', 'Odinson', 'God of Thunder') ,('Steven', 'Rogers', 'Captain America') ,('Bruce', 'Banner', 'Hulk') ,('Clinton', 'Barton', 'Hawkeye') ,('Natasha', 'Romanoff', 'Black Widow'); You run the staticQuery.ps1 PowerShell script from the Windows command shell with the following syntax: powershell .staticQuery.ps1 After running the staticQuery.ps1 PowerShell script, it writes the following to the local console but with minimal effort you can redirect it to a file: Avenger: Iron Man is Anthony Stark Avenger: God of Thunder is Thor Odinson Avenger: Captain America is Steven Rogers Avenger: Hulk is Bruce Banner Avenger: Hawkeye is Clinton Barton Avenger: Black Widow is Natasha Romanoff As always, I hope this helps those looking to use this technology. My guess is the principal uses will be DevOps and Data Engineers.
https://blog.mclaughlinsoftware.com/2021/04/28/mysqlcredentials/
0 notes
Last Seen Blogs