#TCPKeepAlive
Explore tagged Tumblr posts
Visit Tumblr Blog
Explore Tumblr blogs with no restrictions, modern design and the best experience.
Last Seen Tumblr Blogs


Fun Fact
If you dial 1-866-584-6757, you can leave an audio post for your followers.
Text
Configurar las opciones de seguridad en ssh
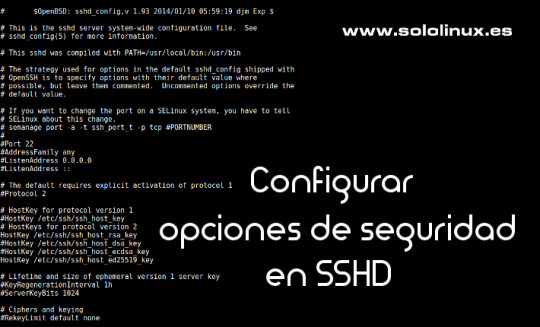
Configurar las opciones de seguridad en ssh. SSH (Secure SHell), permite que el usuario de una maquina en red se conecte y haga uso de la shell de una maquina remota a través de una conexión segura. Consta de dos componentes básicos, el cliente SSH que nos permite conectar con un servidor remoto y el demonio del servidor SSH (más conocido como sshd) que está configurado para aceptar conexiones SSH desde sistemas remotos. Los archivos de configuración de cliente y servidor son diferentes, los podemos localizar en: Conf. del cliente: /etc/ssh/ssh_config Conf. del servidor: /etc/ssh/sshd_config En este articulo veremos las opciones más importantes del archivo de configuración del servidor (algunas indispensables), que deberías plantearte si modificar o no. Las vemos.
Configurar las opciones de seguridad en ssh
Port 22 El puerto predeterminado en SSH es el 22, generalmente está bien pero por seguridad puedes cambiarlo por otro que este disponible si recibes demasiados intentos de conexión no autorizados. Cambiar puerto SSH.

Puerto ssh 22 PermitRootLogin En esta opción tienes dos opciones yes y no. Si se establece en yes se permitirá iniciar SSH directamente como root. Si pones no, solo podrán acceder los usuarios con permiso, pero el root no. Maneja está opción con extremo cuidado, no vaya a ser que te bloquees a ti mismo.

Permit Root Login AllowUsers Con esta opción se puede configurar que solo algunos usuarios del sistema se conecten mediante SSH. Para múltiples usuarios, insertamos espacios entre los diferentes nombres. Por ejemplo: AllowUsers sergio mario david Dependiendo de como se instalo/configuro el servidor sshd (por ejemplo automáticamente desde algún panel de control), es posible que no tengas esta opción dado que la controla el propio panel. LoginGraceTime Aquí podemos modificar el tiempo que SSH espera a que el usuario se autentifique antes de cortar la conexión. De manera predeterminada está establecido en 120 segundos o 2 minutos, pero si recibes muchos ataques de fuerza bruta es recomendable reducir ese tiempo. PasswordAuthentication Al modificar esta opción podemos permitir o no la autentificación por contraseña, ten cuidado solo deberías deshabilitar la opción si tienes habilitada la autenticación por clave pública.
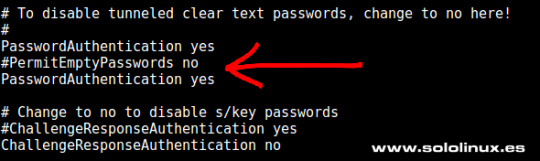
Password Authentication PubkeyAuthentication Una buena alternativa, o simplemente un añadido a la opción anterior (PasswordAuthentication), es activar esta opción y aumentar la seguridad de manera significativa. Para que funcione es necesario indicar dónde están las claves autorizadas, por ejemplo: AuthorizedKeysFile ~/.ssh/authorized_keys TCPKeepAlive Al habilitar esta opción se verifica el estado de la conexión enviando mensajes de alerta al cliente. Si existen interrupciones en la red, se cerrará la conexión en vez de seguir utilizando sus recursos de manera inutil.
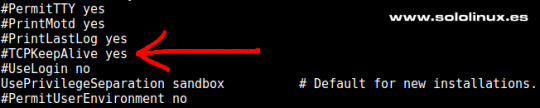
TCP KeepAlive Puedes revisar el resto de opciones, estás son las que considero más importantes. Ten mucho cuidado al manejar este archivo puede jugarte una mala pasada si su configuración no es correcta. Después de modificar el archivo no te olvides de reiniciar el servicio. systemctl restart sshd.service Espero que este articulo sea de utilidad, puedes colaborar con nosotros con una donación (paypal), o con el simple gesto de compartir los manuales en tu sitio web, blog, foro o redes sociales. Read the full article
#/etc/ssh/ssh_config#/etc/ssh/sshd_config#AllowUsers#clienteSSH#configurar#demoniodelservidorSSH#LoginGraceTime#PasswordAuthentication#PermitRootLogin#Port#PubkeyAuthentication#SecureShell#seguridad#seguridadenssh#servidorSSH#ssh#sshd#TCPKeepAlive
0 notes
Text
Preventing SSH connections
Preventing SSH connections Knowing how to use the secure shell for any Linux admin is a great tool. With the secure shell, you can perform any remote administration operations that need to be done on your server. Using SSH may be apart of your daily operations as it is, or they simply are a new means of getting work done for you, either way, this article is for you. But with ssh, there are always some things that you should think about, such as: • Leaving the connections up and running and have someone peek over your shoulder. • Expulsion through the means of someone compromising the serveer through physical means. • A set of trust issue with other users that have access to ssh. If either of those three things happen to you, you should always remember that the Secure Shell has a timeout feature that. This will allow you to make configurations to the SSH server. This could be something such as disconnecting a user, after they show no activity on account. When you want to perform these tasks, you would need the following things first: • SSH installed on a Linux server. • Sudo Privileges. Configuring Secure Shell for timeouts: Upon arrival, the SSH configuration is not configured to the options that we need it to where we are enabling inactive timeouts. Here are the two types of configurations that you should be aware of: • You will need to know how to stop server connections on idle sessions. You can accomplish this by entering the following command: sudo nano /etc/ssh/sshd_config Add these lines to the bottom of the file: TCPKeepAlive yes ClientAliveInterval 30 ClientAliveCountMax 2 Change ClientAliveInterval to seconds seconds, here is an example: ClientAliveInterval 5m Pay attention to the ClientAliveCountMax option. The daemon will be informed as to how many times the interval must be counted. An example of this is to set the interval to: ClientAliveInterval 10m ClientAliveCountMax 0 10 minutes of inactivity timeout would be used per the example above. When you are done making your changes, it would be a good idea to restart your server. You can accomplish this by entering the following into your shell: sudo systemctl restart sshd Configuring Secure Shell to handle timeouts If, by chance you might want to disconnect a client to any remote server. You cannot set this globally on the server, but must have this be taken care of by the client machines. The place that this timeout script is handled is .bashrc file. If you want to go through each user's bachrc script, you may enter the following command: sudo nano /etc/bash.bashrc Scroll down to the bottom and insert these lines: TMOUT=300 readonly TMOUT export TMOUT Testing the configuration • Open a new terminal session. • Make a connection to any of your Linux servers. • Do not use any SSH commands. • When the allotted time passes, you should be kicked out of the session. This is a way for you to keep your server secure and prevent any coworkers from causing any damage. Work Cited Wallen, Jack, " How to prevent unattended SSH connections from remaining connected", https://www.techrepublic.com/article/how-to-prevent-unattended-ssh-connections-from-remaining-connected/, April 27, 2020
0 notes