#ThirdPartyPlugins
Explore tagged Tumblr posts
Visit Tumblr Blog
Explore Tumblr blogs with no restrictions, modern design and the best experience.
Last Seen Tumblr Blogs


Fun Fact
Tumblr was acquired by Yahoo for $1.1B in 2013.
Text
ZenBasket: Overcoming Integration Challenges of Third Party Plugins for Your Online Store

Ecommerce has transformed the way businesses operate by offering user-friendly online platforms for selling products and services. Integrating third party plugins into your website can undoubtedly enhance functionality and expand the capabilities of your online platform. However, the challenge lies in connecting various systems with your platforms. These systems often struggle to communicate effectively with your website, leading to data inconsistencies and synchronization issues. Such limitations can have a significant impact on inventory management and accurate sales tracking, ultimately affecting the overall efficiency of your online business. In this blog, we will explore how ZenBasket overcomes these integration challenges, making operations easier and driving productivity.
ZenBasket Solutions
ZenBasket provides a complete integration solution to tackle these challenges effectively.
Platform compatibility
Each platform comes with its own unique requirements and specifications, which can make integration complicated and time-consuming. ZenBasket is designed to be compatible with multiple platforms, including inventory management, payment gateways and shipping management. You can easily complete the integration process by entering the required access keys directly from the plugin’s website.
Comprehensive guidance for the integration process is provided through our detailed help articles and training video guides. Additionally, our dedicated support team is available to provide assistance and ensure easy integration. This compatibility feature streamlines the integration process, allowing you to focus on your core functions rather than dealing with technological complexities.
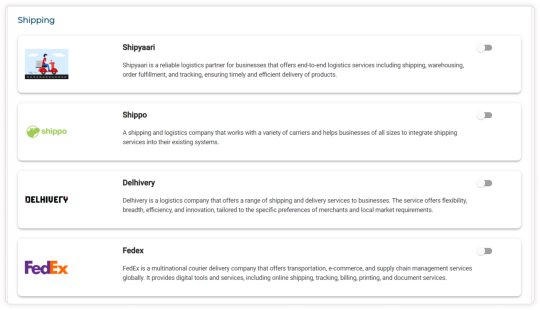
Third-party plugins

Payment plugins

Shipping plugins
Data synchronization
ZenBasket’s integration features provide seamless data synchronization, ensuring that data is consistently and accurately updated across all integrated platforms and real-time inventory updates prevent overselling.
Inventory management
https://www.centizen.com/wp-content/uploads/2023/10/Inventory-Management.png
Inventory is updated in real-time as orders are placed.
ZenBasket integrates with Square POS to sync products and inventory between your online store and Square’s Point of Sale system. This integration enables you to manage your products, track stock levels, and monitor sales across both platforms. It helps ensure that your online and offline channels are always current with the latest product information and updated inventory.
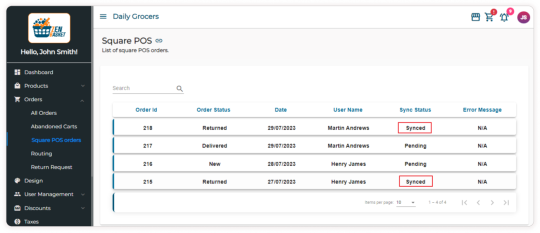
Data synced between ZenBasket store and Square POS.
ZenBasket seamlessly integrates with Facebook, allowing you to showcase your products directly on the social media platform. Through this integration, all your products are synchronized between Facebook and your website, ensuring a consistent and efficient sales experience across channels.

Data synced between ZenBasket store and Facebook Shop.
Conclusion
Efficient integration is crucial for Ecommerce businesses to thrive in a competitive landscape. The challenges posed by platform compatibility issues and data synchronization often hinders smooth operations, resulting in errors and inefficiencies. ZenBasket’s comprehensive compatibility and seamless data synchronization capabilities empower you to overcome these limitations. ZenBasket simplifies the integration process, saving time and increasing productivity, all while ensuring real-time data accuracy across platforms.
#ZenBasket#EcommerceIntegration#ThirdPartyPlugins#SeamlessSync#InventoryManagement#PaymentPlugins#ShippingIntegration
0 notes
Text
Develop 99% of your Ionic app in the browser with Capacitor
One of the very special things about Ionic and Capacitor is that a huge bulk of your app development can happen right in a browser on your desktop. That means full access to your traditional desktop web development tools (Chrome/Safari/Firefox dev tools) and the development velocity of building without having to recompile or deploy to a simulator or device.
One of the guiding design goals of Capacitor, Ionic’s new native web app container project that runs your web app natively on iOS, Android, Electron, and the web as a Progressive Web App, was to increase the amount of time you can spend developing your app on desktop before having to mess with simulators or devices.
On top of that, building web-first means that your app will likely run well as a Progressive Web App with minimal additional work, assuming you’re able to achieve the functionality your app needs with Web APIs.
Let’s take a look at how that works.
A Fake Native Plugin
Chances are, your Ionic/Capacitor app will have some native functionality that it needs, that goes beyond what is available out of the box in Capacitor (such as integrating with a 3rd party SDK).
Let’s say we have this simple Capacitor plugin:
import Foundation import Capacitor @objc(ThirdPartyPlugin) public class ThirdPartyPlugin: CAPPlugin { @objc func connect(_ call: CAPPluginCall) { let service = ThirdPartySDK(apiKey) service.connect() call.resolve(service.getUser()) } }
This plugin connects to the ThirdPartySDK and then returns some user information. Unfortunately, this theoretical SDK is only available on iOS and Android, so when we’re building the app in the browser, we will need to either add custom code to detect which platform we’re running on (not ideal), or mock out the service so we can keep building quickly (much better!)
Mocking Plugins on the Web
In order to mock out this plugin, we need to create what is known as a Web Plugin for Capacitor. Web Plugins have a lot of power and aren’t just for mocking though! For example, Capacitor ships with a full Filesystem implementation for the web that uses IndexedDB so you can work with files just like on iOS, Android, and Electron.
In this case, our web plugin will be pretty basic and just return some fake data, so let’s create it:
import { WebPlugin } from '@capacitor/core'; export class ThirdPartyPluginWeb extends WebPlugin { constructor() { // Register the plugin with Capacitor so it is aware of it super({ name: 'ThirdPartyPlugin', platforms: ['web'] }); } async connect(options: any) { return { id: 123, name: 'Barnaby Jones', email: '[email protected]' } } } export const ThirdPartyPlugin = new ThirdPartyPluginWeb();
Next, we need to register this plugin with Capacitor so it is aware of it. This makes your plugin available at runtime, but only when running on the platforms specified in the constructor (in this case, web):
import { ThirdPartyPlugin } from './plugins'; import { registerWebPlugin } from '@capacitor/core'; registerWebPlugin(ThirdPartyPlugin);
Where you put this code does matter, to ensure it loads before this plugin is accessed, so we recommend putting it in your root index JS/TS file.
Testing the Plugin
Once you have your plugin built, using it is as simple as just serving your app normally (npm start, for example), and then invoking the plugin like so:
import { Plugins } from '@capacitor/core'; function connectToThirdParty() { const { ThirdPartyPlugin } = Plugins; const user = await ThirdPartyPlugin.connect(); }
You should see your mock web data come back when running on the web, otherwise see the normal full connection to the Third Party SDK when running natively!
If you’re having trouble, try accessing your plugin on Plugins as close to where it is used. Unfortunately, with modern bundlers and module loaders, your code may be referencing Plugins.ThirdPartyPlugin before the web plugin has loaded, so be mindful of that.
Conclusion
Web Plugins are wonderful for building out consistent cross-platform APIs (for example, the Geolocation and Share APIs have the same code on all platforms), but they can also be used for mocking out functionality that is only used on native platforms.
If you end up building a web plugin for Capacitor and find this guide helpful, let us know below!
via The Ionic Blog http://bit.ly/31nk4RN
0 notes