#This Application Requires iOS 10.0 or Later
Text
A Detailed Guide to Cricut Download for Computer and Mobile
Hey, are you looking for a guide on Cricut download? Look no further than this guide! In this guide, I will explain how to download the Cricut Design Space app in just a few simple steps. Do you know what it takes to download the Cricut app on any compatible device? There are many things I checked before the Cricut Design Space download. The first thing I prefer to check is the system requirements. These are the most important things that I can never forget. This helped me decide whether my device could properly run the Cricut software properly.
So, let me take you to the steps below in this guide. These easy-to-follow guides will help you not only download the app but also teach you how to install it on your system or mobile device. Let’s get started with a Windows computer first.
Cricut Download on Your Windows Computer
Downloading a Cricut Design Space app on Windows is not daunting. However, you have to ensure that your PC is capable of running the Cricut app smoothly. For this, your PC must have Windows 10 or later with Intel Dual Core or an equivalent AMD processor. Apart from this, you also need to ensure 4 GB RAM and 2 GB free disk space.
Here’s how to download the Cricut Design app on a Windows computer:
Open a compatible browser on your Windows PC and search for the URL design.cricut.com/setup (I am using Google Chrome).
After that, you have to hit the Enter button.
Here, you will move to the next screen, where you must click the checkbox to enable the Download button.
Press the Download option and then wait to begin downloading the app.
After downloading, the downloaded file will be saved to your Downloads folder.
Double-click on this downloaded file and start the installation.
Now, follow the on-screen presented prompts to install the software.
Cricut Download on a Mac Operating System
If you are a Mac user, ensure you have a MacOS 11 or later with a CPU of 1.83 GHz. Along with this, you must have 4 GB of RAM with free 2GB disk space. Once you have it, you are ready to download and run the software smoothly on your Mac:
Advertisement
Here’s how to download the Cricut Design Space app on a Mac computer:
Open a Chrome browser on your Mac and search design.cricut.com.
Hit the Enter and then check the checkbox on the next screen to download the Cricut app.
Afterward, you will see the next page, where you are required to select the file location to save the downloaded file. By default, you may see the downloads folder.
Hence, you need to hit the Save button to initiate the download.
As the download will start, you need to wait for a while until it gets downloaded completely.
Now, head to the downloads folder or a file location where you saved your downloads. Once you find the .dmg file, double-click on it.
As you click on the .dmg file, the next screen will appear, and you will need to drag the Cricut app icon to the Applications folder icon to initiate the installation.
Cricut Download on an Android Device
Okay, now let’s talk about the Android devices we most often use. I think most of us might be using one, right? What if you want to use the same device to run your Cricut machine? Is that really possible? The answer is yes. The only thing you must ensure is that the Android you are using is 10.0 or higher. Let me show you how to download the Cricut app on your Android smartphone.
Here’s how to download the Cricut Design app on an Android phone:
On your phone’s home screen, click the Google Play Store on your Android smartphone.
Search for Cricut Design Space and click on the app shown in the results below.
Press the Install button to download the app.
Now, your app will be shown on your home screen.
Cricut Download on Your iOS Smartphone
Let’s learn the steps for Cricut Design Space download on iOS devices. Before you download the software, make sure your device has iOS 15 or later. You should also have access to the Internet. Once you have met the basic requirements, you can start downloading the app.
Head to your iPhone and look for the App Store icon.
Next, open the App Store to launch it on your device.
Then, search Cricut Design Space on the given search bar.
Now, you must tap on the Cricut app suggested in the results below.
After that, click on the Get button to download and install the app.
FAQs
Question 1: What should I do after Cricut download?
Answer: Once you have downloaded the Cricut app on your computer, move to the downloads folder or the file location where you downloaded the file. Then, double-click the file and start installing the application. To install, follow the screen’s instructions. The installation of the Cricut app can vary on Mac or Windows. However, downloading is the same as Windows.
Question 2: What can I do with Cricut Design Space?
Answer: The Cricut software is a companion app for Cricut machines. It helps you create and customize projects for different needs and is a must when setting up a new Cricut cutting machine. The Cricut app also offers free resources like ready-made projects, images, fonts, and more. With this design, you can design or edit thousands of designs that you can send to the Cricut machine for cutting.
Question 3: Is Cricut Design Space compatible with Linux?
Answer: No, you can’t download and install the Cricut Design app on a Linux operating system. It is also not compatible with Chromebooks or Unix. Despite this, the Cricut software is compatible with Windows, macOS, Android, and iOS. Hence, you can use them on the computer and mobile phone except for Linux, Unix, and Chromebook operating systems.
Advertisement
Hey, are you looking for a guide on Cricut download? Look no further than this guide! In this guide, I will explain how to download the Cricut Design Space app in just a few simple steps. Do you know what it takes to download the Cricut app on any compatible device? There are many things I checked before the Cricut Design Space download. The first thing I prefer to check is the system requirements. These are the most important things that I can never forget. This helped me decide whether my device could properly run the Cricut software properly.
So, let me take you to the steps below in this guide. These easy-to-follow guides will help you not only download the app but also teach you how to install it on your system or mobile device. Let’s get started with a Windows computer first.
Cricut Download on Your Windows Computer
Downloading a Cricut Design Space app on Windows is not daunting. However, you have to ensure that your PC is capable of running the Cricut app smoothly. For this, your PC must have Windows 10 or later with Intel Dual Core or an equivalent AMD processor. Apart from this, you also need to ensure 4 GB RAM and 2 GB free disk space.
Here’s how to download the Cricut Design app on a Windows computer:
Open a compatible browser on your Windows PC and search for the URL design.cricut.com (I am using Google Chrome).
After that, you have to hit the Enter button.
Here, you will move to the next screen, where you must click the checkbox to enable the Download button.
Press the Download option and then wait to begin downloading the app.
After downloading, the downloaded file will be saved to your Downloads folder.
Double-click on this downloaded file and start the installation.
Now, follow the on-screen presented prompts to install the software.
Cricut Download on a Mac Operating System
If you are a Mac user, ensure you have a MacOS 11 or later with a CPU of 1.83 GHz. Along with this, you must have 4 GB of RAM with free 2GB disk space. Once you have it, you are ready to download and run the software smoothly on your Mac:
Here’s how to download the Cricut Design Space app on a Mac computer:
Open a Chrome browser on your Mac and search design.cricut.com.
Hit the Enter and then check the checkbox on the next screen to download the Cricut app.
Afterward, you will see the next page, where you are required to select the file location to save the downloaded file. By default, you may see the downloads folder.
Hence, you need to hit the Save button to initiate the download.
As the download will start, you need to wait for a while until it gets downloaded completely.
Now, head to the downloads folder or a file location where you saved your downloads. Once you find the .dmg file, double-click on it.
As you click on the .dmg file, the next screen will appear, and you will need to drag the Cricut app icon to the Applications folder icon to initiate the installation.
Cricut Download on an Android Device
Okay, now let’s talk about the Android devices we most often use. I think most of us might be using one, right? What if you want to use the same device to run your Cricut machine? Is that really possible? The answer is yes. The only thing you must ensure is that the Android you are using is 10.0 or higher. Let me show you how to download the Cricut app on your Android smartphone.
Here’s how to download the Cricut Design app on an Android phone:
On your phone’s home screen, click the Google Play Store on your Android smartphone.
Search for Cricut Design Space and click on the app shown in the results below.
Press the Install button to download the app.
Now, your app will be shown on your home screen.
Cricut Download on Your iOS Smartphone
Let’s learn the steps for Cricut Design Space download on iOS devices. Before you download the software, make sure your device has iOS 15 or later. You should also have access to the Internet. Once you have met the basic requirements, you can start downloading the app.
Head to your iPhone and look for the App Store icon.
Next, open the App Store to launch it on your device.
Then, search Cricut Design Space on the given search bar.
Now, you must tap on the Cricut app suggested in the results below.
After that, click on the Get button to download and install the app.
FAQs
Question 1: What should I do after Cricut download?
Answer: Once you have downloaded the Cricut app on your computer, move to the downloads folder or the file location where you downloaded the file. Then, double-click the file and start installing the application. To install, follow the screen’s instructions. The installation of the Cricut app can vary on Mac or Windows. However, downloading is the same as Windows.
Question 2: What can I do with Cricut Design Space?
Answer: The Cricut software is a companion app for Cricut machines. It helps you create and customize projects for different needs and is a must when setting up a new Cricut cutting machine. The Cricut app also offers free resources like ready-made projects, images, fonts, and more. With this design, you can design or edit thousands of designs that you can send to the Cricut machine for cutting.
Question 3: Is Cricut Design Space compatible with Linux?
Answer: No, you can’t download and install the Cricut Design app on a Linux operating system. It is also not compatible with Chromebooks or Unix. Despite this, the Cricut software is compatible with Windows, macOS, Android, and iOS. Hence, you can use them on the computer and mobile phone except for Linux, Unix, and Chromebook operating systems.
Source :- https://crricut.wordpress.com/2024/04/09/a-detailed-guide-to-cricut-download-for-computer-and-mobile/
0 notes
Text
0 notes
Text
SAMSUNG Galaxy S23+ Plus Cell Phone, Factory Unlocked Android Smartphone, 256GB Storage, 50MP Camera, Night Mode, Long Battery Life, Adaptive Display, US Version, 2023, Phantom Black

Meet Galaxy S23+, the phone takes you out of the everyday and into the epic. Life doesn’t wait for the perfect lighting, but with Nightography, you are always ready to seize the moment and snap memories like a pro. See your content no matter the time of day on a display with a refresh rate up to 120Hz and Adaptive Vision Booster. Capture and create in rich detail, and then use Quick Share**** to share across devices without losing quality. Move past the mundane and embrace epic power with Galaxy S23+. *Based on average battery life under typical usage conditions. Average expected performance based on typical use. Actual battery life depends on factors such as network, features selected, frequency of calls, and voice, data, and other application usage patterns. Results may vary. **As compared to S22+. ***Requires devices to have One UI 2.5 or later. Must be logged into the same Google account and Google Meet app must be activated on each device. ****For Galaxy-to-Galaxy or any other devices: Quick Share to Galaxy smartphones and tablets, smartphones and tablets with Android OS version 10.0 (Q) and One UI 2.1 or above requires Wi-Fi and Bluetooth connection. Quick Share to iOS and Android devices available by sending shared link: individual files shared cannot exceed 3GB (for a total of 5GB per day) and link will expire after two days; requires a Samsung account and Internet connection. For Galaxy-to-Galaxy device: Quick Share between Galaxy smartphones and tablets with Android OS version 10.0 (Q) and One UI 2.1 or above requires Wi-Fi and Bluetooth connection. For Galaxy to any other device: Quick Share to iOS and Android devices available by sending shared link; individual file shared cannot exceed 3GB (for a total of 5GB per day) and link expires after two days. Requires a Samsung account and Internet connection.
CAPTURE THE NIGHT IN LOW LIGHT: Whether you’re headed to a concert or romantic night out, there’s no such thing as bad lighting with Night Mode; Galaxy S23+ lets you capture epic content in any setting with stunning Nightography
HIGH CAMERA RESOLUTION: Create crystal-clear content worth sharing with the 50MP high-resolution camera of Galaxy S23+; Whether you’re posting or printing, Galaxy S23+ always does the moment justice
FASTEST MOBILE PROCESSOR AVAILABLE: Whether you’re working hard, playing hard or doing both at the same time, smoothly switch between apps with our fastest processor ever
UNLOCK SMOOTH GAMING: Game at full throttle and smoothly switch between apps; Get more done with our fastest processor ever combined with massive internal storage; And if you’re on the move, keep going with a screen that adapts to your environment
POWER TO KEEP MOVING YOU FORWARD: Confidently binge-watch, game or surf without worrying about your phone dying; The impressive 4,700mAh battery* will keep you going longer**
MORE STORAGE. MORE MEMORIES: You’re good on storage space; With an impressive amount of storage, starting at 256GB, you can enjoy being behind the camera without the stress that comes with getting close to filling up your phone
ADAPTIVE DISPLAY: Watch your content comfortably as Adaptive Vision Booster helps your screen adapt to your environment; Whether out in direct sunlight or in bed with the lights off, the contrast on Galaxy S23+’s expansive screen still looks amazing
CONVENIENT COLLABORATION: Whether you’re having a video meeting with your team or your friends, use Google Meet to start a video chat on your Tab*** and then continue the call on your phone as you head out the door
QUICK SHARE: Send even your largest files**** — whether it’s cute puppy videos or work documents — between your Galaxy S23+ and any iOS or Android device; Quick Share helps minimize frustration when sharing the epic
Read the full article
0 notes
Text
macOS is an operating system that runs on every Mac. It was previously named Mac OS X and later OS X. MacOS was developed and marketed by Apple Inc from 2001. MacOS succeeded classic MacOS, a macintosh operating system with nine releases from 1984 to 1999. The first desktop version of macOS X was 10.0, released in 2001 and an update 10.1 coming a year later. Apple in 2012 shortened the name “macOS X” to “OS X” then later in 2016 changed it to macOS in order to align with other Apple’s operating systems i.e iOS, watchOS, and tvOS.
The sixteenth version of macOS (10.15) was called macOS Catalina which was the first version of macOS to support 64-bit applications and also the first to include Activation Lock. After these 16 distinct versions of macOS 10 came macOS Big Sur (version 11) in 2020 and macOS Monterey in 2021. You can check out detailed article on macOS Big Sur vs Catalina.
macOS Mojave has the following major features:
Has the dark mode.
Supports desktop stacks
Has dynamic desktops
Has improved OS and Safari security
screenshot markup
Continuity camera
In this guide, I will demonstrate how to install macOS Catalina & Big Sur on VirtualBox.
macOS installation on VirtualBox requirements
The following are macOS installation requirements on Virtualbox.
Primary display resolutions supported are 5120×2880, 2880×1800, 2560×1600, 2560×1440, 1920×1200, 1600×1200, 1680×1050, 1440×900, 1280×800, 1024×768, 640×480
VirtualBox version 5.2 and above.
RAM above 4 GB
Storage size above 25 GB.
icloud and imessage connectivity and NVRAM
Step 1: Install required Dependencies
There are several dependencies required when installing macOS on VirtualBox.
These are Wget, Coreutils, dmg2img, xxd, bash-completion, gzip and unzip
### RHEL/ Centos 8/ Rocky Linux 8 / Fedora ###
sudo dnf install wget coreutils vim-common p7zip p7zip-plugins bash-completion gzip unzip
#### Debian/Ubuntu ###
sudo apt-get install wget coreutils dmg2img xxd bash-completion gzip unzip
### macOS ###
brew install wget bash-completion gzip unzip
brew install coreutils dmg2img
Step 2: Download and Install macOS on Virtualbox
We will proceed and install macOS Catalina on VirtualBox using the push-button installer.
Here we will download macos-guest-virtualbox.sh using Wget as below.
### With curl ###
curl -sLO https://raw.githubusercontent.com/myspaghetti/macos-guest-virtualbox/master/macos-guest-virtualbox.sh
### With wget ###
wget https://raw.githubusercontent.com/myspaghetti/macos-guest-virtualbox/master/macos-guest-virtualbox.sh
Then make the file executable.
chmod +x macos-guest-virtualbox.sh
Then proceed and install as below:
./macos-guest-virtualbox.sh
Sample Output:
Push-button installer of macOS on VirtualBox
This script installs only open-source software and unmodified Apple binaries,
and requires about 50GB of available storage, of which 25GB are for temporary
installation files that may be deleted when the script is finished.
The script interacts with the virtual machine twice, please do not interact
with the virtual machine manually before the script is finished.
Documentation about optional configuration, iCloud and iMessage connectivity,
resuming the script by stages, and other topics can be viewed with the
following command:
./macos-guest-virtualbox.sh documentation | less -R
Press enter to review the script configuration
vm_name="macOS"
macOS_release_name="Catalina" # install "HighSierra" "Mojave" "Catalina"
storage_size=80000 # VM disk image size in MB, minimum 22000
storage_format="vdi" # VM disk image file format, "vdi" or "vmdk"
cpu_count=2 # VM CPU cores, minimum 2
memory_size=4096 # VM RAM in MB, minimum 2048
gpu_vram=128 # VM video RAM in MB, minimum 34, maximum 128
resolution="1280x800" # VM display resolution
These values may be customized as described in the documentation.
Press enter to continue, CTRL-C to exit
You will be asked to press enter to review the script configuration, this gives the specifications of the VM to be created in VirtualBox such as the VM name, disk size the OS to be run e.t.c. Continue by pressing enter.
The installation starts as below;
Checking that VirtualBox starts the virtual machine without errors.
Checking that VirtualBox uses hardware-supported virtualization.
stage: prepare_macos_installation_files
Downloading Apple macOS Catalina software update catalog
Catalina_sucatalog 100%[===================>] 6.43M 4.34MB/s in 1.5s
Trying to find macOS Catalina InstallAssistant download URL
Catalina_sucatalog_ 100%[===================>] 40.05K --.-KB/s in 0.02s
Found download URL: http://swcdn.apple.com/content/downloads/26/37/001-68446/r1dbqtmf3mtpikjnd04cq31p4jk91dceh8/
.........
This opens and closes VirtualBox as it is checking and creating the macOS VM on it. Wait patiently for the downloading files to finish
Downloading macOS installation files from swcdn.apple.com
Catalina_BaseSystem 100%[===================>] 1.97K --.-KB/s in 0s
Catalina_InstallInf 100%[===================>] 1.55K --.-KB/s in 0s
Catalina_AppleDiagn 100%[===================>] 3.00M 2.73MB/s in 1.1s
Catalina_AppleDiagn 100%[===================>] 328 --.-KB/s in 0s
Catalina_BaseSystem 100%[===================>] 475.53M 2.28MB/s in 3m 56s
Catalina_InstallESD 100%[===================>] 7.21G 2.23MB/s in 54m 42s
With a successful download of the above files, the macOS Catalina installation begins.
Splitting the several-GB InstallESDDmg.pkg into 1GB parts because
VirtualBox hasn't implemented UDF/HFS VISO support yet and macOS
doesn't support ISO 9660 Level 3 with files larger than 2GB.
creating file 'Catalina_InstallESD.part00'
creating file 'Catalina_InstallESD.part01'
creating file 'Catalina_InstallESD.part02'
creating file 'Catalina_InstallESD.part03'
creating file 'Catalina_InstallESD.part04'
creating file 'Catalina_InstallESD.part05'
creating file 'Catalina_InstallESD.part06'
creating file 'Catalina_InstallESD.part07'
....
Creating VirtualBox 6 virtual ISO containing macOS Terminal script
for partitioning and populating the bootable installer virtual disk.
Starting virtual machine "macOS".
This should take a couple of minutes. If booting fails, exit the script by
pressing CTRL-C then see the documentation for information about applying
different CPU profiles in the section CPU profiles and CPUID settings.
Until the script completes, please do not manually interact with
the virtual machine.
Press enter when the Language window is ready.
While at this step, VirtualBox is launched and you will see the created macOS running.
When it has finished loading, you will see the language menu.
When you see this language menu on VirtualBox, go back to your terminal and press enter, do not select anything.
Next, you will see the macOS Utilities window.
When you see it on VirtualBox, go back to the terminal and press enter. The next window you will see is the Terminal command prompt.
Press enter on the terminal when you see it appear on VirtualBox. Wait patiently until disk partitioning is done. This happens on the VirtualBox Terminal command prompt.
When this is complete, the macOS VM reboots and the process repeats itself. You are required to do similar actions as above (pressing enter on the terminal after seeing the displayed item)
On completion, you will see this on your terminal.
After the installer finishes preparing and the EFI and NVRAM files are copied,
macOS will install and boot up when booting the target disk.
Please wait
For further information, such as applying EFI and NVRAM variables to enable
iMessage connectivity, see the documentation with the following command:
./macos-guest-virtualbox.sh documentation | less -R
That's it! Enjoy your virtual machine.
stage: prompt_delete_temporary_files
Temporary files may be deleted when the virtual machine is powered off
and without a suspended state by executing the following command at the script's
working directory:
./macos-guest-virtualbox.sh prompt_delete_temporary_files
In the mean time installation is on going on VirtualBox terminal window prompt. When it is complete, the system reboots but takes quite sometime.
Step 3: Set up macOS Catalina on VirtualBox
When the system finishes loading, you will see this window. Here select your country.
Then select your prefered language and keyboard, the prefered language and keyboard for the Country you set is already given, although you can edit by clicking customize settings
Then next, you will see this privacy settings window.
The next step is choosing whether to transfer files from another mac or not.
Then log in to your apple account. Here enter your account ID/email address and password
You will be required to give the code sent to your device.
If you see this error at this point, just skip and log in to the apple account after completing this setup.
Next, agree to the License terms.
Now, create a user account and password.
Finish up with the express setup and analytics page.
The settings made are then applied.
Now we have successfully installed macOS Catalina on VirtualBox.
Step 4: Upgrade from macOS Catalina to Big Sur
Navigate to System preferences> Software Update. This will automatically start checking for macOS Big Sur Beta version update
With the update found (macOS Big Sur) click on Upgrade now. This starts downloading the macOS Big Sur. Remember this process might take some time depending on your internet speed.
When the download is complete, you will see this pop-up
Click continue and install macOS Big Sur. Agree with the terms and conditions.
Agree the new Big Sur to be installed on your VM’s hard disk.
Enter your password to authorize this installation.
The installation starts. This might take few minutes.
When complete, restart the system.
This takes some time as the system is still doing Big Sur installation. Wait patiently.
Step 5: Delete Temporary Files After Installation
Power off the Virtual Machine and delete temporary files using your client machine terminal.
./macos-guest-virtualbox.sh prompt_delete_temporary_files
Accept the files to be deleted:
Catalina selected to be downloaded and installed
stage: prompt_delete_temporary_files
The following temporary files are safe to delete:
ApfsDriverLoader.efi
AppleImageLoader.efi
AppleSupport-v2.0.4-RELEASE.zip
AppleUiSupport.efi
Catalina_AppleDiagnostics.chunklist
Catalina_AppleDiagnostics.dmg
Catalina_BaseSystem.chunklist
Catalina_BaseSystem.dmg
Catalina_BaseSystem.vdi
Catalina_bootable_installer.vdi
Catalina_installation_files.viso
Catalina_InstallESDDmg.pkg
Catalina_InstallESD.part00
Catalina_InstallESD.part01
Catalina_InstallESD.part02
Catalina_InstallESD.part03
Catalina_InstallESD.part04
Catalina_InstallESD.part05
Catalina_InstallESD.part06
Catalina_InstallESD.part07
Catalina_InstallInfo.plist
macOS_bootinst.txt
macOS_configure_nvram.txt
macOS_csr-active-config.bin
macOS_MLB.bin
macOS_populate_bootable_installer_virtual_disk.viso
macOS_populate_macos_target_disk.viso
macOS_ROM.bin
macOS_startosinstall.txt
macOS_startup.nsh
macOS_system-id.bin
Delete temporary files listed above? [y/N] y
Now power on your macOS VM and enjoy!
Conclusion
In the above article, I have demonstrated how to install macOS Catalina & Big Sur on VirtualBox. I hope this article was of value to you.
0 notes
Text
Drum Game Download For Android

Drum Game Download For Android Phone
Drum Game Download For Android Download
By MWM
Category:Music
Release Date: 2018-05-22
Current Version: 2.28.00
Adult Rating: 4+
File Size: 334.67 MB
Developer:MWM
Compatibility: Requires iOS 10.0 or later.
Drum Game Download For Android Phone
Drumtune PRO (iOS / Android) The best drum tuning application available. Let’s face it, tuning drums. Drum Set Music Games & Drums Kit Simulator Android latest 3.41.0 APK Download and Install. 🎶 Learn how to play drums in the most amazing drum kit app on Google Play! The definitive drumming experience: free and fun. Be a perfect drum hero with this awesome game. Get bonus by tapping the correct pad following the music rhythm. Choose the level that better fits your skill. Play music loud with headset for a superior experience.
4.45156

Free On itunes

Discover the best drumming experience on your phone! Play with super beats like Faded, Chandelier, Closer ... Become a pro on drums and have fun! Learn how to make music and enjoy the ultimate drum experience right at your fingertips!Play like a real drummer in no time! It’s very simple to use, with ultra realistic sound and feel. Everything has been made for you to feel like you're playing on a real drum set. Just tap and instantly hear the kick drums, cymbals, or snare drums! Practice percussions with the lessons whether you are a beginner or a pro drummer: choose the difficulty level that suits you.Learn thousands of song from a songbook updated every week! Come and play to practice and perfect your drumming skills so you can become a master drummer. Get all notes and rhythm perfectly to reach high score. And don’t worry, various musical genres are available: Rock, Pop, Djembe, Jazz, Metal, Hard-Rock... just pick your favorite one!You learned new skills through the lessons and now you want to get wild? Start jamming with the free play mode. Pick the drums that suits your style: Djembe, Jazz, Rock, Dance...they all have beautiful design, and ultra realistic HD sound. Perfect for freestyle sessions! You are free to play everywhere you want and the music you like.Learn, practice and play for hours!KEYS FEATURES:LESSONS - Play easily like on a real drum just by following the instructions - Different difficulty levels so you can practice and progress - Learn to play drums while having fun - Discover and play hundreds of song with various musical genres: Rock, Jazz, Metal, Dance...- New songs added in the songbook every week FREE PLAY MODE- Test and put into practice what you have learned- Select the drums that correspond to your style: Djembe, Rock, Dance, Jazz, Metal...- Ultra realistic HD sound and feel- Create your own music. You are free to play and compose what you like- Perfect for practicing your drums rudiments- Load songs from the catalog to accompany youAre you ready to become a skilled drummer? Drums is waiting for you so do not hesitate any longer! Learn, Practice, Play.------------------------SUBSCRIPTION INFORMATION- Subscribe for unlimited access to our Premium songs catalog and play with all Drum kits- Weekly ($7.99) & yearly ($40.99)*- Free trial subscription is automatically renewed unless cancelled 24 hours before the renewal- Payment will be charged to iTunes Account at confirmation of purchase- Account will be charged for renewal within 24-hours prior to the end of the current period, at the same price- No cancellation of the current subscription is allowed during active subscription period- Subscriptions may be managed by the user and auto-renewal may be turned off by going to the user’s Account Settings after purchase- Any unused portion of a free trial period, if offered, will be forfeited when the user purchases a subscription to that publication, where applicablePrivacy Policy & Terms of Service: https://musicworldmedia.com/products/drums/tos*Price are equal to the value that 'Apple's App Store Matrix' determines is the equivalent of the subscription price in $USD.Have any question or suggestion regarding the app? Our support team is ready to help at [email protected].
Every time we have to watch a video
By Toxic9365
How to raise downloads by 10 times?
5
service, daily installs can reach 3000+. Ping me at Skype: +8618990290838 / Whatsapp:+8618990290838. Every one can get a test promtion for 3 days now!
amount deducted
By 1428madco
its showing that the app is free and my child installed it and she not play even 1day only 10-15 she used and uninstalled aap and this app deducted the amount of rs. 649/- without any sending email any otp anything ridiculous i want my money back.
Advertisements every 15 seconds
By Nikhil1312
It’s so frustrating really. More than the time you’re using the app, you are actually watching some dumb advertisement. It’s so bloody frustrating
App cannot be used until paid
By vincent8oct
Directly asks to purchase. Not sure why it is listed as free
Very bad
By mr.blued
Fake
1
Fake app chalu nahi hota hai
Fake app
By Sparsh Jain
Dont install this appIt doesn't open and completely waste your time.
Not working
By _mr_space
Ok
5
Very nice
Drum Game Download For Android Download
1 note
·
View note
Text
McAfee stinger for windows 10
Welcome to Antivirus Support
McAfee stinger for windows 10- Security Premium Our best protection, plus PC backup and family safety features, for you and the people you care about.
How to Activate McAfee Antivirus with Retail Card?
If you have Already Bought the McAfee antivirus than You can Activate in just a few simple and quick steps –
You must have a Retail Card with a 25 Digit Card Activation Card.
Let’s Go And activate McAfee anti-virus Protection –
Open Your Browser and Type
www.mcafee.com/activate
Or use This Link mcafee.com/activate.
Enter Your 25 Digit Activation Code And Submit. Please Create a McAfee Account In the next Step. Sign Up with Your emailMcAfee Account will Help You to Install And Manage Your McAfee Antivirus Services.
Now You Can Install Your McAfee antivirus protection for Best Installation make sure You Remove any other Antivirus Program From Computer. After Installing Your McAfee anti-virus Please Restart Your Computer. Please Run A full McAfee Antivirus Scan And Check For Viruses. For More Details, We Do Have One More Post with More comprehensive Information.
How to define McAfee activate 25 digit code?
The 25 digits activation code is necessary to install and activate any software be it McAfee or any other antivirus solution. The activation code is something for which you actually pay for. Without this code, you will not be able to show the authority and authenticity of the product. To start using the product it is necessary to download and activate it which you cannot without having an unused product key.
This code makes sure that a user will not face any difficulty while using the product and gives him the idea that the product he is using is not a pirated one. The software with the product key implied on it is officially registered with the company who owns it and this tells us that the product is authentic. With a registered product, you get an opportunity to get the latest updates for the software.
1. Steps to Redeem McAfee retail card:
This section contains the necessary steps to redeem your McAfee retail card:
Using your web browser navigate to mcafee.com/activate.When the sign-in page opens, enter your McAfee login details. If you do not have an account, click on “Create a new account”.Further, select an option for “Country” and “Language” from the list. When prompted, enter the McAfee activate code. Type the email address and click on the “Submit” button. Finally, click on “Verify” and wait for the activation to complete.This process should be followed by downloading the product.
2. A few steps to download McAfee security on your device:
To download McAfee total protection or any other McAfee product follow the steps given below: McAfee stinger for windows 10-
Go to the home page of McAfee by using the URL mcafee.com/activate. Log in to your McAfee account or click “create a new one” if you do not have one. Upon creating a new account, you should complete the sign-in process. When a new page opens, select “My Account”.From here, select your desired product. After this, choose the payment method to pay for the product. Read the McAfee’s license agreement and click on the “Agree” button. Wait for a few minutes and then begin with the installation process.
McAfee antivirus software is beneficial in many ways:
It protects your important documents and secures your files and folder on the device. The McAfee antivirus prevents malware. Secures the important information. Enable your search history to remain private. Prevents ads. It is the most famous antivirus for privacy and security purpose. To get McAfee antivirus security by downloading, installing and activating McAfee setup, visit mcafee.com/activate.
Minimum System Requirements :
Operating system:
Microsoft Windows 10, 8.1, 8, and 7 SP1 (32- and 64-bit)
Mac OS X 10.12 or later
Google Android smartphones and tablets 4.1 or higher
Apple iOS 10 or later
Internet Connection Required
High-speed connection recommended
Supported Browsers:
Internet Explorer 10.0 or later
Firefox
Google Chrome
Safari (Mac and iOS OS Only)
Microsoft Edge
Hardware:
2 GB RAM for Windows 7 and above
500 MB free drive space
1 GHz Processor
Some installation problems of McAfee antivirus software: McAfee stinger for windows 10-
Download it and activate McAfee antivirus from McAfee 25 digit activation code it will provide all kind of safety required and protect you in every manner. We are here to support the users of McAfee to get rid of all kinds of viruses and other harmful activities. Activate McAfee security and protect your device and other devices from Malware, spyware, rootkit, and viruses. McAfee Software is available for Mobile Phones, Tablets, PC, laptops or any other devices. Range of McAfee products is very wide and we provide support for all the McAfee Software.
We have experienced and skilled experts for McAfee Support and our McAfee technical support team helps the user to resolve all the technical issues within a very little amount of time. If you have security software and you are not satisfied with that then we will recommend you to try McAfee antivirus Software. To Redeem, install, Re-install, or Activate of McAfee you can visit McAfee activate with activation code. These processes are very simple so that You can do these all by yourself only but if you need any support you may contact us. We believe in 100% customer satisfaction. We will support you in all issues and provide the right solution required.
McAfee Antivirus Installation Problems: McAfee stinger for windows 10-
Upgrading McAfee Antivirus to the latest version.Resolve activation key problems from mcafee.com/activateOffering Help in McAfee Antivirus Setup and Configuration.Provide the solution to you if McAfee Antivirus is not working or a guide to solving other software issues.Un-installation of other conflicting Applications and repair of any software problems.Provide better System protection.Troubleshoot any McAfee Antivirus problem.Customize the setting of McAfee product as per your system requirements.Scan your device to prevent any type of risk that may occur through viruses Malware or any other threat.Resolve issues related to the firewall.
Overview of McAfee Security Features: McAfee stinger for windows 10-
There are certain features that make McAfee best from other antivirus solutions, and these are:
It safeguards your device from viruses, malware, spyware, and Trojans.Your identity is safe and secured with McAfee’s firewall. It restricts you from visiting suspicious, unsafe websites.You can transfer your subscription from one device to another.It allows you to safeguard several devices using single protection.Your kids can securely surf the Internet with McAfee Safe Family.The antivirus provides you the option to track the misplaced devices.The software has the best-in-class features to help in removing all the possible threats.McAfee automatically scans and removes malicious files.It displays the overall health record of your PC after scanning it thoroughly.
2 notes
·
View notes
Video
youtube
This Application Requires iOS 10 or Later How to Fix How to Get iOS 10...
0 notes
Text
Back to The Mac - A Look Into Apple's Conference
Apple has been focussing a lot on mobile devices in all of its latest events - beginning with the release of the iPad, followed through the release of the iPhone four on the Worldwide Developer's Conference (WWDC) 2010 [covered in the July 2010 issue], and later, the Music Event that ordinarily focussed on iPods. Last month, however, Apple held an occasion titled 'Back to the Mac', particularly for Apple's running gadget (OS), the Mac OS.
The occasion's poster, an photo of the Apple emblem with a lion in the back of it, organized people for what lay beforehand. Apple had named OS X variations after the circle of relatives of big cats - from Mac OS X 10.0 to ten.6 titled Cheetah, Puma, Jaguar, Panther, Tiger, Leopard, and Snow Leopard. Hence, many predicted the discharge of a new running device - and that they had been near, as one of the biggest news made at the occasion changed into concerning a new OS.
The occasion:
The first Mac product showcased become iLife '11, the latest suite of digital life-style applications for Mac. It includes iPhoto (a photo editor), iMovie (a video editor), GarageBand (a virtual audio laptop for audio composing and modifying), iWeb, and iDVD. In iLife 'eleven, features from preceding versions were redesigned; new features have also been introduced. Most of the features in iLife '11 are pretty specific - never visible before on any other laptop application.
The next product changed into the much-awaited function (mainly for users of the iPhone 4 and fourth era iPod Touch) -FaceTime for Mac. With the iPhone 4, Apple evolved a video-calling software known as FaceTime, that allowed video calls from one iPhone four to some other, the usage of Wi-fi. In the Apple Music Event, held in September, the iPod Touch become upgraded with a FaceTime digicam as nicely; so both, iPhone four and iPod Touch users, have been allowed to make and acquire FaceTime calls.
Understandably, Mac customers demanded it as properly, specifically since Mac computers (iMacs and Macbooks) came with a integrated digicam. Wish granted; introducing FaceTime for Mac. It is a separate application, and the beta model can be downloaded from the Apple website totally free.
The Mac OS Lion:
The next massive information came with the preview of Mac OS X10.7: Lion, the eighth essential launch of Mac OS X. Though it changed into most effective a preview, it gives fodder for discussion and speculation most of the Mac person community till its real release in the summer of 2011. It tied in with the event's identify, Back to the Mac, which had a deep philosophy in the back of it. The widely-successful iOS (the OS for devices like the iPhone, iPod Touch, and iPad) has been derived by means of the Mac OS X. So taking it "returned to the Mac" changed into the reason in the back of the improvement of Mac OS X Lion. There are many capabilities in Lion, which can be inspired from the iOS, and several features of the Mac OS were revised. Some of the functions consist of:
• Fullscreen apps (as with the iPad)
• Mac App Store (like the iTunes shop, iOS App Store, and the iBookstore)
• Launchpad (an iOS-kind screen for launching apps)
• Mission Control (for switching between apps. It's a combination of Dock, Expose, Dashboard, and Spaces)
One of the iOS' most cherished function is multitoUch, and Apple has tried to get as near as possible to allowing it at the Mac OS by using using the enter devices at the Mac products. Apple laptops and notebooks may have a multitouch-enabled glass trackpad, to be able to allow a couple of finger-primarily based moves. As for the computing device, Apple's Magic Mouse and Magic Trackpad will do the equal activity.
One more element:
Of path, no Apple occasion is complete without Steve Jobs' trademark phrase, "however there's one greater issue...", and saving the excellent for the remaining! Since Apple has redesigned the Mac OS to be as sophisticated as the iOS, the hardware additionally required an upgrade. So, a brand new and higher model of the MacBook Air turned into released. Two years in the past, the MacBook Air became launched, claiming to be the arena's thinnest computer, and measured 13.Three inches. However, at the side of the software program improve, Apple introduced the MacBook Air's "younger brother", which measures best eleven.6 inches. With the brand new MacBook Air, its thickness has been similarly reduced, and its processing power has been accelerated. It has a unibody shape (similar to other Apple MacBooks), and springs with flash garage incorporated on-board, multitouch trackpad, a FaceTime digicam (previously referred to as iSight digital camera), and a wonderful high-decision display. With a battery time of 5 hours, the brand new Mac Book Air has an super battery lifestyles for the sort of thin pc. According to Apple, it is the most advanced product they've ever made.
For more information visit here https://www.bulletintech.com/task-manager-mac/
2 notes
·
View notes
Text
How to Learn Chinese from Anywhere: Must-Have Mandarin Chinese Language Apps

Let’s face it: The Internet has changed everything. And, “everything” includes Mandarin Chinese language learning! Years ago, the classroom and textbooks were the only resources available to begin learning Chinese. However, with recent online resources emerging, learning Mandarin Chinese is easier and more accessible than ever. Chinese language learners can now take online lessons, learn 1-on-1 with a professional teacher in China from their living room, and supplement their personal Chinese lessons with blogs, websites and apps. Since mobile apps are the most accessible and convenient to users, I would like to introduce some Mandarin Chinese language-learning apps that have helped me over the past few years as I’ve learned Chinese.
Here are three Chinese-learning apps that have helped me with my speaking skills:
1. 汉语拼音游戏 (Hànyǔ pīnyīn yóuxì) Chinese Pinyin Game
This game has helped me improve my pronunciation of pinyin through the comparison of similar sounds that are easy to misunderstand. By solving problems in the form of quizzes, my ears have gradually been trained begin recognizing Chinese pronunciation. It’s been a real game-changer!
Features:
• methods for quickly mastering pinyin;
• conveniently practice your pronunciation;
• browse the pinyin study section.
Compatibility: Requires iOS 8.0 or later.
2. 魔力小孩拼音 (Mólì xiǎohái pīnyīn) Magikid
With more than 30 million users, this app is tested and trusted. Yes, it may be designed for kids, but it’s good practice for all! As I practice the initials, finals, overall reading, and the combination of the objectives, they all come together to make a magic card animation. There is a fun test, the option to read aloud, handwriting practice, singing, and pinyin learning. It’s simple, but effective.
Features:
• Learning through magical games: Defeating the magician; starting the Ferris wheel; and completing the study through playing games.
• Rich in content: 1076 Pinyin combinations; 174 cognitive problems; and a Pinyin challenge test.
• Original children’s songs: 40 original pinyin children’s songs.
• Step-by-step: the default setting one day class mode; memory; combination; strengthen; repeat; cycle; parents can freely control the time of each child’s learning.
Compatibility: Requires iOS 10.0 or later, Android 4.0 or later.
3. 正音万里行 (Zhèngyīn wànlǐ xíng) Zhengyin Miles
A voice assistant application developed to help Chinese beginners learn and practice Chinese phonetics.
Features:
• exercise class grouping;
• comprehensive and...
...for the FULL LIST of the 7 Chinese Learning Apps, you can READ OUR FULL LESSON HERE!
61 notes
·
View notes
Text
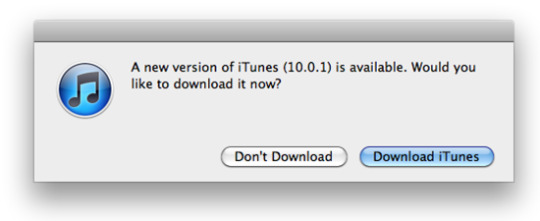
Itunes 10.0 1 Download Mac

Editors who want to make the most of the program are recommended to have a 2011 iMac or Macbook Pro with at least 4GB of RAM. These devices can export videos with 4K resolution. The latest version of iMovie, version 10.1.11 requires OS X 10.11.2 or later. Is there a better alternative? What is Mac OS X for PPC (OSX 10.0, 10.1, 10.2, 10.3, 10.4, 10.5)? Mac OS X is an operating system by Apple Inc. It is a conglomoration of NeXTSTEP, A/UX, and Mac OS 9.
Itunes 10.0 1 Download Mac Os
Itunes 10.0.1 Install
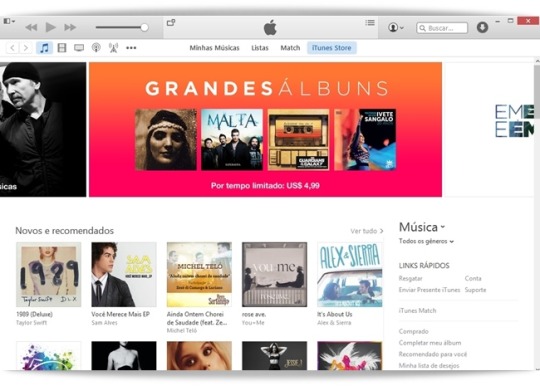
iTunes is going places.
Download macOS Catalina for an all‑new entertainment experience. Your music, TV shows, movies, podcasts, and audiobooks will transfer automatically to the Apple Music, Apple TV, Apple Podcasts, and Apple Books apps where you’ll still have access to your favorite iTunes features, including purchases, rentals, and imports.
You can always download iTunes 12.8 for previous versions of macOS,
as well as the iTunes application for Windows.
Hardware:
Mac computer with an Intel processor
To play 720p HD video, an iTunes LP, or iTunes Extras, a 2.0GHz Intel Core 2 Duo or faster processor is required
To play 1080p HD video, a 2.4GHz Intel Core 2 Duo or faster processor and 2GB of RAM is required
Screen resolution of 1024x768 or greater; 1280x800 or greater is required to play an iTunes LP or iTunes Extras
Internet connection to use Apple Music, the iTunes Store, and iTunes Extras
Apple combo drive or SuperDrive to create audio, MP3, or backup CDs; some non-Apple CD-RW recorders may also work. Songs from the Apple Music catalog cannot be burned to a CD.
Software:
OS X version 10.10.5 or later
400MB of available disk space
Apple Music, iTunes Store, and iTunes Match availability may vary by country
Apple Music trial requires sign-up and is available for new subscribers only. Plan automatically renews after trial.
iTunes
Download the latest version for Windows.
The latest entertainment apps now come installed with macOS Catalina. Upgrade today to get your favorite music, movies, TV shows, and podcasts. You can join Apple Music and stream — or download and play offline — over 70 million songs, ad‑free.
iTunes
Itunes 10.0 1 Download Mac Os
Download the latest version from the Microsoft Store.
The latest entertainment apps now come installed with macOS Catalina. Upgrade today to get your favorite music, movies, TV shows, and podcasts. You can join Apple Music and stream — or download and play offline — over 70 million songs, ad‑free.
Hardware:
PC with a 1GHz Intel or AMD processor with support for SSE2 and 512MB of RAM
To play standard-definition video from the iTunes Store, an Intel Pentium D or faster processor, 512MB of RAM, and a DirectX 9.0–compatible video card is required
To play 720p HD video, an iTunes LP, or iTunes Extras, a 2.0GHz Intel Core 2 Duo or faster processor, 1GB of RAM, and an Intel GMA X3000, ATI Radeon X1300, or NVIDIA GeForce 6150 or better is required
To play 1080p HD video, a 2.4GHz Intel Core 2 Duo or faster processor, 2GB of RAM, and an Intel GMA X4500HD, ATI Radeon HD 2400, or NVIDIA GeForce 8300 GS or better is required
Screen resolution of 1024x768 or greater; 1280x800 or greater is required to play an iTunes LP or iTunes Extras
16-bit sound card and speakers
Internet connection to use Apple Music, the iTunes Store, and iTunes Extras
iTunes-compatible CD or DVD recorder to create audio CDs, MP3 CDs, or backup CDs or DVDs. Songs from the Apple Music catalog cannot be burned to a CD.
Software:
Itunes 10.0.1 Install
Windows 7 or later
64-bit editions of Windows require the iTunes 64-bit installer
400MB of available disk space
Some third-party visualizers may no longer be compatible with this version of iTunes. Please contact the developer for an updated visualizer that is compatible with iTunes 12.1 or later.
Apple Music, iTunes Store, and iTunes Match availability may vary by country
Apple Music trial requires sign-up and is available for new subscribers only. Plan automatically renews after trial.
iTunes is going places.
Visit the iTunes Store on iOS to buy and download your favorite songs, TV shows, movies, and podcasts. You can also download macOS Catalina for an all-new entertainment experience on desktop. Your library will transfer automatically to the new Apple Music app, Apple TV, and Apple Podcasts. And you’ll still have access to your favorite iTunes features, including your previous iTunes Store purchases, rentals, and imports and the ability to easily manage your library.
Music, TV, and podcasts
take center stage.
iTunes forever changed the way people experienced music, movies, TV shows, and podcasts. It all changes again with three all-new, dedicated apps — Apple Music, Apple TV, and Apple Podcasts — each designed from the ground up to be the best way to enjoy entertainment on your Mac. And rest assured; everything you had in your iTunes library is still accessible in each app. iCloud seamlessly syncs everything across your devices — or you can back up, restore, and sync by connecting the device directly to your Mac.
The new Apple Music app is the ultimate music streaming experience on Mac.1 Explore a library of 70 million songs, discover new artists and tracks, find the perfect playlist, download and listen offline, or enjoy all the music you’ve collected over the years. And find it all in your music library on all your devices.
The Apple TV app for Mac is the new home for all your favorite movies, shows, premium channels, and Apple TV+. Watch everything directly in the app or enjoy it offline, and discover the best of what’s on in the Watch Now tab. You can even pick up where you left off on any screen, across all your devices. And for the first time, 4K2 and Dolby Atmos3-supported movies are available on Mac.
More than 700,000 of the best entertainment, comedy, news, and sports shows are now available on your Mac with Apple Podcasts. Search for podcasts by title, topic, guest, host, content, and more. Subscribe and be notified as soon as new episodes become available. And in the Listen Now tab, you can easily pick up where you left off across all your devices.
iTunes Support can help answer your questions
Get help with syncing, updating to a more recent version of iTunes, or with an iTunes Store purchase — and much more.
Learn more
Looking for a previous version of iTunes?
Download earlier versions of iTunes to work with compatible operating systems and hardware.
Find previous versions of iTunes
Review
Changelog
When you think of iTunes, you immediately think of an Apple product. Whether it's on the Mac operating system or an iPhone or an iPad, but as soon as you hear the word iTunes you do not think of the Windows operating system. However, Apple has made it possible for you to have iTunes installed on your Windows computer. The installation is easy, and you do not need to customize anything. The only thing you need to have is an Apple ID. Meaning that if you have an iPhone or an iPad without having a Mac computer, you can still access iTunes on your Windows system.
How Beneficial is iTunes For You?
As you already know, iTunes is owned by Apple with the task of managing all kinds of digital music as well as videos. Using iTunes you have access to the lettuce music from your favorite artists, you have an automatic playlist of new music, trending music, and you can create your playlist, adding songs or removing them as you wish.
Now, the installation is easy as well as setting it up. iTunes has a pretty straightforward user interface. It's not complicated to understand, and inexperienced PC users can quickly manipulate the interface without hassle. It has all the essential functions you need in handling your music as well as the opportunity to purchase digital music from your favorite artists. You can even buy an entire album and save it to your computer.
On the main window, you have access to the main menus on the top panel - Library, For You, Browse, Radio, and Store. ‘Library’ gives you access to all your music and videos, arranged by Recently Added, Artists, Albums, Songs, Genre, and many others. To access your account, click on ‘For You’ and you will be ushered into a page where you can edit your credit card info, account details, and a few other settings. ‘Browse’ allows you to search for all kinds of songs, by artists, genre, or song title as well as playlists created by other iTunes users. ‘Radio’ is pretty straightforward as it allows you to listen to various online radio stations around the world, while ‘Store’ allows you to purchase any song of your choice.
You also have access to about 50 million songs on iTunes as well as the latest TV shows. When you download a song, it is immediately added to your library. You can either create and customize new playlists or use the preset ones. Another thing, all downloaded or purchased songs are accessible in an offline mode. iTunes offers more than 100,000 movies as well as TV shows at your disposal.
Apart from the ability to buy music online using iTunes, users can also sing the iTunes on your laptop to mobile phones. Note that, you can only synchronize your Windows system iTunes to your Apple device, not just any mobile phone or mobile device. To sync both devices, you need a USB cable that can connect your phone to the computer. This is also helpful as you can use this method to access your device in case your phone is broken to recover the photos and documents stored on your mobile device. iTunes is compatible with Windows 7, Windows 8, Windows 10, and Windows 10 64-bit.
Key Features of iTunes Include:
Access to more than 100,000 movies and TV shows;
Access to about 50 million digital songs;
Offers preset playlists and radio stations;
Can listen to downloaded songs in offline mode;
Can purchase music and save to your library at any time;
The ability to keep up with your favorite artists;
Access to hit songs, new songs, as well as trending shows;
You can preview songs before buying;
Can sync your devices;
Neat and straightforward user interface;
Can use iTunes to backup and recover your photos and documents;
Supports multiple languages;
Compatible with Windows 7, Windows 8, Windows 10, and Windows 10 64-bit.
Summary
In general, iTunes is the perfect tool for organizing and managing your songs in one place. You can use it as your computer’s default player and sync it across multiple devices. iTunes offers its users access to more than 100k TV shows as well as 50 million music that can be streamed at any time without restrictions. You have access to your favorite artists and songs in one compact tool.
We don't have any change log information for iTunes 12.10.2.3 yet. If you have any change log info for this version of iTunes you can share with us.
Screenshots
More info
Developer:Apple Inc
Version:12.10.2.3
Downloads:228,915
Operating system:Windows 10, Windows 8/8.1, Windows 7, Windows Vista, Windows XP
MD5 Checksum:bb66fd6cb8e5c70309f20c70c8dd147b
iTunes 64 bit
Related Apps
Top Alternatives
MusicBee
Mac miller diamonds and gold. Software that enables you to manage and play your favorite audio tracks with ease
QuickTime Player
A solid video player developed by Apple for all kinds of users
Windows Media Player
A freeware iTunes competitor for exciting music experience
MediaMonkey
MediaMonkey is a software that plays, categorizes, and helps to organize your entire music collection into one space
Foobar2000
An advanced audio player utility for the Windows platform
MusicBee
Software that enables you to manage and play your favorite audio tracks with ease
MediaMonkey
MediaMonkey is a software that plays, categorizes, and helps to organize your entire music collection into one space
Foobar2000
An advanced audio player utility for the Windows platform
Winamp
A great tool for managing all your multimedia contents, with a wide variety of plugins at your disposal
AIMP
This is an audio player that is completely free and supports a wide range of Audio formats
Teamviewer 15 download mac os. TeamViewer Host is used for 24/7 access to remote computers, which makes it an ideal solution for uses such as remote monitoring, server maintenance, or connecting to a PC or Mac in the office or at home. Install TeamViewer Host on an unlimited number of computers and devices. As a licensed user, you have access to them all!
Recommended articles
0 notes
Text
SAMSUNG Galaxy S23+ Plus Cell Phone, Factory Unlocked Android Smartphone, 256GB Storage, 50MP Camera, Night Mode, Long Battery Life, Adaptive Display, US Version, 2023, Phantom Black

Meet Galaxy S23+, the phone takes you out of the everyday and into the epic. Life doesn’t wait for the perfect lighting, but with Nightography, you are always ready to seize the moment and snap memories like a pro. See your content no matter the time of day on a display with a refresh rate up to 120Hz and Adaptive Vision Booster. Capture and create in rich detail, and then use Quick Share**** to share across devices without losing quality. Move past the mundane and embrace epic power with Galaxy S23+. *Based on average battery life under typical usage conditions. Average expected performance based on typical use. Actual battery life depends on factors such as network, features selected, frequency of calls, and voice, data, and other application usage patterns. Results may vary. **As compared to S22+. ***Requires devices to have One UI 2.5 or later. Must be logged into the same Google account and Google Meet app must be activated on each device. ****For Galaxy-to-Galaxy or any other devices: Quick Share to Galaxy smartphones and tablets, smartphones and tablets with Android OS version 10.0 (Q) and One UI 2.1 or above requires Wi-Fi and Bluetooth connection. Quick Share to iOS and Android devices available by sending shared link: individual files shared cannot exceed 3GB (for a total of 5GB per day) and link will expire after two days; requires a Samsung account and Internet connection. For Galaxy-to-Galaxy device: Quick Share between Galaxy smartphones and tablets with Android OS version 10.0 (Q) and One UI 2.1 or above requires Wi-Fi and Bluetooth connection. For Galaxy to any other device: Quick Share to iOS and Android devices available by sending shared link; individual file shared cannot exceed 3GB (for a total of 5GB per day) and link expires after two days. Requires a Samsung account and Internet connection.
CAPTURE THE NIGHT IN LOW LIGHT: Whether you’re headed to a concert or romantic night out, there’s no such thing as bad lighting with Night Mode; Galaxy S23+ lets you capture epic content in any setting with stunning Nightography
HIGH CAMERA RESOLUTION: Create crystal-clear content worth sharing with the 50MP high-resolution camera of Galaxy S23+; Whether you’re posting or printing, Galaxy S23+ always does the moment justice
FASTEST MOBILE PROCESSOR AVAILABLE: Whether you’re working hard, playing hard or doing both at the same time, smoothly switch between apps with our fastest processor ever
UNLOCK SMOOTH GAMING: Game at full throttle and smoothly switch between apps; Get more done with our fastest processor ever combined with massive internal storage; And if you’re on the move, keep going with a screen that adapts to your environment
POWER TO KEEP MOVING YOU FORWARD: Confidently binge-watch, game or surf without worrying about your phone dying; The impressive 4,700mAh battery* will keep you going longer**
MORE STORAGE. MORE MEMORIES: You’re good on storage space; With an impressive amount of storage, starting at 256GB, you can enjoy being behind the camera without the stress that comes with getting close to filling up your phone
ADAPTIVE DISPLAY: Watch your content comfortably as Adaptive Vision Booster helps your screen adapt to your environment; Whether out in direct sunlight or in bed with the lights off, the contrast on Galaxy S23+’s expansive screen still looks amazing
CONVENIENT COLLABORATION: Whether you’re having a video meeting with your team or your friends, use Google Meet to start a video chat on your Tab*** and then continue the call on your phone as you head out the door
QUICK SHARE: Send even your largest files**** — whether it’s cute puppy videos or work documents — between your Galaxy S23+ and any iOS or Android device; Quick Share helps minimize frustration when sharing the epic
Read the full article
0 notes
Text
Install Xcode For Mojave

Until you access your Mojave system via SSH and face a whole new raft of permission wrangling headaches. Mojave has been a real disappointment. Apple Server app lost DHS, DHCP, Mail, Webpretty much everything you’d use a server for, permissions/access are now so walled off it’s a constant game of access whack-a-mole.
After Sierra, High Sierra, Mojave, the next one is macOS Catalina. Now Catalina includes a huge deal of fresh green stuff. First off, starting off with iTunes, Apple’s Senior VP Craig Federighi nailed it with making fun of showing off some apps in iTunes.
On iOS, install the WireGuard app from the iOS App Store. Then, use the WireGuard app to scan the QR code or AirDrop the configuration file to the device. On macOS Mojave or later, install the WireGuard app from the Mac App Store. A default install only requires the user to sit patiently and, less than ten times, press enter when prompted by the script, without interacting with the virtual machine. Tested on bash and zsh on Cygwin. Works on macOS, CentOS 7, and Windows. Should work on most modern Linux distros. Can you clarify how you upgraded? I have a macpro5,1 running the latest mojave (10.14.6). Unclear to me how to upgrade to catalina (10.15.3), as the installer says “Install a new version of the OS” (or similar) as opposed to “upgrade or install new” from the normal installers.
Quickstart
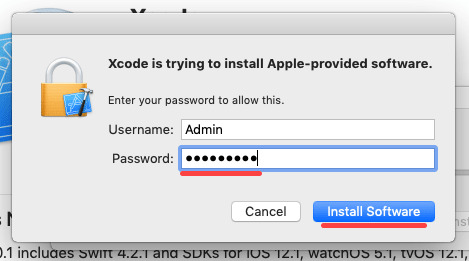
Install Xcode and the Xcode Command Line Tools
Agree to Xcode license in Terminal: sudo xcodebuild -license
Install MacPorts for your version of the Mac operating system:
Installing MacPorts
MacPorts version 2.6.4 is available in various formats for download and installation (note, if you are upgrading to a new major release of macOS, see the migration info page):
“pkg” installers for Big Sur, Catalina, Mojave, and High Sierra, for use with the macOS Installer. This is the simplest installation procedure that most users should follow after meeting the requirements listed below. Installers for legacy platforms Sierra, El Capitan, Yosemite, Mavericks, Mountain Lion, Lion, Snow Leopard, Leopard and Tiger are also available.
In source form as either a tar.bz2 package or a tar.gz one for manual compilation, if you intend to customize your installation in any way.
Git clone of the unpackaged sources, if you wish to follow MacPorts development.
The selfupdate target of the port(1) command, for users who already have MacPorts installed and wish to upgrade to a newer release.
Checksums for our packaged downloads are contained in the corresponding checksums file.
The public key to verify the detached GPG signatures can be found under the attachments section on jmr's wiki page. (Direct Link).
Please note that in order to install and run MacPorts on macOS, your system must have installations of the following components:
Apple's Xcode Developer Tools (version 12.2 or later for Big Sur, 11.3 or later for Catalina, 10.0 or later for Mojave, 9.0 or later for High Sierra, 8.0 or later for Sierra, 7.0 or later for El Capitan, 6.1 or later for Yosemite, 5.0.1 or later for Mavericks, 4.4 or later for Mountain Lion, 4.1 or later for Lion, 3.2 or later for Snow Leopard, or 3.1 or later for Leopard), found at the Apple Developer site, on your Mac operating system installation CDs/DVD, or in the Mac App Store. Using the latest available version that will run on your OS is highly recommended, except for Snow Leopard where the last free version, 3.2.6, is recommended.
Apple's Command Line Developer Tools can be installed on recent OS versions by running this command in the Terminal:
Older versions are found at the Apple Developer site, or they can be installed from within Xcode back to version 4. Users of Xcode 3 or earlier can install them by ensuring that the appropriate option(s) are selected at the time of Xcode's install ('UNIX Development', 'System Tools', 'Command Line Tools', or 'Command Line Support').
Xcode 4 and later users need to first accept the Xcode EULA by either launching Xcode or running:
(Optional) The X11 windowing environment for ports that depend on the functionality it provides to run. You have multiple choices for an X11 server:
Install the xorg-server port from MacPorts (recommended).
The XQuartz Project provides a complete X11 release for macOS including server and client libraries and applications. It has however not been updated since 2016.
Apple's X11.app is provided by the “X11 User” package on older OS versions. It is always installed on Lion, and is an optional installation on your system CDs/DVD with previous OS versions.
macOS Package (.pkg) Installer
Microsoft office 2019 free. download full version for mac download. The easiest way to install MacPorts on a Mac is by downloading the pkg or dmg for Big Sur, Catalina, Mojave, High Sierra, Sierra, El Capitan, Yosemite, Mavericks, Mountain Lion, Lion, Snow Leopard, Leopard or Tiger and running the system's Installer by double-clicking on the pkg contained therein, following the on-screen instructions until completion.
This procedure will place a fully-functional and default MacPorts installation on your host system, ready for usage. If needed your shell configuration files will be adapted by the installer to include the necessary settings to run MacPorts and the programs it installs, but you may need to open a new shell for these changes to take effect.
The MacPorts “selfupdate” command will also be run for you by the installer to ensure you have our latest available release and the latest revisions to the “Portfiles” that contain the instructions employed in the building and installation of ports. After installation is done, it is recommended that you run this step manually on a regular basis to to keep your MacPorts system always current:
Download iMovie 9.0.9. What's New in Version 9.0.9. Addresses issues where iMovie does not recognize video cameras connected to your Mac. Imovie 9 download mac.
At this point you should be ready to enjoy MacPorts!
Type “man port” at the command line prompt and/or browse over to our Guide to find out more information about using MacPorts. Help is also available.
Source Installation
If on the other hand you decide to install MacPorts from source, there are still a couple of things you will need to do after downloading the tarball before you can start installing ports, namely compiling and installing MacPorts itself:
“cd” into the directory where you downloaded the package and run “tar xjvf MacPorts-2.6.4.tar.bz2” or “tar xzvf MacPorts-2.6.4.tar.gz”, depending on whether you downloaded the bz2 tarball or the gz one, respectively.
Build and install the recently unpacked sources:
cd MacPorts-2.6.4
./configure && make && sudo make install
Optionally:
cd ./
rm -rf MacPorts-2.6.4*
These steps need to be perfomed from an administrator account, for which “sudo” will ask the password upon installation. This procedure will install a pristine MacPorts system and, if the optional steps are taken, remove the as of now unnecessary MacPorts-2.6.4 source directory and corresponding tarball.
To customize your installation you should read the output of “./configure --help | more” and pass the appropriate options for the settings you wish to tweak to the configuration script in the steps detailed above.
You will need to manually adapt your shell's environment to work with MacPorts and your chosen installation prefix (the value passed to configure's --prefix flag, defaulting to /opt/local):
Add $(prefix)/bin and $(prefix)/sbin to the start of your PATH environment variable so that MacPorts-installed programs take precedence over system-provided programs of the same name.
If a standard MANPATH environment variable already exists (that is, one that doesn't contain any empty components), add the $(prefix)/share/man path to it so that MacPorts-installed man pages are found by your shell.
For Tiger and earlier only, add an appropriate X11 DISPLAY environment variable to run X11-dependent programs, as Leopard takes care of this requirement on its own.
Install Xcode For Mojave 10.14
Lastly, you need to synchronize your installation with the MacPorts rsync server:
Upon completion MacPorts will be ready to install ports!
It is recommended to run the above command on a regular basis to keep your installation current. Type “man port” at the command line prompt and/or browse over to our Guide to find out more information about using MacPorts. Help is also available.
Jw library download mac. Download JW Library - JW LIBRARY is an official app produced by Jehovah’s Witnesses. It includes multiple Bible translations, as well as books and brochures for Bible study. Download JW Library for PC – Windows 7, 8, 10, Mac: To start, you need to download BlueStacks on your PC & Mac. Run the installation wizard and follow the on-screen instructions.
Git Sources
If you are developer or a user with a taste for the bleeding edge and wish for the latest changes and feature additions, you may acquire the MacPorts sources through git. See the Guide section on installing from git.
Purpose-specific branches are also available at the https://github.com/macports/macports-base/branches url.
Alternatively, if you'd simply like to view the git repository without checking it out, you can do so via the GitHub web interface.
Selfupdate
If you already have MacPorts installed and have no restrictions to use the rsync networking protocol (tcp port 873 by default), the easiest way to upgrade to our latest available release, 2.6.4, is by using the selfupdate target of the port(1) command. This will both update your ports tree (by performing a sync operation) and rebuild your current installation if it's outdated, preserving your customizations, if any.
Other Platforms
Running on platforms other than macOS is not the main focus of The MacPorts Project, so remaining cross-platform is not an actively-pursued development goal. Nevertheless, it is not an actively-discouraged goal either and as a result some experimental support does exist for other POSIX-compliant platforms such as *BSD and GNU/Linux.
The full list of requirements to run MacPorts on these other platforms is as follows (we assume you have the basics such as GCC and X11):
Tcl (8.4 or 8.5), with threads.
mtree for directory hierarchy.
rsync for syncing the ports.
cURL for downloading distfiles.
SQLite for the port registry.
GNUstep (Base), for Foundation (optional, can be disabled via configure args).
OpenSSL for signature verification, and optionally for checksums. libmd may be used instead for checksums.
Normally you must install from source or from an git checkout to run MacPorts on any of these platforms.
Install Xcode For Mojave Installer
Help
Help on a wide variety of topics is also available in the project Guide and through our Trac portal should you run into any problems installing and/or using MacPorts. Of particular relevance are the installation & usage sections of the former and the FAQ section of the Wiki, where we keep track of questions frequently fielded on our mailing lists.
Install Xcode Mojave Command Line
If any of these resources do not answer your questions or if you need any kind of extended support, there are many ways to contact us!
0 notes
Text
Sketchbook Pro For Mac

Sketchbook Pro For Mac
Sketchbook Pro 2020 Mac
Autodesk SketchBook Pro Enterprise 2021 v8.8.0 Best Advanced Painting And Drawing Software free. download full Version. Drawing app for creative professionals. SketchBook drawing and painting software provides designers, architects, and concept artists the tools to sketch ideas quickly and create beautiful illustrations. Available for most platforms and devices. Capture ideas and iterate quickly with SketchBook digital sketching, painting, and drawing software apps. Also, Check out Sketchup Pro Full Version for Mac.
Ideate and design with
Autodesk SketchBook pro Mac cracked version – Autodesk SketchBook Pro is a professional Mac The drawing Mac cracked app, produced by Autodesk, can turn your computer into a digital drawing board. You can use the handwriting pad to draw. Photo artista oil apk. Autodesk SketchBook Pro for Mac is a professional-grade paint and drawing application.
SketchBook pro mac. Capture your inspiration on any device, wherever you are, with the SketchBook drawing and painting app. Quickly iterate ideas and develop them into beautifully rendered concepts. Natural drawing experience. Use the minimalistic interface across Mac, iOS, and Android with a single subscription. Unlimited brushes. Tweak over 140 standard brushes, create new brushes, or import brushes designed by professional artists. Work with layers naturally. Add unlimited layers with blending modes and layer grouping. Import/Export layered PSD. Use SketchBook as part of a workflow that requires interoperability with other apps.
Predictive stroke uses predictive stroke to smooth line work and correct basic shapes to circles, triangles, and rectangles. Four symmetry dimensions draw with X, Y, XY, and up to 16-sector radial symmetry for perfectly symmetrical designs. Rulers and guides. Usefully adjustable rulers, ellipse guides, and French curves for precision drawing. Custom perspective guides. Snap every stroke to an on- or off-canvas vanishing point with 1-, 2-, 3-, and 5-point (fish-eye) perspective. Scan sketch with mobile. Use a phone or tablet to scan your sketch to import as transparent linework with color data. Copic Color Library. An exclusive digital Copic Color Library with matching Copic Marker default brushes. Flipbook animation. Create simple animations with up to 4 layers. Distort transform. Easily distort your illustration to fix perspective and proportions.
The Feature of Autodesk SketchBook Pro for Enterprise For MacOS:
Natural drawing experience.
Work with layers naturally.
Import/Export layered PSD.
Unlimited brushes.
Predictive stroke.
Four symmetry dimensions.
Rulers and guides.
Custom perspective guides.
Scan sketch with mobile.
Copic Color Library.
Flipbook animation.
Distort transform.
System Requirement of Autodesk SketchBook Pro Enterprise 2021 for Mac:
Mobile version 4.1 iOS:
iOS 10.0 or later.
The app is optimized for iPad 4, iPhone 5, iPhone 5C, iPhone 5s, iPhone 6, iPhone 6 Plus, and iPhone SE.
The app is also optimized for the iPod touch (6G).
iPad mini 2+, iPad Pro, and iPad Air.
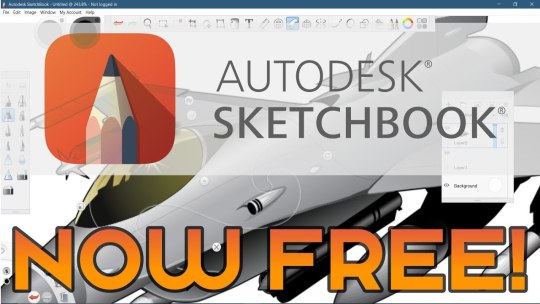
Mobile v4 ++ Android:
Android OS 4.0.3 and higher.
They are optimized for phones and tablets.
Supported styluses: Samsung S Pen and Wacom Stylus for Cintiq Companion Hybrid.
Decibel. Note: Chrome books can run the Android version of SketchBook Mobile from the Play Store. Though we recommend using a tablet, due to the Chromebook’s lack of drivers, you won’t experience pressure-sensitivity, which is one thing that sets SketchBook apart from other drawing apps.
Sketchbook Pro For Mac
Autodesk SketchBook Pro Enterprise 2021 For macOS:
To ensure Autodesk SketchBook for Enterprise runs to its potential, please ensure that your hardware meets the requirements listed for your version of Autodesk SketchBook for Enterprise and operating system:
MacOSX:
Sketchbook Pro 2020 Mac
Support Mac OS X Mavericks (10.9), Yosemite (10.10), El Capitan (10.11), or Sierra (10.12)
1 GHz Intel or AMD CPU
1GB of Memory
256 MB Graphics card with OpenGL 2.0 support
We recommend that you use a pressure-sensitive tablet and pen for basic features
How to download and Install Autodesk SketchBook into Mac OS X?

First of all, Click on the below red Download button and shift to the download Page.
On Download Page, you will have Download links and other Instruction.
Please follow the steps by step guidelines and Install your Software into your Mac OSX.
If you like our work then, don’t forget to share it with your friends and family on Facebook, Twitter, Linked In, and Reddit.
That’s It. Now enjoy.
0 notes
Text
SAMSUNG Galaxy S23+ Plus Cell Phone, Factory Unlocked Android Smartphone, 256GB Storage, 50MP Camera, Night Mode, Long Battery Life, Adaptive Display, US Version, 2023, Phantom Black

Meet Galaxy S23+, the phone takes you out of the everyday and into the epic. Life doesn’t wait for the perfect lighting, but with Nightography, you are always ready to seize the moment and snap memories like a pro. See your content no matter the time of day on a display with a refresh rate up to 120Hz and Adaptive Vision Booster. Capture and create in rich detail, and then use Quick Share**** to share across devices without losing quality. Move past the mundane and embrace epic power with Galaxy S23+. *Based on average battery life under typical usage conditions. Average expected performance based on typical use. Actual battery life depends on factors such as network, features selected, frequency of calls, and voice, data, and other application usage patterns. Results may vary. **As compared to S22+. ***Requires devices to have One UI 2.5 or later. Must be logged into the same Google account and Google Meet app must be activated on each device. ****For Galaxy-to-Galaxy or any other devices: Quick Share to Galaxy smartphones and tablets, smartphones and tablets with Android OS version 10.0 (Q) and One UI 2.1 or above requires Wi-Fi and Bluetooth connection. Quick Share to iOS and Android devices available by sending shared link: individual files shared cannot exceed 3GB (for a total of 5GB per day) and link will expire after two days; requires a Samsung account and Internet connection. For Galaxy-to-Galaxy device: Quick Share between Galaxy smartphones and tablets with Android OS version 10.0 (Q) and One UI 2.1 or above requires Wi-Fi and Bluetooth connection. For Galaxy to any other device: Quick Share to iOS and Android devices available by sending shared link; individual file shared cannot exceed 3GB (for a total of 5GB per day) and link expires after two days. Requires a Samsung account and Internet connection.
CAPTURE THE NIGHT IN LOW LIGHT: Whether you’re headed to a concert or romantic night out, there’s no such thing as bad lighting with Night Mode; Galaxy S23+ lets you capture epic content in any setting with stunning Nightography
HIGH CAMERA RESOLUTION: Create crystal-clear content worth sharing with the 50MP high-resolution camera of Galaxy S23+; Whether you’re posting or printing, Galaxy S23+ always does the moment justice
FASTEST MOBILE PROCESSOR AVAILABLE: Whether you’re working hard, playing hard or doing both at the same time, smoothly switch between apps with our fastest processor ever
UNLOCK SMOOTH GAMING: Game at full throttle and smoothly switch between apps; Get more done with our fastest processor ever combined with massive internal storage; And if you’re on the move, keep going with a screen that adapts to your environment
POWER TO KEEP MOVING YOU FORWARD: Confidently binge-watch, game or surf without worrying about your phone dying; The impressive 4,700mAh battery* will keep you going longer**
MORE STORAGE. MORE MEMORIES: You’re good on storage space; With an impressive amount of storage, starting at 256GB, you can enjoy being behind the camera without the stress that comes with getting close to filling up your phone
ADAPTIVE DISPLAY: Watch your content comfortably as Adaptive Vision Booster helps your screen adapt to your environment; Whether out in direct sunlight or in bed with the lights off, the contrast on Galaxy S23+’s expansive screen still looks amazing
CONVENIENT COLLABORATION: Whether you’re having a video meeting with your team or your friends, use Google Meet to start a video chat on your Tab*** and then continue the call on your phone as you head out the door
QUICK SHARE: Send even your largest files**** — whether it’s cute puppy videos or work documents — between your Galaxy S23+ and any iOS or Android device; Quick Share helps minimize frustration when sharing the epic
Read the full article
0 notes
Photo

Vloggers 360° Auto Face & Object Tracking Smartphone Mount Holder (Supports iOS and Android) 📢 Price 👉QAR 89 Only! Buy Now: https://tuzzut.com/3JvFLRtvxQoJGNU #Features ▶️All-in-one Auto Smart Shooting Selfie Stick Phone Mount : Auto Facial Tracking Technology , Perfect for Selfie Photos and Video. ▶️Face tracking & intelligent shooting : Phone Rotates 360° to follow you and keep you centered in the frame when shooting video or taking pictures,Take selfies and no longer ask for help. It is perfect to Vlogging , Live Video , Family Vacation ect. ▶️How it works: First, download the software APAI GENIE with your mobile phone, without registering, open the APAI GENIE, then turn on the power on key, keep holding the power on key for 5 seconds, the red light is on, turn on the Bluetooth of your mobile phone, and then connect automatically. Made for iPhone and Android (Support system iOS 10.0 and later, Android 8.1 and later).m iOS 10.0 and later, Android 8.1 and later). ▶️Function: Maximize your smartphone camera's capability with 360 degrees object tracking, smart capture and many more functions. No more begging and bribing friends to take your picture or film your video. 1/4" Thread Tripod Mountable ▶️The device will not support other applications aside from the App that comes with the device to capture Video and Pictures. ▶️Support IOS/Android . ▶️ Required: 3pcs +AA Battery https://wa.me/97474439887 📲 Whatsapp us on : +974 74439887 🛍🛒 💵 Pay cash on Delivery 💵 Delivery Charge applicable🛵 #OnlineQatar #OfferSale #Qatar #Dohasale #qatarshopping #tuzzut #tuzzutQatar #apaigenie (at Doha) https://www.instagram.com/p/CPITJcfgPzC/?utm_medium=tumblr
0 notes
Text
Media Player For Mac Plex

Devices and Mac OS X version
Plex Media Player For Mac 10.7.5
Mac Plex Client
Plex 4 includes a mini-player for browsing new content while you’re in the middle of a playing video. There’s never been a better time to try Plex for iOS since the app is now free. Turn a Mac mini into a media server with Plex If you have a large media collection, you may want to use a Mac as a dedicated device to run Plex. And the Mac mini is a perfect device for Plex. Plex Media Player for Mac. 7,004 downloads Updated: May 26, 2020 Freeware. Review Free Download specifications changelog 100% CLEAN report malware. Media center application that offers you the possibility to navigate and view the content of your Plex server in a streamlined manner. 'The Warner Bros. Movies and TV shows will likely be just the beginning of Plex’s ad-supported content, as the company plans on working with additional media partners to expand its catalog. So while the main draw of the app will still be the ability to stream a personal media library, it may eventually become a centralized app for on-demand.
VLC media player requires Mac OS X 10.7.5 or later. It runs on any 64bit Intel-based Mac. Previous devices are supported by older releases.
Note that the first generation of Intel-based Macs equipped with Core Solo or Core Duo processors is no longer supported. Please use version 2.0.10 linked below.
Web browser plugin for Mac OS X
Support for NPAPI plugins was removed from all modern web browsers, so VLC's plugin is no longer maintained. The last version is 3.0.4 and can be found here. It will not receive any further updates.
Older versions of Mac OS X and VLC media player
We provide older releases for users who wish to deploy our software on legacy releases of Mac OS X. You can find recommendations for the respective operating system version below. Note that support ended for all releases listed below and hence they won't receive any further updates.
Mac OS X 10.6 Snow Leopard
Use VLC 2.2.8. Get it here.
Mac OS X 10.5 Leopard
Use VLC 2.0.10. Get it for PowerPC or 32bit Intel.
Mac OS X 10.4 Tiger
Mac OS X 10.4.7 or later is required
Use VLC 0.9.10. Get it for PowerPC or Intel.
Mac OS X 10.3 Panther
Plex Media Player For Mac 10.7.5
QuickTime 6.5.2 or later is required
Use VLC 0.8.6i. Get it for PowerPC.
Mac OS X 10.2 Jaguar
Mac Plex Client
Use VLC 0.8.4a. Get it for PowerPC.
Mac OS X 10.0 Cheetah and 10.1 Puma
Use VLC 0.7.0. Get it for PowerPC.
The media managing and streaming service Plex has rolled out a new app today, and it might mean some painful adjustments for long-time users. Starting today, there’s a new Plex desktop app for both Windows and macOS — this will replace the existing Plex Media Player client. That marks the end of old-fashioned HTPC support for Plex.
For the uninitiated, Plex is a media player platform that organizes video, music, photos, and other media. You can link Plex to files stored on computers, servers, NAS boxes, and even mobile devices. Plex streams all that media on-demand, even transcoding it on the fly as necessary. Technically, you’re only supposed to be using it for media that you own and have backed up, which is already a gray area. However, it’s also popular with the torrent crowd.
The new Plex desktop app supports most of Plex’s existing features and improves a few others. As Plex users can tell you, the “Sync” option for offline downloads has been abysmally slow and buggy for a long time. With the new desktop app, that feature gets a makeover as “Downloads.” It’s faster, more reliable, and gives clearer feedback while content is being saved. The interface is also consistent with other Plex clients with one notable exception: TV mode.
Years back, the most common Plex implementation was to attach a home theater PC (HTPC) to a TV to stream media. With the proliferation of cheap streaming devices like the Chromecast, Apple TV, and Fire TV, almost no one bothers with HTPCs anymore. Thus, Plex is retiring the TV interface with the launch of its new desktop app. This will, no doubt, upset some Plex fans nonetheless.
What about the old Windows app? The version of Plex in the Windows Store will be retired, but that’s no great loss. According to Plex, developing a Windows Store client made sense in the past as Windows Phone existed in some capacity. Today, developing for the Metro/Modern UI platform is not a good use of resources, Plex says.
If you don’t want to give up the classic Plex Media Player client, it’ll be updated through January 30, 2020. You can keep using it, but it’ll probably break before long without updates. The new Plex desktop apps are available for free. Some features like mobile sync, live TV, and more are locked behind the “Plex Pass” premium subscription.
Now read:
0 notes
Last Seen Blogs

rnqccdn72410
석문면출장마사지

carlesbaiges
Urban Sociology

ectotoxic
Ectotoxic

keits-posts-blog
goddes

the-prince-of-light-fan
Untitled