#Tutorial logic Pro x
Explore tagged Tumblr posts
Visit Tumblr Blog
Explore Tumblr blogs with no restrictions, modern design and the best experience.
Last Seen Tumblr Blogs


Fun Fact
130K people were victims of a chain letter scam that affected Tumblr in May 2011.
Text
My latest article for Music Radar takes a look at Logic Pro's new plugin Beat Breaker. This plugin is super-fun and creative, and well worth checking out.
#music production#musicproduction#music producer#musicproducer#logic pro#logicpro#logic pro x#logicprox#tutorial#musicianlife
4 notes
·
View notes
Video
youtube
Midicake Arp Tutorial # 3 ( For Newbies) Using THIS w/LOGIC PRO X /WILD ...
0 notes
Text
**The Ultimate Guide to Producing Hip Hop Music: Hardware and Software Essentials**
As a hip hop producer, you’re about to embark on a journey to create the next big hit. To get started, familiarize yourself with the hardware and software tools used in the production process. In this comprehensive guide, we will cover the essential hardware and software tools, as well as provide tips on how to combine them to produce high-quality hip hop and rap tracks.
---
### **1. Hardware Essentials**
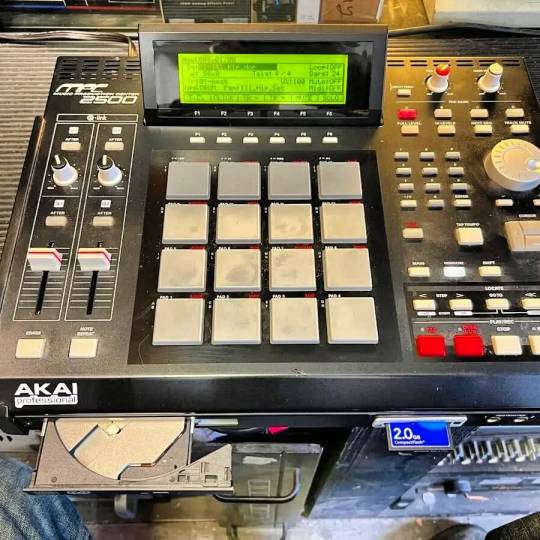
**1.1 MPCs (Akai Pro MPC Series)**
The MPC (Music Production Center) is a legendary sampler and sequencer that has been a staple in hip hop production for decades. The Akai Pro MPC series, including models like the MPC X, MPC Live, and MPC One, offer a myriad of features such as sampling, sequencing, and effects processing. These devices allow producers to create intricate beats and seamlessly blend samples with original material. **Tip**: Experiment with different sampling techniques to find your unique sound.
**1.2 Groove Boxes (Korg Electribe, Roland SP-404, etc.)**
Groove boxes are compact and portable devices designed for creating beats, sequences, and samples on the go. Popular choices among hip hop producers include the Korg Electribe and Roland SP-404. These devices often come with built-in sounds and effects, making them perfect for live performances or quick jam sessions. **Tip**: Use groove boxes for sketching out ideas quickly when inspiration strikes.
**1.3 Drum Machines (Roland TR-808, TR-909, etc.)**
Drum machines are fundamental tools within hip hop production. The Roland TR-808 and TR-909 are iconic machines that have appeared in countless hit tracks. Their distinct sounds can give your beats that classic hip hop flavor. **Tip**: Layer different drum sounds and tweak their envelopes to create a punchier kick or snappier snare.
**1.4 Turntables and Vinyl**
Vinyl records and turntables remain an essential component of hip hop culture. Many producers use turntables to sample and scratch records, adding a unique rhythmic element to their tracks. **Tip**: Explore various genres of vinyl records for sampling; sometimes unexpected sounds can lead to unique beats.
**1.5 MIDI Controllers (Native Instruments Maschine, Novation Launchpad, etc.)**
MIDI controllers provide a hands-on approach to controlling virtual instruments and effects in your DAW. Devices like the Native Instruments Maschine and Novation Launchpad are popular among hip hop producers for their versatility. **Tip**: Utilize pads for finger drumming to capture a more organic feel in your beats.
---
### **2. Software Essentials**
**2.1 DAWs (Ableton Live, FL Studio, Logic Pro, etc.)**
Your Digital Audio Workstation (DAW) is the heart of your production setup. Ableton Live, FL Studio, and Logic Pro are three of the most popular DAWs used in hip hop production. Each DAW has its strengths; for instance, Ableton Live is favored for its session view for live performances, while FL Studio is known for its intuitive interface and powerful step sequencer. **Tip**: Take advantage of the built-in tutorials and communities surrounding each DAW to enhance your workflow.
**2.2 Virtual Instruments (Native Instruments Kontakt, Serum, etc.)**
Virtual instruments provide an expansive palette of sounds for hip hop production. Software like Native Instruments Kontakt and Serum allows you to design and manipulate sounds, offering endless creative possibilities. **Tip**: Incorporate sound design techniques to craft unique sounds that set your tracks apart.
**2.3 Effects Plugins (iZotope Ozone, Waves, FabFilter, etc.)**
Adding effects and processing to your tracks is crucial for achieving a professional sound. Plugins from iZotope Ozone, Waves, and FabFilter offer tools for mixing and mastering your music. From EQs and compressors to reverb and delay, these plugins can help you shape your sound effectively. **Tip**: Use reference tracks to guide your mixing choices and ensure your sound fits within the genre.
---
### **3. Combining Hardware and Software**
The key to successful hip hop production lies in effectively combining your hardware and software. Here are some tips on how to do this:
- **Integration**: Connect your hardware instruments to your DAW via MIDI or audio interfaces for seamless interaction. This allows you to trigger sounds from your hardware while recording in the software.
- **Layering Sounds**: Utilize hardware samplers like the MPC to create base beats, and then enhance those beats using virtual instruments or effects within your DAW.
- **Live Performance**: Incorporate groove boxes or MIDI controllers during live performances to engage your audience and add spontaneity to your set. This can create a unique atmosphere and make each performance special.
- **Experimentation**: Don't be afraid to mix and match hardware and software. Use a MIDI keyboard to play samples from your MPC, or sample your virtual instruments on your groove box. The possibilities are endless.
---
By understanding and utilizing the right hardware and software tools, you’ll be well-equipped to navigate the world of hip hop music production. Remember, the most important aspect is to experiment, find your unique voice, and have fun while crafting your beats. Now go create your next big hit!
7 notes
·
View notes
Text
Logic Pro Sampling: A Comprehensive Guide from Beginner to Advanced Techniques
youtube
Masterful sampling, in Logic Pro is a skill for music creators that opens up doors to creativity and originality in crafting music tracks.This comprehensive tutorial delves into an array of sampling methods for everyone from novices, to experts and offers detailed guidance to elevate your music production journey with confidence.
📊 Step 1: Understanding the Importance of Sampling
Sampling is a pivotal technique in music production, influencing genres from hip-hop to electronic music. It allows producers to infuse their tracks with creativity and originality. Understanding sampling is not just about using existing sounds; it’s about transforming them into something new and unique.
When you experiment with sampling music tracks, in your work or production process. Integrate them creatively into your compositions or arrangements instead of just using them as they are originally recorded or released by others in a new context to give them a unique touch that resonates with the audience more profoundly and emotionally on multiple levels while also bridging the gap, between past musical influences and current innovative sounds by respecting and acknowledging the musical legacy while simultaneously exploring new creative horizons and pushing artistic boundaries forward in exciting ways.
In addition, to that sampling helps streamline the workflow. Of beginning creators can expand on existing sounds leading to faster progress in creating tracks. This is especially valuable in production settings such, as dance music (EDm) and hip hop music.
⚙�� Step 2: Setting Up Your Sample in Logic Pro
When you start sampling in Logic Pro X software program, for music production purposes the first step is importing your chosen sample file into your project workspace, by dragging and dropping it where needed. Be sure to adjust the tempo of your project to guarantee that your sample blends in smoothly with the rest of your work.
After setting up your sample in the software program you can use the Quick Sampler feature, for complex editing tasks. This feature enables you to cut and reorganize your clips allow them to function similar to a MIDI instrument. You have the option to tweak settings, like pitch, loudness and length which gives you the flexibility to shape your desired sound.
Make sure you take the time to check out all the editing features, in Logic Pro software! You have the ability to add effects and tweak pitch settings or even cut samples to come up with some one of a kind sounds and styles! The important thing is to play around and discover what aligns with your ideas.
🎶 Step 3: Adjusting Sample BPM to Match Your Track
To create a sound, in your music production project using Logic Pro software and your sample track it's important to match the BPM (beats per minute). You can effortlessly synchronize the BPM of your sample by right clicking on the audio region and choosing 'Apply Project Tempo to Region'. This action guarantees that your sample will be in harmony, with the projects tempo.
To try another approach; Utilize the Flex Time option, on your track, by activating Flex and then adjusting the sample to match the BPM you want to achieve This adaptability lets you preserve the quality of the sound while making sure it syncs well with your track.
Don't forget that changing the BPM isn't, about tempo changes – it can also impact the vibe of the music itself. Lowering the speed of a sample could introduce a feel to it while ramping it up can give it a burst of liveliness. It's, about trying out things to see what works best!
✂️ Step 4: Utilizing the Cut Tool for Precision Edits
The Cut Tool, in Logic Pro is incredibly useful for making edits to your tracks! Simply press' T '. Choose the Cut Tool from the toolbar to access it easily and start slicing your audio into sections, for more detailed editing work.
After trimming the file to your liking you have the option to rearrange sections or remove any parts. This technique is especially handy, for crafting loops or selecting snippets from an audio recording. Careful editing can greatly improve the quality of your mix.
Furthermore; you might want to try using effects, between scene cuts to achieve transitions, in your audio editing process.This method can effectively minimize any clicks and pops that may arise at the point of edits and deliver a refined sound quality.
🔄 Step 5: Duplicating and Looping Your Sample
After you have trimmed and edited your sample to your liking𝖿 it's time to make copies and repeat it° Choose the section you want to use and press Command + Đ to create a ® This method's excellent, for establishing a strong base, for your song∞
To set up a loop in your project file; mark the areas that are repeated and use the shortcut' U' to activate the loop feature, for repetition of those sections and to create a foundation, for your production work.
In music styles such, as drum and bass that rely repetition for impact and cohesion such, as creating anticipation releasing tension or keeping the momentum going through a song.
For further inspiration, check out our guide on creating a liquid drum and bass track using sampling in Logic Pro. It covers essential steps for integrating loops into your workflow effectively.
🎚️ Step 6: Employing the Slip Tool for Creative Arrangement
The Slip Tool found in Logic Pro is a tool that enables you to reorganize parts without changing their duration making it crucial, for crafting distinctive arrangements and smooth transitions, in your music compositions.
When using the Slip Tool in your editing software; first select the section you wish to adjust and hit' T' to access the tools menu.After that step choose the Slip Tool or press' T' followed by' S '. From there you can simply. Drag inside the audio region to shift the audio from its original position.This allows you to rearrange parts of your audio without impacting the timing flow.
For example; if you have a drum beat laid down, in your music production software and you start moving around the kick and snare drums to form variations; it could introduce some fresh and interesting outcomes that can help elevate the artistic appeal of your composition.
Moreover using the Slip Tool in conjunction, with editing methods such as cross fading could result in transitions between different audio parts. This is especially handy when crafting variations or repeated sections enabling a flow, in your music piece. Don't forget to explore ways to utilize the Slip Tool to unveil creative opportunities !
🔀 Step 7: Smoothing Transitions with Crossfades
Using crossfade techniques is important to improve the smoothness of your transitions as they prevent interruptions and produce a refined sound through seamlessly merging the conclusion of one audio clip, with the commencement of another.
In Logic Pro to create an effect; make sure your audio regions overlap a bit; choose the overlapping sections and go to the 'Edit" menu to select 'Crossfade'. You can also simply hold 'Command’ while dragging one clips edge onto the other for access.
Feel free to customize the duration to suit your preferences better! A lengthier crossfade will offer a transition, between tracks compared to an one that gives a more sudden change, in sound dynamics. Remember to consider the blend of your music crossfade effects can enhance the depth and overall flow of your track for a more cohesive listening experience.
Using cross dissolves is quite useful when dealing with sampled audio as it helps in creating transitions, between loops or parts of a song. For methods of audio manipulation – try out different types of fades and lengths to discover what complements your musical style the best.
🎧 Step 8: Introduction to Intermediate Sampling Techniques
Once you feel confident, with starting sampling techniques and want to dive into advanced methods for increased flexibility and creativity – one impactful method is to make use of the Quick Sampler feature available, in Logic Pro.
The Quick Sampler feature lets you bring in samples and tweak them like they're MIDI instruments. Slicing them up and adjusting pitch while adding effects to each sample to craft sound environments.
Start by bringing in a sample to the Quick Sampler tool. Then dive into using the slicing function to divide the sample into sections, for manipulation and triggering of individual slices, with MIDI notes.
To enhance your music production experience further and add depth and emotion to your quality try tweaking the speed settings for each segment to bring out dynamic shifts, in your musics tone.Also experiment with adjusting the envelope parameters to sculpt the sound over time and have more precise control, over how your music starts and fades out.
🎹 Step 9: Using the Quick Sampler for More Flexibility
The Quick Sampler, in Logic Pro is a tool, for sampling that lets you easily load and tweak sounds in time – a must have for any music producers arsenal.
To begin using the Quick Sampler tool in your project workspace; simply. Drop a file onto the interface to get started! Once the file is imported successfully into the systems library of sounds and samples; you'll have access, to a range of functions including adjusting pitch levels; stretching time durations and applying modulation effects. Essentially giving you the freedom to craft soundscapes that seamlessly complement your creations.
An important aspect is the capability to modify the pitch and speed separately, in music production software or hardware tools like samplers or digital audio workstations (DAWs). This enables users to raise or lower the pitch of a recording without altering the tempo and vice a useful feature, for trying out new sounds and exploring different musical arrangements creatively.
In addition, to that the built in effects of the Quick Sampler can help improve your samples.Try out reverb,delay and distortion to give your sound richness and personality.Being able to adjust your samples on the spot makes the Quick Sampler a valuable asset, for creating music.
🎶 Step 10: Creating MIDI Patterns from Samples
Converting samples into MIDI patterns can significantly boost your music production skills by giving you the ability to trigger samples with MIDI notes, for control over your music arrangement.
Begin by bringing your selected sample into Logic Pro to craft MIDI patterns from it using the Quick Sampler to tune the sample settings according to your key before starting the process of creating a MIDI pattern composition.
Access the Piano Roll editor. Manually input your MIDI notes corresponding to sections of your sample, in Quick Sampler to craft melodies and rhythmic arrangements using the sample slices.
Moreover you can use MIDI effects, like arpeggiators or quantization, on your patterns to enhance the intricacy and diversity of your track. This technique boosts creativity. Creates a lively and captivating listening experience.
For those, with experience in music production you may want to try layer samples to add depth and richness to your soundscapes. Experiment, with blending samples and MIDI patterns to craft musical concepts that will make your tracks shine.
🎵 Step 11: Manipulating Velocity for Dynamic Sampling
Adjusting the speed of notes or samples is key, in the art of sampling as it adds a touch of liveliness, to your music creations and helps bring out more emotion and variation in your performance.
Lets begin by choosing the MIDI section with your samples, in it. Next step is to open the Piano Roll editor that displays all the notes individually. You can modify each notes intensity by moving the velocity markers either up for notes and down, for tones. Higher velocities result in sounds and lower velocities create tones.
Try changing up the speeds to make it sound more natural! For example when you're making drum beats on a computer program think about making the kicks a bit, than the snares. This will give your rhythm depth. Make it feel more real. Also when working on melodies try tweaking the speeds to capture the details you'd hear in a performance.
When you're arranging samples together in your music production processs remember to mix up the speeds a bit! By adjusting the velocities of samples rather than keeping them uniform throughout can help in steering clear of a flat sound and bring depth to your mix instead! This method works wonders in music styles such, as hip hop where having a range of dynamics can truly make a difference, in how impactful the final product turns out to be.
🎹 Step 12: Advanced Sampling Techniques Explained
Exploring sampling methods, in Logic Pro provides a range of creative opportunities for musicians and producers alike." Resampling stands out as an technique; it involves the manipulation of existing audio samples to craft fresh and innovative sounds that add a unique touch, to your music projects."
Start by choosing the track you wish to adjust and adding any effects as needed.Once you are happy, with the quality bounce it to generate a file.This fresh file allows for modifications such, as adjusting pitch and tempo or applying effects.
Another method that can be used is to overlay samples on top of each other for an intricate outcome, in terms of both texture and sound variety in your music production work.In one instance simultaneously using synth samples can enrich the feel and quality of your music piece.To prevent any clash, between the layers its recommended to utilize EQ adjustments to tailor each layer accordingly so that they harmonize well together.
Furthermore,you might want to try out the Flex Pitch function, in Logic Pro,which offers pitch adjustment and manipulation options that can help you craft vocal chops or modify the pitch of instruments to your liking.The secret is to play around with it and discover combinations that align with your creative vision.
🎼 Step 13: Crafting Unique Sounds with Single Notes
Creating sounds, from notes is an amazing method to broaden your range of sonic possibilities. When you focus on a note and experiment, with effects and processing methods you have the potential to generate completely fresh sounds.
Begin by choosing a musical note example and bringing it into Logic Pro software program. Utilize either the Sampler or Quick Sampler feature to upload the note and delve into the options at your disposal. Tweak settings, like pitch control, filter cutoff point and envelope adjustments, to sculpt the sound according to your preferences.
For example; you could try using a low pass filter to give your tone a quality or opt, for a high pass filter to highlight the higher frequencies in the music you're working on! Adding some modulation effects such, as chorus or phaser can bring some changes and richness to the sound you're aiming for.`
Another method worth trying is flipping the sample around to see what happens! This can bring out textures. Produce some unexpected outcomes that might just surprise you! Just highlight the audio section you want to flip with a right click and select "Reverse." You might discover that reversed samples blend seamlessly into your composition and bring a touch of unpredictability to your music.
🎛️ Step 14: Applying Effects and Filters for Final Touches
In the sampling processs conclusion lies the application of effects and filters that refine your sound and seamlessly blend it into your music tracks fabrications.Logic Pro provides an array of effects to enrich your samples and breathe vitality into your vision.
Begin by using an equalizer (EQ) to adjust the sound of your samples in terms of response. Employ a parametric EQ to reduce frequencies and amplify areas that require improvement. This step is crucial when combining samples as it ensures that each component fits harmoniously within the mix.
Consider adding some reverb to give your samples a feeling of space and depth – a little can make them sound more connected while a longer reverb can add ambiance and dimension.
Other things to consider are delay, distortion and modulation. Each of these can change your samples in ways so it's worth experimenting. For example applying distortion to a sample can give it a texture while using delay can introduce some rhythmic flair.
❓ FAQ: Common Questions about Logic Pro Sampling
What is sampling in Logic Pro? Sampling in Logic Pro involves capturing audio clips and manipulating them to create new sounds or musical elements.
How do I import samples into Logic Pro? You can drag and drop audio files directly into your Logic Pro project or use the File menu to import samples.
Can I edit samples in Logic Pro? Yes, Logic Pro provides powerful editing tools, including time stretching, pitch shifting, and various effects to manipulate samples.
What are some tips for effective sampling? Always consider the context of your samples, utilize velocity for dynamics, and experiment with layering and effects for unique sounds.
Is it legal to use samples from other artists? Ensure you have the necessary permissions or licenses to use samples from other artists to avoid copyright issues.
For more insights into sampling and production techniques, check out our other blogs on making liquid drum and bass and creating hip-hop beats.
0 notes
Text
The Role of Technology in Music Production
Music production has evolved significantly over the years, and technology plays a pivotal role in shaping how music is created, produced, and shared today. From beginner musicians to seasoned producers, understanding the tools and platforms available can make the difference between a mediocre track and a hit. Central to the creative process are key elements such as a well-thought-out song set up, efficient use of technology, and leveraging music platforms for inspiration. This article explores how technology influences music production and how you can utilize tools like Instamusic download, learn how to view lyrics on Spotify, and make the most of platforms like Wynk Music online login to enhance your production skills.
Setting Up Your Song for Success
A well-organized song set up forms the foundation of any successful music production. Whether you’re working on a simple acoustic track or a complex electronic piece, how you set up your session can determine the efficiency and quality of your work. Modern Digital Audio Workstations (DAWs) such as Ableton Live, FL Studio, or Logic Pro X allow producers to create detailed song templates. These templates ensure that every instrument, effect, and track is logically arranged before you start creating.
Technology has made it easier than ever to streamline your workflow. For example, tools like drag-and-drop sample integration and MIDI mapping save countless hours of setup time. Platforms such as Instamusic download provide a wide variety of audio loops, samples, and effects that you can instantly incorporate into your song. These tools not only simplify the process but also open the door to experimentation and creativity.
Learning Music Production Through Technology
If you’re new to music production, figuring out how to learn music production can feel like a daunting task. Thankfully, technology offers countless resources to help you get started. Online tutorials, YouTube channels, and even apps have democratized access to knowledge that was once reserved for professionals. Websites like Coursera and Skillshare offer structured courses on everything from basic audio mixing to advanced sound design.
For hands-on learners, apps like Instamusic download are invaluable. These apps allow you to experiment with professional-quality samples and loops without needing expensive hardware. Furthermore, they often include tutorials that guide you through the process of creating beats, layering tracks, and applying effects.
Practice is essential, and technology makes practicing accessible and fun. Virtual instruments, for instance, give you access to a vast array of sounds without requiring physical instruments. Tools like drum pads, synthesizers, and samplers available in software can help you hone your skills and develop a unique sound.
The Importance of Lyrics in Music Production
Lyrics are an integral part of many musical compositions, and technology has made it easier to analyze and incorporate them into your work. Understanding how to view lyrics on Spotify is a game-changer for aspiring songwriters and producers alike. Spotify’s lyric feature allows you to follow along with the words while listening to a track, giving insight into the structure, rhyme schemes, and emotional delivery of the song.
For producers, studying lyrics is more than just reading the words—it’s about understanding how they interact with the music. Tools like lyric analyzers and songwriting apps can help you identify patterns and develop your own writing style. Whether you’re crafting a pop hit or an introspective ballad, the right lyrics can elevate your track and resonate with your audience.
Using Platforms for Inspiration and Learning
Music platforms like Wynk Music online login offer a treasure trove of tracks to inspire your music production journey. Wynk Music provides access to an extensive library of songs spanning genres and languages. Whether you’re studying a particular artist’s discography or exploring a new genre, having easy access to diverse music is invaluable for producers.
What sets Wynk Music apart is its user-friendly interface and seamless integration with playlists. You can create curated playlists to study specific production techniques, song structures, or vocal styles. By listening actively, you’ll develop an ear for the nuances that make a track stand out.
Additionally, platforms like Wynk Music are not just for listening—they’re for networking too. Many producers and musicians use these platforms to showcase their work and collaborate with like-minded creators. Leveraging these platforms for networking can open doors to exciting opportunities in the music industry.
Integrating Technology into Your Workflow
A seamless integration of technology into your workflow can maximize efficiency and creativity. Start with your song set up—organize your tracks, assign specific roles to each instrument, and label everything for quick navigation. Tools like templates and presets save time, allowing you to focus on the creative aspects of production.
Use apps like Instamusic download to access high-quality sounds that fit your style. Whether you’re producing hip-hop, electronic, or rock music, these samples can provide the inspiration you need to overcome creative blocks.
When working with lyrics, take advantage of platforms like Spotify. Learn how to view lyrics on Spotify to study the storytelling techniques of great songwriters. Combine these insights with your production skills to craft songs that are both musically and lyrically compelling.
Finally, platforms like Wynk Music online login provide a comprehensive resource for discovering, studying, and sharing music. Use these platforms to stay updated on trends and expand your understanding of global music styles.
Conclusion
Technology has revolutionized the music production landscape, offering tools and platforms that empower creators at every level. By optimizing your song set up, exploring apps like Instamusic download, and learning how to view lyrics on Spotify, you can streamline your workflow and enhance your creative process. Platforms like Wynk Music online login further enrich your journey by providing access to an expansive library of music.
The key to mastering music production lies in embracing these technologies while staying true to your artistic vision. With practice, dedication, and the right tools, you can transform your ideas into compelling, professional-quality tracks.
0 notes
Text
5 Essential Home Recording Tips to Keep Musicians Engaged During Lockdown
The COVID-19 pandemic has drastically changed the way musicians operate, with limited access to professional studios and fewer opportunities for in-person collaborations. Yet, even with the challenges of lockdown, this time can be incredibly productive. Many musicians have turned to home recording as a powerful way to continue creating, experimenting, and developing their sound. Working from home isn’t just a makeshift solution; it’s a valuable skill set that musicians can carry forward well beyond the pandemic. Fortunately, there are numerous ideas to keep musicians engaged during the coronavirus through DIY home recording, from setting up an affordable studio space to experimenting with recording software and enhancing sound quality. In this article, we’ll delve into practical tips that can turn any home into a creative recording studio, empowering musicians to capture and produce music on their own terms.
1. Set Up a Dedicated Recording Space
One of the first steps in home recording is creating a dedicated workspace that is free from distractions and optimized for recording. While it’s ideal to have a separate room, even a small corner can be transformed into a functional recording space. Choose an area away from heavy foot traffic, street noise, and other sound disruptions.
Tips for Success:
Use curtains, carpets, or foam panels to absorb sound and reduce echo.
Invest in a comfortable chair and an ergonomic desk setup, as recording sessions can be long.
Organize your equipment for easy access and a clutter-free space.
Creating a designated workspace not only improves the quality of your recordings but also helps put you in the right mindset, making it easier to focus on your music.
2. Invest in Affordable, Quality Recording Gear
Quality recording equipment doesn’t have to break the bank. While professional studio gear can be expensive, there are affordable options that can produce high-quality recordings. Start with essential equipment such as a condenser microphone, audio interface, and headphones. Condenser microphones, in particular, are ideal for capturing vocals and acoustic instruments with clarity.
Recommended Gear for Beginners:
Microphone: The Audio-Technica AT2020 and Rode NT1-A are excellent starter microphones for home recording.
Audio Interface: The Focusrite Scarlett series offers affordable and high-quality audio interfaces.
Headphones: Consider closed-back headphones like the Audio-Technica ATH-M50x to accurately monitor your sound without leakage.
Investing in quality starter gear allows musicians to capture a professional sound from home. This gear also serves as a foundation that can be upgraded over time, making it a worthwhile investment.
3. Learn Your Digital Audio Workstation (DAW)
Mastering a DAW is one of the most empowering skills a musician can acquire. A DAW, or Digital Audio Workstation, is the software used for recording, editing, and producing music. Popular DAWs include Ableton Live, Logic Pro X, Pro Tools, and GarageBand, which vary in complexity and price. Learning the ins and outs of a DAW takes time but provides musicians with complete control over their sound.
Tips for Success:
Start with the basics: Learn how to record, edit, and layer tracks.
Watch online tutorials to improve your skills gradually.
Experiment with plugins and effects to create unique sounds and textures.
For musicians, learning a DAW is a game-changer—it’s a tool that enables endless creativity and independence, allowing artists to produce music without depending on external resources.
4. Experiment with Different Recording Techniques
One advantage of home recording is the ability to experiment freely with different techniques. Musicians can try close-miking, room miking, or layering multiple takes to add depth to a track. Experimenting with microphone placement, for example, can dramatically change the tone and feel of a recording.
Techniques to Try:
Close-Miking: Place the microphone close to the sound source to capture detailed sound, ideal for vocals or acoustic guitar.
Double Tracking: Record two takes of the same part and layer them to create a fuller, more powerful sound.
Ambient Recording: Use room mics to capture natural room reverb, adding a sense of space to your tracks.
These techniques allow musicians to explore new dimensions of sound. By learning to record effectively from home, artists can capture high-quality demos or even full tracks ready for distribution.
5. Focus on Mixing and Mastering Skills
The mixing and mastering process is critical to creating polished, professional-sounding music. Mixing is where musicians adjust volume levels, panning, and equalization to balance the elements of a track. Mastering is the final step, where the track is prepared for distribution by enhancing its overall sound quality and volume.
Mixing and Mastering Basics:
Balance Levels: Ensure vocals and instruments sit well in the mix without overpowering each other.
Use EQ and Compression: Equalization and compression are essential tools to shape the sound and add clarity.
Final Polish: Use mastering tools to enhance the overall volume and ensure your track sounds great on all devices.
While mixing and mastering require practice, these skills elevate a musician's work to a professional level. Fortunately, there are many online resources and courses to help musicians get started with these techniques.
6. Engage with Online Communities and Get Feedback
A major part of the recording process is sharing music with others and receiving constructive feedback. Joining online communities and music forums gives musicians the opportunity to share their recordings, get tips, and learn from fellow artists. Platforms like Reddit’s r/WeAreTheMusicMakers, SoundCloud, and BandLab provide spaces for feedback, inspiration, and support.
Tips for Success:
Share your work regularly to track progress and improvements.
Seek specific feedback on areas like vocal clarity, instrument balance, and overall mix.
Engage with other artists and offer feedback to foster connections.
These interactions provide encouragement and inspiration, which are invaluable for musicians working from home.
7. Utilize Music Distribution Platforms to Share Your Work
After recording and refining their music, musicians may wish to distribute it. Platforms like Deliver My Tune offer an accessible way to release music on streaming platforms, expanding a musician's reach and allowing them to share their work with a global audience. Having their music available for streaming provides artists with valuable exposure and even potential income.
Tips for Success:
Optimize your artist profile with engaging images and a well-written bio.
Encourage fans to listen, share, and add your tracks to playlists.
Track your streaming analytics to learn what resonates with listeners.
Conclusion Home recording can be a rewarding way to remain engaged, creative, and productive during the pandemic. By setting up a dedicated space, investing in quality gear, mastering a DAW, and refining mixing and mastering skills, musicians can create high-quality recordings from the comfort of their own homes. In fact, the skills gained in home recording can serve as an invaluable asset for musicians even after the pandemic. These ideas to keep musicians engaged during the coronavirus are not only about filling the time but about building a foundation that strengthens their craft.
Platforms like Deliver My Tune offer tools and services to help musicians distribute their music, allowing artists to reach new audiences and make the most of their creative efforts. Embracing home recording and distribution platforms helps musicians remain active and inspired, even during the challenging times of COVID-19. By continuing to record, learn, and share, musicians can build momentum and set themselves up for future success.
0 notes
Text
📁 Logic Pro X and Garageband analysis for UTAU.

Now that we've talked about recommended recording methods, let's move onto answering questions about using the optimized DAWs (Digital Audio Workstation) on MacOS.
MacOS has two DAWs, Garageband and Logic Pro X (LPX). Garageband is the free DAW that comes with most Macintosh computers, while LPX is their state of the art $200 DAW. For myself, I recently invested in it earlier this year, and mainly use it for mixing my UTAU covers, but for this tutorial, I will be showing you how to record and export an UTAU voicebank using LPX. Why? Just in case you want to LPX for the most, and since it is possible, I will show you how! Though, before continuing, for the most comfortable recording experience, please refer to my Recstar tutorial .
Garageband - Mac , iOS
Logic Pro X - Mac , iOS
*( The iOS build is only compatible with iOS 17.5, and certain hardware. Please check your model of your tablet or computer before purchasing.)
Very quickly, I will add that while it is not impossible, it would be extremely tedious to make an UTAU in Garageband as there is no batch exporting feature. So, if you recorded in Garageband, please refer to my Audacity labeling tutorial coming soon!
1. For recording in LPX, you will want to open your recording list in Textedit. *(If you missed my tutorial on recording lists, click here!)
2. During recording, it is recommended that you enable the metronome. You can adjust the metronome settings by right-clicking the icon. For this method, you will need to separate the recordings by hand, or, record each individually on the same track.
3. After recording all of your samples, you will need to name each sample by right-clicking the sample in the track region. Each track should be renamed after their alias on the reclist.
4. After renaming all the samples, create a folder where you will compile your UTAU’s samples. Now the bank is configuration ready!
1 note
·
View note
Text
How to Make Your Own Music: A Beginner’s Guide

Creating your own music can be a fulfilling and exciting journey. With advancements in technology, it’s easier than ever to produce high-quality music from the comfort of your home. Whether you’re an aspiring musician or just looking to explore a new hobby, this guide will walk you through the essentials of making your own music. We’ll cover everything from setting up your home studio to mastering your final track, ensuring you’re equipped with the knowledge and tools to create music that truly reflects your artistic vision.
1. Setting Up Your Home Studio: Your home studio is the foundation of your music production journey. Here’s how to get started:
a. Choose the Right Space: — Location: Select a quiet room or corner where you can work without interruptions. An isolated area will help minimize external noise, making it easier to record clean audio. — Comfort: Ensure your workspace is comfortable, as you’ll be spending a lot of time here. Good lighting, comfortable seating, and proper ventilation are essential.
b. Essential Equipment: — Computer: Invest in a reliable computer with sufficient processing power and storage. Macs are popular among musicians, but PCs can also be highly effective. — Audio Interface: An audio interface is crucial for converting analog signals (like your voice or guitar) into digital audio that your computer can process. Popular options include Focusrite Scarlett and PreSonus AudioBox. — Microphone: A quality microphone is essential for recording vocals and instruments. For beginners, a condenser microphone like the Audio-Technica AT2020 is a great choice. — Headphones: Invest in a pair of studio headphones to monitor your recordings accurately. The Sony MDR-7506 and Audio-Technica ATH-M50x are popular choices. — MIDI Keyboard: A MIDI keyboard allows you to play and record virtual instruments. Options like the Akai MPK Mini and Novation Launchkey are compact and versatile.
c. Acoustic Treatment: — Soundproofing: To prevent external noise from interfering with your recordings, consider basic soundproofing measures like foam panels, bass traps, and diffusers. — Room Acoustics: Improve the acoustics of your room by strategically placing acoustic panels and bass traps. This helps to reduce unwanted reflections and echoes, ensuring a cleaner sound.
2. Understanding Digital Audio Workstations (DAWs): A Digital Audio Workstation (DAW) is the software you’ll use to record, edit, and produce your music. Here’s what you need to know:
a. Popular DAWs: — Ableton Live: Known for its versatility and powerful features, Ableton Live is great for both live performances and studio production. — FL Studio: Popular among electronic music producers, FL Studio offers a user-friendly interface and a wide range of built-in instruments and effects. — Logic Pro X: Exclusive to Mac users, Logic Pro X is a comprehensive DAW with advanced features and a large sound library. — GarageBand: A free DAW for Mac users, GarageBand is an excellent starting point for beginners.
b. Choosing the Right DAW: — Budget: Some DAWs offer free versions or trial periods. Evaluate your budget and consider investing in a DAW that suits your needs. — Experience Level: If you’re a beginner, opt for a user-friendly DAW with plenty of tutorials and support. — Musical Style: Some DAWs are better suited for specific genres. Research which DAW is best for the type of music you want to create.
c. Basic Features: — Track Recording: Record multiple audio and MIDI tracks. — Editing: Cut, copy, paste, and manipulate your recordings. — Mixing: Adjust levels, panning, and add effects to create a balanced mix. — Virtual Instruments: Use built-in instruments to create melodies, harmonies, and rhythms.
3. Music Theory Basics: Understanding music theory is crucial for creating cohesive and compelling music. Here are the essentials:
a. Scales and Chords: — Scales: Learn major and minor scales as the foundation for melodies and harmonies. — Chords: Understand how to build chords and chord progressions. Common progressions include I-IV-V and ii-V-I.
b. Rhythm and Timing: — Beats: Master the basics of rhythm, including quarter notes, eighth notes, and sixteenth notes. — Tempo: Learn how to set and maintain a consistent tempo.
c. Song Structure: — Parts of a Song: Familiarize yourself with common song structures, such as verse-chorus-bridge. — Arrangement: Understand how to arrange your song to keep the listener engaged.
4. Recording Your Music: Once you’ve set up your studio and learned the basics, it’s time to start recording:
a. Setting Up Your Microphone and Audio Interface: — Connections: Connect your microphone to the audio interface and the interface to your computer. — Settings: Adjust the input gain on your interface to avoid clipping and distortion.
b. Tips for Recording Vocals and Instruments: — Vocals: Use a pop filter to reduce plosive sounds. Stand about six inches from the microphone for a clear recording. — Instruments: Experiment with microphone placement to capture the best sound. For example, place a microphone near the sound hole of an acoustic guitar.
c. Layering Tracks: — Building a Full Sound: Record multiple takes and layer them to create a rich, full sound. This technique is commonly used for vocals and harmonies. — Panning: Use panning to spread out your tracks in the stereo field, giving each element its own space.
5. Editing and Mixing: After recording, you’ll need to edit and mix your tracks to create a polished final product:
a. Cutting and Trimming: — Clean Up: Remove any unwanted noise or mistakes from your recordings. — Timing: Use quantization to fix timing issues and ensure everything is in sync.
b. Adding Effects: — Reverb and Delay: Add depth and space to your recordings. — EQ and Compression: Use equalization to balance frequencies and compression to control dynamics.
c. Balancing Levels: — Volume Levels: Adjust the volume of each track to create a balanced mix. — Automation: Use automation to make dynamic changes throughout your song.
6. Mastering Your Track: Mastering is the final step in the production process, where you polish your track for release:
a. Final Touches: — Loudness: Increase the overall loudness of your track without causing distortion. — EQ and Compression: Apply final EQ and compression to ensure your track sounds balanced and professional.
b. Exporting: — File Format: Choose the appropriate file format for your release, such as WAV or MP3. — Metadata: Add metadata, including the track title, artist name, and album art.
Making your own music is a rewarding process that combines creativity with technical skills. By following these steps and continuously learning and experimenting, you can create music that truly reflects your artistic vision. Remember, the key to success is practice and perseverance. Don’t be afraid to make mistakes and learn from them. Every track you create will bring you one step closer to mastering the art of music production.
Share your first track with us in the comments! What challenges did you face, and how did you overcome them? Engaging with a community of fellow musicians can provide valuable feedback and support as you progress on your musical journey.
Related Articles:
For further reading, explore these related articles:
How to Create an Instagram Broadcast Channel and Promote Music on It
How to Promote Your Music on Instagram Reels
0 notes
Text
How To Use Nicky Romero KICK 2 by Sonic Academy
How To Use Nicky Romero KICK 2
In this paragraph, Nicky Romero Kick 2 returns with more presets – And this time for KICK 2! Get 55 custom presets from Nikki’s own piggy bank, plus 47 click files that can be added to the kit’s presets. Developed in collaboration with producer Nicky Romero and Cableguys, Kickstart 2 is the fastest plugin for professional sidechaining. Lock in your kick and bass in seconds with this quick tutorial as Cableguys’ Joe Rossitter walks you through all the controls and new features.
How to hit hard with Sonic Academy Kick 2? Kick 2 is the best plugin I have used for synth kick purposes. Whether you use FL studio 12, ABLEton, Logic Pro X or Pro Tools, this tool is essential. The plugin’s features make it easy to create clean, punchy beats that are easy to mix and master.
0 notes
Text
20 besten Artikel mit Logic Pro shortcuts
Ein beliebtes Musikproduktionsprogramm für Mac-Benutzer ist Logic Pro. Es bietet eine Vielzahl von Funktionen und Werkzeugen, um Musik und Soundeffekte zu erstellen. Um effizienter arbeiten zu können, sind Shortcuts hilfreich, um schneller zwischen verschiedenen Funktionen zu navigieren. Hier sind 25 Artikel von verschiedenen Webseiten, die eine umfassende Liste von Logic Pro Shortcuts bieten.
"Logic Pro X Keyboard Shortcuts" - Eine ausführliche Liste von Shortcuts für verschiedene Funktionen in Logic Pro X. URL: https://help.apple.com/logicpro/mac/10.5/#/lgce6b39b395
"Top 15 Logic Pro Keyboard Shortcuts" - Eine Auswahl der am häufigsten verwendeten Shortcuts für Logic Pro. URL: https://www.producenewmedia.com/top-15-logic-pro-keyboard-shortcuts/
"Logic Pro X Shortcuts & Key Commands" - Eine Zusammenstellung von Shortcuts und Tastenkombinationen für Logic Pro X. URL: https://www.logicprokeycommands.com/logic-pro-x-keyboard-shortcuts/
"Ultimate Guide to Logic Pro Shortcuts" - Ein umfassender Leitfaden zu Logic Pro Shortcuts für Anfänger und Fortgeschrittene. URL: https://www.sfmusictech.com/school-music-production/ultimate-guide-logic-pro-shortcuts/
"Logic Pro X Keyboard Shortcuts Cheat Sheet" - Eine praktische Spickzettel mit den wichtigsten Shortcuts für Logic Pro X. URL: https://dancemusicproduction.com/pages/logic-pro-x-keyboard-shortcuts-cheatsheet
"Logic Pro X Keyboard Shortcuts for Mac" - Eine Liste von Shortcuts für Mac-Benutzer in Logic Pro X. URL: https://www.edmprod.com/logic-pro-x-keyboard-shortcuts-mac/
"Logic Pro X Shortcuts for Audio Recording" - Spezielle Shortcuts für die Audioaufzeichnung in Logic Pro X. URL: https://avid.secure.force.com/pkb/articles/en_US/How_To/Logic-Pro-X-Shortcut-guide
"Top Logic Pro X Shortcuts Every Music Producer Should Know" - Die wichtigsten Shortcuts, die jeder Musikproduzent in Logic Pro X kennen sollte. URL: https://www.musicproducersforum.com/production-cheat-sheets/top-logic-pro-x-shortcuts-every-music-producer-should-know/
"Logic Pro X Shortcuts for Faster Editing" - Shortcuts, die helfen, den Bearbeitungsprozess in Logic Pro X zu beschleunigen. URL: https://noisegatemusic.com/logic-pro-x-shortcuts/
"Logic Pro X Keyboard Shortcuts Tutorial" - Ein Tutorial, das die Verwendung von Shortcuts in Logic Pro X erklärt. URL: https://musictech.net/how-to/logic-pro-x-keyboard-shortcuts-tutorial/
"Advanced Logic Pro X Shortcuts for Power Users" - Fortgeschrittene Shortcuts für erfahrene Benutzer von Logic Pro X. URL: https://juicybeats.com/advanced-logic-pro-x-shortcuts/
"Logic Pro X Shortcuts for MIDI Editing" - Spezielle Shortcuts für die MIDI-Bearbeitung in Logic Pro X. URL: https://tsamusic.com/logic-pro-x-shortcuts-for-midi-editing/
"Logic Pro X Shortcuts for Mixing and Mastering" - Shortcuts, die beim Mischen und Mastern in Logic Pro X helfen. URL: https://www.blogseite.com/100-logic-pro-shortcuts-und-tastenkombinationen/
"Logic Pro X Shortcuts for Looping and Arrangement" - Shortcuts für das Looping und die Arrangementbearbeitung in Logic Pro X. URL: https://edmprod.com/logic-pro-x-shortcuts-looping-arrangement/
"Logic Pro X Shortcuts for Plugin Navigation" - Shortcuts, um Plugins und Effekte schneller zu navigieren in Logic Pro X. URL: https://beatformula.com/logic-pro-x-shortcuts-plugin-navigation/
"Logic Pro X Shortcuts for Virtual Instruments" - Shortcuts für die Verwendung von virtuellen Instrumenten in Logic Pro X. URL: https://blog.landr.com/logic-pro-x-shortcuts-virtual-instruments/
"Logic Pro X Keyboard Shortcuts for Sound Design" - Shortcuts, die beim Sounddesign in Logic Pro X hilfreich sind. URL: https://www.edmprod.com/logic-pro-x-keyboard-shortcuts-sound-design/
"Logic Pro X Shortcuts for Automation" - Shortcuts für die automatisierte Steuerung von Parametern in Logic Pro X. URL: https://producerspot.com/logic-pro-x-shortcuts-automation
"Logic Pro X Shortcuts for Film Scoring" - Shortcuts, die beim Filmmusikschreiben in Logic Pro X helfen. URL: https://logicxacademy.com/logic-pro-x-shortcuts-film-scoring/
"Logic Pro X Shortcuts for Time-Saving Workflow" - Shortcuts, die die Arbeitsabläufe in Logic Pro X effizienter gestalten. URL: https://sleekaudio.com/logic-pro-x-shortcuts-time-saving-workflow/
"Logic Pro X Keyboard Shortcuts for Drum Programming" - Shortcuts für das Programmieren von Schlagzeugen in Logic Pro X. URL: https://music.tutsplus.com/tutorials/logic-pro-keyboard-shortcuts-for-drum-programmers--audio-7852
"Logic Pro X Shortcuts for Vocal Editing" - Shortcuts für die Bearbeitung von Gesangsspuren in Logic Pro X. URL: https://iheart.com/feature-logic-pro-x-shortcuts-vocal-editing/
"Logic Pro X Shortcuts for Guitar Recording" - Shortcuts für das Aufnehmen und Bearbeiten von Gitarrenspuren in Logic Pro X. URL: https://guitar-control.com/logic-pro-x-shortcuts-guitar-recording/
"Logic Pro X Keyboard Shortcuts for Beat Making" - Shortcuts für das Produzieren von Beats in Logic Pro X. URL: https://beatproduction.net/logic-pro-keyboard-shortcuts-beat-making/
"Logic Pro X Shortcuts for Live Performance" - Shortcuts, die für Live-Auftritte mit Logic Pro X nützlich sind. URL: https://hackattackguitar.com/logic-pro-x-shortcuts-live-performance/
1 note
·
View note
Text
My latest article for Music Radar follows up on my previous "ten things" article, with ANOTHER ten things you might now know about Logic Pro. I hope it can be of some help 👍🏼
#musicproducer#music producer#musicproduction#music production#logicpro#logic pro#logicprox#logic pro x#tutorial
3 notes
·
View notes
Text
Recording 100 [Blog Tutorial]
RECORDING 100: Getting Ready!
Hello, and welcome! If you are reading this, then you’re likely a budding musician that is eager to record their own music. This article will be a beginners guide to setup your own recording rig at home. To do this, we will focus on first time guitar recording tips, as well as simple guitar recording techniques to make it as easy and simple as possible, which it is! Our first step will be to understand acoustic guitar recording equipment. You can’t record without the gear, and fortunately it’s possible to record your songs on a pretty tight budget. For this article, we will describe how you, as a beginner, can have a professional guitar recording setup. Let’s get into it!
What Equipment Do I Need to Record My Music? - Computer -
The first thing you will need is a computer to record your music on. The computer specifications you need will depend on the type of music you want to make. For easy acoustic guitar recording for beginners, we would recommend getting a laptop with these specifications:
At least 4GB of RAM
At least 256GB of SSD storage
An i5 CPU Processor
USB-C Ports (for modern audio interfaces!)
External Hard Drive (for backing up your masterpieces!)
This is a good starting place for beginner recording setups, and the specs will future-proof the machine for you, even more so if you have the budget for higher RAM, or storage. Just note, that if you want to use Garageband, or Logic Pro X, then you will have to buy a Mac. This can be done cheaper by buying second hand, just make sure you follow the specs above and you’ll be ok!
- Audio Interface -
The second bit of gear you need will be your audio interface. This will be your connection between the outside and the digital worlds. With this device and a couple of different cables like the jack cable, and XLR cable, you can record electric and acoustic guitars respectively! It can be overwhelming, as there are many different audio interfaces that you can purchase, but one of the best beginner friendly interfaces is the Focusrite Scarlett. These have fantastic and easy to use settings for recording, with our highest recommendation being the Focusrite Scarlett 2i2 3rd Gen. If you want to shop around for a different interface then we have to recommend a few things:
Ensure the interface has a phantom power (48v) switch. This means that you can power the active circuitry in condenser microphones, commonly used for recording acoustic guitars (more on that in a sec!)
2 XLR and Jack inputs. You want the option to record in stereo. That’s being able to record the left and right channels with separate microphones at the same time. Although recording in mono (with one microphone) will suit you most of the time, you absolutely will want the option to record in stereo.
USB-C connectivity. An interface with USB-C will be fast for transmitting data, but will also power the interface without you having to plug it into the mains power, meaning that you’ll have portable guitar recording equipment!
You shouldn’t have to worry about buying studio monitors yet. Feel free to get a cheap pair of headphones, or use a set that you have lying around.
- Digital Audio Workstation (DAW) -
Thirdly, you will need software to record your music. A digital audio workstation, known as a DAW, is a program that has everything you need. There are multiple DAWs with some of the most well-known being Logic Pro (Mac Only), Cubase, FL Studio, or Audacity. Honestly, it doesn’t really matter which one you pick, but they all come with the same basic functionalities, just with various drawbacks or limitations. For example Audacity, a totally free and open-source option, isn’t very user friendly, and doesn’t have a very pleasant user interface. Logic Pro on the other hand is cheap, and very easy to use, but it is locked to Mac hardware, which comes at a premium price.
We recommend Cubase LE. This is a free learners edition of their software, and comes with a limited range of great features, including a16 track audio capacity, which is more than enough to get you started. If you like using LE, then you can upgrade to Elements for a relatively cheap price too, which makes the Learners Edition even more appealing. When you set up your DAW, ensure the audio routing is correct. The DAW will have a settings panel where you can set you input/output destination. Ensure that both of these say your Audio Interface.
- Microphones -
OK! The last thing you need on this list will be microphones and stands for this basic recording setup. For recording various music genres on acoustic guitar, you will ideally want two of the same condenser microphones, as these are better for picking up delicate high frequencies that the guitar offers. It’ll also be beneficial to have two microphones, in case you would like to experiment with stereo recordings.
We would recommend the Rode M5 matched pair of microphones as a starting place. These will give you a very high quality sound, with the added option of recording a stereo pair.
We can also recommend the Audio Technica AT2020, if you would like to keep things simple, and keep it to one mic, but you will be limited to making mono recordings.
If you have the budget, and want to learn to record acoustic guitar with vocals, then purchasing all three would give you an ideal set. Honestly, this section is just down to your goals and budget constraints. DON’T FORGET! You will need microphone stands for your new recording mics. These can be found in a range for just about every budget. If you’re recording vocals too, consider getting a pop-shield to cover those harsh syllables!
Summary
So now you have everything you need to begin your recording journey. Whether you’re aiming to write your own songs for release, or if you just want to record your creative expressions then check back for the next article… RECORDING 101 where we will take you through the steps that you need to do just that!
1 note
·
View note
Video
youtube
TUTORIAL: Play Logic Pro X Drummer on Addictive Drums 2 Kits
0 notes
Text
Composition Software Recommendations
Please keep in mind that I have not actually used all of the software I mention, and feel free to add information in reblogs please! All of the software mentioned is used by someone I know who uses it as their primary software.
Notation Software - putting music on a staff:
Musescore - This is my program of choice. It’s fairly intuitive and easy to use. Free, open source, and can handle most of the same things as some of the more expensive software. It also has the most accessibility options of any notation software I’ve tried, including fully customizable colorblind and high contrast modes.
Finale - Another decent option. It is kind of pricy at $299 usd, but offers a discounted price of $99 if you have a student email. Can handle pretty much everything Sibelius can. There’s a bit of a learning curve when starting to use it, but once you know where to find things it’s not bad.
Sibelius - The current industry standard. Has a free option that appears to be extremely limited, other than that it looks like it’s a subscription charged either monthly or yearly.
Dorico - I have heard good things but found their interface unintuitive. However, if you can figure out how to use it, scores generally look really nice. Made by the same team that originally made Sibelius. Free version lets you compose for up to 8 players, full version costs $100.
DAWs - playing/recording an instrument, audio production:
Logic Pro X - My program of choice, and seems to be commonly favored by composers. It has a bit of a learning curve, but there are many tutorials on youtube. Mac/iOS exclusive. $200 usd.
GarageBand - Basically, Logic Pro Lite. Mac/iOS exclusive. Free.
Reaper - I've heard good things but never used it. Costs either $60 or $229 depending on which license you get.
Cubase - Has multiple versions with different abilities and price points. Made by the same company as Dorico.
Ableton Live - Has multiple versions with different abilities and price points. I have heard really good things about it.
I am writing some music today :)
30 notes
·
View notes
Text
How to Export Stems in Logic Pro X
youtube
Exporting stems in Logic Pro 11 is an essential skill for any music producer. Whether you're preparing your project for mixing, collaboration, or archiving, understanding how to navigate the export options effectively can save you time and ensure high-quality audio. In this guide, we will cover the steps to export both multitracks and stems, highlighting the nuances of each process.
Understanding Multitrack Exports
When it comes to exporting multitracks, the process is relatively straightforward. You might want to export multitracks for several reasons: creating backups, sending files to a mixing engineer, or collaborating with other musicians. It's crucial to ensure that your session is fully loaded and all tracks are correctly arranged before proceeding.
One key point to note is that when exporting multitracks, any processing applied to buses will not be included in the exported files. This means that if you have effects applied to a bus, those effects will not carry over to the individual tracks exported. Instead, you will export each track separately, which can be beneficial for detailed mixing later on.
Step-by-Step Guide to Exporting Multitracks
Open Your Session: Ensure your Logic Pro session is fully loaded with all the tracks you wish to export.
Select Tracks: Use the mixer view for easier selection. Highlight all the individual tracks you want to export.
Access Export Menu: Instead of the typical Command + B for bouncing, use Command + E to open the export menu.
Choose Export Location: Select a destination for your exported files. It’s best to create a new folder within your project directory to keep everything organized.
Set Export Options:
Choose your range settings - you can trim silence at the end of the file or extend the length to project end.
Set the file format to WAV and choose the bit depth (24-bit is recommended).
Include audio tails if you have effects that need to fade out naturally.
Finalize the Export: Once everything is set, click export and Logic Pro will process the files, creating individual audio files for each track.
Exporting Stems: A More Complex Process
Exporting stems involves a different approach compared to multitracks. Stems are typically the processed output of groups of tracks, allowing for a more cohesive sound that includes effects and bus processing. This method is particularly useful when sending files to a mixing engineer who needs to work with the overall sound as it was intended.
Steps to Export Stems
Prepare Your Buses: Ensure that your buses are set up correctly. This includes routing any effects or reverb to the appropriate buses.
Create Tracks for Buses: Highlight the buses you wish to export, right-click, and create a track for them. This action pulls them into your main project window for easy access.
Select the Buses: Hold down the Shift key and select all the buses you want to export.
Access Export Menu: Similar to the multitrack export, go to File > Export and choose to export selected tracks as audio files.
Set Export Parameters: Ensure you include options such as audio tail and trim silence. Name your stems appropriately for easy identification later.
Export the Stems: Once you hit export, Logic Pro will process and create the stems, which will include all the bus processing and effects.
Final Thoughts
Understanding how to export stems in Logic Pro 11 is a vital part of the music production process. It ensures that your projects are organized and that you're able to collaborate effectively with other musicians and engineers. Whether you're exporting multitracks or cohesive stems, following these steps will help streamline your workflow.
If you’re looking to enhance your music production skills further, consider exploring the Courses — Warrior Sound for in-depth tutorials and resources.
For more tips on mastering your tracks, check out our Mastering Music Masterclass Info — Warrior Sound to polish your final mixes.
Happy producing!
0 notes