#USB Menu Interface
Explore tagged Tumblr posts
Visit Tumblr Blog
Explore Tumblr blogs with no restrictions, modern design and the best experience.
Last Seen Tumblr Blogs


Fun Fact
Tumblr has 16.74 million mobile monthly users in the US.
Note
Please, please explain how to install and use linux like I'm 5 years old. I'm so sick of windows adding AI and other bullshit to my already struggling elderly laptop but I'm really not good with computers at all so I have no idea where to start with Linux.
Okay, so, I'm going to break this down into steps I would give the average tumblr user first, and then if any of them are confusing or use words you don't understand, ask me and I'll explain that step in greater detail.
Step 0) BACK. UP. YOUR. SHIT.
NEVER EVER EVER CHANGE YOUR OPERATING SYSTEM WITHOUT A COMPLETE BACKUP OF ALL YOUR FILES.
Step 1) Learn your machine. You need to know:
How much RAM you have
If your processor is 32 or 64 bit
How big your hard drive is
On windows, you can find out all of this by going to the start menu, typing "about" and opening the first result on your system instead of the internet.
For additional instructions, visit this page.
Step 2) Pick your Linux.
There's like 10,000 kinds of Linux, each tailored to particular functions that the end-user (that is you!) might want to have. The sheer amount is very daunting, so first I'm going to give my suggestions, then I'll explain how to pick for yourself.
For Mac users, I suggest Kubuntu. For windows users, I suggest Mint Cinnamon. If your laptop is really REALLY old, I recommend Sparky Stable, which is the lightest weight Linux I would ever suggest for a new user. In every case, download the version suited to your processor (32 bit can be labelled "x86" or "32 bit"; 64 bit is always labelled "64 bit").
If you want to try a different type of linux, you'll need to make sure your laptop meets the "minimum specs" or "system requirements." These numbers tell you how much RAM, processor and hard drive space the linux will use. (That's why you needed those numbers at the beginning.)
Step 3) Collect your supplies. You're going to need:
An ISO burning program compatible with your current system, like Balena Etcher.
A copy of the ISO file for the Linux you want to use.
Your laptop.
An 8gb or larger USB flash drive.
Step 3) Make a bootable USB drive
Install Balena Etcher, hitting "okay" and "next" when prompted. Last I checked, Etcher doesn't have adware attached, so you can just hit next every time.
Plug your USB drive into the laptop.
Open Etcher.
Click "flash from file" and open the ISO file with your Linux on it.
Click "Select target" and open the USB drive location. Hit the "flash" button. This will start writing all the linux installer data to your flash drive. Depending on the speed of your machine, this could take as long as 10 minutes, but shouldn't be much longer.
Step 4) Boot to the USB drive
This is, in my opinion, the trickiest step for a lot of people who don't do "computer stuff." Fortunately, in a rare act of good will, Windows 10 made this process a lot easier.
All you'll need to do is go to settings, then recovery, then advanced startup and pick the button labelled "use a device."
This tutorial has images showing where each of those is located. It's considered an "advanced setting" so you may get a spooky popup warning you that you could "harm your system by making changes" but we're not doing anything potentially harmful so you can ignore that if you get it.
Step 5) Try out linux on the flash drive first.
Linux installs using a cool little test version of itself that you can play around in. You won't be able to make changes or save settings, but you can explore a bit and see if the interface is to your liking. If it's hideous or hard to navigate, simply pick a new linux version to download, and repeat the "make a bootable USB" step for it.
Step 6) Actually install that sucker
This step varies from version to version, but the first part should be the same across the board: on the desktop, there should be a shortcut that says something like "install now." Double click it.
Follow the instructions your specific linux version gives you. When in doubt, pick the default, with one exception:
If it asks you to encrypt your drive say no. That's a more advanced feature that can really fuck your shit up down the road if you don't know how to handle it.
At some point you're going to get a scary looking warning that says 1 of 2 things. Either:
Install Linux alongside Windows, or
Format harddrive to delete all data
That first option will let you do what is called "dual booting." From then on, your computer will ask every time you turn it on whether you want Windows or Linux.
The second option will nuke Windows from orbit, leaving only linux behind.
The install process is slower the larger your chosen version is, but I've never seen it take more than half an hour. During that time, most linux versions will have a little slideshow of the features and layout of common settings that you can read or ignore as you prefer.
Step 7) Boot to your sexy new Linux device.
If you're dual booting, use the arrow keys and enter key to select your linux version from the new boot menu, called GRUB.
If you've only got linux, turn the computer on as normal and linux will boot up immediately.
Bonus Step: Copy Pasting some code
In your new start menu, look for an application called "terminal" or "terminal emulator." Open that up, and you will be presented with an intense looking (but actually very harmless) text command area.
Now, open up your web browser (firefox comes pre-installed on most!), and search the phrase "what to do after installing [linux version you picked]"
You're looking for a website called "It's FOSS." Here's a link to their page on Mint. This site has lots and lots of snippets of little text commands you can experiment with to learn how that functionality works!
Or, if you don't want to fuck with the terminal at all (fair enough!) then instead of "terminal" look for something called "software manager."
This is sort of like an app store for linux; you can install all kinds of programs directly from there without needing to go to the website of the program itself!
297 notes
·
View notes
Text


07.05.25
I tried out two Linux distributions on my test laptop today.
Before I started the task, I updated Linux Mint Cinnamon with the update manager to receive the latest updates for the system and installed apps.
I can also use the terminal to update everything by typing the APT command 'sudo apt-get update'.
'sudo' elevates root (admin) privileges, 'apt-get' receives the packages needed and 'update' checks for updates. I then type 'sudo apt-get upgrade' and press enter to upgrade all the applications and the system.
System up to date!
Firstly, I downloaded Debian from: https://www.debian.org/distrib/
I chose the Debian Live MATE desktop environment.
I then went to download Linux Mint from: https://linuxmint.com/download.php
I chose the Mint MATE Edition desktop environment.
Debian MATE was 3.1 Giga-Bytes and Linux Mint MATE was 2.9 Giga-Bytes to download.
Once they had downloaded, I located them in Downloads and opened the built in USB writer application.
I wrote the ISO files to the sticks to create two bootable USB sticks.
After this step I booted Debian 12 MATE.
I selected 'try' on the boot menu screen.
Here it is in action! I played around with the user interface and tested the sound, which worked brilliantly!
Next, I booted Linux Mint 22.1 MATE.
Again, I selected 'try' to boot up the live environment.
Here it is in action! Again I tested the sound, played a YouTube video in Firefox and customised the panels and themes.
Both MATE desktops in both distros were very interesting and seemed even snappier when compared to the operating systems I have installed on this laptop, which are Linux Mint 22.1 Cinnamon and Ubuntu 24.04!
I found Debian with the MATE desktop to be the most stable environment however.
See blog below to learn more about the modern take on the classic GNOME 2 experience!
4 notes
·
View notes
Text
How to Calibrate Cricut Explore Air 2? (Full Guide!)
Cricut Explore Air 2 is a worthwhile machine for crafters who want to make pro-level crafting projects. The machine offers precise cuts for more than 100 different types of materials, including Cricut Smart Material, leather, wood, glass, metal, etc. With its easy-to-use interface, the machine allows users to work on DIY projects even if they are novices. Moreover, sometimes crafters may need to perform Cricut Explore Air 2 calibration before a cut.
Calibration is a process that helps set the machine’s blade to cut the design accurately without any flaws. Many users don’t know the procedure and struggle to get the perfect cut. If you have the same problem, then the follow-up blog will provide you with all the information about calibrating your machine.
Cricut Explore Air 2 Calibration on Windows/Mac
If you are using your Cricut Explore Air 2 machine on a computer, then the following is the extensive guide that will help you perform the calibration process.
Step 1: Selecting the Printer
Open the ‘Cricut Design Space app‘, sign in to your account, and then click on the Settings option.
Then, follow the path Machines > Machine Calibration, and select Cricut Explore Air 2.
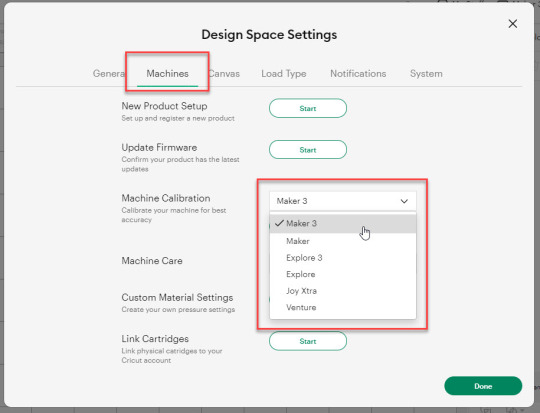
After selecting your crafting machine, click on the Start option.
Depending on the machine you choose, you will be asked to complete the calibration; select the Print Then Cut option.
In the next step, choose what you like to use with your printer machine for the process.
After that, click on the Continue option.
Step 2: Starting the Calibration Cut
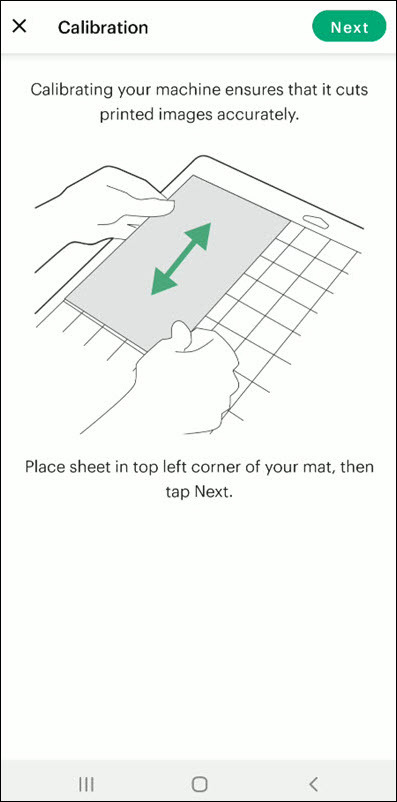
Now, you should place the printed calibration sheet on the mat, position it perfectly, and select the Continue option.
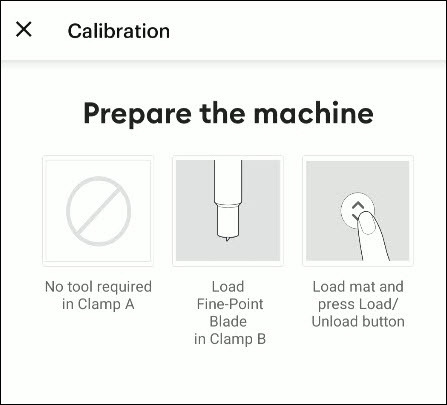
For the next step, ensure that your machine is ON and connected to your computer using USB or Bluetooth. Select the machine from the drop-down menu, insert the cutting mat into your crafting machine, and click Go.
Furthermore, the device will start scanning the markings for the calibration.
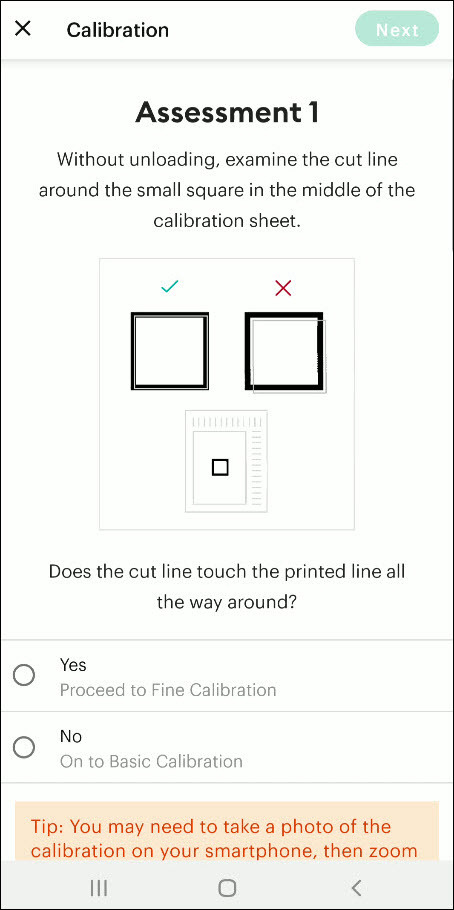
After the cutting is complete, check if the cut-makings are touched without unloading the mat from the machine. (If the markings are touched, then choose the Yes option in the app and select Continue to move to the next step.)
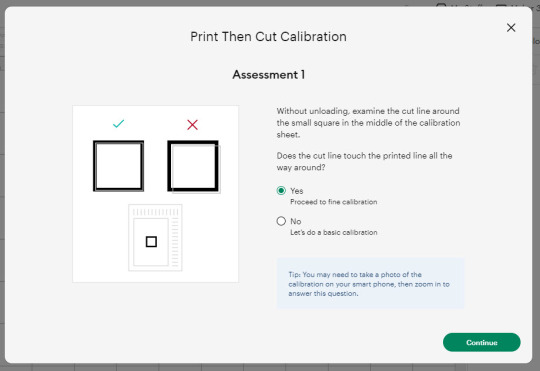
Note: If you choose the No option, then the machine will perform a cut for the next time for the accurate cut.
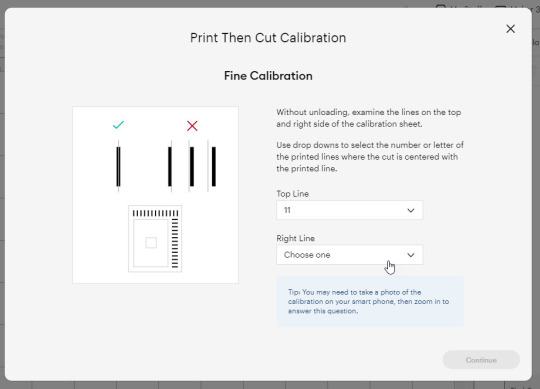
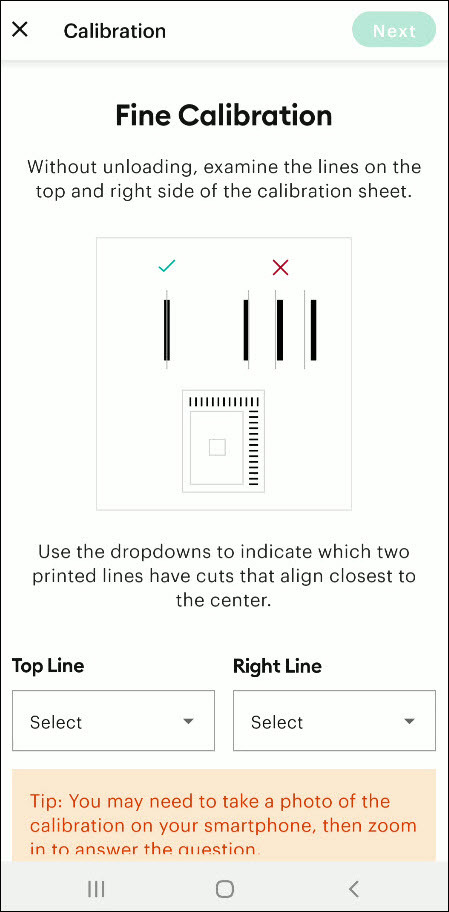
Also, the machine will start the calibration cut at the top and side of the page.
Now, check if the markings are correct without unloading the mat from the device. (The cut should be on or before line 1 and on or before line 21.)
If your cut meets all the conditions, choose the line closest to the center of the printed lines, the same as the following image; when you are done, select the Continue option.
In the next step, the Cricut Explore Air 2 machine will perform a confirmation cut around the large sheet. When this step is complete, unload the mat from the machine and remove the calibration sheet; now, you need to answer the final question on the app.
You need to choose Yes, cut is close enough to the center if you are happy with the cut. (Select no and follow the further process if you are not happy with the cut.)
Cricut Explore Air 2 Calibration On iOS/Android
The follow-up method will allow you to Calibrate your Explore Air 2 machine without any hassle. So, let’s begin the process.
Step 1: Connecting the Printer to Your Machine
Start by signing into your Cricut account on the app and selecting the menu option from the upper right corner.
After that, tap on Settings and then select Print Then Cut Settings.
Also, tap on the Calibration.
Next, you have to choose the Send to Printer, or I have a calibration sheet option.
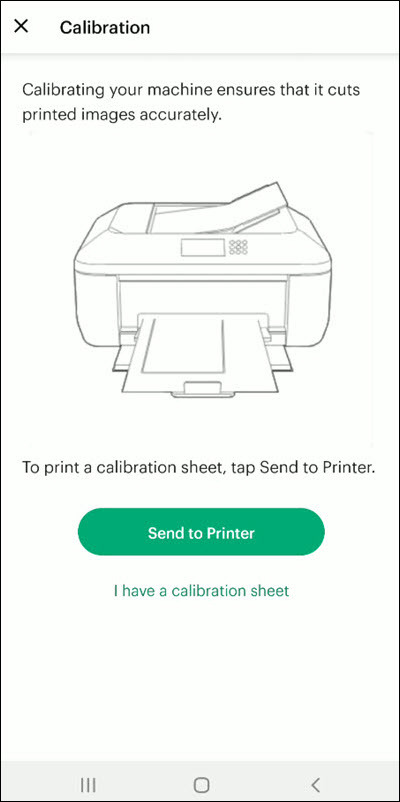
Now, the preview of the calibration sheet will appear on the screen (it can be a little different depending on the device you are using.)
Afterward, tap “Select a printer” and select the printer device you are using. Then, choose Next.
Step 2: Perform Sheet Calibration Process
After that, take the printed calibration sheet, place it onto the machine mat perfectly, and select Next.
Specify the appropriate material setting for your machine.
Then, after loading the mat into the machine, press the Go button on it.
Also, the machine will look for the marking for the calibration and then start the cutting process near the small square.
Afterward, without unloading the mat from the machine, check for the cut to ensure the cut touches the marked lines all the way around. (If the lines touch the cut, then tap Yes in the app, then select Next to proceed with the next step.)
However, if you select the No option, then the machine will try to cut close to the top and sides of the page. (Once done, look closely without unloading the mat; there should be a cut before line 1 and on or after line 21.)
If the cut meets these lines, you need to specify which cut is closest to the center of the printed lines and the right side of the calibration sheet.
Once you are done, select Next to move forward.
After that, keep following the instructions on the screen to complete the procedure.
Once the process is complete, you can start cutting materials on your machine.
Final Words
Cricut Explore Air 2 calibration is the best way to get the pin-point cuts. These methods will help you to perform the calibration process on computer and smartphone devices. With these methods, you cannot only calibrate your Explore Air 2 but also any other cutting machine of the brand. Furthermore, if you have any doubts regarding the procedure or have any issues, then it would be good to ask for more assistance and guidance.
Frequently Asked Questions
Why Is My Cricut Explore 2 Not Cutting Properly?
Cricut Explore machines are known for their flawless and fast-cutting results. Sometimes, it is due to the material you are trying to cut on your device. Also, in some cases, the machine faces technical issues. To get your machine out of this problem and start cutting properly, you can use the calibration procedure. The process to calibrate your machine is simple.
Why Should I Calibrate My Cricut Machine?
However, the cuts can sometimes be misaligned due to various reasons. Crafters can calibrate their devices to get the blades and cuts aligned to their initial position. After the calibration, the machine starts to provide flawless cuts once again. However, the calibration process is a little complex and differs from device to device. So, you must know the whole process before performing it.
What Is the Thickest Setting on Cricut Explore Air 2?
We all know that Cricut cutting machines are known for their fast and flawless cuts, even for intricate designs. Thus, the Cricut Explore machine can cut a wide range of materials of a certain thickness. If you want to cut the wood, metal, leather, etc., then your machine can cut up to 2mm. However, different materials need to use specific blades to get the desired results.
Source: How to Calibrate Cricut Explore Air 2
#how to calibrate cricut explore air 2#cricut design space app#cricut design space download#cricut design space software#cricut machine setup#cricut explore air 2 setup
2 notes
·
View notes
Text
stop me before I scan again!!
So yesterday, it happened again... I was in a thrift and found a Pacific Image Electronics "ImageBox Standalone 9mpx" photo scanner. And it was the color of the day so was half off. :-D

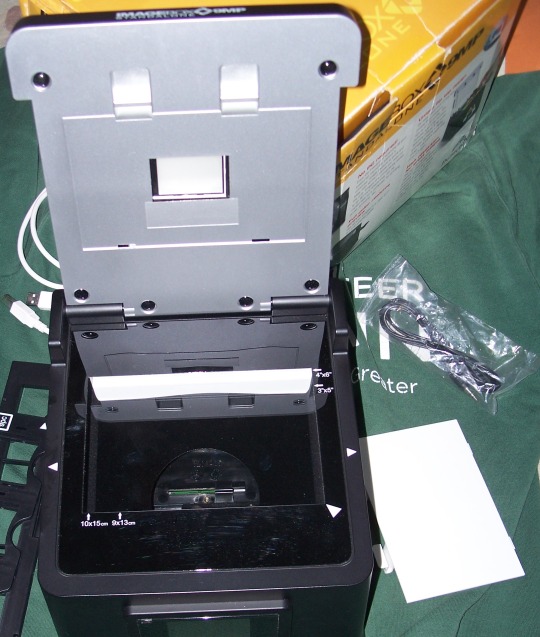
It's a fascinating bit of electronics that does not require a computer because it can save to an SD card, but can be plugged into a USB port for easier access, plus it comes with a stereo-to-RCA cable so it can also be plugged into a television/VHS/DVD/Commodore 64 monitor/etcetera for direct viewing on a larger screen. It didn't come with the manual, that was the only thing missing, but the interface is fairly intuitive about most things. Here's a photo directly down into the unit to show it has two sensors:

Notice in the first photo below the two silver buttons is a slider for choosing between Photo (for the slide and 35mm film templates in the lid, 9mpx and 2400dpi) and Film (paper photos put on the scanner glass, around 4mpx and under 600dpi); that slides the appropriate sensor within into the center of the portal. Also with that slide comes a context-sensitive onscreen menu for setting how many megapixels to use (12mpx is an option so that has to be interpolated), contrast, timing for display and hibernation, original image size for paper photos, and MagicTouch dust removal for slides/negatives, among other tweaks and conditions.
But how well does it work?
Let's start with a paper photograph. As you can see in this side-by-side of the original and the scan I won't be using it for that. The photo is pretty bright as it is, so the default contrast of 0 was too dark and +2 washed it out. As one reviewer said, "it's great for unimportant photos."

Nice thought though. I don't have any 35mm negatives laying around at the moment so let's just work with slides. Here's a test scan, the one where I determined that setting the contrast to -2 looked a lot better because it brought out details the others blew out.

Fairly impressive, and the dimensions are 3232x2144 so there's plenty to work with. I haven't scanned this slide I found the other day with the flatbed so I don't know how 'true' this image is.
Let's back to that MagicTouch dust removal feature, which appears to provide ICE-style infrared cleaning. Here's where I say that for prints and unTouched images it takes five seconds to scan, while with MagicTouch the screen puts up a dialog saying "this may take 45 seconds" and it actually does.

(I selected a commercial tourist slide, never mind the color shift from being 50-60 years old on cheap stock, because it was visibly dusty.)
MagicTouch does the job pretty well, and is a feature I wouldn't have expected on a sensor-based scanner. Looks like I have something for those quick scans that for film produces images considerably better than the F2D Mighty's work for 1/5 of the price. It's not anything I'd be using for scanning most print photos, it's ill-equipped for quality.
So yeah, yet another new toy.
3 notes
·
View notes
Text
Price: [price_with_discount] (as of [price_update_date] - Details) [ad_1] Experience the nostalgia of retro gaming with this all-in-one game console, preloaded with over 20,000 classic games. The console comes with two wireless controllers, offering a convenient and comfortable gaming experience without the tangle of cords. Simply connect the console to your TV using the included HDMI cable and dive into your favorite games with stunning video and audio quality. The plug-and-play design ensures a hassle-free setup, allowing you to start playing right away. Its compact and portable design makes it easy to bring the fun wherever you go. The package includes everything you need: two wireless controllers, a micro USB power cable, an HDMI cable, and a user-friendly interface. Rediscover your favorite classics and explore new ones with this versatile retro game console How to Assemble and Play Step-by-Step Instructions: 1. Unpack the Components: - Ensure you have all the components: the console, 2 wireless controllers, micro USB cable, HDMI cable, and the USB receiver. 2. Insert Batteries into the Controllers: - Open the battery compartment on the back of each wireless controller. - Insert 2 AAA batteries into each controller, ensuring correct polarity. - Close the battery compartment securely. 3. Connect the Console to the TV: - Insert the console into an available HDMI port on your TV. - Connect the micro USB cable to the console and plug it into a power source. 4. Connect the Wireless Controllers: - Insert the USB receiver into one of the USB ports on the console. - Turn on the wireless controllers by sliding the on/off switch to the "on" position. They should automatically sync with the console. 5. Power On the Console: - Turn on your TV and switch to the corresponding HDMI input where the console is connected. - Power on the console by using the on/off switch if it has one. 6. Navigate the Menu: - Use the wireless controllers to navigate through the main menu. - Browse through the 20,000+ games available and select your desired game. 7. Start Playing: - Once you have selected a game, follow the on-screen prompts to start playing. - Enjoy hours of retro gaming fun! Tips for Best Experience: - Ensure your controllers have fresh AAA batteries for uninterrupted gameplay. - If the controllers do not sync automatically, refer to the user manual for syncing instructions. - For optimal video quality, make sure your TV is set to the correct resolution that matches the console's output. - Store the console and controllers in a safe place when not in use to avoid damage. By following these steps, you can easily assemble and start playing with your retro game console, reliving classic games from the past with modern convenience. Wireless Controllers: Comes with 2 ergonomic wireless controllers, ensuring comfortable gameplay without the hassle of cords. Micro USB Power Cable: Includes a micro USB cable for easy charging and power supply. 20,000+ Games Included: Enjoy a massive library of classic games preloaded on the console, providing endless hours of entertainment. HDMI Output: Easily connect to your TV with the included HDMI cable for high-quality video and audio output. Plug and Play: Simple setup with no complicated installation. Just plug the console into your TV and start playing. [ad_2]
0 notes
Text
Penguin Woes
It's early summer and if you know me, you know summer's my IT Spring Cleaning season. I usually format all my personal devices once a year and considering my job, that always comes with an associated symptom the veterans call distro-hopping.
Being a Sysadmin of a fairly small company, we've gotten away with getting our agents set up on Linux Mint, seeing as we don't directly interface with dealership CRM tools. However, we do keep Windows systems for most of the front-end stuff, when dealing with our clients, seeing as Joe McCarSalesman isn't very likely to know his sudo from his dir.
On my end, though, once I've accounted for the one laptop that has to remain a Windows rig and for my main machine that I use for multiplayer gaming with Walt and Sarah, all bets are off. When enough of the workforce is off on vacation, I usually take one or two days off to get my pen-testing dummy out of the closet and poke around with a few operating systems. Wanting to test out ChatGPT's advice regarding Fedora Workstation 42 after years of being married to various Ubuntu forks (primarily Mint, because Mint fucking works), I slapped it onto my Ventoy stick, plugged a sacrificial SSD in and unplugged everything else - and got to testing.
First big oopsie from Fedora's boys: a hard crash at the Date and Time selection, with disgruntled users on Reddit specifying that the only way to move past it was to restart the installer and to click on your desired location, as opposed to using a drop-down menu to reliably select a locale.
Second big oopsie: even if you set a second SSD to be a separate mount point for a Steam Library, Fedora 42 refuses to let said SSD be displayed as an option in Steam. Actually hot-plugged drives like USB sticks show up - but separate drives connected to the PC apparently don't, unless you're ready to spend forty-five minutes wrangling the Terminal.
And a point of contention: the absence of any GUI support for officially-supported NVIDIA drivers. You'd think that a platform that's as mature as Fedora's would have figured out that a certain percentage of its user base is going to use hardware that hasn't quite jumped onboard the Open-Source train as much as AMD.
One of my Helpdesk employees scoffed. "Come on, Grem - you use the Terminal all the time! Who cares if you need to bring up RPM Fusion manually!"
To which I replied that from what I've seen, the Linux community tends to mistakenly assume that video servers (Wayland/Xorg) and GUI design matters more than making the core experience comfortable. If updating your GPU isn't a basic aspect of a computer's maintenance, then I don't know what is. This is where Mint scores a substantial point. In a few clicks, a freshly-installed Mint instance can have all its drivers - video drivers included - and be ready for the more granular aspects of the setup process.
As ever, I tend to think that Linux will only ever mature when the Terminal is only as necessary as Windows' Command Prompt can be - which is not much at all.
Basic setup shouldn't involve the Terminal or the Command Prompt - on any level.
Oh - and ChatGPT's advice for the best distros for specific hardware configs is definitely suspect.
#IT Post#Linux#Fedora Workstation 42#Linux Mint#Computing#Open-Source Software#Distro-Hopping#ChatGPT#Shitty Advice from an LLM
0 notes
Text
Nintendo Switch 2 Unboxing & Hands-On: First Look at the Future of Gaming
youtube
Introduction: A New Chapter in Nintendo Gaming
After years of speculation and anticipation, the Nintendo Switch 2 is finally here. With a larger display, redesigned Joy-Con controllers, and improved build quality, it marks a significant upgrade over its predecessor. This guide walks you through the full unboxing experience, highlighting key features, design improvements, and everything you need to know if you're planning to get one.
Whether you're upgrading from the original Switch, the Switch Lite, or the OLED model, this new console feels like a leap forward—not just an iteration. From the size of the screen to the sturdiness of the hardware, the Switch 2 gives off a premium, next-generation vibe from the moment you open the box.
Unboxing the Nintendo Switch 2: What’s Inside the Box
Opening the Switch 2 box is the beginning of a new gaming era. Inside, you'll find:
The Nintendo Switch 2 console with a noticeably larger screen
A pair of redesigned Joy-Con controllers
Joy-Con straps (color-matched)
A new, more robust dock
An upgraded power brick
An ultra high-speed HDMI cable
Setup manuals and basic documentation
The first thing you'll notice is the massive screen on the console. Compared to the original Switch, this display is significantly larger and makes a strong first impression right out of the box.
Initial Impressions: Bigger, Smoother, Stronger
Larger Display and Refined Build
The screen isn’t just bigger—it’s better. It's bright, clear, and stretches almost edge to edge, giving you more visual real estate without making the device feel too bulky. The bezel is still there but less noticeable than before, especially when the screen is off.
No Rails, Only Magnets
The Joy-Con now attach magnetically. There are no traditional rails, which gives the system a cleaner design. The magnetic mechanism is surprisingly strong and secure, and detaching them requires using the designated release buttons.
Joy-Con Redesign: Major Improvements All Around
Comfort and Grip
The Joy-Con controllers have been reimagined. They're slightly larger and fit more comfortably in your hands—even for those with smaller grip sizes. The analog sticks feel solid and responsive, while the shoulder and trigger buttons are more tactile.
Better Triggers and Ergonomics
The new triggers give a more satisfying click and feel more responsive during gameplay. Compared to the original Joy-Con or even the OLED version, the Switch 2 controllers feel much more like standard gamepads.
Joy-Con Grip: Optional But Functional
The Joy-Con grip included in the box is larger to accommodate the bigger controllers. While some may prefer a Pro Controller, the bundled grip works well and doesn’t feel like an afterthought.
Kickstand and Port Design: Built for Real-World Use
Stronger Kickstand
The kickstand is now made of metal and offers more resistance. It’s stable enough to hold the console upright without wobbling, making it great for tabletop gaming.
Connectivity and Ports
Dual USB ports on both top and bottom
Enhanced dock with matte outer finish and glossy inner shell
Ultra high-speed HDMI for improved output quality
The dock now feels more like a core part of the system and less like a plastic add-on. It’s larger, sturdier, and visually refined to match the system’s more mature look.
First Boot and Interface: A Familiar But Sharper Experience
Upon powering the console, you're greeted with a crisp setup screen and familiar sounds. The operating system looks similar to the original but feels more refined. You’re walked through basic setup, including Wi-Fi, time zone, and system updates.
Audio and Interface
The console’s speakers have been upgraded to deliver better in-game audio. Menus are smoother, and navigating the interface feels snappier than the original Switch.
Game Compatibility and Performance Expectations
The Switch 2 is backward compatible, supporting physical cartridges and digital titles from the original system. The cartridge slot has a metal locking mechanism, ensuring your games stay securely in place.
Early impressions suggest that games like Cyberpunk 2077 run better on Switch 2 than on older consoles like Xbox Series S. Upcoming titles like Metroid Prime 4 and the next Zelda will fully showcase the console’s enhanced capabilities.
Build Quality: Durable Yet Lightweight
Despite the larger size and added features, the console still feels portable. The weight has increased slightly, which actually contributes to a more premium feel. It doesn’t feel fragile or wobbly like the earlier versions—everything is tightly integrated.
Design and Finish
Matte finish for grip and aesthetics
Glossy interior dock design
Consistent button placement for easy transition from older models
Accessories and Extras: Included and Optional
Besides the essentials, Nintendo also ships:
Matching Joy-Con straps
Bigger power brick for more efficient charging
Optional Pro Controller (sold separately)
The system works seamlessly with the Pro Controller, but even the default setup offers a solid gameplay experience.
Final Thoughts: Worth the Hype? Absolutely
The Nintendo Switch 2 feels like more than just a hardware refresh—it’s a new beginning. Every element has been refined. From the display and Joy-Con to the internal power and build quality, Nintendo has built something that’s ready for the modern gaming landscape.
Whether you're a longtime Nintendo fan or new to the ecosystem, the Switch 2 delivers where it matters: performance, design, and experience.
Conclusion: Nintendo Switch 2 Sets a New Standard
The Nintendo Switch 2 isn’t just a sequel—it’s a transformation. With a significantly larger display, improved Joy-Con controllers, and a sturdier build, Nintendo has clearly listened to its audience. Whether you're unboxing it for the first time or upgrading from a previous model, the Switch 2 offers a refined, next-generation experience.
From the metal kickstand to the sleek dock and responsive controls, every component feels premium and purposeful. It’s a true leap forward for handheld and hybrid gaming, blending the best of what made the original great with enhancements that make it truly feel like a 2025-ready console.
If you're a Nintendo fan or a newcomer ready to dive in, the Switch 2 is ready to deliver years of incredible gaming ahead.
FAQs: Nintendo Switch 2
Q1: What comes in the Nintendo Switch 2 box? The box includes the Nintendo Switch 2 console, two redesigned Joy-Con controllers, Joy-Con straps, a more robust dock, an upgraded power brick, an ultra high-speed HDMI cable, and setup documentation.
Q2: What’s new about the Joy-Con controllers? The Joy-Con are larger, more ergonomic, and attach magnetically instead of using sliding rails. The triggers and buttons are also improved for better tactile response.
Q3: Is the Switch 2 screen really that different? Yes. The screen is significantly bigger and brighter than the previous models. It has thinner bezels and provides a more immersive display for handheld gaming.
Q4: Is it backward compatible with older games? Absolutely. The Switch 2 supports all original Switch cartridges and digital games, offering seamless backward compatibility.
Q5: How does the new dock compare to the original? The dock is larger, sleeker, and more stable. It has a matte finish on the outside, a gloss interior, and better cable management. It also includes upgraded ports for enhanced connectivity.
Q6: Can I still use a Pro Controller with the Switch 2? Yes, existing and new Pro Controllers are compatible, though the bundled Joy-Con and grip setup also provides a solid gameplay experience.
Q7: How heavy is the Switch 2 compared to previous versions? The Switch 2 is slightly heavier, which gives it a sturdier feel. Despite the added weight, it remains comfortable for long play sessions.
🎮 Meet Haplo Gaming Chef 🍳
Level 99 Kitchen Warrior here! I'm on a quest to transform your gaming sessions into epic culinary adventures. When I'm not farming rare ingredients in MMOs, I'm crafting real-world recipes inspired by your favorite video games.
Specializing in: • Game-inspired recipe creation • Cooking quest guides • Power-up snacks for gaming sessions • Achievement-worthy meal prep
Join my party as we explore the delicious intersection of pixels and plates. Whether you're a casual foodie or a hardcore gamer, there's always room at my crafting table! #Gaming #GamingGuides #GamingChef #HaploGamingChef For More Visit: https://haplogamingchef.blogspot.com/
#Nintendo Switch 2#Nintendo Switch 2 unboxing#Nintendo Switch 2 hands-on#Nintendo Switch 2 review#Nintendo Switch 2 first impressions#Nintendo Switch 2 gameplay#Nintendo Switch 2 features#Nintendo Switch 2 specs#Nintendo Switch 2 release date#Nintendo Switch 2 price#Nintendo Switch 2 vs Switch#next-gen Nintendo console#Nintendo Switch successor#portable gaming console#hybrid gaming system#Nintendo Switch 2 hardware#Nintendo Switch 2 performance#Nintendo Switch 2 graphics#Nintendo Switch 2 battery life#Nintendo Switch 2 Joy-Con#Nintendo Switch 2 dock#Nintendo Switch 2 games#Nintendo Switch 2 backwards compatibility#Nintendo Switch 2 OLED#Nintendo Switch 2 4K gaming#future of gaming#Nintendo gaming console#handheld gaming device#gaming technology#console unboxing
0 notes
Text
How to Reset Your Chevy Equinox Stereo System: Quick Fix for Common Issues
https://autorepairlebanontn.com/?p=3649 How to Reset Your Chevy Equinox Stereo System: Quick Fix for Common Issues Frustrated with your Chevy Equinox stereo system acting up? We’ve all been there – audio glitches, frozen screens, or unresponsive controls can turn your driving experience from pleasant to painful in seconds. The good news? A simple reset might be all you need to get your infotainment system back on track. In this guide, we’ll walk you through the step-by-step process to reset your Chevy Equinox stereo system. Whether you’re dealing with Bluetooth connectivity issues, system freezes, or just want to start fresh after a software update, we’ve got you covered. Our proven methods work across various Equinox model years and will have your audio system performing like new in no time. Table of Contents Toggle Understanding the Chevy Equinox Stereo SystemCommon Reasons to Reset Your Chevy Equinox StereoSoftware Glitches and Freezing IssuesBluetooth Connection ProblemsHow to Perform a Soft Reset on Chevy Equinox StereoUsing the Home and Fast Forward Buttons MethodUsing the Power Cycle MethodUsing the OnStar Call Button MethodUsing the Settings Menu MethodPerforming a Hard Reset on Your Chevy Equinox Stereo SystemBattery Disconnect MethodFactory Reset MethodFuse Reset ProcedureAfter the Reset: Restoring Your SettingsReconnecting DevicesAdjusting SettingsUpdating SoftwareClearing Cache and Private DataBacking Up DataTroubleshooting Post-Reset IssuesReconnecting DevicesAdjusting SettingsSoftware UpdatesClearing CacheHard ResetWhen to Seek Professional HelpPersistent IssuesComplex ErrorsHardware ProblemsSoftware UpdatesConclusionFrequently Asked QuestionsHow do I reset my Chevy Equinox stereo system?Will I lose my settings when I reset the stereo?Why is my Chevy Equinox stereo freezing?How do I fix Bluetooth connection problems in my Equinox?When should I seek professional help for stereo issues?What’s the difference between a soft reset and a hard reset?How do I update my Chevy Equinox infotainment system?Can I reset my stereo system while driving? Understanding the Chevy Equinox Stereo System The Chevy Equinox comes equipped with an advanced infotainment system that offers a range of audio and connectivity features. This system, depending on the model year, includes either the Chevrolet MyLink or the newer Chevrolet Infotainment System. Both platforms provide touchscreen interfaces, Bluetooth connectivity, and compatibility with smartphone integration technologies like Apple CarPlay and Android Auto. Equinox stereo systems typically feature AM/FM radio, satellite radio options, USB ports for media playback, and auxiliary inputs for external devices. Models from 2018 and newer offer enhanced functionality with voice recognition capabilities, improved touch responsiveness, and more intuitive menu navigation. Common components of the system include the head unit (main display and controls), speakers distributed throughout the vehicle, amplifiers in premium audio packages, and various connectivity modules for Bluetooth and Wi-Fi functionality. The integration between these components creates a comprehensive entertainment experience while driving. Understanding how these elements work together helps when troubleshooting issues or performing system resets. For instance, problems with Bluetooth connectivity might stem from the wireless module rather than the main head unit, while audio quality concerns could relate to speaker performance or amplifier settings. The system’s software architecture allows for periodic updates, which GM sometimes releases to fix bugs or add new features. These updates can be installed by dealerships or, in newer models, through over-the-air updates when connected to Wi-Fi. Common Reasons to Reset Your Chevy Equinox Stereo The Chevy Equinox infotainment system occasionally requires resetting to resolve various performance issues. Understanding the common problems that necessitate a system reset helps owners troubleshoot effectively before seeking professional assistance. Software Glitches and Freezing Issues Software glitches in the MyLink or IntelliLink infotainment system often manifest as frozen screens or unresponsive controls. These technical hiccups typically occur without warning, leaving the system stuck on one screen or completely non-functional. Many Equinox owners experience situations where the touchscreen stops responding to inputs, menu options become inaccessible, or the system displays error messages that won’t clear. Resetting the stereo system clears temporary data conflicts and restores normal operation by restarting all system processes and reloading the core software elements. Bluetooth Connection Problems Bluetooth connectivity issues rank among the most frustrating problems for Chevy Equinox drivers. Common Bluetooth failures include devices that won’t pair, previously connected phones disappearing from the saved devices list, or intermittent audio dropouts during streaming. Some users report their phones connect but won’t transfer audio to the car’s speakers, while others experience situations where calls route through the phone instead of the vehicle’s hands-free system. Performing a system reset refreshes the Bluetooth module’s memory, clears corrupted connection data, and reestablishes the discovery protocol that’s essential for proper device pairing and communication. How to Perform a Soft Reset on Chevy Equinox Stereo Performing a soft reset on your Chevy Equinox stereo system is a quick and effective way to resolve many common issues without losing your settings or data. These simple procedures can be completed in minutes and often restore normal functionality to troubled infotainment systems. Using the Home and Fast Forward Buttons Method MyLink and IntelliLink systems in Chevy Equinox models respond well to this reliable reset technique. Simply press and hold both the Home and Fast Forward buttons simultaneously for at least 10 seconds. Your infotainment screen will go blank momentarily as the system reboots itself. This method works particularly well for resolving frozen screens and general software glitches that affect system performance. Using the Power Cycle Method The power cycle reset is perhaps the most straightforward approach for GM infotainment systems without Google built-in, including many Chevy Equinox models from 2019 to 2023. Turn your vehicle completely off, wait approximately 30 seconds, then restart it. This basic power interruption gives the system a chance to clear temporary memory issues and restart fresh, often fixing minor operational problems. Using the OnStar Call Button Method Older GM infotainment systems (2017-2019) can benefit from this unique reset technique. Press the OnStar call button located on your rearview mirror or overhead console, then immediately hang up. This action triggers a soft reset of the infotainment system without affecting your saved settings. Many drivers find this method surprisingly effective for resolving audio output issues and touchscreen responsiveness problems. Using the Settings Menu Method For a more comprehensive reset option, access the reset function through your system’s settings menu. Navigate to the home screen of your infotainment system, select the Settings option, then choose Return to Factory Settings. Depending on your exact issue, select “Restore Vehicle Settings,” “Clear All Private Data,” or “Restore Radio Settings.” After completing your selected action, restart the system to finalize the reset process. This method provides more targeted answers for exact problems while giving you control over which settings are affected. Performing a Hard Reset on Your Chevy Equinox Stereo System When soft reset methods don’t resolve your Chevy Equinox stereo issues, a hard reset often provides a more thorough solution. Hard resets completely power down the system, clearing persistent software glitches and restoring factory settings. Battery Disconnect Method The most effective hard reset technique involves disconnecting your vehicle’s battery. First, ensure your Equinox is turned off completely and remove the key from the ignition. Open the hood and locate the negative battery terminal (marked with a minus sign). Using the appropriate wrench, loosen the negative terminal clamp and disconnect it from the battery post. Leave the battery disconnected for at least 15 minutes to ensure all residual power drains from the system’s capacitors. Reconnect the negative terminal securely after the waiting period, then start your vehicle. This complete power interruption forces the infotainment system to restart from scratch, often resolving stubborn issues that soft resets couldn’t fix. Factory Reset Method A factory reset returns your stereo to its original settings while clearing all personal data. Navigate to the home screen of your infotainment system and select the “Settings” option. Look for “Return to Factory Settings” or a similar option in the menu. Depending on your exact model year, you’ll see several choices: “Restore Vehicle Settings,” “Clear All Private Data,” or “Restore Radio Settings.” Select the option that best addresses your particular issue. The system will typically ask for confirmation before proceeding. After completing the reset, restart your Equinox to finalize the process. This method effectively removes corrupted user data while preserving the system’s core functionality. Fuse Reset Procedure While there’s no dedicated fuse reset procedure specifically for the stereo system, checking the relevant fuses can resolve certain electrical issues. Locate your vehicle’s fuse box, typically found under the dashboard on the driver’s side or in the engine compartment. Consult your owner’s manual to identify the exact fuse that powers the infotainment system. Using a fuse puller tool, carefully remove the identified fuse and inspect it for signs of damage such as a broken metal strip inside. Replace any damaged fuse with one of identical amperage rating. Even if the fuse appears intact, removing and reinserting it sometimes clears minor electrical faults that affect the stereo system’s performance. After the Reset: Restoring Your Settings After successfully resetting your Chevy Equinox stereo system, several important steps must be taken to restore functionality and personalized settings. Your infotainment system will return to its default state, requiring you to reconfigure various preferences to match your driving experience. Reconnecting Devices Bluetooth connections are automatically cleared during a system reset, requiring you to pair your devices again. Open your phone’s Bluetooth settings and select your Chevy Equinox from the available devices list. Accept any pairing requests that appear on both your phone and the infotainment screen. For optimal performance, ensure your smartphone has the latest operating system installed before attempting to reconnect. Adjusting Settings Your personalized settings need reconfiguration after a system reset. Navigate through the touchscreen menu to restore your preferred audio equalizer settings, display brightness, and menu configurations. Audio presets such as bass, treble, and balance require manual adjustment to match your listening preferences. Display settings including theme colors and home screen layouts can be customized through the settings menu to recreate your ideal interface. Updating Software Software updates enhance system stability and add new features to your Chevy Equinox infotainment system. Check for available updates by handling to the system information section in your settings menu. Models from 2019-2023 may receive over-the-air updates automatically when connected to WiFi, while older systems might require dealer assistance for software installations. Installing the latest software version helps prevent future system crashes and improves compatibility with newer smartphones. Clearing Cache and Private Data Some resets don’t completely clear all stored data. Access additional cleanup options by handling to the settings menu and looking for “Restore Vehicle Settings,” “Clear All Private Data,” or “Restore Radio Settings” depending on your exact system version. Clearing this data removes browsing history, saved locations, and temporary files that might cause performance issues. MyLink and IntelliLink systems typically store these options under the “System” tab in settings. Backing Up Data Creating backups before future resets prevents data loss and simplifies restoration. Many newer Chevrolet infotainment systems allow you to save preferences to your user profile, which links to your key fob or OnStar account. Save important addresses, audio presets, and display configurations to minimize reconfiguration time after future resets. Contact your Chevrolet dealer for exact backup options available for your model year if you’re unsure about your system’s capabilities. Troubleshooting Post-Reset Issues After resetting your Chevy Equinox stereo system, you might encounter several issues that need attention. These post-reset challenges are common and easily manageable with the right approach. Reconnecting Devices Bluetooth devices require re-pairing after a system reset. Open your infotainment system’s Bluetooth menu and set your phone to discoverable mode. Select your device from the available list and confirm the pairing on both devices. Your phone’s contacts and call history will sync automatically once the connection is established. Adjusting Settings Personal preferences need restoration following a reset. Radio presets can be reprogrammed by tuning to your favorite stations and holding down the corresponding preset button. Navigation preferences, sound equalizer settings, and display configurations require manual readjustment through the settings menu. Take a few minutes to customize these settings for an optimal driving experience. Software Updates System performance improves with the latest software versions. Check for available updates through the settings menu or by visiting your Chevrolet dealership. Updates often fix bugs and introduce new features that enhance your infotainment experience. Some newer Equinox models support over-the-air updates that download automatically when connected to Wi-Fi. Clearing Cache Persistent issues often resolve with cache clearing. Navigate to the system settings menu and look for options like “Clear Cache” or “Reset App Preferences.” This process removes temporary files without deleting your personal data. Clearing the cache frequently improves system responsiveness and helps eliminate glitches that survived the initial reset. Hard Reset When all other troubleshooting methods fail, a hard reset offers a last-resort solution. Disconnect the vehicle’s battery for approximately 15 minutes before reconnecting it. This action completely resets the electrical system and clears any persistent software issues. Remember that this method erases all settings and requires reconfiguration of the entire infotainment system. When to Seek Professional Help While many Chevy Equinox stereo issues can be resolved with DIY reset methods, certain situations call for expert assistance. Professional intervention becomes necessary when dealing with persistent problems that don’t respond to standard reset procedures. Persistent Issues Ongoing stereo malfunctions that continue after multiple reset attempts indicate deeper system problems. These stubborn glitches often stem from complex software corruptions or hardware failures that require specialized diagnostic tools. Certified technicians possess the equipment and expertise to identify underlying causes that DIY methods can’t address. Complex Errors System crashes, frequent freezing, and advanced error messages demand professional attention. These symptoms typically point to more serious software conflicts or component failures within the infotainment system. Technicians can access restricted diagnostic menus and perform targeted repairs that aren’t available through consumer-level reset options. Hardware Problems Faulty screens, unresponsive touch interfaces, and damaged audio components fall outside the scope of software resets. Physical damage to your Equinox’s infotainment system, such as cracked displays or malfunctioning control buttons, requires component replacement by qualified professionals. Attempting DIY repairs on hardware issues risks causing additional damage to connected systems. Software Updates Outdated software can cause compatibility issues and reduced functionality in your Equinox’s stereo system. Professional technicians can install the latest GM-approved software updates, ensuring proper integration with all system components. They’ll also preserve important data during the update process, preventing the accidental loss of stored settings and preferences. Conclusion Resetting your Chevy Equinox stereo system doesn’t have to be complicated. We’ve walked through multiple methods from simple soft resets to more involved hard reset procedures for stubborn issues. Remember that most audio glitches connectivity problems and frozen screens can be resolved with these DIY answers. After resetting don’t forget to reconnect your devices adjust your preferred settings and check for updates. If problems persist even though your troubleshooting efforts it’s time to consult a professional. They’ve got the specialized tools and expertise to diagnose deeper issues with your infotainment system. With these reset techniques you’ll be back to enjoying your favorite music podcasts and navigation features in no time making every drive in your Equinox more enjoyable. Frequently Asked Questions How do I reset my Chevy Equinox stereo system? To reset your Chevy Equinox stereo, try the Home and Fast Forward method by pressing both buttons simultaneously for a few seconds. Alternatively, use the Power Cycle method by turning off your vehicle for 30 seconds. For older models, press the OnStar call button and then hang up. You can also access reset options through the Settings menu on your infotainment system. Will I lose my settings when I reset the stereo? A soft reset typically preserves most settings, while a factory reset or battery disconnect will erase personalized preferences. After any reset, you’ll need to reconnect Bluetooth devices, restore radio presets, and readjust audio and display settings. Consider taking photos of your current settings before resetting to make restoration easier. Why is my Chevy Equinox stereo freezing? Your stereo might freeze due to software glitches, conflicting apps, outdated software, or memory overload. Temporary data conflicts between the infotainment system and connected devices can also cause freezing. In some cases, extreme temperatures or electrical issues might affect performance. A reset often resolves these issues by clearing temporary data and refreshing system memory. How do I fix Bluetooth connection problems in my Equinox? Reset your stereo system using one of the methods mentioned above. After resetting, go to Bluetooth settings, delete all paired devices, and then pair your phone again. Ensure your phone’s Bluetooth is turned on and discoverable. If problems persist, check for infotainment system updates or consider resetting your mobile device’s Bluetooth connections. When should I seek professional help for stereo issues? Seek professional help if problems persist after multiple reset attempts, you encounter complex error messages, experience hardware issues like distorted sound or screen damage, or need system updates that can’t be done at home. Dealership technicians have specialized diagnostic tools and can access manufacturer-specific solutions that aren’t available to consumers. What’s the difference between a soft reset and a hard reset? A soft reset refreshes the system without erasing personal data, like pressing specific button combinations or power cycling. It’s ideal for minor glitches and frozen screens. A hard reset, such as disconnecting the battery or performing a factory reset, returns the system to original settings and erases all personal data. Use hard resets only when soft resets fail to resolve issues. How do I update my Chevy Equinox infotainment system? Newer models may receive over-the-air updates automatically. For manual updates, visit your Chevrolet dealership where technicians can install the latest software. Some updates might be available through the GM website for download to a USB drive. Check your owner’s manual for model-specific update procedures or contact your dealer for the most current information. Can I reset my stereo system while driving? It’s not recommended to reset your stereo system while driving, as it can be distracting and potentially dangerous. The reset process may temporarily disable important features like backup cameras or navigation. For safety, park your vehicle in a secure location before attempting any reset procedure on your infotainment system. https://autorepairlebanontn.com/?p=3649 Absolute Auto Repair
0 notes
Text
Duo Sat Pulse é Bom? Análise Completa do Receptor

Com a evolução constante dos receptores digitais e a crescente demanda por conteúdo de qualidade via IPTV e satélite, o Duo Sat Pulse surge como uma opção interessante no mercado. Mas afinal, será que o Duo Sat Pulse é bom mesmo?
Neste artigo, vamos fazer uma análise detalhada do aparelho, avaliando seu desempenho, funcionalidades, conectividade e custo-benefício. Se você está pensando em investir nesse receptor, leia até o final antes de tomar sua decisão.
O Que é o Duo Sat Pulse?
O Duo Sat Pulse é um receptor digital que opera tanto via satélite (SKS/IKS) quanto via IPTV. Ele é voltado para quem deseja acessar uma ampla variedade de canais, filmes, séries e serviços de streaming sem depender exclusivamente da TV por assinatura tradicional. Com interface amigável e recursos modernos, o aparelho ganhou popularidade entre os entusiastas de tecnologia.
Principais Características do Duo Sat Pulse
1. Compatibilidade Híbrida
O aparelho oferece suporte a sinais via satélite (SKS) e pela internet (IKS e IPTV). Isso proporciona maior estabilidade e opções de conexão, garantindo funcionamento mesmo em momentos de instabilidade de rede.
2. Desempenho e Processamento
Equipado com processador eficiente e boa memória RAM, o aparelho é rápido na troca de canais e apresenta bom desempenho na navegação por menus e aplicativos.
3. Conectividade
Porta Ethernet para conexão cabeada
Suporte a Wi-Fi com adaptador USB (incluso ou vendido separadamente)
Entradas USB para mídia externa
HDMI com suporte a resolução Full HD
4. Atualizações Frequentes
A Duo Sat é conhecida por manter uma comunidade ativa e oferecer atualizações frequentes de firmware, o que é essencial para estabilidade e segurança do sistema.
5. Interface e Facilidade de Uso
A interface é intuitiva, com menus organizados, atalhos rápidos e sistema de busca eficiente. Ideal tanto para usuários avançados quanto iniciantes.
Prós e Contras do Duo Sat Pulse
Pontos Positivos:
Boa estabilidade no SKS e IKS
Suporte IPTV com boa fluidez
Interface responsiva e organizada
Atualizações frequentes de sistema
Preço competitivo frente a concorrentes
Pontos de Atenção:
Não possui suporte nativo a 4K (limita-se ao Full HD)
Necessidade de adaptador Wi-Fi em alguns modelos
Dependência de atualizações para manter estabilidade
Vale a Pena Investir no Duo Sat Pulse?
Se você procura um receptor estável, com boa variedade de conteúdo, compatibilidade com diversas tecnologias de transmissão e preço justo, este aparelho é uma escolha bastante equilibrada. Ele atende bem tanto quem prioriza canais via satélite quanto quem prefere conteúdo sob demanda via IPTV.
No entanto, se a sua prioridade absoluta é resolução 4K ou funções mais avançadas de integração com smart home, pode ser interessante considerar modelos mais recentes e completos.
Veja Também: Como Escolher o melhor receptor de canais
Considerações Finais
O Duo Sat Pulse é bom sim, especialmente para quem busca confiabilidade, simplicidade e compatibilidade com os principais sistemas de transmissão digital. Ele entrega o que promete, com desempenho satisfatório e um bom leque de recursos. Para muitos usuários, é a combinação ideal entre tecnologia, preço e praticidade.
Duo Sat Pulse é Bom?
#duosat#duo sat pulse#aparelho de tv box#btv#tv box#btvs#santaefigênia#receptor de canais#loja de tv box#duo sat é bom
0 notes
Text
Test XGIMI Halo+ New : Que vaut-il vraiment ?

Test du XGIMI Halo+ New : le vidéoprojecteur portable qui voit grand sans se la raconter
XGIMI remet le couvert avec son Halo+ New, une version boostée de son best-seller nomade. À mi-chemin entre la lampe de poche intelligente et le mini-ciné-club de salon, ce projecteur promet tout : de la 4K en entrée, du Netflix officiel (si si !), et du Google TV pour les allergiques aux menus bricolés. Mais au-delà du buzz marketing, que vaut vraiment ce petit bijou à LED ? Spoiler : il a plus d’un pixel dans son sac… mais quelques concessions aussi.

Une technique qui fait (presque) tout bien
Fiche technique digérée (sans tableau, c’est promis) Résolution native : Full HD (1920x1080) Technologie : DLP avec source lumineuse LED (durée de vie estimée : 25 000 heures) Luminosité : 700 ISO Lumens (attention, pas ANSI – on t’explique juste après) Audio : Deux haut-parleurs Harman Kardon 5W – stéréo bien balancée, effet home-cinéma en mini format Système : Google TV avec Netflix, Prime Video, Disney+, YouTube, etc. (Netflix natif ! Oui, on insiste) Correction automatique : Keystone horizontal/vertical + autofocus Autonomie : Batterie intégrée pour 2h30 en usage modéré Connectique : HDMI, USB-A, prise jack, Wi-Fi, Bluetooth 5.0 Dimensions : 113,5 × 145 × 171,5 mm – tient dans un sac à dos Poids : 1,6 kg – c’est pas une plume, mais pas non plus un haltère Des promesses tenues ? La promesse de XGIMI est simple : un projecteur tout-en-un, facile à utiliser, et assez musclé pour remplacer une télé. Globalement, le contrat est rempli. La qualité d’image est propre, sans latence perceptible, avec des couleurs vives et une netteté satisfaisante même sur une grande diagonale (jusqu’à 200 pouces, selon votre mur et vos rêves). Il ne fait pas de miracle en plein soleil, mais dans une pièce semi-obscure, le rendu est franchement convaincant. Le son mérite une mention spéciale : XGIMI reste fidèle à sa tradition en intégrant des haut-parleurs Harman Kardon qui tiennent la route. C’est suffisamment puissant et clair pour une soirée film sans enceinte externe – un vrai plus pour les nomades.
Et pour les débutants, c’est galère ou bonheur ?
L’expérience utilisateur pour les noobs (on vous voit) Tu n’as jamais utilisé de vidéoprojecteur et tu paniques à l’idée de devoir régler des lentilles ou d’aligner ton image à la main ? Respire. Le Halo+ New est littéralement un projecteur pour les gens qui n’aiment pas se compliquer la vie. Installation ? Tu le poses, tu l’allumes, tu vis. L’autofocus et la correction de trapèze font le boulot en moins de 10 secondes. Interface ? Google TV est claire, fluide, intuitive. Tu navigues comme sur une box Android, avec les apps qu’on connaît déjà. Télécommande ? Minimaliste mais efficace, avec micro intégré pour parler à Google Assistant. (Oui, tu peux dire “mets-moi Le Seigneur des Anneaux sur Netflix”, et ça marche.) Connexion ? Wi-Fi rapide, Bluetooth stable, et même un port HDMI si tu veux brancher ta console ou ton PC. Petit bémol newbie Attention à la luminosité : 700 ISO Lumens, ce n’est pas 700 ANSI Lumens. Dans une pièce baignée de lumière naturelle, le rendu s’affadit rapidement. Pour une bonne expérience, prévois des rideaux. Et si tu rêves de sessions foot à midi sur ta terrasse, change de rêve ou investis dans un modèle plus lumineux.
Nomade, oui, mais avec modération
Le Halo+ New est portable… mais pas ultra-light. Son gabarit est contenu, mais son poids d’1,6 kg et sa batterie interne l’orientent plus vers une mobilité domestique (passer de la chambre au salon) qu’un road trip dans les Alpes. Batterie : l’ami des séries, pas des marathons En conditions optimales (mode éco, luminosité modérée), tu obtiens environ 2h30 d’autonomie, ce qui suffit pour un film standard. Mais si tu veux pousser la luminosité ou activer les apps gourmandes, l’autonomie fond comme une glace au soleil. Prévoyez donc une rallonge pour les longues soirées.
XGIMI Halo+ New Le verdict – un coup de cœur raisonné ?
Ce qu’on adore ❤️ Netflix enfin intégré et certifié – on ne le dira jamais assez Une image ultra propre pour du Full HD Le son intégré de qualité, pas besoin d’enceinte Facilité d’usage extrême – plug, play, enjoy Un OS Google TV fluide, complet, personnalisable Ce qui fait grincer des dents 😬 Luminosité perfectible en conditions lumineuses Pas de zoom optique : le placement est crucial Pas 4K natif (mais upscaling convaincant pour du contenu HD) Autonomie limite pour les gourmands Le XGIMI Halo+ New est une réussite dans la catégorie des vidéoprojecteurs portables premium. Avec sa compatibilité Netflix native, sa technologie LED durable, un son signé Harman Kardon, et Google TV intégré, il coche presque toutes les cases pour une expérience home cinéma fluide, moderne et sans prise de tête. Idéal pour les utilisateurs en quête de confort visuel sans sacrifier la mobilité, il reste toutefois un peu limité par sa luminosité modérée et sa résolution Full HD qui n’impressionnera pas les puristes de la 4K native. 👉 En résumé : le Halo+ New, c’est un vrai bon plan pour les amateurs de cinéma nomade et les familles modernes, à condition de ne pas le surestimer. Read the full article
0 notes
Text
Moog Strikes Back with Messenger Synthesizer to Compete with Budget Clones

Source: rekkerd.org
Moog, the legendary name in analog synthesis, has unveiled its newest creation—the Moog Messenger, a compact monophonic analog synthesizer aimed at both honoring its rich heritage and pushing into a new era. This new model is designed to counter the rise of affordable clone synths that have flooded the market in recent years, offering users a genuine Moog experience at a more accessible price point.
The Messenger combines decades of analog expertise into a portable three-octave unit with 32 semi-weighted keys and a control-laden interface that invites real-time sonic exploration. With a focus on authentic analog sound design, the Messenger boasts a new array of filters and oscillators alongside classic circuitry, staying true to Moog’s iconic warmth and gritty texture.
Despite no longer being an all-American manufacturer—following its acquisition by inMusic and the shift of production facilities overseas—Moog aims to retain its soul with the Messenger, balancing heritage with innovation. Joe Richardson, President of Moog Music, described the instrument as “crafted for musicians and producers seeking a portable, powerful monosynth that delivers the iconic Moog sound.”
Built for Performance and Creativity
The Moog Messenger isn’t just about sound quality—it’s about hands-on performance. Unlike many modern synthesizers that rely on screens and complex menus, this new Moog model embraces simplicity. Each function has a dedicated knob or switch, allowing users to dive straight into sound sculpting without getting lost in submenus.
The synthesizer also comes loaded with 256 onboard presets, a 64-step sequencer, and a built-in arpeggiator with various patterns, giving users the tools to craft rhythmic and melodic patterns on the fly. The connectivity suite is equally impressive, featuring MIDI (both 5-pin and USB-C), control voltage (CV) inputs and outputs, and clock sync for integration with other gear.
Erik Norlander, Director of Keyboard Product Development at inMusic, noted that the Moog Messenger was designed to invite exploration. “Our goal was to create a synthesizer that welcomes first-time Moog players and offers the depth and expressiveness that experienced musicians expect,” he explained.
Balancing Legacy with Accessibility
Moog’s decision to move production to Asia has sparked some debate among fans who view the brand’s Asheville, North Carolina roots as integral to its identity. However, the shift is part of a larger strategy to remain competitive in a market saturated with low-cost clone synths. With devices mimicking Moog’s legendary Model D retailing for under $500, the company faced mounting pressure to create a high-quality yet affordable alternative.
The Messenger may prove to be Moog’s answer to this challenge—a genuine analog synth that bridges the gap between legacy craftsmanship and mass-market accessibility. While purists may lament the move from hand-built American instruments, the Messenger could extend Moog’s reach to a new generation of musicians, all without sacrificing the sonic character that made the brand iconic.
As Moog enters this new chapter, the Moog Messenger stands as both a defensive move against imitation and a bold step toward making analog synthesis more widely accessible.
0 notes
Text
A Beginner’s Guide to Digital Signage Cloud Software for Small Businesses

In a modern, digital-first business world, capturing the attention of a customer is competitive! For small businesses, digital signage cloud software is fast becoming the ultimate helper to engage customers, put the product into the spotlight and communicate with expediency-all with minimal exertion. For a small business owner who wonders how to grasp and implement this technology, this beginner's guide is a must.
What is Digital Signage Cloud Software?
Digital signage cloud software is a web-based platform allowing businesses to manage their digital displays remotely, through the Internet. Being cloud-based, there is no need for local servers or manual updates using USB drives. Now, whichever offers are to be showcased, menus updated, or promotional videos displayed, the content can be changed from anywhere at any time.
Usually, the software includes a CMS (Content Management System) for digital signage that enables you to upload and schedule content for a display or several screens. Most offer intuitive interfaces, so even a non-technical person can get around them without difficulty.
Why Choose Cloud-Based Digital Signage?
Old-time digital signage systems with all their moving parts had to be in place and in-person. Cloud-based digital signage can provide all its stars of flexibility and efficiency to help small businesses that truly want to benefit from it, particularly in fast-paced markets like Sydney and Brisbane.
Here’s why cloud signage is ideal for small businesses:
Remote Management: Update your screens from your phone or laptop—anytime, anywhere.
Cost-Effective: No need for physical updates or printing costs. Cloud systems lower long-term expenses.
Real-Time Updates: Launch flash sales or emergency messages in seconds.
Scalable: Start with one screen, grow with your business.
Professional Look: Appear slick and star-tech without spending enterprise-level droppings.
From a Sydney boutique, with a few fitness studios in Brisbane, down to a retail store: the essential tools provided by digital signage cloud software ensure the most timely and powerful contents.
Choosing the Best Digital Signage Cloud Software
The best digital signage software, especially cloud-based, must offer:
User-Friendly CMS: Easy dashboard for content uploading and scheduling
Multi-Screen Control: To control multiple screens in different locations
Content Formats Support: Videos, images, RSS feeds, live data, social media, and more.
Security and Uptime: Truly secure cloud infrastructure to have any odds for down-time.
A Customer Support: Well-documented plus a strong team of support members.
Most popular digital signage software offers free trials, so make sure you take advantage of these to assess ease of use, customization, and support.
Real-World Applications of Cloud-Based Digital Signage
Cloud signage fits seamlessly into various small business types:
Retail Store Digital Signage: Display offers, product demos, or welcome messages.
Restaurants and Cafés: Use LED screens as dynamic menu boards, updating items in real time.
Gyms and Studios: Show class schedules, health tips, or member achievements.
Clinics and Offices: Use screens in waiting areas to reduce perceived wait times and share updates.
Adding an LED screen board connected to your digital signage software creates a visually striking, professional presence that boosts customer engagement.
Digital Signage in Australia’s Small Business Landscape
In cities like Sydney and Brisbane, digital signage is fast becoming a popular choice in the realm of small business marketing. As people begin pouring in, resuming patronizing in person experiences, standing out visually through cloud-supported signage is becoming more of an asset.
Cloud software further enables the Australian business to be on the same page when it comes to two or more locations-i.e., a couple of shops or an emerging franchise.
Conclusion
Digital signage cloud software is no longer just for big names. Today, cloud-based solutions are affordable, intuitive, and powerful enough to support the needs of any small business. Choosing the right platform and coupled with a smart content strategy will deliver timely and engaging messages. This will help to convert viewers into customers.
If you feel it is high time to modernize how your company communicates, then research around for the best digital signage cloud software now! You will be amazed at how easy it is to give your brand presence an uplift.
If you’re looking for a reliable and scalable digital signage cloud software solution tailored to small businesses, Engagis has you covered. With years of experience delivering cutting-edge digital signage solutions across Australia—including in Sydney and Brisbane—Engagis offers everything from cloud-based CMS platforms to LED screen boards, installation, and ongoing support.
#digital signage cloud software#digital signage cms#digital signage software#digital signage#led screens#software digital signage
0 notes
Text
Exploring the HACH 2100N: A Comprehensive Guide to Water Quality Analysis
Introduction to the HACH 2100N
The HACH 2100N is a state-of-the-art instrument designed specifically for water quality analysis, offering precise measurement capabilities that are essential for various applications in environmental science and water treatment industries. Its primary purpose is to enhance the efficiency and accuracy of testing critical water quality parameters such as turbidity, total suspended solids, and color, all of which are vital for determining the overall health of water bodies and ensuring compliance with regulatory standards.
One of the significant features of the HACH 2100N is its advanced nephelometric technology, which provides reliable turbidity measurements. This feature is particularly important for water treatment facilities, as it allows for real-time monitoring of water clarity, thus aiding in process optimization. The device comes equipped with a user-friendly interface, enabling professionals to navigate through the testing process with ease and efficiency.
In terms of versatility, the HACH 2100N can measure a range of parameters beyond just turbidity. This includes assessments of particulate matter, which are crucial for evaluating the effectiveness of filtration processes and overall water quality. The compact design and portability of the instrument make it suitable for both laboratory use and field testing, promoting its adoption by various professionals across the environmental sector.
This instrument is preferred by many in the water quality testing field for its accuracy, reliability, and robust data management capabilities. It supports compliance with both national and international water quality standards, making it an essential tool for any professional involved in water quality management. By using the HACH 2100N, practitioners can ensure they maintain high water quality standards, thereby protecting public health and the environment.
Key Features and Specifications
The HACH 2100N is a sophisticated water quality analyzer designed to meet the rigorous demands of modern water testing. One of the standout features of this equipment is its ability to measure turbidity across a wide range of levels, from 0.01 NTU to 4000 NTU. This broad measurement range allows for precise assessments in various water quality scenarios, making it suitable for both drinking water systems and industrial applications.
In terms of user interface, the HACH 2100N boasts a large, intuitive LCD screen that enhances readability and ease of use. Operators can navigate through different settings and measurement parameters quickly, promoting efficient workflows during testing. The menu-driven interface, combined with a simplified calibration process, reduces the potential for user error, further ensuring reliable results in water analysis.
Portability is another vital aspect of the HACH 2100N. Weighing only a few kilograms, this device is compact enough for field use while still maintaining durability in diverse environmental conditions. It is equipped with a rechargeable battery, allowing users to conduct measurements without being tethered to power sources, thus enhancing the flexibility of water testing applications.
Data management plays a crucial role in modern water quality analysis, and the HACH 2100N excels in this area. It features built-in data storage that can hold multiple measurement results, which can be easily accessed for review and analysis. Furthermore, users can connect the device to computers or mobile devices via USB, facilitating seamless data transfer for reporting and record-keeping purposes.
Overall, the combination of measurement capabilities, an intuitive user interface, portability, and advanced data management options underscores the HACH 2100N's role in enhancing the accuracy and efficiency of water quality testing, making it a valuable tool for various water testing professionals.
Benefits of Using the HACH 2100N
The HACH 2100N represents a significant advancement in water quality analysis, boasting numerous benefits that make it invaluable for both laboratory and field applications. One of the primary advantages of utilizing the HACH 2100N is its reliability; the device consistently produces accurate results, ensuring that users can trust the data for critical decision-making regarding water quality.
Another notable benefit is the ease of use offered by the HACH 2100N. The intuitive interface allows users, regardless of their technical expertise, to operate the machine efficiently. Furthermore, the streamlined workflow reduces the need for elaborate training, making it accessible for professionals as well as those who may be newer to water analysis. This user-friendly design enhances productivity and minimizes the possibility of errors during sample processing.
Time-saving capabilities are also central to the HACH 2100N's advantages. Traditional water testing methods can be labor-intensive and time-consuming, often delaying the availability of results. However, the HACH 2100N provides rapid analysis, allowing users to obtain results in a fraction of the time, which is especially beneficial for urgent assessments in environmental monitoring or compliance testing.
The precision of the results delivered by the HACH 2100N cannot be overstated. Users have reported that the equipment offers reliable measurements of turbidity and other critical parameters, contributing to better monitoring of water quality. Case studies from various industries, such as wastewater treatment and drinking water suppliers, highlight the effectiveness of this device in enhancing operational efficiency and ensuring compliance with regulatory standards.
In summary, the HACH 2100N stands out due to its reliability, user-friendliness, time efficiency, and precise results, making it a preferred choice for water analysis across various sectors.
Conclusion and Future of Water Quality Testing
The HACH 2100N has proven itself to be a vital instrument in the field of water quality testing, providing reliable and accurate measurements that aid environmental monitoring and public health protection. As concerns over water pollution and quality continue to rise globally, tools like the HACH 2100N become increasingly crucial. This device stands at the forefront of water analysis technology, enabling users to obtain immediate results that can inform timely decisions regarding water safety.
In the context of modern environmental challenges, the HACH 2100N plays a significant role in ensuring compliance with regulations and contributing to the larger goal of sustainable water management. Its ability to perform turbidity testing and other critical analyses allows water treatment facilities, laboratories, and field researchers to maintain high standards of water quality. With growing integration of technology, devices such as the HACH 2100N are evolving, incorporating smart capabilities that enhance data analysis and reporting processes.
Looking ahead, emerging trends in water analysis point towards greater automation and digitization, paving the way for more innovative solutions in water quality management. The integration of artificial intelligence (AI) and machine learning into the testing process is expected to improve the predictive capabilities of devices similar to the HACH 2100N, allowing for better response strategies to potential water quality issues. This evolution not only enhances accuracy but also streamlines operations, ultimately making water quality analysis more efficient.
In summary, as we navigate the complexities of managing water resources, the HACH 2100N will remain an indispensable tool. Its continuous advancement and adaptation to new technological trends will shape the future landscape of water quality testing, ensuring that public health and environmental standards are upheld for generations to come.
0 notes
Text
In an age where convenience and connectivity are king, the Fabfunk Wired to Wireless CarPlay Adapter emerges as a revolutionary solution for drivers seeking to upgrade their in-car tech—without upgrading their car. If you're tired of dealing with tangled cords or limited movement, this compact device is your key to a smarter, cleaner, and wire-free driving experience.
What is the Fabfunk Wired to Wireless CarPlay Adapter?
The Fabfunk Wired to Wireless CarPlay Adapter is a plug-and-play device that transforms your existing wired Apple CarPlay system into a fully wireless interface. No more fumbling with cables every time you get in your car. This tiny but mighty adapter connects your iPhone to your car via Bluetooth and Wi-Fi, letting you enjoy all the features of Apple CarPlay—wirelessly.
Key Features of Fabfunk Wired to Wireless CarPlay Adapter
Seamless Wireless Connectivity: Say goodbye to cords. The Fabfunk Wired to Wireless CarPlay Adapter pairs your iPhone with your car automatically after the initial setup.
Wide Compatibility: Works with most factory-installed and aftermarket CarPlay systems (2016 and later models).
Plug & Play Installation: No apps. No coding. Just plug the adapter into your car’s USB port, and you’re ready to go.
Compact & Sleek Design: Minimalist build that fits seamlessly in your car’s center console.
Fast Boot Time: Connects within 10–15 seconds of engine start-up.
OTA (Over-the-Air) Updates: Keeps your device up-to-date with automatic firmware updates.
User Experience: Real Convenience
Using the Fabfunk Wired to Wireless CarPlay Adapter is genuinely a delight. The initial pairing process takes less than a minute. Once set, every time you step into your car, your iPhone connects instantly—no need to pull it out of your pocket or bag. Navigation, calls, music, Siri, and all your essential apps work just like they would over a wired connection—but with total freedom.
Compatibility & Setup
The Fabfunk Wired to Wireless CarPlay Adapter supports most vehicles with wired Apple CarPlay manufactured after 2016. It is compatible with major car brands like BMW, Mercedes, Audi, Ford, Hyundai, Honda, Toyota, Kia, and more.
Setup is as simple as:
Plug the Fabfunk Wired to Wireless CarPlay Adapter into your car's USB port.
Enable Bluetooth and Wi-Fi on your iPhone.
Select your car from the Bluetooth menu.
Done! Your wireless CarPlay is live.
Why Choose Fabfunk?
Unlike other generic adapters in the market, the Fabfunk Wired to Wireless CarPlay Adapter is known for its stability, speed, and reliability. It’s tested extensively across vehicle types and comes with strong customer support. With ongoing firmware improvements, the product is future-proof, keeping your CarPlay setup modern and hassle-free.
Is Fabfunk Wired to Wireless CarPlay Adapter Worth It?
Absolutely! If you’re looking to cut the cord and enjoy the full Apple CarPlay experience wirelessly, the Fabfunk Wired to Wireless CarPlay Adapter is one of the best investments you can make for your car. Whether you’re commuting daily or embarking on long road trips, this adapter brings tech convenience, freedom, and a touch of modern luxury to your driving life.
1 note
·
View note
Text
1. Changxun Solution
Factory Password: 8888
APK Installation and Upgrade:
Place the APK file on a USB stick.
On the main device interface, open the ESC browser or file manager, find the APK upgrade file, click to install. After installation, restart the device.
APK Upgrade Platforms: Landscape 4G version (3518C), WIFI version (8227/9218), Portrait 4G version (3518C). Choose the corresponding APK platform for the upgrade.
Steps:
Uninstall the previous version: Car Settings > Android Settings > Apps > Original Car Settings > Uninstall.
Extract the files to the root directory of the USB drive, insert the USB into the car's USB port, find the extracted files in the file manager, and click to install. After installation, select the model.
After model selection, go to Factory Settings, and click "Restart" to reboot.
For Portrait WIFI Version Upgrade: Extract the files to the root directory of the USB stick (no folder needed), then go to the main menu, Settings > General Settings > System Information, and click "Android Upgrade" (green button).
After the upgrade, press and hold the touchscreen for 3 seconds to bring up the touch calibration interface. Follow the instructions to calibrate.
2. Novida Solution
Factory Password: 666888/168 (Landscape), 1617 (Portrait)
APK Upgrade:
Create an "updateApk" folder, place the APK inside, and copy it to a USB drive. Then, in the main device interface, go to the toolbox and click “APK Upgrade.”
After the upgrade, you can check the version information in the CAN model settings.
APK Upgrade Method: The upgrade method is the same for both landscape and portrait versions, but make sure to choose the corresponding APK file.
System Upgrade:
Copy the compressed software package directly to the root of the USB drive (do not create a folder). Rename it to "update.zip."
In car settings, go to Factory Settings > System Upgrade.
3. Dingwei Solution
Factory Password: 8888
MCU Upgrade Method:
Extract the software package to the USB stick (no folder needed), then go to Settings > General Settings > MCU Upgrade/System Upgrade.
Online Upgrade:
For both landscape and portrait versions, connect the main device to the internet.
Go to General Settings > Advanced Settings, enter password 8888, choose the corresponding vehicle model, and click "Confirm." Follow the prompts for the upgrade process.
4. Fangyitong Solution
Factory Password: 3368
Software Upgrade:
Extract the software package to the root of the USB drive. The system will automatically recognize the USB and upgrade.
APK Installation:
Place the extracted APK files on the USB root directory. Open the File Manager on the main device, locate the APK files, and install them one by one.
5. Waterword Solution
Factory Password: 8888
Online Upgrade:
Connect the device to the internet, go to "About the Device" > "Software Online Upgrade" > "System Software Upgrade."
Local Upgrade:
Rename the upgrade file to "wwc_update.zip" (without extracting), place it in the USB root directory, then go to Settings > Software Local Upgrade > System Software Upgrade.
CANBUS-GO App: Download the latest version from the app store and select the vehicle model in K6G-Canbus.
6. Hengchen Solution
Factory Password: 000000
Software Upgrade:
Place the software package in the root directory of the USB drive. The system will automatically upgrade.
APK Installation:
Place the APK file in the root directory of the USB stick. Install directly from the device by selecting the file in the File Manager.
7. Feige Solution
APK Upgrade:
Place the APK file on the USB drive, go to the main device interface, open the File Manager, and click to install the APK.
8. Xunzu Solution
Factory Password: 8888
Upgrade Package:
Extract the upgrade package to the root directory of the USB stick. After inserting it into the device, the upgrade window will pop up. Confirm the upgrade to start.
Once the upgrade is complete, the system will prompt "Please remove the external upgrade device, and the device will restart."
Android Version:
Go to Settings > General Settings > Version Information, tap the Android version 5 times. A password box will pop up; enter password 8888.
9. Ingmote (Deanjer) Solution
Factory Password: 8317
Upgrade Process:
Extract the upgrade file to the root directory of the USB drive. Once the USB is inserted and the device is powered on, the upgrade process will begin automatically.
After completion, the device will prompt for you to remove the USB/SD card. The device will reboot.
System Upgrade Password: 888888
Go to Car Settings > System > System Update, and enter the system upgrade password (888888).
10. Tengshi Solution
Factory Password: 7772 (Car Settings > About Device > Enter the password at the top right)
Upgrade Process:
Format the USB drive, extract the upgrade files, and insert the USB stick. The system will detect the upgrade automatically.
11. Bodha Solution
Upgrade Process:
No need to extract the upgrade package. The system will automatically pop up an upgrade prompt in the radio interface, allowing you to select either MCU or SYSTEM upgrade.
Model Selection:
Go to Settings > About Version, click the kernel version and OS version 3 times each (total 6 times) to enter Factory Settings, where you can choose the CAN protocol company and vehicle model.
12. Aimi Solution
Factory Password: 1501
13. Qiding Solution
Factory Password: 13248756
System Upgrade:
Extract the upgrade package to the root directory of the USB stick. Insert the USB while the device is powered on, and the system will prompt for an upgrade. Click to upgrade, and during the upgrade process, the system will prompt you to remove the USB. Once removed, the upgrade will continue and complete.
APK Installation:
Place the APK file on the USB stick, go to the File Manager on the main device, locate the APK file, and install it.
This summary includes the steps for upgrading the software and APK on various car multimedia systems. Make sure to follow the specific instructions for each system to ensure the upgrade is successful. If you need additional details or encounter issues, feel free to ask!
1 note
·
View note
Text
Price: [price_with_discount] (as of [price_update_date] - Details) [ad_1] Experience the nostalgia of retro gaming with this all-in-one game console, preloaded with over 20,000 classic games. The console comes with two wireless controllers, offering a convenient and comfortable gaming experience without the tangle of cords. Simply connect the console to your TV using the included HDMI cable and dive into your favorite games with stunning video and audio quality. The plug-and-play design ensures a hassle-free setup, allowing you to start playing right away. Its compact and portable design makes it easy to bring the fun wherever you go. The package includes everything you need: two wireless controllers, a micro USB power cable, an HDMI cable, and a user-friendly interface. Rediscover your favorite classics and explore new ones with this versatile retro game console How to Assemble and Play Step-by-Step Instructions: 1. Unpack the Components: - Ensure you have all the components: the console, 2 wireless controllers, micro USB cable, HDMI cable, and the USB receiver. 2. Insert Batteries into the Controllers: - Open the battery compartment on the back of each wireless controller. - Insert 2 AAA batteries into each controller, ensuring correct polarity. - Close the battery compartment securely. 3. Connect the Console to the TV: - Insert the console into an available HDMI port on your TV. - Connect the micro USB cable to the console and plug it into a power source. 4. Connect the Wireless Controllers: - Insert the USB receiver into one of the USB ports on the console. - Turn on the wireless controllers by sliding the on/off switch to the "on" position. They should automatically sync with the console. 5. Power On the Console: - Turn on your TV and switch to the corresponding HDMI input where the console is connected. - Power on the console by using the on/off switch if it has one. 6. Navigate the Menu: - Use the wireless controllers to navigate through the main menu. - Browse through the 20,000+ games available and select your desired game. 7. Start Playing: - Once you have selected a game, follow the on-screen prompts to start playing. - Enjoy hours of retro gaming fun! Tips for Best Experience: - Ensure your controllers have fresh AAA batteries for uninterrupted gameplay. - If the controllers do not sync automatically, refer to the user manual for syncing instructions. - For optimal video quality, make sure your TV is set to the correct resolution that matches the console's output. - Store the console and controllers in a safe place when not in use to avoid damage. By following these steps, you can easily assemble and start playing with your retro game console, reliving classic games from the past with modern convenience. 【Massive Childhood Classic Games】More than 20,000+ retro classic games are pre-installed in the game console to relive your childhood memories. Equipped with upgraded chip,the game Console is compatible with 9 emulators( PS1/ ATARI/ MAME/ SFC/ FC/ GBA/ GB/ GBC/ MD), built in the classic retro game console with 64G SD card. NO need to download games, no Wi-Fi required! And the game console is preinstalled with 9 emulators to bring you back to your childhood! 【Plug & Play Game Console】Connect the gamepad to the power supply, then plug it into the TV, and adjust the TV power to the HD channel to display the game list screen on the TV. The steps are as follows:1. Connect the HD output of the TV 2. Insert the built-in TF game content card 3. Using the charging adapter to connect the power supply will turn on automatically. (2 controllers require 4 AAA batteries, not included in the package) 【4K Gaming Experience】4K HD HDMI output, 1080P HD quality, equipped with expanded HDMI cable, suitable for different monitors, can be connected to TV/computer/TV set-top box /PC, perfect to meet your high resolution and game configuration needs. Please make sure your screen has an HDMI input port so that the console can connect to your TV/TV set-top box.
You can enjoy vivid and exciting video games on the big screen for a more comfortable gaming experience. 【2 Controllers】2 PCS controller adapters, the connection is stable and almost zero latency, allowing you to beat more bosses without any wiring problems. 【Perfect Gifts and Service】Plug and play video games console not only bring fun play time to kids, they also evoke fond childhood memories and release the stress of life for adults in the 80s and 90s. Ideal gift for children and adults on birthdays, Thanksgiving day, Christmas day or any occasion. If you come across any problems during playing, please contact us through the Information of Amazon Buyers and Sellers. [ad_2]
0 notes