#cricut design space app
Text
How to Connect Cricut to Phone: A Guide for Beginners
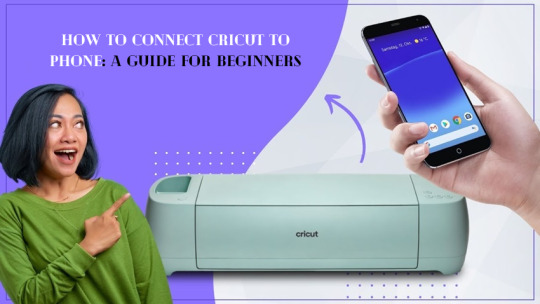
Hey readers! How is it going? I hope you are happy after getting a Cricut machine. This range of machines is excellent and creates a good impact on your crafting skills. Hence, if you want to hone your DIY projects, Cricut is something unbeatable. To get started, you need to set it up on your device, such as a computer or phone. And, today I’ll teach you how to connect Cricut to phone through this blog.
Being a full time DIYer and a blogger, I always hear from my users that they are always a little confused about their machine’s setup. Hopefully, I’ll be able to help them all. If you’ have been struggling with the connection process, here you’ll get all the clarity. So, let’s get started!
What Is a Cricut Design Space App?
If you’re expecting a Cricut machine to connect to your phone, you know that it can’t be possible without an application. Hence, Cricut offers its design app known as Cricut Design Space app to create designs that you convert into your favorite crafts. So, to get it on your phone, you need to install its application on your phone. I’ll mention all the steps.
How to Download Cricut Design Space on Phone?
Before we proceed to learn how to connect Cricut to phone, here is something more important. As you know Cricut Design Space is crucial to setup a Cricut machine on a phone, you need to download and install it on your phone. Look at the steps below to learn them quickly.
For Android
All Android users can follow these steps to get the Cricut Design app on their Android phones.
Go to the Play Store on your Android device and open it.
Now, locate the Cricut Design Space in the search bar.
When you see the icon for the Cricut app as a green C letter, select it.
After that, hit the Install button to install that app.
Next, you’ll see your app on the home screen along with other apps.
Now, click on the icon of Cricut Design Space.
In the last step, begin the sign-in and design.
Finally, you have the Cricut software on your Android device. Let’s check the steps for iOS.
For iOS
If you are an iOS user, don’t worry. The steps are simple for it, too. Let’s check the steps here.
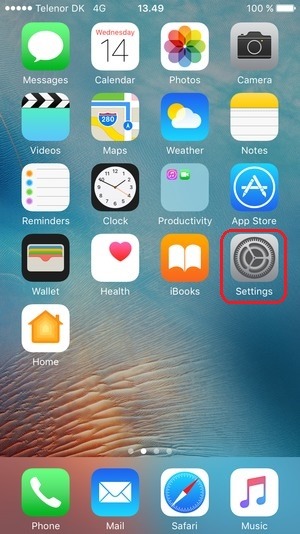
First of all, open the App Store on the iOS device’s home screen.
Now, navigate to the Cricut Design Space app in the search bar.
After that, you’ll see a Get button; click on it to download your app.
Next, when your app is downloaded, open it and select one option: Sign In or Cricut New Machine Setup.
Now, the Cricut Design app is on your iOS device. Here, the door for creativity is just a step away from you. Connect your machine to your phone to finalize the Cricut setup on the phone.
How to Connect Cricut to Phone?
Finally, you are here to learn the connection procedure between your Cricut and phone. So, let’s learn how to connect Cricut to phone wirelessly.
For Android
Are you an Android user? You can easily connect your Cricut to your phone using the following steps. Here, I’m using the Bluetooth connection. Let’s see the final steps in detail.
In the beginning, turn on your machine and check whether it is 10-15 feet away from your phone or not.
Then, head to the phone Settings.
After that, head to the Bluetooth option.
Next, enable the Bluetooth option if it’s not.
Thereafter, select your Bluetooth module name from the list.
If you need to enter the four-digit PIN, enter “0000”.
Finally, you’re ready with your Cricut machine connected to an Android device.
That’s how to connect Cricut to phone. Now, you have the freedom to utilize your Cricut machine the way you want.
For iOS (iPhone or iPad)
Well, if you’re an iOS user, here are the steps for you. Below, I’m mentioning some step-by-step instructions for connecting a machine to an iOS. Let’s see how to connect Cricut to phone Bluetooth.
In the beginning, ensure that the distance between your Cricut and phone is not exceeding 10-15 feet.
On your phone’s screen, open the Settings option.
After that, enable the Bluetooth option and search for your Cricut machine.
Next, once you see your machine in the list, select it and continue to pair it.
Now, you may need to enter the four-digit PIN and enter “0000”.
At last, click on the Pair option to end the process.
That’s how to connect Cricut to phone. These steps are common for iPhones and iPad. Once you connect your Cricut to your phone, various possibilities are available to you now.
Conclusion
I have tried my best to make you understand about the connection process between a Cricut machine and a phone. Here, you can create anything with your Cricut machine. Once the setup is complete, you’re allowed to use Cricut Design Space Software the way you want. If you want premium features, you can opt for the Cricut Access subscription. This subscription will make your work easy by offering you with so many advanced features. Now, connect Cricut to your phone and enjoy your day!
For more information visit: www.cricut.com/setup login
Cricut setup on computer
cricut maker setup
Source: How to Connect Cricut to Phone
#connect cricut to phone#Cricut design space download#cricut design space login#design.cricut.com#cricut machine setup#Cricut maker setup#Cricut Setup#Cricut design space app
2 notes
·
View notes
Text
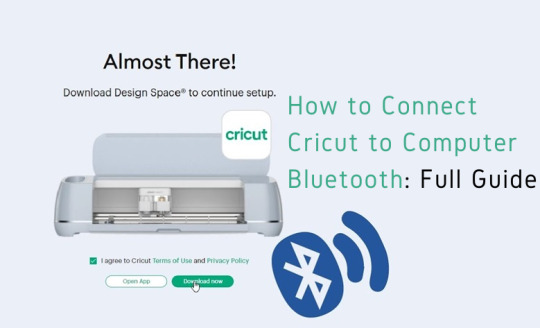
How to Connect Cricut to Computer Bluetooth: Beginners Tutorial

Want to learn how to connect Cricut to computer Bluetooth? If so, you are in the right place! Throughout this guide, I will show you how I connect my Cricut to a laptop using Bluetooth. I know how difficult it can be for beginners to connect a Cricut machine set up. The process is similar whether you want to pair it to a Windows or Mac. Besides, you will need to keep some things in mind before establishing a connection. So, you must start with the system requirements.
Are you ready to start the connection process via Bluetooth? If yes, I will provide step-by-step instructions so you can easily connect your Cricut in no time. Start with the system requirements and then connect your Cricut machine to the desired device.
System Requirements to Use Cricut Design Space
So, are you ready to delve into the guide to learn how to connect Cricut to computer Bluetooth? If so, let’s individually discuss the system requirements for Mac and Windows computers. Once you have confirmed your system requirements, you will need to move to the next step, which is to connect Cricut to a computer(Windows & Mac).
For Windows
Operating System – Windows 10 or later (64-bit)
RAM – Minimum 4 GB
Disk – 2 GB free
CPU – Intel Dual Core or equivalent to AMD processor
Display – Minimum 1024px x 768px screen resolution
A USB port or Bluetooth is required
For Mac
Operating System – macOS 11 or later
CPU – 1.83 GHz
RAM – Minimum 4 GB
Display – Minimum 1024px x 768px screen resolution
A USB port or Bluetooth is required
Disk – 2 GB
Now that you have learned how to connect Cricut to a computer let’s move to the next section, where you want to connect your Cricut machine to a Windows PC.
How to Connect Cricut to Computer Bluetooth (Windows)?
Let’s start with the Windows computer. But wait, do you know what I like about Windows PCs when it comes to connecting any device via Bluetooth? Most of us are very familiar with them. Thus, it becomes easier to connect any device to Bluetooth.
Place your Cricut Explore Air 2 on a flat surface and ensure a distance of 10 – 15 between your PC and the machine.
Then, you will need to head to the Start menu and select Settings.
Afterward, you will need to tap on Devices.
Confirm whether your Bluetooth is ON, then rap on the Add Bluetooth or other device.
You should tap on the Bluetooth option and wait a while for your computer to find your Cricut model.
As it appears in the available list, you have to select the model and proceed.
Finally, you have done the pairing.
Since you have made the connection successfully, you are ready to set up your Cricut machine hassle-free.
How to Connect Cricut to Computer Bluetooth (Mac)?
You must rely on the instructions below if you are a Mac user. The steps are not difficult; it will take up to 2 minutes to connect with your Mac system. Once you are ready, start with the following instructions:
Check whether your desktop computer is turned on or off.
Once it is on, you must place the computer and machine within 10 to 15 feet.
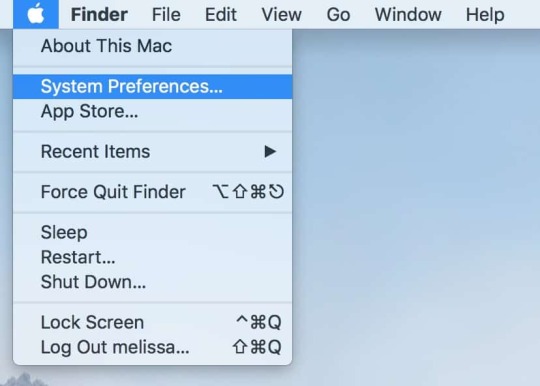
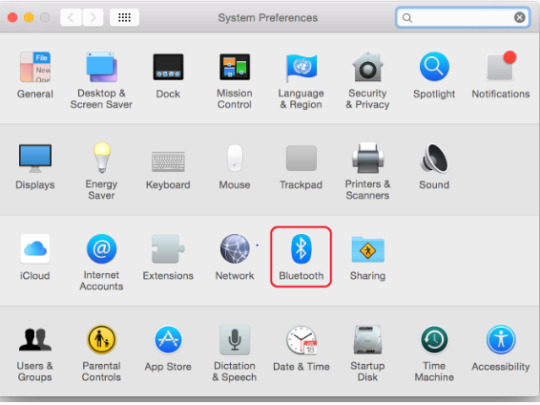
Now, proceed to the Apple menu and select the System Preferences option.
Here, you have to find the Bluetooth option on your Mac.
Afterward, when the wireless Bluetooth is ON.
Next, you will need your Cricut machine from the available list.
Lastly, you are now connected to your Mac system when the pair is done.
Final Words
Overall, when you go through this guide to learn how to connect Cricut to computer Bluetooth, you will get your Cricut machine connected wirelessly in a few minutes. The easy-to-follow steps will help you establish the connection quickly, and you don’t need to worry about anything. So, get started with your Cricut product effortlessly with this guide.
FAQs
Can I connect my Cricut wirelessly?
Yes, it is possible and really simple for everyone to connect it wirelessly. The latest Cricut machine has a built-in Bluetooth feature that allows users to connect their Cricut to their desktop and mobile devices wirelessly. However, you must maintain an adequate distance between your Cricut and the compatible device that you want to connect.
Do I need to connect my Cricut to Wi-Fi?
It depends. Your computer must connect to the Internet to access resources such as images, fonts, or ready-made projects. However, if you have saved them already, you won’t need to connect to Wi-Fi or the Internet. Besides, the Cricut machine does not require Wi-Fi. It is completely run using Cricut software, which controls your Cricut.
Do I need to connect Cricut to computer for using Cricut Design Space?
Not necessarily! The Cricut machine does not need to be connected to your computer to use your Cricut Design app. This is a completely cloud-based software; hence, you can use it to design anything you want anytime, anywhere. Since Cricut Design Space is a free companion app, you will get thousands of images of ready-made projects for free.
Why won’t my Cricut connect to my computer?
Your Cricut might not connect to a computer for many reasons. Following are the reasons to make sure you resolve this issue:
Check network settings, as incorrect networking settings or corrupted adapters can hinder the app from working.
Check whether you have turned on the Bluetooth.
Check the USB connection and verify if there is no fault in it.
For more information visit: cricut.com setup mac
cricut design space desktop
www.cricut.com setup login
Cricut setup on computer
Source: How to Connect Cricut to Computer Bluetooth
#cricut design space app#cricut design space login#Cricut setup on computer#cricut machine setup#cricut explore air 2#cricut.com setup mac
2 notes
·
View notes
Text
How to Connect Cricut Joy to Computer: A Complete Guide
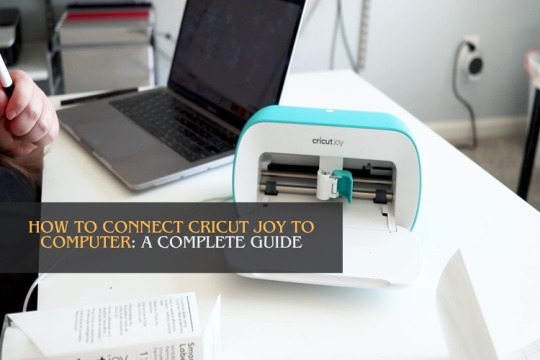
Hey, have you just got a new Cricut Joy machine? Here’s something important for you! In this blog, I am going to talk about how to connect Cricut Joy to computer. This guide will be crucial to you as every crafter who buys a new Cricut needs to set up their machine. In order to set it up, you need to connect it to your device.
But do you know which method is used to connect the Cricut cutting machine to a compatible device? Well, the short answer is Bluetooth only. Unfortunately, you can’t connect your Cricut Joy with a USB cable as there is no USB port available.
Since we can only connect it via Bluetooth, you have to know different methods to connect this Cricut model on Windows and Mac. Yes, the process of connecting the Cricut machine slightly varies for both types of computers. And I have covered them in detail. Let’s delve into it!
Minimum System Requirements for Using Cricut Design Space
Before I show you how to connect Cricut Joy to computer, you must know the basic requirements. These basic needs are important for your system to run the Cricut Design Space software.
The Cricut Design Space software is a companion app used to create amazing designs, command the machine for various operations, and set up our machine. Below, I have provided the requirements for Windows and Mac. Read them carefully:
For Windows
Operating System
Windows 11 and Windows 10 and newer (X64 processors)
Microsoft Windows 11 and newer (ARM64 processors)
Browsers
Google Chrome
Firefox
Microsoft Edge
Hardware
2 GB RAM
1.3 GB free drive space
1 GHz Processor
For Mac
Operating System
14.x (Sonoma); 4.21.x or later
13.x (Ventura); 4.21.x or later
12.x (Monterey); 4.21.x or later
11.x (Big Sur); 4.21.x
10.15.x (Catalina); 4.21.x
Supported Browsers
Safari
Google Chrome
Hardware
Processor: Intel, Apple Silicon M1, M2, and M3 processors
2GB RAM
About 300 MB Hard Drive Space
How to Connect Cricut Joy to Computer?
You might not believe it, but connecting Cricut Joy to computer is a breeze. Before connecting with Joy, you must ensure that your computer meets the basic requirements to run the Cricut app. After that, you can start establishing the connection. Let’s start with a Windows computer first.
Windows
Unbox your machine and take out all the accessories and items that come with your machine.
Then, place your Cricut machine at a distance of 10 – 15 feet away from your computer.
Now, you have to turn it on by plugging it into the power source.
After that, head to the Start menu and select Settings.
Later, you need to click on Devices.
Make sure you have turned on your Bluetooth.
Here, you will need to click on ‘Add Bluetooth or other device’.
Thereon, click on the Bluetooth tab and stay until your PC is searching for your Cricut machine. Once it appears in your list, select it to connect.
Eventually, Bluetooth is paired now.
Mac
Power on your Mac using your power cord.
Next, place your machine on a flat surface and keep it 10 to 15 feet away from your Mac.
Then, head to the Apple menu and choose the option System Preferences.
Now, find the Bluetooth option on your Mac
So, verify whether the Bluetooth is ON.
Later, you will need to select your Cricut model from the available list.
Now, you have paired your Cricut machine setup with your Mac computer.
Finally, I have explained how to connect Cricut Joy to computer. Now, you are ready to make anything amazing using your Cricut cutting machine.
FAQs
Question 1: Can I setup my Cricut Joy on a mobile device?
Answer: Yes, you can easily set up your Cricut Joy on Android and iOS mobile devices. The Cricut cutting machines connect with Bluetooth only, so you will need a smartphone. Compatibility plays a pivotal role in running the Design Space app, which is a must-have app for setup.
Question 2: Do I need software to access Cricut Joy?
Answer: Absolutely, yes! Without software, you will not be able to access Cricut Joy. The software is used to set up and connect your machine to a computer or mobile device. Further, you have to use the software to create beautiful designs and send them to the Cricut machine to cut them. Thus, the software is important for giving commands to Cricut.
Question 3: Can I connect Cricut Joy with a USB cable?
Answer: No, you can’t! Cricut Joy only connects via Bluetooth. Except for the Joy model, all the Cricut machines can be connected via both USB and Bluetooth. Since Cricut Joy doesn’t have a USB port, you will only need to rely on Bluetooth. The pairing is simple and the same as other Cricut machines.
Wrap Up
Since you have learned how to connect Cricut Joy to computer, you must have an idea of the right way to connect your Cricut. Whether you are a novice crafter or a pro, a new Cricut must be connected to your compatible device. However, before connecting the Cricut machine to a computer, you must check the system requirements that I have already provided in his blog above. So, use Cricut Joy to make endless projects in no time.
For more information visit: design.cricut.com
www.cricut.com/setup login
cricut design space app
Source: How to Connect Cricut Joy to Computer
#how to connect cricut joy to computer#connecting cricut joy to computer#cricut design space download#cricut design space app#cricut design space software#cricut design space login#cricut machine setup#cricut joy app#cricut joy machine
2 notes
·
View notes
Text
Cricut Computer Setup: Full Guide for Windows and Mac

Ever since I started doing the Cricut computer setup, the excitement of setting up a new Cricut machine is still as fresh as it ever was. But do you know how to setup a Cricut machine on a computer? If your answer is no, then chillax! You have already opened the right page, so you will definitely find something helpful.
So, what do we need to do before setting up a Cricut? Well, the only thing you will need to know is to establish a connection between your Cricut and computer. But the next question is—HOW? And by which method? There are two methods: USB or Bluetooth. We can do it easily by following some easy ways. Want to know? Let’s check out this blog to learn more!
Lastly, you must complete the machine setup, and this process is the same for both Mac and Windows. Let’s get started!
Cricut Computer Setup for Windows and Mac
Setup is easy if you will do it once. But even if you are a beginner, it is going to be a breeze. Just trust me and follow the steps that I have given below. Remember the below-mentioned steps are the same for both Mac and Windows computers:
Here’s the Cricut setup on computer (Windows and Mac):
First, launch an internet browser and head to the cricut.com/setup website.
Now, you will need to download and install the Cricut software on your computer.
Next, follow the steps given to your display and create your new Cricut account accordingly.
If you already have an account, you should sign in to your Cricut ID using your username and password.
Then, select your Cricut machine model for the setup procedure.
Now, switch on the Cricut by inserting the power cable into its power outlet.
Hit the power button on your Cricut machine.
Next, establish a connection between the Cricut and your device, either using a USB cord or Bluetooth (To learn how to connect it properly, you should navigate to the next section given below).
Afterward, you should register your Cricut cutting machine.
Finally, your Cricut setup on computer is done, and you will be prompted to test the cut.
Now, you might have learned the Cricut computer setup. Below, I have explained how to connect your Cricut to your computer via Bluetooth. Let’s delve into it!
How to Connect Cricut Machine to Computer via Bluetooth?
Here, I want to focus on the steps to connect Cricut to a computer. Many crafters, especially beginners, can face difficulties while connecting. So, I’ve made it easier for you.
Below are the steps to connect Cricut to a Mac and Windows using a Bluetooth wireless connection:
Windows
The first thing you need to do is keep your machine at an adequate distance, about 10-15 feet from your computer. If you are using Explore models, you should insert the wireless Bluetooth adapter.
Now, check whether you have enabled Bluetooth. To do this, go to Settings and then move to the Devices option.
Then, you can enable Bluetooth by clicking on the toggle button.
Next, click on the Add Bluetooth or other device.
So, you will have to wait until your Bluetooth finds your Cricut machine.
Afterward, select the machine from the available list.
Finally, you have successfully paired the machine.
Mac
The first step would be the same as the above.
Then, you have to hit the Apple menu and select the System Preferences option from the given options.
Look for the Bluetooth option and check whether it is enabled or off. If it is off, you should turn it on.
Now, you will see your Mac Bluetooth is looking for an available device, such as your Cricut machine.
Once your Cricut machine appears in the list, you must select it to pair with your computer.
Once the pairing is done with your Mac, you are ready to setup your machine further.
Once you complete your Cricut computer setup, you can start making your projects hassle-free.
FAQs
How is the Cricut app crucial for machine setup?
The Cricut app, Cricut Design Space, plays a pivotal role in machine setup. It helps you connect your Cricut machine setup and allows your computer to communicate with your Cricut cutting machine. Whether it is a computer or mobile device, the Cricut software is compatible with all four platforms: Mac, Windows, iOS, and Android. However, you will be prompted to download the app during machine setup. Thus, it is a crucial part of the Cricut machine setup. Without this software, your setup is incomplete.
What are the system requirements for using Cricut software on Mac?
The minimum system requirements for using the Cricut Design app on a Mac computer are as follows:
macOS 11 or later
USB port or Bluetooth
1.83 GHz CPU
Minimum 2 to 3 Mbps download speed and 1 to 2 Mbps upload speed
4 GB RAM
2 GB free disk space
Minimum display screen resolution of 1024px x 768px
Can I setup my Cricut machine using my Samsung Galaxy?
Yes, you can setup your Cricut machine using your Samsung Galaxy device. To setup on an Android phone, you have to follow the steps below:
First, connect the Cricut’s power cord to the wall outlet.
You need to pair your device and the Cricut via Bluetooth.
Then, you have to download the Cricut app from the Google Play Store.
Open the software and start signing in or creating a Cricut ID.
Choose the model, and your setup will be completed.
Final Thoughts
In a nutshell, I have explained the Cricut computer setup procedure in easy steps for both Mac and Windows users. The setup process given in this blog is based on the setup that I performed recently. It doesn’t matter whether you are a Mac or Windows computer. For any Cricut users, the setup is a must to get started! Without this, you will not be able to make a single cut.
For more information visit: cricut design space download
design.cricut.com
cricut.com/create
Source: Cricut setup on computer
#Cricut setup on computer#Cricut computer setup#cricut new machine setup#cricut machine setup#cricut design space download#cricut design space software#cricut design space app#cricut design space login
2 notes
·
View notes
Text
How to Pair Cricut Maker to Phone and Computer: Full Guide
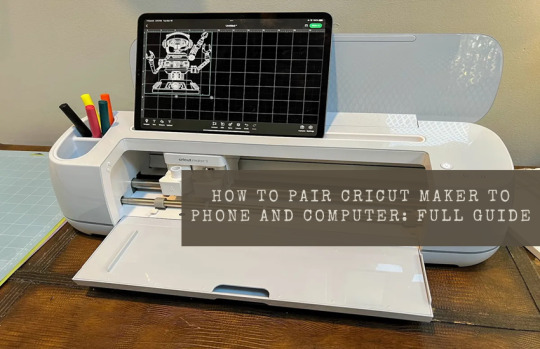
Every crafter will agree that the Cricut Maker Setup is one of the smartest and favorite models among cutting machines. This Cricut machine can cut 300+ materials such as vinyl, iron-on, cardstock, and more. It can also cut, write, foil, and score different materials. To start with this Cricut cutting machine, one must know how to pair Cricut Maker with a computer and smartphone.
Crafters have two options for pairing both devices: Bluetooth and USB cable. However, it is their call to decide in which mode to connect their Cricut machine to a computer and mobile devices. Also, to begin any projects, all users must download the Cricut software and connect it to their device.
If you cover the entire blog from top to bottom, you will quickly learn how to set up and pair this Cricut machine with devices.
How to Setup Cricut Maker on a Computer?
Before getting started with how to pair Cricut Maker, all the users need to set up their Cricut product on a computer. To properly end the setup process, they need to go through the below-shared steps:
Lay the first stone of the setup process by unpacking your Cricut machine & switching it on.
After doing that, connect both devices via USB cable or Bluetooth.
Next, visit cricut.com/setup and install the Design Space app on your computer.
Then, create your Cricut ID or sign in with the login details.
Now, follow the instructions appearing in your front on the screen.
Finally, you will be called for a test cut after completing the setup process.
How to Pair Cricut Maker to Windows and Mac?
Below are some tips and instructions for pairing this Cricut product with Windows and Mac systems.
Windows
In addition to this blog section, look at the steps below and learn about setting up both devices.
Go ahead with the process by checking that your Maker machine is within 10-15 feet of your computer.
Now, tick the Settings icon and land on the Windows Settings tab.
Following this, choose Devices and check that the Bluetooth is on.
After that, hit Add Bluetooth or other device that appears at the top of the screen.
Next, click the Bluetooth button under the Add a device tab.
A window will appear at this point. Click on your Cricut model.
Finally, your Maker and Windows pairing process will come to an end.
Mac
This section explains how to pair Cricut Maker with a Mac system.
Make the first move by ensuring that your Cricut cutting machine is on.
Afterward, check that it is under the range of 10-15 ft of your Mac system.
Next, open the Apple menu, choose System Preferences, and click the Bluetooth icon.
Check that your Bluetooth is on, and select your Cricut model from the list.
After a few minutes, your device’s pairing process will end.
How to Pair Cricut Maker to Phone (Android/iOS)?
Further referring to the blog, let’s discuss the process that will help the user pair smartphones with this Cricut product.
Android
Take the first step and ensure that your Cricut machine is on and positioned within 10-15 ft of your mobile device.
After that, scroll down your phone’s home screen and hold on to the Bluetooth icon for a few seconds.
Now, turn on your device’s Bluetooth and let it scan for the machine for a few minutes.
Next, choose your model name, and the pairing process between your Android and Maker will end.
iOS
To get things moving, check that your Cricut Maker is on and within 10-15 feet of your iOS device.
Go to the Settings tab and activate your device’s Bluetooth feature.
After activating the Bluetooth, a list of available devices will be shared in front of you.
Select your model name from the list at this point, and both of your devices will be paired successfully.
By paying special attention to these steps, the user can swiftly pair up their respective smartphones with the Cricut Maker machine. Moreover, they need to be very cautious so they don’t make any mistakes during the process.
Frequently Asked Questions
How to Setup My Cricut Maker on a Smartphone?
With the help of the below steps, you can effortlessly set up a Maker machine with smartphones:
Begin the process by plugging the machine and turning on its power.
After that, pair your smartphone with the Cricut machine via Bluetooth.
Install the Design Space app on your device and create your account.
Next, go to the Menu section and tick the Cricut Machine Setup option.
Following this, choose your machine name from the list and follow the steps to finish the setup.
Finally, when informed of the test cut, you will know about the setup completion.
How to Connect Cricut Maker to Devices via USB Cable?
To connect the Cricut cutting machine with devices via a USB cord, the user needs to follow these steps:
First, unpack your Cricut product and USB cable very carefully.
Following this, switch on your machine and put one cord into the machine port.
Afterward, insert another end of the cable into the device and let it connect with each other.
Now, the Cricut Maker will turn on and be ready for cutting purposes.
How Do I Pair My Cricut Maker With iOS via Bluetooth?
With the help of these steps, you can effortlessly connect the Cricut product with iOS devices:
Check that your Cricut machine is enabled and place it under your device’s 10-15 ft range.
Next, go to the Settings tab and turn on your device’s Bluetooth.
After a few seconds, a list of devices will be shared on your phone screen.
Tap the model name, and the pairing process will end after a few seconds.
For More Information Visit: www.cricut.com setup login
Cricut Design Space Download
Cricut setup on computer
Source: How to Pair Cricut Maker
#how to pair cricut maker#cricut maker setup#cricut design space app#cricut design space login#cricut design space download#Cricut setup on computer#cricut machine setup#how to setup cricut maker
3 notes
·
View notes
Text
Do you take your crafts seriously? Cricut is a perfect machine that allows you to craft with your heart. So, use the machine and employ all your crafting skills to end up with a wide range of personalized and professional handmade items. Also, download and install the Design Space software to add more creativity to your project. Go to cricut.com/setup and get the software right away. Once you make a unique and attractive project, give it a professional touch and take your crafting skills to a commercial level. Cricut Design Space Login You can utilize online platforms to sell them and make some extra bucks while staying in the comfort of your home.
#Cricut Design Space#cricut design space login#cricut design space download#cricut design space for mac#cricut design space app#cricut design space setup#cricut software#cricut.com setup windows#cricut.com/setup windows#cricut.com/setup#cricut.com sign in#cricut.com/create#cricut.com design space#design cricut.com download
2 notes
·
View notes
Text
How to Connect Cricut Maker 3 to Bluetooth: Beginner’s Guide
Want to connect Cricut Maker 3 to Bluetooth on your phone or computer? Then, you are welcome. In this blog, I will be guiding you through all the details that you require to know. After reading this post, you will have no tension about connecting any device, be it a computer or a mobile device. I will teach you about the basic steps, and then you will be ready to connect any device to your Cricut Maker 3 machine. So, without any further delay, let’s dive into it.
Connecting Cricut Maker 3 to a Windows PC via Bluetooth
Connecting the Cricut machine to your Windows laptop or computer is easy. You can connect it by using these simple steps:
The first thing you are supposed to do is plug the machine in and turn it on.
Then, keep the machine within 10 to 15 feet of range. So your machine will not have to face the connectivity issue.
Next, look for the Start menu on your computer and open it.
Once it opens, go to the Settings tab.
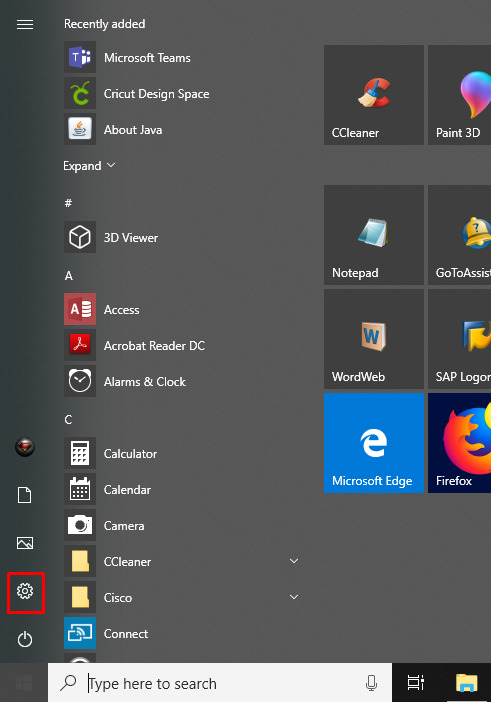
When the Settings open, click on the option Devices.

There, you will find Bluetooth. Then, go to Bluetooth and search for your machine.
Now, start the Cricut machine procedure.
When it is complete, it will show as connected.
That’s it for connecting the Cricut cutting machine to your Windows operating system. Now, you can start making unique designs and stunning projects with your machine.
How to Connect Cricut Maker 3 to Bluetooth on Mac
Like Windows computers, Macs have a similar approach to connecting with the Cricut cutting machine. You can follow these easy steps to connect the Cricut Maker machine.
To start, you have to power on the machine after plugging it in using the power adapter.
Next, keep your Mac computer and the machine within 10-15 feet range.
Open the Apple menu on your Mac computer and go to System Preferences.
You will find Bluetooth over there. Open it.
Look for the machine on the list of Bluetooth devices.
After that, select the machine you want to connect to.
Then, go to the Cricut app and select New Product Setup.
Now, the Cricut cutting machine will be connected.
Isn’t it an easy setup guide? Yes, right. You have successfully connected the Cricut machine to your Mac. Now, download and install the Cricut software and start your crafting journey!
How to Connect Cricut Maker 3 to Bluetooth on Android?
Smartphones have a slightly different approach to connecting to the machine. The phone’s settings and applications are placed in a different way. But these are easy to find, and you can do it as follows:
First of all, switch on your Cricut cutting machine.
Maintain the distance between the machine and your phone, which should not be more than 10-15 feet.
Search for the Settings tab on your phone and open it.
On the following screen, you need to open Bluetooth.
Look for the machine in the list that is displayed on your phone and select it.
Next, the machine is connected. Now, open the Cricut app and select Setup.
In the last step, your machine will appear to be connected.
Connecting Cricut Maker 3 to iOS Devices Using Bluetooth
Like Android phones, iOS phones can also connect to your phone. All you need to do is:
Initially, the Cricut Maker 3 machine should be on and should have a range of 10-15 ft.
Bluetooth will be found in the Settings and should be opened.
Next, open Bluetooth and see the list of devices. You will find your Cricut model in the list.
After that, select the Cricut model machine.
Now, open the Cricut app and then sign in with your username and password.
After you complete the process, the Cricut cutting machine will show up as connected.
Conclusion
Cricut Maker 3 is an amazing cutting machine to get started with your DIY projects. After reading this blog, I am sure you have learned how to connect Cricut Maker 3 to Bluetooth. Wireless Bluetooth connectivity gives you flexibility about keeping your machine anywhere according to your preference. You can now connect your Cricut machine to any operating system, such as Android, Mac, Windows, or iOS that you are using and start your journey in the world of crafting.
FAQs
Why Is Cricut Maker 3 Bluetooth Facing Connection Issues?
A couple of reasons may affect the connection of your Cricut cutting machine to your device. One of them could be that you kept the distance between your operating device and the machine more than 15 feet. It is a very common problem. In this case, you have to bring the device in the reach of your Bluetooth connectivity, and the error will be solved.
What Should I Do if My Cricut Maker 3 Is Not Working?
If your Cricut Maker 3 machine is not working even after connecting it to your mobile/computer, then you can do two things. First, turn off the machine for 10 seconds and turn it on again. The problem should be fixed. If it persists, you can go to the Bluetooth settings, unpair the device, and pair it again. The problem will be solved.
Do I Always Need to Connect Cricut Design Space to the Internet?
Not really! You don’t always need an internet connection in order to use the Cricut app. You can use it without the Internet as well, although there is a limit to the number of features you can use without the Internet. If you want full access to all the features, you will need to connect to the Internet.
#connect cricut maker 3 to bluetooth#Cricut Design Space#cricut design space login#cricut design space app#cricut maker setup#cricut maker bluetooth not working
0 notes
Text

Why put so much effort and a lot of hard work and the same old traditional crafting method when there are machines to work at your fingertips for everything? Indeed? If you agree, the Cricut machine is suitable for all craft work. It helps you to manage and save your precious time and produce more DIY projects with its sharp edge rotational blades, which rotate in all directions to give you the perfect and smooth cut. It allows you to cut over 100 different types of materials. You can set up the Cricut machine on your mobile device and computer from Cricut Design Space to get started on your first project.
#Cricut Design Space#install cricut design space app#cricut design space app#cricut.com/setup mac#cricut explore 3#www.cricut.com setup login#cricut explore air 2#cricut.com/setup
0 notes
Text
Discover 5 Best Printer for Cricut Projects in 2024
Searching for the best printer for Cricut projects? If so, look no further; I can help you with that! The only reason we need a printer for crafts is because we want to make some stickers, for which we need to use a Print Then Cut feature. I don’t know whether you have heard this term before, but some Cricut machines come with this new feature that makes creating a project that requires printed images. Cricut then cuts those printed images accordingly.
There are many printers in the marketplace, but which one is better? Well, this is what I will tell you in this blog. I know it can be daunting for many novice crafters when they start making their first project using a printer and Cricut machine. But you don’t have to worry at all, as I am with you in finding the best printers for Cricut users. Let’s get started!
1. Canon PIXMA TS9521C Printer
If you are looking for the best printer for Cricut projects, look no further than this Canon PIXMA TS9521C printer. This model has a big printer size and is also heavy compared to other branded printers, making it the perfect choice for your crafts. If you want something that prints high-quality images in no time, then the Canon PIXMA TS9521C printer is the perfect choice for you!
There are many pros and cons of using this printer. So, let’s get into it.
Pros:
Cons:
2. Epson EcoTank Printer
If you still couldn’t find the best printer for Cricut projects, chillax! So, what I think is that it is the perfect choice for those who are into everyday printing. Not only that, it can also be suitable for those who want the best sublimation printer. However, the one thing that you need to know is that this printer will use only sublimation ink. Besides, you can’t use any other inks that you use for other printers. So, what are the pros and cons? Let’s know it further!
Pros:
Cons:
3. Canon TS6420 Printer
If you trust the Canon brand, you can use the Canon TS6420 printing device. Also, it is the best printer for Cricut projects, with top-notch features and great quality. It can also help you explore the Print Then Cut feature. So, without wasting much time, you will need to know the pros and cons of using a Canon TS6420 printer; let’s explore:
Pros:
Cons:
4. HP Envy 6455E Printer
The HP Envy 6455E printer is the best printer for Cricut projects. Since it is a mid-range printer, it has satisfied many crafters. So, whether it is about price or quality, this Envy model will provide everything you need to try the Print Then Cut feature. You have to try this model for better quality, especially if you are looking for something in the mid-range.
Pros:
Cons:
5. Canon PIXMA TS3320
Last but not least, this is what I am using currently; it has done a lot of things for me. So, I bought this along with my Cricut Maker 3 machine last year. The sole purpose of buying this machine was to explore the Print Then Cut feature. I had never tried this before, so I wanted to give it a try! Now, it was a great experience. Besides, do you know what the best part was and what its pros were? So, let’s dig into it:
Pros:
Cons:
FAQs
Question 1: What should I check before buying a printer for Cricut?
Answer: Before buying a printer or any machine, you must check its system requirements. Once you are sure about it, then there are other factors you have to check.
Here are the factors you need to check before buying a printer for Cricut:
Question 2: What type of printer do I need for Cricut?
Answer: Many printers are available in the marketplace that you can use to create unique crafts with Cricut. They must meet some criteria, such as the type of paper they can print, the print quality, and more. Whether you want to create stickers or decals, this printer will help you stand out!
Below, I have mentioned some printers that you can use for your DIY projects:
Question 3: Should I choose a laser or inkjet printer for Cricut?
Answer: Although inkjet printers are a better option for many crafters, the laser printer has its own place for crafting. It is because, with a laser printer, you can have a high volume of coloring book pages, planner pages, and foiling craft paper that would be better suited for a laser printer. Hence, you can choose a printer that suits your needs and create your stickers or anything hassle-free.
Visit: install cricut design space app
cricut.com/setup
www.cricut.com setup login
Source: https://cricutdesignappspace.wordpress.com/2024/05/10/discover-5-best-printer-for-cricut-projects-in-2024/
#www.cricut.com setup login#www.cricut.com/setup#www.cricut.com/setup login#cricut.com/setup app#cricut explore air 2#cricut.com/setup#cricut new machine setup#cricut design space#cricut maker 3#cricut.com/setup windows#cricut.com/setup mac#cricut.com/setup login#cricut.com setup mac#cricut create connect to computer#cricut.com setup download#cricut setup download#cricut setup#setting up my cricut maker#setting up your cricut maker#cricut setup on computer#cricut design space download#cricut design space app#cricut design space login#cricut new product setup#cricut new product device
0 notes
Text
install cricut design space app
With the Cricut machine, you can unleash your creativity by crafting DIY projects such as stickers, cards, t-shirts, decals, stickers, and wood. For those aiming to work with over 300+ materials, the Cricut Maker 3 stands out as the premier cutting machine in the Cricut lineup. Equipped with 13 different tools, it facilitates cutting, writing, scoring, engraving, drawing, and more. To set up and use your Cricut machine, visit Cricut's official website at cricut.com/setup and download the install Cricut Design Space app on your device.
#install Cricut Design Space app#cricut.com setup mac#cricut.com/setup#cricut setup on computer#cricut design space app#cricut design space download#cricut design space login#cricut create connect to computer#www.cricut.com/setup login
0 notes
Text
How to Make Shirts With Cricut: Creating From Scratch

How to make shirts with Cricut? I assume this is the sort of question you might be looking for answers to, right? Don’t worry—take a deep breath and say Thank God😁! Yes, because god has landed you on the right page!
Making shirts with Cricut is always fun for me. Even though I have made hundreds of projects to date, personalized shirts are still my favorite. I am kind of obsessed with them! But WHY??????? Because I always create them for someone I love, they are always a gift. And I like to give something handmade.
Okay, I have already explained the stepwise methods for making shirts with Cricut.com/setup. The following project is easy to create using any Cricut model. Now, let’s get started without any further ado!
What Supplies Are Required to Create a Shirt With Cricut?
Okay, so what do you need to make shirts with a Cricut? Since I am going to make a shirt for my mom on her 49th birthday, I needed some supplies. So, before you learn how to make shirts with Cricut, let’s have a look at the materials you will need to gather.
Weeding tools
Cricut LightGrip mat, or you can also use an older standard mat (green), which is less sticky. Ensure the mat is clean.
EasyPress machine or household iron
EasyPress mat or towel to keep it under the heat source
Teflon sheets or protective sheets, e.g., wax paper
Laptop or computer (MacBook or Windows computer) for using the Cricut software app
How to Make Shirts With Cricut: 5 Easy Steps
Once you have gathered the materials or supplies to make shirts, you can learn how to use Cricut for shirts. I will walk you through the steps one by one so that they aren’t too confusing for you. So, are you ready to start? If so, let’s start!
Step 1: Create a Shirt Design on the Cricut App
Probably the most challenging thing I’ve found was deciding which design to create. The more complex it is, the more time-consuming it will be. Therefore, I chose a text-based simple design. Everyone can create it in no time. Want to see what it is? It is “Blessed MAMA.”
In order to create it, you have to follow the steps I’ve described below:
Launch a Cricut Design Space app on your computer and hit the New Project tab.
In order to add text, click on the Text button on the left side.
You can add the texts that you like and modify them accordingly. However, I have typed “Blessed” and “Mama” in two separate boxes.
Then, select the font style you like and then weld them together using the Weld tool.
After that, you must attach them so that Cricut will cut exactly as it is.
Now, Save your text design and click Make It in the top right corner.
Step 2: Cut the Vinyl Using Your Cricut Machine
Now, it’s time to cut vinyl. Okay, fine, but are we forgetting something? Oh yes, it’s the MIRROR setting! We must mirror our vinyl design before cutting, especially when it is text.
For symmetrical designs, it’s okay if you don’t mirror the design.
To mirror the text, you must return to the Cricut app (After clicking the Make It button) and enable the Mirror toggle button. Enabling this option will flip over your entire text or image.
Step 3: Settings for HTV or Iron-On-Vinyl
For Cricut Explore Air or Cricut Explore Air 2 Setup users, they need to turn the wheel to iron-on.
One thing I have noticed is that I get the best results when I turn the wheel to Custom and then select the material from the drop-down menu.
However, if you are using everyday iron-on vinyl, you will see this setting on Popular Materials, and you just have to click on it.
On the other hand, I prefer to select Search all materials if I am using specialty iron-on vinyl. So, from the drop-down menu, just select iron-on vinyl.
Step 4: Place HTV or Vinyl on a Cricut Mat
Placing vinyl is not something that you just grab and place on the mat. There is a shiny and dull side to your vinyl. You have to be extra careful when placing it.
So, the shiny side goes down on the mat, and the dull side faces up. It’s as simple as that!
Use a brayer tool to smooth the vinyl on the mat. Then, check to see if the arrow link is blinking on the Cricut machine. If so, insert the mat with the vinyl into the machine.
Step 5: Apply Iron-On Vinyl to a Shirt
Okay, so here’s the interesting part: You’re finally going to learn how to Make Shirts With Cricut. To do this, you’ll need to apply the HTV to your shirt.
Make sure you have turned on your Cricut EasyPress now. The Cricut Heat Guide will instruct you to preheat your heat press to 340° F with a 30-second timer.
By now, your Cricut might have done all the cutting required. See if the Cricut has stopped and the arrow light is flashing. If so, you have to unload the mat and weed out the design.
Now, preheat the shirt to the recommended temperature or time.
Place the design on the shirt and then press it again using your EasyPress machine.
That’s it, you are done! Yes, that’s what you needed to learn about how to make shirts with Cricut.
FAQs
How do you place patterned vinyl on the Cricut mat?
In order to place your patterned vinyl on the mat, you have to keep the patterned area down. In such a type of HTV or vinyl, a pattern needs to be placed, and the blank area will face up. That’s the thing you need to remember. Besides, there is no difference between cutting plain or patterned vinyl
What can I use if I don’t have a Cricut EasyPress?
If you don’t have a Cricut EasyPress machine, you don’t need to worry; you can simply choose to use a household iron. But there is always a difference between Cricut EasyPress and household irons. Household irons don’t spread the heat evenly on the surface, damaging your design. However, EasyPress is the opposite, and it is designed mainly to place the HTV on fabrics.
What is the life expectancy of Cricut HTV?
Cricut Everyday Iron-On material or heat transfer vinyl (HTV) can last up to 50 washes and is suitable with many base materials. In other words, it can remain up to 1 or 2 years or 50 wash cycles. Besides, lifespan depends on various factors such as quality, conditions, and care.
For more information visit: Cricut.com login
Cricut Design Space Download
Cricut setup on computer
Source: How to Make Shirts With Cricut
#how to make shirts with cricut#how to use Cricut for shirts#Cricut design space download#Cricut design space app#cricut software app#cricut explore air 2#Cricut EasyPress
0 notes
Text
How to Set Up My Cricut Explore Air 2: A Stepwise Guide
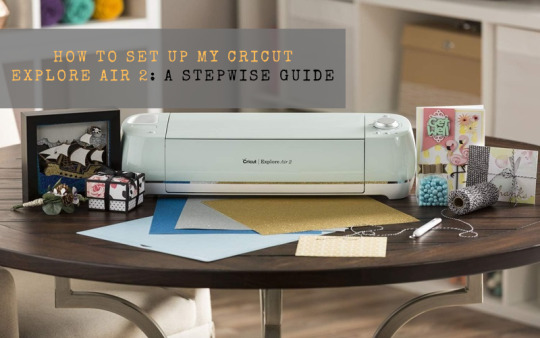
The common question every other DIYer searches for is how to set up my Cricut Explore Air 2. Beyond the shadow of a doubt, this Cricut product makes the user’s DIY dreams come true by cutting 100+ different materials. Also, the Cricut Explore Air 2 works with 6 different tools to cut, write, score, and foil on various materials. Whether you are creating cards, T-shirts, or home decor, this Cricut machine makes it easy to go from an idea to I Did It.
Further, when referring to the Cricut machine, one must download and connect the Cricut Design Space app to this Cricut product. Following this, all DIYers need to do is set up and pair both devices for any projects. Keep going with the blog and study the Design Space download, machine setup, and pairing process.
How to Download Cricut Design Space on Mobile Devices?
Before I encountered how to set up my Cricut Explore Air 2 for crafting purposes, I was obliged to install the Cricut app on my mobile devices. To save you time, I have explained the installation process straightforwardly. Stay focused on the given below steps:
Android
Intending to install the Cricut app on Android phones, follow the steps provided below:
Start by paying a visit to the Google Play Store and navigating to Design Space.
After getting lucky in finding the app, press the Install option, which appears in the middle of the page.
Now, the app will start to install, and keep the phone open till the installation is ongoing.
Afterward, return to your device’s home screen and open the app.
Next, choose Cricut Machine Setup or Sign In and make new designs on the blank canvas.
iOS
Furthermore, this Cricut software is also compatible with iOS devices as an app. To get this free-of-cost app, follow these steps in a systematic order:
First, open the App Store and type Cricut Design Space inside the Search blank.
Afterward, hit the Get button and confirm the installation by entering your iTunes password (If asked).
Now, you need to wait for a few seconds until the app installation is going on.
After installing the app, click the Cricut Design app and open it.
To get started, press Machine Setup or Sign In (as per your preference) and start designing your craft on the canvas.
After downloading this Cricut app, it’s best to introduce you to setting up this Cricut machine with mobile devices. The details of the machine setup process can be learned from the paragraph below.
How to Set Up My Cricut Explore Air 2 on Android/iOS?
To finish the Cricut Explore Air 2 setup process with Android/ iOS devices, you need to follow the steps given below:
Initiate the process by plugging your cutting machine into the socket and turning it on.
After that, pair up your Android or iOS devices with Cricut products via Bluetooth.
Further, install Cricut Design Space from the App Store or Play Store and launch it.
Following this, if you already have an account, then sign in or create your account.
Next, tap the Menu panel and then tick the Machine Setup option.
At this point, click Cricut Explore Family and then follow the on-screen instructions.
In the end, you will be notified that the setup has been completed when invited for a material test cut.
These steps should have taught you how to set up my Cricut Explore Air 2 with mobile devices. The DIYer needs to pay special attention while performing the setup process, as it will help them finish the pairing process quickly.
How to Pair Cricut Explore Air 2 to Mobile Devices via Bluetooth?
On the contrary, this Cricut product can pair them wirelessly with Android/ iOS devices. Get to know about the process by referring to the steps below:
Android
Take a quick scan at the steps given below and grab the details about the pairing process:
Initiate the pairing process by ensuring your respective machine is on and within 10-15 ft of your Android device.
Next, go to Settings and enable Bluetooth on your device (If it isn’t on).
After that, you will see your device name inside the Available Devices column.
Then, enter your four-digit PIN code (0000) and click the OK button.
At last, your wireless pairing process will come to an end.
iOS
See the steps below and learn how to pair this Cricut machine with iOS devices.
First, you must ensure that your Cricut cutting machine is on and available within 10-15 feet of your iOS device.
Following this, go to Settings and activate your device Bluetooth by moving the toggle to the right-hand side.
Select your Cricut machine name from the Devices section and enter the PIN code.
After that, enter the PIN code and click the Pair option.
Finally, both of your devices will easily get paired with each other.
Conclusion
You must have understood how to set up my Cricut Explore Air 2. After finishing the download, set up, and pairing process, the user can make various custom-made crafts with this cutting machine. In addition, this Cricut machine is compatible with all PCs and smartphones and works with the Design Space app. Moreover, all users must ensure they take the correct steps during the setup process.
FAQs
Can I Set Up My Cricut Explore Air 2 on My Mobile Device?
Crafters can use Cricut Design Space software to set up their Explore Air 2 with mobile devices. After installing the app, they must turn on their machine and connect it to mobile devices. Then, they must create their respective account by entering the required details or signing in using their Cricut ID and password.
How to Set up Cricut Explore Air 2 on a Desktop?
With the help of the below steps, you can easily set up Cricut Explore 2 with a desktop:
First, unpack your cutting machine, plug in the power cable & switch it on.
Next, connect both devices via USB cable or Bluetooth.
After doing that, download Cricut Design Space & create your account.
Now, follow the on-screen instructions and wait till the setup process is on.
Finally, when the setup is finished, you will be invited to cut the material.
How Do I Install Cricut Design Space on My Windows?
By referring to these steps, one can easily install the Cricut software on their Windows:
First, go to Cricut Design Space’s official website Cricut.com setup mac and click Download.
After that, double-click the file available in the Downloads folder.
Next, open the installed app and create your account (If you are a new user).
Finally, you can start working on new projects on the Cricut app.
Source: how to set up my cricut explore air 2
#how to set up my cricut explore air 2#setting up cricut explore air 2#cricut design space download#cricut design space login#cricut design space app#design.cricut.com#cricut explore air 2 setup#how to set up a cricut explore#install cricut explore air 2#Install Cricut Design Space
2 notes
·
View notes
Text
How to Make Labels With Cricut Explore for Office?
Hi! Lovely crafters. I have been waiting to write this blog for many days after designing a custom label for my daughter’s school assignment. It was fun making it. And most importantly, my daughter loved it. So, I thought, why not share my way of creating labels with a Cricut Explore machine?
Well, you all are here to learn how to make labels with Cricut. I am ready to share all the important points with you all. Let’s dive into this beautiful project that you can make any time.
Supplies and Tools Needed for Creating Cricut Labels
This is the important part. You should get ready with all the things I am mentioning in the list below.
Finally, you are set with your supplies. Now, let’s check out the final steps for creating a label.
How to Make Labels With Cricut Explore Machine?
Now, it’s time to learn the process for creating a label with your Cricut machine. Here are the step-by-step instructions on making the best labels.
Step 1: Make a Design in the Cricut Software
To get started, you’ll need to create a design in the Cricut Design Space. You must be already familiar with Design Space, and while making labels you have plenty of options to select your font, size of font, and everything else that is needed to make a proper label. And, you can also make labels in multiple sizes that fit your place.
You first need to be clear about the purpose of your label, where you are going to put it on. For instance, I created the labels for a basket for my daughter. What’s your use? Select the size accordingly.
Step 2: Allow Your Cricut Machine to Cut Labels
When you are done with the labels, don’t wait to cut them down with your Cricut cutting machine. After that, hit the Make It button to let the machine cut your design effectively. As you are using premium vinyl, you’ll get the best cut with the machine.
Step 3: Remove the Excess Vinyl
When you are ready with your final cut, it’s time to weed off the excess vinyl from the design. This step is really important to keep the design precise and avoid overlapping of letters. Here, Cricut’s weeding tool can save you.
Step 4: Apply Labels to the Surface
Finally, you know how to make labels with Cricut Explore. And now, it’s time to learn how to transfer it on the surface. Basically, you need to apply tape on your label’s sheet. Next, smooth down the surface with a scraper tool. This step will stick your vinyl designs well to the tape.
Now, cut down the label pieces. Then, you have all the label pieces with transfer tape on them. These tapes have a significant role in transferring the design.
So, how do you transfer the final design? To start, select a label and place it on the area you want it to stick. Also, remove the backing paper from the label. Your label will transfer to the surface. Use the scraper tool again to smooth out the final design. Finally, peel off your transfer tape to leave only the vinyl design.
Conclusion
Wasn’t it fun learning how to make labels with Cricut? I hope you all enjoyed the process. Moreover, the supplies are minimal to get started. With no complex procedure, you can make any label with your Cricut cutting machine. I like making such small things for my office. If you’re also a working person and want to create a label for your name to put it on your desk, go for it.
FAQs
How to Make Name Labels With Cricut?
To make a name label with Cricut, all you need to do is use your Cricut Design Space to create any text you want. Use your name or the name of anyone you want to create a label for. Then, cut it with your Cricut machine and stick transfer paper on it. Now, transfer the design to your surface, remove the backing of the transfer tape, and peel off the transfer tape to leave the final design.
What Do You Need to Make a Label With Cricut Explore?
To get started making a label with Cricut Explore, you will need these things:
● Cricut cutting machine
● Cutting mat
● Transfer tape
● Cricut’s vinyl
● Weeding tool
● Scraper tool
● Label design
How to Make Labels With Cricut Print and Cut?
The process for making labels with the Print then Cut feature is simple. To do this, you must have a printer to print the image you want to make a label of. In this process, you’ll make a design using the Cricut Design Space and will print it with your printer and then cut it with the Cricut machine. Lastly, you can easily transfer your design on its place using a transfer tape.
Visit: install cricut design space app
Source: https://mannyexplore.com/cricut-design/how-to-make-labels-with-cricut-explore-for-office
#cricut.com setup#cricut.com/register#cricut.com/setup#cricut.com/create#cricut.com sign in#cricut.com design space#cricut.com/setup login#cricut setup#install cricut design space app#cricut create connect to computer#cricut design space app#cricut new machine setup#cricut software app#cricut design space#cricut explore air 2#cricut.com#cricut setup on computer#cricut setup create account
1 note
·
View note
Text
How to Connect Cricut to Computer Bluetooth: Full Guide
Connect Cricut to computer Bluetooth using the simplest steps described in this blog. Yes, you heard that right! I am very confident about the steps written in my blogs. This confidence comes from a year of experience as a crafter. I still remember the day I got my first Cricut new machine setup and Mac together. Connecting my Cricut to my Mac seems challenging as I was not used to using my Mac. So, I just took a USB cable that came with my Cricut, plugged it, and started using it.
Day passed, and finally, when I became a pro-Mac user, I connected my Cricut to Bluetooth. Gradually, I also got some new Cricut models and learned all the setup methods, including pairing and setting up the machine. Just like that, I am going to teach you how to connect Cricut to Bluetooth. Let’s dive into it to learn more.
System Requirements to Connect Cricut to Computer Bluetooth
Why are system requirements important? Well, it might not be very important for connecting purposes because it has nothing to do with your Windows operating system until it has a Bluetooth feature. But what is the benefit of connecting to a device that can be used further with your Cricut software app? Yes, in order to run the Cricut app on our computer, you will need a compatible device. To do this, you have to check your software as well as hardware. Let’s check it below:
For Windows
Operating System – Windows 10 or later (64-bit)
RAM – Minimum 4 GB
Disk – 2 GB free
CPU – Intel Dual Core or equivalent to AMD processor
Display – Minimum 1024px x 768px screen resolution
Connection Options – A USB port or Bluetooth
For Mac
Operating System – macOS 11 or later
CPU – 1.83 GHz
RAM – Minimum 4 GB
Display – Minimum 1024px x 768px screen resolution
Connection Options – A USB port or Bluetooth
Disk – 2 GB
Connect Cricut to Computer Bluetooth (Windows)
When connecting a Cricut machine to a computer wirelessly, you have to ensure that your computer is capable of running the Cricut software. Although every computer with Bluetooth features can not hinder you from establishing a connection, you should always pay attention to system requirements. To know the system’s needs, you can go to Cricut’s official website. Once you are sure that your device is compatible, start following the steps below:
To learn how to connect Cricut to Bluetooth, first decide where you want to place your Cricut machine. This is a must before connecting it to your Windows PC. The distance between the PC and Cricut should be no more than 15 feet. Once you have placed Cricut correctly, follow the steps:
Head to the Start menu icon and choose a gear-like icon that is Settings.
Next, you will need to select the option Devices.
After that, verify if your Bluetooth is ON.
Then, select the Add Bluetooth or other device.
Once done, you will have to select the Bluetooth option.
Now, wait for a while and let your computer find your Cricut cutting machine.
As you find it in the available list, select the model to pair your devices.
Connect Cricut to Computer Bluetooth (Mac)
In order to connect Cricut to a computer using Bluetooth to the Mac computer. You have to ensure the proper placement of your computer and Cricut. In other words, you have to place them near each other. Once done, follow the steps below to connect:
Then, you have to check whether your Mac is turned on or off.
Afterward, turn the Mac computer on if it is off.
Then, go to the Apple menu and choose the System Preferences option.
Here, you need to discover the Bluetooth option on your Mac.
Next, when you have Bluetooth on, find your available Cricut models.
Select the machine from the available list.
Lastly, you will be connected to your Mac.
Finally, you have learned to connect Cricut to computer Bluetooth. Now, connect your Cricut and begin your Cricut machine setup hassle-free.
FAQs
Which MacBook is best suited for a Cricut machine?
In my opinion, the Apple MacBook Air (M2, 2022) is the best in terms of portability and performance. Its battery also lasts longer as no fan is installed in it. As a result, you get a noise-free, quiet device. Due to these features, I prefer this Mac model to be used with a Cricut machine.
Why is my Cricut machine not connecting?
There might be various possible reasons that you need to know. First, ensure that your Mac or Windows computer is properly connected to each other. For this, you can check if your USB cable is inserted properly into its USB ports. If everything seems okay, then you can try changing the cable. However, if you are connected to Bluetooth, make sure devices are placed close to each other.
Should I connect Cricut via Bluetooth or USB?
It’s up to you! And both work best. However, when you use a USB cable to connect your Cricut to a computer, it connects really fast. If you want to connect quickly, you can do so with a USB cable. Otherwise, there is always another option, i.e., Bluetooth. Bluetooth might be a little complex initially, but once you are connected, you are free from those clumsy wires. Hence, the choice is yours!
For more information visit: design.cricut.com
Cricut account login
Cricut setup on computer
Source: Connect Cricut to Computer Bluetooth
#connect Cricut to computer Bluetooth#cricut design space download#cricut design space app#cricut design space login#cricut.com/setup#cricut new product setup#cricut software app
1 note
·
View note
Text
7 Cricut Maker 3 Leather Projects to Enhance Your Style

Hey, are you looking for some unique Cricut Maker 3 leather projects? Look no further than this guide! In this post, I am going to tell you the best DIY projects that you can create with leather. About 3 weeks ago, I finished my Cricut leather projects. I have aimed to make a few projects so that I could write this blog diligently. But do you know what was the most difficult part of this project? Cutting intricate designs on leather. Yes, it might not be easy to cut, but they require patience during both cutting and weeding such designs.
Without any further delay, let’s get straight into this blog to find out the most amazing ideas for creating leather Cricut projects.
1. Bracelets
Do you love bracelets? If so, you must give it a shot! When I was looking for ideas for Cricut Maker 3 leather projects, it had been on my mind for a long time. Finally, I gave it a try and saw how beautiful it looked. If you have any friends you want to give this bracelet to, it would be great!
2. Hair Accessories
Do you want something for your hair? You might wonder what I can make for my hair or other beauty stuff. Well, this leather accessory is also made with leather. As you can see, it might look a little tedious, but it is a piece of cake. Start diving into your Crafting journey and create what you need the most.
I gave it a flower shape, and if you are a little bit familiar with Cricut Maker 3 Setup, then it is a breeze for Maker 3 to cut such designs.
3. Earrings
I love leather earrings, as they enhance my beauty and are easy to create. Beginners who are looking for the best Cricut Maker 3 leather projects should try them out! Why? Because they are really easy to make. I also wanted to make them a little unique, so I added some glittery effects. This is what I needed, and hence, I made them.
4. Keychains
If you want personalized keychains, then here I have something for you! Whether you are a novice crafter or a pro, this keychain is easy to make. All I did was add some texts with different font styles to my Design Space.
Finally, after finishing my design, I started my Cricut Maker 3 and cut all the words Daddy and Daniel to make keychains. I handed it to my dad, my brother, and my dinner.
5. Crossbody Bag
Today, everyone wants to use a body bag, and what if you have a personalized one? Sounds like a great idea, no? I created this simple bag for myself as I am not much into personalized stuff. But you can have one if you want. The process of making this bag is easier, and you will need iron-on vinyl to make such a beautiful crossbody bag.
6. Monogram Keyring
Looking for super easy-to-make Cricut Maker 3 leather projects? Here is the monogram keyring that is most widely useful, and it would be great if you could give it a shot! This is a great beginner project, and any beginner should try to make something unique. I also used paint to color it to make it look stunning! Lastly, you can see the result in the picture, like how elegant it looks.
7. Cord Organizers
Every one of us uses earphones or a charger, but sometimes managing those clumsy wires is boring and tedious. So, I decided to create something that could organize my cords or wires. Here, you go with leather cord organizers, which I created using my Cricut. There are many cuts that I had to make, and I preferred my Cricut Maker to cut them as they are faster and provide precise cuts, making them look professional rather than handmade.
FAQs
Can I cut leather with Cricut Maker 3?
Yes, leather can be easily cut with Cricut Maker 3. It can also cut other materials such as fabric, paper, and balsa wood without any problem. In order to cut the leather, you have to use a knife blade, and the thickness of the leather should be up to 2.4 mm or 3/32 mm thick. However, you have to use a clean cutting mat with a sharp blue edge for better results.
What are the essential Cricut tools for cutting leather?
There are some common tools that you can use to cut leather. They are as follows:
Utility knife: This sharp knife is considered a versatile tool for cutting your leather.
Rotary cutter: This is a tool that comes with a wheel-shaped blade. Ideal for long and straight cuts.
Leather shears: A kind of specialized scissors idea for cutting thick and tough leather.
Round knife: It is a popular tool that is most widely used for cutting leather.
How thick can I cut leather with Cricut Maker 3?
If you want to cut the leather on Cricut Maker 3, you can cut up to 7 oz thick. The best thing about the Maker 3 machine is that it cuts anything precisely. In addition, cutting the leather is a breeze. You will also have to use a knife blade for all these leather Cricut projects.
Wrapping Up
As you went through the 7 Cricut Maker 3 leather projects, you might have found them easy to make. The best thing about these leather projects is that they are beginner-friendly. So, you will not need to worry about the complexity of the projects; just turn on the Cricut Maker 3 and prepare the leather that you want to cut. After cutting, the result will be fantastic and will stand out!
For more information and visit: www.cricut.com/setup login
cricut.com/create
Cricut Design Space App
Source: Cricut Maker 3 Leather Projects
#Cricut Maker 3 leather projects#leather Cricut projects#cricut design space download#Cricut maker setup#cricut maker 3 setup#Cricut Design Space Login#Cricut Design Space App#Cricut New Machine Setup
2 notes
·
View notes
Text
How to Connect Cricut to MacBook: A Complete Guide
Do you want to connect your Cricut machine to your MacBook? If yes, then this blog will help you understand the connection between Cricut and Macbook. It’s not only about you; almost everyone who is starting with a Cricut machine finds the setup procedure difficult. Therefore, be with me and learn how to connect Cricut to MacBook here.
Before that, you need to understand that Cricut Design Space is an intuitive Cricut software that you need to set up on your device to connect your Cricut product. To get this software, you need to download and install it on your device. Then, you will be ready to set up your Cricut machine for a MacBook.
What Do You Need to Get Started?
To get started with the Cricut connection to MacBook, you need to keep a few things in mind. Look at the steps below to learn the necessary requirements.
Now, you are ready to start the Cricut setup on your MacBook. Let’s check the steps.
How to Connect Cricut to MacBook?
As you know, Cricut machines are compatible with Windows and Mac computers; you can set it up easily on any of your devices. Here, you’ll learn how to connect it to a Mac device. Look at the steps below.
Step 1: Connect Cricut to a MacBook via Bluetooth
Your first step should be to connect your Cricut to a MacBook using a suitable method. I’m choosing the Bluetooth connection method, which is the best wireless connection.
Finally, your pairing process will be finished. You have learned one step towards how to connect Cricut to MacBook.
Step 2: Download Cricut Design Space
In the second step of connecting Cricut to a MacBook, you need to download and install the Cricut Design app on your device. Look at the steps given below to install the Cricut software.
Finally, you have learned how to install Cricut Design Space and how to connect Cricut to MacBook. Now, you can start project-making with your amazing Cricut machine.
FAQs
How Do I Setup Cricut Machine on My Phone?
To set up a Cricut product on a phone, follow these steps.
How to Connect Cricut Maker to Mac?
Follow these steps to learn how to connect Cricut to MacBook:
Why Am I Unable to Run Cricut Design Space on My Mac?
This problem is common, and everyone might have experienced it. This issue may arise when your app is not updated or there are some issues with the device you’re installing. Hence, if you get such issues, immediately try updating your app. Otherwise, you can also uninstall it and then install it back.
Visit: install cricut design space app
www.cricut.com setup login
Source: https://explorenewmachine.com/how-to-connect-cricut-to-macbook-a-complete-guide/
#cricut.com/setup mac#cricut.com/create#cricut.com/setup#cricut.com sign in#cricut.com design space#cricut setup#cricut explore air 2#cricut#install cricut design space#cricut design space#install cricut design space app#cricut design space login#cricut design space app#www.cricut.com setup login#www.cricut.com/setup#www.cricut.com/setup login#install cricut explore air 2#cricut new machine setup#cricut software app#cricut create connect to computer#setting up your cricut maker#cricut setup for pc#cricut setup explore air 2 setup
0 notes
Last Seen Blogs

divinemotherpots
Divine Mother

sxmnium
Danny's Muse Emporium

lackfires
ITS YOUR POWER!

shakkala
Untitled

simp-lyy
SIMPly simple