#UserPreferences
Explore tagged Tumblr posts
Visit Tumblr Blog
Explore Tumblr blogs with no restrictions, modern design and the best experience.
Last Seen Tumblr Blogs


Fun Fact
Hackers stole 65M passwords from Tumblr in 2013.
Text

Customizable Interface Users can configure their home page and dashboards according to their preferences, enabling a more personalized and efficient user experience.
Unlock actionable insights now! Schedule your demo today! https://calendly.com/fresatechnologies
For more queries please visit below link 👇https://fresatechnologies.com/fresa-gold/
For further inquiries, please contact us : [email protected]
#Fresa#Freightsolutions#Freightforwarding#Import#FresaGold#ERPSoftware#FresaAIChatbot#SmartFreightAssistant#G2Awards#EasyUsability#BestSupport#AutomateYourBusiness#FresaTechnologies#LogisticsSoftware#ERPforLogistics#FreightSolutions#CustomizableInterface#UserDashboard#PersonalizedExperience#EfficientUI#TechInnovation#UserPreferences#DashboardDesign#UserExperience#DigitalCustomization#InterfaceDesign#ModernSolutions
0 notes
Text
Email Verification: Confirm Your Email on DeviantArt

Email verification is a crucial step in ensuring the security and functionality of your DeviantArt account. In this section, we'll explore: - Importance of Email Verification: Understanding why verifying your email address is essential for maintaining the security and integrity of your DeviantArt account. - Benefits of Confirming Email Addresses: Highlighting the advantages of having a confirmed email address, including enhanced account security and improved communication capabilities. - Purpose of the Blog Post: Outlining the aim of this blog post, which is to provide users with a clear and comprehensive guide on how to confirm their email addresses on DeviantArt, empowering them to take control of their account security and communication preferences.
Understanding Email Verification

Email verification serves as a vital security measure and communication tool on DeviantArt. Here's what you need to know: - Email Verification Process: DeviantArt requires users to verify their email addresses to confirm their identity and ensure the security of their accounts. This process typically involves receiving a verification email containing a unique link or code that users must click or enter to confirm their email addresses. - Access to Features and Functionalities: Verifying your email address on DeviantArt grants you access to certain features and functionalities that may be restricted to verified users. These include account recovery options, notification settings, and communication tools. - Dispelling Misconceptions: Some users may have concerns or misconceptions about email verification, such as fears of spam or misuse of email addresses. DeviantArt is committed to safeguarding user privacy and only uses verified email addresses for essential account-related communications and notifications.
Steps to Confirm Your Email
Confirming your email address on DeviantArt is a straightforward process. Follow these steps: - Access Email Verification Settings: Log in to your DeviantArt account and navigate to your account settings. Look for the section labeled "Email Settings" or "Account Security." - Initiate Verification Process: In the email settings section, locate the option to verify your email address. This may be labeled as "Verify Email" or "Confirm Email." - Check Your Inbox: After initiating the verification process, check the email inbox associated with your DeviantArt account. You should receive an email from DeviantArt containing a verification link or code. - Click Verification Link or Enter Code: Open the email from DeviantArt and follow the instructions provided. Click on the verification link or enter the verification code provided in the email. - Verify Your Email Address: Once you've clicked the verification link or entered the code, your email address should be successfully verified. You may receive a confirmation message on the DeviantArt website confirming the successful verification. - Troubleshooting Tips: If you encounter any issues during the verification process, double-check that you've entered the correct email address and that the verification email hasn't been marked as spam or filtered into a different folder. If you still have trouble verifying your email address, consider contacting DeviantArt support for assistance.
Benefits of Verified Email Addresses
Verifying your email address on DeviantArt comes with several advantages: - Enhanced Account Security: A verified email address adds an extra layer of security to your DeviantArt account. It helps prevent unauthorized access and ensures that you receive important security notifications regarding your account. - Communication with DeviantArt Support: Having a verified email address enables smoother communication with DeviantArt's support team. In case you encounter any issues or require assistance, DeviantArt can reach out to you via email to provide support and resolve any concerns. - Access to Exclusive Features: Some features and functionalities on DeviantArt may be available only to users with verified email addresses. These could include advanced account settings, special promotions, or exclusive community events. - Account Recovery Options: In the event that you forget your password or encounter login issues, a verified email address serves as a reliable point of contact for account recovery. DeviantArt can send password reset links or verification codes to your verified email address to help you regain access to your account. - Notification Preferences: Verified email addresses allow you to customize your notification preferences more effectively. You can choose to receive email notifications for important updates, such as new messages, comments, or deviations, helping you stay informed about activity on your account. Overall, verifying your email address on DeviantArt not only enhances the security and functionality of your account but also ensures a smoother and more personalized user experience on the platform.
Managing Email Preferences
DeviantArt offers users the flexibility to customize their email notification settings according to their preferences. Here's how you can manage your email preferences effectively: - Access Email Settings: Log in to your DeviantArt account and navigate to your account settings. Look for the section labeled "Email Preferences" or "Notification Settings." - Customize Notification Preferences: In the email preferences section, you'll find various options to customize your email notifications. These may include settings for new messages, comments on your artwork, activity from users you watch, and more. - Choose Notification Frequency: Decide how frequently you'd like to receive email notifications. Options typically include immediate notifications, daily digests, or weekly summaries. Select the frequency that best suits your preferences and browsing habits. - Opt-In/Opt-Out: Review the list of notification categories and choose which types of notifications you'd like to receive via email. You can opt-in or opt-out of specific categories based on your interests and preferences. - Save Your Preferences: After making changes to your email notification settings, be sure to save your preferences to apply the changes. Look for a "Save" or "Update" button at the bottom of the email preferences page. - Reduce Email Notifications: If you find yourself receiving too many email notifications from DeviantArt, consider reducing the frequency or opting out of non-essential notification categories. This can help streamline your inbox and prevent email overload. - Regularly Review Settings: Periodically review your email notification settings to ensure they align with your current preferences and usage patterns. Update your settings as needed to reflect any changes in your preferences or activity on DeviantArt. By managing your email preferences effectively, you can tailor your notification experience on DeviantArt to suit your individual preferences and stay informed about activity on the platform without feeling overwhelmed by email notifications.
Frequently Asked Questions (FAQs)
Q: Why do I need to verify my email address on DeviantArt? A: Verifying your email address helps ensure the security of your DeviantArt account and enables you to receive important notifications and updates about your account activity. Q: How do I verify my email address on DeviantArt? A: To verify your email address, log in to your DeviantArt account, navigate to your account settings, and follow the instructions to initiate the verification process. You'll typically receive a verification email containing a link or code to confirm your email address. Q: What if I didn't receive the verification email from DeviantArt? A: If you didn't receive the verification email, double-check your email inbox (including spam or junk folders) to ensure it wasn't filtered out. If you still can't find the email, you can request a new verification email from DeviantArt or contact their support team for assistance. Q: Can I change the email address associated with my DeviantArt account? A: Yes, you can update the email address associated with your DeviantArt account in your account settings. After changing your email address, you may need to verify the new email address to confirm its validity. Q: Is email verification required for all DeviantArt users? A: While email verification is recommended for all DeviantArt users to enhance account security and functionality, it may not be mandatory for basic account usage. However, certain features and functionalities may require a verified email address. Q: Can I opt out of receiving email notifications from DeviantArt? A: Yes, you can customize your email notification preferences in your account settings to control the types and frequency of notifications you receive from DeviantArt via email. You can opt out of specific notification categories or adjust the frequency of notifications to suit your preferences.
Conclusion
In conclusion, email verification plays a crucial role in ensuring the security and functionality of your DeviantArt account. Let's recap some key points covered in this blog post: - Importance of Email Verification: Verifying your email address on DeviantArt enhances account security and enables you to receive important notifications and updates. - Steps to Confirm Your Email: We've provided step-by-step instructions for confirming your email address on DeviantArt, making the verification process easy to follow. - Benefits of Verified Email Addresses: Verified email addresses offer several benefits, including enhanced account security, smoother communication with DeviantArt support, and access to exclusive features. - Managing Email Preferences: Users have the flexibility to customize their email notification settings on DeviantArt, allowing them to tailor their notification experience to their preferences. - FAQs: We've addressed common questions and concerns related to email verification on DeviantArt, providing users with clarity and guidance on the verification process and its implications. We encourage all DeviantArt users to verify their email addresses for enhanced account security and communication capabilities. Additionally, remember to regularly review and update your email preferences to ensure you stay informed about updates and notifications relevant to your interests. Thank you for taking the time to learn about email verification on DeviantArt. By following the guidance provided in this blog post, you can make the most of your DeviantArt experience while safeguarding your account against potential security risks. Read the full article
#AccountManagement#AccountSecurity#Communication#DeviantArt#emailverification#notificationsettings#UserPreferences
0 notes
Text
AI vs. Human: Who Wins in the Battle of Chatbots? A Global Perspective

Who Wins in the Battle of Chatbots?
In the rapidly evolving landscape of artificial intelligence (AI), chatbots have emerged as a prominent and impactful application. They've become our virtual companions, assisting us with tasks, answering questions, and even engaging in conversations that can mimic human interactions. The rise of AI-driven chatbots has sparked a debate: Can these digital entities surpass the capabilities of human chatbots in the global chatbot battle? In this article, we delve into the world of AI vs. human chatbots from a global perspective, exploring their strengths, weaknesses, and the preferences of users worldwide.
The Evolution of Chatbots: AI Takes the Stage
AI Chatbots: The New Age Conversationalists
In recent years, AI-powered chatbots have gained significant traction in various industries, including customer service, e-commerce, healthcare, and more. These chatbots leverage natural language processing (NLP) and machine learning algorithms to understand and respond to user queries with remarkable precision. Their ability to adapt, learn, and improve over time makes them an attractive choice for businesses looking to enhance customer interactions.
The Human Touch: Traditional Chatbots
On the other side of the spectrum, we have traditional chatbots, which rely on predefined scripts and rule-based systems. These chatbots, often referred to as "scripted" or "rule-based" chatbots, have been in use for quite some time. They can efficiently handle routine and straightforward tasks but often struggle with complex and context-based conversations.
The Battle of Capabilities
AI Chatbots: Quick Learners
AI chatbots are celebrated for their ability to learn from interactions and adapt to evolving customer needs. They excel in personalization and can provide tailored responses to user inquiries. These chatbots leverage vast amounts of data to continuously improve their conversational skills and provide users with a natural and engaging experience.
Human Chatbots: The Human Connection
Human chatbots, on the other hand, offer a more human touch to interactions. They excel in understanding nuances, emotions, and context in conversations. Human chatbots often thrive in scenarios that require empathy and emotional intelligence. Users seeking a more human-like interaction might prefer them.
The Global User Perspective
User Preferences Vary
User preferences for chatbots vary across the globe. While some users prefer the efficiency and precision of AI chatbots, others value the empathetic and human-like touch provided by human chatbots. Cultural differences, language nuances, and regional expectations play a significant role in shaping these preferences.
The Role of Industry
The choice between AI and human chatbots also depends on the industry. In sectors like e-commerce and banking, AI chatbots are often favored for their ability to provide quick, accurate, and personalized responses. In contrast, industries emphasizing healthcare or counseling may lean toward human chatbots for their emotional intelligence and nuanced understanding.
Regional Perspectives
Different regions exhibit distinct preferences. For example, in Asia, where the concept of "kawaii" or cuteness holds value, human-like chatbots with friendly appearances and personas tend to be well-received. In contrast, North American users might prioritize efficiency and problem-solving capabilities, which AI chatbots can provide.
The Ongoing Debate
The AI vs. human chatbot debate continues to captivate AI enthusiasts, developers, and users worldwide. Proponents of AI chatbots emphasize their ability to scale, adapt, and provide cost-effective solutions, making them attractive for businesses. In contrast, advocates for human chatbots highlight their emotional intelligence, understanding, and the ability to create genuine connections with users.
The Future Outlook
As AI technology continues to advance, we are likely to witness a convergence of the strengths of both AI and human chatbots. Developers are working to infuse AI chatbots with emotional intelligence and a more human-like touch. Likewise, human chatbots are being augmented with AI capabilities to improve efficiency.
Conclusion
The battle of AI vs. human chatbots in a global perspective is not about declaring a single winner. It's about recognizing the unique strengths and attributes that each brings to the table. The future of chatbots lies in the harmonious integration of AI and human elements, ensuring that users across the globe can benefit from the best of both worlds.
FAQs
1. Are AI chatbots completely replacing human chatbots?
No, AI chatbots are not replacing human chatbots entirely. While AI chatbots excel in efficiency and precision, human chatbots provide emotional intelligence and a more human-like touch. The future likely involves a blend of both approaches.
2. How do regional preferences affect the choice between AI and human chatbots?
Regional preferences are influenced by cultural nuances and expectations. In some regions, users prioritize efficiency, while others value empathetic interactions. Developers often tailor chatbots to meet these preferences.
3. What industries are adopting AI chatbots over human chatbots?
Industries such as e-commerce and banking often prefer AI chatbots for their ability to provide quick, accurate, and personalized responses. However, industries emphasizing emotional support, like healthcare, may lean toward human chatbots.
4. Can AI chatbots understand and respond to emotions?
AI chatbots are evolving to better understand and respond to emotions. They can recognize sentiment in text and respond with appropriate empathy, although their abilities in this regard may not match those of human chatbots.
5. What does the future hold for chatbots in the global perspective?
The future of chatbots lies in the integration of AI and human elements. Developers are working to combine the strengths of both to create more versatile and user-friendly chatbots that can cater to a diverse global audience.
By exploring the unique attributes of AI and human chatbots and considering the global perspective, we can appreciate the diversity in chatbot usage and anticipate the promising future of chatbot technology.
Don’t Miss Out: Stay Ahead of the Curve with:
Behind the Scenes of ChatGPT Vision: What Makes It So Wildly Innovative? Unveil the secrets of ChatGPT Vision’s groundbreaking technology and explore the world of AI image recognition. Dive into the future of AI with us! Your Chatbot BFF: AI Gets Personal with ChatGPT and You Won’t Believe It Discover how AI is revolutionizing friendships through personalized conversations with ChatGPT. Say hello to your new chatbot BFF! ChatGPT Vision vs. Human Vision: Can AI Really See Like Us? Join us in a visual showdown! Explore the capabilities of ChatGPT Vision and see if AI can truly match human vision. AI That Knows You: ChatGPT’s Personalized Conversations Delve into the world of personalized AI conversations and see how ChatGPT understands you better than ever before. Chai, DALL·E 3, and Candy AI: The Latest AI Trends You Need to Know Stay ahead of the curve with the latest AI trends! Dive into the world of Chai, DALL·E 3, and Candy AI and discover what’s shaping the future of technology.
Keywords:
AI vs. Human chatbots
Global chatbot battle
User preferences
Industry trends
Future outlook
Chatbot technology
Human chatbot strengths
AI chatbot capabilities
Emotional intelligence in chatbots
Regional chatbot preferences
Hashtags: #AIvsHumanChatbots #GlobalChatbotBattle #UserPreferences #ChatbotTechnology #FutureOutlook #EmotionalIntelligence #AIChatbots #HumanChatbots
Focus Keywords:
AI vs. Human chatbots
Global chatbot battle
User preferences
Industry trends
Future outlook
Chatbot technology
0 notes
Text
Insecure Deserialization Vulnerabilities in Laravel: How to Protect Your Web Applications
Introduction: What is Insecure Deserialization?
Insecure deserialization is a vulnerability that occurs when untrusted data is deserialized into objects. In the context of a Laravel application, this could allow attackers to manipulate serialized objects, leading to remote code execution, data tampering, or other severe consequences.

Understanding this vulnerability is crucial for maintaining a secure web application, and in this blog post, we will dive into how to identify and mitigate insecure deserialization in Laravel applications.
The Risk of Insecure Deserialization in Laravel
Laravel uses PHP’s native serialize() and unserialize() functions for object serialization. If user-controlled data is deserialized, malicious actors could inject code that manipulates the application’s behavior.
For instance, an attacker could inject a payload that, when deserialized, executes unwanted code, resulting in security breaches such as privilege escalation or system compromise.
Let’s break down an example of how this vulnerability works.
Coding Example: How Insecure Deserialization Works in Laravel
Consider a Laravel application that uses serialization to store user preferences in a session:
// Store user preferences in a session $userPreferences = ['theme' => 'dark', 'notifications' => 'enabled']; session(['user_preferences' => serialize($userPreferences)]);
Later, when the application retrieves these preferences:
// Retrieve and unserialize user preferences $userPreferences = unserialize(session('user_preferences'));
In this example, if the session data is manipulated or an attacker crafts a malicious payload, it could lead to harmful behavior. A simple attacker-controlled input like O:8:"stdClass":1:{s:3:"foo";s:5:"bar";} could cause the application to execute unintended actions.
Preventing Insecure Deserialization in Laravel
To prevent insecure deserialization, you should:
Avoid Unserialize User-Controlled Data: Don’t deserialize data from untrusted sources, especially user input. If necessary, use json_decode() instead of unserialize() as it is more secure for handling data.
Use Class Whitelisting: Laravel provides unserialize class whitelisting through the unserialize_callback_func PHP directive. This limits the classes that can be deserialized, reducing the risk of remote code execution.
Example:
ini_set('unserialize_callback_func', 'my_safe_callback');
3. Encrypt Serialized Data: Laravel supports built-in encryption mechanisms. By encrypting your serialized data, you ensure that an attacker cannot manipulate it even if they can access it.
Example:
use Illuminate\Support\Facades\Crypt; $encryptedData = Crypt::encrypt($userPreferences);
4. Regular Security Audits: Regular vulnerability assessments and penetration testing can help identify and fix deserialization issues before they become a threat.
How Our Free Website Security Tool Can Help
To make this process easier for you, our free Website Security Scanner tool helps you quickly detect vulnerabilities such as insecure deserialization on your Laravel application. It provides a detailed analysis of your website’s security and suggests the next steps.
Here’s a screenshot of our Website Security Checker:

Screenshot of the free tools webpage where you can access security assessment tools.
After running the analysis, you will get a comprehensive vulnerability assessment report that highlights any potential security risks, including insecure deserialization. This can guide you in addressing vulnerabilities effectively.
Here’s a screenshot of a typical vulnerability assessment report:

An example of a vulnerability assessment report generated with our free tool, providing insights into possible vulnerabilities.
Conclusion
Insecure deserialization is a serious risk that can lead to devastating security breaches. However, by following best practices such as avoiding deserialization of user-controlled data, using encryption, and running regular security audits, you can significantly reduce this risk.
Leverage our free tool to check Website Vulnerability to ensure that your Laravel application is protected from this and other potential vulnerabilities.
Don’t wait for an attack to happen. Take proactive measures and secure your web applications today!
#cyber security#cybersecurity#pentesting#data security#security#the security breach show#laravel#sql#php#insecure
1 note
·
View note
Photo
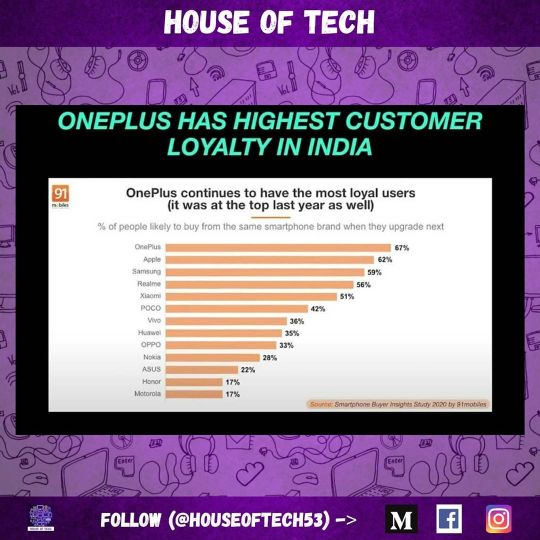
(Survey credits - 91mobiles) has released an elaborate survey report that observes how the Indian smartphone market is changing as regards to customers’ preference and other factors and one of the most important study is about brand loyalty. . A loyal set of customers is probably the best proof to a consumer brand’s success, and this is where OnePlus has traditionally come out on top, based on surveys conducted before. This time too, OnePlus leads, with a massive 67 percent of its current users saying they’ll stick to the same brand when they upgrade next and is followed by Apple and Samsung. Realme is also forming a loyal user base too and since its a newly launched brand, it is going in the right direction in terms of growth. . #BrandLoyalty #OnePlus #UserPreference #SmartphoneBuyerinsights #HouseOfTech . Like, Share and Follow for all future updates! (at Dubai, United Arab Emirates) https://www.instagram.com/p/CBIJ77igxX8/?igshid=6togpudhcrbb
0 notes
Text
Prefer Storing Data with Jetpack DataStore
Posted by Florina Muntenescu, Android Developer Advocate, Rohit Sathyanarayana, Software Engineer
Welcome Jetpack DataStore, now in alpha - a new and improved data storage solution aimed at replacing SharedPreferences. Built on Kotlin coroutines and Flow, DataStore provides two different implementations: Proto DataStore, that lets you store typed objects (backed by protocol buffers) and Preferences DataStore, that stores key-value pairs. Data is stored asynchronously, consistently, and transactionally, overcoming most of the drawbacks of SharedPreferences.
SharedPreferences vs DataStore
* SharedPreferences has a synchronous API that can appear safe to call on the UI thread, but which actually does disk I/O operations. Furthermore, apply() blocks the UI thread on fsync(). Pending fsync() calls are triggered every time any service starts or stops, and every time an activity starts or stops anywhere in your application. The UI thread is blocked on pending fsync() calls scheduled by apply(), often becoming a source of ANRs.
** SharedPreferences throws parsing errors as runtime exceptions.
In both implementations, DataStore saves the preferences in a file and performs all data operations on Dispatchers.IO unless specified otherwise.
While both Preferences DataStore and Proto DataStore allow saving data, they do this in different ways:
Preference DataStore, like SharedPreferences, has no way to define a schema or to ensure that keys are accessed with the correct type.
Proto DataStore lets you define a schema using Protocol buffers. Using Protobufs allows persisting strongly typed data. They are faster, smaller, simpler, and less ambiguous than XML and other similar data formats. While Proto DataStore requires you to learn a new serialization mechanism, we believe that the strongly typed schema advantage brought by Proto DataStore is worth it.
Room vs DataStore
If you have a need for partial updates, referential integrity, or support for large/complex datasets, you should consider using Room instead of DataStore. DataStore is ideal for small , simple datasets and does not support partial updates or referential integrity.
Using DataStore
Start by adding the DataStore dependency. If you’re using Proto DataStore, make sure you also add the proto dependency:
// Preferences DataStore implementation "androidx.datastore:datastore-preferences:1.0.0-alpha01" // Proto DataStore implementation "androidx.datastore:datastore-core:1.0.0-alpha01"
When working with Proto DataStore, you define your schema in a proto file in the app/src/main/proto/ directory. See the protobuf language guide for more information on defining a proto schema.
syntax = "proto3"; option java_package = "<your package name here>"; option java_multiple_files = true; message Settings { int my_counter = 1; }
Create the DataStore
Create the DataStore with the Context.createDataStore() extension functions.
// with Preferences DataStore val dataStore: DataStore<Preferences> = context.createDataStore( name = "settings" )
If you’re using Proto DataStore, you’ll also have to implement the Serializer interface to tell DataStore how to read and write your data type.
object SettingsSerializer : Serializer<Settings> { override fun readFrom(input: InputStream): Settings { try { return Settings.parseFrom(input) } catch (exception: InvalidProtocolBufferException) { throw CorruptionException("Cannot read proto.", exception) } } override fun writeTo(t: Settings, output: OutputStream) = t.writeTo(output) } // with Proto DataStore val settingsDataStore: DataStore<Settings> = context.createDataStore( fileName = "settings.pb", serializer = SettingsSerializer )
Read data from DataStore
DataStore exposes the stored data in a Flow, either in a Preferences object or as the object defined in your proto schema. DataStore ensures that data is retrieved on Dispatchers.IO so your UI thread isn’t blocked.
With Preferences DataStore:
val MY_COUNTER = preferencesKey<Int>("my_counter") val myCounterFlow: Flow<Int> = dataStore.data .map { currentPreferences -> // Unlike Proto DataStore, there's no type safety here. currentPreferences[MY_COUNTER] ?: 0 }
With Proto DataStore:
val myCounterFlow: Flow<Int> = settingsDataStore.data .map { settings -> // The myCounter property is generated for you from your proto schema! settings.myCounter }
Write data to DataStore
To write data, DataStore offers a suspending DataStore.updateData() function that gives you the current state of the stored data as a parameter—either as a Preferences object, or an instance of the object defined in the proto schema. The updateData() function updates the data transactionally in an atomic read-write-modify operation. The coroutine completes once the data is persisted on disk.
Preferences DataStore also provides a DataStore.edit() function to make it easier to update data. Instead of receiving a Preferences object, you receive a MutablePreferences object which you edit. As with updateData(), the changes are applied to disk after the transform block completes, and the coroutine completes once data is persisted to disk.
With Preferences DataStore:
suspend fun incrementCounter() { dataStore.edit { settings -> // We can safely increment our counter without losing data due to races! val currentCounterValue = settings[MY_COUNTER] ?: 0 settings[MY_COUNTER] = currentCounterValue + 1 } }
With Proto DataStore:
suspend fun incrementCounter() { settingsDataStore.updateData { currentSettings -> // We can safely increment our counter without losing data due to races! currentSettings.toBuilder() .setMyCounter(currentSettings.myCounter + 1) .build() } }
Migrate from SharedPreferences to DataStore
To migrate from SharedPreferences to DataStore, you need to pass in a SharedPreferencesMigration object to the DataStore builder. DataStore can automatically migrate from SharedPreferences to DataStore for you. Migrations are run before any data access can occur in DataStore. This means that your migration must have succeeded before DataStore.data returns any values and before DataStore.updateData() can update the data.
If you’re migrating to Preferences DataStore, you can use the default SharedPreferencesMigration implementation and just pass in the name used to construct your SharedPreferences.
With Preferences DataStore:
val dataStore: DataStore<Preferences> = context.createDataStore( name = "settings", migrations = listOf(SharedPreferencesMigration(context, "settings_preferences")) )
When migrating to Proto DataStore, you’ll have to implement a mapping function that defines how to migrate from the key-value pairs used by SharedPreferences to the DataStore schema you defined.
With Proto DataStore:
val settingsDataStore: DataStore<Settings> = context.createDataStore( produceFile = { File(context.filesDir, "settings.preferences_pb") }, serializer = SettingsSerializer, migrations = listOf( SharedPreferencesMigration( context, "settings_preferences" ) { sharedPrefs: SharedPreferencesView, currentData: UserPreferences -> // Map your sharedPrefs to your type here } ) )
Wrap-up
SharedPreferences comes with several drawbacks: a synchronous API that can appear safe to call on the UI thread, no mechanism for signaling errors, lack of transactional API, and more. DataStore is a replacement for SharedPreferences that addresses most of these shortcomings. DataStore includes a fully asynchronous API using Kotlin coroutines and Flow, handles data migration, guarantees data consistency, and handles data corruption.
As DataStore is still in alpha, we need your help to make it better! To get started, find out more about DataStore in our documentation and try it out by taking our codelabs: Preferences DataStore codelab and Proto DataStore codelab. Then, let us know how we can improve the library by creating issues on the Issue Tracker.
Prefer Storing Data with Jetpack DataStore published first on https://phonetracking.tumblr.com/ Prefer Storing Data with Jetpack DataStore published first on https://leolarsonblog.tumblr.com/
0 notes
Text
Prefer Storing Data with Jetpack DataStore
Posted by Florina Muntenescu, Android Developer Advocate, Rohit Sathyanarayana, Software Engineer
Welcome Jetpack DataStore, now in alpha - a new and improved data storage solution aimed at replacing SharedPreferences. Built on Kotlin coroutines and Flow, DataStore provides two different implementations: Proto DataStore, that lets you store typed objects (backed by protocol buffers) and Preferences DataStore, that stores key-value pairs. Data is stored asynchronously, consistently, and transactionally, overcoming most of the drawbacks of SharedPreferences.
SharedPreferences vs DataStore
* SharedPreferences has a synchronous API that can appear safe to call on the UI thread, but which actually does disk I/O operations. Furthermore, apply() blocks the UI thread on fsync(). Pending fsync() calls are triggered every time any service starts or stops, and every time an activity starts or stops anywhere in your application. The UI thread is blocked on pending fsync() calls scheduled by apply(), often becoming a source of ANRs.
** SharedPreferences throws parsing errors as runtime exceptions.
In both implementations, DataStore saves the preferences in a file and performs all data operations on Dispatchers.IO unless specified otherwise.
While both Preferences DataStore and Proto DataStore allow saving data, they do this in different ways:
Preference DataStore, like SharedPreferences, has no way to define a schema or to ensure that keys are accessed with the correct type.
Proto DataStore lets you define a schema using Protocol buffers. Using Protobufs allows persisting strongly typed data. They are faster, smaller, simpler, and less ambiguous than XML and other similar data formats. While Proto DataStore requires you to learn a new serialization mechanism, we believe that the strongly typed schema advantage brought by Proto DataStore is worth it.
Room vs DataStore
If you have a need for partial updates, referential integrity, or support for large/complex datasets, you should consider using Room instead of DataStore. DataStore is ideal for small , simple datasets and does not support partial updates or referential integrity.
Using DataStore
Start by adding the DataStore dependency. If you’re using Proto DataStore, make sure you also add the proto dependency:
// Preferences DataStore implementation "androidx.datastore:datastore-preferences:1.0.0-alpha01" // Proto DataStore implementation "androidx.datastore:datastore-core:1.0.0-alpha01"
When working with Proto DataStore, you define your schema in a proto file in the app/src/main/proto/ directory. See the protobuf language guide for more information on defining a proto schema.
syntax = "proto3"; option java_package = "<your package name here>"; option java_multiple_files = true; message Settings { int my_counter = 1; }
Create the DataStore
Create the DataStore with the Context.createDataStore() extension functions.
// with Preferences DataStore val dataStore: DataStore<Preferences> = context.createDataStore( name = "settings" )
If you’re using Proto DataStore, you’ll also have to implement the Serializer interface to tell DataStore how to read and write your data type.
object SettingsSerializer : Serializer<Settings> { override fun readFrom(input: InputStream): Settings { try { return Settings.parseFrom(input) } catch (exception: InvalidProtocolBufferException) { throw CorruptionException("Cannot read proto.", exception) } } override fun writeTo(t: Settings, output: OutputStream) = t.writeTo(output) } // with Proto DataStore val settingsDataStore: DataStore<Settings> = context.createDataStore( fileName = "settings.pb", serializer = SettingsSerializer )
Read data from DataStore
DataStore exposes the stored data in a Flow, either in a Preferences object or as the object defined in your proto schema. DataStore ensures that data is retrieved on Dispatchers.IO so your UI thread isn’t blocked.
With Preferences DataStore:
val MY_COUNTER = preferencesKey<Int>("my_counter") val myCounterFlow: Flow<Int> = dataStore.data .map { currentPreferences -> // Unlike Proto DataStore, there's no type safety here. currentPreferences[MY_COUNTER] ?: 0 }
With Proto DataStore:
val myCounterFlow: Flow<Int> = settingsDataStore.data .map { settings -> // The myCounter property is generated for you from your proto schema! settings.myCounter }
Write data to DataStore
To write data, DataStore offers a suspending DataStore.updateData() function that gives you the current state of the stored data as a parameter—either as a Preferences object, or an instance of the object defined in the proto schema. The updateData() function updates the data transactionally in an atomic read-write-modify operation. The coroutine completes once the data is persisted on disk.
Preferences DataStore also provides a DataStore.edit() function to make it easier to update data. Instead of receiving a Preferences object, you receive a MutablePreferences object which you edit. As with updateData(), the changes are applied to disk after the transform block completes, and the coroutine completes once data is persisted to disk.
With Preferences DataStore:
suspend fun incrementCounter() { dataStore.edit { settings -> // We can safely increment our counter without losing data due to races! val currentCounterValue = settings[MY_COUNTER] ?: 0 settings[MY_COUNTER] = currentCounterValue + 1 } }
With Proto DataStore:
suspend fun incrementCounter() { settingsDataStore.updateData { currentSettings -> // We can safely increment our counter without losing data due to races! currentSettings.toBuilder() .setMyCounter(currentSettings.myCounter + 1) .build() } }
Migrate from SharedPreferences to DataStore
To migrate from SharedPreferences to DataStore, you need to pass in a SharedPreferencesMigration object to the DataStore builder. DataStore can automatically migrate from SharedPreferences to DataStore for you. Migrations are run before any data access can occur in DataStore. This means that your migration must have succeeded before DataStore.data returns any values and before DataStore.updateData() can update the data.
If you’re migrating to Preferences DataStore, you can use the default SharedPreferencesMigration implementation and just pass in the name used to construct your SharedPreferences.
With Preferences DataStore:
val dataStore: DataStore<Preferences> = context.createDataStore( name = "settings", migrations = listOf(SharedPreferencesMigration(context, "settings_preferences")) )
When migrating to Proto DataStore, you’ll have to implement a mapping function that defines how to migrate from the key-value pairs used by SharedPreferences to the DataStore schema you defined.
With Proto DataStore:
val settingsDataStore: DataStore<Settings> = context.createDataStore( produceFile = { File(context.filesDir, "settings.preferences_pb") }, serializer = SettingsSerializer, migrations = listOf( SharedPreferencesMigration( context, "settings_preferences" ) { sharedPrefs: SharedPreferencesView, currentData: UserPreferences -> // Map your sharedPrefs to your type here } ) )
Wrap-up
SharedPreferences comes with several drawbacks: a synchronous API that can appear safe to call on the UI thread, no mechanism for signaling errors, lack of transactional API, and more. DataStore is a replacement for SharedPreferences that addresses most of these shortcomings. DataStore includes a fully asynchronous API using Kotlin coroutines and Flow, handles data migration, guarantees data consistency, and handles data corruption.
As DataStore is still in alpha, we need your help to make it better! To get started, find out more about DataStore in our documentation and try it out by taking our codelabs: Preferences DataStore codelab and Proto DataStore codelab. Then, let us know how we can improve the library by creating issues on the Issue Tracker.
Prefer Storing Data with Jetpack DataStore published first on https://phonetracking.tumblr.com/
0 notes
Text

📈🔧🚀Customizable Interface📊⚙️💻
Users can configure their home page and dashboards according to their preferences, enabling a more personalized and efficient user experience.💻
For more queries please visit below link 👇 🌐 www.fresatechnologies.com/products/fresa-gold
For further inquiries, please contact us : ✉️ [email protected]
#Fresa |#Freightsolutions |#Freightforwarding |#Import |#FresaGold |#ERPSoftware |#G2Awards |#capterra |#SoftwareAdvice |#MostRecommended2024 |#GetApp |#UserReviews |#BestFunctionality |#BestFreightForwardingSoftware |#BestSupport |#FreightForwarding |#ShippingSoftware |#CustomizableInterface |#UserDashboard |#PersonalizedExperience |#EfficientUI |#TechInnovation |#UserPreferences |#DashboardDesign |#UserExperience |#DigitalCustomization |#InterfaceDesign |#ModernSolutions
0 notes
Text
Data modeling with NoSQL Workbench for Amazon DynamoDB
When using a NoSQL database such as Amazon DynamoDB, I tend to make different optimization choices than what I am accustomed to with relational databases. At the beginning, it was not easy for me, because my relational database experience was telling me to do things differently. To help with that, AWS released NoSQL Workbench for Amazon DynamoDB, a client-side application, available for Windows and macOS, that you can use to build scalable, high-performance data models, and simplify query development and testing. With NoSQL Workbench, you can: Define your data model using one or more tables. Visualize the data model to understand how it works in different scenarios. Build the data plane operations for multiple programming languages. In this blog post, I am using NoSQL Workbench, that is now generally available, to design the data model for a common use case: managing URL bookmarks for multiple customers. Even if the use case is relatively simple, there are still many interesting considerations to make. Data modeler For this application, I need to store information about bookmarks and customer accounts. I start by writing down the list of attributes I want to store, with a brief description of what I am planning to store: Customer customerId – a universally unique identifier (UUID) email fullName – for example, “Shirley Rodriguez” userPreferences – a JSON object describing user settings for my app creationDate updateDate Bookmark URL – “https://…” customerId – the customer storing this bookmark folder – to organize bookmarks in folders, for example “Cloud” title – by default the HTML title of the page description ��� optional creationDate updateDate A first approach, similar to what you’d do with a relational database, is to create two tables, one for customers, and one for bookmarks. The customerId attribute links information between the two tables. Let’s see this design in practice. Using the Data modeler section in NoSQL Workbench, I create a new data model with two tables. The following screenshot shows the details for the Customer table. The following screenshot shows the details for the Bookmark table. The Customer table has customerId as primary key. For the Bookmark table, I use a composite primary key, where customerId is the partition key, and url is the sort key. In this way, if two customers store the same URL, I can have both in the table. DynamoDB doesn’t have a fixed schema, only the attributes in the primary key (the partition key and optionally the sort key) must be defined at table creation. Each item stored in the table can then use different attributes on top of those in the primary key. For date fields, such as createDate and updateDate, I use the ISO 8601 standard to store them as strings, like “20200325T091641.123”. This has the advantage that string comparison preserves the order of dates. I store userPreferences as JSON strings. For simplicity, I am using an empty JSON object (such as “{}”) in examples hereafter. Depending the actual application, I could use this to store language or sort preferences, for example something like: { “language”: “en”, “sort”: “date”, “sortDirection”: “ascending” } This first approach, using two tables, definitely works. But what happens in my application when customers log in to display their bookmarks? Each time, the application runs two requests to DynamoDB, the first to get the customer data in the Customer table, the second to get the customer bookmarks in the Bookmark table. This is something quite common when moving a relational data model to NoSQL without changes: table joins are “unrolled” into multiple requests to the database. This is not efficient, especially if you start to have three or more requests instead of one. When using a NoSQL database, you should design your data model to optimize for the application’s access patterns. You should ask yourself: How am I inserting data? How am I going to update that data? What kind of queries am I going to use to retrieve information? How often? You shouldn’t start the design of the data model if those questions are not clear, otherwise you risk to update it too often, slowing down development. Going back to our bookmark application, can I design a better data model? Yes! In my case, I know that most of the times the application is showing, for a specific customer, a summary of the customer information, and the list of customer bookmarks. Wouldn’t it be great if I could retrieve all this information with a single query? To do that, I store the customer information and the customer’s bookmarks in the same table as a collection of related items. Let’s see how that works. The primary key of the CustomerBookmark table is composite: the partition key is always the customerId, while the sort key can hold different values. I use the sort key to store URL for bookmarks, or a concatenated string such as “CUST#” followed by customerId for customer data. In this way, the sort key is an overloaded attribute, and I use a generic name for it: sk. Adding the customerId as part of the sort key for customer data is redundant, but in this way the sk attribute has a high cardinality (meaning that it contains values that are very uncommon or unique) and can be used later as partition key for a secondary index without creating hot partitions. When defining the table in NoSQL Workbench, attributes can be assigned to one or more facets. A facet is a virtual construct in NoSQL Workbench, not a functional construct in DynamoDB itself, that allows you to visualize the different kind of data you store in the same table. For each facet, you can configure aliases for the partition key and for the sort key. For overloaded attributes, aliases describe what that attribute is supposed to hold for that facet. In my case, I have two facets for the CustomerBookmark table, depending on which data is stored in an item: customer data or bookmarks. Each of the two facets has a different alias for the sk sort key: type for items storing customer data, url for items storing bookmark information. We’ll see how to use facets in the next section. Now that I am storing these related items together in the same index, my application can run a single query by customerId and get all the info it needs: customer data and bookmarks. Let’s make this clear using the Visualizer. Visualizer To literally “see” the advantages of this new approach, I move to the Visualizer section of NoSQL Workbench. One of the advantages of using the Visualizer, is that you can add sample data to enrich visualizations. I can also see the sample data from the perspective of the Global Secondary Indexes (GSI) I created, specifically: ByEmail index to get customer data by email address. Note that items without an email attribute, such as those hosting bookmark information, are not retrieved by the index. ByUrl index to get bookmark data by URL. Note that I added customerId as sort key for the index, because the same URL can be bookmarked by multiple customers. ByCustomerFolder index to get, for each customer, bookmarks by folder. Selecting the facets for the CustomerBookmark table, I see how data is rendered when items are hosting customer or bookmark data: The Customer facet shows customer information such as email addresses and full names. The sort key is using the type alias, and begins with “CUST#”. The Bookmark facet describes bookmark data with values such as folders and titles. The sort key is using the url alias, and does not start with “CUST#”. Using DynamoDB Local You can develop and test your DynamoDB applications in your local development environment using DynamoDB Local. In this way, you can work on your application locally, even without an internet connection. I download and set up DynamoDB Local on my laptop following these instructions. If you prefer, you can use Apache Maven or a Docker image. In the directory where I decompressed the archive, I start DynamoDB Local: java -Djava.library.path=./DynamoDBLocal_lib -jar DynamoDBLocal.jar -sharedDb In another window, I test that the local endpoint works using the AWS Command Line Interface (CLI): aws dynamodb list-tables --endpoint-url http://localhost:8000 { "TableNames": [] } It works, and there are currently no tables, as expected. In the NoSQL Workbench Visualizer, I select to commit the data model to DynamoDB, then I add a new DynamoDB Local connection: After that, I repeat the previous AWS CLI command to list DynamoDB tables available locally. Now I see the CustomerBookmark table: aws dynamodb list-tables --endpoint-url http://localhost:8000 { "TableNames": [ "CustomerBookmark" ] } All sample data has been added to the table. I run a table scan for a quick check. For the sake of brevity, I am not showing the results here: aws dynamodb scan --table-name CustomerBookmark --endpoint-url http://localhost:8000 Operation builder Moving to the Operation builder section of NoSQL Workbench, I can build operations and execute them on a connection, using DynamoDB Local or a real AWS account. You can build operations to put, update, or delete items in a table, or to query or scan a table or an index. There is also support for transactions. Using the Operation builder, I can simulate what operations my application would do and generate the code for Python, JavaScript (Node.js), or Java. I can use conditions and parameters to filter data, scan an index forward or backward, or limit the number of items to evaluate. For example, to simulate my bookmark application, I execute a single query operation on the CustomerBookmark table to get all the info (customer data and bookmarks) for a specific customerId: When executing the query on my DynamoDB Local connection, I get the info I expect from the sample data: As an additional tuning, I can change the sort order of the query, using the Scan index format option, to get the customer data as first item. I can accomplish the same result changing the prefix I use in the sk sort key to identify customer data, for example using the lowercase string “cust#”. Satisfied by the result, I select the option to generate code to kick start my application. For this operation, I select Python as the output programming language. The code you see in this screenshot is just a subset of what is being generated: Similarly, I can use the operations builder to query secondary indexes. For example, I can see how many customers bookmarked a specific website selecting the ByUrl index: Again, I can execute the query on the sample data to validate the result: Finally, I generate the code for the query, using the ByUrl secondary index, this time selecting Java as output programming language: Conclusions NoSQL Workbench for DynamoDB helped me refine the design of the data model, based on my access patterns, and generate the code to start the implementation of my application. I could use DynamoDB Local to experiment without the need for an internet connection. NoSQL Workbench supports also IAM roles and temporary AWS security credentials. For example, if your organization uses AWS Single Sign-On (SSO), your users can sign in to your Active Directory, a built-in AWS SSO directory, or another identity provider connected to AWS SSO, and map that identity to an IAM role that you can use for authentication with NoSQL Workbench. Now that NoSQL Workbench for DynamoDB is generally available, transforming your ideas in real applications is much easier. To start, download NoSQL Workbench here, and tell me what are you going to use it for! About the Author Danilo Poccia works with startups and companies of any size to support their innovation. In his role as Principal Evangelist at Amazon Web Services, he leverages his experience to help people bring their ideas to life, focusing on serverless architectures and event-driven programming, and on the technical and business impact of machine learning and edge computing. He is the author of AWS Lambda in Action from Manning. Follow him on Twitter @danilop. https://probdm.com/site/MjA2OTI
0 notes
Text
List of Salesforce sObject ID Prefixes
ID PrefixObject Type 001 Account 002 Note 003 Contact 005 User 006 Opportunity 008 OpportunityHistory 100 UserLicense 101 Custom Label 400 ApexClassMember 500 Case 501 Solution 608 ForecastShare 701 Campaign 707 AsyncApexJob 709 ApexTestQueueItem 750 Bulk Query Job 751 Bulk Query Batch 752 Bulk Query Result 800 Contract 806 Approval 888 Remote Access 000 Empty Key 00a CaseComment/IdeaComment 00b WebLink 00B View 00D Organization 00e Profile 00E UserRole 00G Group 00h Page Layout 00I Partner 00J OpportunityCompetitor 00K OpportunityContactRole 00k OpportunityLineItem 00l Folder 00N Custom Field Definition 00o OpportunityLineItemSchedule 00O Report 00P Attachment 00p UserTeamMember 00Q Lead 00q OpportunityTeamMember 00r AccountShare 00S Import Queue 00t OpportunityShare 00T Task 00U Event 00v CampaignMember 00X EmailTemplate 010 CaseSolution 011 GroupMember 012 RecordType 015 Document 016 BrandTemplate (Letterhead) 018 EmailStatus 019 BusinessProcess 01a DashboardComponent 01D UserAccountTeamMember 01H MailmergeTemplate 01m BusinessHours 01M AccountTeamMember 01n CaseShare 01N Scontrol 01o LeadShare 01p ApexClass 01q ApexTrigger 01Q AssignmentRule 01Q Workflow Rule 01r Visualforce Tab 01s Pricebook2 01t Product2 01u PricebookEntry 01Y CampaignMemberStatus 01Z Dashboard 020 EventAttendee 021 QuantityForecast 022 FiscalYearSettings 026 Period 027 RevenueForecast 028 OpportunityOverride 029 LineitemOverride 02a ContractContactRole 02c Sharing Rule 02i Asset 02n CategoryNode 02o CategoryData 02s EmailMessage 02Z AccountContactRole 033 Package 035 SelfServiceUser 03d Validation Rule 03g QueueSobject 03j CaseContactRole 03s ContactShare 03u UserPreference 04g ProcessInstance 04h ProcessInstanceStep 04i ProcessInstanceWorkitem 04k Outbound Message Id 04l Outbound Notification Id 04m AdditionalNumber 04s AsyncResult/DeployResult 04t Install Package 04v CallCenter 04W RevenueForecastHistory 04X QuantityForecastHistory 04Y Field Update 058 ContentWorkspace 059 ContentWorkspaceDoc 05X DocumentAttachmentMap 060 Portal Id 066 ApexPage 068 ContentVersion 069 ContentDocument 07E Sandbox 07L ApexLog 07M ApexTestResult 07M Apex Test Result 081 StaticResource 082 Data from Uninstalled Packages 083 Vote 087 Idea 08e CronTrigger 08s CampaignShare 091 EmailServicesFunction 092 Weekly Data Export 093 EmailServicesAddress 099 ApexComponent 09a Community 0A2 Change Set 0A3 Installed Package 0BM Connection - Salesforce to Salesforce 0C0 Holiday 0D2 OrgWideEmailAddress 0D5 UserProfileFeed 0D5 FeedItem/NewsFeed/UserProfileFeed 0DM Site 0E8 EntitySubscription 0EP Inbound Change Set 0J0 SetupEntityAccess 0PS Permission Set Metadata 0Q0 Quote 0t0 TagDefinition 0Ya LoginHistory 1dc MetadataContainer 1dr ContainerAsyncRequest 7tf TraceFlag CF00N Custom Field Id
0 notes
Text
MoniWiki 커스터마이즈
=== 가입 차단 및 비밀글 기능 사용 === * “‘wiki.php”’ 의 3950줄 즈음,{{{ if (!$action) $options['pi’]=1; # protect a recursivly called #redirect# if (!$DBInfo->security->is_allowed('read’,$options)) {# do_invalid($formatter,$options);# return;# }}}}에서 코드 부분의 주석 제거 * “'needtologin.php”’ 의 {{{ function writable{}}}} 뒤에{{{ function may_read($action,&$options) {/* $private_pages=array(“); if ($options['id’]=='Anonymous’) { $options['err’]=sprintf(_("You are not allowed to ’%s’ on this page.”),$action); $options['err’].=“\n”._(“Please Login or make your ID on this Wiki ;)”); return 0; }*/ if ($options['page’]=='UserPreferences’) { $options['err’]=sprintf(_(“You are not allowed to ’%s’ on this page.”),$action); return 0; } if (substr($options['page’],0,2)==’_p’) { $options['err’]=sprintf(_(“You are not allowed to ’%s’ on this page.”),$action); return 0; } return 1; }}}}추가=== EditTextForm 추가 ===
0 notes
Text
For the #PlayStation7 UI framework, we can start with a skeleton of the structure that allows for intuitive navigation, personalization, accessibility features, interactive tutorials, and feedback mechanisms. This foundation will give us a clear and modular layout for managing and expanding each component.
I’ll break down each area and propose a code structure for a scalable and flexible UI system. Since this is for a game console, it would likely be built using a high-performance front-end framework like React or Unity UI Toolkit if we want C# for seamless integration. I’ll draft this in React with TypeScript for scalability and reusability.
1. Base UI Component Structure
The UI can be organized in a hierarchy of components that handle each aspect:
// App.tsx - Main entry point
import React from 'react';
import { NavigationMenu } from './components/NavigationMenu';
import { Personalization } from './components/Personalization';
import { Accessibility } from './components/Accessibility';
import { Tutorials } from './components/Tutorials';
import { Feedback } from './components/Feedback';
export const App: React.FC = () => {
return (
<div className="ps7-ui">
<NavigationMenu />
<Personalization />
<Accessibility />
<Tutorials />
<Feedback />
</div>
);
};
Each component would encapsulate its own logic and state, allowing for modular updates and improved maintainability.
2. Intuitive Navigation
The NavigationMenu component could use React Router to manage routes for easy navigation between games, apps, and settings. Quick access can be achieved using a menu structure that includes hotkeys or icons.
// components/NavigationMenu.tsx
import React from 'react';
import { Link } from 'react-router-dom';
export const NavigationMenu: React.FC = () => {
return (
<nav className="navigation-menu">
<Link to="/home">Home</Link>
<Link to="/games">Games</Link>
<Link to="/apps">Apps</Link>
<Link to="/settings">Settings</Link>
</nav>
);
};
3. Personalization Options
The Personalization component could offer theme and layout options. We can use context for storing and accessing user preferences globally.
// components/Personalization.tsx
import React, { useState, useContext } from 'react';
import { UserContext } from '../context/UserContext';
export const Personalization: React.FC = () => {
const { userPreferences, setUserPreferences } = useContext(UserContext);
const handleThemeChange = (theme: string) => {
setUserPreferences({ ...userPreferences, theme });
};
return (
<div className="personalization">
<h3>Customize Your Experience</h3>
<select onChange={(e) => handleThemeChange(e.target.value)}>
<option value="dark">Dark</option>
<option value="light">Light</option>
</select>
</div>
);
};
4. Accessibility Features
The Accessibility component includes support for voice commands, color blindness options, and mobility support. We can add accessibility settings to UserContext.
// components/Accessibility.tsx
import React, { useContext } from 'react';
import { UserContext } from '../context/UserContext';
export const Accessibility: React.FC = () => {
const { accessibilityOptions, setAccessibilityOptions } = useContext(UserContext);
const toggleVoiceCommands = () => {
setAccessibilityOptions({ ...accessibilityOptions, voiceCommands: !accessibilityOptions.voiceCommands });
};
return (
<div className="accessibility">
<h3>Accessibility Settings</h3>
<label>
Voice Commands
<input type="checkbox" checked={accessibilityOptions.voiceCommands} onChange={toggleVoiceCommands} />
</label>
</div>
);
};
5. Interactive Tutorials
The Tutorials component will guide new users through the setup. You can create individual tutorial steps as components or objects within an array.
// components/Tutorials.tsx
import React, { useState } from 'react';
export const Tutorials: React.FC = () => {
const [currentStep, setCurrentStep] = useState(0);
const tutorialSteps = [
"Welcome to PlayStation 7",
"How to Navigate",
"Personalization Settings",
"Feedback and Support",
];
return (
<div className="tutorials">
<h3>{tutorialSteps[currentStep]}</h3>
<button onClick={() => setCurrentStep((prev) => (prev + 1) % tutorialSteps.length)}>Next</button>
</div>
);
};
6. Feedback Mechanisms
The Feedback component enables users to submit feedback. This could involve a backend integration for storing data and using WebSocket for real-time updates.
// components/Feedback.tsx
import React, { useState } from 'react';
export const Feedback: React.FC = () => {
const [feedback, setFeedback] = useState("");
const handleSubmit = () => {
// Logic to send feedback to the server
console.log("Feedback submitted:", feedback);
};
return (
<div className="feedback">
<h3>Give Us Your Feedback</h3>
<textarea value={feedback} onChange={(e) => setFeedback(e.target.value)} />
<button onClick={handleSubmit}>Submit</button>
</div>
);
};
7. Context for Global State
A UserContext can hold user preferences, accessibility settings, and other globally accessible states, making the app reactive and user-tailored.
// context/UserContext.tsx
import React, { createContext, useState } from 'react';
interface UserPreferences {
theme: string;
layout: string;
}
interface AccessibilityOptions {
voiceCommands: boolean;
colorBlindMode: boolean;
}
interface UserContextProps {
userPreferences: UserPreferences;
setUserPreferences: React.Dispatch<React.SetStateAction<UserPreferences>>;
accessibilityOptions: AccessibilityOptions;
setAccessibilityOptions: React.Dispatch<React.SetStateAction<AccessibilityOptions>>;
}
export const UserContext = createContext<UserContextProps>({} as UserContextProps);
export const UserProvider: React.FC = ({ children }) => {
const [userPreferences, setUserPreferences] = useState<UserPreferences>({ theme: 'dark', layout: 'grid' });
const [accessibilityOptions, setAccessibilityOptions] = useState<AccessibilityOptions>({ voiceCommands: false, colorBlindMode: false });
return (
<UserContext.Provider value={{ userPreferences, setUserPreferences, accessibilityOptions, setAccessibilityOptions }}>
{children}
</UserContext.Provider>
);
};
Wrapping Up
By organizing the code into components and using context, this framework can be expanded for future updates and personalized settings, all without sacrificing modularity. This structure allows each branch of the UI to evolve independently, providing a scalable, interactive, and customizable experience for #PlayStation7 users.
Would you like to explore one of these sections in even more detail, or should I add more code to specific functionalities?
0 notes
Text

Customizable Interface Users can configure their home page and dashboards according to their preferences, enabling a more personalized and efficient user experience.
For more queries please visit below link 👇 www.fresatechnologies.com/products/fresa-gold
For further inquiries, please contact us : [email protected]
#Fresa | #Freightsolutions | #Freightforwarding | #Import | #FresaGold | #ERPSoftware | #G2Awards | #LeaderEMEA | #UsersLoveUs | #Leader | #EMEA | #EMEASummer2024 | #LeaderSummer2024 | #LeaderSmallBusiness | #MomentumLeader | #CategoryLeader | #BestSupport | #CustomizableInterface | #PersonalizedExperience | #DashboardDesign | #UserCustomization | #TailoredUX | #InterfaceDesign | #MyDashboardMyWay | #CustomHomePage | #UserPreferences | #EfficientUI | #DesignYourDashboard | #PersonalizedUI | #FlexibleDesign | #CustomizableUX | #SmartDashboard
0 notes
Text

Customizable Interface Users can configure their home page and dashboards according to their preferences, enabling a more personalized and efficient user experience.
For more queries please visit below link 👇 www.fresatechnologies.com/products/fresa-gold/
For further inquiries, please contact us : [email protected]
#fresa | #freightsolutions | #freightforwarding | #import | #g2reviews | #softwaresuggest | #CategoryLeaderWinter2024 | #BestSupporWinter2024 | #LeaderEMEASpring2024 | #LeaderSpring2024 | #LeaderSmallBusinessSpring2024 | #UsersLoveUs | #supplychain | #transportation | #logisticssoftware | #ERP | #fresagoldsoftware | #all_in_one | #warehouse | #shipping | #Fresagold | #CustomizableInterface | #PersonalizedExperience | #UserPreferences | #EfficientDashboard | #HomePageCustomization | #UserFriendlyDesign | #PersonalizedDashboard | #UserExperienceEnhancement
0 notes
Photo

New on my Pinterest: New Studies @SurveyCircle http://bit.ly/2De7Qh7 : Participants needed for online survey! Topic: "Cities' recommendation based on user preference using machine learning" http://bit.ly/2XIQPuF via @SurveyCircle #MachineLearning #TravelGuide #UserPreference #SaudiArabia #ml #learning #survey #surveycircle http://bit.ly/2JM63VM #SurveyCircle #Research #Survey #Study #CallForParticipants #Participants #Respondents | Participate now: http://bit.ly/2JC2ZwC
0 notes