#Visual Composer plugin
Explore tagged Tumblr posts
Visit Tumblr Blog
Explore Tumblr blogs with no restrictions, modern design and the best experience.
Last Seen Tumblr Blogs


Fun Fact
Forty percent of Tumblr users are between the ages of 18 to 25.
Note
What software do you use for your music? Do you have tips and recommendations for beginners? (Also your music is wonderful, I wanna compose like you someday!)
I just use garageband because it came free with my laptop like forever ago (Along with some free plugins that came with my MIDI keyboard) and it's definitely the easiest DAW I've used. I know there's a couple web based DAWs that are like super super simple but I don't know them by name. I'd definitely recommend it to beginners if you have access to it, but obviously it's an Apple thing so that's not gonna work great for everyone. I would not recommend FLStudio to beginners but some people really gel with it (somehow) so that's up to you.
As for specific tips? (wall of text below)
Honestly my music learning process has been a lot of just trial and error. I've always been good at like "visualizing" what a song should be like, it was just a matter of figuring out how to get it out of my brain in a way that sounds good. Something that I do think is helpful is to make music on a time limit. Don't get caught up in tweaking things and getting stuck on the intro for hours and then trashing the song. Just keep it moving and then come back later if you feel like you need to and have the ideas for it.
And if you're like a complete total beginner with basically no music knowledge and you don't have the time to dedicate to studying theory like at a professional level, I would actually advise *against* trying to get into learning music theory. As you'll likely just end up limiting yourself to the few "rules" that you do have time to learn which will stifle your organic growth. I had a chunk of time where I was trying to learn proper theory and it made my music worse than when I basically first started because it became super rigid and stale. Obviously everyone is different and can learn more in less amounts of time than me, but I think it's good to avoid creating a rigid template in your mind of what a "good" song should be when you're starting out.
Something else I found very useful was to recreate songs by ear in a few hours. No downloading MIDIs to tweak, just listening to a song, trying to figure out what kind of instruments it has, and reconstructing the composition yourself. You'll pick up a lot of useful info and skills!
Hope that helps! and thanks a ton!
37 notes
·
View notes
Text
Flash back - Live Looping tribute to 90s / 2000s Racing Games
RESEARCH
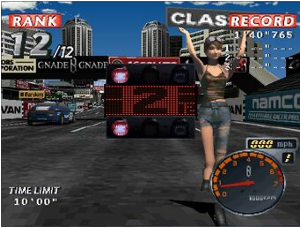
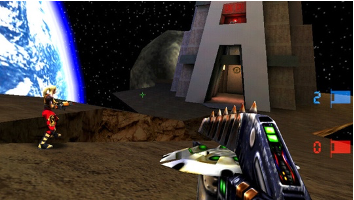
My live looping project draws from the audio-visual world of late 90s / early 2000s video games from PS1 and Nintendo 64 – an aesthetic comprised of glossy graphics and postmodern settings, in which the immersive experience is often provided by up-beat, high octane soundtracks. Here are some examples of this:
youtube
youtube
youtube

Whilst researching game composers and jungle artists, one of them particularly stood out to me – Hideki Okugawa, the composer responsible for the soundtrack to all 3 Street Fighters. Here are a couple examples of his work.
youtube
youtube
I admire the intensity that Okugawa manages to capture through all his work, nevertheless, I’d like to allow for some contrasting laid-back sections to better match the ambience that I’m after. After some online research on forums, and speaking to my peers, I created a playlist of various tracks that would correspond to this aesthetic.
One of these songs is View of Life by Moonchild, which perfectly captures the nostalgic essence of old video games. The intro section lasts for just over a minute; this adds to the tension and sense of anticipation that one might experience whilst playing a high adrenalin first person shooter or racing game. I have created a mood board to display the desired tone of the project.

As much as this project is a tribute to 90s/2000s classic video games, I also wish to convey a sense of nostalgia.
Another inspiration behind this project was seeing an Instagram user create a live loop to the same aesthetic:
instagram
The style is slightly different, but it reinforces the notion that this genre has become a trend.
PROTOTYPE & REHEARSALS
In the prototype phase of this project, I made the first version of the track, which was a lot slower, and less energetic. After having delved into breakbeats and jungle, I was drawn to higher tempos, and a slightly different sound pallet.
(google drive link)
I increased the tempo from 125 to 165 and created a new intro (inspired by the aforementioned ‘View of Life’ by ‘Moonchild’). After this I focused on highlighting melodies, rhythms and textures that would be interesting to loop whilst carrying that adrenalin fuelled, ‘racing’ narrative.
Once the arrangement had been completed, I ordered the different audio and midi regions into separate sections; these sections would then become scenes once imported into Ableton. I divided them into 10 sections (some of them repeating), before stemming each track into one of seven folders (one for each scene). I then imported them making sure to de-select warp on each track. I have added sped up screen recordings of this process in the OneDrive folder.
Originally, I had planned to play my set in the same way as Elise Trouw in this video:
youtube
She uses arrangement view to input midi notes that she has midi mapped to different functions such as record, stop, playback, loop, etc. This means that those set functions will activate automatically in relation to the timeline. which is useful for handsfree, seamless transitions. Although this is a great technique in some circumstances, it comes at the cost of freedom; I wanted my track to stay structured whilst being able to improvise melody lines and transition to whichever scene suits me in the moment.
The hardware I used to create the set comprised of a Maschine MK3 Mikro, an ableton launchpad, an RD-08 keyboard and a sustain pedal. I used a filter plugin on the stereo out and mapped the cutoff to the Maschine MK3’s fx strip in midi mode. I had originally mapped it to the keyboards modulation wheel, but I found it to be less intuitive. I also mapped the sustain pedal to control the delay feedback on the e-piano.
Should I do this again, I would like to find a way of mapping different parameters to an xbox or ps4 controller, in the spirit of the theme.
I have included a screenshot of my performance to highlight my set-up.
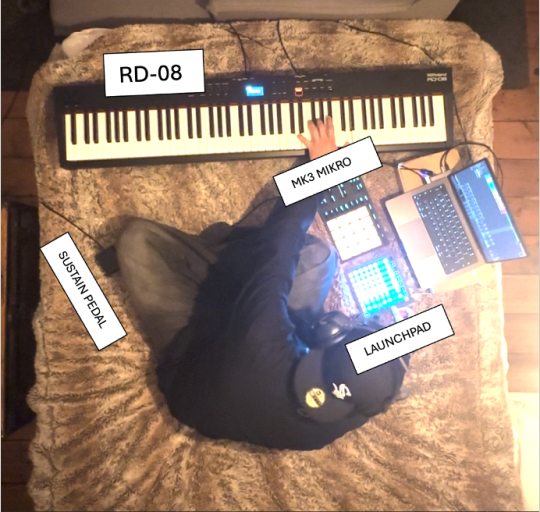
I set up my phone camera on top of a lamp, which worked well regarding the placement but ideally, I would like to find a more secure place to hold it as it fell several times. I would like to keep this camera angle going forwards with this type of content as it showcases the both the hardware and the way it is being used.
FINAL PERFORMANCE AND DOCUMENTATION
The final performance consisted of a one take recording with seven scenes being triggered in different orders, with four midi tracks being controlled by a keyboard and drum pad and used to improvise melodies and chords throughout the performance. The premise was to have slightly different results every take whilst retaining a sense of structure and coherence. As a result, whilst being intelligible for the listener, the piece remains original and interesting every time.
The improvised melodies reflect the motion of a video game, be it the tension of a tactical rpg or a race in a futuristic landscape. This way, the soundtrack becomes the narrative. In order to push the idea of this narrative I structured each new scene to represent a new levels or areas in a game, with the intro ramping up to the chorus, and abrupt transitions mimicking the erraticism found within these landscapes. I made use of real-time triggered effects throughout the performance to further simulate this experience.
I used a birds eye view angle to capture my interactions with the hardware and showcase exactly how the piece was constructed. In the editing of the video, I chose not to include any cuts in an effort to present the set as clearly as possible. I also included a split screen format with a portion of the screen showing gameplay from extreme g racing to make the experience more immersive. This is the final render:
youtube
2 notes
·
View notes
Text
OMORI: TO RENEW OST - 002 Nothing Box
youtube
"Welcome, This is White Space." "Your personal nothing box."
Credit : Scott B. His Channel
Composer (made this theme for White Space/writing)
Art By BQ / @bq98632
When tracks are released, it will be out of order but a playlist will be made when there is more.
Video made with FL Studio ZGameEditor Visualizer plugin
More Info : A Dusttale Sunburn AU
Trailer : • 【M̶O̶D̶】Omori: To Renew (Trailer)
Website: https://renewed143.vercel.app/
April Fools Build :
https://gamejolt.com/games/RenewLeaked/983743
We are currently looking for RPGMaker coders. Click here to apply: https://docs.google.com/forms/d/e/1FA...
"What Happens When a Traumatic Experience Becomes a Gift?"
Omori Renew Is A Dusttale Inspired AU with Accurate Sunburn - meaning the stuff you'll see in the mod regarding the Sunburn relationship and the characterization and situations will be as accurate as possible despite the major changes with realism based on the Original Omori events.
This AU explores a what-if where on the fateful day where Mari was hanged, Aubrey was also a witness, leading her to create her own BlackSpace like Sunny. However, she also began to develop precognitions which allowed her to see the many endings of “Omori”. Determined to save Sunny, she learns to enter his HeadSpace and plans to defeat Omori so that the worst case scenario never happens.
OMORI : TO RENEW, Owned By Cheezey_Memez, OMORI owned by OMOCAT, DUSTTALE Owned By Ask Dusttale / Evan Streblow
Tags (To get more views) : #omori#omoriau#omoriaubrey#omorifanart#whitespace
2 notes
·
View notes
Text
More Notes on the Computer Music Playpen
I have finished maintenance on the VST3 plugin opcodes for Csound, Csound for Android, and some other things, and am re-focusing in composition.
One thing that happened as I was cleaning up the VST3 opcodes is that I discovered a very important thing. There are computer music programs that function as VST3 plugins and that significantly exceed the quality or power what Csound has so far done on it own, just for examples that I am using or plan to use:
The Valhalla reverbs by Sean Costello -- I think these actually derive from a reverb design that Sean did in the 1990s when he and I both were attending the Woof meetings at Columbia University. Sean's reverb design was ported first to Csound orchestra code, and then to C as a built-in opcode. It's the best and most widely used reverb in Csound, but it's not as good as the Valhalla reverbs, partly because the Valhalla reverbs can do a good job of preserving stereo.
Cardinal -- This is a fairly complete port of the VCV Rack "virtual Eurorack" patchable modular synthesiser not only to a VST3 plugin, but also to a WebAssembly module. This is exactly like sticking a very good Eurorack synthesizer right into Csound.
plugdata -- This is most of Pure Data, but with a slightly different and somewhat smoother user interface, as a VST3 plugin.
I also discovered that some popular digital audio workstations (DAWs), the workhorses of the popular music production industry, can embed algorithmic composition code written in a scripting language. For example, Reaper can host scripts written in Lua or Python, both of which are entirely capable of sophisticated algorithmic composition, and both of which have Csound APIs. And of course any of these DAWs can host Csound in the form of a Cabbage plugin.
All of this raises for me the question: What's the playpen? What's the most productive environment for me to compose in? Is it a DAW that now embeds my algorithms and my Csound instruments, or is it just code?
Right now the answer is not simply code, but specifically HTML5 code. And here is my experience and my reasons for not jumping to a DAW.
I don't want my pieces to break. I want my pieces to run in 20 years (assuming I am still around) just as they run today. Both HTML5 and Csound are "versionless" in the sense that they intend, and mostly succeed, in preserving complete backwards compatibility. There are Csound pieces from before 1990 that run just fine today -- that's over 33 years. But DAWs, so far, don't have such a good record in this department. I think many people find they have to keep porting older pieces to keep then running in newer software.
I'm always using a lot of resources, a lot of software, a lot of libraries. The HTML5 environment just makes this a great deal easier. Any piece of software that either is written in JavaScript or WebAssembly, or provides a JavaScript interface, can be used in a piece with a little but of JavaScript glue code. That includes Csound itself, my algorithmic composition software CsoundAC, the live coding system Strudel, and now Cardinal.
The Web browser itself contains a fantastic panoply of software, notably WebGL and WebAudio, so it's very easy to do visual music in the HTML5 environment.
2 notes
·
View notes
Text
Find the Top 5 Latest Mobile App Development Software in 2025 — Expert Picks by TimD — Tim Digital
Choosing the right mobile app development software in 2025 is more than just a technical decision — it’s a strategic advantage. With the growing pressure to deliver faster, reduce bugs, and maintain UI consistency across devices, developers and companies alike are re-evaluating their tech stacks.

Why the Right Mobile Development Stack Makes All the Difference
Many development teams struggle not because of a lack of skill but due to poor tooling and platform fragmentation. Common issues include:
Too much time spent on duplicate codebases
Difficulty managing bugs across platforms
Low design consistency between iOS and Android versions
A better stack can lead to faster time-to-market, fewer bugs, and improved collaboration across teams.
Snapshot: 5 Game-Changing Mobile Development Frameworks
In 2025, five standout mobile development frameworks are leading the way.
Flutter, backed by Google, offers hot reload, expressive visuals, and UI consistency — making it ideal for cross-platform UI precision. React Native, developed by Meta, is JS/TS-based and features fast refresh and a robust plugin ecosystem, best suited for teams transitioning from web to mobile. .NET MAUI, Microsoft’s enterprise-grade solution, combines native speed with C# and deep integration into the Microsoft ecosystem, perfect for unified experiences across mobile and desktop. For Apple-centric development, Swift stands out with hardware-level API access and deep iOS integration, delivering high-performance, iOS-only applications. Lastly, Kotlin, Google’s preferred language for Android, is known for its concise syntax and Jetpack Compose support, making it the go-to choice for scalable, Android-first projects.
1. Flutter — Deliver Visually Consistent Cross-Platform Apps
Backed by Google, Flutter continues to lead the way for teams needing high-performance mobile apps from a single Dart codebase. With its built-in Skia rendering engine, it doesn’t rely on native UI components — giving you full control over visuals on both Android and iOS.
Why It’s a Top Pick:
Rapid UI iteration with Hot Reload
Mature ecosystem on pub.dev
Excellent for MVPs, startups, and custom-designed apps
2. React Native — A Natural Fit for Web Development Teams
Created by Meta, React Native allows JavaScript developers to build native mobile apps without switching tech stacks. It’s ideal for web teams transitioning into mobile, especially with tools like Expo simplifying builds.
Best Use Cases:
Fast deployment using React-based components
Shared codebase between web and mobile
Lightweight apps needing high iteration cycles
3. .NET MAUI — Microsoft’s Unified Solution for Desktop and Mobile
.NET MAUI enables enterprise-grade cross-platform development using C# and XAML. It compiles to native code, ensuring performance, while simplifying development for organizations already using Microsoft tools and Azure.
Why Enterprises Prefer It:
Strong support for desktop/mobile hybrid builds
Full access to native APIs
Streamlined with Visual Studio and Azure DevOps
4. Swift — The Gold Standard for Native iOS App Development
Developed by Apple, Swift is the go-to for building fluid, fast, and fully integrated iOS apps. Combined with SwiftUI or UIKit, it’s the most reliable way to deliver App Store-ready applications with deep device capabilities.
Ideal For:
iOS-only apps
Products that leverage ARKit, Core ML, or HealthKit
Premium apps requiring pixel-perfect animations
5. Kotlin — For Next-Level Native Android Performance
Endorsed by Google and developed by JetBrains, Kotlin is a modern language designed for Android. It brings null safety, concise syntax, and coroutine-based async capabilities, making it a favorite among Android developers in 2025.
Where It Shines:
Clean migration path from Java
Jetpack Compose support for UI innovation
Great for complex, scalable Android apps
Native vs. Cross-Platform vs. Hybrid — What Should You Choose?
When it comes to choosing the right development approach, your decision should align with your product roadmap, team capabilities, and performance expectations. Native development offers the best UX quality and strong scalability, making it ideal for performance-intensive apps — but it comes with higher maintenance needs and moderate development speed. Cross-platform frameworks like Flutter and React Native strike a balance by allowing faster development, lower maintenance, and good scalability, although UX quality may slightly lag behind native builds. On the other hand, hybrid frameworks such as Ionic are fast to develop and easy to maintain but offer limited user experience and only moderate scalability — making them suitable for basic MVPs or internal tools where performance is not critical.
Expert Tip: If your app relies on camera, AR, or sensors — go native. For time-to-market and design parity, cross-platform tools like Flutter or React Native offer the best ROI.
What to Look for in Mobile App Development Platforms
When selecting mobile development tools in 2025, top agencies and development teams recommend looking for:
Real-time debugging and emulation support
Comprehensive UI libraries
CI/CD compatibility (e.g., App Center, GitHub Actions)
Easy deployment to Play Store and App Store
Third-party plugin support for maps, payments, authentication, etc.
Final Thoughts
Whether you’re launching a feature-rich Android app, building an enterprise mobile suite, or rapidly shipping a cross-platform MVP — choosing the right development platform in 2025 is key to avoiding unnecessary rework and scaling with confidence.
If you’re looking for expert guidance, several agencies — like TimD — Tim Digital — are offering tailored consulting and mobile app solutions built on the most robust tools in the market.
👉 Looking for the Best Mobile Apps Development Services in Kolkata? Explore trusted mobile development experts who can help architect your next big idea, fast and friction-free.
Follow us for insights and expert strategies on LinkedIn, Facebook, Instagram, YouTube, Pinterest, and Twitter (X).
#MobileAppDevelopment#AppDevelopmentTools#CrossPlatformDevelopment#FlutterDevelopment#SwiftProgramming#KotlinAndroid#DotNetMAUI#iOSDevelopment#AndroidDevelopment#TechStack2025#TimDigital#TimDTech#SoftwareDevelopment
0 notes
Text
How to Install
Looking for easy, step-by-step guides on how to install everything from software to home devices? Our "How to Install" blog provides clear, beginner-friendly instructions to help you get things up and running without the hassle. Whether you're setting up a new app, assembling tech gadgets, or configuring tools, we simplify the process for you. Each post is written with accuracy and user convenience in mind.
How to Install How to Install Printers Without CD How to Install Webcam Drivers How to Install SSH How to Install Pixelmon How to Install OptiFine How to Install Fabric How to Install Zend Framework with XAMPP on Windows How to Install Roblox on Chromebook How to Install Roblox Studio How to Install Firefox on Mac How to Install Firefox on Linux How to Install Firefox on Windows How to Install Java Step-by-Step Guide for Beginners How to Install Java on Mac Follow Full Process Ultimate Guide How to Install Java for Minecraft Easy Step Guide for How to Install VPN for Privacy How to Install VPN Server Virtual Private Network How to Install VPN on Router A Step-by-Step Guide : Complete Guide for How to Install Anaconda How to Install Anaconda on Linux Complete Guide How to Install Anaconda on Mac: A Step-by-Step Guide How to Install Anaconda on Ubuntu: A Step-by-Step Guide How to Install Anaconda on Windows How to Install npm A Step-by-Step Guide for Beginners How to Install npm on Ubuntu Step-by-Step How to Install NVM on Ubuntu Tips, and Explanations How to Install npm on Windows Solve Common Issues How to Install NVM on Windows Troubleshooting Tips How to Install npm on Visual Studio Code How to Install Node.js on Your Machine How to Install Node.js on Linux Step-by-Step Guide How to Install Node.js on Mac Step-by-Step Guide How to Install Node Modules on Angular How to Install Node.js on Ubuntu The Latest Version How to Install Node.js on Windows Get started Full Method How to Install APK File on Your Android Device Complete Guide on How to Install APK on Android TV How to Install APK on Chromebook Step by Step Process How to Install APK on iOS A Comprehensive Guide How to Install IPA on iPhone A Complete Guide How to Install APK on Windows 10 Complete Guide How to Install Git A Step-by-Step Guide for Beginners How to Install Git Bash A Complete Step-by-Step Guide How to Install Git on Visual Studio Code How to Install GitHub Simple Step-by-Step Process How to Install Git on Mac Step-by-Step Guide How to Install Git on Linux A Step-by-Step Guide How to Install Git on Ubuntu Step-by-Step Guide How to Install Git on Windows A Simple Guide How to Install Docker How to Install Docker on Linux How to Install Docker on Mac How to Install Docker Daemon Mac How to Install Docker on Ubuntu How to Install Docker Compose on Ubuntu 20.04 How to Install Docker Compose on Windows How to Install Docker on Windows How to Install WordPress How to Install WordPress on Ubuntu How to Install WordPress Plugins How to Install WordPress on Windows 10 How to Install Kodi on Firestick How to Install Exodus on Kodi How to Install The Crew on Kodi How to Install XAMPP on Mac
0 notes
Text
Understanding Scale and Perspective in 3D Vector Maps for Architects

Perspective in 3D Vector Maps for Architects
In today’s architectural world, technology is rapidly transforming how professionals visualize, plan, and present their designs. Among these cutting-edge tools, 3D Vector Maps have emerged as a vital resource for architects. These maps offer detailed, interactive, and scalable representations of environments—urban, rural, or topographical. Understanding how to effectively apply scale and perspective in these maps is crucial for producing realistic, functional, and visually compelling Architecture Illustration.
This blog explores the core concepts of scale and perspective in 3D Map Illustration, their importance in architectural workflows, and best practices for creating accurate and impactful 3D visuals.
What Are 3D Vector Maps?
Unlike raster images, which are composed of pixels, vector maps use geometric primitives like points, lines, and polygons to represent spatial data. This makes them infinitely scalable without losing resolution—ideal for architectural design, urban planning, and infrastructure development.
In architecture, these maps often serve as the base layer for planning structures within real-world contexts. Whether designing a city skyline or a single residential building, 3D vector maps allow architects to visualize how their designs interact with existing environments.
The Role of Scale
In 3D Map Illustration, using the correct scale is essential for accuracy and context. A structure that looks impressive in isolation might prove disproportionate or unfeasible when placed within a realistically scaled environment.
Why Scale Matters
Proportional Design
Accurate scaling ensures that buildings, roads, vegetation, and other elements maintain correct proportions relative to one another.
Spatial Planning
City planners and architects use scale to estimate distances, plot zoning boundaries, and assess infrastructure needs.
Client Communication
Presenting a scaled 3D map helps clients better understand spatial relationships and project feasibility, especially in large-scale developments.
Practical Applications
Most architectural software (like AutoCAD, SketchUp, or Revit) allows for importing and working with scaled vector data. By aligning 3D models to a base map with a known scale, architects can simulate real-world conditions with impressive precision.
Perspective: Creating Depth and Realism
While scale ensures dimensional accuracy, perspective adds depth and realism to Architecture Illustration. Perspective in 3D mapping involves simulating how objects appear smaller as they recede into the distance, mimicking human vision.
Types of Perspective in 3D Map Illustration
One-Point Perspective
Commonly used in interior design or symmetrical architectural views.
Three-Point Perspective
Utilized for dramatic aerial views or looking up/down on structures.
Enhancing Visual Impact
Incorporating the correct perspective helps viewers intuitively grasp spatial hierarchies.
Merging Scale and Perspective in Architecture Illustration
The most effective Architecture Illustration blend scale and perspective seamlessly. Here’s how to merge both elements effectively:
Align Models with Base Maps
Start with a geo-referenced 3D vector map to establish scale. Ensure your architectural models are built or imported at the same scale.
Set Up Viewpoints Strategically
Choose viewpoints based on what you need to emphasize—street-level engagement, skyline profile, or environmental integration.
Adjust Camera Settings
Use your rendering software’s camera settings to control focal length and depth of field.
Tools for Creating Scaled 3D Vector Maps
Modern software tools have made it easier than ever to create and work with 3D map illustrations. Here are some popular platforms:
Google Earth Studio:
Great for high-level contextual visualizations.
QGIS with Qgis2threejs Plugin:
Open-source solution for rendering 3D terrain and structures.
These tools enable architects to integrate topographic data, zoning overlays, and real-time weather conditions into their models, making them far more robust and informative.
Common Challenges and How to Overcome Them
Data Inconsistency
Vector data may come from multiple sources and scales. Normalize datasets before integrating them into a single project.
Rendering Complexity
Use Level of Detail (LoD) modeling and scene optimization techniques.
Visual Clutter
Too much detail can overwhelm the viewer. Focus on what's important and use transparency or color-coding to manage visual hierarchy.
Perspective Distortion
Always cross-reference with plan views and sectional drawings.
Future Trends: AI and Real-Time Visualization
With the advent of artificial intelligence, real-time rendering engines, and augmented reality (AR), the future of Architecture Illustration is increasingly immersive. AI-driven tools can automatically adjust perspective based on viewer input or optimize scale based on project scope.
Imagine walking through a new housing development before a single brick is laid—thanks to AR layers embedded in a 3D vector map. These innovations are not just flashy; they enable faster iteration, better decision-making, and stronger client engagement.
Conclusion
Understanding scale and perspective in 3D vector maps is not just a technical requirement—it’s a creative opportunity. When applied effectively, these principles allow architects to communicate their vision clearly, design more effectively within real-world constraints, and create visually compelling 3D Map Illustration.
As the architectural field continues to evolve with digital tools, mastering these foundational concepts will empower professionals to stay ahead of the curve, deliver superior results, and push the boundaries of what's possible in design and visualization.
Whether you’re planning a small residential project or an entire smart city, the power of 3D Vector Maps lies in how well you understand and manipulate scale and perspective. Embrace these tools not just as utilities, but as extensions of your creative mind
0 notes
Text
The Future of Mobile Applications: How Technology is Transforming the Way We Interact
Every e-commerce person needs to know how to build pages with WP bakery page builder. This theme provides support for the Visual Composer plugin as well as a custom-made plugin named “Visual Composer Extension” for our customers. The Visual Composer plugin and extension adds a range of drag-and-drop plugins to your dashboard, allowing you to create your site quickly and easily. This theme provides support for the Visual Composer plugin as well as a custom-built plugin named “Visual Composer Extension” for our customers.
The Visual Composer plugin and extension adds a plethora of drag-and-drop plugins to your dashboard, allowing you to create your site quickly and easily. Creating pages for your WordPress platform is also as simple as a few clicks and drag-and-drop operations with WPBakery Page Builder‘s elaborate but intuitive front-end and back-end editors. I’ll teach you how to add WPBakery Page Builder to your WordPress installation and walk you through all of the key features in this Visual Composer guide.
Requirements for WP Bakery Page Builder
You’ll need the following items to follow along with this WPBakery Page Builder tutorial:
WordPress 5.0 or higher is essential.
a subscription to Envato
In addition, I recommend reading the following article to better understand how to use Visual Composer and why you should use WPBakery Page Builder instead of any of the other page-builder plugins available today:
WPBakery Page Builder Installation
WPBakery Page Builder is a WordPress premium plugin. It’s available on Code Canyon, so sign up with your Envato account and buy a license. It’s still commonly is in reference as Visual Composer. Once you’ve paid for it, you’ll be able to download a ZIP file containing various plugin data.
Look for a file called js composer.zip after extracting the ZIP file. This is a WordPress plugin archive file that you must add to your server. So, go to Plugins > Add New in your WordPress admin line. Then pick js composer.zip from the Upload Plugin drop-down menu. To begin the update, click the Install Now button. When the installation is over, click the Enable Plugin button. You’ll be guided to the WPBakery Page Builder welcoming screen as soon as you do so.
Make Sure WPBakery Page Builder Plugin Is Installed & Active
Make sure the WPBakery Page Builder plugin is turned on. Since this plugin is not included with the theme (for good reason), it must be installed and allowed as described in the “Installing Recommended Plugins” guide. You should have been asked to install the recommended plugins after downloading the theme. Now is the time to install the Visual Composer if you haven’t already.
Configuring the WP Bakery Page Builder Plugin
It’s easy to learn how to use WPBakery Page Builder. The plugin is highly customizable, with hundreds of configuration choices to tailor it to your specific needs. To see them, press the Settings button on the welcome pad.
WP Bakery Page Builder with general settings
The plugin comes with a well-thought-out default setup that will suffice for the majority of use cases. For example, you can see that it supports responsive design right out of the box in the General Settings tab. The plugin also attempts to add different optimizations so that the pages you generate with it load quickly. For example, it defaults to using only the Latin script subset of Google fonts. All you have to do is change the Google fonts subsets option to accept other scripts.
You’ll note that this plugin is only available for your WordPress site’s pages in the Role Manager tab. Select Custom in the Post styles list and allow the post feature if you want it to be eligible for your posts as well.
Configuring post types:
Scroll down and press the Save Changes button once you’ve made the changes.
Finally, go to the Template Options tab and search the Use custom design area if you want to configure the look and feel of WPBakery Page Builder’s content elements. You’ll be able to adjust the plugin’s pre-set colors, margins, and widths after you’ve done so.
Define Main Settings for WP Bakery Page Builder
To configure the plugin, go to Settings > WPBakery Page Builder. The most crucial step is to turn on the composer for the post forms you choose to use it for. This is achieved through the “Role Manager” tab and the “Post Types” options. You can make the page builder accessible based on the user function, but you’ll really just want to change the “Administrator” settings.
Using the WP Bakery Page Builder Plugin
The Visual Composer is really simple and doesn’t need much explanation; for a short guide, see the screenshots below (you can also check out this more detailed Visual Composer guide). To begin, choose if you want to use the Backend or Frontend editor and press the appropriate button.
The Visual Composer Backend Editor
In this Visual Composer tutorial, this is a crucial step. There are two powerful editors included with WPBakery Page Builder: a back-end editor and a front-end editor. They can only be accessed from inside a website or a tweet. As a result, I recommend that you make a new page by heading to Pages > Add New for the time being. You can select which editor you want to use in the page construction GUI. To open the backend editor, first press the Backend Editor button.
You can conveniently connect a number of widely used elements to the website using this editor. Simple elements including text blocks, pictures, and separators are available in WPBakery Page Builder. Advanced features include Facebook “Like” icons, Google Maps, charts, and animated carousels. The components are grouped into four groups for easy access: text, social, structure, and WordPress widgets.
The elements that are available are listed below:
Content elements, as the name implies, are elements that are often used to construct the contents of a blog or an article. Social features, on the other hand, are ones that make it simple for people to share your profile on social media sites. Structure components, on the other hand, are intended for more experienced users who are familiar with writing code. They allow you to add raw HTML and JavaScript to your website directly.
To add an element, simply click the Add Element button and choose the desired element. Alternatively, you should use the Add Text Block button to add text to the website directly.
Text editor
If you don’t like the way an aspect looks by default, you can always change its styles by going to the Design Options page. Once you’ve added a few items, you’ll find that each one has a toolbar with a few buttons associated with it. These buttons show intuitive icons and enable you to perform essential operations like dragging and dropping an entity to alter its position, duplicating, removing, or editing its contents.
Keep in mind to save your page once you’ve finished adding components.
The Visual Composer Frontend Editor
The frontend Visual Composer has the same page building choices as the backend Visual Composer. The main distinction is that instead of position holders, you will see the individual page elements when you insert theme.
Using the WYSIWYG Front-End Editor
The back-end editor is perfect for pages with a number of elements that are lengthy and complicated. You get to deal on the final presentation of your website right from the start if you use the WYSIWYG front-end editor instead. You can swap between editors at any time, so scroll up and click the Frontend Editor button to launch the latest one.
Frontend Editor
Only when you mouse over a feature in this editor can you see the toolbars associated with it. Toolbars and the features they provide are somewhat close to those provided by the back-end editor in frontend editors demo options. You will now see how the website appears on different screen sizes using the front-end editor. You can also continue editing the page in whatever screen size you choose.
Using Templates
Using models is another critical part of learning how to use WPBakery Page Builder. Any page or post you make with WPBakery Page Builder can be turned into a prototype. You will reduce the amount of tedious work you do when making pages for your WordPress site by using this feature.
Open the Templates dialogue, assign the template a tag, and click the Save Template button to save the new layout of your page as a template.
Save the template in the Save Template dialogue box
Working with your own models isn’t the only choice. This plugin has a huge template library that is maintained on a daily basis. Switch to the Template Library tab and hit the Access Library button to access the library. In the template library, you’ll find that the library has a large number of high-quality layout models. You will do any of them for free. However, before you can use them, you must first unlock your WPBakery Page Builder certificate.
0 notes
Text
Construction WordPress theme https://visualmodo.com/theme/construction-wordpress-theme/ a business theme designed specifically for construction, building companies and those that offer building services. The theme comes pre-packed with a drag and drop page builder (Visual Composer) to ensure you can easily design your website just how you like it. 👷♂️🚧🏗️👷
building #developer #webdesign #HTML5 #CSS3 #templates #plugins #theme #WordPress #construction #ecommerce #responsive #retina #SEO #website #siteBuilder #services
0 notes
Text

Midsem break SDL - Learning After Effects
I ended up finishing the module to get the badge.
The notes are from all of the videos from the list
After Effects
Introduction: What After Effects Is For
After Effects is the Swiss Army knife of motion graphics, visual effects, and animation.
It's not a video editor (Premiere Pro is better for that), but it's perfect for layering, animating, and creating dynamic visuals.
Think of it as a combination of Photoshop (layer manipulation), Premiere Pro (timeline control), and basic 3D tools (Cinema 4D Lite integration).
Core Foundations of After Effects
1. Compositions
A Composition (comp) is where everything happens: defines frame size, frame rate, and duration.
Comps organize your work like folders; you can even pre-compose comps inside comps for cleaner structure.
2. Layers
Layers represent elements like text, video, shapes, or solids.
Layers stack vertically (higher = visually above).
Control layers via visibility, solo, lock, renaming, and blending modes.
3. Animation
Animate by keyframing properties over time (position, scale, opacity, rotation).
Easy Ease (F9) smooths motion naturally.
Graph Editor fine-tunes motion speed curves.
Use shortcuts: U (reveal keyframes), P (position), S (scale), R (rotation), T (opacity).
4. Effects
Apply effects via Effects & Presets panel or top menu.
Effects types:
Generative (e.g., Fractal Noise).
Transformative (e.g., Turbulent Displace).
Adjustive (e.g., Color Correction like Curves).
Presets and templates can be a great starting point.
5. 3D Basics
After Effects offers 2.5D space: flat layers moving/rotating in 3D space (X, Y, Z axes).
Switch to Cinema 4D Renderer for true extrusion and bevel options.
Add lights to reveal 3D depth and cast shadows.
6. Rendering
Preview rendering (RAM preview = green bar).
Final rendering:
Use Adobe Media Encoder for flexible, background rendering (H.264 for web).
Or use Render Queue inside AE for lossless, high-quality exports.
Save single frames as images (File > Export Frame).
Important User Interface (UI) Tips
Workspaces: Reset to "Default" if the UI looks odd.
Project Panel: Organize assets cleanly with folders.
Timeline: Arrange layers in time; higher = on top visually.
Comp Viewer: Use Auto-Resolution for faster previews.
Save often! Auto-save defaults to every 20 minutes.
Text Animation in After Effects
Using Text Animation Presets
Found under Effects & Presets > Animation Presets > Text.
Drag and drop onto text layers at the playhead position.
Adjust properties inside Animator: units (words, characters), randomize, ease, add blur, and more.
After Effects Text Animation Presets Gallery
Preview text animations via Thumbnail Gallery for faster selection.
Categories include: 3D Text, Animate In/Out, Blurs, Curves and Spins, Light and Optical, Rotation, Scale, Tracking, and more.
Animation Composer Plugin
A free plugin that makes browsing, previewing, and applying presets fast and easy.
Allows adjusting:
Animation timing via markers.
Randomization, reverse order, positioning, rotation.
Effect intensity and duration.
Shortcuts for Speed
Action
Shortcut
Show all keyframes
U
Show Scale
S
Show Position
P
Show Rotation
R
Show Opacity
T
Apply Easy Ease
F9
Final Tips
Experiment: Play with different presets, effects, and layer combinations.
Preview creatively: Thumbnail previews and Animation Composer speed up exploration.
Save Versions: Use "Increment and Save" to keep backup copies.
Rendering is a break: While rendering, take time to review and improve your work.
Have fun: Motion design is about discovery and creativity — don’t stress about perfection at the start.
Big Idea:
Learn the basics → Practice small animations → Build confidence → Then create anything you imagine!
0 notes
Text
Templatera NULLED Plugin 2.3.0

The Templatera NULLED Plugin is your go-to solution for seamless template management in WordPress using Visual Composer. This powerful tool lets you create, save, and reuse templates across your entire site with ease—without paying a single cent. With the nulled version, you get access to all premium features completely free, offering a cost-effective way to enhance your workflow and design capabilities. Whether you're managing client projects or building your own site, the Templatera NULLED Plugin empowers you to work faster and smarter. It’s fully functional, easy to install, and safe to use—just like the original. Perfect for freelancers, agencies, and DIY site owners alike, this plugin brings professional-grade template control to your fingertips with zero limitations.
0 notes
Text
Blog Post #06- Sound Design in Dead Space

In this particular blog post I will breakdown the notion of sound design as it contributes to the heightening of tension and horror in Survival Horror games using Dead Space (2008) as the main example. Because as a game designer, it's important to learn about the effects of audio elements in creating immersive experiences that players will remember. Let me introduce the framework of the game first of all. Dead Space, developed by EA Redwood Shores and released in 2008, is set in a dystopian future where engineer Isaac Clarke must find his way through the abandoned spaceship USG Ishimura. The storyline is basically interwoven with survival, horror, and mystery as Isaac tries to unravel the truth behind the Necromorph outbreak. But, as I said earlier, this would not have such an impact on the narrative without the masterful integration of its sound design. For example, the immediate eerie silence versus the jolting mechanical creaks of the USG Ishimura when first discovered set an haunting tone right away. This is best articulated by the composer, Jason Graves, who described how the approach was more about creating "textures and mood" rather than melody. Theoretically speaking, it is, in fact, a non-traditional approach that launches the audio into the status of narrative device.
Innovative Techniques in Audio Design:
Using the original audio recordings already represents a sure sign of how dedicated the team had been in bringing forth unique sounds. First, an audio team recorded raw sourced material on rare locations and applied boutique processing plugins, analogue synthesizers, and experimental techniques in creating futuristic sound. This really enhances the audio palette's feeling of realistic immersion within this game.
youtube
Moreover, dynamic music fits smoothly in-game. Graves employed features such as dissonant strings, crazy patterns, and new ways of playing instruments, like bowing cymbals, to create feelings of unease. My argument can be best explained when, from an almost subtle ambient tension, the music shifts into loud cacophony during action moments; in this case, the player's are always engaged emotionally and psychologically.
The use of Ambient Sounds :
Another way which the game shows off its audio design is through the use of background noises. For example, old structures of the Ishimura, the distant sound of machinery, and low voices instill fear in the movie. In definition, this use of sound engulfs the player as well as makes them feel exposed in one way or the other. The only way I can relate this portrayal of reality is by speaking about Isaac’s breathing and heartbeat which ever change with his or her health and stress levels at a given time. Such physiological feedback makes it quite easy for players to – at least – feel that they are experiencing Isaac in their own skin.
Despite the audiences knowing there is an ‘evil’ waiting for them at every turn, it is the lack of music that most scares. Modern examples of this technique include games like Alien: These are isolation that employs the use of silence to amplify the noise that ensues. Dead Space, however, goes a tad further by allowing environment sounds to come with a form of life of its own, leaving the players constantly feeling groping.
The Power of Silence:
After having explored the topic at hand, it is fair to say that the sound design in Dead Space is a masterclass in audio innovation. The contrary was proven when games with generic audio libraries failed to deliver the same level of immersion. In conclusion, all the aspects discussed in this blog have shown just how important sound design as a narrative tool in gaming is.
With the addition of dynamic audio, ambient sounds, and physiological feedback, Dead Space is so much more than its visuals and narrative. As I said earlier in this post, sound design is not merely a background feature—it is an essential driver of emotion, tension, and player engagement. For game designers, the lessons from Dead Space’s audio approach provide invaluable insights into crafting immersive gaming experiences.
Sources:
Jason Graves, & Rod Abernethy, 2008. The Music of Dead Space: Artistic Design and Technical Implementation. Music 4 Games. Available at: https://www.music4games.net/ [Accessed 28 Dec. 2024].
Jason Graves, 2008. The Soundtrack of Dead Space. Music 4 Games. Available at: https://www.music4games.net/ [Accessed 28 Dec. 2024].
Graves, J., 2008. 'Dead Space Sound Design in Space: No One Can Hear Interns Scream – They Are Dead.' Original Sound Version. Available at: http://www.originalsoundversion.com/dead-space-sound-design-in-space-no-one-can-hear-interns-scream-they-are-dead-interview/ [Accessed 28 Dec. 2024].
Source details from Reddit about Dead Space Sound Design, 2024. Available at: https://www.reddit.com/r/DeadSpace/comments/mi9817/sound_design/ [Accessed 28 Dec. 2024].
Source details from Reddit about Dead Space Sound Design, 2024. Available at: https://www.reddit.com/r/DeadSpace/comments/1eu4v7x/the_sound_design_in_the_remake_is_phenomenal/ [Accessed 28 Dec. 2024].
1 note
·
View note
Text
Proper Steps To Create A WordPress Website For A Dental Clinic

Visitors are more likely to return to your dental business if your website is visually appealing. Even if your clinic is small and you rely on word of mouth, patients are likely to search for your business online. Creating a stunning website for dentists doesn’t have to break the bank, and we’ll show you how in this guide.
Choosing A Dental Clinic Website Template
Choosing a WordPress dental clinic website theme is the first step in constructing your WordPress site. To begin, you can choose between general healthcare or a dentist’s theme. To make a significant effect on the internet, we suggest that you select a specialist theme from our list of the finest dentist themes. A cross-browser-compatible, responsive WordPress theme is the best way to make sure that your website visitors see a beautiful site regardless of their device type and size.

It’s even better to use a theme that includes a page builder like visual composer or Elementor page builder. It allows you to create new pages with greater freedom and control over the look and feel of your website. If you’re looking for a dental clinic WordPress theme, establish a list of all the features you need, and then look for a theme that supports a plugin that can help you get them all.
For instance, an appointment booking form if you wish to have online appointments, a full-width layout, a giant menu for your site, or any number of other options. When you have a clear picture of what you want your website to look like, picking a theme becomes easy.
Subscribing For Hosting And Domain Name
A domain name and web hosting can now be obtained in conjunction with the dental clinic website theme you’ve previously purchased.
In the same way that other website builders don’t charge a fixed monthly fee, WordPress does not. It’s free, but you’ll need to find a place to put your site on the internet.
Hosting
Because of the fierce rivalry amongst web hosting firms, it is now easy to locate a host for your website that is both affordable and reliable. Your site can be hosted by finding the best options in your area. To host your website, we recommend Bluehost, which has the finest uptimes, top-notch customer service, and security.
Domain name
You can think of your domain name as essentially representing your online persona and location. Because of this, you should always take your time while picking a domain name.
Choosing A Domain Name Might Be Tricky, So Here Are Some Pointers:
Short and easy to remember
Make spelling mistakes a thing of the past
Do not use symbols or numbers
Use caution while selecting a domain name extension
Include the keywords if you can
Symbolize your company’s identity in a unique way
Bluehost is a great option for hosting your domain name, as we’ve said before. Search for the availability of two or three distinct domain names. For your dental clinic’s website, purchase the domain name.

Installing WordPress for a Dental Clinic Website Theme Is A Simple Process.
Following purchase and download, you’ll be given access to all of the components that come with the template, including a parent theme and a subtheme. Our WordPress dashboard is now ready for theme installation, so let’s get to it! We need to go to the ‘Appearance’ area and click on ‘Themes’ in order to do so.
What we really want is for you to be taken to a page that lists all of the installed themes, but we’re not interested in that! Select the “Add New” option. By now you should have selected the “Dentario” zip package by selecting “Upload Theme” and then “Upload”. After you’ve installed the theme, WordPress will inform you which plugins are required.
This is critical since it will ensure that all of the template’s features perform as expected. Just select all of the plugins you need and click the “Install” button to begin the process of installing them. You’ll have to go through the same process again to activate them when they’ve been installed.
Content Of Your Website
Your website’s content is unquestionably king!
What keeps your site’s users interested and motivated to take action is the variety of content you offer them on your site. Your website’s success is entirely contingent on how successfully you prepare and implement the content.
Material writers can be hired to develop a wide range of different types of content for you.
Mobile-Friendly Dental Clinic Website
Optimizing your website for the mobile platform will increase the number of visitors to your site. It is important to take notice of spacing, image sizes, and features that may not look good or perform properly on mobile devices. You don’t want to be in a situation where your dentist’s website development appears bad on a mobile device and causes customers to go to other, better-looking dentist websites.
Tips for Building a Dentist Website
Add Statistics
Even if the numbers are bad, people enjoy reading them. Add a few numbers on the homepage to show how many people have visited. Customer satisfaction, procedures, or anything else you think is significant can be included in these numbers.
Use Popups
Using popups for messages that you want the user to focus on is a good practice. Anything from a discount to an invitation for you to get in touch is possible.
Use Forms
Users can easily reach out to you by filling out forms on your website. Become their favorite dentist by making their life easy.
Having a website for your dental practice is a good idea. We’re not just referring to a pretty website that doesn’t actually do anything. It should be able to help with things like scheduling an appointment, finding a dentist, and looking at their work. All of these elements were incorporated into ‘Dentario’ by its designers. Just a few blocks are all you need to do to get there. A few tweaks are all that is needed before you’re ready to launch your website. If you’re seeking help with dental website development, you should consider contacting a WordPress development company in Cincinnati.
Contact Us
At Reversed Out Creative, we understand the challenges and opportunities presented by AI disruption. Our team of experts specializes in web design, SEO, graphic design, and digital marketing services. Reach out to us through our contact form to learn more about navigating the evolving job market and embracing the potential of AI. Together, let’s shape a future that combines human ingenuity with the power of AI.
Content source: https://reversedout.com/benefits-of-wordpress-for-dental-clinic-website/
#Website Development Company In Cincinnati#WordPress Website Create#WordPress Website Building#Web Development Company Cincinnati#Design Agencies In Cincinnati
0 notes
Text
Boris FX Continuum 2025 Complete Perpetual License
Boris FX Continuum 2025 Complete Perpetual License. Boris FX Continuum 2025 Complete is an advanced visual effects and post-production plugin suite designed for professional editors, compositors, and motion graphic artists. Compatible with popular host applications like Adobe Premiere Pro, After Effects, Avid Media Composer, and DaVinci Resolve, Continuum 2025 provides a comprehensive set of…
0 notes
Text
Understanding Bitmap Images: The Foundation of Effective Photo Editing in Photoshop
Image Recreate: Common Questions Answered
1.How do I maximize image quality in Photoshop?
To maximize image quality in Photoshop, start with a high-resolution source image. Use the “Save As” option to choose formats like PNG for lossless quality. Adjust image dimensions using “Image Size” while maintaining the resolution (300 DPI for print). Utilize adjustment layers for non-destructive editing and avoid excessive compression when saving files.
2. Where is Super Resolution in Photoshop?
Super Resolution in Photoshop is found in the Adobe Camera Raw (ACR) interface. To access it, open an image in ACR, right-click on the image, and select "Enhance." In the Enhance dialog box, check the "Super Resolution" option, and then click "Enhance" to apply it and increase the image resolution.
3. What is the maximum image size in Photoshop?
The maximum image size in Photoshop depends on the version and the system architecture. For 64-bit versions, the maximum dimensions are approximately 300,000 by 300,000 pixels. However, the total file size can be limited by available RAM and disk space, with a maximum file size of 2 gigabytes for PSD files and up to 4 gigabytes for PSB files.
4. How many GB is Photoshop?
The size of Adobe Photoshop varies by version and operating system, but the installation typically requires around 2 to 4 GB of space. Additional space may be needed for scratch disk files and plugins. Always check the system requirements on Adobe's website for the most accurate and up-to-date information.
5. What is bitmap in Photoshop?
A bitmap in Photoshop refers to a type of image composed of pixels, where each pixel represents a specific colour. This format is commonly used for detailed images, such as photographs, but can lose quality when scaled. Bitmaps are typically saved in formats like BMP, JPEG, or PNG, and are ideal for rich, colourful visuals but not for scalability.

Visit: VS Website See: VS Portfolio
0 notes
Text
10 Essential Tools for Aspiring Software Developers
In the ever-evolving world of software development, having the right tools at your disposal can make a huge difference. Whether you’re a beginner stepping into the coding world or an aspiring developer sharpening your skills at Srishti Campus, understanding the tools that simplify workflows and boost productivity is crucial.
Here’s a list of 10 essential tools every software developer should explore to enhance their learning and professional growth.
1. Visual Studio Code (VS Code)
Why It’s Essential: VS Code is one of the most popular code editors, loved for its simplicity, flexibility, and a vast array of extensions. It supports multiple programming languages like Python, JavaScript, and C++, making it perfect for beginners and experts alike.
Top Features:
Intelligent code completion.
Built-in Git support.
Extensions for debugging and language tools.
Pro Tip: Use extensions like Prettier for formatting and Live Server for real-time web development.
2. Git and GitHub
Why It’s Essential: Version control is the backbone of modern software development. Git helps track code changes, while GitHub allows collaboration and sharing with other developers.
Top Features:
Manage project versions seamlessly.
Collaborate with teams using pull requests.
Host and showcase projects to potential employers.
Pro Tip: Beginners can start with the GitHub Desktop app for an easy GUI interface.
3. Postman
Why It’s Essential: Postman is a must-have for testing APIs. With its user-friendly interface, it helps developers simulate requests and check responses during backend development.
Top Features:
Test RESTful APIs without writing code.
Automate API tests for efficiency.
Monitor APIs for performance.
Pro Tip: Use Postman collections to organize and share API tests.
4. Docker
Why It’s Essential: For developers building scalable applications, Docker simplifies the process of deploying code in isolated environments. This ensures your application works consistently across different systems.
Top Features:
Create lightweight, portable containers.
Simplify development-to-production workflows.
Enhance team collaboration with containerized apps.
Pro Tip: Use Docker Compose for managing multi-container applications.
5. Slack
Why It’s Essential: Communication is key in software development teams, and Slack has emerged as the go-to tool for efficient collaboration. It’s particularly useful for remote teams.
Top Features:
Channels for organizing team discussions.
Integration with tools like GitHub and Trello.
Real-time messaging and file sharing.
Pro Tip: Customize notifications to stay focused while coding.
6. IntelliJ IDEA
Why It’s Essential: For Java developers, IntelliJ IDEA is the ultimate Integrated Development Environment (IDE). It provides advanced features that simplify coding and debugging.
Top Features:
Code analysis and refactoring tools.
Support for frameworks like Spring and Hibernate.
Integrated version control.
Pro Tip: Explore the community edition for free if you're starting with Java.
7. Figma
Why It’s Essential: Understanding UI/UX design is crucial for front-end developers, and Figma offers a collaborative platform for designing and prototyping interfaces.
Top Features:
Cloud-based collaboration for teams.
Interactive prototypes for testing.
Easy integration with development workflows.
Pro Tip: Use Figma plugins for assets like icons and mockup templates.
0 notes