#WAMP Server Errors
Explore tagged Tumblr posts
Visit Tumblr Blog
Explore Tumblr blogs with no restrictions, modern design and the best experience.
Last Seen Tumblr Blogs


Fun Fact
Tumblr has 16.74 million mobile monthly users in the US.
Text
Apache errors associated with WAMP installation for TeamPass
In this article, we shall discuss how to resolve Apache errors associated with WAMP installation for TeamPass. Apache WAMP (Windows, Apache, MySQL, PHP) is a software stack that allows users to create a local development environment for building and testing web applications on Windows. Please see how to Setup VirtualHost with SSL on WAMP Server, how to Configure SQL Server Instance to listen on a…
0 notes
Text
How to Build a Slot Machine Game: A Guide to Source Code Structure

Introduction
Slot machine games are popular in casinos and online platforms. To build a functional and engaging slot machine game, developers need to understand slot machine game source code. This guide explains the structure of the source code, focusing on key components like RNG, reels, symbols, and payouts. Using PHP slot machine game source code, developers can create web-based games efficiently.
Understanding Slot Machine Game Source Code
What is the Slot Machine Game Source Code?
The slot machine game source code is the set of instructions that control the game. It defines how the game generates random outcomes, displays reels, and calculates payouts. Understanding this code is essential for building a functional game.
Why Use PHP for Slot Machine Game Development?
PHP is a widely used scripting language for web development. It is easy to learn and integrates well with databases. PHP is a good choice for developing slot machine game source code for web-based games.
Key Components of Slot Machine Game Source Code
Random Number Generation (RNG)
RNG is the core of slot machine games. It ensures that each spin produces a random outcome. Developers use algorithms in the source code to generate these random numbers. This ensures fairness and predictability.
Reels, Symbols, and Paylines
Reels are the spinning columns in a slot machine. Symbols are the images on the reels. Paylines are the patterns that determine wins. The source code controls how reels spin, where symbols land, and how paylines are evaluated.
Payout Logic and Bet Management
Payout logic calculates wins based on symbol combinations. Bet management tracks player balances and wagers. The source code defines the rules for payouts and handles player transactions securely.
Step-by-Step Guide to Building a Slot Machine Game
Setting Up the Development Environment
To start, install a local server like XAMPP or WAMP. Use a code editor like Visual Studio Code. These tools help developers write and test PHP slot machine game source code efficiently.
Writing the PHP Slot Machine Game Source Code
Create a basic HTML structure for the game interface.
Use PHP to generate random numbers for the reels.
Define symbols and paylines using arrays.
Implement payout logic using conditional statements.
Testing and Debugging
Test the game by running it on a local server. Check for errors in the code. Use debugging tools to fix issues. Ensure the game works as expected.
Advanced Features and Customization
Adding Graphics and Animations
Use CSS and JavaScript to enhance the game’s visuals. Add animations for spinning reels and winning effects. Libraries like jQuery can simplify this process.
Multiplayer and Online Integration
Extend the game to support multiple players. Use PHP to connect the game to an online database. Store player data and game results securely.
Security Considerations
Ensure the game is fair and secure. Use encryption for sensitive data. Prevent cheating by validating all inputs and outputs.
Best Practices for Slot Machine Game Development
Writing Clean and Maintainable Code
Organize code into functions and classes. Use comments to explain complex logic. Follow coding standards to make the code easy to read and update.
Optimizing Performance
Minimize the use of heavy graphics. Optimize database queries. Use caching to improve game speed.
Staying Compliant with Gaming Regulations
Follow local laws and regulations. Implement features like age verification and spending limits. Ensure the game meets industry standards.
Conclusion
Building a slot machine game requires a clear understanding of the slot machine game source code. PHP is a practical choice for web-based games. By following this guide, developers can create functional and engaging slot machine games. For professional assistance, contact AIS Technolabs.
FAQ
1. What is the slot machine game source code?
Slot machine game source code is the set of instructions that define how the game operates, including RNG, reels, symbols, and payouts.
2. Why use PHP for slot machine game development?
PHP is easy to learn, integrates well with databases, and is suitable for web-based games.
3. How does RNG work in slot machine games?
RNG generates random numbers to ensure fair and unpredictable outcomes, implemented through specific functions in the source code.
4. Can I add graphics to a PHP slot machine game?
Yes, use CSS and JavaScript to add graphics and animations to the game.
5. How do I ensure my slot machine game is secure?
Use encryption, validate inputs, and follow gaming regulations to ensure security.
0 notes
Text
How to Develop a Website Using PHP
How to Develop a Website Using PHP
In today's digital era, websites play a crucial role in business growth and online presence. One of the most widely used server-side scripting languages for web development is PHP (Hypertext Preprocessor). It is open-source, easy to learn, and widely supported by web servers and databases. This guide will walk you through the step-by-step process of developing a website using PHP.

Why Choose PHP for Web Development?
Before diving into the development process, let’s explore some key reasons why PHP is a great choice for website development:
1. Open-Source: PHP is free to use, making it cost-effective for developers.
2. Cross-Platform Compatibility: Runs on Windows, Linux, and macOS without compatibility issues.
3. Database Support: Easily integrates with MySQL, PostgreSQL, and other databases.
4. Scalability: Suitable for both small websites and large-scale web applications.
5. Large Community Support: Extensive documentation and active developer communities for troubleshooting and learning.
Prerequisites for PHP Web Development
To develop a website using PHP, you need the following tools:
1. Text Editor or IDE: VS Code, Sublime Text, or PHPStorm.
2. Local Server: XAMPP, WAMP, or MAMP for running PHP scripts.
3. Database System: MySQL or PostgreSQL for data storage.
4. Web Browser: Chrome, Firefox, or Edge for testing the website.
Step-by-Step Guide to Developing a Website Using PHP
1. Setting Up Your Development Environment
To begin developing a PHP website, follow these steps:
· Install XAMPP (or WAMP/MAMP) to create a local server.
· Using the XAMPP Control Panel, launch Apache and MySQL.
· Navigate to htdocs in the XAMPP directory to store PHP project files.
2. Creating the Project Structure
Organizing your files properly enhances maintainability. A typical PHP project structure:
project-folder/
│-- index.php
│-- config.php
│-- assets/
│ ├── css/
│ ├── js/
│ ├── images/
│-- includes/
│ ├── header.php
│ ├── footer.php
│-- pages/
│ ├── about.php
│ ├── contact.php
│-- database/
│ ├── db_connect.php
3. Writing Your First PHP Script
Create an index.php file and add the following code:
<?php
echo "Welcome to My PHP Website!";
?>
Save the file and access it in the browser by navigating to http://localhost/project-folder/.
4. Connecting PHP with MySQL Database
To manage dynamic content, connect PHP with a MySQL database.
Create a Database
1. Open phpMyAdmin from XAMPP.
2. Create a new database, e.g., my_website.
3. Add a users table with fields id, name, email, and password.
Database Connection Code (db_connect.php)
<?php
$servername = "localhost";
$username = "root";
$password = "";
dbname = "my_website";
$conn = new mysqli($servername, $username, $password, $dbname);
if ($conn->connect_error) {
die("Connection failed: " . $conn->connect_error);
}
?>
5. Creating a User Registration System
A simple user registration form using PHP and MySQL.
Registration Form (register.php)
<form method="POST" action="register.php">
<input type="text" name="name" placeholder="Full Name" required>
<input type="email" name="email" placeholder="Email" required>
<input type="password" name="password" placeholder="Password" required>
<button type="submit" name="register">Register</button>
</form>
Handling User Registration (register.php)
<?php
include 'database/db_connect.php';
if(isset($_POST['register'])) {
$name = $_POST['name'];
$email = $_POST['email'];
$password = password_hash($_POST['password'], PASSWORD_BCRYPT);
$sql = "INSERT INTO users (name, email, password) VALUES ('$name', '$email', '$password')";
if ($conn->query($sql) === TRUE) {
echo "Registration successful!";
} else {
echo "Error: " . $conn->error;
}
}
?>
6. Implementing User Login System
Login Form (login.php)
<form method="POST" action="login.php">
<input type="email" name="email" placeholder="Email" required>
<input type="password" name="password" placeholder="Password" required>
<button type="submit" name="login">Login</button>
</form>
Handling Login Authentication (login.php)
<?php
session_start();
include 'database/db_connect.php';
if(isset($_POST['login'])) {
$email = $_POST['email'];
$password = $_POST['password'];
$result = $conn->query("SELECT * FROM users WHERE email='$email'");
$user = $result->fetch_assoc();
if(password_verify($password, $user['password'])) {
$_SESSION['user'] = $user;
echo "Login successful!";
} else {
echo "Invalid credentials!";
}
}
?>

7. Adding Navigation and Styling
· Use Bootstrap or CSS frameworks to improve UI.
· Include a header.php and footer.php for better navigation.
8. Deploying the PHP Website
Once development is complete, deploy your PHP website using:
· Shared Hosting with cPanel for easy management.
· Cloud Hosting (AWS, DigitalOcean) for high performance.
· Domain & SSL Certificate for a secure and professional website.
Conclusion
Developing a website using PHP is an efficient way to create dynamic and interactive websites. By following this step-by-step guide, you can build a PHP-based website from scratch, implement database interactions, user authentication, and deploy your project successfully. Start your PHP development journey today and create powerful web applications!
#web development#seo services#web designing#social media marketing#graphic design#digital marketing#digitalmarketing#marketing#digitalindia#seo
1 note
·
View note
Text
How to Move Your WordPress Site from Localhost to a Live Server
Developing a WordPress site on localhost is a great way to build and test your website in a controlled environment. However, the real challenge arises when it's time to move the site from your local server to a live hosting environment. If not done correctly, you could encounter broken links, missing images, or even database errors.
In this blog, we'll guide you through a step-by-step process to successfully move your WordPress site from localhost to a live server.

Step 1: Choose the Right Hosting Provider
Your first step is to select a reliable web hosting provider that meets your website’s needs. Look for:
Server Speed: Fast servers for better performance.
Uptime Guarantee: At least 99.9% uptime to ensure availability.
Ease of Use: User-friendly dashboards and tools.
WordPress Support: Hosting optimized for WordPress websites.
Popular options include Bluehost, SiteGround, and WP Engine.
Step 2: Export Your Local WordPress Database
The database is the backbone of your WordPress site. To export it:
Open phpMyAdmin on your local server (e.g., XAMPP or WAMP).
Select your WordPress database.
Click on the Export tab and choose the Quick Export method.
Save the .sql file to your computer.
Step 3: Upload Your WordPress Files to the Live Server
To move your files:
Compress Your WordPress Folder: Zip your local WordPress installation folder.
Access Your Hosting Account: Use a file manager or an FTP client like FileZilla.
Upload the Files: Transfer the zipped folder to your hosting server's root directory (usually public_html).
Unzip the Folder: Extract the files once uploaded.
Step 4: Create a Database on the Live Server
Now, set up a new database on your live hosting server:
Log in to your hosting control panel (e.g., cPanel).
Navigate to the MySQL Databases section.
Create a new database, database user, and password.
Assign the user to the database with full privileges.
Step 5: Import the Database to the Live Server
Open phpMyAdmin in your hosting control panel.
Select the new database you created.
Click the Import tab.
Choose the .sql file you exported from your localhost.
Click Go to import the database.
Step 6: Update the wp-config.php File
To connect your site to the live database:
Locate the wp-config.php file in your WordPress installation.
Open the file in a text editor.
Update the following lines: define('DB_NAME', 'your_live_database_name'); define('DB_USER', 'your_live_database_user'); define('DB_PASSWORD', 'your_live_database_password'); define('DB_HOST', 'localhost'); // Keep this unless your host specifies otherwise.
Save the file and upload it to your server via FTP.
Step 7: Update URLs in the Database
Your localhost URLs need to be replaced with your live site URLs.
Use a tool like Search Replace DB or run SQL queries in phpMyAdmin.
In phpMyAdmin, run the following query: UPDATE wp_options SET option_value = 'http://your-live-site.com' WHERE option_name = 'siteurl'; UPDATE wp_options SET option_value = 'http://your-live-site.com' WHERE option_name = 'home';
Step 8: Test Your Live Website
Once everything is uploaded and configured, check your website by entering its URL in a browser. Test for:
Broken Links: Fix them using plugins like Broken Link Checker.
Missing Images: Ensure media files were uploaded correctly.
Functionality: Verify forms, buttons, and features work as expected.
Step 9: Set Up Permalinks
To ensure proper URL structure:
Log in to your WordPress admin dashboard on the live site.
Go to Settings > Permalinks.
Choose your preferred permalink structure and click Save Changes.
Step 10: Secure Your Live Website
After migrating, secure your site to prevent vulnerabilities:
Install an SSL Certificate: Most hosting providers offer free SSL certificates.
Update Plugins and Themes: Ensure everything is up to date.
Set Up Backups: Use plugins like UpdraftPlus for regular backups.
Conclusion
Moving your WordPress site from localhost to a live server may seem daunting, but by following these steps, you can ensure a smooth and error-free migration. A successful move allows you to showcase your site to the world, engage your audience, and achieve your goals.
Start today and take your WordPress project live with confidence!
0 notes
Text
Custom PHP Development: Leveraging MySQL for Database Management

In the realm of web development, the combination of PHP and MySQL has proven to be a powerful duo. Custom PHP development, when paired with the robust capabilities of MySQL for database management, allows developers to create dynamic, scalable, and efficient web applications. This article explores how custom PHP development can leverage MySQL to build effective database-driven websites and applications.
The Synergy of PHP and MySQL PHP (Hypertext Preprocessor) is a widely-used open-source scripting language that is especially suited for web development. It is embedded within HTML and interacts seamlessly with databases. MySQL, on the other hand, is a reliable and fast open-source relational database management system (RDBMS) known for its performance and scalability.
Together, PHP and MySQL form a formidable partnership in custom web development, offering numerous advantages:
Ease of Integration: PHP scripts can easily connect to MySQL databases using built-in functions.
Flexibility: Both PHP and MySQL are highly flexible, making them suitable for a wide range of applications from simple blogs to complex enterprise solutions.
Cost-Effectiveness: Being open-source, they provide a cost-effective solution for businesses.
Setting Up the Environment Before diving into custom development, you need to set up your development environment:
1. Install PHP: Ensure that PHP is installed on your server. You can download it from the official PHP website.
2. Install MySQL: Download and install MySQL from its official site. During installation, configure the root password and other settings as needed.
3. Web Server: Install a web server like Apache or Nginx. Many developers prefer to use XAMPP or WAMP for an all-in-one solution that includes Apache, MySQL, and PHP.
Connecting PHP to MySQL The first step in leveraging MySQL in custom PHP development is to establish a connection between PHP and MySQL. Here’s a basic example using PHP’s MySQLi (MySQL Improved) extension:
```php
<?php
$servername = "localhost";
$username = "username";
$password = "password";
$database = "database_name";
// Create connection
$conn = new mysqli($servername, $username, $password, $database);
// Check connection
if ($conn->connect_error) {
die("Connection failed: " . $conn->connect_error);
}
echo "Connected successfully";
?>
```
In this script, `mysqli` is used to connect to the MySQL database. The script checks the connection and prints a success message if the connection is successful, or an error message if it fails.
Creating and Managing Databases Once connected, the next step is to create and manage databases. Here’s how you can create a database and a table using PHP:
```php
<?php
// Create database
$sql = "CREATE DATABASE myDatabase";
if ($conn->query($sql) === TRUE) {
echo "Database created successfully";
} else {
echo "Error creating database: " . $conn->error;
}
// Use the database
$conn->select_db("myDatabase");
// Create table
$sql = "CREATE TABLE Users (
id INT(6) UNSIGNED AUTO_INCREMENT PRIMARY KEY,
firstname VARCHAR(30) NOT NULL,
lastname VARCHAR(30) NOT NULL,
email VARCHAR(50),
reg_date TIMESTAMP
)";
if ($conn->query($sql) === TRUE) {
echo "Table Users created successfully";
} else {
echo "Error creating table: " . $conn->error;
}
$conn->close();
?>
``` This script first creates a database named `myDatabase`. It then creates a table named `Users` with columns for ID, first name, last name, email, and registration date.
Performing CRUD Operations CRUD (Create, Read, Update, Delete) operations are fundamental to any database-driven application. Here’s how to perform these operations using PHP and MySQLi:
Create: Inserting Data
```php
<?php
$sql = "INSERT INTO Users (firstname, lastname, email) VALUES ('John', 'Doe', '[email protected]')";
if ($conn->query($sql) === TRUE) {
echo "New record created successfully";
} else {
echo "Error: " . $sql . "<br>" . $conn->error;
}
?>
```
Read: Retrieving Data
```php
<?php
$sql = "SELECT id, firstname, lastname, email FROM Users";
$result = $conn->query($sql);
if ($result->num_rows > 0) {
while($row = $result->fetch_assoc()) {
echo "id: " . $row["id"]. " - Name: " . $row["firstname"]. " " . $row["lastname"]. " - Email: " . $row["email"]. "<br>";
}
} else {
echo "0 results";
}
?>
```
Update: Modifying Data
```php
<?php
$sql = "UPDATE Users SET lastname='Smith' WHERE id=1";
if ($conn->query($sql) === TRUE) {
echo "Record updated successfully";
} else {
echo "Error updating record: " . $conn->error;
}
?>
```
Delete: Removing Data
```php
<?php
$sql = "DELETE FROM Users WHERE id=1";
if ($conn->query($sql) === TRUE) {
echo "Record deleted successfully";
} else {
echo "Error deleting record: " . $conn->error;
}
?>
```
Advanced Techniques in Custom PHP and MySQL Development To further enhance your custom PHP development, consider incorporating the following advanced techniques:
Prepared Statements Prepared statements are used to execute the same statement repeatedly with high efficiency and security. They help prevent SQL injection attacks:
```php
<?php
$stmt = $conn->prepare("INSERT INTO Users (firstname, lastname, email) VALUES (?, ?, ?)");
$stmt->bind_param("sss", $firstname, $lastname, $email);
// Set parameters and execute
$firstname = "Jane";
$lastname = "Doe";
$email = "[email protected]";
$stmt->execute();
echo "New records created successfully";
$stmt->close();
?>
``` Object-Oriented Programming (OOP) Approach Using an object-oriented approach can help in structuring your code more effectively:
```php
<?php
class Database {
private $servername = "localhost";
private $username = "username";
private $password = "password";
private $dbname = "myDatabase";
public $conn;
public function __construct() {
$this->conn = new mysqli($this->servername, $this->username, $this->password, $this->dbname);
if ($this->conn->connect_error) {
die("Connection failed: " . $this->conn->connect_error);
}
}
public function insertUser($firstname, $lastname, $email) {
$stmt = $this->conn->prepare("INSERT INTO Users (firstname, lastname, email) VALUES (?, ?, ?)");
$stmt->bind_param("sss", $firstname, $lastname, $email);
$stmt->execute();
$stmt->close();
}
// Additional CRUD methods...
public function __destruct() {
$this->conn->close();
}
}
$db = new Database();
$db->insertUser("Alice", "Smith", "[email protected]");
?>
``` Conclusion Custom PHP development, when combined with MySQL for database management, offers a versatile and powerful solution for creating dynamic, data-driven websites and applications. By leveraging the synergy between PHP and MySQL, developers can build robust, scalable, and secure applications tailored to specific business needs. From setting up your environment and connecting PHP to MySQL, to performing CRUD operations and employing advanced techniques, the potential for innovation and customization is vast. As you continue to explore and implement these tools, you'll unlock new possibilities for delivering exceptional web experiences.
Also Read: 10 Best Web Development Languages for Your Project in 2024
0 notes
Text
Creating a Simple REST API with PHP: A Beginner's Guide
In the digital era, REST APIs have become the backbone of web and mobile applications, facilitating seamless communication between different software systems. PHP, with its simplicity and wide adoption, is a powerful tool for building robust REST APIs. This guide aims to introduce beginners to the fundamentals of creating a simple REST API using PHP.
Understanding REST APIs
Before diving into the technicalities, it's essential to understand what REST APIs are. REST (Representational State Transfer) is an architectural style for designing networked applications. It relies on a stateless, client-server, cacheable communications protocol -- typically HTTP. In simpler terms, REST uses HTTP requests to GET, PUT, POST, and DELETE data.
Setting Up Your Environment
To start building your REST API with PHP, you'll need a local server environment like XAMPP, WAMP, or MAMP. These software packages provide the necessary tools (Apache, MySQL, and PHP) to develop and test your API locally. Once installed, start the Apache server to run your PHP scripts.
Planning Your API
Before coding, plan what resources your API will provide access to and the corresponding endpoints. For example, if you're building an API for a blog, resources might include articles, authors, and comments. An endpoint for retrieving articles could be structured as http://yourdomain.com/api/articles.
Creating the API
1. Setting Up a Project Structure
Create a new directory in your server's root folder (e.g., htdocs in XAMPP) named my_api. Inside this directory, create two files: .htaccess and index.php. The .htaccess file will be used for URL rewriting, making your API endpoints clean and user-friendly.
.htaccess
apacheCopy code
RewriteEngine On RewriteCond %{REQUEST_FILENAME} !-f RewriteRule ^([a-zA-Z0-9-]+)/?$ index.php?request=$1 [QSA,NC,L]
This configuration redirects all requests to index.php, passing the request path as a query parameter.
2. Implementing the API Logic
index.php
Start by initializing an array to mock a database of articles. Then, parse the request to determine which resource is being accessed.
phpCopy code
<?php // Mock database of articles $articles = [ ['id' => 1, 'title' => 'The First Article', 'content' => 'This is the first article.'], ['id' => 2, 'title' => 'The Second Article', 'content' => 'This is the second article.'] ]; // Get the request path $request = $_GET['request'] ?? ''; // Split the path into components $requestParts = explode('/', $request); // Determine the resource $resource = $requestParts[0] ?? ''; header('Content-Type: application/json'); switch ($resource) { case 'articles': echo json_encode($articles); break; default: http_response_code(404); echo json_encode(['error' => 'Resource not found']); break; }
This script checks the requested resource and returns a JSON-encoded list of articles if the articles resource is accessed. For any other resource, it returns a 404 error with a JSON error message.
3. Testing Your API
To test your API, you can use tools like Postman or simply your browser. For instance, navigating to http://localhost/my_api/articles should display the JSON-encoded articles.
Extending Your API
Once you've mastered the basics, you can extend your API by implementing additional HTTP methods (POST, PUT, DELETE) and adding authentication for secure access. This might involve more advanced PHP programming, including working with headers for content type and authentication tokens, and dealing with more complex routing and database interactions.
Best Practices
When developing your API, keep in mind best practices such as:
Security: Implement measures like authentication, input validation, and sanitization to protect your API.
Versioning: Version your API from the start (e.g., v1/articles) to avoid breaking changes for users as your API evolves.
Documentation: Provide clear, concise documentation for your API's endpoints, request parameters, and response objects.
Embracing PHP's Flexibility for Rapid Development
One of the unique aspects of creating a REST API with PHP is leveraging PHP's inherent flexibility and simplicity for rapid development. As a dynamically typed language, PHP allows developers to iterate quickly without the strict type constraints found in statically typed languages. This flexibility is particularly beneficial in the early stages of API development, where the data model and business logic might frequently change. Furthermore, PHP's extensive standard library and numerous frameworks can significantly speed up the development process. For instance, using a PHP framework like Laravel or Symfony can provide out-of-the-box solutions for routing, security, and ORM (Object-Relational Mapping), enabling developers to focus on the unique aspects of their application rather than boilerplate code. To streamline projects with experts, businesses look for top php development companies and avail their services to implement better development strategies.
The Power of PHP's Community and Resources
Another unique advantage of building REST APIs with PHP is the extensive community support and wealth of resources available. PHP is one of the most widely used programming languages for web development, with a vibrant community that contributes to a vast ecosystem of libraries, frameworks, and tools. This community support means developers can often find solutions to common problems and questions through forums, blogs, and tutorials. Additionally, the availability of comprehensive documentation and best practices makes it easier for businesses to avail PHP development services to delve deeper into advanced topics. The combination of PHP's ease of use and the support of its community makes it an excellent choice for developing REST APIs, providing both beginners and seasoned developers with the resources they need to succeed.
Conclusion
Building a REST API with PHP is a rewarding project that can enhance your web development skills. Following this guide, you've taken the first step towards creating your API, understanding its foundational concepts, and applying best practices. As want to incorporate more features, refine code, and explore the vast possibilities of RESTful services, the natural choice for them is to hire php developers by outsourcing.
Remember, the key to mastering API development is practice and continuous learning. Experiment with different scenarios, contribute to open-source projects, and stay updated with the latest trends in web development. Your journey as an API developer is just beginning, and the digital world eagerly awaits your contributions.
0 notes
Text
Getting Started with PHP: A Beginner's Guide to Your First "Hello World" Program

Introduction
PHP tutorial for beginners and professionals provides in-depth knowledge of PHP scripting language. Our PHP tutorial will help you to learn PHP scripting language easily.
This PHP tutorial covers all the topics of PHP such as introduction, control statements, functions, array, string, file handling, form handling, regular expression, date and time, object-oriented programming in PHP, math, PHP MySQL, PHP with Ajax, PHP with jQuery and PHP with XML.
What is PHP
PHP is an open-source, interpreted, and object-oriented scripting language that can be executed at the server side. PHP is well suited for web development. Therefore, it is used to develop web applications (an application that executes on the server and generates the dynamic page.).
PHP was created by Rasmus Lerdorf in 1994 but appeared in the market in 1995. PHP 7.0 is the latest version of PHP, which was released on 28 November. Some important points need to be noticed about PHP are as follows:
PHP stands for Hypertext Preprocessor.
PHP is an interpreted language, i.e., there is no need for compilation.
PHP can be embedded into HTML.
PHP is an object-oriented language.
PHP is an open-source scripting language.
PHP is simple and easy to learn language.

Why use PHP
PHP is a server-side scripting language, which is used to design dynamic web applications with MySQL database.
It handles dynamic content, database as well as session tracking for the website.
You can create sessions in PHP.
It can access cookies variables and also set cookies.
Using PHP language, you can control the user's to access some pages of your website.
It helps to encrypt the data and apply validation.
PHP supports several protocols such as HTTP, POP3, SNMP, LDAP, IMAP, and many more.
PHP Features

Install PHP
To install PHP, we will suggest you to install AMP (Apache, MySQL, PHP) software stack. It is available for all operating systems. There are many AMP options available in the market that are given below:
WAMP for Windows
LAMP for Linux
MAMP for Mac
SAMP for Solaris
FAMP for FreeBSD
XAMPP (Cross, Apache, MySQL, PHP, Perl) for Cross Platform: It includes some other components too such as FileZilla, OpenSSL, Webalizer, Mercury Mail, etc.
How to install XAMPP server on windows
We will learn how to install the XAMPP server on windows platform step by step. Follow the below steps and install the XAMPP server on your system.
Step 1: Click on the above link provided to download the XAMPP server according to your window requirement.
Step 2: After downloading XAMPP, double click on the downloaded file and allow XAMPP to make changes in your system. A window will pop-up, where you have to click on the Next button.
Step 3: Here, select the components, which you want to install and click Next.

Step 4: Choose a folder where you want to install the XAMPP in your system and click Next
Step 5: Click Next and move ahead
Step 6: XAMPP is ready to install, so click on the Next button and install the XAMPP.
Step 7: A finish window will display after successful installation. Click on the Finish button
Step 8: Choose your preferred language
Step 9: XAMPP is ready to use. Start the Apache server and MySQL and run the php program on the localhost.
Step 10: If no error is shown, then XAMPP is running successfully

How to run PHP code in XAMPP
Generally, a PHP file contains HTML tags and some PHP scripting code. It is very easy to create a simple PHP example. To do so, create a file and write HTML tags + PHP code and save this file with .php extension.
All PHP code goes between the php tag. It starts with <?php and ends with ?>. The syntax of PHP tag is given below:
<?php
//your code here
?>
How to run PHP programs in XAMPP PHP is a popular backend programming language. PHP programs can be written on any editor, such as - Notepad, Notepad++, Dreamweaver, etc. These programs save with .php extension, i.e., filename.php inside the htdocs folder.
For example - p1.php.
As I'm using window, and my XAMPP server is installed in D drive. So, the path for the htdocs directory will be "D:\xampp\htdocs".
Step 1: Create a simple PHP program like hello world.
<?php
echo "Hello World!";
?>
Step 2: Save the file with hello.php name in the htdocs folder, which resides inside the xampp folder.
Step 3: Run the XAMPP server and start the Apache and MySQL.
Step4: Now, open the web browser and type localhost http://localhost/hello.php on your browser window.
Step 5: The output for the above hello.php program will be shown as the screenshot below

Most of the time, PHP programs run as a web server module. However, PHP can also be run on CLI (Command Line Interface).
Credits – Shweta Patil (Backend)
MetricsViews Pvt. Ltd.
MetricsViews specializes in building a solid DevOps strategy with cloud-native including AWS, GCP, Azure, Salesforce, and many more. We excel in microservice adoption, CI/CD, Orchestration, and Provisioning of Infrastructure - with Smart DevOps tools like Terraform, and CloudFormation on the cloud.
www.metricsviews.com
0 notes
Text
Mastering PHP: The Ultimate Guide to PHP Online Courses
In today's fast-evolving digital era, web development continues to play a vital role in shaping online experiences. One of the most trusted and widely-used server-side scripting languages in this domain is PHP (Hypertext Preprocessor). Whether you are a beginner aiming to break into web development or a seasoned programmer looking to expand your skills, enrolling in a PHP online course is a smart and strategic move.
What is PHP?
PHP is a powerful scripting language specifically designed for web development. It is open-source, easy to learn, and integrates seamlessly with HTML, databases like MySQL, and content management systems such as WordPress. PHP runs on almost all operating systems including Linux, Windows, and macOS, making it incredibly versatile.
Since its creation in 1994 by Rasmus Lerdorf, PHP has evolved dramatically. Today, it powers over 75% of websites on the internet, including big names like Facebook, Wikipedia, and WordPress. Its simplicity and wide applicability make it a must-know language for aspiring web developers.
Why Learn PHP Online?
1. Flexibility and Convenience
One of the biggest advantages of choosing an online PHP course is the flexibility it offers. Whether you're a college student, a working professional, or a freelance developer, you can learn PHP at your own pace, anytime and anywhere.
2. Cost-Effective Learning
Online courses are typically more affordable than in-person classes. Many platforms even offer free PHP tutorials or low-cost courses that deliver high-quality content.
3. Access to Quality Resources
Most online PHP courses provide a wealth of resources, including video lectures, downloadable content, quizzes, code editors, and forums. These materials make it easier to grasp complex concepts and practice coding in real-time.
4. Certification and Career Growth
Many PHP online courses offer certificates upon completion. These certificates can enhance your resume and make you stand out in the job market. With PHP skills, you can pursue roles such as Web Developer, Full-Stack Developer, Backend Developer, or Software Engineer.
Key Topics Covered in a PHP Online Course
A comprehensive PHP course typically includes the following modules:
1. Introduction to PHP
What is PHP?
Installation and setup (XAMPP, WAMP)
Syntax and basic structure
Embedding PHP in HTML
2. PHP Variables and Data Types
Strings, integers, floats, booleans
Arrays (indexed and associative)
Constants
Type casting
3. Control Structures
Conditional statements (if, else, switch)
Looping structures (for, while, do-while, foreach)
4. Functions and Scope
Creating and calling functions
Function parameters and return values
Variable scope (local, global, static)
5. Forms and User Input
Handling GET and POST methods
Form validation
Superglobals like $_GET, $_POST, $_REQUEST, $_SERVER
6. Working with Databases
Connecting PHP with MySQL
CRUD operations (Create, Read, Update, Delete)
Using PDO and MySQLi
Prepared statements for security
7. Error Handling
Types of errors (syntax, runtime, logical)
Try-catch blocks
Custom error handlers
8. Sessions and Cookies
Creating and managing sessions
Setting and reading cookies
Session security best practices
9. File Handling in PHP
Reading and writing files
Uploading files via forms
File permissions
10. Object-Oriented Programming in PHP
Classes and objects
Constructors and destructors
Inheritance, encapsulation, polymorphism
Interfaces and traits
11. PHP and Web Security
Input validation and sanitization
Preventing SQL injection and XSS
HTTPS and secure sessions
12. Advanced PHP Topics
PHP with AJAX
REST APIs in PHP
MVC Frameworks like Laravel and CodeIgniter
Composer and dependency management
Popular Platforms Offering PHP Online Courses
Here are some of the best platforms where you can learn PHP online:
1. Udemy
Udemy offers a wide range of PHP courses for all levels. Courses like “PHP for Beginners” and “Object-Oriented PHP & MVC” are among the top-rated, featuring lifetime access and a certificate upon completion.
2. Coursera
Partnering with universities and colleges, Coursera offers structured PHP programs. You can audit most courses for free or pay to receive a certification. A good example is the Web Applications for Everybody course from the University of Michigan.
3. edX
edX features PHP-related content through universities like Harvard and MIT. Though primarily focused on computer science and web development, several PHP courses are included under broader programming paths.
4. LinkedIn Learning
LinkedIn Learning provides bite-sized PHP lessons with project-based learning. A subscription gives access to multiple courses, helpful if you're pursuing more than just PHP.
5. FreeCodeCamp and W3Schools
Both platforms are excellent for beginners who want to explore PHP basics for free. W3Schools, in particular, is well-known for its hands-on “Try It Yourself” editor.
Who Should Take a PHP Online Course?
1. Beginners in Web Development
If you're new to coding and want to start with a language that's widely used and beginner-friendly, PHP is a great option.
2. Students and Computer Science Graduates
Learning PHP alongside HTML, CSS, and JavaScript can give you a competitive edge when applying for internships or junior developer roles.
3. Freelancers and Entrepreneurs
If you're planning to build your own website or work on client projects, PHP enables you to create dynamic, database-driven websites quickly.
4. Working Professionals
Developers who want to expand their backend skills or transition into full-stack development will benefit significantly from PHP expertise.
Career Opportunities After Learning PHP
Once you complete a PHP online course, several doors open for your professional growth:
Web Developer: Design and build dynamic websites.
Backend Developer: Manage server-side logic and database interactions.
Full-Stack Developer: Handle both frontend and backend tasks.
WordPress Developer: Customize and develop plugins/themes using PHP.
Freelance Developer: Build and manage websites for clients.
According to recent job market statistics, PHP developers earn an average salary of $60,000–$90,000 annually, depending on experience, location, and industry.
Tips for Success in an Online PHP Course
Set Clear Goals: Decide whether you’re learning for a job, freelance projects, or personal growth.
Practice Regularly: The best way to learn coding is by doing it. Practice through exercises and mini-projects.
Join Online Communities: Platforms like Stack Overflow, Reddit, and GitHub can help you learn collaboratively.
Work on Real Projects: Apply what you learn by building real-world applications—this boosts your confidence and portfolio.
Keep Up With Updates: PHP continues to evolve (e.g., PHP 8.x versions), so staying updated ensures your skills remain relevant.
Conclusion
PHP remains a cornerstone of modern web development, and mastering it through an online course is an effective, convenient, and affordable way to jumpstart or advance your programming journey. With comprehensive learning resources, expert instructors, and real-world projects, PHP online courses provide everything you need to build robust, scalable, and dynamic websites.
Whether you're starting from scratch or adding PHP to your skillset, now is the perfect time to enroll and harness the power of this essential language.
#php online course#PHP Training in Chandigarh#Python Training in Chandigarh#CCNA Training in Chandigarh#MERN Stack Training in Chandigarh
0 notes
Photo

Laravel vendor/autoload.php) failed to open stream | Windows 10 | Wamp Server SUBSCRIBE to keep up to date with all the news on our channel! In this tutorial will fix the error of: ... source
1 note
·
View note
Text
A Beginner's Guide to Web Development
The present world is where network is never again an extravagance yet a need. It is presently an essential enhancement, without which, simple living and staying refreshed would in any case remain a fantasy.
The Internet is where pretty much every individual on the planet visits every day. It is the response to each possible issue since some place, somebody, would have battled through indistinguishable wretchedness and trouble from ourselves.
Basically here you get important knowledge about web development like how to start your career in web development. If you want to know more about web development then please visit our page Rankfrog on Wordpress.
Accordingly, rather than rehashing the wheel, the web encourages us to keep the wheel rolling!
Join the Developer Community
The capacity to surf the immense measure of data is a joy however then again, to most likely form landmarks as opposed to simply look at them is unquestionably all the more intriguing.
Firstly you read this article if you think there is something missing then tell us and visit our blog rankfrog.wordpress.com
Begin: Search and Learn
A standout amongst the most essential things in web advancement is to seek. This unending mission for learning begins with a couple of basic ventures on Google which here and there lead to vast outcomes and on occasion demotivating for apprentices. Along these lines, it's critical to set littler targets and to comprehend what to search for.
Here are a couple of destinations to help keep us progressing nicely:
Mozilla Developer Network: MDN is an incredible place to begin alongside other co-students. It channels the outcomes productively giving a satisfactory measure of data. This system can answer pretty much every inquiry in the most exact way.
The New Boston : A cool site that really advances free instruction. As a novice, I was a successive guest to the YouTube channel of this incredible individual who knew nearly everything. Afterward, I arrived on a site where a similar educator, alongside other extraordinary teachers, shared his insight for nothing. Suggested for novices, this site educates you regarding what dialects are utilized now and how.
Stack Overflow : Ever had issues you couldn't fathom alone? Indeed, you presently have Stack Overflow, which keeps the "pile of issues" from flooding. This site blessings you with a vast report bunch that incorporates engineers from all sides of the network. Notwithstanding being new or old - everybody can gain from the errors of others.
It works like a network sharing stage, where issues and related issues can be hunt down and arrangements by other individuals can be found.These answers are dependably in keeping us on the correct way.
Hands on coding is the most imperative thing with regards to web advancement. It truly relies upon what dialect the engineer pick. Diverse stages bolster distinctive coding dialects. For instance LAMP, short for Linux Apache MySQL PHP, is commonly utilized for running sites.
HTML/CSS: Hypertext markup dialect is the standard markup dialect to structure the interface of how the site looks. Falling Style Sheet is utilized to characterize styling designs for different HTML components on the page. Different virtual products like Adobe muse are presently accessible in the market for giving sites dazzling highlights like parallax looking without getting their hands messy with long codes. In spite of the fact that this makes things simple and lifts the weight off gorgeous front-end for sites, it is in every case great to gain proficiency with the nuts and bolts so as to style dynamic substance and perform customizations on the site.
PHP: One of the most broadly utilized dialects for web improvement. It's anything but difficult to learn and adaptable. It tends to be utilized as a capacity arranged just as article situated programming dialect. New software engineers may require some an opportunity to get to know its coding style, however once you get hang of it, it's one of the most straightforward dialect to create proficient electronic applications.
It is likewise a server side programming dialect, which implies it serves to oversee server-side demands and handles reaction sent by the server and can be utilized to run inquiries and oversee database. An undisputed top choice.
SQL: Database is the clerk of everything that goes on in the site. SQL, short for Structured Query Language, is basic for running questions (directions) to make, refresh, and perform tasks on the database.
These SQL directions are activated on demand utilizing PHP contents, which keep running on the server.
JavaScript: To add a flavor to our site, we can utilize JavaScript. It keeps running on the customer's PC, which diminishes your traffic, and uses the machine's preparing power. Pretty much every site utilizes JavaScript for frame approvals, activitys, AJAX solicitations, clocks, and different other customer side tasks.
jQuery is a broadly utilized javaScript library that streamlines activities.
When you've taken in these dialects, you can begin coding and creating sites starting with no outside help or add to recently composed code.
You can setup a MySQL database and a nearby server all alone machine to run and test server side code. XAMPP and WAMP are a couple to name.
Beginning from HTML labels and meta portrayals, you should initially make a layout about how the site should look and feel to the client. Next comes the dynamic updates of the substance of the pages. Structures, catches, and connections can be utilized to trigger demands on the server. PHP then becomes possibly the most important factor — it can get demands and process data to perform database tasks and react with perspectives and separate information.
Programming interface/module coordination additionally assumes a noteworthy job during the time spent web advancement. Github is a pool of vaults that contain various modules that spares us from reexamining the wheel.
JavaScript can likewise be utilized to trigger solicitations, perform activitys, and other customer side activities like word processors.
When the site has been created, it should be exchanged onto a live server. An area name and a facilitating space are two of the essential requirements for a site to obvious on the Internet. GoDaddy and bigrock are two merchants that move comparative administrations.
A FTP customer can be utilized to transfer the site's records to an open envelope for anybody's survey. A MySQL server can be setup along these lines.
This ought to presumably get a site ready for action. On the off chance that despite everything it doesn't work, the sellers give client bolster that will fix the issues.
1 note
·
View note
Text
Wordpress localhost ampps alternative

#Wordpress localhost ampps alternative how to#
#Wordpress localhost ampps alternative install#
#Wordpress localhost ampps alternative update#
I had mega problems getting the XAMPP Server working locally, so I decided to try the WAMP. In “Step 5”, you say “With your browser go to Should this be: Thanks so much for your assistance! In “Step 4”, you say “…… the username is root, enter nothing between the ‘.’, and host……” What is the “enter nothing between the ‘…’ referring to? The password?ģ. In “Step 3″, you say ” Go to wamp / www”… This directory does not exist. (get “IE cannot display this webpage” error on this one. No luck on either front, as constant “The requested URL was not found on this server” errors.
#Wordpress localhost ampps alternative install#
Having endless problems with the install and have tried both Nicks and your directions. If you’re having a problem getting your WAMP or XAMPP server online, that’s a whole ‘nother issue, but check to make sure you’re not using IIS infact disable IIS if possible. Step5.)With your browser go to Hope that helps! New file structure will be wamp / Step4.)Unless you’ve changed the db username, password or host name then the db_name is whatever you created in Step 2, the username is root, enter nothing between the ‘.’, and host is localhost. Step 3.) Go to wamp / to a folder ( mysite) with only the content of the wordpress folder dumped directly into ( mysite). With WAMP installed (or XAMPP) your Step 3, 4 and 5 will look different then, our gracious host has suggested, with a MAMP install.
#Wordpress localhost ampps alternative how to#
In the next chapter, I’m going to show you how to create a custom WordPress theme in designer way (no PHP skill is required).įor anyone using WAMP (and possibly XAMPP, have not tested) who has any issues related to Step 3-5, here is your solution: With your browser, go to and follow the instructions to install WordPress.
#Wordpress localhost ampps alternative update#
Open wp-config.php and update the database details (db_name, user, password, host) according to your local server. In the folder, rename the wp-config-sample.php to wp-config.php. Go to the htdocs folder (where you installed the MAMP), extract the wordpress.zip to a new folder (eg. Go to and download the latest build of WordPress. In the phpMyAdmin page, create a new database (eg. Create a New DatabaseĪfter you’ve installed MAMP, run it and it should take you to the start page. I’m using Mac here, so I’m going to install MAMP. In order to run any PHP/database application on a local computer, you need a local host (ie. Run wp-admin/install.php and follow the instructions to install WordPress.īefore you start, let’s look at the requirements to run WordPress: Rename the wp-config-sample.php file to wp-config.php and update the database details according to your local server. Install a local server ( Mac: MAMP, PC: XAMPP or WAMP).ĭownload WordPress from and extract the files to a new folder under the htdocs folder. Here are the simplified steps on how to install WordPress on a local computer: If you have some technical background, you can skip the detailed steps in this tutorial. This tutorial is intended for beginners who want to learn how to run WordPress locally. You can also use the local version to test new plugins, themes, and upgrades. By doing so, it will save you time from updating and previewing files (so, you don’t have to frequently upload files on every change). In this chapter, you will learn how to install WordPress on a local computer. This is the first chapter of the Complete WordPress Theme Guide series.
0 notes
Text
Enable webcam chrome browser

ENABLE WEBCAM CHROME BROWSER HOW TO
ENABLE WEBCAM CHROME BROWSER INSTALL
ENABLE WEBCAM CHROME BROWSER UPDATE
ENABLE WEBCAM CHROME BROWSER ANDROID
How to access a Hikvision device in Chrome? If you think Mozilla Firefox is better, read the instructions in this link. You’ll be able to see the live feed, playback, modify the settings, etc. The Hikvision experience will be much more comfortable and smoother if you’re using the Chrome browser.
ENABLE WEBCAM CHROME BROWSER HOW TO
In this step-by-step guide, we will show how to access a Hikvision device ( IP camera, NVR, DVR) using Google Chrome.Īnd let’s face it, Chrome is better and faster than Internet Explorer. Since Hikvision cannot be accessed directly using Google Chrome, you need to do a few tricks.
ENABLE WEBCAM CHROME BROWSER INSTALL
What plugin to install on Chrome? How to see a Hikvision camera or NVR using Chrome? I haven't yet tested it, it seems amazing and more fast than passing by a server, as I know if there is a firewall configs between the two peers theseĬould still prevent connectivity and cause problems for the PeerConnection API, coding with JavaScript and on browsers is the future of Web apps.Many users want to view their Hikvision cameras or access the DVR/NVR using Google Chrome. To activate the WebRTC feature in chrome, access this page in Chrome chrome://flags/ and search through the list of features WebRTC and activate it :Īnother WebRTC API could be used for a browser-to-browser Real Time Communication is a PeerConnection API, Now, you could see the object value attributes and methods prompted in the console : You could now use Expression watchers or evaluate your the expressions in the console, to track the variables values and how it changes. When the OnSuccess() or the OnError() method is called the JavaScript code execution will stop in the breakpoint (debugger ), when the element inspector of chrome or FireBug in FireFox is openned : If you have some issues with the code or the camera/microphone doesn't respond to the access by JavaScript code, you could debug the code to see where the problem come from by placing a breakpoints in the JavaScript code place "debugger " key word like this :
ENABLE WEBCAM CHROME BROWSER ANDROID
You could also test it an a smartphone Android Chrome or otherĪccept the use of your Camera and Microphone and enjoy 4 - Debug the code Make sure that the Server is started and Acces the page using the web browser. To test the demo you should simply download the page.zip file, unzip it and copy it to an HTTP Server, a Wamp Server for example. When the function is called in case of error ,an alert is prompted 3 - Test the demo Using the codeġ - Getting access to your Camera and Microphone :Īlert( " Error function reached, Can't Access the user devices") The basics of programming using JavaScript and HTML5 are needed to understand the code, but no need to be a web programmer to test this demo. When you finish the installation, you could than try out my demo, by only copying the enclosed page in an HTTP Server and then open it using the installed web browser.
ENABLE WEBCAM CHROME BROWSER UPDATE
In This article we will see how it very simple to implement this feature using the webkitGetUserMedia API developed by WebRTC and the HTML5 video element.īefore you can start using these features/API you need to install the latest version of a Google Chrome Chrome Canary for example, or Opera, or simply update your current version. With the latest version of Google chrome, Opera and other web browsers that support WebRTC, also with the rise of HTML5 and the features that helps to access user devices and files has made the capture of Video/Audio a simple task and without downloading any plugin like what is the case for Facebook, GTalk or skype, this access could be allowed using the WebKit GTK+ which is already in Google latest Chrome and other web browsers to capture the video/audio from camera/microphone and HTML5 video element to display it.
0 notes
Text
Wamp server 64 bit for windows 10

Set up Wamp server on windows 10 - ElderNode Blog.
Wamp server for windows 10 64 bit free download - movieslasem.
Frequently Asked Questions (FAQs) - Snap Creek Software.
How to download Windows Installer 5.0.
WampServer - Browse /WampServer 3/WampServer 3.0.0 at.
Wampserver - Files and addons.
Php - Call to undefined function oci_connect() - Stack Overflow.
WAMPServer - Download.
How to Update to PHP 8 in WAMP Server Localhost - Blog.
Php - Composer install error - requires ext_curl when it's.
UwAmp Wamp Server - Apache MySQL PHP.
How to Install WAMP server in windows 10: Step by Step.
Download WAMPServer 3.2.6 for Windows - F.
Set up Wamp server on windows 10 - ElderNode Blog.
I think the point is that XAMPP works in 32-bit, and can therefore only work with the Oracle 32-bit driver. The Oracle client 32-bit is intelligent enough to be able to talk with the 64-bit server version. But XAMPP-32 is not intelligent enough to work with the Oracle 64-bit client driver.. Jul 01, 2022 · Install WordPress on Windows Using WampServer. WampServer or WAMP is a compilation of Apache web server, PHP and MySQL bundled for Windows computers. All of them are separate open-source software. However, installing them separately is not quite easy even for experienced users. Download WebStorm: The Smartest JavaScript IDE by JetBrains.Windows Installer 3 1 64 bit download - X 64-bit Download.Downloads - MAMP & MAMP PRO.Welcome to CodeIgniter.FusionInventory.WampServer (64-Bit) - Free download and software reviews - CNET Download.Télécharger WinRAR gratuit pour PC - CCM - CommentCaMarche.Télécharger gratuitement WampServer sur Futura.Download Release.
Wamp server for windows 10 64 bit free download - movieslasem.
Jan 24, 2021 · Step 0: Download the PHP 8 zip version from the PHP Download site for Windows. Choose the x64 Thread Safe version if you have 64bit Windows. As of now PHP 8.0.1 is available so I have downloaded PHP 8.0(8.0.1).
Frequently Asked Questions (FAQs) - Snap Creek Software.
Step 9. Select the components that you want to install and click on the "Next" button. Step 10. Select the start menu folder. Step 11. "Ready to Install" window will appear on the screen and then, click on the "Next" button. Step 12. Now, select the default browser and default text editor for the wamp server. Step 12. Download WampServer 64 bits (x64) 3.2.6. WampServer est disponible gratuitement (sous licence GPL). Vous pouvez remplir ce formulaire qui nous permettra de vous faire parvenir les actualités formation d’Alter Way, société éditrice, ainsi que toutes les informations liées aux évolutions de WampServer. WampServer 64-Bit is an open-source web development platform for Windows that developers use to test web applications on a local machine. WampServer is an open-source web development stack that developers can use to test their own applications and run other programs locally. For the web developer, a tool like this can ease development considerably.
How to download Windows Installer 5.0.
Oct 09, 2011 · Windows Installer 5.0 is released with Windows Server 2008 R2 and Windows 7. Windows Installer 5 is not available as a standalone version and you can either download Windows 7 SDK Web installer or the Windows 7 SDK ISO file. The advantage of the web installer is you can choose to install any subset of the SDK. WampServer (anciennement WAMP5) est une plateforme de développement Web de type WAMP, permettant de faire fonctionner localement (sans avoir à se connecter à un serveur externe) des scripts PHP.
WampServer - Browse /WampServer 3/WampServer 3.0.0 at.
3.2.6. Apr 29th, 2022. Older versions. Advertisement. WampServer is a collection of web development tools that you can use to install an Apache server with PHP and MySQL database. An open source package that you need to test the function of your website locally. You need these tools if you do backend coding since this is the only way that you. Step 3: Installing the app from Windows Store. When you've found the WampServer (64-bit) on windows store, you'll see the name and logo, followed by a button below. The button will be marked Free, if it's a free app, or give the price if it's paid. Click the button and the installation will begin.
Wampserver - Files and addons.
How to Download and install Wamp Server 3.2 on Windows 10 error free. This is a tutorial on how to download and install Wamp Server on your Windows 10. The. WAMPServer is an excellent development tool, allowing developers to quickly set up a web server that they can deploy their web applications to and test things like website design and dynamic website features easily, and from the comfort of a local machine. It is not entirely beginner-friendly, however, as the documentation for WAMPServer can be. Download. 596.33 MB. free. WampServer is a collection of web development tools that you can use to install an Apache server with PHP and MySQL database. An open source package that you need to test the function of your website locally.
Php - Call to undefined function oci_connect() - Stack Overflow.
The default database manager is MySQL, see wamp(64)/ for details.... With Windows 64-bit, it is imperative to install both 32 and 64 bit of each package.
WAMPServer - Download.
WampServer aims to help developers who need to create advanced web applications. The software is available for free for both 32-bit and 64-bit Windows computers. It’s compatible with Windows Vista, 7, 8 and 10, but it won’t work with Windows XP, SP3 or Windows Server 2003. You can use WampServer with Apache, PHP, MySQL and MariaDB. Jan 01, 1970 Method 1: Unintall app Manually. Hover your mouse to taskbar at the bottom of your Windows desktop. Then click the “Start” button / Windows logo. Select the “Control Panel” option. Click the Add or Remove Programs icon. Select “WampServer (64-bit)” from apps that displayed, then click. UBugtack Your new lightweight and powerful bugtracker, compatible with Slack, Github... Try it Free.
How to Update to PHP 8 in WAMP Server Localhost - Blog.
Wampserver 3.2.9 64 bit - Apache 2.4.53 - PHP 8.1.5…5.6.40 - MySQL 5.7.38/8.0.29 - MariaDB 10.5.15/10.7.3 PhPMyadmin 5.1.3 - MysqlDumper 1.24.5 on W10 and W7 Pro 64 bit Documentation Apache - Documentation PHP - Documentation MySQL - Wampserver install files & addons.
Php - Composer install error - requires ext_curl when it's.
WampServer 64-bit 3.2.6. WampServer x64 is a Windows web development environment. It allows you to create web applications with Apache, PHP and the MySQL database. It also comes with PHPMyAdmin to easily manage your databases. WampServer installs automatically (installer), and its usage is very intuitive. Jun 21, 2022 · The Uniform Server is a free lightweight WAMP server solution for Windows. Less than 50MB, modular design. The server includes the latest versions of Apache 2, PHP (switch between PHP 7.0, PHP 7.1, PHP 7.2, PHP 7.3, PHP 7.4, PHP 8.0 or PHP 8.1), MySQL, MariaDB with phpMyAdmin built in. No installation required! No registry dust! Just unpack and. Oct 02, 2021 · The store will show Ubuntu 18.04 or 20.04, select and install any of them as per your choice. This tutorial is written as per Ubuntu 18.04, those who want to go for the 20.04 version can see this one- How to install NextCloud on Ubuntu 20.04 LTS WSL Windows 10 and then use the launch button.
UwAmp Wamp Server - Apache MySQL PHP.
WampServer is a Web development platform on Windows that allows you to create dynamic Web applications with Apache2, PHP, MySQL and MariaDB. WampServer... in both 32 and 64 bit versions. Wampserver is not compatible with Windows XP, SP3, or Windows Server 2003. Features. Manage your Apache, MySQL and MariaDB services; Install and. WampServer, also known as WAMP, is a free, open-source Content Management System used to easily deploy, manage and configure websites, blogs, social media applications and many more. WampServer has been around since 1993, with many developers contributing their time and efforts to make it even better. The WampServer is very flexible and you can.
How to Install WAMP server in windows 10: Step by Step.
This is of vital importance since if we use a 64-bit computer, we must install the versions for 64 and 32 bits too. Both can be downloaded from here. Tool to check if the VC++ packages needed to Wampserver 3 are installed correctly. All VC Redistribuable Packages (x86_x64) (32 & 64bits). With that in mind, now let’s look at how to install a WAMP server. Step 1: Installing and Setting Up WAMP Server on Windows Computer. The first step is to download the latest version of the installer file for the WAMP server on to your Windows PC. To do this: Visit the WAMPserver website. WampServer Files A Windows Web development environment for Apache, MySQL, PHP databases Brought to you by: alterway, herveleclerc... If you do it you will get an instable Wampserver. Version 2.2e 32 or 64 bits Apache 2.2.22 or 2.4.2 MySQL 5.5.24 PHP 5.3.4 or 5.4.3 PHPMyAdmin 3.5.1 SqlBuddy 1. 3.3 XDebug.
Download WAMPServer 3.2.6 for Windows - F.
WampServer 64-bit is a Windows web development environment. It allows you to create web applications with Apache, PHP, and the MySQL database. It also comes with phpMyAdmin to easily manage your databases. The app is the only packaged solution that will allow you to reproduce your production server. Once the software is installed, you have the.
Other content:
Ti Nspire Cx Cas Student Software Download Free
Visiting Card Software Free Download Full Version
Windows 10 Product Key For Hp Laptop
1 note
·
View note
Text
How to Easily Install Joomla 4.x
As you know, Joomla is one of the most popular open-source Content Management Systems in the world. In previous years, you are used to using Joomla 3 to manage and build up their sites. We offered you a way to install Joomla 3.x so that you can easily and simply install and use the Joomla 3 versions. However, currently, the Joomla! 4.x coming with many new features has been released, which means you need a guide on how to install Joomla 4.x. That is the reason why we give you the blog today. So, let's start to explore it now!
The technical requirements to install Joomla 4.x
If you want to install Joomla 4.x, you need to check the technical requirements first in order to ensure that you can smoothly install without any trouble. Let's have a look at the requirements below: - Server: Linux, Apache. Besides, you can also locally install it on your computer using WAMP/ JAMP/ MAMP/ XAMPP software. - PHP: 7.3, 7.4, or 8. - MySQL/ MySQLi 5.6+ or MariaDB. - PostgreSQL: 11 (if you install on localhost). - memory_limit = 128MB or more. - upload_max_file_size = 4M or more. - max_execitopm_time = 180 or more. - CURL library: your server works with url_fopen or curl. - OpenSSL Libraries: enabled. - PHP file_get_contents() function: available or unlocked.
How to install Joomla 4.x
There are 2 ways for you to install Joomla 4.x. Thus, we will find out both of them so that you can easily choose the most suitable one. Install Joomla 4.x on a web server First of all, before you install Joomla 4.x on the web server, you need to download the Joomla! 4 package from the official website. After you click on the download button, the Joomla 4 installation package will be downloaded and saved on your computer. Don't forget to unzip it to a new folder.

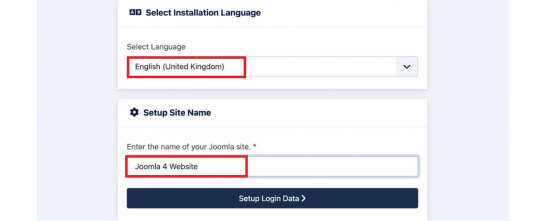
Set up the Database Now, it's time for you to generate a MySQL database, then assign a user with full permissions. In order to do that, let's follow the steps below: - Login to the cPanel. - Scroll down and select MySQL Databases in the Database section. - Create a new database by entering the name of the new database, then click on the Create Database button. - Generate a user for the database by filling out the username, password, confirmed password, and pressing the Create User button. Besides that, you can also add more users to the database in the Add User to Database section. - There will be a table of User Privileges, so check the All Privileges box at the top of the table to make sure the user will have all the privileges or full permissions. Install and set up Joomla 4 The next step you need to do is upload the Joomla files to your server via FTP Client. Let's ensure that you are utilizing an official release of an FTP Client so that there will no error during the Joomla 4 installation and setting process. Once uploading the Joomla package, we will start the installation by accessing your URL or domain you uploaded the Joomla 4 files before. For instance, it may be https://your-domain.com/folder-name. The interface will show you the language and site name setup first. Thus, simply choose the language, then fill out the name of your site. After that, you just need to click on the Setup Login Data button to move on to the next step.
Next, you need to enter the login data, including the Super User name, Super User account as well as password, and the email address of the Super User. Then, let's press the Setup Database Connection button.

Now, we will move on to the database configuration. So, you need to choose the database type first. After that, simply enter the hostname, username, password as well as database name. Besides that, you can fill out the table prefix randomly. Once everything was entered, let's click on the Install Joomla button.

Everything is done. You installed Joomla 4 successfully. There will be a congratulation message to ensure that. So, now, you can go to the admin backend dashboard or open the site without any difficulties.

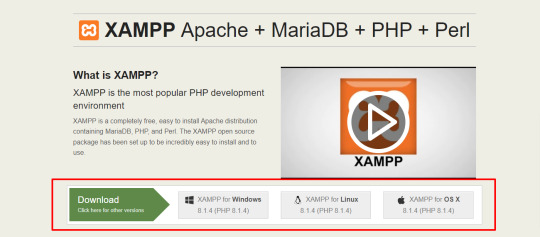
Install Joomla 4.x on Localhost with XAMPP If you don't want to install Joomla 4.x on a web server, you can also do it on Localhost via XAMPP. In order to do that, simply implement the following steps. First of all, you need to download and install XAMPP.
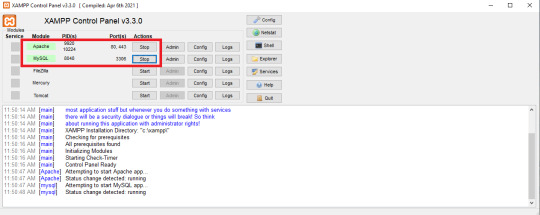
Once installed, it's time for you to start the XAMPP and turn on the two options including Apache and MySQL.
Next, let's open the browser and type localhost/phpmyadm, then click on the New option in the top left of the screen. Now, simply fill out the database name and press the Create button.

We will go on the process by downloading the Joomla 4 package and extracting it from the root of your site. For instance, it may be C drive -> Program Files (x86) -> Ampps -> www -> create a folder and unzip the package there. Now, you just need open the browser to access localhost/yourfoldername. So, this is the place where you moved the unzipped Joomla file. For example, it may be localhost/joomla-file-name. So, the interface will show you the language and site name setting. You just need to follow the Joomla 4 configuration steps we introduce to you above.
Wrap up
In conclusion, we hope that the two methods we bring you will help you install Joomla 4.x quickly and effectively. If you have any trouble or difficulties during the Joomla 4 installation, don't hesitate to leave your comment below so that we can support you as soon as possible. Besides, in case you try to install Joomla 4.x successfully after following the steps below, let's share it with others. Last but not least, once Joomla 4 installation, don't forget to give it an eye-catching and professional appearance. All you need to do is visit our site as well as explore a lot of high-quality, attractive, and responsive Joomla 4 Templates. Thanks for your reading and hope you enjoy the blog. See you the next time with many tutorial blogs related to Joomla 4. Read the full article
0 notes