#Winrar exe
Text
Winrar exe

Winrar exe archive#
Winrar exe rar#
Winrar exe windows 10#
Winrar exe trial#
While the tool is made for Windows, there is no version specifically for Mac, which makes it limited and does not translate as well into the language of the system. rar format is unique to WinRar, and the ease of transfer or sharing is also a definite advantage.
Winrar exe trial#
The 40-day free trial enables users to experience the software, before choosing to buy the license or not. zip formats make WinRar a great tool for data compression. The easy to use interface, efficient functionality, and the flexibility to save files to. PeaZip and Bandizip are other alternatives. For Apple, iZip is also a compression tool that can be used on the Mac and other iOS devices. 7zip is also an alternative program that is used to compress a number of file formats. While WinZip has an official Mac version, a WinRar can also be used in a Mac. Most users, in fact, use them interchangeably, as both are able to extract files from both formats. zip formats, and have similar interfaces for users. Both programs allow for files to be compressed to. The most commonly known alternative to WinRar is WinZip, a direct competitor. rar file, but they are not able to create a file with that particular format. Other programs like WinZip or 7zip are able to extract data from a. zip, this is the only program that can create compressed files in the. While WinRar can also create file formats other than.
Winrar exe archive#
There is no official separate version for Macs or Apple devices, but the WinRar app does work on Mac desktops to extract, archive or compress files. WinRar is primarily compatible with Windows and is now also available for Android. The final formats can be either rar, rar4, or zip, and the user can choose the option, as well as the destination where the file needs to be saved.
Winrar exe rar#
When creating a new rar file, users need to apply the Add files option, to add any number of files they choose to compress in the single file. This makes the transfer and sharing of multiple files easily. WinRar allows users to compress various files into a single compressed file. The list view allows one to see the files in the program itself, before extracting to a chosen destination. zip files can also be opened from the destination itself when you right-click and follow the option to open with WinRar. Using the extract option, users can open compressed files, which open into the window in a list format. The top panel shows options to Add, Extract, Test, View, Delete, and more options. Once the program is downloaded on the Windows system, it opens up to a simple interface. WinRar also lets users archive properly, by splitting archives and cataloging correctly. The program can also be used to extract files from a compressed format, and save to a chosen file destination. Sharing data is also made easy using the program, as it allows users to send multiple files in a compressed file, which can go as an attachment in a mail. WinRar works well for multimedia files, which occupy large space on the computer storage. zip format, that takes up less storage than the original file formats. The tool enables users to convert a number of files into a. WinRar is a data compression tool that enables users to transfer, share, or archive large files into a compressed format.
Winrar exe windows 10#
The program is Windows 10 compatible and a 40 day free services trial is available upon download. The program is available for a free 32-bit version, or the paid 64-bit version. zip format, and can be compressed, encrypted, archived, and shared. Winrar is a file compressing tool that enables users to transfer files easily.
0 notes
Text

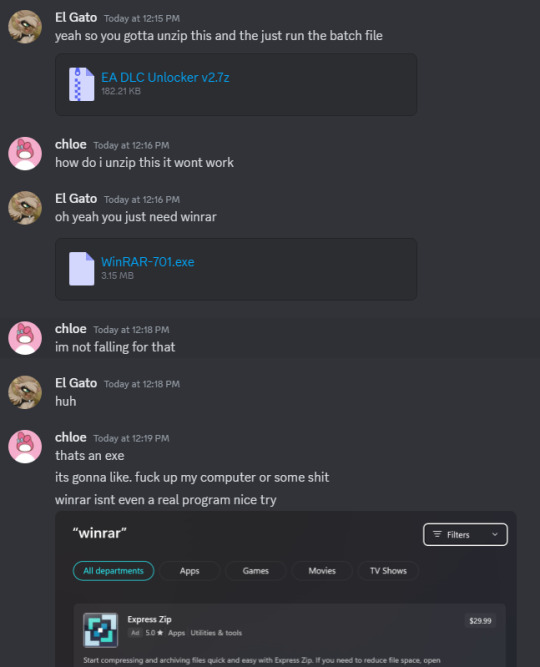
I'm sorry, but I adamantly disagree.
This is very good behavior.
They didn't recognize the file extension.
They didn't recognize the EXE program.
And so they refused to open them.
That is excellent internet security hygiene.
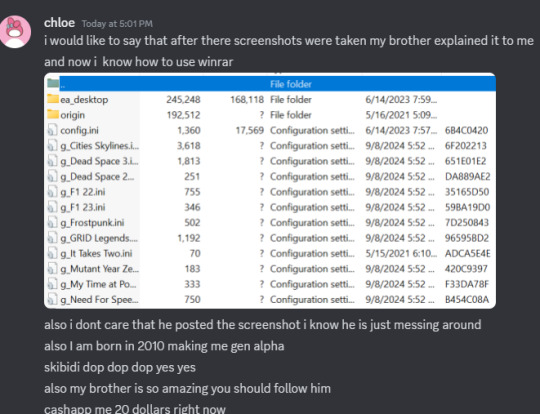
They went to a trusted person (their brother) and verified WinRAR was legit and then proceeded to unpack the files.
How is this not *encouraging* for gen alpha? Is it just because they didn't know what WinRAR was? Who cares? I'm just proud they were being careful.
Unlike my boomer uncle who once installed so many spam search toolbars that there was no screen real estate left to show webpages.
10K notes
·
View notes
Note
its Hiveswap that im checking thru!! it wanted me to run the exe as admin, and i cant set up a VM
OHHHHHH I SEE I SEE >:00
THATS COOL!! AND UNDERSTANDABLE X) SITES LIKE STEAM UNLOCKED TEND TO HAVE VIRUS INFECTED GAMES SOMETIMES!!
#mmmm maybe get winrar to check it for viruses and if itsclear mayb check the exe file itself for viruses#I dont rememebr what aplication does that though
1 note
·
View note
Note
Hi hi hi <3 I wanted to ask, I wanna install mods to bg3 but I only find guides from months ago and since we got new patches, I was wondering if you could help me ? Thank u and sorry to disturb you <3
hi, sure!! i will say that 1) things shouldnt have changed so much with new patches. mods do break, but the mod authors are usually quick to rectify them so they work with the patches (check your downloaded mods in nexus and change the order to most recently updated and dl it. bg3mm is rly good at just overwriting old mods with the newer versions w/o having to do anything but import them)

and 2) i am just. a layperson doing my best when it comes to modding. i dont know shit so this is just my experience!
NECESSARY FOR MOST MODS TO WORK
BG3 MOD MANAGER
BG3 mod fixer
bg3 community library
compatibility framework
companions – old shaders
improvedUI release ready
player and npc - old shaders
script extender
shivero’s icon gallery
trips’ old shader pack
tutorial chest summoning
unique tav
vfx library
Okay, i just copied and pasted this from my mods page because this is a good starting point methinks. I don't mod through nexus' program, so i can only guide through bg3 mod manager (bg3mm)
alright lets start with the easiest types of mods: paks. PAKs are what bg3mm are able to export directly into the game without us having to do anything but i'll break it down
PAKs are typically: additional gear, hairstyles, earrings, weapons, faces, horns, eye colors, makeup colors, dyes, dice, new spells, new classes, new potions, and the like. they're things that dont need to override things in the vanilla game in order to be added, however, order is still important in bg3mm
find some shit you wanna dl. i'm gonna use tav’s hair salon as an example. they dl as zip files
i recommend having all of your dl-ed mods moved to a specific folder for you to keep track of
open up bg3mm and go to >file>import mod

4. select the mod/s you want to import

5. they will get loaded into bg3mm on the RIGHT SIDE (inactive mods)
6. you just have to click and drag the mods you want over to the right side to move them to active
7. certain mods need a special load order in bg3mm. ex: tav's hair salon needs to be above (a lower number) and it's icon patch needs to be below it (a higher number)
7a. unique tav should be loaded at the bottom of the load order(a higher number) and any "unique tav patches" that you need for other mods should be loaded beneath it (a higher number than unique tav)

8. press export at the top to the game file path and you should be all loaded in

yay okay now, to mods that need to be directly overwriting game files. you need a zip extractor - i use winrar
it will be in the mod description whether or not you need to add these manually, but they are typically: unique tav, different makeup or tattoo styles, different body types or body tattoos, etc. i'll be using soft body for my example because i lov it<3
a lot of work needs to go into getting soft body to work, and it has to be done in a certain order so that things are replaced and loaded properly
trips’ old shader pack needs to be dl-ed AND installed first. extract it. anything that needs to replace files will do so in the DATA folder for bg3 OR if it's unique tav, their specific folders
companions – old shaders is next, and fortunately the two files for this mod is now 2 paks, and can be added to bg3mm easily
soft body is finally to be dl-ed, extracted, and moved into the data folder. you have to enter the extracted folder and move the GENERATED folder created from the mod into the DATA folder for bg3. every time you install manually, you will get a prompt to overwrite the files. click YES as that is what is allowing the mods to exist

as u can see, i like pinning the data folder to the quick access so i can just throw the generated folders in when i need to
and this is what ur mod folder should look like for bg3

ok yeah thats all i got hopefully this makes sense or is helpful lmk if theres anything i missed
8 notes
·
View notes
Text

This twitter thread sucks.
There's a lot of people dunking on Gen Z and Gen Alpha for being scared of opening .exe files, and like... I dunno... that's a valid fear? And probably not rooted in a dead meme?
Like... speaking as a millennial, I was taught to never open .exe files from a source you don't trust? Like, if you're opening an application from a disk or downloading it from an official website it's fine, but it's never a good idea to open files from random e-mails and discord servers or seedy websites? Even when your pirating something, you have to make sure the application your getting is from an okay-ish source from someone in the community and not a random bot.
If I'm a young kid and have no idea what "winrar" is, of course I'd be suspicious.
4 notes
·
View notes
Note
hey I've never gotten games off something like that before, how do I get it to run?
sorry im answering this kind of late . also i dont have a mac so ill be answering using windows
uhh basically the games r in a zip file so u need extract them somewhere. u can download 7zip or winRaR for that purpose, they work the same though. i use 7zip
so download 7zip and then download the game file and right click on it to show u the options menu. at the bottom of the menu u should see a prompt that says "show more options" and u will see a prompt that says "extract here" with 7zip underneath it. when u hover over that it should automatically show another menu.
click "extract here" and then wait for the files to extract. then open the 7zip program. you will see the game file listed there. click on it and then click on the game .exe and it should run fine. hope this helps
5 notes
·
View notes
Note
ive tried playing a lot of other games but its always an .exe file and those arent able to run on Chromebook. Not to mention, last time i tried to go on the site i had no idea wtf i was doing. It was so confusing T^T
So this is what I did, but there may be an easier way to do it (I'm used to modding my games, so I do things strange without realizing it sometimes.)
Get Winrar. It's free and you can uninstall it if you don't fuck around with .rar files very often. It'll ask you to buy it with a small, not-very-invasive popup when you use it, but you just click cancel cause you're only planning on using it once. It should allow you to continue.
Go to this link
and click the turquoise link that says 'Download normal version' (or download text only version if that's what you prefer/need)
It should download, and depending on what browser you use, you can click on the popup (or hit CTRL-J to take you to the downloads page.)
Afterwards, I extract it to the desktop. Just the whole file. You just click the file once, and then 'extract' and it'll bring up another popup. Click desktop and then OK.
Then you can maneuver over to the desktop and open the new file, and launch DOL from there.
I think it might be an exe but it launches for me in firefox. There's gotta be a workaround :((((
11 notes
·
View notes
Text
okay, done with the liveblog for the night. I will probably finish the game tomorrow. if you want to watch a playthrough, click here. beneath the cut is the instructions my friend Marsh put together for how to play the game. he's the only reason I'm able to right now! I will say, however, that I had additional tech issues with getting the game set up. if you run into an error, you can message me and I'll see if I can help with it. I had to download new software from the Microsoft store.
This guide is for Windows. I have no experience with Macs, so I cannot help.
You need to download multiple files to run the Utena game. I included links to the downloads I used:
1. Utena game files (https://www.dropbox.com/s/s9kjp7smf1izh6g/Utena_Sega1.rar?dl=0, https://www.dropbox.com/s/6llr2tcsaybmysh/Utena_Sega2.rar?dl=0)
The original Utena game was split into two discs, so the downloadable files available on the internet are also split in two. You will need to download both. There might be downloads where people have managed to combine the two disks into one, but I don't know how trustworthy they are.
2. Virtual Clonedrive (https://www.elby.ch/en/products/vcd.html)
This software takes game isos and "mounts" them into a virtual drive. This is how you trick your computer into thinking that you have inserted the game disk.
3. SSF 0.12 beta R3 (https://emutopia.com/index.php/emulators/item/297-sega-saturn/416-ssf scroll and select SFF 0.12 beta R3)
This is the emulator. You can use other versions of this emulator but I have heard that this one is most reliable for this game.
4. Translator (https://mega.nz/file/ywtDzDza#ZXNxaD4q2V-PBY4w126FHCqOkVmnWzGWeIOJQkbrzz4)
Translates game into english. Really easy to use, and comes with instructions that can help guide you through the emulation process. Note: I cannot get the name portion to work and this doesn't translate everything, just the most important parts.
5. Winrar (https://www.win-rar.com/start.html?&L=0)
Several files download as .rar and will not open correctly without this.
INSTRUCTIONS:
1. Virtual Clonedrive downloads as an .exe file. Open file and finish the install and it will be done.
2. Translator files and game files are .rar format. Make a folder somewhere on computer, with a name that is easy for you to find or remember. Extract the Utena game files, and translator files to this folder. Translator will not work if all these files are not in same folder.
3. Emulator files are in a zip folder. Extract to somewhere easy to find. Doesn't need to be in same location as translator and game files.
4. Open folder with game and translator files. There is a word file called Instructions. Open that and follow what is written there to translate the game. If done correctly, you will have two files that say Utena_English1 and Utena_English2.
5. Right click Utena_English1 and click "Mount".
6. Go to the extracted emulator files. Double click SSF application. The Utena game should start playing once this application is opened.
7. The controls are kinda weird. The arrow keys move the cursor around, enter is the start/menu button, and z is the select button.
#zeal plays utena#i would recommend at least watching a playthru bc it's a fun game#v much in the spirit of the show#like. not fun in a video game way but fun for fans of the characters#the game itself isnt v interactive
5 notes
·
View notes
Text
كيفية تحميل Xtream IPTV Player على الكمبيوتر؟
زيارة موقع Live4K:افتح متصفح الإنترنت على جهاز الكمبيوتر الخاص بك وانتقل إلى موقع Live4K. تأكد من استخدام رابط موثوق لضمان أمان الجهاز وبياناتك.
تسجيل الدخول إلى حسابك:قم بتسجيل الدخول إلى حسابك على موقع Live4K باستخدام بيانات الاعتماد التي حصلت عليها عند الاشتراك.
البحث عن Xtream IPTV Player:بعد تسجيل الدخول، ابحث في الموقع عن Xtream IPTV Player. يمكنك العثور على رابط التحميل عادةً في قسم البرامج أو التطبيقات.
تنزيل Xtream IPTV Player:اضغط على رابط تنزيل أو تحميل المخصص لـ Xtream IPTV Player. سيبدأ تحميل ملف التثبيت على جهاز الكمبيوتر الخاص بك.
فتح ملف التثبيت:بعد الانتهاء من تنزيل الملف، افتح مجلد التنزيلات على جهاز الكمبيوتر وابحث عن ملف التثبيت. قد يكون الملف بامتداد .exe أو .zip.إذا كان الملف مضغوطًا بامتداد .zip، قم بفك ضغطه أولاً باستخدام برنامج فك الضغط مثل WinRAR أو 7-Zip.
تثبيت Xtream IPTV Player:انقر نقرًا مزدوجًا على ملف التثبيت لبدء عملية التثبيت.اتبع التعليمات التي تظهر على الشاشة لإكمال التثبيت. قد يتطلب منك ذلك اختيار موقع التثبيت والموافقة على شروط الترخيص.
تشغيل Xtream IPTV Player:بعد الانتهاء من التثبيت، ابحث عن أيقونة Xtream IPTV Player على سطح المكتب أو في قائمة ابدأ وافتحها.
إدخال بيانات حساب IPTV:بمجرد فتح Xtream IPTV Player، ستحتاج إلى إدخال بيانات حساب IPTV الخاص بك. عادةً ما يتطلب ذلك إدخال URL الخاص بـ Xtream API، واسم المستخدم، وكلمة المرور.احصل على هذه المعلومات من مزود خدمة IPTV الخاص بك أو من موقع Live4K إذا كانت متاحة.
تحديث وتكوين الإعدادات:قم بتحديث إعدادات البرنامج حسب رغبتك، مثل ضبط جودة البث، وتكوين قائمة القنوات، وتفعيل ميزات أخرى إذا لزم الأمر.
التمتع بالمحتوى:بعد تكوين Xtream IPTV Player، يمكنك بدء مشاهدة القنوات والبث المباشر عبر البرنامج.
نصائح هامة:
تأكد من تنزيل البرنامج من مصادر موثوقة لتجنب البرمجيات الضارة أو المشاكل الأمنية.
تحديث البرنامج بانتظام لضمان حصولك على أحدث الميزات والتحديثات الأمنية.
تواصل مع دعم العملاء في حال واجهت أي مشاكل أثناء التثبيت أو التشغيل.
باتباع هذه الخطوات، يمكنك تنزيل وتثبيت Xtream IPTV Player على الكمبيوتر واستخدامه لتشغيل قنوات IPTV بسهولة.
0 notes
Text
Guia Definitivo: Instalando Lotes

youtube
Use este guia para acompanhar melhor o meu vídeo mostrando como instalar lotes no The Sims 3. Eu vou mostrar:
➡️ lotes premium da Store
➡️ lotes que usam objetos da Store
➡️ lotes que são compartilhados pela comunidade com conteúdos personalizados
Eu já fiz um guia completo para instalação de Mundos sem Launcher, que você pode encontrar AQUI.
Esse processo, para garantir que não tenha erro, vai exigir que o jogo seja aberto e fechado algumas vezes, então tenha um pouco de paciência que, no final, vai valer a pena.
Mods Necessários
Para este processo todo, nós vamos precisar dos seguintes mods.:
➡️ Delphy's Sims 3 Pack Multi-Extracter (faça o download AQUI)
➡️ CUSTARD Sims3Pack Cleaner (faça o download AQUI)
➡️ s3pe (faça o download AQUI)
Instalando os mods
Para instalar esses mods você vai precisar ter um arquivo para abrir arquivos tipo WinRar ou Winzip.
Multi-Extracter e CUSTARD
Os dois serão instalados da mesma maneira
Acesso o link dos mods, desça um pouco na página e clique na aba Download
Clique no botão Download e dê dois cliques no arquivo .rar para abrir a pasta.
Como são arquivos .exe, não é possível abrí-lo a partir desse arquivo temporário, então você precisa extrair os arquivos em algum lugar.
Suba um nível Eu recomendo que você tenha uma pasta onde salve todos esses programas necessários para otimizar o The Sims.

5. Selecione a pasta que estiver ali e clique em Extrair. Você pode extrair nessa mesma localização ou em outro lugar que for mais conveniente para você. Como eu tenho uma pasta onde salvo todos esses programas, eu vou extrair diretamente para ela

Sims 3 Package Editor
Já o Sims 3 Package Editor, requer que você tenha o .Net 4 instalado, mas não se preocupe, isso já é padrão para computadores Windows desda versão 7
Acesse a página do s3pe
Na sessão DOWNLOADS, clique na versão s3pe_14-0222-1852.exe: Windows Easy Installer version
Ele vai abrir diretamento o arquivo .exe
Proceda com a instalação normal
Você pode instalá-lo tanto na sua pasta C: ou na pasta onde você tem todos os programas instalados. Caso instale na pasta C: pode criar um atalho na sua área de trabalho ou na sua pasta com os outros programas para encontrá-lo mais facilmente quando precisar dele.
E para instalação é isso
Entendendo o princípio

Para instalação de lote, tanto de lote quanto de mundo, existe uma sequência que é o seguinte: vamos pensar o que depende do que
O lote depende dos objetos, porque se não tiver os objetos o lote fica vazio, concorda? Então os objetos vem antes do lote
Se for instalar um save que tem algum lote que precisa ser instalado, é a mesma coisa: primeiro objetos, depois lote e por último o save
Então a gente sempre começa pelos objetos
Instalando Lotes Premium
Vamos começar com a Stones Throw Greenhouse.
Por quê? Porque eu vou mostrar uma casa para vocês, eu sei que vai precisar destas a desse telhado especial aqui.
Quando a gente baixa do Sims 3 Store, tudo vem como Sims 3 Pack.
O que nós vamos fazer é começar extraindo os conteúdos do Sims 3 Pack.
Então nós vamos lá no multi installer.
Eu gosto de colocar tudo em uma pasta, que eu chamo de download, porque o Multi Extracter não é arquivo específico, então todos os arquivos .sims3pack que estiverem na pasta, serão extraídos, o que pode confundir conteúdos, se você tiver mais de uma arquivo na pasta.
No meu, ele já está programado para ir buscar nesta passa de download. Mas, se essa é a primeira vez que você está usando, no Step 1, o que nós vamos fazer é indicar em qual pasta está o arquivo que vai ser extraído. Clique em browse e para procurar onde está o seu arquivo. No meu caso, ele já direciona para essa pasta download.
Uma vez que a gente fez isso, ele vai guardar esse caminho para o resto da vida dele, tá? Até a gente mudar pelo menos.
No Step 2, a gente vai colocar onde vão ficar os arquivos extraídos. No meu caso, eu direciono para a mesma pasta. Eu poderia direcionar para uma pasta diferente, Mas no meu caso, eu gosto de deixar assim.
E aí, a gente vai clicar para extrair.
Uma vez que extraiu, quando a gente vem aqui na pasta, onde a gente pediu para extrair, todos os arquivos aqui estão os packages deste arquivo Sims 3 Pack.
Agora nós precisamos saber, dentro de tudo de todos os arquivos .package gerados, o que é o lote e o que são os objetos.
Para isso, nós temos o custard.
O que o custard vai fazer é olhar para o Sims 3 Pack e entender o que é cada um daqueles arquivos que estão ali. Então, nós vamos vir aqui em File Open, direcionar para onde está o nosso arquivo.
No meu caso, eu voltei para esta pasta Instalando Lotes.
Vou clicar nele e vou pedir para abrir. Pronto, aqui estão todos os objetos. Se você for reparar as descrições dos objetos, todos eles começam com tipo catalog, object, store, CAS ...
Se eu quisesse separar o que é objeto, do que é CAS, eu selecionaria esses arquivos aqui para fazer separadamente.
Como é que eu sei qual é o arquivo do lote?
Ele é o único que vai vir com uma descrição do lote.
No caso, ele veio aqui, com o green house, você está com certeza de ter o melhor harvest. Então, este aqui é o nome do arquivo, 0x7249.
Eu vou vir aqui na minha lista e vou procurar por ele
O que eu vou fazer é clicar com o botão direito em cima dele e vou vir aqui em renomear e aí eu vou dar o nome dentro do meu padrão de nomenclatura: LOT_COM_StonesThrowGreenhouse
O resto dos arquivos .packages são os objetos.
O que eu vou fazer é pegar o lote e vou colocar em qualquer lugar, tá?
O negócio é só tirar desta pasta aqui.
Nós agora vamos abrir o Sims 3 PE, para compactar tudo isso em um único arquivo. Vou vir aqui em File, New, com o botão direito, nessa área branca, eu vou clicar e vou vir em Import As > dbc.
Vou direcionar para todos esses arquivos .package, por isso que eu tirei o lote, para não ter perigo de confundir.
Vou selecionar todos, só apertando Ctrl A, vou abrir, e aí ele vai me perguntar qual é o nome que eu quero. Então, eu vou renomear para indicar que são os itens do lote. Clique em Enter para começar o processo.
Quando ele termina, ele traz a lista toda e a gente pode fechar o programa.
Na nossa pasta, onde estão todos os arquivos extraídos, ele salvou o arquivo compactado. Este arquivo a gente vai colocar na pasta Packages (ou downloads, se tiver o CC MAgic ou na pasta Mods, se tiver o S3MO).
E agora, o que eu vou fazer é abrir o jogo. Enquanto o jogo carrega, deixa eu dar um recado aqui.
Existem pessoas que fazem o processo tudo junto ao mesmo tempo, instalar o mundo com o lote com os objetos ou o lote com objetos. Eu prefiro instalar os objetos, abrir o jogo, fechar e instalar o lote ou o mundo, porque tende a ter menos erro para mim, pelo menos quando eu faço desse jeito. Você pode fazer os dois ao mesmo tempo e ver como isso funciona para você.
Quando chega na tela do menu principal, você pode simplesmente sair.
Agora que o jogo já entendeu que tem aqueles objetos, o que nós vamos fazer é vir lá em Electronic Arts > The Sims 3 > Library.
E aí, o arquivo do lote, a gente vai arrastar para essa pasta Library.
Então, os objetos ficam na pasta Mods > Package ou no CC Magic e o lote fica em Library.
E pronto.
Instalando Lote que usa item da Store
Vamos fazer o download da casa que eu separei para vocês. É uma casinha amarelinha, que seria para geração amarela do Not So Berry do CJ. Não sei se você conhece o CJ ou não. (canal @cjplays)
Mas ele fez essa casinha e eu acho ela bem bonitinha.

Link para a Speed Build da casa: https://youtu.be/6-NhSEgXR8c?si=um6-mm4FLkADav9c
Uma das coisas que ele usou para essa casa, foi aquele telhado.
Então, eu vou clicar para salvar lá na minha área de trabalho, neste daqui, instalando aqui os lotes. E do mesmo jeito, como ele está num Sims 3 Pack, do mesmo jeito, a gente vai lá na pasta onde você vai colocar o seu arquivo para o multi installer extrair.
Então, eu vou arrastar para cá.
Vou lá no meu multi installer.
Vou falar para ele simplesmente extrair, porque ele já está direcionado para essa pasta.
Na hora que eu venho aqui, o arquivo do CJ já gera um arquivo único Package.
Este arquivo único aqui, eu vou pegar e colocar lá na pasta library, porque aqui tem o lote junto com os objetos do junto misturado. Então, como tem lote, a gente vai colocar lá no library.
E vou colocar aí, vou arrastar para cá.
E agora sim, a gente vai abrir o jogo novamente, já com os objetos instalados, inclusive que a casa precisa. E o lote também.
Uma vez no mundo, eu venho aqui em editar a cidade, e venho em lotes comunitários, aqui está a estufa que eu instalei.
E aqui também está, na parte de casas, a casinha que a gente instalou.
Um jeito muito mais fácil
Agora, se você não quiser ter todo esse trabalho de ficar extraindo e compactando, descobrindo o que é o quê, existe este site ➡️ Non-Decrapified Store
É um Google Drive onde você já pode achar todos os itens da loja, já separado e organizado:
Os Itens vão na pasta Mods > Packages (ou CC Magic ou S3MO)
Os Lotes vão na Library
Mundos vão na pasta Worlds na sua pasta de instalação do jogo. Para mim o caminho é: C:\Program Files (x86)\EA Games\The Sims 3\GameData\Shared\NonPackaged\Worlds

Instalando casa com conteúdo personalizado
Agora eu vou mostrar como instalar lotes que dependem de conteúdos personalizados, é mais ou menos a mesma maneira do que depende de objetos da Store: primeiro a gente vai instalar os objetos, depois a gente vai instalar um lote.
E para isso eu escolhi esta casinha aqui que se chama Little Blue Starter Home, de Starter ela não tem nada, porque ela custa 56.595 simoleon mobiliada, ou quase 8.000 se ela estiver sem mobília.

Link para a casinha inicial que de inicial não tem nada: https://youtu.be/0quAcQrUZ2o?si=AQ3D6J1K3cQCK4Dq
E a @shellseaisms (canal no YT: @shellsea), inclusive recomendo SUPER, porque as construções delas são lindíssimas, usa muito conteúdo personalizado.
Aqui no Tumblr dela, eu vou deixar o link desta casa aqui, e se você for aqui no Index você vai achar todas as outras construções dela, ela faz a descrição da casa, que tem umas fotos da casa lindíssima, como você pode perceber.
Aqui embaixo ela tem a parte do conteúdo personalizado. Se você quiser ver todos os conteúdos personalizados usados nessa construção, você pode vir aqui que tem um link, aqui estão todos os conteúdos personalizados que ela usa para esta construção. Ou ela coloca aqui embaixo para você fazer o download da casa mobiliada, ou sem mobília.
Se a gente clicar aqui na pasta package, ela já vem com o conteúdo incluso, então, ou você pode vir nas Sims 3 Pack, e aí você converte e instala pelo launcher do jeito que você acha mais fácil, só que aí não viria com os conteúdos personalizados.
No caso, como eu quero mostrar a instalação com conteúdo personalizado, eu vou vir aqui na pasta package, vou pedir para abrir.
Aqui ele já abriu automaticamente, senão você teria que ter um arquivo para extrair zip.
No caso, ela traz dois arquivos: Um é o que ela já marcou como o que vai na pasta mods e o outro é o que vai na pasta library.
O que nós vamos fazer é, esta parte que está na pasta mods, eu vou colocar lá no download, na pasta eletrônica artes Sims 3 Downloads, para ele ser trabalhado pelo CC Magic. Eu poderia colocar isso na pasta mods, só que assim. Neste exato momento, a minha pasta mods está vazia, então não tem problema. Mas se a gente for colocando muita coisa lá, o jogo começa a ficar muito pesado, e ele começa a dar lag, porque o jogo tem que trabalhar aquele monte de conteúdo que está lá dentro.
Eu, ele, particularmente, só deixo a pasta mods para os mods mesmo, e ainda assim já estou vendo de como compactar os mods entre si. E isso é, inclusive, um dos motivos pelo qual estou demorando para trazer, trazer os meus vídeos falando sobre os mods que eu uso.
Bom, enfim, coloquei aqui na pasta de download, vou abrir o CCMedic, vou esperar o CC Magic carregar, e ele achou aqui o Little Blue Starter Home Mods, certo? Este arquivo aqui, eu vou pegar, e vou arrastar para esta pasta que eu já tenho criada aqui, teste. Se não, eu viria aqui dentro da default e criaria uma categoria, esse new aqui, eu daria o nome de Test Lots, para eu saber que é deste tutorial, e esse arquivo que eu coloquei aqui, eu arrastaria para cá. Muito bem, quando eu faço isso, está vendo aqui, cria esse símbolozinho ⚠ aqui, toda vez que tem esse símbolo, a gente precisa reconstruir o conteúdo.
Então, eu clico em Rebuild, e espero ele reconstruir o conteúdo.
Vamos vir agorana aba aqui Configurations, apareceu o Test Lots como desabilitado, porque eu acabei de criar esta pasta. Então, eu vou selecioná-la, e vou arrastá-la, e vou clicar com uma setinha para a esquerda para colocá-la nesta coluna de conteúdos habilitados.
O que está na coluna da direita de Disabled, significa que está desabilitado, ou seja, eles não vão aparecer no jogo, mas eu quero que ele apareça, então, eu deixo ele aqui na coluna de Habilitados.

Vou vir aqui em Rebuild novamente, só para garantir que está certinho e vou abrir o jogo para ele entender que tem esse novo conteúdo e a gente já volta.
Como a gente só está colocando o objeto, a gente pode chegar nesta página do menu principal, simplesmente vir aqui no menu e simplesmente sair.
E aí, a gente vai pegar o nosso lote, e vai colocar lá na nossa pasta Documents\Electronic Arts\The Sims 3\Mods\Library e pronto!
Agora, a gente pode abrir o jogo, e a gente vai ver este lote lá, como a gente já viu o outro. Então, essa parte eu não vou mostrar.
Com relação a Saves
Antes de terminar, eu gostaria de falar com relação a saves, que dependem de conteúdos personalizados ou itens da loja.
O esquema para os saves ou mesmo para o mundo é sempre o mesmo:
Instala os objetos,
instala o lote e o mundo,
e, por último, instala o save.
Lembra que eu desenhei, então.
Exemplo 1: Strawberry Acres

Por exemplo, Storberry Acres, quando você entra na página, o criador até fala aqui embaixo: Primeiro, você vai instalar os objeto e o mundo, que pode ser encontrado aqui no link, e depois você vai instalar o conteúdo personalizado.
Exemplo 2: LittlewoodHaven
A mesma coisa acontece com Littlewood Haven, do @yorkiebdownloads
Esse é o mundo que eu tenho gravado os meus vídeos ultimamente, e vocês sempre me perguntam qual é. Então, é Little Wood Haven do YorkieB. (link AQUI)
Funciona da mesma maneira:
Você vai instalar todos os objetos que ele fala aqui,
você abre o jogo,
instala o mundo, particularmente eu gosto de abrir o jogo de novo, para ele entender que todos os objetos foram instalados
E aí, por último, você vai instalar o save que vem junto com o mundo.
Esse mundo aqui, eu acho que ele ainda está para ser comprado no Patreon do YorkieB, mas todas as informações e todos os conteúdos personalizados que ele usa para o mundo dele, inclusive um monte de cabelo feminino masculino, pode encontrar aqui.
Encerrando
E acho que para o vídeo de hoje, o que eu tinha para falar é isso.
O importante é sempre seguir a ordem: Primeiros objetos, depois o lote e por último o save.
Espero que você tenha gostado e espero que tenha ajudado.
Qualquer coisa, deixa nos comentários aqui embaixo.
E é isso.
Um grande beijo. Fui!
0 notes
Text
SPSS 25 Full Cr@ck - Hướng dẫn Tải và Cài đặt đơn giản
Bước 1: Tải SPSS 25 Full Crack Đầu tiên, bạn cần tìm và tải bản cài đặt SPSS 25 Full Crack. Dễ dàng tìm kiếm và tải xuống bản cài đặt này từ các trang web tin cậy hoặc diễn đàn chia sẻ phần mềm. Hãy đảm bảo rằng bạn chỉ lựa chọn các nguồn tải tin cậy để tránh việc tải xuống các tệp tin có chứa phần mềm độc hại. Bước 2: Giải nén và chạy tệp cài đặt Khi tải xuống hoàn tất, bạn cần giải nén tệp tin cài đặt SPSS 25. Sử dụng một phần mềm giải nén như WinRAR hoặc 7-Zip để thực hiện quá trình này.

Sau khi giải nén, bạn sẽ thấy một tệp tin có đuôi .exe hoặc .msi. Chạy tệp tin cài đặt bằng cách nhấp đúp vào nó. Một cửa sổ cài đặt sẽ xuất hiện. Bước 3: Đồng ý các điều khoản và chọn vị trí cài đặt Đọc kỹ các điều khoản và điều kiện của phần mềm SPSS trước khi tiếp tục với quá trình cài đặt. Đảm bảo bạn hiểu và chấp nhận các điều khoản này trước khi nhấn đồng ý. Sau khi đồng ý, bạn sẽ được yêu cầu chọn vị trí cài đặt cho SPSS 25. Hãy chọn một ổ đĩa có đủ dung lượng để cài đặt phần mềm này. Bước 4: download spss 25 Hoàn tất quá trình cài đặt Sau khi chọn vị trí cài đặt, nhấn vào nút "Cài đặt" và đợi quá trình cài đặt hoàn tất. Việc này có thể mất vài phút tùy thuộc vào tốc độ của máy tính của bạn. Khi quá trình cài đặt kết thúc, bạn sẽ được thông báo rằng SPSS 25 đã được cài đặt thành công. Bước 5: Sử dụng SPSS 25 Full Crack Giờ đây, bạn đã hoàn thành việc cài đặt SPSS 25 Full Crack. Hãy mở chương trình và nhập thông tin cần thiết để đăng nhập và sử dụng SPSS. Lưu ý: Việc sử dụng bản SPSS 25 Full Crack có thể vi phạm pháp luật về bản quyền phần mềm. Hãy cân nhắc kỹ trước khi sử dụng và tuân thủ luật pháp địa phương khi tải và cài đặt phần mềm này
#spss_25, #spss_25_download_free, #download_spss_25, #Kiến_thức_IT
0 notes
Text
How to Use a Computer, Part 3: Common Filetypes in Windows
In this section, we’ll talk about files and what software tends to open it.
Text and Word Processing
DOC & DOCX: Microsoft Word documents. Word can open DOCX, OpenOffice and LibreOffice can open DOC.
ODT: OpenDocument Text. OpenOffice and LibreOffice use this filetype natively. Word will (begrudgingly) open it, but it will complain about the file being corrupt (the only thing corrupt around here is Microsoft).
RTF: Rich Text Format document. WordPad, Word, OpenOffice, and LibreOffice can open it.
TXT: Text file. Notepad and Wordpad can open it.
Audio
MP3: MPEG Layer-3 file. Every audio player can open it.
WAV: Microsoft PCM sample. Every audio player and audio editor can open it.
AIFF: Apple PCM sample. Every audio player and most audio editors can open it.
MID: Sequenced MIDI file. Windows Media Player can open this, but you might need the MIDI mapper driver on Win 8-11.
FLAC: Free lossless audio compression. Sort of obscure still, but VLC media and most audio editors can open it.
Video
MP4: MPEG Layer-4 file. Every video player can open it.
MKV: Matroska Video Container file. VLC media player can open it.
MPEG: Ye olde thyme videoe filee. MPEG is still supported in Windows Media Player (for some reason).
AVI: Audiovisual Interleave. Every video player can open it.
MOV: Apple iMovie file. Most video players can open it. WMP used to have a problem with MOV, but that got ironed out in Windows 7, I think.
Images
JPG: JPEG file. Every image viewer, editor, web browser, and desktop publishing application can open this.
PNG: Portable Network Graphic file. All the same software that can open JPG can also open PNG.
GIF: You’re on Tumblr. You know what a GIF is. Windows Image Viewer on Windows 7 for some reason can’t open GIFs, relegating them to Internet Explorer.
ICO: Icon file. Most of Windows’ stock icons are packed away in DLLs, but you can edit standalone ICO files and create new ones in GIMP and Photoshop.
File compression and archives
ZIP: WinZip compressed folder. Windows can open these natively.
7Z: 7-Zip file. 7-Zip and, I think WinRAR, can open these. Only 7-Zip can save files in 7Z format.
RAR: WinRAR compressed folder. WinRAR and 7-Zip can open these, only WinRAR can save files in RAR format.
Miscellaneous and Windows system formats
EXE: Binary executable. These are the actual software programs that you run to do stuff with, like GZDoom, Mozilla Firefox, Snes9x, WordPad, and all that.
MSI: Windows installer file. Usually, installers are in EXE format, but a scattering of developers, particularly Microsoft, Mozilla, and Google use MSI. If you need to install something from MSI, just treat it like an EXE and click on it.
DLL: Dynamic link library. Software file directories are lousy with DLLs, but there’s not really any need to mess with them.
CFG: Configuration file. Human-readable configuration settings that can be opened in Notepad and reset manually. Usually, there won’t be any need to do that, though.
There are loads more esoteric filetypes in Windows, but these have been the kinds you’ll encounter the most as a casual computer user. Tune in next time as we discuss Mozilla Firefox.
0 notes
Text
Selbstentpackende Archive als Angriffsgehilfe

Früher steckte in gepackten, selbstextrahierenden Archiven oft Malware. Eine neue Masche zeigt: selbstentpackende Archive enthalten keine Malware, führen aber beim Öffnen in Windows Befehle aus die dann Malware nachholen können - so Crowdstrike.
Damit große Dateien via Mail schneller transportiert werden können, setzen viele Mitarbeiter in Unternehmen auf einen Packer, wie etwa ZIP, 7zip oder WinRAR. Auch in der Business-Welt beliebt sind selbstextrahierende Archive. Die Archive sind eine EXE-Datei und lassen sich per Klick entpacken. Auch wenn zum Beispiel Outlook Mail-Anhänge mit einer EXE-Datei blockiert, so lässt es aber eine ZIP-Datei in der eine EXE-Datei steck gewähren. Gute Scanner haben auch in doppelt gepackten Archiven die Malware aufgespürt. Daher gehen die Angreifer nun neue Wege, um arglose Mitarbeiter in die Falle zu locken.
Emotet nutzt verschlüsselte Archive
Bei Emotet wurde ein Archiv mit harmlosen Köderdateien und einem weiteren, aber verschlüsseltes Archiv an die Nutzer geschickt. Der Scan ergab nur harmlose Dateien, da der verschlüsselte Teil oft nicht untersucht werden kann. Nicht zu sehen sind versteckte Parameter und Befehle im Archiv. Wird nun das selbstextrahierende Archiv entpackt, so schreibt das Tool die gepackten Dateien und startet das zweite, verschlüsselte Archiv. Per Parameter wird dann das Passwort an dieses Archiv übergeben, die Emotet-Datei entpackt und ausgeführt.
Archive mit Befehlskette
Wird eine selbstextrahierendes Archiv - kurz SFX - per Klick ausgeführt, so entpackt sich der Inhalt. Wird dann zum Beispiel eine Malware auf das System geschrieben, wehrt diese eine Endpoint-Security-Lösung in der Regel sicher ab. Aber: in von Crowdstrike gefundenen Archiven steckt keine Malware. Vielmehr führen die SFX-Dateien eine Befehlskette aus, die man ihnen ganz regulär mitgeben kann. In einem aufgezeichneten Fall wurde per Parameter ein Registryschlüssel an Windows übergeben. Dieser hat dann dazu geführt, dass das Ausführen von Befehlen mit höheren Rechten als denen eines Standardadministratorkontos möglich war.
Wie diese Fallen in der Praxis funktionieren hat Crowdstrike in einem Blogbeitrag festgehalten und erklärt die einzelnen Fallen der Beispiele die in freier Wildbahn gefunden wurden.
Passende Artikel zum Thema
Lesen Sie den ganzen Artikel
0 notes
Text
Come craccare un software

Esistono vari modi per craccare un software, che vanno da semplici tecniche come la modifica dei file DLL al reverse engineering, che può rivelare il funzionamento interno del programma. L'uso degli strumenti giusti è essenziale per il successo del cracking. Inoltre, il reverse engineering ti consente di superare il processo di attivazione di determinati programmi.
In questa guida tratteremo quello che forse per molti utenti è l'argomento più desiderato ovvero le migliori tecniche su come craccare un software
Parleremo di come possiamo creare noi stessi delle crepe che ci permetteranno di far funzionare tutti i programmi. Ci sono due modi più grandi per creare crack per qualsiasi programma. In questa guida per ora vi spiego il primo metodo, per il secondo farò un'altra guida dove ti spiegherò come craccare un programma.
Per craccare un programma devi cercare di aggirare il controllo del codice di licenza. Questo di solito è controllato via internet o deve essere valido secondo alcuni algoritmi del software.
Importante: questa guida è solo a titolo informativo pertanto non mi assumo la responsabilità dell'uso che ne viene fatto.
Come craccare un software

Il primo metodo di cui parlo è molto tecnico ma allo stesso tempo molto efficace. Ma prima di iniziare a cercare di capire come creare la crack è necessario sapere cosa viene scritto quando il programma rifiuta il codice di licenza inserito. Ad esempio, se dice “Spiacente, codice di licenza errato” ricorda questo testo perché ti servirà più avanti nella guida.
Ecco i passaggi che devi fare per craccare un software:
- Per iniziare ti serve il file eseguibile (.exe) del programma che vuoi craccare e devi scaricare il programma Ollydbg che trovi a questo link ;
- Dopo aver scaricato Ollydbg devi estrarlo utilizzando un programma come Winrar che puoi scaricare da questo link ;
- Ora avvia il file OLLYDBG.EXE e clicca su Apri nell'angolo in alto a sinistra;
- Dalla finestra che si è aperta seleziona il file .exe del programma che vuoi craccare;
- Ora devi capire qual è l'istruzione che controlla la password. Per fare ciò, fai clic con il pulsante destro del mouse nella prima finestra di Olly e vai su Cerca > Tutte le stringhe di testo referenziate;
- Nella finestra che si apre cliccare nuovamente con il tasto destro del mouse, cliccare su Cerca testo e ricercare la parola “ chiave ” (o quella che compariva nel messaggio di codice di licenza errato) tra tutte le istruzioni che contengono testo nel programma esaminato;
- Dopo aver trovato la riga di testo del messaggio di errore, fai doppio clic con il mouse sulla stringa trovata e verrai indirizzato all'istruzione di assemblaggio che genera quel messaggio;
- Noterete che prima di tale istruzione c'è un JNZ SHORT (salta se diverso da zero), proprio quello che in caso di corretto inserimento del numero seriale fa superare il sistema di sicurezza;
- Sostituire JNZ con JMP, in modo che il programma ignori sempre il controllo della password;
- Termina con un clic destro andando su Copia su eseguibile> Tutte le modifiche per salvare le modifiche;
A questo punto il crack del programma è stato realizzato!
Note finali
E siamo arrivati alle note finali di questa guida su come craccare un software. Prima di salutare volevo informarti che mi trovi anche sui Social Network, per entrarci clicca sulle icone appropriate che trovi nella Home di questo blog, inoltre se la guida ti è piaciuta condividila pure attraverso i pulsanti social di Facebook, Twitter, Pinterest e Tumblr, per far conoscere il blog anche ai tuoi amici, ecco con questo è tutto Wiz ti saluti.
Read the full article
0 notes
Text
Tải WinRAR 2022 full (32bit – 64bit) – [Link Google Drive Mới Nhất]
WinRAR là phần mềm nén và giải nén file được nhiều người tiêu dùng nhất hiện nay, tương trợ đa số các định dạng cơ bản và cả những định dạng thi thoảng hiện nay, điểm cộng của WinRar ghép file này là tỷ lệ nén cao, tốc độ nén và giải nén cao, dễ sử dụng, sở hữu khả năng nén hàng loạt tập tin một khi giúp kiệm ước thời gian. Ngoài ra, bạn với thể tiêu dùng nó để tạo những file cài đặt dạng exe vô cùng tiện thể lợi. WinRAR cho phép người sử dụng tạo, sắp xếp và quản lý các file lưu trữ của mình. Với sự giúp đỡ của phần mềm này, bạn với thể tạo những tệp lưu trữ dữ liệu, nén hoặc giải nén chúng cũng như bảo vệ để hạn chế bị hư hại.
WinRAR là trình nén file và giải nén đa định dạng được kiểm tra cao về giao diện đồ họa cũng như các tính năng cao cấp. Ưu điểm của nó là mang tỷ lệ nén cao, cao hơn 10%-50% so có các cách nén khác, tạo file nén an toàn, thiết lập mật khẩu, thêm lưu trữ và bình luận, trong 1 số trường hợp nó còn giúp sửa sang các file bị hỏng.

0 notes
Text
Technize supported by its audience. When you buy through links on our site, we may earn an affiliate commission. Learn more.HomeSoftware7 Best Ninite Alternatives for 2022
7 Best Ninite Alternatives for 2022
Updated on October 4, 2022Prayas ChakmaSoftware
If you need to install Windows on a computer or bunch of computers then you’ll likely want to install many applications that you use frequently. To install each of these applications individually takes a lot of time and it is pretty dull sitting there watching the process. Surely there is a better solution?
Most people will use Ninite for the installation of multiple apps on their Windows computers. Two experienced programmers who wanted to help people install their favorite applications without having to do any work developed Ninite. They wanted to help people to go and do something else while Ninite was busy installing everything.
Since the release of Ninite, it has become the number one choice for people that want to install popular applications on Windows computers. You can choose which applications you want from a large list which includes:
Google Chrome and Firefox Web Browsers
Skype, Trillian and Discord messaging apps
VLC Media Player, Winamp, Spotify, Audacity and AIMP media apps
Paint.net, Inkscape, Blender and Gimp graphics apps
Open Office, CutePDF, Libre Office and Foxit Reader document apps
Avast, Avira, Malwarebytes and AVG security apps
OneDrive, Google Sync and Dropbox cloud apps
WinRAR, PeaZip and 7-Zip file compression apps
And a lot more such as Evernote, CDBurnerXP, Team Viewer and lots of development tools.
There is a free version of Ninite which will do what most users want. For an additional $10/year you can automatically check for updates to the applications supported by Ninite so that there’s no need for you to perform manual updates.
You can also get a pro version of Ninite that enables you to manage all of your computers using a live web interface. Having used Ninite myself I was wondering if there were similar programs available. So I went looking and testing and I now bring you the 7 Ninite alternatives you should take a look at.
Table of Contents
Best Ninite Alternatives
1. Chocolatey – Free version and Pro for $96/year
I have heard a lot about Chocolatey as a good Ninite alternative but I’d never used it before. When I went to the official website I saw that there was a huge amount of applications and utilities available for downloading on to Windows computers. I had to use a PowerShell to add the commands for the installations which was a bit tricky for me at first.
Things got a lot better when I downloaded the GUI from here. I needed to install .NET 4.5.2. and then I had a visible interface to keep track of what was installed and what wasn’t. You can install your favorite applications and leave it all unattended while you go and do something useful if you use Chocolatey.
I only used the open-source version of Chocolatey and I found that it did everything that I wanted. There is a Pro version but only businesses with lots of Windows computers will want to go for this. Some people have said that Chocolatey doesn’t install some applications well but I didn’t experience that.
2. Just Install – Free
Just Install is another good application for installing applications on Windows computers and is worthy of inclusion on my Ninite alternative list. It is quite similar to Chocolatey in the way that it works. You have to use a command-line process to install any of the popular applications.
Just Install will install all of the applications correctly and you will be able to see them using Control Panel. This means that you can uninstall them in the normal way. All Just Install applications download from their original sources and there’s no repackaging going on. It will just install the apps that you want and skip all dialogs and prompts.
I found that it was pretty easy to create a tailored .exe installer which will download and install all of the applications that I needed in one hit rather than using different command-line strings. I would say that it takes a bit of time to get the hang of using Just Install but I was able to learn pretty fast and it really helped with those tedious installs.
3. Silent Install Helper – Free
Yet another free Ninite alternative is Silent Install Helper. What impressed me about this great free app is that you are not limited to install specific applications as you are with other Ninite alternatives (and indeed Ninite itself). You can install all the applications of your choosing with Silent Install Helper.
There is no free lunch though. I had to first download all of the relevant program installers to the application before I was able to create my first batch of installations. Silent Install Helper will alert you if it thinks that a program installer is trying to install something unwanted such as adware.
It did take me a while to set up Silent Install Helper with the program installers that I wanted but after that everything was a breeze. It was great not to be restricted to choosing from a list of applications and being free to choose what I wanted to install.
4. Silent Install Builder – Free evaluation version and $299 for single-user license
Silent Install Builder is another good Ninite alternative. Although it has a hefty price tag you can use the free version which is fully functional to install your favorite applications on a Windows computer. You create install packages which contain the entire install files that you need to get all of the apps installed.
I found it pretty easy to create install packages with Silent Install Builder. The application was able to recognize the most commonly used installer setups such as Windows Installer, Install shield, Nullsoft Installer and Inno Setup. After I’d created my package I was able to install all of the programs on my computer completely unattended.
Similarly to Silent Install Helper, I had to download all of the install files for the apps that I wanted first and then add them to Silent Install Builder. Everything was very intuitive and the whole process went smoothly for me. There is a facility to use scripts to record the installation process if you need to install apps on many Windows-based computers.
0 notes
Last Seen Blogs

h2osommelier
old enough to live through the trend cycle of a website

quillofacorvid
Quill of a Corvid

ra-wonderland
Fogg


quetzalcactus
Locus is mothman (Commissions open!)