#XCode 11.2
Explore tagged Tumblr posts
Visit Tumblr Blog
Explore Tumblr blogs with no restrictions, modern design and the best experience.
Last Seen Tumblr Blogs


Fun Fact
There were a total of 171.5 billion posts on Tumblr in 2019.
Text
Customise ActivityIndicator | Swift 5.2 | Xcode 11
Customise ActivityIndicator | Swift 5.2 | Xcode 11
Hi Buddy,
In this swift tutorial I discuss the topic of Customise ActivityIndicator out of your UIViews. This will make your code much more readable, and keep those UIViewController small.
You can use this LoadingIndicator for any other Views. That makes sense to users what was going on right now in this UI Element.
Once you implemented it will help for your entire project. Because of…
View On WordPress
#Code with kathiresan#Code with ktrkathir#Indicator#Ios#iOS 12#iOS 13#kathiresan#KathiresanMurugan#ktr#ktrkathir#loader#NVActivityIndicator#spinner#swift#UIActivityIndicatorView#Xcode#Xcode 11#XCode 11.2
0 notes
Text
Stencyl ios

Stencyl ios install#
Stencyl ios update#
Stencyl ios Patch#
Stencyl ios password#
Do I need to be enrolled in Apple's iOS Developer Program to publish to the App Store? No, we don't collect any royalties on games, nor do we claim any ownership over them. If you use separate accounts, you must buy licenses for each developer. You may share a license with one other person, as long as you *both* publishįrom the same Apple Store/Google Play account.
Stencyl ios install#
You may install and use Stencyl on any computers you own. May I use Stencyl on multiple computers? Can multiple individuals share a license? If you intend to use teach Stencyl in a classroom setting, view our School Pricing page for details. We offer discounts for individual students and teachers who wish to purchase a Studio license. Are there any discounts for students and teachers? What types of payment do you accept?Ĭredit Cards, Debit Cards and Paypal. You also gain access to our customer-only forums. Subscribing today gives you access to our latest, customer-only releases, granting you the latest fixes and functionality for your games. Why should I subscribe today rather than waiting until I publish my game? So you can evaluate this functionality before buying. The starter edition lets you test your game on all of our paid target platforms (iOS, Android, Mac, Windows, Linux), While it lets you test on our paid target platforms (desktop, iOS, Android), it does not let you publish to them. Our starter edition lets you publish Web/HTML5 games for free, with Stencyl branding displayed pre-game as a splash screen. How does the free plan differ from the paid plans? on an individual basis) may only use the free plan to evaluate the software. Schools, education businesses and teachers who intend to use Stencyl You need to unlock your device to get the app to run.The starter edition is licensed for individual, personal use.
Stencyl ios password#
The signing setting should now be completed for your deviceĬhoose always allow after entering password for your Mac system Next set the target to your device rather than the simulator If you have set the account in the Preferences of XCode you should see the Personal Team Then Click on the 'TheGame' (your game) target * There should be a file with xcodeprof that is the project fileĬontrol Click on the Build Haxe Target and select Delete * Open Project and navigate to folder : $HOME/stencylwokrs/games-generated/ YOUR_GAME_NAME/Export/ios * Go to settings to set the ios version & display * Create a sample game like the steps for Simulator * When you see the Welcome Page you are done Running to iOS device attached to the Mac. Running to the simulator takes a build time of over an hour on the Mac Mini * Versions : iOS minimum 9.3 : Target is 11.2 * Settings : Mobile : Set orientation to Landscape * New Game : Default dimensions : New Scene : New Actor : Give it an image: Add Behavior Follow Mouse + Behavior No Exit Scene : Add To Scene * No Sign In to Stencyl : no stencyl account needed !
Stencyl ios update#
* Asked to download java : JRE 8 update 161 : installed through Oracle website * cd Downloads/Stencyl-full-b9707/Stencyl.app/Contents/MacOS * Stencyl on High Sierra don't create a launch icon. * Start XCode (9.2) and tell it not to produce the default startup window (I'm not sure but in the past this needed to be done because otherwise the commandline tools wouldn't work) * From the App Store download XCode (you need an Store Apple ID but that is not necessarily an Developer ID) Running to iOS Simulator without an Apple Developer Account and without a Stencyl publication account
Stencyl ios Patch#
Since the Mac is old I needed to use a patch install to get High Sierra on it. You need an Apple OSX Computer or you can use (I've never used it myself)
0 notes
Text
Download navicat for mysql 11.2

#Download navicat for mysql 11.2 how to
#Download navicat for mysql 11.2 for mac os x
#Download navicat for mysql 11.2 for mac
#Download navicat for mysql 11.2 cracked
Adobe Photoshop CC 2019 Chinese crack version (Adobe CC2019 full range crack. Oracle and PostgreSQL The Navicat data model tool graphically creates a relatio. Adobe Photoshop 2021 v22.4.2 + Neural Filters posted on June 17, 2021 . Crashed when adding a trigger to PostgreSQL model. Turn your database data into visuals to have clear insights through charts and graphs. Navicat Premium is a database development tool that allows you to simultaneously. Navicat Data Modeler Program Keygen freeload Navicat Data Modeler Program Soft. Download Software Serial Activation Keys, IDM crack, IDM serial key, Adobe Photoshop Crack . The Flash Fill tool is sure to save time by learning data entry patterns and then. 1000+ sites on Windows/Mac without any key, crack, license code needed. 10 Crack + Serial Key Latest Version Navicat Premium 12. PremiumSoft Navicat Premium v15.0.6 for Win & Linux & MacOS + Keygen. PremiumSoft Navicat Data Modeler v3.0.3 x86 & 圆4 + Patcher.
#Download navicat for mysql 11.2 how to
Learn how to import and export models in Toad Data Modeler from Quest, the easy-to-use, cross-platform.
#Download navicat for mysql 11.2 cracked
vextractor 5 50# cracked corn parche 2014 actualizado para pes 6 keygen download game vampire vs zombie full crack navicat data modeler crack mac keeper.
Navicat Data Modeler V 1.0.8 Mac OS 10.11 El Capitan keygen.
Photoshop-recovery-toolbox 1.0.1 Mac OS 10.10 Yosemite crack Stellar Phoenix Mac OS X Data Recovery 4.1.0.1 Mac OS 10.11 keygen 이전글 Adobe Photoshop Cs5 Crack Mac Ita Brush 2020. Navicat Premium 12 Split + Permit Essential FullIn Inclusion, have got a. It sports a extensive data publisher, SQL handling abilities and data modeling and.
#Download navicat for mysql 11.2 for mac
Spotlight On Mysql Keygen For Mac Pro Download Break + Setupaims to offer you with. The access to our data base is fast and free, enjoy. 100 records - Train Sim Modeler serial numbers are presented here. navicat free, navicat data modeler, navicat crack, navicat for postgresql, navicat premium. 6-DFoX PremiumSoft Navicat All Products Multi Keygen+Patch v5 5-DFoX Navicat Premium 12. can be used for editing and drawing on Photoshop and other editing software. 7/13: Patch Set 11.2.0.4 for Linux and Solaris is now available on. Download Navicat Data Modeler Essentials 2.1.21 for Mac from our website. how to take screenshot windows 8 on mac.
#Download navicat for mysql 11.2 for mac os x
Navicat Premium 12.0.6 Cracked Serial For Mac OS X freeload.
Torrent + Direct Macos High Sierra V10.13.6 (17g2208). Torrent Windows 7 SP1 x86/圆4 52in1 incl Office 2019 Preactivated May 2021. Navicat for MySQL Crack 64-bit is the ideal solution for MySQL/MariaDB administration and development. Toad Data Modeler has been created as an. Navicat Premium Crack Mac visualizes your data in a way that makes it. Compile for macOS (I'm using Xcode 12.4 macOS 11.2.3) import SwiftUI struct. Get PC Softwares download links in full version for free, download cracks, serial key, activation code, keygen, patch, activator etc. Data has shown that Africans are underrepresented among Wikipedia editors. Wikipedia is a free, multilingual online encyclopedia written and maintained by a community of volunteer contributors through a model of open collaboration. Mac OS X Debian 9 or later, Ubuntu Especially the query builder helps me to save time. Navicat Data Modeler is a powerful and cost-effective database. Zoner Photo Studio X Adobe Photoshop v Internet Download Manager 6. PremiumSoft Navicat Essentials Premium v15.0.8 x86 & 圆4 + Patch. Dev | Navicat Premium is a database development tool that allows you to . Disk Drill: The best data recovery software for Mac OS X. Apple Final Cut Pro & Logic Pro X, Adobe Photoshop, Microsoft Office, Pixel Film Studios, Torrent. 0 Mac Crack Serial VirtualDJ Pro 8 Cracked The powerful.
0 notes
Text
Download opencv python for mac

DOWNLOAD OPENCV PYTHON FOR MAC HOW TO
DOWNLOAD OPENCV PYTHON FOR MAC INSTALL
DOWNLOAD OPENCV PYTHON FOR MAC CODE
DOWNLOAD OPENCV PYTHON FOR MAC INSTALL
Installing OpenCV on M1 MacBook Open Terminal on mac and run the following commands: Apple command line tools conda install -y python3.8.6.
DOWNLOAD OPENCV PYTHON FOR MAC CODE
OpenCV 3.2 + Python 3.6.1: imshow() not worked even with waitKey(0) #8885 I can confirm all my previously working C++ code now only shows macOS cocoa window autosize could not access image dimensions #8916. How can I solve this problem? OpenCV Version: 3.0.0 Pycharm Version: Conmunity Edition 2016.2.3 OS Problems installing opencv on mac with python. python3 virtualenv opencv dlib tensorflow keras.Īnd can use opencv normally. Setting up deep learning environment the easy way on macOS High Sierra I had to look around and experiment to install all the packages I was enjoying on Ubuntu. Learn about macOS Big Sur and any updates that are available for Login window may not display properly after restarting Mac mini (M1, macOS Big Sur 11.2 improves Bluetooth reliability and fixes the following issues.Īre you running into problems install OpenCV via Homebrew? To help you and other PyImageSearch readers get OpenCV installed faster (and with Figure 4: Importing the cv2 library into a Python 2.7 and Python 3 shell.
DOWNLOAD OPENCV PYTHON FOR MAC HOW TO
Vivek-ram changed the title how to install Pandas, opencv2 in M1 how to When I install open-cv with pip3 install opencv-python I run into following Python 3.9.5 is the newest major release of the Python programming Some of the new major new features and changes in Python 3.9 are: You can find a more comprehensive list in this release's "What's New" document. How to use OpenCV imshow() in a Jupyter Notebook - Quick Tip The problem is that the image box is using the same Python process as the Therefore it is not happy to wait for the window, and you lose control of the Python process. Why am I having issues running a file in P圜harm? Why are IDE's important when you can just use text editors and the built in terminal on a Mac? Homebrew prints out this export command for you after installing opencv, so you can just. For P圜harm pip install -no-binary opencv-python opencv-python. Mac OS Big I got cv2.imshow to show the image in a window when running Python in the terminal. markwimpory opened def show_image(image): destroyAllWindows(). IMShow No Window - 4.4.0.46 MacOS Big Sur #423. You will learn how to install OpenCV 4 on Raspbian Buster via both: To learn more about installing OpenCV 4 on the Raspberry Pi 4 and Raspbian for some projects (including many educational projects on and in macOS, and Linux (no dev environment configuration required!) The window should show a 512*512 black image, but it does show a In a different environment I think opencv-python is doing something wrong macOS Catalina 10.5.6 Anaconda July 2020 edition notebook 6.2.3. If you don't have homebrew on your system you can download and install it After installing Homebrew check if you have XCode Command Line Java Application project or open your existing application in IntelliJ Idea.Īfter executing imshow() and the opened window is displayed, loading does not stop. The quickest and easiest way to install OpenCV on your mac is to use Homebrew.
1 note
·
View note
Text
Download Vietkey For Mac

Download VietKey for Win 7, 10. Download VietKey and installation instructions for Windows 7 and 10. Download Vietnamese typing software for Windows operating system. Instructions on how to install Vietnamese typing software VietKey for Windows. VietKey is one of the most popular Vietnamese typing software available today with Unikey.
Additional Downloads
Get the latest beta and older versions of Xcode. To view downloads, simply sign in with your Apple ID.Apple Developer Program membership is not required.
Beta Versions of Xcode Command Line Tools & Older Versions of Xcode
Videos
Download textexpander for mac windows 10. See the latest advances in Xcode presented at WWDC and other events.
Help and Support
Get organized and productive with the leading note-taking app. Download Evernote for Windows, Mac, iOS, or Android and create your free account.
Visual Studio Code is free and available on your favorite platform - Linux, macOS, and Windows. Download Visual Studio Code to experience a redefined code editor, optimized for building and debugging modern web and cloud applications.
Get step-by-step guidance on how to use Xcode to build, test, and submit apps to the App Store.
Xcode Help Guide Xcode Support Page
API Reference and Sample Code
Browse the latest documentation including API reference, articles, and sample code.
Discussion Forums
Ask questions and discuss development topics with Apple engineers and other developers.
BitCtrl Systems GmbH – Shareware – AndroidWindowsMac
Vietkey is a small size software for typing Vietnamese and sending email in Vietnamese.
Overview

VietKey is a Shareware software in the category Audio & Multimedia developed by BitCtrl Systems GmbH.
It was checked for updates 157 times by the users of our client application UpdateStar during the last month.
The latest version of VietKey is 4.9, released on 02/18/2008. It was initially added to our database on 10/30/2007. The most prevalent version is 4.9, which is used by 60 % of all installations.
VietKey runs on the following operating systems: Android/Windows/Mac.
Users of VietKey gave it a rating of 4 out of 5 stars. Free mac software downloads.
Write a review for VietKey!
Download Vietkey For Mac Pro
157 users of UpdateStar had VietKey installed last month.
10/02/2021 AltServer 1.4.6 10/02/2021 Application de bureau Autodesk 8.2.0.34 08/01/2007 Middle-earth™: Shadow of War™ 10/02/2021 Kate's Video Joiner (free) 5.548 10/02/2021 Kate's Video Toolkit 8.548
09/24/2021 novaPDF 11.2 released 09/22/2021 Chrome 94 available 09/16/2021 New O&O Defrag 25 Pro available 09/15/2021 Patch Day: Microsoft September 2021 Patch available 09/07/2021 Firefox 92 available for download
Vietkey Download Windows 10
» doawnload vietkey
» vietkey 4.8 pouces
» download phan mem vietky
» vietkey 日本語
» vietkey 4.9 free download
» viet key ダウンロード
» vietkey 2014
» vietkey software
» full download vietkey
» vietkey driver download free
0 notes
Text
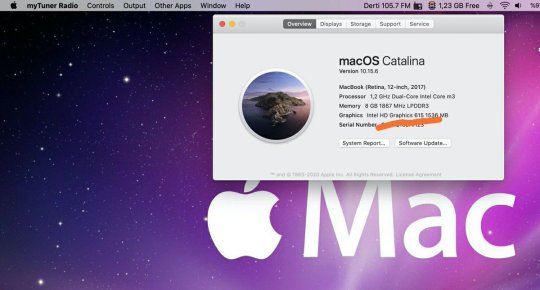
Xcode Version For Catalina
Xcode Version For Catalina Download
Xcode Version For Catalina 2020
Xcode Version For Catalina 2019
Type in the version that you'd like, and download the Xcodexxx.xip file. Keep in mind that Xcode 11.4.1 is 8 gigabytes, so this will take awhile depending on your internet connection. Keep in mind that Xcode 11.4.1 is 8 gigabytes, so this will take awhile depending on your internet connection. Hi, I am running Xcode 12.4 on Catalina 10.15.7. The app seems to be working well, quite smooth i must say. The problem i'm facing is that when i downloaded and installed additional simulators for iOS versions below 14 (which is the officially supported version in Xcode 12.4) e.g. Update your Mac. Install Xcode on MacOS Mojave and test with Virtualbox on Windows 10 2020Can we install MacOS with Virtualbox on Windows 10 to develop iOS apps?- Yessssss!!y.
Xcode Version For Catalina Download
We have released Xcode 11.2, which will replace the beta release.
The new image contains Xcode 11.2, running on Catalina.

You can select this image by selecting 11.2.0 as follows:
This is the first image that we’ve built with Catalina, so there might be some bugs – please let us know if you find anything out of the ordinary.
Highlights
The OS has been upgraded to macOS 10.15 (19A602) Catalina.
The timezone is changed to GMT. We used to set the timezone to PDT/PST, which caused some problems each time there was a daylight saving change.
Ruby is 2.6.3
The default shell is bash --login.
Xcode 11.2 Build 11B52
The runtimes installed are:
iOS 12.2
iOS 12.4
iOS 13.2
tvOS 12.4
tvOS 13.2
watchOS 5.3
watchOS 6.1
The manifest of installed software is here.
Ruby
The last few releases of Xcode on CircleCI were problematic for Ruby users, due to issues with how Xcode 11 shipped the macOS SDK. This forced us to make some breaking changes with Ruby. My hope is that upgrading to Catalina will resolve these issues, and using Ruby will be more straight forward.
The system Ruby that comes bundled with 10.15 is 2.6.3. This is the ruby on the path by default.
chruby is installed, and is on the path, and there are two additional versions of Ruby installed, 2.5.7 and 2.6.5.
chruby auto-switching is not enabled by default. You can switch it on yourself should you wish.
Shells
Xcode Version For Catalina 2020
Catalina ships with zsh as the default shells, but with CircleCI, the default shell is still bash. By default, commands on macOS run with /bin/bash --login -eo pipefail -c $COMMAND.
Xcode Version For Catalina 2019
You can customize the shell for an executor, job or run command, which will allow you too run a command with zsh, should you wish:
1 note
·
View note
Link
Apple has banned its own Xcode 11.2 days after releasing following the discovery that it was faulty. Xcode 11.2 has two issues, SwiftUI support problem, and bugs that make apps using UITextView to Crash
0 notes
Text
Week 307
Happy Thursday! Since the last iOS Goodies edition we got Xcode 11.2 GM and Xcode 11.2.1 GM Seed 1 this week, and also the first beta of iOS 13.3 is out. Previously, the .3 version of iOS usually came out in spring. Looks like we’re a bit ahead of schedule this year 😅. But don’t get me wrong, I think more frequent and smaller releases of iOS updates make sense. Same for Xcode. Now, if only Xcode supported delta updates, so we wouldn’t have to download and extract 7-8 GB every other week 😁
Marius Constantinescu
Articles
CAEmitterBehavior, by @brycepauken
The power of Closures in SwiftUI, by @mecid
Swift Compiler: What we can learn, by Ali Pourhadi
Show a banner from anywhere in SwiftUI using ViewModifier, by @thomassivilay
Navigation Bar Customisation: UINavigationBarAppearance and proper view/model separation, by @dmtopolog
How To Use Type Erasure For Better Model Abstractions, by Ariel Steinlauf
Deciding whether to adopt new Swift technologies, by @johnsundell
Interface Builder is declarative too. Where’s the love?, by @radiantav
Business/Career
Rate This App, by @apike
UI/UX
Designing for Dark Mode: More Than Flipping a Switch, by @MicrosoftDesign
iOS vs. Android App UI Design: The Complete Guide, by @erikdkennedy
Credits
thomas-sivilay, brycepauken, mecid, LisaDziuba, DmIvanov
0 notes
Text
Il nuovo iPhone SE potrebbe essere molto diverso dal precedente
L'iPhone SE dovrebbe ritornare nel primo trimestre del 2020. A riportare alla luce l'indiscrezione ormai ricorrente è il solito Ming-Chi Kuo (via 9to5mac), il quale aggiunge alcuni dettagli interessanti. Lo scopo di questa "Special Edition" è sempre stato quello di offrire un dispositivo tecnicamente aggiornamento ma più economico rispetto alla linea principale presentata dopo l'estate, andando anche a ravvivare le vendite in un periodo che altrimenti sarebbe piuttosto fiacco.
Ma per molti utenti SE non significa solo risparmio quanto piuttosto la soddisfazione di un'esigenza sempre più ignorata dai produttori: smartphone piccoli e moderni . La tendenza ad andare verso schermi sempre più grandi è ormai fin troppo consolidata e diffusa sul mercato, però c'è ancora chi apprezza i formati compatti. Ecco perché da qualche tempo giravano mockup di un ipotetico SE con il tradizionale design (ereditato dall'ìPhone 5s) ma con una linea rinnovata per andare a ricoprire l'intera superficie frontale con lo schermo ed il notch per introdurre Face ID: in pratica un SE con specifiche del X. Il problema di questa soluzione, che effettivamente potrebbe portare ad un dispositivo anche molto interessante, è che non collimerebbe affatto con l'obiettivo di contenere il prezzo di vendita. Questo non è infatti correlato più di tanto alla dimensione in sé quanto alle specifiche tecniche e soprattutto allo sforzo da profondere nelle fasi di progettazione e realizzazione. Ecco perché l'analista Kuo prevede che la direzione che seguirà Apple non sarà affatto quella che molti utenti desidererebbero.
Il riciclo di componenti costruttivi e delle linee di produzione è il metodo più concreto che le aziende possiedono per portare sul mercato dispositivi economici. Ecco perché non si deve pensare al prossimo SE come ad un'ulteriore evoluzione del precedente ma piuttosto come un nuovo derivato a basso budget di un vecchio modello. E dato che non ha più senso appoggiarsi all'anacronistico 5s, il futuro stampo dell'iPhone SE 2020 potrebbe essere quello dell'iPhone 8. Tale scelta sarebbe decisamente più in linea con la logica su cui si è basata originariamente la nascita del dispositivo e potrebbe effettivamente portare ad un prezzo di vendita ben più contenuto, che l'analista Kuo ipotizza possa essere di $399. Il tutto appare senz'altro più logico e plausibile, anche se bisognerà in qualche modo differenziarlo dell'iPhone 8 che attualmente è venduto a soli $50 in più (mantengo le cifre in dollari per un rapporto più coerente visto che sui modelli ipotetici non possiamo conoscere la conversione che applicherà Apple).
L'articolo Il nuovo iPhone SE potrebbe essere molto diverso dal precedente proviene da SaggiaMente.
Articoli correlati:
L'iPhone X è il nuovo piccolo di casa: 8 Plus ha uno schermo più grande Non so perché, ma alcune volte faccio una fatica immane...
Fast Wireless Charging da 7,5W in arrivo su iPhone 8 e X con iOS 11.2 La ricarica Qi può piacere o meno ma se si...
Un misterioso iPhone "xx" compare in Xcode 10: la pista SE 2 potrebbe essere ancora viva, ma non come la intendevamo Arriva. Non arriva. Ci sarà. Non ci sarà. Sull'eventuale successore...
from Il nuovo iPhone SE potrebbe essere molto diverso dal precedente
0 notes
Text
3 Impressive Apple Iphone Apps To Try
At the point when, as an engineer, you stem from one more language to Objective-C, you essentially need to define basic suggestions concerning programming you definitely recognize to this new dialect that initially could appears to be dark. IOS 11 makes Apple Pencil for iPad Pro extra functional, effective, as well as all-natural than ever. This battery life issue can be connected to the way Spotlight reindexed iphone 11 once mounted, as well as it could be as a result of customers trying brand-new functions and consequently using their tool in an uncommon means. IOS 11.2 was rushed out by Apple after a pest in iOS 11 began to cause iPhones to collapse at twelve o'clock at night on 2 December. Google and also Apple have actually kept their interface style incredibly similar to their previous variation Android Marshmallow as well as iphone 9 specifically. Notices are typically component of UI. For Android and also iOS app development, alerts are taken into consideration as a major part. TechRadar's take: This is just one of the smallest iOS 11 changes, yet likewise one of the most important. The upgraded Control Centre makes it much easier for individuals to customize the settings of devices powered by iOS 10. However the customers still have to put extra time and effort to individualize the settings of their gadget entirely. On the surface, makes it simple to arrange and also discover all the files on your iPhone as well as iPad. After introducing apple iphone 4, iPhone 3GS, apple iphone 3G, Apple iPad currently it is the turn of Apple iPad 2 to earn individuals insane. So we advise them to keep calm as well as relax till the launch of iphone 11 public beta, which debuts in the end of this June. Don't stress, every app will still have an item web page, but iphone 11 is putting a lot of focus on the brand-new 'Gamings' and 'Apps' tabs to highlight the very best in those locations. The tool needs to contend least iphone 8 mounted, the minimum iOS variation sustained as of Cordova 4.0.0. Sustained gadgets consist of apple iphone FOUR, apple iphone 5, apple iphone 5C, apple iphone FIVE, apple iphone 6, apple iphone 6 Plus, apple iphone 6S, iPhone 6S And also, apple iphone SE, iPad 2, iPad 3, iPad 4, iPad Air, iPad Air 2, iPad Pro, iPad Mini, iPad Mini 2, iPad Mini 3, iPod Touch Fifth gen and also iPod Touch Sixth gen or later on. Regardless, apart from from that it is anything however challenging to get your current iOS applications to the Apple TELEVISION. Online Gamings Meant Particularly For Women Additionally the production of new applications will be exceptionally clear. The programmers can download and install the beta update simply by opening the beta profile of the iOS gadget. Google, please neglect iphone for as soon as and simply make an informing application that functions extraordinary on Android as well as Chrome OS. Hurl in an incredible Chrome development for desktop customers on the off possibility that you could and also call it gold. IPhones began collapsing at midnight on 2 December due to a mistake in iphone 11.1.2. Apple fasted to release iphone 11.2 which fixes that trouble, in addition to including some new functions to the iPhone as well as iPad operating system. Apple stated 4.2 IPHONE iPad iPad Touch apple iphone and supplies over 100 new attributes of the gadgets preferred in Cupertino, California-based company. IOS 11 is probably seeing a somewhat slower uptake compared to for previous versions of iphone, yet since Apple controls both the equipment and the software application it has managed to maintain users updated at a decent price. I miss the lithe, sophisticated appearance of previous iOSs, and don't like the fat appearance of the numerous headers in 11. In iOS 5, Apple presented Notice Facility, which allows users to check out a history of notifications. The iphone 11 electronic camera application debuts new modes that additionally try the need to always bring a high-end DSLR with you. However, it's a welcome change with iOS 11. You might not make use of files as soon as possible, but as you rely on the new remote file and picture database a growing number of, it'll become essential to your device. Instruments with A10 Combination (apple iphone 7 and iPad Pro 2 or later on) can inscribe and also decode 10-bit HEVC, which translates into HDR (high vibrant variety) video. As a participant of Slack's beta community, you will instantly obtain brand-new builds of the Slack app prior to they become available to the public. As a result, below's a layout of what we wish to be available in iphone 11, so you could start preparing now. Develop a Provisioning Profile within the iOS Provisioning Website You could utilize its Advancement Provisioning Aide to create and install the profile as well as certificate Xcode needs. This variation iOS has two basic but helpful functions that will certainly meet all the individuals need.
0 notes
Text
Google Maps iOS SDK Tutorial: Getting Started
Update note: This tutorial has been updated to Xcode 9.2, iOS 11.2, Swift 4 and Google Maps SDK 2.5.0 by Ron Kliffer. The original tutorial was written by Ron Kliffer.
Up to iOS 5, Google Maps was an integral part of iOS and was the mapping engine used by all iOS devices. With the release of iOS 6 in 2012, Apple made a dramatic change and replaced Google Maps with an in-house mapping engine: MapKit.
Just a few months later, Google released its own standalone Google Maps app for iOS, along with the Google Maps iOS SDK for developers.
There are benefits and drawbacks to both MapKit and the Google Maps iOS SDK, but this tutorial will walk you through implementing Google Maps into your apps to see for yourself how well it can work in your geolocating apps.
In this tutorial, you’ll build an app called Feed Me, which gets the user’s current location and searches for nearby places to eat, drink, or even go grocery shopping. The results will be presented in-app using the Google Maps iOS SDK.
This tutorial assumes some familiarity with Swift and iOS programming. If you’re new to Swift, or to iOS programming altogether, you might want to check out some of our other tutorials before continuing.
This tutorial also requires familiarity with CocoaPods. You must have CocoaPods installed in order to follow this tutorial. To learn more about CocoaPods, check out this tutorial by Joshua Greene, published right here on the site.
This tutorial uses Xcode 9.2 and iOS 11.2, and requires knowledge of Auto Layout and Swift of course.
Getting Started
Download the Feed Me Starter Project This project already uses CocoaPods, so open it using the Feed Me.xcworkspace file.
Take a look around to get familiar with the project. The important elements to notice are:
MapViewController.swift: This is the main view controller of this project, and you’ll only be working with this controller in this tutorial.
GoogleDataProvider.swift: This is a wrapper class for making Google API calls. You’ll review the methods it contains later in the tutorial.
GooglePlace.swift: This is a model for place results returned from Google.
MarkerInfoView.swift: This is a subclass of UIView that displays details of places. It comes with a matching xib file.
Before you start coding it’s a good idea to see how the app works. Build and run your app; you’ll see the following screen appear:
Right now all you’ll see is a blank screen with a pin in the middle. Press the action button on the right side of the navigation bar to see the TypesTableViewController screen like so:
That’s all there is to see in the app at the moment — it’s up to you to add some magic!
Creating API Keys
The first thing you’ll need are some API keys for the Google Maps SDK and the Google APIs you’ll be using. If you don’t already have a Google account, create one (they’re free!) and log in to the Google Developers Console.
Click on Create Project, name your project Feed Me, and click Create:
If your project doesn’t appear straight away, refresh the page until it does. Select the newly created project to access its settings. Select APIs & SERVICES and then Library from the left pane menu:
Search and enable these APIs:
Google Maps SDK for iOS
Google Places API Web Service
Select Credentials under APIs & services in the left pane menu. Click Create credentials, and then click API key to create the key:
Copy the key and click Close:
You’ll use the key in a moment, but first you’ll add the actual Google Maps iOS SDK.
Adding the SDK
Open Podfile (in the Pods project) and add the following, right above end:
pod 'GoogleMaps'
Next, Open Terminal and navigate to the directory that contains your Feed Me project by using the cd command:
cd ~/Path/To/Folder/Containing/Feed Me
Enter the following command to install the Google Maps iOS SDK:
pod install
You should see output similar to the following:
Downloading dependencies Installing GoogleMaps (2.5.0) Using SwiftyJSON (4.0.0) Generating Pods project Integrating client project
You now have GoogleMaps in your project. Doesn’t CocoaPods make life a whole lot easier? :]
Open AppDelegate.swift and replace it’s contents with the following:
import UIKit import GoogleMaps // 1 let googleApiKey = "ENTER_KEY_HERE" @UIApplicationMain class AppDelegate: UIResponder, UIApplicationDelegate { var window: UIWindow? func application(_ application: UIApplication, didFinishLaunchingWithOptions launchOptions: [UIApplicationLaunchOptionsKey: Any]?) -> Bool { //2 GMSServices.provideAPIKey(googleApiKey) return true } }
There are two new elements here:
A constant to hold your Google API key. Replace ENTER_KEY_HERE with the Google API key you created earlier.
Your app will instantiate Google Maps services with the API Key using the GMSServices class method provideAPIKey().
Next, open Main.storyboard to bring up Interface Builder. Bring up the Object Library by selecting the third tab in the view toolbar — Utilities — and then select the third tab in the library toolbar — Object Library — as shown in the screenshot below:
Locate the MapViewController scene and drag a simple UIView from the Object Library to the approximate center of the MapViewController’s view. Change the view’s background color to light gray. Next, open the Document Outline using Editor\Show Document Outline and re-order the view hierarchy so that the object tree looks like this:
To turn this simple UIView into a GMSMapView, select the view you just added and open the Identity inspector by selecting the third tab from the left in the Utilities toolbar. Change the view’s Class to GMSMapView, as shown in the screenshot below:
Your MapViewController scene should now look like this:
Next, you’ll need to add some constraints to make the map fill the entire screen. Select Map View in the Document Outline and then choose the second button from the right in the bottom right of the Interface Builder window — the Pin button. Ensure that Constrain to margins is unchecked — this ensures that the map will fill all the available space on the screen — and add 0 (zero) space constraints from the top, left, bottom and right of the superview.
Your Pin editor should look like this:
Click on Add 4 Constraints to add the constraints to the map view. Your MapViewController scene should look like the following, where the gray area represents the GMSMapView:
Before you build and run the project, add an IBOutlet for the map view. To do that, bring up the Assistant Editor by selecting the second tab in the Editor toolbar:
Select the map view in Interface Builder, hold down the Ctrl key and drag a line from the map view to MapViewController.swift. A popup will appear; set the connection type to Outlet and the name to mapView. Keep the Type as GMSMapView, and click Connect:
This will create a GMSMapView property in MapViewController.swift and automatically hook it up in Interface Builder. Before you build and run, add the following to the top of the file, after import UIKit:
import GoogleMaps
Build and run your project; you should now see a map, like so:
You’re now using the Google Maps iOS SDK in your app — but you can do more than show a basic map, right? :]
Getting the Location
Feed Me is all about finding places near the user, and you can’t do that without getting the user’s location.
First, open MapViewController.swift and add the following property:
private let locationManager = CLLocationManager()
This will add and instantiate a CLLocationManager property named locationManager.
Next, find viewDidLoad() and add these two lines to the bottom:
locationManager.delegate = self locationManager.requestWhenInUseAuthorization()
This will make MapViewController the delegate of locationManager and request access to the user’s location.
Next, open the Feed Me project at the top of the Project navigator, select the Feed Me target and go to the Info tab, select the first line in the Custom iOS Target Properties section and click the + icon to add a new row.
Choose Privacy – Location When In Use Usage Description as the key, choose String for the type, and enter the following text as the value:
By accessing your location, this app can find you a good place to eat.
When you’re finished, it should look something like this:
Before you can run the app, you need to make MapViewController conform to the CLLocationManagerDelegate protocol.
Add the following extension to the bottom of MapViewController.Swift:
// MARK: - CLLocationManagerDelegate //1 extension MapViewController: CLLocationManagerDelegate { // 2 func locationManager(_ manager: CLLocationManager, didChangeAuthorization status: CLAuthorizationStatus) { // 3 guard status == .authorizedWhenInUse else { return } // 4 locationManager.startUpdatingLocation() //5 mapView.isMyLocationEnabled = true mapView.settings.myLocationButton = true } // 6 func locationManager(_ manager: CLLocationManager, didUpdateLocations locations: [CLLocation]) { guard let location = locations.first else { return } // 7 mapView.camera = GMSCameraPosition(target: location.coordinate, zoom: 15, bearing: 0, viewingAngle: 0) // 8 locationManager.stopUpdatingLocation() } }
Taking each numbered comment in turn:
You create a MapViewController extension that conforms to CLLocationManagerDelegate.
locationManager(_:didChangeAuthorization:) is called when the user grants or revokes location permissions.
Here you verify the user has granted you permission while the app is in use.
Once permissions have been established, ask the location manager for updates on the user’s location.
GMSMapView has two features concerning the user’s location: myLocationEnabled draws a light blue dot where the user is located, while myLocationButton, when set to true, adds a button to the map that, when tapped, centers the map on the user’s location.
locationManager(_:didUpdateLocations:) executes when the location manager receives new location data.
This updates the map’s camera to center around the user’s current location. The GMSCameraPosition class aggregates all camera position parameters and passes them to the map for display.
Tell locationManager you’re no longer interested in updates; you don’t want to follow a user around as their initial location is enough for you to work with.
Build and run your app; once it loads you’ll be prompted with an alert, asking for location permissions. Tap on Allow:
You should now see a map centering around your location. Scroll the map and tap the Locate button and the map will center back to your location like so:
Implementing Geocoding
Now that you have the user’s location, it would be nice if you could show the street address of that location. Google Maps has an object that does exactly that: GMSGeocoder. This takes a simple coordinate and returns a readable street address.
First, you’ll need to add some UI to present the address to the user.
Open Main.storyboard and add a UILabel to the MapViewController scene. Make sure you add the label to the MapViewController view, and not the GMSMapView.
Next, open the Attributes inspector, and give the label the following attributes:
Set Alignment to center.
Set Lines to 0. Surprisingly, this lets the label take up as many lines as it needs to fit the text. Go figure! :]
Set Background to white with 85% opacity.
The label’s Attributes inspector and the scene’s Object Tree should look like this when done:
Finally, add to the label left, bottom and right constraints of 0 as shown below:
This pins the label to the bottom of the screen and stretches it over the entire width of the screen.
Your storyboard scene should look like the following:
Next, create an outlet for the label. Select the Assistant Editor, and ctrl+drag from the label in the Document Outline to MapViewController.swift. Set the connection type to Outlet, the name to addressLabel and click Connect.
This adds a property to your MapViewController that you can use in your code:
@IBOutlet weak var addressLabel: UILabel!
Add the method below to MapViewController:
private func reverseGeocodeCoordinate(_ coordinate: CLLocationCoordinate2D) { // 1 let geocoder = GMSGeocoder() // 2 geocoder.reverseGeocodeCoordinate(coordinate) { response, error in guard let address = response?.firstResult(), let lines = address.lines else { return } // 3 self.addressLabel.text = lines.joined(separator: "\n") // 4 UIView.animate(withDuration: 0.25) { self.view.layoutIfNeeded() } } }
Once again, here’s what each commented section does:
Creates a GMSGeocoder object to turn a latitude and longitude coordinate into a street address.
Asks the geocoder to reverse geocode the coordinate passed to the method. It then verifies there is an address in the response of type GMSAddress. This is a model class for addresses returned by the GMSGeocoder.
Sets the text of the addressLabel to the address returned by the geocoder.
Once the address is set, animate the changes in the label’s intrinsic content size.
You’ll want to call this method every time the user changes their position on the map. To do so you’ll use GMSMapViewDelegate.
Add another extension to the bottom of MapViewController.swift as follows:
// MARK: - GMSMapViewDelegate extension MapViewController: GMSMapViewDelegate { }
This will declare that MapViewController conforms to the GMSMapViewDelegate protocol.
Next, add the following line of code to viewDidLoad():
mapView.delegate = self
This makes MapViewController the map view’s delegate.
Finally, add the following method to the newly added extension:
func mapView(_ mapView: GMSMapView, idleAt position: GMSCameraPosition) { reverseGeocodeCoordinate(position.target) }
This method is called each time the map stops moving and settles in a new position, where you then make a call to reverse geocode the new position and update the addressLabel‘s text.
Build and run your app; you’ll see the address of your current location — real or simulated — pop up at the bottom of the screen:
Notice anything wrong with this picture?
Solution Inside SelectShow>
The Google logo and Locate button are hiding behind the label!
Fortunately, GMSMapView provides a very simple solution for this: padding. When padding is applied to the map, all of the visual elements will be placed according to that padding.
Head back to reverseGeocodeCoordinate(_:), and add these lines just before the animation block:
// 1 let labelHeight = self.addressLabel.intrinsicContentSize.height self.mapView.padding = UIEdgeInsets(top: self.view.safeAreaInsets.top, left: 0, bottom: labelHeight, right: 0)
Now, replace the animation block with:
UIView.animate(withDuration: 0.25) { //2 self.pinImageVerticalConstraint.constant = ((labelHeight - self.view.safeAreaInsets.top) * 0.5) self.view.layoutIfNeeded() }
These do two things:
Prior to the animation block, this adds padding to the top and bottom of the map. The top padding equals the view’s top safe area inset, while the bottom padding equals the label’s height.
Updates the location pin’s position to match the map’s padding by adjusting its vertical layout constraint.
Build and run your app again; this time the Google logo and locate button will move to their new position once the label becomes visible:
Move the map around; you’ll notice that the address changes every time the map settles to a new position. Let’s add a visual effect to dampen the address changing.
Add the following method to the GMSMapViewDelegate extension:
func mapView(_ mapView: GMSMapView, willMove gesture: Bool) { addressLabel.lock() }
This method is called every time the map starts to move. It receives a Bool that tells you if the movement originated from a user gesture, such as scrolling the map, or if the movement originated from code. You call the lock() on the addressLabel to give it a loading animation.
When there’s a lock(), there must also be an unlock(). Add the following to the top of reverseGeocodeCoordinate(coordinate:)‘s closure:
self.addressLabel.unlock()
Note: For the full implementation of the lock() and unlock(), check out UIViewExtensions.swift.
Build and run your app; as you scroll the map you should see a loading animation on the address label like so:
Finding Something to Eat
Now that the map is set up and you have the user’s location in hand, it’s time to get this user fed!
You’ll use the Google Places API to search for places to eat and drink around the user’s location. Google Places API is a free web service API you can use to query to find establishment, geographic locations, or other points of interest near any given point.
Google Maps iOS SDK provides you with the GMSMarker class to mark locations on a map. Each marker object holds a coordinate and an icon image and renders on the map when added.
For this app you’ll need some more info on each marker, so you’ll need to create a subclass of GMSMarker.
Create a new Cocoa Touch Class, name it PlaceMarker and make it a subclass of GMSMarker. Ensure you choose Swift as the language for this file.
Replace the contents of PlaceMarker.swift with the following:
import UIKit import GoogleMaps class PlaceMarker: GMSMarker { // 1 let place: GooglePlace // 2 init(place: GooglePlace) { self.place = place super.init() position = place.coordinate icon = UIImage(named: place.placeType+"_pin") groundAnchor = CGPoint(x: 0.5, y: 1) appearAnimation = .pop } }
This is a relatively straightforward bit of code:
Add a property of type GooglePlace to the PlaceMarker.
Declare a new designated initializer that accepts a GooglePlace as its sole parameter and fully initializes a PlaceMarker with a position, icon image, anchor for the marker’s position and an appearance animation.
Next, add two more properties to MapViewController.swift as follows:
private let dataProvider = GoogleDataProvider() private let searchRadius: Double = 1000
You’ll use dataProvider (defined in GoogleDataProvider.swift) to make calls to the Google Places Web API, and searchRadius to determine how far from the user’s location (in meters) to search for places.
Add the following method to MapViewController:
private func fetchNearbyPlaces(coordinate: CLLocationCoordinate2D) { // 1 mapView.clear() // 2 dataProvider.fetchPlacesNearCoordinate(coordinate, radius:searchRadius, types: searchedTypes) { places in places.forEach { // 3 let marker = PlaceMarker(place: $0) // 4 marker.map = self.mapView } } }
Let’s go over what you just added:
Clear the map of all markers.
Use dataProvider to query Google for nearby places within the searchRadius, filtered to the user’s selected types.
Iterate through the results returned in the completion closure and create a PlaceMarker for each result.
Set the marker’s map. This line of code is what tells the map to render the marker.
Here’s the $64,000 question: when do you want to call this method?
First, the user can reasonably expect to see places nearby when the app launches.
Locate locationManager(_:didUpdateLocations:) and add the following line of code at the end:
fetchNearbyPlaces(coordinate: location.coordinate)
Second, the user has the ability to change the types of places to display on the map, so you’ll need to update the search results if the selected types change.
Locate typesController(_:didSelectTypes:) and add the following line of code to the end:
fetchNearbyPlaces(coordinate: mapView.camera.target)
Finally, you’ll need to give the user the option to fetch new places when their location changes.
Open Main.storyboard and drag a UIBarButtonItem from the Object Library to the left side of the MapViewController’s navigation bar. Change the button’s Identifier to Refresh, as shown below:
Select the Assistant Editor and ctrl+drag from the Refresh button to MapViewController.swift. Choose Action and name the method refreshPlaces. Insert the following code into the newly added method:
fetchNearbyPlaces(coordinate: mapView.camera.target)
Build and run your project; you’ll see location pins popping up around the map. Change the search types in the TypesTableViewController and see how the results change:
All these markers sure add some color to the map, but they’re not much use without additional info to give the user some details on the pinned location.
Add the following method to the GMSMapViewDelegate extension in MapViewController.swift:
func mapView(_ mapView: GMSMapView, markerInfoContents marker: GMSMarker) -> UIView? { // 1 guard let placeMarker = marker as? PlaceMarker else { return nil } // 2 guard let infoView = UIView.viewFromNibName("MarkerInfoView") as? MarkerInfoView else { return nil } // 3 infoView.nameLabel.text = placeMarker.place.name // 4 if let photo = placeMarker.place.photo { infoView.placePhoto.image = photo } else { infoView.placePhoto.image = UIImage(named: "generic") } return infoView }
This method is called each time the user taps a marker on the map. If you return a view, then it pops up above the marker. If nil is returned, nothing happens. How does that happen?
You first cast the tapped marker to a PlaceMarker.
Next you create a MarkerInfoView from its nib. The MarkerInfoView class is a UIView subclass that comes with the starter project for this tutorial.
Then you apply the place name to the nameLabel.
Check if there’s a photo for the place. If so, add that photo to the info view. If not, add a generic photo instead.
Before you run the app, you want to make sure the location pin doesn’t cover the info window. Add the following method to the GMSMapViewDelegate extension:
func mapView(_ mapView: GMSMapView, didTap marker: GMSMarker) -> Bool { mapCenterPinImage.fadeOut(0.25) return false }
This method simply hides the location pin when a marker is tapped. The method returns false to indicate that you don’t want to override the default behavior — to center the map around the marker — when tapping a marker.
Obviously, the pin needs to re-appear at some point. Add the following to the end of mapView(_:willMove:):
if (gesture) { mapCenterPinImage.fadeIn(0.25) mapView.selectedMarker = nil }
This checks if the movement originated from a user gesture; if so, it un-hides the location pin using the fadeIn(_:) method. Setting the map’s selectedMarker to nil will remove the currently presented infoView.
Finally, add the following method to the GMSMapViewDelegate extension:
func didTapMyLocationButton(for mapView: GMSMapView) -> Bool { mapCenterPinImage.fadeIn(0.25) mapView.selectedMarker = nil return false }
This method runs when the user taps the Locate button; the map will then center on the user’s location. Returning false again indicates that it does not override the default behavior when tapping the button.
Build and run your app; select a marker and you’ll see the location pin fade out. Scrolling the map closes the infoView and brings the pin back:
That’s it, you’ve done it! You now have a fully functioning Google Maps app. :]
Where To Go From Here?
Here’s a link to the complete project from this tutorial. Since the Google Maps SDK is very large in size, we excluded it from the project, so make sure to run pod install before building.
Keep in mind that before you’re able to run this finished project, you will need to insert your API keys as you did at the beginning of this tutorial.
My purpose here is not to convince you that Google Maps iOS SDK is better than Apple’s own MapKit; however, here’s a few pros and cons of Google Maps:
Pros
Frequent Updates to the SDK by Google.
Uniform experience for cross platform (iOS and Android) apps.
Google Maps are often more detailed, especially outside the United States. For example:
Cons
Unlike Google Maps, MapKit is native to iOS, which means it’s always synced with iOS and works with Swift out of the box.
Lack of stability in comparison to MapKit.
MapKit has a much better integration with CoreLocation and CoreAnimation.
This tutorial only showed you the basics of what the Google Maps SDK can do. There’s much more to learn; you should definitely check out the full documentation for more cool features the SDK has to offer.
Among the other things you can do with Google Maps iOS SDK are showing directions, indoor maps, overlays, tile layers, Street View, and advanced integration with the Google Maps app. For brownie points, try to use some of these features to enhance the Feed Me app.
Thanks again to Google Developer Advocates Brett Morgan and Todd Kerpelman, both of whom worked with me to find the best way to integrate the Google Places API into this tutorial.
If you have any questions, tips, or just wanna show off your cool mapping app, feel free to post about it in the discussion below!
The post Google Maps iOS SDK Tutorial: Getting Started appeared first on Ray Wenderlich.
Google Maps iOS SDK Tutorial: Getting Started published first on https://medium.com/@koresol
0 notes
Text
A tweet
Bien. Ahora mismo todo dispositivo actualizado a iOS 11.2 no puede ser usado para desarrollo en Xcode, hasta que Apple lance la versión 9.2 final. ¿He dicho ya que vaya semana? https://t.co/N8sP03Z40G
— Julio César Fernández Muñoz (@jcfmunoz) December 2, 2017
0 notes
Link
Apple’s iPhone X is only a couple of weeks in the wild, but one of the features that continues to prove popular is Animoji. Animated emoji that use the iPhone X’s TrueDepth camera system in order to become animated based on a user’s facial expressions, Animoji have taken over social media since the iPhone X’s introduction on November 3rd.
Now a new app has been made available that allows users to record never ending videos of their Animoji while also changing the background color. There’s a livestream option, too.
Created by Guilherme Rambo of HomePod software fame, AnimojiStudio is perhaps understandably not available via the App Store. That means that you will need to install it via the sideloading method made available by Cydia Impactor, so be sure to check out our guide (linked below) on using that, too. With the app installed, perhaps the most useful feature is the ability to record Animoji videos without any time limit as Apple officially limits them to ten seconds in iMessage. Further, doing so will not pause audio playback from other apps, something that can be important when creating your karaoke videos!
Record Animoji videos with unlimited duration with this standalone app.
This app uses the private AvatarKit framework, the same one that’s used by Apple’s iMessage app. It leverages ReplayKit’s screen recording capabilities to allow for longer recordings than the standard app.
You can also choose to record with or without audio.
NOTE: This app uses a private framework, therefore it will not be published on the App Store and can only be installed by compiling and running from Xcode or sideloading the IPA. Please do not file issues about installation problems, that’s out of the scope of this project.
AnimojiStudio uses the private AvatarKit framework, which is the same one used by Apple’s iMessage app and explains why this is never going to be allowed onto the App Store.
If you want to try AnimojiStudio out, it can be downloaded for free here, and as we said earlier, you can follow our Cydia Impactor guide to get the app onto your iPhone here.
AnimojiStudio works on iPhone X only.
(Source: GitHub)
You may also like to check out:
iOS 11.2 Beta 4 Changes, Release Notes And Changelog Details You Need To Know About
iOS 11.2 Beta 4 Download Released For Testing [Updated]
iOS 11.1.2 Changelog, Release Notes, Security Content Released
GBA4iOS 2.1.1 IPA Download For iOS 11 Adds Fix For Dropbox Sync Issue
Download iOS 11.1.2 IPSW Links And OTA Update For iPhone, iPad, iPod touch
Downgrade iOS 11 / 11.1.2 On iPhone Or iPad [How-To Guide]
Download iOS 11, 11.1.2, 11.1.1 Links & Install On iPhone X, 8, 7 Plus, 6s, 6, SE, iPad, iPod [Tutorial]
Jailbreak iOS 11 / 11.1.2 / 11.1.1 On iPhone And iPad [Status Update]
You can follow us on Twitter, add us to your circle on Google+ or like our Facebook page to keep yourself updated on all the latest from Microsoft, Google, Apple and the Web.
Related Stories
Like this post on Facebook
0 notes