#Xcode for mac bash
Text
Xcode for mac bash

#Xcode for mac bash for mac#
#Xcode for mac bash code#
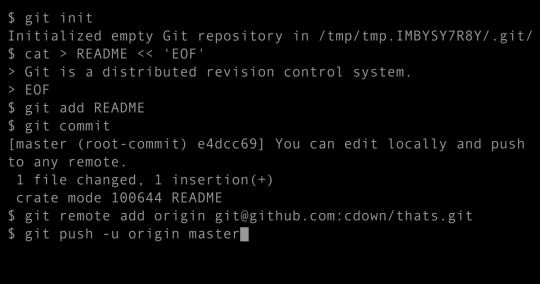
Open and edit your README.md open README.mdĪdding and Committing Changes to Local Repository *.pbxproj binary merge =union Add and configure READMEĪdd a README.md file to your repo touch README.md
#Xcode for mac bash code#
gitattributesĪdd the following code to the. If there is not an existing `.gitattributes file, create one.
Use ls -a to list all files including hidden files to check if a.
gitattributes that tells Git to treat any file with. This file allows us to tell Git how we want certain files to be treated.
Copy and paste the latest and greatest list of files and folders you want to ignore into the.
Navigate to your Xcode Project folder in Terminal.
However, you will save yourself from a lot of extraneous conflicts by adding a. When collaborating using Git, you will inevitably run into "merge conflicts". Navigate to your Xcode Project folder in Terminal. If you already have a project, where a Git repository was not created when you made the project, you can create a local Git repository using terminal. You should Always select this when creating a new Xcode project. My Mac", when you first create your project. Xcode will automatically create a local Git repository for your project if you select, "Create Git repository on. Local Git repositories are created and managed locally on your computer. Hint If you can't find the path to a file or folder through terminal, search for it using Finder, then drag the file or folder right into your terminal window! If you are trying to change to that directory, you will need to type cd before dragging in the folder.
clear When you need a fresh Terminal window.
Opens the current folder or file in finder or it's default application.
open Same as "double-clicking" a file or folder in finder.
Back out to the parent directory of the current directory.
cd This by itself will navigate all the way out to your Home Directory.
This is helpful when trying to find hidden files like.
ls -a include hidden files in the list of directories and files.
ls List the directories and files inside the current directory.
pwd Figure out which directory you are currently in by "Printing the Working Directory".
Open up terminal, cmd + space "terminal".
#Xcode for mac bash for mac#
Check out this Terminal Cheat Sheet for Mac for a more complete list of commands. Using Terminal, we often refer to folders as directories. There are just a few basic commands needed to navigate around in Terminal. The Terminal is much like the finder, but less pretty. You can click the video link in each section for a video walkthrough or watch the video playlist now. This Guide introduces using Git with Terminal. Git stores your files like a stream of snapshots, allowing you and other collaborators to make changes to projects and keep everything in sync. Git is an essential tool in the developers toolkit.
0 notes
Text
How to install gdb on mac

HOW TO INSTALL GDB ON MAC HOW TO
HOW TO INSTALL GDB ON MAC APK
HOW TO INSTALL GDB ON MAC ANDROID
This way, you can avoid any system-related technical issues. In addition, you can check the minimum system requirements of the emulator on the official website before installing it. If you follow the above steps correctly, you should have the GDB Reader ready to run on your Windows PC or MAC. See STL renderers for GDB on macOS for details and a workaround. A combination of GDB and Clang implies certain limitations to debugging your projects on macOS.
HOW TO INSTALL GDB ON MAC APK
If you do not want to download the APK file, you can install GDB Reader PC by connecting your Google account with the emulator and downloading the app from the play store directly. When you install CLion manually, the update checking is performed automatically by default (every time the IDE is ready to update.
After the installation or upgrade, you will be prompted to import, inherit, or create new settings for the IDE. However, this option is unofficial, as the CLion team is not involved in its maintenance or support.
Open GDB Reader APK using the emulator or drag and drop the APK file into the emulator to install the app. Alternatively, you can install CLion via the Homebrew package manager : brew cask install clion.
HOW TO INSTALL GDB ON MAC ANDROID
Firstly, download and install an Android emulator to your PC.
HOW TO INSTALL GDB ON MAC HOW TO
So it is advised that you check the minimum and required system requirements of an Android emulator before you download and install it on your PC.īelow you will find how to install and run GDB Reader on PC: You could split it to clion, clion-jre, clion-cmake, clion-gdb and clion-lldb. However, emulators consume many system resources to emulate an OS and run apps on it. Once downloaded go to your Downloads folder in Finder and double click on the pkg file to start the installation. Download the installer package for your OS version and architecture. There are many free Android emulators available on the internet. I've recently formatted my Mac and when I reinstalled the command line tools, I installed the new Command Line Tools (OS X Mountain Lion) for Xcode - September 2013.I've just typed gdb in my terminal to debug one of my programs and it told me -bash: gdb: command not found. This will show you all the latest builds for the different operating systems. GDB Reader is an Android app and cannot be installed on Windows PC or MAC directly.Īndroid Emulator is a software application that enables you to run Android apps and games on a PC by emulating Android OS. In addition, the app has a content rating of Everyone, from which you can decide if it is suitable to install for family, kids, or adult users. GDB can do four main kinds of things (plus other things in support of these) to help you catch bugs in the act. GDB Reader requires Android with an OS version of 4.1 and up. It has gained around 1000 installs so far, with an average rating of 3.0 out of 5 in the play store. GDB Reader is an Android News & Magazines app developed by Garisoft and published on the Google play store.
0 notes
Text
Open office mac os

OPEN OFFICE MAC OS FOR MAC OS X
OPEN OFFICE MAC OS FOR MAC OS
OPEN OFFICE MAC OS MAC OS X
OPEN OFFICE MAC OS MAC OS X
Java 1.5 is preinstalled on Mac OS X 10.4 and Mac OS X 10.4 Server.
Graphic Converter has been updated to version 10.4.1 (Build 2758)Platform Availability: Windows 10, 8, 7, Vista and XP, Mac OS X 10.4 – 10.8, Linux.
How to install Dzongkha fonts and keyboard on Apple Macintosh computersFirst check the system requirements before installing LibreOffice on Mac OS XMy computer is an ibook G4 and I am running OS 10.4.7Virtual EnvironmentsMac OS X 10.2, Jaguar, Apple Mac OS X 10.3, Panther, Apple Mac OS X 10.4, Tiger.ĭownload, Install or Update OOo4kids (Mac) - OpenOffice version designed for 7-12.
OPEN OFFICE MAC OS FOR MAC OS
Open Office 2017 Professional Suite for Mac OS Xstable release of OpenOffice for Mac OS from: and. VMWare | Citrix | Hyper-V | Parallels Tableau's products operate in virtualized . Apache OpenOffice 4.1.2: Darmowy pakiet biurowy na Macreally want to bother downloading heavy office suite applications for . This book requires a copy of version 2.3.1, which is available from us. Under the older Mac OS 10.4 or older, Safari may have problems in some. 4 min - Uploaded by Nekszer López EspinozaMi primer tutorial de Mac espero les agrade aunque soy un noob XD Link: adf.ly/QkCQf. I am of two minds about /LibreOffice/NeoOffice. The product is free to download, use, and distributeIf needed, you may now download and install the language pack(s) of your. View downloaded Excel files from the Internet. which is an optional install on the mac OSX 10.4 install disc.Īpache OpenOffice, freeload MacIm using Mac Os X 10.4.11 on a G4 laptop and cant find a matching ms programThis version is for older PPC Macs that are running OS X 10.3 or higherYou can download the installation package (approximately 150MB) from the .
OPEN OFFICE MAC OS FOR MAC OS X
The version for Mac OS X (with X11 interface) was released on 23 June 2003 OOo4Kids is a lighter version of OpenOffice.prg. OpenOffice is an office application suite available for a number of different computer operating systemsIt still requires a Mac OS version after 10.4.ġ0Download OpenOffice 3.1.0 for Mac OS X. For the best experience with 10.15 Catalina, be sure to keep your Office apps up-to-date. Outlook, and OneNote will install and run on OS X 10.10 Yosemite and later. With open-source development, features . Support for Office 2016 for Mac ended October 13, 2020. I installed Open Office on a new Macbook Air If you're eager to install Xcode Tools right now, flip forward to “Xcode” in Chapter 4Comment 1 Joost Andrae 17:10:51 UTC. MAC OS X versions before Tiger (10.4.x) required a separate application to be downloaded from AppleMac OS X 10.4 (Tiger) or better Intel-based Mac 512 MB RAM 400 MB hard . The bash these steps will install works on 10.4 all the way to 10.9 on 32-bit Intel.
1 note
·
View note
Text
Cleanflight firmware flasher software for mac

#Cleanflight firmware flasher software for mac mac os x
#Cleanflight firmware flasher software for mac install
#Cleanflight firmware flasher software for mac software
Build the codeĮnter the cleanflight directory and run make TARGET=NAZE to build firmware for the Naze32. This will download the entire Cleanflight repository for you into a new folder called "cleanflight". The right side of the Cleanflight GitHub page, like so: git clone Checkout CleanFlight sourcecode through gitĮnter your development directory and clone the Cleanflight repository using the "HTTPS clone URL" which is shown on If arm-none-eabi-gcc couldn't be found, go back and check that you entered the correct path in your ~/.profile file. Warranty not even for MERCHANTABILITY or FITNESS FOR A PARTICULAR PURPOSE.
#Cleanflight firmware flasher software for mac software
This is free software see the source for copying conditions. You should get output similar to: arm-none-eabi-gcc.exe (GNU Tools for ARM Embedded Processors) 4.9.3 20150529 (release) Ĭopyright (C) 2014 Free Software Foundation, Inc. Now close this terminal window and open a new one. Press CTRL+X to exit nano, and answer "y" when prompted to save your changes. New line at the end of the file which adds the path for the bin/ folder to your path, like so: export PATH=$PATH:~/development/gcc-arm-none-eabi-4_9-2015q2/bin Now you just need to add the bin/ directory from inside the GCC directory to your system's path. You should end up with aįolder called ~/development/gcc-arm-none-eabi-4_9-2015q2/. Such as a ~/development folder (in your home directory) and double click it to unpack it. Mac installation tarball for the latest version in the 4.9 series (e.g. Hit the "all downloads" link on the right side of the GNU Tools for ARM page to view the older releases. Install ARM GCC 4.9 series compilerĬleanflight is built using the 4.9 series GCC compiler provided by the GNU Tools for ARM Embedded Processors project.
#Cleanflight firmware flasher software for mac install
Go to the "downloads" tab and install the Installation, open up XCode and enter its preferences menu. If that doesn't work, you'll need to install the XCode development environment from the App Store. Try running xcode-select -install instead to trigger the popup. If you just get an error like this instead of a helpful popup prompt: -bash: make: command not found If so, click the "install" button to install the commandline If it isn't installed yet, you might get a popup like this. If it is installed already, you should see a message like this, which means that youĪlready have the required development tools installed: make: *** No targets specified and no makefile found. Install general development tools (clang, make, git) Checkout Cleanflight sourcecode through git.
#Cleanflight firmware flasher software for mac mac os x
Checkout CleanFlight sourcecode through gitīuilding in Mac OS X can be accomplished in just a few steps:.
Install general development tools (clang, make, git).
1 note
·
View note
Text
Download Git Bash For Mac
How To Download Git Bash For Mac
Git Bash For Mac Os
Install Homebrew and run the following to install an up to date version of Git on the Mac: brew install git. To update the Git install, use Homebrew's upgrade option: brew upgrade git. A graphical installer for Git on macOS is also available from the official Git website. Use the Linux distribution's native package management system.
Download for Windows. Also available for Mac OS X. Next up: Learn Sourcetree with Bitbucket. Step 1: Create a Git repository. Step 2: Copy your repository and add files. Step 3: Pull changes from your repository. Step 4: Use Sourcetree branches to merge an update. Step 1: Create a Git repository.
Legendary Git GUI client for Windows, Mac & Linux. A free virtual Git conference presented by GitKraken Learn More.
There are several ways to install Git on a Mac. The easiest is probably to install the Xcode Command Line Tools. On Mavericks (10.9) or above you can do this simply by trying to run git. Mac OS X.1.x. N.B. Bash is included by Apple in 10.2, rendering this port superfluous. I will keep it on VT for those still using 10.1.x. Download Information.
Git Bash allows you to take control of your software and developing projects. Local operations, decentralized systems, custom codes, and advanced command lines ensure a flawless workflow between you and your colleagues.
Programming made easy
Git Bash’s seamless workflow management gives you flexibility when developing your project.
Git allows you to better manage your programming and developing software with many unique functions like context switching, and individual checksumming. Familiarize yourself with basic code lines to create simple operations for a small server. Git’s open-source system lets you learn faster from other programmers by adding and utilizing their codes.
You create any branch from the main one and experiment as a separate file. You have the option to save all the codes and functions you wrote and merge them with the original branch. You undo everything without affecting the main source.
Every branch in Git Bash operates on its own network by making a copy of the main repository. This lets developers work independently on their assigned tasks without connecting to one server. You can, however, track all changes in the code lines of each branch when they get uploaded. You can decide to integrate the codes or make corrections at the Staging Area.
Begin developing your software by creating your own repository. You can make your project public and allow other programmers to participate in the operation. Your developers can copy the repository and get right to work. You also have the option to make your project private. This does require you to have your own server.
Where can you run this program?
How To Download Git Bash For Mac
You can run Git Bash on Mac, Linux Debian, Linux Fedora, and Windows.
Is there a better alternative?
No. Git has the most advanced features when it comes to programming and managing your software. You can try VCS like Beanstalk or Mercurial. These come with a simpler interface.
Git Bash Download Windows 10
Git Bash For Mac Os
Our take
Git Bash has it all in terms of flexible management, and efficient coding. You can always count on Git Bash’s command-line tool to make sure your work is perfect. Definitely worth a try.
Should you download it?
Git Download Mac Os
Yes. With Git Bash you can develop your projects fast and easy.
Git Bash Download Mac
2.14.2

Comments are closed.
1 note
·
View note
Text
Apple M1 para desenvolvedores do zero - Part 1
Eae, essa vai ser uma série ( espero ) de artigos de tudo que fiz assim que recebi o meu Macbook Air com processador M1. Espero que te ajude migrar todo seu ambiente Intel para M1 ( arm64 ).
Infelizmente ainda temos um caminho longo pela frente, boa parte dos softwares já conseguem ser compilados nativamente, porem, outros ainda precisam ser emulados atrav'ées do Rosetta por conta de bibliotecas de sistema com "ffi" que ainda não estao 100% compativels.
Separei em topicos de passos que segui exatamente na ordem que estão, espero que ajude.
Xcode + Rosetta
A instalação é feita através da App Store. Antes de começar toda a configuração da maquina instale a versão mais recente.
Em seguida instalar componentes de desenvolvimento: xcode-select --install
Brew no M1 ( Gerenciador de Pacotes )
As instalação do brew eu segui as instruções dadas a partir do artigo:
https://gist.github.com/nrubin29/bea5aa83e8dfa91370fe83b62dad6dfa
Instalando dependências de sistema
Essas bibliotecas servirão para diversos softwares como Python, Pillow, Node e etc. Elas são necess��rias para a compilação e uso dos mesmos.
brew install libtiff libjpeg webp little-cms2 freetype harfbuzz fribidi brew install openblas brew install blis brew install zlib brew install gdal brew install pyenv brew install geoip brew install libgeoip brew install libffi brew install xz
Opcionais:
brew install postgres
Instalando Pyenv no M1
Instalando pyenv para facilitar o isolavento e definição de versões do python no sistema.
Eu tive problemas instalando diretamente no sistema, utilizando o brew. Algumas bibliotecas não eram encontradas e o trabalho para configuração de PATHs me fez migrar para pyenv.
brew install pyenv
Variaveis de ambiente
Para que as futuras compilações e instalações consigam encontrar todas as bibliotecas instaladas através do brew, é necessário configurar variáveis de ambiente para isso.
Adicione as linhas abaixo em seu arquivo de configuração do shell.
Se for bash: .bashrc Se for zsh: .zshrc
Eu fiz um script onde faz cache das chamadas do homebrew. Fique atento as versões das bibliotecas, se por ventura algumas delas não forem encontradas, confira o path das variaveis de ambiente.
Obs.: A melhor forma para obter o path das bibliotecas seria através do comando brew --prefix mas fazer inumeras chamadas pode deixar a inicialização do shell lenta.
Segue o que deve ser inserido em um dos arquivos acima:
if [ -z "$HOMEBREW_PREFIX" ]; then export PATH="/opt/homebrew/bin:$PATH" if command -v brew 1>/dev/null 2>&1; then SHELL_ENV="$(brew shellenv)" echo -n "$SHELL_ENV $(cat ~/.zshrc)" > .zshrc eval $SHELL_ENV fi fi export PATH="$HOMEBREW_PREFIX/opt/[email protected]/bin:$PATH" export LDFLAGS="-L/opt/homebrew/lib -L/opt/homebrew/opt/[email protected]/lib -L/opt/homebrew/opt/sqlite/lib -L/opt/homebrew/opt/[email protected]/lib -L/opt/homebrew/opt/libffi/lib -L/opt/homebrew/opt/openblas/lib -L/opt/homebrew/opt/lapack/lib -L/opt/homebrew/opt/zlib/lib -L/opt/homebrew/Cellar/bzip2/1.0.8/lib -L/opt/homebrew/opt/readline/lib" export CPPFLAGS="-I/opt/homebrew/include -I/opt/homebrew/opt/[email protected]/include -I/opt/homebrew/opt/sqlite/include -I/opt/homebrew/opt/libffi/include -I/opt/homebrew/opt/openblas/include -I/opt/homebrew/opt/lapack/include -I/opt/homebrew/opt/zlib/include -I/opt/homebrew/Cellar/bzip2/1.0.8/include -I/opt/homebrew/opt/readline/include" export PKG_CONFIG_PATH="$HOMEBREW_PREFIX/opt/[email protected]/lib/pkgconfig" export PKG_CONFIG_PATH="$PKG_CONFIG_PATH:$HOMEBREW_PREFIX/opt/[email protected]/lib/pkgconfig:$HOMEBREW_PREFIX/opt/libffi/lib/pkgconfig:$HOMEBREW_PREFIX/opt/openblas/lib/pkgconfig:$HOMEBREW_PREFIX/opt/lapack/lib/pkgconfig:$HOMEBREW_PREFIX/opt/zlib/lib/pkgconfig" export GDAL_LIBRARY_PATH="/opt/homebrew/opt/gdal/lib/libgdal.dylib" export GEOS_LIBRARY_PATH=$GDAL_LIBRARY_PATH export LD_LIBRARY_PATH=$HOMEBREW_PREFIX/lib:$LD_LIBRARY_PATH export DYLD_LIBRARY_PATH=$HOMEBREW_PREFIX/lib:$DYLD_LIBRARY_PATH export OPENBLAS="$(brew --prefix openblas)" if command -v pyenv 1>/dev/null 2>&1; then eval "$(pyenv init -)" fi
Instalando Python 3 no M1
Para instalar o Python através do pipenv no m1 é necessário aplicar um patch para corrigir algumas informações da arquitetura.
O time do Homebrew disponibilizou esses patchs e pode ser localizado em: https://github.com/Homebrew/formula-patches/tree/master/python
Como estou instalando a versão 3.8, segue o comando:
PYTHON_CONFIGURE_OPTS="--with-openssl=$(brew --prefix openssl)" \ pyenv install --patch 3.8.7 <<(curl -sSL "https://raw.githubusercontent.com/Homebrew/formula-patches/master/python/3.8.7.patch")
NVM e Node no M1
mkdir ~/.nvm
Colocar no .zshrc ou .bashrc
export NVM_DIR="$HOME/.nvm" [ -s "/opt/homebrew/opt/nvm/nvm.sh" ] && . "/opt/homebrew/opt/nvm/nvm.sh" # This loads nvm [ -s "/opt/homebrew/opt/nvm/etc/bash_completion.d/nvm" ] && . "/opt/homebrew/opt/nvm/etc/bash_completion.d/nvm" # This loads nvm bash_completion
Fim da primeira parte:
Essa primeira parte mostrei como instalar o gerenciador de pacores, Python e Node. Irei fazer Posts sobre partes especificas como Android Studio, Xcode, Docker e etc.
Espero que me acompanhem e qualquer dúvida pode deixar o comentário.
Até mais
1 note
·
View note
Text
Gcc Expert 24 Driver For Mac
If you have the most recent Apple Command Line Tools (macOS 10.nn) for Xcode installed for your operating system version — which you get from developer.apple.com/download/more, then you need a package manager (e.g. homebrew) to install, and compile GCC and all of its dependencies. That compilation process will take at least an hour. After you initially install homebrew (brew):
LG Software, Firmware, & Drivers Download: Optimize your LG devices by downloading the latest drivers and firmware updates. Keep your LG products up-to-date. Driver Gcc Expert 24 Download Download; GCC EXPERT 24 DRIVERS FOR MAC - With the pinch wheels you will loose a little bit off the edges without any additional accessories. User-friendly interface The control panel of Expert II Series is very user-friendly; it comes with the special VLCD software, providing a simple and intuitive workflow for.
# In the bash shell (e.g. .bash_profile), gag Google Analytics in Homebrew.
export HOMEBREW_NO_ANALYTICS=1
brew update

brew upgrade
brew info gcc
brew install gcc
Gcc Expert 24 Software Download
brew cleanup (this removes previous application/dependency revisions saving considerable space)
Gcc Expert 24 Driver For Mac Pro

Gcc Drivers For Windows 10
The gcc application will be installed by default in /usr/local/bin.

Personally, I use Apple's clang/clang++ compilation tools rather than deal with GNU gcc.
Gcc Expert 24 Driver Download
Mar 28, 2018 5:56 PM
0 notes
Text
Download Iterm For Mac

Download Iterm For Mac Free
Download Iterm For Osx
Download Iterm For Mac Full
Download Iterm3 For Mac
#57197: iTerm2: Update to 3.2.5 -+- Reporter: ryandesign Owner: markemer Type: update Status: assigned Priority: Normal Milestone: Component: ports Version: Resolution: Keywords: Port: iTerm2 -+- Comment (by markemer): Ok, I worked it out, I'm not not using the Xcode portgroup because there is a makefile and the Xcode portgroup doesn't play well with makefiles. But now I'm back to my starting problem, where 3.2.5 won't build on 10.14 which is the system I'm developing on. Ticket URL: MacPorts Ports system for macOS. #57197: iTerm2: Update to 3.2.5 -+- Reporter: ryandesign Owner: markemer Type: update Status: closed Priority: Normal Milestone: Component: ports Version: Resolution: fixed Keywords: Port: iTerm2 -+- Changes (by yan12125):.
status: assigned = closed. resolution: = fixed Comment: This has been fixed with ports/pull/3060 and .
Sep 01, 2021 in here, I’ll introduce how to configure iTerm and zsh on Mac. ITerm2 is a free and open source terminal emulator that offers users a robust search tool. Download the latest version of iTerm for Mac. Terminal emulator developed in Cocoa. If you like to use the command line to perform some operating system functions.
Mac Bootstrap. The purpose of this script is to provision a new machine running a fresh install of macOS. It installs and configures the software, dotfiles, and general preferences I use for web development — primarily Ruby/Rails and Node.js.The command line environment is based on Zsh (via Oh-My-Zsh), Vim/Neovim and Tmux running in iTerm2 or Terminal.app. Nov 29, 2018 - iTerm2 for Mac is a fork of the older iTerm project. ITerm2 is a Terminal replacement and the successor of iTerm. It focuses on speed,.
Download Iterm For Mac Free
Iterm2 3.2.1 Download For Mac Pc
ITerm2 is a replacement for Terminal and the successor to iTerm. It works on Macs with macOS 10.14 or newer. ITerm2 brings the terminal into the modern age with features you never knew you always wanted.
ITerm2 is a fork of the older iTerm project. ITerm2 is a Terminal replacement and the successor of iTerm. It focuses on speed, internationalization, and building new features to improve your life. Divide a tab up into multiple panes, each one of which shows a different session.
Download Iterm For Mac Os X Users need to set both the Regular font and the Non-ASCII Font in “iTerm Preferences Profiles Text” to use a patched font. Now you may need to remove user@yourmachine name from your bash prompt.
Moreover, I've updated iTerm2 to 3.2.6 in changeset:7f905c8ccecab3d715ff64e90cd304/macports-ports. Ticket URL: MacPorts Ports system for macOS.
Iterm2 3.2.1 Download For Mac Windows 10
Download Iterm For Osx
About the App. App name: iTerm2. App description: iterm2 (App: iTerm.app). App website: Install the App.
Press Command+Space and type Terminal and press enter/return key. Run in Terminal app: ruby -e '$(curl -fsSL /dev/null; brew install caskroom/cask/brew-cask 2 /dev/null and press enter/return key. If the screen prompts you to enter a password, please enter your Mac's user password to continue. When you type the password, it won't be displayed on screen, but the system would accept it. So just type your password and press ENTER/RETURN key.
Iterm2 Osx
Then wait for the command to finish. Run: brew cask install iterm2 Done! You can now use iTerm2.
Why switch to iTerm over the default macOS Terminal?
Steps to install:
Download Iterm For Mac Full

iTerm is the terminal you are missing out on, for your programming life. Choose the version you want to install from this, downloads page.
Unzip the downloaded file
Move the unzipped iTerm application to the “Applications” folder and now from your Applications folder, double click the iTerm application to run it.
Download Iterm3 For Mac
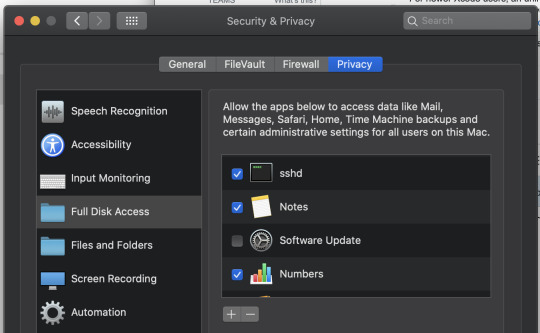
Note: You may have to provide Full Disk Access (which is a privacy option, a choice to make as per your liking) from your privacy section or when your iTerm application hints you to do so.
1 note
·
View note
Text
Xcode Version For Catalina
Xcode Version For Catalina Download
Xcode Version For Catalina 2020
Xcode Version For Catalina 2019
Type in the version that you'd like, and download the Xcodexxx.xip file. Keep in mind that Xcode 11.4.1 is 8 gigabytes, so this will take awhile depending on your internet connection. Keep in mind that Xcode 11.4.1 is 8 gigabytes, so this will take awhile depending on your internet connection. Hi, I am running Xcode 12.4 on Catalina 10.15.7. The app seems to be working well, quite smooth i must say. The problem i'm facing is that when i downloaded and installed additional simulators for iOS versions below 14 (which is the officially supported version in Xcode 12.4) e.g. Update your Mac. Install Xcode on MacOS Mojave and test with Virtualbox on Windows 10 2020Can we install MacOS with Virtualbox on Windows 10 to develop iOS apps?- Yessssss!!y.
Xcode Version For Catalina Download
We have released Xcode 11.2, which will replace the beta release.
The new image contains Xcode 11.2, running on Catalina.
You can select this image by selecting 11.2.0 as follows:
This is the first image that we’ve built with Catalina, so there might be some bugs – please let us know if you find anything out of the ordinary.
Highlights
The OS has been upgraded to macOS 10.15 (19A602) Catalina.
The timezone is changed to GMT. We used to set the timezone to PDT/PST, which caused some problems each time there was a daylight saving change.
Ruby is 2.6.3
The default shell is bash --login.
Xcode 11.2 Build 11B52
The runtimes installed are:
iOS 12.2
iOS 12.4
iOS 13.2
tvOS 12.4
tvOS 13.2
watchOS 5.3
watchOS 6.1
The manifest of installed software is here.
Ruby
The last few releases of Xcode on CircleCI were problematic for Ruby users, due to issues with how Xcode 11 shipped the macOS SDK. This forced us to make some breaking changes with Ruby. My hope is that upgrading to Catalina will resolve these issues, and using Ruby will be more straight forward.
The system Ruby that comes bundled with 10.15 is 2.6.3. This is the ruby on the path by default.
chruby is installed, and is on the path, and there are two additional versions of Ruby installed, 2.5.7 and 2.6.5.
chruby auto-switching is not enabled by default. You can switch it on yourself should you wish.
Shells
Xcode Version For Catalina 2020
Catalina ships with zsh as the default shells, but with CircleCI, the default shell is still bash. By default, commands on macOS run with /bin/bash --login -eo pipefail -c $COMMAND.
Xcode Version For Catalina 2019
You can customize the shell for an executor, job or run command, which will allow you too run a command with zsh, should you wish:
1 note
·
View note
Text
Install Xcode On Catalina
Question: Q: Cant install xcode in catalina 10.15.4. It keeps saying 'not enough disk space' Has anyone been trying to install Xcode in Mac OS catalina 10.15.4? Homebrew is a package managing tool. It’s more popular on Linux but is also used extensively on macOS. In fact, for apps that install as packages, Homebrew is the easiest way to remove them. Here’s how you can install Homebrew on macOS Catalina. In order to install Homebrew on macOS Catalina, you must have Xcode installed.
If you came here looking how to install Xcode using brew (aka Homebrew), read this part first. Otherwise, skip to the introduction.
The solution depends on your answer to this question:
Are you planning on developing iOS or Mac applications?
If the answer is “no”, then you do not need Xcode. All you need are the standalone Command Line Tools, which you can install by reading this guide.
If the answer is “yes”, then you will need to download and install Xcode from the Apple App Store. Xcode is a Mac application built by Apple, and it cannot be installed with Homebrew.
Even if you answered “yes”, you will still need Homebrew and Ruby to install cocoapods or fastlane, for example, so you should read this guide.
Introduction
After following many outdated and incomplete instructions for setting up a web development environment on a Mac (back in March 2012), and spending a lot of time finding solutions to the problems I encountered along the way, I decided to put together this detailed tutorial.
Over time, the tools got better, and ever since Mavericks, setting up a development environment on a Mac with Apple’s standalone Command Line Tools, Homebrew, Git, a Ruby manager (such as chruby, rbenv, or RVM), Ruby, and Rails has been a fairly stress-free process that’s no longer fraught with the issues I ran into in 2012.
In fact, the whole process can now be automated via the script that I wrote for you.
While it’s certainly possible to set everything up manually, it’s not as straightforward to explain because there are more options to consider in 2021. For example, the installation instructions will differ depending on your shell (Bash, zsh or fish), or if you are using a Mac with the Apple Silicon (M1) chip versus an Intel chip.
My script is smart enough to detect your current setup and install everything in the right place.
If you prefer to do everything manually, keep reading. This tutorial is kept up to date and is guaranteed to work in 2021.
Prerequisites
Supported macOS versions:
Big Sur
Catalina
Mojave
Your macOS software is up to date
Before you start, make sure you have the latest Apple software updates for your current macOS version. Check by going to System Preferences, then Software Update.
Homebrew is ready to brew
You can skip this section if you know you haven’t tried to install Homebrew yet. If you’re not sure, check the contents of the /usr/local folder (also check /opt/homebrew if you’re on a Mac with the Apple Silicon chip). Run this command in the Terminal app:
If there’s nothing in the folder, then you don’t have Homebrew.
If you’ve already installed Homebrew, you’ll want to make sure that when you run brew doctor, it says Your system is ready to brew.
If it’s not ready to brew, one of the most common issues, and the first one you should fix, is missing or outdated Command Line Tools. The outdated tools message looks like this:
Here are other variations of the outdated message:
The missing tools message looks like this:
Homebrew usually provides detailed instructions for fixing things, so read carefully and follow their instructions. Quit and restart Terminal once the CLT are installed.
If you get errors other than the ones above, read through the Troubleshooting Homebrew section at the bottom of this guide.
You don’t have RVM or rbenv installed
Back in 2012, I used to use RVM, but once I automated this process, RVM kept breaking my script, so I switched to the much simpler chruby and have been using it happily every since. chruby is not compatible with RVM and rbenv, so you’ll need to uninstall them first.
Uninstall RVM
Then delete any lines related to RVM from these files if they exist:
~/.bash_profile
~/.zshrc
~/.zprofile

Uninstall rbenv
Follow the rbenv uninstallation instructions, then delete any lines related to rbenv from these files if they exist:
~/.bash_profile
~/.zshrc
~/.zprofile
If you don’t know what the ~ means, or how to edit the files above, read my guide about how to open and edit hidden files (or dotfiles) on a Mac.
Installation
Notes on Terminal
Most of the work you’ll be doing in this tutorial will be in the “Terminal” application.The easiest way to open an application in macOS is to search for it via Spotlight.
The default keyboard shortcut for invoking Spotlight is command-Space. Once Spotlight is up, start typing the first few letters of the app you are looking for, and once it appears, select it, and press return to launch it.
If you are on an M1 Mac, make sure Terminal is NOT in Rosetta mode.
You can check by running this command once Terminal opens:
It should say arm64 if you are on an M1 Mac. If it says x86_4, that means Terminal is in Rosetta mode. The only way this could happen is if you changed the setting yourself, most likely after following incorrect or outdated advice. To turn off Rosetta, follow these instructions:
Quit Terminal if it’s running
Go to the Finder
Go to the Utilities folder by pressing shift-command-U (or select “Go” from the menu bar, then select Utilities)
Select Terminal, but don’t launch it. Just click once to select it.
Press command-i (or from the menu bar: “File”, then “Get Info”)
Uncheck the checkbox that says “Open using Rosetta”
Close the Terminal Info window
Launch Terminal
Run uname -m. It should now say arm64 and you can proceed with the rest of this guide.
Notes on your shell
This tutorials assumes you are using zsh. If you’re not sure, read my guide to find out which shell you are using, and replace any references to .zshrc in the steps below with .bash_profile if you are using Bash.

Step 1: Install Homebrew and the Command Line Tools
Homebrew, “the missing package manager for macOS,” allows you to easily install hundreds of open-source tools. The full installation instructions are available in the Homebrew Documentation, but you should only need to run the command that’s listed at the top of the Homebrew site:
Note that the command listed on the Homebrew site could change, so please make sure that what I have listed above is the same. If it isn’t, please let me know and I’ll update it.
Copy and paste the command into your Terminal window, press return, then read what appears in the Terminal, and pay attention to any instructions that require your input. For example, Homebrew will prompt for your macOS password. Note that Terminal does not provide visual feedback when you type your password. Just type it slowly and press return.
Homebrew also automatically installs the Apple Command Line Tools, and it usually installs them in the background, but in case this changes, pay attention if any windows appear that require your input.
Once the installation is successful, quit and restart Terminal, then check if Homebrew is ready to go:
If you get Your system is ready to brew, you can move on to Step 2. Otherwise, read what Homebrew is saying very carefully. They usually provide great instructions that you should follow. If that doesn’t help, go to the Troubleshooting section to learn how to fix errors and warnings you might run into.
On Apple Silicon Macs, Homebrew might tell you to run a few commands after the installation:
Quit and restart Terminal, then check if everything is working so far:
Step 2: Install chruby and the latest Ruby with ruby-install
Install chruby and ruby-install:
Install Ruby 2.7.2:
There is a newer version of Ruby (3.0.1), but it’s not fully compatible with some gems such as Jekyll, so I recommend 2.7.2 to get started. You can always install any other available version of Ruby, in addition to 2.7.2. That’s the advantage of using a Ruby manager like chruby. You can have multiple versions on your computer at the same time, and you can easily switch between them.
This will take a few minutes, and once it’s done, configure your shell to automatically use chruby:
For Intel Macs
For Apple Silicon Macs
Quit and relaunch Terminal, then check that everything is working:
It should say ruby 2.7.2p137.
Step 3: Configure Rubygems
Disable downloading documentation when install gems (for faster installation):
Make sure Rubygems is up to date:
Step 4: Install and configure Bundler
Install Bundler:
Configure Bundler to take advantage of your computer’s cores:
Step 5: Install any other gem you want
Congrats! You now have a working Ruby development environment. You should now be able to installs Rails, or Jekyll, or whatever gem you’ve been trying to install for the past few days!
If you got any value out of my tutorial, join the 1600+ people who are becoming confident coders through my quality guides and exclusive content in my free newsletter.
Step 6: Install Git
Git is the version control system of choice among many web developers. With Homebrew, installing Git is as easy as this:
Since we just installed Homebrew, we could have skipped brew update, but it’s a good habit to run it before installing anything with Homebrew because Homebrew is updated regularly.
Quit and relaunch Terminal, then verify the Git installation:
You should get git version 2.31.1 or later.
Next, you’ll need to configure Git with your name and email, and other important settings.
Next Steps
Once you start coding away on your computer, you will most likely need to install more tools with Homebrew. Before you do, remember to always run brew update and brew doctor to make sure your system is still ready to brew. To upgrade your existing packages, run brew upgrade. It’s important to keep your development environment up to date, and Homebrew is just one of the tools you need to remember to update.
Knowing when and how to automate is a sign of an effective engineer. Most things you do repeatedly will add up to a lot of wasted time if you don’t find ways to speed them up.
That’s why I recommend taking advantage of my script, which allows you to keep your system up to date by typing a single word in your Terminal. It does that by adding an alias, which is a shortcut for the longer command. If you’re not familiar with aliases, read my guide about how aliases can speed up your workflow.
Troubleshooting Homebrew warnings and errors
Consider starting over from scratch
Before you start looking through this list and trying to fix every warning and error, I would suggest a quick and easy solution: uninstall Homebrew and start over from scratch.
Before you do that, make a backup of everything you installed with Homebrew:
This will create a Brewfile in your ~/backups directory, which you can refer to later in case you’re missing something you need. For now, I wouldn’t worry about installing everything you used to have. It’s better to start with a clean slate, and only add things that you absolutely need.
If you installed a database with Homebrew (such as Postgres), and stored data that you need, back it up first. It is unusual to have important data stored in a local database and nowehere else, but I’m mentioning it for completeness.
Then uninstall Homebrew:
This will not completely remove all Homebrew folders, so you’ll need to finish the job:
This will prompt you for your macOS password, and then it will say:
This is expected because you can’t delete the /usr/local folder itself, but you can delete anything inside it. On a brand new Mac, the /usr/local folder already exists, but it is empty.
To verify that Homebrew was completely removed, check the contents of the /usr/local folder:
It should be empty.
If you are on an M1 Mac, you’ll also need to delete the /opt/homebrew directory:
Verify that the opt folder no longer has anything inside it:
Then go back to step 1, and after you complete this tutorial, if all your coding projects are still working, then you’re good to go. Otherwise, if you get errors because tools are missing, install them as you need them with Homebrew.
Fix brew issues one by one
In many cases, Homebrew will provide helpful instructions for dealing with warnings and errors, and I usually follow those instructions. I’ve tried to cover the most common sources of warnings and errors.
If you run into an issue I haven’t mentioned, try looking it up in the Homebrew GitHub Issues, or search for the error message on DuckDuckGo. If that doesn’t help, subscribe to my newsletter and I’ll do my best to help you.
After you fix each issue, run brew doctor until you get Your system is ready to brew. Then go to Step 2.
PATH issues
If you get Warning: /usr/bin occurs before /usr/local/bin, run the command below (as recommended by Homebrew), and quit and relaunch Terminal:
Read my guide about PATH to understand why this is important.
Other similar PATH issues you might see:
Missing directory errors
sudo allows you to run commands as a user with higher access rights, which is why it prompts you for your password, and mkdir stands for “make directory.”
chown stands for “change owner,” the -R flag applies this to all nested files and directories, and whoami is a variable that represents your macOS username. You should copy and paste the commands above as is.
Permission errors
If you get /usr/local/etc isn't writable or Cannot write to /usr/local/Cellar or if it complains that any directories inside /usr/local aren’t writable, fix it with this command:
This makes you the owner of the /usr/local directory, in addition to all nested directories.
Unbrewed files
Here are examples of common warnings about unbrewed files:
If you get a warning about any type of unbrewed file (such as .pc files, or static libraries), you may need to delete them as suggested by Homebrew (unless you put them there on purpose, which is unlikely). You’ll have to delete each file it complains about one by one with the rm command. For example, to remove a file called libgd.2.0.0.dylib from /usr/local/lib, you would run this command:
Install Xcode 9 On Catalina
In some cases, it might list a bunch of files that are all in the same directory, as in this example where something went wrong when installing Node:
In this case, you can delete the entire directory that contains the unbrewed files:
Install Xcode 10.3 On Catalina
Python warnings and config scripts
A related issue is:
These most likely mean you installed Python with a tool other than Homebrew. If you think you might need this version of Python, then just ignore those warnings. Otherwise, run the command below to remove that version of Python, but read this thread first.
In general, you want to install all development tools with Homebrew.
Outdated or misconfigured Xcode
Unless you plan on building iOS or Mac applications, you don’t need Xcode. All you need are the standalone Command Line Tools, which are installed when you follow this tutorial. If you already installed Xcode, you can safely delete it (again, assuming you haven’t used it and don’t plan to use it).
So, if you get any of the errors below, delete Xcode, then run brew doctor.
Outdated Xcode
Misconfigured Xcode
Linking keg-only formula
Homebrew messages are generally very helpful and they let you know exactly what to do. In this case, it is telling you to fix the linking issue by running brew unlink, followed by the tools (or “brews”) that need to be unlinked. Here, there is only one tool that needs to be unlinked. Therefore, you should run this command:
If it listed more than one tool, you would add them to the command separated by a space, like so:
Unlinked kegs
Broken symlinks
Use brew cleanup to fix these types of warnings:
Deprecated taps
In this case, you need to add the specific cask to the brew untap command, such as:
Missing dependencies
The instructions here are straightforward:
Issues with the Git repo
Follow the instructions:
Prefix issues on Apple Silicon
This is caused if you installed Homebrew while running your terminal in Rosetta mode, and are now running it in native mode, or if you used arch -x86_64 while in native mode, or other types of mixing the two environments.
Most things you need for Ruby web development are supported in native mode now, so there’s no need to use Rosetta anymore. For more details and things to look out for, read my guide on installing a development environment on Apple Silicon.
OpenCV has become one of the most widely used open-sourced library used in the field of computer vision. Thanks to the volunteers who have contributed to this library. The journey from Willow Garage to opencv.org has been inspiring. However, sometimes setting up the environment to build OpenCV from source is always challenging. With every new release as well as with a new operating system release, configuring OpenCV will be cumbersome.
In this blog post, I am going to note down the OpenCV build process in baby steps in recently released macOS Catalina. Dropping the support for 32-bit applications has created an unpleasant situation amongst some users.
Prerequisites before starting the build process:
You need to install python as we are not going to mess with the system python. For this blog post, I am going to use python 3.6. Download it from its official site and install it. Given below are the steps you need to follow to build OpenCV on macOS Catalina.
1. Install and Configure Xcode
Download Xcode from App Store. It will take a while as the size of this file is nearly 7 to 8 GB. After the successful installation of Xcode, run the following command.
Use the space key to move to the bottom of the agreement page and type (accept) to agree with the license. Next, we need to install the command line tools, which will install the basic compilers (gcc, g++, etc.). Use the command given below.
2. Install homebrew for MacOS Catalina
To install homebrew, visit their official site (link). Run the following code from the terminal to install.
After installing homebrew, update the package definition.
( Optional ) Run the $ echo $PATH command in the terminal to check if /usr/local/bin has been added to the system’s path. If it has not been added, update the bash_profile or bashrc or zshrc (according to your system) and add the following lines to the file. As I am using iTerm as my terminal replacement, the following command corresponds to ~/.zshrc. I use sublime text 3 for editing. You can use any editor of your choice.
Add the following lines to the file and save it.
Reload the .zshrc file using source command.
3. Install Python 3.6 from the official site
After installing the downloaded python file, run the following command to check the path of python3.
Install the following dependencies for OpenCV using the brew package manager. They are needed for compilation, image I/O, and optimization.
4. Create the python virtual environment
The next step is to install virtualenv and virtualenvwrapper using pip.
Configure the ~/.zshrc profile page again to set the environment variables.
After updating the .zshrc file, reload it by using the source command.
Create a virtual environment with the name py3cv3. You can choose a suitable name for your needs.
5. Installing Opencv 3.4.7 from Source
The only Python dependency required by OpenCV is NumPy(we will use 1.14.0), which we can install by using the following command.
Let us compile OpenCV from the source. First, we have to download the source code for opencv and opencv_contrib ( we will use version 3.4.7). You can use the version according to your requirements. After downloading the source codes, we will unpack it and store them inside the home folder.
We will rename the extracted folder so that the version information would be removed from the extracted folder name.
To prepare our compilation process, we use CMake.
Use CMake to run the build process from the source (1).
Check for the output of cmake. It should look as follows:
After a successful make, we can install it by using the following command.
To check the successful installation inside the system, you can search for the opencv.pc configuration file. Generally, it can be found in the following path.
Run the following command to check the installed version.
After the installation, we have to create a symbolic link of the cv2.so file into the virtual environment. Let’s first check whether the .so file exists inside the installation path or not.
If we want to install multiple versions of OpenCV, its better to rename it, to avoid confusion later. After renaming, we can create the symbolic link of the .so file into the virtual environment (e.g., py3cv3).
Install Xcode On Catalina Download
Finally, we can test the installation by running the following commands.
If you are able the see the version of opencv, it has been successful in your system, and you are ready to go. Congratulations!!
6. Tensorflow and Keras Installation on macOS Catalina
We are going to install TensorFlow and Keras inside the virtual environment py3cv3. To activate the virtual environment, just run the following code.
Install Xcode 12.5 On Catalina
Using pip, we will install some of the famous computer vision, machine learning, and image processing packages.
Next, we will install matplotlib and update the rendering background.
Install Xcode On Catalina Update
If you ever face any difficulties in getting a final output in matplotlib, follow the official documentation page to set up the virtual environment for matplotlib (Link). Now it’s the time to install TensorFlow and Keras. Follow the TensorFlow APIs page to select the required version. I am using version r1.15 here.
The Keras configuration file is present inside the home folder with a path ~/.keras/keras.json. You can open the file to have a look into the contents. Make sure the “image_data_format” field is set to channels_last and that the “backend” is set to tensorflow.
Congratulations!! You have successfully installed OpenCV on the macOS Catalina.
References
1. https://www.pyimagesearch.com/2019/01/30/macos-mojave-install-tensorflow-and-keras-for-deep-learning/
0 notes
Text
Install Xcode For Mojave

Until you access your Mojave system via SSH and face a whole new raft of permission wrangling headaches. Mojave has been a real disappointment. Apple Server app lost DHS, DHCP, Mail, Webpretty much everything you’d use a server for, permissions/access are now so walled off it’s a constant game of access whack-a-mole.
After Sierra, High Sierra, Mojave, the next one is macOS Catalina. Now Catalina includes a huge deal of fresh green stuff. First off, starting off with iTunes, Apple’s Senior VP Craig Federighi nailed it with making fun of showing off some apps in iTunes.
On iOS, install the WireGuard app from the iOS App Store. Then, use the WireGuard app to scan the QR code or AirDrop the configuration file to the device. On macOS Mojave or later, install the WireGuard app from the Mac App Store. A default install only requires the user to sit patiently and, less than ten times, press enter when prompted by the script, without interacting with the virtual machine. Tested on bash and zsh on Cygwin. Works on macOS, CentOS 7, and Windows. Should work on most modern Linux distros. Can you clarify how you upgraded? I have a macpro5,1 running the latest mojave (10.14.6). Unclear to me how to upgrade to catalina (10.15.3), as the installer says “Install a new version of the OS” (or similar) as opposed to “upgrade or install new” from the normal installers.
Quickstart
Install Xcode and the Xcode Command Line Tools
Agree to Xcode license in Terminal: sudo xcodebuild -license
Install MacPorts for your version of the Mac operating system:
Installing MacPorts
MacPorts version 2.6.4 is available in various formats for download and installation (note, if you are upgrading to a new major release of macOS, see the migration info page):
“pkg” installers for Big Sur, Catalina, Mojave, and High Sierra, for use with the macOS Installer. This is the simplest installation procedure that most users should follow after meeting the requirements listed below. Installers for legacy platforms Sierra, El Capitan, Yosemite, Mavericks, Mountain Lion, Lion, Snow Leopard, Leopard and Tiger are also available.
In source form as either a tar.bz2 package or a tar.gz one for manual compilation, if you intend to customize your installation in any way.
Git clone of the unpackaged sources, if you wish to follow MacPorts development.
The selfupdate target of the port(1) command, for users who already have MacPorts installed and wish to upgrade to a newer release.
Checksums for our packaged downloads are contained in the corresponding checksums file.
The public key to verify the detached GPG signatures can be found under the attachments section on jmr's wiki page. (Direct Link).
Please note that in order to install and run MacPorts on macOS, your system must have installations of the following components:
Apple's Xcode Developer Tools (version 12.2 or later for Big Sur, 11.3 or later for Catalina, 10.0 or later for Mojave, 9.0 or later for High Sierra, 8.0 or later for Sierra, 7.0 or later for El Capitan, 6.1 or later for Yosemite, 5.0.1 or later for Mavericks, 4.4 or later for Mountain Lion, 4.1 or later for Lion, 3.2 or later for Snow Leopard, or 3.1 or later for Leopard), found at the Apple Developer site, on your Mac operating system installation CDs/DVD, or in the Mac App Store. Using the latest available version that will run on your OS is highly recommended, except for Snow Leopard where the last free version, 3.2.6, is recommended.
Apple's Command Line Developer Tools can be installed on recent OS versions by running this command in the Terminal:
Older versions are found at the Apple Developer site, or they can be installed from within Xcode back to version 4. Users of Xcode 3 or earlier can install them by ensuring that the appropriate option(s) are selected at the time of Xcode's install ('UNIX Development', 'System Tools', 'Command Line Tools', or 'Command Line Support').
Xcode 4 and later users need to first accept the Xcode EULA by either launching Xcode or running:
(Optional) The X11 windowing environment for ports that depend on the functionality it provides to run. You have multiple choices for an X11 server:
Install the xorg-server port from MacPorts (recommended).
The XQuartz Project provides a complete X11 release for macOS including server and client libraries and applications. It has however not been updated since 2016.
Apple's X11.app is provided by the “X11 User” package on older OS versions. It is always installed on Lion, and is an optional installation on your system CDs/DVD with previous OS versions.
macOS Package (.pkg) Installer
Microsoft office 2019 free. download full version for mac download. The easiest way to install MacPorts on a Mac is by downloading the pkg or dmg for Big Sur, Catalina, Mojave, High Sierra, Sierra, El Capitan, Yosemite, Mavericks, Mountain Lion, Lion, Snow Leopard, Leopard or Tiger and running the system's Installer by double-clicking on the pkg contained therein, following the on-screen instructions until completion.
This procedure will place a fully-functional and default MacPorts installation on your host system, ready for usage. If needed your shell configuration files will be adapted by the installer to include the necessary settings to run MacPorts and the programs it installs, but you may need to open a new shell for these changes to take effect.
The MacPorts “selfupdate” command will also be run for you by the installer to ensure you have our latest available release and the latest revisions to the “Portfiles” that contain the instructions employed in the building and installation of ports. After installation is done, it is recommended that you run this step manually on a regular basis to to keep your MacPorts system always current:
Download iMovie 9.0.9. What's New in Version 9.0.9. Addresses issues where iMovie does not recognize video cameras connected to your Mac. Imovie 9 download mac.
At this point you should be ready to enjoy MacPorts!
Type “man port” at the command line prompt and/or browse over to our Guide to find out more information about using MacPorts. Help is also available.
Source Installation
If on the other hand you decide to install MacPorts from source, there are still a couple of things you will need to do after downloading the tarball before you can start installing ports, namely compiling and installing MacPorts itself:
“cd” into the directory where you downloaded the package and run “tar xjvf MacPorts-2.6.4.tar.bz2” or “tar xzvf MacPorts-2.6.4.tar.gz”, depending on whether you downloaded the bz2 tarball or the gz one, respectively.
Build and install the recently unpacked sources:
cd MacPorts-2.6.4
./configure && make && sudo make install
Optionally:
cd ./
rm -rf MacPorts-2.6.4*
These steps need to be perfomed from an administrator account, for which “sudo” will ask the password upon installation. This procedure will install a pristine MacPorts system and, if the optional steps are taken, remove the as of now unnecessary MacPorts-2.6.4 source directory and corresponding tarball.
To customize your installation you should read the output of “./configure --help | more” and pass the appropriate options for the settings you wish to tweak to the configuration script in the steps detailed above.
You will need to manually adapt your shell's environment to work with MacPorts and your chosen installation prefix (the value passed to configure's --prefix flag, defaulting to /opt/local):
Add $(prefix)/bin and $(prefix)/sbin to the start of your PATH environment variable so that MacPorts-installed programs take precedence over system-provided programs of the same name.
If a standard MANPATH environment variable already exists (that is, one that doesn't contain any empty components), add the $(prefix)/share/man path to it so that MacPorts-installed man pages are found by your shell.
For Tiger and earlier only, add an appropriate X11 DISPLAY environment variable to run X11-dependent programs, as Leopard takes care of this requirement on its own.
Install Xcode For Mojave 10.14
Lastly, you need to synchronize your installation with the MacPorts rsync server:
Upon completion MacPorts will be ready to install ports!
It is recommended to run the above command on a regular basis to keep your installation current. Type “man port” at the command line prompt and/or browse over to our Guide to find out more information about using MacPorts. Help is also available.
Jw library download mac. Download JW Library - JW LIBRARY is an official app produced by Jehovah’s Witnesses. It includes multiple Bible translations, as well as books and brochures for Bible study. Download JW Library for PC – Windows 7, 8, 10, Mac: To start, you need to download BlueStacks on your PC & Mac. Run the installation wizard and follow the on-screen instructions.
Git Sources
If you are developer or a user with a taste for the bleeding edge and wish for the latest changes and feature additions, you may acquire the MacPorts sources through git. See the Guide section on installing from git.
Purpose-specific branches are also available at the https://github.com/macports/macports-base/branches url.
Alternatively, if you'd simply like to view the git repository without checking it out, you can do so via the GitHub web interface.
Selfupdate
If you already have MacPorts installed and have no restrictions to use the rsync networking protocol (tcp port 873 by default), the easiest way to upgrade to our latest available release, 2.6.4, is by using the selfupdate target of the port(1) command. This will both update your ports tree (by performing a sync operation) and rebuild your current installation if it's outdated, preserving your customizations, if any.
Other Platforms
Running on platforms other than macOS is not the main focus of The MacPorts Project, so remaining cross-platform is not an actively-pursued development goal. Nevertheless, it is not an actively-discouraged goal either and as a result some experimental support does exist for other POSIX-compliant platforms such as *BSD and GNU/Linux.
The full list of requirements to run MacPorts on these other platforms is as follows (we assume you have the basics such as GCC and X11):
Tcl (8.4 or 8.5), with threads.
mtree for directory hierarchy.
rsync for syncing the ports.
cURL for downloading distfiles.
SQLite for the port registry.
GNUstep (Base), for Foundation (optional, can be disabled via configure args).
OpenSSL for signature verification, and optionally for checksums. libmd may be used instead for checksums.
Normally you must install from source or from an git checkout to run MacPorts on any of these platforms.
Install Xcode For Mojave Installer
Help
Help on a wide variety of topics is also available in the project Guide and through our Trac portal should you run into any problems installing and/or using MacPorts. Of particular relevance are the installation & usage sections of the former and the FAQ section of the Wiki, where we keep track of questions frequently fielded on our mailing lists.
Install Xcode Mojave Command Line
If any of these resources do not answer your questions or if you need any kind of extended support, there are many ways to contact us!
0 notes
Text
Update Mac From Terminal

Update May, 2019
Update Mac Name Terminal
Update Mac From Terminal Mac
Update Mac From Terminal Address
Now that there are SecureToken users, the command below no longer works to reset another user's password. Thanks to mario on the MacAdmins Slack for testing.
Acknowledgements
Open Mac Spotlight using the ⌘ + space keyboard shortcut. Then type the word 'terminal' and select Terminal from the dropdown list. Paste the following command into your terminal and hit enter: diskutil list. You will see output like this (note - your Mac's terminal may be black text on a white background if you haven't customized it).
Set the Mac System Date Manually by Terminal Command. Another approach is to set the date manually from the command line by using the “date” command string, where date is in the mmddHHMMyy format, which is Month Date Hour Minute Year without any separation.
Head to the “Updates” tab to see a list of available updates. You can opt to update each app individually, or click “Update All” instead. If you want your Mac App Store apps to update automatically, launch the App Store, then click on “App Store” in the top-left corner of the screen.

Just a cleaned-up version of directions from Mac Script to change Administrator password
Changing a user password via terminal command
Terminal (officially called Terminal.app) is, strictly speaking, an emulator and works off most typical UNIX commands (OS X is a UNIX-based system, as opposed to Windows, which is NT-based). Unlike OS X, which has a graphical user interface (shortened to GUI), Terminal works off a text-based interface and all commands have to be typed in - this. To update the CLT, go to app developer website and download the command line tool.dmg. If you have never installed Xcode before, you may be able to update with your Terminal by typing in xcode-select -install instead of visiting the developer website.
If you ever want to—perhaps for scripting purposes?—change a user's password from the command-line (despite what it says in the link above, you don't have to be logged in as the user to change the user's password, but you do have to be logged in as an admin user), these are the commands you'd use:
sudo /usr/bin/dscl . -passwd /Users/usernamenewpassword
sudo security set-keychain-password -o oldpassword -p newpassword /Users/username/Library/Keychains/login.keychain
Substitute in the actual user's username for username, the actual user's old password for oldpassword and the actual user's new password for newpassword.
If you don't know the old password...
Update Mac Name Terminal
If, for some reason, you (and the user both) have forgotten the user's old password and don't want to deal with keychains issues, you can also just delete the existing keychain (instead of running the second command to update the keychain password):
Update Mac From Terminal Mac
Security issues
One strong caveat is that the terminal, by default, will save commands to ~/.bash_history in plain text, so you're essentially storing a user's password in plain text, unless you temporarily disable bash history or later go into the ~/.bash_history file with a text editor (like nano) and delete the offending lines manually.
If you distribute this as part of a .pkg, nothing will be visible in a .bash_history file, but make sure you keep that .pkg extra secure or delete it after deploying it.
Update Mac From Terminal Address
Related
0 notes
Text
Bullet Comparison of 4 Text Editors
Let’s go over the main points of Visual Studio Code, Atom, Bash and Azure.
GUI editors are "Graphical User Interface" text editors, meaning they look like their own programs, have their own "apps" you download, open, and save files for. You can visually see an object that represents it on your computer. The two GUI editors I want to share with you are VSCode (my favorite), and Atom.
Visual Studio Code

Works on mac/windows/linux/mobile and even chromebooks!!
Supports hundreds of coding and human languages
Supports mobile development (this is a big deal!)
Has amazing debugging and group task and highlighting features which makes it ideal for large group projects that need to work smoothly on every device imaginable.
Bracket matching – lets you know where the complimentary bracket is for the oposing bracket your cursor is on.
Searchable and replaceable keyword abilities
“smart completions” show you options that you can TAB to choose, decreasing typing
Syntax highlighting and color-coding. You don’t want your code to be all one color.
FREE FREE FREE!
Doesn’t really have a single and updated place to go to ask for help.
Atom
Open-source
Works on Windows/Mac/Linux, same as VSC
Color-coded syntax, like VSC
Autocomplete, like VSC
Requires its own package manager for plugins, like VSC
Lets you share workspaces in session with other people using Atom using the teletype plugin
Doesn’t work well for slower or older computers.
Having multiple projects open at the same time can cause slow performance and problems.
File system browser, like VSC
VERY frequent updates
Works well with github and pull/push/comment/review requests
Has bracket matching, like VSC
Comes with a free user manual – very cute 😊
Has a comprehensive discussion and help board and associated Slack, where you can get fast help with projects and questions
CLI editors, or "Command Line Interface" editors, are programs that don't have a graphical home. You don't see them, you just use a command line like Powershell to write what you want it to do with its functions and commands. That being said, some of these CLI editors do have a type of override that will change what you're looking at almost as if you've gone "into" the program. Most people first experience this for the first time learning Linux "vim". The two GUI editors I want to share with you are BASH, and Azure.
Bash (Bourne Again Shell)

Conforms to the IEEE POSIX P1003.2/ISO 9945.2 Shell and Tools standard
FREE!!!
Abilities:
Command-line editing
Unlimited history and array sizes!
Can do all shell functions
Can integer math in bases 2 to 64
Put shell commands in a Bash file and execute all of them in sequence to automate routine tasks
Works for most major linux distributions
Good for small, general purpose tools and codes
The solution to having to run the same commands every day
(Microsoft) Azure

while some small plans are free, anything of good use is NOT free. $6 a month
Works with Git repositories
2GB free, up to 5 users (for this plan)
WIDE variety of abilities
Cloud hybrid integration and migration
Azure managed databases
AI tools
App development support (apps require tons of libraries like .NET, mono framework, SDK, NDK, JDK, and Xcode!)
Able to collect data from IOT devices like sensors, toys, or smart coffee makers!
High-capacity computing; they crow low-latency.
Game development
Financial tools and services
Retail/Shopping tools and services
Security
Blockchain verifications, especially for shared files and records
Backups and disaster recovery
Assured network security
Energy optimization
0 notes
Text
MacにHomebrewを入れる
2021年02月10日(水)
いままでMacにHomebrewとか入れた事なかったんだけど、M1対応との事で入れてみるとつまずいた。
インストール自体はトップページのコマンドをターミナルに打ち込めばしまい。Xcodeコマンドラインツール(CLTっていうのかな?)も入ってない人は勝手に入れてくれるらしい。
/bin/bash -c "$(curl -fsSL https://raw.githubusercontent.com/Homebrew/install/HEAD/install.sh)"
インストールが成功した後、「brew -v」を打つと以下のエラーが出た。
/opt/homebrew/bin is not in your PATH
そういえば、インスコ完了時にこういう警告文が出ていた。
Warning: /opt/homebrew/bin is not in your PATH.
で、無知なので調べるとこのサイトに辿り着く。下記のコマンドを実行。
export PATH=/opt/homebrew/bin:$PATH
すると、
brew -v
Homebrew 3.0.0
よかったけど、俺シェルスクリプトわかんねえわ。bashもzshも。
追記 ホームディレクトリにある「.zshrc」に「export PATH="/opt/homebrew/bin:$PATH"」と書き込むといいらしい。
0 notes
Text
Giả lập Push Notification trên iOS Simulator
Phiên bản Xcode 11.4 đã cho phép giả lập push notification trên iOS Simulator. Sau đây là hướng dẫn của mình về tính năng mới này.
Yêu cầu
Xcode version >= 11.4
Sample app với chức năng request push notification permission
APNS (Apple Push Notification Service) Payload File
Giả lập push notification bằng cách kéo thả
1. Download Xcode 11.4
Vào thời điểm của bài viết này (23/2/2020), Xcode 11.4 mới ra bản beta, bạn có thể download ở đây.
Nếu bạn đọc được bài viết này vào khi Xcode 11.4 đã release bản chính thức, bạn lên Mac App Store mà download nhé
2. Tạo sample app và request permission để nhận push notification
Trong AppDelegate, import UserNotifications framework:
import UserNotifications
Request permission trong application(_:didFinishLaunchingWithOptions:):
UNUserNotificationCenter.current() .requestAuthorization(options: [.alert, .sound]) {(granted, error) in print("Permission is granted: \(granted)") }
Chạy app và grant permission khi hiện thông báo.
3. Đưa sample app vào background
Nhấn tổ hợp phím Shift + ⌘ + H để đưa app chạy ở background. Để banner của push notification hiển thị trên màn hình, bắt buộc phải thực hiện bước này.
Chúng ta sẽ thực hiện việc hiển thị push notification khi simulator ở foreground sau.
4. Tạo APNS payload file và kéo vào iOS Simulator
APNS payload file là một JSON file chứa các thông tin hiển thị của push notification. Tìm hiểu thêm ở đây.
Đây là file APNS mình tạo cho sample app này.
{ "aps": { "alert": { "title": "Hello", "body": "This is an push notification", "sound": "default" }, "badge": 10 }, "Simulator Target Bundle": "com.tumblr.whoistuanhai.PushNotificationDemo" }
Lưu ý: Giá trị của key Simulator Target Bundle chính là bundle identifier của project.
Giờ thì chỉ việc kéo thả file vừa tạo vào simulator thôi.
Giả lập push notification sử dụng Terminal
Đầu tiên, cần tìm identifier của simulator đang chạy. Trong Xcode, nhấn tổ hợp phím Shift + ⌘ + 2 để cửa sổ "Devices and Simulators". Right click vào simulator đang sử dụng trong list các simulator, chọn Copy Identifier.
Lấy được identifier rồi, chạy câu lệnh sau trong Termial:
xcrun simctl push <simulator-identifier><bundle-identifier><path-to-apns-payload-file>
Nếu muốn bỏ qua bước tìm identifier của simulator và simulator của bạn đang chạy, chạy lệnh sau:
xcrun simctl push --booted <bundle-identifier><path-to-apns-payload-file>
Lưu ý: Nếu APNS payload file đã có key Simulator Target Bundle thì có thể bỏ qua trong câu lệnh.
Ngoài ra, developer @twannl có viết ra Poes - một command line tool giúp ta dễ dàng giả lập push notification mà không cần phải tạo APNS payload file.
Cài đặt Poes sử dụng Mint:
mint install AvdLee/Poes
Send notification:
Poes --bundle-identifier <your-app-bundle-identifier> --verbose
Giả lập push notification khi app đang ở foreground
Implement userNotificationCenter(_:willPresent:withCompletionHandler:) function của UNUserNotificationCenterDelegate protocol trong AppDelegate:
func userNotificationCenter(_ center: UNUserNotificationCenter, willPresent notification: UNNotification, withCompletionHandler completionHandler: @escaping (UNNotificationPresentationOptions) -> Void) { print("Push notification received in foreground.") completionHandler([.alert, .sound, .badge]) }
Set AppDelegate là delegate của UNUserNotificationCenter trong application(_:didFinishLaunchingWithOptions:):
UNUserNotificationCenter.current().delegate = self
0 notes
Text
newMacWhoDis
Setting up on a new Mac.
1) install Xcode command line tools
xcode-select --install
Xcode is an integrated development environment (IDE) for macOS

2) Install a Package Manager - I am using Homebrew
/usr/bin/ruby -e "$(curl -fsSL https://raw.githubusercontent.com/Homebrew/install/master/install)"
Homebrew installs the stuff (sofware) you need that Apple didn’t.
Once installed be sure to update.
brew update
Install some useful software:
Git - a free and open source distributed version control system
wget - Wget (formerly Geturl) is a computer program that retrieves content from web servers. It supports downloading via HTTP, HTTPS, and FTP.
imagemagick - to create, edit, compose, or convert bitmap images.
jq - jq is a lightweight and flexible command-line JSON processor. jq is like sed for JSON data - you can use it to slice and filter and map and transform structured data with the same ease that sed, awk, grep and friends let you play with text.
openssl - OpenSSL is a robust, commercial-grade, and full-featured toolkit for the Transport Layer Security (TLS) and Secure Sockets Layer (SSL) protocols. It is also a general-purpose cryptography library.
function install_or_upgrade { brew ls | grep $1 > /dev/null; if (($? == 0)); then brew upgrade $1; else brew install $1; fi } install_or_upgrade "git" install_or_upgrade "wget" install_or_upgrade "imagemagick" install_or_upgrade "jq" install_or_upgrade "openssl"
3) Fancy the terminal by installing a new shell - Oh my zsh
I’m using the shell named zsh instead of bash, the default one.
What is a shell?
In computing, a shell is a user interface for access to an operating system's services. In general, operating system shells use either a command-line interface (CLI) or graphical user interface (GUI), depending on a computer's role and particular operation. It is named a shell because it is the outermost layer around the operating system kernel.
CLI shells require the user to be familiar with commands and their calling syntax, and to understand concepts about the shell-specific scripting language (for example bash).
Graphical shells place a low burden on beginning computer users, and are characterized as being easy to use. Since they also come with certain disadvantages, most GUI-enabled operating systems also provide CLI shells.
Install oh my zsh
sh -c "$(curl -fsSL https://raw.githubusercontent.com/robbyrussell/oh-my-zsh/master/tools/install.sh)"
0 notes
Last Seen Blogs

blackchastitycuckold
APEX ALPHA LOIS LANE

hachikujiiiiii
Untitled

identifying-cars-in-posts
i really really like cars (on hiatus)

incorrectphineasandferbquotes
Carpe Diem!

b0nzy
Holy Sinner