#almost any non UI state -> react
Explore tagged Tumblr posts
Visit Tumblr Blog
Explore Tumblr blogs with no restrictions, modern design and the best experience.
Last Seen Tumblr Blogs


Fun Fact
There were a total of 171.5 billion posts on Tumblr in 2019.
Text
i feel like this is at least partly a result of the comfortable unified environment provided by a full framework. cooperation between the frontend and backend for shit like multipart forms or validation is silly. but like, ideally there would be a better choice than react for a lot of stuff. there are a lot of interesting pushes in this direction though- i used to be really into liveview and alpine, and it seems like people like svelte and vue
Feel like the ultimate question of web deployment is "does this even need to be an application" and part of the reason everyone hates web developers is that the answer *would* be no in most cases if not for a whole bunch of dynamic content that no one who visits the website actually wants.
if you didnt have ads and trackers and banners and email signup popups and comments sections full of spam and trolls, you'd just be serving some text with images 99.999% of the time and none of the webdev gack would be necessary. You only gamble on the added bloat paying for itself despite the massive added bandwidth cost because otherwise the amount you're getting paid is "zero"
#i think it goes#0 state -> static#UI state -> lightweight framework or bare js#almost any non UI state -> react#honestly dont think theres a place for wordpress but that could be trauma from having to maintain people's awful instances
53 notes
·
View notes
Text
React Native Impressions

I’m on a project at work using React Native but not in the typical way, which is to say it didn’t start as a React Native project. It’s an exiting app out in the world actively uses by, I’d imagine, tens and tens of thousands of people. Perhaps hundreds of thousands. Bottom line is, it’s a frontline app and is important to our client.
Our client has a large team of React developers and a team dedicated to the design and development of reusable React components for the company. They’ve done an amazing job creating a platform for their devs to build on and would like to have those devs build mobile experiences as well. I can’t blame them. They’re very good at it.
They currently have native iOS and Android apps that are almost ten years old and use various frameworks and technologies. Your typical legacy codebase. That’s nothing new or frightening. All code develops its rough patches over time and as time goes by we go in and turn the soil so to speak. We replace outdated frameworks developed out of necessity with new platform supplied frameworks and our code is more robust and easier to read and maintain, especially for developers coming right out of school.

With all that in mind here’s what our client is looking to do. We are building new features in React Native and leveraging much of the internal native code to fetch network data, build models, and return that data to React Native code. The API or Interface to the native code is well defined and implemented on iOS and Android. The React Native team code is the same for both platforms. I’m part of the platform team integrating React Native into the existing app and providing the API/Interfaces to the React Native developers.
Like I said, this is a non-standard way of doing this but it’s been done by others with stories of success and failure. I believe we are on track to have a story of success. It’s not going to be free of bumps along the way but we’re making really great progress and I believe we will hit a steady working state as soon as next week. That means the foundation to strap up and host React Native code is in place and working as expected. Now it’s time to build out the API more thoroughly, driven by our React Native developers need for specific data or business logic. It’s a single app, purpose built, API. The idea is to hide any ugly code on the native side and keep the API to the app clean for the React Native developers.
Cool Bits
One of the extremely cool things about how we’re approaching it is how our React Native devs work.
They work inside of a separate application while they’re developing new views and logic. It allows them to move more quickly and not have to rely on the native apps to update before writing their code. It also means they don’t have to worry about keeping the existing native app building on their computers. That can be a headache, I wish it weren’t, but it can be. More on that in a bit.
How does it work? Well, when you create a brand new React Native project you run some tool to generate the project for you. It creates the scaffolding for your React Native code as well and iOS and Android host app projects complete with the frameworks necessary to build the native host apps. On iOS uses CocoaPods. I don’t know what Android used.
That allows the React Native Developers to run ahead of the platform native developers to build their UI’s.
Ok, so how does that work?
We negotiate with the React Native development team to define an API signature for the native apps. They build a mock version of that in their development host app that matches the agreed upon signature and go about coding.
We build out the platform side to do the true implementation. When we have something to test we pull over a packaged version of the React Native code and give it a spin. If there are problems we work directly with the React Native developers to figure it out. Once it’s ironed out it’s wash, rinse, repeat. We currently have a feature built by WillowTree and one built by our client working in the development host and in the existing native applications.
It’s pretty darned magical when it works! 🧙🏼♂️
The Ugly Bits
Getting the React Native frameworks and nuanced build settings and scripts in place has been a bit of a struggle but I think we may finally have all that figured out. But it is painful for a native developer who’s used to opening Xcode, loading the project, hitting build, and it runs. Sure, we may have to use CocoaPods to get started, but that’s rare now since Apple introduced Swift Package Manager, or SPM.
SPM is integrated into Xcode and works really well. I’ve never had an issue with it, knock wood, and went through Stream a couple years back and replaced my use of Carthage and CocoaPods with SPM. It’s been glorious.
This option is, unfortunately, not available to React Native projects AFAIK. That’s fine. CocoaPods works and is familiar.

The one really ugly bit, at least to me, is the requirement to use npm. I know web devs are accustomed to using it but it feels really strange and fragile to use these two package managers to be able to build and run an app that includes React Native. I know I’ve run into random issues I can’t explain when node packages change or are added but that’s just me being a big whiny cry baby developer. I understand it well enough to be dangerous but I don’t currently have that deep knowledge I like to have. I’m learning new stuff everyday but I’ve only scratched the surface.
Great! How do you feel about it overall? 🤔

I can see why companies are making this choice, especially companies with an army of React developers. It makes complete sense for them to build great UI with their existing developers. And, yes, you can build a great iOS UI with React Native. I’ve witnessed it first hand. If you didn’t know a view was React Native you wouldn’t know the difference in this app. It’s seamless. It’s great in that way.
Angelo Stavrow
but oof — it still feels like I’m working with a business decision, rather than a sharp tool.
I think Angelo’s quote above is a nice TL;DR for me. On the downside I really dislike the tooling. It feels so arcane. I’d love to see something integrated into the Xcode UI for package management and project settings. That’s probably asking a bit much but I’d rather have some do an amazing job of all this scaffolding so I can just hit the build button to run the app.
All that said, it’s still worth using. 👍🏼
0 notes
Text
How to Explain Employment Gaps on Your Resume
Gaps in employment are not fatal, but they can muddle that first impression you make to a potential employer. Indeed, the last thing you want is to get branded as ‘unreliable’ or ‘job hopper’ aka someone who cannot hold on to a good job for too long. While you certainly cannot re-write your career history, there are several ways to put a positive spin on those gaps in your resume.
How Employers React to Gaps in Employment
The popular lore says that gaps in a resume are almost always viewed as an absolute deal-breaker by prestigious employers.
But let’s put things into perspective for a second. Plenty of talented and highly successful people took sabbaticals and some 15% of employers even have formalized paid and non-paid sabbatical policies. Then there are working parents who chose to leave their career for a while to focus on the family.
Plus, some other very valid reasons can stand behind the employment gaps on a resume such as:
Personal health or medical issue
Providing care for a child or another family member
Pursuing further education or changing careers
Taking time off to relocate to another city/state/country
Taking a personal leave (sabbatical) to volunteer, travel, or work on a personal project
Recuperating after being laid off
Working as a freelancer/contractor
All of these reasons are hardly uncommon and most won’t put off potential employers as much as you may imagine. Yes, applicants with gaps in employment may have a lower chance of landing a job interview when compared to candidates with an uninterrupted employment track record. However, applicants who addressed their employment gaps in the resume are more likely to be called to the interview.

The takeaway – don’t leave the recruiter wondering about your gaps. Instead, provide a forthcoming and honest explanation of your situation both in your resume and cover letter.
How to Explain Gaps in Employment: 4 Strategies
Here’s the deal: when it comes to applying for a new job, most employers will be more interested in your most recent work experience, training, and achievements. So if your employment gap happened some 3 to 5 job positions earlier, you can confidently leave it out and focus on highlighting your most recent accomplishments.
Explaining gaps in employment that have a fresher date is a bit more challenging, but still doable. Below are several quick strategies that will help you make those gaps look like a tiny decorative perforation on your resume, rather than a glaring, attention-sucking hole.
1. Conceal Short-Term Gaps Within the Role You Had at That Time
For example, you fell ill and had to take a medical leave for six months in 2016 and then returned to work for the same company. If that’s the case, you can format the respective job entry in the following manner:
June 2016-December 2018 Event Coordinator at The International Peace Federation
As a head events coordinator, I was responsible for organizing semi-annual events that were attended by corporate executives, philanthropists, and A-List celebrities.
In this case, you bridge a gap in your resume without actually mentioning that you were off work.
2. Omit the Employment Months and Leave Years Only
Alternatively, if you have a ‘meaty’ Work Experience section, spanning over a decade, you can conceal small gaps in your resume (under 12 months), by leaving out the exact employment dates and months.
For example, you can choose to format your entries in the following manner.
March 2019-Present Senior Product Manager at Company X
2017-2019 IT Project Manager at Company Y
2015-2017 Junior Project Manager at Company Z
2014-2015 Scrum Master at Startup W
Such an approach is somewhat less favorable as it may leave some recruiters wondering about the omission of months unless they get ‘sold’ on your core competencies and accomplishments listed for each role.
And as we already mentioned, it’s always better to honestly talk about your career progression.
3. Leave a Quick Note, Explaining Your Gap
Most recruiters are guilty of skimming resumes before reading them properly. So when they see a gap and no explanation, they might make certain assumptions that will not play in your favor.
To avoid that you can try the following: incorporate your gap within one of the roles. Here’s how it can look:
March 2018-June 2020 UX Designer at Tech Company
UX/UI designer, specializing in designing user interfaces for SaaS products and financial applications. Top Behance designer of April 2019. Took a family leave between June 2019 and April 2020. At that time, I have also obtained new certifications in UX writing and completed a workshop on Information Architecture.
4. Use a Functional Resume Format
If neither of the options really work for you or you have more than one employment gap that you’d rather not highlight, try a functional resume format.
Unlike the traditional chronological resume format the encourages you to list all the work entries one after another, a functional resume emphasizes your overall qualifications, transferable skills, and first-hand experiences without linking them to specific work entry.
This resume format is less preferable among HRs, but it can help you get your foot into the door if you’ve been out of the workforce for a while.
Learn more about the different resume formats in this video:
youtube
To ‘pull off’ a functional resume, you need to:
Write a strong resume objective statement
Provide a detailed resume summary
Create a solid list of skills that match the employer’s requirements
Complement your resume with a compelling cover letter.
What If I Had a Long-Term Sickness?
When you are talking about an extended period of sickness that lasts longer than a year, this can be a little more difficult to address in your resume. Where you may not feel completely comfortable about disclosing the nature of your malady, you can simply state that you were taking some long-term leave for medical reasons. It would then be up to the employer to enquire further should they wish to know more.
If the illness you suffered is unlikely to affect your work performance in your new role, then you can tell your potential new employer this without actually disclosing the nature of your illness. However, if you know that you have an ongoing medical condition, you should inform your employer and make them aware of any special working requirements or adjustments you need to have put in place.
In any case, prepare a short explanatory statement that you’ll share with the employer during the interview.
To Conclude
At the end of the day, the best approach to addressing gaps in employment is being honest and confident. Most employers can understand your decision to stay at home with the kids or take a break for another reason. Pretty much every employer will appreciate the fact that you took some time off to pursue further education, training, or licensing.
Remember, your main goal is to merely communicate the reasons why you chose to leave the workforce. You don’t need to provide excuses or over-justify your decision.
Last updated on December 2020
The post How to Explain Employment Gaps on Your Resume appeared first on Freesumes.com.
How to Explain Employment Gaps on Your Resume published first on https://skillsireweb.tumblr.com/
0 notes
Text
Review of Contextual Knowledge
A lot of progress went on this evening as I learnt more about the philosophy of pulp fiction and key elements that make up the movie. This is yet to be refined, but it is still a good mind dump of information that was found.

http://henryjenkins.org/blog/2007/03/transmedia_storytelling_101.html
Above is the understanding of varying definitions of transmedia storytelling. By understanding the terms, I should be able to reflect and show an understanding of how this can be applied to Pulp Fiction and the prototypes I end up making.

https://www.empireonline.com/movies/reviews/pulp-fiction-review/
Above is a review of pulp fiction that I read. The review goes into detail as to what the structure, characters and interaction of story and cinema techniques.

https://www.theguardian.com/lifeandstyle/2019/dec/18/sunny-nihilism-since-discovering-im-worthless-my-life-has-felt-precious
Above is an article I read on Nihilism. I read this because it has a strong relationship to the themes and concept portrayed in Pulp Fiction. By understanding more about this Philosophy, I can understand the social relevance and meaning of the term. It’s is interesting that we never really acknowledge it but it exists and can plague us unknowingly. This can be critical to understanding users when it comes to working with a potential prototype that can help users through a global pandemic.
Review of Contextual Knowledge - Development for the Exegesis
PHILOSOPHY AND SOCIOLOGY THEORY
Pulp Fiction includes mature themes of violence, drug usage, and sex. The film uses these themes as tangible material that can be used to exhibit the main concept of the film that is redemption. Watching the film for the first time requires your complete attention as the film has a non-linear portrayal of 3 stories and a small story. Quentin Tarantino’s representation of redemption in his some of his characters embrace the escape from a nihilistic lifestyle. The philosophy of nihilism states that existence or values are meaningless and relentless negativity or cynicism creates an absence of values and beliefs. The characters Jules and Butch portrayed by Samuel L. Jackson and Bruce Willis are instilled with a discovery of purpose to break free from nihilistic American culture. https://www.highonfilms.com/pulp-fiction-1994-explained/#:~:text=However%2C%20Pulp%20Fiction%20isn't,of%20the%20nihilistic%20American%20culture. These characters show a distinct change in character through discovery of morals and beliefs. Jules takes the path of redemption by finishing his last job for his boss Marcellus after a near death experience that almost insured his death. Butch finds himself on the path of redemption by freeing Marcellus from being raped. Butch decided not to escape their capture, even though he went against his deal that he made with Marcellus earlier in the story. This move by butch would free him of any association with Marcellus and morally redeem Butch for doing the right thing. Conveying redemption displays hope and a second chance to escape a lifestyle before becoming consumed by criminal actions.
The philosophy of nihilism is important in this film because it can relate to our current position during the global COVID-19 pandemic. The negative implications of this pandemic can help us relate to Jules and Butch as they are stuck in a meaningless and negative lifestyle. By developing an app that redeems users’ actions based on lifestyle choices, we can find redemption and meaningful positivity in lockdown or social isolation.
DESIGN DEFINITION
By defining design, I can take the literature review of pulp fiction and explain how it will affect the design choices I make for a transmedia prototype. The design I will be conducting will heavily focus on UX design and partial features of UI design. By understanding UX (User Experience), I will be able to understand how users engage, react, and learn through methodology techniques. The UX will provide a foundation for UI (User Interface) qualities that can enable users to fully utilize a digital prototype for the purpose it was created for.
TRANSMEDIA DEFINITION
In mentioning a transmedia prototype, a definition from Henry Jenkins explains ‘transmedia stories are based not on individual characters or specific plots but rather complex fictional worlds which can sustain multiple interrelated characters and their stories’. http://henryjenkins.org/blog/2007/03/transmedia_storytelling_101.html
By incorporating this into the design we can look to world building design. ‘This process of world-building encourages an encyclopedic impulse in both readers and writers. We are drawn to master what can be known about a world which always expands beyond our grasp.’ This can help to situate an environment on a digital platform for users to explore and take from the experience.
KEY CONCEPTS OF YOUR STORY TELLING
I believe that there are two unique way to address story telling well. That is to immerse the user in a story that they become apart of in the world around them and the other way to story tell is by having the user make their own story with the resources provided to create a playful and engaging experience. I personally believe that creating your own story is more personal and successful as meaningful interactions are dependant on the actions of the user. In relation to pulp fiction, the user may choose to follow a path of redemption or go against it in a book or mini game. Or maybe users can use their current environment and mindset to make decisions that can utilize redemption through the use of an app to record and reflect on experiences to pass time during lockdown.
0 notes
Text
Onboarding thousands of users with React Native
A retrospective for companies considering React Native

Source: engineering.fb.com
By Ian Ownbey, Nick Cherry, and Jacob Thornton
In mid-2019, we committed to rewriting Coinbase’s core mobile sign-up with React Native. This decision was motivated by a few observations:
Coinbase currently supports over 100 countries. Because different jurisdictions have different regulatory requirements (e.g. Know Your Customer, Anti-Money Laundering), our sign-up experience needs to be dynamic — adapting to each user’s location and identity profile. Unfortunately, these flows were some of the oldest, most complex parts of our mobile apps; even incremental changes could be expensive to implement. In order for us to support more countries faster (and more safely), we needed to make our mobile onboarding code much more robust. Given the state of the app, we estimated that rewriting the sign-up flows from scratch would be significantly faster than trying to refactor the existing code.
As mentioned above, our sign-up flow involves a great deal of business logic. Rewriting the sign-up experience natively would require a non-trivial amount of code duplication, and maintaining parity between our iOS and Android apps (something we’ve struggled with historically) would be costly. However, if we implemented the module with React Native, we could target multiple platforms. This would allow us to re-use most (if not all) of the business logic and ensure behavioral consistency between all of our apps.
Coming into this project, the Coinbase mobile apps were fully native and the Coinbase Pro mobile app was written entirely with React Native. We wanted to share our new sign-up experience with both products, and we expected that integrating a React Native package would be less expensive than embedding native modules.
So far, the project has been a success, increasing our team’s velocity and enabling us to share the sign-up flow across products and platforms. Ultimately, we feel like we’ve made the right decision investing in React Native. With a team of five engineers, we’ve rewritten the entire sign-up flow from scratch and shipped to both Coinbase and Coinbase Pro on iOS with support for Android being worked on now. We’ve learned a lot about React Native in the process and want to take the time to share the highlights and lowlights of our experience.
The Good Parts
If we were to reduce the benefits of React Native to a single word, it would be “velocity”. On average, our team was able to onboard engineers in less time, share more code (which we expect will lead to future productivity boosts), and ultimately deliver features faster than if we had taken a purely native approach. We accomplished this while maintaining a high bar for quality, and we believe the finished product is indistinguishable from a fully native app. There were many factors that contributed to these wins, and in the following sections, we’ll discuss some of the most important ones.
Components
Components are composable JavaScript functions that accept immutable inputs (called “props”) and return React elements describing what should appear on the screen. They are the fundamental building blocks of any React app and make it easy for engineers to split their UIs into self-contained, reusable pieces.
For the onboarding rewrite, we created a family of components comprised of form elements (e.g. buttons, text inputs), text elements (e.g. headings, paragraph text), layout elements (e.g. screens, spacers), and more complex UI widgets (e.g. date inputs, progress bars, modals). With the exception of the date input, all components were written entirely in TypeScript.
Most of the core components were created early in the project’s lifecycle. These reusable building blocks enabled engineers to move very quickly when building out screens, which is mostly an exercise in describing interfaces with declarative markup. For example, below is the code used for creating our phone verification screen:
const config = { name: 'PhoneScreen', formShape: { phoneNumber: '', countryCode: 'US' }, optionsShape: { analytics: {} },
};
export default createScreen(config, ({ Form, isLoading, options }) => { const { phoneNumber, countryCode } = useFields(Form); const [submit, isSubmittable] = useSubmitter(Form);
return ( <AnalyticsContext.Provider value={options.analytics}> <Screen> <Header> Set up 2-step verification </Header>
<Paragraph type="muted"> Enter your phone number so we can text you an authentication code. </Paragraph>
<PhoneInput {...phoneNumber} countryCodeValue={countryCode.value} label="Phone" keyboardType="phone-pad" onCountryCodeChange={countryCode.onChange} placeholder="Your phone number" returnKeyType="done" validators={[ [required, 'Phone number is a required field.'], [phoneNumberValidator, 'Please enter a valid phone number.'], ]} />
<Spacer />
<Button disabled={!isSubmittable} isLoading={isLoading} name="continue" onPress={submit} > Continue </Button> </Screen> </AnalyticsContext.Provider> ) });
Each component was designed to be themeable from the start, which helped us adhere to a design system and ensure visual consistency across the module. The theme provider also makes it trivial to uniformly adjust styling (e.g. colors, typefaces, sizes, padding, etc.) either globally or for a given set of screens.
Lastly, because components lend themselves nicely to encapsulation, we were often able to parallelize development efforts around these units, as engineers could work on various parts of the app with minimal dependence on one another. This was beneficial to our velocity and our ability to schedule work effectively.
Fast Refresh
Fast Refresh is a React Native feature that allows engineers to get near-instant feedback for changes in their React components. When a TypeScript file is modified, Metro will regenerate the the JavaScript bundle (For incremental builds, this typically takes less than a second), and the simulator or development device will automatically refresh its UI to reflect the latest code. In many cases, the full state of the application can be retained, but when dependencies outside the React tree are modified, Fast Refresh will fall back to performing a full reload. When a full reload occurs, the app loses most of its state, but engineers still get the benefit of seeing the effects of their changes nearly instantly.
Fast Refresh significantly boosted productivity when creating core components and screens, as both tasks are very visual and iterative in nature.
The functionality was also helpful when developing against API endpoints, as it enabled engineers to tweak the API client and perform network requests without needing to configure the application state (e.g. access tokens, form data) after every change.
Even when UI and state retention were not particularly relevant (e.g. when working on business logic within the framework), the ability to manually test code in seconds (as opposed to tens of seconds) is a huge win for productivity, as engineers are not constantly making the trade-off of either context-switching or sitting idly while they wait for the compiler.
Learning Curve for React/Web Engineers
There are a few notable differences between writing React code for a React Native app versus a web-based app:
The component primitives are different. For example, in React Native engineers will use View and Text elements, where web engineers would use div or span.
Unlike CSS, styles applied to elements in React Native do not cascade. For example, setting a font-family in a root-level container does not apply the typeface to its children.
React Native often requires engineers to have some familiarity with native development tools, like XCode and Android Studio. For example, even when using a third-party library that requires no Objective-C coding, an engineer may need to modify a permission in a plist file.
Mobile devices have features, limitations, and quirks that web engineers may not be familiar with. For example, logic to retry requests during periods of intermittent connectivity is more nuanced for mobile apps than for web.
In our experience, most of these differences were easily surmountable for web engineers, who were able to be productive in a React Native context almost immediately. Considering that the vast majority of the sign-up flow was written in TypeScript (i.e. only a tiny portion of the app required any custom native code), this substantially contributed to our velocity.
It should be noted that developing a deep familiarity with the native environment is undoubtedly the most challenging part of transitioning from web to React Native. This is also one of the reasons why it is invaluable to have native engineers as part of teams working with React Native.
Code-Sharing
iOS + Android
The vast majority of the new sign-up flow was written in TypeScript that is functional on both iOS and Android devices out of the box. One exception to this was needing to write our own native module to take advantage of the native iOS Date Picker, which will be required to productionize for Android. Even with this extra overhead, we expect that the velocity benefits of sharing an estimated 95% of the code and having parity between the two platforms will be well worth the cost.
Coinbase + Coinbase Pro
We shipped the new sign-up screens as an internal NPM package that is currently being utilized by both the Coinbase app, written in Swift, and the Coinbase Pro iOS app which is written entirely in React Native. Adding support for Coinbase Pro cost an estimated two weeks of engineering time, with most of the efforts going into 1) explorations around how to best support both greenfield and brownfield React Native implementations and 2) abstracting authentication logic (e.g. granting and refreshing access tokens) to allow host applications to provide their own custom implementations. Similar to supporting both iOS and Android, we expect that the benefits of sharing the entire sign-up screens codebase between Coinbase and Coinbase Pro will be worth the extra overhead.
React Native + Web
We have a number of internal libraries at Coinbase which are utilized in our web stack, and by utilizing React Native we were able to take advantage of some of them. Especially useful was an internal library that was written to manage form state, validation and submission. Since this was an important part of the project we were able to use it with pretty minor changes, enabling the library to be shared between web and mobile. Conceivably, React Native and web could share any code that 1) can be extracted to an NPM package and 2) isn’t tightly coupled to UI primitives (e.g. div, View). For example, API clients, localization modules, and various utilities (e.g. crypto address parsers, currency formatters) could all be candidates for sharing.
TypeScript
TypeScript is a typed superset of JavaScript that compiles to plain JavaScript. It is commonly used for developing React Native apps and has capabilities similar to Swift and Kotlin.
While TypeScript does come with a learning curve and possibly a higher upfront cost to write (compared to vanilla JavaScript), we believe the safety, ease of maintenance, and IDE enhancements it enabled were invaluable. Without a type-safe abstraction on top of JavaScript, many of the framework-level changes that were required throughout the project would have been significantly more challenging and error-prone. Especially given the slow release cadence (relative to web) of mobile apps, we feel that the extra confidence provided by a typed language is essential.
The Hard Parts
While our overall experience with React Native has been positive, the journey was not without its bumps. In the following sections, we’ll discuss some of the challenges we faced, including the native-to-React-Native learning curve, complications of targeting multiple platforms, and the sharp edges that come with emerging technologies.
Learning Curve for Native Engineers
React Native is built on a multitude of technologies. TypeScript is transpiled into JavaScript with Babel, then served by Metro (a relative to Webpack). The compiled JavaScript interacts with React Native APIs that communicate “over the bridge” to Objective-C or Java. React Native also provides global variables to polyfill functionality one would expect to find in a modern browser context, like fetch or FormData. Most of the application code is written with React, using TSX to mimic the ergonomics of HTML and CSS-like props to style elements. Engineers may come across tutorials featuring class-based components integrating with Redux, but the community is migrating to functional components, hooks, and context. Coding styles and conventions are enforced by TSLint/ESLint, then prettified by Prettier. Jest is the unit test runner, and we rely on Detox for E2E tests, possibly adding Enzyme in the future. Engineers spend most of their time in VSCode, a terminal shell, and their debugger of choice (e.g. Chrome dev tools, Reactotron).
Web engineers have probably had at least some exposure to most of the technologies and concepts mentioned in the previous paragraph, which is a big part of why the React Native learning curve is relatively low for them. Native engineers, on the other hand, may not be familiar with many of those terms, making the barrier to entry steeper. They’re not just learning a new language. They’re learning a new meta-language that transpiles into a new language using new build tools, a new library (React) that embraces new paradigms, a new framework (React Native), and a new ecosystem, all emerging from the complex and quirky evolution of JavaScript development over the past decade.
Another factor that makes the transition to React Native challenging for native engineers is the modular nature of the landscape. With native development, engineers spend their time in a powerful IDE (XCode, Android Studio) that does most of the heavy lifting in regards to managing the local environment. In contrast, React Native development often requires engineers to be more hands-on — installing dependencies and starting servers from the command-line, setting up build and release scripts, and configuring and connecting to a third-party debugger.
Finally, where mobile engineering has centralized authorities (Apple, Google) who maintain many of the foundational tools and define best practices for the platform, the React Native ecosystem is much more decentralized. While decentralization certainly comes with its benefits, it can create a great deal of confusion for newcomers. Often there is no single source of truth to rely on, and engineers may need to sift through several resources (e.g. Github documentation, Medium posts, StackOverflow threads, source code) to find what they’re looking for. In the process, they may encounter information that is conflicting and/or outdated, as the JavaScript ecosystem tends to evolve rapidly.
Possible Future Improvements
Invest in custom tooling to improve the local development experience for native engineers.
Have each native engineer spend a significant portion of their time pairing with one or more web engineers for the first quarter working with React Native.
Maintain a library for commonly referenced React Native documentation, written with native engineers in mind as the primary audience. Materials would include up-to-date best practices for developing React Native apps at Coinbase, tutorials, troubleshooting guides, etc.
The React Native team is also continually working to update their documentation to be more friendly to engineers across platforms.
Native Interoperability
Sometimes an app may need to access a platform API for which React Native doesn’t have a corresponding module yet. Or a particular feature might benefit from a performance boost that can only be achieved through native code. For scenarios like these, React Native offers native modules, which allow JavaScript to delegate tasks to custom native code.
When developing the Sign Up screens we didn’t encounter any performance issues that couldn’t be addressed purely with JavaScript. We did, however, need to write our date input using a custom native module, as we wanted to present the UIDatePicker that iOS users are accustomed to. We successfully implemented the component, but the developer experience was less than ideal:
While native modules can be written in Swift and Kotlin, React Native only supports Objective-C and Java by default. Additionally, native modules must be exported using a set of macros that come with React Native. Between the Objective-C (We didn’t prioritize supporting Swift.) and the macros, writing code for a native module can feel a little awkward/clumsy.
The core React Native components (e.g. TextInput) are not easily extendable through native code. If a component needs to behave similarly to a core component, but also requires custom native code, engineers may need to re-implement functionality that typically comes for free with core components. An example of this is triggering focus and blur callbacks for our custom native input components.
Changes to custom native modules require a rebuild, the same as it would for a native app. As a consequence, engineers working on native code are forced to go back to a less productive environment without things like Fast Refresh.
Data sent over the javascript-to-native bridge is not typesafe, which means that types need to be maintained on both the native and the TypeScript side.
Possible Future Improvements
Add Swift and Kotlin support for native modules.
If we find ourselves dealing with the same category of problem (e.g. focusing and blurring inputs that rely on custom native modules) more than once, consider investing in a lightweight framework to standardize and abstract the common behavior or upstream the changes into React Native.
Maintain a sandbox environment to improve build times when writing native modules.
Describe native APIs with JSON and use a tool like quicktype to generate types for TypeScript, Swift, and Kotlin, making it easy to keep JavaScript and native types synchronized.
Coming React Native features like CodeGen will greatly change how Native Modules work and should solve a lot of these problems.
Platform Differences
While the majority of TypeScript code works on both platforms out of the box, there are some behavioral/styling inconsistencies between foundational UI components on iOS vs Android. Many of these differences are acknowledged in the React Native documentation, but could easily be overlooked if engineers aren’t diligent about testing on both platforms. React Native provides two convenient options to implement platform-specific behavior when it is necessary (the Platform module and platform-specific file extensions), but this introduces branching logic between platforms.
Possible Future Improvements
Ensure that each React Native team at Coinbase has at least one native engineer from each platform (iOS, Android). These individuals will likely have better intuitions than web engineers when it comes to the expected behaviors and nuances of platform-specific native components.
Maintain a thorough integration/E2E test suite that must pass for both iOS and Android simulators before any code can be committed to master. This should help protect against platform-specific defects that may have been missed in development.
Require Pull Requests to include screenshots and/or gifs of new features working on iOS and Android, to normalize and enforce manual testing on both platforms.
Introduce an automated visual testing framework to prevent unintended UI changes.
Debugging
One surprising discovery was that React Native debuggers do not necessarily evaluate JavaScript in the same engine as the simulator / device. With iOS devices, React Native runs on JavaScriptCore, and with Android devices, React Native can run on Hermes. However, when debugging is enabled, JavaScript execution is delegated to the debugger. So when debugging with Chrome dev tools, the Javascript is being evaluated by the V8 engine in the web context, not JavaScriptCore or Hermes in the native context.
In theory, these engines should all behave the same, as they’re all following the ECMAScript Language Specification. However, on two occasions, we were haunted by bugs that seemed to appear at random, then reliably work the moment we tried to examine the behaviors more closely. After a great deal of head-scratching in both cases, we realized that the bug was only present when debugging was disabled. The root cause of the issues had to do with the fact that global variables (specifically the fetch function and the Date object) had slightly different behaviors depending on which engine was running the code. Other teams have also cited different performance characteristics depending on whether debug was enabled (see “message actions” section).
It should be noted that the overwhelming majority of JavaScript behaves identically, regardless of whether debug is enabled. Furthermore, now that we’re aware of the potential pitfalls of debug mode, we expect any future issues to be easier to identify.
Possible Future Improvements
Encourage new engineers to rely primarily on debuggers like Reactotron or Safari developer tools (which evaluate JavaScript using the simulator/device’s engine) and only resort to Chrome when one of its unique features is valuable.
Encourage new engineers to use whatever debuggers they prefer, but be very explicit in communicating engine-related pitfalls, so they have a better chance of identifying this category of problem if they encounter it.
Maintain a thorough integration/E2E test suite that must pass for both iOS and Android simulators before any code can be committed to master. This should help ensure that bugs aren’t masked by discrepancies between the engines of the simulator/device and a debugger.
Moving Forward
Overall, our team had a markedly positive experience with React Native. Component reusability, Fast Refresh, and ease of web engineer onboarding have all contributed meaningfully to the velocity of the project. As the team moves quickly, TypeScript and unit + E2E test suites should help ensure that it also moves safely. It is also worth noting that we did not encounter any performance issues that couldn’t be solved with JavaScript alone.
We are excited to continue our investments in React Native, with a particular internal focus on the following:
Developer Experience
While some aspects of working with React Native could be described as delightful, the developer experience is not without its quirks and may feel very hands-on at times, particularly for engineers who don’t come from a web background. For example, working with a React Native app requires installing and configuring several system-level dependencies (e.g. Homebrew, Node, Yarn, Ruby, Bundler, XCode, XCode Commandline Tools, XCodeGen, OpenJDK, Android Studio, Watchman, React Native CLI, TypeScript), synchronizing NPM packages (Javascript and native), synchronizing assets (e.g. fonts), managing a local Metro server with simulators/emulators, and connecting to a standalone debugger.
Education and Onboarding
React Native is a powerful technology that web engineers will be able to go far with. But unlocking its full potential requires a deep understanding of iOS and Android platforms, which can only be acquired through years of mobile experience. That is to say, for React Native to be truly successful at Coinbase, we need the help of our native engineers.
As mentioned previously, the learning curve for native engineers will be steep; in addition to React Native, they’ll also need to become familiar with several layers of technologies from the web ecosystem. If you are considering this on your team, we recommend you do everything you can to setup your engineers for success. This might include creating content that will help them navigate the landscape (e.g. tutorials, clearly defined best practices, troubleshooting guides), regularly scheduling pairing sessions with web engineers, and/or incorporating guard rails and tooling into our codebases sooner rather than later.
If you’re interested in technical challenges like this, please check out our open roles and apply for a position.
This website contains links to third-party websites or other content for information purposes only (“Third-Party Sites”). The Third-Party Sites are not under the control of Coinbase, Inc., and its affiliates (“Coinbase”), and Coinbase is not responsible for the content of any Third-Party Site, including without limitation any link contained in a Third-Party Site, or any changes or updates to a Third-Party Site. Coinbase is not responsible for webcasting or any other form of transmission received from any Third-Party Site. Coinbase is providing these links to you only as a convenience, and the inclusion of any link does not imply endorsement, approval or recommendation by Coinbase of the site or any association with its operators.
Onboarding thousands of users with React Native was originally published in The Coinbase Blog on Medium, where people are continuing the conversation by highlighting and responding to this story.
from Money 101 https://blog.coinbase.com/onboarding-thousands-of-users-with-react-native-361219066df4?source=rss----c114225aeaf7---4 via http://www.rssmix.com/
0 notes
Text
Designing And Building A Progressive Web Application Without A Framework (Part 2)
Designing And Building A Progressive Web Application Without A Framework (Part 2)
Ben Frain
2019-07-25T14:00:59+02:002019-07-25T12:06:45+00:00
The raison d’être of this adventure was to push your humble author a little in the disciplines of visual design and JavaScript coding. The functionality of the application I’d decided to build was not dissimilar to a ‘to do’ application. It is important to stress that this wasn’t an exercise in original thinking. The destination was far less important than the journey.
Want to find out how the application ended up? Point your phone browser at https://io.benfrain.com.
Read Part One of Designing And Building A Progessive Web Application Without A Framework.
Here is a summary of what we will cover in this article:
The project set-up and why I opted for Gulp as a build tool;
Application design patterns and what they mean in practice;
How to store and visualize application state;
how CSS was scoped to components;
what UI/UX niceties were employed to make the things more ‘app-like’;
How the remit changed through iteration.
Let’s start with the build tools.
Build Tools
In order to get my basic tooling of TypeScipt and PostCSS up and running and create a decent development experience, I would need a build system.
In my day job, for the last five years or so, I have been building interface prototypes in HTML/CSS and to a lesser extent, JavaScript. Until recently, I have used Gulp with any number of plugins almost exclusively to achieve my fairly humble build needs.
Typically I need to process CSS, convert JavaScript or TypeScript to more widely supported JavaScript, and occasionally, carry out related tasks like minifying code output and optimizing assets. Using Gulp has always allowed me to solve those issues with aplomb.
For those unfamiliar, Gulp lets you write JavaScript to do ‘something’ to files on your local file system. To use Gulp, you typically have a single file (called gulpfile.js) in the root of your project. This JavaScript file allows you to define tasks as functions. You can add third-party ‘Plugins’, which are essentially further JavaScript functions, that deal with specific tasks.
An Example Gulp Task
An example Gulp task might be using a plugin to harness PostCSS to process to CSS when you change an authoring style sheet (gulp-postcss). Or compiling TypeScript files to vanilla JavaScript (gulp-typescript) as you save them. Here is a simple example of how you write a task in Gulp. This task uses the ‘del’ gulp plugin to delete all the files in a folder called ‘build’:
var del = require("del"); gulp.task("clean", function() { return del(["build/**/*"]); });
The require assigns the del plugin to a variable. Then the gulp.task method is called. We name the task with a string as the first argument (“clean”) and then run a function, which in this case uses the ‘del’ method to delete the folder passed to it as an argument. The asterisk symbols there are ‘glob’ patterns which essentially say ‘any file in any folder’ of the build folder.
Gulp tasks can get heaps more complicated but in essence, that is the mechanics of how things are handled. The truth is, with Gulp, you don’t need to be a JavaScript wizard to get by; grade 3 copy and paste skills are all you need.
I’d stuck with Gulp as my default build tool/task runner for all these years with a policy of ‘if it ain’t broke; don’t try and fix it’.
However, I was worried I was getting stuck in my ways. It’s an easy trap to fall into. First, you start holidaying the same place every year, then refusing to adopt any new fashion trends before eventually and steadfastly refusing to try out any new build tools.
I’d heard plenty of chatter on the Internets about ‘Webpack’ and thought it was my duty to try a project using the new-fangled toast of the front-end developer cool-kids.
Webpack
I distinctly remember skipping over to the webpack.js.org site with keen interest. The first explanation of what Webpack is and does started like this:
import bar from './bar';
Say what? In the words of Dr. Evil, “Throw me a frickin’ bone here, Scott”.
I know it’s my own hang-up to deal with but I’ve developed a revulsion to any coding explanations that mention ‘foo’, ‘bar’ or ‘baz’. That plus the complete lack of succinctly describing what Webpack was actually for had me suspecting it perhaps wasn’t for me.
Digging a little further into the Webpack documentation, a slightly less opaque explanation was offered, “At its core, webpack is a static module bundler for modern JavaScript applications”.
Hmmm. Static module bundler. Was that what I wanted? I wasn’t convinced. I read on but the more I read, the less clear I was. Back then, concepts like dependency graphs, hot module reloading, and entry points were essentially lost on me.
A couple of evenings of researching Webpack later, I abandoned any notion of using it.
I’m sure in the right situation and more experienced hands, Webpack is immensely powerful and appropriate but it seemed like complete overkill for my humble needs. Module bundling, tree-shaking, and hot-module reloading sounded great; I just wasn’t convinced I needed them for my little ‘app’.
So, back to Gulp then.
On the theme of not changing things for change sake, another piece of technology I wanted to evaluate was Yarn over NPM for managing project dependencies. Until that point, I had always used NPM and Yarn was getting touted as a better, faster alternative. I don’t have much to say about Yarn other than if you are currently using NPM and everything is OK, you don’t need to bother trying Yarn.
One tool that arrived too late for me to appraise for this application is Parceljs. With zero configuration and a BrowserSync like browser reloading backed in, I’ve since found great utility in it! In addition, in Webpack’s defense, I'm told that v4 onwards of Webpack doesn’t require a configuration file. Anecdotally, in a more recent poll I ran on Twitter, of the 87 respondents, over half chose Webpack over Gulp, Parcel or Grunt.
I started my Gulp file with basic functionality to get up and running.
A ‘default’ task would watch the ‘source’ folders of style sheets and TypeScript files and compile them out to a build folder along with the basic HTML and associated source maps.
I got BrowserSync working with Gulp too. I might not know what to do with a Webpack configuration file but that didn’t mean I was some kind of animal. Having to manually refresh the browser while iterating with HTML/CSS is soooo 2010 and BrowserSync gives you that short feedback and iteration loop that is so useful for front-end coding.
Here is the basic gulp file as of 11.6.2017
You can see how I tweaked the Gulpfile nearer to the end of shipping, adding minification with ugilify:
Project Structure
By consequence of my technology choices, some elements of code organization for the application were defining themselves. A gulpfile.js in the root of the project, a node_modules folder (where Gulp stores plugin code) a preCSS folder for the authoring style sheets, a ts folder for the TypeScript files, and a build folder for the compiled code to live.
The idea was to have an index.html that contained the ‘shell’ of the application, including any non-dynamic HTML structure and then links to the styles and the JavaScript file that would make the application work. On disk, it would look something like this:
build/ node_modules/ preCSS/ img/ partials/ styles.css ts/ .gitignore gulpfile.js index.html package.json tsconfig.json
Configuring BrowserSync to look at that build folder meant I could point my browser at localhost:3000 and all was good.
With a basic build system in place, files organization settled and some basic designs to make a start with, I had run-out of procrastination fodder I could legitimately use to prevent me from actually building the thing!
Writing An Application
The principle of how the application would work was this. There would be a store of data. When the JavaScript loaded it would load that data, loop through each player in the data, creating the HTML needed to represent each player as a row in the layout and placing them in the appropriate in/out section. Then interactions from the user would move a player from one state to another. Simple.
When it came to actually writing the application, the two big conceptual challenges that needed to be understood were:
How to represent the data for an application in a manner that could be easily extended and manipulated;
How to make the UI react when data was changed from user input.
One of the simplest ways to represent a data structure in JavaScript is with object notation. That sentence reads a little computer science-y. More simply, an ‘object’ in JavaScript lingo is a handy way of storing data.
Consider this JavaScript object assigned to a variable called ioState (for In/Out State):
var ioState = { Count: 0, // Running total of how many players RosterCount: 0; // Total number of possible players ToolsExposed: false, // Whether the UI for the tools is showing Players: [], // A holder for the players }
If you don’t really know JavaScript that well, you can probably at least grasp what’s going on: each line inside the curly braces is a property (or ‘key’ in JavaScript parlance) and value pair. You can set all sorts of things to a JavaScript key. For example, functions, arrays of other data or nested objects. Here’s an example:
var testObject = { testFunction: function() { return "sausages"; }, testArray: [3,7,9], nestedtObject { key1: "value1", key2: 2, } }
The net result is that using that kind of data structure you can get, and set, any of the keys of the object. For example, if we want to set the count of the ioState object to 7:
ioState.Count = 7;
If we want to set a piece of text to that value, the notation works like this:
aTextNode.textContent = ioState.Count;
You can see that getting values and setting values to that state object is simple in the JavaScript side of things. However, reflecting those changes in the User Interface is less so. This is the main area where frameworks and libraries seek to abstract away the pain.
In general terms, when it comes to dealing with updating the user interface based upon state, it’s preferable to avoid querying the DOM, as this is generally considered a sub-optimal approach.
Consider the In/Out interface. It’s typically showing a list of potential players for a game. They are vertically listed, one under the other, down the page.
Perhaps each player is represented in the DOM with a label wrapping a checkbox input. This way, clicking a player would toggle the player to ‘In’ by virtue of the label making the input ‘checked’.
To update our interface, we might have a ‘listener’ on each input element in the JavaScript. On a click or change, the function queries the DOM and counts how many of our player inputs are checked. On the basis of that count, we would then update something else in the DOM to show the user how many players are checked.
Let’s consider the cost of that basic operation. We are listening on multiple DOM nodes for the click/check of an input, then querying the DOM to see how many of a particular DOM type are checked, then writing something into the DOM to show the user, UI wise, the number of players we just counted.
The alternative would be to hold the application state as a JavaScript object in memory. A button/input click in the DOM could merely update the JavaScript object and then, based on that change in the JavaScript object, do a single-pass update of the all interface changes that are needed. We could skip querying the DOM to count the players as the JavaScript object would already hold that information.
So. Using a JavaScript object structure for the state seemed simple but flexible enough to encapsulate the application state at any given time. The theory of how this could be managed seemed sound enough too – this must be what phrases like ‘one-way data flow’ were all about? However, the first real trick would be in creating some code that would automatically update the UI based on any changes to that data.
The good news is that smarter people than I have already figured this stuff out (thank goodness!). People have been perfecting approaches to this kind of challenge since the dawn of applications. This category of problems is the bread and butter of ‘design patterns’. The moniker ‘design pattern’ sounded esoteric to me at first but after digging just a little it all started to sound less computer science and more common sense.
Design Patterns
A design pattern, in computer science lexicon, is a pre-defined and proven way of solving a common technical challenge. Think of design patterns as the coding equivalent of a cooking recipe.
Perhaps the most famous literature on design patterns is "Design Patterns: Elements of Reusable Object-Oriented Software" from back in 1994. Although that deals with C++ and smalltalk the concepts are transferable. For JavaScript, Addy Osmani’s "Learning JavaScript Design Patterns" covers similar ground. You can also read it online for free here.
Observer Pattern
Typically design patterns are split into three groups: Creational, Structural and Behavioural. I was looking for something Behavioural that helped to deal with communicating changes around the different parts of the application.
More recently, I have seen and read a really great deep-dive on implementing reactivity inside an app by Gregg Pollack. There is both a blog post and video for your enjoyment here.
When reading the opening description of the ‘Observer’ pattern in Learning JavaScript Design Patterns I was pretty sure it was the pattern for me. It is described thus:
The Observer is a design pattern where an object (known as a subject) maintains a list of objects depending on it (observers), automatically notifying them of any changes to state. When a subject needs to notify observers about something interesting happening, it broadcasts a notification to the observers (which can include specific data related to the topic of the notification).
The key to my excitement was that this seemed to offer some way of things updating themselves when needed.
Suppose the user clicked a player named “Betty” to select that she was ‘In’ for the game. A few things might need to happen in the UI:
Add 1 to the playing count
Remove Betty from the ‘Out’ pool of players
Add Betty to the ‘In’ pool of players
The app would also need to update the data that represented the UI. What I was very keen to avoid was this:
playerName.addEventListener("click", playerToggle); function playerToggle() { if (inPlayers.includes(e.target.textContent)) { setPlayerOut(e.target.textContent); decrementPlayerCount(); } else { setPlayerIn(e.target.textContent); incrementPlayerCount(); } }
The aim was to have an elegant data flow that updated what was needed in the DOM when and if the central data was changed.
With an Observer pattern, it was possible to send out updates to the state and therefore the user interface quite succinctly. Here is an example, the actual function used to add a new player to the list:
function itemAdd(itemString: string) { let currentDataSet = getCurrentDataSet(); var newPerson = new makePerson(itemString); io.items[currentDataSet].EventData.splice(0, 0, newPerson); io.notify({ items: io.items }); }
The part relevant to the Observer pattern there being the io.notify method. As that shows us modifying the items part of the application state, let me show you the observer that listened for changes to ‘items’:
io.addObserver({ props: ["items"], callback: function renderItems() { // Code that updates anything to do with items... } });
We have a notify method that makes changes to the data and then Observers to that data that respond when properties they are interested in are updated.
With this approach, the app could have observables watching for changes in any property of the data and run a function whenever a change occurred.
If you are interested in the Observer pattern I opted for, I describe it more fully here.
There was now an approach for updating the UI effectively based on state. Peachy. However, this still left me with two glaring issues.
One was how to store the state across page reloads/sessions and the fact that despite the UI working, visually, it just wasn’t very ‘app like’. For example, if a button was pressed the UI instantly changed on screen. It just wasn’t particularly compelling.
Let’s deal with the storage side of things first.
Saving State
My primary interest from a development side entering into this centered on understanding how app interfaces could be built and made interactive with JavaScript. How to store and retrieve data from a server or tackle user-authentication and logins was ‘out of scope’.
Therefore, instead of hooking up to a web service for the data storage needs, I opted to keep all data on the client. There are a number of web platform methods of storing data on a client. I opted for localStorage.
The API for localStorage is incredibly simple. You set and get data like this:
// Set something localStorage.setItem("yourKey", "yourValue"); // Get something localStorage.getItem("yourKey");
LocalStorage has a setItem method that you pass two strings to. The first is the name of the key you want to store the data with and the second string is the actual string you want to store. The getItem method takes a string as an argument that returns to you whatever is stored under that key in localStorage. Nice and simple.
However, amongst the reasons to not use localStorage is the fact that everything has to be saved as a ‘string’. This means you can’t directly store something like an array or object. For example, try running these commands in your browser console:
// Set something localStorage.setItem("myArray", [1, 2, 3, 4]); // Get something localStorage.getItem("myArray"); // Logs "1,2,3,4"
Even though we tried to set the value of ‘myArray’ as an array; when we retrieved it, it had been stored as a string (note the quote marks around ‘1,2,3,4’).
You can certainly store objects and arrays with localStorage but you need to be mindful that they need converting back and forth from strings.
So, in order to write state data into localStorage it was written to a string with the JSON.stringify() method like this:
const storage = window.localStorage; storage.setItem("players", JSON.stringify(io.items));
When the data needed retrieving from localStorage, the string was turned back into usable data with the JSON.parse() method like this:
const players = JSON.parse(storage.getItem("players"));
Using localStorage meant everything was on the client and that meant no 3rd party services or data storage concerns.
Data was now persisting refreshes and sessions — Yay! The bad news was that localStorage does not survive a user emptying their browser data. When someone did that, all their In/Out data would be lost. That’s a serious shortcoming.
It’s not hard to appreciate that `localStorage` probably isn’t the best solution for 'proper' applications. Besides the aforementioned string issue, it is also slow for serious work as it blocks the 'main thread'. Alternatives are coming, like KV Storage but for now, make a mental note to caveat its use based on suitability.
Despite the fragility of saving data locally on a users device, hooking up to a service or database was resisted. Instead, the issue was side-stepped by offering a ‘load/save’ option. This would allow any user of In/Out to save their data as a JSON file which could be loaded back into the app if needed.
This worked well on Android but far less elegantly for iOS. On an iPhone, it resulted in a splurge of text on screen like this:

(Large preview)
As you can imagine, I was far from alone in berating Apple via WebKit about this shortcoming. The relevant bug was here.
At the time of writing this bug has a solution and patch but has yet to make its way into iOS Safari. Allegedly, iOS13 fixes it but it’s that’s in Beta as I write.
So, for my minimum viable product, that was storage addressed. Now it was time to attempt to make things more ‘app-like’!
App-I-Ness
Turns out after many discussions with many people, defining exactly what ‘app like’ means is quite difficult.
Ultimately, I settled on ‘app-like’ being synonymous with a visual slickness usually missing from the web. When I think of the apps that feel good to use they all feature motion. Not gratuitous, but motion that adds to the story of your actions. It might be the page transitions between screens, the manner in which menus pop into existence. It’s hard to describe in words but most of us know it when we see it.
The first piece of visual flair needed was shifting player names up or down from ‘In’ to ‘Out’ and vice-versa when selected. Making a player instantly move from one section to the other was straightforward but certainly not ‘app-like’. An animation as a player name was clicked would hopefully emphasize the result of that interaction – the player moving from one category to another.
Like many of these kinds of visual interactions, their apparent simplicity belies the complexity involved in actually getting it working well.
It took a few iterations to get the movement right but the basic logic was this:
Once a ‘player’ is clicked, capture where that player is, geometrically, on the page;
Measure how far away the top of the area is the player needs to move to if going up (‘In’) and how far away the bottom is, if going down (‘Out’);
If going up, a space equal to the height of the player row needs to be left as the player moves up and the players above should collapse downwards at the same rate as the time it takes for the player to travel up to land in the space vacated by the existing ‘In’ players (if any exist) coming down;
If a player is going ‘Out’ and moving down, everything else needs to move up to the space left and the player needs to end up below any current ‘Out’ players.
Phew! It was trickier than I thought in English — never mind JavaScript!
There were additional complexities to consider and trial such as transition speeds. At the outset, it wasn’t obvious whether a constant speed of movement (e.g. 20px per 20ms), or a constant duration for the movement (e.g. 0.2s) would look better. The former was slightly more complicated as the speed needed to be computed ‘on the fly’ based upon how far the player needed to travel — greater distance requiring a longer transition duration.
However, it turned out that a constant transition duration was not just simpler in code; it actually produced a more favorable effect. The difference was subtle but these are the kind of choices you can only determine once you have seen both options.
Every so often whilst trying to nail this effect, a visual glitch would catch the eye but it was impossible to deconstruct in real time. I found the best debugging process was creating a QuickTime recording of the animation and then going through it a frame at a time. Invariably this revealed the problem quicker than any code based debugging.
Looking at the code now, I can appreciate that on something beyond my humble app, this functionality could almost certainly be written more effectively. Given that the app would know the number of players and know the fixed height of the slats, it should be entirely possible to make all distance calculations in the JavaScript alone, without any DOM reading.
It’s not that what was shipped doesn’t work, it’s just that it isn’t the kind of code solution you would showcase on the Internet. Oh, wait.
Other ‘app like’ interactions were much easier to pull off. Instead of menus simply snapping in and out with something as simple as toggling a display property, a lot of mileage was gained by simply exposing them with a little more finesse. It was still triggered simply but CSS was doing all the heavy lifting:
.io-EventLoader { position: absolute; top: 100%; margin-top: 5px; z-index: 100; width: 100%; opacity: 0; transition: all 0.2s; pointer-events: none; transform: translateY(-10px); [data-evswitcher-showing="true"] & { opacity: 1; pointer-events: auto; transform: none; } }
There when the data-evswitcher-showing="true" attribute was toggled on a parent element, the menu would fade in, transform back into its default position and pointer events would be re-enabled so the menu could receive clicks.
ECSS Style Sheet Methodology
You’ll notice in that prior code that from an authoring point of view, CSS overrides are being nested within a parent selector. That’s the way I always favor writing UI style sheets; a single source of truth for each selector and any overrides for that selector encapsulated within a single set of braces. It’s a pattern that requires the use of a CSS processor (Sass, PostCSS, LESS, Stylus, et al) but I feel is the only positive way to make use of nesting functionality.
I’d cemented this approach in my book, Enduring CSS and despite there being a plethora of more involved methods available to write CSS for interface elements, ECSS has served me and the large development teams I work with well since the approach was first documented way back in 2014! It proved just as effective in this instance.
Partialling The TypeScript
Even without a CSS processor or superset language like Sass, CSS has had the ability to import one or more CSS files into another with the import directive:
@import "other-file.css";
When beginning with JavaScript I was surprised there was no equivalent. Whenever code files get longer than a screen or so high, it always feels like splitting it into smaller pieces would be beneficial.
Another bonus to using TypeScript was that it has a beautifully simple way of splitting code into files and importing them when needed.
This capability pre-dated native JavaScript modules and was a great convenience feature. When TypeScript was compiled it stitched it all back to a single JavaScript file. It meant it was possible to easily break up the application code into manageable partial files for authoring and import then into the main file easily. The top of the main inout.ts looked like this:
/// <reference path="defaultData.ts" /> /// <reference path="splitTeams.ts" /> /// <reference path="deleteOrPaidClickMask.ts" /> /// <reference path="repositionSlat.ts" /> /// <reference path="createSlats.ts" /> /// <reference path="utils.ts" /> /// <reference path="countIn.ts" /> /// <reference path="loadFile.ts" /> /// <reference path="saveText.ts" /> /// <reference path="observerPattern.ts" /> /// <reference path="onBoard.ts" />
This simple house-keeping and organization task helped enormously.
Multiple Events
At the outset, I felt that from a functionality point of view, a single event, like “Tuesday Night Football” would suffice. In that scenario, if you loaded In/Out up you just added/removed or moved players in or out and that was that. There was no notion of multiple events.
I quickly decided that (even going for a minimum viable product) this would make for a pretty limited experience. What if somebody organized two games on different days, with a different roster of players? Surely In/Out could/should accommodate that need? It didn’t take too long to re-shape the data to make this possible and amend the methods needed to load in a different set.
At the outset, the default data set looked something like this:
var defaultData = [ { name: "Daz", paid: false, marked: false, team: "", in: false }, { name: "Carl", paid: false, marked: false, team: "", in: false }, { name: "Big Dave", paid: false, marked: false, team: "", in: false }, { name: "Nick", paid: false, marked: false, team: "", in: false } ];
An array containing an object for each player.
After factoring in multiple events it was amended to look like this:
var defaultDataV2 = [ { EventName: "Tuesday Night Footy", Selected: true, EventData: [ { name: "Jack", marked: false, team: "", in: false }, { name: "Carl", marked: false, team: "", in: false }, { name: "Big Dave", marked: false, team: "", in: false }, { name: "Nick", marked: false, team: "", in: false }, { name: "Red Boots", marked: false, team: "", in: false }, { name: "Gaz", marked: false, team: "", in: false }, { name: "Angry Martin", marked: false, team: "", in: false } ] }, { EventName: "Friday PM Bank Job", Selected: false, EventData: [ { name: "Mr Pink", marked: false, team: "", in: false }, { name: "Mr Blonde", marked: false, team: "", in: false }, { name: "Mr White", marked: false, team: "", in: false }, { name: "Mr Brown", marked: false, team: "", in: false } ] }, { EventName: "WWII Ladies Baseball", Selected: false, EventData: [ { name: "C Dottie Hinson", marked: false, team: "", in: false }, { name: "P Kit Keller", marked: false, team: "", in: false }, { name: "Mae Mordabito", marked: false, team: "", in: false } ] } ];
The new data was an array with an object for each event. Then in each event was an EventData property that was an array with player objects in as before.
It took much longer to re-consider how the interface could best deal with this new capability.
From the outset, the design had always been very sterile. Considering this was also supposed to be an exercise in design, I didn’t feel I was being brave enough. So a little more visual flair was added, starting with the header. This is what I mocked up in Sketch:
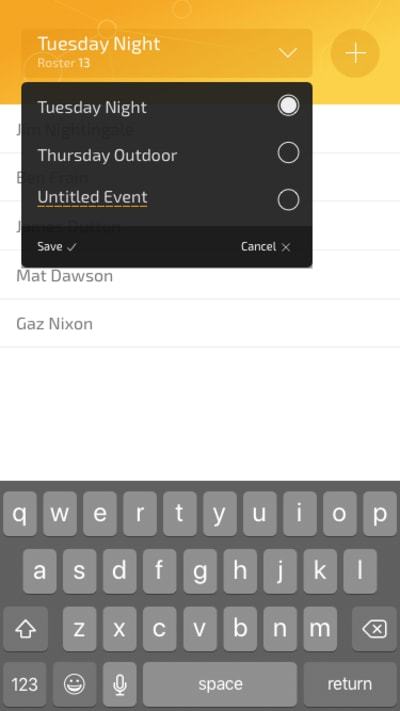
Revised design mockup. (Large preview)
It wasn’t going to win awards but it was certainly more arresting than where it started.
Aesthetics aside, it wasn’t until somebody else pointed it out, that I appreciated the big plus icon in the header was very confusing. Most people thought it was a way to add another event. In reality, it switched to an ‘Add Player’ mode with a fancy transition that let you type in the name of the player in the same place the event name was currently.
This was another instance where fresh eyes were invaluable. It was also an important lesson in letting go. The honest truth was I had held on to the input mode transition in the header because I felt it was cool and clever. However, the fact was it was not serving the design and therefore the application as a whole.
This was changed in the live version. Instead, the header just deals with events — a more common scenario. Meanwhile, adding players is done from a sub-menu. This gives the app a much more understandable hierarchy.
The other lesson learned here was that whenever possible, it’s hugely beneficial to get candid feedback from peers. If they are good and honest people, they won’t let you give yourself a pass!
Summary: My Code Stinks
Right. So far, so normal tech-adventure retrospective piece; these things are ten a penny on Medium! The formula goes something like this: the dev details how they smashed down all obstacles to release a finely tuned piece of software into the Internets and then pick up an interview at Google or got acqui-hired somewhere. However, the truth of the matter is that I was a first-timer at this app-building malarkey so the code ultimately shipped as the ‘finished’ application stunk to high heaven!
For example, the Observer pattern implementation used worked very well. I was organized and methodical at the outset but that approach ‘went south’ as I became more desperate to finish things off. Like a serial dieter, old familiar habits crept back in and the code quality subsequently dropped.
Looking now at the code shipped, it is a less than ideal hodge-bodge of clean observer pattern and bog-standard event listeners calling functions. In the main inout.ts file there are over 20 querySelector method calls; hardly a poster child for modern application development!
I was pretty sore about this at the time, especially as at the outset I was aware this was a trap I didn’t want to fall into. However, in the months that have since passed, I’ve become more philosophical about it.
The final post in this series reflects on finding the balance between silvery-towered code idealism and getting things shipped. It also covers the most important lessons learned during this process and my future aspirations for application development.

(dm, yk, il, ra)
0 notes
Text
February 12, 2017
News and Links
Top
State channel scalability: Update from the Raiden team on development progress and RaidEX
Raiden MVP release planned for March
Not state channels: Make Ethereum massively scalable today with delayed computations
Per Vitalik, the 3 greatest challenges for the Foundation in 2017 are: 1) more revenue, 2) finding more of the right researchers, and 3) "Improving the foundation’s external communications; working on helping the community understand what the foundation is doing, why things are done the way they are done, and what the progress is."
I hope this newsletter helps with #3.
Stuff for Dapp developers
Creating an Ethereum-enabled command line tool with Truffle 3.0
Embark 2.3.0
Plugin to support es5, es6, es7 & react
Christian Reitwießner on what is and isn't possible with zk-SNARKs
Eli Ben-Sasson video presentation of zk-snarks with no trusted setup (and Reddit thread)
uml to solidity, v 1.0.9
web3j, milestone 2.0 release
Client releases
Parity 1.5.2 includes browser extension
Protocol
Video of Vlad Zamfir January talk at Stanford. [All videos from that conference.]
Erik Voorhees: "I’ve found myself now holding a modest balance of Ethereum merely for the purpose of small (not micro) payments to friends. It’s just cheaper and more reliable. And I’m doing that with more allegiance to Bitcoin than almost anyone on Earth."
Joe Lubin: "Ethereum has an ambitious, aggressive, coordinated and achievable roadmap to scalability. Bitcoin has an embattled, haphazard ongoing struggle to make the slightest progress on scalability. First system that demonstrates genuine scalability will quickly dominate."
Ecosystem
Chronicled is thinking about making an Ethereum CryptoSeal for physical assets
Cryptomarket gets some press for being the first Ether-only exchange in Latin America.
Ethers Wallet for iOS
Some folks are bringing back TheDAO and calling it Vega.
It's unmistakeable that there is some tension among core developers. This is another small bit of evidence
Both Dfinity and Santiment sold out their presales quite quickly. Dfinity in 74 mins, and Santiment in about 2 hours.
How Santiment hopes to transform crypto trading
Project Updates
Aragon - UI for managing your company (cap table, vesting, payments, voting, bylaws, fundraising and identity) on Ethereum
Colony is now in beta
Podcast interview with Firstblood's Head of Biz dev Marco Cuesta
SuperDAO Overview
Blockjack is live on the mainnet
IDEX is also live on the mainnet
Token Sales
A Beginner Guide to Polkadot and Parachains
Gnosis' design reasoning for their tokens
Their followup the next day: why so complicated?
The Cosmos Roadmap
Understanding the iEx.ec Architecture
Simon de la Rouviere: Exploring Continuous Token Models
General
Vitalik: The Meaning of Decentralization
Microsoft: Blockchain Smart Contracts for semi-trusted Consortium Networks
MSFT's Marley Gray: the 3 tiered architecture for Cryptlets
Two members of the US House formed a Blockchain Caucus.
Consensys: The UN should use Ethereum to attain its Sustainable Development Goals.
A few days after publication, Joe Lubin gave a presentation at the UN headquarters.
Vitalik on what non-coders can do for Ethereum
"As the relationship with Dubai deepens, ConsenSys is taking additional office space in Dubai and increasing personnel in the region." -- IBTimes
Nick Szabo: Money, blockchains, and social scalability
Dates of note
Feb 13 – Etheroll token sale begins
Feb 14 – Chronobank sale ends
Feb 15 – Melonport sale begins (must check a box that you aren’t US Citizen)
Feb 17-18 – Ethereum Euro Dev Conference in Paris
Feb 27 – Intellisys private equity “Mainstreet fund” sale begins (closed to US/EU citizens, KYC done by exchange for initial purchase and for dividends)
Feb 28 – Contingency sale ends
Mar 1 -- WeTrust token sale begins (1st day bonus, weekly price changes)
Mar 1 -- Qtum sale begins
Mar 15 -- SuperDAO token sale begins
“Feb/Mar” – iEx.ec token sale begins
“Feb/Mar” – Gnosis token sale likely to begin
"Feb/Mar" – Humaniq token sale begins
“Late March” – Matchpool token sale begins
[I aim for a relatively comprehensive list of Ethereum sales, but make no warranty as to even whether they are legit; as such, I thus likewise warrant nothing about whether any will produce a satisfactory return. I have passed the CFA exams, but this is not investment advice.]
This is issue 26, so the newsletter has been around for half a year!
Thank you for reading and subscribing. It's been a joy to write, even if occasionally some issues feel like work. I'm thankful for all the tips, praise, links, and upvotes. I'm also particularly thankful to have so many more smart people to chat with about Ethereum.
Daily updates? Since early January, I've been considering doing daily updates. I may test it out at some point soon. Let me know at [email protected] if you would subscribe to daily updates.
Last week I asked for upvotes, and it worked. I appreciate it. The posts on r/ethereum and r/ethtrader both got many more upvotes than recent weeks. The newsletter also added 56 subscribers last week, which is good mean-reversion to the long-term average.
Link: http://www.weekinethereum.com/post/157186387648/february-12-2017
(Please use the weekinethereum.com link!)
Just in case you want to send Ether (or tokens?): 0x96d4F0E75ae86e4c46cD8e9D4AE2F2309bD6Ec45
Did someone forward this issue to you? Sign up to receive the weekly email.
1 note
·
View note
Text
Avorion: Efficient Mission Implementation
Key features of a good mission framework.
Every game lives and dies with the “things-to-do” in the game. If a player at some point has the feeling that there’s nothing fun to do anymore, they’re more than likely to abandon the game. Even if there’s a lot more content the player simply hasn’t discovered yet. Therefore it is vital to have a good amount of well-built missions and events available to the player at any moment. Even in a sandbox game like Avorion we implemented more than 45 missions and events to give the player the feeling that there’s always something to do.
Some of these missions have an almost tutorial-like character and aim to explain game mechanics to the player. Others are story related and provide a progression for the player to follow. And lastly side-missions. These are smaller mini-stories and assignments intended to keep the player busy while he isn’t ready to progress yet.
A mission in Avorion is a .lua script that is attached to a player. The engine offers several entry-point functions, like initialize(), update(), secure() and restore() functions, to name a few, but those are kept very general.
Our first few missions were hard-coded, with only minimal library functions. Every new mission was made entirely from scratch. In all fairness, the code quality itself improved with every iteration, making newer missions more robust and better performing. But as more and more missions and events were implemented, it became apparent that a centralized library was necessary. In our early stages of experimenting with this, the self-written library could only handle the most common actions like accepting and finishing a mission, saving all necessary data and providing an update function that would automatically update saved data.
The mission framework provides many comfort features and automatic saving of mission data.
It soon became clear that most missions had a few key points in common:
A description that has to be updated dynamically and contains all information needed for the player. For example the mission location, an explanation of what the mission is and maybe most importantly: A name that the player can use to track the mission.
Synchronization between server and client. Avorion is based on a server-client model. In a very rough abstraction: The server saves and updates all technical data, e.g. at what mission stage the player is. The client does everything UI related, e.g. showing the player in his mission overview what the next step in the mission is. Every time the player completes a step of the mission, the mission data has to be synchronized. It soon became apparent that this synchronization should happen automatically to reduce error potential.
The structure of mission development. Very often, missions have a phase of initial work where mission dependent data is determined. This includes the mission location, especially if the mission requires the player to travel to a destination and the initialization of any NPC that has to be spawned. After the initial stage, there’s usually a list of steps to follow. The player has to complete each of these steps for the mission to move on. If the last step is completed, the mission is completed as well.
With this in mind, we set out to implement a framework able to handle all of the above plus adding in as many comfort features as we could think of. The starting point for the framework was all the code that we caught ourselves duplicating every time we started to implement a new mission. The key points of the mission framework are:
Functions to accept, finish or abandon a mission
Track, save and synchronize player progress
Phase structure (ie. a state machine)
Dynamic descriptions
Comfort features
Moddable missions
Functionality to accept, finish or abandon a mission Every mission naturally must have a beginning and an end, and the mission framework has to provide functionality for that.
In Avorion there are two types of missions. The first ones are classic story- or tutorial missions or random events that are automatically given to the player. For these, we need a name, description (for the missions overview UI), and which steps the player has to take next.
The second ones are message board missions that the player has to actively accept. Those are a little trickier because we need to know things before the mission is actually added to the player (and thus initialized). Each station has a message board that offers various, sometimes randomly generated missions. Here, we need the mission’s name, a short description of what to do, difficulty, and the reward. To solve this and keep things centralized and clean, missions can define a bulletin via the framework. This bulletin is then automatically used to display the mission on a message board and also to initialize the mission with the necessary data once the player accepts it.
There are multiple ways of how a mission can end. First option: Everything went perfectly. The player completed the entire mission exactly as we had planned. For these cases, missions can define a reward and accomplish the mission whenever they see fit. The player receives the reward and a “MISSION ACCOMPLISHED” notice is shown. The second option is: The player fails the mission. In this case, the mission framework provides the functionality to fail the mission, like displaying a complaint from an NPC or a “MISSION FAILED” notice. Mission developers can even add a punishment here.
But sometimes it isn’t as simple as that. The player may have done all necessary steps to finish the mission, but still failed to some extent. For example, we implemented a mission for Avorion named ‘Transfer Vessel’. In it, the player is asked to bring a ship from a shipyard to a target location. On the way, the player may encounter pirates and take damage. When the player arrives, the ship is scanned for damages. The mission steps were completed successfully, but would the contractor really reward a player if the ship is damaged too much? No, so the mission framework has to offer the possibility to accomplish a mission without giving the reward, or better yet, with only giving players part of the reward. The same should be done for punishments in case a player fails a vital mission.
Another point stems from our sandbox approach. Avorion is a space sandbox that promises players to have full freedom. As such, we feel it is vital that, at any point, a player can decide not to do something. Every mission can be abandoned at any time. Abandoning, of course, means that the mission and all related data have to be deleted, and the player shouldn’t get a reward, but also no punishment (most of the time). The framework offers missions to provide specific functionality on how to react to the abandoning of a mission, depending on at which point in the mission it is abandoned.
The mission framework is essentially a classic state machine.
Track, save and synchronize mission data Tracking and saving player progress is another great example of why a mission framework is important. If you have a centralized library to take care of that automagically, developers no longer have to remember that, yielding cleaner and easier to read code. Additionally, our framework is able to synchronize mission data between client and server and does so whenever the mission updates. This key point proved to be the one with the most impact on our mission development. Due to the server-client structure of Avorion’s engine, the disparity of what data is available on the client or server at what point is sometimes hard to understand. Especially new team members used to struggle with this initially. With the framework taking care of synchronization and saving the data, even new team members were able to produce robust missions in very little time.
Phase structure When we analyzed our early missions, it became clear to us that most missions follow a step by step list of actions with one step having to be completed before the next step is revealed. In our mission framework, we emulate that by providing a phase structure, which is, in essence, a classic state machine. The framework automatically initializes the first phase of the mission and then continues to track player progress. If the player completes phases one and two of a mission and then ends the session, the framework will restore all data up to that point on the next login, and the player can seamlessly continue the mission.
After implementing the first few missions using phase structure, we found that it had two major advantages. The first advantage lies in the phase structure itself. If you can control when the next phase is started by using framework functions, you can also jump to an arbitrary phase. This made non-linear missions possible without having to change much in the framework.
The second advantage is that the enforced structuring of the missions led to a better code structure, too. Even though multiple people worked on several missions, the written code naturally followed the same coding style. This is ideal for big projects like Avorion as it’ll make maintaining the code much easier for the future and additionally allows new team members to pick up on the project’s coding style much faster.
Dynamic descriptions Another very important side effect of the phase structure mentioned above is the ability to have a dynamic mission description. Now that we always know in which phase of a mission a player is, we can update the description accordingly. If the player fails a step and is reset to an earlier stage of the mission, the description can easily be reset as well. If the description is dependent on data determined in a certain phase, we can simply add that part of the description only when reaching that stage of the mission.
On-screen text notices give instant feedback and a create a feeling of accomplishment for the player.
Comfort features Our mission framework grew from what we learned from situations when we had to duplicate code when writing new missions. We collected all of these instances and included them in the framework. I’d like to highlight some of them in the next few paragraphs.
One major comfort feature that we found to be essential is a simple tool for callback registration.
The progress of a mission usually depends on events happening. For example, reaching a certain location, dealing damage to a target or the destruction of a ship. By providing predefined tools for these events in the framework, we moved the boilerplate code of handling all those organizational things into the framework code and kept the mission code itself clean.
Similar to the callback functions, we found it very useful to include checks on the surroundings of the player into the framework. These checks include whether or not enemies, stations, asteroids or other objects are close to the player. We also added basic checks if a group of ships was destroyed or if an entire faction was vanquished from a sector. The framework offers easy-to-use functionality to provide code that is run in these situations.
Additionally, we added some very basic triggers, where a programmer only has to supply a condition that is checked regularly, and provide some code that should be executed when the condition was met. The important thing about these triggers (as compared to a simple “if” statement) is that you can configure whether or not they should be disabled once they were triggered – even over a game restart – or if they should be reevaluated each tick. The last comfort feature I’d like to mention is somewhat born out of the randomness of enemy encounters. In Avorion, lots of subsystems work mostly independently from each other and can sometimes interfere with each other. One such example would be pirates attacking during a mission. Since these attacks can greatly disrupt missions by killing off important NPCs or destroying objects, the mission framework allowed us to easily implement functionality to mark certain locations or NPCs as “no-random-encounters-here”, to prevent random attacks. This is as simple as setting a single flag to “true” and ensures that a mission will run smoothly for every player.
Moddable missions Avorion is a sandbox, and we think that some of the best experiences in sandboxes are created by community content. As such, our mission framework and all of our missions are written in Lua, while our game engine is in C++. The .lua files are openly distributed with the Steam installation and can be accessed and modified by anyone. Together with the integration of the Steam Workshop for mods, we want to inspire our community to create their very own missions!
All the tools they’ll need, and extensive documentation are part of our mission framework and thus available at their disposal.
Conclusion I hope I was able to inspire you guys as well. If you’re planning on a big game project, you may want to consider a mission framework like this. At the beginning without the framework, writing a mission and then making sure it actually worked and was robust enough to release, took us about a week. Now with the help of the mission framework and much of the boilerplate code already taken care of, the first implementation of a mission can be done within a day. As an additional advantage, new team members or interns can use the framework to design and implement short missions without the necessity to know every single detail of Avorion’s internal structure.
Margareta Büche Community and Development
Margareta has many roles: She takes care of the community, develops, is our hard-working team assistant and takes care of all things that sometimes occur outside the normal development cycle, such as conferences. She also takes care of bug reports and all other things the community has to tell us.
The post Avorion: Efficient Mission Implementation appeared first on Making Games.
Avorion: Efficient Mission Implementation published first on https://leolarsonblog.tumblr.com/
0 notes
Text
Getting Started With The React Hooks API
About The Author
Shedrack Akintayo is a software engineer from Lagos, Nigeria, who has a love for community building, open source and creating content and tech for the next … More about Shedrack …
In this tutorial, you are going to learn and understand what React hooks are, the basic React Hooks that are available and also examples of how to write them for your React applications. In the process, you will also get to know about some additional hooks that were shipped with React 16.8 and also how to write your own custom React Hooks.
When React 16.8 was released officially in early February 2019, it shipped with an additional API that lets you use state and other features in React without writing a class. This additional API is called Hooks and they’re becoming popular in the React ecosystem, from open-sourced projects to being used in production applications.
React Hooks are completely opt-in which means that rewriting existing code is unecessary, they do not contain any breaking changes, and they’re available for use with the release of React 16.8. Some curious developers have been making use of the Hooks API even before it was released officially, but back then it was not stable and was only an experimental feature. Now it is stable and recommended for React developers to use.
Note: We won’t be talking about React or JavaScript in general. A good knowledge of ReactJS and JavaScript will come in handy as you work through this tutorial.
What Are React Hooks?
React Hooks are in-built functions that allow React developers to use state and lifecycle methods inside functional components, they also work together with existing code, so they can easily be adopted into a codebase. The way Hooks were pitched to the public was that they allow developers to use state in functional components but under the hood, Hooks are much more powerful than that. They allow React Developers to enjoy the following benefits:
Improved code reuse;
Better code composition;
Better defaults;
Sharing non-visual logic with the use of custom hooks;
Flexibility in moving up and down the components tree.
With React Hooks, developers get the power to use functional components for almost everything they need to do from just rendering UI to also handling state and also logic — which is pretty neat.
Motivation Behind The Release Of React Hooks
According to the ReactJS official documentation, the following are the motivation behind the release of React Hooks:
Reusing stateful logic between components is difficult. With Hooks, you can reuse logic between your components without changing their architecture or structure.
Complex components can be difficult to understand. When components become larger and carry out many operations, it becomes difficult to understand in the long run. Hooks solve this by allowing you separate a particular single component into various smaller functions based upon what pieces of this separated component are related (such as setting up a subscription or fetching data), rather than having to force a split based on lifecycle methods.
Classes are quite confusing. Classes are a hindrance to learning React properly; you would need to understand how this in JavaScript works which differs from other languages. React Hooks solves this problem by allowing developers to use the best of React features without having to use classes.
The Rules Of Hooks
There are two main rules that are strictly to be adhered to as stated by the React core team in which they outlined in the hooks proposal documentation.
Make sure to not use Hooks inside loops, conditions, or nested functions;
Only use Hooks from inside React Functions.
Basic React Hooks
There are 10 in-built hooks that was shipped with React 16.8 but the basic (commonly used) hooks include:
These are the 4 basic hooks that are commonly used by React developers that have adopted React Hooks into their codebases.
useState()
The useState() hook allows React developers to update, handle and manipulate state inside functional components without needing to convert it to a class component. Let’s use the code snippet below is a simple Age counter component and we will use it to explain the power and syntax of the useState() hook.
function App() { const [age, setAge] = useState(19); const handleClick = () => setAge(age + 1) return <div> I am {age} Years Old <div> <button onClick={handleClick}>Increase my age! </button> </div> </div> }
If you’ve noticed, our component looks pretty simple, concise and it’s now a functional component and also does not have the level of complexity that a class component would have.
The useState() hook receives an initial state as an argument and then returns, by making use of array destructuring in JavaScript, the two variables in the array can be named what. The first variable is the actual state, while the second variable is a function that is meant for updating the state by providing a new state.
Our finished React app (Large preview)
This is how our component should look when it is rendered in our React application. By clicking on the “Increase my Age” button, the state of the age will change and the component would work just like a class component with state.
useEffect()
The useEffect() hook accepts a function that would contain effectual code. In functional components, effects like mutations, subscriptions, timers, logging, and other effects are not allowed to be placed inside a functional component because doing so would lead to a lot of inconsistencies when the UI is rendered and also confusing bugs.
In using the useEffect() hook, the effectual function passed into it will execute right after the render has been displayed on the screen. Effects are basically peeked into the imperative way of building UIs that is quite different from React’s functional way.
By default, effects are executed mainly after the render has been completed, but you have the option to also fire them when certain values change.
The useEffect() hook mostly into play for side-effects that are usually used for interactions with the Browser/DOM API or external API-like data fetching or subscriptions. Also, if you are already familiar with how React lifecycle methods work, you can also think of useEffect() hook as component mounting, updating and unmounting — all combined in one function. It lets us replicate the lifecycle methods in functional components.
We will use the code snippets below to explain the most basic way that we can by using the useEffect() hook.
Step 1: Define The State Of Your Application
import React, {useState} from 'react'; function App() { //Define State const [name, setName] = useState({firstName: 'name', surname: 'surname'}); const [title, setTitle] = useState('BIO'); return( <div> <h1>Title: {title}</h1> <h3>Name: {name.firstName}</h3> <h3>Surname: {name.surname}</h3> </div> ); }; export default App
Just like we discussed in the previous section on how to use the useState() hook to handle state inside functional components, we used it in our code snippet to set the state for our app that renders my full name.
Step 2: Call The useEffect Hook
import React, {useState, useEffect} from 'react'; function App() { //Define State const [name, setName] = useState({firstName: 'name', surname: 'surname'}); const [title, setTitle] = useState('BIO'); //Call the use effect hook useEffect(() => { setName({name: 'Shedrack', surname: 'Akintayo'}) }, [])//pass in an empty array as a second argument return( <div> <h1>Title: {title}</h1> <h3>Name: {name.firstName}</h3> <h3>Surname: {name.surame}</h3> </div> ); }; export default App
We have now imported the useEffect hook and also made use of the useEffect() function to set the state of our the name and surname property which is pretty neat and concise.
You may have noticed the useEffect hook in the second argument which is an empty array; this is because it contains a call to the setFullName which does not have a list of dependencies. Passing the second argument will prevent an infinite chain of updates (componentDidUpdate()) and it’ll also allow our useEffect() hook to act as a componentDidMount lifecycle method and render once without re-rendering on every change in the tree.
Our React app should now look like this:
React app using the useEffect Hook (Large preview)
We can also use change the title property of our application inside the useEffect() function by calling the setTitle() function, like so:
import React, {useState, useEffect} from 'react'; function App() { //Define State const [name, setName] = useState({firstName: 'name', surname: 'surname'}); const [title, setTitle] = useState('BIO'); //Call the use effect hook useEffect(() => { setName({name: 'Shedrack', surname: 'Akintayo'}) setTitle({'My Full Name'}) //Set Title }, [])// pass in an empty array as a second argument return( <div> <h1>Title: {title}</h1> <h3>Name: {name.firstName}</h3> <h3>Surname: {name.surame}</h3> </div> ); }; export default App
Now after our application has rerendered, it now shows the new title.
Our finished project (Large preview)
useContext()
The useContext() hook accepts a context object, i.e the value that is returned from React.createContext, and then it returns the current context value for that context.
This hook gives functional components easy access to your React app context. Before the useContext hook was introduced you would need to set up a contextType or a <Consumer> to access your global state passed down from some provider in a class component.
Basically, the useContext hook works with the React Context API which is a way to share data deeply throughout your app without the need to manually pass your app props down through various levels. Now, the useContext() makes using Context a little easier.
The code snippets below will show how the Context API works and how the useContext Hook makes it better.
The Normal Way To Use The Context API
import React from "react"; import ReactDOM from "react-dom"; const NumberContext = React.createContext(); function App() { return ( <NumberContext.Provider value={45}> <div> <Display /> </div> </NumberContext.Provider> ); } function Display() { return ( <NumberContext.Consumer> {value => <div>The answer to the question is {value}.</div>} </NumberContext.Consumer> ); } ReactDOM.render(<App />, document.querySelector("#root"));
Let’s now break down the code snippet and explain each concept.
Below, we are creating a context called NumberContext. It is meant to return an object with two values: { Provider, Consumer }.
const NumberContext = React.createContext();
Then we use the Provider value that was returned from the NumberContext we created to make a particular value available to all the children.
function App() { return ( <NumberContext.Provider value={45}> <div> <Display /> </div> </NumberContext.Provider> ); }
With that, we can use the Consumer value that was returned from the NumberContext we created to get the value we made available to all children. If you have noticed, this component did not get any props.
function Display() { return ( <NumberContext.Consumer> {value => <div>The answer to the question is {value}.</div>} </NumberContext.Consumer> ); } ReactDOM.render(<App />, document.querySelector("#root"));
Note how we were able to get the value from the App component into the Display component by wrapping our content in a NumberContext.Consumer and using the render props method to retrieve the value and render it.
Everything works well and the render props method we used is a really good pattern for handling dynamic data, but in the long run, it does introduce some unnecessary nesting and confusion if you’re not used to it.
Using The useContext Method
To explain the useContext method we will rewrite the Display component using the useContext hook.
// import useContext (or we could write React.useContext) import React, { useContext } from 'react'; // old code goes here function Display() { const value = useContext(NumberContext); return <div>The answer is {value}.</div>; }
That’s all we need to do in order to display our value. Pretty neat, right? You call the useContext() hook and pass in the context object we created and we grab the value from it.
Note: Don’t forget that the argument that is passed to the useContext hook must be the context object itself and any component calling the useContext will always re-render when the context value changes.
useReducer()
The useReducer hook is used for handling complex states and transitions in state. It takes in a reducer function and also an initial state input; then, it returns the current state and also a dispatch function as output by the means of array destructuring.
The code below is the proper syntax for using the useReducer hook.
const [state, dispatch] = useReducer(reducer, initialArg, init);
It is sort of an alternative to the useState hook; it is usually preferable to useState when you have complex state logic that has to do with multiple sub-values or when the next state is dependent on the previous one.
Other React Hooks Available
useCallback This hook returns a callback function that is memoized and that only changes if one dependency in the dependency tree changes. useMemo This hook returns a memoized value, you can pass in a “create” function and also an array of dependencies. The value it returns will only use the memoized value again if one of the dependencies in the dependency tree changes. useRef This hook returns a mutable ref object whose .current property is initialized to the passed argument (initialValue). The returned object will be available for the full lifetime of the component. useImperativeHandle This hook is used for customizing the instance value that is made available for parent components when using refs in React. useLayoutEffect This hook similar to the useEffect hook, however, it fires synchronously after all DOM mutations. It also renders in the same way as componentDidUpdate and componentDidMount. useDebugValue This hook can be used to display a label for custom hooks in the React Dev Tools. It is very useful for debugging with the React Dev Tools.
Custom React Hooks
A “custom Hook” is a JavaScript function whose names are prefixed with the word use and can be used to call other Hooks. It also lets you to extract component logic into reusable functions; they are normal JavaScript functions that can make use of other Hooks inside of it, and also contain a common stateful logic that can be made use of within multiple components.
The code snippets below demonstrate an example of a custom React Hook for implementing infinite scroll (by Paulo Levy):
import { useState } from "react"; export const useInfiniteScroll = (start = 30, pace = 10) => { const [limit, setLimit] = useState(start); window.onscroll = () => { if ( window.innerHeight + document.documentElement.scrollTop === document.documentElement.offsetHeight ) { setLimit(limit + pace); } }; return limit; };
This custom Hook accepts two arguments which are start and pace. The start argument is the starting number of elements to be rendered while the pace argument is the subsequent number of elements that are to be rendered. By default, the start and pace arguments are set to 30 and 10 respectively which means you can actually call the Hook without any arguments and those default values will be used instead.
So in order to use this Hook within a React app, we would use it with an online API that returns ‘fake’ data:
import React, { useState, useEffect } from "react"; import { useInfiniteScroll } from "./useInfiniteScroll"; const App = () => { let infiniteScroll = useInfiniteScroll(); const [tableContent, setTableContent] = useState([]); useEffect(() => { fetch("https://jsonplaceholder.typicode.com/todos/") .then(response => response.json()) .then(json => setTableContent(json)); }, []); return ( <div style=> <table> <thead> <tr> <th>User ID</th> <th>Title</th> </tr> </thead> <tbody> {tableContent.slice(0, infiniteScroll).map(content => { return ( <tr key={content.id}> <td style=>{content.userId}</td> <td style=>{content.title}</td> </tr> ); })} </tbody> </table> </div> ); }; export default App;
The code above will render a list of fake data (userID and title) that make use of the infinite scroll hook to display the initial number of data on the screen.
Conclusion
I hope you enjoyed working through this tutorial. You could always read more on React Hooks from the references below.
If you have any questions, you can leave them in the comments section and I’ll be happy to answer every single one!
The supporting repo for this article is available on Github.
Resources And Further Reading
(ks, ra, yk, il)
Website Design & SEO Delray Beach by DBL07.co
Delray Beach SEO
source http://www.scpie.org/getting-started-with-the-react-hooks-api/ source https://scpie.tumblr.com/post/615094926681718784
0 notes
Text
Getting Started With The React Hooks API
About The Author
Shedrack Akintayo is a software engineer from Lagos, Nigeria, who has a love for community building, open source and creating content and tech for the next … More about Shedrack …
In this tutorial, you are going to learn and understand what React hooks are, the basic React Hooks that are available and also examples of how to write them for your React applications. In the process, you will also get to know about some additional hooks that were shipped with React 16.8 and also how to write your own custom React Hooks.
When React 16.8 was released officially in early February 2019, it shipped with an additional API that lets you use state and other features in React without writing a class. This additional API is called Hooks and they’re becoming popular in the React ecosystem, from open-sourced projects to being used in production applications.
React Hooks are completely opt-in which means that rewriting existing code is unecessary, they do not contain any breaking changes, and they’re available for use with the release of React 16.8. Some curious developers have been making use of the Hooks API even before it was released officially, but back then it was not stable and was only an experimental feature. Now it is stable and recommended for React developers to use.
Note: We won’t be talking about React or JavaScript in general. A good knowledge of ReactJS and JavaScript will come in handy as you work through this tutorial.
What Are React Hooks?
React Hooks are in-built functions that allow React developers to use state and lifecycle methods inside functional components, they also work together with existing code, so they can easily be adopted into a codebase. The way Hooks were pitched to the public was that they allow developers to use state in functional components but under the hood, Hooks are much more powerful than that. They allow React Developers to enjoy the following benefits:
Improved code reuse;
Better code composition;
Better defaults;
Sharing non-visual logic with the use of custom hooks;
Flexibility in moving up and down the components tree.
With React Hooks, developers get the power to use functional components for almost everything they need to do from just rendering UI to also handling state and also logic — which is pretty neat.
Motivation Behind The Release Of React Hooks
According to the ReactJS official documentation, the following are the motivation behind the release of React Hooks:
Reusing stateful logic between components is difficult. With Hooks, you can reuse logic between your components without changing their architecture or structure.
Complex components can be difficult to understand. When components become larger and carry out many operations, it becomes difficult to understand in the long run. Hooks solve this by allowing you separate a particular single component into various smaller functions based upon what pieces of this separated component are related (such as setting up a subscription or fetching data), rather than having to force a split based on lifecycle methods.
Classes are quite confusing. Classes are a hindrance to learning React properly; you would need to understand how this in JavaScript works which differs from other languages. React Hooks solves this problem by allowing developers to use the best of React features without having to use classes.
The Rules Of Hooks
There are two main rules that are strictly to be adhered to as stated by the React core team in which they outlined in the hooks proposal documentation.
Make sure to not use Hooks inside loops, conditions, or nested functions;
Only use Hooks from inside React Functions.
Basic React Hooks
There are 10 in-built hooks that was shipped with React 16.8 but the basic (commonly used) hooks include:
These are the 4 basic hooks that are commonly used by React developers that have adopted React Hooks into their codebases.
useState()
The useState() hook allows React developers to update, handle and manipulate state inside functional components without needing to convert it to a class component. Let’s use the code snippet below is a simple Age counter component and we will use it to explain the power and syntax of the useState() hook.
function App() { const [age, setAge] = useState(19); const handleClick = () => setAge(age + 1) return <div> I am {age} Years Old <div> <button onClick={handleClick}>Increase my age! </button> </div> </div> }
If you’ve noticed, our component looks pretty simple, concise and it’s now a functional component and also does not have the level of complexity that a class component would have.
The useState() hook receives an initial state as an argument and then returns, by making use of array destructuring in JavaScript, the two variables in the array can be named what. The first variable is the actual state, while the second variable is a function that is meant for updating the state by providing a new state.
Our finished React app (Large preview)
This is how our component should look when it is rendered in our React application. By clicking on the “Increase my Age” button, the state of the age will change and the component would work just like a class component with state.
useEffect()
The useEffect() hook accepts a function that would contain effectual code. In functional components, effects like mutations, subscriptions, timers, logging, and other effects are not allowed to be placed inside a functional component because doing so would lead to a lot of inconsistencies when the UI is rendered and also confusing bugs.
In using the useEffect() hook, the effectual function passed into it will execute right after the render has been displayed on the screen. Effects are basically peeked into the imperative way of building UIs that is quite different from React’s functional way.
By default, effects are executed mainly after the render has been completed, but you have the option to also fire them when certain values change.
The useEffect() hook mostly into play for side-effects that are usually used for interactions with the Browser/DOM API or external API-like data fetching or subscriptions. Also, if you are already familiar with how React lifecycle methods work, you can also think of useEffect() hook as component mounting, updating and unmounting — all combined in one function. It lets us replicate the lifecycle methods in functional components.
We will use the code snippets below to explain the most basic way that we can by using the useEffect() hook.
Step 1: Define The State Of Your Application
import React, {useState} from 'react'; function App() { //Define State const [name, setName] = useState({firstName: 'name', surname: 'surname'}); const [title, setTitle] = useState('BIO'); return( <div> <h1>Title: {title}</h1> <h3>Name: {name.firstName}</h3> <h3>Surname: {name.surname}</h3> </div> ); }; export default App
Just like we discussed in the previous section on how to use the useState() hook to handle state inside functional components, we used it in our code snippet to set the state for our app that renders my full name.
Step 2: Call The useEffect Hook
import React, {useState, useEffect} from 'react'; function App() { //Define State const [name, setName] = useState({firstName: 'name', surname: 'surname'}); const [title, setTitle] = useState('BIO'); //Call the use effect hook useEffect(() => { setName({name: 'Shedrack', surname: 'Akintayo'}) }, [])//pass in an empty array as a second argument return( <div> <h1>Title: {title}</h1> <h3>Name: {name.firstName}</h3> <h3>Surname: {name.surame}</h3> </div> ); }; export default App
We have now imported the useEffect hook and also made use of the useEffect() function to set the state of our the name and surname property which is pretty neat and concise.
You may have noticed the useEffect hook in the second argument which is an empty array; this is because it contains a call to the setFullName which does not have a list of dependencies. Passing the second argument will prevent an infinite chain of updates (componentDidUpdate()) and it’ll also allow our useEffect() hook to act as a componentDidMount lifecycle method and render once without re-rendering on every change in the tree.
Our React app should now look like this:
React app using the useEffect Hook (Large preview)
We can also use change the title property of our application inside the useEffect() function by calling the setTitle() function, like so:
import React, {useState, useEffect} from 'react'; function App() { //Define State const [name, setName] = useState({firstName: 'name', surname: 'surname'}); const [title, setTitle] = useState('BIO'); //Call the use effect hook useEffect(() => { setName({name: 'Shedrack', surname: 'Akintayo'}) setTitle({'My Full Name'}) //Set Title }, [])// pass in an empty array as a second argument return( <div> <h1>Title: {title}</h1> <h3>Name: {name.firstName}</h3> <h3>Surname: {name.surame}</h3> </div> ); }; export default App
Now after our application has rerendered, it now shows the new title.
Our finished project (Large preview)
useContext()
The useContext() hook accepts a context object, i.e the value that is returned from React.createContext, and then it returns the current context value for that context.
This hook gives functional components easy access to your React app context. Before the useContext hook was introduced you would need to set up a contextType or a <Consumer> to access your global state passed down from some provider in a class component.
Basically, the useContext hook works with the React Context API which is a way to share data deeply throughout your app without the need to manually pass your app props down through various levels. Now, the useContext() makes using Context a little easier.
The code snippets below will show how the Context API works and how the useContext Hook makes it better.
The Normal Way To Use The Context API
import React from "react"; import ReactDOM from "react-dom"; const NumberContext = React.createContext(); function App() { return ( <NumberContext.Provider value={45}> <div> <Display /> </div> </NumberContext.Provider> ); } function Display() { return ( <NumberContext.Consumer> {value => <div>The answer to the question is {value}.</div>} </NumberContext.Consumer> ); } ReactDOM.render(<App />, document.querySelector("#root"));
Let’s now break down the code snippet and explain each concept.
Below, we are creating a context called NumberContext. It is meant to return an object with two values: { Provider, Consumer }.
const NumberContext = React.createContext();
Then we use the Provider value that was returned from the NumberContext we created to make a particular value available to all the children.
function App() { return ( <NumberContext.Provider value={45}> <div> <Display /> </div> </NumberContext.Provider> ); }
With that, we can use the Consumer value that was returned from the NumberContext we created to get the value we made available to all children. If you have noticed, this component did not get any props.
function Display() { return ( <NumberContext.Consumer> {value => <div>The answer to the question is {value}.</div>} </NumberContext.Consumer> ); } ReactDOM.render(<App />, document.querySelector("#root"));
Note how we were able to get the value from the App component into the Display component by wrapping our content in a NumberContext.Consumer and using the render props method to retrieve the value and render it.
Everything works well and the render props method we used is a really good pattern for handling dynamic data, but in the long run, it does introduce some unnecessary nesting and confusion if you’re not used to it.
Using The useContext Method
To explain the useContext method we will rewrite the Display component using the useContext hook.
// import useContext (or we could write React.useContext) import React, { useContext } from 'react'; // old code goes here function Display() { const value = useContext(NumberContext); return <div>The answer is {value}.</div>; }
That’s all we need to do in order to display our value. Pretty neat, right? You call the useContext() hook and pass in the context object we created and we grab the value from it.
Note: Don’t forget that the argument that is passed to the useContext hook must be the context object itself and any component calling the useContext will always re-render when the context value changes.
useReducer()
The useReducer hook is used for handling complex states and transitions in state. It takes in a reducer function and also an initial state input; then, it returns the current state and also a dispatch function as output by the means of array destructuring.
The code below is the proper syntax for using the useReducer hook.
const [state, dispatch] = useReducer(reducer, initialArg, init);
It is sort of an alternative to the useState hook; it is usually preferable to useState when you have complex state logic that has to do with multiple sub-values or when the next state is dependent on the previous one.
Other React Hooks Available
useCallbackThis hook returns a callback function that is memoized and that only changes if one dependency in the dependency tree changes.useMemoThis hook returns a memoized value, you can pass in a “create” function and also an array of dependencies. The value it returns will only use the memoized value again if one of the dependencies in the dependency tree changes.useRefThis hook returns a mutable ref object whose .current property is initialized to the passed argument (initialValue). The returned object will be available for the full lifetime of the component.useImperativeHandleThis hook is used for customizing the instance value that is made available for parent components when using refs in React.useLayoutEffectThis hook similar to the useEffect hook, however, it fires synchronously after all DOM mutations. It also renders in the same way as componentDidUpdate and componentDidMount.useDebugValueThis hook can be used to display a label for custom hooks in the React Dev Tools. It is very useful for debugging with the React Dev Tools.
Custom React Hooks
A “custom Hook” is a JavaScript function whose names are prefixed with the word use and can be used to call other Hooks. It also lets you to extract component logic into reusable functions; they are normal JavaScript functions that can make use of other Hooks inside of it, and also contain a common stateful logic that can be made use of within multiple components.
The code snippets below demonstrate an example of a custom React Hook for implementing infinite scroll (by Paulo Levy):
import { useState } from "react"; export const useInfiniteScroll = (start = 30, pace = 10) => { const [limit, setLimit] = useState(start); window.onscroll = () => { if ( window.innerHeight + document.documentElement.scrollTop === document.documentElement.offsetHeight ) { setLimit(limit + pace); } }; return limit; };
This custom Hook accepts two arguments which are start and pace. The start argument is the starting number of elements to be rendered while the pace argument is the subsequent number of elements that are to be rendered. By default, the start and pace arguments are set to 30 and 10 respectively which means you can actually call the Hook without any arguments and those default values will be used instead.
So in order to use this Hook within a React app, we would use it with an online API that returns ‘fake’ data:
import React, { useState, useEffect } from "react"; import { useInfiniteScroll } from "./useInfiniteScroll"; const App = () => { let infiniteScroll = useInfiniteScroll(); const [tableContent, setTableContent] = useState([]); useEffect(() => { fetch("https://jsonplaceholder.typicode.com/todos/") .then(response => response.json()) .then(json => setTableContent(json)); }, []); return ( <div style=> <table> <thead> <tr> <th>User ID</th> <th>Title</th> </tr> </thead> <tbody> {tableContent.slice(0, infiniteScroll).map(content => { return ( <tr key={content.id}> <td style=>{content.userId}</td> <td style=>{content.title}</td> </tr> ); })} </tbody> </table> </div> ); }; export default App;
The code above will render a list of fake data (userID and title) that make use of the infinite scroll hook to display the initial number of data on the screen.
Conclusion
I hope you enjoyed working through this tutorial. You could always read more on React Hooks from the references below.
If you have any questions, you can leave them in the comments section and I’ll be happy to answer every single one!
The supporting repo for this article is available on Github.
Resources And Further Reading
(ks, ra, yk, il)
Website Design & SEO Delray Beach by DBL07.co
Delray Beach SEO
source http://www.scpie.org/getting-started-with-the-react-hooks-api/ source https://scpie1.blogspot.com/2020/04/getting-started-with-react-hooks-api.html
0 notes
Text
Getting Started With The React Hooks API
About The Author
Shedrack Akintayo is a software engineer from Lagos, Nigeria, who has a love for community building, open source and creating content and tech for the next … More about Shedrack …
In this tutorial, you are going to learn and understand what React hooks are, the basic React Hooks that are available and also examples of how to write them for your React applications. In the process, you will also get to know about some additional hooks that were shipped with React 16.8 and also how to write your own custom React Hooks.
When React 16.8 was released officially in early February 2019, it shipped with an additional API that lets you use state and other features in React without writing a class. This additional API is called Hooks and they’re becoming popular in the React ecosystem, from open-sourced projects to being used in production applications.
React Hooks are completely opt-in which means that rewriting existing code is unecessary, they do not contain any breaking changes, and they’re available for use with the release of React 16.8. Some curious developers have been making use of the Hooks API even before it was released officially, but back then it was not stable and was only an experimental feature. Now it is stable and recommended for React developers to use.
Note: We won’t be talking about React or JavaScript in general. A good knowledge of ReactJS and JavaScript will come in handy as you work through this tutorial.
What Are React Hooks?
React Hooks are in-built functions that allow React developers to use state and lifecycle methods inside functional components, they also work together with existing code, so they can easily be adopted into a codebase. The way Hooks were pitched to the public was that they allow developers to use state in functional components but under the hood, Hooks are much more powerful than that. They allow React Developers to enjoy the following benefits:
Improved code reuse;
Better code composition;
Better defaults;
Sharing non-visual logic with the use of custom hooks;
Flexibility in moving up and down the components tree.
With React Hooks, developers get the power to use functional components for almost everything they need to do from just rendering UI to also handling state and also logic — which is pretty neat.
Motivation Behind The Release Of React Hooks
According to the ReactJS official documentation, the following are the motivation behind the release of React Hooks:
Reusing stateful logic between components is difficult. With Hooks, you can reuse logic between your components without changing their architecture or structure.
Complex components can be difficult to understand. When components become larger and carry out many operations, it becomes difficult to understand in the long run. Hooks solve this by allowing you separate a particular single component into various smaller functions based upon what pieces of this separated component are related (such as setting up a subscription or fetching data), rather than having to force a split based on lifecycle methods.
Classes are quite confusing. Classes are a hindrance to learning React properly; you would need to understand how this in JavaScript works which differs from other languages. React Hooks solves this problem by allowing developers to use the best of React features without having to use classes.
The Rules Of Hooks
There are two main rules that are strictly to be adhered to as stated by the React core team in which they outlined in the hooks proposal documentation.
Make sure to not use Hooks inside loops, conditions, or nested functions;
Only use Hooks from inside React Functions.
Basic React Hooks
There are 10 in-built hooks that was shipped with React 16.8 but the basic (commonly used) hooks include:
These are the 4 basic hooks that are commonly used by React developers that have adopted React Hooks into their codebases.
useState()
The useState() hook allows React developers to update, handle and manipulate state inside functional components without needing to convert it to a class component. Let’s use the code snippet below is a simple Age counter component and we will use it to explain the power and syntax of the useState() hook.
function App() { const [age, setAge] = useState(19); const handleClick = () => setAge(age + 1) return <div> I am {age} Years Old <div> <button onClick={handleClick}>Increase my age! </button> </div> </div> }
If you’ve noticed, our component looks pretty simple, concise and it’s now a functional component and also does not have the level of complexity that a class component would have.
The useState() hook receives an initial state as an argument and then returns, by making use of array destructuring in JavaScript, the two variables in the array can be named what. The first variable is the actual state, while the second variable is a function that is meant for updating the state by providing a new state.
Our finished React app (Large preview)
This is how our component should look when it is rendered in our React application. By clicking on the “Increase my Age” button, the state of the age will change and the component would work just like a class component with state.
useEffect()
The useEffect() hook accepts a function that would contain effectual code. In functional components, effects like mutations, subscriptions, timers, logging, and other effects are not allowed to be placed inside a functional component because doing so would lead to a lot of inconsistencies when the UI is rendered and also confusing bugs.
In using the useEffect() hook, the effectual function passed into it will execute right after the render has been displayed on the screen. Effects are basically peeked into the imperative way of building UIs that is quite different from React’s functional way.
By default, effects are executed mainly after the render has been completed, but you have the option to also fire them when certain values change.
The useEffect() hook mostly into play for side-effects that are usually used for interactions with the Browser/DOM API or external API-like data fetching or subscriptions. Also, if you are already familiar with how React lifecycle methods work, you can also think of useEffect() hook as component mounting, updating and unmounting — all combined in one function. It lets us replicate the lifecycle methods in functional components.
We will use the code snippets below to explain the most basic way that we can by using the useEffect() hook.
Step 1: Define The State Of Your Application
import React, {useState} from 'react'; function App() { //Define State const [name, setName] = useState({firstName: 'name', surname: 'surname'}); const [title, setTitle] = useState('BIO'); return( <div> <h1>Title: {title}</h1> <h3>Name: {name.firstName}</h3> <h3>Surname: {name.surname}</h3> </div> ); }; export default App
Just like we discussed in the previous section on how to use the useState() hook to handle state inside functional components, we used it in our code snippet to set the state for our app that renders my full name.
Step 2: Call The useEffect Hook
import React, {useState, useEffect} from 'react'; function App() { //Define State const [name, setName] = useState({firstName: 'name', surname: 'surname'}); const [title, setTitle] = useState('BIO'); //Call the use effect hook useEffect(() => { setName({name: 'Shedrack', surname: 'Akintayo'}) }, [])//pass in an empty array as a second argument return( <div> <h1>Title: {title}</h1> <h3>Name: {name.firstName}</h3> <h3>Surname: {name.surame}</h3> </div> ); }; export default App
We have now imported the useEffect hook and also made use of the useEffect() function to set the state of our the name and surname property which is pretty neat and concise.
You may have noticed the useEffect hook in the second argument which is an empty array; this is because it contains a call to the setFullName which does not have a list of dependencies. Passing the second argument will prevent an infinite chain of updates (componentDidUpdate()) and it’ll also allow our useEffect() hook to act as a componentDidMount lifecycle method and render once without re-rendering on every change in the tree.
Our React app should now look like this:
React app using the useEffect Hook (Large preview)
We can also use change the title property of our application inside the useEffect() function by calling the setTitle() function, like so:
import React, {useState, useEffect} from 'react'; function App() { //Define State const [name, setName] = useState({firstName: 'name', surname: 'surname'}); const [title, setTitle] = useState('BIO'); //Call the use effect hook useEffect(() => { setName({name: 'Shedrack', surname: 'Akintayo'}) setTitle({'My Full Name'}) //Set Title }, [])// pass in an empty array as a second argument return( <div> <h1>Title: {title}</h1> <h3>Name: {name.firstName}</h3> <h3>Surname: {name.surame}</h3> </div> ); }; export default App
Now after our application has rerendered, it now shows the new title.
Our finished project (Large preview)
useContext()
The useContext() hook accepts a context object, i.e the value that is returned from React.createContext, and then it returns the current context value for that context.
This hook gives functional components easy access to your React app context. Before the useContext hook was introduced you would need to set up a contextType or a <Consumer> to access your global state passed down from some provider in a class component.
Basically, the useContext hook works with the React Context API which is a way to share data deeply throughout your app without the need to manually pass your app props down through various levels. Now, the useContext() makes using Context a little easier.
The code snippets below will show how the Context API works and how the useContext Hook makes it better.
The Normal Way To Use The Context API
import React from "react"; import ReactDOM from "react-dom"; const NumberContext = React.createContext(); function App() { return ( <NumberContext.Provider value={45}> <div> <Display /> </div> </NumberContext.Provider> ); } function Display() { return ( <NumberContext.Consumer> {value => <div>The answer to the question is {value}.</div>} </NumberContext.Consumer> ); } ReactDOM.render(<App />, document.querySelector("#root"));
Let’s now break down the code snippet and explain each concept.
Below, we are creating a context called NumberContext. It is meant to return an object with two values: { Provider, Consumer }.
const NumberContext = React.createContext();
Then we use the Provider value that was returned from the NumberContext we created to make a particular value available to all the children.
function App() { return ( <NumberContext.Provider value={45}> <div> <Display /> </div> </NumberContext.Provider> ); }
With that, we can use the Consumer value that was returned from the NumberContext we created to get the value we made available to all children. If you have noticed, this component did not get any props.
function Display() { return ( <NumberContext.Consumer> {value => <div>The answer to the question is {value}.</div>} </NumberContext.Consumer> ); } ReactDOM.render(<App />, document.querySelector("#root"));
Note how we were able to get the value from the App component into the Display component by wrapping our content in a NumberContext.Consumer and using the render props method to retrieve the value and render it.
Everything works well and the render props method we used is a really good pattern for handling dynamic data, but in the long run, it does introduce some unnecessary nesting and confusion if you’re not used to it.
Using The useContext Method
To explain the useContext method we will rewrite the Display component using the useContext hook.
// import useContext (or we could write React.useContext) import React, { useContext } from 'react'; // old code goes here function Display() { const value = useContext(NumberContext); return <div>The answer is {value}.</div>; }
That’s all we need to do in order to display our value. Pretty neat, right? You call the useContext() hook and pass in the context object we created and we grab the value from it.
Note: Don’t forget that the argument that is passed to the useContext hook must be the context object itself and any component calling the useContext will always re-render when the context value changes.
useReducer()
The useReducer hook is used for handling complex states and transitions in state. It takes in a reducer function and also an initial state input; then, it returns the current state and also a dispatch function as output by the means of array destructuring.
The code below is the proper syntax for using the useReducer hook.
const [state, dispatch] = useReducer(reducer, initialArg, init);
It is sort of an alternative to the useState hook; it is usually preferable to useState when you have complex state logic that has to do with multiple sub-values or when the next state is dependent on the previous one.
Other React Hooks Available
useCallback This hook returns a callback function that is memoized and that only changes if one dependency in the dependency tree changes. useMemo This hook returns a memoized value, you can pass in a “create” function and also an array of dependencies. The value it returns will only use the memoized value again if one of the dependencies in the dependency tree changes. useRef This hook returns a mutable ref object whose .current property is initialized to the passed argument (initialValue). The returned object will be available for the full lifetime of the component. useImperativeHandle This hook is used for customizing the instance value that is made available for parent components when using refs in React. useLayoutEffect This hook similar to the useEffect hook, however, it fires synchronously after all DOM mutations. It also renders in the same way as componentDidUpdate and componentDidMount. useDebugValue This hook can be used to display a label for custom hooks in the React Dev Tools. It is very useful for debugging with the React Dev Tools.
Custom React Hooks
A “custom Hook” is a JavaScript function whose names are prefixed with the word use and can be used to call other Hooks. It also lets you to extract component logic into reusable functions; they are normal JavaScript functions that can make use of other Hooks inside of it, and also contain a common stateful logic that can be made use of within multiple components.
The code snippets below demonstrate an example of a custom React Hook for implementing infinite scroll (by Paulo Levy):
import { useState } from "react"; export const useInfiniteScroll = (start = 30, pace = 10) => { const [limit, setLimit] = useState(start); window.onscroll = () => { if ( window.innerHeight + document.documentElement.scrollTop === document.documentElement.offsetHeight ) { setLimit(limit + pace); } }; return limit; };
This custom Hook accepts two arguments which are start and pace. The start argument is the starting number of elements to be rendered while the pace argument is the subsequent number of elements that are to be rendered. By default, the start and pace arguments are set to 30 and 10 respectively which means you can actually call the Hook without any arguments and those default values will be used instead.
So in order to use this Hook within a React app, we would use it with an online API that returns ‘fake’ data:
import React, { useState, useEffect } from "react"; import { useInfiniteScroll } from "./useInfiniteScroll"; const App = () => { let infiniteScroll = useInfiniteScroll(); const [tableContent, setTableContent] = useState([]); useEffect(() => { fetch("https://jsonplaceholder.typicode.com/todos/") .then(response => response.json()) .then(json => setTableContent(json)); }, []); return ( <div style=> <table> <thead> <tr> <th>User ID</th> <th>Title</th> </tr> </thead> <tbody> {tableContent.slice(0, infiniteScroll).map(content => { return ( <tr key={content.id}> <td style=>{content.userId}</td> <td style=>{content.title}</td> </tr> ); })} </tbody> </table> </div> ); }; export default App;
The code above will render a list of fake data (userID and title) that make use of the infinite scroll hook to display the initial number of data on the screen.
Conclusion
I hope you enjoyed working through this tutorial. You could always read more on React Hooks from the references below.
If you have any questions, you can leave them in the comments section and I’ll be happy to answer every single one!
The supporting repo for this article is available on Github.
Resources And Further Reading
(ks, ra, yk, il)
Website Design & SEO Delray Beach by DBL07.co
Delray Beach SEO
source http://www.scpie.org/getting-started-with-the-react-hooks-api/
0 notes
Quote
When React 16.8 was released officially in early February 2019, it shipped with an additional API that lets you use state and other features in React without writing a class. This additional API is called Hooks and they’re becoming popular in the React ecosystem, from open-sourced projects to being used in production applications. React Hooks are completely opt-in which means that rewriting existing code is unecessary, they do not contain any breaking changes, and they’re available for use with the release of React 16.8. Some curious developers have been making use of the Hooks API even before it was released officially, but back then it was not stable and was only an experimental feature. Now it is stable and recommended for React developers to use. Note: We won’t be talking about React or JavaScript in general. A good knowledge of ReactJS and JavaScript will come in handy as you work through this tutorial. What Are React Hooks? React Hooks are in-built functions that allow React developers to use state and lifecycle methods inside functional components, they also work together with existing code, so they can easily be adopted into a codebase. The way Hooks were pitched to the public was that they allow developers to use state in functional components but under the hood, Hooks are much more powerful than that. They allow React Developers to enjoy the following benefits: Improved code reuse; Better code composition; Better defaults; Sharing non-visual logic with the use of custom hooks; Flexibility in moving up and down the components tree. With React Hooks, developers get the power to use functional components for almost everything they need to do from just rendering UI to also handling state and also logic — which is pretty neat. Motivation Behind The Release Of React Hooks According to the ReactJS official documentation, the following are the motivation behind the release of React Hooks: Reusing stateful logic between components is difficult.With Hooks, you can reuse logic between your components without changing their architecture or structure. Complex components can be difficult to understand.When components become larger and carry out many operations, it becomes difficult to understand in the long run. Hooks solve this by allowing you separate a particular single component into various smaller functions based upon what pieces of this separated component are related (such as setting up a subscription or fetching data), rather than having to force a split based on lifecycle methods. Classes are quite confusing.Classes are a hindrance to learning React properly; you would need to understand how this in JavaScript works which differs from other languages. React Hooks solves this problem by allowing developers to use the best of React features without having to use classes. The Rules Of Hooks There are two main rules that are strictly to be adhered to as stated by the React core team in which they outlined in the hooks proposal documentation. Make sure to not use Hooks inside loops, conditions, or nested functions; Only use Hooks from inside React Functions. Basic React Hooks There are 10 in-built hooks that was shipped with React 16.8 but the basic (commonly used) hooks include: useState() useEffect() useContext() useReducer() These are the 4 basic hooks that are commonly used by React developers that have adopted React Hooks into their codebases. useState() The useState() hook allows React developers to update, handle and manipulate state inside functional components without needing to convert it to a class component. Let’s use the code snippet below is a simple Age counter component and we will use it to explain the power and syntax of the useState() hook. function App() { const [age, setAge] = useState(19); const handleClick = () => setAge(age + 1) return I am {age} Years Old Increase my age! } If you’ve noticed, our component looks pretty simple, concise and it’s now a functional component and also does not have the level of complexity that a class component would have. The useState() hook receives an initial state as an argument and then returns, by making use of array destructuring in JavaScript, the two variables in the array can be named what. The first variable is the actual state, while the second variable is a function that is meant for updating the state by providing a new state. Our finished React app (Large preview)This is how our component should look when it is rendered in our React application. By clicking on the “Increase my Age” button, the state of the age will change and the component would work just like a class component with state. useEffect() The useEffect() hook accepts a function that would contain effectual code. In functional components, effects like mutations, subscriptions, timers, logging, and other effects are not allowed to be placed inside a functional component because doing so would lead to a lot of inconsistencies when the UI is rendered and also confusing bugs. In using the useEffect() hook, the effectual function passed into it will execute right after the render has been displayed on the screen. Effects are basically peeked into the imperative way of building UIs that is quite different from React’s functional way. By default, effects are executed mainly after the render has been completed, but you have the option to also fire them when certain values change. The useEffect() hook mostly into play for side-effects that are usually used for interactions with the Browser/DOM API or external API-like data fetching or subscriptions. Also, if you are already familiar with how React lifecycle methods work, you can also think of useEffect() hook as component mounting, updating and unmounting — all combined in one function. It lets us replicate the lifecycle methods in functional components. We will use the code snippets below to explain the most basic way that we can by using the useEffect() hook. Step 1: Define The State Of Your Application import React, {useState} from 'react'; function App() { //Define State const [name, setName] = useState({firstName: 'name', surname: 'surname'}); const [title, setTitle] = useState('BIO'); return( Title: {title} Name: {name.firstName} Surname: {name.surname} ); }; export default App Just like we discussed in the previous section on how to use the useState() hook to handle state inside functional components, we used it in our code snippet to set the state for our app that renders my full name. Step 2: Call The useEffect Hook import React, {useState, useEffect} from 'react'; function App() { //Define State const [name, setName] = useState({firstName: 'name', surname: 'surname'}); const [title, setTitle] = useState('BIO'); //Call the use effect hook useEffect(() => { setName({name: 'Shedrack', surname: 'Akintayo'}) }, [])//pass in an empty array as a second argument return( Title: {title} Name: {name.firstName} Surname: {name.surame} ); }; export default App We have now imported the useEffect hook and also made use of the useEffect() function to set the state of our the name and surname property which is pretty neat and concise. You may have noticed the useEffect hook in the second argument which is an empty array; this is because it contains a call to the setFullName which does not have a list of dependencies. Passing the second argument will prevent an infinite chain of updates (componentDidUpdate()) and it’ll also allow our useEffect() hook to act as a componentDidMount lifecycle method and render once without re-rendering on every change in the tree. Our React app should now look like this: React app using the useEffect Hook (Large preview) We can also use change the title property of our application inside the useEffect() function by calling the setTitle() function, like so: import React, {useState, useEffect} from 'react'; function App() { //Define State const [name, setName] = useState({firstName: 'name', surname: 'surname'}); const [title, setTitle] = useState('BIO'); //Call the use effect hook useEffect(() => { setName({name: 'Shedrack', surname: 'Akintayo'}) setTitle({'My Full Name'}) //Set Title }, [])// pass in an empty array as a second argument return( Title: {title} Name: {name.firstName} Surname: {name.surame} ); }; export default App Now after our application has rerendered, it now shows the new title. Our finished project (Large preview) useContext() The useContext() hook accepts a context object, i.e the value that is returned from React.createContext, and then it returns the current context value for that context. This hook gives functional components easy access to your React app context. Before the useContext hook was introduced you would need to set up a contextType or a to access your global state passed down from some provider in a class component. Basically, the useContext hook works with the React Context API which is a way to share data deeply throughout your app without the need to manually pass your app props down through various levels. Now, the useContext() makes using Context a little easier. The code snippets below will show how the Context API works and how the useContext Hook makes it better. The Normal Way To Use The Context API import React from "react"; import ReactDOM from "react-dom"; const NumberContext = React.createContext(); function App() { return ( ); } function Display() { return ( {value => The answer to the question is {value}.} ); } ReactDOM.render(, document.querySelector("#root")); Let’s now break down the code snippet and explain each concept. Below, we are creating a context called NumberContext. It is meant to return an object with two values: { Provider, Consumer }. const NumberContext = React.createContext(); Then we use the Provider value that was returned from the NumberContext we created to make a particular value available to all the children. function App() { return ( ); } With that, we can use the Consumer value that was returned from the NumberContext we created to get the value we made available to all children. If you have noticed, this component did not get any props. function Display() { return ( {value => The answer to the question is {value}.} ); } ReactDOM.render(, document.querySelector("#root")); Note how we were able to get the value from the App component into the Display component by wrapping our content in a NumberContext.Consumer and using the render props method to retrieve the value and render it. Everything works well and the render props method we used is a really good pattern for handling dynamic data, but in the long run, it does introduce some unnecessary nesting and confusion if you’re not used to it. Using The useContext Method To explain the useContext method we will rewrite the Display component using the useContext hook. // import useContext (or we could write React.useContext) import React, { useContext } from 'react'; // old code goes here function Display() { const value = useContext(NumberContext); return The answer is {value}.; } That’s all we need to do in order to display our value. Pretty neat, right? You call the useContext() hook and pass in the context object we created and we grab the value from it. Note: Don’t forget that the argument that is passed to the useContext hook must be the context object itself and any component calling the useContext will always re-render when the context value changes. useReducer() The useReducer hook is used for handling complex states and transitions in state. It takes in a reducer function and also an initial state input; then, it returns the current state and also a dispatch function as output by the means of array destructuring. The code below is the proper syntax for using the useReducer hook. const [state, dispatch] = useReducer(reducer, initialArg, init); It is sort of an alternative to the useState hook; it is usually preferable to useState when you have complex state logic that has to do with multiple sub-values or when the next state is dependent on the previous one. Other React Hooks Available useCallbackThis hook returns a callback function that is memoized and that only changes if one dependency in the dependency tree changes. useMemoThis hook returns a memoized value, you can pass in a “create” function and also an array of dependencies. The value it returns will only use the memoized value again if one of the dependencies in the dependency tree changes. useRefThis hook returns a mutable ref object whose .current property is initialized to the passed argument (initialValue). The returned object will be available for the full lifetime of the component. useImperativeHandleThis hook is used for customizing the instance value that is made available for parent components when using refs in React. useLayoutEffectThis hook similar to the useEffect hook, however, it fires synchronously after all DOM mutations. It also renders in the same way as componentDidUpdate and componentDidMount. useDebugValueThis hook can be used to display a label for custom hooks in the React Dev Tools. It is very useful for debugging with the React Dev Tools. Custom React Hooks A “custom Hook” is a JavaScript function whose names are prefixed with the word use and can be used to call other Hooks. It also lets you to extract component logic into reusable functions; they are normal JavaScript functions that can make use of other Hooks inside of it, and also contain a common stateful logic that can be made use of within multiple components. The code snippets below demonstrate an example of a custom React Hook for implementing infinite scroll (by Paulo Levy): import { useState } from "react"; export const useInfiniteScroll = (start = 30, pace = 10) => { const [limit, setLimit] = useState(start); window.onscroll = () => { if ( window.innerHeight + document.documentElement.scrollTop === document.documentElement.offsetHeight ) { setLimit(limit + pace); } }; return limit; }; This custom Hook accepts two arguments which are start and pace. The start argument is the starting number of elements to be rendered while the pace argument is the subsequent number of elements that are to be rendered. By default, the start and pace arguments are set to 30 and 10 respectively which means you can actually call the Hook without any arguments and those default values will be used instead. So in order to use this Hook within a React app, we would use it with an online API that returns ‘fake’ data: import React, { useState, useEffect } from "react"; import { useInfiniteScroll } from "./useInfiniteScroll"; const App = () => { let infiniteScroll = useInfiniteScroll(); const [tableContent, setTableContent] = useState([]); useEffect(() => { fetch("https://jsonplaceholder.typicode.com/todos/") .then(response => response.json()) .then(json => setTableContent(json)); }, []); return ( User ID Title {tableContent.slice(0, infiniteScroll).map(content => { return ( {content.userId} {content.title} ); })} ); }; export default App; The code above will render a list of fake data (userID and title) that make use of the infinite scroll hook to display the initial number of data on the screen. Conclusion I hope you enjoyed working through this tutorial. You could always read more on React Hooks from the references below. If you have any questions, you can leave them in the comments section and I’ll be happy to answer every single one!
http://damianfallon.blogspot.com/2020/04/getting-started-with-react-hooks-api.html
0 notes
Link
Design your way http://j.mp/2zJuSPi
It’s a damn mess and I have some theories on why.
I’ve been doing design work in the finance space for a long time. This wasn’t something I set out to do, it just kind of happened. My first finance gig was for firstUSA–I made banner ads. Not a glamorous job, but occasionally we got a fun one. I did get to make banner ads for the Austin Powers VISA card.
“Grandma needs another credit card” – evil Art Director
I can’t find the banner ads to prove it, but here’s an image of one of the card designs. Insanity: it was the 90s. After this trial by fire, I worked for other financial institutions: CapitalOne, MBNA, Bank of America and maybe a few more. I lost track and thank goodness this wasn’t the only type of work I did.
Over the last few years, I’ve been on the brand side and e-commerce is a big part of a brand’s survival in this new age of Amazon. To try and keep pace there are many ways to collect funds. Credit cards are the standard, but there’s PayPal, VISA Checkout, AMEX Express Checkout, Amazon Pay, Apple Pay, Bitcoin, Etherium, Litecoin, Venmo, Alipay, Android Pay and and six new methods have probably been launched since I started writing this. They all have a similar goal: to get the user’s funds in exchange for goods or services. Each has benefits and a downside and most have horrible (UI) buttons that are mandated by the payment issuers.
If you design a checkout screen the way the payment issuers request you end up with something like this on the left. It’s not the most cohesive look and each payment option is competing for attention, including the (green) ‘Buy Now’ button. How does the user decide which is best for them?
Some of these are worse than others and one or two aren’t horrible, just awkward. So, let’s break it down…
Credit Cards
The old standard. All credit cards have what are known as ‘acceptance marks’. These are what you see on the sticker on the door of your favorite business in the real physical world. These little gems have been transformed into little buttons for e-commerce and because the old credit card companies were slow to react to this new world, they never really mandated any rules on these marks for digital. You’ll see all kinds around the web and there are often stylized versions. I’m sure this kills the brand folks at VISA, Mastercard, American Express and Discover but they were too late to the game.
Here are some examples from Amazon, Zappos, Rakuten, Simplify Commerce and Apple. Each one has the basics, but the style, shape, and size are different. The design teams have customized these to their site’s needs.
PayPal
I was a huge fan of PayPal early on. They were renegades before they got bought by eBay. They were the first widely used digital payment option and then they got stale and slow.
The buttons for PayPal are a damn mess–there’s no way around it. There are three distinct sets of official PayPal buttons at this time.
The old standard (still official) → options here
The new standard (I think, also official) → options here
and the even newer responsive option → details here
The good news is that it looks like PayPal is finally updating their un-responsive buttons with this last option. The problem is that this recent version has many limitations, the biggest of which is that bottom tagline under the button. It’s not something you can turn off (easily). If, and this is a big IF, PayPal improves on this recent responsive button tool and gives designers more flexibility then maybe we can use this in the future.
VISA Checkout
VISA has spent a ton of money marketing their digital product and the experience isn’t awful but it’s not any better than PayPal really. It still takes you outside the store and then drops you back in. The bigger issue with VISA Checkout is that the (UI) buttons are clearly designed by someone who has never worked on a checkout flow. Branding and visibility are the most important elements–everything else be damned. This double button shape doesn’t align easily with other elements on a page and it’s huge as well. When you stack it vertically with other buttons you end up with strange vertical spacing. Forget trying to use this one in a row.
The acceptance marks are actually pretty decent and have many options to choose from. These are at least workable.
My guess is that VISA paid a big agency a ton of money to work on that goofy button. They’ve now invested who knows how much in it, so it’s here to stay. That is, until a new Chief Design Officer comes in and changes the executive’s minds with their new vision. The documentation is → here if you care to learn more.
Apple Pay
Apple, running the usual Apple playbook, wasn’t the first to the party of digital payments. But, once again, they slide in and do an amazing job hitting all of the notes the other players miss. The Apple Pay (two words) buttons are fully responsive and come in three simple styles. The acceptance mark is clean and small. Apple has two major advantages. First, iPhone penetration is huge and it’s an economically strong audience. Second, the UX of Apple Pay is amazing. You click Apple Pay, the payment sheet pops up and you confirm with a finger print. Done. No leaving the site, no distractions, just pay and move on with life.
Apple Pay buttons also come in white and white with a border
Full Apple interface guidelines are → here
Masterpass
Masterpass is very similar to VISA Checkout. They are kind of a mess and your first clue is that the UI guidelines are a PDF and not a code tool. Again, I think a big agency sold them on this and now they are stuck. It’s not as ugly as VISA’s but it’s no beauty either. It’s a standard shape at least.
the masterpass button
AMEX Express Checkout
Once again we have a half-assed attempt at UI. AMEX won’t even let you see their UI guide without an account. I’ve been unable to secure one despite multiple attempts. You can try and learn more → here. The button is a monstrosity with a faux shadow and no responsive features. Is it a button, inside of a button, inside of a street sign? Is this the UI version of inception?
Amazon Pay
Amazon is running the e-commerce world ragged with their constant evolution. With 43% of all online sales, they have the process of collecting money down to a science. The look and feel of Amazon Pay is evolving and the documentation already looks out of date. What’s odd is that these new ones are not responsive. It almost seems like they wanted what VISA and masterpass have–ugly buttons with big branding. Gradients are hot, right?
recent Amazon Pay buttons look like this (also in gold and dark grey)
I still see these older Amazon pay buttons around as well
Android Pay
Google tends to do things right and Android Pay is no different. They’ve crafted a clean set of buttons that fall in line with their material design philosophy. Of course, these are responsive. You can check out the documentation → here.
Android Pay button, also available in white and white with a border
How did we get here and what’s coming
This mess was created by designers who were given bad direction from brands who are ignoring the end user. There are a lot of conflicting priorities, investments and bad design that have hamstrung designers trying to build a decent experience for checkout.
Bitcoin and other new payment forms are coming online all the time. I can’t predict which ones will get traction and which won’t. The users will determine what they want and we’ll deal.
How to make it better
Before you run into a dark corner and cry about how these buttons will never work in your beautiful design, take a deep breath. You don’t have to use what the payment brands provide. All of them (even Apple) will grant you some flexibility with how these buttons appear. If you need capsules that all look the same, try it.
Keep in mind, you will need approval from all issuers before you go live: they’ll review your designs, but don’t be afraid of trying something non-standard. Trust your gut and design what’s right for your audience.
Do bear in mind that there is a large amount of cash being spent to make these recognizable. I’m not suggesting you ignore the branding entirely: balance is the key, as usual, in good design.
adidas (mobile) • • • work in progress (mobile)
Two examples. First is Adidas, they’ve got custom PayPal and Apple Pay buttons. These are not what either issuer suggests, but they’ve respectfully modified the buttons to match their UI and it all looks great. The other image is something I’m working on, where we’ve modified PayPal and Visa Checkout to match the Apple Pay button shape. This was done to create consistency among these ‘acceptance marks’ and minimize the chaos. This design was also approved by the payment issuers (but isn’t live yet). It can be done.
Let me know what you think in the comments, or if there’s a payment button I’ve missed!
In my efforts to make my job easier, I’ve developed a lot of assets for this work and if you need these check out my E-Commerce Payment Button Vector Set for $10. It’s got AI, EPS and Sketch formats for all of these payments and more. I’ll add new ones as I find them or as they evolve.
The post The Sad State of Payment Buttons appeared first on Design your way.
http://j.mp/2A6pLJG via Design your way URL : http://j.mp/2arS45r
0 notes
Text
The Sad State of Payment Buttons
It’s a damn mess and I have some theories on why.
I’ve been doing design work in the finance space for a long time. This wasn’t something I set out to do, it just kind of happened. My first finance gig was for firstUSA–I made banner ads. Not a glamorous job, but occasionally we got a fun one. I did get to make banner ads for the Austin Powers VISA card.
“Grandma needs another credit card” – evil Art Director
I can’t find the banner ads to prove it, but here’s an image of one of the card designs. Insanity: it was the 90s. After this trial by fire, I worked for other financial institutions: CapitalOne, MBNA, Bank of America and maybe a few more. I lost track and thank goodness this wasn’t the only type of work I did.
Over the last few years, I’ve been on the brand side and e-commerce is a big part of a brand’s survival in this new age of Amazon. To try and keep pace there are many ways to collect funds. Credit cards are the standard, but there’s PayPal, VISA Checkout, AMEX Express Checkout, Amazon Pay, Apple Pay, Bitcoin, Etherium, Litecoin, Venmo, Alipay, Android Pay and and six new methods have probably been launched since I started writing this. They all have a similar goal: to get the user’s funds in exchange for goods or services. Each has benefits and a downside and most have horrible (UI) buttons that are mandated by the payment issuers.
If you design a checkout screen the way the payment issuers request you end up with something like this on the left. It’s not the most cohesive look and each payment option is competing for attention, including the (green) ‘Buy Now’ button. How does the user decide which is best for them?
Some of these are worse than others and one or two aren’t horrible, just awkward. So, let’s break it down…
Credit Cards
The old standard. All credit cards have what are known as ‘acceptance marks’. These are what you see on the sticker on the door of your favorite business in the real physical world. These little gems have been transformed into little buttons for e-commerce and because the old credit card companies were slow to react to this new world, they never really mandated any rules on these marks for digital. You’ll see all kinds around the web and there are often stylized versions. I’m sure this kills the brand folks at VISA, Mastercard, American Express and Discover but they were too late to the game.
Here are some examples from Amazon, Zappos, Rakuten, Simplify Commerce and Apple. Each one has the basics, but the style, shape, and size are different. The design teams have customized these to their site’s needs.
PayPal
I was a huge fan of PayPal early on. They were renegades before they got bought by eBay. They were the first widely used digital payment option and then they got stale and slow.
The buttons for PayPal are a damn mess–there’s no way around it. There are three distinct sets of official PayPal buttons at this time.
The old standard (still official) → options here
The new standard (I think, also official) → options here
and the even newer responsive option → details here
The good news is that it looks like PayPal is finally updating their un-responsive buttons with this last option. The problem is that this recent version has many limitations, the biggest of which is that bottom tagline under the button. It’s not something you can turn off (easily). If, and this is a big IF, PayPal improves on this recent responsive button tool and gives designers more flexibility then maybe we can use this in the future.
VISA Checkout
VISA has spent a ton of money marketing their digital product and the experience isn’t awful but it’s not any better than PayPal really. It still takes you outside the store and then drops you back in. The bigger issue with VISA Checkout is that the (UI) buttons are clearly designed by someone who has never worked on a checkout flow. Branding and visibility are the most important elements–everything else be damned. This double button shape doesn’t align easily with other elements on a page and it’s huge as well. When you stack it vertically with other buttons you end up with strange vertical spacing. Forget trying to use this one in a row.
The acceptance marks are actually pretty decent and have many options to choose from. These are at least workable.
My guess is that VISA paid a big agency a ton of money to work on that goofy button. They’ve now invested who knows how much in it, so it’s here to stay. That is, until a new Chief Design Officer comes in and changes the executive’s minds with their new vision. The documentation is → here if you care to learn more.
Apple Pay
Apple, running the usual Apple playbook, wasn’t the first to the party of digital payments. But, once again, they slide in and do an amazing job hitting all of the notes the other players miss. The Apple Pay (two words) buttons are fully responsive and come in three simple styles. The acceptance mark is clean and small. Apple has two major advantages. First, iPhone penetration is huge and it’s an economically strong audience. Second, the UX of Apple Pay is amazing. You click Apple Pay, the payment sheet pops up and you confirm with a finger print. Done. No leaving the site, no distractions, just pay and move on with life.
Apple Pay buttons also come in white and white with a border
Full Apple interface guidelines are → here
Masterpass
Masterpass is very similar to VISA Checkout. They are kind of a mess and your first clue is that the UI guidelines are a PDF and not a code tool. Again, I think a big agency sold them on this and now they are stuck. It’s not as ugly as VISA’s but it’s no beauty either. It’s a standard shape at least.
the masterpass button
AMEX Express Checkout
Once again we have a half-assed attempt at UI. AMEX won’t even let you see their UI guide without an account. I’ve been unable to secure one despite multiple attempts. You can try and learn more → here. The button is a monstrosity with a faux shadow and no responsive features. Is it a button, inside of a button, inside of a street sign? Is this the UI version of inception?
Amazon Pay
Amazon is running the e-commerce world ragged with their constant evolution. With 43% of all online sales, they have the process of collecting money down to a science. The look and feel of Amazon Pay is evolving and the documentation already looks out of date. What’s odd is that these new ones are not responsive. It almost seems like they wanted what VISA and masterpass have–ugly buttons with big branding. Gradients are hot, right?
recent Amazon Pay buttons look like this (also in gold and dark grey)
I still see these older Amazon pay buttons around as well
Android Pay
Google tends to do things right and Android Pay is no different. They’ve crafted a clean set of buttons that fall in line with their material design philosophy. Of course, these are responsive. You can check out the documentation → here.
Android Pay button, also available in white and white with a border
How did we get here and what’s coming
This mess was created by designers who were given bad direction from brands who are ignoring the end user. There are a lot of conflicting priorities, investments and bad design that have hamstrung designers trying to build a decent experience for checkout.
Bitcoin and other new payment forms are coming online all the time. I can’t predict which ones will get traction and which won’t. The users will determine what they want and we’ll deal.
How to make it better
Before you run into a dark corner and cry about how these buttons will never work in your beautiful design, take a deep breath. You don’t have to use what the payment brands provide. All of them (even Apple) will grant you some flexibility with how these buttons appear. If you need capsules that all look the same, try it.
Keep in mind, you will need approval from all issuers before you go live: they’ll review your designs, but don’t be afraid of trying something non-standard. Trust your gut and design what’s right for your audience.
Do bear in mind that there is a large amount of cash being spent to make these recognizable. I’m not suggesting you ignore the branding entirely: balance is the key, as usual, in good design.
adidas (mobile) • • • work in progress (mobile)
Two examples. First is Adidas, they’ve got custom PayPal and Apple Pay buttons. These are not what either issuer suggests, but they’ve respectfully modified the buttons to match their UI and it all looks great. The other image is something I’m working on, where we’ve modified PayPal and Visa Checkout to match the Apple Pay button shape. This was done to create consistency among these ‘acceptance marks’ and minimize the chaos. This design was also approved by the payment issuers (but isn’t live yet). It can be done.
Let me know what you think in the comments, or if there’s a payment button I’ve missed!
In my efforts to make my job easier, I’ve developed a lot of assets for this work and if you need these check out my E-Commerce Payment Button Vector Set for $10. It’s got AI, EPS and Sketch formats for all of these payments and more. I’ll add new ones as I find them or as they evolve.
The post The Sad State of Payment Buttons appeared first on Design your way.
from Web Development & Designing http://www.designyourway.net/blog/design/sad-state-payment-buttons/
0 notes
Text
Hybrid Apps And React Native: A Time To Transition?
Accomplished musicians often talk about how, at certain moments in their careers, they had to unlearn old habits in order to progress. This process often causes them to regress in performance while they adjust to an ultimately better method. Once the new approach is integrated, they are able to reach new heights that would not have been possible with their previous techniques.
Like musicians, all professionals should frequently question their methodologies and see what other options exist. If one approach was previously the best, that does not mean it remains the best. Then again, many established techniques have been the best for decades and might never be surpassed. The important thing is that one is willing to consider alternative approaches and is not too heavily biased towards the one they are most familiar with. This analysis is often more difficult in software development because new frameworks and technologies emerge almost as quickly as they die off.
This article will apply this analysis to hybrid mobile apps and present why I sincerely believe that React Native is in many ways a superior solution for apps developed in 2017, even if it introduces some temporary pains while you’re getting acclimated. To do this, we will revisit why hybrid apps were created initially and explore how we got to this point. Then, within this context, we’ll discuss how React Native stacks up and explain why it is the better approach in most cases.
Further Reading on SmashingMag: Link
An Origin Story Link
It’s 2010. Your company has a pretty awesome web application that uses jQuery (or, if you’re hip, some sort of AngularJS and React precursor like Mustache). You have a team of developers competent in HTML, CSS and JavaScript. All of a sudden, mobile apps are taking over. Everyone has one. Mobile apps are the new Tickle Me Elmo! You frantically research how to make your own mobile app and immediately run into a host of issues. Your team is ill-equipped for the task. You don’t have Java or Objective-C developers. You can’t afford to develop, test and deploy two separate apps!
Not to worry. The hybrid mobile app is your silver bullet. This shiny new technology allows you to quickly and (in theory) easily reuse what you have (code and developers) for your lustrous new mobile app. So, you pick a framework (Cordova, PhoneGap, etc.) and get to work building or porting your first mobile app!
For many companies and developers, their problems were solved. They could now make their very own mobile apps.
Problems Arise Link
Ever since 2010, developer forums, blogs and message boards have been full of arguments about the efficacy of hybrid apps. Despite the great promise and flexibility described in the previous paragraphs, hybrid apps have had and continue to face a very real series of challenges and shortcomings. Here are a few of the most notable problems
User-Experience Shortcomings Link
Over the past couple of years, the bar for UX in mobile apps has risen dramatically. Most smartphone owners spend the majority of their time using only a handful of premier apps5. They, perhaps unfairly, expect any new app they try to be as polished as Facebook, MLB TV, YouTube and Uber.
With this very high bar, it is quite difficult for hybrid apps to measure up. Issues such as sluggish or limited animations, keyboard misbehavior and frequent lack of platform-specific gesture recognition all add up to a clunkier experience, which makes hybrid apps second-class citizens. Compounding this issue is hybrid apps’ reliance on the open-source community to write wrappers for native functionality. Here is a screenshot from an app that highlights all of these issues. This app6 was selected from Ionic’s showcase7 and was created by Morgan Stanley.
8 Screenshot of the app store listing for MS StockPlan (View large version9)
A few things should be immediately apparent. This app has a very low rating (2.5 stars). It does not look like a mobile app and is clearly a port of a mobile web app. Clear giveaways are the non-native segmented control, font size, text density and non-native tab bar. The app does not support features that are more easily implemented when building natively. Most importantly, customers are noticing all of these issues and are summarizing their feelings as “feels outdated.”
User Interface Challenges Link
The majority of users are very quick to uninstall or forget new apps10. It is crucial that your app makes a great first impression and is easily understood by users. A large part of this is about looking sharp and being familiar. Hybrid apps can look great, but they do tend to be more platform-agnostic in their UI (if they look like a web app) or foreign (if they look like an iOS app on Android or vice versa).
Before even installing an app, many would-be customers will review images in the app store. If those screenshots are unappealing or off-putting, the app might not be downloaded at all. Here is an example app found on the Ionic showcase. This app11 was created by Nationwide, and, as you can tell, both apps look just like a mobile-friendly website, rather than a mobile app.
12 Screenshot of the Nationwide app on iOS 13 Screenshot of the Nationwide app on Android
It is clear from the app store reviews (3 stars on both platforms) that this app has several issues, but it is unlikely that any app with this UI would attract new customers. It is clearly only used by existing customers who think they might as well try it out.
Performance Issues Link
The most common complaints about hybrid apps cite poor performance, bugs and crashes. Of course, any app can have these issues, but performance issues have long plagued hybrid apps. Additionally, hybrid apps often have less offline support, can take longer to open and perform worse in poor network conditions. Any developer has heard any of the above called a “bug” and has had their app publicly penalized as a result.
Overall Lack of Premier Apps Link
All of these issues have added up to the vast majority of premier apps being written natively. A quick look at both PhoneGap’s14 and Ionic’s15 showcases demonstrate a noticeable shortcoming in premier apps. One of the most highly touted hybrid apps is Untappd, which despite being a pretty great platform, has fewer than 5 million downloads. This might seem like a large number, but it puts it quite far down the list of most used apps.
Additionally, there is a long list of apps that have migrated from hybrid to native. That list includes Facebook16, TripAdvisor17, Uber18, Instagram3619 and many others.
It would be quite challenging to find a list of high-end apps that have moved from native to hybrid.
Final Defence of Hybrid Apps Link
The point of this section is not to be overly critical of hybrid apps, but to show that there is room for an alternative approach. Hybrid apps have been a very important technology and have been used successfully in many cases. Returning to the Ionic showcase, there are several apps that look better than the ones above. Baskin Robbins20, Pacifica21 and Sworkit22 are three recent examples.
For the past four years, hybrid app developers and frameworks have been working hard to improve their apps, and they have done an admirable job. However, underlying issues and foundational shortcomings remain, and ultimately better options can be found if you’re building a new app in 2017.
Another Approach Link
Although it is clear that hybrid apps do not quite stack up against native apps, their advantages and success can’t be ignored. They help solve very real resource, time and capabilities problems. If there was another approach that solved these same problems, while also eliminating the shortcomings of hybrid apps, that would be extremely appealing. React Native might just be the answer.
Overview and Advantages Link
React Native23 is a cross-platform mobile application development framework that builds on the popular React web development framework. Like React, React Native is an open-source project maintained largely by developers at Facebook and Instagram.
This framework is used to create Android and iOS applications with a shared JavaScript code base. When creating React Native apps, all of your business logic, API calls and state management live in JavaScript. The UI elements and their styling are genericized in your code but are rendered as the native views. This allows you to get a high degree of code reuse and still have a UI that follows each platform’s style guide and best practices.
React Native also allows you to write platform-specific code, logic and styling as needed. This could be as simple as having platform-specific React components or as advanced as using a platform-specific C library in your React Native app24.
Similarities to Hybrid Apps Link
Like hybrid app frameworks, React Native enables true cross-platform development. Instagram has shared that it is seeing between 85 and 99% code reuse25 for its React Native projects. Additionally, React Native is built using technologies (JavaScript and React) that many web developers will be familiar with. In the event that a developer is not familiar with React, it is a dramatically easier to learn if they are familiar with AngularJS, jQuery or vanilla JavaScript than it would be to learn Objective-C or Java.
Additionally, debugging26 React Native apps should also be a familiar process for web developers. This is because it is exceptionally easy to use Chrome’s debugging tools to monitor a code’s behavior. Chrome tools can be used when viewing apps in an emulator or on actual devices. As an added bonus, developers can also use more native debuggers as needed.
27 iOS React Native debugger window
The main takeaway here is that React Native solves the same core problems that hybrid app frameworks set out to solve.
Further Improvements Over Hybrid Apps Link
Unlike hybrid apps, React Native apps run natively, instead of within a web view. This means they are not restricted to web-based UI elements, which can be sluggish when paired with a poor JavaScript interpreter28. Because React Native renders native UI elements, apps immediately feel more at home on the platform and make the user more comfortable on first use. Additionally, developer quality of life can be improved with React Native through more complete use of native tooling and profiling utilities.
Below are two screenshots of a recently released React Native app. These images highlight the platform-specific interface that can be achieved using this framework. As you can see, each app uses its native map and has callouts that follow each platform’s design guidelines. On Android, the callout is a card that rises from the bottom of the map. On iOS, the callout connects to the selected element on the map. The same actions can be performed in both apps, and most of the code is shared, but that extra bit of platform-specific polish really helps with overall usability.
29 Screenshot of the Vett Local app on iOS 30 Screenshot of the Vett Local app on Android (View large version31)
How Is This Done? Link
Below is a sample React Native component. It demonstrates some common elements that make up React Native apps and highlights the areas that web developers should already be familiar with. Following the code snippet is a description of what each section is doing.
import PropTypes from "prop-types"; import React, { PureComponent } from "react"; import { Dimensions, StyleSheet, Text, View } from "react-native"; import LoadingAnimation from "./LoadingAnimation"; import SearchBar from "./SearchBar"; const { width } = Dimensions.get("window"); const styles = StyleSheet.create({ title: { backgroundColor: colors.transparent, color: colors.black, fontSize: 19, fontWeight: "500", }, }); export default class MovieList extends PureComponent { state = { movies: [], filteredMovies: [], loading: true, }; componentWillMount() { this._fetchMovies(); } _fetchMovies = () => { fetch("http://ift.tt/2swy1i4", { method: "GET", }) .then(res => res.json()) .then(res => { this.setState({ movies: res, filteredMovies: res, loading: false, }); }) .catch(err => { this.setState({ error: "Unable to get movies.", }); }); }; _applyFilter = term => { const filteredList = this.state.movies.filter( movie => movie.title.toLowerCase().search(term) !== -1, ); this.setState({ filteredMovies: filteredList, }); }; _renderTitleRow = movie => { const titleLimit = width >= 375 ? 26 : 20; let formattedTitle = movie.title; if (formattedTitle.length > titleLimit) { formattedTitle = formattedTitle.slice(0, titleLimit - 3) + "..."; } return ( <Text numberOfLines={1} style={styles.title} key={movie.id}> {formattedTitle} </Text> ); }; render() { if (this.state.loading) { return ( <View> <LoadingAnimation /> </View> ); } else { return ( <View> <SearchBar onFilterChange={this._applyFilter} /> {this.state.filteredMovies.map(movie => this._renderTitleRow(movie))} </View> ); } } }
Much of the code above should be familiar to most web developers. The vast majority of the code is just JavaScript. Much of the rendering logic will be new, but the migration from HTML to the React Native views is pretty straightforward. Additionally, the style attributes are quite similar to CSS. Let’s walk through some of this code:
state State32 is an object that contains many of the values that our component33 MovieList needs to function. When state properties are changed (using this.setState()), the entire component is re-rendered to reflect those changes.
componentWillMount ComponentWillMount34 is a lifestyle function that is called prior to the component being rendered. Initial network requests often belong in this function.
_fetchMovies This function makes a network request that returns an array of movie objects. After it successfully completes, it updates state with the list and sets loading to false. Note that it also sets the initial filteredMovies to the returned list.
_applyFilter This function is called by our imported SearchBar component. For simplicity’s sake, assume that this function is called (likely with some debounce) whenever the value typed into the SearchBar component is changed. This function just contains some JavaScript that filters the filteredMovies list to the relevant titles.
_renderTitleRow This function outputs the view for a single movie. It contains some logic to make sure our output is uniform and renders a basic text component.
render() This function outputs the view for the component. It conditionally renders the list of movies or a loading animation, depending on the loading value stored in the state object.
Who Is Doing This? Link
When deciding how to build your own application, it is important to learn from industry leaders. Other companies and developers might have wasted years and millions of dollars building applications, and in minutes you can learn from their mistakes and experiences. Here is a quick list of some large companies that are using React Native in their apps: Facebook35, Instagram3619, Airbnb37, Baidu, Discord, Tencent, Uber38 and Twitter39.
Many of these apps were originally written using other approaches but have transitioned fully to React Native or are now using React Native to augment their existing native applications.
There is a notable trend of many premier apps being moved to React Native as a cross-platform solution, whereas, previously, most technology shifts among this class of apps were from cross-platform to platform-specific. This change simply can’t be ignored.
What Should You Do Now? Link
Just like the musician who has to rethink their approach to progress, so too must mobile app developers reconsider their technologies. It is critical that we make decisions based on the best options available and not rely solely on our familiarities. Even if the transition is uncomfortable initially, our industry and the app marketplace are highly competitive and demand that we continue to progress.
React Native is a highly attractive technology that combines the reusability and cost-effectiveness of hybrid apps with the polish and performance of native apps. It is seeing rapid adoption and should be considered as an alternative approach for any upcoming would-be hybrid apps.
(da, vf, yk, al, il)
1 http://ift.tt/2gPkWXi
2 http://ift.tt/2b2APf9
3 http://ift.tt/1SBKCSH
4 http://ift.tt/2oqbWwb
5 http://ift.tt/2cy5iTZ
6 http://ift.tt/2t65e0V
7 http://ift.tt/2t67ODY
8 http://ift.tt/2rhhfiD
9 http://ift.tt/2rhhfiD
10 http://ift.tt/1HZuIfA
11 http://ift.tt/2swISc5
12 http://ift.tt/2swZXlX
13 http://ift.tt/2swAU2G
14 http://ift.tt/14oiDl4
15 http://ift.tt/2t67ODY
16 http://ift.tt/2fCFTFx
17 http://ift.tt/1btSJks
18 http://ift.tt/2axUU92
19 http://ift.tt/2kkqjSN
20 http://ift.tt/2auP7zj
21 http://ift.tt/1PgOOep
22 https://sworkit.com/
23 http://ift.tt/1SBKCSH
24 http://ift.tt/2dvhW2H
25 http://ift.tt/2kkqjSN
26 http://ift.tt/1M6KVS3
27 http://ift.tt/2swKwug
28 http://ift.tt/1ReOni5
29 http://ift.tt/2t5RdAv
30 http://ift.tt/2t5RJyf
31 http://ift.tt/2t5RJyf
32 http://ift.tt/2t6rgAI
33 http://ift.tt/2fYy3Iu
34 http://ift.tt/2guuIlk
35 http://ift.tt/1LUtTNz
36 http://ift.tt/2kkqjSN
37 https://www.youtube.com/watch?v=tUfgQtmG3R0
38 http://ift.tt/2o8FCBl
39 http://ift.tt/2t67SUe
↑ Back to top Tweet itShare on Facebook
via Smashing Magazine http://ift.tt/2so5IRZ
0 notes
Text
March 17, 2020 at 10:00PM - The Complete Front-End Developer Bundle (97% discount) Ashraf
The Complete Front-End Developer Bundle (97% discount) Hurry Offer Only Last For HoursSometime. Don't ever forget to share this post on Your Social media to be the first to tell your firends. This is not a fake stuff its real.
CSS (Cascading Style Sheets) is one of the main building blocks of web content as it’s used to add styling to plain HTML. Want to bring your web content to life? You need to learn CSS, and that’s just what this course will help you do. You’ll learn how to use CSS syntax and begin to understand where to apply different properties and values. Whether you’re a complete beginner or want to refresh your skills, this course is for you.
Access 82 lectures & 6 hours of content 24/7
Learn how to add CSS to your websites
Add styling w/ colors to fonts & backgrounds
Discover the Box Model
Understand how Padding, Borders, & margins work
Update your height, width & dimensions
Learn the basics of displaying content w/ CSS
Bootstrap is a free and open-source front-end web framework for designing websites and web applications. It contains HTML- and CSS-based design templates for typography, forms, buttons, navigation and other interface components, as well as optional JavaScript extensions. Unlike many web frameworks, it concerns itself with front-end development only and allows you to build responsive, mobile-first projects fast. This course will show you the ins and outs of Bootstrap and even includes source code and a step-by-step guide to build five complete websites.
Access 155 lectures & 11 hours of content 24/7
Learn how to add Bootstrap to your website
Explore how containers work
Add classes to make things happen
Understand how the Bootstrap Grid works
Explore columns & rows and how to structure your content
Adobe Illustrator is the industry-standard vector graphics application that lets you create logos, icons, sketches, typography and complex illustrations for print, web, interactive, video and mobile devices. In this course, you’ll start with the very basics and progress to creating complex projects.
Access 91 lectures & 12 hours of content 24/7
Learn how to draw circles & rectangles
Create complex illustrations, logos, business cards & more
Get confident w/ each tool or feature of Illustrator
HTML and CSS are the building blocks of the web; the stuff that makes web pages appear the way they do. Whether you want to make changes to your website’s template, create new pages from scratch, or just understand what those YouTube coding tutorials are actually saying, this course can help. Here, you’ll create a simple “Coming Soon” web page using valid HTML5 and CSS3 code so you can learn how to code with confidence.
Access 43 lectures & 4 hours of content 24/7
Learn what tools you need to write HTML & CSS, and how to use them
Organize & manage web page content w/ HTML
Use CSS to control the presentation or “look” of your webpage
Understand how web publishing works, & how to get your HTML and CSS files from your computer onto the web
JavaScript for Beginners is your one-stop course to enter into the language of JavaScript. You’ll start from scratch and build up your understanding of the world’s most popular programming language. With whiteboard videos, you get to visualize what JavaScript does under the hood. You won’t become a master overnight, but this is a great foundation.
Access 94 lectures & 9 hours of content 24/7
Take advantage of Google Chrome developer tools to put the JavaScript you’ve learned into practice
Cover the building blocks of JavaScript
Discuss objects, arrays, functions, loops & conditionals
Explore functional programming
If you’re interested in pursuing a career in web development, then it is imperative that you become proficient in JavaScript. Almost every digital development project involves some level of JavaScript, and experts are perpetually in demand. Whether you’re a business owner, a freelancer, or seek to work in the web dev industry, this comprehensive course will get you started on the right path. Once you complete the course, you’ll be eligible to sit for the JavaScript Specialist Designation exam, and be armed with all the knowledge you need to receive a passing grade.
Access 65 lectures & 8 hours of content 24/7
Learn how to output to the console & to the browser window by manipulating the DOM
Understand how to use variables, perform arithmetic, use operators, numbers, & Booleans, & much more w/ JavaScript
Code for JavaScript events & callback functions
Create arrays, strings, string functions, & more
Process text w/ JavaScript regular expressions
Access web services w/ the xmlHTTPRequest() Object
Discover JSON notation & parsing JSON content
With the growing importance of brilliant and interactive UIs, React has taken center stage at simplifying the process of building dynamic user interfaces, as well as websites and apps. This React course not only helps to break down the fundamentals of React but also dives deep into how React works and the actual coding process that is required. At the end of this course, you will have a thorough working idea of React and you’ll even be able to build your own small projects.
Access 35 lectures & 5 hours of content 24/7
Explore JSX, looping, & ES
Understand how to fix bugs
Discuss states, props, libraries, actions, Redux, & ore
Build a small but effective project
Want to learn how to design mobile apps with Sketch 3? Then this course is for you. This fluff-free course focuses only on the most important things you need to know to get up and working as fast as possible. Before you know it, you’ll be a fluent app designer in Sketch 3 and be putting together beautiful mobile app designs in no time.
Access 23 lectures & 5 hours of content 24/7
Go from beginner to fluent in mobile app design
Learn the Sketch 3 app
Discover core design principles that you can take w/ you to any app
You probably at least know of Photoshop, the world’s leading photo editing software, but you might not know quite how to use it to its fullest potential. In this course, you’ll go from zero to hero in Photoshop, mastering all of the editing tools available, as well as the design capabilities. Whether you want to use Photoshop for business or pleasure, this course will give you all the tools you need to succeed.
Access 59 lectures & 6 hours of content 24/7
Navigate & customize a Photoshop workspace
Learn how to edit RAW & non-RAW photos in Photoshop
Use selection tools, retouching tools, & more
Create & adjust shapes in Photoshop
Design graphics w/ different blend models
Save your projects for printing, online, sharing, & more
from Active Sales – SharewareOnSale https://ift.tt/3a0NMQy https://ift.tt/eA8V8J via Blogger https://ift.tt/2QowsgE #blogger #bloggingtips #bloggerlife #bloggersgetsocial #ontheblog #writersofinstagram #writingprompt #instapoetry #writerscommunity #writersofig #writersblock #writerlife #writtenword #instawriters #spilledink #wordgasm #creativewriting #poetsofinstagram #blackoutpoetry #poetsofig
0 notes