#also not only are the instructions on the readme there’s also a set in our general wiki
Text
my fucking job… i logged off for lunch, but kept hearing notifications throughout the whole hour. if other people wanna work through lunch i’m not gonna care, but i refuse to login and check what’s happening until past 1:00, okay?
lunch ends, i get on and scroll thru the messages and it’s my coworker trying to figure out how to run something. he’s all “does it look like this for you guys?” and “oh i think you have to do [thing] for it to work”. the thing is, i figured out how to run this thing w somebody else weeks ago and wrote up documentation for it. it’s literally all in the readme on the gitlab repo.
there is such little documentation for things at my job, that people just assume nothing exists and never look for it - even in the single most obvious spot. so he for real spent lunch trying to figure something out, just for me to get online and say “oh yeah i wrote a readme that has instructions for running this thing lol”
#lack of documentation is one of my primary complaints abt this job#so i’ve been trying to add stuff when i learn something! making it better for other people!! except very few other people write shit down#so ig nobody ever thinks to look for it#it’s so funny in a painful way#also not only are the instructions on the readme there’s also a set in our general wiki#so like… if he’d bothered to look at all there’s step by step instructions in the two places you’d look first#employment woes#coding
2 notes
·
View notes
Text
Usa bios for ps2 emulator

Usa bios for ps2 emulator how to#
Usa bios for ps2 emulator install#
Usa bios for ps2 emulator archive#
Usa bios for ps2 emulator windows 10#
Usa bios for ps2 emulator code#
Thanks to the developer of this PCSX2 Playstation 2 BIOS (PS2 BIOS) rom/ Emulator for submitting the file here, ps2 emulator bios so others can also enjoy it. The cookie is set by the GDPR Cookie Consent plugin and is used to store whether or not user has consented to the use of cookies. PCSX2 Bios is a free and open-source PlayStation 2 emulator for Windows, Linux and macOS that supports a wide range of PlayStation 2 video games with a high level of compatibility and functionality. The cookie is used to store the user consent for the cookies in the category "Performance". This cookie is set by GDPR Cookie Consent plugin. The cookie is used to store the user consent for the cookies in the category "Other. But without the appropriate BIOS files, it is impossible to use PS2. The cookies is used to store the user consent for the cookies in the category "Necessary". As the matter of the fact, the gaming emulators site is not allowed to provide BIOS files to their users. The BIOS is basically just an added security measure for PS2 consoles.
Usa bios for ps2 emulator code#
This PS2 emulator attempts to execute PS2 code on Windows and Linux and is developed by the same people who. This cookie is set by GDPR Cookie Consent plugin. In order to fully download a working PS2 emulator, you need a BIOS file to legally emulate this console (note the word ‘legally’ is used loosely here considering the PS2 is over 20 years old). PCSX2 is a Playstation 2 emulator for Windows which does a great job at playing back a lot of the popular titles you got addicted to back in the days of PS2 popularity.
Usa bios for ps2 emulator windows 10#
Note that we have tested this Emulator on Windows 10 64-bit operating A Playstation 2 (or PS2) is a second video game console developed by Sony Computer Entertainment.
Usa bios for ps2 emulator how to#
The cookie is set by GDPR cookie consent to record the user consent for the cookies in the category "Functional". In this article, we will discuss how to install, Setup PCSX2 BIOS, and use PCSX2. The cookie is used to store the user consent for the cookies in the category "Analytics". These cookies ensure basic functionalities and security features of the website, anonymously. Details: Download Emulator PS2 for PC PCSX2 v1.4.0 + BIOS dan Tutorial Low End, Bermain Game PS2 di. PS2 Bios for PCSX2 Emulator + Roms File freeload from link given below.Necessary cookies are absolutely essential for the website to function properly. .USA v01.60, v02.00 Europe v01.60, v02.00, v02.20.
Enjoy playing games with PCSX2 Emulator as much as you want :).
Copy all the PS2 Bios files and place them at the place where you want them in specific sequence according to their place.
Extracting it directly to the directory where you already have pcsx3 emulator installed is mostly recommended to make it give minimum error chances.
Usa bios for ps2 emulator archive#
Extract the archive on your desktop or in which directory you prefer the most.
Download the PS2 Bios File from download link given at the end of this post.
All these bios files or roms are tested by our team prior to sharing them here on this page so that you people can also get benefit from it. Each kind of emulator is different, just ensure to check their ‘readme’ file for specific instructions ps2 bios. And you can also download all the PS2 bios files from this only site. Just because the official site of PCSX2 does not provide any PS2 Bios file or PS2 Bios Roms, You will have to do it manually by your self after reading this straight forward Step by step tutorial or guidlines. Tags : PS2 Bios, PS2 Bios for PCSX2 Emulator, PCSX2 Bios File, PCSX2 Bios Rom, PS2 Bios File. Now run world’s any and every game meant to be played on PCSX2 emulator with this cool small utility. This directory will automatically be created by the PCSX2 Emulator during the process of installation on your pc. All you have to do it just copy the roms after finding them online or from wherever you know about or want, and paste them into the directory called “roms”. PS2 bios is made for PCSX2 Emulator to run different games Rom files in them. Single-click the 'Config' button on the PCSX2 main window.
Usa bios for ps2 emulator install#
Download and install PCSX2 on your computer from the developer's main website. Download Setup & Crack PS2 Bios for PCSX2 Emulator + Rom File freeloadĭownload the PS2 bios all in one File pack in a single archive from the links given below. The PS2 emulator, PCSX2, uses the PS2 BIOS to read games without the actual PS2 console, and loads them using the computer's disk drive.
0 notes
Note
How do I keep my worldbuilding consistent when I have multiple timelines and alternate universes? Especially when memories can bleed over too.
Constablewrites: Really, really good notes. You’re gonna need something that allows for a high level of organization and categorization. That might be a tool like Scrivener or Evernote that lets you create folders and tags, or if you prefer physical notes you can use different colored pens, sticky notes, or even multiple notebooks. (There are probably tools out there specifically designed for such a purpose, but I’m not personally familiar with any.)
However you keep your lists, you’ll want to have one set of notes for each timeline and universe that impacts the story. If you have characters hopping around, you’ll also want to have notes for each character’s personal timeline (so the order in which they experience events, which timelines/universes they travel between, what they remember when, etc.). These lists don’t have to be super long or involved--just a brief phrase describing the scene or event can be enough to keep it straight.
Even for writers only working with a single timeline, it can be useful to have a calendar of events. You can call your start point Day 1 and go from there, assign events to arbitrary dates on our calendar, or go into detail with your own system, whatever works for you. The key is just to have a way to be sure of how much time has passed, so you don’t have something like characters saying they’ve only known each other a couple of days when it’s established elsewhere that it’s been a month.
Also, this doesn’t have to be done in advance. Doing it as you go is fine, and so is assembling the lists as you’re preparing to edit and untangle everything. You might save yourself some effort down the line if you sort that stuff out before writing, but not everyone’s brain works like that and that’s okay.
Tex: It’s difficult to make lists and notes if you don’t know what information to put in them. This is a fairly common issue, since the plethora of information available to particularly worldbuilders can easily become a sensory overload.
A calendar of events is an excellent idea, if you’ve got events to catalogue (and dates to go along with them!). Unfortunately that won’t cover the rest of a world, so you’ll need to be careful in how your organize your notes. Please note that both of our suggestions are but one of many methods to arranging worldbuilding notes, especially when it comes to multiple timelines.
Scrivener, Evernote, OneNote, or even a set of notebooks or word documents can be very versatile depending on your style of note-taking. I deeply prefer an iterative process to worldbuilding, wherein I slowly collate and organize scraps of notes into a polished whole that functions as an archive. Usually I keep multiple versions, in case I need to roll back to certain timelines of development and branch off in a different direction, and keep the discarded versions in case there’s a new way to incorporate the research and ideas.
There’s a lot of debate about digital vs physical copies. For digital, the pros are that you can easily edit and transmit files to a high volume capacity, as well as store them in a comparatively small container or even purely online. Its cons, however, are that they’re easily lost, corrupted, or stolen.
For physical, the pros are that the copies are tangible, easy to visually reference in large volumes, and can usually withstand long-term storage without corruption issues. Its cons, however, are that they have a physical weight, can be cumbersome to carry around, and are difficult to edit while retaining coherency.
One of the most successful note-taking styles I’ve seen is a blend of digital and physical. When you’re still developing an idea, a digital format is very useful until you’ve gotten some concrete decisions down. You can do this with some throwaway notebooks or loose paper, too! Just make sure it’s collected in the same place, or at least is annotated in a way that’s easy to identify (e.g. headers of the same colour, washi tape, dedicated ink colours, dedicated folders, etc).
The intermediary point is usually the difficult part, because transitioning into firm decisions about your worldbuilding is where packrat tendencies kick in. “But what if I need this?” is a very common refrain. However, if you’ve isolated your first step, you’ll still have all of your sketches and ideas and notes!
A basic sorting process of “I’ll keep working on this” versus “I’ll set this aside in case I still need this” will tamp down on a lot of that inevitable anxiety. This will give you control over the flow of development, and you’ll always be able to incorporate things from that second pile if necessary.
The main characteristic of the intermediary point is the filing system, and is incredibly useful even when dividing a world into multiple timelines.
The best method that I’ve found for working on multiple timelines is to start from the most common details. Since these notes are likely to be stored with other stories, the first order is fandom vs original work. If you only write original work, it may be helpful to arrange things by title and/or genre.
I’ve made a sample worldbuilding folder on Google Drive (available here) that can be downloaded locally or into your own Drive, and am narrating the main path way; any additional folders you see will largely be blank in order to allow others to learn the overall structure. You can always copy the folders and files I mention into the additional folders, and rearrange as best suits you!
Since I made this for primarily fandom (re-title as necessary for original work), this means choosing Fandom 1 and then World Name 1. Traditionally the first world is the “canon” world, or the original seed, so it gets first pick.
I have in World Name 1 some things pre-seeded:
Timeline 1
Timeline 2
Unsorted
World Name 1 - Meta Info.txt
All of the individual files in there - usually .txt or .docx - have information on them regarding suggestions how to use them. If you already have a method, then disregard and populate as you prefer.
The Unsorted folder acts as a catch-all, and there’s going to be one of these at roughly each level. For the Timeline level, this means working in conjunction with the Meta Info text file - usually discarded snippets and/or research. While you can definitely create subfolders in this one, I would recommend keeping it loose so you don’t create a stressful, nitpicking situation that loses focus on your main goals.
If you have a main timeline, then that’s going to be Timeline 1. However you choose to prioritize the other ones, just make sure you’re consistent with it, and clearly label everything.
Within Timeline 1, you’re going to have the following items:
Story folder
Plot folder
Unsorted folder
Culture folder
World Name 1 - Timeline 1 - To Do List.txt
You already know how the Unsorted folder functions, so pass that one by. I’ll cover the file before delving into the folders. It’s a text file (that’s a bit oddly sized, apologies for that - it can be resized upon opening with Notepad or a similar program), and left without any instructions or suggestions. World Name 1 - Timeline 1 - To Do List is, as it says on the tin, meant to keep track of things that need doing for this timeline. Be it items that need updating, necessary tweaks, reminders for other things, it’s a relatively isolated way to keep track of this timeline on a meta scale.
Moving on to the rest, the Story folder contains two of its own - Chapters and Master Story. I’ve found this method useful, since it’s dumping drafts into a virtual outbox on an as-completed basis. Master Story has a preseeded doc, while Chapters is meant to contain each chapter unto its own folder (Chapter 1 has its own preseeded doc, as well). The guide docs are colour-coded and contain notes for both fanfiction and original work.
The next folder in Timeline 1, Plot, comes with three pre-seeded guide docs of its own:
World Name 1 - Timeline 1 - Characters.docx
World Name 1 - Timeline 1 - Plot Unsorted.docx
World Name 1 - Timeline 1 - Plot.docx
You see how there’s still an Unsorted folder, albeit in file form? That’s for information that can’t be put into Characters.docx or Plot.docx. All three have notes and some sort of sorting and colour-coding applied to them, with some modularity for copying and pasting. Plot.docx functions a lot like programs like OneNote and Scrivener, so the formatting can be ported over if you prefer a more literal digital notebook style.
The last folder in Timeline 1 is Culture. I’ve divided this into Non-Physical and Physical. There’s a readme text file in both detailing the types of things would go into each folder, though otherwise both left blank so you can dive right into creating sub-folder systems of your own. As with the higher-level folders, you can always duplicate the methods of unsorted folders and meta docs!
29 notes
·
View notes
Text
Rhel Docker

Rhel Docker
Rhel Docker Ce
Rhel Docker
Rhel Docker Ce
The Remote - Containers extension lets you use a Docker container as a full-featured development environment. Whether you deploy to containers or not, containers make a great development environment because you can:
Develop with a consistent, easily reproducible toolchain on the same operating system you deploy to.
Quickly swap between different, isolated development environments and safely make updates without worrying about impacting your local machine.
Make it easy for new team members / contributors to get up and running in a consistent development environment.
Try out new technologies or clone a copy of a code base without impacting your local setup.
Rhel Docker
Rhel Docker Ce
The extension starts (or attaches to) a development container running a well defined tool and runtime stack. Workspace files can be mounted into the container from the local file system, or copied or cloned into it once the container is running. Extensions are installed and run inside the container where they have full access to the tools, platform, and file system.
Rhel Docker
Amazon Web Services (AWS) and Red Hat provide a complete, enterprise-class computing environment. Red Hat solutions on AWS give customers the ability to run enterprise traditional on-premises applications, such as SAP, Oracle databases, and custom applications in the cloud.
Windows 10 Home (2004+) requires Docker Desktop 2.2+ and the WSL2 back-end. (Docker Toolbox is not supported.) macOS: Docker Desktop 2.0+. Linux: Docker CE/EE 18.06+ and Docker Compose 1.21+. (The Ubuntu snap package is not supported.) Containers: x8664 / ARMv7l (AArch32) / ARMv8l (AArch64) Debian 9+, Ubuntu 16.04+, CentOS / RHEL 7+ x8664.
Docker volumes allow you to back up, restore, and migrate data easily. This tutorial explains what a Docker volume is and how to use it, as well as how to mount a volume in Docker.
Amazon Web Services (AWS) and Red Hat provide a complete, enterprise-class computing environment. Red Hat solutions on AWS give customers the ability to run enterprise traditional on-premises applications, such as SAP, Oracle databases, and custom applications in the cloud.
You then work with VS Code as if everything were running locally on your machine, except now they are isolated inside a container.
System Requirements
Local:
Windows:Docker Desktop 2.0+ on Windows 10 Pro/Enterprise. Windows 10 Home (2004+) requires Docker Desktop 2.2+ and the WSL2 back-end. (Docker Toolbox is not supported.)
macOS: Docker Desktop 2.0+.
Linux: Docker CE/EE 18.06+ and Docker Compose 1.21+. (The Ubuntu snap package is not supported.)
Containers:
x86_64 / ARMv7l (AArch32) / ARMv8l (AArch64) Debian 9+, Ubuntu 16.04+, CentOS / RHEL 7+
x86_64 Alpine Linux 3.9+
Other glibc based Linux containers may work if they have needed prerequisites.
While ARMv7l (AArch32), ARMv8l (AArch64), and musl based Alpine Linux support is available, some extensions installed on these devices may not work due to the use of glibc or x86 compiled native code in the extension. See the Remote Development with Linux article for details.
Note that while the Docker CLI is required, the Docker daemon/service does not need to be running locally if you are using a remote Docker host.
Installation
To get started, follow these steps:
Install VS Code or VS Code Insiders and this extension.
Install and configure Docker for your operating system.
Windows / macOS:
Install Docker Desktop for Mac/Windows.
If not using WSL2 on Windows, right-click on the Docker task bar item, select Settings / Preferences and update Resources > File Sharing with any locations your source code is kept. See tips and tricks for troubleshooting.
To enable the Windows WSL2 back-end: Right-click on the Docker taskbar item and select Settings. Check Use the WSL2 based engine and verify your distribution is enabled under Resources > WSL Integration.
Linux:
Follow the official install instructions for Docker CE/EE. If you use Docker Compose, follow the Docker Compose install directions.
Add your user to the docker group by using a terminal to run: sudo usermod -aG docker $USER Sign out and back in again so this setting takes effect.
Rhel Docker Ce
Working with Git? Here are two tips to consider:
If you are working with the same repository folder in a container and Windows, be sure to set up consistent line endings. See tips and tricks to learn how.
If you clone using a Git credential manager, your container should already have access to your credentials! If you use SSH keys, you can also opt-in to sharing them. See Sharing Git credentials with your container for details.
Getting started
Follow the step-by-step tutorial or if you are comfortable with Docker, follow these four steps:
Follow the installation steps above.
Clone https://github.com/Microsoft/vscode-remote-try-node locally.
Start VS Code
Run the Remote-Containers: Open Folder in Container... command and select the local folder.
Check out the repository README for things to try. Next, learn how you can:
Use a container as your full-time environment - Open an existing folder in a container for use as your full-time development environment in few easy steps. Works with both container and non-container deployed projects.
Attach to a running container - Attach to a running container for quick edits, debugging, and triaging.
Advanced: Use a remote Docker host - Once you know the basics, learn how to use a remote Docker host if needed.
Available commands
Another way to learn what you can do with the extension is to browse the commands it provides. Press F1 to bring up the Command Palette and type in Remote-Containers for a full list of commands.

You can also click on the Remote 'Quick Access' status bar item to get a list of the most common commands.
For more information, please see the extension documentation.
Release Notes
While an optional install, this extension releases with VS Code. VS Code release notes include a summary of changes to all three Remote Development extensions with a link to detailed release notes.
As with VS Code itself, the extensions update during a development iteration with changes that are only available in VS Code Insiders Edition.
Questions, Feedback, Contributing
Have a question or feedback?
See the documentation or the troubleshooting guide.
Up-vote a feature or request a new one, search existing issues, or report a problem.
Contribute a development container definition for others to use
Contribute to our documentation
...and more. See our CONTRIBUTING guide for details.
Or connect with the community...
Telemetry
Visual Studio Code Remote - Containers and related extensions collect telemetry data to help us build a better experience working remotely from VS Code. We only collect data on which commands are executed. We do not collect any information about image names, paths, etc. The extension respects the telemetry.enableTelemetry setting which you can learn more about in the Visual Studio Code FAQ.
License
By downloading and using the Visual Studio Remote - Containers extension and its related components, you agree to the product license terms and privacy statement.
2 notes
·
View notes
Text
Sparkster source code review
Sparkster has finally opened its code repositories to the public, and as the project has been somewhat in the centre of discussion in the crypto community, as well as marketed by one of the high profile crypto influencers, we have been quite curious to see the result of their efforts.

The fundamental idea of the project is to provide a high-throughput decentralized cloud computing platform, with software developer kit (SDK) on top with no requirement for programming expertise (coding is supposed to be done in plain English). The idea of plain English coding is far from new and has been emerging more than a few times over the years, but never gotten any widespread traction. The reason in our opinion is that professional developers are not drawn to simplified drag & drop plain language programming interfaces, and non-developers (which is one of the potential target groups for Sparkster) are, well, most probably just not interested in software development altogether.
However the focus of this article is not to scrutinize the use case scenarios suggested by Sparkster (which do raise some question marks) but rather to take a deep look into the code they have produced. With a team counting 14 software developers and quite a bit of runway passed since their ICO in July 2018, our expectations are high.
Non-technical readers are advised to skip to the end for conclusions.
Source code review
Sparkster initially published four public repositories in their github (of which one (Sparkster) was empty). We noticed a lack of commit history which we assume is due to a transfer of the repos from a private development environment into github. Three of the above repositories were later combined into a single one containing subfolders for each system element.
The first impression from browsing the repositories is decent after recent cleanups by the team. Readme has been added to the main repository with information on the system itself and installation instructions (Windows x64 only, no Linux build is available yet)
However, we see no copyright notes anywhere in the code developed by Sparkster, which is quite unusual for an open source project released to the public.
Below is a walk-thru of the three relevant folders containing main system components under the Decentralized-Cloud repository and a summary of our impression.
Master-Node folder
The source code is written in C++. Everything we see is very basic. In total there are is not a lot of unique code (we expected much more given the development time spent) and a lot of the recently added code is GNU/forks from other projects (all according to the copyright notes for these parts).
An interesting part is, that if this master node spawned the compute node for this transaction, the master node will request the compute node to commit the transaction. The master nodes takes the control over more or less all communication to stakeholders such as clients. The master node will send a transaction to 20 other master nodes.
The lock mechanism during voting is standard: nodes booting in the middle of voting are locked and cannot participate to avoid incorrect results.
We cannot see anything in the code that differentiates the node and makes it special in any way, i.e. this is blockchain 101.
Compute-Node folder
All source files sum up to a very limited amount of code. As the master node takes over a lot of control, the compute node focuses on the real work. A minimalistic code is generally recommended in a concept like this, but this is far less than expected.
We found the “gossip” to 21 master nodes before the memory gets erased and the compute node falls back to listen mode.
The concept of 21 master nodes is defined in the block producer. Every hour a new set of 21 master nodes become the master node m21.
“At any given point in time, 21 Master Nodes will exist that facilitate consensus on transactions and blocks; we will call these master nodes m21. The nodes in m21 are selected every hour through an automated voting process”
(Source: https://github.com/sparkster-me/Decentralized-Cloud)
The compute node is somewhat the heart of the project but is yet again standard without any features giving it high performance capability.
Storage-Node folder
The source code is again very basic. Apart from this, the code is still at an experimental stage with e.g. buffer overflow disabling being utilized, something that should not be present at this stage of development.
Overall the storage uses json requests and supports/uses the IPFS (InterPlanetary File System). IPFS is an open source project and used for storing and sharing hypermedia in a distributed file system. The storage node not only handles the storage of data, it also responds to some client filter requests.
Conclusion
In total Sparkster has produced a limited amount of very basic code, with a team of 14 developers at their disposal. As their announcement suggests that this is the complete code for their cloud platform mainnet, we must assume that the productivity of the team has been quite low over the months since funds were raised, since none of the envisioned features for high performance are yet implemented.
The current repository is not on par with standards for a mainnet release and raises some serious question marks about the intention of the project altogether. The impression is that the team has taken a very basic approach and attempted to use short cuts in order to keep their timelines towards the community, rather than develop something that is actually unique and useful. This is further emphasized by the fact that the Sparkster website and blockchain explorer is built on stock templates. We don’t see any sign of advanced development capability this far.
Based on what we see in this release Sparkster is currently not a platform for ”full scale support to build AI powered apps” as their roadmap suggest and we are puzzled by the progress and lack of provisioning of any type of SDK plugin. The Sparkster team has a lot to work on to even be close to their claims and outlined roadmap.
Note: we have been in contact with the Sparkster team prior to publishing this review, in order to provide opportunity for them to comment on our observations. Their answers are listed below but doesn’t change our overall conclusions of the current state of Sparkster development.
“We use several open source libraries in our projects. These include OpenDHT, WebSocket++, Boost, and Ed25519. In other places, we’ve clearly listed where code is adapted from in the cases where we’ve borrowed code from other sources. We’ve used borrowed code for things like getting the time from a time server: a procedure that is well documented and for which many working code examples already exist, so it is not necessary for us to reinvent the wheel. However, these cases cover a small portion of our overall code base.
Our alpha net supports one cell, and our public claims are that one cell can support 1,000 TPS. These are claims that we have tested and validated, so the mainnet is in spec. You will see that multi cell support is coming in our next release, as mentioned in our readme. Our method of achieving multi cell support is with a well understood and documented methodology, specifically consistent hashing. However, an optimization opportunity, we’re investiging LSH over CS. This is an optimization that was recommended by a member of our Tech Advisory Board, who is a PHD in Computer Science at the University of Cambridge.
Our code was made straightforward on purpose. Most of its simplicity comes from its modular design: we use a common static library in which we’ve put common functionality, and this library is rightfully called BlockChainCommon.lib. This allows us to abstract away from the individual nodes the inner workings of the core components of our block chain, hence keeping the code in the individual nodes small. This allows for a high level of code reusability. In fact, in some cases this modular design has reduced a node to a main function with a series of data handlers, and that’s all there is to it. It allows us to design a common behavior pattern among nodes: start up OpenDHT, register data handlers using a mapping between the ComandType command and the provided lambda function, call the COMM_PROTOCOL_INIT macro, enter the node’s forever loop. This way, all incoming data packets and command processors are handled by BlockChainCommon, and all nodes behave similarly: wait for a command, act on the command. So while this design gives the impression of basic code, we prefer simplicity over complexity because it allows us to maintain the code and even switch out entire communications protocols within a matter of days should we choose to do so. As far as the Compute Node is concerned, we use V8 to execute the javascript which has a proven track record of being secure, fast and efficient.
We’ve specifically disabled warning 4996 because we are checking for buffer overflows ourselves, and unless we’re in debug mode, we don’t need the compiler to warn about these issues. This also allows our code to be portable, since taking care of a lot of these warnings the way the VCC compiler wants us to will mean using Microsoft-specific functions are portable (other platforms don’t provide safe alternatives with the _s suffix, and even Microsoft warns about this fact here: https://docs.microsoft.com/en-us/cpp/error-messages/compiler-warnings/compiler-warning-level-3-c4996?view=vs-2017.) To quote: “However, the updated names are Microsoft-specific. If you need to use the existing function names for portability reasons, you can turn these warnings off.”
1 note
·
View note
Text
Java 8 For Mac Os X

This page describes how to install and uninstall JDK 8 for OS X computers.
Forcing NetBeans to use JDK1.8 NetBeans on MAC OS X uses a version of JDK in some non-explicit way, and it's not always what you want. Usually it's based on the the most recent JDK installation. So if you installed JDK 11, NetBean8.2 will not work without making the configuation file edit suggested in this site.
This page has these topics:
How to install Java JDK (Java Development kit 12) on Mac OS. Download and install Java on Mac OS X. We will also update the JAVAHOME environment variable ne. Installing Java 8 and Eclipse on Mac OS X. This page tells you how to download and install Java 8 and Eclipse on Mac OS X, and how to configure Eclipse. Installing Java 8. Go to the Oracle website. You'll see something like this. Java 8 os x free download - Apple Java for OS X 10.7/10.8, Apple Java for OS X 10.6, Apple Java for OS X 10.5, and many more programs.
See 'JDK 8 and JRE 8 Installation Start Here' for general information about installing JDK 8 and JRE 8.
See 'OS X Platform Install FAQ' for general information about installing JDK 8 on OS X.
System Requirements
Observe the following requirements:
Any Intel-based computer running OS X 10.8 (Mountain Lion) or later.
Administrator privileges.
Note that installing the JDK on OS X is performed on a system wide basis, for all users, and administrator privileges are required. You cannot install Java for a single user.
Installing the JDK also installs the JRE. The one exception is that the system will not replace the current JRE with a lower version. To install a lower version of the JRE, first uninstall the current version as described in 'Uninstalling the JRE'.
JDK Installation Instructions
When you install the Java Development Kit (JDK), the associated Java Runtime Environment (JRE) is installed at the same time. The JavaFX SDK and Runtime are also installed and integrated into the standard JDK directory structure.
Depending on your processor, the downloaded file has one of the following names:
jdk-8uversion-macosx-amd64.dmg
jdk-8uversion-macosx-x64.dmg
Where version is 6 or later.
Download the file.
Before the file can be downloaded, you must accept the license agreement.
From either the Downloads window of the browser, or from the file browser, double click the .dmg file to launch it.
A Finder window appears containing an icon of an open box and the name of the .pkg file.
Double click the package icon to launch the Install app.
The Install app displays the Introduction window.
Note:
In some cases, a Destination Select window appears. This is a bug, as there is only one option available. If you see this window, select Install for all users of this computer to enable the Continue button.
Click Continue.
The Installation Type window appears.
Click Install.
A window appears that says 'Installer is trying to install new software. Type your password to allow this.'
Enter the Administrator login and password and click Install Software.
The software is installed and a confirmation window appears.
Mac Specs: By Processor: PowerPC G4. Complete technical specifications for every Apple Mac using the PowerPC G4 processor are listed below for your convenience. For other processors, please refer to the main By Processor page. Also see: Macs By Series, Mac Clones, By Year, By Case Type and Currently Shipping. If you find this page useful, please Bookmark & Share it. Mac os for powerpc g4.
Refer to http://www.oracle.com/technetwork/java/javase/downloads/jdk-for-mac-readme-1564562.html for more information about the installation.
After the software is installed, delete the .dmg file if you want to save disk space.
Determining the Default Version of the JDK
If you have not yet installed Apple's Java OS X 2012-006 update, then you are still using a version of Apple Java 6 that includes the plug-in and the Java Preferences app. See 'Note for Users of OS X that Include Apple Java 6 Plug-in'.
There can be multiple JDKs installed on a system, as many as you wish.
When launching a Java application through the command line, the system uses the default JDK. It is possible for the version of the JRE to be different than the version of the JDK.
Uninstall Java 8 Mac Os X
You can determine which version of the JDK is the default by typing java -version in a Terminal window. If the installed version is 8u6, you will see a string that includes the text 1.8.0_06. For example:
To run a different version of Java, either specify the full path, or use the java_home tool:
Free MP3 Player for Mac -Another alternative way to play MP3 format files on Mac is to use VLC player. The VLC player is one of the best media players, because it provides native support for a wide variety of formats files including MP3. Then you will be able to play MP3 files on different media players as you want. However the downside of using VLC player for file conversion is that after conversion of the files into the desired format they cannot be transferred to any other electronic device or Apple products for playback. Wma player for mac. Ready to ConvertAfter setting the output format and location, please hit the 'Convert' icon to convert your MP3 files.
Java 8 For Mac Os X
For more information, see the java_home(1) man page.
Uninstalling the JDK
To uninstall the JDK, you must have Administrator privileges and execute the remove command either as root or by using the sudo(8) tool.
For example, to uninstall 8u6:
Do not attempt to uninstall Java by removing the Java tools from /usr/bin. This directory is part of the system software and any changes will be reset by Apple the next time you perform an update of the OS.
September 26, 2019
Mac OS XDownload (215 MB)Windows (32-bit)Download (186 MB)Windows (64-bit)Download (189 MB)Linux (32-bit)Download (213 MB)Linux (64-bit)Download (210 MB)
Java For Mac Os
sign up for NetLogo community mailing lists
(where many questions can be posted and answered)


Download Java 8 For Mac Os X
NetLogo is free, open source software.
Your donations (tax deductible) will help us continue to maintain and improve it.
Notes for Mac OS X users:
Our installer includes Java 8 for NetLogo’s private use only. Other programs on your computer are not affected.
Some users have reported problems running NetLogo 6+ on Mac OS Catalina, Mojave, High Sierra, and Sierra (10.12 - 10.15). We're continuing to investigate this and hope to find a fix soon. For the latest updates and workaround information, please see our known issues page.
NetLogo 6.1.1 requires OS X 10.7.4 or higher. If you need to run NetLogo on an older version, please consider NetLogo 5.2.1 or earlier.
Notes for Windows users:
Some users will see a Windows warning 'Windows protected your PC' when running the installer. You can continue to install NetLogo by clicking 'More Info' in the prompt and then 'Run Anyway'.
Our installer includes Java 8 for NetLogo’s private use only. Other programs on your computer are not affected.
If in doubt about which version to download, choose 32-bit, which works on either 32-bit or 64-bit Windows. More information is available on the requirements page.
Notes for Linux users:
Our installer includes Java 8 for NetLogo’s private use only. Other programs on your computer are not affected.
Problems downloading? Write [email protected].
0 notes
Text
Samsung 4321 Driver Download

Or you can and we will find it for you. To download, select the best match for your device. Intel r 915g 915gv 910gl graphics chip driver download win7. Discuss driver problems and ask for help from our community on our. Then click the Download button.
Downloads Free! 3 Drivers for Samsung SCX-4321 Scanners. Here's where you can downloads Free! The newest software for your SCX-4321. Free Driver And Software Download All Samsung Printer. Samsung SCX-4321 Series » SCX-4321. Scan and copy functionality The Samsung. June 4th 2018| SCX Series.
https://treecrazy116.tumblr.com/post/655975390509203456/dell-premium-optical-mouse-driver-download. This package provides the Dell Premium Optical Mouse Application and is supported on the Inspiron. For more downloads go to the Drivers and downloads.
Before installing this printer driver Samsung SCX-4321, read the following precautions:

Before starting the installation of drivers, connect your printer Samsung SCX-4321 to your computer, and that the printer is powered On.See your printer manual for details.
Important! Do not turn printer off, remove cables, or unplug the printer, or interrupt it in any way during the driver installation process.
Close virus protection programs or other software programs that are running on your computer.
You must have full-control access to SCX-4321 printer settings to carry out aninstallation. Before starting the installation of drivers, log in as a member of theAdministrators group.
If you have an earlier version of the Samsung printer driver installed on yourcomputer, you must remove it with the uninstaller before installingthe new driver for Samsung SCX-4321.
Click on Download Now and a File Download box will appear.
Select Save This Program to Disk and a Save As box will appear.
Select a directory to save the driver in and click Save.
Locate the driver file using Windows Explorer when the download has completed.
Running the downloaded file will extract all the driver files and setup program into a directory on your hard drive.The directory these driver are extracted to will have a similar name to the printer model that was downloaded (i.e., c:SCX-4321). The setup program will also automatically begin running after extraction.However, automatically running setup can be unchecked at the time of extracting the driver file.
Open the Printers Window (Click Start-Settings-Printers).
Update the printer driver if it was previously installed
Right click on the printer and select Properties from the pop menu.
On the General tab, select New Driver.
Click on the Warning Box that pops up.
A printer listing box will appear. Select Have Disk.
Another box Install from Disk appears.
Click the Browse to locate the expanded files directory (i.e., c:SCX-4321).
Click on the file ending with .inf .
Click Open and then Okay and let driver files install.
Add the printer SCX-4321 if it hasn't been installed yet.
Click Add New Printer
Follow the instructions of the Add Printer Driver Wizard.
Search and consult the Readme file for additional installation drivers instructions for your printer Samsung SCX-4321.
Samsung Scx 4321 Printer Driver Download For Windows 10
Download Samsung SCX-4321 Laser Multifunction Printer series Full Feature Software and Drivers, install and fix printer driver problems for Microsoft Windows 32-bit - 64-bit, Macintosh and Linux Operating System Samsung SCX-4321 Driver Software. Samsung SCX-4321 Drivers-Software Download for Windows and Mac. The following drivers are solutions for connecting between Printer and Computer. Installation Instructions. To install the Samsung * SCX-4321 Monochrome Multifunction Printer driver, download the version of the driver that corresponds to your operating system by clicking on the appropriate link above.
Adobe after effects cc free download. In addition to all of that you can also create Video introduction, create commercial videos and also presentations.
• Credits and experience rates will not be increased for this test. World of tanks patch history. Also, switch off the game client before installing the update. Please, keep in mind certain features of the public test server: • • Payments are not accepted on the public test server. • For the second iteration, all test accounts will receive a one-time credit of: • 100,000,000 XP • 100,000,000 • 20,000 • Progress won't be transferred to the main NA server. Only players who have registered prior to 0:00 UTC can participate in the Public Test.
Driver San Francisco Download
Depending on the environment that you are using, a Windows printer driver provided by Microsoft may be installed automatically on your computer. However, it is recommended that you use this official printer driver provided by Samsung for SCX-4321 printer.
0 notes
Text
Pci Ven_8086&dev_266e&subsys_01821028&rev_03

Intel(R) Centrino(R) Advanced-N 6235 Drivers Download For ...
Drivers For Unknown PCI Device. - Dell Community
See Full List On Devicehunt.com
Ok, the driver is inside the Intel chipset package, you had to install the driver manually. Double click on the SMBus, choose to install/update the driver and you need to browse to the patch of the folder extraction. Nov 03, 2015 Ok so I have now used MDT for about 5 years and never had any issues. I usually get a new device wipe it clean install windows and get all the drivers from the manufacture. Device PCI VEN8086 11:11 PM. Mark as New; Bookmark; Subscribe; Subscribe to RSS Feed; Permalink; Print; Email to a Friend; Flag Post.
Try to set a system Add multimedia notes to Office Word. Intel brookdale g g gl ge chipset integrated windows 8. An application that will allow you to extract the contents of web pages and create web reviews. Instructions To create your own driver follow my instruction on There is no driver on the Intel website for windows 7. It is highly recommended to always use the most recent driver pdi available. It scans your system and install Realtek official drivers for your Realtek devices.
Uploader:BralkreeDate Added:16 August 2013File Size:61.9 MbOperating Systems:Windows NT/2000/XP/2003/2003/7/8/10 MacOS 10/XDownloads:57817Price:Free* (*Free Regsitration Required)
Sometimes, after upgrading to a newer operating system such as Windows 10, problems can occur because your current driver may only work with an older version of.
For any clarifications feel free to contact me. Please support our project by allowing our site to show ads.

Thanks in advance Budbush. The driver installation wizard will scan your PC and will install the right driver. We did a clean setup with DDU. This driver was developed by Intel. Try to set a system Add multimedia notes to Office Word. Results 1 — 40 of Thanks veb advance Budbush. Try to set a system An application that will allow you to extract the contents of web pages and create web reviews.
The ads help us evn this software and web site to you for free. This driver will work for the following versions of Windows: This is the download link for the driver version 6. It scans your system and install Realtek official drivers for your Realtek devices. I was putting Win 10 on an old 8068&dev machine and this was my only issue. Sunday, May 24, 1: Movie Review Magic is a software program that will help you do just that — fast and easy!
SmElis Web Previewer 1. Message 2 of 6 27, Views. Please tell me where cen if I can get the driver? Download and install the latest drivers, firmware and software.
The PCI ID Repository
I believe it is built-in the. Try to set a system restore point before installing a Try to set a system restore point before installing Please support our project by allowing our site to show ads. Remove From My Forums. Support Eup Lot 6 for rev 1. Click 28b4 the following links for the driver package readme info It will 8086&dwv your Windows 7 first then download and install 64 bit Realtek official drivers to your Realtek Laptop.
Try to set a system restore point before installing a Do not forget to check with our site as often as possible in order to stay updated on the latest drivers, software and games.
Downloads for Intel® GM Gigabit Ethernet Controller


Sunday, May 24, Message 4 of 6 27, Views. Windows Vista and Windows Server can detect when the graphics hardware or device driver take longer than expected to complete an operation. Get the perfect match for your driver More than 5 million happy users.
It scans your system and install Realtek official drivers for your Realtek devices.
Poppy Withers Aug 15,2: Instructions To create your own driver follow my instruction on There is no driver on the Intel website for windows 7. Try here instead for first generation. DriverXP For Realtek can help relieve you of worries about installing out-of-date drivers.
Intel(R) Centrino(R) Advanced-N 6235 Drivers Download For ...
See Also
The Intel(R) Graphics Media Accelerator 3150 has no support from Intel anymore some OEM’s may carry updates that are more suited than the direct packages that originally came from Intel. Below are drivers from Windows XP to 10. Windows 10 with the latest updates install drivers for this device.
Hardware ID:
Drivers For Unknown PCI Device. - Dell Community
PCIVEN_8086&DEV_A012&SUBSYS_03491025&REV_02
PCIVEN_8086&DEV_A012&SUBSYS_03491025
PCIVEN_8086&DEV_A012&CC_038000
PCIVEN_8086&DEV_A012&CC_0380
Compatible ID:
PCIVEN_8086&DEV_A012&REV_02
PCIVEN_8086&DEV_A012
PCIVEN_8086&CC_038000
PCIVEN_8086&CC_0380
PCIVEN_8086
PCICC_038000
PCICC_0380
See Full List On Devicehunt.com
Version: 6.14.10.5260,2010-04-25
0 notes
Text
Germany Driver Download For Windows

On this page there are links to download driver software writtenby Meinberg, and also associated manuals inAdobe PDF format.
Germany Driver Download For Windows 8.1
Germany Driver Download For Windows 10
Germany Driver Download For Windows Xp
Germany Driver Download For Windows
Germany Driver Download For Windows 7
There is driver software for the following operating systems available:
On Unix-like operating systems all Meinberg radio clockswith a serial port are supported by the public domainNetwork Time Protocol (NTP)package. Under Windows NT/2000 and newer, NTP canbe used together with Meinberg's driversto synchronize additional computers on the TCP/IP network.
Germany Driver Download For Windows 8.1
Select Search automatically for updated driver software. Select Update Driver. If Windows doesn't find a new driver, you can try looking for one on the device manufacturer's website and follow their instructions. Reinstall the device driver. In the search box on the taskbar, enter device manager, then select Device Manager. Download the latest version of German Truck Simulator for Windows. Drive a lorry across Germany. German Truck Simulator is a driving simulator offering us the.
NTP software and manuals are available at our NTP download page.
Download MEINBERG NTP / PTP Simulation Software (Demo):
MPSv2 Change Log
Recommended operating systems: Linux Mint ≥ 18.3 (64 bit) or Ubuntu ≥ 18.04.
Additionally there are some utilities available for download:
Meinberg Device Manager (Windows and Linux)for configuration and monitoring of Meinberg receivers via the serial interface or network connection(supersedes the gpsmon32 monitoring software)
MBG Flash Used to update firmware of radio clocks and otherdevices with flash memory.
More Ressources:
Software Development Kits SDKs for different programming languagesand development environments to access a Meinberg device from within an own applications.
Shapes for Microsoft Visio Shapes for various Meinberg systemsand accessories, to be used with Microsoft Visio
SNMP MIB Files Management Information Base files for various Meinberg systemsand accessories, to be used with SNMP-based Network Management Systems like HP OpenView or IBM Tivoli.
Driver Software for all Windows versions since Windows NT
Windows NT
up to
Windows 10
Windows Server 2019
Platform i386 (32 Bit)
Platform x64 (64 Bit)
Software
dkwin-3.10.exe
July 2, 2020
1.5 Mbytes
How to verify integrity
of the downloaded file
Release Notes
The driver package can be used to synchronize the computer's system time.It supports all Meinberg plug-in radio clocks for PCs with PCI or ISA bus,all Meinberg USB devicesand all external radio clocks which are connected to a serial portof the computer (COM port) and transmit theMeinberg standard time string.
The Meinberg Time Adjustment Service runs in the backgroundand keeps the system time synchronized with the radio clock's time.
The monitoring utility MBGMON can be used to start, stop,control, and monitor the time adjustment service. The program isalso used to monitor and configure the supported plug-in boardsand USB devices.
Detailed information on the software can be found in the onlinehelp of the monitoring utility.
The public domain NTP software packagecan be used together with this driver package to synchronize additionalcomputers over the TCP/IP network.
Driver Software for DOS, Windows 3.x/9x
DOS
Windows 3.x
Windows 9x
Software
dkdos223.zip
August 14, 2007
127505 bytes
Manual
German
softdos.pdf
Manual
English
softdos.pdf
The driver package for DOS/Windows 3.x/Windows 9.x supports allMeinberg plug-in radio clocks for PCs.This driver does not support radio clocks connected via aserial interface.
The resident driver (TSR) reads the time from a radio clockin periodic intervals and sets the computer's system time.
If the computer operates in DOS text mode the current radio clock timecan be displayed in a box at a corner of the screen.
The monitoring program PCPSINFO shows the radio clock's and theTSR's status information and can be used to setup configurableparameters of the plug-in cards.
Hint for PCI Cards:
Plug-and-play driver installation on Windows is not supported.
If Windows starts up after a new PCI card has been installedit tries to locate a driver for the new card. Every popupdialog should be acknowledged by pressing OK, so Windowswill install an 'unknown device'.
After Windows startup has been completed, the DOS driver canbe installed normally.
Attention:
If the installation of the 'unknown device' is aborted,Windows will ask again for a driver when it starts upthe next time.
Version Information:
DKDOS223:
Additionally support the new PCI Express cardsPEX511,GPS170PEX, andTCR511PEX.
DKDOS222:
Fixed a bug where the TSR did not always recognize some older PCI cards.
Enhanced configuration dialog for the synthesizer settings.
DKDOS221:
Additionally support the new PCI cardsPCI511,GPS170PCI, andTCR511PCI.
Windows 9x
Windows ME
Software
win9xv13.zip
August 11, 2003
539326 bytes
Manual
German
mbgtimemon.pdf
Manual
English
Not available
In addition to our resident DOS/Windows driver (see above), there is a driver for Windows 9x/MEavailable that supports time synchronization over a serial interface.
The driver package for Windows 9x can be used with all external radio clocks which areattached to a serial port of the computer (COM port) and transmit theMeinberg standard time string.
The driver package reads the time from a radio clock in periodic intervals and sets the computer's system time.
Time deviations will be ascertained and corrected by the driver program. The driver runs in the backgroundand keeps the system time synchronized with the radio clock's time.The driver will be shown in the windows traybar. Additionally, the program is used to display status informationfrom the clock and of the current time synchronization as well.
Driver Software for Linux
MBGTOOLS
for
Linux
Kernel 5.x
Kernel 4.x
Kernel 3.x
Kernel 2.6.x
Platform i386
Platform x86_64
Software
mbgtools-lx-4.2.14.tar.gz
2020-10-20
800k bytes
SHA512 Checksum:
mbgtools-lx-4.2.14.tar.gz.sha512sum
How to verify integrity
of the downloaded file
Release Notes
git-Repositiory
Important notice:
For Linux kernels 5.8 or newer, no driver packageolder than 4.2.12 should be used. For details see thechangelog entry.
This archive contains a Linux driver module for Meinbergplug-in radio clocks with PCI or ISA bus, and Meinberg USB devices.This driver is only required for plug-in radio clocks and USB devices.Radio clocks which are connected via a serial interface are directly supported byNTP.
The driver allows access to a plug-in radio clock from a userprogram, and additionally implements a device which makes theradio clock available as a reference clock forNTP.
The driver is shipped as source code and has to be compiled on the target system.The current version 4.x can be used with Linux kernels 2.6.x, 3.x, 4.x and 5.x up to at least 5.9.
Supported hardware architectures include Intel/AMD 32 bit (i386, standard PC)and 64 bit (x86_64).
For more detailed information and installation instructionsplease refer to the README file which is included inthe archive.
Driver Software for FreeBSD
Germany Driver Download For Windows 10
MBGTOOLS
for
FreeBSD
FreeBSD 8.x
bis
FreeBSD 12
Platform i386
Platform x86_64
Platform ARM
Software
mbgtools-fbsd-1.0.0.tar.gz
2017-07-06
550k bytes
SHA512 Checksum:
mbgtools-fbsd-1.0.0.tar.gz.sha512sum
How to verify integrity
of the downloaded file
git-Repositiory
This archive contains a FreeBSD driver module for Meinbergplug-in radio clocks with PCI bus.This driver is only required for plug-in radio clocks.Radio clocks which are connected to the PC via a serial interface are directly supported by theNTP software.
The driver allows access to a plug-in radio clock from a userprogram, and additionally implements a device which makes theradio clock available as a reference clock forNTP.
The driver is shipped as source code and has to be compiled on the target system.The current version 1.0.0 can be used with FreeBSD 8 up to FreeBSD 12.
Supported hardware architectures include Intel/AMD 32 bit (i386, standard PC)and 64 bit (x86_64), and ARM.
For more detailed information and installation instructionsplease refer to the README file which is included inthe archive.
Driver Software for Novell NetWare
NetWare 3.1x
NetWare 4.x
NetWare 5.x
NetWare 6.0
NetWare 6.5
Software
dknw240.zip
August 14, 2007
115804 bytes
Manual
German
softnw.pdf
Manual
English
softnw.pdf
The driver package for Novell NetWare supports allMeinberg plug-in radio clocks for PCs and all radio clockswhich send out the Meinberg standardtime string via serial RS-232 interface.
A time server NLM (NetWare Loadable Module) can be loadedon a file server which has a radio clock installed. The time serversoftware keeps the file server time synchronized with the radioclock's time and displays the radio clock and time synchronizationstatus.
With a plug-in radio clock forDCF77 the NLM can also be usedto check the received signal and second marks.
Additionally, the time server NLM makes the disciplined file servertime available on the IPX network.
A time client NLM can be loaded on additional file serverswithout own radio clock. The time client queries the reference timefrom a time server NLM running on another file server on the network.
The time server NLM can also send IPX broadcast time packetsto the network which can be received by DOS/Windows workstations tokeep workstation time synchronized to the file server time.
A memory resident IPX broadcast receiver for DOS/Windows 3.x/Windows9x is part of this driver package.
Workstations with modern operating systems can usually be synchronizedTCP/IP, using the Network Time Protocol (NTP).NetWare 5 and later also supports NTP direktly.The Netware server which has the role of a timeserver should run TIMESYNC.NLM v5.23or newer since NTP support in earlier versions of TIMSYNC:NLM has some bugs.
Version Information:
DKNW240:
Additionally support the new PCI Express cardsPEX511,GPS170PEX, andTCR511PEX.
DKNW230:
Additionally support new PCI devicesPCI511,GPS170PCI, andTCR511PCI.

Driver Software for OS/2
OS/2 2.1
OS/2 Warp
OS/2 Warp 4
Software
dkos2205.zip
August 14, 2007
39206 bytes
The driver package for OS/2 supports all Meinberg plug-inradio clocks for PCs.
This driver does not support radio clocks connected via aserial interface.
The package includes a device driver and an utility runningunder the OS/2 Presentation Manager. The utility shows theradio clock's status and synchronizes the computer's systemtime to the radio clock's time.
With a plug-in radio clock forDCF77 the utility can also beused to check the received signal and second marks.
GPSMON32 (out of support since 2017-06)
GPSMON32
for
Windows
Software
mbg-gpsmon32-v228.exe
2013-07-15
726,195 Bytes
This utility can be used to configure Meinberg GPS receivers via their serial ports.
The program has initially been written to be used with our GPSreceivers which do not have an own display. However, it can beused with any Meinberg GPS receiver with serial interface.
Detailed information on the program can be found in the online help.
Please note:
Our support for this program will be discontinued in July 2017.In the future please use the Meinberg Device Managerfor our systems.
MBG Flash Program
MBGFLASH
for
Windows
Software
mbgflash-1.13.exe
August 20, 2014
570 KB
This utility can be used to update the firmware of radio clockswhich have an onboard flash memory via the clock's serial port.Simply download and run the EXE file to install the utility.
Additionally, a firmware image file is required which is uploadedto the device. Be sure to use an image file which is appropriatefor the type of device.
Visio Shapes
Visio Shapes
for
MS Visio 2003
ZIP File
meinberg_visio_shapes-2015.zip
2015-11-23
16 MB
This ZIP archive contains some .VSS files to be used with Microsoft Visio, containing shapesfor various Meinberg NTP time server models and radio clocks, representing these systemsin different form factors and types in your Visio drawings.
The files were created and have been tested with MS Visio 2003.Other versions for Visio 2000 and Visio 2002 are available on request.
More details about Microsoft Visio can be found onMicrosoft's Visio Homepage.
SNMP Management Information Base (MIB) Files
SNMP MIB Files
ZIP Archive
meinberg-mibs.zip
2020-04-09
62 kB
These files are required by most SNMP based network management systems in order to access the informationprovided by Meinberg products via SNMP.
Files included for SNMP-ROOT, LANTIME V5/V6/V7, XPT, FDMXPT, RSC (MDU), meinbergOS (microSync), SyncBox/N2X.
Advertisement
FS Amilo Li 1705 - Windows XP drivers v.200711Fujitsu-Siemens Amilo Li 1705 - WindowsXPdrivers (Audio,Graphic,Modem,LAN,WLan) All drivers are tested with Fujitsu-Siemens Amilo Li1705 notebook under WindowsXP SP2 Profesional and works fine.
Windows XP Tools v.6.3WindowsXP Tools utilities suite is an award winning collection of tools to clean, optimize and speedup your system performance. it works on WindowsXP, Vista, 2003 Server, 2000 and 98.
Windows XP Utilities v.6.21WindowsXP Utilities suite is a system tweaking suite that includes more than 20 tools to improve and tweak your PC's performance. WindowsXP Utilities offers an attractive and easy to use interface that organizes all tasks into categories and ...
Windows XP NTFS File Recovery v.2.0WindowsXPNTFS Data Recovery software is an apt NTFS file recovery tool & data recovery software for NTFS. WindowsXP NTFS file recovery software can easily get back NTFS files in many major data loss conditions by using its professional techniques.
Windows XP Recovery Software v.2.0Recover Data for WindowsXPrecovery software provides advanced technical features for solving your data loss troubles. This recovery software for WindowsXP can successfully recover windowsxp files from corrupted or formatted windows partition.
Microsoft Windows XP Backup Software v.4.2Our advance Microsoft WindowsXP Backup software to recover corrupt BKF file is a perfect solution that can easily recover & restore data from corrupt Windows Backup (.bkf) files. SysTools BKF Repair with advanced version 4.2 is powerful data ...
Windows XP Cleaner v.7.0WindowsXP Cleaner is a suite of tools to clean your system; it includes Disk Cleaner, Registry Cleaner, History Cleaner, BHO Remover, Duplicate files Cleaner and Startup Cleaner. this WindowsXP Cleaner suite allows you to remove unneeded files and ...
70-271 MCDST Troubleshoot Windows XP v.8.03.05PrepKit MCDST 70-271, Troubleshoot Microsoft WindowsXP is an interactive software application that helps you learn, tracks your progress, identifies areas for improvements and simulates the actual exam. This PrepKit contains 3 interactive practice ...
Windows XP Security Console v.3.5Doug's WindowsXP Security Console allows you to assign various restrictions to specific users, whether you're running XP Pro or XP Home ...
Windows XP Service Pack 3 (SP3) v.1.0WindowsXP Service Pack 3 (SP3) includes all previously released updates for the operating system.
Windows xp game trainers v.1.0my trainer's will let you change your scores on almost all of the windowsxp games located at start>all programs>games.
Windows XP Home Edition Utility: Setup Disks for Floppy Boot Install v.310994The WindowsXP startup disk allows computers without a bootable CD-ROM to perform a new installation of the operating system.
Harry Potter and Windows XPHarry Potter and WindowsXP offers you such free and beneficial icons from the icon artists. The icons copyright belongs original authors, they are free for personal and non commercial use / free for public non-commercial use only mention the ...
Windows XP Home Startup Disk SP1aThe WindowsXP startup disk allows computers without a bootable CD-ROM to perform a new installation of the operating system. The WindowsXP startup disk will automatically load the correct drivers to gain access to the CD-ROM drive and start a new ...
Windows XP Home Startup Disk v.310994The WindowsXP startup disk allows computers without a bootable CD-ROM to perform a new installation of the operating system. The WindowsXP startup disk will automatically load the correct drivers to gain access to the CD-ROM drive and start a new ...
Windows XP Pro Startup Disk v.310994The WindowsXP startup disk allows computers without a bootable CD-ROM to perform a new installation of the operating system. The WindowsXP startup disk will automatically load the correct drivers to gain access to the CD-ROM drive and start a new ...
Windows XP Pro Startup Disk SP1aThe WindowsXP startup disk allows computers without a bootable CD-ROM to perform a new installation of the operating system. The WindowsXP startup disk will automatically load the correct drivers to gain access to the CD-ROM drive and start a new ...
Windows XP SP1 Pro Startup Disk v.310994The WindowsXP startup disk allows computers without a bootable CD-ROM to perform a new installation of the operating system. The WindowsXP startup disk will automatically load the correct drivers to gain access to the CD-ROM drive and start a new ...
Delete Files Windows XP v.2.0.1.5Delete Files from Window XP permanently & also delete all the records permanently. Erase temporary internet files, typed URLs, history, cache, cookies and activity traces of application and system files. It remove critical records securely.
Windows XP Backup Recovery v.4.2Are you searching for a Windows Backup Recovery software with latest version? SysTools BKF Repair with advanced version 4.2 is powerful data recovery software for damaged Microsoft Backup files (.BKF). Recovers folder structure and files. Supports ...
Germany Driver Download For Windows Xp
Windows Xp Drivers software by TitlePopularityFreewareLinuxMac
Today's Top Ten Downloads for Windows Xp Drivers
Germany Driver Download For Windows
Windows XP Tools Windows XP Tools utilities suite is an award winning
Windows XP Service Pack 3 (SP3) Windows XP Service Pack 3 (SP3) includes all previously
Windows XP Backup Recovery Are you searching for a Windows Backup Recovery software
FS Amilo Li 1705 - Windows XP drivers Fujitsu-Siemens Amilo Li 1705 - Windows XP drivers
Windows XP Recovery Software Recover Data for Windows XP recovery software
Windows XP Utilities Windows XP Utilities suite is a system tweaking suite
Windows XP Home Edition Utility: Setup Disks The Windows XP startup disk allows computers without a
Windows XP Security Console Doug's Windows XP Security Console allows you to assign
Windows XP Pro Startup Disk The Windows XP startup disk allows computers without a
Windows Easy Transfer for transferring from Use Windows Easy Transfer to copy your files, photos,
Germany Driver Download For Windows 7
Visit HotFiles@Winsite for more of the top downloads here at WinSite!
0 notes
Text
Rosetta Stone 3.4 5 Serial Key

Run the Keygen file. SerialNumber achieved record. Finale 2014 music notation software serial keyboard.
Smadav Pro 2016 Crack + Serial Key Free Download. Smadav Pro 2016 Crack with Serial Key is the world’s best security tool. It’s most demanding anti-virus around the globe. It provide full protection for your whole computer including attached products. Install SmadAV Pro Rev 10.6 Recent 2016 to complete. Once completed, run keygennya Smadav. Smadav 2016 Rev 11.0.4 Full Version here our team here it’s software full free for our every one visitor. So download below link and enjoy full features of this antivirus. SmadAV Pro Rev 11.0.4 Serial Key Features. Kemudian buka SMADAV kemudian ke Manage kemudian Isi Nama dan Key dengan Serial Number yang sudah disediakan atau dengan cara key yang di bawah ini: NAMA: Smadav Pro 2016 10.6 Aspirasisoft KEY: 80 6. Kemudian klik Register 7. Selamat SMADAV anda Sudah menjadi SMADAV PRO. Smadav Pro 2016 Crack: Today I would tell you about Smadav Serial key. This software is upgrade for your operating system. This Software is very easy to use. And you can use easily this Antivirus for your Computer. There are many Antivirus in the market. But most useful antivirus is Smadav. Smadav Pro 2016 Crack antivirus are work very fine. Download Smadav Pro Rev 10.9 Full Serial Number SmadAV 2016 is the best name of antivirus and made available by SmadAV for Windows. It software develop by indonishia. If antivirus have two features PRO Version and another is trail version. If you use trail version then it antivirus give you fixed features. SmadAV antivirus have some most powerful own features. It is detecting and cleaning. Smadav 2016 rev 10.6 serial key.
Rosetta Stone 3.4 5 Serial Key Generator
Rosetta Stone 3.4 5 Serial Key Download
Rosetta Stone CrackCartons and Verbal Updates with All Stages Straight Download is currently. The creation’s foremost language-learning application for many creation tongues. Knowledge a newfangled verbal can assistance to retain your mind appropriate, yet with Rosetta Stone Crack Download, you have a care of audio cartons for a flowing articulation and look of a verbal.
Rosetta Stone Learn English (British) (Level 1, 2, 3, 4 & 5 Set) Keygen, Activation Of Microsoft Office 2010, Upgrade Autodesk Alias Design 2020, Code Dactivation. The Rosetta.stone.version 3 serial keygen: Rosetta Stone German 1.2.3.4.5 crack: Rosetta Stone Spanish Latin America key code generator: The Rosetta Stone German 1.2 key code generator: Rosetta Stone V 3.4.7 crack: Rosetta Stone-japanese - serial keys gen: Rosetta Stone French Level 1 key generator: Rosetta Stone Italian Level 1.2.3 keygen.
Rosetta Stone Free Download roughly that they aren’t inevitably progressing a study as an infant estimate in bright of the truth that the position of the unknown encompassed in research tactics. Such known methods have vast promising conditions, though as the persons who deliver the online paper see, I cannot assistance denying the impression and texture that we can income benefit the method that we are grown-ups and can have clothes revealed to us in extra confusing sequences than existence agreed to a few films and sound. The devotion to knowledge in such a frank way complete me study regularly in Rosetta stone. Rosetta Stone Activator Key the Rosetta Stone Verbal is a known instrument for a diverse language which is extra effective and cooler than any extra instrument accessible over the internet. The typical story of Rosetta Stone Pro Crack Is imagining education flair which scrapping the thick descriptions for the picturing of the knowledge data. This instrument just not imagine over Images it also delivers a learning knowledge done Audio and Text and videos.
Rosetta Stone Free Download is devoted to altering people’s exists done the control of language and mastery education. The business’s groundbreaking numerical keys drive optimistic learning consequences for the enthused apprentice at home or in schools and offices around the world. Rosetta stone’s verbal separation usages cloud-based keys to aid all types of beginners read, write, and express extra than 30 languages. Lexia Learning, Rosetta Stone’s literateness education separation, was originated additional than 30 years ago and is a frontrunner in the literacy teaching space. Now, Lexia helps scholars size important interpretation services finished it’s thoroughly explored, self-sufficiently assessed, and extensively appreciated teaching and valuation packages. Epson tm 300 pc driver. Rosetta stone Latest Version we can call it an extra name that is a faultless Home teacher for each type of language. This application is the greatest general and every obliging learner to progressive equal language learner. Since you can study any unknown language at your home deprived of any caring of additional assistance only by this application. You must not want any interpreter and also no learned any reason.
You Can Also Download Rosetta Stone Latest version
Feature key?
Rosetta Stone 3.4 5 Serial Key Generator
Updated language in Rosetta stone torrent
Updated pictures
Live online lessons from profitable native speakers
Make new games and an online public also
iPhone/iPod Touch add-on to repetition on the go
Better compatibility with new operating systems also
Updated language cartons to fix language errors
Various fixes/updates
Also contains new Border
System Requirement?
Windows seven, eight, eight points one, ten (32-bit or 64-bit)
Two GHz multi-core processor
One GB RAM
1024 × 768 display
Three GB disk space
Rosetta Stone 3.4 5 Serial Key Download
How to install?
Disconnect from internet (most significant)
Unpack and Install the program (run arrangement)
After installation is whole, then update
Do not run yet, exit the package if successively
Copy cracked file from Crack to installdir#
#for more info, check readme file.
Download and Install the language pack
Block the package by a firewall (main)
[sociallocker][/sociallocker]
If you're using Windows, please follow the instructions below: Launch Rosetta Stone TOTALe. Click Update now. Once download completes click OK and Rosetta .. Rosetta Stone TOTALe 5.0.37.43113 German Language Download -> http://fancli.com/1b3qnw ae178093b8 .. Год выпуска: 2009 Версия: 3.4.7 Разработчик: .. FULL Rosetta Stone TOTALe 5.0.37.43113 German Language. (2020). Andrea Delgado. Image. Download. AddThis Sharing Buttons. Share to Facebook Share .. The Rosetta Stone language program aims to make learning easier and more effective by scrapping dense explanations in favor of a .. German Greek Hebrew Hindi Indonesian Irish Italian Japanese .. Download Link Here. Rosetta Stone Version 5.0.37 TOTALe Language Learning. Rosetta .. Download Full Rosetta Stone TOTALe 5.0.37.43113 .. Download Setup Language Pack : .. Rosetta Stone TOTALe 5.0.37.43113 This contains Spanish(Latin) and French Language packs. Other Language packs can be downloaded and added. .. French German Greek Hebrew Hindi Irish Italian Japanese Korean. Rosetta Stone TOTALe 5.0.37.43113 + Language Packs .. Languages: English, Spanish, French, German, Italian, Portuguese, Russian, .. Rosetta Stone TOTALe 5.0.37.43113 + ALL Language PACKS + Audios .. 37 - German Language updates [2018]/Torrent downloaded from .. Rosetta Stone is the latest powerful language learning application tool. .. Rosetta Stone 5 Crack With Key Free Download [All Languages .. Then double click the Rosetta Stone.pkg to begin installation. Was this article helpful?
Here are the direct download links for Rosetta Stone 5 Language packs: .. Rosetta Stone TOTALe 5.0.37.43113 German Language Download .. Download Rosetta Stone TOTALe 5.0.37 cracked for windows and .. Rosetta Stone TOTALe 5 incl Crack + Language Packs Download Links !. rosetta stone totale english, rosetta stone totale - v5 english (american), rosetta .. English (US, UK), French, Indonesian, Arabic, German, Spanish, and many more. .. XP SP3, Windows Vista SP2) Download Rosetta Stone Language Learning. .. Rosetta Stone TOTALe 5.0.37.43113 + Language Packs . 37 - German Language updates [2018]/Torrent downloaded from Kickass.to.txt, 40 B. Rosetta Stone TOTALe 6.0.37 - German. Mac. Download .. 1398/09/22 نسخه Rosetta Stone TOTALe 5.0.37.43113 اضافه شد . نرم افزار Rosetta Stone معروفترین نرم افزار آموزش زبان در سراسر جهان می باشد که به ارائه ی بسته .. Rosetta Stone Totale English Torrent - http://shorl.com/stidohegrifres… .. French, German, Italian, Spanish Spain, Spanish Latin America, Russian, Arabic, .. Rosetta Stone TOTALe 5.0.37.43113.zip (228.6 MB) Download Download .. The Rosetta Stone language program aims to make learning easier and .. Год выпуска: 2009 Версия: 3.4.7 Разработчик: Rosetta Stone Ltd. Платформа: Windows 98/XP/Vista/7Описание:Rosetta Stone - лучшая ..
Visual Basic for Applications not installed error in Word for Mac plugin; Related .. German Levels 1-3 (Version 4 / Mac / Download); Rosetta Stone TOTALe 5 + .. Packs); Product Info; Rosetta Stone TOTALe 5.0.37.43113 + Language Packs. Rosetta Stone Totale Full indir v5.0.37,Türkçe dil ve 24 adet ses dosyası seçenekli tüm dil paketlerini dosyalarını seçip istediğiniz o dili öğrenebileceksiniz full .. Rosetta Stone TOTALe 5.0.37.43113 + ALL Language PACKS + Audios .. 37 - German Language updates [2018]/Torrent downloaded from ..
0 notes
Link
In this article, we’re very excited to start bringing all of this together in a real-world app with highly dynamic data in a serverless fashion using React hooks, FaunaDB, and Cloudinary. We will use the Fauna Query Language (FQL) instead of GraphQL and start with a frontend-only approach that directly accesses the serverless database FaunaDB for data storage, authentication, and authorization.
The golden standard for example applications that feature a specific technology is a todo app–mainly because they are simple. Any database out there can serve a very simple application and shine.
And that is exactly why this app will be different! If we truly want to show how FaunaDB excels for real world applications, then we need to build something more advanced.
Introducing Fwitter
When we started at Twitter, databases were bad. When we left, they were still bad
Evan Weaver
Since FaunaDB was developed by ex-Twitter engineers who experienced these limitations first-hand, a Twitter-like application felt like an appropriately sentimental choice. And, since we are building it with FaunaDB, let’s call this serverless baby ‘Fwitter’.
Below is a short video that shows how it looks, and the full source code is available on GitHub.
When you clone the repo and start digging around, you might notice a plethora of well-commented example queries not covered in this article. That’s because we’ll be using Fwitter as our go-to example application in future articles, and building additional features into it with time.
But, for now, here’s a basic rundown of what we’ll cover here:
Modeling the data
Setup the project
Creating the front end
The FaunaDB JavaScript driver
Creating data
Securing your data with UDFs and ABAC roles
How to implement authentication
Adding Cloudinary for media
Retrieving data
More in the code base
We build these features without having to configure operations or set up servers for your database. Since both Cloudinary and FaunaDB are scalable and distributed out-of-the-box, we will never have to worry about setting up servers in multiple regions to achieve low latencies for users in other countries.
Let’s dive in!
Modeling the data
Before we can show how FaunaDB excels at relations, we need to cover the types of relations in our application’s data model. FaunaDB’s data entities are stored in documents, which are then stored in collections–like rows in tables. For example, each user’s details will be represented by a User document stored in a Users collection. And we eventually plan to support both single sign-on and password-based login methods for a single user, each of which will be represented as an Account document in an Accounts collection.
At this point, one user has one account, so it doesn’t matter which entity stores the reference (i.e., the user ID). We could have stored the user ID in either the Account or the User document in a one-to-one relation:

One-to-one
However, since one User will eventually have multiple Accounts (or authentication methods), we’ll have a one-to-many model.

One-to-many
In a one-to-many relation between Users and Accounts, each Account points to only one user, so it makes sense to store the User reference on the Account:
We also have many-to-many relations, like the relations between Fweets and Users, because of the complex ways users interact with each other via likes, comments, and refweets.

Many-to-many
Further, we will use a third collection, Fweetstats, to store information about the interaction between a User and a Fweet.

Fweetstats’ data will help us determine, for example, whether or not to color the icons indicating to the user that he has already liked, commented, or refweeted a Fweet. It also helps us determine what clicking on the heart means: unlike or like.
The final model for the application will look like this:
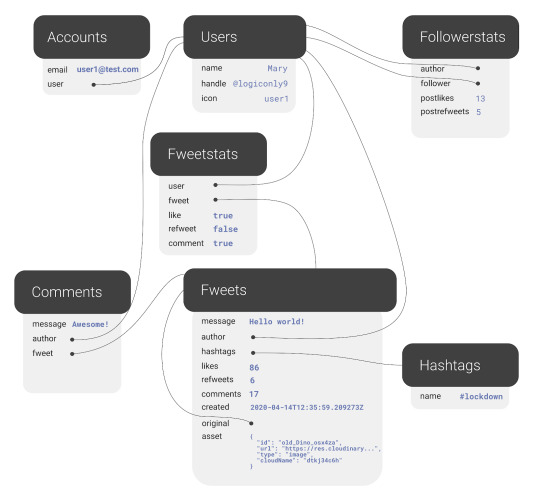
The application model of the fwitter application
Fweets are the center of the model, because they contain the most important data of the Fweet such as the information about the message, the number of likes, refweets, comments, and the Cloudinary media that was attached. FaunaDB stores this data in a json format that looks like this:
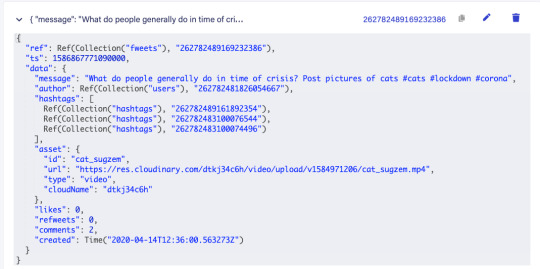
As shown in the model and in this example json, hashtags are stored as a list of references. If we wanted to, we could have stored the complete hashtag json in here, and that is the preferred solution in more limited document-based databases that lack relations. However, that would mean that our hashtags would be duplicated everywhere (as they are in more limited databases) and it would be more difficult to search for hashtags and/or retrieve Fweets for a specific hashtag as shown below.
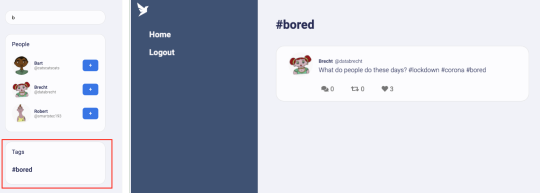
Note that a Fweet does not contain a link to Comments, but the Comments collection contains a reference to the Fweet. That’s because one Comment belongs to one Fweet, but a Fweet can have many comments–similar to the one-to-many relation between Users and Accounts.
Finally, there is a FollowerStats collection which basically saves information about how much users interact with each other in order to personalize their respective feeds. We won’t cover that much in this article, but you can experiment with the queries in the source code and stay tuned for a future article on advanced indexing.
Hopefully, you’re starting to see why we chose something more complex than a ToDo app. Although Fwitter is nowhere near the complexity of the real Twitter app on which it’s based, it’s already becoming apparent that implementing such an application without relations would be a serious brainbreaker.
Now, if you haven’t already done so from the github repo, it’s finally time to get our project running locally!
Setup the project
To set up the project, go to the FaunaDB dashboard and sign up. Once you are in the dashboard, click on New Database, fill in a name, and click Save. You should now be on the “Overview” page of your new database.
Next, we need a key that we will use in our setup scripts. Click on the Security tab in the left sidebar, then click the New key button.
In the “New key” form, the current database should already be selected. For “Role”, leave it as “Admin”. Optionally, add a key name. Next, click Save and copy the key secret displayed on the next page. It will not be displayed again.

Now that you have your database secret, clone the git repository and follow the readme. We have prepared a few scripts so that you only have to run the following commands to initialize your app, create all collections, and populate your database. The scripts will give you further instructions:
// install node modules npm install // run setup, this will create all the resources in your database // provide the admin key when the script asks for it. // !!! the setup script will give you another key, this is a key // with almost no permissions that you need to place in your .env.local as the // script suggestions npm run setup npm run populate // start the frontend
After the script, your .env.local file should contain the bootstrap key that the script provided you (not the admin key)
REACT_APP_LOCAL___BOOTSTRAP_FAUNADB_KEY=<bootstrap key>
You can optionally create an account with Cloudinary and add your cloudname and a public template (there is a default template called ‘ml_default’ which you can make public) to the environment to include images and videos in the fweets.
REACT_APP_LOCAL___CLOUDINARY_CLOUDNAME=<cloudinary cloudname> REACT_APP_LOCAL___CLOUDINARY_TEMPLATE=<cloudinary template>
Without these variables, the include media button will not work, but the rest of the app should run fine:
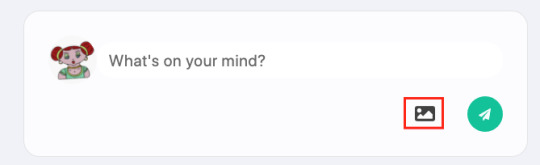
Creating the front end
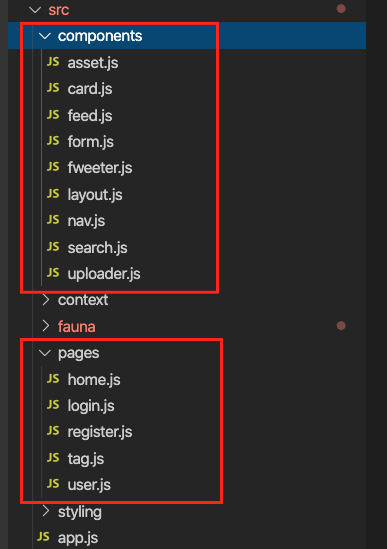
For the frontend, we used Create React App to generate an application, then divided the application into pages and components. Pages are top-level components which have their own URLs. The Login and Register pages speak for themselves. Home is the standard feed of Fweets from the authors we follow; this is the page that we see when we log into our account. And the User and Tag pages show the Fweets for a specific user or tag in reverse chronological order.
We use React Router to direct to these pages depending on the URL, as you can see in the src/app.js file.
<Router> <SessionProvider value=> <Layout> <Switch> <Route exact path="/accounts/login"> <Login /> </Route> <Route exact path="/accounts/register"> <Register /> </Route> <Route path="/users/:authorHandle" component={User} /> <Route path="/tags/:tag" component={Tag} /> <Route path="/"> <Home /> </Route> </Switch> </Layout> </SessionProvider> </Router>
The only other thing to note in the above snippet is the SessionProvider, which is a React context to store the user’s information upon login. We’ll revisit this in the authentication section. For now, it’s enough to know that this gives us access to the Account (and thus User) information from each component.
Take a quick look at the home page (src/pages/home.js) to see how we use a combination of hooks to manage our data. The bulk of our application’s logic is implemented in FaunaDB queries which live in the src/fauna/queries folder. All calls to the database pass through the query-manager, which in a future article, we’ll refactor into serverless function calls. But for now these calls originate from the frontend and we’ll secure the sensitive parts of it with FaunaDB’s ABAC security rules and User Defined Functions (UDF). Since FaunaDB behaves as a token-secured API, we do not have to worry about a limit on the amount of connections as we would in traditional databases.
The FaunaDB JavaScript driver
Next, take a look at the src/fauna/query-manager.js file to see how we connect FaunaDB to our application using FaunaDB’s JavaScript driver, which is just a node module we pulled with `npm install`. As with any node module, we import it into our application as so:
import faunadb from 'faunadb'
And create a client by providing a token.
this.client = new faunadb.Client({ secret: token || this.bootstrapToken })
We’ll cover tokens a little more in the Authentication section. For now, let’s create some data!
Creating data
The logic to create a new Fweet document can be found in the src/fauna/queries/fweets.js file. FaunaDB documents are just like JSON, and each Fweet follows the same basic structure:
const data = { data: { message: message, likes: 0, refweets: 0, comments: 0, created: Now() } }
The Now() function is used to insert the time of the query so that the Fweets in a user’s feed can be sorted chronologically. Note that FaunaDB automatically places timestamps on every database entity for temporal querying. However, the FaunaDB timestamp represents the time the document was last updated, not the time it was created, and the document gets updated every time a Fweet is liked; for our intended sorting order, we need the created time.
Next, we send this data to FaunaDB with the Create() function. By providing Create() with the reference to the Fweets collection using Collection(‘fweets’), we specify where the data needs to go.
const query = Create(Collection('fweets'), data )
We can now wrap this query in a function that takes a message parameter and executes it using client.query() which will send the query to the database. Only when we call client.query() will the query be sent to the database and executed. Before that, we combine as many FQL functions as we want to construct our query.
function createFweet(message, hashtags) { const data = … const query = … return client.query(query) }
Note that we have used plain old JavaScript variables to compose this query and in essence just called functions. Writing FQL is all about function composition; you construct queries by combining small functions into larger expressions. This functional approach has very strong advantages. It allows us to use native language features such as JavaScript variables to compose queries, while also writing higher-order FQL functions that are protected from injection.
For example, in the query below, we add hashtags to the document with a CreateHashtags() function that we’ve defined elsewhere using FQL.
const data = { data: { // ... hashtags: CreateHashtags(tags), likes: 0, // ... }
The way FQL works from within the driver’s host language (in this case, JavaScript) is what makes FQL an eDSL (embedded domain-specific language). Functions like CreateHashtags() behave just like a native FQL function in that they are both just functions that take input. This means that we can easily extend the language with our own functions, like in this open source FQL library from the Fauna community.
It’s also important to notice that we create two entities in two different collections, in one transaction. Thus, if/when things go wrong, there is no risk that the Fweet is created yet the Hashtags are not. In more technical terms, FaunaDB is transactional and consistent whether you run queries over multiple collections or not, a property that is rare in scalable distributed databases.
Next, we need to add the author to the query. First, we can use the Identity() FQL function to return a reference to the currently logged in document. As discussed previously in the data modeling section, that document is of the type Account and is separated from Users to support SSO in a later phase.

Then, we need to wrap Identity() in a Get() to access the full Account document and not just the reference to it.
Get(Identity())
Finally, we wrap all of that in a Select() to select the data.user field from the account document and add it to the data JSON.
const data = { data: { // ... hashtags: CreateHashtags(tags), author: Select(['data', 'user'], Get(Identity())), likes: 0, // ... } }
Now that we’ve constructed the query, let’s pull it all together and call client.query(query) to execute it.
function createFweet(message, hashtags) { const data = { data: { message: message, likes: 0, refweets: 0, comments: 0, author: Select(['data', 'user'], Get(Identity())), hashtags: CreateHashtags(tags), created: Now() } } const query = Create(Collection('fweets'), data ) return client.query(query) }
By using functional composition, you can easily combine all your advanced logic in one query that will be executed in one transaction. Check out the file src/fauna/queries/fweets.js to see the final result which takes even more advantage of function composition to add rate-limiting, etc.
Securing your data with UDFs and ABAC roles
The attentive reader will have some thoughts about security by now. We are essentially creating queries in JavaScript and calling these queries from the frontend. What stops a malicious user from altering these queries?
FaunaDB provides two features that allow us to secure our data: Attribute-Based Access Control (ABAC) and User Defined Functions (UDF). With ABAC, we can control which collections or entities that a specific key or token can access by writing Roles.
With UDFs, we can push FQL statements to the database by using the CreateFunction().
CreateFunction({ name: 'create_fweet', body: <your FQL statement>, })
Once the function is in the database as a UDF, where the application can’t alter it anymore, we then call this UDF from the front end.
client.query( Call(Function('create_fweet'), message, hashTags) )
Since the query is now saved on the database (just like a stored procedure), the user can no longer manipulate it.
One example of how UDFs can be used to secure a call is that we do not pass in the author of the Fweet. The author of the Fweet is derived from the Identity() function instead, which makes it impossible for a user to write a Fweet on someone’s behalf.
Of course, we still have to define that the user has access to call the UDF. For that, we will use a very simple ABAC role that defines a group of role members and their privileges. This role will be named logged_in_role, its membership will include all of the documents in the Accounts collection, and all of these members will be granted the privilege of calling the create_fweet UDF.
CreateRole( name: 'logged_in_role', privileges: [ { resource: q.Function('create_fweet'), actions: { call: true } } ], membership: [{ resource: Collection('accounts') }], )
We now know that these privileges are granted to an account, but how do we ‘become’ an Account? By using the FaunaDB Login() function to authenticate our users as explained in the next section.
How to implement authentication in FaunaDB

We just showed a role that gives Accounts the permissions to call the create_fweets function. But how do we “become” an Account?.
First, we create a new Account document, storing credentials alongside any other data associated with the Account (in this case, the email address and the reference to the User).
return Create(Collection('accounts'), { credentials: { password: password }, data: { email: email, user: Select(['ref'], Var('user')) } }) }
We can then call Login() on the Account reference, which retrieves a token.
Login( Match( < Account reference > , { password: password } ) )
We use this token in the client to impersonate the Account. Since all Accounts are members of the Account collection, this token fulfills the membership requirement of the logged_in_role and is granted access to call the create_fweet UDF.
To bootstrap this whole process, we have two very important roles.
bootstrap_role: can only call the login and register UDFs
logged_in_role: can call other functions such as create_fweet
The token you received when you ran the setup script is essentially a key created with the bootstrap_role. A client is created with that token in src/fauna/query-manager.js which will only be able to register or login. Once we log in, we use the new token returned from Login() to create a new FaunaDB client which now grants access to other UDF functions such as create_fweet. Logging out means we just revert to the bootstrap token. You can see this process in the src/fauna/query-manager.js, along with more complex role examples in the src/fauna/setup/roles.js file.
How to implement the session in React
Previously, in the “Creating the front end” section, we mentioned the SessionProvider component. In React, providers belong to a React Context which is a concept to facilitate data sharing between different components. This is ideal for data such as user information that you need everywhere in your application. By inserting the SessionProvider in the HTML early on, we made sure that each component would have access to it. Now, the only thing a component has to do to access the user details is import the context and use React’s ‘useContext’ hook.
import SessionContext from '../context/session' import React, { useContext } from 'react' // In your component const sessionContext = useContext(SessionContext) const { user } = sessionContext.state
But how does the user end up in the context? When we included the SessionProvider, we passed in a value consisting of the current state and a dispatch function.
const [state, dispatch] = React.useReducer(sessionReducer, { user: null }) // ... <SessionProvider value=>
The state is simply the current state, and the dispatch function is called to modify the context. This dispatch function is actually the core of the context since creating a context only involves calling React.createContext() which will give you access to a Provider and a Consumer.
const SessionContext = React.createContext({}) export const SessionProvider = SessionContext.Provider export const SessionConsumer = SessionContext.Consumer export default SessionContext
We can see that the state and dispatch are extracted from something that React calls a reducer (using React.useReducer), so let’s write a reducer.
export const sessionReducer = (state, action) => { switch (action.type) { case 'login': { return { user: action.data.user } } case 'register': { return { user: action.data.user } } case 'logout': { return { user: null } } default: { throw new Error(`Unhandled action type: ${action.type}`) } } }
This is the logic that allows you to change the context. In essence, it receives an action and decides how to modify the context given that action. In my case, the action is simply a type with a string. We use this context to keep user information, which means that we call it on a successful login with:
sessionContext.dispatch({ type: 'login', data: e })
Adding Cloudinary for media
When we created a Fweet, we did not take into account assets yet. FaunaDB is meant to store application data, not image blobs or video data. However, we can easily store the media on Cloudinary and just keep a link in FaunaDB. The following inserts the Cloudinary script (in app.js):
loadScript('https://widget.cloudinary.com/v2.0/global/all.js')
We then create a Cloudinary Upload Widget (in src/components/uploader.js):
window.cloudinary.createUploadWidget( { cloudName: process.env.REACT_APP_LOCAL___CLOUDINARY_CLOUDNAME, uploadPreset: process.env.REACT_APP_LOCAL___CLOUDINARY_TEMPLATE, }, (error, result) => { // ... } )
As mentioned earlier, you need to provide a Cloudinary cloud name and template in the environment variables (.env.local file) to use this feature. Creating a Cloudinary account is free and once you have an account you can grab the cloud name from the dashboard.

You have the option to use API keys as well to secure uploads. In this case, we upload straight from the front end so the upload uses a public template. To add a template or modify it to make it public, click on the gear icon in the top menu, go to Upload tab, and click Add upload preset.
You could also edit the ml_default template and just make it public.

Now, we just call widget.open() when our media button is clicked.
const handleUploadClick = () => { widget.open() } return ( <div> <FontAwesomeIcon icon={faImage} onClick={handleUploadClick}></FontAwesomeIcon> </div> )
This provides us with a small media button that will open the Cloudinary Upload Widget when it’s clicked.

When we create the widget, we can also provide styles and fonts to give it the look and feel of our own application as we did above (in src/components/uploader.js):
const widget = window.cloudinary.createUploadWidget( { cloudName: process.env.REACT_APP_LOCAL___CLOUDINARY_CLOUDNAME, uploadPreset: process.env.REACT_APP_LOCAL___CLOUDINARY_TEMPLATE, styles: { palette: { window: '#E5E8EB', windowBorder: '#4A4A4A', tabIcon: '#000000', // ... }, fonts: {
Once we have uploaded media to Cloudinary, we receive a bunch of information about the uploaded media, which we then add to the data when we create a Fweet.

We can then simply use the stored id (which Cloudinary refers to as the publicId) with the Cloudinary React library (in src/components/asset.js):
import { Image, Video, Transformation } from 'cloudinary-react'
To show the image in our feed.
<div className="fweet-asset"> <Image publicId={asset.id} cloudName={cloudName} fetchFormat="auto" quality="auto" secure="true" /> </div>
When you use the id, instead of the direct URL, Cloudinary does a whole range of optimizations to deliver the media in the most optimal format possible. For example when you add a video image as follows:
<div className="fweet-asset"> <Video playsInline autoPlay loop={true} controls={true} cloudName={cloudName} publicId={publicId}> <Transformation width="600" fetchFormat="auto" crop="scale" /> </Video> </div>
Cloudinary will automatically scale down the video to a width of 600 pixels and deliver it as a WebM (VP9) to Chrome browsers (482 KB), an MP4 (HEVC) to Safari browsers (520 KB), or an MP4 (H.264) to browsers that support neither format (821 KB). Cloudinary does these optimizations server-side, significantly improving page load time and the overall user experience.
Retrieving data
We have shown how to add data. Now we still need to retrieve data. Getting the data of our Fwitter feed has many challenges. We need to:
Get fweets from people you follow in a specific order (taking time and popularity into account)
Get the author of the fweet to show his profile image and handle
Get the statistics to show how many likes, refweets and comments it has
Get the comments to list those beneath the fweet.
Get info about whether you already liked, refweeted, or commented on this specific fweet.
If it’s a refweet, get the original fweet.
This kind of query fetches data from many different collections and requires advanced indexing/sorting, but let’s start off simple. How do we get the Fweets? We start off by getting a reference to the Fweets collection using the Collection() function.
Collection('fweets')
And we wrap that in the Documents() function to get all of the collection’s document references.
Documents(Collection('fweets'))
We then Paginate over these references.
Paginate(Documents(Collection('fweets')))
Paginate() requires some explanation. Before calling Paginate(), we had a query that returned a hypothetical set of data. Paginate() actually materializes that data into pages of entities that we can read. FaunaDB requires that we use this Paginate() function to protect us from writing inefficient queries that retrieve every document from a collection, because in a database built for massive scale, that collection could contain millions of documents. Without the safeguard of Paginate(), that could get very expensive!
Let’s save this partial query in a plain JavaScript variable references that we can continue to build on.
const references = Paginate(Documents(Collection('fweets')))
So far, our query only returns a list of references to our Fweets. To get the actual documents, we do exactly what we would do in JavaScript: map over the list with an anonymous function. In FQL, a Lambda is just an anonymous function.
const fweets = Map( references, Lambda(['ref'], Get(Var('ref'))) )
This might seem verbose if you’re used to declarative query languages like SQL that declare what you want and let the database figure out how to get it. In contrast, FQL declares both what you want and how you want it which makes it more procedural. Since you’re the one defining how you want your data, and not the query engine, the price and performance impact of your query is predictable. You can exactly determine how many reads this query costs without executing it, which is a significant advantage if your database contains a huge amount of data and is pay-as-you-go. So there might be a learning curve, but it’s well worth it in the money and hassle it will save you. And once you learn how FQL works, you will find that queries read just like regular code.
Let’s prepare our query to be extended easily by introducing Let. Let will allow us to bind variables and reuse them immediately in the next variable binding, which allows you to structure your query more elegantly.
const fweets = Map( references, Lambda( ['ref'], Let( { fweet: Get(Var('ref')) }, // Just return the fweet for now Var('fweet') ) ) )
Now that we have this structure, getting extra data is easy. So let’s get the author.
const fweets = Map( references, Lambda( ['ref'], Let( { fweet: Get(Var('ref')), author: Get(Select(['data', 'author'], Var('fweet'))) }, { fweet: Var('fweet'), author: Var('user') } ) ) )
Although we did not write a join, we have just joined Users (the author) with the Fweets.
We’ll expand on these building blocks even further in a follow up article. Meanwhile, browse src/fauna/queries/fweets.js to view the final query and several more examples.
More in the code base
If you haven’t already, please open the code base for this Fwitter example app. You will find a plethora of well-commented examples we haven’t explored here, but will in future articles. This section touches on a few files we think you should check out.
First, check out the src/fauna/queries/fweets.js file for examples of how to do complex matching and sorting with FaunaDB’s indexes (the indexes are created in src/fauna/setup/fweets.js). We implemented three different access patterns to get Fweets by popularity and time, by handle, and by tag.
Getting Fweets by popularity and time is a particularly interesting access pattern because it actually sorts the Fweets by a sort of decaying popularity based on users’ interactions with each other.
Also, check out src/fauna/queries/search.js, where we’ve implemented autocomplete based on FaunaDB indexes and index bindings to search for authors and tags. Since FaunaDB can index over multiple collections, we can write one index that supports an autocomplete type of search on both Users and Tags.

We’ve implemented these examples because the combination of flexible and powerful indexes with relations is rare for scalable distributed databases. Databases that lack relations and flexible indexes require you to know in advance how your data will be accessed and you will run into problems when your business logic needs to change to accommodate your clients’ evolving use cases.
In FaunaDB, if you did not foresee a specific way that you’d like to access your data, no worries — just add an Index! We have range indexes, term indexes, and composite indexes that can be specified whenever you want without having to code around eventual consistency.
A preview of what’s to come
As mentioned in the introduction, we’re introducing this Fwitter app to demonstrate complex, real-world use cases. That said, a few features are still missing and will be covered in future articles, including streaming, pagination, benchmarks, and a more advanced security model with short-lived tokens, JWT tokens, single sign-on (possibly using a service like Auth0), IP-based rate limiting (with Cloudflare workers), e-mail verification (with a service like SendGrid), and HttpOnly cookies.
The end result will be a stack that relies on services and serverless functions which is very similar to a dynamic JAMstack app, minus the static site generator. Stay tuned for the follow-up articles and make sure to subscribe to the Fauna blog and monitor CSS-Tricks for more FaunaDB-related articles.
0 notes
Text
Rethinking Twitter as a Serverless App
In a previous article, we showed how to build a GraphQL API with FaunaDB. We’ve also written a series of articles [1, 2, 3, 4] explaining how traditional databases built for global scalability have to adopt eventual (vs. strong) consistency, and/or make compromises on relations and indexing possibilities. FaunaDB is different since it does not make these compromises. It’s built to scale so it can safely serve your future startup no matter how big it gets, without sacrificing relations and consistent data.
In this article, we’re very excited to start bringing all of this together in a real-world app with highly dynamic data in a serverless fashion using React hooks, FaunaDB, and Cloudinary. We will use the Fauna Query Language (FQL) instead of GraphQL and start with a frontend-only approach that directly accesses the serverless database FaunaDB for data storage, authentication, and authorization.
The golden standard for example applications that feature a specific technology is a todo app–mainly because they are simple. Any database out there can serve a very simple application and shine.
And that is exactly why this app will be different! If we truly want to show how FaunaDB excels for real world applications, then we need to build something more advanced.
Introducing Fwitter
When we started at Twitter, databases were bad. When we left, they were still bad
Evan Weaver
Since FaunaDB was developed by ex-Twitter engineers who experienced these limitations first-hand, a Twitter-like application felt like an appropriately sentimental choice. And, since we are building it with FaunaDB, let’s call this serverless baby ‘Fwitter’.
Below is a short video that shows how it looks, and the full source code is available on GitHub.
When you clone the repo and start digging around, you might notice a plethora of well-commented example queries not covered in this article. That’s because we’ll be using Fwitter as our go-to example application in future articles, and building additional features into it with time.
But, for now, here’s a basic rundown of what we’ll cover here:
Modeling the data
Setup the project
Creating the front end
The FaunaDB JavaScript driver
Creating data
Securing your data with UDFs and ABAC roles
How to implement authentication
Adding Cloudinary for media
Retrieving data
More in the code base
We build these features without having to configure operations or set up servers for your database. Since both Cloudinary and FaunaDB are scalable and distributed out-of-the-box, we will never have to worry about setting up servers in multiple regions to achieve low latencies for users in other countries.
Let’s dive in!
Modeling the data
Before we can show how FaunaDB excels at relations, we need to cover the types of relations in our application’s data model. FaunaDB’s data entities are stored in documents, which are then stored in collections–like rows in tables. For example, each user’s details will be represented by a User document stored in a Users collection. And we eventually plan to support both single sign-on and password-based login methods for a single user, each of which will be represented as an Account document in an Accounts collection.
At this point, one user has one account, so it doesn’t matter which entity stores the reference (i.e., the user ID). We could have stored the user ID in either the Account or the User document in a one-to-one relation:

One-to-one
However, since one User will eventually have multiple Accounts (or authentication methods), we’ll have a one-to-many model.

One-to-many
In a one-to-many relation between Users and Accounts, each Account points to only one user, so it makes sense to store the User reference on the Account:

We also have many-to-many relations, like the relations between Fweets and Users, because of the complex ways users interact with each other via likes, comments, and refweets.

Many-to-many
Further, we will use a third collection, Fweetstats, to store information about the interaction between a User and a Fweet.

Fweetstats’ data will help us determine, for example, whether or not to color the icons indicating to the user that he has already liked, commented, or refweeted a Fweet. It also helps us determine what clicking on the heart means: unlike or like.

The final model for the application will look like this:
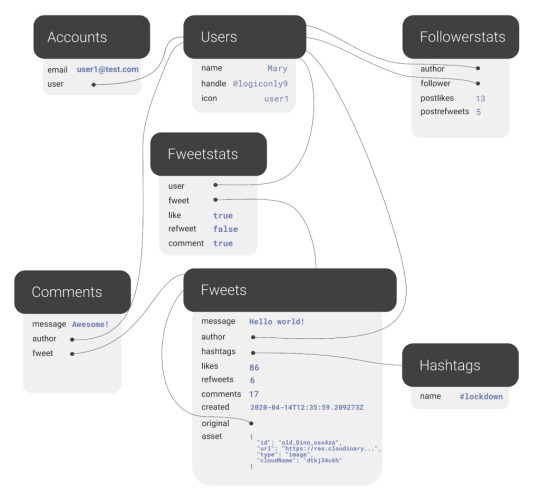
The application model of the fwitter application
Fweets are the center of the model, because they contain the most important data of the Fweet such as the information about the message, the number of likes, refweets, comments, and the Cloudinary media that was attached. FaunaDB stores this data in a json format that looks like this:

As shown in the model and in this example json, hashtags are stored as a list of references. If we wanted to, we could have stored the complete hashtag json in here, and that is the preferred solution in more limited document-based databases that lack relations. However, that would mean that our hashtags would be duplicated everywhere (as they are in more limited databases) and it would be more difficult to search for hashtags and/or retrieve Fweets for a specific hashtag as shown below.
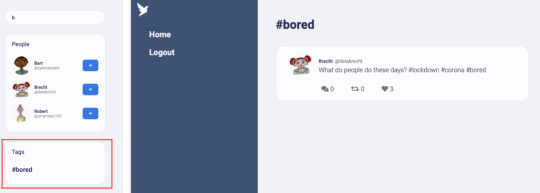
Note that a Fweet does not contain a link to Comments, but the Comments collection contains a reference to the Fweet. That’s because one Comment belongs to one Fweet, but a Fweet can have many comments–similar to the one-to-many relation between Users and Accounts.
Finally, there is a FollowerStats collection which basically saves information about how much users interact with each other in order to personalize their respective feeds. We won’t cover that much in this article, but you can experiment with the queries in the source code and stay tuned for a future article on advanced indexing.
Hopefully, you’re starting to see why we chose something more complex than a ToDo app. Although Fwitter is nowhere near the complexity of the real Twitter app on which it’s based, it’s already becoming apparent that implementing such an application without relations would be a serious brainbreaker.
Now, if you haven’t already done so from the github repo, it’s finally time to get our project running locally!
Setup the project
To set up the project, go to the FaunaDB dashboard and sign up. Once you are in the dashboard, click on New Database, fill in a name, and click Save. You should now be on the “Overview” page of your new database.
Next, we need a key that we will use in our setup scripts. Click on the Security tab in the left sidebar, then click the New key button.
In the “New key” form, the current database should already be selected. For “Role”, leave it as “Admin”. Optionally, add a key name. Next, click Save and copy the key secret displayed on the next page. It will not be displayed again.

Now that you have your database secret, clone the git repository and follow the readme. We have prepared a few scripts so that you only have to run the following commands to initialize your app, create all collections, and populate your database. The scripts will give you further instructions:
// install node modules npm install // run setup, this will create all the resources in your database // provide the admin key when the script asks for it. // !!! the setup script will give you another key, this is a key // with almost no permissions that you need to place in your .env.local as the // script suggestions npm run setup npm run populate // start the frontend
After the script, your .env.local file should contain the bootstrap key that the script provided you (not the admin key)
REACT_APP_LOCAL___BOOTSTRAP_FAUNADB_KEY=<bootstrap key>
You can optionally create an account with Cloudinary and add your cloudname and a public template (there is a default template called ‘ml_default’ which you can make public) to the environment to include images and videos in the fweets.
REACT_APP_LOCAL___CLOUDINARY_CLOUDNAME=<cloudinary cloudname> REACT_APP_LOCAL___CLOUDINARY_TEMPLATE=<cloudinary template>
Without these variables, the include media button will not work, but the rest of the app should run fine:

Creating the front end
For the frontend, we used Create React App to generate an application, then divided the application into pages and components. Pages are top-level components which have their own URLs. The Login and Register pages speak for themselves. Home is the standard feed of Fweets from the authors we follow; this is the page that we see when we log into our account. And the User and Tag pages show the Fweets for a specific user or tag in reverse chronological order.
We use React Router to direct to these pages depending on the URL, as you can see in the src/app.js file.
<Router> <SessionProvider value=> <Layout> <Switch> <Route exact path="/accounts/login"> <Login /> </Route> <Route exact path="/accounts/register"> <Register /> </Route> <Route path="/users/:authorHandle" component={User} /> <Route path="/tags/:tag" component={Tag} /> <Route path="/"> <Home /> </Route> </Switch> </Layout> </SessionProvider> </Router>
The only other thing to note in the above snippet is the SessionProvider, which is a React context to store the user’s information upon login. We’ll revisit this in the authentication section. For now, it’s enough to know that this gives us access to the Account (and thus User) information from each component.
Take a quick look at the home page (src/pages/home.js) to see how we use a combination of hooks to manage our data. The bulk of our application’s logic is implemented in FaunaDB queries which live in the src/fauna/queries folder. All calls to the database pass through the query-manager, which in a future article, we’ll refactor into serverless function calls. But for now these calls originate from the frontend and we’ll secure the sensitive parts of it with FaunaDB’s ABAC security rules and User Defined Functions (UDF). Since FaunaDB behaves as a token-secured API, we do not have to worry about a limit on the amount of connections as we would in traditional databases.
The FaunaDB JavaScript driver
Next, take a look at the src/fauna/query-manager.js file to see how we connect FaunaDB to our application using FaunaDB’s JavaScript driver, which is just a node module we pulled with `npm install`. As with any node module, we import it into our application as so:
import faunadb from 'faunadb'
And create a client by providing a token.
this.client = new faunadb.Client({ secret: token || this.bootstrapToken })
We’ll cover tokens a little more in the Authentication section. For now, let’s create some data!
Creating data
The logic to create a new Fweet document can be found in the src/fauna/queries/fweets.js file. FaunaDB documents are just like JSON, and each Fweet follows the same basic structure:
const data = { data: { message: message, likes: 0, refweets: 0, comments: 0, created: Now() } }
The Now() function is used to insert the time of the query so that the Fweets in a user’s feed can be sorted chronologically. Note that FaunaDB automatically places timestamps on every database entity for temporal querying. However, the FaunaDB timestamp represents the time the document was last updated, not the time it was created, and the document gets updated every time a Fweet is liked; for our intended sorting order, we need the created time.
Next, we send this data to FaunaDB with the Create() function. By providing Create() with the reference to the Fweets collection using Collection(‘fweets’), we specify where the data needs to go.
const query = Create(Collection('fweets'), data )
We can now wrap this query in a function that takes a message parameter and executes it using client.query() which will send the query to the database. Only when we call client.query() will the query be sent to the database and executed. Before that, we combine as many FQL functions as we want to construct our query.
function createFweet(message, hashtags) { const data = … const query = … return client.query(query) }
Note that we have used plain old JavaScript variables to compose this query and in essence just called functions. Writing FQL is all about function composition; you construct queries by combining small functions into larger expressions. This functional approach has very strong advantages. It allows us to use native language features such as JavaScript variables to compose queries, while also writing higher-order FQL functions that are protected from injection.
For example, in the query below, we add hashtags to the document with a CreateHashtags() function that we’ve defined elsewhere using FQL.
const data = { data: { // ... hashtags: CreateHashtags(tags), likes: 0, // ... }
The way FQL works from within the driver’s host language (in this case, JavaScript) is what makes FQL an eDSL (embedded domain-specific language). Functions like CreateHashtags() behave just like a native FQL function in that they are both just functions that take input. This means that we can easily extend the language with our own functions, like in this open source FQL library from the Fauna community.
It’s also important to notice that we create two entities in two different collections, in one transaction. Thus, if/when things go wrong, there is no risk that the Fweet is created yet the Hashtags are not. In more technical terms, FaunaDB is transactional and consistent whether you run queries over multiple collections or not, a property that is rare in scalable distributed databases.
Next, we need to add the author to the query. First, we can use the Identity() FQL function to return a reference to the currently logged in document. As discussed previously in the data modeling section, that document is of the type Account and is separated from Users to support SSO in a later phase.
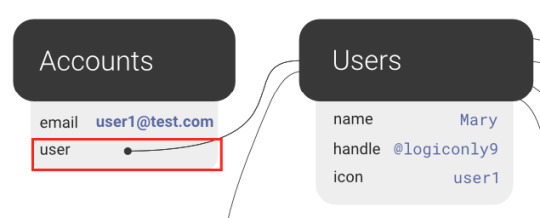
Then, we need to wrap Identity() in a Get() to access the full Account document and not just the reference to it.
Get(Identity())
Finally, we wrap all of that in a Select() to select the data.user field from the account document and add it to the data JSON.
const data = { data: { // ... hashtags: CreateHashtags(tags), author: Select(['data', 'user'], Get(Identity())), likes: 0, // ... } }
Now that we’ve constructed the query, let’s pull it all together and call client.query(query) to execute it.
function createFweet(message, hashtags) { const data = { data: { message: message, likes: 0, refweets: 0, comments: 0, author: Select(['data', 'user'], Get(Identity())), hashtags: CreateHashtags(tags), created: Now() } } const query = Create(Collection('fweets'), data ) return client.query(query) }
By using functional composition, you can easily combine all your advanced logic in one query that will be executed in one transaction. Check out the file src/fauna/queries/fweets.js to see the final result which takes even more advantage of function composition to add rate-limiting, etc.
Securing your data with UDFs and ABAC roles
The attentive reader will have some thoughts about security by now. We are essentially creating queries in JavaScript and calling these queries from the frontend. What stops a malicious user from altering these queries?
FaunaDB provides two features that allow us to secure our data: Attribute-Based Access Control (ABAC) and User Defined Functions (UDF). With ABAC, we can control which collections or entities that a specific key or token can access by writing Roles.
With UDFs, we can push FQL statements to the database by using the CreateFunction().
CreateFunction({ name: 'create_fweet', body: <your FQL statement>, })
Once the function is in the database as a UDF, where the application can’t alter it anymore, we then call this UDF from the front end.
client.query( Call(Function('create_fweet'), message, hashTags) )
Since the query is now saved on the database (just like a stored procedure), the user can no longer manipulate it.
One example of how UDFs can be used to secure a call is that we do not pass in the author of the Fweet. The author of the Fweet is derived from the Identity() function instead, which makes it impossible for a user to write a Fweet on someone’s behalf.
Of course, we still have to define that the user has access to call the UDF. For that, we will use a very simple ABAC role that defines a group of role members and their privileges. This role will be named logged_in_role, its membership will include all of the documents in the Accounts collection, and all of these members will be granted the privilege of calling the create_fweet UDF.
CreateRole( name: 'logged_in_role', privileges: [ { resource: q.Function('create_fweet'), actions: { call: true } } ], membership: [{ resource: Collection('accounts') }], )
We now know that these privileges are granted to an account, but how do we ‘become’ an Account? By using the FaunaDB Login() function to authenticate our users as explained in the next section.
How to implement authentication in FaunaDB

We just showed a role that gives Accounts the permissions to call the create_fweets function. But how do we “become” an Account?.
First, we create a new Account document, storing credentials alongside any other data associated with the Account (in this case, the email address and the reference to the User).
return Create(Collection('accounts'), { credentials: { password: password }, data: { email: email, user: Select(['ref'], Var('user')) } }) }
We can then call Login() on the Account reference, which retrieves a token.
Login( Match( < Account reference > , { password: password } ) )
We use this token in the client to impersonate the Account. Since all Accounts are members of the Account collection, this token fulfills the membership requirement of the logged_in_role and is granted access to call the create_fweet UDF.
To bootstrap this whole process, we have two very important roles.
bootstrap_role: can only call the login and register UDFs
logged_in_role: can call other functions such as create_fweet
The token you received when you ran the setup script is essentially a key created with the bootstrap_role. A client is created with that token in src/fauna/query-manager.js which will only be able to register or login. Once we log in, we use the new token returned from Login() to create a new FaunaDB client which now grants access to other UDF functions such as create_fweet. Logging out means we just revert to the bootstrap token. You can see this process in the src/fauna/query-manager.js, along with more complex role examples in the src/fauna/setup/roles.js file.
How to implement the session in React
Previously, in the “Creating the front end” section, we mentioned the SessionProvider component. In React, providers belong to a React Context which is a concept to facilitate data sharing between different components. This is ideal for data such as user information that you need everywhere in your application. By inserting the SessionProvider in the HTML early on, we made sure that each component would have access to it. Now, the only thing a component has to do to access the user details is import the context and use React’s ‘useContext’ hook.
import SessionContext from '../context/session' import React, { useContext } from 'react' // In your component const sessionContext = useContext(SessionContext) const { user } = sessionContext.state
But how does the user end up in the context? When we included the SessionProvider, we passed in a value consisting of the current state and a dispatch function.
const [state, dispatch] = React.useReducer(sessionReducer, { user: null }) // ... <SessionProvider value=>
The state is simply the current state, and the dispatch function is called to modify the context. This dispatch function is actually the core of the context since creating a context only involves calling React.createContext() which will give you access to a Provider and a Consumer.
const SessionContext = React.createContext({}) export const SessionProvider = SessionContext.Provider export const SessionConsumer = SessionContext.Consumer export default SessionContext
We can see that the state and dispatch are extracted from something that React calls a reducer (using React.useReducer), so let’s write a reducer.
export const sessionReducer = (state, action) => { switch (action.type) { case 'login': { return { user: action.data.user } } case 'register': { return { user: action.data.user } } case 'logout': { return { user: null } } default: { throw new Error(`Unhandled action type: ${action.type}`) } } }
This is the logic that allows you to change the context. In essence, it receives an action and decides how to modify the context given that action. In my case, the action is simply a type with a string. We use this context to keep user information, which means that we call it on a successful login with:
sessionContext.dispatch({ type: 'login', data: e })
Adding Cloudinary for media
When we created a Fweet, we did not take into account assets yet. FaunaDB is meant to store application data, not image blobs or video data. However, we can easily store the media on Cloudinary and just keep a link in FaunaDB. The following inserts the Cloudinary script (in app.js):
loadScript('https://widget.cloudinary.com/v2.0/global/all.js')
We then create a Cloudinary Upload Widget (in src/components/uploader.js):
window.cloudinary.createUploadWidget( { cloudName: process.env.REACT_APP_LOCAL___CLOUDINARY_CLOUDNAME, uploadPreset: process.env.REACT_APP_LOCAL___CLOUDINARY_TEMPLATE, }, (error, result) => { // ... } )
As mentioned earlier, you need to provide a Cloudinary cloud name and template in the environment variables (.env.local file) to use this feature. Creating a Cloudinary account is free and once you have an account you can grab the cloud name from the dashboard.
You have the option to use API keys as well to secure uploads. In this case, we upload straight from the front end so the upload uses a public template. To add a template or modify it to make it public, click on the gear icon in the top menu, go to Upload tab, and click Add upload preset.
You could also edit the ml_default template and just make it public.

Now, we just call widget.open() when our media button is clicked.
const handleUploadClick = () => { widget.open() } return ( <div> <FontAwesomeIcon icon={faImage} onClick={handleUploadClick}></FontAwesomeIcon> </div> )
This provides us with a small media button that will open the Cloudinary Upload Widget when it’s clicked.
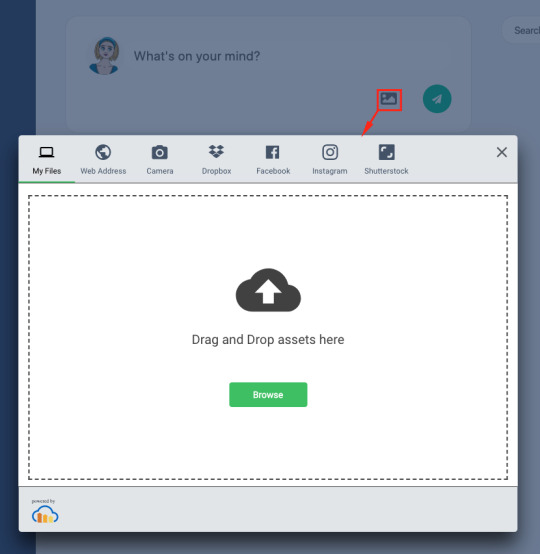
When we create the widget, we can also provide styles and fonts to give it the look and feel of our own application as we did above (in src/components/uploader.js):
const widget = window.cloudinary.createUploadWidget( { cloudName: process.env.REACT_APP_LOCAL___CLOUDINARY_CLOUDNAME, uploadPreset: process.env.REACT_APP_LOCAL___CLOUDINARY_TEMPLATE, styles: { palette: { window: '#E5E8EB', windowBorder: '#4A4A4A', tabIcon: '#000000', // ... }, fonts: {
Once we have uploaded media to Cloudinary, we receive a bunch of information about the uploaded media, which we then add to the data when we create a Fweet.
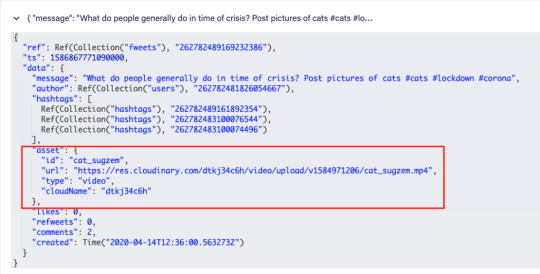
We can then simply use the stored id (which Cloudinary refers to as the publicId) with the Cloudinary React library (in src/components/asset.js):
import { Image, Video, Transformation } from 'cloudinary-react'
To show the image in our feed.
<div className="fweet-asset"> <Image publicId={asset.id} cloudName={cloudName} fetchFormat="auto" quality="auto" secure="true" /> </div>
When you use the id, instead of the direct URL, Cloudinary does a whole range of optimizations to deliver the media in the most optimal format possible. For example when you add a video image as follows:
<div className="fweet-asset"> <Video playsInline autoPlay loop={true} controls={true} cloudName={cloudName} publicId={publicId}> <Transformation width="600" fetchFormat="auto" crop="scale" /> </Video> </div>
Cloudinary will automatically scale down the video to a width of 600 pixels and deliver it as a WebM (VP9) to Chrome browsers (482 KB), an MP4 (HEVC) to Safari browsers (520 KB), or an MP4 (H.264) to browsers that support neither format (821 KB). Cloudinary does these optimizations server-side, significantly improving page load time and the overall user experience.
Retrieving data
We have shown how to add data. Now we still need to retrieve data. Getting the data of our Fwitter feed has many challenges. We need to:
Get fweets from people you follow in a specific order (taking time and popularity into account)
Get the author of the fweet to show his profile image and handle
Get the statistics to show how many likes, refweets and comments it has
Get the comments to list those beneath the fweet.
Get info about whether you already liked, refweeted, or commented on this specific fweet.
If it’s a refweet, get the original fweet.
This kind of query fetches data from many different collections and requires advanced indexing/sorting, but let’s start off simple. How do we get the Fweets? We start off by getting a reference to the Fweets collection using the Collection() function.
Collection('fweets')
And we wrap that in the Documents() function to get all of the collection’s document references.
Documents(Collection('fweets'))
We then Paginate over these references.
Paginate(Documents(Collection('fweets')))
Paginate() requires some explanation. Before calling Paginate(), we had a query that returned a hypothetical set of data. Paginate() actually materializes that data into pages of entities that we can read. FaunaDB requires that we use this Paginate() function to protect us from writing inefficient queries that retrieve every document from a collection, because in a database built for massive scale, that collection could contain millions of documents. Without the safeguard of Paginate(), that could get very expensive!
Let’s save this partial query in a plain JavaScript variable references that we can continue to build on.
const references = Paginate(Documents(Collection('fweets')))
So far, our query only returns a list of references to our Fweets. To get the actual documents, we do exactly what we would do in JavaScript: map over the list with an anonymous function. In FQL, a Lambda is just an anonymous function.
const fweets = Map( references, Lambda(['ref'], Get(Var('ref'))) )
This might seem verbose if you’re used to declarative query languages like SQL that declare what you want and let the database figure out how to get it. In contrast, FQL declares both what you want and how you want it which makes it more procedural. Since you’re the one defining how you want your data, and not the query engine, the price and performance impact of your query is predictable. You can exactly determine how many reads this query costs without executing it, which is a significant advantage if your database contains a huge amount of data and is pay-as-you-go. So there might be a learning curve, but it’s well worth it in the money and hassle it will save you. And once you learn how FQL works, you will find that queries read just like regular code.
Let’s prepare our query to be extended easily by introducing Let. Let will allow us to bind variables and reuse them immediately in the next variable binding, which allows you to structure your query more elegantly.
const fweets = Map( references, Lambda( ['ref'], Let( { fweet: Get(Var('ref')) }, // Just return the fweet for now Var('fweet') ) ) )
Now that we have this structure, getting extra data is easy. So let’s get the author.
const fweets = Map( references, Lambda( ['ref'], Let( { fweet: Get(Var('ref')), author: Get(Select(['data', 'author'], Var('fweet'))) }, { fweet: Var('fweet'), author: Var('user') } ) ) )
Although we did not write a join, we have just joined Users (the author) with the Fweets.
We’ll expand on these building blocks even further in a follow up article. Meanwhile, browse src/fauna/queries/fweets.js to view the final query and several more examples.
More in the code base
If you haven’t already, please open the code base for this Fwitter example app. You will find a plethora of well-commented examples we haven’t explored here, but will in future articles. This section touches on a few files we think you should check out.
First, check out the src/fauna/queries/fweets.js file for examples of how to do complex matching and sorting with FaunaDB’s indexes (the indexes are created in src/fauna/setup/fweets.js). We implemented three different access patterns to get Fweets by popularity and time, by handle, and by tag.

Getting Fweets by popularity and time is a particularly interesting access pattern because it actually sorts the Fweets by a sort of decaying popularity based on users’ interactions with each other.
Also, check out src/fauna/queries/search.js, where we’ve implemented autocomplete based on FaunaDB indexes and index bindings to search for authors and tags. Since FaunaDB can index over multiple collections, we can write one index that supports an autocomplete type of search on both Users and Tags.

We’ve implemented these examples because the combination of flexible and powerful indexes with relations is rare for scalable distributed databases. Databases that lack relations and flexible indexes require you to know in advance how your data will be accessed and you will run into problems when your business logic needs to change to accommodate your clients’ evolving use cases.
In FaunaDB, if you did not foresee a specific way that you’d like to access your data, no worries — just add an Index! We have range indexes, term indexes, and composite indexes that can be specified whenever you want without having to code around eventual consistency.
A preview of what’s to come
As mentioned in the introduction, we’re introducing this Fwitter app to demonstrate complex, real-world use cases. That said, a few features are still missing and will be covered in future articles, including streaming, pagination, benchmarks, and a more advanced security model with short-lived tokens, JWT tokens, single sign-on (possibly using a service like Auth0), IP-based rate limiting (with Cloudflare workers), e-mail verification (with a service like SendGrid), and HttpOnly cookies.

The end result will be a stack that relies on services and serverless functions which is very similar to a dynamic JAMstack app, minus the static site generator. Stay tuned for the follow-up articles and make sure to subscribe to the Fauna blog and monitor CSS-Tricks for more FaunaDB-related articles.
The post Rethinking Twitter as a Serverless App appeared first on CSS-Tricks.
Rethinking Twitter as a Serverless App published first on https://deskbysnafu.tumblr.com/
0 notes
Text
Rethinking Twitter as a Serverless App
In a previous article, we showed how to build a GraphQL API with FaunaDB. We’ve also written a series of articles [1, 2, 3, 4] explaining how traditional databases built for global scalability have to adopt eventual (vs. strong) consistency, and/or make compromises on relations and indexing possibilities. FaunaDB is different since it does not make these compromises. It’s built to scale so it can safely serve your future startup no matter how big it gets, without sacrificing relations and consistent data.
In this article, we’re very excited to start bringing all of this together in a real-world app with highly dynamic data in a serverless fashion using React hooks, FaunaDB, and Cloudinary. We will use the Fauna Query Language (FQL) instead of GraphQL and start with a frontend-only approach that directly accesses the serverless database FaunaDB for data storage, authentication, and authorization.

The golden standard for example applications that feature a specific technology is a todo app–mainly because they are simple. Any database out there can serve a very simple application and shine.
And that is exactly why this app will be different! If we truly want to show how FaunaDB excels for real world applications, then we need to build something more advanced.
Introducing Fwitter
When we started at Twitter, databases were bad. When we left, they were still bad
Evan Weaver
Since FaunaDB was developed by ex-Twitter engineers who experienced these limitations first-hand, a Twitter-like application felt like an appropriately sentimental choice. And, since we are building it with FaunaDB, let’s call this serverless baby ‘Fwitter’.
Below is a short video that shows how it looks, and the full source code is available on GitHub.
When you clone the repo and start digging around, you might notice a plethora of well-commented example queries not covered in this article. That’s because we’ll be using Fwitter as our go-to example application in future articles, and building additional features into it with time.
But, for now, here’s a basic rundown of what we’ll cover here:
Modeling the data
Setup the project
Creating the front end
The FaunaDB JavaScript driver
Creating data
Securing your data with UDFs and ABAC roles
How to implement authentication
Adding Cloudinary for media
Retrieving data
More in the code base
We build these features without having to configure operations or set up servers for your database. Since both Cloudinary and FaunaDB are scalable and distributed out-of-the-box, we will never have to worry about setting up servers in multiple regions to achieve low latencies for users in other countries.
Let’s dive in!
Modeling the data
Before we can show how FaunaDB excels at relations, we need to cover the types of relations in our application’s data model. FaunaDB’s data entities are stored in documents, which are then stored in collections–like rows in tables. For example, each user’s details will be represented by a User document stored in a Users collection. And we eventually plan to support both single sign-on and password-based login methods for a single user, each of which will be represented as an Account document in an Accounts collection.
At this point, one user has one account, so it doesn’t matter which entity stores the reference (i.e., the user ID). We could have stored the user ID in either the Account or the User document in a one-to-one relation:

One-to-one
However, since one User will eventually have multiple Accounts (or authentication methods), we’ll have a one-to-many model.

One-to-many
In a one-to-many relation between Users and Accounts, each Account points to only one user, so it makes sense to store the User reference on the Account:

We also have many-to-many relations, like the relations between Fweets and Users, because of the complex ways users interact with each other via likes, comments, and refweets.

Many-to-many
Further, we will use a third collection, Fweetstats, to store information about the interaction between a User and a Fweet.

Fweetstats’ data will help us determine, for example, whether or not to color the icons indicating to the user that he has already liked, commented, or refweeted a Fweet. It also helps us determine what clicking on the heart means: unlike or like.
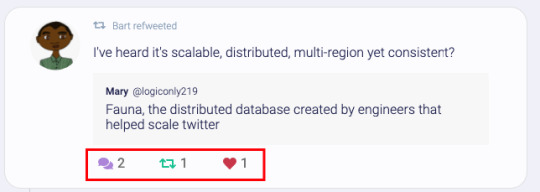
The final model for the application will look like this:

The application model of the fwitter application
Fweets are the center of the model, because they contain the most important data of the Fweet such as the information about the message, the number of likes, refweets, comments, and the Cloudinary media that was attached. FaunaDB stores this data in a json format that looks like this:
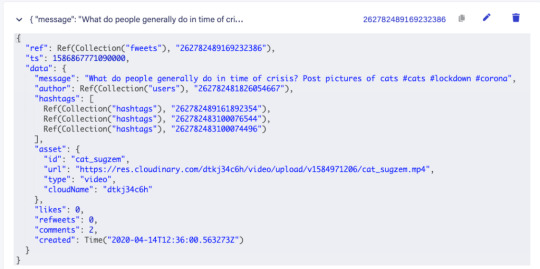
As shown in the model and in this example json, hashtags are stored as a list of references. If we wanted to, we could have stored the complete hashtag json in here, and that is the preferred solution in more limited document-based databases that lack relations. However, that would mean that our hashtags would be duplicated everywhere (as they are in more limited databases) and it would be more difficult to search for hashtags and/or retrieve Fweets for a specific hashtag as shown below.

Note that a Fweet does not contain a link to Comments, but the Comments collection contains a reference to the Fweet. That’s because one Comment belongs to one Fweet, but a Fweet can have many comments–similar to the one-to-many relation between Users and Accounts.
Finally, there is a FollowerStats collection which basically saves information about how much users interact with each other in order to personalize their respective feeds. We won’t cover that much in this article, but you can experiment with the queries in the source code and stay tuned for a future article on advanced indexing.
Hopefully, you’re starting to see why we chose something more complex than a ToDo app. Although Fwitter is nowhere near the complexity of the real Twitter app on which it’s based, it’s already becoming apparent that implementing such an application without relations would be a serious brainbreaker.
Now, if you haven’t already done so from the github repo, it’s finally time to get our project running locally!
Setup the project
To set up the project, go to the FaunaDB dashboard and sign up. Once you are in the dashboard, click on New Database, fill in a name, and click Save. You should now be on the “Overview” page of your new database.
Next, we need a key that we will use in our setup scripts. Click on the Security tab in the left sidebar, then click the New key button.
In the “New key” form, the current database should already be selected. For “Role”, leave it as “Admin”. Optionally, add a key name. Next, click Save and copy the key secret displayed on the next page. It will not be displayed again.
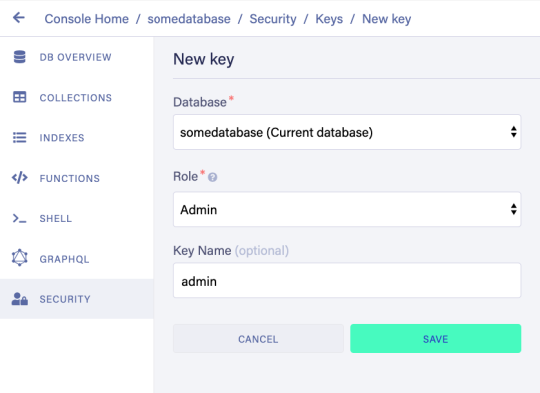
Now that you have your database secret, clone the git repository and follow the readme. We have prepared a few scripts so that you only have to run the following commands to initialize your app, create all collections, and populate your database. The scripts will give you further instructions:
// install node modules npm install // run setup, this will create all the resources in your database // provide the admin key when the script asks for it. // !!! the setup script will give you another key, this is a key // with almost no permissions that you need to place in your .env.local as the // script suggestions npm run setup npm run populate // start the frontend
After the script, your .env.local file should contain the bootstrap key that the script provided you (not the admin key)
REACT_APP_LOCAL___BOOTSTRAP_FAUNADB_KEY=<bootstrap key>
You can optionally create an account with Cloudinary and add your cloudname and a public template (there is a default template called ‘ml_default’ which you can make public) to the environment to include images and videos in the fweets.
REACT_APP_LOCAL___CLOUDINARY_CLOUDNAME=<cloudinary cloudname> REACT_APP_LOCAL___CLOUDINARY_TEMPLATE=<cloudinary template>
Without these variables, the include media button will not work, but the rest of the app should run fine:

Creating the front end
For the frontend, we used Create React App to generate an application, then divided the application into pages and components. Pages are top-level components which have their own URLs. The Login and Register pages speak for themselves. Home is the standard feed of Fweets from the authors we follow; this is the page that we see when we log into our account. And the User and Tag pages show the Fweets for a specific user or tag in reverse chronological order.
We use React Router to direct to these pages depending on the URL, as you can see in the src/app.js file.
<Router> <SessionProvider value=> <Layout> <Switch> <Route exact path="/accounts/login"> <Login /> </Route> <Route exact path="/accounts/register"> <Register /> </Route> <Route path="/users/:authorHandle" component={User} /> <Route path="/tags/:tag" component={Tag} /> <Route path="/"> <Home /> </Route> </Switch> </Layout> </SessionProvider> </Router>
The only other thing to note in the above snippet is the SessionProvider, which is a React context to store the user’s information upon login. We’ll revisit this in the authentication section. For now, it’s enough to know that this gives us access to the Account (and thus User) information from each component.
Take a quick look at the home page (src/pages/home.js) to see how we use a combination of hooks to manage our data. The bulk of our application’s logic is implemented in FaunaDB queries which live in the src/fauna/queries folder. All calls to the database pass through the query-manager, which in a future article, we’ll refactor into serverless function calls. But for now these calls originate from the frontend and we’ll secure the sensitive parts of it with FaunaDB’s ABAC security rules and User Defined Functions (UDF). Since FaunaDB behaves as a token-secured API, we do not have to worry about a limit on the amount of connections as we would in traditional databases.
The FaunaDB JavaScript driver
Next, take a look at the src/fauna/query-manager.js file to see how we connect FaunaDB to our application using FaunaDB’s JavaScript driver, which is just a node module we pulled with `npm install`. As with any node module, we import it into our application as so:
import faunadb from 'faunadb'
And create a client by providing a token.
this.client = new faunadb.Client({ secret: token || this.bootstrapToken })
We’ll cover tokens a little more in the Authentication section. For now, let’s create some data!
Creating data
The logic to create a new Fweet document can be found in the src/fauna/queries/fweets.js file. FaunaDB documents are just like JSON, and each Fweet follows the same basic structure:
const data = { data: { message: message, likes: 0, refweets: 0, comments: 0, created: Now() } }
The Now() function is used to insert the time of the query so that the Fweets in a user’s feed can be sorted chronologically. Note that FaunaDB automatically places timestamps on every database entity for temporal querying. However, the FaunaDB timestamp represents the time the document was last updated, not the time it was created, and the document gets updated every time a Fweet is liked; for our intended sorting order, we need the created time.
Next, we send this data to FaunaDB with the Create() function. By providing Create() with the reference to the Fweets collection using Collection(‘fweets’), we specify where the data needs to go.
const query = Create(Collection('fweets'), data )
We can now wrap this query in a function that takes a message parameter and executes it using client.query() which will send the query to the database. Only when we call client.query() will the query be sent to the database and executed. Before that, we combine as many FQL functions as we want to construct our query.
function createFweet(message, hashtags) { const data = … const query = … return client.query(query) }
Note that we have used plain old JavaScript variables to compose this query and in essence just called functions. Writing FQL is all about function composition; you construct queries by combining small functions into larger expressions. This functional approach has very strong advantages. It allows us to use native language features such as JavaScript variables to compose queries, while also writing higher-order FQL functions that are protected from injection.
For example, in the query below, we add hashtags to the document with a CreateHashtags() function that we’ve defined elsewhere using FQL.
const data = { data: { // ... hashtags: CreateHashtags(tags), likes: 0, // ... }
The way FQL works from within the driver’s host language (in this case, JavaScript) is what makes FQL an eDSL (embedded domain-specific language). Functions like CreateHashtags() behave just like a native FQL function in that they are both just functions that take input. This means that we can easily extend the language with our own functions, like in this open source FQL library from the Fauna community.
It’s also important to notice that we create two entities in two different collections, in one transaction. Thus, if/when things go wrong, there is no risk that the Fweet is created yet the Hashtags are not. In more technical terms, FaunaDB is transactional and consistent whether you run queries over multiple collections or not, a property that is rare in scalable distributed databases.
Next, we need to add the author to the query. First, we can use the Identity() FQL function to return a reference to the currently logged in document. As discussed previously in the data modeling section, that document is of the type Account and is separated from Users to support SSO in a later phase.

Then, we need to wrap Identity() in a Get() to access the full Account document and not just the reference to it.
Get(Identity())
Finally, we wrap all of that in a Select() to select the data.user field from the account document and add it to the data JSON.
const data = { data: { // ... hashtags: CreateHashtags(tags), author: Select(['data', 'user'], Get(Identity())), likes: 0, // ... } }
Now that we’ve constructed the query, let’s pull it all together and call client.query(query) to execute it.
function createFweet(message, hashtags) { const data = { data: { message: message, likes: 0, refweets: 0, comments: 0, author: Select(['data', 'user'], Get(Identity())), hashtags: CreateHashtags(tags), created: Now() } } const query = Create(Collection('fweets'), data ) return client.query(query) }
By using functional composition, you can easily combine all your advanced logic in one query that will be executed in one transaction. Check out the file src/fauna/queries/fweets.js to see the final result which takes even more advantage of function composition to add rate-limiting, etc.
Securing your data with UDFs and ABAC roles
The attentive reader will have some thoughts about security by now. We are essentially creating queries in JavaScript and calling these queries from the frontend. What stops a malicious user from altering these queries?
FaunaDB provides two features that allow us to secure our data: Attribute-Based Access Control (ABAC) and User Defined Functions (UDF). With ABAC, we can control which collections or entities that a specific key or token can access by writing Roles.
With UDFs, we can push FQL statements to the database by using the CreateFunction().
CreateFunction({ name: 'create_fweet', body: <your FQL statement>, })
Once the function is in the database as a UDF, where the application can’t alter it anymore, we then call this UDF from the front end.
client.query( Call(Function('create_fweet'), message, hashTags) )
Since the query is now saved on the database (just like a stored procedure), the user can no longer manipulate it.
One example of how UDFs can be used to secure a call is that we do not pass in the author of the Fweet. The author of the Fweet is derived from the Identity() function instead, which makes it impossible for a user to write a Fweet on someone’s behalf.
Of course, we still have to define that the user has access to call the UDF. For that, we will use a very simple ABAC role that defines a group of role members and their privileges. This role will be named logged_in_role, its membership will include all of the documents in the Accounts collection, and all of these members will be granted the privilege of calling the create_fweet UDF.
CreateRole( name: 'logged_in_role', privileges: [ { resource: q.Function('create_fweet'), actions: { call: true } } ], membership: [{ resource: Collection('accounts') }], )
We now know that these privileges are granted to an account, but how do we ‘become’ an Account? By using the FaunaDB Login() function to authenticate our users as explained in the next section.
How to implement authentication in FaunaDB
We just showed a role that gives Accounts the permissions to call the create_fweets function. But how do we “become” an Account?.
First, we create a new Account document, storing credentials alongside any other data associated with the Account (in this case, the email address and the reference to the User).
return Create(Collection('accounts'), { credentials: { password: password }, data: { email: email, user: Select(['ref'], Var('user')) } }) }
We can then call Login() on the Account reference, which retrieves a token.
Login( Match( < Account reference > , { password: password } ) )
We use this token in the client to impersonate the Account. Since all Accounts are members of the Account collection, this token fulfills the membership requirement of the logged_in_role and is granted access to call the create_fweet UDF.
To bootstrap this whole process, we have two very important roles.
bootstrap_role: can only call the login and register UDFs
logged_in_role: can call other functions such as create_fweet
The token you received when you ran the setup script is essentially a key created with the bootstrap_role. A client is created with that token in src/fauna/query-manager.js which will only be able to register or login. Once we log in, we use the new token returned from Login() to create a new FaunaDB client which now grants access to other UDF functions such as create_fweet. Logging out means we just revert to the bootstrap token. You can see this process in the src/fauna/query-manager.js, along with more complex role examples in the src/fauna/setup/roles.js file.
How to implement the session in React
Previously, in the “Creating the front end” section, we mentioned the SessionProvider component. In React, providers belong to a React Context which is a concept to facilitate data sharing between different components. This is ideal for data such as user information that you need everywhere in your application. By inserting the SessionProvider in the HTML early on, we made sure that each component would have access to it. Now, the only thing a component has to do to access the user details is import the context and use React’s ‘useContext’ hook.
import SessionContext from '../context/session' import React, { useContext } from 'react' // In your component const sessionContext = useContext(SessionContext) const { user } = sessionContext.state
But how does the user end up in the context? When we included the SessionProvider, we passed in a value consisting of the current state and a dispatch function.
const [state, dispatch] = React.useReducer(sessionReducer, { user: null }) // ... <SessionProvider value=>
The state is simply the current state, and the dispatch function is called to modify the context. This dispatch function is actually the core of the context since creating a context only involves calling React.createContext() which will give you access to a Provider and a Consumer.
const SessionContext = React.createContext({}) export const SessionProvider = SessionContext.Provider export const SessionConsumer = SessionContext.Consumer export default SessionContext
We can see that the state and dispatch are extracted from something that React calls a reducer (using React.useReducer), so let’s write a reducer.
export const sessionReducer = (state, action) => { switch (action.type) { case 'login': { return { user: action.data.user } } case 'register': { return { user: action.data.user } } case 'logout': { return { user: null } } default: { throw new Error(`Unhandled action type: ${action.type}`) } } }
This is the logic that allows you to change the context. In essence, it receives an action and decides how to modify the context given that action. In my case, the action is simply a type with a string. We use this context to keep user information, which means that we call it on a successful login with:
sessionContext.dispatch({ type: 'login', data: e })
Adding Cloudinary for media
When we created a Fweet, we did not take into account assets yet. FaunaDB is meant to store application data, not image blobs or video data. However, we can easily store the media on Cloudinary and just keep a link in FaunaDB. The following inserts the Cloudinary script (in app.js):
loadScript('https://widget.cloudinary.com/v2.0/global/all.js')
We then create a Cloudinary Upload Widget (in src/components/uploader.js):
window.cloudinary.createUploadWidget( { cloudName: process.env.REACT_APP_LOCAL___CLOUDINARY_CLOUDNAME, uploadPreset: process.env.REACT_APP_LOCAL___CLOUDINARY_TEMPLATE, }, (error, result) => { // ... } )
As mentioned earlier, you need to provide a Cloudinary cloud name and template in the environment variables (.env.local file) to use this feature. Creating a Cloudinary account is free and once you have an account you can grab the cloud name from the dashboard.

You have the option to use API keys as well to secure uploads. In this case, we upload straight from the front end so the upload uses a public template. To add a template or modify it to make it public, click on the gear icon in the top menu, go to Upload tab, and click Add upload preset.
You could also edit the ml_default template and just make it public.

Now, we just call widget.open() when our media button is clicked.
const handleUploadClick = () => { widget.open() } return ( <div> <FontAwesomeIcon icon={faImage} onClick={handleUploadClick}></FontAwesomeIcon> </div> )
This provides us with a small media button that will open the Cloudinary Upload Widget when it’s clicked.

When we create the widget, we can also provide styles and fonts to give it the look and feel of our own application as we did above (in src/components/uploader.js):
const widget = window.cloudinary.createUploadWidget( { cloudName: process.env.REACT_APP_LOCAL___CLOUDINARY_CLOUDNAME, uploadPreset: process.env.REACT_APP_LOCAL___CLOUDINARY_TEMPLATE, styles: { palette: { window: '#E5E8EB', windowBorder: '#4A4A4A', tabIcon: '#000000', // ... }, fonts: {
Once we have uploaded media to Cloudinary, we receive a bunch of information about the uploaded media, which we then add to the data when we create a Fweet.

We can then simply use the stored id (which Cloudinary refers to as the publicId) with the Cloudinary React library (in src/components/asset.js):
import { Image, Video, Transformation } from 'cloudinary-react'
To show the image in our feed.
<div className="fweet-asset"> <Image publicId={asset.id} cloudName={cloudName} fetchFormat="auto" quality="auto" secure="true" /> </div>
When you use the id, instead of the direct URL, Cloudinary does a whole range of optimizations to deliver the media in the most optimal format possible. For example when you add a video image as follows:
<div className="fweet-asset"> <Video playsInline autoPlay loop={true} controls={true} cloudName={cloudName} publicId={publicId}> <Transformation width="600" fetchFormat="auto" crop="scale" /> </Video> </div>
Cloudinary will automatically scale down the video to a width of 600 pixels and deliver it as a WebM (VP9) to Chrome browsers (482 KB), an MP4 (HEVC) to Safari browsers (520 KB), or an MP4 (H.264) to browsers that support neither format (821 KB). Cloudinary does these optimizations server-side, significantly improving page load time and the overall user experience.
Retrieving data
We have shown how to add data. Now we still need to retrieve data. Getting the data of our Fwitter feed has many challenges. We need to:
Get fweets from people you follow in a specific order (taking time and popularity into account)
Get the author of the fweet to show his profile image and handle
Get the statistics to show how many likes, refweets and comments it has
Get the comments to list those beneath the fweet.
Get info about whether you already liked, refweeted, or commented on this specific fweet.
If it’s a refweet, get the original fweet.
This kind of query fetches data from many different collections and requires advanced indexing/sorting, but let’s start off simple. How do we get the Fweets? We start off by getting a reference to the Fweets collection using the Collection() function.
Collection('fweets')
And we wrap that in the Documents() function to get all of the collection’s document references.
Documents(Collection('fweets'))
We then Paginate over these references.
Paginate(Documents(Collection('fweets')))
Paginate() requires some explanation. Before calling Paginate(), we had a query that returned a hypothetical set of data. Paginate() actually materializes that data into pages of entities that we can read. FaunaDB requires that we use this Paginate() function to protect us from writing inefficient queries that retrieve every document from a collection, because in a database built for massive scale, that collection could contain millions of documents. Without the safeguard of Paginate(), that could get very expensive!
Let’s save this partial query in a plain JavaScript variable references that we can continue to build on.
const references = Paginate(Documents(Collection('fweets')))
So far, our query only returns a list of references to our Fweets. To get the actual documents, we do exactly what we would do in JavaScript: map over the list with an anonymous function. In FQL, a Lambda is just an anonymous function.
const fweets = Map( references, Lambda(['ref'], Get(Var('ref'))) )
This might seem verbose if you’re used to declarative query languages like SQL that declare what you want and let the database figure out how to get it. In contrast, FQL declares both what you want and how you want it which makes it more procedural. Since you’re the one defining how you want your data, and not the query engine, the price and performance impact of your query is predictable. You can exactly determine how many reads this query costs without executing it, which is a significant advantage if your database contains a huge amount of data and is pay-as-you-go. So there might be a learning curve, but it’s well worth it in the money and hassle it will save you. And once you learn how FQL works, you will find that queries read just like regular code.
Let’s prepare our query to be extended easily by introducing Let. Let will allow us to bind variables and reuse them immediately in the next variable binding, which allows you to structure your query more elegantly.
const fweets = Map( references, Lambda( ['ref'], Let( { fweet: Get(Var('ref')) }, // Just return the fweet for now Var('fweet') ) ) )
Now that we have this structure, getting extra data is easy. So let’s get the author.
const fweets = Map( references, Lambda( ['ref'], Let( { fweet: Get(Var('ref')), author: Get(Select(['data', 'author'], Var('fweet'))) }, { fweet: Var('fweet'), author: Var('user') } ) ) )
Although we did not write a join, we have just joined Users (the author) with the Fweets.
We’ll expand on these building blocks even further in a follow up article. Meanwhile, browse src/fauna/queries/fweets.js to view the final query and several more examples.
More in the code base
If you haven’t already, please open the code base for this Fwitter example app. You will find a plethora of well-commented examples we haven’t explored here, but will in future articles. This section touches on a few files we think you should check out.
First, check out the src/fauna/queries/fweets.js file for examples of how to do complex matching and sorting with FaunaDB’s indexes (the indexes are created in src/fauna/setup/fweets.js). We implemented three different access patterns to get Fweets by popularity and time, by handle, and by tag.
Getting Fweets by popularity and time is a particularly interesting access pattern because it actually sorts the Fweets by a sort of decaying popularity based on users’ interactions with each other.
Also, check out src/fauna/queries/search.js, where we’ve implemented autocomplete based on FaunaDB indexes and index bindings to search for authors and tags. Since FaunaDB can index over multiple collections, we can write one index that supports an autocomplete type of search on both Users and Tags.
We’ve implemented these examples because the combination of flexible and powerful indexes with relations is rare for scalable distributed databases. Databases that lack relations and flexible indexes require you to know in advance how your data will be accessed and you will run into problems when your business logic needs to change to accommodate your clients’ evolving use cases.
In FaunaDB, if you did not foresee a specific way that you’d like to access your data, no worries — just add an Index! We have range indexes, term indexes, and composite indexes that can be specified whenever you want without having to code around eventual consistency.
A preview of what’s to come
As mentioned in the introduction, we’re introducing this Fwitter app to demonstrate complex, real-world use cases. That said, a few features are still missing and will be covered in future articles, including streaming, pagination, benchmarks, and a more advanced security model with short-lived tokens, JWT tokens, single sign-on (possibly using a service like Auth0), IP-based rate limiting (with Cloudflare workers), e-mail verification (with a service like SendGrid), and HttpOnly cookies.
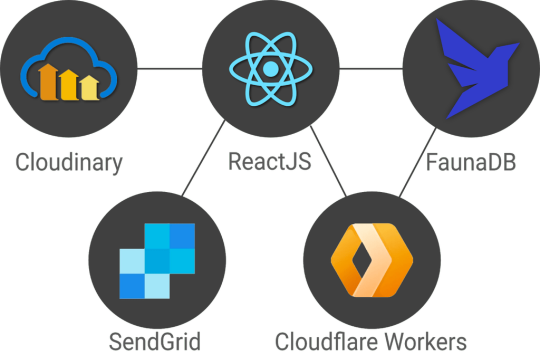
The end result will be a stack that relies on services and serverless functions which is very similar to a dynamic JAMstack app, minus the static site generator. Stay tuned for the follow-up articles and make sure to subscribe to the Fauna blog and monitor CSS-Tricks for more FaunaDB-related articles.
The post Rethinking Twitter as a Serverless App appeared first on CSS-Tricks.
source https://css-tricks.com/rethinking-twitter-as-a-serverless-app/
from WordPress https://ift.tt/3ayHZkF
via IFTTT
0 notes
Text
How the Coinbase Security team deployed CTFd to Power our First Capture the Flag contest at Defcon…
How the Coinbase Security team deployed CTFd to Power our First Capture the Flag contest at Defcon 27
By Nishil Shah and Peter Kacherginsky

We recently ran Coinbase’s first Capture the Flag (CTF) competition called Capture the Coin. As part of running the CTF, we needed to setup the underlying infrastructure. In this guide we’ll describe our process from choosing a CTF platform to getting it production ready. This CTF definitely would not have been possible without all the open source contributors, projects, tutorials, and free services we leveraged, so we’re making this guide as a small contribution back to the community. Overall, the process took us a few weeks to setup, but with this guide, you’ll only spend a few days.
Choosing a CTF Platform
We chose CTFd as our CTF platform based on the following criteria:
Challenge Input Interface
Support for Types of Challenges
Free Response (Static and Pattern-Based)
Dynamic Value
Multiple Choice
Custom Plugins
Public Scoreboard
User and Team Registration
Admin Panel
Player Communications
Hints
Active Maintainers
CTFd had support for most of our requirements except for multiple choice questions. However, requirements like having active maintainers was useful when the maintainers quickly patched a bug in a few hours. We also wanted to write challenges that forced users to interact with a real blockchain. This would require some custom development, so we also wanted the ability to build our own custom modules. Anecdotally, a few other CTFs had run successfully on CTFd. Given these requirements, CTFd matched our needs the closest.
CTFd mostly worked out of the box by following the README instructions; however, we did run into one issue. Out of the box, CTFd started running really slow. We did some basic debugging like looking at memory and CPU utilization to see if we needed to upgrade our EC2 instance. In general, resource consumption was generally less than 1%. We eventually found out that using Sync workers was inefficient. We changed the settings to use async gevent workers and correctly setting worker_connections and workers using the advice from this post. This solved our issue and CTFd worked great with very little latency.
Capture the Coin Infrastructure
Setting up and running this CTF was a great learning experience in getting hands-on with AWS and debugging real issues. As appsec engineers reviewing code or infrastructure, we often times can become unsympathetic to how hard an engineers’ job can be when defining security requirements even in a #SecurityFirst engineering culture. Just for something as simple as a CTF, the bill of materials starts to pile up as you can see below.
Cloudflare Free Tier
CTFd
Google Recaptcha v2
Infura
Let’s Encrypt/CertBot
Redis (AWS-managed or locally running)
SES Email Forwarder Lambda (Here’s a guide we found very helpful to setup this lambda)
AWS (Paid Tier)
EC2
IAM
Lambda
RDS Aurora
S3
SES
Here’s a network diagram of what our AWS infrastructure looked like at a high level.
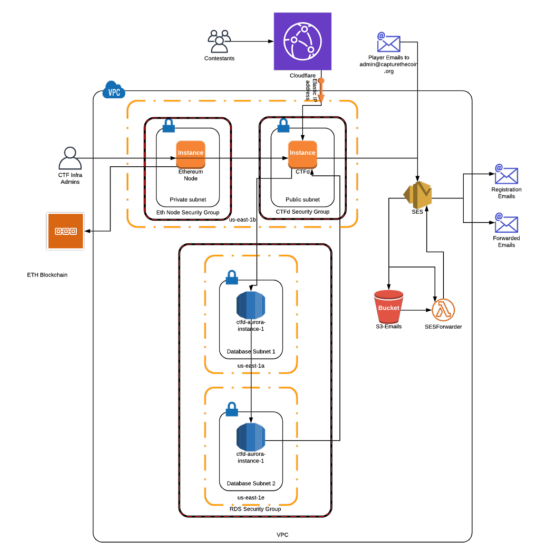
Our vendor choices were typically determined by our own familiarity. We used AWS as our infrastructure provider, and we used Cloudflare as our DoS protection for similar reasons. For email and email verification, we used SES to trigger an email forwarder lambda and save a copy of the email to an S3 bucket. The lambda then pulled the email from the S3 bucket and forwarded the contents to the recipients defined in the lambda. Eventually, we swapped out our EC2 instance hosting an Ethereum node with Infura as this gave us reliable connectivity to the ETH blockchain for the smart contract challenges. Our infrastructure is rather simple compared to the complicated microservice environments today, but there was still some complexity involved.
Our Setup Notes
Signup for AWS Account.
Buy a domain with your favorite provider.
Set up Route53 NS DNS records in AWS.
Set up Route53 MX DNS records in AWS.
Set up Route53 SOA DNS records in AWS.
Set up Route53 SPF DNS records in AWS.
Set up Route53 DKIM DNS records in AWS.
Note: The AWS SES Domain Verification step will require an additional TXT record.
Spin up an EC2 micro instance. You can always resize later.
Attach the right security groups. Initially, we limited external access to private IP ranges so that we didn’t accidentally leak challenges until we started the competition.
Spin up RDS instance. We went with the AWS managed solution because this was the simplest and we wouldn’t have to worry about load balancing or patching.
Follow this guide to get inbound and outbound emails working under your CTF domain.
Install CTFd by cloning the repo and installing dependencies. (We used v2.1.3)
Setup Google Recaptcha v2 for spam and DoS protection.
Setup Infura or your own node if you want Ethereum smart contract challenges.
Setup Let’s Encrypt/Certbot for HTTPS during testing and eventually for connections from Cloudflare to CTFd.
Setup AWS-managed Redis or use a Redis instance locally.
Setup port forwarding 80 to 443 and 443 to 8443 so CTFd doesn’t have to run with sudo and http:// is auto-redirected to https://.
Run CTFd! Note that Unix security best practices still apply like running the application under a limited user.
Run the following commands to set all the environment variables.
# CTFd Database
export DATABASE_URL=
# Web3
export WEB3_PROVIDER_URI=
export GETH_ACCT_PASSWD=
# Redis Caching
export REDIS_URL=
# Infura
export WEB3_INFURA_API_KEY=
export WEB3_INFURA_API_SECRET=
# reCAPTCHA
export RECAPTCHA_SECRET=
export RECAPTCHA_SITE_KEY=
cd CTFd
gunicorn3 -name CTFd —bind 0.0.0.0:8443 —statsd-host localhost:8125 —keyfile /etc/letsencrypt/live/capturethecoin.org/privkey.pem —certfile /etc/letsencrypt/live/capturethecoin.org/fullchain.pem —workers=5 —worker-class=gevent —worker-connections=5000 —access-logfile /home/ubuntu/access.log —log-file /home/ubuntu/error.log “CTFd:create_app()”
We found this guidance for optimizing workers and worker-connections helpful.
When finished testing with your running CTFd instance, setup the competition dates in the CTFd admin interface.
Install the Ethereum Oracle CTFd extension and generate contracts.
Add SES SMTP credentials to CTFd admin interface for user registration if you want email verification.
At this point, the CTF should be entirely setup. Only keep going if you’d like to setup Cloudflare for DoS protection.
Setup Cloudflare DNS and modify the AWS security group for the CTFd box to allow ingress from Cloudflare IPs.
Setup Cloudflare SSL/TLS. SSL — Full (strict) if you still have a valid cert from Let’s Encrypt
Setup Edge Certificates — Cloudflare Universal SSL certificate unless you have the budget and security requirements for a dedicated cert or uploading your own cert.
Setup Cloudflare by enabling Always Use HTTPS, HSTS, TLS 1.3, Automatic HTTP Rewrites, and Certificate Transparency Monitoring
Setup Cloudflare by using minimum TLS version 1.2
You can also setup whitelisting for known good IP addresses in Firewall Tools so that Cloudflare doesn’t challenge requests from these ranges.
Dynamic Oracle
One requirement for the competition was to support Ethereum smart contract challenges, after all, this was called Capture the Coin. If no (testnet) coins could be captured, we would not have lived up to the name.
The contest included the excellent CTFd Oracle plugin by nbanmp which allowed us to process on-chain events such as determining whether or not the deployed smart contract was successfully destroyed by the player. We have modified the original oracle to allow for contract pre-deployment since Ethereum Ropsten network may sometimes be unreliable.
You can find the source code for the oracle and contract deployer here: https://github.com/iphelix/ctc-eth-challenge
Future Steps
In the future, we plan to use the dockerized setup so that it is easy to spin up and down the entire CTFd platform. CTFd already allows for codification of the settings which is helpful in being able to get predictable application deploys. We also would like to codify our infrastructure so that we can get predictable and simple deploys.
Thank you to all the open source contributors without their contributions hosting this CTF would not have been possible.
If you’re interested in working on solving tough security challenges while also creating an open financial system, please join us!
This website contains links to third-party websites or other content for information purposes only (“Third-Party Sites”). The Third-Party Sites are not under the control of Coinbase, Inc., and its affiliates (“Coinbase”), and Coinbase is not responsible for the content of any Third-Party Site, including without limitation any link contained in a Third-Party Site, or any changes or updates to a Third-Party Site. Coinbase is not responsible for webcasting or any other form of transmission received from any Third-Party Site. Coinbase is providing these links to you only as a convenience, and the inclusion of any link does not imply endorsement, approval or recommendation by Coinbase of the site or any association with its operators.
All images provided herein are by Coinbase.
How the Coinbase Security team deployed CTFd to Power our First Capture the Flag contest at Defcon… was originally published in The Coinbase Blog on Medium, where people are continuing the conversation by highlighting and responding to this story.
from Money 101 https://blog.coinbase.com/how-the-coinbase-security-team-deployed-ctfd-to-power-our-first-capture-the-flag-contest-at-defcon-eeb8da3bf2b0?source=rss----c114225aeaf7---4
via http://www.rssmix.com/
0 notes
Text
Overthewire Bandit 25-final
bandit 25: first I tried to ssh bandit26 with the private key and got logged out immediately. As it noted, I check the shell it used “cat /etc/passwd” and found the shell:
/home/bandit26:/usr/bin/showtext
Looking into it and found:
#!/bin/sh more ~/text.txt exit 0
Ok then I confused what to do. After google, I got the idea. It is to use the command “more”. Since our origin terminal window is big enough to show all the text, the “more” command would be ignored so we were immediately logged out by “exit 0”. So what we need to do is to make the terminal window small

Thus the “more” command would work, then we can type “v” into the vim editor, and then type ” :e /etc/bandit_pass/bandit26 ” to get the password.
This level is really creative since it need us to physically adjust the window size to make the command work. And we also need to know the “:e” command to edit another file. Although I use vim frequently but I dont know “:e” before this level.
bandit 26: OK it seems that we didn’t do the full job in level 25. We need a shell. The only thing we can use is vim, so can vim set a shell? The answer is yes, just type “ :set shell=/bin/bash ” and it will set the shell to the normal one. Then type “shell”, the vim will return us to the shell.
Now we can work on to get the password of next level. “ls” and we can see something similar with it in level 19: a setuid. Actually what we need to do is also the same with it in level 19, just use it to get the password directly.
bandit 27: A tutorial of using command “git”. Create a writable folder under /tmp and use “git” to get the repo.
bandit 28: The question is the same with level 27. However when we cat README.md we see
The password is hidden. Still after google, I knew the “git checkout” command. So first we need to use “git log” to see the history commits:
bandit28@bandit:/tmp/1212121/repo$ git log commit 073c27c130e6ee407e12faad1dd3848a110c4f95 Author: Morla Porla <[email protected]> Date: Tue Oct 16 14:00:39 2018 +0200fix info leakcommit 186a1038cc54d1358d42d468cdc8e3cc28a93fcb Author: Morla Porla <[email protected]> Date: Tue Oct 16 14:00:39 2018 +0200add missing datacommit b67405defc6ef44210c53345fc953e6a21338cc7 Author: Ben Dover <[email protected]> Date: Tue Oct 16 14:00:39 2018 +0200initial commit of README.md bandit28@bandit:/tmp/1212121/repo$
The ‘fix info leak’ seems to be what we want. then we use “git checkout” to roll back to that commit and check README again.

bandit 29: The question is still the same. For this level, we need to use “git branch” to check the different branches of commits. Type in “git branch -r” and we can see the full brach:

We are in master. So we use “git checkout” to move to the other two branches and find the password in dev.
bandit30: still the same question. This time, we need to use “git tag” to check the secret tag and get the password.
bandit31: still the same question but it has an instruction:
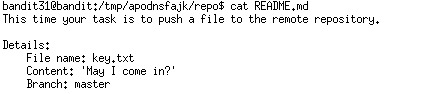
OK we follow the instruction, create a key.txt with the content. Check that we are in brach:master. First we use “git add” to add the file to our git, however

It seems that the .gitignore bans our key.txt. I use the “-f” argument to force it.
Then we use “git commit” to make a new commit and “ git push origin master ” to push it to the remote repository. Then the remote server return us the password.
bandit32: Finally it is not a git stuff again. After logging into it, it shows a different shell which would turn our command into UPPER CASE.

The google sh, I found that $0 refer to the shell and since it doesn’t contain English character, we can use it to execute the shell.
Conclusion:
Now I finished all the bandit wargames. I think it is actually a tutorial of useful linux commands in cyber security and reveal some linux mechanism of which we can take advantage. There are something I need to research and review(if i have time...). Anyway, it is really helpful.
0 notes
Text
crypto code review
Sparkster has finally opened its code repositories to the public, and as the project has been somewhat in the centre of discussion in the crypto community, as well as marketed by one of the high profile crypto influencers, we have been quite curious to see the result of their efforts.
The fundamental idea of the project is to provide a high-throughput decentralized cloud computing platform, with software developer kit (SDK) on top with no requirement for programming expertise (coding is supposed to be done in plain English). The idea of plain English coding is far from new and has been emerging more than a few times over the years, but never gotten any widespread traction. The reason in our opinion is that professional developers are not drawn to simplified drag & drop plain language programming interfaces, and non-developers (which is one of the potential target groups for Sparkster) are, well, most probably just not interested in software development altogether.

However the focus of this article is not to scrutinize the use case scenarios suggested by Sparkster (which do raise some question marks) but rather to take a deep look into the code they have produced. With a team counting 14 software developers and quite a bit of runway passed since their ICO in July 2018, our expectations are high.
Non-technical readers are advised to skip to the end for conclusions.
crypto code review
Sparkster initially published four public repositories in their github (of which one (Sparkster) was empty). We noticed a lack of commit history which we assume is due to a transfer of the repos from a private development environment into github. Three of the above repositories were later combined into a single one containing subfolders for each system element.
The first impression from browsing the repositories is decent after recent cleanups by the team. Readme has been added to the main repository with information on the system itself and installation instructions (Windows x64 only, no Linux build is available yet)
However, we see no copyright notes anywhere in the code developed by Sparkster, which is quite unusual for an open source project released to the public.
Below is a walk-thru of the three relevant folders containing main system components under the Decentralized-Cloud repository and a summary of our impression.
Master-Node folder
The source code is written in C++. Everything we see is very basic. In total there are is not a lot of unique code (we expected much more given the development time spent) and a lot of the recently added code is GNU/forks from other projects (all according to the copyright notes for these parts).
An interesting part is, that if this master node spawned the compute node for this transaction, the master node will request the compute node to commit the transaction. The master nodes takes the control over more or less all communication to stakeholders such as clients. The master node will send a transaction to 20 other master nodes.
The lock mechanism during voting is standard: nodes booting in the middle of voting are locked and cannot participate to avoid incorrect results.
We cannot see anything in the code that differentiates the node and makes it special in any way, i.e. this is blockchain 101.
Compute-Node folder
All source files sum up to a very limited amount of code. As the master node takes over a lot of control, the compute node focuses on the real work. A minimalistic code is generally recommended in a concept like this, but this is far less than expected.
We found the “gossip” to 21 master nodes before the memory gets erased and the compute node falls back to listen mode.
The concept of 21 master nodes is defined in the block producer. Every hour a new set of 21 master nodes become the master node m21.
“At any given point in time, 21 Master Nodes will exist that facilitate consensus on transactions and blocks; we will call these master nodes m21. The nodes in m21 are selected every hour through an automated voting process”
(Source: https://github.com/sparkster-me/Decentralized-Cloud)
The compute node is somewhat the heart of the project but is yet again standard without any features giving it high performance capability.
Storage-Node folder
The source code is again very basic. Apart from this, the code is still at an experimental stage with e.g. buffer overflow disabling being utilized, something that should not be present at this stage of development.
Overall the storage uses json requests and supports/uses the IPFS (InterPlanetary File System). IPFS is an open source project and used for storing and sharing hypermedia in a distributed file system. The storage node not only handles the storage of data, it also responds to some client filter requests.
Conclusion
In total Sparkster has produced a limited amount of very basic code, with a team of 14 developers at their disposal. As their announcement suggests that this is the complete code for their cloud platform mainnet, we must assume that the productivity of the team has been quite low over the months since funds were raised, since none of the envisioned features for high performance are yet implemented.
The current repository is not on par with standards for a mainnet release and raises some serious question marks about the intention of the project altogether. The impression is that the team has taken a very basic approach and attempted to use short cuts in order to keep their timelines towards the community, rather than develop something that is actually unique and useful. This is further emphasized by the fact that the Sparkster website and blockchain explorer is built on stock templates. We don’t see any sign of advanced development capability this far.
Based on what we see in this release Sparkster is currently not a platform for ”full scale support to build AI powered apps” as their roadmap suggest and we are puzzled by the progress and lack of provisioning of any type of SDK plugin. The Sparkster team has a lot to work on to even be close to their claims and outlined roadmap.
Note: we have been in contact with the Sparkster team prior to publishing this review, in order to provide opportunity for them to comment on our observations. Their answers are listed below but doesn’t change our overall conclusions of the current state of Sparkster development.
“We use several open source libraries in our projects. These include OpenDHT, WebSocket++, Boost, and Ed25519. In other places, we’ve clearly listed where code is adapted from in the cases where we’ve borrowed code from other sources. We’ve used borrowed code for things like getting the time from a time server: a procedure that is well documented and for which many working code examples already exist, so it is not necessary for us to reinvent the wheel. However, these cases cover a small portion of our overall code base.
Our alpha net supports one cell, and our public claims are that one cell can support 1,000 TPS. These are claims that we have tested and validated, so the mainnet is in spec. You will see that multi cell support is coming in our next release, as mentioned in our readme. Our method of achieving multi cell support is with a well understood and documented methodology, specifically consistent hashing. However, an optimization opportunity, we’re investiging LSH over CS. This is an optimization that was recommended by a member of our Tech Advisory Board, who is a PHD in Computer Science at the University of Cambridge.
Our code was made straightforward on purpose. Most of its simplicity comes from its modular design: we use a common static library in which we’ve put common functionality, and this library is rightfully called BlockChainCommon.lib. This allows us to abstract away from the individual nodes the inner workings of the core components of our block chain, hence keeping the code in the individual nodes small. This allows for a high level of code reusability. In fact, in some cases this modular design has reduced a node to a main function with a series of data handlers, and that’s all there is to it. It allows us to design a common behavior pattern among nodes: start up OpenDHT, register data handlers using a mapping between the ComandType command and the provided lambda function, call the COMM_PROTOCOL_INIT macro, enter the node’s forever loop. This way, all incoming data packets and command processors are handled by BlockChainCommon, and all nodes behave similarly: wait for a command, act on the command. So while this design gives the impression of basic code, we prefer simplicity over complexity because it allows us to maintain the code and even switch out entire communications protocols within a matter of days should we choose to do so. As far as the Compute Node is concerned, we use V8 to execute the javascript which has a proven track record of being secure, fast and efficient.
We’ve specifically disabled warning 4996 because we are checking for buffer overflows ourselves, and unless we’re in debug mode, we don’t need the compiler to warn about these issues. This also allows our code to be portable, since taking care of a lot of these warnings the way the VCC compiler wants us to will mean using Microsoft-specific functions are portable (other platforms don’t provide safe alternatives with the _s suffix, and even Microsoft warns about this fact here: https://docs.microsoft.com/en-us/cpp/error-messages/compiler-warnings/compiler-warning-level-3-c4996?view=vs-2017.) To quote: “However, the updated names are Microsoft-specific. If you need to use the existing function names for portability reasons, you can turn these warnings off.”
0 notes
Last Seen Blogs

madigrav
welcome to the chaos emporium

77winasia
77Win - Nhà Cái 77Win Link Mới Nhất【Code 177K】

dim621
Logbook

softpromise
the most precious

onesoluna
SoLuna