#and as systems become more complex the dev time must be extended
Explore tagged Tumblr posts
Visit Tumblr Blog
Explore Tumblr blogs with no restrictions, modern design and the best experience.
Last Seen Tumblr Blogs


Fun Fact
Tumblr.com rank in the US is 25.
Text
i think the reason i can't participate in the datv discourse rn is that too many fans aren't engaging in good faith and they're without the knowledge of what triple-a game development entails nowadays
by this, i mean: y'all need to understand that triple-a games cost hundreds of millions of dollars + an average of five (not three! five!} years, and that purchases by people engaged in fandom are a very small slice of the profit pie vs. casual gamers
also, if you're happy that it didn't sell as well as ea and bioware potentially expected? be prepared to kiss me5 and bioware goodbye in this extremely volatile climate of the industry
#text post.#speaking.#dragon age.#i'm not saying i'm not frustrated with the writing#i'm saying please learn that games like datv have so much money behind them that they are too big to fail#and as systems become more complex the dev time must be extended#they are not sustainable by any measure#and devs are realising this!
5 notes
·
View notes
Text
Navigating the Path to DevOps Excellence: A Comprehensive Guide
In the ever-evolving landscape of information technology, DevOps has emerged as a pivotal force, bridging the gap between software development (Dev) and IT operations (Ops). The philosophy of DevOps revolves around the principles of collaboration, automation, and efficiency, making it a driving force behind the success of modern enterprises. Aspiring to embark on a journey towards DevOps mastery is an ambitious endeavor, with the time required to achieve proficiency varying greatly based on individual circumstances. To navigate this path effectively, one must consider their prior experience, depth of knowledge desired, and overall dedication to the craft.

A Stepping Stone to DevOps Proficiency:
Beginner Level (2-3 months):
The journey to DevOps excellence typically commences at the beginner level. For those new to the realm of DevOps, this phase is dedicated to laying a solid foundation. During this time, you'll immerse yourself in fundamental concepts and practices, gradually building a repertoire of essential skills. One of the primary objectives is to become comfortable with version control systems and scripting. Key tools like Git, Jenkins, and Docker will emerge as your trusted companions, playing a pivotal role in this foundational stage.
Intermediate Level (3-6 months):
The intermediate level marks a significant transition in your DevOps expedition. Here, you'll delve deeper into the intricacies of DevOps, progressively broadening your knowledge and skill set. This stage is characterized by a more comprehensive exploration of automation, continuous integration/continuous deployment (CI/CD) practices, and containerization. Your objective is to attain proficiency with tools such as Ansible for automation, Kubernetes for container orchestration, and Terraform for managing infrastructure as code (IaC).
Advanced Level (6+ months):
As your journey progresses, you'll eventually ascend to the advanced level of DevOps mastery. At this stage, you'll broaden your horizons even further. You'll embark on a deep exploration of cloud platforms, including AWS, Azure, or Google Cloud. Additionally, you'll intensify your focus on advanced CI/CD practices, in-depth monitoring strategies, and robust security measures. The objective is to become a DevOps virtuoso, capable of orchestrating complex systems and ensuring their reliability and security.
The Ever-Evolving Nature of DevOps:
In the dynamic domain of DevOps, it's not merely important but paramount to recognize that this field is far from static. Instead, it resides in a perpetual state of evolution, mirroring the rapid pace at which technology advances. Within this dynamic realm, best practices are continually redefined, and the tools and techniques of yesterday may become outdated sooner than expected.
As professionals journey through the landscape of DevOps, a fundamental mindset becomes not just beneficial but necessary—continuous learning. This is the bedrock upon which a successful career in DevOps is built. The ability to remain current, adaptable, and innovative is the essence of thriving in this ever-evolving domain.
The Winds of Change in DevOps:
DevOps professionals must embrace the winds of change and be prepared to evolve alongside the technology they work with. In a world where new technologies and methodologies are constantly emerging, complacency is the antithesis of success.
DevOps engineers, architects, and practitioners find themselves at the forefront of change, pioneers in a technological revolution. They need to be well-versed in the latest trends and possess the acumen to assess which tools, practices, and processes are the best fit for the task at hand.
The Crucial Role of Continuous Learning:
The role of continuous learning in DevOps extends beyond keeping up with the latest tools or platforms. It includes adopting new paradigms and staying informed about emerging trends in cloud computing, containerization, security, and automation. It also means engaging in peer-driven knowledge-sharing through community involvement and participation in conferences, webinars, and forums.
DevOps professionals must not merely react to change; they must drive it, shaping the evolution of their own domain. They are the architects of the future, constructing the bridge between development and operations while adapting to the ever-shifting terrain beneath them.
The Relevance of Adaptability:
The capacity to adapt and pivot is a hallmark of the successful DevOps practitioner. Whether it's integrating new tools into existing workflows, implementing innovative security protocols, or optimizing CI/CD pipelines, adaptability is the linchpin that ensures continued effectiveness.

In this constantly changing environment, the ability to transition from legacy systems to new paradigms, from traditional infrastructure to cloud-based services, and from manual processes to automation is what sets DevOps professionals apart.
For those who aspire to undertake a structured and comprehensive journey to DevOps mastery, ACTE Technologies offers an alluring choice. Their meticulously crafted courses are designed not only to provide fundamental knowledge but also to offer practical, hands-on experience and insights into industry practices. Under the guidance of seasoned instructors, learners can accelerate their trajectory towards becoming proficient DevOps engineers.
In the realm of DevOps, the path to proficiency is diverse and adaptable. It is a journey that varies based on individual circumstances, prior experience, and the depth of knowledge one aspires to attain. At its core, DevOps embodies the principles of collaboration, automation, and efficiency, empowering organizations to thrive in the digital era.
As you embark on your DevOps journey, remember that your commitment to continuous learning is your greatest asset. ACTE Technologies, with its comprehensive training programs and expert guidance, stands as your partner in this dynamic and ever-evolving field. The digital world is yours to shape and innovate, and the voyage towards DevOps excellence is an exciting and rewarding one.
5 notes
·
View notes
Text
Shopify SAP business one integration for Business Agility - i95 Dev
Shopify powers 427,676 eCommerce stores, and 820,000+ merchants currently use it for their online businesses. It is arguably the best platform for businesses as it enjoys the patronage of 800,000 businesses across 175 countries. On the other end, market volatility and dynamism are posing the need for dedicated ERP systems. ERP solutions’ market is expected to touch USD 78.40 billion by 2026, while 51% of CIOs prefer cloud ERP solutions. In this article, we are going to understand how Shopify SAP integration improve your business agility. Dive in deeper to learn more about the topic:

What Is ERP Solution and How It Helps Your Business
An ERP suite is a set of software solutions for managing business processes and functions through common databases. ERP applications are generally based on the Software-as-a-Service (SaaS) model. Material Resources Planning (MRP), Customer Relationship Management (CRM), Human Resource Management, and Supply Chain Management are its core modules. They provide visibility of resources and processes across various departments of the organization and corresponding external partners/ stakeholders. In the absence of an Enterprise Resource Planning system, the following problems would stall your organization’s productivity:
Manual data entry and database management on spreadsheets.
Exhaustive efforts to retrieve and apply information from primary and complementary databases.
Mismanaged workflows at the interdepartmental and cross-departmental level.
Inefficient utilization of resources.
Poor responsiveness against change.
Redundant and repetitive processes that don’t add value to any business function.
Through ERP implementation, you can visualize, automate, streamline, integrate, and measure all your business functions and processes. Thus, they help improve your ROI and bottomline with real-time responses to every transaction. Modern ERPs also include purchase, sales, marketing, finance, inventory, manufacturing, and order management systems. They provide user-friendly dashboards along with extensive BI reports. They foster a collaborative culture within the organization and manage business across geographies with state of the art system security and stability. Clubbing these aspects with the increasing competition in the online store industry, integrating your eCommerce platform with ERP applications is becoming mandatory.
Shopify SAP B1 integration
Shopify is an online marketplace platform where users can build a frontend to display your products/ services, collect payments, manage inventory, and to ship. You can also integrate your Shopify store with Amazon and Facebook Marketplace. It provides an ecosystem for eCommerce business functions across in-house and partner applications, shipping firms, suppliers, and vendors. Shopify store owners grow at 126% YoY on an average. Shopify Plus is its enterprise-level solution with the following salient features:
An over-the-cloud model with 99.99% uptime.
Unlimited bandwidth, zero transaction fees, and customization-friendly APIs.
High scalability with no limits on product count.
Quick customization and deployment cycles.
It can be used without any dedicated in-house IT support.
24/7 Customer support over phone calls, live chat, emails, and community forums.
Single ecosystem for all your online business requirements.
Relatively affordable as compared to legacy online selling platforms.
You can integrate Shopify with any leading ERPs like Microsoft Dynamics, SAP Business One, and Sage 100. Ideally, you should always consult an expert before considering ERP implementation. This is because its upfront costs and post-implementation costs like employee training are considerable investments. Getting stuck with the wrong solution is expensive and sabotages productivity until an extended period. You can evaluate the need for using one based on some key indicators as mentioned below:
You are facing trouble in coordinating sales with inventory management.
Your IT infrastructure is becoming a significant cost center.
Managing operations requires a vast number of repetitive clerical formalities.
Your estore has complex workflows and uses multiple software solutions for various business processes.
Core business functions like analytics, accounting, and supply chain management are suffering due to weak information visibility.
Nestle, Tesla Motors, Pepsico, and Redbull are some of the major brands that rely on Shopify to run their online stores. However, using a dedicated enterprise resource planning system is equally crucial for running a profitable estore.
Points to Keep in Mind While Selecting your ERP Software for your Shopify-Based Online Store
Many factors affect the selection of the right ERP vendor due to the customization and utility criteria. Online stores are moving towards omnichannel sales and mobile-first strategies, which require agility, intuitive automation, BYOD friendliness, system stability, and data security. While selecting the right cloud ERP solution, you should look out for integrations with online selling platforms, shipping management, and inventory control support for omnichannel sales. Also, reflecting information across the selling platforms and the accounting system is a must. Warehouse management, too, needs an integrated approach for streamlining operations. Typical market offerings have hostility towards extensive customization and mobile-friendliness. It should harness marketing automation through engagement tools, reduction in errors, maintaining data integrity across cloud, on-premise, and your eCommerce platform. You should keep all of these aspects in mind while considering an ERP Software for your eCommerce platform.
Key Benefits of Comprehensive Integration Solutions
As an organization, you should avail a lot of operational and strategic benefits from Integrating your Shopify store with an ERP suite. However, integration solutions also play a significant role in the success of the implementation. Here, we are listing down a few key benefits that your solution provider should offer. You should look out for the following features for ensuring high ROI and smooth functioning of your business:
Standardized application flows across storefront, databases, and ERP systems.
Extensive marketing capabilities, BI analytics, and data sync.
API-first integration strategy.
Support for multiple platforms and stores.
Bidirectional data integration on your Shopify store and ERP.
Enhanced customer experience (CX).
Over to You
We have tried to cover everything about Shopify ERP integrations that affect the prospects of online stores. It is indeed necessary to move ahead with an integrated business ecosystem as they are the industry’s biggest game-changers. Everything else, including products and pricing, are governed by the market itself. We hope that this article on Shopify SAP business one integration will benefit your business agility in 2020 and beyond. To know more, contact our integration experts today!
1 note
·
View note
Photo


Hustle Hobo (WIP) - Dev Blog #001 : 3D Level Editor
In our game, the player takes the role of a magical store keeper. Their goal is to use their managerial skills and tools provided to keep their store running. Off the bat, there are dozens of factors to consider for prototyping such a game; such as reward, accessibility, balancing, and- though often overlooked- environment. Though some mechanics were implemented, they didn’t mean much without a level to test them in.
My approach to this problem was to design a 3D Level Editor to rapidly prototype varying spaces, metrics, scenarios and even speed up the final stages of developing the store when we get there. Be warned that the current state of the Level Editor isn’t considered to be a final version, but more of a tool designed with the assurance that the time spent on developing it would be worth the time saved by using it. As such, I made the decision to trade clarity for efficiency. At least for now.
The Problems:
Needing to rapidly test store layouts in a short period of time.
Creating a smoother workflow than Unity’s default Editor.
Budgeting time towards in-game code.
What It Does
The 3D Level Editor can be imagined as a Minecraft-based system on the surface, but with modified features. Its most basic function is point-and-clicking to add or remove blocks. However, this is only one of the three ways to use it.
Alternatively, you can use the “Quick-Actions” to layout your blocks entirely using the keyboard. This is faster for long or repeating patterns, but can be less effective for intricate patterns that may be easier to be done manually.
The third way is an extension on the previous Quick-Action. By holding Shift, the Level Editor selects all newly placed blocks (including the origin blocks), and can thus be used for producing sheets of blocks for things such as walls or ceilings.
How It Works
https://github.com/CAJJI/Test/commit/598915b5110f7b349368605b59388272d3162ad4
Depending on your experience with such systems, you may be thinking this Level Editor is an intricate piece of work, or you be thinking it’s a poorly designed prototype. Both are valid, but only to a degree. The truth is that the basic functions are more intricate and technical, whereas the extra functions were quickly designed and conceptually simplistic.
Block on Block
When I noted the speed and level of complexity that players are able to build houses in Minecraft, I knew I wanted to use it as the base reference.
Similarly, in order to build, you need something to build off of. To solve this problem, I created the option of generating a ground to build on. It’s important that the ground is generated using a grid-like algorithm because each “point” of the ground must have its own Vector position for the user-placed blocks to build on top of.
Now that there’s something to work with, the concept of placing blocks at the crosshair location seems easy enough, but there’s more to consider than one may expect. In order to get the correct orientation and placement of the newly spawned block, you must:
1. Calculate the crosshair location using a Raycast. Use the mouse position converted from screen to world or the camera’s position (as I did) as the ray origin, then use the camera’s forward direction as the ray direction.
2. Calculate which side of the object you’re looking at. I did this by checking the X, Y, Z axis of the hit point and comparing it to each of the specified object’s axis. Because I was using 1x1x1 blocks, I used a range of -0.5 to 0.5 for each axis, but the range should scale-adjusted to encompass different block sizes if used for other purposes. If the Raycast’s hit.point axis value is equal or passed the object’s axis value of 0.5/-0.5, then you know the player is looking at that respective face of the block. This check will have to be repeated individually for each axis until the face is determined. *See diagram
I also used an ulterior GameObject called “HollowCube” to help contain the active position at all times, then when a block is spawned, it’s simply spawned at the HollowCube’s position.
Not too much work to ask for, but more than expected for such a simple outcome. This worked as a base, but still feels inefficient, as it requires the designer to run around and build in real time. To solve this, I implemented the Quick Actions feature.
Quick Actions
To solve the issue of overly-manual labour, special functions can be implemented to speed up the process. The first action I chose to implement was the ability to extend on newly placed blocks using the arrow keys to select a direction and Enter to spawn the extended block. I also used PageUp and PageDown to control the length of units to extend. I coded the adjustable length by using a simple loop to spawn blocks in the direction of the extension; the loop amount should be equivalent to the chosen length value. This allows users the possibility of building structures using only their keyboard and not needing to have vision of every face they wish to build on.
There is however, a problem with this that may not be too obvious. I chose to use the arrow keys to decide which direction to extend in, but each block has 6 directions to extend in. Instead of changing the layout, I made the design choice to have the left and right arrows swap between Left and Back, and Right and Forward depending on if the key is pressed once or twice in a row. Without aided clarity it can be confusing for a while, but over time becomes muscle memory.
Along with the extending Quick Action, I also wanted the designer to be able to highlight multiple blocks for mass-extending in the case of creating things like walls. I figured that instead of having the user manually highlight blocks, I’d code it so you can highlight all newly spawned blocks automatically. This of all things was the simplest to implement and merely required a List and a loop to handle mass-extending. However, I also implemented a ClearSelected() function to clear the list and disable highlights on the blocks.
It should be noted that because the script only runs in Play mode, the designer will have to copy the blocks from the Hierarchy, stop running the game, then paste the GameObjects back into the Hierarchy for them to be saved.
Why it’s Useful
As you can see, the current state of the code is visibly rushed- and for now that’s a good thing. With a deadline in mind, as long as the tool works as needed, there’s no reason to refine it since the player will never be able to see it. It only took one night out of the schedule to design and code this version of the Level Editor, but allows us to make rapid changes that may have otherwise been too difficult to pull off farther into development.
Adapting For Other Projects
There’s also the factor of incorporating these scripts or concepts into other games. I’ve already began working on prototypes that are based on or share code from this specific 3D Level Editor. I’ve even converted the concept into a 2D Level Editor that instead allows the designer to draw their levels from a top-down (or side) perspective using a line-tool design.
1 note
·
View note
Text
Original Post from Google Security Author: Google Security PR
Posted by Christian Blichmann & Robert Swiecki, ISE Sandboxing team
Many software projects process data which is externally generated, and thus potentially untrusted. For example, this could be the conversion of user-provided picture files into different formats, or even executing user-generated software code.
When a software library parsing such data is sufficiently complex, it might fall victim to certain types of security vulnerabilities: memory corruption bugs or certain other types of problems related to the parsing logic (e.g. path traversal issues). Those vulnerabilities can have serious security implications.
In order to mitigate those problems, developers frequently employ software isolation methods, a process commonly referred to as sandboxing. By using sandboxing methods, developers make sure that only resources (files, networking connections and other operating system resources) which are deemed necessary are accessible to the code involved in parsing user-generated content. In the worst-case scenario, when potential attackers gain remote code execution rights within the scope of a software project, a sandboxing technique can contain them, protecting the rest of the software infrastructure.
Sandboxing techniques must be highly resistant to attacks and sufficiently protect the rest of the operating system, yet must be sufficiently easy-to-use for software developers. Many popular software containment tools might not sufficiently isolate the rest of the OS, and those which do, might require time-consuming redefinition of security boundaries for each and every project that should be sandboxed.
Sandbox once, use anywhere
To help with this task, we are open-sourcing our battle-tested project called Sandboxed API. Sandboxed API makes it possible to create security policies for individual software libraries. This concept allows to create reusable and secure implementations of functionality residing within popular software libraries, yet is granular enough to protect the rest of used software infrastructure.
As Sandboxed API serves the purpose of accessing individual software functions inside a sandboxed library, we are also making publicly available our core sandboxing project, Sandbox2. This is now part of Sandboxed API and provides the underlying sandboxing primitives. It can be also used standalone to isolate arbitrary Linux processes, but is considered a lower-level API.
Overview Sandboxed API is currently implemented for software libraries written in the C programming language (or providing C bindings), though we might add support for more programming runtimes in the future.
From a high-level perspective, Sandboxed API separates the library to be sandboxed and its callers into two separate OS processes: the host binary and the sandboxee. Actual library calls are then marshalled by an API object on the host side and send via interprocess communication to the sandboxee where an RPC stub unmarshals and forwards calls to the original library.
Both the API object (SAPI object) and the RPC stub are provided by the project, with the former being auto-generated by an interface generator. Users just need to provide a sandbox policy, a set of system calls that the underlying library is allowed to make, as well as the resources it is allowed to access and use. Once ready, a library based on sandboxed API can easily be reused in other projects. The resulting API of the SAPI object is similar to the one of the original library. For example, when using zlib, the popular compression library, a code snippet like this compresses a chunk of data (error handling omitted for brevity):
void Compress(const std::string& chunk, std::string* out) {
z_stream zst{};
constexpr char kZlibVersion[] = “1.2.11”;
CHECK(deflateInit_(&zst, /*level=*/4, kZlibVersion, sizeof(zst)) == Z_OK);
zst.avail_in = chunk.size();
zst.next_in = reinterpret_cast(&chunk[0]);
zst.avail_out = out->size();
zst.next_out = reinterpret_cast(&(*out)[0]);
CHECK(deflate(&zst, Z_FINISH) != Z_STREAM_ERROR);
out->resize(zst.avail_out);
deflateEnd(&zst);
}
Using Sandboxed API, this becomes:
void CompressSapi(const std::string& chunk, std::string* out) {
sapi::Sandbox sandbox(sapi::zlib::zlib_sapi_embed_create());
CHECK(sandbox.Init().ok());
sapi::zlib::ZlibApi api(&sandbox);
sapi::v::Array s_chunk(&chunk[0], chunk.size());
sapi::v::Array s_out(&(*out)[0], out->size());
CHECK(sandbox.Allocate(&s_chunk).ok() && sandbox.Allocate(&s_out).ok());
sapi::v::Struct s_zst;
constexpr char kZlibVersion[] = “1.2.11”;
sapi::v::Array s_version(kZlibVersion, ABSL_ARRAYSIZE(kZlibVersion));
CHECK(api.deflateInit_(s_zst.PtrBoth(), /*level=*/4, s_version.PtrBefore(),
sizeof(sapi::zlib::z_stream).ValueOrDie() == Z_OK));
CHECK(sandbox.TransferToSandboxee(&s_chunk).ok());
s_zst.mutable_data()->avail_in = chunk.size();
s_zst.mutable_data()->next_in = reinterpet_cast(s_chunk.GetRemote());
s_zst.mutable_data()->avail_out = out->size();
s_zst.mutable_data()->next_out = reinterpret_cast(s_out.GetRemote());
CHECK(api.deflate(s_zst.PtrBoth(), Z_FINISH).ValueOrDie() != Z_STREAM_ERROR);
CHECK(sandbox.TransferFromSandboxee(&s_out).ok());
out->resize(s_zst.data().avail_out);
CHECK(api.deflateEnd(s_zst.PtrBoth()).ok());
}
As you can see, when using Sandboxed API there is extra code for setting up the sandbox itself and for transferring memory to and from the sandboxee, but other than that, the code flow stays the same.
Try for yourself It only takes a few moments to get up and running with Sandboxed API. If Bazel is installed:
sudo apt-get install python-typing python-clang-7 libclang-7-dev linux-libc-dev
git clone github.com/google/sandboxed-api && cd sandboxed-api
bazel test //sandboxed_api/examples/stringop:main_stringop
This will download the necessary dependencies and run the project through its paces. More detailed instructions can be found in our Getting Started guide and be sure to check out the examples for Sandboxed API.
Where do we go from here?
Sandboxed API and Sandbox2 are used by many teams at Google. While the project is mature, we do have plans for the future beyond just maintaining it:
Support more operating systems – So far, only Linux is supported. We will look into bringing Sandboxed API to the Unix-like systems like the BSDs (FreeBSD, OpenBSD) and macOS. A Windows port is a bigger undertaking and will require some more groundwork to be done.
New sandboxing technologies – With things like hardware-virtualization becoming almost ubiquitous, confining code into VMs for sandboxing opens up new possibilities.
Build system – Right now, we are using Bazel to build everything, including dependencies. We acknowledge that this is not how everyone will want to use it, so CMake support is high on our priority list.
Spread the word – Use Sandboxed API to secure open source projects. If you want to get involved, this work is also eligible for the Patch Reward Program.
Get involved
We are constantly looking at improving Sandboxed API and Sandbox2 as well as adding more features: supporting more programming runtimes, different operating systems or alternative containment technologies.
Check out the Sandboxed API GitHub repository. We will be happy to consider your contributions and look forward to any suggestions to help improve and extend this code.
#gallery-0-5 { margin: auto; } #gallery-0-5 .gallery-item { float: left; margin-top: 10px; text-align: center; width: 33%; } #gallery-0-5 img { border: 2px solid #cfcfcf; } #gallery-0-5 .gallery-caption { margin-left: 0; } /* see gallery_shortcode() in wp-includes/media.php */
Go to Source Author: Google Security PR Open-sourcing Sandboxed API Original Post from Google Security Author: Google Security PR Posted by Christian Blichmann & Robert Swiecki, ISE Sandboxing team…
0 notes
Text
What is Software Development Life Cycle

I. Overview of Software Development Life Cycle
A good and reasonable process always produces standardized products. It enables the interaction of activities and factors with each other in a smooth, effective way. It can be said that the software process brings the quality, productivity and price of the software, thus increasing the competitiveness and profitability of enterprises. 1. Concepts Software development process is a set of organizational activities whose purpose is to build and develop software. Where are the questions: HR: Who will do? Who do? Time: When do? How long does it take? Method: How to do? Tool: What tools do you use to do this job? Cost: How much does it cost? How much? (estimate) Goal: What is the goal? Different types of systems require different development processes. 2. Basic operations of the software development process There are four operations that are the foundation of most software development processes: Software specification: Define the functions and conditions of the software. Software Development: Is the process of building the specification. Software evaluation: The software must be evaluated to make sure that at least the specifications that are required can be met. Software evolution: This is the process of finishing the functions as well as the interface to improve the software as well as requirements from the customer.
II. Models developed in software projects
1. Waterfall model

Describe: Waterfall model is a model applied in the sequence of software development stages This means that the next phase is only done when the previous phase has ended Do not go back to the previous stage to handle the changes in the request This is considered to be the first software development model. Apply: Often applied to projects that are not frequently changed on request. Characteristics Advantages: Easy to use, easy to access The stages and activities are clearly defined Confirmation at each stage, ensuring early detection of errors Defect: It is difficult to return to any stage when it is over Its limited flexibility and scope of adjustment is quite difficult, costly. Read more: https://melsatar.wordpress.com/2012/03/15/software-development-life-cycle-models-and-methodologies/ 2. V- Shaped Model

Describe: This is an extended model from the waterfall model Instead of moving down sequentially, the steps will follow in the V shape Apply: Software requirements must be clearly defined Software engineering and tools must be thoroughly explored Characteristics: Advantages: Simple, easy to use Specific distribution in each stage Perform verification and validation early in each development phase Defect: The adjustment range is quite difficult and expensive. Learn more: https://melsatar.wordpress.com/2012/03/15/software-development-life-cycle-models-and-methodologies/ 3. Spiral Model - Spiral model

Describe: The model combines the features of the prototyping model and the waterfall model. Spiral model is preferred for large, expensive and complex projects. This model uses many stages similar to the waterfall model, in order, plan, risk assessment, ... Apply: Often used for large applications and systems built in small phases or under segments Characteristics: Advantages: Estimates (i.e. budget, schedule, etc.) become more practical as a workflow, because important issues were discovered earlier. Early involvement of deverlopers Risk management and system development by phase Defect: High cost and long time to have final product Must have good skills to assess risk and assumptions. More: https://melsatar.wordpress.com/2012/03/15/software-development-life-cycle-models-and-methodologies/
4. Iterative Model
Diagram:

Describe: A pattern is repeated from start to full spec Instead of developing software from spec specs and then starting to execute, this model can be reviewed progressively to reach the final requirement. The development process is repeated for each version of the product in each cycle. Apply: The requirements of the system are complete, clearly defined and understandable Key requirements need to be defined, and some details may be renewed over time Characteristics Advantages: Build and complete step by step products Get user feedback from the sketches Document time will be less than design time Defect: Each repetition phase is rigid Having a system architecture or design problem may arise but not all of it happens throughout the life cycle. Learn more: http://istqbexamcertification.com/what-is-incremental-model-advantages-disadvantages-and-when-to-use-it/ https://melsatar.wordpress.com/2012/03/15/ software-development-life-cycle-models-and-methodologies / 5. Incremental Model Example:

Diagram: !(/uploads/ed4f64c3-97ed-424e-82ff-fc767d001645.png) Describe: In this model, the spec is divided into sections. The cycle is divided into small modules, easy to manage. Each module will go through the requirements of design, implementation, ... as a normal development life cycle. Apply: Applies to projects whose requirements have been described, defined and understood explicitly There is demand for the product soon Characteristics: Advantages: Software works quickly throughout the development lifecycle This model is more flexible, less expensive to change the scope and requirements Easier to check and fix with smaller repetition Defect: Good planning and design Need a clear and complete definition of the whole system before it can be broken down and built step by step The total cost is higher than the waterfall. Learn more: https://melsatar.wordpress.com/2012/03/15/software-development-life-cycle-models-and-methodologies/ 6. RAD Model (Rapid Application Development)

Describe: Is a form of incremental model In the RAD model, components or functions are developed in parallel as if they were small projects Development of this over time, provided and assembled into a working prototype This can quickly bring up something for the customer to see and use and provide feedback regarding their supply and request. Apply: RAD should be used when there is a need to create a modularized system over a period of 2-3 months. Should be used when available designer for the model and high cost Characteristics: Advantages: Reduced development time. Increased reusability of components Give early evaluation quickly Encourage customers to give feedback Defect: There should be a good team to determine the software requirements Only systems with new modules can use this model Dev / design requirements must have a lot of experience Much depends on modeling skills For more information: http://istqbexamcertification.com/what-is-rad-model-advantages-disadvantages-and-when-to-use-it/ 7. Agile Model

Describe: Based on the iterative and incremental model Development requirements and solutions are based on a combination of functions Apply: It can be used with any type of project, but it requires engagement and customer interaction. In addition, it can be used when the customer requires functional availability within a short period of time (3 weeks) Characteristics: Advantages: Reduce the time required to take advantage of some features of the system The end result is high quality software in the least possible time and customer satisfaction Defect: Depends on the skill of the software developer Data is available at a later stage Need an experienced team. Special skills for the team. For more information: http://istqbexamcertification.com/what-is-rad-model-advantages-disadvantages-and-when-to-use-it/ 8. Scrum (Scrm is an agile software development model)

Description: Scrum is a flexible method (agile), so it follows the principles of Agile Manifesto (see also Agile Manifesto). In addition, Scrum works on three core values, also known as Three Legs of Scrum, including Transparency, Inspection, and Adaptability.
III. Learn about the Scrum Model
1. Scrum concept: It is a process of developing software according to the agile model. The main principle is to split the software to produce a small part to develop (these parts have to read and release), get customer comments and change accordingly during the playback. This will ensure that the release product meets what the customer expects. Scrum divides the project into developmental loops called sprints. Each sprint usually takes 2-4 weeks (30 days) to complete. It is suitable for projects with many changes and high speed requirements. 2. Some features of SCRUM Scrum (or agile in general) falls into the "Feature-driven development" category. Products are developed according to features, not product development according to system architecture. Scrum is different from Agile models in that it is Customer Oriented, the role of customers in evaluating products is very important. Only after every sprint (2-4 weeks) will the customer see the change of his product, giving early feedback to the direction. -> Fast response to change requests Scrum minimizes resources for management but focuses more on jobs that are directly related to product creation. By reducing the management role (PM) by pushing the management to the individual, Reduce the time spent writing materials by increasing the live time. Often when estimating work, the team estimates the time spent on communication to complete the task. Focusing on the product, the new product is the ultimate destination, not the process. 3. Advantages and disadvantages of the Scrum model 3.1 ADVANTAGES: One can do many things such as dev can test Bug detection is much earlier than traditional methods Customers quickly see the product that provides feedback early. Applicable to projects where customer requirements are not clear from the beginning. 3.2 ASK: The level of the group is a certain skill Must have knowledge of the aglie model. Difficulties in determining the budget and time. Always listen to feedback from customers and change accordingly, so time will be long when there are too many requests from customers. The role of PO is very important, PO is product oriented. If PO does not work well, it will affect the overall result. 4. The elements that make up a process in Scrum Simply put, there are three important components that make up SCRUM: Organization, Process, Atifacts. Each element has three child elements. Thus, we only need to understand and apply these 9 elements that can apply SCRUM. Organization: Organization of the project team and Roles (role) Product Owner ScrumMaster (Moderator) Development Team Documentation (Atifacts): Outputs Product Backlog (List of functions to be developed by the product) Sprint Backlog (List of functions to be developed for each stage) Estimation (Team Estimation) Process: Specify how the SCRUM works Sprint Planning meeting Sprint Review (Meetings to summarize for each stage) Daily Scrum Meeting 4.1 Organization of the project (Organization)

Product Owner Product Owner is the owner of the product, who decides what functions the product is and determines the product backlog. Often, this role is undertaken by the client or his representative. ScrumMaster Scrum Master ensures that Scrum processes are implemented properly and that they help the team to do the best job of developing the product. Development Team A group of 4-7 software engineers are responsible for product development. The project team must work with the Product Owner to decide what to do in this Sprint and what the results will look like. At the same time, the group also discussed the options, estimating the time spent doing the work and evaluating the results. If large projects we need to split into small projects. 4.2 Materials (Atifacts) Product Backlog Product Backlog is a list of functions that need to be developed for the product. This listing is determined by the Product Owner. It is regularly updated to meet the changing needs of customers as well as the conditions of the project.

Sprint Backlog Sprint is a development stage in the product development process, which is recommended for 2-4 weeks. Each Sprint is determined by the development time, the list of development functions (Sprint Backlog). Every sprint must release the product to ensure that it receives the customer feedback, through the development process of the product to learn from experience and avoid future problems. The Sprint Backlog is a list of functionality developed in Sprint, which is determined by the Sprint Planning meeting. Sprint Backlog is the functionality selected from Product Backlog based on the priority and ability of the development team.

Estimation In SCRUM, Team members will select their own Task and estimate the estimated development time and take responsibility for this estimate. Upon completion will update the Sprint Backlog.

3.3 Processes

Sprint Planning meeting As we know above, Sprint is a development phase that takes 2-4 weeks. To prepare for each Sprint team needs to meet to determine what functions will be sprint backlog, expected outcomes (Goal, Release, Estimate) who does what) and discuss solutions. All are recorded in minutes to have the basis for implementation and Review later. Sprint Review Is a meeting to review Sprint's past performance, determine what functions are released, what functions to continue to fix or develop, identify issues and discuss solutions, Product Backlog v. Daily Scrum Meeting (also known as Standup Meeting) Daily Scrum Meeting is a daily meeting and is recommended for no more than 15 minutes and a standing meeting to ensure the meeting time is not extended at the beginning of each day, each member only answers 3 questions: + Yesterday you can What? What's the problem? Today you will do If members have problems, they should work separately so that they do not have to spend a lot of time with members. Scrum Master must ensure that this meeting is properly implemented. Sprints will be repeated until the items in the Product Backlog are completed or when the Product Owner decides to stop the project based on the actual situation. By using "more valuable than first" tactics, items that bring more value to the project owner are always completed first. So Scrum always brings the highest value to the investor for the project. As the process is always improving, the Scrum team often has very high productivity. These are two great benefits that Scrum brings to the organization. Read the full article
0 notes
Link
Jenkins came with a big bang. That said, it enhanced the whole process of continuous integration & continuous deployment.
The challenge that a dev faces is to deliver the most updated and safe code to the customer. The advent of CD(continuous deployment) pipeline automates expression of the process to get the software from the version control system directly to the user.
This expression, which does it so fluently as we speak, is what a Jenkins file constitutes.
Introduction
Jenkins is an open source automation server written in Java. Jenkins helps to automate the non-human part of the software development process, with continuous integration and facilitating technical aspects of continuous delivery.
So the next part is about how we can achieve that.
Pipelines
Jenkins Pipeline is a suite of plugins which supports implementing and integrating continuous delivery pipelines into Jenkins.
Plugins have been released for Jenkins that extend its use to projects written in languages other than Java. Plugins are available for integrating Jenkins with most version control systems and bug databases. Many build tools are supported via their respective plugins. Builds can generate test reports in various formats supported by plugins (JUnit support is currently bundled) and Jenkins can display the reports and generate trends and render them in the GUI.
A CD pipeline: automates expression of getting the software from VCS(git). contains stages of continuous delivery from which the software must go through before the user handles it. are extensible by tools for modeling simple-to-complex delivery pipelines.
The Jenkinsfile
A simple text file containing the definition of the pipeline. This jenkinsfile can be committed to the project’s source. It is advantageous because it allows for the following advantages:
automatically creates a pipeline for each branch and PR(pull request).
code review of the pipeline can be done.
can be viewed and edited by other users also.
Flavors of jenkinsfile
Jenkinsfile can be defined in 2 different ways. First, which is the oldest way and quite popular in the community, is the Scripted Pipeline syntax. The other, which is the new ‘hot stepper’ in the field and has an edge over the former, is the Declarative pipeline.
Though the syntax of both the flavors doesn’t differ from each other the Declarative pipeline is made to make writing and reading the pipeline code much easier.
Before we dig into the practicality of pipelines let’s see why they are needed in the first place. There are 5 points by which we can understand the need:
CODE: the pipeline becomes the part of the project source, therefore, can be viewed, reviewed and changed as per the need.
DURABLE: pipeline executes whenever there is a new commit message in the project source, hence allowing it to survive both planned and unplanned starts.
PAUSABLE: pipelines can also wait for human interaction and plan the task accordingly.
VERSATILE: pipelines can also perform work in parallel and can implement the real-world CD requirements easily.
EXTENSIBLE: supports plugins which make even the Jenkins GUI better.
Now that we know the need of pipeline. Let’s see how it is made.
pipeline { agent any stages { stage('Build') { steps { // } } stage('Test') { steps { // } } stage('Deploy') { steps { // } } } }
Let’s take a look at the various elements of the pipeline defined above. Sections of the declarative pipeline:
agent: section specifies where the entire Pipeline, or a specific stage, will execute in the Jenkins environment. Agent option can be specified for each stage.
values: any: executing the pipeline on any available agent. This tag has more meaning when we consider the situation where we have several instances.
stages: This section specifies the stages from which the software needs to pass through before the user gets to use it.
stage: This section is the subsection of the Stages section. Each section must have the which denotes the name of the process, in case it fails.
There goes the introduction. Let’s move towards creating jenkinsfile for our own repository. Here to demonstrate I have a java project which consists of classes and test cases with integrated stylesheet by which we can check the syntactical mistakes.
Since we are going to put the jenkinsfile directly to the source. If you don’t have the repository locally, please clone your repo first.
Process
Step: 1 Create A jenkinsfile.
Open the terminal in your java project folder and hit this command:
>gedit jenkinsfile
or
>vi jenkinsfile
Although there are a lot of editors which will help you in creating the jenkinsfile, for now, you can use your text editor. Jenkinsfile uses the groovy notation but it isn’t necessary to have an understanding of the syntax. This file can also be created by IntelliJ while you develop your project. Let’s put the following content in the jenkinsfile:
pipeline{ stages{ stage('checkstyle'){ // } stage('run test cases'){ // } } }
Now that we have created a backbone of our jenkinsfile by defining the stages. Now we need to insert content inside these stages to carry out just what it says.
Now we need to insert tools section. Tools section defining tools to auto-install and put to PATH. This is ignored if agent none is specified. PATH contains the name of the directory within Jenkins.
We require two tools. First is Maven to execute checkstyle and test and Second is Java Development Kit version 8. But before putting this information in our jenkinsfile. We need to add these tools to Jenkins.
Step: 2 Adding the tools to Jenkins.
Go to Managing Jenkins -> Global Tool Configurations.
To add JDK: Click on Add JDK button. Put the name as ‘jdk8’. Click on install automatically. Select the Java version 8 and check I agree. Click on the username and password and put in the credentials of your Jenkins account.
To add Maven: Same procedure as above. Put the name as ‘Maven 3.3.9’ and also select the same version.
After we’re done with this we can now use them easily.
Step 3: Adding the tool section in jenkinsfile.
... tools { maven 'Maven 3.3.9' jdk 'jdk8' } ...
Now we will update the stages with the appropriate commands.
For the checkstyle stage, we will put in something like this.
steps{ sh 'mvn checkstyle:checkstyle' }
sh here resembles the command prompt, we only need to specify the command as we do on our local console. Similarly, the testing stage can be updated with an appropriate command.
Step 4: Commit the jenkinsfile to your Github repository.
Step 5: Creating the item and build.
Go to the Dashboard. Click on New Item. Put in the name of the Pipeline project. Click OK. Click on the Pipeline panel. On the definitions select Pipeline script from SCM Select SCM as git. On the Repositories section. Put your GitHub URL at repository URL. Script Path must contain the location of your jenkinsfile in the repository. Do not use the path from your local machine. Click on apply and save. For building, Click on Build Now and wait for a while.
Output
You will have the following output which will depict the stages.
Understanding the process
Declarative steps are done prior to executing user-specified step. In these steps, the first task to be done is to pull the repository to Jenkins and then tools are installed accordingly as specified by the user. Installation of tools may take some time if done for the first time.
I hope you find the blog helpful.
Example Repository
0 notes
Text
Kubernetes and Serverless: Oracle at KubeCon 2017
By: Bob Quillin
Vice President Developer Relations
Today at the KubeCon + CloudNativeCon 2017 conference in Austin, Texas, the Oracle Container Native Application Development team open sourced two new Kubernetes related projects which we are also demoing here at the show. First, we open-sourced an Fn Installer for Kubernetes. Fn is an open source serverless project announced this October at Oracle OpenWorld. This Helm Chart for Fn enables organizations to easily install and run Fn on any Kubernetes deployment including on top of the new Oracle managed Kubernetes service Oracle Container Engine (OCE).
Second, we have open sourced Global Multi-Cluster Management, a new set of distributed cluster management features for Kubernetes federation that intelligently manages highly distributed applications—“planet-scale” if you will—that are multi-region, hybrid, or even multi-cloud. In a federated world, many operational challenges emerge—imagine how you would manage and auto-scale global applications or deploy spot clusters on-demand. For more, check out the Multi-Cluster Ops in a Hybrid World session by Kire Filipovski and Vitaliy Zinchenko on Thursday, December 7, at 3:50pm!
Pushing Ahead: Keep It Open, Integrated, and Enterprise-Grade
Customers are seeking an open, cloud-neutral, and community-driven container-native technology stack that avoids cloud lock-in and allows them to run the same stack in the public cloud as they run locally. This was our vision when we launched the Container Native Application Development Platform at Oracle OpenWorld 2017 in October.
Since then Oracle Container Engine was in the first wave of Certified Kubernetes platforms announced in November 2017, helping developers and dev teams be confident that there is consistency and portability among products and implementations.
So, the community is now looking for the same assurances from their serverless technology choice: make it open and built in a consistent way to match the rest of their cloud native stack. In other words, make it open and on top of Kubernetes. And if the promise of an open-source based solution is to avoid cloud lock-in, the next logical request is to make it easy for DevOps teams to operate across clouds or in a hybrid mode. This lines up with the three major “asks” we hear from customers, development teams and enterprises: their container native platform must be open, integrated, and enterprise-grade:
Open: Open on Open
Both the Fn project and Global Multi-Cluster Management are cloud neutral and open source. Doubling down on open, the Fn Helm Chart enables the open serverless project (Fn) to run on the leading open container orchestration platform (Kubernetes). (Sure beats closed on closed!) The Helm Chart deploys a fully functioning cluster of Fn github.com/fnproject/fn on a Kubernetes cluster using the Helm helm.sh/ package manager.
Integrated: Coherent and Connected
Delivering on the promise of an integrated platform, both the Fn Installer Helm Charts and Global Multi-Cluster Management are built to run on top of Kubernetes and thus integrate natively into Oracle’s Container Native Platform. While having one of everything works in a Home Depot or Costco, it’s no way to create an integrated, effortless application developer experience—especially at scale across hundreds if not thousands of developers across an organization. Both the Fn installer and Global Multi-Cluster Management will be available on top of OCE, our managed Kubernetes service.
Enterprise-Grade: HA, Secure, and Operationally Aware
With the ability to deploy Fn to an enterprise-grade Kubernetes service such as Oracle Container Engine you can run serverless on a highly-available and secure back-end platform. Furthermore, Global Multi-Cluster Management extends the enterprise platform to multiple clusters and clouds and delivers on the enterprise desire for better utilization and capacity management.
Production operations for large distributed systems is hard enough in a single cloud or on-prem, but becomes even more complex with federated deployments—such as multiple clusters applied across multi-regions, hybrid (cloud/on-prem), and multi-cloud scenarios. So, in these situations, DevOps teams need to deploy and auto-scale global applications or spot clusters on-demand and enable cloud migrations and hybrid scenarios.
With Great Power Comes Great Responsibility (and Complexity)
So, with the power of Kubernetes federation comes great responsibility and new complexities: how to deal with challenge of applying application-aware decision logic to container native deployments. Thorny business and operational issues could include cost, regional affinity, performance, quality of service, and compliance. When DevOps teams are faced with managing multiple Kubernetes deployments they can also struggle with multiple cluster profiles, deployed on a mix of on-prem and public cloud environments.
These are basic DevOps question that are hard questions to answer:
How many clusters should we operate?
Do we need separate clusters for each environment?
How much capacity do we allocate for each cluster?
Who will manage the lifecycle of the clusters?
Which cloud is best suited for my application?
How do we avoid cloud lock-in?
How do we deploy applications to multiple clusters?
The three open source components that make up Global Multi-Cluster Management are: (1) Navarkos (which means Admiral in Greek) enables a Kubernetes federated deployment to automatically manage multi-cluster infrastructure and manage clusters in response to federated Kubernetes application deployments; (2) Cluster Managerprovides lifecycle management for Kubernetes clusters using a Kubernetes federation backend; and (3) the Federated Ingress Controller is an alternative implementation of federated ingress using external DNS.
Global Multi-Cluster Management works with Kubernetes federation to solve these problems in several ways:
Creates Kubernetes clusters on demand and deploys apps to them (only when there is a need)
Clusters can be run on any public or private cloud platform
Runs the application matching supply and demand
Manages cluster consistency and cluster life-cycle
Ingress, nodes, network
Control multi-cloud application deployments
Control applications independently of cloud provider
Application-aware clusters
Clusters are offline when idle
Workloads can be auto-scaled automatically
Provides the basis to help decide where apps run based on factors that could include cost, regional affinity, performance, quality of service and compliance
Global Multi-Cluster Management ensures that all of the Kubernetes clusters are created, sized and destroyed only when there is a need for them based on the requested application deployments. If there are no application deployments, then there are no clusters.
As DevOps teams deploy various applications to a federated environment, then Global Multi-Cluster Management makes intelligent decisions if any clusters should be created, how many of them, and where. At any point in time the live clusters are in tune with the current demand for applications, and the Kubernetes infrastructure becomes more application and operationally aware.
See us at Booth G8, join our sessions, and learn more at KubeCon + CloudNativeCon 2017
Come see us at Booth G8 and meet our engineers and contributors! As a local Austin native (and for the rest of the old StackEngine team) we’re excited to welcome you all (y’all) to Austin. Make sure to join in to “Keep Cloud Native Weird.”
And be fixin’ to check out these sessions:
Multi-Cluster Ops in a Hybrid World deep dive session by Kire Filipovski, Cloud Architect at Oracle, and Vitaliy Zinchenko, cloud architect at Oracle Thursday December 7 at 3:50 p.m. – 4:25 p.m., Meeting Room 8ABC, Level 3.
Running MySQL on Kubernetes – Patrick Galbraith, principal platform engineer at Oracle. Thursday, December 7, 3:50 p.m. – 4:25 p.m., Meeting Room 9C, Level 3
https://blogs.oracle.com/kubernetes-and-serverless%3A-oracle-at-kubecon-2017
from WordPress https://reviewandbonuss.wordpress.com/2017/12/07/kubernetes-and-serverless-oracle-at-kubecon-2017/
0 notes
Link
Culling
One of the most important aspects of scene management is rendering the scene. We are not going to discuss rendering the scene just yet; instead, we are going to discuss how to avoid rendering the scene. That's right, we want to look at methods that will allow our engine to avoid rendering as much of the scene as possible. Why do want to do this? Quite simply because the less we render, the less work our video card has to do, and the less work the video card has to do, the better.
A game's performance is often measured by how many frames per second it can achieve in a given situation. This is often referred to as a benchmark. We measure performance in this manner because it gives us an indication of how well the underlying engine is handling the scene. When the engine has to process and render a lot of data, the frame rate drops. On the other hand, when the engine processes and renders very little, you will notice an increased frame rate. Therefore, it makes sense to introduce techniques into the engine that minimize the amount of data that the engine has to process and render for each frame.
Measuring a game's performance by frame rate alone is technically inaccurate. The reason for this is that a drop in frame rate from 100 fps to 90 fps is not the same as a drop from 40 fps to 30 fps. Instead, you should look at the change in frame rate as a percentage. Therefore, changing from 100 fps to 90 fps is a 10% performance hit, whereas changing from 40 fps to 30 fps is in fact a 25% performance hit, which is much worse.
One of the most common methods of elevating the strain on the video card is through culling (or sometimes called hidden surface removal ), which is a general term used to define the filtering of faces that do not require rendering. What this means is that any face in the scene that does not need to be rendered in a particular frame, does not need to be pushed down the DirectX graphics pipeline. This does not mean that the face does not exist, or is removed from the scene. It simply means that the engine does not send the face to DirectX to be rendered. The real question is, how do we determine if a face needs to be culled?
There are a number of common methods we can use to perform culling, with some being more complicated than others. The most effective solution usually combines two or more methods to ensure the most accurate culling results. The reason for this is that each method has its strengths and weaknesses. Some methods are computationally fast, but are relatively inaccurate, while others are slower, but yield better precision. It is usually best practice to employ a fast and rough culling method to cull away most of the non-visible faces (i.e., faces that cannot be seen by the viewer in the current frame). Then we follow this up with a slower, more accurate method that removes the extra faces not culled away by the fast method.
Developing an effective culling algorithm is like a fine balancing act. Your computer has two processors (the CPU and the GPU) that you must keep busy at all times. However, you don't want to let one of them become overloaded, therefore creating a bottleneck. The more culling you perform, the more strain you put on the CPU. On the other hand, the less culling you do, the more strain you put on the GPU. Figure 10.1 shows the relationship between culling and performance. You can see that as we perform more culling on our scene, the better the performance, up to a point, after which performance begins to drop off. This happens because the CPU is causing a bottleneck due to the amount of processing involved with the elaborate culling algorithm. You should also notice from Figure 10.1 that culling is affected by diminishing returns. This means that the more you do, the less of a performance increase you gain. The idea is to find the perfect balance among the amount of culling the CPU performs, the amount of geometry the GPU renders, and the amount of work you have to do to achieve satisfactory results.
As previously mentioned, there are a number of common culling methods in use today. Table 10.1 shows three common methods used to cull hidden faces, as well as the advantages and disadvantages.
For our culling system, we will use all three of the methods shown in Table 10.1. We have already touched on back face culling in Chapter 5 so you should recall what that is. Fortunately for us, DirectX has back face culling built into it, and using it is as simple as switching it on. In fact, it is on by default, so that makes it even easier. The second two culling methods are new and they require a little discussion. We'll start with frustum culling.
Method
Advantages
Disadvantages
Back Face
DirectX can perform this for us. It is just a matter of switching it on.
None really. The performance gain justifies the addition of this extra step to the graphics pipeline.
Frustum
Relatively easy to implement. Can be quite computationally inexpensive.
Fairly inaccurate. Many faces close to the view will be rendered.
Occlusion
Perfect for removing surfaces in view that are hidden behind something.
Can be a significant burden on the CPU in complex scenes.
Table 10.1 Culling Methods
In the last chapter, we talked about the view and projection matrices. We know that the view matrix defines the virtual camera used to view the scene, and the projection matrix acts like the lenses of the camera to control the projection of the 3D scene onto your flat monitor screen. If you combine these two matrices (i.e., multiply them together), you can derive a new matrix that represents the field of view (FOV). The FOV simply defines what can be seen by the camera. To better understand this principle, you can look at the FOV of your own eyes. While keeping your head and eyes still, facing straight ahead, extend your right arm out to your side and move it back until you can no longer see it in your peripheral vision. This means that your arm is no longer in your FOV. If you move your arm back in slowly, it will eventually come back into your FOV when you can see it again in the corner of your eye.
We will use this exact principle to cull faces that are not in the camera's FOV. To achieve this we need to create what is called a frustum (or a view frustum ) from the camera's FOV matrix. You can imagine a view frustum like a pyramid on its side, with its apex positioned at the camera and its base extended away in the direction of the camera's facing. Figure 10.2 shows what a view frustum looks like.
We won't look at the actual implementation details just yet. Instead, let's look at how the view frustum can be used to cull the scene. Once a view frustum has been calculated, we can define it using a set of planes . A plane (which is provided by the D3DX library through the use of the D3DXPLANE structure) is like a flat 2D surface, which extends infinitely through 3D space; it has no thickness and it has no boundaries. It has two sides (a positive side and a negative side), and every vertex in 3D space is located on either one of these sides. Our view frustum can be defined using six of these planes (however, you can get away with only five if you ignore the near plane, which is what we will do in our implementation). If you look at Figure 10.2 again, you can see that we need a plane for each of the sides of the pyramid.
The planes are not enclosed by the actual shape of the sides of the view frustum pyramid, as they extend indefinitely along their axes. The shape of the view frustum is enforced by the fact that the planes intersect each other, therefore creating a pyramid-shaped box in 3D space. Once we have this box we can test if faces are visible by checking if they are on the inside or the outside of this box, which is quite easy to do. Figure 10.3 shows how planes are used to define a physical view frustum in 3D space.
Now that you understand how view frustum culling works, you shouldn't have too much trouble understanding how occlusion culling works as it relies on the same principle. Occlusion culling basically means to cull the scene that is hidden behind occluders. So what is an occluder? An occluder can be any object that has the ability to conceal parts of the scene from the viewer. A typical example is a large building or a solid wall. If the player is viewing the scene and a large solid wall hides a good portion of the player's view, then it makes sense to cull anything that is behind that wall. Figure 10.4 illustrates the example.
How do we determine if something is hidden by an occluder? We use the same principle as discussed for frustum culling. All we need to do is create a frustum that extends from the occluder, away from the viewer. Then, rather than culling everything that is outside the frustum, we cull everything that is inside the frustum. Figure 10.5 shows how frustums are used for occlusion culling.
With these three culling methods we are able to cull a good portion of our scene and prevent many of the hidden surfaces from being sent through the DirectX graphics pipeline. You should be aware that this system is not perfect; there will still be a number of faces that are rendered each frame that don't need to be. However, it is not necessary to have a perfect system. We must keep the balance in mind and prevent our CPU from becoming a bottleneck from over culling. Figure 10.6 gives you an idea of the kind of returns each of the culling methods will give us. As you can see, the more culling we do, the less effective it is.
You should also note that the effectiveness of our culling methods is also strongly linked to the data set we give it to cull. In other words, what is the system trying to cull? Individual faces, groups of faces, whole objects?
--
This article is excerpted from Programming a Multiplayer FPS in DirectX. (ISBN # 1-58450-363-7). For more information about the book, please visit http://ift.tt/2oKzInj.
______________________________________________________
0 notes
Text
Shopify-ERP integrations Guide improve your business agility - i95 Dev

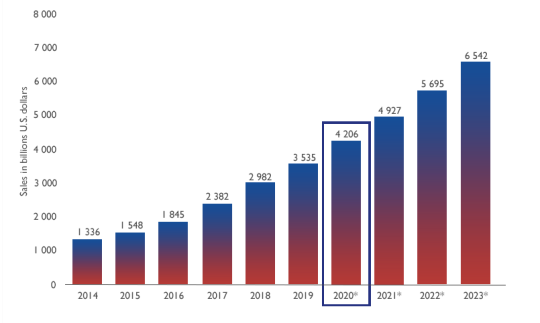
Shopify powers 427,676 eCommerce stores, and 820,000+ merchants currently use it for their online businesses. It is arguably the best platform for businesses as it enjoys the patronage of 800,000 businesses across 175 countries. On the other end, market volatility and dynamism are posing the need for dedicated ERP systems. ERP solutions’ market is expected to touch USD 78.40 billion by 2026, while 51% of CIOs prefer cloud ERP solutions. In this article, we are going to understand how Shopify-ERP integrations improve your business agility. Dive in deeper to learn more about the topic:
What Is ERP Solution and How It Helps Your Business
An ERP suite is a set of software solutions for managing business processes and functions through common databases. ERP applications are generally based on the Software-as-a-Service (SaaS) model. Material Resources Planning (MRP), Customer Relationship Management (CRM), Human Resource Management, and Supply Chain Management are its core modules. They provide visibility of resources and processes across various departments of the organization and corresponding external partners/ stakeholders. In the absence of an Enterprise Resource Planning system, the following problems would stall your organization’s productivity:
Manual data entry and database management on spreadsheets.
Exhaustive efforts to retrieve and apply information from primary and complementary databases.
Mismanaged workflows at the interdepartmental and cross-departmental level.
Inefficient utilization of resources.
Poor responsiveness against change.
Redundant and repetitive processes that don’t add value to any business function.
Through ERP implementation, you can visualize, automate, streamline, integrate, and measure all your business functions and processes. Thus, they help improve your ROI and bottomline with real-time responses to every transaction. Modern ERPs also include purchase, sales, marketing, finance, inventory, manufacturing, and order management systems. They provide user-friendly dashboards along with extensive BI reports. They foster a collaborative culture within the organization and manage business across geographies with state of the art system security and stability. Clubbing these aspects with the increasing competition in the online store industry, integrating your eCommerce platform with ERP applications is becoming mandatory.
Shopify and ERP Implementation
Shopify is an online marketplace platform where users can build a frontend to display your products/ services, collect payments, manage inventory, and to ship. You can also integrate your Shopify store with Amazon and Facebook Marketplace. It provides an ecosystem for eCommerce business functions across in-house and partner applications, shipping firms, suppliers, and vendors. Shopify store owners grow at 126% YoY on an average. Shopify Plus is its enterprise-level solution with the following salient features:
An over-the-cloud model with 99.99% uptime.
Unlimited bandwidth, zero transaction fees, and customization-friendly APIs.
High scalability with no limits on product count.
Quick customization and deployment cycles.
It can be used without any dedicated in-house IT support.
24/7 Customer support over phone calls, live chat, emails, and community forums.
Single ecosystem for all your online business requirements.
Relatively affordable as compared to legacy online selling platforms.
You can integrate Shopify with any leading ERPs like Microsoft Dynamics, SAP Business One, and Sage 100. Ideally, you should always consult an expert before considering ERP implementation. This is because its upfront costs and post-implementation costs like employee training are considerable investments. Getting stuck with the wrong solution is expensive and sabotages productivity until an extended period. You can evaluate the need for using one based on some key indicators as mentioned below:
You are facing trouble in coordinating sales with inventory management.
Your IT infrastructure is becoming a significant cost center.
Managing operations requires a vast number of repetitive clerical formalities.
Your estore has complex workflows and uses multiple software solutions for various business processes.
Core business functions like analytics, accounting, and supply chain management are suffering due to weak information visibility.
Nestle, Tesla Motors, Pepsico, and Redbull are some of the major brands that rely on Shopify to run their online stores. However, using a dedicated enterprise resource planning system is equally crucial for running a profitable estore.
Points to Keep in Mind While Selecting your ERP Software for your Shopify-Based Online Store
Many factors affect the selection of the right ERP vendor due to the customization and utility criteria. Online stores are moving towards omnichannel sales and mobile-first strategies, which require agility, intuitive automation, BYOD friendliness, system stability, and data security. While selecting the right cloud ERP solution, you should look out for integrations with online selling platforms, shipping management, and inventory control support for omnichannel sales. Also, reflecting information across the selling platforms and the accounting system is a must. Warehouse management, too, needs an integrated approach for streamlining operations. Typical market offerings have hostility towards extensive customization and mobile-friendliness. It should harness marketing automation through engagement tools, reduction in errors, maintaining data integrity across cloud, on-premise, and your eCommerce platform. You should keep all of these aspects in mind while considering an ERP Software for your eCommerce platform. The reasons proposed for using cloud infrastructure for commercial purposes are as mentioned below
7 Ways ERP Integrations Boost the Business Agility Of Your Shopify Store
This section will list down the top seven ways (not necessarily in any order) in which ERP integrations boost your business. It impacts a multitude of areas in the entire organization on a varying scale. We have tried to keep them relevant to our broad audience. Have a quick look here:
#1 Improved Control over Resource Allocation
Clubbing your Shopify platform with ERP applications results in an intuitive, intelligent, automated, and data-driven business ecosystem. Hence, the resources within the company and from the partner organizations are allocated in a better manner. The direct benefit of intelligent resource allocation is reflected in the strategic execution and eased out supporting business functions like accounting and human resource management. Firms with less control over resource insights tend to price their products conservatively, which ultimately leads to cart abandonment and low sales:
#2 Enhanced Decision Making Through BI Tools
Business Intelligence (BI) is one of the biggest benefits pursued by organizations throughout ERPs’ history. They generate a large number of customized reports for marketing, sales, inventory management, and order fulfillment purposes, including warehouse picking. Hence, online stores can make well-informed decisions despite a large number of transactions.
#3 Omni-Channel Marketing And Sales Support
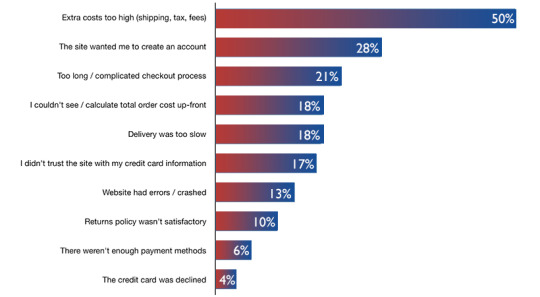
Omnichannel marketing and sales are transformed through seamless data integration. Automation of workflows and database management help businesses synchronize their efforts while acting upon demand trends. Usually, Shopify requires manual inputs that would drive users frenzy, but implementing an enterprise resource planning solution helps save thousands of dollars spent on overheads. Consumers describe not receiving goods on time as the biggest reason for not completing a purchase.

#4 Improved Vendor, Supplier, and Shipping Partner Management
For any eCommerce store, the most challenging aspects of operations revolve around supplier/ vendor management and coordinating with the shipping/ logistics partners. Using an ERP suite with Shopify Plus streamlines all of these functions and facilitates a smooth flow across inhouse and partner applications.
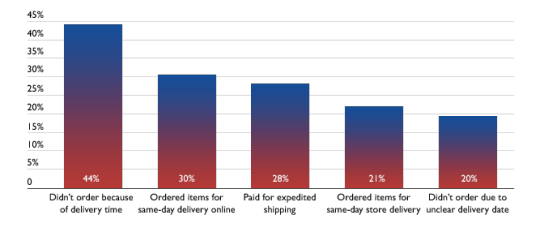
#5 Optimized Business Processes and System Stability
The customizations and third-party integrations help reduce the repetitive workload across all platforms, while ERP applications eliminate all redundancies. Real-time control over the business processes and high system stability translate into revenue-centric operations. Thus, your estore can handle the transactions in a better manner without compromising on any strategic front.
#6 Better Grip Over Inventory And Customer Experience

The demand patterns in the eCommerce industry exhibit high volatility, and many factors like movies, social media, and festivities impact sales. Hence, getting real-time updates regarding the stock and shipping status aids in catering better customer experience. Events like flash sales, discounts, stock clearance, and event-based sales are entirely dependent on agile inventory management and highly enriched CX.
#7 Greater Visibility across Multiple Stores and Platforms
Omnichannel sales is too complex to be handled manually. Hence, automated workflows and triggered actions help ensure timely delivery of all shipments without any mishaps. ERPs also enable your Shopify store to process backorders effortlessly.
Key Benefits of Comprehensive Integration Solutions
As an organization, you should avail a lot of operational and strategic benefits from Integrating your Shopify store with an ERP suite. However, integration solutions also play a significant role in the success of the implementation. Here, we are listing down a few key benefits that your solution provider should offer. You should look out for the following features for ensuring high ROI and smooth functioning of your business:
Standardized application flows across storefront, databases, and ERP systems.
Extensive marketing capabilities, BI analytics, and data sync.
API-first integration strategy.
Support for multiple platforms and stores.
Bidirectional data integration on your Shopify store and ERP.
Enhanced customer experience (CX).
Over to You
We have tried to cover everything about Shopify ERP integrations that affect the prospects of online stores. It is indeed necessary to move ahead with an integrated business ecosystem as they are the industry’s biggest game-changers. Everything else, including products and pricing, are governed by the market itself. We hope that this article on Shopify ERP integrations will benefit your business agility in 2020 and beyond. To know more, contact our integration experts today!
1 note
·
View note