#and had one piece of split chipboard
Explore tagged Tumblr posts
Visit Tumblr Blog
Explore Tumblr blogs with no restrictions, modern design and the best experience.
Last Seen Tumblr Blogs


Fun Fact
Tumblr has a 66 index score for customer satisfaction in the US.
Text
My wife and I take turns living the One Who Is Good With Tools stereotype.
Yesterday was my turn when I grabbed four clamps at the hardware store while she questioned when on earth were we going to need SO MANY clamps. (We ended up needing precisely four clamps for the repair we were buying the clamps for.)
Last Monday was her turn when she packed up both the cordless drill, making sure it was charged, and the Ikea toolbox, just in case, to pick up our free new desk table. (We ended up needing the screwdriver.)
#LGBTQ#stereotypes#TO THE HARDWARE STORE#the free desk needed repairing#it has a bit of cracked laminate in unimportant places#and had one piece of split chipboard#neither of us was taught any DIY at home#all I know from watching YouTube is that there is no such thing as too many clamps#especially if there's a weird swoopy bit#and she knows that people don't always disassemble stuff they want out of the house#or leave out tools for people who pick it up to do so#this lady did#but two screwdrivers are better than one#is it living up to stereotypes if you're both bi?#i thought our thing was indecision and a general lack of life skills#seriously#get the IKEA toolbox if you have no tools in the house#my dad threw it in the cart when we went shopping for my dorm#fourteen years later those fifteen euros are still some of the best money he's invested in my future#not always the best tool for the job#but A tool is better than NO tool at all
2 notes
·
View notes
Photo


I made an end table to show the process I use for making my mini calico critter furniture! :^) It’s a set to go with the credenza I made a little while ago!
Process under the cut! Give it a shot, its not too hard at all, I promise! I didn’t use a pattern, but if you would like to make one for the pieces, give me a hollar! :^D
What you’ll need:
Chipboard (thin cardboard used for cereal and dry food boxes)
Cardboard (For this small furniture, I use cardboard with the small teeth inside (on the left in the image below) versus the more sturdy standard cardboard. It is just what I had laying around, but you can use either!

Glue
Acrylic paint
Popsicle sticks (standard size)
First: Size and cut your pieces

I used a official side table for scale, this piece is simple so there is no storage on it however. You’ll need 3 sets of 2 sides (front/back, left/right, top/bottom). Do the top and bottom last. The front/back and sides can be whatever width you would like (as long as you have two pairs they will match up) I made mine ~1.2 inch wide and 1 inch high. Make sure the front/back and left/right are the same height though. (I stack them to compare pieces and trim the excess.) You want all of them to be a little shorter than your final overall desire, so you have room to add legs.
Find the size of the top/bottom by lining up the front and a side, standing them up so they meet at a 90 degree angle. Trace around the half of a square they make onto the cardboard you are using, then move and flip the pieces to finish the other side by lining up their ends with the ends of the lines you made previously. Cut the second top/bottom by using the piece you just cut as a guide.

Glue either pair of sides onto the flat part of a top/bottom piece. Because my cardboard is thin, it does not stand up on its own, so I lean it as straight up as possible against two objects. When they dry (be patient depending on your glue), glue your other side pair to the edges of the U shape you have created. Do not try to wedge them in between or you risk bending the cardboard. Once all of your four sides are dry and connected, top them off with your final piece. It should look like the next image.

Somewhere along the line I measured wrong. Any visible gaps or edges will be hidden however, so if you have any, don’t worry. :^) Next you will need your chipboard and popsicle sticks. Cut long strips of chipboard (about 1/8th of an inch, I think). Then, measuring them against your box, cut 4 for the width of your side pieces, 4 for the height. Repeat for back and front. Glue the pieces measured to your width first, so you have one at the top, and one at the bottom of each side. Then layer the pieces measured to your height over top of them, so that all of the edges of your chipboard are as close to the edges of your cardboard sides as possible. This should cover any exposed edges.
Next, prep your popsicle sticks. Cut the rounded ends off, then split the popsicle down the middle so you have two long halves. Cut each half in two. Trim to size to line the boarder of the top side of your box, like the image below. There will probably be gaps between the popsicle sticks and the box. Don’t worry. But your popsicle sticks should overlap/touch each other, however. I always cut them a little longer than I need, and then little by little trim them down to fit.

Next you will need to make a tabletop. Take your chipboard, place your box on top, and trace an outline. Cut on the inside of the line you made. It should be slightly smaller than boarder at the top of your box. Test it by placing it on top, if it is too big, gently trim the edges until it fits like the image below.

Once you are satisfied, glue it down. While the glue is drying, get ready to cut your side designs into chipboard. You can make them whatever you like, hearts, diamonds (kinda what I did) or butterflies... You name it, its up to you. Just make your design small enough to fit within the boarders of chipboard you made on your sides (you may need to hold it up to the table a few times to eyeball if it is the right size). Trace around the design you like onto the chipboard to cut identical pieces for the other sides. Once you are happy, glue the pieces in.
Still have gaps in your cardboard and/or chipboard? Fill with thin strips of glue, squirted into the cracks. When this dries it will fill them in, and give an even, blocked surface to paint over. Keep layering until it is full to your liking.

Next, you will need your popsicle sticks again. Cut the ends, split them down the middle again. 4 short sticks, a little longer than a sprinkle. Use the first one cut, to measure the size of the others by holding it up to the stick and marking the end point.
Glue these to the bottom side of your table using the strongest glue you have. If you dab the glue on the bottom, you should be able to stand them up in the liquid- but if they try to fall over or lean, you can prop them up with scraps (lean them so they are not touching the glue)

Wait for everything to dry. Like completely dry. I mean it, or when you begin the next step, stuff is going to slide around and fall off.
Paint everything in a thick coat of white. Make sure your brush strokes on each side follow the same direction. Still got cracks? Fill them with globs of paint on a small brush. Really stuff it in there-- then gently brush over the whole side’s surface to remove any excess that has strayed from the cracks

I do two thick coats of white. Don’t forget the legs. Once your base layers have dried, you can pick your wood color. I decided on a birch color, so I used a lot of white and yellow, a bit of red, and the smallest dab of blue to mute the color to a more natural tone. You don’t want to just use red and yellow, because even a deep orange runs the risk of looking too saturated and unnatural.

Time for the details.
To make a wood texture, mix a color a few shades darker than your wood tone. I added a bit more red to mine to give it a gentle, peach cast. Load your paint brush, and rub the excess paint into your pallet. Dry brush the remaining paint in your bristles sparingly across the surfaces of your sides in light strokes. The streakier the better. You are trying to create fake wood grain.
While that is drying, take one of the scraps of your popsicle sticks (one of the thin, half-strips) and cut off one more “sprinkle”. This is your drawer handle. You can either glue this on, let it dry, then paint it-- OR you can paint it, let it dry, then glue it. Up to you. I painted mine gold.
Lastly, using a color 2-3 shades darker than your darkest wood tone, carefully paint the side details you cut out of chipboard. This color should be slightly more saturated than the wood grain. For a more weathered look, after applying the paint, scrub at with a paper towel- this should lift some of the paint and leave a more natural, worn appearance. (Make sure you’re using a clean spot on your cloth each time you scrub at a new detail)
By the end, you should have something like this! You can change the size of the sides to make buffets, dressers, cabinets, you name it. When in doubt sizing, place a stand in calico critter nearby, and trim little by little while comparing!

I hope this helped! I would love to see if anyone can use this tutorial to make some goodies of their own! If you have any questions, feel free to send me a message! Have a lovely day!
--
@cozy-possum @shiloh-sylvanian
Hope its ok I tagged u both since you said you would like to see how I made the credenza! ;v;/ I loved hearing about your Grandma’s similar one in green Shiloh! That sounds so pretty!
#calico critters#sylvanian families#doll furniture#custom furniture#artists on tumblr#diy#custom#tutorial#art tutorial#art#sfw#minitures
31 notes
·
View notes
Text
Arcade Bartop with Raspberry Pi & RetroPie DIY tutorial (with pictures) - Part 1 of 6 - Introduction

Owning a "coin-op", or to better say an arcade gaming cabinet, has always been one of my biggest dreams since I was a kid. Unfortunately, they take up a lot of space in a typical house and they're also rather expensive: on top of that, they are usually limited to a single game (or a given set of games), which is far from ideal for a home-entertainment scenario. Starting from the late '90s, the MAME project (Multiple-Arcade-Machine-Emulator) and the subsequent release of small single-board computers such as the NUC and the Raspberry PI paved the way to fix most of these issues - yet only for the few heroes brave (and capable) enough to build their own Arcade Cabinet and equip it with the required amount of hardware, software and ROMs to make everything work: those who couldn't do that had to lower their standards down to a standard PC with a couple of joysticks/joypads. They could still feel the joy of playing countless retro-games on a single machine, yet they won't have the chance to revive the cabinet look & feel like the former ones. For countless years I was one of them - until the day I decided I would also try to design and build my own Arcade Bartop! This post is the first part of an extensive tutorial containing all the required instructions on how to do that - together with a lot of pictures, graphics and photos explaining and documenting the task. I would have liked to condense everything into a single article, but considering the huge amount of info and photos I had to put up to decently explain all the required steps I eventually had to split the tutorial into six parts. Part 1 of 6: Introduction & Raw Materials Part 2 of 6: Tools, Design & Prototype Part 3 of 6: Building the Cabinet Part 4 of 6: Painting & T-Molding Part 5 of 6: Installing the Hardware Part 6 of 6: Configuring the Software (Raspberry PI & Retropie) Check out all the pictures of the Arcade Bartop (all those used in this tutorial + more) on my Arcade Bartop album on Flickr.com.
Introduction: Full-Size Cabinet vs Bartop Cabinet
As soon as I chose to build a gaming cabinet by myself, I was forced to choose between doing a Full-Size (aka Upright) or a Bartop (aka Countertop) cabinet. As clearly explained in this awesome Wikipedia page, the former are what we're used to see in a typical Arcade Gaming Hall: five-to-six feet (180/200 meters) tall, with the control panel set perpendicular to the monitor at slightly above waist level and the monitor itself at eye level, with the marquee above it - either matching the player's head level or encompassing it. Conversely, Countertop or Bartop cabinets are usually only large enough to house their monitors and control panels: they're called that way because they can be usually found on bars or tables in pubs and restaurants. Long story short, I went with the Bartop cabinet - I'll just call it Arcade Bartop from now on - for three main reasons: It's way cheaper in terms of required raw materials and tools. It's way easier to build, as you won't have to do complex wood cuts. It's more practical, expecially if you want to make it fit into an average apartment: the full-size cabinet requires a fixed place and a certain amount of space, while the bartop can be easily moved, placed upon a table/desk/shelf and so on. For the above reasons, the guide you're about to read will explain how to build an Arcade Bartop. In case you want to build a full-size cabinet, you can check out this exceptional tutorial from ILikeToMakeStuff.com. Why Do it Yourself? In case you're asking why DIY in 2018 when you can just purchase a pre-made cabinet from a dedicated store such as GameRoomSolutions, ArcadeWorld or even eBay or Amazon, well... That's not as simple as you might initially think. First of all, you have to accept that given layout - which is a relevant aspect of the whole thing; you'll probably also have to bear with a sub-optimal software setup, since these pre-made cabinets are rarely equipped with a NUC or a Raspberry PI with an updated RetroPie - which is the only solution that gives you the chance to play virtually any retro-game ever made: MAME, NES, SNES, Genesis, PC Engine, NEO-GEO, Amiga, Laser Games such as Dragon's Lair and so on; last but not least... you'll definitely miss a lot of fun! And also the immeasurable gratification of looking something like this...

... knowing that you actually put that beast into life with your own hands. Needless to say, if you don't think that such feeling is not worth the hassle of having to draw, saw, cut, screw, sand, polish, paint (and many other heroic acts) for A LOT of hard-working hours, just spare yourself from the trouble and buy a pre-made, ready-to-play cabinet or bartop from one of the resellers above. I can personally guarrantee that you won't lose much in doing that: although it's true that doing it by yourself will cost a lot less in terms of raw materials, the required amount of work you'll need to invest will definitely square up. Which lead us to the following question... How much it will cost? The whole project will cost you about 230€ (approx. 265$) of raw materials and will give you a machine that can be compared to the GameRoomSolutions' Plug & Play Deluxe, which is currently being sold for 1099$ (approx. 945€): this basically mean that the DIY will cost roughly four times less (!) than going for the hassle-free purchase - as long as you'll have the required tools (see Part 2). That's not bad, as long as you're willing (and capable) to deal with it. If you're still reading I guess you are up for the task, hence... Enough with the talking and let's do this!
Raw Materials
Let's start with a comprehensive list of what you'll need in terms of raw materials (and the approximate price) to build the Arcade Bartop shown above. I also put some advices and considerations on the various pieces and a descriptive photo with some other comments that you could find useful to better understand the role of each one of them. Multi-layered Wood - 2 square meters (50€ / 60$). You could also use Chipboard Wood instead for half the price, which is the wood type used by to build most pre-made cabinets... However, I strongly advise to go with the multi-layered, as it's stronger, lighter and won't have moistness issues.

These are the required raw wood panels - don't worry, I'll explain how to get/cut them later on. 19" TFT monitor (40€ / 50$). Don't spend much money on this... a used or refurbished one from eBay or Amazon Marketplace will be more than enough - as long as it works! You need to be sure that it will fit in the Bartop cabinet case, hence get one with a 420 mm max width and 340 mm max height rame (or less). Also, ensure that it supports a HDMI and/or DVI connector, otherwise you'll be forced to also buy a HDMI-to-VGA adapter (6€ / 8$) to make it work with the Raspberry PI output. I was lucky enough to find a refurbished NEC 19" EA193MI for 40€ on eBay, which has the perfect size (408 x 338 x 65 mm) and a DVI-in.

Here's the NEC EA193MI, the monitor that I used for this project. Needless to say, the base stand won't be needed and will be removed. USB Stereo Speakers (10€ / 12$) for the audio part. For this project I picked the Trust Leto, but any other Speaker set will do as long as the speakers have a width, height and length size of 8 centimeters max: the Arvicka Speakers, the Myguru Stereo and many others around that size would also work.

A couple of Trust LETO boxes: I bought two sets of speakers because I built two cabinets, but you'll need only one. Raspberry PI 3 B (or B+) kit (40€ / 50$). Be sure to get a kit which includes the board together with a case, the heat sinks and a power supply: there's a lot of them on Amazon and eBay. The one I used here isn't available anymore, but this one from CanaKit is almost identical and has the same set of features.

Here's the Raspberry PI, already secluded in its case. The one I got also had a cooling fan on top of the two heat sinks... a nice add-on. MicroSD Card - 64GB (15€ / 20$). I got this one for my setup, but the Raspberry PI will accept anything else. You could also go for a 32GB and save some bucks here - it will still contain thousands of ROMs.

The Samsung EVO Plus is a class-10 MicroSD: it's 100Mb/s transfer rate will perform well with the Raspberry PI. T-Molding (15mm) - 5 meters (3€ / 3.5$ plus shipping). You'll probably have to buy this online, as few stores have it available. I got mine from arcadeworlduk.com and I'm very happy with the results, although it was quite difficult to put it on... as you'll see later on.

A couple Raspberry PI Arcade Joystick Kits (35€ / 40$). For this project I bought two of these kits from Quimat which are a perfect fit, but any other kit will do - for example, this Gamelec kit will also work: just remember that the Raspberry PI will need two driver kits (the green circuit board), one for each joystick, hence you need to avoid the 2-kits that come with a single driver board (such as this one - just like the item description says).

The QUIMAT Arcade Joystick kits... at a rather advanced implementation stage. More on that later on! A power strip (5€ / 7$) and a IEC320 C14 power socket connector (5€ / 7$ including the 10A fuse) for the power part. Just get these stuff on Amazon without worrying too much for the size, as the cabinet will have enough space to host it. If you can, try to get both of them with an ON/OFF switch for increased security and versatility: I did that to be able to turn the Bartop ON and OFF from the inside and/or from the outside.

Each one of these will go within a cabinet to plug the Raspberry PI, the monitor and the (optional) LED bar. We'll see how to properly wire them later on. It's worth mentioning that the power part of this tutorial might need some adjustments, depending on the country you live in: what I bought and did below will work well for Italy and for most EU countries. A (optional) 50cm LED bar (3€ / 5$) and a AC/DC driver to power it (5€ / 7$ including the power plug). You'll only need these if you want to retro-illuminate the Bartop Marquee through a simple (and energy efficient) LED-based back-light mechanism. Once again I got everything from Amazon: the SODIAL led bar was ridiculously cheap, as well as the Liqoo 12W Led Driver that I used to power it: both of them performed greatly.

The LED driver DC cables go to the LED strip, while the AC ones go to a power socket through a plug. Water-based enamel (8€ / 10$ for a 5L can) and Primer for wood (8€ / 10$ for a 5L can). Within this project I went for a total-white cabinet and a black/white one: I managed to do both with a single Primer 5L can and two 5L enamel cans (one black and one white).

Primer on the left, black enamel on the right. I chose water-based paintings because they have low environmental impact and will perform well for this kind of work. A pack of (at least) 100 screws (6€ / 8$ for a 250-pack of 3.5x40mm size) to assemble the cabinet, plus 10-20 mini-screws (3€ / 4$) for the small parts - if you don't want to use the glue, see below - and also 4 VESA mount screws/bolts (M4) for the monitor (1.5€ / 2$). As for the VESA screws, they'll be most likely included in the monitor itself, yet you'll probably need them to be longer since you'll have to mount the monitor in a non-standard way: I used four M4x25mm for such task, as you'll see later on. I got the screws from Amazon and the rest from a local hardware store for few bucks.

A couple of hinges and magnet lockers for the openin/closing mechanism of the cabinet back-side opening (5-10$ total). If you sum all the listed prices, you'll end up with 230€ / 265$ - which is precisely what we said earlier.
Conclusion
That's about it for Part 1: throughout this post we got a good understanding of what an Arcade Bartop actually is and we went through the pros and cons of building it by ourselves: right after that, we put together a list of the required raw materials & components together with their price and some useful insights on how to properly choose and buy them. Let's now jump to the Part 2 of this tutorial, where we'll take a look of the required Tools, learn how to Design our project and build a full-scale, cardboard-based Prototype to check up the sizings & measurements before cutting the wood. If you have any question or want to leave your feedback, you're more than welcome to do that using the comment section below! Here are the links to the next parts of this guide: Part 1 of 6: Introduction & Raw Materials Part 2 of 6: Tools, Design & Prototype Part 3 of 6: Building the Cabinet Part 4 of 6: Painting & T-Molding Part 5 of 6: Installing the Hardware Part 6 of 6: Configuring the Software (Raspberry PI & Retropie) Check out all the pictures of the Arcade Bartop (all those used in this tutorial + more) on my Arcade Bartop album on Flickr.com. Read the full article
#Arcade#Arcade Bartop#DIY#EMU#Emulation Station#Gamelec#MAME#MicroSD#NECEA193MI#Quimat#RaspberryPI#retrogaming#Retro Pie#ROMs#T-Molding#Trust#Wood
0 notes
Photo
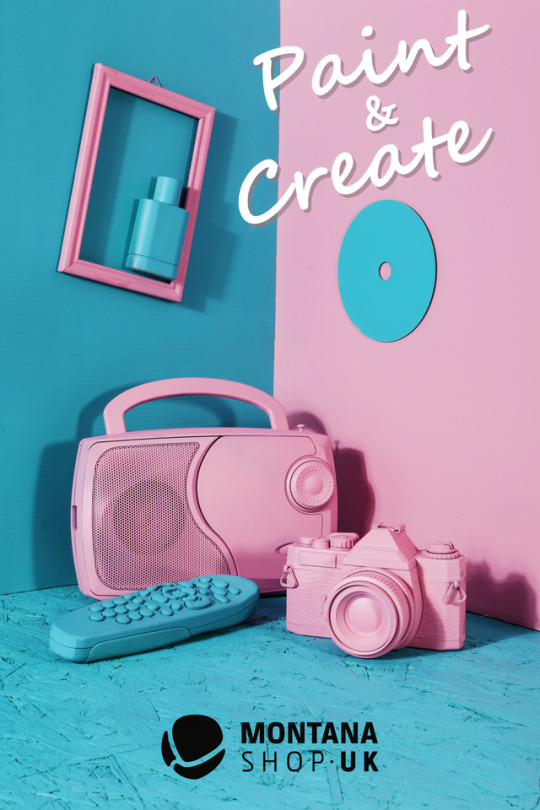
Montana Shop Advert - Final
Preparation for shoot diary entry No.1
Firstly, we selected a variety of inanimate objects that we believed might be relevant to our clientele, like cameras, stereos, telephones and CD’s. We then spray painted them either blue or pink using spray paint from our client, ensuring to prepare the paint properly by shaking and testing the canister before applying it to the products ensuring the paint was all smooth without bits as well as making sure the spray would be distributed evenly. When painting we made sure the room was well ventilated to avoid fumes, we also used glove and eye protection, spraying against newspaper to avoid damaging other objects in the area that we didn’t want painted. For technique we kept the canister about a meter away from the objects to get a smooth finish and ensure the paint got into all areas of the object, nooks and crannies included.
Set design plays a huge role in this brief and our shoot. WE spent a good half an hour playing around with our objects composition before we even touched the camera. This is to ensure our time in the studio would be efficient and effective. Often working in a studio can be costly if you rent it out as an artist, therefore this was good practise for our photographic careers. Experimenting with composition in groups was helpful as it got multiple people’s opinions thrown into the mix. Everyone sees things in different ways so for an ad campaign that many people are going to see it’s important that you create something that can be liked by the many as opposed to just the artist’s personal preference. Working in groups practically eliminates this issue.
The shoot itself went very well, our planning paid off and we executed our pre planned compositions quick enough to experiment further. Using a professional setup based around capture1 meant that all members of our team had a job to do that we could all focus on and hopefully perfect. For example, one on the mac reviewing images and pressing the shutter button, one behind the camera making alterations to focal length, points and framing the images, one managing the set forming the compositions and finally a fourth man on the lighting systems. This system meant communications was vital which it took a little while to get used to but we got there in the end. The only issue we had was a technical one with the connections from the camera to the computer which stopped us from pressing the shutter. This was a quick fix but it did cost us a few minutes of studio time. If we were to use this system in the studio again I would be interested to see what it would be like with a live subject. It would create more openings in the team like props/costume person and also likely someone in a director’s role instructing the model on the fly, inevitably ramping up the intensity and speed of the shoot.
Finished Product Evaluation:
Do your images successfully reflect the style the brief asked you to create?
My images do indeed fulfil the brief to the maximum, the client asked for an emphasis on their new line of spray paints shown by the bright and enthusiastic colour palette within the image. (used Montana paint to create set). Also I incorporated their slogan into the image but unfortunately one of the cans themselves were unavailable to me.
What are the similarities to the images in the brief and your own?
The two primary constants are, one, they both contain seemingly mandarin objects, and two, they both contain colour that covers everything in the image, resulting in a very tightly constricted and controlled colour palette.
What are the differences?
The objects in the brief coincide with some kind of theme for each individual image, one with golf, one with badminton and a third with exercise/sport related objects. This gives the images a context and purpose, unfortunately for our shoot we had a limited number of objects available to us and so couldn't really adhere to this trend. We attempted to go for objects related to creation and media, tying in with the “Paint & Create” slogan but I believe we could have been far more effective at this if we sourced our objects a little better (that being said we struck gold with the SLR)
Does the logo and slogan fit well in the image? Why this specific typeface? How did you manipulate the typeface in the image?
The logo was relatively easy to get looking right in the image, due to the considerably empty space towards the bottom of the image I went with a large size and central position to match the symmetry of the colours in the image. The slogan took slightly more thinking, I knew with the space I had left it would need to go to the right handside, either above or below the disc, I tried putting one word above and one below but it split the text up too much, I wanted to keep it fairly close together and in a large font to jump out at the audience as well as become a feature of the image in itself. My selected typeface is elegant, relaxed and flowing (like drawing or painting) while also been bold and affirming at the same time, I kept it as close to white as I could get without having the distraction of a pure with against blue and pink while also addition a 3D aspect to ensure its the first thing the clientele sees and for extra character in the image.
Are you happy with the logo and slogan? how could they be improved?
I am pleased with how this mini brief turned out however there are a few improvements I could think of making if i had more time. First I would move the disc slightly down and to the right allowing for space for my typeface to flow into as they are currently too close together. I would also experiment with the logo and present it in a more creative way such as making it look like the the current logo was a stencil, it had been placed on the image and then spray painted over (in matching pink or black). Then the stencil had been removed revealing the blue unpainted print of the logo on the image, tying in with the briefs theme of spray paint.
Did you crop your image?
Thankfully I didn't need to crop any of my images as we got our framing bang on in-camera to save us all time in post production (valuable lesson that has been drilled into us over the past 14 months)
The Edit - Creation Process
Unfortunately my screenshots I captured while editing this final piece have been lost due to a corrupted memory stick, as a result I will try to type out the process I took from the bare image in camera to what you see above.
1) Selected the image I wanted to work with and bought it into photoshop, changed the orientation to portrait.
2) Using either clone stamp, paint brush or spot healing I began to retouch the image, removing any blemishes or places where the paint had chipped off (especially the strap looks on the camera and the bottom of the TV remote.
3) Removed the tramlines in our chipboard base as they were very distracting in the image and didn't adhere to the clean look I wanted to end with.
4) Began to edit the image in camera RAW filter primarily but also using levels and curves adjustment layers as a secondary. Vibrance was important for the image as I needed to bring the colours from being quite muted to really popping, as a result vibrance was increased (not saturation) along with contrast sharpness, and a touch of clarity. After that any other alteration were incredibly minimal in all kinds of areas.
5) Imported the logo from my source, stripped it of its white backdrop using the selection tools and inversing that selection of the layer then pressing DLT. Then sorted its size and positioning.
6) Experimented with typeface and text positioning (ended up with around 120pt). Duplicated my text layers, applied a ‘difference’ blend mode and moved it out and back slightly to create illusion of a shadow / 3D text.
7) Made final alterations, double checked my retouching and applied blending modes to layers to achieve my desired look.
0 notes