#api11
Explore tagged Tumblr posts
Visit Tumblr Blog
Explore Tumblr blogs with no restrictions, modern design and the best experience.
Last Seen Tumblr Blogs


Fun Fact
In 2020, Tumblr had 29.4 million users in the US.
Text
How to use HarmonyOS NEXT - @Provide and @Consume?
@Provide and @Consume are used for two-way data synchronization with future generations of components, and for scenarios where state data is transmitted between multiple levels. Different from the above-mentioned transfer between father and son components through named parameter mechanism, @Provide and @Consume get rid of the constraints of parameter transfer mechanism and realize cross-level transfer.
Among them, the variable decorated by @Provide is in the ancestor component, which can be understood as a state variable that is "provided" to future generations. The variable decorated by @Consume is the variable provided by the ancestor component in the descendant component.
@Provide/@Consume is a two-way synchronization across component levels. Before reading the @Provide and @Consume documents, it is recommended that developers have a basic understanding of the basic syntax and custom components of the UI paradigm. It is recommended to read in advance: basic syntax overview, declarative UI description, custom components-creating custom components.
The status variable decorated by @Provide/@Consume has the following characteristics:
The state variable decorated by-@Provide is automatically available to all its descendant components, that is, the variable is "provided" to his descendant components. Thus, the convenience of @Provide is that developers don't need to pass variables between components many times.
Descendants use @Consume to obtain variables provided by @Provide, and establish two-way data synchronization between @Provide and @Consume. Unlike @State/@Link, the former can be passed between multi-level parent-child components.
@Provide and @Consume can be bound by the same variable name or the same variable alias, suggesting the same type, otherwise implicit type conversion will occur, resulting in abnormal application behavior.
@Provide/@Consume must specify the type, and the variable types that allow decoration are as follows:
Object, class, string, number, boolean, enum types, and arrays of these types.
Date type is supported.
API11 and above support Map and Set types.
Support the union types defined by the ArkUI framework, such as Length, ResourceStr and ResourceColor.
The type of @Consume variable of-@Provide variable must be the same.
any is not supported.
API11 and above support the union types of the above supported types, such as string | number, string | undefined or ClassA | null. For an example, see @Provide_and_Consume for an example of supporting union types.
Code example [code] // Bound by the same variable name @Provide a: number = 0; @Consume a: number;
// Bound by the same variable alias @Provide('a') b: number = 0; @Consume('a') c: number; [/code]
Code example ProvideConsumePage [code] import { SonComponent } from './components/SonComponent';
@Entry @Component struct ProvideConsumePage { @State message: string = '@Provide and @Consume'; @Provide('count') stateCount: number = 0
build() { Column({space:10}) { Text(this.message) .fontSize(20) .fontWeight(FontWeight.Bold) Button('增加次数').onClick(()=>{ this.stateCount++ }) Text('stateCount='+this.stateCount) SonComponent() } .height('100%') .width('100%')
} } [/code] SonComponent [code] import { GrandsonComponent } from './GrandsonComponent'
@Component export struct SonComponent { build() { Column({ space: 10 }) { Text('这是子组件') GrandsonComponent() } .width('100%') .padding(10) .backgroundColor(Color.Orange)
} } [/code] GrandsonComponent [code] @Component export struct GrandsonComponent { @Consume('count') grandsonCount: number
build() { Column({space:10}){ Text('孙组件') Button('增加次数').onClick(()=>{ this.grandsonCount++ }) Text('grandsonCount='+this.grandsonCount) } .width('100%') .padding(10) .backgroundColor('#EEEEEE') } } [/code]
0 notes
Text
Plano de Ligação API 11
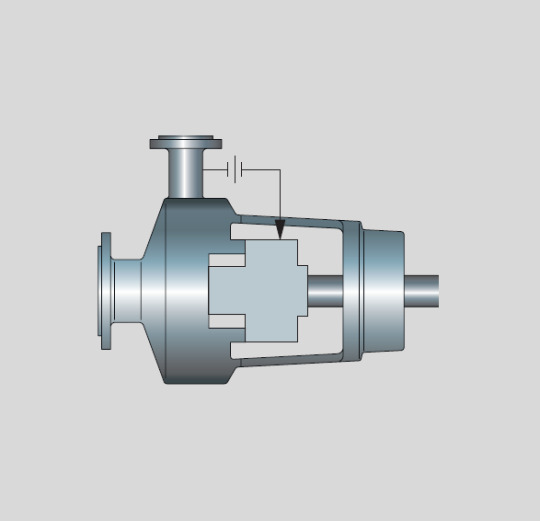
API 11
Plano de ligação para selos mecânicos simples, onde a circulação e refrigeração do selo mecânico são feitos pelo próprio fluido do processo, através de uma tubulação conectada do recalque da bomba (descarga) para a caixa de selagem ou sobreposta.
Neste plano de ligação a sobreposta do selo mecânico possui apenas uma conexão, mas a ligação também pode ser feita com a conexão da caixa de selagem, ambos com utilização de orifício calibrado ou não.
O plano de ligação API 11 pode ser combinado com outros planos de ligação como, por exemplo, o plano API 62 (quench e dreno).
Esse plano de ligação é utilizado principalmente em fluidos limpos e frios.
Para mais informações sobre referências de fluidos frios, quentes, sujos e limpos ver notas abaixo:
Notas:
Fluidos frios até 60 ºC.
Fluidos extremamente quentes acima de 100 ºC.
Fluidos limpos até 3% de sólidos para faces em carbono duro e 7% para faces em cabertos (tungstênio / silício).
Fluidos extremamente sujos acima de 30% de sólidos.
Espero que o artigo tenha ajudado a esclarecer suas dúvidas, mas caso tenham interesse em mais informações entre em contato pelos canais abaixo.
Não esqueçam de seguir a página da LEDES Consultoria para ficarem por dentro dos assuntos que postamos semanalmente:
https://www.linkedin.com/company/ledesconsultoria/
LEDES - Consultoria Especialista em Selos Mecânicos
Para consultoria e treinamento entre em contato via
Fone / WhatsApp (19) 9 9607 3360
e-mail: [email protected]
www.ledesconsultoria.com.br
https://www.facebook.com/ledesconsultoria/
https://www.instagram.com/ledesconsultoria/
http://www.linkedin.com/ederledes
https://www.tumblr.com/blog/ledesconsultoria
#consultoria#mecanico#consultor#bomba#bombacentrifuga#bombas#aplicação#api11#selo#selos#engenharia#ledesconsultoria#treinamento
0 notes
Text
android app namespace에 관하여
original source : https://stackoverflow.com/a/26692768
The app namespace is not specific to a library, but it is used for all attributes defined in your app, whether by your code or by libraries you import, effectively making a single global namespace for custom attributes - i.e., attributes not defined by the android system.In this case, the appcompat-v7 library uses custom attributes mirroring the android: namespace ones to support prior versions of android (for example: android:showAsAction was only added in API11, but app:showAsAction (being provided as part of your application) works on all API levels your app does) - obviously using the android:showAsAction wouldn't work on API levels where that attribute is not defined.
original source : https://stackoverflow.com/a/38493589
Xmlns stands for 'XML Namespace'
The part after ':' is the prefix for the Namespace
The part after '=' is the Namespace URI (the correct name for his part is actually "Namespace name").
(For further details see https://en.wikipedia.org/wiki/XML_namespace)
The namespace 'schemas.android.com/tools' is for specifying options to build the app by Android Studio, and are not included in the final app package
The namespace 'schemas.android.com/apk/res-auto' is used for all custom attributes - defined in libraries or in code. See this answer for details.
Note that any prefix can be used for a namespace, it is not mandatory to use 'app' for schemas.android.com/apk/res-auto. But the same prefix must be used when defining the custom attributes in the document, otherwise an error will be shown.
So, because met_maxCharacters is a custom attribute, it is shown when the 'schemas.android.com/apk/res-auto' namespace is used, and not with 'schemas.android.com/tools'
0 notes
Text
Random whosits.
1542812006 MetaTrader 5 build 1781.2, model: iPhone9,2, os: 12.1, free: 6128.70 mb, id: 892779699, timeoff: -21600, timeerr: 0.14 sec
08:53:26 MetaTrader 5 build 1781 (64-bit) rev.2 started on iPhone9,2 (arm64)
08:53:26 whitelabel synchronization started
08:53:26 whitelabel updating from api11.mql5.com
08:53:26 ‘501141’: connected to Larson-Real through Access Server
08:53:26 whitelabel: updating…
View On WordPress
0 notes
Text
How to use HarmonyOS NEXT - @Prop and @Link?
@Prop decorator: one-way synchronization between father and son @Link decorator: father-son two-way synchronization
The variable decorated by @Prop establishes a one-way synchronization relationship with the parent component; The @ prop variable is allowed to be modified locally, but the modified changes will not be synchronized back to the parent component. When the data source changes, the variables decorated by @Prop will be updated, and all local changes will be overwritten. Therefore, the synchronization of numerical values is from the parent component to the child component (belonging component), and the change of numerical values of the child component will not be synchronized to the parent component.
A variable decorated with @Link shares the same value with the data source in its parent component.
summary The variable decorated with @ prop can establish a one-way synchronization relationship with the parent component. Variables decorated with @Prop are mutable, but changes are not synchronized back to their parent components. The variable decorated with @ link can establish a two-way synchronization relationship with the parent component.
@Prop decorative variable restrictions: When @Prop decorates variables, it will be copied deeply. In the process of copying, except for basic types, Map, Set, Date and Array, all types will be lost. For example, complex types provided by NAPI, such as PixelMap, are partially implemented on the Native side, so it is impossible to obtain complete data on the ArkTS side through deep copy.
@Link decorative variable restrictions: The link decorator cannot be used in a custom component decorated by @Entry. link decorated variables are forbidden to be initialized locally, otherwise an error will be reported at compile time. The type of link decorated variable should be consistent with the data source type, otherwise the framework will throw a runtime error.
@Prop variable decorator must specify the type, and the variable types allowed to be decorated are as follows: ·Object, class, string, number, boolean, enum types, and arrays of these types. Does not support any, supports undefined and null. ·Support Date type. ·API11 and above support Map and Set types. ·Support the joint types defined by the ArkUI framework, such as Length, ResourceStr and ResourceColor.
@Prop and data source types need to be the same. There are three situations:
When the variable decorated by-@Prop is synchronized with @State and other decorators, both types must be the same. For example, please refer to the synchronization of simple data types from parent component @State to child component @Prop.
When the variable decorated with-@Prop is synchronized with the items of @State and other arrays decorated with decorators, the type of @Prop needs to be the same as the array items decorated with @State, such as @Prop: T and @State: Array. For an example, please refer to the synchronization from the items in the array of parent component @State to the simple data type of child component @Prop.
When the parent component state variable is Object or class, the attribute type of the @Prop decorated variable is the same as that of the parent component state variable. For example, please refer to the synchronization from the @State class object attribute in the parent component to the @Prop simple type.
Prop supports federated type instances: @Prop supports joint types and undefined and null. In the following example, the animal type is Animals | undefined. Click the Button in the parent component Zoo to change the attribute or type of animal, and the Child will be refreshed accordingly.
Link supports federated type instances: @Link supports union types and undefined and null. In the following example, the name type is string | undefined. Click the Button in the parent component Index to change the attribute or type of the name, and the Child will be refreshed accordingly.
Code example PropLinkPage [code] import { LinkComponent } from './components/LinkComponent'; import { PropComponent } from './components/PropComponent';
@Entry @Component struct PropLinkPage { @State message: string = '@Prop and @Link'; @State stateCount:number=0;
build() { Column({space:10}) { Text(this.message) .fontSize(20) .fontWeight(FontWeight.Bold) Button('增加次数').onClick(()=>{ this.stateCount++ }) Text('stateCount='+this.stateCount) PropComponent({propCount:this.stateCount}) LinkComponent({linkCount:this.stateCount}) } .height('100%') .width('100%')
} } [/code] PropComponent [code] @Component export struct PropComponent{ @Prop propCount:number=0 build() { Column({space:10}){ Text('Prop子组件') Button('增加次数').onClick(()=>{ this.propCount++ }) Text('propCount='+this.propCount) } .width('100%') .padding(10) .backgroundColor(Color.Orange) } } [/code] LinkComponent [code] @Component export struct LinkComponent{ @Link linkCount:number build() { Column({space:10}){ Text('Link子组件') Button('增加次数').onClick(()=>{ this.linkCount++ }) Text('linkCount='+this.linkCount) } .width('100%') .padding(10) .backgroundColor(Color.Pink)
} } [/code]
0 notes
Text
O que é selo mecânico cartucho e quando utilizar?

Olá pessoal! O assunto hoje é selo mecânico cartucho!
Primeiramente vamos esclarecer o que é o conceito “cartucho.
Cartucho nada mais é que um selo mecânico pronto para montagem, diferentemente dos selos mecânicos componentes (peças soltas) que precisam de pré-montagem do equipamento para definir o aperto correto do conjunto de compensação (aperto das molas).
Ao contrário do que muitos pensam, selo mecânico cartucho não é um tipo específico e sim uma concepção de projeto para que fique mais fácil sua montagem, ou seja, muitos tipos de selos mecânicos podem ser montados como componentes e também na versão “cartucho”.
Observação: Em alguns casos específicos o tipo de selo mecânico é apenas cartucho, não sendo possível a montagem de suas partes como selo componente.
Os selos mecânicos cartuchos são utilizados basicamente nas seguintes condições:
1ª - Agilidade na montagem e eliminar desvios na “medida de aperto”;
2ª - Quando os equipamentos precisam ser ajustados e não podem ser desmontados novamente para instalação do selo mecânico;
3ª - Padronização do estoque.
A sequência de montagem de um selo mecânico cartucho normalmente é a seguinte:
1º - Montagem no eixo do equipamento;
2º - Montagem total do equipamento com seus devidos ajustes;
3º - Aperto dos prisioneiros (parafusos) da sobreposta;
4º - Aperto dos parafusos de arrasto do anel de arrasto (colar);
5º - Interligação do plano de selagem (Ex.: Plano API 11);
6º - Soltar as travas de fixação (transporte).
Espero que o artigo tenha ajudado a esclarecer suas dúvidas, mas caso tenham interesse em mais informações entre em contato pelos canais abaixo.
Não esqueçam de seguir a página da LEDES Consultoria para ficarem por dentro dos assuntos que postamos semanalmente:
https://www.linkedin.com/company/ledesconsultoria/
LEDES - Consultoria Especialista em Selos Mecânicos
Para consultoria e treinamento entre em contato via 📱(19) 996 073 360 / [email protected]
www.ledesconsultoria.com.br
https://www.facebook.com/ledesconsultoria/
https://www.instagram.com/ledesconsultoria/
http://www.linkedin.com/ederledes
https://www.tumblr.com/blog/ledesconsultoria
#cartucho#componente#selo#selos#analise#mecanico#consultoria#consultor#bomba#bombas#borracha#Bombacaldeira#bombacentrifuga#api11#aplicações#aplicação
0 notes
Text
Planos de ligação API (selos simples)

Planos de ligação API
Exemplos básicos de sistemas de selagem para selos simples
Nesta publicação vamos comentar os planos de selagem para selos simples mais comuns do mercado, tendo em vista uma didática mais simples para que todos consigam absorver as informações e realmente possam aplicar no seu dia-a-dia.
Normalmente para o selo mecânico funcionar corretamente, sua lubrificação, refrigeração e limpeza deverão ser otimizados. Devemos levar em consideração o tipo do fluido a ser selado, o tipo de selo mecânico utilizado, o tipo de equipamento em que os selos mecânicos serão montados e as condições de proteção ambiental exigidas.
Muitas vezes uma simples mudança na instalação no plano de selagem aumenta a vida útil do selo mecânico, como por exemplo uma ligação com um tubo do recalque da bomba até a sobreposta (Plano API 11). Essa pequena alteração aumenta a circulação de fluido na caixa de selagem, proporcionando uma melhor lubrificação e refrigeração nas faces do selo mecânico.
À medida que as demandas operacionais aumentam, os planos de selagem devem ser alterados para melhor apoiar o funcionamento do selo mecânico.
Abaixo seguem informações necessárias para a seleção correta de sistemas de selagem e os equipamentos auxiliares utilizados para garantir um funcionamento ideal dos selos mecânicos.
Circulação / Flush - Para selos simples é geralmente aconselhável instalar uma tubulação de circulação / flush para a caixa de selagem ou sobreposta do selo mecânico, obedecendo às seguintes condições:
Fluidos limpos e frios
Plano API 11 (recalque >> sobreposta).
Fluidos sujos e quentes
Plano API 13 (sucção >> sobreposta).
Fluidos limpos e extremamente quentes
Plano API 21 (recalque >> trocador de calor >> sobreposta).
Fluidos limpos e extremamente quentes
Plano API 23 (sobreposta >> trocador de calor >> sobreposta).
Fluidos extremamente sujos e frios
Plano API 32 (fluido limpo de fonte externa >> sobreposta) - o processo deve permitir injeção de fluido externo.
Fluidos extremamente sujos e extremamente quentes
Plano API 41 (recalque >> separador de sólidos >> trocador de calor >> sobreposta).
Quench
Sistema de limpeza com vapor, água ou gás utilizados normalmente em fluidos que cristalizam ou geram resíduos sólidos no micro vazamento das faces de selagem.
Importante ressaltar que a limpeza é apenas externa ao processo e em nenhum momento tem contato com o fluido do processo.
Fluidos frios
Plano API 62 (recalque da bomba >> sobreposta com água* ou gás*).
Fluidos quentes
Plano API 62 (recalque da bomba >> sobreposta com vapor*).
Notas:
A tubulação utilizada deve ser informada pelo fabricante do selo mecânico, pois cada condição de operação define uma bitola.
Fluidos frios até 60 ºC.
Fluidos extremamente quentes acima de 100 ºC.
Fluidos limpos até 3% de sólidos para faces em carbono duro e 7% para faces em cabertos (tungstênio / silício).
Fluidos extremamente sujos acima de 30% de sólidos.
* a compatibilidade química deve ser analisada.
Em breve postaremos outros planos de ligação mais usados em selos mecânicos duplos.
LEDES - Consultoria Especialista em Selos Mecânicos
Para treinamento e consultoria entre em contato via 📱(19) 996 073 360
http://www.linkedin.com/ederledes
https://www.facebook.com/ledesconsultoria/
https://www.instagram.com/ledesconsultoria/
https://www.tumblr.com/blog/ledesconsultoria
#planoapi#planodeligacao#planodeselagem#tubulacao#bomba#bombas#bombacentrifuga#bombascentrifugas#bombafora#consultoria#mecanico#consultor#confiabilidade#selosmecanicos#selo#selos#selomecanico#selovazou#api11#api13#api32#api21#api23#api41#api62
0 notes