#atmega32
Explore tagged Tumblr posts
Visit Tumblr Blog
Explore Tumblr blogs with no restrictions, modern design and the best experience.
Last Seen Tumblr Blogs


Fun Fact
Tumblr was the first site to host the blog for President Barack Obama in 2011.
Text
Build a Digital Thermometer with ATmega 32, LM35 & Arduino
Learn to design and build a digital thermometer using ATmega 32, LM35 sensor, and Arduino in this practical online course on EasyShiksha. Perfect for electronics enthusiasts and aspiring engineers looking to gain hands-on experience with sensors and microcontrollers. Enroll today and start building!
0 notes
Text

AT25DF041A-SSHF-B for Atmel Flash IC Distributor We not produce chip,just distribute them,so all of the chip we provided is from original manufacturer.Specification or datasheet can be checked from official web. Online price is for refference,usually different quantity,price difference.Since price sometimes is changing,welcome chat with us via whatsapp to inquire the latest price. We not only sell this atmel flash chip,but also available to supply other electronic components stock,have a view here. Note:There are thousands of inventory stock not list online yet,below share you partial list of the flash ic: - atmega162 16au - atmega32a pu - atmega16 16pu - atmega32 16pu - attiny84 20pu - atmel at89c51 - atmel at89c2051 - at89s8253 microcontroller - atmega88 15ad - atmel at89c4051 - atmel at89s52 microcontroller ...... Therefore,if you also look for electronic components distributor,like power ic,memory ic,flash ic, logic ic,wifi chip,control chip or others.Welcome chat with us to talk via whatsapp online. if you didn't find the parts number online,welcome drop us email to talk. Read the full article
0 notes
Photo

Just spend 2 minutes to read our blog. Till that give rest to your finger.
Visit: http://bit.ly/2FZaZoM to know the uses of ATMEGA 32…
#embeddedschool#embeddedtraininginstitute#traininginstitute#reskilling#atmel#atmega32#atmega32uses#atmelavrfeatures
0 notes
Text
Tutorial CVAVR Atmega16/Atmega32 Kumpulan Simulasi Proteus 8
Tutorial CVAVR Atmega16/Atmega32 Kumpulan Simulasi Proteus 8
Sebelumnya saya sudah membagikan kumpulan proyek simulasi arduino dengan proteus 8 dan kali ini saya akan bagikan berbagai macam simulasi CVAVR dengan Atmega16/Atmega32 dengan proteus 8 juga. terdapat beberapa simulasi yang lancar dijalankan namun ada juga yang penerapanya lancar tapi di simulasi tidak berjalan lancar. untuk itu jika kalian memliki sistem minimum atmega16 atau atmega32 wajib…

View On WordPress
#Simulasi CVAVR Atmega16/Atmega32 ADC#Simulasi CVAVR Atmega16/Atmega32 DHT11#Simulasi CVAVR Atmega16/Atmega32 Keypad 4x3#Simulasi CVAVR Atmega16/Atmega32 LCD 16x2#Simulasi CVAVR Atmega16/Atmega32 LCD 16x2 I2C#Simulasi CVAVR Atmega16/Atmega32 Motor DC#Simulasi CVAVR Atmega16/Atmega32 Running LED#Simulasi CVAVR Atmega16/Atmega32 Sensor LDR#Simulasi CVAVR Atmega16/Atmega32 Sensor LM35#Simulasi CVAVR Atmega16/Atmega32 Seven Segment
0 notes
Text
Basic c programmering atmega32
når du kjører arduino.cc , du putter in kode blokker. når compileren leser igjenom ,lager den en objekt file. en tilsvarende del kalt linker , sammenligner objekt filen med c programerings bibliotekene. jobber du med atmega 32 vil første bibloteket være io.h lib. fordi den forteller linkeren hvordan denne typen cpu arkitektur skal håndteres. ofte leser den å skriver til litt annerledes steder i henhold til andre arkitekturer. dette er med å påvirker hvoran resten blir lest, å skreve. til cpuen. Som de fleste vet vil forskjelige arduino ha forskjelige arkitekturer. da trenger du forskjelig start bibliotek. til linkeren. av å til setter cpuen begrensninger. det kommer ikke en feil melding en gang.
0 notes
Photo

📷 IR Temperature Sensor module . . . . . . . 💻 MLX90614ESF is an infrared thermometer for non-contact temperature measurements. It can use with any microcontroller that can communicate with it through it's I2C interface. . . . #microcontroller #sensor #arduino #armcortexm4 #embeddedsystems #engineersasylum #electronics #electronicsengineer #electronicengineering #atmega32 #diyelectronics #raspberrypi #raspberrypizero #raspberrypi2 #raspberrypi3 #digitalelectronics #analogelectronics #sensors https://www.instagram.com/p/BrXAv-sH-4m/?utm_source=ig_tumblr_share&igshid=djr9h2zyv09q
#microcontroller#sensor#arduino#armcortexm4#embeddedsystems#engineersasylum#electronics#electronicsengineer#electronicengineering#atmega32#diyelectronics#raspberrypi#raspberrypizero#raspberrypi2#raspberrypi3#digitalelectronics#analogelectronics#sensors
0 notes
Photo

Display Oled for sensor diabetes #mikrokontroller #microcontroller #microcontrollers #projekakhir #atmega328 #arduino #microprocesor #mikroprosesor #interfacing #skripsi #tesis #usu #Fmipausu #fmipa #robotik #robotic #avr #bahasc #laboratoriumterpadu #universitassunaterautara #anakkampus #hobby #hobbyaja #elektronik #electronic #jalancempaka #tanjungsari #medan #anakmedan #hobielektronik #solder #timah #sensor #belajarelektronik #belajarprogram #atmega8535 #atmega32 #atmega16 #chip #tukangsolder #anaklangkat #tanjungpura #bajakuning #kabupatenlangkat #akusisidata
#elektronik#timah#projekakhir#bahasc#mikrokontroller#microcontroller#hobby#tukangsolder#fmipa#arduino#tanjungpura#tesis#hobielektronik#atmega8535#electronic#universitassunaterautara#jalancempaka#belajarelektronik#atmega32#laboratoriumterpadu#medan#fmipausu#robotic#anaklangkat#robotik#mikroprosesor#solder#interfacing#sensor#anakmedan
0 notes
Text
Intro to Embedded Systems with AVR ATMEGA32 https://courseunity.com/free-courses/intro-to-embedded-systems-with-avr-atmega32/?feed_id=687&_unique_id=63af0070de89a #udemycourse #udemycourses #onlinecourses #onlineclasses #udemy #udemyfree #onlinelearningcourse #onlinecertification #courseunity
0 notes
Text
Arduino 1.8.5 themes

It generates the clock, acts like a serial port, acts like a disk drive, and so on. The little computer project uses a real Z80 chip and uses an ATMega32A for almost all the support functions. In another way, it is very difficult because the tools want to help you so badly. How hard can it be to update the buffer? In one way, it is trivial. It did seem to work with the default 64-byte buffer, but XModem sends more data than that and it would be easy to imagine it getting overrun. But the upshot was that for XModem transfers, felt like the default Arduino serial buffer wasn’t big enough to be reliable. Details are available in a discussion on Hackaday.io, if you really want to follow it. I won’t bore you with the details about getting the board to work since you will only care if you have one. The Issue: Arduino Serial Buffer Size Limit It’s a trick worth knowing as it will come in handy beyond this single problem. What I ended up with is a way to make your own menus in the Arduino IDE to set compiler options based on the target hardware for the project. I wanted better, and that sent me down a Saturday morning rabbit hole. It looked like the best bet was to do Intel hex files and transfer them copy and paste across the terminal. The only problem was there were not many good options for transferring data back and forth to the PC. But I finally found time to finish it and had CP/M booted up. I got the PCB and - you guessed it - it sat some more, partially assembled. The parts sat partially assembled for a while and then a PCB came out for it. I rarely have time to build things I write about, but I really wanted to try this little computer. A while back I’d written about the $4 Z80 computer by. No matter how you craft your personal environment, the minute your code hits the Internet, someone will try to use it in the IDE. But when you produce things for other people to use, you almost can’t ignore it. On the other hand, I was impressed with how extensible it was if you can dig out the details of how it works internally.įirst, you might wonder why I use the IDE. On the one hand, I despise the lackluster editor for hiding too much detail from me and providing little in the way of useful tools. The solution I arrived at might help you do some other things, so even if you don’t need that exact feature, you still might find it useful to see what I did.įollowing this experience I am genuinely torn. I realized just how much heartburn the other day when I wanted to something very simple: increase the receive buffer on an ATmega32 serial port. But the original IDE always gives me heartburn.
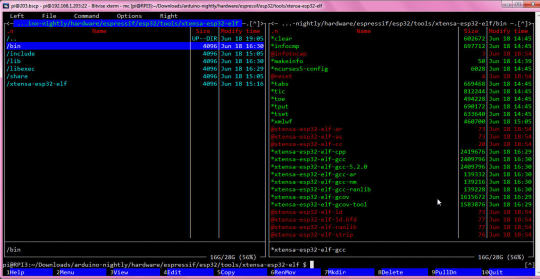
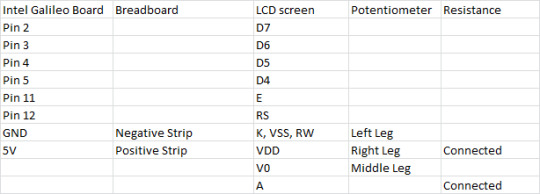
Granted, these days you have more options with the pro IDE and Platform IO, for example. It is pretty well-known that I’m not a big fan of the Arduino infrastructure. Locks and security are our bread and butter, so enjoy some physical key appreciation and digital lock love. We are in advanced territory now, but keep this inspiration train going and drop us a tip to share something you make with this miniature deadbolt. You will be compiling your sketch in Arduino’s IDE, but uploading through ST-Link across some wires you will have to solder. There are a couple of tables for the controller pins and header for your convenience.
The Github upload instructions are illustrated, and you know we appreciate documentation. Three, it’s a piece of (minimal) security hardware, but who knows where that can scale. Two, someone saw a tool they wanted to control and made it happen.
One, the Arduino banner covers a lot of programmable hardware, and it is a powerful tool in a hardware hacker’s belt. connected a Rothult unit to the Arduino IDE in response to Ripping up a Rothult. We are continuously inspired by our readers which is why we share what we love, and that inspiration flows both ways.
0 notes
Text
Free Download Sistem Minimum Atmega 16 / Atmega 32 PCB Layout
Free Download Sistem Minimum Atmega 16 / Atmega 32 PCB Layout
Hello sahabat anak kendali kesempatan kali ini saya akan membagikan rangkaian sistem minimum Atmega 16 versi ke 2 yang dibuat menggunakan aplikasi EAGLE. disini saya akan membagikan design pcb sismin Atmega 16 secara gratis, dan saya perbolehkan untuk kamu me redesign atau mencetak langsung PCB nya. sebelumnya juga saya sudah membuat design board pcb sismin Atmega 16 namun perbedaanya hanya…
View On WordPress
#Desain PCB Sismin Atmega16#Desain PCB Sismin Atmega32#Eagle Sismin Atmega#PCB Layout Sistem Minimum Atmega16#PCB Layout Sistem Minimum Atmega32#Sismin Atmega16#Sismin Atmega32
0 notes
Text
Keychron Q1 Wired 75% Mechanical Keyboard Review: The Hotswap Mechanical Keyboard for Perfectionists
Keychron Q1
8.80 / 10
Read Reviews
Read More Reviews
Shop Now
An excellent keyboard by any standard.
Key Features
Tenkeyless
All metal construction
QMK and VIA compatibility
Gasket-mounted plate
Specifications
Brand: Keychron
Wireless: No
Backlight: RGB SMD
Media Controls: Yes
Num Pad: No, TKL
Switch Type: Gateron Phantom
Replaceable Keys: Modular hotswap
Pros
Stable and solid typing
Outstanding build quality
Ultra heavy base
Programmable keys and backlight
Cons
Expensive
Not travel friendly
Not wireless
Extremely thick
Buy This Product
Keychron Q1 other
Shop
// Bottom
As a veteran keyboard builder, I love the $169 Keychron Q1 75% ten-keyless (TKL) keyboard. Its near-perfect typing experience dominates the competition. While it's not right for those who need ergonomics and Bluetooth, it's perfect for typists who don't need a ten-key keypad.
Is the Keychron Q1 Mechanical Keyboard Right for You?
While wowing me with its marvelous and muted typing experience, the Q1 isn't without flaw.
If you're looking for the heaviest 75%, modular, hot-swap keyboard, it's the best in its class. But for those of you looking for ergonomics or wireless, there are more suitable options. A strong candidate that covers ergonomics and wireless is the Kinesis Freestyle2, a split mechanical keyboard.
Who Are Keychron?
Before I get into the pros and cons, you might want to know more about the company behind the Q1. Keychron is a newcomer to the mech market with a reputation for quality. Its first designs focused on products for the Mac. But it's since moved on to building general-use keyboards.
The Keychron Q1 is their newest flagship product, this time catering to the high-end, enthusiast market. Their selling point here isn't just hotswap sockets. Keychron has distinguished itself from the competition with an ultra-heavy case. To my knowledge, this is one of the heaviest 75-key keyboards ever made and probably one of the most gravity-challenged keyboards of 2021, period.
Although gasket-mounted plates, and other typist-oriented features, appear in multiple keyboards, such as the Mojo68, the Rama Works Kara, and the Ikki68 Aurora, I haven't seen them paired with heavier framed designs. Considering that gaskets reduce the shock of bottoming out, I'm surprised to not see them used with keyboards designed for stability. Potentially a heavy case, gasket mounts, and Poron could mean the triple crown for a stable typing platform. To date, no keyboard combines those three components.
Hardware Specifications
Image Gallery (3 Images)
Expand
Expand
Expand
Close
Dimensions: 145 x 327.5 x 21.6 mm
Weight: ~1,600 grams
Plate: 6063 Aluminum
Switch type: Barebones or Gateron Phantom Red, Phantom Blue, Phantom Brown
Ports: USB Type-C (USB-C)
Case material: 6063 Aluminum
Case colors: Carbon Black, Space Gray, Navy Blue
Sockets: Kailh Hotswap
Keycaps: Double-shot ABS, top-key legends
Cable: Black, detachable, braided, coiled USB-C
Extras: Keycap puller, switch puller, extra "Poron" material, additional keys for macOS, optional rotary encoder
Modular Hotswap Sockets and Gateron Phantom Switches
Image Gallery (2 Images)
Expand
Expand
Close
Keychron offers three default keycaps to go with the latest Gateron Phantom series switches. To be honest, I can't tell the difference between the Phantom series and the Ink series (I reviewed the Ink series in 2020). Both have the same weights, actuation curves, and colored transparent switch housings. A more relevant comparison would be to compare regular 2021 Gaterons to the Phantom switches. In my initial testing, the difference seems to be the Phantoms are smoother. My guess is that Gateron used lower friction plastic or lubricant.
Keychron Q1 Teardown
A teardown of the Q1 reveals several innovative design features. My favorite is the ability to customize the specific level of shock absorption of the keyboard. But aside from that, there are three other components that Keychron used to great effect.
Poron Gasket-Mounted Plate
Image Gallery (3 Images)
Expand
Expand
Expand
Close
Gasket-mounted plate designs float the plate, PCB, and switches on top of a series of Poron-foam gaskets. Whenever you type, the gasket depresses, softening each keypress. Typing hard enough causes the entire plate to drop a millimeter or two. The effect causes a reduction in the harshness of bottoming a key out. Although the keycaps are not silenced, gaskets also chop down on typing sounds. That's because a special advantage of Poron over other kinds of foam is that it exhibits extreme energy muffling properties.
However, the substance that Keychron refers to as Poron looks and feels exactly like neoprene. I'm not sure whether Keychron used Poron on the inter. Then there's a denser layer of a kind of urethane foam that also appears to be a Poron layer. This layer pads the interior of the aluminum case.
Keychron included extra Poron in its kit. If you want, you can increase the amount of Poron between the plate and the base. However, I found that this actually increased the sensation of bottoming out of keys. After some experimentation, I found that fewer pieces of Poron improve the comfort of hard key presses.
Screw-In Stabilizers Vs. Plate-Mounted Stabilizers
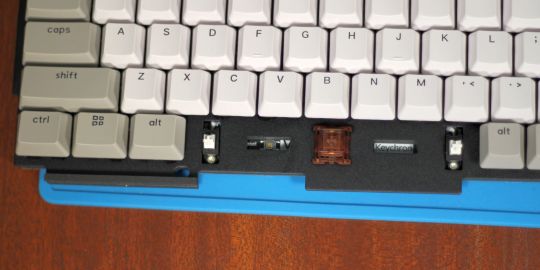
The biggest source of rattle and noise production on a keyboard is oftentimes the space bar. Different keyboard stabilizer types cause different kinds of problems though. Costar stabilizers are easier to remove but suffer from stability and noise issues. Cherry stabilizers produce less rattle but are difficult to service. Screw-in stabilizers offer the best of both. They produce less noise, are super stable, and aren't difficult to service.
Typing on the Q1's space bar feels, to overuse a word, solid. While screw-in stabilizers demonstrate a tremendous amount of side-to-side wiggle, the opposite is true of their typing stability. They are enormously stable, thanks to the fact that they are literally screwed into the motherboard. I suspect, though, that space bar removal is a big advantage here. It appears that the stabilizer's play allows for space bar removal from extreme angles. So you can pull it without the risk of damage to the keycap. I can't help but feel that screw-in stabilizers are the future of high-end keyboard design.
Poron Layer
Poron looks and feels like neoprene on first inspection. But pushing my finger into the material reveals the difference: Poron seems more durable and resistant compared to neoprene. Rather than yielding to touch as neoprene would, Poron feels almost solid and inflexible. I've read that there are different formulations of Poron, some offering consistency equivalent to neoprene.
The functional use of Poron on the base seems to further stabilize typing. I can't imagine there's a more stable typing machine out there.
Thick Aluminum Base
Image Gallery (2 Images)
Expand
Expand
Close
Another interesting feature Keychron's use of a weighted aluminum base. The base by itself weighs in at 872 grams, which is only 94 grams less than my steel-plate Varmilo VB87M 87-key keyboard. In other words, the base alone weighs more than a larger, steel-plated keyboard. The full keyboard weighs 1,623 grams, almost double my Varmilo.
The extremely heavy base makes for a stable, solid typing experience. Personally, I dislike the feel of metal-plate keyboards for touch typing. Because aluminum and steel are such great conductors of vibrations, you tend to feel on your other fingers whenever you strike a keycap. However, Keychron's approach here was to dampen each keypress while maintaining the solidity of a metal plate. The end result is solid and stable typing.
Lots of Customization Options
Keychron includes customization options for the case and switches. In future, two bare-bones models will be made: ISO and ANSI. At launch, though, only the case color and switches are customizable. The case colors include black, dark blue, and gray. As mentioned earlier, the switch options are a bit more interesting as they cover Gateron's latest switches: Phantom Red, Phantom Blue, and Phantom Brown.
QMK/VIA Support
The ultimate customization option is the ability to reprogram the keyboard from top to bottom. QMK or VIA can do just that, although it requires understanding how to flash your keyboard with firmware. It's not hard but there's a slight learning curve.
While I don't use VIA and have no familiarity with it, I am familiar with QMK. It's not hard to use, particularly if you're already familiar with flash ATMega32 processors. Those of you who have unlocked the bootloader of an Ender 3 will know what I mean.
But for those who do like to create their own custom layouts and color schemes, Keychron published their Q1 QMK source code on GitHub. The broad compatibility with QMK is probably because it uses an ATMega32 microchip, which is one of the most common processors used on QMK-supported keyboards. It's also commonly seen on 3D printers and other consumer electronics.
Backlighting and Animation Effects
Image Gallery (3 Images)
Expand
Expand
Expand
Close
The animation effects are about what you would expect on a high-end keyboard. The Q1 uses RGB SMDs instead of LEDs so there's a tremendous amount of color variation, like on all RBG backlit keyboard. However, it's worth noting that can set custom colors using QMK Configurator, so if you need a particular shade, that's possible. On top of that, there are numerous animations, including several multi-hued, rainbow-like variations.
While the backlight looks good, Keychron's standout feature is how they combined front-facing lighting with transparent switch housings. The combination allows for more intense animation effects, since the light is visible from the portion of the keyboard that faces the typist. However, while this is an interesting visual, I'd have preferred shine-through keycaps with front-printed lettering.
What's Not Good?
While great, not everything is perfect with the Keychron Q1.
No Function Layer Markings
Something I found irritating on the Q1: there are nonfunction layer markings on the keycaps. Because there's no documentation, this led to a lot of guesswork as to how to control backlights.
Expensive For a Keyboard in This Class
While $169 isn't the most expensive 75% keyboard, it's also a fair bit more expensive than the competition in this particular market segment. Razer, for example, sells a wired 75% for under $100. And while Razer's 75% isn't nearly as nice, $69 is enough to buy another low-end mechanical keyboard, such as the Vissles V84.
Front-Facing Lighting Paired with Top-Printed Legends
LED lighting scheme is designed for front-lit shine through keycaps.
That's partly by design as the keycaps aren't shine-through. The goal was to use a semi-transparent switch housing to allow for various visual effects.
No Capslock Status Indicator
Most keyboards include some kind of indicator that capslock is turned on. The Q1 doesn't provide any hint that you might be accidentally yelling at your friends and family over email.
The Future Will Mean Lower Prices
Gasket-mounted plates, screw-in stabilizers, and dampening material like silicone and Poron are the future. While the Keychron might seem like a good deal today at $169, next year there will be similar options for less money.
Should You Buy the Keychron Q1?
If you're looking for a high-end typist's keyboard, the Keychron Q1 beats the keycaps off the overpriced Razer BlackWidow. But if you want an ergonomic or wireless keyboard, look elsewhere.
For those looking for a low-cost hot-swap alternative, I suggest the Glorious Modular Mechanical Keyboard. The GMMK offers the same modular hot-swap design with a focus on entry-level keyboard enthusiasts.
Keychron Q1 Wired 75% Mechanical Keyboard Review: The Hotswap Mechanical Keyboard for Perfectionists published first on http://droneseco.tumblr.com/
0 notes
Photo

This badge📛gamifies the #Blockchain with a crypto puzzle, is easily reprogrammable, and can be worn on the wrist as well. #ATmega32 #Arduino #RaspberryPi #Coding
Learn More - ▶️ https://bit.ly/3yr50Tk
0 notes
Text

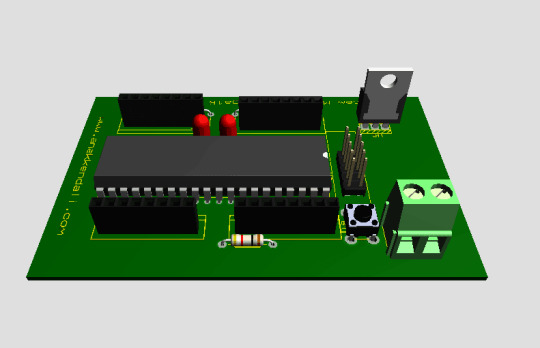
AVR ATmega16 Minimum System Development Module
In world where we have Arduino using ATmega microcontrollers with their own IDE one might feel there is no need to directly code ATmega MCUs and take advantage of them in prototyping and rapid development. With this AVR ATmega 16 Development module you can directly connect your DIP package ATmega16 IC without need of soldering in your DIY circuits. It has external power supply module to power up the MCU via DC-005 barrel jack connector. It also has two onboard LEDs one for power indication and other for program run indication. It also has 8MHz crystal onboard which can be replaced with any other crystal to change the clock frequency. You can expand power supply pins upto 4 peripherals with 8 pins onboard for this purpose. It also has standard ISP download interface to program the onboard chip.
Specifications
32 I/O pin all the leads.
Size:88mmx38mm/3.47"x1.49"(inch)
Classic ATmega16 minimum system, eliminating the hassle of soldering.
Crystal: The socket hole welding facilitate the buyer to replace the crystal, 8M crystal.
Power supply: power adapter or external expansion pin power supply (not support ISP download interface power supply)
DC-005 Power Block (supporting the transposon is 5.5*2.1mm).
Expand outside 4 channel VCC, GND.
Reset: Power-on reset and reset button.
Power LED (D1) and the program run indicator (D2).
Standard ISP download interface.
Support chips: ATmega16/ATmega32 and chip which pin-compatible.
Buy this Development Module: https://quartzcomponents.com/products/avr-atmega16-minimum-system-development-module
0 notes
Photo
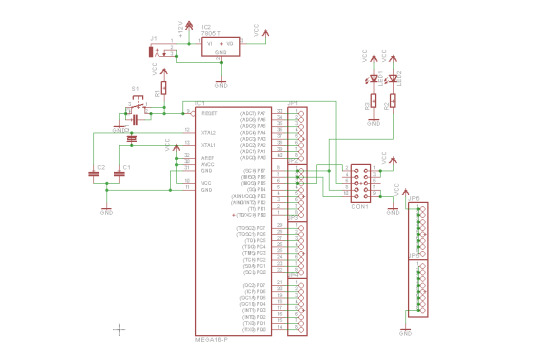
Download File Skematik dan Layout PCB Sismin Atmega16 / Atmega32 Proteus8 Ares
0 notes
Video
youtube
3 Phase VFD | Arduino - Atmega32 base 3 Phase VFD for Speed Control of I...
0 notes