#atworkcrm
Explore tagged Tumblr posts
Visit Tumblr Blog
Explore Tumblr blogs with no restrictions, modern design and the best experience.
Last Seen Tumblr Blogs


Fun Fact
The Tumblr app for Google Glass was released on May 16, 2013.
Text
3 Ways to synchronize Microsoft Dynamics CRM Contacts to Outlook
The Synchronization of Microsoft Dynamics CRM (MSDCRM) contacts to Outlook is a feature that often doesn’t get the attention it deserves. This blog will highlight a number of options that can be used to ensure that you can easily manage which MSDCRM Contacts are synchronized to your Outlook.
The default setting in the Outlook Client for MSDCRM, synchronizes Active Contacts that you own in MSDCRM to Outlook. This means that if you create a Contact in MSDCRM or assign a Contact to yourself in MSDCRM this Contact will be synchronized to your Outlook. The disadvantage of the default setting is that a Contact can only have one “Owner” and that multiple Users within your organization may want to synchronize the same Contacts from MSDCRM.
To enable Users to stay in control of which MSDCRM Contacts are synchronized to their Outlook, the Outlook Filter for Contacts in MSDCRM can be configured to synchronize Contacts based on the following criteria:
1. Contacts you follow in MSDCRM
2. Contacts you follow in MSDCRM
3. Contacts you follow in MSDCRM
The benefits of these 3 options and the Outlook Filter settings required to achieve synchronization will be described in the following three chapters.
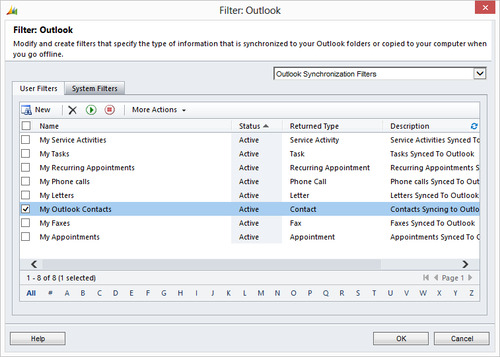
The Outlook Filter rules for Contacts can be adjusted (in Outlook 2013) by going to:
File > CRM > Synchronize > Outlook Filters
Here you can adjust the “My Outlook Contacts” filter:
Contacts you follow in MSDCRM
The advantage of using the Follow functionality in MSDCRM to determine which Contacts are synchronized to Outlook is that multiple Users can follow one Contact and that it only takes one click to follow a Contact. You can follow contacts by selecting them and pressing the Follow button in the Ribbon.

The My Outlook Contacts filter needs to be configured as follows:

Contacts of Accounts you follow in MSDCRM
The main advantage of using the filter which synchronizes Contacts of Accounts you follow is that when colleagues add Contacts to an Account you follow these are also automatically synchronized to your Outlook. This way all the Contacts of the Accounts you are working on will automatically be synchronized to your Outlook.

Contacts you are Connected to in MSDCRM
The advantage of using Connections to determine which Contacts are synchronized to your Outlook is that the Connections can also be created by other Users and that Connections can offer additional value to your organization as they give an overview of who is Connected to the Contact and their Role.


I hope this blog article helps you effectively manage the MSDCRM Contacts that are synchronized to your Outlook. Feel free to contact us if you need help setting up your Outlook Filter(s).
Happy tracking,
the @work CRM Team
2 notes
·
View notes
Text
CRM summer school: Importing Data in Microsoft Dynamics CRM 2011
When your Microsoft Dynamics CRM system is installed, the next step is to configure and then add data. Without the data the system cannot share and analyze valuable customer information. Therefore it is important to move your existing (accurate) data into the system. This can be done by manually entering the data but, that is very time consuming and multiple typing errors could occur. The easier and more efficient way is to import data step by step and with the help of functionalities that are already available for you in Microsoft Dynamics CRM.
There are six important steps you need to take to ensure the right data will get into the right place in your Microsoft Dynamics CRM system:

1. Organize your source data
2. Determine for which fields data duplication is required
3. Use templates
4. Map your source data
5. Import your data
6. Verify the data
These options are also important if you already have data in your system, but want to (for example) add a list of contacts or leads you recently acquired.
Organize your source data
Organizing your source data is important to make sure that each type of data is in its own column. In the below topic ‘CRM Templates’ we explain how to organize your source data by using CRM templates. Of course there are countless other options, which you can read about in the Microsoft Help topic Work with Imports.
Determine data duplication rules
To avoid the import of duplicate records, it is essential to define duplicate detection settings in your Microsoft Dynamics CRM system. It is possible to select multiple attributes at the same time (e.g. Account name and address fields). Also, more than one duplicate detection setting per entity is possible (e.g. an additional setting for Account’s website URL).
CRM Templates
In Microsoft Dynamics CRM, you can generate templates that will help you with the preparation of your data. These import templates are in an XML format which you can open with Excel. To create such a template you need to go to the Data Import button in your ribbon, and select Download Template for Import in the dropdown list. This will open a window with a dropdown where you can select an entity from. Once you have made your selection, click on the download button to download the template.

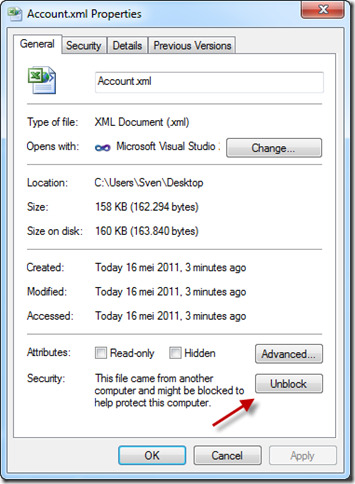
Once this is downloaded you first need to unblock the file to prevent an error from appearing.
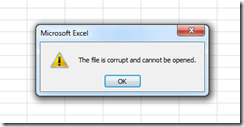
To unblock the file, right click on the XML file and open the properties. Here you will see a button to unblock the file.
You can open the Excel template, which would look like this:

You can put all the data you wish to import in this Excel sheet and off you go importing it!
Map your source data
It is important to determine where each column in your data belongs in your Microsoft Dynamics CRM system. Mapping the data from your source file to Microsoft Dynamics CRM can be done automatically or by using a data map that explicitly maps your source columns to Microsoft Dynamics CRM fields. The following table shows when to use auto mapping or when to use a data map.
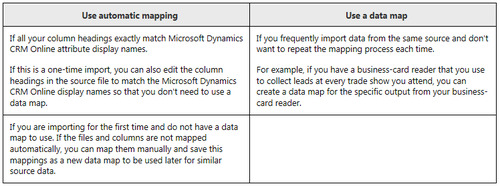
If you are going to use automatic mapping you need to edit the column headers in your source data to exactly match the display labels in Microsoft Dynamics CRM. If you are going to use a data map, you can use an existing one or you can create a new Data Map in Microsoft Dynamics CRM.
Import your data
There are multiple instructions on how to import data via the wizard and if you click [here] you will go to the very helpful Microsoft Customer Center page and find a lot of useful articles and videos that will guide you through the process.
Verify the data
Overall, it is important to keep verifying Microsoft Dynamics CRM records versus the data source information. If errors occur, try to find out the reason of the error and then there are two possibilities to continue:
1. Remove all imported records (bulk delete) and start over;
2. Export errors, fix problems and import again with same data mapping.
Data importing is one of the reasons you want to work with a certified Microsoft Dynamics CRM partner like @work www.atworkmgt.nl . It takes experience to do it right.
Happy Tracking!
The @work team
(source: Microsoft Customer Center)
2 notes
·
View notes
Text
A day of an outside salesman, made easy by the SFA App
Ever since the @work developers showed me the Sales Force Automation Application, it grabbed my attention. Microsoft Dynamics CRM is a fantastic application, but it misses one thing: an easy, reliable Sales app that is able to run on multiple platforms. My one request to the @work developers was:
“Please make it very simple and very fast”.
I have always been a firm believer of ‘practice what you preach’ so I have been using the app ever since the first release of the beta version. It has made my life so much easier.
Honestly, I am using the SFA app more than classic Microsoft Dynamics CRM itself!
Below I have described a typical day in my life, showing you how I take advantage of the SFA App in my job of being an outside salesman.
07:30 am Breakfast at home
In between making sandwiches for my kids and having my own breakfast I take a look at my activities & appointments for today. Because the SFA App opens so quickly, I now know everything that is on my to-do-list in an instant. I feel ready for today! (Check our previous blog post for details on the speed of the SFA App)

The colored squares in the middle of my screen, display all my phone calls, tasks and appointments for today, the rest of the week and my overdue activities. This overview indicates I have two appointments and a task, scheduled for today, but also one overdue phone call.
When I touch one of the colored squares, the details of activity are displayed. I decide to make the overdue phone call in the car on my way to my first appointment.
Next to the colored squares on the home screen, the most important chart for a salesperson is visible, the sales pipeline! The chart itself has drill down functionality, and I want to check all opportunities that are in the close state. The list appears and I decide to open one particular opportunity to check the details. Next to the name of the prospect the most important elements of the opportunity are shown: estimated closing date, probability percentage, estimated revenue and all related activities. I see there is a follow up phone call planned for tomorrow, so no need for me to worry about this one today.
11:00 am Appointment with a prospect
Traffic was really kind to me this morning and I arrived 30 minutes earlier at the prospect. Driving up there, I have made the overdue phone call and it was rather successful. I have agreed with the customer to deliver him a revised offer based on the discussed opportunity. Being early I take the time to register the details from the call and to create a task for tomorrow, to look at the existing offer as agreed upon.
During the drive I also received an incoming phone call. This was a new lead that came in via an existing customer. The prospect showed interest in a Dynamics CRM implementation. I don’t want to forget what we discussed, so I use the SFA app to create a new lead and a task for this lead to follow up with.
1:00 pm Lunch
After the CRM demonstration me and my colleague leave the prospect and go out for a quick lunch at Subway. During lunch I add my notes from the meeting to the appointment activity, and mark the activity as complete. Afterwards I create two different tasks as agreed upon during the meeting.

I notice a new phone call has been added to my home screen. I quickly check what it is about, it`s from our receptionist, she created a 'please call back activity' for me. I will make this phone call in the car on my way over to my next appointment.
2:00 pm Appointment with existing account
After a good meeting with an existing CRM account, I register the details from the meeting on my tablet. The account showed interest in upgrading to Microsoft Dynamics online! I also enter the details from the call that I made when I was on my way to the appointment. My CRM system is now completely up to date.
4:00 pm Time left !
For me, one of the best features of the @work SFA app is the Bing Maps integration. The app shows your current location on a map and with pointers it shows you all your Opportunities, Leads, Quotes, Accounts and or Contacts on the map! After checking this, I notice an opportunity which is actually only 5 minutes away from me. I decide to give the prospect a call and ask him if he is available for a quick chat!

Screenshot shows how this feature could look on your screen.
7:00 pm Time to relax
After dinner with my family I decide to go for a quick round of golf with my friends. While waiting for my friends to arrive, I quickly verify I have closed all necessary actions for today and have a glance at what I am planned to do in the morning. Now it is time to relax!

This picture shows, that is also possible to run the SFA app on a second (personal) Windows 8 touchscreen pc. No additional licenses needed and the app is real time up to date!
Footnote from @work Management Associates.
All of Pieters` activities were registered on a Windows device. @work expects the SFA app to be available in the Apple App store by the beginning of July.
Happy tracking,
@work CRM Team
2 notes
·
View notes