#aws cognito authorization code grant
Explore tagged Tumblr posts
Visit Tumblr Blog
Explore Tumblr blogs with no restrictions, modern design and the best experience.
Last Seen Tumblr Blogs


Fun Fact
Tumblr has 4 main sources of revenue.
Text
Amazon Cognito Authentication and Authorization | Cognito User Pool & Identity Pool Explained
Full Video Link https://youtube.com/shorts/plyv476pZmo Hi, a new #video on #aws #apigateway #cloud is published on #codeonedigest #youtube channel. @java #java #awscloud @awscloud #aws @AWSCloudIndia #Cloud #CloudComputing @YouTube #yo
Amazon Cognito is an identity platform for web and mobile apps. Today we will understand important features of Cognito. Userpool – Amazon Cognito user pool is a user directory. With a user pool, your users can sign in to your web or mobile app through Amazon Cognito, or federate through a third-party Identity provider. Amazon Cognito user pool can be a standalone IdP. Amazon Cognito draws from…

View On WordPress
#amazon cognito#amazon web services#aws#aws cloud#aws cognito android#aws cognito authentication java example#aws cognito authentication node js#aws cognito authentication spring boot#aws cognito authorization code grant#aws cognito authorizer#aws cognito custom login page#aws cognito demo#aws cognito otp login#aws cognito react#aws training#aws tutorial#cognito aws react#cognito login#cognito login react#cognito user pool
0 notes
Text
Integrating Okta as a SAML identity provider in an Amazon Cognito user pool
Posted on March 12, 2020, by Sandeep
Amazon Cognito user pool allows users to sign-in through an external identity provider (federation), such as Okta. A user pool integrated with Okta allows users in your Okta app to get user pool tokens from Amazon Cognito and authenticate apps that use Cognito.
Prerequisites 1. Cognito user pool created in the AWS account 2. Okta developer account
Steps 1. Create an app client in your user pool
a. When adding an app client, clear the Generate client secret checkbox. b. Select the required auth flows Select at least ALLOW_USER_SRP_AUTH and ALLOW_REFRESH_TOKEN_AUTH

Note: We are using the “Authorization code grant” authentication flow which does not require client secrets.
2. Create your Cognito user pool domain
a. Under the App Integration tab in the user pool console side menu, choose Domain name b. Enter your choice of unique domain prefix which is used to build Cognito login url for your SAML app.
3. Create a SAML app in Okta
a. Sign in to okta with admin access credentials and click on the “Admin” button on top right corner b. On the admin, menu chooses Applications and then choose Add Application. c. On the Add Application page, choose to Create a New App. d. In the Create a New Application Integration dialog, confirm that Platform is set to Web. e. For the Sign-on method, choose SAML 2.0. f. Choose to Create, this will open a General Settings page for saml app.
(i) Enter a name for your app. (ii) (Optional) Upload a logo and choose the visibility settings for your app. (iii) Choose Next.

(iv) Under GENERAL, for Single sign-on URL, enter https://yourDomainPrefix.auth.region.amazoncognito.com/saml2/idpresponse.
Note: Replace yourDomainPrefix and region with the values for your user pool. Find these values in the Amazon Cognito console on the Domain name page for your user pool.
(v) For Audience URI (SP Entity ID), enter urn:amazon:Cognito:sp:yourUserPoolId.
Note: Replace yourUserPoolId with your Amazon Cognito user pool ID. Find it in the Amazon Cognito console on the General settings page for your user pool.

(vi) Under ATTRIBUTE STATEMENTS (OPTIONAL- specifies which user attributes you want to export to Cognito), add a statement with the following information:
For Name, enter the SAML attribute name (attribute name by which you want to user attributes to be passed to Cognito in SAML response).

eg: if you want to pass user email in SAML response and you want to call it ‘Email Id’ enter ‘Email id’ in Name field and enter ‘user.email’ in Value field.
(vii) For all other settings on the page, leave them as their default values or set them according to your preferences. (viii) Choose Next. (ix) Choose a feedback response for Okta Support. (x) Choose Finish.
4. Assign a user to your Okta application
a. On the Assignments tab for your Okta app, for Assign, choose Assign to People. b. Next to the user that you want to assign, choose Assign.
Note: If this is a new account, the only option available is to choose yourself (the admin) as the user.
c. (Optional) For User Name, enter a user name, or leave it as the user’s email address, if you want. d. Choose Save and Go Back. Your user is assigned. e. Choose Done.
5. Get the IdP metadata for your Okta application
a. On Okta developer console, navigate to the Applications tab and select your application. b. On the Sign-On tab, find the Identity Provider metadata hyperlink (Look for text ‘Identity Provider metadata is available if this application supports dynamic configuration.’). Right-click the hyperlink (Identity Provider metadata), and then copy the URL.
6. Configure Okta as a SAML IdP in your user pool
a. In the Amazon Cognito console, choose to Manage user pools, and then choose your user pool. b. In the left navigation pane, under the Federation, choose Identity providers. c. Choose SAML. d. Under the Metadata document, paste the Identity Provider metadata URL that you copied. e. For Provider name, enter Okta. f. (Optional) Enter any SAML identifiers (Identifiers (Optional)) and enable sign-out from the IdP (Okta) when your users sign out from your user pool (Enable IdP sign out flow). g. Choose Create provider.

7. Map SAML attributes to user pool attributes
a. In the Amazon Cognito console, choose Manage user pools, and then choose your user pool. b. In the left navigation pane, under the Federation, choose Attribute mapping. c. On the attribute mapping page, choose the SAML tab. d. Choose Add SAML attribute. e. For the SAML attribute, enter the SAML attribute name (attribute name which you have mentioned in ATTRIBUTE STATEMENTS while creating the SAML app in Okta.

eg: we had specified ‘Email Id’ in the example above so mention ‘Email Id’ under SAML attribute and select Email under User pool attribute, continue and map all other attributes if you had mentioned any other in ATTRIBUTE STATEMENTS and Choose Save changes.
Note: Make sure all mapped attributes in cognito are readable and writable, you can set attribute permissions in General settings->App clients->Set read and write permissions.
8. Change app client settings for your user pool
a. In the Amazon Cognito console, choose Manage user pools, and then choose your user pool. b. In the left navigation pane, under App integration, choose App client settings. c. On the app client page, do the following: Under Enabled Identity Providers, select the Okta and Cognito User Pool checkboxes. For Callback URL(s), enter a URL where you want your users to be redirected after they log in. For testing, you can enter any valid URL, such as https://www.example.com/. For Sign out URL(s), enter a URL where you want your users to be redirected after they log out. For testing, you can enter any valid URL, such as https://www.example.com/. Under Allowed OAuth Flows, be sure to select Authorization code grant checkbox. Under Allowed OAuth Scopes, be sure to select the email and profile checkboxes. d. Choose Save changes.

9. Construct the endpoint URL
a. Using values from your user pool, construct this login endpoint URL: https://yourDomainPrefix.auth.region.amazoncognito.com/login?response_type=code&client_id=yourClientId&redirect_uri=redirectUrl b. Be sure to do the following:
(i) Replace yourDomainPrefix and region with the values for your user pool. Find these values in the Amazon Cognito console on the Domain name page for your user pool. (ii) Replace yourClientId with your app client’s ID, and replace redirectUrl with your app client’s callback URL. Find these in the Amazon Cognito console on the App client settings page for your user pool.
10. Test the endpoint URL
a. Enter the constructed login endpoint URL in your web browser. b. On your login endpoint webpage, choose Okta.
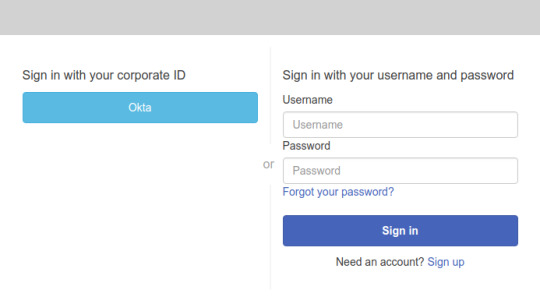
Note: If you’re redirected to your app client’s callback URL, you’re already logged in to your Okta account in your browser. The user pool tokens appear in the URL in your web browser’s address bar.
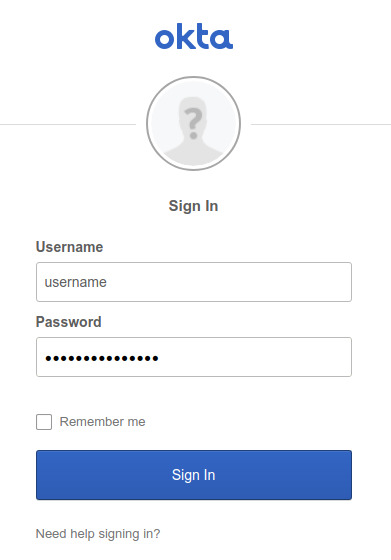
c. On the Okta Sign In page, enter the username and password for the user that you assigned to your app.
1 note
·
View note
Text
Creating a REST API for Amazon DocumentDB (with MongoDB compatibility) with Amazon API Gateway and AWS Lambda
Representational state transfer (REST) APIs are a common architectural style for distributed systems. They benefit from being stateless and therefore enable efficient scaling as workloads increase. These convenient—yet still powerful—APIs are often paired with database systems to give programmatic access to data managed in a database. One request that customers have expressed is to have a REST API for access to their Amazon DocumentDB (with MongoDB compatibility) database, which is what this post discusses. Amazon DocumentDB is a fast, scalable, highly available, and fully managed document database service that supports MongoDB workloads. As a document database, Amazon DocumentDB makes it easy to store, query, and index JSON data. The primary mechanism that users use to interact with Amazon DocumentDB is via the MongoDB drivers, which provide a stateful, session-based API. Providing simple HTTP-based access to Amazon DocumentDB allows for the addition of document data to webpages, other services and microservices, and other applications needing database access. In this post, I demonstrate how to build a REST API for read and write access to Amazon DocumentDB by using Amazon API Gateway, AWS Lambda, and AWS Secrets Manager. Solution overview The REST API in this post can perform insert, update, delete, and read operations against Amazon DocumentDB collections. Access can be restricted to particular collections, all collections in a particular database, or all collections in all databases. To accomplish this goal, we use the following services: Amazon DocumentDB – Stores our data API Gateway – Exposes an HTTP REST API Lambda – Connects the API Gateway service to the database Secrets Manager – Stores the database credentials for use by our Lambda function A discussion around best practices for securing the API endpoints is beyond the scope of this post, but for more information, see Controlling and managing access to a REST API in API Gateway. For this post, a simple username-password authentication is presented as another Lambda function. The following diagram illustrates the architecture of this solution. I use the AWS Serverless Application Model (AWS SAM) to deploy this stack because it’s the preferred approach when developing serverless applications such as this one. The template and code are available in the GitHub repo. In terms of functionality for the API, insert, update, delete, and find operations against data stored in the database are exposed. Storing our data with Amazon DocumentDB (with MongoDB compatibility) Amazon DocumentDB is a fast, scalable, highly available, and fully managed document database service that supports MongoDB workloads. To read more about the architecture, value proposition, and attributes of Amazon DocumentDB, see 12 things you should know about Amazon DocumentDB (with MongoDB compatibility). This post begins with an already existing Amazon DocumentDB cluster that we expose via a REST API to applications. If you don’t already have an Amazon DocumentDB cluster, see Getting Started with Amazon DocumentDB (with MongoDB compatibility). Storing database credentials with Secrets Manager As is common with applications deployed in AWS that connect to Amazon DocumentDB, including Lambda functions, we use Secrets Manager to store credentials to connect to Amazon DocumentDB. This way, you can grant permissions to access those credentials to a role, such as the role used to run a Lambda function. After the application, or Lambda function, retrieves the credentials from Secrets Manager, it can use those credentials to make a database connection to Amazon DocumentDB. Exposing a REST API with API Gateway For this post, we use API Gateway to expose a REST API to the world. API Gateway supports several APIs, REST being just one of the options, but the one on which I focus in this post. API Gateway can define REST endpoints and define operations on those endpoints. For this discussion, an endpoint per collection is used and multiple operations on that endpoint are defined, specifically: GET – Corresponds to a read or find database operation PUT or POST – Corresponds to an insert database operation PATCH – Corresponds to an update database operation DELETE – Corresponds to a delete database operation The parameters that are sent with those operations mimic the parameters in the corresponding database operation. For example, the GET operation mimics the find() operation in the MongoDB API. In the MongoDB API, you can specify five parameters to the find() operation: A filter to identify documents of interest, specified as a JSON object A projection to specify what fields should be returned, specified as a JSON object A sort to specify the order of the results, specified as a JSON object A limit to specify the number of results to return, specified as an integer A skip amount to specify how many results to skip before returning results, specified as an integer Similarly, the PATCH operation mimics the update() operation in the MongoDB API, which takes two parameters: A filter to identify which documents should be updated, specified as a JSON object An update command to indicate what update should be applied, specified as a JSON object Updates include setting or unsetting a field value, incrementing or decrementing a field value, and so on For more information about the MongoDB API, see the MongoDB documentation. We use the path of the REST endpoint to specify the database and collection against which to operate. In API Gateway, you can specify the exact path, thereby specifying a particular database and collection, and the client calling the REST endpoint can’t change that. For example, API Gateway can expose a URL like http:///docdb/mydb/mycollection that corresponds to accessing the mycollection collection in the mydb database. In addition, in API Gateway, you can allow for path variables to be added to a particular REST endpoint. This allows you to expose an endpoint to a particular database, but allows the user to specify the collection. This enables access to all collections in a particular database. For example, API Gateway can expose a URL like http:///docdb/mydb, which allows the caller to append a particular collection name to the URL, such as http:///docdb/mydb/another_collection. This allows access to any collection, including another_collection, inside the mydb database. You can extend this idea further and expose a REST endpoint and allow the client to specify both the database and the collection as path variables, thereby exposing all collections in all databases. For example, API Gateway can expose a URL like http:///docdb/, which allows the caller to append both the database and the collection names to the URL, such as http:///docdb/other_db/other_collection. This allows access to any collection, including other_collection, inside any database, including the other_db database. Enforcing API Gateway security From a security standpoint, as a best practice, access to these endpoints should be restricted via the security mechanisms in API Gateway. For more information, see Controlling and managing access to a REST API in API Gateway. API Gateway has several available authorization schemes, including Amazon Cognito, AWS Identity and Access Management (IAM), and Lambda functions. For the purposes of this post, I use a simple Lambda authorizer that compares the supplied username and password with static values (stored as environment variables in the Lambda function). I can choose to protect some or all of the API endpoints, and even protect the different endpoints differently (for example, with different username/password pairs, or different authorizers), but that is beyond the scope of this post. Connecting API Gateway to the database with Lambda The component doing the heavy lifting in this solution is Lambda. We use a single, simple Lambda function to perform all the various operations exposed: GET (for find), PUT or POST (for insert), PATCH (for update), and DELETE (for delete). When API Gateway calls the Lambda function, the incoming event contains several pieces of metadata, including the REST method that was invoked. This function uses that field to determine which subfunction to call and return the results. Additionally, the API path that was invoked is also sent as part of the event. This path can be used to determine the database and collection that are to be queried. It’s worth talking about a few good practices for implementing this Lambda function. Using Lambda layers Lambda has a mechanism by which you can package up some commonly used libraries or packages so that you don’t need to package them up with each Lambda function that you deploy. For example, I do a lot of work with Lambda functions in Python connecting to Amazon DocumentDB, so many of my functions need the MongoDB drivers to make the connection. Because I’m using the best practice configuration, which uses SSL to communicate with the cluster, my functions also need the certificate file for connecting to Amazon DocumentDB. You can package up these dependencies into a .zip file and create a Lambda layer. Then, when you create a Lambda function, like the CRUD operations function for this REST API, you can add the layer to your function to bring in those dependencies. This greatly simplifies deployment of Lambda functions. You can now easily compose Lambda functions directly on the AWS Management Console, because the dependencies are packaged up already. Additionally, if your Lambda function is simple, you can include the source code for our function directly in an AWS CloudFormation template, simplifying automated deployments as well. For this post, I create a single Lambda layer that includes the MongoDB Python driver and the Amazon DocumentDB certificate file. When added to a Python Lambda function, the resources are available under the /opt directory. Connecting to Amazon DocumentDB If you make the connection to Amazon DocumentDB inside the handler for the Lambda function, you have to go through the process of connecting to the database on every call to the Lambda function. This is a wasteful and resource-intensive approach to connections. As with other database services accessed from Lambda functions, the best practice is to make the connection outside of the handler itself. When AWS reuses the environment for another Lambda invocation, the connection is already made. For this post, I store the connection in a global variable and use that connection, unless it’s uninitialized, in which case I call a database connection subfunction. Enforcing Lambda security As stated earlier, we store our credentials for our Amazon DocumentDB cluster in Secrets Manager. I grant the permission to retrieve this secret to the role that the Lambda function uses. It’s a simple operation to add a subfunction to the Lambda function that retrieves those credentials, which you can then use to connect to the database. Using this pattern is a nice way to not expose usernames or passwords in code or in the configuration of the Lambda function. Creating a REST API in an Amazon Document DB cluster Now, let’s walk through the steps to create a REST API for your Amazon DocumentDB cluster. For this example, I assume you currently have an Amazon DocumentDB cluster, and know the username and password for a user that can query collections in that cluster. If you don’t currently have an Amazon DocumentDB cluster up and running, use the following CloudFormation template to launch one. To deploy this REST API, I use AWS SAM and the following repository. The important files in this repository are the template file, template.yaml, and the Lambda source code located in the docdb_rest folder, specifically app.py and auth.py. Clone the repository with the template and code: git clone https://github.com/aws-samples/docdb-rest.git You need to build the .zip file for the Lambda layer that holds the database driver and certificate authority file to connect to Amazon DocumentDB. To do this, run the following command: make Now you’re ready to build the serverless application via the sam command: sam build When that is complete, deploy the serverless application: sam deploy --capabilities CAPABILITY_NAMED_IAM --guided You need to answer several questions from the command line: The stack name Which Region to deploy A prefix to be prepended to resources created by this stack (for easy identification on the console) The identifier for the Amazon DocumentDB cluster The username for accessing the Amazon DocumentDB cluster The password for accessing the Amazon DocumentDB cluster A VPC subnet with networking access to the Amazon DocumentDB cluster A security group with access to the Amazon DocumentDB cluster The username to use to protect the REST API The password to use to protect the REST API Optionally, choose to confirm changes before deploying. You need to allow the AWS SAM CLI to create an IAM role. Optionally, choose to save the arguments to a configuration file, and choose a configuration file name and a configuration environment. Configuring SAM deploy ====================== Looking for config file [samconfig.toml] : Not found Setting default arguments for 'sam deploy' ========================================= Stack Name [sam-app]: docdb-rest AWS Region [us-east-1]: us-east-2 Parameter Prefix []: docdbrest Parameter DocDBIdentifier []: docdb-cluster Parameter DocDBUsername []: dbuser Parameter DocDBPassword: Parameter DocDBVPCSubnet []: subnet- XXXXXXXXXXXXXXXXX Parameter DocDBSecurityGroup []: sg-XXXXXXXXXXXXXXXXX Parameter APIUsername []: apiuser Parameter APIPassword: #Shows you resources changes to be deployed and require a 'Y' to initiate deploy Confirm changes before deploy [Y/n]: Y #SAM needs permission to be able to create roles to connect to the resources in your template Allow SAM CLI IAM role creation [Y/n]: Y Save arguments to configuration file [Y/n]: Y SAM configuration file [samconfig.toml]: SAM configuration environment [default]: When prompted, choose to deploy this change set. When the stack has finished deploying, you see a list of the resources and a notice: Successfully created/updated stack - docdb-rest in us-east-2 Make note of the APIRoot output printed at the successful deployment. You use this to test the API in the next step. Testing the API Now you can test our API by calling your REST endpoints via curl. To do so, you need to get the URL, which is the APIRoot output from the deployment. You can also retrieve this information from API Gateway. Let’s set environment variables to hold the root URL for the API, as well as the username and password to access the API: export URLBASE= export APIUSER= export APIPWD= Now we can issue some HTTP commands. Insert some data via PUT: curl -X PUT -H "Content-Type: application/json" -d '{"name":"brian", "rating": 5}' https://$APIUSER:$APIPWD@$URLBASE/docdb/blog/test curl -X PUT -H "Content-Type: application/json" -d '{"name":"joe", "rating": 5}' https://$APIUSER:$APIPWD@$URLBASE/docdb/blog/test Insert some data via POST: curl -X POST -H "Content-Type: application/json" -d '{"name":"jason", "rating": 3}' https://$APIUSER:$APIPWD@$URLBASE/docdb/blog/test Retrieve all the data via GET: curl -G https://$APIUSER:$APIPWD@$URLBASE/docdb/blog/test Retrieve just the joe document via GET: curl -G --data-urlencode 'filter={"name": "joe"}' https://$APIUSER:$APIPWD@$URLBASE/docdb/blog/test Retrieve just the joe document but only project the name field via GET: curl -G --data-urlencode 'filter={"name": "joe"}' --data-urlencode 'projection={"_id": 0, "name": 1}' https://$APIUSER:$APIPWD@$URLBASE/docdb/blog/test Update the jason document via PATCH: curl -X PATCH -H "Content-Type: application/json" -d '{"filter": {"name": "jason"},"update": {"$set": {"rating": 4}}}' https://$APIUSER:$APIPWD@$URLBASE/docdb/blog/test Delete the jason document via DELETE: curl -X DELETE -H "Content-Type: application/json" -d '{"filter": {"name": "jason"}}' https://$APIUSER:$APIPWD@$URLBASE/docdb/blog/test See the README file in the repository for more information on the REST API syntax implemented in the Lambda function. Limiting access to certain collections These commands were issued against the generic endpoint that interprets the database and collection from the URL. The API that was implemented has two other endpoints: one that specifies a fixed database (demodb) but allows access to all collections in that database, and one that specifies a specific collection (democollection) in a specific database (demodb). If only the endpoint to a specific collection is exposed, then only that collection can be accessed via REST commands. This allows you to grant broad or narrow access to the databases and collections as suits your needs. Cleaning up You can delete the resources created in this post by deleting the stack via the AWS CloudFormation console or the AWS Command Line Interface (AWS CLI). Your Amazon DocumentDB cluster is not deleted by this operation. Conclusion In this post, I demonstrated how to create a REST API to gain read and write access to collections in an Amazon DocumentDB database. Amazon DocumentDB access is only available within an Amazon VPC, but you can access this REST API outside of the VPC. I also showed how to create a single Lambda function that serves as the bridge between the API Gateway REST API and the Amazon DocumentDB database, and supports insert, update, delete, and read operations. Finally, I showed how to use Lambda layers to simplify Lambda function development, and how to safely store database credentials in Secrets Manager for use by our Lambda function. For more information about recent launches and blog posts, see Amazon DocumentDB (with MongoDB compatibility) resources. About the Author Brian Hess is a Senior Solution Architect Specialist for Amazon DocumentDB (with MongoDB compatibility) at AWS. He has been in the data and analytics space for over 20 years and has extensive experience with relational and NoSQL databases. https://aws.amazon.com/blogs/database/creating-a-rest-api-for-amazon-documentdb-with-mongodb-compatibility-with-amazon-api-gateway-and-aws-lambda/
0 notes
Text
Original Post from Amazon Security Author: Michael Chan
AWS re:Invent 2019 is coming fast! You’ll soon need to prioritize your sessions. Here’s a list of AWS Identity sessions, workshops, and chalk talks at AWS re:Invent 2019. If you haven’t registered yet for re:Invent, here’s a template you can provide to your manager to help justify your trip.
AWS Identity Leadership Keynote
SEC207-L – Leadership session: AWS identity (Breakout session) Digital identity is one of the fastest growing and fastest changing parts of the cloud. Zero-trust networks, GDPR concerns, and new IoT opportunities have been dominating cloud news coverage. In this session, learn about significant industry changes that will affect the way AWS approaches identity for both workforce and consumer customers. We announce new features, discuss our participation in open standards and industry groups, and explain how we’re making identity, access control, and resource management easier for you every day.
AWS Identity Management for your Workforce
FSI310 – The journey to least privilege: IAM for Financial Services (Chalk talk) Enhancements to AWS Identity and Access Management and related services have made it safer and easier than ever to grant developers direct access to AWS. In this session, we share a new approach to automating identity and access management in AWS based on recent engagements with global Financial Services customers. Then, we dive deep to answer your questions about how CI/CD tools and techniques can be used to enforce separation of duties, curtail human review of policy code, and delegate access to IAM while reducing the risk of unintended privilege escalation.
MGT407-R – Automating security management processes with AWS IAM and AWS CloudFormation (Builders session) Security is a critical element for highly regulated industries like healthcare. Infrastructure as code provides several options to automate security controls, whether it is implementing rules and guardrails or managing changes to policies in an automated yet auditable way. Learn how to implement a process to automate creation, permission changes, and exception management with AWS Service Catalog, AWS CloudFormation, and AWS IAM policies, fostering efficient collaborations between security stakeholders across teams. (Note that this session is repeated once more during the week and denoted with a suffix of “-R1.”)
WIN312-R – Active Directory on AWS to support Windows workloads (Breakout session) Want to learn your options for running Microsoft Active Directory on AWS? When moving Microsoft workloads to AWS, it’s important to consider how to deploy Microsoft Active Directory to support group policy management, authentication, and authorization. In this session, we discuss options for deploying Microsoft Active Directory to AWS, including AWS Directory Service for Microsoft Active Directory and deploying Active Directory to Windows on Amazon Elastic Compute Cloud (Amazon EC2). We cover such topics as integrating your on-premises Microsoft Active Directory environment to the cloud and leveraging SaaS applications, such as Office 365, with AWS Single Sign-On. (Note that this session is repeated once more during the week and denoted with a suffix of “-R1.”)
WIN405-R – Active Directory design patterns on AWS (Builders session) Want to learn about your options for running Microsoft Active Directory on AWS? When you move Microsoft workloads to AWS, it’s important to consider how to deploy Active Directory in support of name resolution, authentication, and authorization. In this session, we discuss options for deploying Microsoft Active Directory to AWS, including AWS Managed Microsoft Active Directory and deploying Active Directory to Windows on Amazon EC2. The discussion includes such topics as how to integrate your on-premises Active Directory environment to the cloud using Amazon Route 53 Resolver. (Note that this session is repeated once more during the week and denoted with a suffix of “-R1.”)
AWS Identity Management for your Customers
SEC219-R — Build the next great app with Amazon Cognito (Chalk talk) Are you planning to build the next great app? Are you planning to include features like AI-driven responses, a friendly user experience, and a lightning fast response time? There’s just one thing in your way: Identity. Before your users can use your app, you first have to know who they are. In this talk, we walk through how Amazon Cognito can help you deliver a unified identity management and authentication experience and help you mediate access to AWS services. We then discuss Amazon Cognito features, best practices, architectures, and how you can use Amazon Cognito to build your app today. (Note that this session is repeated once more during the week and denoted with a suffix of “-R1.”)
SEC403-R — Serverless identity management, authentication, and authorization (Workshop) In this workshop, you learn how to build a serverless microservices application demonstrating end-to-end authentication and authorization using Amazon Cognito, Amazon API Gateway, AWS Lambda, and all things AWS Identity and Access Management (IAM). You have the opportunity to build an end-to-end functional app with a secure identity provider showcasing user authentication patterns. To participate, you need a laptop, an active AWS Account, an AWS IAM administrator, and familiarity with core AWS services. (Note that this session is repeated once more during the week and denoted with a suffix of “-R1.”)
SEC409-R — Fine-grained access control for serverless apps (Builders session) In this small-group, hands-on builders session, you take a guided tour of how to build enterprise-grade serverless web applications with fine-grained, directory-based access controls. We show how to take a regular Express.js app, move it to AWS Lambda, add authentication using Amazon Cognito with SAML federation, and implement fine-grained authorization based on an external identity provider’s group membership (e.g., LDAP/AD). Services used: Amazon Cognito, AWS Lambda, Amazon API Gateway, Amazon DynamoDB, AWS CDK, and AWS Amplify. Prerequisites: Proficiency in basic JavaScript/TypeScript. Basic experience with AWS is recommended but not mandatory. (Note that this session is repeated twice more during the week and denoted with a suffix of “-R1” and “-R2.”)
MOB304 – Implement auth and authorization flows in your iOS apps (Workshop) Learn how to leverage social-provider identity federation (log in with Google, Amazon, Facebook, etc.) as well as easily set up custom authentication flows configured and deployed by the AWS Amplify CLI. You do this hands-on by building and deploying a modern iOS app using AWS Amplify and serverless services. This workshop is suitable for all, even if you’re not a cloud expert. Please bring your own Mac with XCode already installed.
MOB315-R – Breaking down the OAuth flow (Chalk talk) Are you lost when reading about OAuth implicit grants vs. code grants? Are you always struggling to understand the difference between Amazon Cognito user pools and Amazon Cognito federated identities? And how your corporate Active Directory fits into that picture? During this chalk talk, we demystify identity federation and whiteboard the main flows, allowing you to understand how to leverage these services to bring identity federation to your web or mobile applications. (Note that this session is repeated twice more during the week and denoted with a suffix of “-R1” and “-R2.”)
AWS Access Management
SEC209-R — Getting started with AWS identity (Breakout session) The number, range, and breadth of AWS services are large, but the set of techniques that you, as a builder in the cloud, will use to secure them is not. Your cloud journey starts with this breakout session, in which we get you up to speed quickly on the practical fundamentals to do identity and authorization right in AWS. (Note that this session is repeated once more during the week and denoted with a suffix of “-R1.”)
SEC217-R – Delegate permissions management using permissions boundaries (Builders session) The new permissions boundaries feature in AWS IAM addresses how to delegate permissions management to many users. If you have developers who need to be able to create roles for Lambda functions or system administrators who need to be able to create AWS IAM roles and users, or if you find yourself in a similar scenario, permissions boundaries might be a solution for you. (Note that this session is repeated multiple times during the week and denoted with a suffix of “-R1,” “-R2,” and “-R3.”)
SEC326-R — AWS identity-dynamic permissions using employee attributes (Chalk talk) To access AWS resources, you can configure your IdP in AWS to be your corporate directory, letting your users federate into AWS for single sign-on access to AWS accounts using their corporate credentials. Along with employee credentials, your directory also stores employee attributes such as cost center, department and email address. Now, you can rely on the employee attributes to create fine-grained permissions in AWS. Permissions can then be automatically applied based on attributes when employees change departments or new employees are added in AWS. (Note that this session is repeated once more during the week and denoted with a suffix of “-R1.”)
SEC402-R — AWS identity: Permission boundaries & delegation (Workshop) A permissions boundary is an AWS IAM feature that makes it easier to delegate permissions management to trusted employees. These employees can now configure IAM permissions to help scale permissions management and move workloads to AWS faster. For example, developers can create IAM roles for AWS Lambda functions and Amazon EC2 instances without exceeding certain permissions boundaries. In this workshop, using a sample application that we provide, practice delegating IAM permissions management so that developers can create roles without being able to either escalate their permissions or impact the resources of other teams. All attendees need a laptop and familiarity with core AWS services. (Note that this session is repeated once more during the week and denoted with a suffix of “-R1.”)
SEC405-R — Access management in 4D (Breakout session) In this session, we take “who can access what under which conditions” and deeply explore “under which conditions.” We demonstrate patterns that allow you to implement advanced access-management workflows such as two-person rule, just-in-time privilege elevation, real-time adaptive permissions, and more using advanced combinations of AWS identity services, a range of environmental and contextual information sources, and automated and human-based approval workflows. We keep things fun, engaging, and practical using a lively mix of demos and code that you can take home and implement in your own environment. (Note that this session is repeated once more during the week and denoted with a suffix of “-R1.”)
SEC409-R — Fine-grained access control for serverless apps (Builders session) In this small-group, hands-on builders session, you take a guided tour of how to build enterprise-grade serverless web applications with fine-grained, directory-based access controls. We show how to take a regular Express.js app, move it to AWS Lambda, add authentication using Amazon Cognito with SAML federation, and implement fine-grained authorization based on an external identity provider’s group membership (e.g., LDAP/AD). Services used: Amazon Cognito, AWS Lambda, Amazon API Gateway, Amazon DynamoDB, AWS CDK, and AWS Amplify. Prerequisites: Proficiency in basic JavaScript/TypeScript. Basic experience with AWS is recommended but not mandatory. (Note that this session is repeated twice more during the week and denoted with a suffix of “-R1” and “-R2.”)
Governance of Multi-account Environments
SEC325-R — Architecting security & governance across your landing zone (Breakout session) A key element of your AWS environment is having a framework to provide resource isolation, separation of duties, and clear billing separation (i.e., a landing zone). In this session, we discuss updates to multi-account strategy best practices for establishing your landing zone, new guidance for building organizational unit structures, and a historical context. We cover security patterns, such as identity federation, cross-account roles, consolidated logging, and account governance. We wrap up with considerations on using AWS Landing Zone, AWS Control Tower, or AWS Organizations. We encourage you to attend all the landing zone sessions. Search for “landing zone” in the session catalog. (Note that this session is repeated once more during the week and denoted with a suffix of “-R1.”)
SEC341-R — Set permission guardrails for multiple accounts in AWS Organizations (Chalk talk) AWS Organizations provides central governance and management for multiple accounts. Central security administrators use service control policies (SCPs) with Organizations to establish controls that all AWS Identity and Access Management (IAM) principals (users and roles) adhere to. For example, you can use SCPs to restrict access to specific AWS Regions or prevent your IAM principals from deleting common resources, such as an IAM role used by your central administrators. You can also define exceptions to your governance controls, restricting service actions for all IAM entities (users, roles, and root) in the account except a specific administrator role. (Note that this session is repeated once more during the week and denoted with a suffix of “-R1.”)
MGT302-R – Enable AWS adoption at scale with automation and governance (Breakout session) Enterprises are taking advantage of AWS so they can move quickly while maintaining governance control over costs, security, and compliance. In this session, we discuss how AWS Control Tower, AWS Service Catalog, AWS Organizations, and AWS CloudFormation simplifies compliance and makes ongoing governance easier. You learn how to set up and govern your multi-account AWS environment or landing zone through automation, blueprints, and guardrails. Finally, you learn how to launch governed and secure resources on AWS through a DevOps CI/CD pipeline. (Note that this session is repeated once more during the week and denoted with a suffix of “-R1.”)
MGT307-R – Governance at scale: AWS Control Tower, AWS Organizations, and more (Chalk talk) As you move to an organization-wide multi-account, multi-region strategy for your AWS environment, new questions emerge. How do I control budgets across many accounts, workloads, and users in a large organization? How do I automate account provisioning and maintain good security when hundreds of users and business units are requesting cloud resources? How can I ensure the organization is adhering to security and governance requirements? Bring all your questions about using AWS Landing Zones, AWS Control Tower, AWS Organizations, AWS Config, and more to build an AWS environment with governance control built in. (Note that this session is repeated multiple times during the week and denoted with a suffix of “-R1,” “-R2,” and “-R3.”)
Want more AWS Security news? Follow us on Twitter.
Michael Chan
Michael is a Developer Advocate for AWS Identity and Access Management. Prior to this, he was a Professional Services Consultant who assisted customers with their journey to AWS. He enjoys understanding customer problems and working backwards to provide practical solutions.
#gallery-0-5 { margin: auto; } #gallery-0-5 .gallery-item { float: left; margin-top: 10px; text-align: center; width: 33%; } #gallery-0-5 img { border: 2px solid #cfcfcf; } #gallery-0-5 .gallery-caption { margin-left: 0; } /* see gallery_shortcode() in wp-includes/media.php */
Go to Source Author: Michael Chan Your AWS re:Invent 2019 guide to AWS Identity sessions, workshops, and chalk talks Original Post from Amazon Security Author: Michael Chan AWS re:Invent 2019 is coming fast! You’ll soon need to prioritize your sessions.
0 notes
Text
Schedule an appointment in Office 365 using an Amazon Lex bot
You can use chatbots for automating tasks such as scheduling appointments to improve productivity in enterprise and small business environments. In this blog post, we show how you can build the backend integration for an appointment bot with the calendar software in Microsoft Office 365 Exchange Online. For scheduling appointments, the bot interacts with the end user to find convenient time slots and reserves a slot.
We use the scenario of a retail banking customer booking an appointment using a chatbot powered by Amazon Lex. The bank offers personal banking services and investment banking services and uses Office 365 Exchange Online for email and calendars.
Bank customers interact with the bot using a web browser. Behind the scenes, Amazon Lex uses an AWS Lambda function to connect with the banking agent’s Office 365 calendar. This function looks up the bank agent’s calendar and provides available times to Amazon Lex, so these can be displayed to the end user. After the booking is complete, an invitation is saved on the agent’s Office 365 and the bank customer’s calendar as shown in the following graphic:
The following flowchart describes the scenario:
To achieve this automation we use an AWS Lambda function to call Office 365 APIs to fulfill the Amazon Lex intent. The Office 365 secrets are stored securely in AWS Secrets Manager. The bot is integrated with a web application that is hosted on Amazon S3. Amazon Cognito is used to authorize calls to Amazon Lex services from the web application.
To make it easy to build the solution, we have split it into three stages:
Stage 1: Create an Office 365 application. In this stage, you create an application in Office 365. The application is necessary to call the Microsoft Graph Calendar APIs for discovering and booking free calendar slots. You need to work with your Azure Active Directory (AAD) admin to complete this stage.
Stage 2: Create the Amazon Lex bot for booking appointments. In this stage, you create an Amazon Lex bot with necessary intents, utterances, and slots. You also create an AWS Lambda function that calls Office 365 APIs for fulfilling the intent.
Stage 3: Deploy the bot to a website. After completion of stage 1 and stage 2, you have a fully functional bot that discovers and books Office 365 calendars slots.
Let’s start building the solution.
Stage 1: Create an Office 365 application
Follow these steps to create the Office 365 application. If you don’t have an existing office 365 account for testing, you can use the free trial of Office 365 business premium.
Notes:
To complete this stage, you will need to work with your Azure Active Directory administrator.
The Office 365 application can be created using Microsoft Azure portal or the Application Registration portal. The following steps uses the Application Registration portal for creating the Office 365 application.
Log in to https://apps.dev.microsoft.com/ with your Office365 credentials and click Add an App.
On the Create App Screen, enter the name and choose Create.
On the Registration screen, Copy the Application Id and choose Generate New Password in the Application Secrets.
In the New password generated pop-up window, save the newly generated password in a secure location. Note that this password will be displayed only once.
Click Add Platform and select Web.
In the Web section, enter the URL of the web app where the Amazon Lex chatbot will be hosted. For testing purposes, you can also use a URL on your computer, such as http://localhost/myapp/. Keep a note of this URL.
In the Microsoft Graph Permissions section, choose Add in Application Permissions sub-section.
In the Select Permission pop-up window, select Calendars.ReadWrite permission.
Choose Save to create the application.
Request your Azure Active Directory (AAD) Administrator to give you the tenant ID for your organization. The AAD tenant ID is available on the Azure portal.
Request your AAD Administrator for the user id of the agents whose calendar you wish to book. This information is available on the Azure portal.
Admin Consent: Your AAD administrator needs to provide consent to the application to access 365 APIs. This is done by constructing the following URL and granting access explicitly.URL: https://login.microsoftonline.com/{Tenant_Id}/adminconsent?client_id={Application_Id}&state=12345&redirect_uri={Redirect_URL}For the previous parameters substitute suitable values.
{AAD Tenant_Id}: AAD Tenant ID from step 9
{Application_Id}: Application ID from step 2
{Redirect_URL}: Redirect URL from step 5
Your AAD administrator will be prompted for administrator credentials on clicking the URL. On successful authentication the administrator gives explicit access by clicking Accept.
Notes:
This step can be done only by the AAD administrator.
The administrator might receive a page not found error after approving the application if the redirect URL specified in step 5 is http://localhost/myapp/ . This is because the approval page redirects to the redirect URL configured. You can ignore this error and proceed
To proceed to the next step, a few important parameters need to be saved. Open a text pad and create the following key value pairs. These are the keys that you need to use.
Key
Values/ Details
Azure Active Directory Id The AAD Administrator has this information as described in step 9. Application Id The ID of the Office 365 application that you created. Specified in step 2. Redirect Uri The redirect URI specified in step 5. Application Password The Office 365 application password stored in step 3. Investment Agent UserId The user ID of the investment agent from step 10. Personal Agent UserId The User ID of the personal banking agent from step 10.
Stage 2: Create the Amazon Lex bot for booking appointments
In this stage, you create the Amazon Lex bot and the AWS Lambda function and store the application passwords in AWS Secrets Manager. After completing this stage you will have a fully functional bot that is ready for deployment. The code for the lambda function is available here.
This stage is automated using AWS CloudFormation and accomplishes the following tasks:
Creates an Amazon Lex bot with required intents, utterances, and slots.
Stores Office 365 secrets in AWS Secrets Manager.
Deploys the AWS Lambda function.
Creates AWS Identity and Access Management (IAM) roles necessary for the AWS Lambda function.
Associates the Lambda function with the Amazon Lex bot.
Builds the Amazon Lex bot.
Choose the launch stack button to deploy the solution.
On the AWS CloudFormation console, use the data from Step 11 of Stage 1 as parameters to deploy the solution.
The key aspects of the solution are the Amazon Lex bot and the AWS Lambda function used for fulfilment. Let’s dive deep into these components.
Amazon Lex bot
The Amazon Lex bot consist of intents, utterances, and slots. The following image describes them.
AWS Lambda function
The AWS Lambda function gets inputs from Amazon Lex and calls Office 365 APIs to book appointments. The following are the key AWS Lambda functions and methods.
Function: 1 – Get Office 365 bearer token
To call Office 365 APIs, you first need to get the bearer token from Microsoft. The method described in this section gets the bearer token by passing the Office 365 application secrets stored in AWS Secrets Manager.
var reqBody = "client_id=" + ClientId + "&scope=https%3A%2F%2Fgraph.microsoft.com%2F.default&redirect_uri=" + RedirectUri + "&grant_type=client_credentials&client_secret=" + ClientSecret; var url = "https://login.microsoftonline.com/" + ADDirectoryId + "/oauth2/v2.0/token"; Request.post({ "headers": { "content-type": "application/x-www-form-urlencoded" }, "url": url, "body": reqBody, }, (error, response, body) => { if (error) { return console.log(error); } accessToken = JSON.parse(body).access_token; if (bookAppointment) { BookAppointment(accessToken , //other params); } else { GetDateValues(accessToken , //other params); } });
Function: 2 – Book calendar slots
This function books a slots in the agent’s calendar. The Graph API called is user/events. As noted earlier, the access token is necessary for all API calls and is passed as a header.
var postUrl = "https://graph.microsoft.com/v1.0/users/" + userId + "/events"; var endTime = parseInt(time) + 1; var pBody = JSON.stringify({ "subject": "Customer meeting", "start": { "dateTime": date + "T" + time + ":00", "timeZone": timeZone }, "end": { "dateTime": date + "T" + endTime + ":00:00", "timeZone": timeZone } }); Request.post({ "headers": { "Content-type": "application/json", "Authorization": "Bearer " + accesstoken }, "url": postUrl, "body": pBody }, (error, response, postResBody) => { if (error) { return console.log(error); } //Return successful message to customer and complete the intent..
You have completed Stage 2, and you have built the bot. It’s now time to test the bot and deploy it on a website. Use the following steps to the test the bot in the Amazon Lex console.
Testing the bot
In the Amazon Lex console, choose the MakeAppointment bot, choose Test bot, and then enter Book an appointment.
Select Personal/ Investment and Choose a Day from the response cards.
Specify a time from the list of slots available.
Confirm the appointment.
Go to the outlook calendar of the investment/ personal banking agent to verify that a slot has been booked on the calendar.
Congratulations! You have successfully deployed and tested a bot that is able to book appointments in Office 365.
Stage 3: Make the bot available on the web
Now your bot is ready to be deployed. You can choose to deploy it on a mobile application or on messaging platforms like Facebook, Slack, and Twilio by using these instructions. You can also use this blog that shows you how you can integrate your Amazon Lex bot with a web application. It gives you an AWS CloudFormation template to deploy the web application.
Note: To deploy this in production, use AWS Cognito user pools or use federation to add authentication and authorization to access the website.
Clean up
You can delete the entire CloudFormation stack. Open the AWS CloudFormation console, select the stack, and choose the Delete Stack option on the Actions menu. It will delete all the AWS Lambda functions and secrets stored in AWS Secrets Manager. To delete the bot, go to the Amazon Lex console, select the Make Appointments bot, and then choose Delete on the Actions menu.
Conclusion
This blog post shows you how to build a bot that schedules appointments with Office 365 and deploys it to your website within minutes. This is one of the many ways bots can help you improve productivity and deliver a better customer experience.
About the Author
Rahul Kulkarni is a solutions architect at Amazon Web Services. He works with partners and customers to help them build on AWS
Source link
Source/Repost=> http://technewsdestination.com/schedule-an-appointment-in-office-365-using-an-amazon-lex-bot/ ** Alex Hammer | Founder and CEO at Ecommerce ROI ** http://technewsdestination.com
0 notes