#aws cognito authorizer
Explore tagged Tumblr posts
Visit Tumblr Blog
Explore Tumblr blogs with no restrictions, modern design and the best experience.
Last Seen Tumblr Blogs


Fun Fact
Premium Tumblr themes are available from anywhere between $9 to $49.
Text
Amazon Cognito Authentication and Authorization | Cognito User Pool & Identity Pool Explained
Full Video Link https://youtube.com/shorts/plyv476pZmo Hi, a new #video on #aws #apigateway #cloud is published on #codeonedigest #youtube channel. @java #java #awscloud @awscloud #aws @AWSCloudIndia #Cloud #CloudComputing @YouTube #yo
Amazon Cognito is an identity platform for web and mobile apps. Today we will understand important features of Cognito. Userpool – Amazon Cognito user pool is a user directory. With a user pool, your users can sign in to your web or mobile app through Amazon Cognito, or federate through a third-party Identity provider. Amazon Cognito user pool can be a standalone IdP. Amazon Cognito draws from…

View On WordPress
#amazon cognito#amazon web services#aws#aws cloud#aws cognito android#aws cognito authentication java example#aws cognito authentication node js#aws cognito authentication spring boot#aws cognito authorization code grant#aws cognito authorizer#aws cognito custom login page#aws cognito demo#aws cognito otp login#aws cognito react#aws training#aws tutorial#cognito aws react#cognito login#cognito login react#cognito user pool
0 notes
Text
Secure AWS Resources with Cognito User Pools and API Gateway Integration
Introduction Securing AWS Resources with Cognito User Pools and API Gateway Integration is a crucial aspect of building robust and scalable cloud-based applications. In this tutorial, we will explore the process of integrating Amazon Cognito User Pools with Amazon API Gateway to provide secure authentication and authorization for your AWS resources. What You Will Learn By the end of this…
0 notes
Text
Cognito Amazon’s New Features For Modern App Authentication

Amazon Cognito advanced security features
I’m happy to inform a number of important changes to Cognito Amazon today. These improvements are meant to give your apps greater flexibility, enhanced security, and an improved user experience.
Here is a brief synopsis:
A brand-new developer-focused console environment that facilitates integration with well-known application frameworks for beginners
Presenting Managed Login: a collection of customization choices and a redesigned Cognito-managed drop-in sign-in and sign-up page
Passkey authentication and passwordless login are now supported by Cognito Amazon.
Additional pricing tier options to suit your use cases include the Lite, Essentials, and Plus tiers.
Image credit to AWS
A fresh console experience geared toward developers
With a short wizard and recommendations tailored to specific use cases, Amazon Cognito now provides a simplified getting started experience. With this new method, you may contact your end customers more quickly and effectively than ever before and set up configurations more quickly.
You can easily set up your application with the help of this new Cognito Amazon procedure. There are three stages to get started:
Decide what kind of application you must create.
Set up the sign-in options based on the kind of application you’re using.
To incorporate the sign-in and sign-up pages into your application, adhere to the guidelines.
Next, choose Create.
Image credit to AWS
Your application and a new user pool a user directory for authentication and authorization are then automatically created by Amazon Cognito. From here, you can either start using the sample code for your application or choose the View login page to examine your sign-in page. Additionally, Cognito Amazon provides comprehensive integration instructions for standard OpenID Connect (OIDC) and OAuth open-source libraries, as well as compatibility with major application frameworks.
This is your application’s updated overview dashboard. Important details are now available in the Details part of the user pool dashboard, along with a list of suggestions to assist you further your development.
The Managed Login function on this page allows you to personalize the sign-in and sign-up process for your users.
Presenting Managed Login
With the launch of Managed Login, Amazon Cognito offers even more customization options. For your business, Managed Login takes care of the heavy work of security, scalability, and availability. After integration, any future additions and security fixes are automatically applied without requiring additional code modifications.
With the help of this functionality, you can design unique sign-up and sign-in processes for your customers that blend in seamlessly with the rest of your business application.
You must assign a domain before you can utilize Managed Login. To give your consumers a recognizable domain name, you can either use a prefix domain, a randomly created Cognito Amazon domain subdomain, or your own custom domain.
After that, you can decide between the original Hosted UI and Managed login as your branding version.
The classic Hosted UI feature may be recognizable to you if you now utilize Amazon Cognito. A new set of web interfaces for sign-up and sign-in, multi-factor authentication, built-in responsiveness for various screen sizes, and password-reset capabilities for your user base are all features of Managed Login, an enhanced version of Hosted UI.
An array of API operations for programmatic configuration or deployment via infrastructure-as-code with Amazon Web Services CloudFormation, a new branding designer, and a no-code visual editor for managed login materials and style are all available with Managed Login.
You may alter how the entire user journey from sign-up and sign-in to password recovery and multi-factor authentication looks and feels by working with the branding designer. Before you run it, you can preview screens in various screen sizes and display modes with this feature’s handy shortcuts and real-time preview.Image credit to AWS
Support for passwordless login
Additionally, the Managed Login functionality provides pre-built connectors for passwordless authentication techniques, such as SMS OTP, email OTP (one-time password), and passkey signing. Better security than typical passwords is provided with passkey support, which enables users to authenticate using cryptographic keys that are safely saved on their devices. This feature enables you to create secure and low-friction authentication solutions without having to comprehend and use WebAuthn-related protocols.
This feature makes it easier for users to use your applications while upholding strong security standards by lowering the hassle that comes with traditional password-based sign-ins.
Additional pricing tier choices include Lite, Essentials, and Plus
Three new user pool feature tiers—Lite, Essentials, and Plus have been added to Cognito Amazon. The Essentials tier is the default tier for new user pools that customers create, and these tiers are made to accommodate various customer needs and use cases. With the ability to move between tiers as needed, this new tier structure also lets you select the best solution based on the needs of your application.
You can choose Feature plan from your application dashboard to see your current tier. Additionally, you can choose Settings from the menu.
You can choose to upgrade or downgrade your plan and get comprehensive details about each tier on this page.
Here is a brief synopsis of every tier:
Lite tier: This tier now includes pre-existing functionality including social identity provider integration, password-based authentication, and user registration. You can keep using these capabilities if you already use Cognito Amazon without changing your user pools.
Essentials tier: With the help of the Essentials tier’s ex:tensive authentication and access control tools, you can quickly and easily create safe, scalable, and personalized sign-up and sign-in processes for your application. In addition to providing Managed Login and passwordless login options via passkeys, email, or SMS, it has all the features of Lite. Additionally, Essentials allows you to disable password reuse and customize access tokens.
Plus Tier: It expands on the Essentials tier by emphasizing higher security requirements. It has all the essential functionality plus the ability to identify compromised credentials, protect against suspicious login activity, export user authentication event logs for threat analysis, and implement risk-based adaptive authentication.
Amazon Cognito pricing
The Lite, Essentials, and Plus levels’ prices are determined by the number of active users each month. Customers who are currently utilizing Cognito Amazon‘s advanced security features might want to think about upgrading to the Plus tier, which offers all of the advanced security features along with other benefits like passwordless access and up to 60% more savings than using the advanced security features alone.
Visit the Amazon Cognito pricing page to find out more about these new price tiers.
Things you should be aware of
Availability: With the exception of AWS GovCloud (US) Regions, all AWS Regions where Cognito Amazon is accessible offer the Essentials and Plus tiers.
Amazon Cognito free tier
Free tier for Lite and Essentials tiers: Users on the Lite and Essentials tiers are eligible for the free tier every month, which is perpetual. Both new and current Amazon Web Services users can access it indefinitely.
Customers can upgrade their user pools without advanced security features (ASF) in their current accounts to Essentials and pay the same price as Cognito user pools until November 30, 2025, with an extended pricing benefit for current customers. Customers must have had at least one monthly active user (MAU) on their accounts throughout the previous 12 months by 10:00 a.m. Pacific Time on November 22, 2024, to qualify. Until November 30, 2025, these customers can create new user pools with the Essentials tier for the same pricing as Cognito user pools in those accounts.
With these enhancements, you can use Cognito Amazon to create safe, scalable, and adaptable authentication solutions for your apps.
Read more on govindhtech.com
#CognitoAmazon#ModernApp#Authentication#advancedsecurity#AmazonWebServices#Essentials#tierchoices#Additionalpricing#technology#technews#news#AmazonCognitopricing#govindhtech
1 note
·
View note
Text
Looking to learn about AWS?
Of course! Amazon Web Services (AWS) is a comprehensive, evolving cloud computing platform provided by Amazon. It offers a wide range of services including computing power, storage solutions, networking, databases, machine learning, and more. Here's a brief overview of some key aspects of AWS:
Compute:
EC2 (Elastic Compute Cloud): Provides scalable virtual servers in the cloud, allowing you to run applications.
Lambda: A serverless computing service where you can run code in response to events without provisioning or managing servers.
Storage:
S3 (Simple Storage Service): Offers object storage that is highly scalable, secure, and durable. It's commonly used for hosting static websites, storing backups, and hosting media files.
EBS (Elastic Block Store): Provides persistent block storage volumes for use with EC2 instances.
Databases:
RDS (Relational Database Service): Managed relational databases including MySQL, PostgreSQL, Oracle, and SQL Server.
DynamoDB: A fully managed NoSQL database service, offering low-latency access to data at any scale.
Networking:
VPC (Virtual Private Cloud): Lets you provision a logically isolated section of the AWS Cloud where you can launch AWS resources in a virtual network.
Route 53: A scalable domain name system (DNS) web service designed to route end users to internet applications.
Security:
IAM (Identity and Access Management): Allows you to manage access to AWS services and resources securely.
Cognito: Provides authentication, authorization, and user management for web and mobile apps.
Machine Learning and AI:
SageMaker: A fully managed service for building, training, and deploying machine learning models.
Rekognition: A deep learning-based image and video analysis service for analyzing images and videos for content and metadata.
Developer Tools:
CodeCommit: A fully managed source control service that makes it easy for teams to host secure and highly scalable private Git repositories.
CodeDeploy: Automates software deployments to a variety of compute services such as EC2, Lambda, and ECS.
These are just a few highlights of the vast array of services AWS offers. Learning AWS involves understanding how these services work, how they integrate with each other, and best practices for deploying and managing applications in the cloud. AWS provides extensive documentation, tutorials, and training resources to help you get started. Additionally, there are many online courses, certifications, and communities where you can learn from others and deepen your understanding of AWS.
Watch Now:;- https://www.youtube.com/watch?v=bYYAejIfcNE
0 notes
Text
AWS Cloud Practitioner - study notes
Security and Compliance
------------------------------------------------------
Shared Responsibility Model:
AWS responsibility: security of the cloud
Infrastructure elements: regions, edge locations an availability zones
Access control to data centers
Maintains networking components
Managed services like RDS, S3, ECS, Lambda
My responsibility: security in the cloud
Application data
Security configs like API calls, rotating credentials etc
Patching of a quest operation system
IAM
Network traffic protection
Installed software
Identity and Access Management (IAM):
Control access to your AWS services and resources
Secure cloud
Define who has access
Define what they can do
Free
Web Application Firewall (WAF):
Protect your web applications against common web attacks.
Protects apps against common attack patterns
Protects against SQL injection
Protects against cross-site scripting
Shield:
Managed Distributed Denial of Service protection service.
Always on-detection
Shield Standard is free
Shield Advanced is paid
Works with: CloudFront, Route S3, Elastic Load Balancing and AWS Global Accelerator
Macie:
Discover and protect sensitive data.
Uses machine learning
Evaluates S3 environment
Uncovers personally identifiable information (PII)
Config:
Asses, audit and evaluate the configs of resources.
Track config changes over time
Deliver config history file to S3
Notifications via Simple Notification Service of every config change
GuardDuty:
Intelligent threat detection system which uncovers unauthorized behavior.
Uses machine learning
Built-in detection for EC2, S3 and IAM
Reviews CloudTrail, VPC Flow Logs and DNS logs
Inspector:
Works with EC2 instances to uncover an report vulnerabilities.
Agent installed on EC2 instance
Reports vulnerabilities found
Check access from the internet, remote root login, vulnerable software versions, etc.
Artifact:
Offers on-demand access to AWS security and compliance reports.
Central repository for compliance reports form third-party auditors
Service Organization Controls (SOC) reports
Payment Card Industry (PCI) reports
Cognito:
Control access to mobile and web applications.
Provides authentication and authorization
Helps you manage users
Assists with user sign-up and sign-in
Key Management Service (KMS):
Generate and store encryption keys.
Key generator
Store and control keys
AWS manages encryption keys
Automatically enabled for certain services
CloudHSM:
Hardware security module (HSM) used to generate encryption keys.
Dedicated hardware for security
Generate and manage own encryption keys
AWS doesn't have access to keys
Secrets Manager:
Manage and retrieve secrets like passwords and keys.
Rotate, manage and retrieve secrets
Encrypt secrets at rest
Integrates with services like RDS, Redshift and DocumentDB
Well-Architected Framework:
Design principles and best practices for running workloads in the cloud.
Operational Excellence: AWS CodeCommit for version controlling and code changing.
Security: Using CloudTrail to configure central logging of all actions in account.
Reliability: Multi-AZ deployments for enhanced availability and reliability of RDS databases
Performance Efficiency: use AWS Lambda to run code whitout adminisitration.
Cost Optimization: USe S3 Intelligent-Tiering to move data between access tires.
Sustainability: Using EC2 Auto Scaling to ensure max. utilization.
0 notes
Text
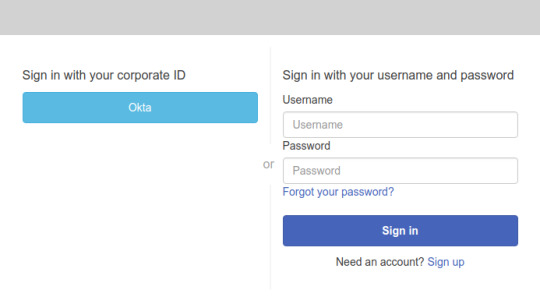
Integrating Okta as a SAML identity provider in an Amazon Cognito user pool
Posted on March 12, 2020, by Sandeep
Amazon Cognito user pool allows users to sign-in through an external identity provider (federation), such as Okta. A user pool integrated with Okta allows users in your Okta app to get user pool tokens from Amazon Cognito and authenticate apps that use Cognito.
Prerequisites 1. Cognito user pool created in the AWS account 2. Okta developer account
Steps 1. Create an app client in your user pool
a. When adding an app client, clear the Generate client secret checkbox. b. Select the required auth flows Select at least ALLOW_USER_SRP_AUTH and ALLOW_REFRESH_TOKEN_AUTH

Note: We are using the “Authorization code grant” authentication flow which does not require client secrets.
2. Create your Cognito user pool domain
a. Under the App Integration tab in the user pool console side menu, choose Domain name b. Enter your choice of unique domain prefix which is used to build Cognito login url for your SAML app.
3. Create a SAML app in Okta
a. Sign in to okta with admin access credentials and click on the “Admin” button on top right corner b. On the admin, menu chooses Applications and then choose Add Application. c. On the Add Application page, choose to Create a New App. d. In the Create a New Application Integration dialog, confirm that Platform is set to Web. e. For the Sign-on method, choose SAML 2.0. f. Choose to Create, this will open a General Settings page for saml app.
(i) Enter a name for your app. (ii) (Optional) Upload a logo and choose the visibility settings for your app. (iii) Choose Next.

(iv) Under GENERAL, for Single sign-on URL, enter https://yourDomainPrefix.auth.region.amazoncognito.com/saml2/idpresponse.
Note: Replace yourDomainPrefix and region with the values for your user pool. Find these values in the Amazon Cognito console on the Domain name page for your user pool.
(v) For Audience URI (SP Entity ID), enter urn:amazon:Cognito:sp:yourUserPoolId.
Note: Replace yourUserPoolId with your Amazon Cognito user pool ID. Find it in the Amazon Cognito console on the General settings page for your user pool.

(vi) Under ATTRIBUTE STATEMENTS (OPTIONAL- specifies which user attributes you want to export to Cognito), add a statement with the following information:
For Name, enter the SAML attribute name (attribute name by which you want to user attributes to be passed to Cognito in SAML response).

eg: if you want to pass user email in SAML response and you want to call it ‘Email Id’ enter ‘Email id’ in Name field and enter ‘user.email’ in Value field.
(vii) For all other settings on the page, leave them as their default values or set them according to your preferences. (viii) Choose Next. (ix) Choose a feedback response for Okta Support. (x) Choose Finish.
4. Assign a user to your Okta application
a. On the Assignments tab for your Okta app, for Assign, choose Assign to People. b. Next to the user that you want to assign, choose Assign.
Note: If this is a new account, the only option available is to choose yourself (the admin) as the user.
c. (Optional) For User Name, enter a user name, or leave it as the user’s email address, if you want. d. Choose Save and Go Back. Your user is assigned. e. Choose Done.
5. Get the IdP metadata for your Okta application
a. On Okta developer console, navigate to the Applications tab and select your application. b. On the Sign-On tab, find the Identity Provider metadata hyperlink (Look for text ‘Identity Provider metadata is available if this application supports dynamic configuration.’). Right-click the hyperlink (Identity Provider metadata), and then copy the URL.
6. Configure Okta as a SAML IdP in your user pool
a. In the Amazon Cognito console, choose to Manage user pools, and then choose your user pool. b. In the left navigation pane, under the Federation, choose Identity providers. c. Choose SAML. d. Under the Metadata document, paste the Identity Provider metadata URL that you copied. e. For Provider name, enter Okta. f. (Optional) Enter any SAML identifiers (Identifiers (Optional)) and enable sign-out from the IdP (Okta) when your users sign out from your user pool (Enable IdP sign out flow). g. Choose Create provider.

7. Map SAML attributes to user pool attributes
a. In the Amazon Cognito console, choose Manage user pools, and then choose your user pool. b. In the left navigation pane, under the Federation, choose Attribute mapping. c. On the attribute mapping page, choose the SAML tab. d. Choose Add SAML attribute. e. For the SAML attribute, enter the SAML attribute name (attribute name which you have mentioned in ATTRIBUTE STATEMENTS while creating the SAML app in Okta.

eg: we had specified ‘Email Id’ in the example above so mention ‘Email Id’ under SAML attribute and select Email under User pool attribute, continue and map all other attributes if you had mentioned any other in ATTRIBUTE STATEMENTS and Choose Save changes.
Note: Make sure all mapped attributes in cognito are readable and writable, you can set attribute permissions in General settings->App clients->Set read and write permissions.
8. Change app client settings for your user pool
a. In the Amazon Cognito console, choose Manage user pools, and then choose your user pool. b. In the left navigation pane, under App integration, choose App client settings. c. On the app client page, do the following: Under Enabled Identity Providers, select the Okta and Cognito User Pool checkboxes. For Callback URL(s), enter a URL where you want your users to be redirected after they log in. For testing, you can enter any valid URL, such as https://www.example.com/. For Sign out URL(s), enter a URL where you want your users to be redirected after they log out. For testing, you can enter any valid URL, such as https://www.example.com/. Under Allowed OAuth Flows, be sure to select Authorization code grant checkbox. Under Allowed OAuth Scopes, be sure to select the email and profile checkboxes. d. Choose Save changes.

9. Construct the endpoint URL
a. Using values from your user pool, construct this login endpoint URL: https://yourDomainPrefix.auth.region.amazoncognito.com/login?response_type=code&client_id=yourClientId&redirect_uri=redirectUrl b. Be sure to do the following:
(i) Replace yourDomainPrefix and region with the values for your user pool. Find these values in the Amazon Cognito console on the Domain name page for your user pool. (ii) Replace yourClientId with your app client’s ID, and replace redirectUrl with your app client’s callback URL. Find these in the Amazon Cognito console on the App client settings page for your user pool.
10. Test the endpoint URL
a. Enter the constructed login endpoint URL in your web browser. b. On your login endpoint webpage, choose Okta.
Note: If you’re redirected to your app client’s callback URL, you’re already logged in to your Okta account in your browser. The user pool tokens appear in the URL in your web browser’s address bar.
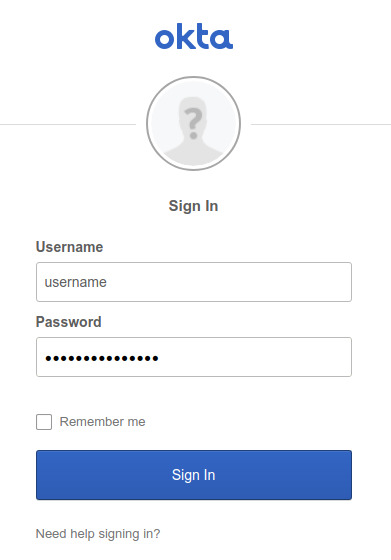
c. On the Okta Sign In page, enter the username and password for the user that you assigned to your app.
1 note
·
View note
Text
Architecture On The LAMP Environment AWS Existing Stack

The data layer of the solution consists of fully managed, scalable and highly available services such as DynamoDB and Amazon S3. DynamoDB provides a NoSQL datastore for storing structured data with low latency access. Amazon S3 offers an extremely robust and scalable archive of objects for storing photos, videos, binary data and other files that can be accessed directly via HTTP. Data stored in Amazon S3 can be stored in the Amazon Glacier service by applying a storage policy to the S3 bucket. Identity Management Amazon Cognito can simplify user authentication and authorization, and gives customers the ability to authenticate users with Amazon Cognito user pools, social identity providers, or their own identity management system. Amazon Cognito offers users access capabilities and integrates with Identity and Access Management AWS, adding additional security features to the mobile backend and simplifying the management of important security features for your app. Interface to access the user interface Log in with Facebook, Google and Twitter Add user access and access workflows to your applications for onboarding customers by supporting your apps with a fully managed multi-factor authentication service. You can also authenticate users through social identifiers such as Facebook, Twitter and Google+. This feature is provided by Amazon Cognito. Architecture Guided by Events AWS Lambda simplifies the implementation of event-based architectures that do not require permanent resources. Lambda hosts the backend logic for mobile apps. Lambda automatically runs the code in response to events and assigns resources to resolve requests as needed. In this way, you can provide the mobile application with a minimum logic to simplify scaling and updating. AWS Lambda automatically monitors lambda functions in your order and reports metrics via Amazon CloudWatch. To help troubleshoot problems, Lambda logs all feature requests and automatically logs logs through the Amazon CloudWatch logs. App Store Amazon Cognito Sync supports reading and writing in a local data store. This means that your app can work the same way, regardless of whether the device is online or offline. You can also save user data such as user preferences, logins and game status and then synchronize that data on the user's device for a consistent experience. Amazon DynamoDB offers a managed and highly available NoSQL database for storing and querying app data by eliminating unnecessary client and content mining downloads. Amazon DynamoDB includes granular access control to follow best practices of minimum privileges for lambda functions that query specific data Mobile Push Notifications Amazon Simple Notification Service (Amazon SNS) is a fast, flexible and managed push notification service that allows you to send push notifications to mobile users, email recipients or send messages to other simple and inexpensive distributed services. Mobile push notifications send messages directly to apps on mobile devices that can be viewed in the mobile app such as message notifications, badge updates, or even audible notification. Disaster recovery planning The underlying AWS services used by the solution provide built-in fault tolerance and high availability using multiple zones of availability in each area to protect against single computer or data center failures. For better understanding visit
Mobile App Developer in Austin
. Conclusion Serverless architectures with PaaS offers from the leading public cloud AWS offers the ability to deploy scalable and available applications without the need for capacity planning and server configuration. The ability to independently scale the web, logic, and data levels allows optimal performance of the overall solution.
3 notes
·
View notes
Text
Teacode technologies

TEACODE TECHNOLOGIES FULL
TEACODE TECHNOLOGIES REGISTRATION
TEACODE TECHNOLOGIES SOFTWARE
TEACODE TECHNOLOGIES CODE
Its Registered Address and Contact Email are 'A/221 MONALISA RESIDENCY VILLAGE VADODARA VODODARA Vadodara GJ 390011 IN' and respectively.
TEACODE TECHNOLOGIES REGISTRATION
They are: Hiren Buhecha and Alpeshkumar Kanaiyalal Prajapati.Īs per the records of Ministry of Corporate Affairs (MCA), Teacode Technologies Private Limited's last Annual General Meeting (AGM) was held on Oct 30, 2019, and the date of lastest Balance Sheet is Mar 31, 2019.Ĭorporate Identification Number (CIN) of Teacode Technologies Private Limited is U72200GJ2018PTC101974 and its Registration Number is 101974. There are 2 Directors associated with Teacode Technologies Private Limited. It is a Non-govt company with an Authorized Capital of ₹ 50,000 (Fifty Thousand Indian Rupees) and Paid Up Capital of ₹ 50,000 (Fifty Thousand Indian Rupees). It is registered with Registrar of Companies, Ahmedabad on Apr 23, 2018.Ĭurrent Status of Teacode Technologies Private Limited is Active.
TEACODE TECHNOLOGIES CODE
Bartek : As a developer I like to learn every day in my work, in TeaCode I can do it thanks to interesting projects and challenges, but also great code review policy, strong team cooperation and many knowledge sharing events and initiatives.TEACODE TECHNOLOGIES PRIVATE LIMITED is a Private Company limited by Shares.
Thanks to that we create an app not just a separate section. Every person on the project knows what the frontend and backend looks like and how it works.
TEACODE TECHNOLOGIES FULL
Matt : Our great value is that we work on our projects in a full stack way. What did you find most impressive about them They helped me choose the right technology stack and kept very up-to-date with project management tools.
Tech stack : React, React Native, Gatsby, MaterialUI, React Query, React Native Geolocation, AWS (Lambda Functions, DynamoDB, AppSync).
Project 2 : A British app encouraging children to have fun on a fresh air.
Tech stack : React Native, AWS (Amplify : Cognito, S3, Lambda, AppsSync, DynamoDB), Firebase Services, admin panel : Next.
Project 1 : A Californian startup for social media travel industry.
Methodology : Scrum - two week sprints, daily meetings, retro / planning session.
Playwright, Cypress, Jest, TypeScript, React Native Detox, Appium, Testrail, Mocha, K6.
Slack, Github / Gitlab, Asana, Clickup, Jira, Figma, Notion, Confluence, Sentry, Miro, Toggl, Google Workspace.
Node.js, AWS, Amplify, Nest.js, Express, Fastify, MongoDB, Postgresql, TypeScript, Cloudformation, Firebase, Elasticsearch, Serverless.
TypeScript, React (Functional Components, Hooks, Context API), Styled components, Next.js, Redux, Storybook, Webpack, Babel, Prettier, Eslint, GitHub Actions, GitLab, React Native.
technical interview with our developers.
recruitment task - we do our best to make it a real life case.
entry interview with Joanna - our Talent Acquisition Specialist.
What does the recruitment process look like?
last but not least we work together, we party together.
the office full of sweet and spicy snacks but also fresh fruits and vegetables.
table football - we take those gameplays very seriously.
We have monthly meetings that summarise our achievements, allow us to talk in-depth about some of the projects and set our priorities for the upcoming month
active participation in the life of TeaCode - we share our success stories as well as learn from each other's mistakes.
We are looking for experienced developers and freshers also for PHP and who have clear concept of.
workstation equipment (MacBook Pros, additional screen) Teacode Technology is hiring PHP developers with expertise in PHP, Laravel, Codeigniter etc.
technical university degree (preferably IT related faculty).
speaking and writing in English on a very good level (B2).
at least 3 years of experience on both frontend and backend side using React.js and Node.js.
we have clients from all over the world is a Information Technology And Services company and has headquarters in Vadodara, Gujarat, India.
we work on one programming language JavaScript (React.js on the frontend side and Node.js on the backend side).
TEACODE TECHNOLOGIES SOFTWARE
we are a software house based in Warsaw.That will serve as an UI framework with its own database. We are working on an internal tool for a client from the cryptocurrency industry.
0 notes
Text
API design
I'm ready to design the API for my book review app.
Before diving in the code, I need to understand what the users will do. Easiest way to flush that out is to make a good old Use Case diagram.
For now I'll focus on my two main types of users: those who have an account, and those who don't. I'll get back to the premium users (such as authors or publishers) later.

Already from this diagram I can see that the app can be easily divided in a few big pieces.
My gut feeling is that it'd work best as 4 parts:

One could argue that read/rate should be green, since they have to do with reviews, but I disagree. When I design an API, I don't put things in boxes based on how they conceptually relate to others, but based on what I'm willing to break when I make an update.
For instance, I could decide to add some fancy stuff in my Create Review feature, and maybe it's not gonna work well. If I bundle that with the Read/Rate features, I'm impacting everyone, and I'm shackling myself with a lot more regression testing than I really need.
Additionally, I can already guess that most of the traffic on my app will come from guests. If I don't split the requirements of guest and authenticated users, I'm gonna have to satisfy both, and it probably means that I'll need to scale the whole thing based on the guest volume, which can be needlessly expensive.
The four apps of the Apocalypse
Based on my extensive analysis, I'm ready to define four different API endpoints for bookreview-o-matic. From now on, I'll consider those as four different apps (although on the front-end it will still be a single Reat app - more on that later).
Search (a Lambda app)
Reviews (another Lambda app)
Posts (another Lambda app)
Auth (not a Lambda app)
The fourth app will be powered by Cognito, which is a really easy way to leverage oAuth and other such things. By having Cognito in the picture, I'll be able to use JWT tokens.

REST API
For my project, the absolute best would be to use GraphQL, but it's a bit tedious to implement when there's a lot of unknowns in the design, so for now I'll rely on a REST API.
A REST API is a fancy way to say that my API endpoint represents entities, not actions. It's the HTTP method used to access those endpoints that determine the action. So, for instance, I wouldn't have:
/reviews/123/edit
/reviews/123?edit
/reviews/create
Instead, it would just be /reviews or /reviews/123 and I'd use GET, PUT, POST or PATCH depending on how my client wants to interact with the review(s).
Microservices, yes please
As I code, it could be tempting to have all my Lambda functions "see" all my data. After all, it's one big app, right?

If I start coupling the data access layers of my 4 apps, I'm gonna end up with a monolith, and again I'm gonna have to do lots of regression testing and whatnot in all parts of the app whenever I change anything. It will just slow me down when I want to add features in one area that don't impact the others.
So that's the golden rule I'll keep in mind: lambda applications talk to each other via HTTPS, they don't peek under the hood at shared data stores. I have four apps, and each app will have its own private data persistence, and will only interface with other apps (or with users) via HTTPS. No shared library, no shared database, nothing like that.
Let's remember the prime directive from Jeff Bezos that was the starting point for the huge business that AWS has become.
But a monolith is better/easier/more robust (etc)
If you're convinced that a monolith is better, go for it. If you're convinced that hosting VMs that you control is better, go for it. If you're convinced that a central database is better, go for it.
But I've been there, many times, and for this bookreview-o-matic application I'm going to use the microservice-inspired approach.
This means I'm going to need 4 hostnames:
search.bookreview-o-matic.com
reviews.bookreview-o-matic.com
posts.bookreview-o-matic.com
auth.bookreview-o-matic.com

The plot thickens
I'm planning to use external services to help me build a better app, such as Google Analytics. This means I'm gonna need an email address, and that's something I'll discuss in the next post.
0 notes
Video
youtube
(via Amazon Cognito for Authentication & Authorization | AWS Cognito Tutorial for Cloud Developer) Full Video Link https://youtube.com/shorts/LTFQ7VdNK_4?feature=share Hi, a new #video on #aws #amazon #cognito #authentication #authorization #authorisation is published on #codeonedigest #youtube channel. @java #java #awscloud @awscloud #aws @AWSCloudIndia #Cloud #CloudComputing @YouTube #youtube #azure #msazure #aws #aws #amazonwebservices #awscognito #awstutorial #awscloud #awstraining #awscognitodemo #awscognitocustomloginpage #awscognitoauthorizationcodegrant #awscognitootplogin #awscognitoreact #awscognitoauthenticationnodejs #awscognitoauthorizer #awscognitoauthenticationjavaexample #awscognitologinandroid #awscognitotraining #awscognitoauthenticationspringboot #cognitoawsreact #cognitoaws #amazoncognitoandroid #amazoncognitoreact #amazon
#video#aws#amazon#cognito#authentication#authorization#authorisation#codeonedigest#youtube#java#awscloud
1 note
·
View note
Text
What Is Amazon Cognito?, Its Use cases & Amazon Cognito FAQ

Introducing Amazon Cognito
What is Amazon Cognito?
In just a few minutes, you can incorporate user sign-up, sign-in, and access management into your web and mobile applications using Amazon Cognito. It is an affordable, developer-focused solution that offers federation options and secure, tenant-based identity stores that can accommodate millions of users. Every month, Amazon Cognito handles over 100 billion authentications, giving your apps customer identity and access management (CIAM).
You can safely manage and synchronize app data for your users across their mobile devices with Amazon Cognito, a straightforward user identification and data synchronization service. With several public login providers (like Amazon, Facebook, and Google), you can give your users distinct identities and allow unauthenticated visitors. App data can be locally stored on users’ devices, enabling your apps to function even when the devices are not connected.
Without building any backend code or maintaining any infrastructure, you can use Amazon Cognito to store any type of data in the AWS Cloud, including game state or app preferences. This means that rather than worrying about developing and maintaining a backend solution to manage identity management, network state, storage, and sync, you can concentrate on making amazing app experiences.
Amazon Cognito benefits
Scalable and safe management of consumer identification and access (CIAM)
Offers enterprise-grade, affordable, and adaptable customer identity and access management that is safe and scalable. supports both passwordless login with WebAuthn passkeys or one-time passwords sent by email and SMS, as well as login with social identity providers. With a well-managed, dependable, and high-performance user directory, grow to millions of users.
Your application can be easily integrated and customized
Gives programmers access to low-code, no-code capabilities that boost efficiency. Create unique sign-up and sign-in processes that are consistent with your brand without the need for a special code. AWS Amplify, React, Next.js, Angular, Vue, Flutter, Java,.NET, C++, PHP, Python, Golang, Ruby, iOS (Swift), and Android are just a few of the many developer frameworks that it works with.
Easy access to resources and services offered by AWS
Allows for role-based access to AWS services, including AWS Lambda, Amazon S3, and Amazon DynamoDB. To enable least privilege access to a service, users can be dynamically assigned to various roles.
Advanced sign-up and sign-in security features
Provides cutting-edge security capabilities to meet your compliance and data residency needs, including risk-based adaptive authentication, compromised credential monitoring, IP geo-velocity tracking, and security metrics.
Applications
Engage clients with personalized, adaptable authentication
With the improved UI editor, you can provide your clients branded customer experiences and safe, password-free access.
Oversee B2B (business-to-business) identities
Make use of a range of multi-tenancy alternatives that offer your company varying degrees of policy and tenant isolation.
Safe authorization of machine-to-machine (M2M)
Create cutting-edge, safe, microservice-based apps and connect them to web services and backend resources more readily.
Gain access to AWS resources and services depending on roles
Get role-based, safe access to AWS services like AWS Lambda, Amazon S3, and Amazon DynamoDB.
In brief
With AWS’s customer identity and access management (CIAM) solution, Amazon Cognito, developers can easily incorporate safe user sign-up and sign-in features into their online and mobile apps. It supports millions of users with scalable, adaptable solutions, connects easily with different developer frameworks, and includes sophisticated security features including risk-based adaptive authentication and multi-factor authentication. Through role-based access management, Cognito enables safe access to other AWS services and resources, supporting a variety of use cases such as M2M and B2B authentication. Up to 10,000 monthly active users can take use of the service’s affordable free tier.
Amazon Cognito FAQ
How does Amazon Cognito support secure authentication practices?
Strong security aspects in Amazon Cognito include:
By dynamically modifying authentication requirements in response to risk variables, risk-based adaptive authentication improves security without sacrificing user experience.
Risk-based Adaptive Authentication: Dynamically controls authentication based on risk indicators to improve security without affecting user experience.
To protect user accounts, continuously monitors for compromised credentials and takes action.
IP Geo-velocity Tracking: Reduces possible risks by identifying suspicious login attempts from odd geographic regions or at odd frequencies.
IP Geo-velocity Tracking: Reduces risks by detecting suspicious login attempts from unusual places or frequencies.
Security and Compliance: Provides comprehensive security metrics and helps meet data residency and security best practices compliance standards.
How do I get started with Amazon Cognito?
Explore these Amazon Cognito resources to get started:
Features Page: Discover Amazon Cognito’s capabilities. Video lessons, workshops, and sample applications help you implement.
Developer Documentation: Find thorough instructions and best practices in developer guides and documentation.
To start Amazon Cognito, use the AWS Free Tier, which offers 10,000 free monthly active users.
What is the AWS Free Tier for Amazon Cognito?
It is free to start using Amazon Cognito with the AWS Free Tier. It offers 10,000 active users each month for free, so you can test out Cognito and see its advantages before deciding to buy a plan. For the testing, development, and deployment of applications with a small user base, this is perfect.
Can I integrate Amazon Cognito with other AWS services?
Yes, you may take use of the power of the AWS ecosystem by using Amazon Cognito’s seamless integration with a variety of AWS services. Role-based access to services such as Amazon S3, Amazon DynamoDB, AWS Lambda, and others can be provided to users through Cognito. For apps working with numerous AWS services, this interface expedites the development process and simplifies authorization.
Read more on govindhtech.com
#AmazonCognito#AmazonCognitoFAQ#AWSCloud#AWSAmplify#AWSLambda#AWSservices#aws#securityfeatures#Applications#technology#technews#adaptableauthentication#news
0 notes
Text
My Experience, Feedback, And Tips for the AWS Developer Associate Exam
I passed the AWS Certified Developer Associate test on my first try a few weeks ago. My second attempt at the trial was having previously obtained AWS Developer Associate certification around four years ago. Since then, the test has undoubtedly altered. In the past, you could easily pass the test using knowledge from the AWS Certified Solutions Architect Associate and a few extra facts about Amazon DynamoDB. The latest exam is unquestionably more developer-focused, with questions evaluating your grasp of Developer Tools, development best practices, and code examples.
I still don't think you need a solid background in development to pass this exam. Indeed, my experience is in Enterprise Solutions Architecture rather than programming. You will need to comprehend some basic code examples, such as JSON code, configuration files, and IAM policy documents, although these are pretty simple. This is a credential that anybody, regardless of background, may obtain with the proper training.
In this post, I'll go through the test blueprint, provide some input from my exam experience, and offer some advice on effectively preparing for this exam. Of course, all exam takers must sign a non-disclosure agreement (NDA) that precludes me from discussing exam subject specifics.
General Information About the Exam:
· AWS Certified Developer Associate is an abbreviation for Amazon Web Services Certified Developer Associate
· The length of the questionnaire is 65 questions.
· Duration: 130 minutes
· Passing grade: 720 points out of a possible 1000 points.
· On the test, there are two sorts of questions:
· Multiple-choice: There is one correct answer and three wrong answers (distractors)
· Multiple response: Has two or more accurate replies from a set of five or more possibilities. (I only saw four of them out of 65 questions.)
· Exam Guide for the AWS Certified Developer Associate
What should I study?
Here is a list of services and some crucial subjects I believe you should learn before taking the exam. There is a strong emphasis on serverless application development, so make sure you are well-versed in the first five services listed below.
Listed in ascending order of significance (the first five services made up over 50 percent of my exam)
AWS LAMBDA (10–15 % OF THE EXAM)
Types of invocation
· Using event source mappings and notifications
· X-Ray concurrency and throttling, as well as Amazon SQS DLLs
· Aliases and variants
· The use of blue and green deployment
· VPC connection packaging and deployment (with Internet/NAT GW)
· ELB target Lambda
· Dependencies
DYNAMODB AMAZON (10 percent OF THE EXAM)
· Query vs. Scans (and the APIs, parameters you can use)
· Secondary indices at the local and global levels
· Calculating RCUs (Read Capacity Units) and WCUs (Write Capacity Units) (WC)
· Best techniques for performance and optimization
· Case studies (for example, session state, key/value data storage, and scalability)
· Streams in DynamoDB
· Use with Lambda and API Gateway in a serverless app.
· Use cases for DynamoDB Accelerator (DAX)
AMAZON API GATEWAY (8%–10% OF THE EXAM)
· Authorizers for Lambda, IAM, and Cognito
· Cache invalidation
· Types of integration: proxy vs. bespoke / AWS vs. HTTP Caching
· importing and exporting Swagger standards for OpenAPI
· Variables at each stage
· Metrics of performance
AWS COGNITO (7%–8% OF THE EXAM)
· Identity pools vs. User pools
· An identity that has not been authenticated
· AWS Cognito Sync with Cognito Web Identity Federation Using MFA
AMAZON S3 (7%–8% OF THE EXAM)
· Encryption – needs to unmake sure you understand S3 encryption well before taking the exam!
· Versioning Data Copying Data Lifecycle Rules S3 Transfer Acceleration
IDENTITY AND ACCESS MANAGEMENT (IAM) ON AMAZON IAM POLICIES AND ROLES
· Access to multiple accounts
· API calls for multi-factor authentication (MFA)
· IAM Roles in EC2 (instance profiles)
· Roles vs. access keys
· Federation of IAM Best Practices
ELASTIC CONTAINER SERVICE ON AMAZON (ECS)
· Containers share storage space.
· Single-docker environments vs. multi-docker environments
· Using ECR to upload and download pictures
· Methods of placement (e.g., spread, binpack, random etc.)
· Mappings of ports
· Task definitions must be defined.
· Task Roles in IAM
ELASTIC BEANSTALK ON AMAZON
· Blue/green deployment policies
· extensions and configuration files
· Deployment updates
· Worker tier vs. web tier
· Deployment, packaging, and files, as well as code and commands, are all utilized.
· Case studies
CLOUD FORMATION ON AWS
· Anatomy of a CloudFormation template (e.g., mappings, outputs, parameters, etc.)
· AWS Serverless Application Model was utilized for packaging and deployment, including instructions (SAM)
#AWS Developer Associate Exam#AWS Certified Solutions Architect Associate#aws certified developer associate
0 notes
Text
Integrate Amazon Managed Blockchain identities with Amazon Cognito
When you authenticate with a web or mobile application, you typically do so with a username and password where you’re authenticated against a user database such as Amazon Cognito. You’re expected to secure your password and rotate it periodically or when it has been compromised. When you’re building a user-facing application that is running on a Hyperledger Fabric blockchain network, there are no usernames and passwords native to the blockchain. Instead, user credentials consist of a private key and one or more public certificates. The private key is used to validate ownership of your account (similar to a password), whereas the public certificate contains publicly consumable information such as your name, role, organization. Every read or write transaction against a blockchain network requires the transaction to be signed with the private key to prove user authenticity. This is similar to requiring you to enter your password for every action you performed on a web application, which would be a very poor user experience. In this post, we look at how we can continue providing a familiar username and password authentication experience to users, while securely managing private keys with AWS Secrets Manager and using AWS Lambda to sign blockchain transactions on the user’s behalf. This post shows a step-by-step approach to implement this, but you can automate many of these steps to provide a simple mechanism for administering users across Amazon Cognito and the blockchain. Certificate Authorities, private keys, and public certificates A blockchain network consists of multiple members, each representing a different organization participating in the network. Each member manages their own users’ credentials through a Certificate Authority (CA), which serves two primary purposes: Registration – The first step is to create accounts for new users, which get created within the CA. Enrollment – The second step is to generate cryptographic material (private keys and public certificates) for the user. Private keys should be managed with the same level of security as a password, whereas public certificates are designed to be shared. A user’s private key is used to sign a blockchain transaction before it’s submitted to the blockchain network. When a user has signed a transaction, their identity and associated attributes (such as name, role, and organization) are available to the network through their public certificate. This enables role-based access control within a smart contract, such as ensuring only administrators can perform a particular function. You can also use this to include the identity of the user in the smart contract data, or to assign them ownership of a digital asset. Blockchain credentials as part of web application authentication This post builds on the blockchain application deployed in the following GitHub repo. The application lets users donate to their favorite NGOs, while having transparency into how their donations are being spent. Application data and functionality are contained within a smart contract deployed on the blockchain. We continue to build out this application by creating users and defining their roles within our CA. We also upgrade our smart contract to restrict access based on the user’s role using Hyperledger Fabric’s native attribute-based access control. To build this, we start by registering and enrolling two users within our CA with the usernames ngoDonor and ngoManager. Next, we create an Amazon Cognito user pool with two users: bobdonor and alicemanager. Each user is tied to their respective CA user (ngoDonor or ngoManager) by setting Amazon Cognito custom attributes on their user profile. We then deploy an Amazon API Gateway and secure access to it by requiring authentication against the user pool. For more details on how API Gateway uses Amazon Cognito user pools for authorization, see Control access to a REST API using Amazon Cognito user pools as authorizer. Solution overview The following diagram illustrates the solution architecture. The blockchain user is registered (created) in the Certificate Authority, and the application takes custody of the user’s private key and public certificate in AWS Secrets Manager. The user never needs to know or supply their private key; instead a Lambda function signs their blockchain transactions for them after they have successfully authenticated. A corresponding user account is created within an Amazon Cognito user pool, with a custom attribute, fabricUsername, that identifies this user within the Certificate Authority, and also identifies their credentials within Secrets Manager. A user attempting to access an API Gateway endpoint is challenged to authenticate via username and password against the Amazon Cognito user pool. When a user successfully authenticates, Amazon Cognito returns an identity token, which is a JSON Web Token (JWT). A JWT is a standards-based method for transferring credentials between two parties in a trusted manner. The client application includes this JWT in requests sent to the API Gateway, which authorizes the user to invoke the API route. API Gateway retrieves the fabricUsername custom attribute from the JWT, and sends this to the Lambda function that runs the blockchain transaction. The Lambda function retrieves the blockchain user’s private key from Secrets Manager and retrieves the connection profile for connecting to the Amazon Managed Blockchain network from AWS Systems Manager (Parameter Store). We use AWS Identity and Access Management (IAM) policies to restrict access to Secrets Manager and Systems Manager to only the Lambda function. Up to this point, we have a solution for issuing blockchain transactions on behalf of a user that has authenticated using a username and password. The last step is to enforce attribute-based access within our Fabric chaincode. We upgrade our chaincode to add new methods that add restrictions as to who can run them. The following is a snippet of a Node.js function that retrieves information about the invoking user. function getClientIdentity(stub) { const ClientIdentity = shim.ClientIdentity; let cid = new ClientIdentity(stub); let result = {} result['getID'] = cid.getID(); result['getMSPID'] = cid.getMSPID(); result['getX509Certificate'] = cid.getX509Certificate(); result['role'] = cid.getAttributeValue("role"); //e.g. acme_operations result['affiliation'] = cid.getAttributeValue("hf.Affiliation"); //member name, e.g. ACME result['enrollmentID'] = cid.getAttributeValue("hf.EnrollmentID"); //the username, e.g. ngoDonor result['fullname'] = cid.getAttributeValue("fullname"); //e.g. Bob B Donor return result; } The following diagram shows the sequence of events that transpire to authenticate a user and invoke blockchain transactions on their behalf. Prerequisites Prior to completing the step-by-step walkthrough, you must complete Part 1, Part 2, and Part 6 in the GitHub repo. These parts include creating the Managed Blockchain network, deploying the NGO chaincode, and deploying an API Gateway with an associated Lambda function to query the blockchain. Walkthrough overview In our solution, we create two blockchain users, ngoDonor and ngoManager, each with a corresponding Amazon Cognito user we use to authenticate with. Next, we define API routes in API Gateway that require authorization via Amazon Cognito. One of these routes allows access only to ngoManager users. We then test our setup using the AWS Command Line Interface (AWS CLI) and curl. For more information about each step in this process, see the GitHub repo. Each step listed in this post has a matching step in the repo in which you run the script or command that completes that step. As you read each step, you can refer to the corresponding step in the repo to gain a more in-depth understanding. The walkthrough includes the following steps: Create Fabric users in the Certificate Authority. Deploy an Amazon Cognito user pool. Deploy API Gateway routes that require Amazon Cognito authentication. Create users in the Amazon Cognito user pool. Upgrade the chaincode. We conclude by testing the solution. Create Fabric users in the Certificate Authority On our Certificate Authority, we create two users, one named ngoDonor that represents a donor, and one named ngoManager that represents a manager. We define various attributes on the users’ certificates, including the users’ fullname and role. These attributes are available within the smart contract and can be used to enforce attribute-based access. For more information about creating Fabric users, see Fabric CA client. These credentials are stored in Secrets Manager, where they’re retrieved when processing an API request. Deploy an Amazon Cognito user pool Next, we create an Amazon Cognito user pool. We enable user password authentication to allow users to authenticate just like they do with a typical web application. We also define a custom attribute called fabricUsername that we populate with the user’s identity within the Certificate Authority. Deploy API Gateway routes that require Amazon Cognito authentication In this step, we deploy an API Gateway with the following routes: /donors – Returns information about all donors. This route is available to all authenticated users. /donorsmanager – Same as the preceding route, but restricted to authenticated users with the necessary attributes. /user – Returns information about the calling user. Useful for debugging. API Gateway fulfills these routes using the Lambda function that was deployed in Part 6. Each route requires authentication with the Amazon Cognito user pool we created in the previous step. When the user is authenticated, API Gateway parses the user’s fabricUsername from the provided identity token. This value is sent to the Lambda function with each invocation so it can retrieve the corresponding user’s CA credentials stored in Secrets Manager. Create users in the Amazon Cognito user pool Next, we create two users within the Amazon Cognito user pool. User bobdonor represents a donor, and we set a corresponding fabricUsername of ngoDonor. User alicemanager represents a manager and has a fabricUsername of ngoManager. Upgrade the chaincode The final step before we test is to upgrade the NGO chaincode with the new methods needed to support our application. We deploy this on our peer node and upgrade the chaincode on the channel. In a high availability deployment, blockchain members have multiple peer nodes, and you should first install the chaincode on all peer nodes before upgrading the chaincode version on the channel. Test the solution You’ve now provisioned all the components and are ready to test. First, we verify that an unauthenticated user can’t access the APIs. We issue the following command: curl -s -X GET "https://" We get the following expected response: {"message":"Unauthorized"} Next, we access that same URL, but first we authenticate as the bobdonor We do this using the aws cognito-idp initiate-auth AWS CLI command.The command returns a JWT that contains various information about the authenticated user. The following code is an example of a parsed JWT; note the fabricUsername attribute that identifies this user in the Certificate Authority. { "sub": "e6add7b3-xxxxx", "aud": "3q0bnxxxxx", "event_id": "d41d634a-xxxxx", "token_use": "id", "custom:fabricUsername": "ngoDonor", "auth_time": 1597273756, "iss": "https://cognito-idp.us-east-1.amazonaws.com/us-east-1_xxxxx", "cognito:username": "bobdonor", "exp": 1597277356, "iat": 1597273757 } We call the API again, but this time we send an Authorization header with the JWT token. curl -H "Authorization: " -s -X GET "https:///donors" This returns a successful response containing a list of all the donors. We try using this same JWT to access the API route that is restricted to only users with the ngoManager role. curl -H "Authorization: " -s -X GET "https:///donorsmanager" As expected, this fails because our user is not a manager, and the returned response tells us the following. User must have ngo_manager role to call this function. To complete our testing, we authenticate as user alicemanager, who maps to our ngoManager user in our CA. We use the returned JWT to query the restricted API route, and we can now view the list of donors. {"Key":"donormelissa","Record":{"donorUserName":"melissa","email":"[email protected]","docType":"donor"}} View user attributes within the smart contract It can be helpful during debugging to know what attributes are available within the smart contract. When we upgraded our chaincode, we included a method that returns the attributes associated with the caller. We can see these attributes by calling the following route: curl -H "Authorization: $ID_TOKEN" -s -X GET " https:///user" This returns the following result: { "getID":"x509::/C=US/ST=North Carolina/O=Hyperledger/OU=user+OU=member/CN=ngoManager::/C=US/ST=Washington/L=Seattle/O=Amazon Web Services, Inc./OU=Amazon Managed Blockchain/CN=member Amazon Managed Blockchain Root CA", "getMSPID":"m-abc123...", "getX509Certificate":{...}, "role":"ngo_manager", "affiliation":"member", "enrollmentID":"ngoManager", "fullname":"'Alice Manager'" } Summary In this post, I walked you through how to authenticate blockchain users with API Gateway and Amazon Cognito, while securing their blockchain credentials in Secrets Manager. Developers can use this approach to easily integrate blockchain capabilities into their web and mobile applications. Although this post explored implementing this integration step by step, you can automate user administration behind a user API. For example, with a single request, the API can atomically create a user within the CA, within the Amazon Cognito pool, and store their credentials on Secrets Manager. You can also extend this solution beyond Amazon Cognito user pools. For example, you can implement a similar solution that uses other identity providers such as Facebook or Google for authentication. For more information, see Amazon Cognito Identity Pools (Federated Identities). About the author Emile Baizel is a Senior Blockchain Architect on the AWS Professional Services team. He has been working with blockchain technology since 2018 and is excited by its potential across a wide range of industries and use cases. In his free time he enjoys trail running, and spending tech-free time with his wife and two young children. https://aws.amazon.com/blogs/database/integrate-amazon-managed-blockchain-identities-with-amazon-cognito/
0 notes
Text
Auth0: Vue & TypeScript Quickstart SDK - The Missing Docs

Authentication is hard. Even if you know the ins and outs of it, handling registration, login, email verification, forgotten password, secret rotation... and what not... is a tedious work.
For this reason, we use auth providers such as AWS Cognito or Auth0. But this comes with its own drawback, namely that you are at the provider's mercy when it comes to examples and tutorials. If a resource you need does not exist, you either need to contact support and wait for them (but nobody got time for that), or figure it out yourself by the good ol' trial and error method.
A couple of days ago, I had to use Auth0 with Vue.js and TypeScript. Now, Auth0 has an excellent tutorial for Vue.js, but I could not find any examples in TypeScript. So seeing no better option, I started annotating the code provided by the tutorial.
I finished it, and in this blogpost, I'll walk you through the details, so you don't have to repeat this chore.
We will follow the original Auth0 Vue tutorial structure which can be found here. To make it easier to compare the two, we'll use the exact same first-level headings as the original.
You can find my complete auth0 vue typescript repo on RisingStack's Github.
Configure Auth0
First, you'll need to set up your Auth0 application. That part is very well written in the original tutorial, and I would like to be neither repetitive nor plagiarize Auth0's content, so please go ahead and read the first section there, then come back.
Create a Sample Application
Now we already start to diverge from the Auth0 tutorial.
If you already have an existing app, make sure that typescript, vue-class-component, and vue-property-decorator are present in your package.json, as we'll use class components.
If you don't have one, let's create a sample app.
$ vue create auth0-ts-vue
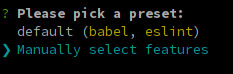
When prompted, select Manually select features.
We'll need Babel, TypeScript, and Router.
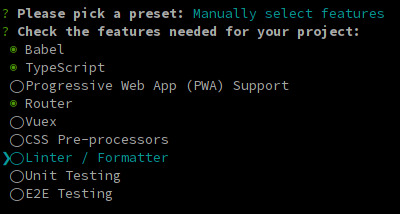
The next 3 questions are about deciding whether you want to use class-style component syntax, Babel, and history mode. Hit enter for all three to answer "Yes". You might opt-out from history mode if you really want to.

It is entirely up to you if you want to use dedicated config files or not, and if you want to save this as a preset.
Grab a beverage of your preference while the dependencies are being installed.
Install the SDK
Once it's done, we need to install our auth0 dependencies.
$ cd auth0-ts-vue-example $ npm install @auth0/auth0-spa-js
The auth0-spa-js package comes with its own type definitions, so we're all set for now.
Modify your Webpack Config
If you followed the original Auth0 tutorials configuration part, you've set up your URLs to listen at port 3000. Time to hard code this into our webpack dev-server.
Create a vue.config.js file in the root directory of your app.
const webpack = require('webpack') module.exports = { devServer: { port: 3000 } }
This way, we don't have to specify the PORT env var when we run our app. We'd need to change it in Auth0 anyway all the time, while we're developing it.
Start the application
$ npm run serve
Leave it running so we can leverage Webpack's incremental build throughout the process.
Create an Authentication Wrapper
Have you ever created a Vue.js plugin? Well, now is the time!
The easiest way to use Auth0 in your app is to make it available on this in each of your components, just as you do with $route after you've installed Vue Router.
It would be nice if this was a separate dependency, but for the sake of simplicity, let it live inside our codebase.
Create a directory called auth inside your src dir then create the following files: index.ts auth.ts, VueAuth.ts, User.ts. The original tutorial has them all in one file. Still, in my opinion, it is easier to understand what's happening if we separate the matters a bit, and it also results in nicer type definitions too.
Our index.ts will be a simple barrel file.
export * from './auth'
auth.ts is where we define the plugin. VueAuth.ts is a wrapper Vue object around auth0-spa-js, so we can leverage the observability provided by Vue, and User.ts is a class to make its type definition nicer.
Defining our User
Let's go from the inside out and take a look at User.ts
import { camelCase } from 'lodash' export class User { sub: string names: string nickname: string picture: string updatedAt: string email: string emailVerified: boolean provider?: string id?: string givenName?: string familyName?: string locale?: string [key: string]: string | boolean | undefined constructor (auth0User: { [key: string]: string | boolean | undefined }) { if (!auth0User) return for (const key in auth0User) { this[key] = auth0User[key] } this.sub = auth0User.sub as string this.provider = this.sub.split('|')[0] this.id = this.sub.split('|')[1] } }
Now, this requires a bit of explanation. The first block of fields are the one that are always present, no matter what login scheme the user used. Sub is the OpenID ID Token's Subject Identifier, which contains the authentication provider (eg. auth0 or google) and the actual user id, separated by a |. The other mandatory fields are probably self-explanatory.
Next are provider and id, which are a result of splitting sub, so they should be there, but we cannot be sure. The last are the ones that were only present when Google OAuth is used as the provider. There might be more, depending on what connections you set up and what other data you request. Or you could even code custom fields in the returned ID Token... but I digress.
Last we tell TypeScript, that we want to be able to use the bracket notation on our object by adding [key: string]: any
Our constructor takes a raw user object with similar fields but snake_cased. That's why we camelCase them and assign each of them to our User object. Once we're done, we extract the provider and the id from the subfield.
Show me the Wrapper
Time to take a look at VueAuth.ts
import { Vue, Component } from 'vue-property-decorator' import createAuth0Client, { PopupLoginOptions, Auth0Client, RedirectLoginOptions, GetIdTokenClaimsOptions, GetTokenSilentlyOptions, GetTokenWithPopupOptions, LogoutOptions } from '@auth0/auth0-spa-js' import { User } from './User' export type Auth0Options = { domain: string clientId: string audience?: string [key: string]: string | undefined } export type RedirectCallback = (appState) => void @Component({}) export class VueAuth extends Vue { loading = true isAuthenticated? = false user?: User auth0Client?: Auth0Client popupOpen = false error?: Error async getUser () { return new User(await this.auth0Client?.getUser()) } /** Authenticates the user using a popup window */ async loginWithPopup (o: PopupLoginOptions) { this.popupOpen = true try { await this.auth0Client?.loginWithPopup(o) } catch (e) { console.error(e) this.error = e } finally { this.popupOpen = false } this.user = await this.getUser() this.isAuthenticated = true } /** Authenticates the user using the redirect method */ loginWithRedirect (o: RedirectLoginOptions) { return this.auth0Client?.loginWithRedirect(o) } /** Returns all the claims present in the ID token */ getIdTokenClaims (o: GetIdTokenClaimsOptions) { return this.auth0Client?.getIdTokenClaims(o) } /** Returns the access token. If the token is invalid or missing, a new one is retrieved */ getTokenSilently (o: GetTokenSilentlyOptions) { return this.auth0Client?.getTokenSilently(o) } /** Gets the access token using a popup window */ getTokenWithPopup (o: GetTokenWithPopupOptions) { return this.auth0Client?.getTokenWithPopup(o) } /** Logs the user out and removes their session on the authorization server */ logout (o: LogoutOptions) { return this.auth0Client?.logout(o) } /** Use this lifecycle method to instantiate the SDK client */ async init (onRedirectCallback: RedirectCallback, redirectUri: string, auth0Options: Auth0Options) { // Create a new instance of the SDK client using members of the given options object this.auth0Client = await createAuth0Client({ domain: auth0Options.domain, client_id: auth0Options.clientId, // eslint-disable-line @typescript-eslint/camelcase audience: auth0Options.audience, redirect_uri: redirectUri // eslint-disable-line @typescript-eslint/camelcase }) try { // If the user is returning to the app after authentication.. if ( window.location.search.includes('error=') || (window.location.search.includes('code=') && window.location.search.includes('state=')) ) { // handle the redirect and retrieve tokens const { appState } = await this.auth0Client?.handleRedirectCallback() ?? { appState: undefined } // Notify subscribers that the redirect callback has happened, passing the appState // (useful for retrieving any pre-authentication state) onRedirectCallback(appState) } } catch (e) { console.error(e) this.error = e } finally { // Initialize our internal authentication state when the page is reloaded this.isAuthenticated = await this.auth0Client?.isAuthenticated() this.user = await this.getUser() this.loading = false } } }
It might make sense to compare this with the original tutorial.
In the original tutorial, a Vue object is created while we're creating a class to make its annotation easier. There you can find it as:
// The 'instance' is simply a Vue object instance = new Vue({ ... })
Now let's unpack it.
First, we need to import a couple of types, including our User class.
Then we create the Auth0Options and RedirectCallback type aliases for convenience.
Instead of creating a simple Vue object, we define a Class Component. The public fields are the same as the data object in the original, whereas the static ones are the parameters passed to the plugin.
We differ in two substantial way from the original tutorial:
We have one less method: handleRedirectCallback is not used anywhere in the original, so we omitted it.
Instead of setting up the Auth0 Client in the Vue object's created hook, we use a separate method called init. Aside from that, the contents of the two are identical.
The reason for using a separate method is simple: The created hook is used in place of a constructor when it comes to Class Components, as the constructor of the class is usually called by Vue.
First, a component object is created just like when using Vue({}), passing it the data, methods, watchers, paramlist, and all the things we usually define for components. When this is done, the created hook is called. Later, when the component is actually used and rendered, the params are passed to it, and mounted, or updated.
The problem with the original one is that we cannot pass parameters to the created method. Neither can we write a proper constructor. So we need to have our own method we will call right after the object is instantiated just as it's done with created by Vue.
Let's dissect init a bit.
First, we create and auth0Client.
Then, in the try-catch block, we check if the user is returning after authentication and handle it. We check if the query params contain any signs of redirection. If they do, we call auth0Client.handleRedirectCallback, which parses the URL and either rejects with an error or resolves with and appState.
Then, we pass on the appState to onRedirectCallback. This is a function we can pass to the plugin when we install it to Vue, so we can handle the app level ramifications of a login.
For the other methods, getUser is a simple wrapper around the authClient's getUser method. We pass on the resolved promise to our User's constructor to create a nicely looking User object.
Next, there is loginWithPopup, which we won't use, as popups can be blocked by browsers. So we'll go with the redirect way, where the user is redirected to Auth0, login, then the callback URL is called by Auth0 passing information to our app in the callback URL's query.
The information in the URL is parsed by auth0Client.handleRedirectCallback which will return a Promise<RedirectCallbackResult>. The Promise will be rejected if there is an error in the authentication flow.
We have a couple of simple wrappers around the auth0Client. loginWithRedirect initiates the flow I described above, logout speaks for itself.
Finally, we set up the user and check if we're authenticated.
Let's turn this into a Plugin
Now, all we need to do is create a proper plugin.
If you take a look at Vue's documentation about plugins, you'll see that we need to create an object that exposes an install method. This method will be called when we pass the object to Vue.use and it will receive the Vue constructor and optionally... options.
type Auth0PluginOptions = { onRedirectCallback: RedirectCallback, redirectUri: string, domain: string, clientId: string, audience?: string, [key: string]: string | RedirectCallback | undefined } export const Auth0Plugin = { install (Vue: VueConstructor, options: Auth0PluginOptions) { Vue.prototype.$auth = useAuth0(options) } }
In our install method, we add an $auth member to any Vue object, so the VueAuth object is available everywhere, just as vue-router is.
Let's implement the useAuth function.
/** Define a default action to perform after authentication */ const DEFAULT_REDIRECT_CALLBACK = () => window.history.replaceState({}, document.title, window.location.pathname) let instance: VueAuth /** Returns the current instance of the SDK */ export const getInstance = () => instance /** Creates an instance of the Auth0 SDK. If one has already been created, it returns that instance */ export const useAuth0 = ({ onRedirectCallback = DEFAULT_REDIRECT_CALLBACK, redirectUri = window.location.origin, ...options }) => { if (instance) return instance // The 'instance' is simply a Vue object instance = new VueAuth() instance.init(onRedirectCallback, redirectUri, options as Auth0Options) return instance }
useAuth returns a singleton VueAtuh instance, and extracts the onRedirectCallback and redirectUri from the options object. What's left is an Auth0Options type which we'll pass on straight to the auth0Client.
You can see the init method in action we created earlier. Then VueAuth is instantiated if it hasn't been already. Above that, we also expose a getInstance function, in case we need to use it outside of a Vue component.
Let's see here the whole auth.ts for your copy-pasting convenience:
import { VueConstructor } from 'vue' import { VueAuth, Auth0Options, RedirectCallback } from './VueAuth' type Auth0PluginOptions = { onRedirectCallback: RedirectCallback, domain: string, clientId: string, audience?: string, [key: string]: string | RedirectCallback | undefined } /** Define a default action to perform after authentication */ const DEFAULT_REDIRECT_CALLBACK = (appState) => window.history.replaceState({}, document.title, window.location.pathname) let instance: VueAuth /** Returns the current instance of the SDK */ export const getInstance = () => instance /** Creates an instance of the Auth0 SDK. If one has already been created, it returns that instance */ export const useAuth0 = ({ onRedirectCallback = DEFAULT_REDIRECT_CALLBACK, redirectUri = window.location.origin, ...options }) => { if (instance) return instance // The 'instance' is simply a Vue object instance = new VueAuth() instance.init(onRedirectCallback, redirectUri, options as Auth0Options) return instance } // Create a simple Vue plugin to expose the wrapper object throughout the application export const Auth0Plugin = { install (Vue: VueConstructor, options: Auth0PluginOptions) { Vue.prototype.$auth = useAuth0(options) } }
As you can see, we're extending the Vue constructor with a new instance member. If we try to access it in a component, the TypeScript compiler will start crying as it has no idea what happened. We'll fix this a bit later down the line.
Now, the Auth0Options are the ones that are needed for the client to identify your tenant. Copy the Client ID and Domain from your Auth0 applications settings and store them in a file called auth.config.json for now. It would be nicer to inject them as environment variables through webpack, but as these are not sensitive data, we'll be just fine like that as well.
With all that said, I will not include my auth.config.json in the reference repo, only an example you'll need to fill in with your data.
{ "domain": "your tenant's domain", "clientId": "your app's clientId" }
Make sure to add "resolveJsonModule": true, to your tsconfig.json.
Finally, we're ready to create our main.ts.
import Vue from 'vue' import App from './App.vue' import router from './router' import { Auth0Plugin } from './auth' import { domain, clientId } from '../auth.config.json' Vue.use(Auth0Plugin, { domain, clientId, onRedirectCallback: (appState) => { router.push( appState && appState.targetUrl ? appState.targetUrl : window.location.pathname ) } }) Vue.config.productionTip = false new Vue({ router, render: h => h(App) }).$mount('#app')
The onRedirectCallback redirects the user to a protected route after they have authenticated. We'll cover this a bit later when we create an actual protected route.
Log in to the App
Time to put the authentication logic to use.
First, we'll add a Login / Logout button to Home.vue
<template> <div class="home"> <img alt="Vue logo" src="../assets/logo.png" /> <HelloWorld msg="Welcome to Your Vue.js App" /> <!-- Check that the SDK client is not currently loading before accessing is methods --> <div v-if="!$auth.loading"> <!-- show login when not authenticated --> <button v-if="!$auth.isAuthenticated" @click="login">Log in</button> <!-- show logout when authenticated --> <button v-if="$auth.isAuthenticated" @click="logout">Log out</button> </div> </div> </template>
We'll also need to update the logic in the script tag of Home
<script lang="ts"> import { Component, Vue } from 'vue-property-decorator' import HelloWorld from '@/components/HelloWorld.vue' @Component({ components: { HelloWorld } }) export default class Home extends Vue { login () { this.$auth.loginWithRedirect({}) } // Log the user out logout () { this.$auth.logout({ returnTo: window.location.origin }) } } </script>
First, we turn the original example component into a Class Component. Second, the methods simply call the methods of VueAuth exposed by our Auth0Plugin.
But what's that? this.$auth is probably underlined in your IDE. Or if you try to compile the code you'll get the following error:
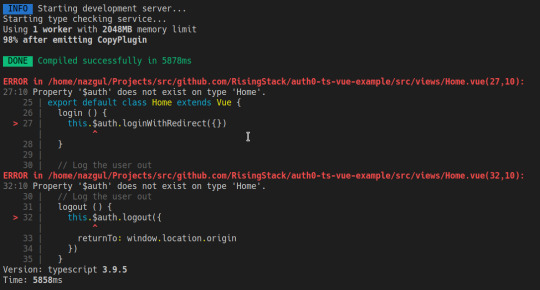
Of course, we still have to tell the compiler that we have augmented the Vue constructor with our $auth member.
Let's create a shims-auth0.d.ts file in our src directory. If you're using VSCode, you might need to reload the window to make the error go away.
import { VueAuth } from './auth/VueAuth' declare module 'vue/types/vue' { interface Vue { $auth: VueAuth } }
Checkpoint
Now, let's try to compile our code. If you have configured your Auth0 credentials correctly, you should be redirected to the Auth0 Universal Login page when you click Login, and back to your app against once you have logged in.
Then, you should be able to click Log out and have the application log you out.
Display the User's Profile
So far so good, but let's try to create a protected route. Displaying the user's profile seems like a prime target for that.
Let's create a file called Profile.vue in src/views.
<template> <div> <div> <img :src="$auth.user.picture"> <h2></h2> <p></p> </div> <div> <pre></pre> </div> </div> </template>
That's it. We read all the information we need from $auth.user we've already set up in VueAuth.ts.
Add a route to the Profile component
Let's update the app's routing configuration, so the users can access their profile.
Open up src/router/index.ts and add the following to the routes array.
//.. other imports // NEW - Import the profile component import Profile from "../views/Profile.vue"; Vue.use(VueRouter) const routes: Array<RouteConfig> = [ routes: [ // .. other routes and pages .. // NEW - add the route to the /profile component { path: "/profile", name: "profile", component: Profile } ] }); export default router
Now we need to update the navigation bar in App.vue
<template> <div id="app"> <div id="nav"> <router-link to="/">Home</router-link> | <router-link to="/about">About</router-link> <span v-if="$auth.isAuthenticated"> | <router-link to="/profile">Profile</router-link> </span> </div> <router-view/> </div> </template>
Checkpoint
The code should compile, so let's check if we can navigate to the Profile page and see the data. For added profit, try logging in with both Google and register a username and password. Take note of the data you get.
Secure the Profile Page
We have the route, time to make it protected. Let's create a new file in src/auth called authGaurd.ts.
import { getInstance } from './auth' import { NavigationGuard } from 'vue-router' export const authGuard: NavigationGuard = (to, from, next) => { const authService = getInstance() const fn = () => { // Unwatch loading unwatch && unwatch() // If the user is authenticated, continue with the route if (authService.isAuthenticated) { return next() } // Otherwise, log in authService.loginWithRedirect({ appState: { targetUrl: to.fullPath } }) } // If loading has already finished, check our auth state using `fn()` if (!authService.loading) { return fn() } // Watch for the loading property to change before we check isAuthenticated const unwatch = authService.$watch('loading', (loading: boolean) => { if (loading === false) { return fn() } }) }
First, we put auth.ts's getInstance to use. Then we create a function that checks if the user is authenticated. If they are, we call next, otherwise redirect them to login.
However, we should only call this function, if the authService is not loading, as otherwise, we still don't have any settled information about the login process.
If it is still loading, we set up a watcher for authService.loading, so when it turns true, we call our guard function. Also, please notice that we use the unwatch function returned by $watch to clean up after ourselves in fn.
I personally prefer giving descriptive names to my functions, but I only wanted to change things for the sake of either type annotation, or stability, so forgive me for keeping fn as it is to maintain parity with the JS tutorial.
Guidance with Auth0, Vue & TypeScript
Auth0 and all other authentication providers relieve us from the tedious job of handling user management ourselves. Auth0 itself excels in having a lot of educational resources for their users. The original Vue tutorial was really helpful, but seeing that TypeScript is becoming the industry standard when it comes to writing anything that should be run by JavaScript runtimes, it would be nice to see more TypeScript tutorials.
I hope this article manages to fill in a bit of this gap. If you liked what you just read, please share it with those who might need guidance with Auth0, Vue & TypeScript!
Happy authenticating!
Auth0: Vue & TypeScript Quickstart SDK - The Missing Docs published first on https://koresolpage.tumblr.com/
0 notes
Link
2012年に Heroku によって提唱された「The Twelve-Factor App」は素晴らしく,アプリケーションをうまく開発し,うまく運用するための「ベストプラクティス」として知られている.2020年になった現在でもよく引用されていると思う.日本語訳もある. 12factor.net Beyond the Twelve-Factor App とは? クラウド化が進むなど,提唱された2012年と比較すると技術的な変化もあり,今までの「The Twelve-Factor App」で宣言されてい��観点以外にも必要な観点やベストプラクティスがあるのでは?という意見もある.そこで,2016年に Pivotal は「Beyond the Twelve-Factor App」を提唱した.The Twelve-Factor App にあった「12項目をアップデート」し,新しく「3項目を追加」した.「計15項目」となる. 今回は Beyond the Twelve-Factor App を読んで,興味を持った箇所を中心にメモ程度に残しておく(正確に言うと,もっと前に読み終わっていたけど,記事を書いていなかった).オリジナルの The Twelve-Factor App よりは具体的に書かれているけど,それでもまだ抽象的なところもある.とは言え,議論の種になって良いと思う.以下のサイトにメールアドレスを登録すると,無料で PDF をダウンロードできる. content.pivotal.io The Twelve-Factor App と Beyond the Twelve-Factor App まず,The Twelve-Factor App と Beyond the Twelve-Factor App に宣言されている項目を一覧しておく.Beyond the Twelve-Factor App には正式な日本語訳がなく,個人的に載せているため,参考程度にしてもらればと!Beyond the Twelve-Factor App で新しく追加された項目は「2. API first」と「14. Telemetry」と「15. Authentication and authorization」となる. The Twelve-Factor App Codebase(コードベース) Dependencies(依存関係) Config(設定) Backing services(バックエンドサービス) Build, release, run(ビルド、リリース、実行) Processes(プロセス) Port binding(ポートバインディング) Concurrency(並行性) Disposability(廃棄容易性) Dev/prod parity(開発/本番一致) Logs(ログ) Admin processes(管理プロセス) Beyond the Twelve-Factor App One codebase, one application(1 コードベース、1 アプリケーション) API first(API ファースト) Dependency management(依存関係管理) Design, build, release, and run(デザイン、ビルド、リリース、実行) Configuration, credentials, and code(設定、機密情報、コード) Logs(ログ) Disposability(廃棄容易性) Backing services(バックエンドサービス) Environment parity(環境一致) Administrative processes(管理プロセス) Port binding(ポートバインディング) Stateless processes(ステートレスプロセス) Concurrency(並行性) Telemetry(テレメトリ) Authentication and authorization(認証/認可) 1. One codebase, one application The Twelve-Factor App では「Codebase」という項目だったけど,Beyond the Twelve-Factor App では「One codebase, one application」という項目になり,より具体的な名前に変わった.とは言え,内容は「コードベースとアプリケーションを 1対1 にすること」となり,大きく変わっていないと思う.なお,リポジトリ構成で議論になることもある「モノレポ」に関しては明確な言及はなかった. ただし「キューを使った非同期アプリケーション」を題材とし,「メインアプリケーション」と「密結合ワーカー」が同じリポジトリルートを共有する場合は項目に違反していると書いてあったり,1個の EAR ファイルを複数の起動スクリプトによって制御している場合も,複数のアプリケーションを管理していることになり項目に違反していると書いてある.さらに「コンウェイの法則」に対する言及もあり,より具体的に解説されている点は Beyond the Twelve-Factor App の素晴らしい点だと思う. 2. API first 次に Beyond the Twelve-Factor App で追加された項目「API first」は,今でこそ「言わずもがな」な印象を受けるけど,確かに The Twelve-Factor App には明確に言及されていなかった.具体的には,開発中にうまくサービス間を結合できなかったりすると悪夢だから,API を「ファーストクラス」と考えることにより,干渉せず「公開されたインタフェース」を中心に開発を進められるようになると書いてある. また,サービスの例としては API Blueprint と Apiary(前職で使ってた)を使ってモックサーバを立てるプラクティスも載っていた.最近だと Swagger や OpenAPI って書いておくと良さそう. swagger.io 4. Design, build, release, and run The Twelve-Factor App では「Build, release, run」という項目だったけど,Beyond the Twelve-Factor App では「Design, build, release, and run」という項目になり,「Design」が追加された. 意味としては「設計」だけど,本書を読むと「リリースする小さな機能の設計」と書いてあったり「アプリケーションの依存関係」と書いてあったり「うまく作られた CI/CD パイプラインを使えば Design から Run まで数分で終わる」と書いてあったりする.正直言って「要件を整理する話」なのか「Design Doc のように技術仕様を整理する話」なのか「ライブラリ依存を整理する話」なのか,ハッキリと理解できなかった.ライブラリ依存だとすると「Dependency management」と重複する.もう少し具体例を解説している情報などを探しておく必要がありそう. 5. Configuration, credentials, and code The Twelve-Factor App では「Config」という項目だったけど,Beyond the Twelve-Factor App では「Configuration, credentials, and code」という項目になり,より具体的な名前に変わった. 例えば「接続する API のエンドポイント情報」だったり「データベースの接続情報」だったり,環境依存な設定を環境変数に入れておくというプラクティスはもともと言及されていた.ただし,言い換えると今までは「環境変数に入れておく」以外に言及されていなかった. Beyond the Twelve-Factor App では,環境変数を外部化 (Externalizing Configuration) する必要性と,可能なら外部サービスに入れると書いてあった.サービスの例としては Spring Cloud Config Server が載ってて,Git と連携できる Config Server は良さそう.最近だと AWS Systems Manager Parameter Store だったり,HashiCorp Vault だったり,選択肢は多いと思う. cloud.spring.io 8. Backing services 「Backing services」は The Twelve-Factor App から変わってないけど,内容はとても充実していた.「バックエンドサービス」とは何か?を定義しつつ,例えば「クラウドだとファイルシステムを一時的なリソースとして考える」など,クラウド化により活発に議論されるようになった観点も言及されていた.さらに「サーキットブレーカー」に対する言及もあり,誤ったバックエンドサービスに対するアクセスを遮断する必要性も書かれていて良かった. martinfowler.com 14. Telemetry Beyond the Twelve-Factor App で追加された項目「Telemetry」は,意味としては「モニタリング全般」と言える.クラウド時代に必要なテレメトリとして「3種類」紹介されていた. APM (Application Performance Monitoring) ドメイン情報 稼働状況/ログ 「ドメイン情報」の具体的な例が載っていて,例えば「秒間 HTTP リクエスト平均数」よりも「直近 20min に iPad 経由で販売された件数」の方がビジネスインパクトがあるよね?という内容だった.稼働状況に関しては,例えば「外形監視」など,ユーザー目線でモニタリングをする重要性が書かれている.また,クラウド時代の「監視戦略」として,例えば「インスタンスが 100台 までスケールしたら,単純計算でログも 100倍 になる可能性がある」など,ログの保存量まで考えることもテレメトリを正しく行うために重要であると書かれていた. kakakakakku.hatenablog.com 15. Authentication and authorization 最後も Beyond the Twelve-Factor App で追加された項目で,認証と認可など,セキュリティ面にフォーカスした「Authentication and authorization」となる.内容としては,全てのエンドポイントを RBAC (Role-Based Access Control) のような仕組みで保護すると書いてある.ようするに,クライアント側が必要な認可を持っているか確認できるようにすることを意味している. 実現する技術の例としては OAuth2 や OpenID Connect や SSO (Single Sign-On) が載っていた.最近だと Amazon Cognito だったり,認証認可 SaaS の Auth0 だったり,選択肢は多いと思う. auth0.com まとめ 2012年に提唱された「The Twelve-Factor App」と,2016年に提唱された「Beyond the Twelve-Factor App」を読んで,興味を持った箇所を整理した.多分意図的に抽象的に書かれているところもあり,そのあたりは議論をして実践的な解釈を深めていければと思う.興味があったら読んでみると良いのではないでしょうか! content.pivotal.io
0 notes
Text
How to refresh AWS Cognito user pool tokens for SSO
Cognito user pool is an AWS user identity service which is implemented using the OpenID Connect (OIDC) standard so it gives the following three token upon successful authentication: ID Token contains details about the user attributes and can be used as an authorizer in AWS API gateway service.Access Token authorizes to Cognito user pool APIs for updating user profile or signing them out on their behalf.Refresh Token is for refreshing the above two tokens. The ID and access tokens are valid only for an hour but refresh token validity is configurable.

Source: https://amzn.to/2fo77UIWhat is Single Sign-On (SSO)? SSO is where you ask your end customer to sign in once and store the authentication result in the browser session using local storage or cookies and then reuse the session information for multiple apps without asking them to sign in again. We have implemented SSO using AWS Amplify where one application provides a login to Cognito user pool and other apps call the login app when a user needs to be authenticated and the login app redirects the calling app with the token when the user is successfully authenticated. AWS Amplify provides a nice wrapper on top Cognito user pool APIs and makes it easy to integrate web apps with Cognito User pool. AWS amplify automatically refresh the tokens but doesn’t provide any way to fetch new tokens using just refresh token so we couldn’t implement self-refreshing of Id and access tokens in the apps without calling the login app every time using AWS Amplify. I started researching further to find another way and I found a Cognito user pool API: InitiateAuth which can help with our requirement but when we tried to invoke the API using AWS Javascript SDK, it was asking to provide AWS credentials but we need to call this API from WebApp using refresh token and there are no AWS credentials in that context. We got stuck and I started digging into AWS Amplify and found that we can call the rest API directly using node-fetch without using AWS SDK. I am sharing the below code so that you can save a day. Conclusion This is a very small blog on how to refresh Cognito user pool tokens using refresh token from a web app but I hope this is helpful to you. Read the full article
0 notes