#blazor c example
Explore tagged Tumblr posts
Visit Tumblr Blog
Explore Tumblr blogs with no restrictions, modern design and the best experience.
Last Seen Tumblr Blogs


Fun Fact
Post activity is at the highest at 4:00 pm EDT; notes peak at 10:00 pm EDT.
Link
Blazor Tutorial in Asp.net Core, Blazor Example in Asp.net Core C#, blazor application .net core, blazor c# example step by step
0 notes
Text
ReBlogger
As someone who's had their nsfw blog terminated for far too many times, I've decided to take matters into my own hands & start working on a tool to help people back up & restore & manage their blogs by using a (web)app to leverage the Tumblr API.
The concrete goals of a v1.0 for this project would be to have the ability to:
Back up a list of blogs you are following, so that these can be refollowed on a new blog in case of termination through the application.
Download posts with specific tags, in order to store these posts, should they need to be reuploaded.
Reupload the stored posts to the new blog.
go through the user's followers, for example for my blog, check whether or not the followers have no blog title or description , think empty "untitled/sin titulo/unbeteitelt" blogs, and block them en-masse to purge these bots from your followers.
Current Nice-To-Haves:
The ability to quickly have an overview of your followers' title, description & pinned post if they have one, to create an easier way to vet blogs. Since it's etiquette to have your age clearly visible on your blog in the nsfw community, this should make this process a bit smoother.
The ability to have this app run as a service on your pc, locally, so that you don't need to manually start the app when you turn on your pc, this would enable me to work on auto-back up features.
For this application to be able to be hosted online, with either donations and/or ads to cover hosting services. Currently, if anyone were to try & use the app, they'd need to go through the process of registering their own application & change keys & secrets in the settings. While this isn't the most complicated process, it might be enough of a barrier for some.
Currently, I am working on the app with .net 6/C#, and I'm using Blazor for both frontend & backend. The Blazor frontend uses WASM/Webassembly. Blazor is a component based framework, like Angular or React, but uses C# instead of type-/javascript. Blazor server is very akin to ASP.NET WebAPI
On that note: if you are a .net c# dev, I can strongly suggest giving Blazor a try if you haven't. There is definitely some weirdness since it isn't as mature as Angular or React, but it makes it way more easy for you to get more mileage out of your backend code. Since you can keep the Client & Server in the same solution & share c# objects across both. API calls between the client & server are fairly easy & straightforward to make. It is, however, a departure from the ASP.NET ViewModel paradigm which can take some getting used to.
Please feel free to request any features or things i'd need to pay attention to & I'll consider adding them to the backlog.
Currently, i'm keeping the repo a bit secret in my back pocket, but once i've reached 1.0, i'll share the link with the repository & consider collaboration. I fully intend to open source the project so that the more savvy among you can go through the code & make more targeted suggestions.
2 notes
·
View notes
Text
.NET Core 3.0 が gRPC をサポートした。
「.NET Core 3.0」正式版が登場。Windowsデスクトップアプリ開発可能、exeファイルを生成、マイクロサービス対応など - Publickey
最新記事10本 Kafka開発元のConfluentに聞いた。エンタープライズ市場への道筋、大手クラウドとの現在の関係について 最大32コアのAMD EPYCプロセッサを搭載、コストパフォーマンスを高...
https://ift.tt/2mg6uiV
これまで通り、dotnet コマンドで SDK テンプレートを使って色々なアプリケーションを作成できる様になっている。dotnet 3.0 から使える SDK テンプレートは以下の通り。
使用法: new [options] オプション: -h, --help Displays help for this command. -l, --list Lists templates containing the specified name. If no name is specified, lists all templates. -n, --name The name for the output being created. If no name is specified, the name of the current directory is used. -o, --output Location to place the generated output. -i, --install Installs a source or a template pack. -u, --uninstall Uninstalls a source or a template pack. --nuget-source Specifies a NuGet source to use during install. --type Filters templates based on available types. Predefined values are "project", "item" or "other". --dry-run Displays a summary of what would happen if the given command line were run if it would result in a template creation. --force Forces content to be generated even if it would change existing files. -lang, --language Filters templates based on language and specifies the language of the template to create. --update-check Check the currently installed template packs for updates. --update-apply Check the currently installed template packs for update, and install the updates. Templates Short Name Language Tags ---------------------------------------------------------------------------------------------------------------------------------- Console Application console [C#], F#, VB Common/Console Class library classlib [C#], F#, VB Common/Library WPF Application wpf [C#] Common/WPF WPF Class library wpflib [C#] Common/WPF WPF Custom Control Library wpfcustomcontrollib [C#] Common/WPF WPF User Control Library wpfusercontrollib [C#] Common/WPF Windows Forms (WinForms) Application winforms [C#] Common/WinForms Windows Forms (WinForms) Class library winformslib [C#] Common/WinForms Worker Service worker [C#] Common/Worker/Web Unit Test Project mstest [C#], F#, VB Test/MSTest NUnit 3 Test Project nunit [C#], F#, VB Test/NUnit NUnit 3 Test Item nunit-test [C#], F#, VB Test/NUnit xUnit Test Project xunit [C#], F#, VB Test/xUnit Razor Component razorcomponent [C#] Web/ASP.NET Razor Page page [C#] Web/ASP.NET MVC ViewImports viewimports [C#] Web/ASP.NET MVC ViewStart viewstart [C#] Web/ASP.NET Blazor Server App blazorserver [C#] Web/Blazor ASP.NET Core Empty web [C#], F# Web/Empty ASP.NET Core Web App (Model-View-Controller) mvc [C#], F# Web/MVC ASP.NET Core Web App webapp [C#] Web/MVC/Razor Pages ASP.NET Core with Angular angular [C#] Web/MVC/SPA ASP.NET Core with React.js react [C#] Web/MVC/SPA ASP.NET Core with React.js and Redux reactredux [C#] Web/MVC/SPA Razor Class Library razorclasslib [C#] Web/Razor/Library/Razor Class Library ASP.NET Core Web API webapi [C#], F# Web/WebAPI ASP.NET Core gRPC Service grpc [C#] Web/gRPC dotnet gitignore file gitignore Config global.json file globaljson Config NuGet Config nugetconfig Config Dotnet local tool manifest file tool-manifest Config Web Config webconfig Config Solution File sln Solution Protocol Buffer File proto Web/gRPC Examples: dotnet new mvc --auth Individual dotnet new --help
WinForms や WPF を使ったアプリケーションの開発もできる。すばらしい。
dotnet 3.0 で WinForms なアプリ動いた。 pic.twitter.com/46TkkM47SP
— mattn (@mattn_jp) September 24, 2019
以下の手順でアプリケーションを作成すると、SayHello というメソッドを持った Greeter サービスが作られる。
$ dotnet new grpc -o mygrpc
proto ファイルは以下の通り。
syntax = "proto3"; option csharp_namespace = "mygrpc"; package Greet; // The greeting service definition. service Greeter { // Sends a greeting rpc SayHello (HelloRequest) returns (HelloReply); } // The request message containing the user's name. message HelloRequest { string name = 1; } // The response message containing the greetings. message HelloReply { string message = 1; }
dotnet コマンドを使ってそのまま実行できる。
試しにこの proto ファイルから Go のクライアントを作って接続してみる。以下のコマンドで Go のクライアントが作られる。
$ go get github.com/golang/protobuf/protoc-gen-go $ protoc --go_out=plugins=grpc:. greet.proto
以下がそのクライアントを使ったサンプル。dotnet のサーバ側はポート 5000 番で通常ソケットの HTTP、5001 番で HTTP/2 で通信可能。dotnet run コマンドでは HTTP 通信のサーバは起動しないので dotnet build でビルドし、bin 配下にある exe ファイルを実行する。この exe ファイル出力も今回の .NET Core 3.0 の新しい機能になる。
package main import ( "fmt" "log" pb "github.com/mattn/grpc-greeter/Greet" "golang.org/x/net/context" "google.golang.org/grpc" ) func main() { conn, err := grpc.Dial("127.0.0.1:5000", grpc.WithInsecure()) if err != nil { log.Fatal(err) } /* opts = append(opts, grpc.WithTransportCredentials(creds)) */ defer conn.Close() client := pb.NewGreeterClient(conn) hello := &pb.HelloRequest{ Name: "おるみん", } result, err := client.SayHello(context.Background(), hello) if err != nil { log.Fatal(err) } fmt.Println(result.GetMessage()) }
実行すると以下の結果が得られる。
Hello おるみん
from Big Sky https://ift.tt/2msTsz2
1 note
·
View note
Text
Book Review of Blazor WebAssembly by Example: Use practical projects to start building web apps with .NET 7, Blazor WebAssembly, and C# 11, 2nd Edition
This is a book focusing on the modern Web development on the Microsoft platform involving WASM which has recently gained a lot of traction. It seems to me that this technology is here to stay and evolve.What influenced me to buy the book in particular is that it is a second edition so it has to be very up-to-date, and ironically, the foreword by Scott Hanselman who I value as a technical leader…
View On WordPress
0 notes
Text
asp.net interview questions and answers
We’ll concentrate on ASP.NET and interview questions on asp.net in this post. We assume that you have experience with C# programming to condense the article’s scope. It is also anticipated that you have a basic grasp of standard object-oriented ideas and front-end technologies like HTML, CSS, and JavaScript. ASP.NET Interview Questions:
1) What is a web application?
Ans. Software that users may access using a web browser like Chrome or Firefox is known as a web application. The browser sends an HTTP request to access a specific URL for the web application. The user receives a dynamic HTML response built by the web application server after intercepting and processing the request. StackOverflow, Reddit, Google, and other well-known online apps are a few examples.
A web application differs from a standard webpage in several ways. Websites are static. The website returns an HTML page when you visit it without building its contents. If you reload the browser, the same page will appear. An online program, however, can provide a different result each time you use it.
Take the following scenario: You post a question on Stack Overflow. You will see your query when you first go to the URL. If another user responds to your query, the browser will show that response on your subsequent visit to the same URL.
A web application is made up of several distinct layers. A three-layered architecture consisting of display, business, and data levels is a typical example. For instance, the browser (presentation) speaks to the application server to retrieve the required data, which then connects to the database server. This is yet another common interview questions on asp.net.
2) What exactly is a web application framework, and what advantages does it Offer?
Ans.Learning how to build a modern web application could be scary. A standard set of features that most web applications provide include:
a. Create a dynamic response to match an HTTP request.
b. Permit users to log in and manage their data on the application.
c. Put the information in the database.
d. Connect to databases and manage transactions.
e. Send URLs to the proper procedures.
f. Supporting user authorization, sessions, and cookies.
g. Improve security and output formatting (e.g., HTML, JSON, XML).
Frameworks aid programmers in the creation, upkeep, and scaling of programs. They offer programs and libraries that make it easier to complete the before mentioned repetitive processes, reducing the amount of needless complexity.
3) What advantages does ASP.NET Core have over the original ASP.NET?
Ans. a) Cross-Platform:
The key benefit of ASP.NET Core is that, unlike the original ASP.NET framework, it is not dependent on the Windows operating system. Linux or a Mac may be used to create and operate production-ready ASP.NET Core applications. Since Windows licenses are not necessary when using an open-source operating system like Linux, you may save a lot of money.
b) Exemplary performance:
Additionally, it was created from the ground up with performance in mind. One of the quickest web application frameworks now.
c) Free Software:
Finally, it is open-source, and hundreds of developers actively contribute to it worldwide. Anyone may see, modify, and contribute to the source code, which is all accessible on GitHub. Despite the patches, bug fixes, and improvements made to the framework by contributors worldwide, it has led to a considerable increase in goodwill and confidence for Microsoft.
d) Modern technologies:
In addition to the conventional Model-View-Controller methodology, ASP.NET Core allows you to create apps utilizing cutting-edge technologies like Razor Pages and Blazor.
4) How does the HTTP protocol works?
Ans. An application-layer protocol called Hypertext Transfer Protocol (HTTP) is used to send hypermedia content like HTML. It manages the interaction between web servers and web browsers. HTTP uses the traditional client-server architecture. A client, such as a web browser, establishes a connection to send a request and waits for the server to respond.
The protocol HTTP makes it possible to retrieve resources, including HTML pages. It is a client-server protocol, which means that all requests for data transmission on the Internet are initiated by the recipient, which is frequently the Web browser.
5) What is a web server?
Ans. The words web server can describe software or hardware that functions alone or in tandem.
A web server is a machine with additional processing power and memory that keeps static assets like photos and JavaScript, CSS, and HTML files in addition to the back- end code for the application. Due to its internet connection, this computer enables the communication between many linked devices.
A web server is a piece of software that receives HTTP requests from clients like web browsers, processes them, and then sends back a response. The answer might be either static (an image or piece of text) or dynamic (a summation of the shopping cart's contents).
Web servers that are often used include Apache, Nginx, and IIS. If you take up asp.net training online, you will learn a lot about asp.
6) What is the NuGet package manager?
Ans. Not all of the code written by software engineers is original. They depend on programming community-created code libraries. Any contemporary development environment must offer a way for developers to obtain and utilize pre-existing libraries, sometimes called packages. For instance, the Node Package Manager (NPM) in the JavaScript ecosystem enables developers to identify and use libraries created by other JavaScript developers.
A package manager for the.NET ecosystem is called NuGet. Microsoft created it to give users access to thousands of.NET developer’s packages. It may also be used to distribute the code you’ve written.
Many open-source NuGet packages often support the functionality of an ASP.NET- developed web applications. Consider Newtonsoft. With 91,528,205 downloads as of this writing, the most widely used package for working with JSON data in.NET is JSON.
7) What is the goal of the Program class?
Ans. The main interface of our Program is the Program.cs class. A static void Main() method is where an ASP.NET program begins, much like a console application.
The request-handling web server is configured using this class. Application lifecycle management, including graceful shutdown, is the host's responsibility.
The host must configure a server and a pipeline for handling requests. The host also controls dependency injection, configuration, and logging.
8) What is the aim of the Startup class?
Ans. This class manages the middleware pipeline and service registration, two crucial components of your application.
Services are C# classes utilized by both the framework and your application to provide additional functionality. Databases and logging are some examples. When your Program is operating and in need of them, these services must be registered to be Instantiated.
Your application handles HTTP requests in a particular order using Middleware (the next question explains the concept of Middleware in detail).
Two methods are included in the Startup class: ConfigureServices() and Configure (). As its name indicates, the first technique registers every service the Program requires. Utilizing the second method, the middleware pipeline is set up.
9) What is the goal of the www-root folder?
Ans. The static files and built assets your web application needs, such as JavaScript, CSS, and pictures, are located in the www-root folder. The only folder in the whole project displayed to the browser in its current state is www-root.
10) What is caching?
Ans. Caching is the technique of temporarily storing data that is easier to reach than its an original place so that it may be obtained more rapidly the next time the same data is needed.
Your application's speed and scalability are enhanced by caching. It accomplishes this by making obtaining the data more accessible. Data that is expensive to develop and obtain and doesn’t change frequently might benefit from caching.
Caching options are available right out of the box with ASP.NET. For straightforward use cases, you may employ the IMemoryCache interface. It indicates a cache kept in the web server’s memory. Along with Redis, ASP.NET provides distributed caching, or a cache shared by several app servers.
Conclusion:
In this ASP.NET interview questions post, you learned about the traditional ASP.NET framework and its contemporary replacement, ASP.NET Core. The post covered various fundamental and sophisticated questions that might be asked during a job interview for a junior/intermediate developer position. We hope it will be helpful for your upcoming job interview!
0 notes
Text
Xl deployit

#Xl deployit update#
#Xl deployit free#
#Xl deployit windows#
#Xl deployit update#
NetSparkle is a C# software update framework for. NET Core library for all your SIP, VoIP and WebRTC needs! Open Source Continuous File SynchronizationĪ real-time communications, cross platform, C#. NET Core version from the System Linq Dynamic functionality.Ī Json based Rules Engine with extensive Dynamic expression supportĪ tiny win10 (dynamic) wallpaper changer | 巨应壁纸 | 动态壁纸Īn ASP.NET Core web application exposing OPC UA Servers to non OPCUA-compliant clients with a REST interfaceĪ Node.js implementation of RTMP/HTTP-FLV/WS-FLV/HLS/DASH/MP4 Media ServerĪ fully customizable and extensible all-purpose diagrams library for Blazor Go语言开发的端口转发工具 for port data forward (TavenLi 李锡远)Ī lightweight IoT edge analytics softwareĪ lightweight RTSP/RTMP/HTTP/HLS/HTTP-FLV/WebSocket-FLV/GB28181 server and client framework based on C++11 Net, LiveCharts2 can now practically run everywhere WPF, Xamarin, Avalonia, Uno (WIP), WinForms and UWP (WIP). Simple, flexible, interactive & powerful charts, maps and gauges for. NET core (it currently supports Kafka, RabbitMQ and MQTT).Ĭreate cross-platform (Xamarin, Windows. Silverback is a simple but feature-rich message bus for. SqlTableDependency extensions, Joker.OData, Joker.Redis, Joker.MVVM and ksqlDB LINQ provider Reactive data changes from SQL server to. High performance, cross platform ionic app for Home/Commerical Security Surveillance using ZoneMinderĮxpose a local server to the internet. Modern and flexible load testing framework for Pull and Push scenarios, designed to test any system regardless a protocol (HTTP/WebSockets/AMQP etc) or a semantic model (Pull/Push). NET Core lightweight configuration server YOLOv5 object detection with C#, ML.NET, ONNXįace analytics library based on deep neural networks and ONNX runtime.
#Xl deployit windows#
WeText is a sample application that demonstrates the implementation of DDD/CQRS and microservice architectural patterns in C#.Ī wrapper executable that can run any executable as a Windows service, in a permissive license.Ī remote control and remote scripting solution, built with. Payment,目前支持:支付宝(Alipay)、微信支付(WeChatPay)、QQ钱包(QPay)、京东支付(JDPay)、银联支付(UnionPay)ĭefinitely Fastest and Zero Allocation JSON Serializer for C#(NET. NET developers to easily add auto update functionality to their classic desktop application projects. Good luck demystifying the secrets of is a class library that allows.
You should be able to see the output of variable list on double clicking the script.
Now start a new deployment and open the Plan Analyzer after mapping the type to container.
You may change the type to deploy on any container type. This type will deploy on overthere.LocalHost by default.
Create new Application or include "test.scriptdeployable" type under existing package.
#Xl deployit free#
Copy the above free marker snippet into that file.
Create a folder script under XLDEPLOY_HOME/ext folder and create a new file called osscript.sh.ftl under that folder.
Or if you're just more interested in getting details of deployed, you can do thisĪ simple example to try this out would be TIP: Prefer keeping depth=0 or depth=1 if you prefer to use it with plugins other than XL-rules. Exception are generated while trying to find out values of certain properties who are unresolved at that point and throws exceptions. statics : is not explored since its not of type hash or a simple type step : when this is being explored, you'll see a lot of exceptions being generated in the log and it takes a lot of time but it would still show up in a while. NOTE: This won't work for jython step in XL-rules since that doesn't exposes the freemarker context IMPORTANT : If you use this with generic or another plugin except XL-rules, it will mostly include 3 top level variables that will be explored further. It gives you convenient output if you include it in a script that shows up in plan analyzer while planning for deployment. "Maybe $ Now this Freemarker snippet can be used wherever a free marker context is available. "What variable are exposed by Freemarker ?" A lot of new people starting on XL Deploy always get these questions in mind,"How do it get to know what variables i could use in my script ?"
0 notes
Text
Silverlight for mac latest version

#Silverlight for mac latest version full
#Silverlight for mac latest version code
The Uno platform is another option for Silverlight and there is a migration guide.
#Silverlight for mac latest version code
NET code cross-platform or in the browser. NET Core as well as Blazor means there are now a number of options for running. The existence of OpenSilver demonstrates the way in which Microsoft's various shifts of direction in its development platform has left some users stuck with technologies that have no future – see Visual Studio Tools for Office for another example. According to its press release: "The beta version can now make use of AoT compilation for up to 15 times improved performance compared to the first release." Blazor also runs C# in a web browser via WebAssembly, and OpenSilver makes use of it. The OpenSilver developers are also waiting anxiously for Ahead-of-Time (AoT) Compilation for Microsoft Blazor, coming in. Sometimes these companies offer a loosely equivalent HTML/JavaScript component in which case the code can be substituted. The company behind OpenSilver, Userware, warned that "many compilation errors are expected, since OpenSilver currently supports a subset of Silverlight functionality." There is also a problem with third-party components from the likes of Telerik or DevExpress.
#Silverlight for mac latest version full
Blazor: Full stack C# and Microsoft's pitch for ASP.NET Web Form diehardsĪccording to the docs: "The general principle for migrating a Silverlight application to OpenSilver consists of creating an OpenSilver-type project for each of the original Silverlight projects, then copying/pasting all the files from the original projects to the OpenSilver projects, and finally compiling the solution.".Last stop before MAUI: Xamarin Forms 5.0 released for cross-platform mobile, new features, new bugs.Cross-platform Windows Presentation Framework, anyone? The short answer: yes.Feeling saucy? Wave of Microsoft releases includes go-live licence for.It is open source and related to another project, CSHTML5, which compiles C# and XAML to JavaScript and HTML. OpenSilver is a reimplementation of Silverlight that runs in modern browsers using WebAssembly. There is another option (aside from rewriting everything in JavaScript). Determined users should also note that IE 11 goes out of support on 15 June 2022, though IE Mode in Edge continues. Silverlight applications may continue to work, but the installer will no longer be available. There is no longer support for Chrome, Firefox, or any browser using the Mac operating system." If your a Mac user running an older PowerPC setup (ie G5 or older system) or are running OSX on windows hardware, you prob noticed you cant install. "Silverlight development framework is currently only supported on Internet Explorer 10 and Internet Explorer 11, with support for Internet Explorer 10 ending on January 31, 2020. "Microsoft Silverlight will reach the end of support on October 12, 2021," the company stated.
0 notes
Text
What is Blazer WebAssembly? And what is it used for?

What is Blazer WebAssembly?
Blazer WebAssembly is another UI innovation from Microsoft, authoritatively delivered with .NET Core 3.1 and getting refreshed in .NET 5. Blazer permits engineers to make single-page applications (SPAs) utilizing C# and .NET using a part-based design. Blazer WebAssembly is a client-side in-program execution of Blazor, which incorporates a .NET runtime carried out in WebAssembly.
With the arrival of Blazer WebAssembly, it is presently conceivable to make customer-side SPAs utilizing C#. Beforehand it has been feasible to make sites utilizing ASP.NET Core MVC and Blazer Server, with every one of these contributions being worker side arrangements. In case you're hoping to extend your range of abilities and use some new Microsoft innovations, or simply have an overall interest in WebAssembly, then, at that point, Blazer WebAssembly is for you. Many web development companies help you in Blazor, Web assembly.
On the off chance that you come from a .NET foundation and need to foster a SPA, then, at that point, Blazer is a positive development. The advantage of composing a Blazer application is that you can utilize a ton of a similar form apparatus, biological systems, and language includes that you as of now use. Assuming you have loads of involvement in .NET, moving to another dialect (like JavaScript or TypeScript) and another structure (like Angular or React) requires a great deal of speculation that probably won't be achievable.
Following this instructional exercise, you will learn how to make a SPA in Blazer WebAssembly. It will cover the nuts and bolts of Blazor and its part-based engineering. The individuals who know about Razor will perceive a portion of the format highlights, and for those that aren't, this instructional exercise will cover highlights like mandates and occasions.
How do we develop web applications today?
For worker side turn of events, we use programming dialects like C#Java, PHP, and so forth. These are the worker-side programming dialects.
For the customer side improvement we use JavaScript systems like Angular, React, Vue and so forth There's no question these JavaScript structures overwhelmed customer side advancement up to this point.
To remain in the business as an engineer and stay cutthroat, it's inescapable that we learn both a worker-side programming language and a customer-side programming language.
In any case, the inquiry is, the reason we should learn and utilize 2 unique arrangements of programming dialects and systems.
Can we use C# both for server-side and client-side advancement?
With Blazer, we would now be able to fabricate intelligent web UIs utilizing C# rather than JavaScript. C# code can be executed both on the worker and in the customer program with many development services in it. This implies existing .Net designers can reuse their c# abilities instead of acquiring new JavaScript systems and their tremendous expectation to learn and adapt.
Programs comprehend and execute just JavaScript. How might we execute the c# code in the consumer program?
Blazer can run C# code straightforwardly in the program, utilizing WebAssembly. It runs in a similar security sandbox as JavaScript systems like Angular, Reacts, Vue, and so on Not only C#Truth be told, we can run any kind of code in the program utilizing WebAssembly.
WebAssembly depends on open web guidelines. So it is a local piece of all advanced programs including versatile programs. This implies for the blazer application to work, there is no compelling reason to introduce any exceptional module like back in the times of silver light and glimmer.
This is additionally called the customer side facilitating model and in this model, the application runs straightforwardly in the program on WebAssembly. Thus, all the application requires i.e the arranged application code itself, its conditions, and the .NET runtime are downloaded to the program. We will see this in real life in our forthcoming videos. The worker-side programming dialects.
For the customer side advancement we use JavaScript structures like Angular, React, Vue and so on There's no question these JavaScript structures ruled customer side improvement up to this point.
However, the inquiry is the reason we should learn and utilize 2 unique arrangements of programming dialects and structures.
All things considered, we can and that is by and large why we use Blazer. With Blazer, we would now be able to fabricate intuitive web UIs utilizing C# rather than JavaScript.This implies existing .Net engineers can reuse their c# abilities instead of acquiring new JavaScript structures and their immense expectation to absorb information.
This is additionally called the worker facilitating model and in this model, the application is executed on the worker from inside an ASP.NET Core application.
At the point when an occasion happens on the customer, for example, a catch click, for instance, the data about the occasion is shipped off the worker over the SignalR association.
The whole HTML isn't sent back again to the customer, it's just the diff that is shipped off the customer over the setup SignalR association. The program then, at that point refreshes the UI. Blazer accepts the single page application engineering which reworks a similar page powerfully in light of the client activity. Since just the diff is applied to refresh the UI, the application feels quicker and more receptive to the client.
We utilize the Blazer Server App layout, to make a Blazer application with the worker facilitating model. We will make a blazer application with both the facilitating models and talk about the upsides and downsides exhaustively in our impending recordings.
What is Blazer Web assembly Used for?
Indeed, since, supposing that we use Blazer, we can run our application in any program, including portable ones, because WebAssembly is important for all significant programs. We are at this point not reliant upon modules like we were some time ago with Flash and Silverlight. Also, we use Blazor because it permits us to reuse our C# abilities.
C# is an incredible advancement language and specifically which implies we can get the mistake at assemble time rather than runtime. Blazer is only a structure that suddenly spikes in demand for the .NET runtime, so we can utilize any library that we need to use, as long as it is viable with .NET Standard.
This implies that we can utilize our own libraries and furthermore practically all open NuGet bundles
There are several in number reasons, which show why we should utilize Blazer
WebAssembly is upheld by all significant programs
Use C# for intuitive web applications
Reuse existing libraries
Execution is close to local
Tooling and troubleshooting
You can check and pick the apparatus according to your accommodation. The following are alternatives, to begin with, Blazer.
Blazer WebAssembly runs on the customer in the program. It downloads all that it requires to the program including HTML, CSS, perhaps some JavaScript, and conceivably pictures. It likewise downloads the congregations that make up the application, and it even downloads the total .NET runtime that is changed over into WebAssembly bytecode.
The entirety of this runs totally on WebAssembly, which is a piece of all significant internet browsers, including portable programs. This kind of Blazor application needn't bother with an association with a worker. It simply needs to stack into the program, and that is it.
A Blazer WebAssembly application comprises static records, so you needn't bother with an undeniable worker to get this to the program. You could have the static records on a substance conveyance organization, or CDN, which is somewhat modest and is internationally performant. You can likewise have it on a worker in the cloud, in your own server farm, or elsewhere.
Benefits
Close Native Performance, running your application on web assembly is quick.
The application can work totally disconnected.
No Server is Needed, you don't need to keep up with the worker and keep the design basic. it requires asset handling at customer gadget
No Plugin is required, WebAssembly is a local piece of every significant program. it takes all static documents into the program
Run in every Modern Browser
Disadvantages
Limited to capabilities of the program. It downloads everything into the program including .NET runtime.
The program accomplishes basically everything.
More to download plan to longer load time.
Mystery or Key needs an association with API, it needs to download at the client-side and there is an approach to encode which isn't protected.
Required WebAssembly, time your application running to the old program which doesn't have web assembly and application won't work all things considered.
Blazer Server is a worker-side Blazor application. The application runs inside an ASP.NET site that suddenly spikes in demand for the .NET runtime. This site then, at that point serves the Blazer site and loads Blazor through a WebSocket association that it utilizes through SignalR. Utilizing this, UI refreshes are spilled from the worker continuously. This sounds confusing, yet you don't need to do anything exceptional to make this work. This all emerges from the case.
Source:
https://fuerte-developers.medium.com/what-is-blazer-webassembly-and-what-is-it-used-for-af0fbd1b140a
0 notes
Link
Every market is ruled by certain common concepts, and JavaScript development is no exception. The product lifecycle is a concept that you can apply to several different environments to understand and predict their behavior. It is a business concept that helps us understand the stages that a product goes through during its life, explaining the impact of these stages on its popularity measure—in most cases, sales. If we observe market behavior patterns, we can estimate the current stage of a product and therefore make some predictions about its popularity. There are four stages: introduction, growth, maturity, and decline, and on the chart above, you can see the impact on expected product sales for each stage. For example, smartphones sales aren’t growing like five years ago—actually, quite the opposite is true—so we can fairly say that smartphones are getting into their maturity stage. In the past few years, we’ve seen the introduction of a lot of new technologies in JavaScript, but we needed time to see how the market was going to adopt them. Nobody wants to be the specialist on another promising technology that ends with zero adoption. Now, however, is the time to take another look. In this article, I will take a look at how popular JavaScript is becoming and the factors that may have affected this popularity, and I will try to predict what the future of JavaScript will look like. The Future of JavaScript Language Features Since the European Computer Manufacturers Association (ECMA) established the year-based release cycle for ECMAScript, a standardized JavaScript specification, we haven’t seen a lot of new features coming to the language—just a few each year. This could be one of the reasons we saw an increase of adoption of languages that compile to ES5 like TypeScript or ReasonML, both bringing features to the language that are highly requested by the community. This is not new—JavaScript went through this process before (CoffeeScript) and, in the end, those features ended up being merged into the language standard itself, and that’s probably the future that we can expect for these new typed features, too. But now we are starting to see a game changer move in the compile-to-js market with the increasing availability of WebAssembly in the browsers. Now, we can use almost any language and compile it to run at almost native speed in a browser and, more importantly, we are starting to see support for future-proof features like support for threads that will allow us to take advantage of the multi-processor architecture that represents the inevitable future of all devices. The official toolchain for WebAssembly will help you to compile C/C++, but there are a lot of community provided compilers for different languages, like Rust, Python, Java, and Blazor (C#). Particularly, the Rust community is pretty active and we started to see complete front-end frameworks like Yew and Dodrio. This brings a lot of new possibilities to browser-based apps, and you only need to test some of the great apps built with WebAssembly to see that near-native browser-based apps are a reality now, e.g., Sketchup or Magnum. Adoption of typed languages that compile to ES5 is mature enough, the players are well established, and they won’t disappear (or be merged with ES) in the near future, but we’ll see a slow shift in favor of typed languages with WebAssembly. Web Front-end Frameworks Every year, we see a big fight on the front-end frameworks market for the web, and React has been the indisputable winner for the past few years—since the introduction of their game-changer technology, the Virtual DOM, we saw an almost obligated adoption from their counterparts in order to remain relevant in the battle. Some years ago, we saw the introduction of a radical new approach to web application development with Svelte, the “compiler framework” that disappears at compile time leaving small and highly efficient JavaScript code. However, that feature was not enough to convince the community to move to Svelte, but with the recent launch of Svelte 3.0, they introduced real reactive programming into the framework and the community is thrilled, so perhaps we are witnessing the next big thing in front-end frameworks. Inspired by the destiny operator: var a = 10; var b <= a + 1; a = 20; Assert.AreEqual(21, b); Svelte brings reactivity to JavaScript by overloading the use of label statements with reactivity at compile time by instructing the code to be executed in topological order: var a = 10; $: b = a + 1; a = 20; Assert.AreEqual(21, b); This is a radical new idea that might help in different contexts, so the creator of Svelte is also working on svelte-gl, a compiler framework that will generate low-level WebGL instructions directly from a 3D scene graph declared in HTMLx. Needless to say that React, Angular, and Vue.js won’t disappear overnight, their communities are huge, and they’ll remain relevant for several years to come—we are not even sure if Svelte will be the actual successor, but we can be sure of something: We’ll be using something different sooner or later. WebXR and the Future of the Immersive Web Virtual reality has been struggling for the past 60 years to find a place in the mainstream, but the technology was just not ready yet. Less than ten years ago, when Jon Carmack joined Oculus VR (now part of Facebook Technologies, LLC), a new wave of VR started to rise, and since then, we’ve seen a lot of new devices supporting different types of VR and of course the proliferation of VR-capable applications. Browser vendors didn’t wanted to lose this opportunity, so they joined with the WebVR specification allowing the creation of virtual worlds in JavaScript with WebGL and well-established libraries like three.js. However, the market share of users with 6dof devices was still insignificant for massive web deployments, but the mobile web was still able to provide a 3D experience with the device orientation API, so we saw a bunch of experiments and a lot of 360 videos for a while. In 2017, with the introduction of ARKit and ARCore, new capabilities were brought to mobile devices and all sorts of applications with AR and MR experiences. However it still feels a little unnatural to download one specific app for one specific AR experience when you are exploring your world around you. If we could only have one app to explore different experiences… This sounds familiar. We solved that problem in the past with the browser, so why not give it another shot? Last year, Mozilla introduced the WebXR Device API Spec (whose last working draft, at the time of this writing, is from two weeks ago) to bring AR, VR, and MR (ergo XR) capabilities to the browser. A few of the most important browser vendors followed with their implementation, with an important exception: Safari mobile, so to prove their point, Mozilla released a WebXR capable browser under the iOS platform WebXR Viewer. Now, this is an important step because the combination of AR and VR brings 6dof to mobile devices and mobile device-based headsets like Google Cardboard or the Samsung Gear VR, as you can see in this example, increasing the market share of 6dof devices by a large margin and enabling the possibility of a large-scale web deployment. At the same time, the guys at Mozilla have been working on a new web framework to facilitate the creation of 3D worlds and applications called A-Frame, a component-based declarative framework with HTML syntax based on three.js and WebGL, having just one thing in mind—to bring back the fun and ease of use to web programming. This is part of their crusade to the immersive web, a new set of ideas on how the web should look like in the future. Luckily for us, they are not alone, and we’ll start to see more and more immersive experiences on the web. If you want to give it a try, go ahead download the WebXR Viewer and visit this site to see the possibilities of the immersive web. Once again, standard browser-based apps won’t fade in a year or two—we’ll probably always have them. But 3D apps and XR experiences are growing and the market is ready and eager to have them. Native Support for ES6 Almost every technology invented in JavaScript in the past decade was created to solve problems generated by the underlying implementation of the browsers, but the platform itself has matured a lot over these past few years, and most of those problems have disappeared, as we can see with Lodash, which once reigned the performance benchmarks. The same is happening with the DOM, whose problems once were the actual inspiration for the creation of web application frameworks. Now, it is a mature API that you can use without frameworks to create apps—actually, that’s what web components are. They are the “framework” of the platform to create component-based apps. Another interesting part of the platform evolution is the language itself. We’ve been using Babel.js for the past few years to be able to use the latest features of ECMAScript, but since the standard itself started to stagnate a little bit in the last few years, that was enough time to allow the browser vendors to implement most of their features, including native support of the static import statement. So now, we can start to consider the creation of applications without Babel.js or other compilers since we have (again) the support of the language features in the platform it self, and since Node.js uses the same V8 VM as Google Chrome, we’ve started to see stronger support of ES6 in Node.js, even with the static import statement under the experimental-modules flag. This doesn’t mean that we’ll stop seeing apps being compiled at a professional level, but it means that starting with a browser-based application will be easy and fun as it once was. Server-side JavaScript Even though JavaScript started with server side in 1995 with the Netscape Enterprise Server, it wasn’t until Ryan’s Dahl presentation in 2009 that JavaScript started to be seriously considered for server-side apps. A lot of things happened in the past decade to Node.js. It evolved and matured a lot, creating once again the opportunity for disruption and new technologies. In this case, it comes from the hand of its very own creator, Ryan Dahl, who has been working on a new perspective of server-side secured apps with Deno, a platform that supports natively the latest language features as async/await, and also the most popular compile-to-js language TypeScript, targeting the best performance thanks to their implementation in Rust and the usage of Tokio, but more importantly with a new security philosophy that differentiates it from most of the server-side platforms like Python, Ruby, or Java). Inspired by the browser security model, Deno will let you use the resources of the host only after the user explicitly granted the permissions to the process, which might sound a bit tedious at the beginning, but it might result in a lot of implications by allowing us to run unsecured code in a secured environment by just trusting the platform. Node.js will still be there in the future but may be we’ll start to see serverless services like AWS Lambda and Azure Functions to provide the Deno functionality as an alternative to provide unsecured server-side code execution on their systems. Conclusion These are exciting times in the JavaScript world—a lot of technologies have matured enough to leave space for innovation, the active community never stopped to amaze us with their brilliant and incredible ideas, and we expect a lot of new alternatives to well-established tools since their mature stages are arriving quickly; we won’t stop using them since a lot of them are really good and there is plenty of proof in the battlefield, but new and exciting markets will start to emerge, and you’d better be prepared. Staying up to date with the latest in JavaScript world isn’t easy, because of the pace of development, but there are some sources that can really help. First, the most important news source, in my opinion, is Echo JS, where you can an incredible amount of new content every hour. However, if you don’t have the time, the JavaScript Weekly newsletter is an excellent summary of the week in JS. Besides this, it is also important to keep an eye on the conferences around the world, and YouTube channels like, JSConf, React Conf, and Google Chrome Developers are wonderfully helpful. Conversely, if you’re interested in seeing some constructive critique of where JavaScript is heading, I recommend reading As a JS Developer, This Is What Keeps Me Up at Night by fellow JavaScript developer Justen Robertson.
0 notes
Text
What is Blazor and what is Razor Components?
I've blogged a little about Blazor, showing examples like Compiling C# to WASM with Mono and Blazor then Debugging .NET Source with Remote Debugging in Chrome DevTools as well as very early on asking questions like .NET and WebAssembly - Is this the future of the front-end?
Let's back up and level-set.
What is Blazor?
Blazor is a single-page app framework for building interactive client-side Web apps with .NET. Blazor uses open web standards without plugins or code transpilation. Blazor works in all modern web browsers, including mobile browsers.
You write C# in case of JavaScript, and you can use most of the .NET ecosystem of open source libraries. For the most part, if it's .NET Standard, it'll run in the browser. (Of course if you called a Windows API or a Linux specific API and it didn't exist in the client-side browser S world, it's not gonna work, but you get the idea).
The .NET code runs inside the context of WebAssembly. You're running "a .NET" inside your browser on the client-side with no plugins, no Silverlight, Java, Flash, just open web standards.
WebAssembly is a compact bytecode format optimized for fast download and maximum execution speed.
Here's a great diagram from the Blazor docs.
Here's where it could get a little confusing. Blazor is the client-side hosting model for Razor Components. I can write Razor Components. I can host them on the server or host them on the client with Blazor.
You may have written Razor in the past in .cshtml files, or more recently in .razor files. You can create and share components using Razor - which is a mix of standard C# and standard HTML, and you can host these Razor Components on either the client or the server.
In this diagram from the docs you can see that the Razor Components are running on the Server and SignalR (over Web Sockets, etc) is remoting them and updating the DOM on the client. This doesn't require Web Assembly on the client, the .NET code runs in the .NET Core CLR (Common Language Runtime) and has full compatibility - you can do anything you'd like as you are not longer limited by the browser's sandbox.
Per the docs:
Razor Components decouples component rendering logic from how UI updates are applied. ASP.NET Core Razor Components in .NET Core 3.0 adds support for hosting Razor Components on the server in an ASP.NET Core app. UI updates are handled over a SignalR connection.
Here's the canonical "click a button update some HTML" example.
@page "/counter" <h1>Counter</h1> <p>Current count: @currentCount</p> <button class="btn btn-primary" onclick="@IncrementCount">Click me</button> @functions { int currentCount = 0; void IncrementCount() { currentCount++; } }
You can see this running entirely in the browser, with the C# .NET code running on the client side. .NET DLLs (assemblies) are downloaded and executed by the CLR that's been compiled into WASM and running entirely in the context of the browser.
Note also that I'm stopped at a BREAKPOINT in C# code, except the code is running in the browser and mapped back into JS/WASM world.
But if I host my app on the server as hosted Razor Components, the C# code runs entirely on the Server-side and the client-side DOM is updated over a SignalR link. Here I've clicked the button on the client side and hit the breakpoint on the server-side in Visual Studio. No there's no POST and no POST-back. This isn't WebForms - It's Razor Components. It's a SPA app written in C#, not JavaScript, and I can change the locations of the running logic, while the UI remains always standard HTML and CSS.
Looking at how Razor Components and now Phoenix LiveView are offering a new way to manage JavaScript-free stateful server-rendered apps has me realizing it’s the best parts of WebForms where the postback is now a persistent websockets tunnel to the backend and only diffs are sent
— Scott Hanselman (@shanselman) March 16, 2019
It's a pretty exciting time on the open web. There's a lot of great work happening in this space and I'm very interesting to see how frameworks like Razor Components/Blazor and Phoenix LiveView change (or don't) how we write apps for the web.
Sponsor: Manage GitHub Pull Requests right from the IDE with the latest JetBrains Rider. An integrated performance profiler on Windows comes to the rescue as well.
© 2018 Scott Hanselman. All rights reserved.


0 notes
Text
Azure pipelines docker
Azure pipelines docker Azure pipelines docker News stories Azure pipelines docker Publishing to Azure Container Registry using Azure Pipelines My book, Blazor in Action – an example-driven guide to building client-side web apps using C# and .NET – is now available to buy via the Manning Early Access Program (MEAP). Containerising Blazor Applications With Docker (Part 3) Part 1 – Containerising…

View On WordPress
0 notes
Text
Working with Blazor’s component model
Welcome to Working with Blazor’s component model” post! In this new post I’ll build a simple project in Blazor and explain the basic Blazor components and interactions. Also, the source code of the project I’m going to create in this post is available on GitHub.
Here the posts I wrote about Blazor that help you to learn this new technology better and faster:
Getting Started With C# And Blazor
Setting up a Blazor WebAssembly application
Working with Blazor’s component model
Table of contents
What is a Blazor component?
Structuring Components
Single file
HomePage code
Code explained
Visual Studio and Razor
Partial class
Pros of separating UI and logic
Cons of separating UI and logic
Component lifecycle methods
The first render
Render explained
The lifecycle with async
Dispose – The extra lifecycle method
Communicating between parent and child components
Passing values from a parent to a child
The TrailDetails component
Define a component parameter
Drawer implementation
Updating the HomePage component
Passing data from a child to a parent
Code explained
Styling components
Global styling
Why a global CSS?
Scoped styling
Example of scoped styling
Global styles can still have an effect
Using CSS preprocessors
Integrating a CSS preprocessor
Integrate tools
Conclusion
What is a Blazor component?
First, the fundamental building blocks of Blazor applications are components, almost everything you do will directly or indirectly work with them. In order to build great applications, you must know how to harness their power.
So, components define a piece of UI, that can be something as small as a button or as large as an entire page, components can also contain other components. They encapsulate any data that that piece of UI requires to function. They allow a piece of UI that you can reuse across an application or even shared across multiple applications.
Then, you can pass data into a component using parameters. Parameters define the public API of a component. The syntax for passing data into a component using parameters is like defining attributes on a standard HTML element, with a key/value pair. The key being the parameter name and the value being the data you wish to pass to the component.
Also, the data a component holds is more commonly referred to as its state. Methods on a component define its logic. These methods manipulate and control that state via the handling of events.
Also, we can style the components via traditional global styling; however, it is more common to use scoped styles. Scoped styles allow the component to define its own CSS classes without fear of collision with other styles in the application. It’s even possible to use CSS pre-processors such as Sass with scoped styling.
The new component for drawer in our application
Now, we’ll be adding a cool new slide out drawer feature to Blazor Trails. The drawer will slide out from the right-hand side of the page when the user clicks on a button we’ll add to the TrailCard component. The drawer will display more detailed information about the selected trail. When the user clicks the close button on the drawer it will cleanly slide back out of view.
Structuring Components
As you will find with almost every part of Blazor, there are multiple ways of doing things. The Blazor team have been very deliberate with making the framework unopinionated. So, developers can build applications the way that works best for them.
It is possible to define a component in a single .razor file that contains both its markup and logic. Also, it is possible to separate a component into a .razor file which defines the markup and a C# class which defines the logic.
Single file
When using a single file approach all mark-up and logic for a component is defined in a single file. The primary advantage of this approach is that it allows you to work with everything in one place. This can really help with productivity as you don’t need to keep swapping back and forth between multiple files.
Single file is the default when creating new components.
HomePage code
@page "/" @inject HttpClient Http @if (_trails == null) { <p>Loading trails...</p> } else { <div class="row row-cols-1 row-cols-md-2"> @foreach (var trail in _trails) { <div class="col mb-4"> <TrailCard Trail="trail" /> </div> } </div> } @code { private IEnumerable<Trail> _trails; protected override async Task OnInitializedAsync() { try { _trails = await Http.GetFromJsonAsync<IEnumerable<Trail>>("trails/trail-data.json"); } catch (HttpRequestException ex) { Console.WriteLine($"There was a problem loading trail data: {ex.Message}"); } } }
Code explained
The code should look familiar, this is the Blazor Trails home page component. The entire component is defined in a single .razor file with the markup coming first then the logic coming second, defined in the code block.
So, having everything in a single file, it allows me to work faster as I don’t have to switch files. But there is another benefit which I find useful, monitoring component size.
When building applications, it’s easy to create very large components which are doing lots of things. However, just like when creating regular C# classes, you should try to keep your components focused, with a single purpose.
One way I use to gauge this is the size of my component files. When I find I’m constantly scrolling up and down a file adding markup and logic, it’s an indication that my component may be doing too much and I should be thinking about splitting it out into additional components with more focused responsibility. This isn’t a clear-cut method however, there are times when a component may be quite large but still only have one responsibility, but it at least makes me think about it.
One argument I often hear against this method is that mark-up and logic should be separated because otherwise we’re mixing concerns. I disagree with this view. The logic in a component should be logic which operates over the mark-up and drives the function of the component. Business logic has no place in components.
If you take this view then the logic and mark-up are intertwined, they are tightly coupled, one can’t exist without the other. In which case separating them seems to fall into the same category as organizing an applications files by type rather than feature, and this is inefficient and hinders productivity.
Visual Studio and Razor
There is one drawback of this approach at the moment, and that is the functionality of the Razor editor in Visual Studio. There are several key refactoring abilities which don’t work in razor files, namely quick actions and refactorings. Renaming of variables can be a bit sketchy and only work some of the time. This is due to the fact the Razor editor in Visual Studio is not fully support Blazor yet.
However, the tooling teams are currently completely rebuilding the Razor tooling experience from the ground up to include all the rich functionality that developers have come to expect when working with regular C# class files. Once this work is complete, the experience working in Razor files should be on par with that of C# class files.
Partial class
Another approach is to split the markup and logic of a component into two separate files. The markup of the component is kept in the .razor file, the logic is added to a C# class. In earlier versions of Blazor it was only possible to apply this approach using inheritance as there was no support for the partial keyword, this is no longer the case.
Let’s take a look at the home page component refactored to use this approach.
@page "/" @if (_trails == null) { <p>Loading trails...</p> } else { <div class="row row-cols-1 row-cols-md-2"> @foreach (var trail in _trails) { <div class="col mb-4"> <TrailCard Trail="trail" /> </div> } </div> }
Now the logic for the component.
using Microsoft.AspNetCore.Components; using System; using System.Collections.Generic; using System.Net.Http; using System.Net.Http.Json; using System.Threading.Tasks; namespace BlazorTrails.Features.Home { public partial class HomePage : ComponentBase { private IEnumerable<Trail> _trails; [Inject] public HttpClient Http { get; set; } protected override async Task OnInitializedAsync() { try { _trails = await Http.GetFromJsonAsync<IEnumerable<Trail>>("trails/trail-data.json"); } catch (HttpRequestException ex) { Console.WriteLine($"There was a problem loading trail data: {ex.Message}"); } } } }
As you can see, using this technique you can make the two elements of the component completely separate. You should also note the naming of the files, HomePage.razor and HomePage.razor.cs. If you’re using Visual Studio to build your applications, following this naming convention will produce a nested effect.
Naming a partial class the same as the markup portion of the component will produce a nested effect when using Visual Studio
Pros of separating UI and logic
This makes it easier to work with the component. It also keeps the number of files being displayed in the IDE to a minimum as you can simply hide any partial classes you’re not currently interested in.
The major benefit of separating the markup and logic of the component is the development experience. As I mentioned when talking about the single file approach, the razor editor is not as fully featured as when working with regular C# class files. By separating out the logic to a C# class file, developers can access all the editor features.
Cons of separating UI and logic
The drawback of this approach is that you now have two files to manage when you’re working with a component. This can end up with lots of switching back and forth as you will need to be in the logic file when adding methods or other members to the component. Then you will need to be in the mark-up file to add any UI, hook up event handlers, etc.
Largely which approach you choose for building your applications is a personal choice based on which method you find most productive.
Component lifecycle methods
Just as in other component-based frameworks, components in Blazor have a lifecycle.
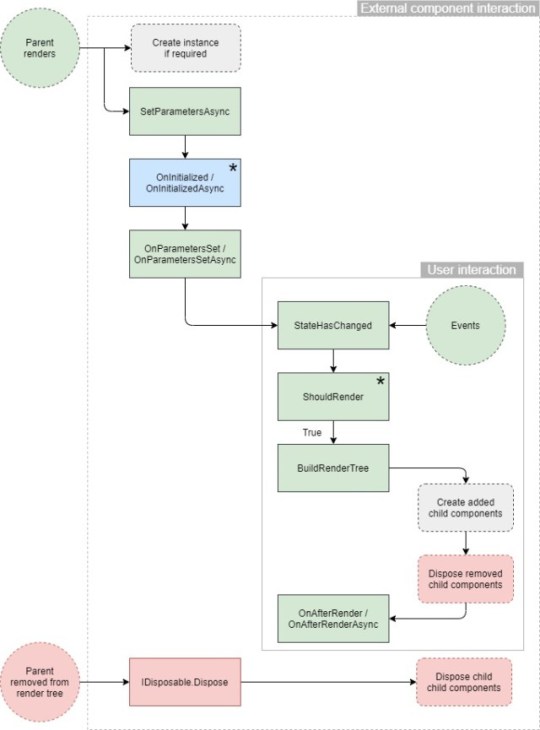
Blazor component lifecycle methods
Depending on what an application is doing, it may need to perform actions at certain points during this lifecycle. For example, load initial data for the component to display when it is first created, or update the UI when a parameter has a certain value from the parent. Blazor supports this by giving us access to the component lifecycle at specific points.
Initialized component: OnInitialized/OnInitializedAsync
Parameter set: OnParametersSet/OnParametersSetAsync
After Render: OnAfterRender/OnAfterRenderAsync
The lifecycle methods are provided by the ComponentBase class which all components inherit from. Each method has a synchronous and asynchronous version. The synchronous version is always called before the asynchronous version.
<h1>Componet Lifecycle</h1> <p>Check the browser console for details...</p> @code { public override async Task SetParametersAsync(ParameterView parameters) { Console.WriteLine("SetParametersAsync - Begin"); await base.SetParametersAsync(parameters); Console.WriteLine("SetParametersAsync - End"); } protected override void OnInitialized() { Console.WriteLine("OnInitialized"); } protected override async Task OnInitializedAsync() { Console.WriteLine("OnInitializedAsync"); } protected override void OnParametersSet() { Console.WriteLine("OnParametersSet"); } protected override async Task OnParametersSetAsync() { Console.WriteLine("OnParametersSetAsync"); } protected override void OnAfterRender(bool firstRender) { Console.WriteLine($"OnAfterRender (First render: {firstRender})"); } protected override async Task OnAfterRenderAsync(bool firstRender) { Console.WriteLine($"OnAfterRenderAsync (First render: {firstRender})"); } }
The first render
During the first render, all the component’s lifecycle methods will be called – during subsequent renders only a subset of the methods will run.
The process starts with SetParametersAsync being called. This is the only lifecycle method which requires us to call the base method, if we don’t then the component will fail to load. This is because the base method does two essential things:
Sets the values for any parameters the component defines – This happens both the first time the component is rendered and whenever parameters could have changed
Calls the correct lifecycle methods depending if the component is running for the first time or not
If we removed the call to the base method the output in the browser console would look like this.
Render explained
During a first render, the component hasn’t been initialized. This means that OnInitialized and OnInitializedAsync will be called first – it is also the only time they will run. This pair of methods are the only ones which run once in a component’s lifetime. You can think of these as constructors for your component. It makes them a great place to make API calls, for example, to get the initial data the component will display.
Once the OnInitialized methods have run, OnParametersSet and OnParametersSetAsync are called. These methods allow developers to perform actions whenever a components parameters change. In the case of a first render, the components parameters have been set to their initial values.
The final methods to run are OnAfterRender and OnAfterRenderAsync. These methods both take a Boolean value indicating if this is the first time the component has been rendered. On the initial render, the value of firstRender will be set to true for every render after, it will be false.
void OnAfterRender(bool firstRender) Task OnAfterRenderAsync(bool firstRender)
This is useful as it allows one-time operations to be performed when a component is first rendered, but not on subsequent renders. The primary use of the OnAfterRender methods are to perform JavaScript interop and other DOM related operations such as setting the focus on an element.
The lifecycle with async
One key point about the render we just covered was that it ran synchronously. In the Lifecycle component there are no awaited calls in any of the async lifecycle methods, meaning each method ran in sequence. However, when async calls are added then things look a bit different. To demonstrate this let’s update the OnInitializedAsync method in the Lifecycle.razor component to make an async call.
protected override async Task OnInitializedAsync() { Console.WriteLine("OnInitializedAsync - Begin"); await Task.Delay(300); Console.WriteLine("OnInitializedAsync - End"); }
While Blazor was awaiting the async call, the component was rendered. You can see it was then rendered a second time after the OnParametersSet methods, as before. This is because Blazor checks to see if an awaitable task is returned from OnInitializedAsync, if there is it calls StateHasChanged to render the component with the results of any of the asynchronous code which has been run so far, while awaiting the completion of the task. This behavior is also true for async calls made in OnParametersSetAsync.
Dispose – The extra lifecycle method
There is another lifecycle method which we can use but this one is optional and it’s not built-in to the ComponentBase class, Dispose. This method is used for the same purposes in Blazor as in other C# applications, to clean up resources. This method is essential when creating components which subscribe to events, as failing to unsubscribe from events before a component is destroyed will cause a memory leak.
In order to access this method a component must implement the IDisposable interface.
@implements IDisposable <h1>Componet Lifecycle</h1> <p>Check the browser console for details...</p> @code { // Other methods ommitted for brevity public void Dispose() { Console.WriteLine($"Dispose - Begin"); Console.WriteLine($"Dispose - End"); } }
To see the effect of this new lifecycle method we need to navigate away from the component, this will remove it from the DOM and invoke the Dispose method.
Blazor understands the IDisposable interface, when it detects its presence on a component it will call the Dispose method at the correct point when destroying the component instance.
As of .NET 5, Blazor also supports the IAsyncDisposable interface. This allows disposal of resources asynchronously. This is useful when using JavaScript interop. But for now, note that IDisposable and IAsyncDisposable can’t both be implemented on the same component.
Communicating between parent and child components
A great analogy for components is Lego blocks. Each Lego block is a self-contained unit, but the real fun comes when you plug the blocks together in order to build something bigger and better. This is the same for components, they can be useful on their own, but they are more powerful when used together. In order to do this in any meaningful way, components need to be able to communicate with each other, passing data, and firing and handling events.
In Blazor, we achieve this using component parameters. Component parameters are declared on a child component which forms that components API. A parent component can then pass data to the child using that API. But component parameters can also be used to define events on the child that the parent can handle. This allows data to be passed from the child back up to the parent.
We’ll add a view button to the TrailCard which when clicked, will slide open a drawer on the right of the application. This drawer will display more detailed information about the selected trail. For this to work we will need to have three different components communicate and pass data.
The HomePage component will coordinate the operation. It will handle any OnSelected events from the TrailCard component. When an OnSelected event is raised, the HomePage component will record the selected trail and pass it into the TrailDetails component. Inside the TrailDetails component, whenever the trail value changes, it will be the trigger for the drawer to active and slide into view.
Passing values from a parent to a child
In order to build our new drawer, we need to create a component which takes in a trail and then displays its information. We will use a component parameter to create its API.
The TrailDetails component
The TrailDetails component will display the selected trail which is passed in via a component parameter.
<div class="drawer-wrapper @(_isOpen ? "slide" : "")"> <div class="drawer-mask"></div> <div class="drawer"> @if (Trail != null) { <div class="drawer-content"> <div class="trail-image"> <img src="@Trail.Image" /> </div> <div class="trail-details"> <h3>@Trail.Name</h3> <h6 class="mb-3 text-muted"><span class="oi oi-map-marker"></span> @Trail.Location</h6> <div class="mt-4"> <span class="mr-5"><span class="oi oi-clock mr-2"></span> @Trail.Time</span> <span><span class="oi oi-infinity mr-2"></span> @Trail.Length km</span> </div> <p class="mt-4">@Trail.Description</p> </div> </div> <div class="drawer-controls"> <button class="btn btn-secondary" @onclick="@(() => _isOpen = false)">Close</button> </div> } </div> </div> @code { private bool _isOpen; [Parameter] public Trail? Trail { get; set; } protected override void OnParametersSet() { if (Trail != null) { _isOpen = true; } } }
Define a component parameter
A component parameter is defined as a public property which is decorated with the Parameter attribute. Blazor uses this attribute to find component parameters during the execution of the SetParametersAsync lifecycle method we looked at earlier in the chapter. During this lifecycle method, the reflection sets the parameter values.
We’re using the OnParametersSet lifecycle method to trigger the drawer sliding into view. As we learned earlier, this lifecycle method is run every time the components parameters change. This makes it perfect for our scenario as we can use it to trigger opening the drawer.
Drawer implementation
Opening and closing the drawer is done using CSS. When a new trail is passed in, the isOpen field is set to true, this triggers the logic at the top of the component to render the slide CSS class.
<div class="drawer-wrapper @(_isOpen ? "slide" : "")">
In the app.css file (this is found in wwwroot > css folder) we need to add the styles to the bottom of the file.
.drawer-mask { visibility: hidden; position: fixed; overflow: hidden; top: 0; right: 0; left: 0; bottom: 0; z-index: 99; background-color: #000000; opacity: 0; transition: opacity 0.3s ease, visibility 0.3s ease; } .drawer-wrapper.slide > .drawer-mask { opacity: .5; visibility: visible; } .drawer { display: flex; flex-direction: column; position: fixed; top: 0; right: 0; bottom: 0; width: 35em; overflow-y: auto; overflow-x: hidden; background-color: white; border-left: 0.063em solid gray; z-index: 100; transform: translateX(110%); transition: transform 0.3s ease, width 0.3s ease; } .drawer-wrapper.slide > .drawer { transform: translateX(0); } .drawer-content { display: flex; flex: 1; flex-direction: column; } .trail-details { padding: 20px; } .drawer-controls { padding: 20px; background-color: #ffffff; }
The two key parts of the styles above are the transform: translateX properties on the .drawer and .drawer-wrapper.slide > .drawer classes. Without these properties, the drawer would sit in its open position, in full view. Figure 3.12 shows the effect of the properties on the drawer.
The transform property on the .drawer class repositions the drawer off the right-hand side of the screen by 110% of its width. The transform property on the .drawer-wrapper.slide > .drawer class repositions it back to its default, bringing it into view.
Updating the HomePage component
To pass the trail into the TrailDetails component, we use attributes when defining the component in the parent. The parent for us is the HomePage component. Listing 3.10 shows the HomePage component updated with the TrailDetails component.
@page "/" @inject HttpClient Http @if (_trails == null) { <p>Loading trails...</p> } else { <TrailDetails Trail="_selectedTrail" /> <div class="row row-cols-1 row-cols-md-2"> @foreach (var trail in _trails) { <div class="col mb-4"> <TrailCard Trail="trail" /> </div> } </div> } @code { private IEnumerable<Trail> _trails; private Trail? _selectedTrail; protected override async Task OnInitializedAsync() { try { _trails = await Http.GetFromJsonAsync<IEnumerable<Trail>>("trails/trail-data.json"); } catch (HttpRequestException ex) { Console.WriteLine($"There was a problem loading trail data: {ex.Message}"); } } }
In the HomePage component we have defined a field called _selectedParameter which will store the selected trail. We then pass this into the TrailDetails component using an attribute style syntax.
<TrailDetails Trail="_selectedTrail" />
The attribute name matches the component parameter we defined on the TrailDetails component. It is important that the case also matches otherwise Blazor will consider it a regular HTML attribute and ignore it. If you’re using an IDE such as Visual Studio for Windows or Mac, or JetBrains Rider you will receive IntelliSense to help you do this. Visual Studio Code also has IntelliSense support for Blazor via the C# extension.
Passing data from a child to a parent
We have successfully used a component parameter to define the API of the TrailDetails component, but we can’t see the fruit of our labor yet. In order to see something happen on screen we need to be able to select a trail to display. To do this we need to be able to pass that information up from the TrailCard component to the HomePage component.
To do this we are going to use component parameters to define an event on the TrailCard. This event will pass the selected trail, the HomePage component can then handle this event and pass the trail to the TrailDetails component to display.
<div class="card" style="width: 18rem;"> <img src="@Trail.Image" class="card-img-top" alt="@Trail.Name"> <div class="card-body"> <h5 class="card-title">@Trail.Name</h5> <h6 class="card-subtitle mb-3 text-muted"><span class="oi oi-map-marker"></span> @Trail.Location</h6> <div class="d-flex justify-content-between"> <span><span class="oi oi-clock mr-2"></span> @Trail.Time</span> <span><span class="oi oi-infinity mr-2"></span> @Trail.Length km</span> </div> <button class="btn btn-primary mt-3" @onclick="@(() => OnSelected?.Invoke(Trail))">View</button> </div> </div> @code { [Parameter] public Trail Trail { get; set; } [Parameter] public Action<Trail> OnSelected { get; set; } }
We define the event as a delegate of type Action<Trail>. This allows us to pass the trail which this TrailCard is displaying back to the parent component. This happens when the View button is clicked. We handle the buttons click event using Blazor’s @onclick event.
With the TrailCard updated all that’s left to do is handle the event in the HomePage component. First, we need to add a method to the code block which will be called whenever an event is raised.
private void HandleTrailSelected(Trail trail) { _selectedTrail = trail; StateHasChanged(); }
Code explained
This method accepts the selected trail, assigns it to the _selectedTrail field. However, in order to see anything happen we must call StateHasChanged – this is to let Blazor know that we need the UI to update. The reason we must do this manually, is that Blazor can’t know the intent of our code. It has no idea that our custom event should trigger a re-render of the UI.
There are some cases where this manual control over re-renders is preferred, however, in most cases this is just an extra line of code which must be added to achieve the desired effect. There is another way. We can use a different type to define our event on the TrailCard called EventCallback. By using this type for our event, Blazor will automatically call StateHasChanged on the component which handles the event, removing the need to manually call it.
To take advantage of this we can update the component parameter on TrailCard and update how the event is invoked.
<div class="card" style="width: 18rem;"> <img src="@Trail.Image" class="card-img-top" alt="@Trail.Name"> <div class="card-body"> <h5 class="card-title">@Trail.Name</h5> <h6 class="card-subtitle mb-3 text-muted"><span class="oi oi-map-marker"></span> @Trail.Location</h6> <div class="d-flex justify-content-between"> <span><span class="oi oi-clock mr-2"></span> @Trail.Time</span> <span><span class="oi oi-infinity mr-2"></span> @Trail.Length km</span> </div> <button class="btn btn-primary mt-3" @onclick="@(async () => await OnSelected.InvokeAsync(Trail))">View</button> </div> </div> @code { [Parameter] public Trail Trail { get; set; } [Parameter] public EventCallback<Trail> OnSelected { get; set; } }
Then, we can simply remove the StateHasChanged call from our handler in the HomePage component:
private void HandleTrailSelected(Trail trail) { _selectedTrail = trail; }
The final update is to assign the HandleTrailSelected method to the OnSelected event. We do this the same way we did to pass the selected trail into the TrailDetails component, using attributes.
<TrailCard Trail="trail" OnSelected="HandleTrailSelected" />
If all has gone to plan, then clicking the view button should trigger the drawer and display the trail. Clicking the close button at the bottom of the drawer will close it and allow a new trail to be selected.
Styling components
The styling is an important element to building any application and a powerful tool in delivering great UX. Look at the drawer we just built, the ability for it to slide in and out of the viewport was achieved using CSS, not C#.
There are two approaches to styling component-based applications such as Blazor:
Global styling
Scoped styling
As you would expect, global styles are classes which are declared on the global scope and can apply to any element which uses that class name or meets the selector for that class. Scoped styles are the opposite, a stylesheet is created for a specific component and any classes defined in it are made unique to that component using a unique identifier produced during the build process.
No matter which of these approaches you take to style your application, it is possible to combine it with CSS preprocessors. CSS preprocessors like SASS, allow CSS to be written in a more modular and maintainable way – taking advantage of features such as variables and functions.
Global styling
Global styling is the default method when building applications. This is how we have been styling Blazing Trails up to this point. To apply global styling, one or more stylesheets are added to the host page which, by default, is index.html in Blazor WebAssembly and _Host.cshtml in Blazor Server. The styles defined in those stylesheets are then available throughout the application.
Global styles are fantastic for creating a consistent look and feel across an application. For example, if all buttons needed to be blue with certain font size and rounded corners. This can be defined once in a global style and would apply to all buttons in the app:
button { font-size: 1rem; background-color: blue; border-radius: .25rem }
This makes global styles an incredibly powerful tool because if we wanted to change how the buttons, or any aspect of the applications design looked, we can change the styles in one place, and the application is immediately updated.
Why a global CSS?
This global scope of styles can also cause some issues when developing larger applications. For example, if we wanted a certain button to be green with square corners rather than the global blue style above, we would need to add another style to the stylesheet. We would then need to apply the style to the particular button. That doesn’t seem too bad, but think of this happening many times over, you end up with a stylesheet which is full of one-off styles or niche styles. You could say this is down to bad design or lack of maintenance, which would be fair, but it still doesn’t stop it happening.
Making changes to global styles can also be cumbersome. Constantly scrolling up and down a stylesheet with 100’s of lines of style classes can become tedious. Especially, when changes need to be made in multiple places.
There are mitigations for this of course, using a CSS preprocessor like SCSS allows the global styles to be broken up and kept next to the component they are for in the project structure. This makes working with them much easier and more efficient. There is also another option which has come about with the rise of SPA frameworks, scoped CSS.
Scoped styling
Scoped styling works by allowing a developer to create styles which only effect a certain component in the application – this is done by creating a stylesheet with the same name as the component. During the build process, Blazor generates unique IDs for each component and then the styles for that component are rescoped using each ID.
To get a feel for this, let’s rework the styles for the TrailDetails component we just built to use scoped CSS. To do this, we first need to create a new stylesheet called TrailDetails.razor.css, then take all the styles we added to app.css for the TrailDetails component and move them to this file.
It is important that we name the file this way otherwise Blazor won’t pick it up and associate its styles with the TrailDetails component. If you’re using Visual Studio, a nice effect of this naming convention is the file nesting in Solution Explorer.
Example of scoped styling
When using scoped CSS, there will be a lot of stylesheets dotted around the application. Adding each and every one of them to the host page would be tedious and difficult to maintain. So, what Blazor does as part of the build process is bundle all the styles from the various stylesheets into a single stylesheet. This means we just need to reference that one stylesheet in our host page. The file has a naming convention of [ProjectName].styles.css. As our project is called BlazingTrails.Web, the file will be called, BlazingTrails.Web.styles.css. Listing 3.13 demonstrates where to reference the file.
<!DOCTYPE html> <html> <head> <meta charset="utf-8" /> <meta name="viewport" content="width=device-width, initial-scale=1.0, maximum-scale=1.0, user-scalable=no" /> <title>BlazingTrails.Web</title> <base href="/" /> <link href="css/bootstrap/bootstrap.min.css" rel="stylesheet" /> <link href="css/app.css" rel="stylesheet" /> <link href="BlazingTrails.Web.styles.css" rel="stylesheet" /> </head>
If we run the project and select a trail to open the drawer, we can use the browsers dev tools to look at the HTML and styles produced.

Inspecting the HTML of the application in a browser shows a unique ID applied to each HTML element belonging to the TrailDetails component
Each HTML element belonging to the TrailDetails component now has a unique attribute applied to it. This attribute follows the format of b-[uniqueID]. If we then select an element to inspect its styles.
Each selector for the styles in the TrailDetails.razor.css file has been rewritten to use the unique ID Blazor generated for the component. Doing this is what scopes the style to that component and stops the style effecting another element in another component.
Global styles can still have an effect
If you use scoped styles and nothing else in your application, then what I’m about to say isn’t an issue. However, if you have some global styles and some scoped styles then you may still run into issues.
To give an example, let’s say we had the following CSS class called .drawer in our global CSS file, in addition to the one we have in the TrailDetails components scoped stylesheet:
.drawer { border: 5px solid lawngreen; }
As you can see, using scoped styles doesn’t make components immune from the standard behavior of CSS. This is something to think about when deciding on how to style your components, mixing global and scoped styles could make things more complicated.
Using CSS preprocessors
Whether you choose to use global styles, scoped styles, or a mix of both, you can still leverage the power of CSS preprocessors. Preprocessors work in a similar way as TypeScript does for JavaScript, as a superset language. They provide access to a richer feature set than CSS provides alone.
There are many options out there when it comes to CSS preprocessors, but the main players are:
LESS (http://lesscss.org/)
SASS/SCSS (https://sass-lang.com/)
Stylus (https://stylus-lang.com/)
They all provide similar feature sets which offer the following enhancements over regular CSS, just with different syntaxes.
Mixins – reusable groups of styles
Variables – works the same way as variables in C#
Nesting – the ability to define the scoped of a style by writing it within another
Import – allows us to organize large CSS files into smaller more focused files. Then import common aspects such as variables.
Choosing a preprocessor largely comes down to which syntax you prefer. My favorite preprocessor is SCSS (https://sass-lang.com/). It has a syntax very similar to regular CSS which makes everything easy to read. Also, it has been around for a very long time so there’s lots of documentation and blog posts out there to help if you get stuck.
Integrating a CSS preprocessor
I’m going to show you how to integrate SCSS into a Blazor app, specifically when using scoped CSS. There are two ways we can integrate SCSS into our application, using JavaScript tools or not using .NET tools.
If you don’t want to use any JavaScript tools in your application, then I would suggest of the following options.
WebCompiler from Mads Kristensen (https://marketplace.visualstudio.com/items?itemName=MadsKristensen.WebCompiler). This hasn’t had any meaningful updates for a couple of years, but it does still appear to work.
WebCompiler by excubo-ag (https://github.com/excubo-ag/WebCompiler). This is forked from Mads WebCompiler and is looking like a promising project. It uses a dotnet CLI tool to perform the compilation of SCSS files and ties in with MSBuild. However, it currently only supports SCSS. Meaning if you are using a different preprocessor such as LESS or Stylus you are out of luck. Configuration is a bit difficult and there is limited documentation.
The option I prefer, and I’m going to show you, is to use a mix of NPM and MSBuild. This does require having an up to date version of NodeJS installed which can be downloaded at https://nodejs.org/. The version I’m using is 14.15.0 and is the latest LTS version.
Integrate tools
We’re going to use a tool called dart-sass (https://sass-lang.com/dart-sass) which we can install as an NPM package called sass (https://www.npmjs.com/package/sass). We’re then going to use MSBuild to call this tool during the build process, specifically at the start of the build process. This is important as we need to compile our SCSS files to CSS before Blazor’s compiler runs so it can pick up the compiled CSS files and bundle them into the single [ProjectName].style.css file we talked about earlier.
This new SCSS version of the TrailDetails styles only has one slight modification, it’s using the nesting feature from SCSS. It will allow us to confirm that the compilation steps worked and that the SCSS generates CSS.
Conclusion
Finally, we did it! We understand how working with Blazor’s component model and it works. If you have any problem, you have the source code on GitHub. If you have any question, please use the forum.
Happy coding!
The post Working with Blazor’s component model appeared first on PureSourceCode.
from WordPress https://www.puresourcecode.com/dotnet/blazor/working-with-blazors-component-model/
0 notes
Text
Setting up a Blazor WebAssembly application
Welcome to “Setting up a Blazor WebAssembly application” post! In this new post I’ll build a simple project in Blazor and explain the basic Blazor components and interactions. The source code of the project I’m going to create in this post is available on GitHub.
Here the posts I wrote about Blazor that help you to learn this new technology better and faster:
Getting Started With C# And Blazor
Blazor is a framework for building interactive client-side web UI with .NET:
Create rich interactive UIs using C# instead of JavaScript.
Share server-side and client-side app logic written in .NET.
Render the UI as HTML and CSS for wide browser support, including mobile browsers.
Integrate with modern hosting platforms, such as Docker.
Using .NET for client-side web development offers the following advantages:
Write code in C# instead of JavaScript.
Leverage the existing .NET ecosystem of .NET libraries.
Share app logic across server and client.
Benefit from .NET’s performance, reliability, and security.
Stay productive with Visual Studio on Windows, Linux, and macOS.
Build on a common set of languages, frameworks, and tools that are stable, feature-rich, and easy to use.
So, here we’re going to start off by looking at the available templates provided by Microsoft to create a new application. Templates are a great way to get started quickly and provide all of the primary building blocks we need for a working an application. Once we have an understanding of the options, we’ll then choose a template as the base for our Blazor Trails app. We’ll build and run the template so we can get a feel for how it behaves, then we’ll strip out all of the unnecessary parts leaving us with only the key components.
As a result, this is a screenshot of the web application I’m going to explain.
Blazor Trails home page: final
Table of contents
Setting up the application
Blazor WebAssembly template configurations
Standalone mode
Hosted mode
Creating the application
Building and running the application
Local SSL certificate
Key components of a Blazor application
Index.html
More details about Index.html
Base tag
Program.cs
More details about Program.cs
Dependency injection
App.razor
Router component
wwwroot folder & _imports.razor
Writing your first components
Organizing files using feature folders
Routable component
Defining the layout
Main layout
The Blazor Trails home page
Prepare the data
The first injection
Read the data
JsonAsync methods
Waiting for the data
Refactor
Conclusion
Setting up the application
So, in other frameworks setting up a new application involves creating everything manually, from scratch. Generally speaking, .NET applications aren’t created this way. Many, if not all, start life being generated from a template. Using a template has many advantages:
Developers can have a working application in seconds
Boilerplate code is taken care of and doesn’t need to be written for every new application
The template serves as a working example of using the framework
The process is repeatable, using a template will give you the same starting point time and time again
Blazor comes with two templates which can be used to create new applications. When choosing a template, we’re essentially making the choice of which hosting model we want to use, either Blazor Server or Blazor WebAssembly. In fact, the two available templates are named Blazor Server and Blazor WebAssembly which makes knowing the hosting model they use pretty straightforward. However, we’re going to be using Blazor WebAssembly to build our Blazor Trails application so that is the template type we’re going to focus on in this post.
Blazor WebAssembly template configurations
Before we actually create the application, I want to talk about the configuration options available for the Blazor WebAssembly template. This template is the more complex of the two available because you can configure it in two modes: hosted or standalone.
The left side shows the projects created when configuring the template in hosted mode. The right shows the project created when configuring the template in standalone mode.
Standalone mode
In the standalone mode, which is the default configuration, you will end up with a single Blazor WebAssembly project in the solution. This template is great if you’re looking to build an application which doesn’t need any kind of backend or server element to it, or perhaps you already have an existing API.
Hosted mode
Hosted mode is a little bit more complex. If you enable the ASP.NET Core Hosted option when creating the template, you will end up with three projects in the solution:
Blazor WebAssembly project
ASP.NET Core WebAPI project
.NET Standard class library
In this configuration you are getting a full stack .NET application. A fully functioning backend (ASP.NET Core WebAPI), a place to put code which is shared between the frontend and backend project (.NET Standard class library), and the frontend application (Blazor WebAssembly).
So, I want to highlight that using this configuration does require a .NET runtime to be installed on the host server. You may remember in my previous post I mentioned an advantage of using Blazor WebAssembly was it didn’t require a .NET runtime on the server, that benefit doesn’t apply when you’re using the hosted configuration. This is because there is a full ASP.NET Core WebAPI project in the solution which does need a .NET runtime on the server to function.
Creating the application
So, I want to create a Standalone mode application. There are two way to create a new application using a template, the dotnet CLI (Command Line Interface) or via an IDE (Integrated Development Environment) such as Visual Studio. To create the application, open Visual Studio and follow these steps (there may be slight differences in wording or order of screen on other IDEs):
File > New Project.
From the project templates list select Blazor WebAssembly App.
The next screen allows us to set the name of the project and the solution as well as where the files will be saved on disc. Enter the details and then click Next to move to the next step.
Select .NET5 as Target Framework
Create a new Blazor WebAssebly app
Configure your new Blazor project
Additional information
Be sure, ASP.NET Core hosted and Progressive Web Application are not checked.
This will create a new application with the same configuration and folder structure we setup using Visual Studio. At this point you’ve created your first Blazor application, congratulations! Now we have our shiny new application we’re going to look at how we can build and run it.
Building and running the application
When it comes to running .NET applications there are 3 steps that need to happen:
Restore any packages (also referred to as dependencies)
Compile or build the application
Fire up a web server and serve the application
In previous versions of .NET Core these steps needed to be performed manually so you would need to first restore any packages, then build the code, and finally run the app. However, this is no longer the case, we can now jump straight to running the application and either Visual Studio or the .NET CLI will take care of performing the first two steps, if they’re required.
However, it’s always good to understand how to perform these steps yourself manually if the need arises. When using Visual Studio, you can restore packages by right clicking on the solution and selecting Restore NuGet Packages from the context menu. If you’re using the .NET CLI then you can execute the dotnet restore command.
To perform a build from Visual Studio, select Build > Build Solution from the top menu. You can also use a keyboard shortcut to perform the same task, Ctrl+Shift+B. From the .NET CLI you can use the dotnet build command. Performing a build will also perform a package restore, if it’s required, both when using Visual Studio or the CLI. So, having to manually restore packages shouldn’t be an issue.
All that’s left is to run the application. From Visual Studio this can be done in several ways. First, you can press the play button found in the main toolbar. You can also use a keyboard shortcut which is F5. Finally, you can select Debug > Start Debugging from the top menu. Any of the above will run the application and Visual Studio will fire up a browser and load the application automatically.
Local SSL certificate
Depending on what types of application you’ve created and run before, you could see an extra step which asks if you want to trust the development SSL certificate. Answering yes to this will install the development certificate on your machine and this allows the application to be run over https rather than http. I would recommend trusting and installing the development SSL certificate as running sites over https is best practice, even in development as it mimics the live environment.
First run of a boilerplate Blazor app
Key components of a Blazor application
While the template has generated a fair few files, some of these files are more important to know and understand than others. In this section, we’re going to look at each of those key files to understand what they do and why they’re important. Then we’re going to remove all of the other files from our project to give us a clean base ready to start building Blazor Trails.
Index.html
This is one of the most important components of a Blazor WebAssembly application. It can be found in the wwwroot directory of the project and it’s the host page for the Blazor application.
<!DOCTYPE html> <html> <head> <meta charset="utf-8" /> <meta name="viewport" content="width=device-width, initial-scale=1.0, maximum-scale=1.0, user-scalable=no" /> <title>BlazorTrailsWA</title> <base href="/" /> <link href="css/bootstrap/bootstrap.min.css" rel="stylesheet" /> <link href="css/app.css" rel="stylesheet" /> <link href="BlazorTrailsWA.styles.css" rel="stylesheet" /> </head> <body> <div id="app">Loading...</div> <div id="blazor-error-ui"> An unhandled error has occurred. <a href="" class="reload">Reload</a> <a class="dismiss">🗙</a> </div> <script src="_framework/blazor.webassembly.js"></script> </body> </html>
8: the tag base is used by Blazors router to understand which routes it should handle
15: the app tag is where the Blazor application will load
19: this div is displayed automatically by Blazor when an unhandled exception occurs
22: Blazors JavaScript runtime which downloads and initializes the application
More details about Index.html
The key element in the index.html file is the link to the Blazor JavaScript runtime, found near the bottom of the page. As we saw previously, this is the file which downloads the .NET WebAssembly based runtime as well as the application and any of its dependencies. Once this is complete it also initializes the runtime which loads and runs the application.
When the application runs its content needs to be outputted somewhere on the page and, by default, this is outputted to the app tag. This is configurable and is setup in the Program.cs file which we will look at in a second. Any default content which exists in the tag will be replaced at runtime with the output from the application. This has a useful benefit; initial content can be used as a placeholder which will be displayed to the user until the application is ready.
If there is ever an unhandled exception caused inside the application, then Blazor will display a special UI which signals to the user that something has gone wrong. This is defined here in the index.html. This can be customized however you would like but the containing element much have an id attribute with the value blazor-error-ui. The default message states there has been a problem and offers the user a button which will cause a full page reload. This is the only safe option at this point as the application will be in an unknown state.
Exception bar in a Blazor application
Base tag
The final key piece to the index.html file is the base tag. This is an important tag when it comes to client-side routing. The reason this tag is important is that is tells Blazors router what URLs, or routes, are in scope for it to handle.
If this tag is missing or configured incorrectly then you may see some unexpected or unpredictable behavior when navigating your application. By default, the tag is configured with a value of /. This means that the application is running at the root of the domain (for example www.puresourcecode.com). The router should handle all navigation requests within that domain.
However, if the application was running as a sub-application for example https://www.puresourcecode.com/blazortrails, then the base tag would need to reflect this with a value of /blazortrails/. This would mean the router will only handle navigation requests which start with /blazortrails/.
Program.cs
Just like other ASP.NET Core applications, Blazor apps start off as .NET console apps. What makes them a Blazor application is the type of host they run. In the case of Blazor WebAssembly it runs a WebAssemblyHost. The purpose of the code contained in this file is to configure and create that host, figure 2.9 shows the default configuration of the Program class.
public class Program { public static async Task Main(string[] args) { var builder = WebAssemblyHostBuilder.CreateDefault(args); builder.RootComponents.Add<App>("#app"); builder.Services.AddScoped(sp => new HttpClient { BaseAddress = new Uri(builder.HostEnvironment.BaseAddress) }); await builder.Build().RunAsync(); } }
17: create an instance of WebAsseblyHostBlazor
18: define the root component for the application
20: configure and register services with the IServiceCollection
24: build and run an instance of WebAssemblyHost using the configuration defined with the WebAssemblyHostBuilder
More details about Program.cs
There are two critical pieces of configuration happening, the root component for the application is defined and any services are configured and added to the IServiceCollection.
When defining the root components – there can be more than one although that is usually not the case in most applications – we are actually giving the builder two pieces of information.
The first is the type of the root component for the application. By default, this is the App component (which we will look at next). However, you can configure this to be any component you wish.
The second is the place in the host page where we want to inject the application. The standard setup has the application being injected into the app element we looked at previously on the index.html page. But again, you can configure this to be injected anywhere you wish. The argument the builder.RootComponents.Add method takes is a CSS selector which is used to identify the target element where the component will be injected. Specific elements can be targeted such as app or elements with a specific ID, for example, #root-component, or any other valid CSS selector.
Dependency injection
The next line shows the HttpClient being configured and registered with the IServiceCollection making it available to classes and components via dependency injection (DI). Blazor uses the same DI container as other ASP.NET Core apps and allows registering of services using one of 3 lifetimes:
Transient – A new instance is provided each time it’s requested from the service container. Given a single request, if two objects needed an instance of a transient service, they would each receive a different instance.
Scoped – A new instance is created once per request. Within a request you will always get the same instance of the service across the application.
Singleton – An instance is created the first time it’s requested from the service container, or when the Program.Main method is run, and an instance is specified with the registration. The same instance is used to fulfil every request for the lifetime of the application.
The last thing that the Main method does is to take all of the configuration specified with the WebAssemblyHostBuilder and call its Build method. This will create an instance of a WebAssemblyHost which is the heart of your Blazor app. It contains all of the application configuration and services needed to run your app.
App.razor
This is the root component for a Blazor application, and we saw how this was configured in the Program.Main method in the previous section. This doesn’t have to be the case however; you can configure a different component to be the root component if you wish, or even have multiple root components, you just need to update the configuration in the Program.Main method.
Router component
The App component contains a vital component for building multi-page applications, the Router component. The Router component is responsible for managing all aspects of client-side routing. When an application first starts up, the router will use reflection to scan the applications assemblies for any routable components. Then, it stores information about them in a routing table and whenever a link is click or navigation is triggered programmatically, the router will look at the route which has been requested and try and find a routable component which handles that route. If a match is found, then it will load that component, otherwise it will load a not found template which is specified inside the Router component.
wwwroot folder & _imports.razor
Now, I’m going to cover both of these files in this section as there is not a huge amount to say about them. In fact the _imports.razor file is the one component on this list which is not required to run a Blazor application, but it makes things a lot easier if you do use it.
By convention all ASP.NET Core applications have a wwwroot folder which is used to store public static assets. This is the place where you can put things such as images, CSS files, JavaScript files or any other static files you need. Anything you put in this folder will be published with your application and available at runtime. As I mentioned earlier, this is also where the index.html file is kept.
The _imports.razor file is optional and not required when building a Blazor application, however, it’s really useful to have at least one of these files. The _imports.razor file has a simple job, it contains using statements. What is really great about the way this file works is that it makes those using statements available to all of the components in that directory and any sub-directories. This saves you having to add common using statements to every component in your application.
As I alluded to, you can also have multiple version of this file at different points in your folder structure. So, if you had a structure of BlazorTrails > Features > Home, and you only wanted specific using statements to be applied to components in the Home folder. Then you could add a _Imports.razor file in the Home folder with those using statements and they would only apply there but would still inherit any using statements from _Imports.razor files higher in the structure.
Writing your first components
We’ve had a look at the app created by the template, and we’ve covered each of the key files and, at a high level, what they do. Now it’s time to write some code of our own. As I said at the start of the chapter, we’re going to be building the foundations of the Blazor Trails application.
List of trails
The first thing we’ll do is take about how the application files are going to be organized. Next, we’ll remove all of the unneeded files which were generated by the template. This will give us a clean base to start building from. We’ll then define several new components to create what you see, a layout component, a page component and a couple of regular components.
Organizing files using feature folders
Before we start adding our own code, we need to remove all of the unnecessary files generated by the template. By default, the app structure used by the template divides files by responsibility. There’s a Pages folder for routable components. There is a Shared folder for anything which is used in multiple places or is a global concern.
This kind of separation doesn’t scale well and makes adding or changing functionality much more difficult as files end up being spread out all over the place. Instead we’re going to use a system called feature folders to organize our application.
When using feature folders all of the files relating to that feature are all stored in the same place. The has two major benefits, first, when you go to work on a particular feature all of the files you need are in the same place making everything easier to understand and more discoverable.
The second is that it will scale well, every time you add a new feature to the app you just add a new folder, and everything goes in there. You can also arrange each feature with sub-features if they contain a lot of files.
Routable component
The other little thing I like to do when using this organization system with Blazor is to append any routable component with the word Page. The reason is when a feature has several components in it it’s almost impossible, at a glance, to see which one is the routable component. The only real way to know is to open the file and check for the @page directive at the top.
So, start by deleting the Pages and Shared folders along with their contents, then delete the sample-data folder from the wwwroot folder. Also delete most of the contents of the app.css, just leave the import statement for the open iconic styles and the class called #blazor-error-ui and #blazor-error-ui .dismiss.
We also need to delete the last using statement from the _Imports.razor file, @using BlazorTrailsWA.Shared.
Add a new folder at the root of the project called Features, then inside that add a folder called Layout and another called Home. Inside Layout, add a new Razor Component called MainLayout.razor. Inside Home add a new Razor Component called HomePage.razor. Once you’ve done that head back over to the _Imports.razor and add the following using statements.
@using BlazingTrails.Web.Features.Home @using BlazingTrails.Web.Features.Layout
Defining the layout
Blazor borrows the concept of a layout from other parts of ASP.NET Core and essentially it allows us to define common UI which is required by multiple pages. Things such as the header, footer and navigation menu are all examples of things you might put in your layout. We also add a reference to a parameter called Body where we want page content to be rendered. This comes from a special base class which all layouts in Blazor must inherit from called LayoutComponentBase. The following image shows an example of what might be defined in a layout along with where the rendered page content would be displayed.
An example layout defining shared UI
You don’t have to stick with a single layout for your whole application either, you can have multiple layouts for different parts of your app. So, if you wanted a particular layout for the public facing pages but a different one for the admin pages, you can do that. In Blazor the default layout is defined on the Router component. This will automatically be applied to all pages in the application.
<Router AppAssembly="@typeof(Program).Assembly" PreferExactMatches="@true"> <Found Context="routeData"> <RouteView RouteData="@routeData" DefaultLayout="@typeof(MainLayout)" /> </Found> <NotFound> <LayoutView Layout="@typeof(MainLayout)"> <p>Sorry, there's nothing at this address.</p> </LayoutView> </NotFound> </Router>
In line 3 and 6 you see the default layout is defined by passing the type of the component you wish to use. If you want to use a different layout on certain pages, you can specify an alternative by applying the @layout directive. This goes at the top of the page and you pass the type of the component you wish to use. For example, if we had an alternative layout called AdminLayout, our layout directive would look like this: @layout AdminLayout.
Main layout
We’re going to be updating the MainLayout component. To start with we are going to do two things; First, we’re going to use the @inherits directive to inherit from the LayoutComponentBase class. This will mark this component as a layout component and will give us access to the Body parameter. Second, we’re going to define where our page content is rendered using the Body parameter.
@inherits LayoutComponentBase <main class="container"> @Body </main>
The only thing we’re missing from our layout now is the header. We’re going to define this as a separate component and as it’s part of the overall Layout feature it will go in the Layout feature folder next to the MainLayout component. As we did before, add a new Razor Component called Header.razor. Then, we’re going to add the markup shown which adds a Bootstrap navbar displaying the text.
<nav class="navbar navbar-light bg-light border-bottom mb-4"> <span class="navbar-brand mb-0 h1">Blazing Trails</span> </nav>
That’s all we need in the Header component at the moment; we can now add that to the MainLayout by declaring it as we would any normal HTML element.
@inherits LayoutComponentBase <Header /> <main class="container"> @Body </main>
That’s it for the layout, if you try and run the application at this point you will be able to see the header we’ve just created but there will be a message saying “Sorry, there’s nothing at this address”. That’s because we haven’t defined any routable components (pages) yet.
The Blazor Trails home page
We already created the HomePage component. It still has the boilerplate code which comes with a new component. We need to update this code to make the component routable. Once we have that done, we’re going to define a class which represents a trail. We can then define some test data to use to build out the rest of the UI. Finally, we’re going to load the test data into the HomePage and loop over it to display the various trails via a reusable TrailCard component that we’ll create.
As we talked about earlier, to make a component into a routable component we need to use the @page directive and a route template which specifies the route it will be responsible for. At the top of the HomePage.razor file, add the directive along with a route template of “/”, which tells the Router that this page is the root page of the application. You can run the application at this point, if you wish, to check that the HomePage’s content is being displayed.
We need a way of representing a trail in our code, to do that we’re going to add a new class called Trail to the Home feature folder. Inside this class we need to add a few properties which represent the various data about a trail.
public class Trail { public string Name { get; set; } public string Image { get; set; } public string Location { get; set; } public string Time { get; set; } public int Length { get; set; } }
Prepare the data
Now, we have a definition for a trail we’re going to define some test data to use. At the moment our app doesn’t have a backend, there is no API we can call to retrieve or save data from and to, but later on there might be. In order to simulate making an HTTP call to load data from an API we’re going to define our test data in a json file. So, this is a great way to develop frontend applications which don’t currently have a useable server element. We can still use a HttpClient to load the data from the JSON file in the same way we’d load data from an API. Then once the server element is established, the HTTP call just needs to be updated to point at the API endpoint instead of the JSON file.
Now, in the wwwroot folder create a directory called trails. Inside that folder add a new json file called trail-data.json. You have the full json on GitHub.
Then, with our test data in place we’ll return to the HomePage where we need to load it. We’re going to load the data using the HttpClient, but in order to use it we need to get an instance of it using dependency injection. Blazor makes this really easy by providing an inject directive that has the following format, @inject [TYPE] [NAME], where [Type] is the type of the object we want and [Name] is the name we’ll use to work with that instance in our component.
The first injection
So, under the page directive add the following code which will give us an instance of the HttpClient to work with: @inject HttpClient Http.
Before we can use the HttpClient, we need somewhere to store the results the call will return. Our JSON tests data is an array of trails and as we’re not going to be modifying what’s returned, just listing it out, we can create a private field of type IEnumerable<Trail>.
@page "/" @inject HttpClient Http <h3>HomePage</h3> @code { private IEnumerable<Trail> _trails; }
Read the data
Now, we have somewhere to store our test data we can make the call to retrieve it. A great place to do this kind of thing is the OnInitialized life-cycle method. This method is provided by ComponentBase, which all Blazor components inherit from, and it one of three primary lifecycle methods; The other two are OnParametersSet and OnAfterRender, they all have async versions as well. OnInitialized is only run once in the component’s lifetime making it perfect for loading initial data like we need to.
In order to retrieve the data from the JSON file, we can make a GET request just like we would if we were reaching out to an API. Except, instead of passing the address of the API in the call, we pass the relative location of the JSON file. As the file is in the wwwroot folder it will be available as a static asset at runtime just like the CSS file, this means the path we need to pass in the GET request is simply, “trails/trail-data.json”.
JsonAsync methods
So, a great productivity enhancement which ships with Blazor is the addition of some extension methods for the HttpClient:
GetFromJsonAsync
PostAsJsonAsync
PutAsJsonAsync
Under the hood, these methods are using the new System.Text.Json library. The first method will deserialize a successful response containing a JSON payload to a type we specify. The second and third will serialize an object to JSON to be sent to the server. All three of these methods do this in a single line. No more having to manually serialized and deserialize objects or check for success codes, making everything much cleaner and removing a lot of boilerplate.
Also, one thing to be aware of when using these new methods is that when a non-success code is returned from the server, they’ll throw an exception of type HttpRequestException. This means that it’s generally a good practice to wrap these calls in a try catch statement so non-success codes can be handled gracefully.
@code { private IEnumerable<Trail> _trails; protected override async Task OnInitializedAsync() { try { _trails = await Http.GetFromJsonAsync<IEnumerable<Trail>>("trails/trail-data.json"); } catch (HttpRequestException ex). { Console.WriteLine($"There was a problem loading trail data: {ex.Message}"); } } }
Great! We now have our data being loaded into our component, but we need to do something with it. It would be nice to have a message displayed to the user to let them know that when we’re loading the data, just in case it takes a while.
Waiting for the data
We can use a simple if statement in our markup to check the value of the _trails field. If it’s null then we can surmise that the data is still being loaded, excluding an error scenario of course. If the value is not null, then we have some data and we can go ahead and display it.
@if (_trails == null) { <p>Loading trails...</p> } else { <div class="row row-cols-1 row-cols-md-2"> @foreach (var trail in _trails) { <div class="col mb-4"> <div class="card" style="width: 18rem;"> <img src="@trail.Image" class="card-img-top" alt="@trail.Name"> <div class="card-body"> <h5 class="card-title">@trail.Name</h5> <h6 class="card-subtitle mb-3 text-muted"><span class="oi oi-map-marker"></span> @trail.Location</h6> <div class="d-flex justify-content-between"> <span><span class="oi oi-clock mr-2"></span> @trail.Time</span> <span><span class="oi oi-infinity mr-2"></span> @trail.Length km</span> </div> </div> </div> </div> } </div> }
At the point you should be able to build the app and run it, if all has gone to plan you should see the trails displayed. Now, we could finish here but there’s one little refactor I think we should do first.
Refactor
While it’s all perfectly valid as is, wouldn’t it be nice to encapsulate it all in a component instead? This would make the code in the HomePage component much easier to read.
So, create a new component called TrailCard.razor in the Home feature folder. Then replace the boilerplate code with the markup for the card from the HomePage, be careful not to copy the outer div with the class’s col mb-4. That was pretty painless, but now we have a problem. How do we get access to the current trail data? The answer is parameters.
Now, we can pass data into components via parameters, you can think of these as the public API for a component and they work one way, from parent to child. We can define them in the code block by creating a public property and decorating it with the Parameter attribute. Then, we pass data into them from the parent using attributes on the component tag.
For our TrailCard component we’re going to create a parameter which will allow us to pass in the current trail from the parent. We can then update the razor code to use this parameter.
<div class="card" style="width: 18rem;"> <img src="@Trail.Image" class="card-img-top" alt="@Trail.Name"> <div class="card-body"> <h5 class="card-title">@Trail.Name</h5> <h6 class="card-subtitle mb-3 text-muted"><span class="oi oi-map-marker"></span> @Trail.Location</h6> <div class="d-flex justify-content-between"> <span><span class="oi oi-clock mr-2"></span> @Trail.Time</span> <span><span class="oi oi-infinity mr-2"></span> @Trail.Length km</span> </div> </div> </div> @code { [Parameter] public Trail Trail { get; set; } }
All that’s left now is to update the HomePage component to use the new TrailCard component.
@page "/" @inject HttpClient Http @if (_trails == null) { <p>Loading trails...</p> } else { <div class="row row-cols-1 row-cols-md-2"> @foreach (var trail in _trails) { <div class="col mb-4"> <TrailCard Trail="trail" /> </div> } </div> } @code { private IEnumerable<Trail> _trails; protected override async Task OnInitializedAsync() { try { _trails = await Http.GetFromJsonAsync<IEnumerable<Trail>>("trails/trail-data.json"); } catch (HttpRequestException ex) { Console.WriteLine($"There was a problem loading trail data: {ex.Message}"); } } }
Conclusion
Finally, we did it! We finished setting up a Blazor WebAssembly application and it works. If you have any problem, you have the source code on GitHub. If you have any question, please use the forum.
Happy coding!
The post Setting up a Blazor WebAssembly application appeared first on PureSourceCode.
from WordPress https://www.puresourcecode.com/dotnet/blazor/setting-up-a-blazor-webassembly-application/
0 notes
Text
Getting started with C# and Blazor
In this new post, I want to summarize what I understood for getting started with C# and Blazor, the new technology from Microsoft. I briefly spoke about Blazor in some other posts but here I want to introduce it properly.
We live in exciting times, as .NET developer’s life has never been better. We can create apps for any operating system be it Windows, Linux, iOS, Android or macOS. Of course, we can also build amazing web-based applications with ASP.NET. MVC, Razor Pages, and WebAPI have allowed us to create robust scalable and reliable systems for years, but there has long been a missing piece to the puzzle.
One thing all of ASP.NETs web solutions have in common is that they are server based. We’ve never been able to leverage the power of C# and .NET to write client-side applications, this has always been the domain of JavaScript.
So, I’m going to introduce you to a revolutionary client-side framework: Blazor. Built on web standards, Blazor allows us to write rich, engaging user interfaces using C# and .NET. We’ll explore how Blazor can make your development process more efficient and raise your productivity levels, especially if you’re using .NET on the server as well. We’ll cover hosting models, an important concept to understand when starting out with Blazor. We’ll look at both production supported models and the benefits and tradeoffs of each. Next, we’ll introduction components and the benefits of using them to build UIs. Finally, we’ll discuss the reasons why you should consider Blazor for your next project.
Table of contents
Why choose Blazor for new applications?
Pros
Components, a better way to build UI.
What is a component?
The benefits of a component-based UI
Components
Anatomy of a Blazor component
Understanding the code
Blazor, a platform for building modern UI with C#
No installation required
Mobile applications
Understanding hosting models
Blazor Electron
Code example
Mobile Blazor Bindings
Blazor WebAssembly
Process begin
DOM manipulation
blazor.boot.json
dotnet.wasm
Calculating UI Updates
Process explained
Benefits
Tradeoffs
Blazor WebAssembly summarize
Blazor Server
Process begins
Process static files
Calculating UI updates
Process explained
SignalR
DOM
Performance
The test
Testing
Benefits
Tradeoffs
Blazor Server summarize
Why choose Blazor for new applications?
Arguably, the hardest part of starting a new project in recent times has been choosing the tech stack, there is just so much choice available. This is especially true in the front-end world. Pick a framework (Angular, React, Vue), pick a language (TypeScript, CoffeeScript, Dart), pick a build tool (Webpack, Parcel, Browserify). If a team is new to this eco-system, it can seem an almost impossible task to try and work out which combination of technologies will help make the project a success; it’s even hard for teams with experience!
So, first in this getting started with C# and Blazor, let’s cover some of the top reasons for choosing Blazor for your next project and how it can help avoid some of the issues I’ve just mentioned.
Pros
C#, a modern and feature rich language – It’s powerful, easy to learn, and versatile
Great tooling – The .NET community has been fortunate to have some amazing tooling. Visual Studio is an extremely powerful, feature rich and extensible IDE. It’s also 100% free for individuals or non-enterprise teams of 5 or less. If you prefer something more lightweight, then there is Visual Studio Code – one of the most popular code editors today. Both Visual Studio and VS Code are both cross platform:
Visual Studio for Windows and Mac
Visual Studio Code for Windows, Mac and Linux.
.NET Ecosystem – While many new frameworks need to wait for an ecosystem to build up around them, Blazor can tap into the existing .NET ecosystem. Blazor applications target .NET Standard 2.1 and can in theory use any .NET Standard NuGet package.
Unopinionated – There are no preferred patterns or practices for Blazor development, you can write applications using the ones you’re familiar and comfortable with.
Shallow learning curve – If you’re an existing .NET developer then the learning curve for Blazor is quite shallow. Razor, C#, dependency injection, project structure will all look familiar to you. This means you can focus on writing features quicker, rather than learning the framework.
Code sharing – If you’re using C# on the server then Blazor makes an excellent paring. One of the most frustrating problems with different client and server languages is the inability to reuse code. With Blazor, everything is C#. Any shared code can be placed in a common .NET Standard class library and shared easily between server and client.
Open source – As with many projects at Microsoft, Blazor is fully open source and the code is freely available on GitHub for you to browse, download, or fork your own copy.
Components, a better way to build UI.
Blazor, as with many modern front-end frameworks, uses the concept of components to build the UI. Everything is a component, pages, parts of a page, layouts, they’re all components. There are various types of component in Blazor as well as multiple ways to write them all of which will be explored in future chapters. But learning to think in terms of components is essential for writing Blazor applications.
What is a component?
You can think of a component as a building block. You put these building blocks together to form your application. These building blocks can be as big or as small as you decide, however, building an entire UI as a single component wouldn’t be a good idea. Components really show their benefit when you think of them as a way to divide up logical areas of a UI. Let’s look at an example of a user interface structured as components.

Example of a layout divided into components
Each area of the interface is a component and each one has a certain responsibility. You may also notice that there is a hierarchy forming. The layout component sits at the top of the tree, the menu, header, home page and footer are all child components of the layout component. These child components could, and probably would have child components of their own. For example, the header component could contain a logo component and a search component.

Example of nesting components to form a component tree
The benefits of a component-based UI
Many UIs have repeating elements in them, a great advantage to using components is that you can define an element in a component and then reuse the component wherever the element repeats. This can drastically cut down on the amount of repeated code in an application. It also makes the maintainability of the application much better as if the design of that element changes you only need to update it in a single place.
To cater for more advanced scenarios, components can define their own APIs allowing data and events to be passed in and out. Imagine a line of business application, it’s probably safe to assume that within that app there would be lots of places data would be displayed in table format. One approach would be to create each table as its own component, however, this would mean we would end up with a lot of components which displayed data in a table.
A better approach would be to define a single component which took in a dataset as a parameter and then displayed it in a table. Now we have a single component for displaying data in a table that we can reuse all over the application. We could also add features to this component, things such as sorting or paging. As we do, this functionality is automatically available to all the tables in the application as they are all reusing the same component.
Components
Components help speed up the development process. Due to the reusable nature of components, using them often leads to shorter development times. They can be composed together.
While usually self-contained, it’s also possible to have components work together to create more complex UI. For example, let’s take the data table scenario we just talked about, that could be a single component but that could potentially be quite large.
Another approach would be to divide it up into several smaller components, each performing a certain job. We could have a table header component, a table body component even a table cell component. Each of these components are performing a specific job but they are still part of the overall table component.
Anatomy of a Blazor component
Now, in this post getting started with C# and Blazor, we have a better idea of what components are in a general sense, let’s look at an example of a component in Blazor. For this we’re going to grab a component from the Blazor project template.
In figure 1.3 we can see an example of a component from Blazors standard project template, Counter.razor.

The sections of a component in Blazor
This particular component is known as a routable component, as it has a page directive declared at the top. Routable components are essentially a page in the application. When the user navigates to the /counter route in the application, this component will be loaded by Blazor router. It displays a simple counter with a button and when the user clicks on the button the count is incremented by one and the new value displayed to the user.
Understanding the code
While understanding the code isn’t important at this point, we can understand the structure of the component. Figure 1.3 is divided up into three sections each has a certain responsibility.
Section 1 is used to define directives, add using statements, inject dependencies, or other general configuration which applies to the whole component.
Section 2 defines the markup of the component; this is written using the Razor language, a mix of C# and HTML. Here we define the visual elements which make up the component.
Section 3 is the code block. This is used to define the logic of the component. It is possible to write any valid C# code into this section. You can define fields, properties, even entire classes if you wish.
Blazor, a platform for building modern UI with C#
Blazor is a fully featured framework for building modern client-side applications using the power of C# and .NET. Allowing developers to build engaging applications which work across nearly any platform – including web, mobile and desktop.
Blazor is an alternative to JavaScript frameworks and libraries such as Angular, Vue and React. If you’ve had experience working with any of these then you’ll probably start spotting familiar concepts. The most notable influence is the idea of building UIs with components, a concept all these technologies share and something we’ll explore in more detail later in this chapter.
No installation required
Because Blazor is built on top of web standards; it doesn’t require the end user to have .NET installed on their machines or any kind of browser plugin or extension. In fact, with Blazor WebAssembly applications we don’t even need .NET running on the server, this flavor of Blazor can be hosted as simple static files.
Being built on .NET means we have access to the vibrant ecosystem of packages available on NuGet. We also have best in class tooling with Visual Studio and Visual Studio Code, and of course, with .NET being cross platform, we can develop our Blazor applications on whatever our preferred platform is, be that Windows, Mac or Linux.
Mobile applications
Therefore, I want to highlight that Blazors programming model can also be used to build cross-platform native mobile applications via an experimental project called Mobile Blazor Bindings. This is a collaboration between the ASP.NET Core team and the Xamarin team to investigate the potential and demand for using Blazor to build non-web UIs. Microsoft has also announced the future evolution of Xamarin Forms, the Multi-platform App UI framework known as .NET MAUI. This framework will allow developers to build native apps which run on Windows, macOS, iOS and Android. According to the roadmap, Blazors programming model will be offered as an option for building these new .NET MAUI apps. This really makes Blazor a compelling technology to learn as once understood, could allow developers to build UIs for almost any platform or device.
Hopefully, you can already see Blazor is an exciting technology with a lot of potential. But there is a key concept which is important to understand before we go any further, that of hosting models. Let’s tackle that next.
Understanding hosting models
When first getting started with Blazor you will immediately come across the concept of hosting models. Essentially, hosting models are where a Blazor application is run. Currently, Blazor has two production supported hosting models called Blazor WebAssembly and Blazor Server. Regardless of which of these models you choose for your application, the component model is the same meaning components are written the same way and can be interchanged between either hosting model.

Blazor has a separation between hosting models and its app/component model. Meaning components written for one hosting model can be used with another.
The above image shows an abstract representation of Blazors architecture, with the separation between the app and component model and the various hosting models. One of the interesting aspects of Blazor is the potential of other hosting models being made available over time to allow Blazor to run in more places and be used to create more types of UI.
Outside of the two production hosting models we will cover below, there are also two other experimental models Microsoft have been testing, Blazor Electron and Mobile Blazor Bindings.
Blazor Electron
Blazor Electron is the oldest of the two experiments and allows Blazor components to be hosted in an Electron application (https://www.electronjs.org/). Developers write components for this model using HTML and C# in the exact same way as they would for Blazor WebAssembly or Blazor Server.
Code example
An example of a component which can be used by all three of hosting models is shown in the following code.
<div> <p>Current count: @currentCount</p> <button @onclick="IncrementCount">Click me</button> </div> @code { private int currentCount = 0; private void IncrementCount() { currentCount++; } }
Mobile Blazor Bindings
The newer experiment is Mobile Blazor Bindings. This model allows developers to write native mobile applications using Blazors programming model. However, this hosting model can’t use components written using web technologies, components for this hosting model must be written using native controls. The following code contains the same component as the code abode but rewritten for the Mobile Blazor Bindings hosting model.
<StackLayout> <Label> Current count: @currentCount </Label> <Button OnClick="@IncrementCount">Click me</Button> </StackLayout> @code { private int currentCount = 0; private void IncrementCount() { currentCount++; } }
As you can see the programming model is the same between the two code samples. The logic in the code block is unchanged, it’s just C# after all. The only difference is in the markup where web technologies have been swapped for native mobile controls. This does mean that we can’t swap component around between web-based hosting models and native hosting models. However, once we’ve mastered Blazors programming model we can easily use that knowledge to create other types of UI.
Now we’ve talked a little about hosting models in general we’re going to focus in on the two production supported options available in Blazor today, Blazor WebAssembly and Blazor Server.
Blazor WebAssembly
Blazor WebAssembly is the principal hosting model for Blazor applications. Choosing this option will mean your application will run entirely inside the client’s browser making it a direct alternative to JavaScript SPA (Single Page Application) frameworks. To understand how this hosting model works we’re going to walk through the process of initializing a Blazor WebAssembly application shown in following image.
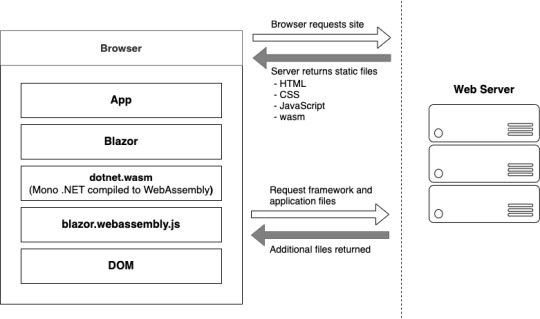
Bootup of a Blazor WebAssembly application showing the interactions between the client’s browser and the web server
Process begin
The process begins when a browser makes a request to the webserver. The web server will return a set of files needed to load the application, these include the host page for the application, usually called index.html, any static assets required by the application such as images, CSS and JavaScript. As well as a special JavaScript file called blazor.webassembly.js.
At this point, you may be wondering why we have a JavaScript file, one of the big selling points of Blazor is the ability to write UI logic using C# instead of JavaScript, right? Yes, that’s true.
But as of right now WebAssembly has a fairly large limitation, it can’t alter the DOM or call Web APIs directly.
DOM manipulation
In order to manage this current limitation, part of the Blazor framework resides in JavaScript called blazor.webassembly.js file. This part of the framework does three main things:
Loads and initializes the Blazor application in the browser.
Provides direct DOM manipulation so Blazor can perform UI updates.
Provides APIs for JavaScript interop scenarios, which we’ll discuss in detail in later chapters.
It’s possible that in the future this file will no longer be required, this will depend on how fast features are added to WebAssembly and adopted by browsers. But for now, it’s an essential part of the framework.
Now, we’ve cleared that up let’s get back to our booting Blazor app. I want to point out that the server returns all static files. They haven’t required any server-side compilation or manipulation. This means that they can be hosted on any service which offers static hosting, there is no requirement for a .NET runtime to be present on the server. For the first time this opens up free hosting options such as GitHub pages to .NET developers (applies to standalone Blazor WebAssembly applications only).
blazor.boot.json
Once the browser has received all the initial files from the web server it can process them and construct the Document Object Model (DOM). Next, blazor.webassembly.js is executed. This performs many actions but in the context of starting a Blazor WebAssembly app it downloads the blazor.boot.json file. This file essentially contains an inventory of all of the framework and application files which are required to run the app.
Most of these files are normal .NET assemblies, there is nothing special about them and they could be run on any compatible .NET runtime. But there’s also another type of file which is downloaded called dotnet.wasm.
dotnet.wasm
The dotnet.wasm file is in fact a complete .NET runtime, the mono .NET runtime to be exact, which has been compiled to WebAssembly.
At this point in time, only the .NET runtime is compiled to WebAssembly, the framework and application are standard .NET assemblies. In the future a feature called AOT (Ahead Of Time) compiling will be introduced which will allow developers to compile parts of their applications into WebAssembly.
The benefit of this will be performance, any code compiled to WebAssembly will be many times more performant than the interpreted approach used today. However, there’s a tradeoff, and that’s size. AOT compiled code will be bigger than the standard assemblies meaning a larger overall download size for the application.
Once the blazor.boot.json file has been downloaded and the files listed in it have been downloaded, it’s time for the application to be run. The WebAssembly .NET runtime is initialized which in turn loads the Blazor framework and finally the application itself. At this point we have a running Blazor application which exists entirely inside the client’s browser. Aside from requesting additional data (if applicable), there’s no further reliance on the server.
Calculating UI Updates
We now understand how a Blazor WebAssembly application boots up. But how do UI updates get calculated? Just as we did for the initialization process, we’re going to follow a scenario to understand how this happens and what Blazor does.
The process of client-side navigation in Blazor WebAssembly from clicking a link to the application of UI updates
For our scenario we have a Blazor WebAssembly application with two pages, home and counter. Neither of these pages have anything on them except a heading saying either “Home” or “Counter”, respectively. The user is on the home page of the application and is going to click on a link to the go to the counter page. We’ll follow the process Blazor goes through to update the UI from that of the home page to the counter page.
Process explained
When the user clicks on the counter link, the navigation event is intercepted by Blazor on the JavaScript side. This event is then passed over to Blazor on the WebAssembly side and is processed by Blazors router component.
The router checks its routing table for any routable components which match the link the user has attempted to navigate to. In our case, it will find a match with the Counter component and a new instance of that component will be created and the relevant lifecycle methods will be executed.
Once complete Blazor will work out the minimum amount of changes that are required to update the DOM to match that of the Counter component. When this is complete, those changes will be passed back down to the Blazor JavaScript runtime and that will in-turn, apply those changes to the physical DOM. At this point the UI will update the user will be on the Counter page.
All of this has happened client-side in the user browser. There was no need for a server during any point in this process. It’s fair to say that in a real world application, you would probably make a call out to a server to some point in this process. This usually happens during the execution of the lifecycle methods of the component being navigated to in order to load some initial data for the component. But this would depend on the individual application.
Benefits
Now we know a bit more about how the Blazor WebAssembly hosting model works, let talk about the benefits and tradeoffs of choosing this model. Let’s start with the benefits.
Applications run on the client. This means that there is much less load on the server, you can offload much of the work to the client. This could lead to significant cost saving on server infrastructure and improve the scalability of an application.
Can work in offline scenarios. As the app runs entirely inside the browser there’s no need for a persistent connection to the server, making applications more tolerant to unstable network connections. It’s also trivial is enable Progressive Web Application (PWA) functionality. In fact, Blazor WebAssembly has this as an option you can select when creating your application.
Deployed as static files. As Blazor WebAssembly apps are just static files, they can be deployed anywhere static hosting is available. This opens up some options which have never been available to .NET developers historically. Services such as GitHub pages, Netlify, Azure Blob Storage, AWS S3 Buckets, Azure Static Web Sites, are all options for hosting standalone Blazor WebAssembly applications.
Code Sharing. Potentially one of the greatest benefits with Blazor WebAssembly is if you’re using C# on the server. You can now use the same C# objects on your client as you use on the server. The days of keeping TypeScript models in sync with their C# equivalent and vice versa, are over.
Tradeoffs
Of course, nothing is a silver bullet so let’s understand some tradeoffs of this model.
Payload. The initial download size for a Blazor WebAssembly app can be considered quite large. The project template weighs in at around 1.8mb when published. This is largely down to the fact Blazor needs to ship an entire .NET runtime to the client which comes in at around 600kb. However, this is a one-time cost as the runtime and many of the framework assemblies are cached on the first load. Meaning subsequent loads can be a small as a few kb.
Load time. A knock-on effect of the payload size can be load time. If the user’s on a poor internet connection the amount of time required to download the initial files will be higher, which will delay the start of the application, leaving the user with a loading message of some kind. This can be offset slightly by using server-side prerendering, however, while this will give the user something more interesting to look at initially, the app still won’t be interactive until all files have been downloaded and initialized. Server-side prerendering for Blazor WebAssembly apps also requires a ASP.NET Core element on the server, which negates any free hosting options.
Restricted runtime. This is arguably not a tradeoff as such, but for existing .NET developers who are used to having a relatively free rein over the machine their apps run on, it’s something to be aware of. WebAssembly applications run in the same browser sandbox as JavaScript applications. This means, for example, that you will not be allowed to reach out to the users’ machine and do things such access the local file system.
Blazor WebAssembly summarize
To summarize, Blazor WebAssembly is the hosting model to choose if you’re looking for a direct replacement for a JavaScript SPA framework such as Angular, React or Vue. While there are a few tradeoffs to consider, there are some substantial benefits to choosing this model.
Blazor Server
Now we’ve seen how Blazor WebAssembly works, let’s turn our attention to the Server hosting model and see how it differs. Blazor Server was the first production supported hosting model for Blazor, being released around 8 months before the WebAssembly version. As we did with the previous model, we’ll walk through initializing a Blazor Server application to help us understand how things work.
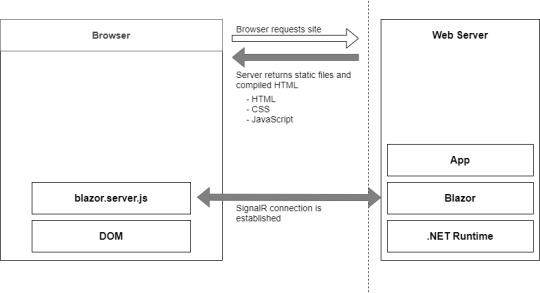
Bootup process of a Blazor Server application
Process begins
The process begins with a request to load the site from the browser. When this request hits the webserver two things could happen, the app is started up, or if the app is already running, a new session is established. Why would the app already be running? Blazor WebAssembly follows the traditional SPA model and runs entirely in the browser, essentially making it like a desktop application. Each user has their own instance of the app which runs locally on their machine. Blazor Server is different, only one instance of the application runs on the server, but it can support many clients. Therefore, the app could already be running, and the new request would just establish a new session.
Process static files
The request is then processed by the application and the initial payload is sent back to the browser. This includes static assets such as CSS and JavaScript files, and images. There is also the initial HTML, but this is compiled rather than static HTML we saw in Blazor WebAssembly. The reason for this is that the hosting page for a Blazor Server application is a Razor Page rather than a static HTML page in the WebAssembly model. The advantage of this is it allows Blazor Server applications to use server-side prerendering out of the box. In fact, this feature is enabled by default when you create this type of Blazor application.
Once the initial payload is returned to the browser the files are processed and the DOM is created – then a file called blazor.server.js is executed. The job of this runtime is to establish a SignalR connection back to the Blazor application running on the server. At this point the application is ready for user interaction.
Calculating UI updates
What happens when a user interacts with the application? We saw earlier that in Blazor WebAssembly the events are processed right there in the browser along with calculating any UI updates and applying them to the DOM. But that can’t happen here as the application is running on the server.
We’ll follow the same scenario as we did with Blazor WebAssembly, we have a Blazor Server application with two pages, home and counter. Neither of these pages have anything on them except a heading saying either “Home” or “Counter”, respectively. The user is on the home page of the application and is going to click on a link to the go to the counter page. We’ll follow the process Blazor goes through to update the UI from that of the home page to the counter page.

Process of updating the UI in Blazor Server
Process explained
The user clicks on the link in the menu and the click event is intercepted by Blazor’s runtime on the client. The runtime then processes the event to understand what has happened. In this case there are two things, a mouse click event and a navigation event, due to it being a hyperlink that was clicked. These two events are then bundled up and sent back to the server over the SignalR connection that was established when the application started.
So, the client sent a the message to the server and the server unpacks and process the message. The Blazor framework then calls any application code necessary. In this case it would instantiate an instance of the counter page component and execute the relevant lifecycle methods.
SignalR
Once complete, Blazor will work out what the minimum amount of changes needed to make the current page transform to the counter page and then send these back to the client via the SignalR connection. Just to be clear, Blazor will not send back an entirely new page to the client. It will only send back the minimum number of instructions needed to update the current DOM to match the Counter page. In our case, the only difference is the heading. Blazor will send back a single instruction to change the text in the heading from “Home” to “Counter”.
DOM
Once back on the client, the client unpacks the changes, and the required changes are applied to the physical DOM. From the user’s perspective, they appear to have navigated to a new page in the application, the counter page. But they are still on the same physical page, it just has a different header.
You may have spotted this already, but the overall process isn’t any different to how Blazor WebAssembly worked, it’s just been stretched out a bit over that SignalR connection. Blazor Server is just as much a SPA as Angular, Vue or Blazor WebAssembly. It just happens to run its logic and calculate UI updates on the server instead of the client. In fact, I would go as far as saying if you were presented with two identical applications, one written in Blazor Server and one in Blazor WebAssembly, you wouldn’t be able to tell the difference between them, as a user.
Performance
Before we talk about benefits and tradeoffs for this model, I want quickly mention performance. With all the network chatter which goes on in this hosting model I’m sure it may have crossed your mind that this might not scale particularly well.
The test
In 2019, the ASP.NET Core team did some testing to establish the performance levels of Blazor Server apps. They setup an application in Azure and tested it on different powered virtual machines, checking the number of active users the application could support. Here are the results.
Standard D1 v2 Instance (1vCPU & 3.5GB Memory). Over 5000 concurrent users
Standard D3 v2 Instance (4vCPU & 14GB Memory). Over 20,000 concurrent users
As you can see, Blazor Server is no slouch when it comes to performance. The main factor they found which effects the number of clients that can be supported is memory. This makes sense as the server needs to keep track of all the clients which are connected to it, the more there are the more information needs to be stored in memory.
Testing
The other major finding from testing was how network latency effected the application. As all interaction are sent back to the server for processing, latency can have a large impact on usability.
If the server is located 250ms away from the client, then each interaction is going to take at least 500ms to be processed as it has to travel to the server (250ms), then be processed, then travel back again (250ms).
Testing found that when the latency went above 200ms then the UI began to feel sluggish and less responsive. As a rough rule you would always want your users to be on the same continent as the server. If you want to have a globally available Blazor Server application, then you need to have your app evenly distributed across the world aiming to keep all clients within 200ms of a server.
Benefits
As we did before, let’s look at the benefits and tradeoffs of choosing a Blazor Server application.
Small payload. As the application is running on the server as opposed to the client, the initial download is significantly smaller. Depending on static assets such as CSS and images a Blazor Server application can be as small as a 100-200kb.
Fast load time. With a much smaller payload the application loads much faster. The server-side prerendering also helps as the user never sees a loading message.
Access to the full runtime. The application code is executing on the server on top of the full .NET runtime. This means that you can do things such as access the servers file system if you require without hitting any security restrictions.
Code security. If you have code which is proprietary, and you don’t want people being able to download and interrogate it then Blazor Server is a good choice. The application code is all executed on the server and only the UI updates are sent to the client. This means your code is never exposed to the client in anyway.
Tradeoffs
Heavy server load. Where Blazor WebAssembly allows us to utilize the power of the client Blazor Server does the complete opposite. Almost all of the work is now being performed by the server. Meaning you might need a larger investment in your infrastructure to support Blazor Server apps.
Doesn’t work offline. Where Blazor WebAssembly takes offline working in its stride Blazor Server does not. The SignalR connection is the lifeline of the application and without it the client can’t function at all. By default, this results in an overlay with a message saying the client is attempting to reestablish the connection. If this fails, the user has to refresh the browser to restart the application.
Latency. Due to its design Blazor Server apps are sensitive to latency issues. Every interaction the user has with the application must be sent back to the server for processing and await any updates that need to be applied. If there is a high latency in the connection between client and server a noticeable lag manifests in the UI and actions quickly feel sluggish. In real numbers a latency above 200ms is going to start causing these issues.
Requires a stable connection. Following on from the need for low latency and tying in with the inability to work offline. Blazor Server apps need to have a stable internet connection. If the connection is intermittent in any way, the user will continually see the reconnecting overlay in their application which quickly becomes very disruptive. An obvious scenario where this could occur is when a user is on a mobile device which has intermittent connection.
Blazor Server summarize
In summary, if you’re looking for a fast loading application and you have users with a fast and stable network connection, then Blazor Server is a great choice.
The post Getting started with C# and Blazor appeared first on PureSourceCode.
from WordPress https://www.puresourcecode.com/dotnet/net-core/getting-started-with-c-and-blazor/
0 notes
Text
Introducing .NET Multi-platform App UI
You can build anything with .NET. It’s one of the main reasons millions of developers choose .NET as the platform for their careers, and companies invest for their businesses. With .NET 5 we begin our journey of unifying the .NET platform, bringing .NET Core and Mono/Xamarin together in one base class library (BCL) and toolchain (SDK).
As we consider what building device applications will look like in a unified .NET, we see many devices across multiple platforms used, from Android and iOS to Windows and macOS. To address this need we are excited to announce a new first-class UI framework for doing just that: .NET Multi-platform App UI, affectionately call .NET MAUI.
Let us introduce you to what .NET MAUI is, the single project developer experience, modern development patterns, and a look at the journey ahead.
What is .NET MAUI
.NET MAUI is an evolution of the increasingly popular Xamarin.Forms toolkit that turns 6 years old this month. For years companies such as UPS, Ernst & Young, and Delta have been leveraging the mobile expertise of Xamarin atop .NET to power their businesses; some since the very beginning. It has also been very successful in helping small businesses maximize their development investment sharing upwards of 95% of their code, and beating their competitors to market. .NET MAUI extends this success on mobile to embrace the desktop making it the best way to build multi-platform applications across both, especially our new devices such as the new Surface Duo.
.NET MAUI simplifies the choices for .NET developers, providing a single stack that supports all modern workloads: Android, iOS, macOS, and Windows. The native features of each platform and UI control are within reach in a simple, cross-platform API for you to deliver no-compromise user experiences while sharing even more code than before.
Single Project Developer Experience
.NET MAUI is built with developer productivity in mind, including the project system and cross-platform tooling that developers need. .NET MAUI simplifies the project structure into a single project to target multiple platforms.
This means you can easily deploy to any target that you wish including your desktop, emulators, simulators, or physical devices with a single click. With built-in cross-platform resources you will be able to add any images, fonts, or translation files into the single project, and .NET MAUI will automatically setup native hooks so you can just code.
Finally, you will always have access the native underlying operating system APIs and it will be easier than ever with new platform specific integrations. Under platforms you can add source code files for a specific operating system and access the native APIs. With .NET MAUI everything is in one place where you need it to keep you productive.
MAUI: cross-platform development, simplified
This delivers:
One project targeting multiple platforms and devices
One location to manage resources such as fonts and images
Multi-targeting to organize your platform-specific code
You master one way to build client apps, the MAUI way, and all platforms are within your reach. Today, Scott Hanselman and I will demo it in action at Build, The Journey to One .NET.
Modern App Patterns
Part of the vision for one .NET is providing developer choice in the areas of personal preferences so you can be most productive using .NET. This manifests in which IDE you use whether Visual Studio 2019, Visual Studio for Mac, or even Visual Studio Code. .NET MAUI will be available in all of those, and support both the existing MVVM and XAML patterns as well as future capabilities like Model-View-Update (MVU) with C#, or even Blazor.
MVVM
Model-View-ViewModel (MVVM) and XAML, the predominant pattern and practice among .NET developers for decades now, are first-class features in .NET MAUI. This will continue to grow and evolve to help make you productive building and maintaining production apps.
<StackLayout> <Label Text="Welcome to .NET MAUI!" /> <Button Text="{Binding Text}" Command="{Binding ClickCommand}" /> </StackLayout>
public Command ClickCommand { get; } public string Text { get; set; } = "Click me"; int count = 0; void ExecuteClickCommand () { count++; Text = $"You clicked {count} times."; }
MVU
In addition, we are enabling developers to write fluent C# UI and implement the increasingly popular Model-View-Update (MVU) pattern. MVU promotes a one-way flow of data and state management, as well as a code-first development experience that rapidly updates the UI by applying only the changes necessary. For more information about MVU as a pattern, check out this Elm Programming guide and this blog from Thomas Bandt.
Below is a basic counter example in the MVU style written in .NET MAUI.
readonly State<int> count = 0; [Body] View body() => new StackLayout { new Label("Welcome to .NET MAUI!"), new Button( () => $"You clicked {count} times.", () => count.Value ++) ) };
This pattern is ideally suited for hot reload as you can see below with added styling, gradients, and fonts with instant hot reload from C#.
MAUI: cross-platform development
Both MVVM and MVU deliver the same native applications, performance, and platform fidelity. Developers will be able to choose which style best suits their preference and use case.
The post Introducing .NET Multi-platform App UI appeared first on PureSourceCode.
from WordPress https://www.puresourcecode.com/news/introducing-net-multi-platform-app-ui/
0 notes