#viewcomponents
Explore tagged Tumblr posts
Visit Tumblr Blog
Explore Tumblr blogs with no restrictions, modern design and the best experience.
Last Seen Tumblr Blogs


Fun Fact
The Tumblr app for Google Glass was released on May 16, 2013.
Text
What's New in Rails 7.1
Ruby on Rails 7.1 introduces powerful updates that simplify workflows and enhance performance. Let’s dive into the highlights, including Turbo and Stimulus enhancements and ActionCable’s real-time features.
Key Features
Turbo Enhancements
Turbo simplifies building responsive applications.
Turbo Streams: Cleaner syntax for real-time updates.
Turbo Frames: Faster, smoother navigation.
Parallel Testing
Database Handling: Efficient test data management.
Dynamic Workers: Optimize resource use during tests.
Active Record Updates
Query Filters: Simplify complex queries.
Batch Operations: Efficient bulk updates.
Improved Query Speed: Faster large dataset handling.
Background Jobs
Custom Priorities: Smarter task management.
Reliable Retries: Ensure critical job execution.
ViewComponent Integration
Reusable UI Components: Modular, testable designs.
Focused Testing: Isolate and test components effectively.
Hotwire: Turbo and Stimulus
Turbo
Turbo Drive: Speed up navigation without page reloads.
Turbo Frames: Update page sections independently.
Turbo Streams: Real-time server-driven updates.
Stimulus
Controller-Based Logic: Reusable, efficient JavaScript.
Lifecycle Hooks: Simplify setup and teardown.
ActionCable for Real-Time Features
Capabilities
Live Notifications: Instant user alerts.
Collaborative Tools: Shared document updates.
Dynamic Dashboards: Real-time analytics.
Setup
Use Redis for scalability.
Define WebSocket channels for streams.
Conclusion
Rails 7.1 revolutionizes development with tools like Turbo, Stimulus, and ActionCable. Explore it now to build smarter, faster, and more dynamic applications!
#ai development#ai development company#ai development services#ai#generative ai#ai in retail#spritle software#conversational ai
0 notes
Text
Setting up a Blazor WebAssembly application
Welcome to “Setting up a Blazor WebAssembly application” post! In this new post I’ll build a simple project in Blazor and explain the basic Blazor components and interactions. The source code of the project I’m going to create in this post is available on GitHub.
Here the posts I wrote about Blazor that help you to learn this new technology better and faster:
Getting Started With C# And Blazor
Blazor is a framework for building interactive client-side web UI with .NET:
Create rich interactive UIs using C# instead of JavaScript.
Share server-side and client-side app logic written in .NET.
Render the UI as HTML and CSS for wide browser support, including mobile browsers.
Integrate with modern hosting platforms, such as Docker.
Using .NET for client-side web development offers the following advantages:
Write code in C# instead of JavaScript.
Leverage the existing .NET ecosystem of .NET libraries.
Share app logic across server and client.
Benefit from .NET’s performance, reliability, and security.
Stay productive with Visual Studio on Windows, Linux, and macOS.
Build on a common set of languages, frameworks, and tools that are stable, feature-rich, and easy to use.
So, here we’re going to start off by looking at the available templates provided by Microsoft to create a new application. Templates are a great way to get started quickly and provide all of the primary building blocks we need for a working an application. Once we have an understanding of the options, we’ll then choose a template as the base for our Blazor Trails app. We’ll build and run the template so we can get a feel for how it behaves, then we’ll strip out all of the unnecessary parts leaving us with only the key components.
As a result, this is a screenshot of the web application I’m going to explain.
Blazor Trails home page: final
Table of contents
Setting up the application
Blazor WebAssembly template configurations
Standalone mode
Hosted mode
Creating the application
Building and running the application
Local SSL certificate
Key components of a Blazor application
Index.html
More details about Index.html
Base tag
Program.cs
More details about Program.cs
Dependency injection
App.razor
Router component
wwwroot folder & _imports.razor
Writing your first components
Organizing files using feature folders
Routable component
Defining the layout
Main layout
The Blazor Trails home page
Prepare the data
The first injection
Read the data
JsonAsync methods
Waiting for the data
Refactor
Conclusion
Setting up the application
So, in other frameworks setting up a new application involves creating everything manually, from scratch. Generally speaking, .NET applications aren’t created this way. Many, if not all, start life being generated from a template. Using a template has many advantages:
Developers can have a working application in seconds
Boilerplate code is taken care of and doesn’t need to be written for every new application
The template serves as a working example of using the framework
The process is repeatable, using a template will give you the same starting point time and time again
Blazor comes with two templates which can be used to create new applications. When choosing a template, we’re essentially making the choice of which hosting model we want to use, either Blazor Server or Blazor WebAssembly. In fact, the two available templates are named Blazor Server and Blazor WebAssembly which makes knowing the hosting model they use pretty straightforward. However, we’re going to be using Blazor WebAssembly to build our Blazor Trails application so that is the template type we’re going to focus on in this post.
Blazor WebAssembly template configurations
Before we actually create the application, I want to talk about the configuration options available for the Blazor WebAssembly template. This template is the more complex of the two available because you can configure it in two modes: hosted or standalone.
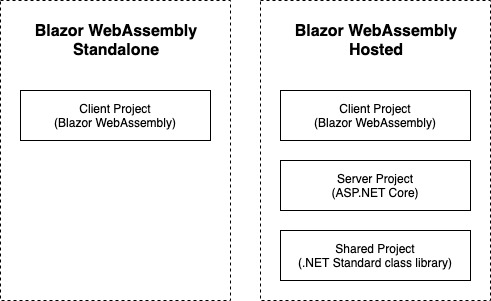
The left side shows the projects created when configuring the template in hosted mode. The right shows the project created when configuring the template in standalone mode.
Standalone mode
In the standalone mode, which is the default configuration, you will end up with a single Blazor WebAssembly project in the solution. This template is great if you’re looking to build an application which doesn’t need any kind of backend or server element to it, or perhaps you already have an existing API.
Hosted mode
Hosted mode is a little bit more complex. If you enable the ASP.NET Core Hosted option when creating the template, you will end up with three projects in the solution:
Blazor WebAssembly project
ASP.NET Core WebAPI project
.NET Standard class library
In this configuration you are getting a full stack .NET application. A fully functioning backend (ASP.NET Core WebAPI), a place to put code which is shared between the frontend and backend project (.NET Standard class library), and the frontend application (Blazor WebAssembly).
So, I want to highlight that using this configuration does require a .NET runtime to be installed on the host server. You may remember in my previous post I mentioned an advantage of using Blazor WebAssembly was it didn’t require a .NET runtime on the server, that benefit doesn’t apply when you’re using the hosted configuration. This is because there is a full ASP.NET Core WebAPI project in the solution which does need a .NET runtime on the server to function.
Creating the application
So, I want to create a Standalone mode application. There are two way to create a new application using a template, the dotnet CLI (Command Line Interface) or via an IDE (Integrated Development Environment) such as Visual Studio. To create the application, open Visual Studio and follow these steps (there may be slight differences in wording or order of screen on other IDEs):
File > New Project.
From the project templates list select Blazor WebAssembly App.
The next screen allows us to set the name of the project and the solution as well as where the files will be saved on disc. Enter the details and then click Next to move to the next step.
Select .NET5 as Target Framework
Create a new Blazor WebAssebly app
Configure your new Blazor project
Additional information
Be sure, ASP.NET Core hosted and Progressive Web Application are not checked.
This will create a new application with the same configuration and folder structure we setup using Visual Studio. At this point you’ve created your first Blazor application, congratulations! Now we have our shiny new application we’re going to look at how we can build and run it.
Building and running the application
When it comes to running .NET applications there are 3 steps that need to happen:
Restore any packages (also referred to as dependencies)
Compile or build the application
Fire up a web server and serve the application
In previous versions of .NET Core these steps needed to be performed manually so you would need to first restore any packages, then build the code, and finally run the app. However, this is no longer the case, we can now jump straight to running the application and either Visual Studio or the .NET CLI will take care of performing the first two steps, if they’re required.
However, it’s always good to understand how to perform these steps yourself manually if the need arises. When using Visual Studio, you can restore packages by right clicking on the solution and selecting Restore NuGet Packages from the context menu. If you’re using the .NET CLI then you can execute the dotnet restore command.
To perform a build from Visual Studio, select Build > Build Solution from the top menu. You can also use a keyboard shortcut to perform the same task, Ctrl+Shift+B. From the .NET CLI you can use the dotnet build command. Performing a build will also perform a package restore, if it’s required, both when using Visual Studio or the CLI. So, having to manually restore packages shouldn’t be an issue.
All that’s left is to run the application. From Visual Studio this can be done in several ways. First, you can press the play button found in the main toolbar. You can also use a keyboard shortcut which is F5. Finally, you can select Debug > Start Debugging from the top menu. Any of the above will run the application and Visual Studio will fire up a browser and load the application automatically.
Local SSL certificate
Depending on what types of application you’ve created and run before, you could see an extra step which asks if you want to trust the development SSL certificate. Answering yes to this will install the development certificate on your machine and this allows the application to be run over https rather than http. I would recommend trusting and installing the development SSL certificate as running sites over https is best practice, even in development as it mimics the live environment.
First run of a boilerplate Blazor app
Key components of a Blazor application
While the template has generated a fair few files, some of these files are more important to know and understand than others. In this section, we’re going to look at each of those key files to understand what they do and why they’re important. Then we’re going to remove all of the other files from our project to give us a clean base ready to start building Blazor Trails.
Index.html
This is one of the most important components of a Blazor WebAssembly application. It can be found in the wwwroot directory of the project and it’s the host page for the Blazor application.
<!DOCTYPE html> <html> <head> <meta charset="utf-8" /> <meta name="viewport" content="width=device-width, initial-scale=1.0, maximum-scale=1.0, user-scalable=no" /> <title>BlazorTrailsWA</title> <base href="/" /> <link href="css/bootstrap/bootstrap.min.css" rel="stylesheet" /> <link href="css/app.css" rel="stylesheet" /> <link href="BlazorTrailsWA.styles.css" rel="stylesheet" /> </head> <body> <div id="app">Loading...</div> <div id="blazor-error-ui"> An unhandled error has occurred. <a href="" class="reload">Reload</a> <a class="dismiss">🗙</a> </div> <script src="_framework/blazor.webassembly.js"></script> </body> </html>
8: the tag base is used by Blazors router to understand which routes it should handle
15: the app tag is where the Blazor application will load
19: this div is displayed automatically by Blazor when an unhandled exception occurs
22: Blazors JavaScript runtime which downloads and initializes the application
More details about Index.html
The key element in the index.html file is the link to the Blazor JavaScript runtime, found near the bottom of the page. As we saw previously, this is the file which downloads the .NET WebAssembly based runtime as well as the application and any of its dependencies. Once this is complete it also initializes the runtime which loads and runs the application.
When the application runs its content needs to be outputted somewhere on the page and, by default, this is outputted to the app tag. This is configurable and is setup in the Program.cs file which we will look at in a second. Any default content which exists in the tag will be replaced at runtime with the output from the application. This has a useful benefit; initial content can be used as a placeholder which will be displayed to the user until the application is ready.
If there is ever an unhandled exception caused inside the application, then Blazor will display a special UI which signals to the user that something has gone wrong. This is defined here in the index.html. This can be customized however you would like but the containing element much have an id attribute with the value blazor-error-ui. The default message states there has been a problem and offers the user a button which will cause a full page reload. This is the only safe option at this point as the application will be in an unknown state.
Exception bar in a Blazor application
Base tag
The final key piece to the index.html file is the base tag. This is an important tag when it comes to client-side routing. The reason this tag is important is that is tells Blazors router what URLs, or routes, are in scope for it to handle.
If this tag is missing or configured incorrectly then you may see some unexpected or unpredictable behavior when navigating your application. By default, the tag is configured with a value of /. This means that the application is running at the root of the domain (for example www.puresourcecode.com). The router should handle all navigation requests within that domain.
However, if the application was running as a sub-application for example https://www.puresourcecode.com/blazortrails, then the base tag would need to reflect this with a value of /blazortrails/. This would mean the router will only handle navigation requests which start with /blazortrails/.
Program.cs
Just like other ASP.NET Core applications, Blazor apps start off as .NET console apps. What makes them a Blazor application is the type of host they run. In the case of Blazor WebAssembly it runs a WebAssemblyHost. The purpose of the code contained in this file is to configure and create that host, figure 2.9 shows the default configuration of the Program class.
public class Program { public static async Task Main(string[] args) { var builder = WebAssemblyHostBuilder.CreateDefault(args); builder.RootComponents.Add<App>("#app"); builder.Services.AddScoped(sp => new HttpClient { BaseAddress = new Uri(builder.HostEnvironment.BaseAddress) }); await builder.Build().RunAsync(); } }
17: create an instance of WebAsseblyHostBlazor
18: define the root component for the application
20: configure and register services with the IServiceCollection
24: build and run an instance of WebAssemblyHost using the configuration defined with the WebAssemblyHostBuilder
More details about Program.cs
There are two critical pieces of configuration happening, the root component for the application is defined and any services are configured and added to the IServiceCollection.
When defining the root components – there can be more than one although that is usually not the case in most applications – we are actually giving the builder two pieces of information.
The first is the type of the root component for the application. By default, this is the App component (which we will look at next). However, you can configure this to be any component you wish.
The second is the place in the host page where we want to inject the application. The standard setup has the application being injected into the app element we looked at previously on the index.html page. But again, you can configure this to be injected anywhere you wish. The argument the builder.RootComponents.Add method takes is a CSS selector which is used to identify the target element where the component will be injected. Specific elements can be targeted such as app or elements with a specific ID, for example, #root-component, or any other valid CSS selector.
Dependency injection
The next line shows the HttpClient being configured and registered with the IServiceCollection making it available to classes and components via dependency injection (DI). Blazor uses the same DI container as other ASP.NET Core apps and allows registering of services using one of 3 lifetimes:
Transient – A new instance is provided each time it’s requested from the service container. Given a single request, if two objects needed an instance of a transient service, they would each receive a different instance.
Scoped – A new instance is created once per request. Within a request you will always get the same instance of the service across the application.
Singleton – An instance is created the first time it’s requested from the service container, or when the Program.Main method is run, and an instance is specified with the registration. The same instance is used to fulfil every request for the lifetime of the application.
The last thing that the Main method does is to take all of the configuration specified with the WebAssemblyHostBuilder and call its Build method. This will create an instance of a WebAssemblyHost which is the heart of your Blazor app. It contains all of the application configuration and services needed to run your app.
App.razor
This is the root component for a Blazor application, and we saw how this was configured in the Program.Main method in the previous section. This doesn’t have to be the case however; you can configure a different component to be the root component if you wish, or even have multiple root components, you just need to update the configuration in the Program.Main method.
Router component
The App component contains a vital component for building multi-page applications, the Router component. The Router component is responsible for managing all aspects of client-side routing. When an application first starts up, the router will use reflection to scan the applications assemblies for any routable components. Then, it stores information about them in a routing table and whenever a link is click or navigation is triggered programmatically, the router will look at the route which has been requested and try and find a routable component which handles that route. If a match is found, then it will load that component, otherwise it will load a not found template which is specified inside the Router component.
wwwroot folder & _imports.razor
Now, I’m going to cover both of these files in this section as there is not a huge amount to say about them. In fact the _imports.razor file is the one component on this list which is not required to run a Blazor application, but it makes things a lot easier if you do use it.
By convention all ASP.NET Core applications have a wwwroot folder which is used to store public static assets. This is the place where you can put things such as images, CSS files, JavaScript files or any other static files you need. Anything you put in this folder will be published with your application and available at runtime. As I mentioned earlier, this is also where the index.html file is kept.
The _imports.razor file is optional and not required when building a Blazor application, however, it’s really useful to have at least one of these files. The _imports.razor file has a simple job, it contains using statements. What is really great about the way this file works is that it makes those using statements available to all of the components in that directory and any sub-directories. This saves you having to add common using statements to every component in your application.
As I alluded to, you can also have multiple version of this file at different points in your folder structure. So, if you had a structure of BlazorTrails > Features > Home, and you only wanted specific using statements to be applied to components in the Home folder. Then you could add a _Imports.razor file in the Home folder with those using statements and they would only apply there but would still inherit any using statements from _Imports.razor files higher in the structure.
Writing your first components
We’ve had a look at the app created by the template, and we’ve covered each of the key files and, at a high level, what they do. Now it’s time to write some code of our own. As I said at the start of the chapter, we’re going to be building the foundations of the Blazor Trails application.
List of trails
The first thing we’ll do is take about how the application files are going to be organized. Next, we’ll remove all of the unneeded files which were generated by the template. This will give us a clean base to start building from. We’ll then define several new components to create what you see, a layout component, a page component and a couple of regular components.
Organizing files using feature folders
Before we start adding our own code, we need to remove all of the unnecessary files generated by the template. By default, the app structure used by the template divides files by responsibility. There’s a Pages folder for routable components. There is a Shared folder for anything which is used in multiple places or is a global concern.
This kind of separation doesn’t scale well and makes adding or changing functionality much more difficult as files end up being spread out all over the place. Instead we’re going to use a system called feature folders to organize our application.
When using feature folders all of the files relating to that feature are all stored in the same place. The has two major benefits, first, when you go to work on a particular feature all of the files you need are in the same place making everything easier to understand and more discoverable.
The second is that it will scale well, every time you add a new feature to the app you just add a new folder, and everything goes in there. You can also arrange each feature with sub-features if they contain a lot of files.
Routable component
The other little thing I like to do when using this organization system with Blazor is to append any routable component with the word Page. The reason is when a feature has several components in it it’s almost impossible, at a glance, to see which one is the routable component. The only real way to know is to open the file and check for the @page directive at the top.
So, start by deleting the Pages and Shared folders along with their contents, then delete the sample-data folder from the wwwroot folder. Also delete most of the contents of the app.css, just leave the import statement for the open iconic styles and the class called #blazor-error-ui and #blazor-error-ui .dismiss.
We also need to delete the last using statement from the _Imports.razor file, @using BlazorTrailsWA.Shared.
Add a new folder at the root of the project called Features, then inside that add a folder called Layout and another called Home. Inside Layout, add a new Razor Component called MainLayout.razor. Inside Home add a new Razor Component called HomePage.razor. Once you’ve done that head back over to the _Imports.razor and add the following using statements.
@using BlazingTrails.Web.Features.Home @using BlazingTrails.Web.Features.Layout
Defining the layout
Blazor borrows the concept of a layout from other parts of ASP.NET Core and essentially it allows us to define common UI which is required by multiple pages. Things such as the header, footer and navigation menu are all examples of things you might put in your layout. We also add a reference to a parameter called Body where we want page content to be rendered. This comes from a special base class which all layouts in Blazor must inherit from called LayoutComponentBase. The following image shows an example of what might be defined in a layout along with where the rendered page content would be displayed.
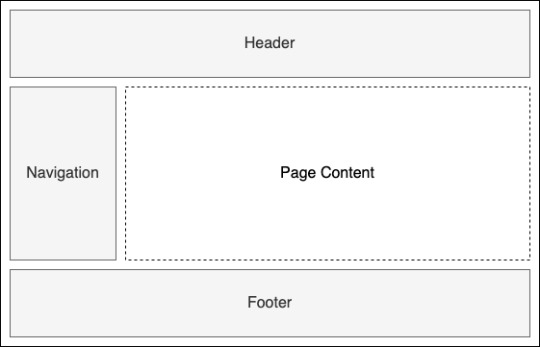
An example layout defining shared UI
You don’t have to stick with a single layout for your whole application either, you can have multiple layouts for different parts of your app. So, if you wanted a particular layout for the public facing pages but a different one for the admin pages, you can do that. In Blazor the default layout is defined on the Router component. This will automatically be applied to all pages in the application.
<Router AppAssembly="@typeof(Program).Assembly" PreferExactMatches="@true"> <Found Context="routeData"> <RouteView RouteData="@routeData" DefaultLayout="@typeof(MainLayout)" /> </Found> <NotFound> <LayoutView Layout="@typeof(MainLayout)"> <p>Sorry, there's nothing at this address.</p> </LayoutView> </NotFound> </Router>
In line 3 and 6 you see the default layout is defined by passing the type of the component you wish to use. If you want to use a different layout on certain pages, you can specify an alternative by applying the @layout directive. This goes at the top of the page and you pass the type of the component you wish to use. For example, if we had an alternative layout called AdminLayout, our layout directive would look like this: @layout AdminLayout.
Main layout
We’re going to be updating the MainLayout component. To start with we are going to do two things; First, we’re going to use the @inherits directive to inherit from the LayoutComponentBase class. This will mark this component as a layout component and will give us access to the Body parameter. Second, we’re going to define where our page content is rendered using the Body parameter.
@inherits LayoutComponentBase <main class="container"> @Body </main>
The only thing we’re missing from our layout now is the header. We’re going to define this as a separate component and as it’s part of the overall Layout feature it will go in the Layout feature folder next to the MainLayout component. As we did before, add a new Razor Component called Header.razor. Then, we’re going to add the markup shown which adds a Bootstrap navbar displaying the text.
<nav class="navbar navbar-light bg-light border-bottom mb-4"> <span class="navbar-brand mb-0 h1">Blazing Trails</span> </nav>
That’s all we need in the Header component at the moment; we can now add that to the MainLayout by declaring it as we would any normal HTML element.
@inherits LayoutComponentBase <Header /> <main class="container"> @Body </main>
That’s it for the layout, if you try and run the application at this point you will be able to see the header we’ve just created but there will be a message saying “Sorry, there’s nothing at this address”. That’s because we haven’t defined any routable components (pages) yet.
The Blazor Trails home page
We already created the HomePage component. It still has the boilerplate code which comes with a new component. We need to update this code to make the component routable. Once we have that done, we’re going to define a class which represents a trail. We can then define some test data to use to build out the rest of the UI. Finally, we’re going to load the test data into the HomePage and loop over it to display the various trails via a reusable TrailCard component that we’ll create.
As we talked about earlier, to make a component into a routable component we need to use the @page directive and a route template which specifies the route it will be responsible for. At the top of the HomePage.razor file, add the directive along with a route template of “/”, which tells the Router that this page is the root page of the application. You can run the application at this point, if you wish, to check that the HomePage’s content is being displayed.
We need a way of representing a trail in our code, to do that we’re going to add a new class called Trail to the Home feature folder. Inside this class we need to add a few properties which represent the various data about a trail.
public class Trail { public string Name { get; set; } public string Image { get; set; } public string Location { get; set; } public string Time { get; set; } public int Length { get; set; } }
Prepare the data
Now, we have a definition for a trail we’re going to define some test data to use. At the moment our app doesn’t have a backend, there is no API we can call to retrieve or save data from and to, but later on there might be. In order to simulate making an HTTP call to load data from an API we’re going to define our test data in a json file. So, this is a great way to develop frontend applications which don’t currently have a useable server element. We can still use a HttpClient to load the data from the JSON file in the same way we’d load data from an API. Then once the server element is established, the HTTP call just needs to be updated to point at the API endpoint instead of the JSON file.
Now, in the wwwroot folder create a directory called trails. Inside that folder add a new json file called trail-data.json. You have the full json on GitHub.
Then, with our test data in place we’ll return to the HomePage where we need to load it. We’re going to load the data using the HttpClient, but in order to use it we need to get an instance of it using dependency injection. Blazor makes this really easy by providing an inject directive that has the following format, @inject [TYPE] [NAME], where [Type] is the type of the object we want and [Name] is the name we’ll use to work with that instance in our component.
The first injection
So, under the page directive add the following code which will give us an instance of the HttpClient to work with: @inject HttpClient Http.
Before we can use the HttpClient, we need somewhere to store the results the call will return. Our JSON tests data is an array of trails and as we’re not going to be modifying what’s returned, just listing it out, we can create a private field of type IEnumerable<Trail>.
@page "/" @inject HttpClient Http <h3>HomePage</h3> @code { private IEnumerable<Trail> _trails; }
Read the data
Now, we have somewhere to store our test data we can make the call to retrieve it. A great place to do this kind of thing is the OnInitialized life-cycle method. This method is provided by ComponentBase, which all Blazor components inherit from, and it one of three primary lifecycle methods; The other two are OnParametersSet and OnAfterRender, they all have async versions as well. OnInitialized is only run once in the component’s lifetime making it perfect for loading initial data like we need to.
In order to retrieve the data from the JSON file, we can make a GET request just like we would if we were reaching out to an API. Except, instead of passing the address of the API in the call, we pass the relative location of the JSON file. As the file is in the wwwroot folder it will be available as a static asset at runtime just like the CSS file, this means the path we need to pass in the GET request is simply, “trails/trail-data.json”.
JsonAsync methods
So, a great productivity enhancement which ships with Blazor is the addition of some extension methods for the HttpClient:
GetFromJsonAsync
PostAsJsonAsync
PutAsJsonAsync
Under the hood, these methods are using the new System.Text.Json library. The first method will deserialize a successful response containing a JSON payload to a type we specify. The second and third will serialize an object to JSON to be sent to the server. All three of these methods do this in a single line. No more having to manually serialized and deserialize objects or check for success codes, making everything much cleaner and removing a lot of boilerplate.
Also, one thing to be aware of when using these new methods is that when a non-success code is returned from the server, they’ll throw an exception of type HttpRequestException. This means that it’s generally a good practice to wrap these calls in a try catch statement so non-success codes can be handled gracefully.
@code { private IEnumerable<Trail> _trails; protected override async Task OnInitializedAsync() { try { _trails = await Http.GetFromJsonAsync<IEnumerable<Trail>>("trails/trail-data.json"); } catch (HttpRequestException ex). { Console.WriteLine($"There was a problem loading trail data: {ex.Message}"); } } }
Great! We now have our data being loaded into our component, but we need to do something with it. It would be nice to have a message displayed to the user to let them know that when we’re loading the data, just in case it takes a while.
Waiting for the data
We can use a simple if statement in our markup to check the value of the _trails field. If it’s null then we can surmise that the data is still being loaded, excluding an error scenario of course. If the value is not null, then we have some data and we can go ahead and display it.
@if (_trails == null) { <p>Loading trails...</p> } else { <div class="row row-cols-1 row-cols-md-2"> @foreach (var trail in _trails) { <div class="col mb-4"> <div class="card" style="width: 18rem;"> <img src="@trail.Image" class="card-img-top" alt="@trail.Name"> <div class="card-body"> <h5 class="card-title">@trail.Name</h5> <h6 class="card-subtitle mb-3 text-muted"><span class="oi oi-map-marker"></span> @trail.Location</h6> <div class="d-flex justify-content-between"> <span><span class="oi oi-clock mr-2"></span> @trail.Time</span> <span><span class="oi oi-infinity mr-2"></span> @trail.Length km</span> </div> </div> </div> </div> } </div> }
At the point you should be able to build the app and run it, if all has gone to plan you should see the trails displayed. Now, we could finish here but there’s one little refactor I think we should do first.
Refactor
While it’s all perfectly valid as is, wouldn’t it be nice to encapsulate it all in a component instead? This would make the code in the HomePage component much easier to read.
So, create a new component called TrailCard.razor in the Home feature folder. Then replace the boilerplate code with the markup for the card from the HomePage, be careful not to copy the outer div with the class’s col mb-4. That was pretty painless, but now we have a problem. How do we get access to the current trail data? The answer is parameters.
Now, we can pass data into components via parameters, you can think of these as the public API for a component and they work one way, from parent to child. We can define them in the code block by creating a public property and decorating it with the Parameter attribute. Then, we pass data into them from the parent using attributes on the component tag.
For our TrailCard component we’re going to create a parameter which will allow us to pass in the current trail from the parent. We can then update the razor code to use this parameter.
<div class="card" style="width: 18rem;"> <img src="@Trail.Image" class="card-img-top" alt="@Trail.Name"> <div class="card-body"> <h5 class="card-title">@Trail.Name</h5> <h6 class="card-subtitle mb-3 text-muted"><span class="oi oi-map-marker"></span> @Trail.Location</h6> <div class="d-flex justify-content-between"> <span><span class="oi oi-clock mr-2"></span> @Trail.Time</span> <span><span class="oi oi-infinity mr-2"></span> @Trail.Length km</span> </div> </div> </div> @code { [Parameter] public Trail Trail { get; set; } }
All that’s left now is to update the HomePage component to use the new TrailCard component.
@page "/" @inject HttpClient Http @if (_trails == null) { <p>Loading trails...</p> } else { <div class="row row-cols-1 row-cols-md-2"> @foreach (var trail in _trails) { <div class="col mb-4"> <TrailCard Trail="trail" /> </div> } </div> } @code { private IEnumerable<Trail> _trails; protected override async Task OnInitializedAsync() { try { _trails = await Http.GetFromJsonAsync<IEnumerable<Trail>>("trails/trail-data.json"); } catch (HttpRequestException ex) { Console.WriteLine($"There was a problem loading trail data: {ex.Message}"); } } }
Conclusion
Finally, we did it! We finished setting up a Blazor WebAssembly application and it works. If you have any problem, you have the source code on GitHub. If you have any question, please use the forum.
Happy coding!
The post Setting up a Blazor WebAssembly application appeared first on PureSourceCode.
from WordPress https://www.puresourcecode.com/dotnet/blazor/setting-up-a-blazor-webassembly-application/
0 notes
Text
The future of web software is HTML over WebSockets
The future of web-based software architectures is already taking form, and this time it’s server-rendered (again). Papa’s got a brand new bag: HTML-over-WebSockets and broadcast everything all the time.
Article Continues Below
The dual approach of marrying a Single Page App with an API service has left many dev teams mired in endless JSON wrangling and state discrepancy bugs across two layers. This costs dev time, slows release cycles, and saps the bandwidth for innovation.
But a new WebSockets-driven approach is catching web developers’ attention. One that reaffirms the promises of classic server-rendered frameworks: fast prototyping, server-side state management, solid rendering performance, rapid feature development, and straightforward SEO. One that enables multi-user collaboration and reactive, responsive designs without building two separate apps. The end result is a single-repo application that feels to users just as responsive as a client-side all-JavaScript affair, but with straightforward templating and far fewer loading spinners, and no state misalignments, since state only lives in one place. All of this sets us up for a considerably easier (and faster!) development path.
Reclaiming all of that time spent addressing architecture difficulties grants you a pool of surplus hours that you can use to do awesome. Spend your dev budget, and your company’s salary budget, happily building full-stack features yourself, and innovating on things that benefit your company and customers.
And in my opinion, there’s no better app framework for reclaiming tedious development time than Ruby on Rails. Take another look at the underappreciated Stimulus. Beef up the View in your MVC with ViewComponents. Add in the CableReady and StimulusReflex libraries for that Reactive Rails (as it has been dubbed) new car smell, and you’re off to the races. But we’ll get back to Rails in a bit…
This all started with web frameworks…#section2
Web frameworks burst onto the scene around 2005 amidst a sea of mostly figure-it-out-for-yourself scripting language libraries glued together and thrown onto hand-maintained Apache servers. This new architecture promised developers a more holistic approach that wrapped up all the fiddly stuff in no-touch conventions, freeing developers to focus on programming ergonomics, code readability, and fast-to-market features. All a developer had to do was learn the framework’s core language, get up to speed on the framework itself and its conventions, and then start churning out sophisticated web apps while their friends were still writing XML configuration files for all those other approaches.
Despite the early criticisms that always plague new approaches, these server-rendered frameworks became tools of choice, especially for fast-moving startups—strapped for resources—that needed an attractive, feature-rich app up yesterday.
But then the JavaScript everything notion took hold…#section3
As the web development world pushed deeper into the 2010s, the tides began to turn, and server-rendered frameworks took something of a backseat to the Single Page Application, wholly built in JavaScript and run entirely on the client’s computer. At many companies, the “server” became relegated to hosting an API data service only, with most of the business logic and all of the HTML rendering happening on the client, courtesy of the big ’ol package of JavaScript that visitors were forced to download when they first hit the site.
This is where things started to get ugly.
Fast-forward to 2020 and the web isn’t getting any faster, as we were promised it would with SPAs. Shoving megabytes of JavaScript down an iPhone 4’s throat doesn’t make for a great user experience. And if you thought building a professional web app took serious resources, what about building a web app and an API service and a communication layer between them? Do we really believe that every one of our users is going to have a device capable of digesting 100 kB of JSON and rendering a complicated HTML table faster than a server-side app could on even a mid-grade server?
Developing and hosting these JavaScript-forward apps didn’t get any cheaper either. In many cases we’re now doing twice the work, and maybe even paying twice the developers, to achieve the same results we had before with server-side app development.
In 2005, app frameworks blew everyone’s minds with “build a blog app in 15 minutes” videos. Fifteen years later, doing the same thing with an SPA approach can require two codebases, a JSON serialization layer, and dozens of spinners all over the place so we can still claim a 50ms First Contentful Paint. Meanwhile, the user watches some blank gray boxes, hoping for HTML to finally render from all the JSON their browser is requesting and digesting.
How did we get here? This is not my beautiful house! Were we smart in giving up all of that server-rendered developer happiness and doubling down on staff and the time to implement in order to chase the promise of providing our users some fancier user interfaces?
Well. Yes. Sort of.
We’re not building web software for us. We’re building it for them. The users of our software have expectations of how it’s going to work for them. We have to meet them where they are. Our users are no longer excited about full-page refreshes and ugly Rube Goldberg-ian multi-form workflows. The SPA approach was the next logical leap from piles of unorganized spaghetti JavaScript living on the server. The problem, though: it was a 5% improvement, not a 500% improvement.
Is 5% better worth twice the work? What about the developer cost?#section4
Bedazzling the web app certainly makes things fancier from the user’s perspective. Done well, it can make the app feel slicker and more interactive, and it opens up a wealth of new non-native interaction elements. Canonizing those elements as components was the next natural evolution. Gone are the days of thinking through how an entire HTML document could be mutated to give the illusion of the user interacting with an atomic widget on the page—now, that can be implemented directly, and we can think about our UX in terms of component breakdowns. But, alas, the costs begin to bite us almost immediately.
Go ahead, write that slick little rating stars component. Add some cool animations, make the mouseover and click area feel good, give some endorphin-generating feedback when a selection is made. But now what? In a real app, we need to persist that change, right? The database has to be changed to reflect this new state, and the app in front of the user’s eyes needs to reflect that new reality too.
In the old days, we’d give the user a couple star GIFs, each a link that hit the same server endpoint with a different param value. Server-side, we’d save that change to the database, then send back a whole new HTML page for their browser to re-render; maybe we’d even get fancy and use AJAX to do it behind the scenes, obviating the need for the full HTML and render. Let’s say the former costs x in developer time and salary (and we won’t even talk about lost opportunity cost for features rolled out too late for the market). In that case, the fancy AJAX-based approach costs x + n (you know, some “extra JavaScript sprinkles”), but the cost of lots and lots of n grows as our app becomes more and more of a JavaScript spaghetti sprinkles mess.
Over in the SPA world, we’re now writing JavaScript in the client-side app and using JSX or Handlebars templates to render the component, then code to persist that change to the front-end data store, then a PUT request to the API, where we’re also writing an API endpoint to handle the request, a JSON serializer (probably with its own pseudo-template) to package up our successful response, and then front-end code to ensure we re-render the component (and some branching logic to maybe rollback and re-render the client-side state change if the backend failed on us). This costs a lot more than even x + n in developer time and salary. And if you’ve split your team into “front-end” and “back-end” people, you might as well go ahead and double that cost (both time and money) for many non-trivial components where you need two different people to finish the implementation. Sure, the SPA mitigates some of the ever-growing spaghetti problem, but at what cost for a business racing to be relevant in the market or get something important out to the people who need it?
One of the other arguments we hear in support of the SPA is the reduction in cost of cyber infrastructure. As if pushing that hosting burden onto the client (without their consent, for the most part, but that’s another topic) is somehow saving us on our cloud bills. But that’s ridiculous. For any non-trivial application, you’re still paying for a server to host the API and maybe another for the database, not to mention load balancers, DNS, etc. And here’s the thing: none of that cost even comes close to what a software company pays its developers! Seriously, think about it. I’ve yet to work at any business where our technical infrastructure was anything more than a fraction of our salary overhead. And good developers expect raises. Cloud servers generally just get cheaper over time.
If you want to be efficient with your money—especially as a cash-strapped startup—you don’t need to cheap out on cloud servers; you need to get more features faster out of your existing high-performance team.
In the old, old days, before the web frameworks, you’d pay a developer for six weeks to finally unveil…the log-in page. Cue the sad trombone. Then frameworks made that log-in page an hour of work, total, and people were launching web startups overnight. The trumpets sound! Now, with our SPA approach, we’re back to a bunch of extra work. It’s costing us more money because we’re writing two apps at once. There’s that trombone again…
We’re paying a lot of money for that 5% user experience improvement.
But what if we could take the best client-side JavaScript ideas and libraries from that 5% improvement and reconnect them with the developer ergonomics and salary savings of a single codebase? What if components and organized JavaScript could all live in one rock-solid app framework optimized for server-side rendering? What if there is a path to a 500% jump?
Sound impossible? It’s not. I’ve seen it, like C-beams glittering in the dark near the Tannhäuser Gate. I’ve built that 500% app, in my free time, with my kids running around behind me barking like dogs. Push broadcasts to logged-in users. Instant updates to the client-side DOM in milliseconds. JavaScript-driven 3D animations that interact with real-time chat windows. All in a single codebase, running on the same server hardware I’d use for a “classic” server-rendered app (and maybe I can even scale that hardware down since I’m rendering HTML fragments more often than full-page documents). No separate front-end app. Clean, componentized JavaScript and server-side code, married like peanut butter and jelly. It’s real, I tell you!
Socket to me! (Get it? Get it? Ah, nevermind…)#section5
Finalized in 2011, support for WebSockets in modern browsers ramped up throughout the 2010s and is now fully supported in all modern browsers. With the help of a small bit of client-side JavaScript, you get a full-duplex socket connection between browser and server. Data can pass both ways, and can be pushed from either side at any time, no user-initiated request needed.
Like the game industry’s ever-expanding moves into cloud-based gaming, the future of web apps is not going to be about pushing even heavier obligations onto the user/client, but rather the opposite: let the client act as a thin terminal that renders the state of things for the human. WebSockets provide the communication layer, seamless and fast; a direct shot from the server to the human.
But this wasn’t terribly easy for many developers to grok at first. I sure didn’t. And the benefits weren’t exactly clear either. After years (decades, even) of wrapping our heads around the HTTP request cycle, to which all server-handled features must conform, adopting this WebSocket tech layer required a lot of head scratching. As with many clever new technologies or protocols, we needed a higher-level abstraction that provided something really effective for getting a new feature in front of a user, fast.
Enter HTML-over-WebSockets…#section6
Want a hyper-responsive datalist typeahead that is perfectly synced with the database? On every keystroke, send a query down the WebSocket and get back precisely the changed set of option tags, nothing more, nothing less.
How about client-side validations? Easy. On every input change, round up the form values and send ’em down the WebSocket. Let your server framework validate and send back changes to the HTML of the form, including any errors that need to be rendered. No need for JSON or complicated error objects.
User presence indicators? Dead simple. Just check who has an active socket connection.
What about multi-user chat? Or document collaboration? In classic frameworks and SPAs, these are the features we put off because of their difficulty and the code acrobatics needed to keep everyone’s states aligned. With HTML-over-the-wire, we’re just pushing tiny bits of HTML based on one user’s changes to every other user currently subscribed to the channel. They’ll see exactly the same thing as if they hit refresh and asked the server for the entire HTML page anew. And you can get those bits to every user in under 30ms.
We’re not throwing away the promise of components either. Where this WebSockets-based approach can be seen as a thick server/thin client, so too can our components. It’s fractal, baby! Make that component do delightful things for the user with smart JavaScript, and then just ask the server for updated HTML, and mutate the DOM. No need for a client-side data store to manage the component’s state since it’ll render itself to look exactly like what the server knows it should look like now. The HTML comes from the server, so no need for JSX or Handlebars or <insert other JavaScript templating library here>. The server is always in control: rendering the initial component’s appearance and updating it in response to any state change, all through the socket.
And there’s nothing saying you have to use those socket channels to send only HTML. Send a tiny bit of text, and have the client do something smart. Send a chat message from one user to every other user, and have their individual clients render that message in whatever app theme they’re currently using. Imagine the possibilities!
But it’s complex/expensive/requires a bunch of new infrastructure, right?#section7
Nope. Prominent open-source web servers support it natively, generally without needing any kind of extra configuration or setup. Many server-side frameworks will automatically ship the JS code to the client for native support in communicating over the socket. In Rails, for example, setting up your app to use WebSockets is as easy as configuring the built-in ActionCable and then deploying as usual on the same hardware you would have used otherwise. Anecdotally, the typical single Rails server process seems to be perfectly happy supporting nearly 4,000 active connections. And you can easily swap in the excellent AnyCable to bump that up to around 10,000+ connections per node by not relying on the built-in Ruby WebSocket server. Again, this is on the usual hardware you’d be running your web server on in the first place. You don’t need to set up any extra hardware or increase your cloud infrastructure.
This new approach is quickly appearing as extensions, libraries, or alternative configurations in a variety of languages and web frameworks, from Django’s Sockpuppet to Phoenix’s LiveView and beyond. Seriously, go dig around for WebSockets-based libraries for your favorite app framework and then step into a new way of thinking about your app architectures. Build something amazing and marvel at the glorious HTML bits zipping along on the socket, like jet fighters passing in the night. It’s more than a new technical approach; it’s a new mindset, and maybe even a new wellspring of key app features that will drive your startup success.
But I’d be remiss if I didn’t highlight for the reader my contender for Best Framework in a Leading Role. Sure, any app framework can adopt this approach, but for my money, there’s a strong case to be made that the vanguard could be Ruby on Rails.
So we come back around to Rails, 15 years on from its launch…#section8
Set up a Rails 6 app with the latest versions of Turbolinks, Stimulus, StimulusReflex, CableReady, and GitHub’s ViewComponent gem, and you can be working with Reactive Rails in a way that simultaneously feels like building a classic Rails app and like building a modern, componentized SPA, in a single codebase, with all the benefits of server-side rendering, HTML fragment caching, easy SEO, rock-solid security, and the like. You’ll suddenly find your toolbelt bursting with straightforward tools to solve previously daunting challenges.
Oh, and with Turbolinks, you also get wrappers allowing for hybrid native/HTML UIs in the same codebase. Use a quick deploy solution like Heroku or Hatchbox, and one developer can build a responsive, reactive, multi-platform app in their spare time. Just see this Twitter clone if you don’t believe me.
OK, that all sounds exciting, but why Rails specifically? Isn’t it old and boring? You already said any framework can benefit from this new WebSocket, DOM-morphing approach, right?
Sure. But where Rails has always shined is in its ability to make rapid prototyping, well…rapid, and in its deep ecosystem of well-polished gems. Rails also hasn’t stopped pushing the envelope forward, with the latest version 6.1.3 of the framework boasting a ton of cool features.
If you’ve got a small, resource-strapped team, Rails (and Ruby outside of the framework) still serves as a potent force multiplier that lets you punch way above your weight, which probably explains the $92 billion in revenue it’s helped drive over the years. With this new approach, there’s a ton more weight behind that punch. While your competitors are fiddling with their JSON serializers and struggling to optimize away all the loading spinners, you’re rolling out a new multi-user collaborative feature every week…or every day.
You win. Your fellow developers win. Your business wins. And, most importantly, your users win.
That’s what Rails promised from the day it was released to the community. That’s why Rails spawned so many imitators in other languages, and why it saw such explosive growth in the startup world for years. And that same old rapid prototyping spirit, married to this new HTML-over-the-wire approach, positions Rails for a powerful resurgence.
Ruby luminary and author of The Ruby Way, Obie Fernandez, seems to think so.
Heck, even Russ Hanneman thinks this approach with StimulusReflex is the new hotness.
And the good folks over at Basecamp (creators of Rails in the first place), dropped their own take on the concept, Hotwire, just in time for the 2020 holidays, so your options for tackling this new and exciting technique continue to expand.
Don’t call it a comeback, because Rails has been here for years. With this new architectural approach, brimming with HTML-over-WebSockets and full-duplex JavaScript interactions, Rails becomes something new, something beautiful, something that demands attention (again).
Reactive Rails, with StimulusReflex and friends, is a must-look for anyone exhausted from toiling with JSON endpoints or JSX, and I’m super excited to see the new crop of apps that it enables.
Bron: Hacker News https://alistapart.com/article/the-future-of-web-software-is-html-over-websockets/
0 notes