#breadboard electronics for beginners
Explore tagged Tumblr posts
Visit Tumblr Blog
Explore Tumblr blogs with no restrictions, modern design and the best experience.
Last Seen Tumblr Blogs


Fun Fact
70% of Tumblr users say the Dashboard is their favorite place to spend time online.
Text
Unlock the Future with Robotics: Join the Best Robotics Classes in Mumbai!
In today's fast-paced world, technology and innovation drive the future, and robotics is at the forefront of this revolution. Whether you're a school student, a young learner, or someone curious about robotics, learning this dynamic field can unlock endless possibilities. If you want to get started, Technobotics Robotics Classes in Mumbai is the place to be. Let's dive into why these classes are perfect for your child's bright future!
Why Choose Robotics Classes for Kids in Mumbai?
Incorporating robotics into a child's education is no longer just an option but a necessity. Robotics for school students helps develop problem-solving skills, fosters creativity, and encourages teamwork—all of which are essential in today's competitive world. Technobotics offers hands-on learning experiences that engage young minds and prepare them for careers in fields like engineering, technology, and artificial intelligence (AI).

What Makes Technobotics Unique?
Technobotics, a leading techno school for robotics, offers a range of robotics courses for kids that go beyond the basic knowledge of coding and circuits. Here are some reasons why Technobotics Robotics Classes stand out:
Tailored Programs for All Levels: Whether your child is a complete beginner or already familiar with the basics of robotics, Technobotics offers classes that cater to different age groups and skill levels. From basic robotic kits to advanced autonomous robotics courses, your child will progress at a pace that suits them.
Hands-on Learning: Children not only learn theories; they also create robots! The curriculum is designed to improve creativity and practical skills. Students work on exciting projects, learning everything from Arduino programming to autonomous robotics. Students work on exciting projects, learning everything from Arduino programming to autonomous robotics.
Future-Focused Skills: Robotics involves a blend of Science, Technology, Engineering, and Mathematics (STEM), making it the ideal foundation for future careers. At Technobotics, students develop coding, problem-solving, teamwork, and innovation skills—traits that will set them apart in the tech world.
Safe and Interactive Learning Environment: The courses are designed to be enjoyable, engaging, and informative, allowing kids to explore their curiosity within a safe learning environment.
What Will Your Child Learn at Technobotics?
Technobotics offers a variety of robotics courses designed for different interests and expertise levels:
Autonomous Robotics (With & Without Programming): These courses teach students how to create robots that can operate independently without constant human control. Programming skills are also covered to enhance robot functionality.
Arduino Programming for Beginners: A beginner-friendly course that introduces kids to the programming world with Arduino, empowering them to create interactive robotics projects.
Breadboard Electronics: This course covers the essential electronics concepts needed to build functional robots.
With these well-rounded courses, your child will be on their way to mastering robotics and shaping a bright future in technology.
Why Robotics is the Future for Your Child
In an era where AI, robotics, and automation are transforming industries, kids must start learning about these technologies early on. Enrolling in Technobotics robotics classes for school students will give your child a competitive edge in their academic and professional pursuits. The skills learned will be invaluable in robotics, engineering, software development, and beyond.
Conclusion: Start Your Child's Robotics Journey Today!
If you want to give your child the best foundation in robotics, Technobotics Robotics Classes in Mumbai is your answer. With a focus on hands-on learning, innovative thinking, and a passion for technology, Technobotics is more than just a school—it's a launchpad for your child's future in robotics. Visit Technobotics Robotics Classes today to learn more and enrol your child in Mumbai's most exciting learning experience.
#robotics for kids#robotics classes#STEMEducation#robotics in mumbai#arduino programming#robotics courses#breadboard electronics for beginners
0 notes
Text
From Circuits to Solutions: Practical Projects to Elevate Your EE Skills
From Breadboards to Breakthroughs” encapsulates the journey of an aspiring electrical engineer as they evolve from basic circuit experiments to advanced, real-world engineering projects. Hands-on projects are essential for building practical skills, reinforcing theoretical knowledge, and preparing for professional challenges. Below is a guide to project-based learning that can help you improve your electrical engineering (EE) skills at every stage.
Beginner Projects: Building Foundations
Simple LED Circuit
What you learn: Basic circuit design, current and voltage concepts, use of resistors and LEDs.
Tools: Breadboard, jumper wires, resistors, LEDs, battery.
Battery Tester
What you learn: Measuring voltage and current, basic instrumentation, and safety practices.
Water Level Indicator
What you learn: Sensor integration, simple logic circuits, and practical applications.
Logic Gates and Digital Circuits
What you learn: Boolean logic, digital circuit fundamentals, and troubleshooting.
DIY Switch Circuits
What you learn: Circuit switching, input/output devices, and practical wiring.
Intermediate Projects: Expanding Your Skills
Infrared Security System
What you learn: Sensor-based security, signal processing, and system integration.
Digital Voltmeter
What you learn: Instrumentation, analog-to-digital conversion, and measurement accuracy.
Solar Charger
What you learn: Renewable energy concepts, power management, and circuit protection.
Motor Control Circuits
What you learn: Driving motors, pulse-width modulation (PWM), and power electronics.
Heart Rate Monitor
What you learn: Biomedical instrumentation, sensor interfacing, and signal filtering.
Advanced Projects: Real-World Breakthroughs
Smart Home Automation System
What you learn: IoT, wireless communication (Bluetooth, Wi-Fi), and system integration.
Wireless Power Transfer System
What you learn: Inductive coupling, resonant circuits, and energy efficiency.
Dual Axis Solar Power Tracker
What you learn: Mechatronics, sensor feedback, and renewable energy optimization.
Smart Energy Meter
What you learn: Real-time data monitoring, wireless communication, and energy management.
DIY Quadcopter or Drone
What you learn: Embedded systems, motor control, wireless communication, and robotics.
Why Hands-On Projects Matter
Resume Building: Practical projects demonstrate your skills to potential employers and can help you land internships or jobs
Theory Application: Projects bridge the gap between classroom learning and real-world engineering challenges.
Skill Discovery: Experimenting with different projects helps you identify your interests and strengths.
How to Get Started
Gather Basic Tools: Invest in a quality breadboard, jumper wires, resistors, capacitors, LEDs, and a multimeter.
Start Simple: Begin with basic circuits and gradually tackle more complex projects as your confidence grows.
Use Online Resources: Take advantage of tutorials, simulation tools, and open-source project guides.
Join Maker Communities: Engage with online forums, local maker spaces, and engineering clubs for support and inspiration.
Document Your Work: Keep a project journal, take photos, and share your progress on platforms like GitHub or LinkedIn.
Conclusion
Arya College of Engineering & I.T. is one of the best colleges of Jaipur, which is progressing from breadboard experiments to advanced engineering projects is a transformative process that builds both technical expertise and problem-solving confidence. By systematically advancing through beginner, intermediate, and advanced projects, you will develop a robust skill set that prepares you for the challenges and opportunities of a career in electrical engineering.
2 notes
·
View notes
Text
From Breadboards to Breakthroughs: Hands-On Projects to Improve Your EE Skills

From Breadboards to Breakthroughs” encapsulates the journey of an aspiring electrical engineer as they evolve from basic circuit experiments to advanced, real-world engineering projects. Hands-on projects are essential for building practical skills, reinforcing theoretical knowledge, and preparing for professional challenges. Below is a guide to project-based learning that can help you improve your electrical engineering (EE) skills at every stage.
Beginner Projects: Building Foundations
Simple LED Circuit
What you learn: Basic circuit design, current and voltage concepts, use of resistors and LEDs.
Tools: Breadboard, jumper wires, resistors, LEDs, battery.
Battery Tester:
· What you learn: Measuring voltage and current, basic instrumentation, and safety practices.
Water Level Indicator
What you learn: Sensor integration, simple logic circuits, and practical applications.
Logic Gates and Digital Circuits: What you learn: Boolean logic, digital circuit fundamentals, and troubleshooting.
DIY Switch Circuits: What you learn: Circuit switching, input/output devices, and practical wiring.
Intermediate Projects: Expanding Your Skills
Infrared Security System: What you learn: Sensor-based security, signal processing, and system integration.
Digital Voltmeter: What you learn: Instrumentation, analog-to-digital conversion, and measurement accuracy.
Solar Charger: What you learn: Renewable energy concepts, power management, and circuit protection.
Motor Control Circuits
What you learn: Driving motors, pulse-width modulation (PWM), and power electronics.
Heart Rate Monitor: What you learn: Biomedical instrumentation, sensor interfacing, and signal filtering.
Advanced Projects: Real-World Breakthroughs
Smart Home Automation System: What you learn: IoT, wireless communication (Bluetooth, Wi-Fi), and system integration.
Wireless Power Transfer System: What you learn: Inductive coupling, resonant circuits, and energy efficiency.
Dual Axis Solar Power Tracker: What you learn: Mechatronics, sensor feedback, and renewable energy optimization.
Smart Energy Meter: What you learn: Real-time data monitoring, wireless communication, and energy management.
DIY Quadcopter or Drone: What you learn: Embedded systems, motor control, wireless communication, and robotics.
Why Hands-On Projects Matter
Resume Building: Practical projects demonstrate your skills to potential employers and can help you land internships or jobs
Theory Application: Projects bridge the gap between classroom learning and real-world engineering challenges.
Skill Discovery: Experimenting with different projects helps you identify your interests and strengths.
How to Get Started
Gather Basic Tools: Invest in a quality breadboard, jumper wires, resistors, capacitors, LEDs, and a multimeter.
Start Simple: Begin with basic circuits and gradually tackle more complex projects as your confidence grows.
Use Online Resources: Take advantage of tutorials, simulation tools, and open-source project guides.
Join Maker Communities: Engage with online forums, local maker spaces, and engineering clubs for support and inspiration.
Document Your Work: Keep a project journal, take photos, and share your progress on platforms like GitHub or LinkedIn.
Conclusion
Arya College of Engineering & I.T. is one of the best engineeering college in Jaipur, which is progressing from breadboard experiments to advanced engineering projects is a transformative process that builds both technical expertise and problem-solving confidence. By systematically advancing through beginner, intermediate, and advanced projects, you will develop a robust skill set that prepares you for the challenges and opportunities of a career in electrical engineering.
Source: Click Here
#best btech college in jaipur#top engineering college in jaipur#best private engineering college in jaipur#best engineering college in rajasthan#best btech college in rajasthan#best engineering college in jaipur
0 notes
Text
Learning of Arduino Coding for Kids
In today’s fast-changing world, it’s more important than ever to introduce kids to technology at an early age. One of the best ways to do that is through Arduino Coding for Kids. It’s fun, creative, and opens the door to exciting fields like Sensors automation and robotics. This blog will explore what Arduino is, why it’s perfect for kids, and how learning it can shape their future.
What is Arduino?
Arduino is a small, open-source IDE (Integrated Development Environment) used to Develop Embedded Systems. It includes a physical board (called a microcontroller) and software that allows users to write and upload code. The best part? It’s easy to understand, even for beginners.
Arduino is widely used by students, hobbyists, and professionals to build devices that can sense the environment and respond in smart ways. For example, you can use it to make a robot, a weather station, or even an automatic plant watering system.
Why Arduino Coding for Kids is Important
1. Encourages Problem Solving
Kids learn how to think logically and solve problems step-by-step. Whether it’s turning on a light or making a toy car move, Arduino Coding for Kids teaches them how to break down problems and fix them on their own.
2. Builds Confidence
When kids see a light turn on or a robot start moving because of their code, it boosts their confidence. They realize that they can create real things with just a few lines of code.
3. Enhances Creativity
Arduino Coding for Kids is not just about electronics. It’s about imagination. Children can design their own smart toys, games, or useful devices. Their only limit is their creativity.
Tools Needed to Get Started
Getting started with Arduino doesn’t require much. Here are the basics:
Arduino board (like Arduino Uno)
USB cable to connect the board to a computer
LEDs, sensors, motors (depending on the project)
Arduino IDE – a free software to write and upload code
Basic components like wires, resistors, and breadboards
Most of these are available in beginner kits that are designed especially for kids.
Simple Projects for Beginners
Here are some fun and easy projects that make Arduino Coding for Kids exciting:
1. Blinking LED
This classic starter project helps kids understand how code controls physical devices. With a few lines of code, they can make an LED blink on and off.
2. Light Sensor
Using a light sensor, kids can build a system that turns on a light when it gets dark. This introduces them to the concept of automation.
3. Obstacle-Avoiding Robot
With a few motors and an ultrasonic sensor, kids can build a simple robot that avoids obstacles. This project is a perfect example of how Arduino Coding for Kids leads into robotics.
The Role of Arduino in Automation and Robotics
One of the most exciting parts of learning Arduino is its connection to automation and robotics. These are not just buzzwords; they are the future of many industries. Here's how Arduino Coding for Kids fits in:
1. Learning Automation
Automation is when machines do tasks without human help. For example, automatic doors or smart lights are based on automation. Arduino helps kids understand how to use sensors and write code that makes machines work on their own.
2. Introduction to Robotics
Robotics combines electronics, coding, and mechanics. By learning Arduino, kids get hands-on experience in all these areas. They can build robots that move, talk, or even follow lines on the ground. This knowledge gives them a strong foundation for future careers.
3. Real-Life Applications
What makes Arduino Coding for Kids so special is how real it feels. Kids are not just learning theory; they are building things that work. From making a smart home system to designing a robotic arm, the projects have real-world value.
How to Teach Arduino Coding to Kids
You don’t need to be an expert to teach Arduino Coding for Kids. Here are some tips to make learning fun and effective:
Start small: Begin with simple projects and increase difficulty step-by-step.
Use visual resources: Many online platforms offer videos and tutorials just for kids.
Encourage teamwork: Let kids work in pairs or groups to build projects together.
Celebrate success: Showcase their projects to friends and family to boost motivation.
Be patient: Every child learns at a different pace. Support and encouragement go a long way.
Where to Find Learning Resources
There are many websites, YouTube channels, and books focused on Arduino Coding for Kids. Look for platforms that offer beginner-friendly guides, videos, and project ideas. Some popular choices include:
Tinkercad Circuits
Wokwi
Future Opportunities
Learning Arduino Coding for Kids is more than just a hobby. It builds skills that are in high demand. As technology grows, so does the need for people who can understand and create smart machines. Kids who start early will have an advantage in fields like:
Engineering
Robotics
Computer Science
Artificial Intelligence
Internet of Things (IoT)
Conclusion
Introducing kids to Arduino is like giving them a superpower. They learn how things work, how to fix them, and how to make their own creations. More importantly, Arduino Coding for Kids builds confidence, creativity, and problem-solving skills.
0 notes
Text
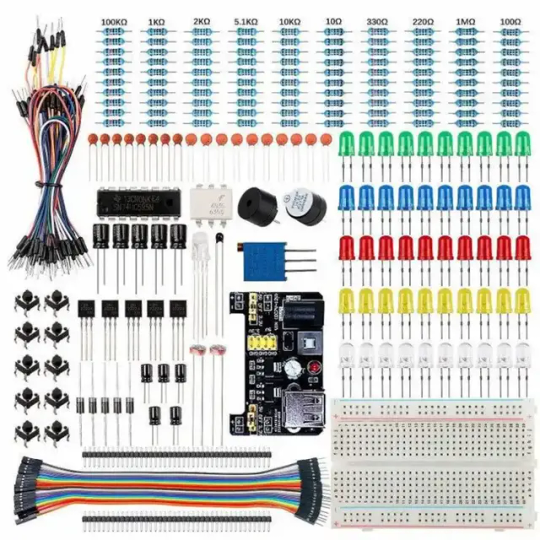
Electronic Components Circuit Breadboard Pack for Arduino Starter Kit The electronic parts suit for electronics program beginner to study the programming for Aruino serial development board,like Dev Board for Arduino Uno R3,Mega R3 etc.Electronic components Circuit Breadboard Pack list contain below: - 1x Power Supply Module Warning: Do not use voltage higher than 9V - 1pcs 830 Connection Point Breadboard - 1pcs 65 Jumper Wire - 140pcs Solderless Jumper Wire - 20pcs Male to Female Dupont Wire - 2pcs Pins (40pin) - 1pcs Precision Potentiometer - 2pcs Photoresistor - 1pcs Thermistor - 5pcs Diode Rectifier (1N4007) - 5pcs NPN Transistor (PN2222) - 1pcs IC 4N35 - 1pcs IC 74HC595 - 1pcs Activity Buzzer - 1pcs Passive Buzzer - 10pcs Push Button (Small) - 10pcs 20pf Ceramic Capacitor - 10pcs 103 Ceramic Capacitor - 5pcs Electrolytic Capacitor (100UF 25V) - 5pcs Electrolytic Capacitor (100UF 50V) - 10pcs white LED - 10pcs yellow LED - 10pcs blue LED - 10pcs green LED - 10pcs red LED - 1pc RGB LED - 10pcs resistor (10R) - 10pcs resistor (100R) - 10pcs resistor (220R) - 10pcs resistor (330R) - 10pcs resistor (1K) - 10pcs resistor (2K) - 10pcs resistor (5K1) - 10pcs resistor (10K) - 10pcs resistor (100K) - 10pcs resistor (1M) More other electronic component kits below: Interested with much more quantity to this Circuit Breadboard Pack,contact us to talk wholesale price support.Know more about our company,view here. Read the full article
0 notes
Text
How to Choose the Right Electronics Starter Kit for Your Needs

Getting started in electronics can be exciting, but picking the right electronics starter kit is essential for a smooth and enjoyable learning experience. Whether you’re just beginning or already have some experience, the right kit can help you understand the basics and dive deeper into more advanced projects. But with so many options available, how do you choose the one that’s right for you? In this article, we’ll walk you through how to select the perfect electronics starter kit based on your needs.
1. Understand Your Skill Level
Before you buy a kit, think about your current knowledge of electronics. Are you completely new to it, or do you have some experience? This will help you decide which kit is best for you.
If you’re a beginner, you’ll want a kit that focuses on the basics, such as learning how circuits work. A good starter kit will include:
Breadboard: A simple tool to build circuits without soldering.
Basic components: Items like resistors, capacitors, and diodes that are easy to work with.
LEDs and transistors: Basic components to help you understand how electrical signals flow.
If you already know a bit about electronics, you might want a more advanced kit with items like microcontrollers (Arduino or Raspberry Pi), sensors, and motors. These kits are for creating projects like robots or smart home devices, which can be more complex and interactive.
2. Think About What You Want to Build
Next, think about the types of projects you want to create. Your goals will help you choose the right kit. There are many different types of kits designed for different purposes. Here are some examples:
Basic Electronics Learning: If your goal is to understand how electronics work, look for a kit that teaches you the fundamentals of building circuits. These kits should have easy-to-follow guides for simple projects.
Arduino or Raspberry Pi Projects: If you want to build interactive projects, look for kits that include an Arduino or Raspberry Pi. These kits often come with microcontrollers, sensors, and other parts for creating cool projects like robots or home automation systems.
Robotics: If you’re interested in building robots, look for a robotics starter kit. These kits usually include motors, sensors, and sometimes even wheels and servos to help you create a robot.
Home Automation: Some kits are designed for smart home projects, such as controlling lights, locks, or even your thermostat. These kits typically include sensors, microcontrollers, and other components that connect to your home devices.
Wireless Projects: If you want to work on wireless electronics like Bluetooth or Wi-Fi, look for kits that include components for these kinds of projects. Wireless communication is becoming more popular, and you can use these kits to build things like remote-controlled gadgets.
Knowing what you want to build will help you choose a kit that gives you the right components and instructions for your projects.
3. Consider the Complexity of the Kit
Some kits are simple and easy for beginners, while others are made for people who already know a lot about electronics. Make sure the kit matches your skill level.
If you're new to electronics, choose a kit that includes basic components and clear instructions. A beginner kit should come with:
Easy-to-follow project guides: These will explain how to build simple circuits and understand basic concepts.
Basic components: Things like resistors, capacitors, and LEDs that you can easily experiment with.
If you’re more experienced, you might prefer a kit with more complex projects. These could involve soldering, using microcontrollers, or designing advanced circuits. More advanced kits allow you to create unique projects and experiment with a variety of components.
4. Check for Quality and Compatibility
Not all electronics kits are the same. Some kits may include low-quality components that break easily or don’t work as expected. To avoid frustration, make sure you choose a kit that has good reviews and is made with quality parts.
Also, make sure the components in the kit are compatible with each other. For example, if the kit includes an Arduino board, make sure the sensors and other parts work well with it. Check the product description and reviews to ensure everything in the kit is easy to use together.
5. Look for Good Documentation and Support
When you’re learning about electronics, good instructions can make a big difference. A high-quality starter kit should include clear guides that explain how to build and troubleshoot your projects. Look for kits that offer:
Step-by-step guides: These will help you understand how to build circuits and what each component does.
Troubleshooting tips: These can be especially helpful if something goes wrong in your project.
Online support or communities: Some kits come with online resources or communities where you can ask questions and get help from others.
For kits that involve programming, like those with Arduino or Raspberry Pi, make sure the kit includes software and guides for coding.
6. Consider Your Budget
Electronics kits come in a range of prices. While it might be tempting to choose the cheapest option, it’s important to remember that you often get what you pay for. Very inexpensive kits might have lower-quality components, or they might be missing key parts.
That said, you don’t have to spend a lot to get a good kit. Many affordable options offer solid components and instructions for beginners. Make sure to balance cost with quality so you can get the most value for your money.
7. Choose a Well-Known Brand
When selecting a kit, consider the brand. Some companies, like Arduino, SparkFun, and Adafruit, are known for making reliable kits with excellent support. These brands offer kits for beginners and more advanced users, and they often have large communities where you can get help, find tutorials, and share projects.
Choosing a well-known brand can also ensure that the components in your kit are high-quality and will work well together. Plus, these brands often provide lots of resources to help you get the most out of your kit.
Conclusion
Choosing the right electronics starter kit is an important step toward learning and exploring electronics. By understanding your skill level, defining your goals, and considering the complexity, quality, support, and price of the kit, you can select one that fits your needs. Whether you’re a beginner or already have some experience, the right electronics starter kit can set you up for success and inspire you to create amazing projects. Take your time, do some research, and pick the kit that will help you build your knowledge and skills in electronics. Happy building!
0 notes
Text
What Are the Must-Have Tools for a Future-Ready STEM Lab in Agartala?

Introduction: Why Every STEM Lab in Agartala Needs the Right Tools
A STEM Lab in Agartala is more than just a classroom—it’s a hands-on innovation center where students explore robotics, coding, AI, and engineering. To make learning engaging and future-ready, schools must equip their STEM Lab in Agartala with the right tools and technologies.
In this guide, we’ll explore the must-have tools that every future-ready STEM Lab in Agartala should have.
1. Robotics Kits – Powering Hands-On Learning
A top-quality STEM Lab in Agartala must include robotics kits to teach students about automation, AI, and engineering. Some of the best robotics kits include:
LEGO Mindstorms EV3 – Ideal for beginners, offering block-based coding. Arduino & Raspberry Pi Kits – Great for advanced robotics and IoT projects. VEX Robotics Kits – Used for competitions and real-world problem-solving.
These kits help students develop logical thinking and problem-solving skills while preparing them for careers in automation and robotics.
2. 3D Printers – Bringing Creativity to Life
A STEM Lab in Agartala should have 3D printers to help students design and prototype real-world objects. Some essential options include:
Creality Ender 3 – Affordable and beginner-friendly for schools. Ultimaker 2+ – High-quality prints for advanced projects. ️ Anycubic Photon – Best for precise, resin-based 3D printing.
With 3D printing, students can turn their ideas into reality, fostering creativity and innovation.
3. Coding & AI Learning Kits – Preparing for the Future
To make a STEM Lab in Agartala future-ready, it must include coding and AI tools for teaching programming skills. Some of the best choices are:
Scratch & Blockly – Block-based coding for beginners. Python & Java Programming Platforms – Industry-standard coding languages. Google AIY & NVIDIA Jetson Nano – AI and machine learning kits for advanced learning.
These tools help students learn AI, data science, and machine learning, making them ready for future tech careers.
4. Virtual Reality (VR) & Augmented Reality (AR) – Immersive Learning
A cutting-edge STEM Lab in Agartala should include VR and AR tools to create immersive educational experiences. The best options are:
VR and AR tools make learning more engaging and interactive, helping students visualize complex concepts easily.
5. IoT & Smart Sensors – Learning About the Connected World
An IoT-enabled STEM Lab in Agartala prepares students for the future of smart technology and automation. Essential IoT tools include:
Arduino IoT Cloud – Teaches real-world IoT applications. ESP8266 & ESP32 Microcontrollers – Used for smart device projects. Smart Sensors (Temperature, Humidity, Motion) – For creating real-time monitoring systems.
With IoT tools, students can build smart home projects, automated weather stations, and AI-driven devices.
6. Electronics & Circuit Design Kits – Understanding Engineering Basics
A future-ready STEM Lab in Agartala must include electronics kits for hands-on engineering projects. The best options are:
LittleBits Electronics Kit – Easy-to-use snap circuits for beginners. Snap Circuits Pro – Teaches circuit design in a fun way. Breadboards & Multimeters – Essential for real-world electronics projects.
Electronics kits enhance problem-solving skills and prepare students for engineering careers.
7. STEM Software & Simulations – Enhancing Digital Learning
A well-equipped STEM Lab in Agartala should also have digital tools and software for coding, engineering, and simulations. Some must-have software include:
Tinkercad – Online 3D design and electronics simulation. MATLAB & Simulink – Used for data analysis and AI applications. AutoCAD & SolidWorks – Industry-grade design software.
These digital tools help students practice real-world STEM applications in a virtual environment.
Conclusion: Build a Future-Ready STEM Lab in Agartala with the Right Tools
A high-quality STEM Lab in Agartala must include robotics kits, 3D printers, AI and coding tools, IoT kits, VR devices, and circuit design tools to prepare students for technology-driven careers.
By investing in these essential tools, schools in Agartala can create an engaging, innovative, and future-ready learning environment.
Want to set up a STEM Lab in Agartala? Contact us today to Upgrade the best solutions for your school!
0 notes
Text
Essential Equipment & Tools for a School Robotics Lab

Introduction
In today's fast-paced world, integrating robotics into education is more important than ever. A well-equipped school robotics lab fosters creativity, problem-solving, and technical skills among students. However, setting up an efficient and cost-effective robotics lab requires careful planning and selecting the right tools. This guide will explore the essential equipment and tools needed to establish a successful robotics lab setup in school.
1. Planning the Robotics Lab Setup in School
Before acquiring equipment, schools must define their objectives. The key factors to consider include:
The age group of students
The curriculum and learning goals
Available space and budget
Having a structured plan will help schools create a well-organized and effective robotic lab for school that meets the needs of students and educators alike.
2. Essential Robotics Kits
Robotics kits form the foundation of any school robotics lab. Some popular options include:
LEGO Mindstorms EV3 – Ideal for beginners and intermediate learners.
VEX Robotics – Best for advanced programming and mechanical engineering skills.
Arduino and Raspberry Pi Kits – Great for teaching coding and electronics.
These kits ensure hands-on learning and make robotics engaging for students.
3. Computers and Software
Every robotics lab needs high-performance computers with appropriate software to program and test robots. Some recommended software includes:
Scratch and Blockly – Perfect for younger students starting with block-based coding.
Python and C++ – Essential for advanced coding and real-world applications.
Robot Operating System (ROS) – A professional platform for designing robotic systems.
Providing access to modern software ensures that students learn industry-relevant skills.
4. 3D Printers and Prototyping Tools
3D printers are becoming an essential tool in robotics labs for schools. They allow students to design and print custom parts for their robots, enhancing their creativity and engineering skills. Some great choices include:
Creality Ender 3 – Budget-friendly and beginner-friendly.
Ultimaker 2+ – High-quality prints for advanced prototyping.
Prototyping tools like laser cutters and soldering kits can further improve hands-on learning experiences.
5. Sensors and Microcontrollers
Adding sensors to robots allows them to interact with their environment. Commonly used sensors include:
Ultrasonic sensors – For distance measurement.
Infrared sensors – For detecting obstacles.
Temperature and humidity sensors – Useful for science projects.
Microcontrollers like Arduino Uno and Raspberry Pi are great tools for coding and controlling robotic functions.
6. Mechanical and Electronic Components
To build fully functional robots, students need access to mechanical and electronic components, such as:
Motors and servos – To enable movement.
Wheels and gears – For mobility and precision.
Breadboards and circuit boards – For assembling electronic circuits.
Having these materials available ensures students can experiment and build various robotics projects.
7. AI and Machine Learning Integration
With AI becoming an integral part of robotics, integrating AI tools in school robotics labs can enhance student learning. AI-powered software such as TensorFlow and OpenCV can help students explore computer vision, automation, and intelligent robotics applications.
8. Collaboration and Safety Equipment
Creating a collaborative environment in the robotics lab is essential. Essential items include:
Workbenches and desks – To provide enough workspace.
Storage units – For organizing tools and components.
Safety gear – Including gloves, goggles, and fire extinguishers to ensure student safety.
Conclusion
A well-structured robotics lab setup in school opens doors for students to explore STEM education in an interactive and engaging way. Schools that invest in quality robotics kits, essential software, and advanced technology like AI will empower students with skills for the future. By implementing these tools and strategies, schools can create an innovative learning environment that prepares students for future tech careers.
0 notes
Text
Top Robotics Courses at Technobotics in Mumbai: A Gateway to the Future of Automation
As we enter 2025, robotics continues to shape the world around us, offering vast career opportunities across multiple industries. Whether you're passionate about electronics, automation, or artificial intelligence, Technobotics in Mumbai offers some of the best robotics courses that can help you kickstart your journey in this exciting field.
Why Robotics?
Robotics is revolutionizing industries such as healthcare, manufacturing, and AI. As automation and artificial intelligence advance, the demand for skilled professionals in robotics continues to rise. By taking a robotics course, you gain practical knowledge and experience to prepare you for a dynamic career in these rapidly evolving fields.

Top Robotics Courses at Technobotics
Technobotics offers a variety of courses designed for both beginners and advanced learners. Here are some of the top robotics courses in Mumbai for 2025:
1. Breadboard Electronics (For Beginners)
Ideal for newcomers, this course teaches basic circuit design using breadboards, laying the foundation for all things robotics. Students learn to wire components and understand how electrical circuits work—essential skills for anyone looking to build robots.
2. Technovation (Electronics Technology)
This course applies electronics to robotics, including building sensors and microcontrollers. It's perfect for those looking to bridge their electronics knowledge with practical robotics projects.
3. Autonomous Robotics (Without Programming)
This course is perfect for those inclined toward hardware. It teaches you how to create autonomous robots using sensors and actuators without programming skills.
4. Autonomous Robotics (With Programming)
For students looking to combine mechanical design with coding, this course dives into programming autonomous robots. It covers sensor integration, control algorithms, and real-time decision-making, offering a comprehensive robotics education.
5. Arduino Programming for Beginners
Arduino is one of the most accessible platforms for robotics and electronics. In this course, students learn to build simple robots by writing code, wiring components, and experimenting with embedded systems. It's the perfect entry point into the world of robotics!
Why Choose Technobotics?
Technobotics stands out for its hands-on approach to learning. Students engage in live projects, building and testing robots using cutting-edge technology in state-of-the-art labs. The skilled faculty at Technobotics equips students with essential theoretical knowledge and practical skills, preparing them to thrive in the competitive robotics industry.
Start Your Robotics Journey Today!
Whether you're just starting or looking to deepen your knowledge, Technobotics provides the resources and expert guidance to help you succeed in robotics. Enroll in one of their top robotics courses in Mumbai today and unlock the door to a future in automation and technology!
#robotics courses in mumbai#robotics courses#arduino programming courses#technovation courses#breadboard electronics for beginners
0 notes
Text
Arduino Projects
Both a physical programmable circuit board (microcontroller) and software (Arduino IDE) are components of Arduino, which is used to develop and upload code to the board. From basic LED blinkers to complicated home automation systems, the platform can handle a broad variety of tasks. It is a well-liked option for makers all around the world because of its user-friendly interface, robust community support, and cost.
Why Choose Arduino for Your Projects?
Easy to Use: Arduino is suitable for both novices and experts because of its straightforward hardware connections and user-friendly IDE.
Accessible and Inexpensive: Arduino boards and parts are readily accessible and reasonably priced.
Huge Community Support: The learning curve is accelerated by having access to forums, tutorials, and an extensive collection of shared projects.
Compatibility: To increase project functionality, Arduino supports a large variety of sensors, actuators, and shields.
Exciting Arduino Project Ideas
Beginner Projects
Intermediate Projects
Advanced Projects
Components Required for Arduino Projects
Arduino Boards: Nano, Mega, or Uno models.
Sensors include those for motion, light, gas, temperature, and soil moisture.
Actuators include relays, motors, and servos.
LCD, OLED, or LED screens are examples of displays.
Bluetooth, Wi-Fi, or GSM modules are examples of connectivity modules.
Other: resistors, capacitors, jumper wires, and breadboards.
Arduino and STEM Education
In STEM (science, technology, engineering, and mathematics) education, Arduino is a vital instrument. It gives students practical learning opportunities while teaching them electronics, coding, and problem-solving techniques. Arduino projects are incorporated into the curricula of many colleges and institutions in order to promote technical proficiency and creativity.
For both professionals and enthusiasts, Arduino projects offer a plethora of opportunities. You can build critical technical abilities and realize your creative ideas by investigating different applications. Arduino's extensive community and limitless resources make it possible for anybody to explore the exciting fields of programming and electronics.
So take out your Arduino board, let your imagination run wild, and get to work creating something incredible right now!
To know more, click here.
0 notes
Text
Arduino UNO R3 Based Advance Starter Kit
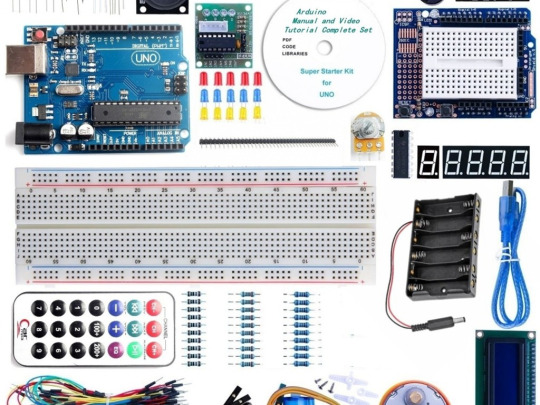
Regardless of your level of familiarity with Arduino, this Arduino UNO R3 Based Advance Starter Kit provides an enjoyable opportunity to broaden your understanding.
Constructing original and uncomplicated projects is an excellent method for gaining experience in coding and understanding basic electronic circuits.
This kit provides all the essential components for exploring electronics with an Arduino, plus additional items to advance your skills from a beginner to an enthusiast level. It contains all the essentials, including an UNO board, breadboard, cables, LEDs, resistors, and pushbutton switches.
An ideal choice for robot prototyping, as it comes with a variety of valuable components such as Servo motors, Ultrasonic sensors, Relays, and LCD modules. Additionally, it also includes several useful component kits like an RFID kit and a water sensor specifically designed for automating planting projects.
Included are the characteristics, qualities, and capabilities that this product has to offer.
Discover the convenience of an all-in-one kit that serves as an excellent introduction to coding.
Ideal for Beginners in Arduino Programming
This pack offers a range of components for experimenting with various projects.
#electronic components#sales in chennai#arduino#robotic kits#Arduino UNO R3 Based Advance Starter Kit
1 note
·
View note
Text
What Is A Protoboard?
A protoboard is a fundamental component in the field of electronics, serving as an essential tool for both beginners and professionals in circuit design. In this article, we will explore what a protoboard is, how to use it, and how it differs from a breadboard.
Introduction to Protoboards: Protoboards, also known as prototype boards, hold a crucial place in the realm of electronics. They are indispensable for creating permanent electronic circuits, moving beyond the temporary designs often assembled on breadboards.
Permanence: The primary advantage of protoboards is their ability to create permanent circuits. Unlike breadboards, which are excellent for temporary and experimental setups, protoboards enable the creation of stable and enduring connections by soldering components directly onto the board. This permanence is ideal for finalized projects.
Design and Usability: At first glance, a protoboard appears as a grid of holes designed to accommodate various electronic components. However, this grid is not merely a design feature; it is a carefully planned layout that facilitates organized and efficient circuit construction. Whether you are building a simple LED setup or a complex project based on a microcontroller, the layout of the protoboard offers the flexibility and order required for the task.
Versatility: Protoboards are highly versatile and suitable for a wide range of electronic projects. They are not limited to beginner-level endeavors but serve as a foundation for intricate and sophisticated designs. This versatility makes them a preferred choice among experienced electronics enthusiasts and professionals.
Suited for the Experienced: It is important to note that protoboards are particularly well-suited for individuals with some experience in electronics. Soldering demands precision and knowledge, making protoboards a step up from the more beginner-friendly breadboards.
Compatibility with Advanced Systems: For users of systems like PicoBricks, protoboards provide an excellent platform for constructing more advanced and permanent projects. They establish robust connections essential for complex designs, ensuring that your project is not just a fleeting experiment but a lasting creation.
Breadboard vs. Protoboard: Breadboards, with their non-permanent, solder-free design, are perfect for beginners and temporary projects, offering flexibility and cost-effectiveness. Protoboards, on the other hand, are ideal for more advanced, permanent installations, providing a sturdy and compact solution for complex circuits.
Flexibility: Breadboards are well-suited for temporary and experimental projects due to their reusable nature, allowing easy insertion and removal of components without soldering. Protoboards, conversely, are designed for permanent circuits as they require soldering, delivering a more stable and durable connection.
Complexity: Breadboards are more user-friendly, making them suitable for beginners or those new to PicoBricks due to their no-soldering approach. Protoboards are better suited for complex and finalized projects where a permanent circuit is necessary.
Size and Portability: Breadboards come in various sizes, making them suitable for projects of different scales. Protoboards are more compact and robust, making them suitable for portable or space-constrained projects.
Cost: Breadboards are generally more cost-effective for prototyping, while protoboards may involve additional expenses due to the need for soldering equipment and materials.
0 notes
Text
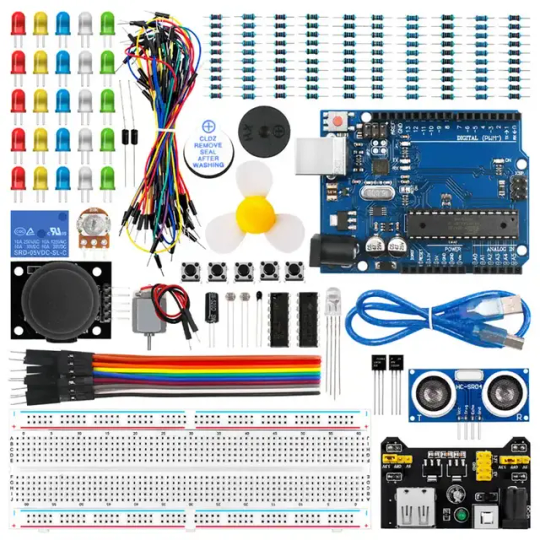
Cmxelcs Breadboard Starter Kit for Arduino Beginner Kit The starter kits is based on the development board for Arduino R3.Online price already contain the international freight cost.Kits Packing list contain as below picture shown: Motherboard:Blue Color pcb. Do you provide teaching lesson for arduino beginner kit ? No,we focus on electronics hardware.Actually all related lesson are universal use from internet anywhere. Does they come with a plastic box? Sure,all of our kits come with extral box to pack into the electronic components. Do you provide custom hardware list for specified arduino beginner kit? Yes,we are experienced to provide customized kits list for education clients,like STEM Education,University etc.If you have your own project hardware list,we can quote as your list.Contact us to talk more. Note:Free Shipping not contain your local import customs clearrance tax,so trade terms is DAP,not DDP,your attention please. About Customs Clearrance: As is known to all,import tax is inevitable to almost all nationalities,online price is just including China to Your local customs destination,after the plane drops off in your country,you'll proceed the import customs clearrance,and pay the extral possible import tax by yourself.So,make sure you are able to proceed before you ordering online. If you wish to deliver with a DDP shipment way,welcome chat with us to check whether they are possible or not,due to some countries indeed not available for DDP but only DAP is available.Know more about our company business. Read the full article
0 notes
Text
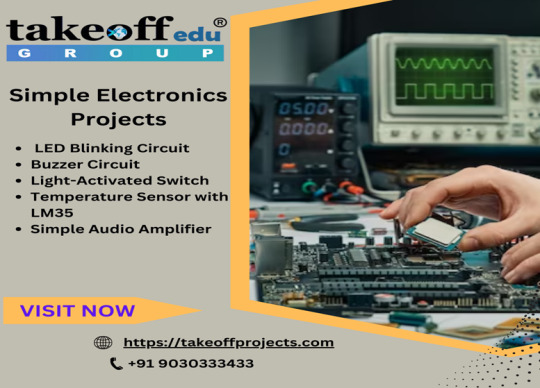
Simple Electronics Projects for Engineering Students
Are you a Final year student? Looking for “Simple electronic projects��? Then I have a Suggestion for you, Takeoff Edu Group provide number of project for Final year Students. Here we furnish a best Ideas and innovative projects for all Kind of Students (like Beginners to Advanced) based on their needs.
As an Engineering Students, You have to work on Simple Electronic projects on your Academic year.
Here are a few Takeoff Edu Group Title of simple electronic projects
Trendy Projects:
Virtex 7 FPGA Implementation of 256 Bit Key AES Algorithm with Key Schedule and Sub Bytes Block Optimization.
A Low-Power Low-Cost Design of Primary Synchronization Signal Detection.
Approximate Belief Propagation Decoder for Polar Codes.
Unequal Error Protection Code Derived from Orthogonal Latin Square Code.
Design and Implementation of a Hybrid Switching Router for the Reconfigurable Network-On-Chip.
Standard Projects
The Mesochronous Dual-Clock FIFO Buffer.
A Double Error Correction Code for 32-bit Data Words with Efficient Decoding.
Security Enhancement of Information using Multi-layered Cryptographic Algorithm.
Fast Mapping and Updating Algorithms for a Binary CAM on FPGA.
Security Enhancement of Information using Multi-layered Cryptographic Algorithm.
LED Blinking Circuit:
Components: LED, Resistor (220 ohms), Breadboard, Jumper wires.
Connect the LED and resistor in series and then connect them to the power source. The LED should blink on and off.
Buzzer Circuit:
Components: Buzzer, Resistor (1k ohm), Transistor (NPN, e.g., 2N3904), Breadboard, Jumper wires.
Connect the buzzer, resistor, and transistor in a circuit. Apply power, and the buzzer should produce sound.
Light-Activated Switch:
Components: LDR (Light Dependent Resistor), Resistor (10k ohms), Transistor (NPN), LED, Breadboard, Jumper wires.
Connect the components such that the LED turns on when light falls on the LDR.
Temperature Sensor with LM35:
Components: LM35 temperature sensor, Resistor (1k ohm), LCD display, Breadboard, Jumper wires.
Connect the LM35 to the LCD display to measure and display the temperature.
Simple Audio Amplifier:
Components: LM386 IC, Capacitor (10uF), Capacitor (0.1uF), Resistor (10k ohms), Speaker, Breadboard, Jumper wires.
Connect the components to create a basic audio amplifier circuit.
The above-mentioned Article are only the example of “Simple electronic projects”?, Here Takeoff Edu Group provide All kind of Academic projects with best project knowledge and support to Student necessities.
Why are you waiting for join and let’s start your Electronic Project today with Takeoff Edu Group.
0 notes
Text
HAHAHAHAHAHAHA
I have spent more money in 6 months in soldering, electronics, and custom PCBs than I have in a full year of 3D printing. Like fuck, a decent beginner soldering iron is like $50 on its own, plus solder, flux, workholding, tip care stuff, and shit to solder. The whole point of this post is that making is unaffordable and inaccessible to a lot of people, whether it's 3D printing or soldering... And it's really not as simple as "ah yeah just get a breadboard and go at it"
i think a major problem with a lot of maker youtube is that those youtubers are extremely disconnected from the actual realities of most people actually interested like, 3D printed stuff uses absurd amounts of filament because those people just don't have to worry about affording that stuff electronics need custom PCBs that are already a notable barrier to entry some stuff requires specialty chemicals or equipment that's just not available in, say, Finland you get the idea
327 notes
·
View notes
Text
Zoomster Studyblr Challenge
Day 4
The topic that I'm most passionate about within my field...
I enjoy doing logs. In the broader field of STEM, I enjoy electronic work, especially breadboarding. Breadboarding is like a beginner's version of building a circuit.
#zoomester studyblr challenge#studyblr#study blog#inconsistently consistent#logarithms#breadboard#circuit#stem#math major
3 notes
·
View notes