#buzzer speaker module
Explore tagged Tumblr posts
Visit Tumblr Blog
Explore Tumblr blogs with no restrictions, modern design and the best experience.
Last Seen Tumblr Blogs


Fun Fact
There were a total of 171.5 billion posts on Tumblr in 2019.
Text
Unveiling the Melodious Marvel: The Buzzer Speaker Module
In the vast realm of electronic components, one unsung hero stands out for its simplicity yet immense utility — the buzzer speaker module. This unassuming device has found its way into countless gadgets, alarms, and interactive projects, adding a touch of auditory magic to our technological landscape.
The Humble Beginnings
The journey of the buzzer speaker module begins with a simple yet ingenious concept. Imagine a tiny device that can transform electrical signals into audible sounds, creating a symphony of beeps, chirps, and melodies. That’s exactly what the buzzer speaker module does. At its core, it’s a small electronic component designed to produce sound when an electric signal is applied.
The Sound Symphony
What makes the buzzer speaker module truly fascinating is its ability to turn mundane electrical impulses into a delightful auditory experience. With a range of frequencies and tones, this electronic marvel can produce everything from attention-grabbing alarms to whimsical tunes. It’s the musical conductor of the electronic orchestra, adding a touch of harmony to the beeps and boops of our gadgets.
Where You’ll Find It
Step into the world of everyday electronics, and you’re likely to encounter the buzzer speaker module more often than you realize. From your morning alarm clock to the electronic doorbell that announces a visitor, these modules are embedded in a variety of devices that make our lives easier and more efficient.
Think about those interactive museum exhibits that captivate visitors with immersive audio experiences or the friendly chirps of a digital thermometer letting you know your pizza is perfectly cooked. It’s the buzzer speaker module that brings these devices to life, engaging our senses in ways that go beyond the visual.
DIY Delight
One of the most exciting aspects of the buzzer speaker module is its popularity among electronics enthusiasts and DIY hobbyists. With a basic understanding of electronics and a creative spark, anyone can incorporate this tiny musical maestro into their projects. Whether it’s a homemade alarm system or a quirky musical instrument, the buzzer speaker module invites experimentation and innovation.
The Future of Sound
As technology advances, the humble buzzer speaker module continues to evolve, becoming more versatile and sophisticated. With improvements in design and functionality, we can expect to see these modules taking on new roles in emerging technologies.
Imagine a future where smart homes communicate with residents through melodic tones, or wearable devices provide feedback through subtle yet distinctive sounds. The buzzer speaker module could play a pivotal role in making our interactions with technology not just efficient but also delightful.
In the vast landscape of electronic components, the buzzer speaker module may seem like a small player, but its impact is anything but insignificant. From waking us up in the morning to alerting us to important events, this unassuming device has become an integral part of our daily lives. As we continue to embrace the possibilities of technology, let’s not forget to appreciate the charm of the buzzer speaker module — a true unsung hero in the symphony of electronic innovation.
0 notes
Text

I've been seeing some people being confused in the notes so,,,
While modern radios have way more elements than this, if the signal is strong enough that's technically all you need. ... okay and some wire i suppose.
Because radio waves are electromagnetic and they oscillate, they create a small current in a conductor (that's induction!). The diode together with a person holding it serves to "decode" the radio signal. The diode rectifies it and the person, acting as an antenna, both picks up the signal and acts as a crude low pass filter. That's all you need to decode an AM (amplitude modulated) signal. With the magnet and tin can, you can make a speaker to then listen to that decoded signal. Mind you that this would be an untuned radio, picking up many frequencies at the same time. You'd hear them overlap.
I intentionally said AM and not FM because the latter is not that easy to decode and would need additional materials.
In this post I'm slightly exaggerating how easy it'd be to listen to a signal like that with some quality but technically with a strong signal it's absolutely possible and even if you do add some more elements to make the signal clear and specific you still wouldn't need an additional power source. The only thing an AM radio typically needs a power source for is a sound amplifier, but if you use high impedance (2k Ohm) headphones you don't need that. The catch is that these can be hard to find these days, but you can still make them out of e.g. piezoelectric buzzers or indeed a magnet and a tin can.
AM radio is like literal magic. There is music all around us that we can't hear, and to hear it you just have to tap a crystal (diode) to the earth and listen to it with another magic rock (magnet) and a tin can. You dont even need electricity to make it work because this music around us is literally all the power you need. Oh and at night when the sun has set, the light of the day gets replaced by MORE music because the signals can travel further at night. This is magic. If you even care.
30K notes
·
View notes
Text
Mobile spare parts wholesale online
Radiovision is the best electronic store to buy genuine mobile spare parts at wholesale prices online. You can get brand- new replacement mobile spare parts with 100% warranty and guarantee on www.radiovision.in
Order original mobile replacement parts such as touchscreen display, LCD touchpad module, gorilla glass folder, battery, door panel, charger port, fingerprint sensor, flex cables, front and rear camera, Mic PCB board, Motherboard, power button, menu key button, loudspeaker buzzer module, vibrating motor flex cable, speaker module, volume buttons, sim-tray, camera lens, at wholesale prices on our website.
We ship mobile spare parts for all top smartphone brands including Xiaomi, Huawei Honor, OnePlus, Apple, Micromax, Sony, Samsung, HTC, Nokia, Asus, and other models. Check our website to get offers, limited deals, and flat discounts on eligible products and avail them with free delivery options.
1 note
·
View note
Text
Google Pixel Parts with Superior Quality

The Google Pixel line of premium smartphones was created by Google. With the launch of the initial generation of Pixel phones in October 2016, several more have come out. Pixel smartphones, which use the Android operating system, are renowned for their excellent cameras, quick processing, and compatibility with many of Google's services. They also have a special function called Google Assistant, a virtual assistant that can carry out a variety of jobs like scheduling, reminding users of things, and even placing calls.
Original accessories and spare parts for the Google Pixel mobile phone
Get the most recent offers on LCD screens with touchpad modules, genuine display prices combined with digitizers made of gorilla glass, rear housing panels with battery doors that have side key buttons, fingerprint sensors, charging port flex cables, loudspeaker buzzer ringers, ear speakers, new motherboards, and other discount batteries and USB chargers. Thus, don't wait to buy our google pixel parts when needed.
For both in-warranty and out-of-warranty damage, Pixel phones offer support alternatives. Depending on your region and the condition of the warranty on your phone, mail-in and walk-in options can be available. As part of our commitment to sustainability, the device packaging for the Pixel phones may no longer include a paper warranty. During phone setup, you can verify the warranty for the model and location. Even if you also received a paper warranty, this information is always accessible on your phone. Are you looking for replacement parts, accessories, casings, batteries, covers, or screen protectors for your Google Pixel? For your Google Pixel, we offer a wide variety of parts.
0 notes
Text
“ ART “ WITH SMART GLASSES
It’s said that “Eyes are the window to your soul “. But unfortunately, the opportunity of sight is not given to everyone. Yes, the blind are a special group of people in our society. Regretfully 44% of visual impairments are beyond clinical corrections. We are independent in this society, because of the coordination of all our sense organs. We can drive ourselves without depending, we can read ourselves without the assistance of anybody, and we can cross the roads ourselves. And independence is our right too. Equality in our society will be defined well if this independence is given to blind people. The happiness of independence Should be experienced by each and everyone in our surroundings.
“Nowadays we have got the opportunity to support and spread this independence and happiness to those who are denied”
Yes, now in our cities we have got this opportunity through the invention of SMART VISION GLASSES.
WHY ARE THE GLASSES CALLED “SMART”? Most advanced smart glass systems can automatically provide information about target insights such as a product in hands, information about scenery, and even facial recognition of a person coming towards.
Right now, most smart glasses feature conventional eyeglass or sunglass lenses with some combination of cameras, microphones, and speakers built into the frames, offloading the core features of your smartphone into a wearable device you can operate without reaching into your pocket.
This device includes a pair of glasses and an obstacle detection module fitted in it the center, a processing unit, an output device i.e. a beeping component, and a power supply. The Obstacle detection module and the output device are connected to the processing unit. The power supply is used to supply power to the central processing unit. The obstacle detection module consists of an ultrasonic sensor, the processing unit consist of a control module and the output unit consists of a buzzer. The control unit controls the ultrasonic sensors and gets the information about the obstacle present in front of the man and processes the information and sends the output through the buzzer accordingly. “ These Ultrasonic Smart Glasses for Blind people is a portable device, easy to use, lightweight, user friendly
”.These glasses could easily guide blind people and help them avoid obstacles.
There has always been the need for the person with a disability to live a normal life and Excel in this world. There have been many inventions to bring such people on the same ground as others. Some have failed and some have made it well. Science and technology have always tried to serve mankind and make society healthy. “ SMART VISION GLASSES is a boon for serving the society and mankind”. “ Humanity is the wealthiest health of us ”
1 note
·
View note
Text
Support for Ryzen 5 5600X, Ryzen 9 5900X and Ryzen 9 5950X 3D V-Cache Series
Reliable leaker Greymon55, who shared a new post on Twitter, said, “A few new products will be available for ZEN3D in the last few days. "That's true, and there will be more information next month." However, it is thought that the new processors may be based on the Ryzen 5 5600X, Ryzen 9 5900X and Ryzen 9 5950X. AMD, which has been preparing to switch from the AM4 socket, which has been supported for a long time, to AM5, can continue to support AM4 with new processor models. The 3D V-Cache range is expanding.
Affordable AM4 and Zen3D processors are coming from AMD
AMD, which recently launched the Ryzen 7 5800X3D model, which came with a large L3 cache size, managed to win the appreciation of users. Continuing to work on the new generation AM5 socket and Zen 4 processors today, the company may soon announce new affordable AM4 processors and Zen3D models. Dependable leaker Greymon55, who shared another post on Twitter, said, "A couple of new items will be accessible for ZEN3D over the most recent couple of days. "That is valid, and there will be more data one month from now." However, it is felt that the new processors might be founded on the Ryzen 5 5600X, Ryzen 9 5900X and Ryzen 9 5950X. Likewise, Greymon55, who says that reasonable low-end model new AM4 processors will be delivered in the continuation of his assertions, guarantees that AMD is as of now testing the new Zen4 processor intended for the AM4 attachment. Albeit the common data has not been affirmed at this point, we can say that the AM4 attachment will be said goodbye later than anticipated.
3D V-Cache Ryzen 7000 Raphael-X Processors Verified
Memory manufacturer Team Group has announced that it has prepared the first industrial DDR5-5600 memory modules. The company claims in its whitepaper that the new RAMs are a good option for next-gen platforms like "Intel Raptor Lake and AMD Raphael-X". We've been talking about the 13th Gen Raptor Lake platform for a long time already. What's interesting here is the "Raphael-X" processors that have never been officially heard of before. As you know, AMD used the name Milan-X after integrating 3D V-Cache technology into its EPYC Milan processors. Now we have learned for sure that the desktop Ryzen 7000 series will be supported with 3D V-Cache in the future. Some sources say that the Raphael-X is already in mass production. Team Group's new DDR5 memory modules will be available in U-DIMM, SO-DIMM, ECC-DIMM and R-DIMM form factors. RGB lighting used for 'industrial' components can look odd. But these multi-colored lights will likely be used for alerts and other useful feedback. Three RGB lighting modes are available in upcoming memory modules; Warning, Notification and Reminder. In the photos we can see that a normally working DIMM will work with green LEDs. However, if something triggers the smart detection system, the dual color RGB LEDs will start to light up. It should also be noted that the memories can make audible warnings in case the modules disappear. In other words, a small speaker (piezo buzzer) that can make 'beep' sounds is placed on the RAM surface.
Ryzen 7 5800X3D
The Ryzen 7 5800X3D was the first Ryzen-branded processor to feature AMD's 3D V-Cache technology. 3D cache technology makes a positive contribution to the performance of games. The Ryzen 7 5800X3D performed on par with the Core i9-12900K/KS in gaming tests. Of course there are differences from game to game, but the 5800X3D and Intel competitors are on average on par. Greymon55, known for credible AMD leakers, says the red team is working to expand its Ryzen 5000X3D processor lineup with more information in July. The Ryzen 7 5800X3D was launched as a standalone octa-core AM4 CPU. As you know, this chip does not officially support overclocking, but motherboard manufacturers like MSI release their own custom BIOS. If the leaks are correct, we could see the introduction of different SKUs like Ryzen 5 5600X3D, Ryzen 9 5900X3D and even Ryzen 9 5950X3D. Assuming that a processor like the 5900X3D will come with 16 cores, the end user will be offered a huge cache of 200 MB (L2+L3) in total. However, it has been confirmed by TeamGroup that the Ryzen 7000 processors based on the Zen 4 architecture will come with the name "Raphael-X". In other words, 3D V-Cache will have an important place in AMD's future. Speaking of the AM4 platform, a new processor called the Ryzen 7 5700 has appeared. As a result, the AM4 platform isn't obsolete yet, and support isn't ending anytime soon. Read the full article
0 notes
Text
Cell Phone Replacement Parts Module for LG G5 / F700S,Kr Version
Cell Phone Replacement Parts Module for LG G5 / F700S,Kr Version
Price: (as of – Details) 1. High quality Bottom (Charging Dock + Microphone + Speaker Ringer Buzzer) Module for LG G5 / F700S. 2. This part is used to replace your damaged or unworkable one. 3. Each item has been checked and in good condition before shipping. 4. The installation of any new part should be done by a qualified person. We will not be responsible for any damage caused during…

View On WordPress
0 notes
Text
Grove passive buzzer module Buzzer alarm small speaker arduino kit sound sensor
Grove passive buzzer module Buzzer alarm small speaker arduino kit sound sensor

lastest_volume
1
Just For Today
Click Here To Visit The Shop
N€W Grove passive buzzer module Buzzer alarm small speaker arduino kit sound sensor
0 notes
Text
Fire Alarm with Siren and Water Sprinkler System Using Arduino
youtube
FIRE ALARM SYSTEM WITH SIREN AND WATER SPRINKLER ****************************************************************** If You Want To Purchase the Full Project or Software Code Mail Us: [email protected] Title Name Along With You-Tube Video Link Project Changes also Made according to Student Requirements http://svsembedded.com/ https://www.svskits.in/ M1: +91 9491535690 M2: +91 7842358459 ****************************************************************** 1. Intelligent Fire Detection & Automatic Water Sprinklers, 2. GSM based Automatic Fire Detection and Water Sprinkler, 3. intelligent fire detector with automatic water sprinkler system, 4. Heat switch (old tube light stater bulb) fire alarm system, 5. Arduino Security and Alarm System Project, 6. Firefighter System Without Using Arduino | Fire Fighting Robot DIY (Simple), 7. Arduino with Fire Sensor, LED and Buzzer (Tutorial), 8. GSM Based Security Alarm System using Arduino, 9. How to make a Automatic Door Opening system using IR sensor, 10. Advanced Home Security System using Arduino and GSM Module, 11. Fire Detection and Water Sprinkler Robot using Arduino, 12. NodeMcu ESP8266 Blynk Fire Alarm Security Notification, 13. Fire Alarm Using Arduino, 14. IOT PROJECTS: Arduino Home Security System, 15. Smoke Level Detector with Alarm using Arduino & MQ-2/MQ-5/MQ-135 Sensor, 16. Arduino Flame Sensor | Fire Detector, 17. Smoke Detector Alarm Without Using Arduino || MQ-6 Sensor, 18. How To - Smoke Alarm Monitoring with Arduino and MySensors, 19. Arduino-based Burglar and Fire Alarm System, 20. Password Based Door Lock Security System Using Arduino, 21. How to Make Fire Alarm Using Flame Sensor with Arduino, 22. Fire Security System Using GSM Module ,flame sensor and Arduino, 23. Home security with Arduino - Arduino Fire Alarm System, 24. Gas Detecting Alarm system with Arduino, 25. Automatic Railway Track Crack Detection System Using GSM & GPS, 26. Smoke alarm using Arduino uno and smoke sensor mQ2, 27. Musical Fire Alarm Hack - Super Mario Bros – Arduino, 28. How to make a fire alarm using battery 9v simply, 29. Density Based Traffic Signal Control System Using Arduino and IR Sensor, 30. GSM Sim800l Based Home Security System Using Arduino and Pir Sensor, 31. Arduino Fire Alarm (Flame sensor and Speaker), 32. Fire Alarm using Arduino uno and Flame Sensor; Arduino security system,DIY, 33. Fire/flame Detector using Flame Sensor and Arduino, 34. Make A Lazer Security System Using Arduino, 35. Zigbee Based Gas and Fire Detection System, 36. Mini Fire Alarm System using Arduino | Arduino with Fire Sensor,LED and Buzzer(Tutorial), 37. Fire Recognition & Extinguisher system using Image processing and Arduino, 38. GSM Based Security Alarm System using Arduino and 433Mhz Remote (V2 0), 39. Arduino Fire Alarm System - gsm security system using Arduino, 40. Learn about IoT based forest fire Alarm System, 41. Security System using Arduino Bluetooth Camera, 42. Home Security System using Arduino – Project, 43. Swachh Bharat Waste Collection Management System using IOT, 44. Forest fire Detection using Thingsspeak Prediction Algorithm –NodeMCU, 45. Home Security System Using RFID and Reed Switch Controlled using Arduino Micrcontroller, 46. Gas Leakage Alarm using Arduino with Matlab Simulink, 47. How to Make IOT Industry Protection System Using Arduino Project, 48. How To Make Smart Home Automation Using Arduino, 49. How to Make an Arduino Fire Flame Alarm, 50. Forest Fire Early Detection & Online Remote Monitoring Using Fire Sensor using Arduino,Raspberry Pi, 51. heat detector fire alarm system | alarm systems fire alarm using arduino nano and fire Sensor, 52. Remote Temperature | GAS | FIRE | LDR | PIR | Sensor's Monitoring on Internet with Arduino GPRS, 53. simple security system using Arduino - Arduino and Motion sensor, 54. Fire Alarm System using AVR Microcontroller, 55. Fire Alarm System using LabView and Arduino , 56. Simple fire alarm using arduino and labview
0 notes
Text
WeatherSensor and MusicBox
After getting the bluetooth working, I started putting all the pieces together. I have two arduino circuits, one named ‘WeatherSensor’ and one named ‘MusicBox’. The WeatherSensor is made up of one raindrop sensor, two LDR’s and a HC-05 Module transmitting the data. The MusicBox is, at the moment, one Piezo speaker and a HC-05 Module.
int rain = analogRead(A0); int light1 = analogRead(A1); int light2 = analogRead(A2); int light = (light1 + light2) / 2; Serial1.write(rain); Serial1.write(light); delay(1000); Serial.flush();
I started this development by sending a String containing direct readings from the rain sensor and an average reading of the LDR’s to my phone, just to check the data was sending.
Then I set up the MusicBox to receive this message. The next step was parsing the message into separate readings again. Due to sending String instead of raw int or byte values, this was more complicated than I expected. My prime language is Javascript, so I’m very used to being able to easily manipulate String values. This is not as easy in C, and I had to struggle with splitting and clearing the String message. I did eventually figure out a system, but once I fully understood the Serial Buffer and how it works, I was able to switch to just sending and receiving two integer values which was a lot easier.
if (Serial1.available()) { int val = Serial1.read(); if (alt) { Serial.println(val); rainVal = map(val, 0, 1050, 0, 100); Serial.println(rainVal); alt = false; } else { lightVal = map(val, 0, 30, 0, 100); alt = true; } }
Next I wrote a series of if/else conditions to determine what kind of weather it was depending on the Light and Rain values. Each statement passes different values into the ‘playMelody()’ function, the index of the required melody and the tempo it is to be played at.
//------DECIDE CONDITION //LIGHT LOW + NO RAIN if (lightVal < 50 && rainVal < 30) { Serial.println("CLOUDY"); playMelody(1, 140); // zelda theme } //LIGHT LOW + SOME RAIN else if (lightVal < 50 && rainVal < 60) { Serial.println("DRIZZLE"); playMelody(0, 88); // zeldas lullaby } //LIGHT LOW + LOTS OF RAIN else if (lightVal < 50 && rainVal >= 60) { Serial.println("HEAVY RAIN"); playMelody(4, 85); // jigglypuff song } //LIGHT HIGH + NO RAIN else if (lightVal > 50 && rainVal < 30) { Serial.println("SUNNY"); playMelody(3, 140); // take on me } //LIGHT HIGH + SOME RAIN else if (lightVal > 50 && rainVal < 60) { Serial.println("SUMMER SHOWER"); playMelody(2, 140); // mii channel theme } else { Serial.println("ERROR"); } //light high + lots of rain not included as it is very unlikely to occur
I created a separate header file to contain the arrays of melodies, simply for organisations sake, and created a global constant ‘jagged’ (multidimensional) array called ‘melodies’ to store them. I also created a separate array containing the sizes of these melodies, as the sizeof() function didn’t seem to work on the instances of the ‘melodies’ array. Each of the melodies are from this GitHub https://github.com/robsoncouto/arduino-songs
extern const int* melodies[] = {zelda1, zelda2, miiChannel, takeOnMe, jigglypuff}; extern const int sizes[] = {sizeof(zelda1), sizeof(zelda2), sizeof(miiChannel), sizeof(takeOnMe), sizeof(jigglypuff)};
The playMelody() function is a reworked version of the loop that comes with the melodies from that GitHub, altered a bit to function with the ‘melodies’ array. As it uses the delay, I had a problem with the Serial buffer becoming backlogged with unprocessed values. I added a serial.flush() function to the WeatherSensor code to clear the outgoing buffer each loop and keep only the most current data in it.
void playMelody( int index, int tempo) { int notes = sizes[index] / sizeof(melodies[index][0]) / 2; // this calculates the duration of a whole note in ms (60s/tempo)*4 beats int wholenote = (60000 * 4) / tempo; int divider = 0, noteDuration = 0; for (int thisNote = 0; thisNote < notes * 2; thisNote = thisNote + 2) { // calculates the duration of each note divider = melodies[index][thisNote + 1]; if (divider > 0) { // regular note, just proceed noteDuration = (wholenote) / divider; } else if (divider < 0) { // dotted notes are represented with negative durations!! noteDuration = (wholenote) / abs(divider); noteDuration *= 1.5; // increases the duration in half for dotted notes } Serial.println(melodies[index][thisNote]); // we only play the note for 90% of the duration, leaving 10% as a pause tone(buzzer, melodies[index][thisNote], noteDuration * 0.9); // Wait for the specief duration before playing the next note. delay(noteDuration); // stop the waveform generation before the next note. noTone(buzzer); } Serial.println("end"); }
The next step is to get the project working remotely. I have some batteries, a couple of snap connecters and some barrel connectors arriving soon that I will use.
WeatherSensor


MusicBox


vimeo
Evaluation
I am really happy with how this turned out. It was definitely a fairly complex and long process, but it all works and I’m proud of how far I’ve come. There are just a couple more pieces to add and I will do a full evaluation of circuit, code and general project outcomes then.
0 notes
Link
Radiovision is the best electronic store to buy genuine mobile spare parts at wholesale prices online. You can get brand- new replacement mobile parts with 100% warranty and guarantee on www.radiovision.in
Order original mobile replacement parts such as touchscreen display, LCD touchpad module, gorilla glass folder, battery, door panel, charger port, fingerprint sensor, flex cables, front and rear camera, Mic PCB board, Motherboard, power button, menu key button, loudspeaker buzzer module, vibrating motor flex cable, speaker module, volume buttons, sim-tray, camera lens, at wholesale prices on our website.
We ship mobile spare parts for all top smartphone brands including Xiaomi, Huawei Honor, OnePlus, Apple, Micromax, Sony, Samsung, HTC, Nokia, Asus, and other models. Check our website to get offers, limited deals, and flat discounts on eligible products and avail them with free delivery options.

0 notes
Photo

HUAWEI NEXUS 6P LOUDSPEAKER BUZZER MODULE
https://www.cellspare.com/huawei-nexus-6p-loud-speaker-module
0 notes
Text
Wio Terminal: ATSAMD51 Core with Realtek RTL8720DN BLE 5.0 & Wi-Fi 2.4G/5G Dev Board
Wio Terminal is an ATSAMD51 based microcontroller with support for wireless connectivity from Realtek RTL8720DN. CPU on Wio Terminal mapu running at speeds of 120 MHz (can be boosted up to 200 MHz). The Realtek RTL8720DN chip supports Bluetooth 5.0 and WiFi 2.4 & 5 GHz connections as a backbone to support data transmission on your IoT project. Wio Terminal is also equipped with a 2.4 inch LCD, on-board IMU sensor (LIS3DHTR), microphone, buzzer, micro SD slot, light sensor, and IR emitter to support your project variations. On the other hand, Wio Terminal has also been equipped with a grove connector to connect the device to the grove modules and a 40 pin header to connect the device to the Raspberry Pi.
Product Features
Integrated hardware design, combining microcontrollers, wireless modules, sensors, and I / O devices in one module
Powered by the powerful Microchip ATSAMD51P19 microcontroller chip
Equipped with Realtek RTL8720DN to provide wireless network support with the latest technology such as dual-band wifi and bluetooth 5.0
Supports USB OTG functionality
Equipped with a grove connector to connect the Wio Terminal to the grove module
Can be used as a Raspberry Pi HAT
Supports development platforms such as Arduino, Micro Python, Arupy, AT firmware
Specification
MCU: ATSAMD51P19 ARM® Cortex®-M4F @ 200 MHz
Memori Flash: 4 MB
Working Temperature: -40 ° C - 85 ° C
LCD: 2.4 inch @ 240x320
Driver LCD: ILI9341
Modul Wireless: RTL8720DN
Wifi: 802.11 a/b/g/n 1x1, 2.4GHz & 5GHz
Bluetooth: Bluetooth 5.0
Accelerometer: LIS3DHTR
Mikrofon: 1.0V-10V -42dB
Speaker: ≥78dB @10cm 4000Hz
Light Sensor: 400-1050nm
IR Emitter: 940nm
Slot Micro SD: Maksimum 16 GB
Pin I/O: 40-PIN (Raspberry Pi Compatible) dan grove connector
FPC: 20-Pins
USB Type-C: Power & USB-OTG
Antarmuka Operasi: 5-Way Switch, Power/Reset Switch, User-defined button
Dimensi: 72x57x12 mm
Material Case: ABS+PC
Application Example
Python Terminal Device
Data Collection Device for Machine Learning
Hand-held Device
Retro Gaming Device
IoT Controller
Education
Prototyping
Slave device / Accessories for Raspberry Pi
https://ift.tt/2yc603l April 11, 2020 at 08:46PM
0 notes
Text
(HUKATO.COM) Original Loudspeaker Speaker Buzzer Ringer Module Replacement Part Compatible for Xiaomi MI Redmi Go
(HUKATO.COM) Original Loudspeaker Speaker Buzzer Ringer Module Replacement Part Compatible for Xiaomi MI Redmi Go
Price: (as of – Details) BUZZER RINGER LOUD SPEAKER DESCRIPTION If you have a non-functional Ringer for your Phone, this is the right product you have been looking for. Replace the old, broken, cracked, damaged Ringer with a new replacement Ringer which is compatible to its respective branded product and make your device work more refreshing than ever. Each item has been checked and in good…

View On WordPress
0 notes
Text
Utilisasi MPU untuk Deteksi Gempa
Bandung memiliki potensi gempa bumi yang cukup tinggi. Salah satu penyebabnya adalah adanya sesar Lembang. Terlebih lagi tidak dapat diprediksi kapan gempa bumi terjadi. ITB sebagai salah satu perguruan tinggi yang berada di Bandung haruslah tanggap dan bisa mengantisipasi risiko. Karena gempa bumi bisa saja tiba-tiba terjadi dan memberikan dampak buruk kepada kegiatan kampus dan sekitarnya yang terkait.
Solusi menggunakan sistem embedded yang bisa saya tawarkan adalah sebagai berikut. Saya mengusulkan sistem pendeteksian gempa dan penyebaran notifikasi gempa untuk lingkup kampus ITB. Fitur yang dimiliki sistem ini adalah pendeteksian gempa berdasarkan akselerometer dan gyrosensor, peringatan melalui audio visual yaitu lampu, bunyi serta layar, kemudian komunikasi antar perangkat untuk efisiensi deteksi, dan pengiriman data deteksi gempa ke server untuk menyalakan protokol kampus untuk penanganan kondisi gempa bumi.
Untuk perangkat, menggunakan mikrokontroler ESP32. Besaran yang diukur adalah pergerakan 3 sumbu (x,y,z) yang bisa diukur menggunakan gyrosensor didukung akselerometer yang terdapat dalam sensor MPU-6050. Untuk sistem peringatan menggunakan LED, buzzer speaker, dan display OLED. Untuk komunikasi menggunakan modul LoRa yang dikoneksikan antar perangkat dan dengan server pusat ITB. Sensor MPU dan display dikoneksikan ke mikrokontroler melalui protokol I2C, sedangkan modul LoRa menggunakan protokol SPI. Hasil pengukuran dari MPU-6050 yang dikoneksikan pada ESP32 yaitu orientasi pada sumbu X,Y, dan Z, akselerasi, dan temperatur. Dari data tersebut diolah data orientasi dan akselerasi menggunakan ambang batas (threshold) tertentu untuk pendeteksian gempa berdasarkan data historis. Kemudian jika melewati pergerakan perangkat melewati ambang batas maka akan dideteksi sebagai terjadi gempa. Lalu sistem peringatan akan dimulai, LED menyala merah, buzzer speaker akan mengeluarkan sirine, layar akan menampilkan informasi gempa terjadi, dan mengirimkan deteksi gempa ke perangkat lain serta mengirim informasi yaitu hasil pengukuran dan state terjadi gempa ke server pusat untuk memulai protokol penanganan kondisi gempa bumi.
Berikut adalah skenario penggunaan sistem deteksi gempa.

Berikut adalah diagram sistem hardware.
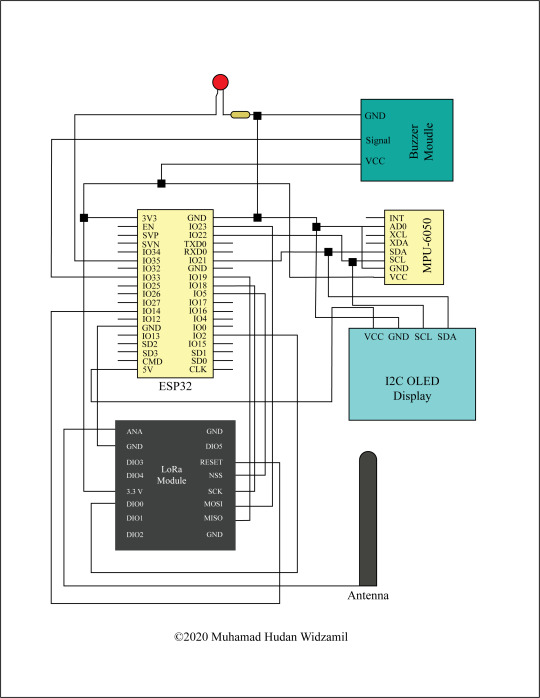
Kemudian berikut adalah alur kerja (flowchart) program yang akan diterapkan.

Untuk lebih jelasnya dapat dilihat melalui pranala berikut: https://drive.google.com/drive/folders/12ucIqwwQeLb2bSAf3iM79C6RI70TkqpR?usp=sharing .
Itulah solusi yang dapat saya tawarkan dari permasalahan tersebut. Semoga bermanfaat.
Muhamad Hudan Widzamil
18218003
0 notes
Text
Don’t Buy a Raspberry Pi Until You’ve Seen CrowPi All-in-One Kit (Review and Giveaway!)
Our verdict of the CrowPi: Compact Raspberry Pi Educational Kit: CrowPi is a unique all-in-one Raspberry Pi starter kit, well designed and for a fair price. To get someone started with Pi programming or hardware, there isn't anything better right now.910
Raspberry Pi starter kits generally contain the same things. While some vary in the number of components or price, they usually all offer the same experience.
That is, until now.
Enter CrowPi, a portable, pre-built, all-in-one Raspberry Pi starter kit. Costing $239 for the basic kit, and $329 for the advanced (as reviewed), it is at the higher end of the price range for this kind of package. Is it worth it? Read on to find out, and at the end of this review, we’ve got one complete kit to giveaway to a lucky reader!
youtube
CrowPi in Brief
The CrowPi was successfully funded on Kickstarter by Elecrow last year. It comes in an ABS plastic, aluminum ringed case (which comes in a variety of colors). Inside, there is a custom PCB with a huge array of hobby electronic components, and a 7″ HDMI touch screen mounted in the lid.
CrowPi: Compact Raspberry Pi Educational Kit CrowPi: Compact Raspberry Pi Educational Kit Buy Now On Amazon $339.00
The basic version comes without a Pi but does provide a pre-loaded 32GB MicroSD card. The advanced version bundles in a Raspberry Pi 3B+ along with a wireless keyboard and mouse, and two USB game controllers.
A ribbon cable attaches the Pi to the custom PCB, completely cutting out the need for setting up circuits on a breadboard. Rather than dismantling and tidying away once you are done, you can simply power off and close the case. This, along with example sketches provided by CrowPi, make getting started with this kit a quick and painless process.
What Comes With CrowPi
Elecrow has managed to fit a lot into the 27 x 17.5 x 7cm carry case.
The basic version contains:
USB Camera
7″ HDMI Touch Screen
16 x 2 LCD Module (MCP23008)
Segment LED (HT16K33)
Vibration Motor
Matrix LED (MAX7219)
Light Sensor (BH1750)
Buzzer
Sound Sensor
PIR Motion Sensor
Ultrasonic Sensor
Servo
Stepper Motor
Tilt Sensor (SW-200D)
Infra Red Sensor
Touch Sensor (TTP223)
Temperature and Humidity Sensor (DH11)
Relay
16 button matrix
4 assignable buttons
RFID Module (MFRC522)
Mini Breadboard
Microphone
IR Remote
USB2.0 to MicroSD converter
Touch Screen Stylus
Power Adaptor and connecting cables
Preloaded Raspbian 32GB MicroSD card with code examples
The advanced version adds a few extra parts:
Raspberry Pi 3B+
Wireless Keyboard and Mouse
2 x USB Retro Game Controllers
Headphones with inline microphone
That’s more components than Pi GPIO pins, so there are two mini 8-row switch banks to allow components to double up on the pins.
The provided power supply attaches to the CrowPi via a barrel jack, though MicroUSB powering is also an option. With a beefy enough portable power brick, you can power the whole board on the move.
Initial Setup
Setting up CrowPi was a simple experience. Since the advanced version comes with the Pi already installed, it was merely a case of plugging in the power supply and mouse and keyboard and powering on.
While I’ve got a lot of experience with the Pi, I approached this review with a beginner’s mindset. Following the quick start guide will take you through connecting to Wi-Fi and downloading the provided source materials which go along with the provided code examples.
Five minutes after opening the box, I was making things flash, buzz, and vibrate. I’m confident anyone would have the same experience regardless of previous experience.
The Build Quality
One concern I had going into the review was the build quality. A portable clam-shell kit is useless if it’s too flimsy to travel. I found the ABS shell to be solid without much flex, and the iron hinges are strong enough to hold open the top half containing the screen.
The PCB is clean and well made, displaying both the components you are using along with the SMC components required to operate them properly.
Given how much they’ve crammed into this board, everything is well organized and uncluttered. The Pi fits in the top left corner of the case, with 90-degree HDMI and 3.5mm jack connectors for connecting to the screen. There are no built-in speakers to the CrowPi, but the provided headphones are good enough quality for daily use.
Using CrowPi
Given that everything comes pre-assembled, the hardware side of the CrowPi is incredibly easy to use. Even external parts like the servo and stepper motor have connectors making it difficult to wire anything in the wrong way.
This is the first significant plus point of the CrowPi for beginners, who can accidentally fry hardware with a simple mistake. This kit removes that disheartening scenario.
Following the provided Python tutorial was an easy process, although it does suffer a little in translation. Each lesson covers a different component and associated code before providing the terminal command to see it working.
The lessons could more accurately be titled as a guide to the provided code, as it doesn’t explain things too much, but CrowPi does provide the lessons on their YouTube channel in a more detailed form.
Regardless of how much Python you’ll learn from these lessons, they do take the reader through identifying components, reading code, and running it in the terminal. In many ways, this is a great way to get someone interested in the beginning steps using the Raspberry Pi with hardware, avoiding some of the pitfalls that may cause some to lose interest.
Other Uses For CrowPi
The 7″ HDMI screen isn’t competing with smart devices or full-size monitors but is more than adequate for watching YouTube. Given the inclusion of two game controllers, I thought it only appropriate to install RetroPie and spend an afternoon playing some old classics.
Perhaps unsurprisingly, CrowPi makes for a fantastic little retro gaming machine, and the inclusion of USB gamepads is a nice touch.
Are There Any Downsides To CrowPi?
The lessons mentioned above do show off each component on the board, but the explanations are lacking in places. For resources for learning how to program the Raspberry Pi using Python, you’ll likely want to look elsewhere.
If only there were a website with a resource of Raspberry Pi tutorials to help you learn how to use it?
Confusingly, part 20 of the lessons refer to an LED and resistor that isn’t provided in the kit, while lesson 21 (which deals with the camera) is mentioned in the quick start guide, but nowhere to be found.
These are tiny points though and given the large online community of Raspberry Pi users and tutorials, not a big deal.
The Cost
For some, the $239/$329 asking price might seem a little high. To compare, I made a list of most of the provided parts in the advanced kit. Without any power supply, cables, headphones, and a few other small peripherals, the combined total, when purchased separately, was over $260. Even then, you would still need to put it all together yourself, and you would be missing the integrated clam-shell case.
While there are significantly cheaper Raspberry Pi kits available, for what it provides the CrowPi is actually great value.
Should You Get A CrowPi
For learning and teaching about the basics of coding and hardware on the Pi, I can think of nothing better than the CrowPi. It combines everything open and extendible about the Pi while removing some of the stumbling blocks that beginners can face.
If you already own a Pi, the $239 standard kit will give you enough hardware to play with for a long time, and the solid case makes it perfect for storing and transporting when not in use.
CrowPi: Compact Raspberry Pi Educational Kit CrowPi: Compact Raspberry Pi Educational Kit Buy Now On Amazon $339.00
If you are looking for a pre-built Raspberry Pi learning platform, there just isn’t anything else quite like the CrowPi available right now.
Enter the Competition!
CrowPi All-in-One Raspberry Pi Learning Kit Giveaway
Read the full article: Don’t Buy a Raspberry Pi Until You’ve Seen CrowPi All-in-One Kit (Review and Giveaway!)
Don’t Buy a Raspberry Pi Until You’ve Seen CrowPi All-in-One Kit (Review and Giveaway!) published first on http://droneseco.tumblr.com/
0 notes