#chaoticresrouces
Note
hi Leah! how do you add a gif to an image on photoshop?
Hello! I assume you’re referring to the current header being a still of Miss Swift while having a butterfly gif on top of it.
Here is an in depth step by step tutorial on how you add a gif over a still image.
We’re going to make this today my friends.

I’m sure there are other ways to do this, and of course you don’t have to follow this tutorial step by step... but this is my process.

So, first you have your ‘still’ image open and ready to go (we’re gonna call it image #1)
You’re going to open up the gif that you’re going to put over the still (we’re gonna call this guy image #2)

In order to do this right, both pictures must be the exact same size and have the exact same number of frames. Otherwise, things will just not work out. Make image #2 the same size as image #1. In order to make them have the same number of frames, you’re going to go back to the still image you have open, go down to the bottom and hit ‘create frame animation’

(If it says something along the lines of ‘create timeline’ all you have to do is hit the arrow down button and change it to create frame animation)
it’s going to create a single frame animation, see below.

Go to the far right and hit this

It’s going to open up a dialogue box you’re going to select ‘copy frames’,
click ‘ok’, then the box will disappear.
You’re gonna hit this box once again

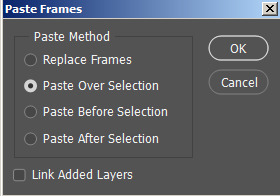
The dialogue box will pop up again, this time you’ll select ‘paste frames’

this box will pop up and you’re going to select ‘pate after selection’, then this will happen

Now you have two frames! Woot! From here, you’re going to keep copying / pasting the frames until you have the exact same frames in image #1 as you do in image #2.
Once you have the same number of frames in both, you’re going to go back to image #2, select the first frame of the set

then scroll aalllll the way over to the very last frame of the set, HIT SHIFT + click the last frame. This should have selected each frame from 1-100

then select this

the dialogue box will appear again, hit ‘copy frames’. Go back to image #1, follow the same steps of selecting frame 1 to the very last frame. Hit this once more,

then hit ‘paste frames’ in the dialogue box. The same box will appear
You’re going to select ‘past frames over selection’ this is crucial.
It will now look like this

It went on there not centered at all, in order to center is you have to select everything but pressing CTRL + A (control + all) and now you’re image will look like this

I always think of this as little dancing arts surrounding the image lol. Anyways, now that everything is selected, you’re going to hit this button on the left side

This is the ‘Move’ button. Then, at the very top you will see this

In order to center it, you’re going to hit both of these


And that will perfectly center your image.
Nooooww you’re going to go over to the ‘Layer’ section on the right and they should look something like this

You’re going to select the very top layer (layer 100 for me), then scroll all the way to the first layer at the bottom and once again while pressing the Shift button, select ‘Layer 1′. This will select every layer of image #2. Now you’re going to find this at the bottom right

select this

This will ‘Group’ your layers together. Now, it should look like this
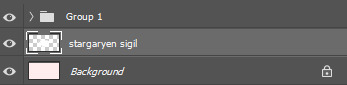
You’re going to highlight / select the Group 1 layer, then near the top you’ll see this

You’re going to use the drop down arrow and switch the layer settings, you can chose lighten, screen, really whatever works best for the look you’re going for. I’m going to use ‘Color Dodge’

Now my image looks like this.

The snow falling is a bit too strong for my taste, so I’m going to go to Layers area and find the opacity.

It’s currently set at 100%, but I’m gonna change it to 60% so it’s not so extreme.

Now it looks like this.. it’s a bit softer in my opinion :)

Now we’re going to add our ‘transition’ (the things that makes it look fancy on mobile)
To do this, you’re going to go back to this section

instead of pressing the group button, you’ll select this one instead

This is going to add a new layer. Make sure to keep it at the top, and it should look like this.

Now you’re going to go over to the left side and find the brush (or press the ‘B’ key as a shortcut)

and while on the new layer, draw whatever pattern you wish!
This is my final product.

If you guys have any further questions, you can reply to this post or send me a direct ask about it and I’ll try to help you best I can.
#yeahps#chaoticresrouces#allresources#photoshop tutorial#overlay tutorial#gif tutorial#gif overlay#header tutorial#I really hope this makes sense lmao#I took like 30+ screenshots alskdjflaksdj#anyways#hope this helps. game of thrones header#got#Anonymous
160 notes
·
View notes
Last Seen Blogs

decaysol
Decay$ol

pc-building-simulator-che6q
K2X№ pc building simulator cheats engine download

we-top-games-blog
Untitled

acourtofdaisiesanddreams
OutofBounds

saffroncream
gay 4 the green