#overlay tutorial
Explore tagged Tumblr posts
Visit Tumblr Blog
Explore Tumblr blogs with no restrictions, modern design and the best experience.
Last Seen Tumblr Blogs


Fun Fact
25% of US internet users with an annual income of $80-100K use Tumblr.
Note
hello, those gifset for ready or not is great!!
https://www.tumblr.com/billysjoel/781204370023972864/sleeping-inside-a-hearse-kizzyedgelll-requested?source=share
i was wondering if you could explain how made this second and fourth gif, splitting the gif into two with each a different colouring
hi, first of all, thank you so much!! i ended up pretty proud of this set! below the cut, i'll walk you through how to do the ripped paper effect with different coloring for both gifs!

first, i made both gifs separately. when i'm combining multiple gifs into one canvas, i typically do not crop them beforehand and instead leave them at their original dimensions so i can move them where necessary on the final canvas. this is totally personal preference.
in this case, my final canvas was 540px by 540px. i create this canvas separately and then bring both gifs over to it. i've sharpened them, but left them uncolored and uncropped.
once both gifs are on the same canvas, i add the ripped paper texture/brush. now, you can do this effect with any sort of texture or brush, not just one that looks like ripped paper, but that's what i used for this set. you can find all sorts of brushes on my resource blog or you can search for them on google or other PS resource websites. you can do the same with textures as well -- here's that tag on my resource blog.
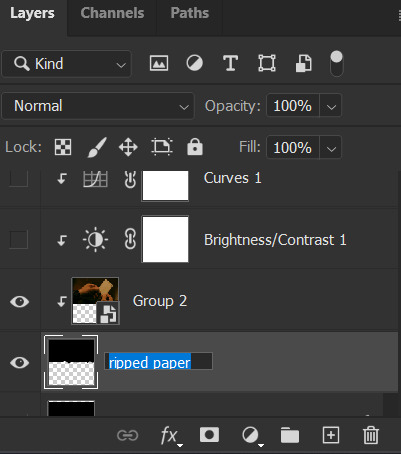
the most important parts are the order of your layers and using clipping masks. for this effect to work, you need the brush/texture layer to go IN BETWEEN your two gif layers. if you're using a texture, you don't really need to do anything other than using either the transform tool (ctrl+t) or move tool (v) to position your texture where you'd like it. it depends on the look you're going for, but with both of the gifs in this set that use this technique, they're divided approximately in half.
if using a brush instead of a texture, you need to create a new layer in between both of your gifs first before stamping the brush in the desired location.
without any clipping masks, your canvas will just show the topmost layer, which we'll call gif #2. gif #1 is your bottom/lowest layer with the brush/texture layer above it and gif #2 at the very top. this is what my canvas looks like with gif #2 hidden so you can see the positioning of my ripped paper brush:

to create a clipping mask, right-click on the gif #2 layer and select "create clipping mask." now you should see both gifs with gif #2 only appearing where your brush/texture appears:
you can see that depending on your texture/brush and its positioning, you can end up with a lot of cool and dynamic arrangements! clipping masks and the order of our layers are going to continue to be very important in order to keep the coloring separate. if it gets hard to keep track of what is where, you can always rename your layers by double-clicking on them!
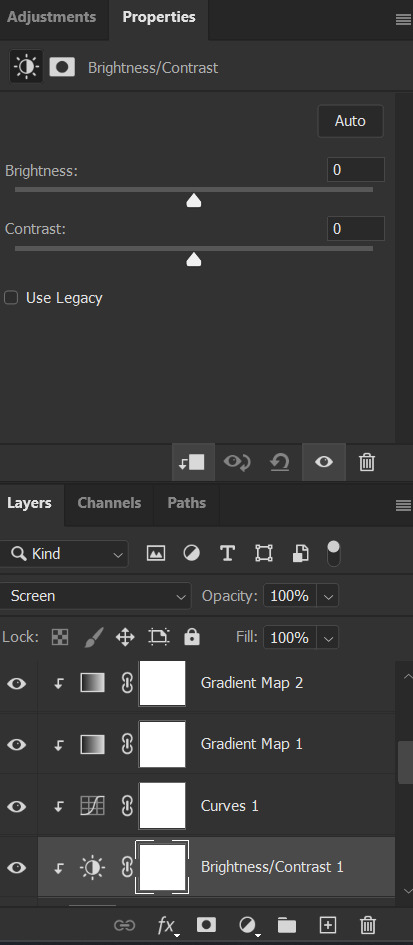
let's color gif #1 first. before adding your first adjustment layer, make sure you have gif #1 selected as any coloring layers need to be above gif #1 but BELOW your texture/brush layer. because gif #2 and the texture/brush layer are above gif #1 and whatever coloring layers, they will only apply to gif #1. you do NOT need to use clipping masks for gif #1. here are my coloring/adjustment layers and their settings (click to enlarge):

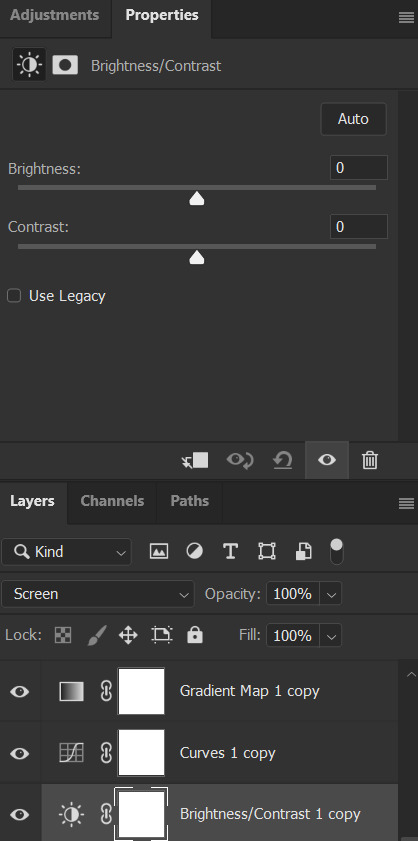


the coloring layers for gif #2 need to be above gif #2 and all of them must utilize clipping masks! with adjustment layers, there are a couple ways to do this. you can right-click on each of them and select "create clipping mask" like we did before or you can click this button underneath the properties tab of each layer:

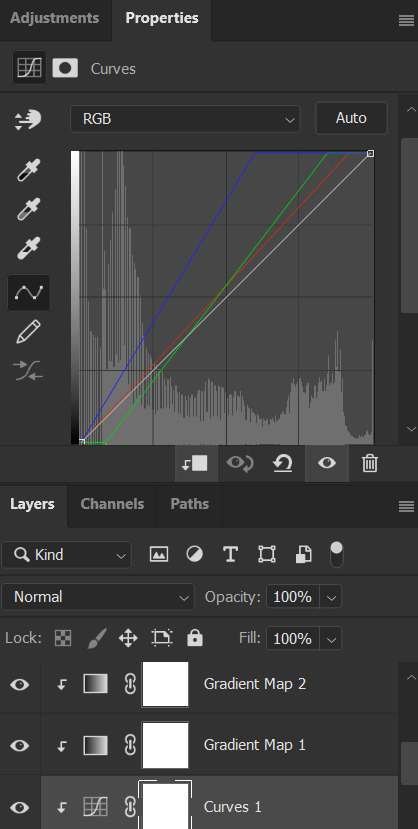
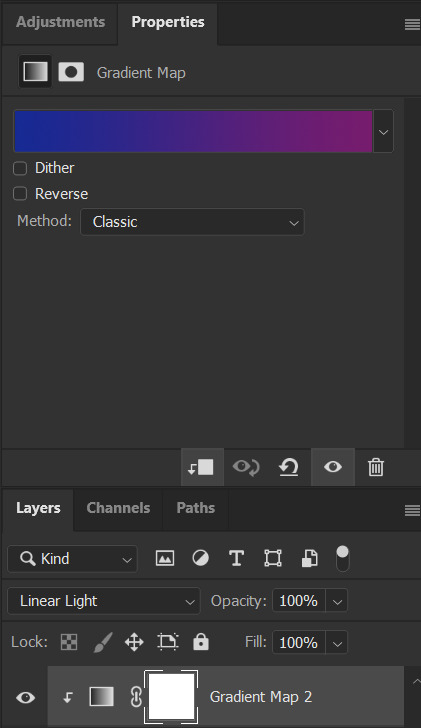
here are these coloring layers and their settings:


the last thing i did was add the drop shadow part of the texture/brush. to do this, i duplicated that layer and moved it down a handful of pixels using the transform tool (ctrl+t).
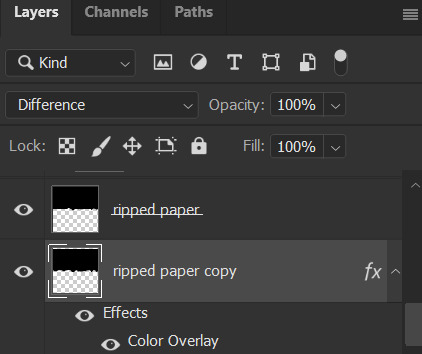
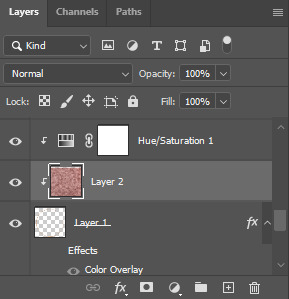
to add the color overlay effect (making it pink), double click the layer, select color overlay, and choose your color and applicable blending mode. i just chose a pink color and left its blending mode at normal and 100% opacity.
and that's pretty much it! as usual, please let me know if you have any additional questions -- about this tutorial or any of my other sets! (and so sorry this one took me so long!)
#answered#Anonymous#gif tutorial#coloring tutorial#overlay tutorial#gifmakerresource#completeresources#dailyresources#tutorials#my tutorials
26 notes
·
View notes
Note
https://www.tumblr.com/pupsec/777071487795478528/messing-around-with-layouts-and-shit?source=share HOW DID U DO THE COLORINGGGGGG I LOVE ITTT CAN U SHARE PLEASE AND TYY
[EDIT 235 GODDAMN NOTES WHAT THE SHIT.]
hi! i am happy you liked it 💗💗😭😭
unfortunately it's something i cannot share because, well, it's something i worked a lot for.
it's not that i dont encourage inspo/asking for help, it's just that with experience you find a style that's unique to you and expresses you!
however, here are some really good overlays i reccomend using for a similar style!
remember to grayscale all of them before you apply a blending mode! that's what i mostly do, no pressure.


example:

if you want a tutorial for how to use blending modes and stuff, and how to mess around with filters, do let me know!
#♡̵ ⠀⠀・ ⠀⠀pupsec ⠀⠀ᜑ⠀⠀💗꣒#♡̵ ⠀⠀・ ⠀⠀edits ⠀⠀ᜑ⠀⠀💗꣒#♡̵ ⠀⠀・ ⠀⠀requests ⠀⠀ᜑ⠀⠀💗꣒#♡̵ ⠀⠀・ ⠀⠀resources ⠀⠀ᜑ⠀⠀꣒#rentry#rentryblr#rentry resources#rentry stuff#rentry icons#rentry overlays#rentry overlay#overlay#overlays#editblr#editblr resources#editblr help#editblr stuff#editblr tutorial#tutorial#rentry tutorial#editing tutorial#hyacine#hsr#hsr hyacine
288 notes
·
View notes
Text

PRAYSIA. An editing resource sideblog. See under cut for further information and helpful links. We do all our editing in Photopea.
OUR TO-DO. RENDERS DRIVE.
Inbox is always open for questions. Want to Request?
Helpful Links: Upscale Images, Image Splitter, PhotoMosh, Text Symbols, UniCodes, Word Combiner, Remove Gif Background, Download Videos from MOST Sources, Gradient Maps, Tons of Laces.
Tutorials: How To Mask Renders via Critical Galaxy, Photopea for Dummies.
Misc Help: Site that has TONS of PNGs.
This will be updated as needed, so be sure to check back before asking for something please!
If you know us, it is likely from our past edit blogs @necromii, doveish and v-rtue, none of which we use anymore.
#𐐪 asks.#𐐪 tutorials and help.#𐐪 important.#𐐪 from praysia.#𐐪 by praysia.#𐐪 from [user].#𐐪 by [user].#𐐪 chatting.#𐐪 praysia's renders.#𐐪 promo.#⠀⠀⠀⠀⠀⠀⠀⠀⠀#transparents#dividers#frames#masks#psds#gifs#buttons#stamps#pixels#pngs#overlays
270 notes
·
View notes
Text

KNiFELACE ──── a(n edit) resource blog run by @chocospresso .

𓊆 my neospring . if you wish for me to delete a post / reblog , let me know .

#𓊆 ✑ 𓊇 posts.#𓊆 ✑ 𓊇 asks.#𓊆 ✑ 𓊇 reblogs.#𓊆 ✑ 𓊇 not resources.#𓊆 ✑ 𓊇 transparents.#𓊆 ✑ 𓊇 masks.#𓊆 ✑ 𓊇 pfp masks.#𓊆 ✑ 𓊇 banner masks.#𓊆 ✑ 𓊇 dividers.#𓊆 ✑ 𓊇 lace.#𓊆 ✑ 𓊇 frames.#𓊆 ✑ 𓊇 backgrounds.#𓊆 ✑ 𓊇 psds.#𓊆 ✑ 𓊇 gradient maps.#𓊆 ✑ 𓊇 overlays.#𓊆 ✑ 𓊇 fonts.#𓊆 ✑ 𓊇 tutorials.#𓊆 ✑ 𓊇 websites.#𓊆 ✑ 𓊇 graphics.
65 notes
·
View notes
Text
Updating... The Tattooer (ver. 3.4)!

Finally! Took me a while, huh. This is the updated version of the Tattooer project. It skips some steps, making the workflow much, much faster! Huge thanks to @applewatersugar for his suggestion on how to bake textures while preserving the transparency. This is kind of a repost of the original Tattooer post, but it actually has some new stuff and a few changes here and there, so please take a look if you want to learn how to use this new version.
This is a series of Blender template files already set up to quickly bake textures from The Sims 4 to The Sims 2. The different Blender files will allow you to: -Bake body textures from TS4 to TS2 (Female) -Bake body textures from TS4 to TS2 (Male) -Bake body textures from TS4 (Female) to TS2 (Male) -Bake body textures from TS2 (Female) to TS2 (Male) [Bonus!] -New! Bake face textures from TS4 to TS2 (Unisex) [Bonus!] -Bake head textures from TS4 to TS2 (Face + Scalp) (Unisex) [Still experimental] Check the file names to see which one is which, and the resolution of the baked texture it will give. Everything you see in the render above was 100% converted using those Blender files.
Download here! SFS / GD
Update: Version 3.4.1 (27/08/2023) Fixed some issues on the shoulders for the AF-body-4t2-1024 and AF-body-4t2-2048 templates. Now the top straps on most converted underwear/swimwear should look right.
Update: Same version (13/12/2023) As requested, added a new spanish version of the included pdf guide!
These templates were made mainly to bake and convert tattoos, but there’s more you can do with them if you get creative. I have to say, these are NOT perfect. Results may vary depending on what you are trying to convert, so! With that in mind, this is all the stuff you will be able to convert almost seamlessly from TS4 to TS2: -Tattoos. -Other body details such as body hair, scars, freckles, supernatural/occult details… -Body painted underwear and swimwear, as well as some other clothing that’s mostly painted on the body. -Socks, stockings and maybe leggings. -Even skintones! In some areas they will look weird, so I recommend editing and blending them with other existing TS2 skins. -Makeup, eyebrows and beards. In the old version this was just a proof of concept, but now I’ve added a new Face file template which gives some pretty decent results! -Hair scalps. Very useful when converting some hairs! Although keep in mind part of that texture might also need to be baked on the face mesh, you know, that hairline makeup stuff.
Got your attention? Nice! Editing some of the textures from TS4 to match the UV mapping in TS2 using a 2D editing program can be incredibly hard. That’s where texture baking in Blender comes to the rescue!
You will need to download Blender, at least version 3.4, but you could always use a newer version. It is only incompatible with versions older than 3.4. -You can download Blender for free here. -You will also need Sims 4 Studio to extract the original Sims 4 CC textures you want. In the first version of these Blender files, there was a necessary step using Photoshop, but that’s no longer needed. However, there’s still a tiny extra step which requires resizing the newly baked texture on some of the high resolution templates, so you might need a 2D editing program like Photoshop. More on that later.
So, before we begin, let’s clear out some questions you might have. What the heck is this texture baking thing and what does it do? Well, let’s imagine you have a video projector and point an image into a blank wall. Then you pick up some brushes and start painting and copying that projected image in that wall. Texture baking is kinda like that when it comes to 3D models. You align two models and match them as closely as you can in shape and form, and once you adjust some parameters and values, Blender does the rest for you: it will give you a new texture for a new model with a different UV map. These files I’m sharing have everything already set up, so it’s a matter of plopping in that Sims 4 texture and you will get that new texture for TS2 in just a few clicks.
This tutorial assumes you know literally nothing about how to use Blender, so if you feel uncomfortable with it, worry no more! This will guide you with pictures showing where you need to click and explaining what is happening. For Sims 4 Studio and Photoshop the process might be a bit less detailed, but still this should be pretty beginner friendly. For this tutorial, I will use some tattoos as an example (properly credited at the end of the post). Alright, enough with the rambling. Let’s get started!
·EXTRACTING TEXTURES IN SIMS 4 STUDIO: First things first, you will need to extract as pngs all the textures you want to convert from TS4 using Sims 4 Studio. It should be pretty straightforward. Just open the packages and export the Diffuse textures. Keep them organized in a folder for easy access.
·BAKING THE TEXTURES IN BLENDER: PRELIMINARY STEP 1: CONFIGURING BLENDER’S GRAPHICS SETTINGS: Open your preferred Blender file depending on what you’re going to bake and the desired resolution (in this example I’m going to use the AF-body-4t2-1024 file). Before we start messing around in Blender, there’s one thing you should set up. It is a onetime step, and once it’s done, you won’t need to do it again. So, does your computer have a dedicated graphics card? If you don’t know or you’re not sure, just skip to the next step. Configuring Blender so it uses your graphics card instead of your CPU will make the baking render much faster, so it is recommended you set it up correctly. If your computer has a dedicated graphics card, click File (1) > Preferences (2) > and on the window that pops up click System (3) > and select CUDA and make sure your graphics card is there and tick it (4). I have an Nvidia Graphics card but your case may vary. Once you’re done, click on the tiny button on the bottom left corner and Save Preferences (5).

PRELIMINARY STEP 2: CHOOSING THE RENDERING DEVICE: Click on the tiny camera button on the right, called Render Properties (1), and on Device (2) select GPU Compute if it’s not already selected. If you’re not sure if you have a graphics card or not, just select CPU. Then select the Material Properties tab (3) and Save your changes, either by pressing Ctrl + S, or clicking File (4) > Save (5). You might need to do this second step with the other Blender files, but once you have it done and saved, you won’t need to do this again. Okay, time to get into the good stuff!

·STEP 1: LOADING YOUR TS4 BASE TEXTURE: In the Material Properties tab, click the folder icon that says Open (1) and on the window that pops up, navigate through your folders and select your first texture. To navigate easily, the 3 buttons on the top right (2) are for the display mode. They will show your files in list mode, vertical and horizontal, and the one on the right will display the file thumbnails, pretty useful if you want to easily preview your textures here. The icons on the left side (3) will let you go one folder back and forward, go to the parent directory, and refresh the folder in case you just dropped something new in there. Double click on the image you need and that will load the texture into the Sims 4 body model, named “ts4 body”.

·STEP 2: SETTING UP YOUR SELECTION AND BAKING THE TEXTURE: On the top right of the screen, you will see the names of the 2 models in the scene. Hold the Ctrl key in your keyboard and left click on the “ts2 body” model (1). If you did it correctly, you should see “ts2 body” in a yellowish orange color, and right down below, “ts4 body” should look more like a red orange. If not, try again by clicking first on ts4 body, and then while holding Ctrl click again on ts2 body. Then switch to the Render Properties tab by clicking the tiny camera icon (2) and click Bake (3). Depending on your screen resolution, you might need to scroll down a bit with your mouse to see the Bake button. Wait a few seconds for it to finish. You will see the progress percentage down on the bottom of your screen. Don’t panic if you notice your computer fans start ramping up, that’s completely normal! As I said in the beginning, using your GPU will bake the textures much faster than the CPU.

·STEP 3: SAVING YOUR NEW TS2 TEXTURE: Once it’s finished, switch to the UV Editing Mode by clicking “UV Editing” on the top of your screen. And there it is: your new texture! You might have to scroll up your mouse wheel a bit to zoom in and see it in all its glory on the left side of the screen. We’re still not done yet though. You need to save it to yet another new folder (always try to keep your stuff organized!).

You can save it by pressing Shift + Alt + S, or clicking on Image* (1) and then Save As… (2). That will pop a window where you’ll need to navigate again and save it somewhere. Give it a proper name (3) and hit Enter to save it… well, Enter doesn’t always work for me for some reason, so if that happens just click Save As Image (4). And that’s it! You’ve successfully converted your baked texture. Congrats!

·STEP 4: GOING BACK TO STEP 1: Alright! If you’re done with your textures, you can close Blender without saving and call it a day. But let’s say you want to keep baking other swatches. In order to go back to step 1 and start the process once again, click Layout (1), go back to the Material Properties tab (2), select “ts4 body” (3) and click on the folder icon (4) to open and load your next swatch.

Then it’s just a matter of repeating the process from step 2. When you’re ready to move on, close Blender without saving. If you see a small check telling you it will save some images, make sure you uncheck it, so you will be able to use it again in the future from the starting point with no issues. I don’t think it really matters if you accidentally save your progress in these files, but I like to keep it clean and fresh so I can do the process where I left it from the beginning next time I open it. And in case you mess up and save somewhere, you can always just delete the .blend file and download the template files again.
In case you’d like a video tutorial on how to use these files, the amazing @platinumaspiration recorded this fantastic video showcasing the process! You can watch it here.
One final note: some of the baking .blend files save the textures with a resolution of 2048x2048 pixels, as clearly stated at the end of their file name. That’s way too overkill, because TS2 only properly supports up to 1024x1024 for most of its textures and you should always resize your final product to that max resolution (or lower if needed). I just made those 2048 versions because there might be some really tiny and slim details on some tattoos that might look a little too blurry when baked into a 1024 resolution texture, so for those cases use that if you want and then resize them using your 2D editing software of choice. In Photoshop, in the Resample mode of the Image Size menu, there are a few options to choose. For the fine details, I like the Nearest Neighbor (hard edges) option, which, even if it looks a bit pixelated, it still preserves most of the texture and quality.

For anything else, I would just directly bake them using the 1024 versions in Blender (512 for the face and scalp).
And for the folks who feel comfortable playing around in Blender, this is just the beginning! Texture baking opens a LOT of possibilities, so feel free to move stuff around and edit the models to your liking! If you notice the baked textures look warped or stretched somewhere, or don’t like where some textures are placed in the S2 body, poke around that area moving stuff and then give it another try. The main objective of the baking process is keeping both overlapping models as close in shape as possible. You may also edit and save new copies of the templates, or make new ones from scratch using mine as a reference (keep a close look on those Baking settings and values, I think they work pretty well) and share them if you want to. Go ham, do whatever you want with them! I still have plans on making templates to convert body textures from Sims 3 to Sims 2, but for now it’s not on my priorities, so we’ll see when that happens.
Whew! Hope none of this was too confusing. Need help or have any issues with these? Please ask/message me here and I’ll be glad to help when I’m able to!
Credits for the CC used in the render demonstration: -Skin by Sims3Melancholic. -Eyes by Northern Siberia Winds. -Eyebrows by PeachyFaerie. -Tattoos by xtc. -Top by SerenityCC. And the Tattoo I used for the tutorial can be found here, by ValhallanSim.
Last but not least, a huge thanks to all the people who somehow contributed to make this project and update possible, either by doing initial testing, finding issues to fix, or teaching me new Blender tricks to make the workflow way faster and easier. So thanks again to @elvisgrace @moyokeansimblr and @applewatersugar on Tumblr! <3
And thank you for reading! Hope you have fun playing with this (not so) new toy hehe.
#tattooer project#tattooer update#ts2 tutorial#ts2 resources#ts2 blender#ts2 overlays#ts2 texture baking#4t2 conversion tutorial#this took me so LONG to update#im really sorry for the delay :(
408 notes
·
View notes
Text


POLARR FILTER QR CODES!
( created by @lovelogs on polarr and pinterest| xlovelogsx on ig)
#polarr code#polarr filter#bts headers#bts icons#kpop icons#black moodboard#messy icons#kpop layouts#users#icons#icons with polarr#moodboard icons#coloring tutorial#coloring#editing tips#editing#dark academia#dark moodboard#gothcore#cyberpunk 2077#webcore#psd coloring#psd download#psd resources#free psd#photopea psd#pngimages#cute pngs#overlays#texture
32 notes
·
View notes
Text
welcome to rentrysources !

A blog that's dedicated to finding, archiving and posting rentry resources!
psd is sea glass by canarysagepsds
#🪭 tumblr layouts#🪭 discord layouts#🪭 blinkies#🪭 masks#🪭 gifs#🪭 templates#🪭 psds#🪭 pngs#🪭 tutorials#🪭 graphics#🪭 raw resoures#🪭 stamps#🪭 overlays#🪭 renders#🪭 pixels#🪭 dividers#🪭 shiny buttons#🪭 resources#🪭
22 notes
·
View notes
Text

WELCOME TO ❝OCEANICVIRTUE❞
THIS BLOG IS FOR REBLOGING RENTRY RESOURCES SUCH AS
⊱ masks◞ symbols◞ graphics◞ dividers◞ psds◞ pixels◞ etc.
NOTHING I REBLOG BELONGS TO ME, PLEASE CREDIT THE CREATORS WHEN CREDIT IS NEEDED .ᐟ
𓄲 TAG KEY
#⚘ masks
#⚘ symbols
#⚘ graphics
#⚘ dividers
#⚘ psds
#⚘ pixels
#⚘ tutorials
#⚘ frames
#⚘ pngs
#⚘ stamps
#⚘ promo
#⚘ overlays
if a tag you're looking for isn't here, I haven't reblogged anything of it yet, with the exception of blinkies and buttons (blinkies and buttons fall under 'pixels'!)
#⚘ masks#⚘ symbols#⚘ graphics#⚘ dividers#⚘ psds#⚘ pixels#⚘ tutorials#⚘ frames#⚘ pngs#⚘ stamps#⚘ promo#⚘ overlays
63 notes
·
View notes
Text
bbngh…
Trying something new.
Traced over a redraw of smth i did during english class. Not the original bc apparently i had to turn in the page i drew it on. Lowkey forgot to write my name on it so idk if im getting it back lol
this style is inspired by a ton of people, all of whom i forgot the names of TwT
#airy hfjone#hfjone fanart#hfjone#hfjone airy#Lowkey kinda love the chunky arms and legs#maybe not the angular lines as much but its still cool#Oh yeah the tutorial i used for the paper overlays was from cheesyx33 on yt!!#Scribbles of the phoenix
12 notes
·
View notes
Note
hi, this edit is cool, would you please tell me how do you make the circle shape and text like that in the second gif?
https://mikelogan.tumblr.com/post/727834848573669376/forgiveness-is-warm-like-a-tear-on-a-cheek-think
hi!! i'm so sorry this took me so long to answer, but i've hardly been on my desktop for the last couple months and haven't been giffing. finally getting around to this and thank you for the kind words!

in this tutorial, i'll show you what i did as well as another way to achieve the same effect:
once you've made your gif and colored it the way you want, you can get the circle effect one of two ways. i'll show you how i did it first and then a more "normal" way lol
i actually had this circle texture laying around and for whatever reason, i decided to use that. so i popped that onto the canvas and used ctrl+T to center it both vertically and horizontally
then i used a glitter texture over the top of the circle layer and applied a clipping mask so that the glitter only shows up on the circle and not the entire gif. to do this, make sure your glitter (or whatever texture you decide to use) layer is ABOVE the circle and then right-click on the glitter layer and select "create clipping mask." you should see this lil arrow on the layer now:
as a quick note about textures/overlays: chances are that if you just google "glitter texture png" or something similar, you'll find tons, but the png portion is important because pngs have transparent backgrounds. this wouldn't work if the circle texture was a jpeg because its background is not transparent and the overlaying of the glitter texture would appear on every pixel, basically just taking the shape of the entire jpeg rather than just the circle.
i have a resources (basically anything downloadable, from overlays to actions to psds) tag on my gifmaking sideblog as well as one specifically for textures and overlays. i also utilize the websites freepik, pngegg, and pngwing for pngs (especially freepik).
to make the glitter layer the same pink/purple color i used, i ended up using a hue/saturation layer above it and also applied a clipping mask to that layer so it only affected the glitter layer. this step is totally optional depending on the coloring you're going for. you might be happy with the glitter texture exactly as it is. you could also skip the hue/saturation layer and instead apply a color overlay to the glitter layer, select the color you want, and set it to screen or another similar blending mode. to do this, double-click on the glitter layer, select color overlay from the menu, choose whatever color you want, make sure the opacity is set to 100%, and adjust the blend mode to whatever you think looks best.
the "normal" way to do the circle would just be to use the ellipse tool (right-click on the rectangle tool and choose ellipse) and input your desired dimensions. to get a perfect circle, the width and height have to be the same as one another. then you'd continue on with the rest of the process.
for the text, create your main text layer. these were my settings for a 540px canvas:
i also added a drop shadow to the layers with these settings (double-click the text layer to bring up this menu):

then i duplicated the text layer 6 times. select the first duplicated layer (the second line), use ctrl+T and your arrow keys (i only used the down arrow) to move the text down the desired amount of space. i made sure i moved each line down exactly 25 pixels, which is equal to 25 presses of the down arrow. i just think it looks nice when they're equally spaced. with each subsequent layer, i just dropped the opacity.
starting with the original text layer, i used: 100% -> 80% -> 60% -> 40% -> 20% -> 10% -> 5%, but this was just my personal preference.
anyway, that's pretty much it! but if you have any additional questions on this tutorial or any other set, just send me a message and i'll do my best to get to it much quicker than this one 💙
27 notes
·
View notes
Text
A little preview of something I’ve been working on ❤️♌️
•
Guess I’ve been feeling nostalgic as I’m redrawing my Legacy of Winx OC’s AND reanimating my Sailor Senshi OC, Leo! I suppose I really meant it when I said I was going to learn OpenToonz since my CSP license is about to expire, I might even fully switch over!
•
Would y’all like to see a process/comparison video? The initial plan was to post a comparison gif like I did in 2019, but I love sharing my processes when it comes to art 🤔🤔🤔
⬇️Comparison gif under the cut anyway ⬇️

#after I finished that Flybeau animation I started watching more OpenToonz tutorials#and came across NobleFrugal’s Texture-in-Color which was the impetus for this project#because my biggest gripe with doing it before was how much labor it was overlaying the moving body texture with the BG#but with the FX nodes in OT and can just key it in and drop in the background!#Also also that retro looks I’ve been struggling to get in Davinci I can fully do in OpenToonz!#I just have to get OUT of the habit of turning off my tablet when I’m done drawing because my phone and tablet screens are more alike#my monitor has blue cast and a slightly lower resolution so the retro effect is dulled when I transfer it over to my phone#my art#digital art#fan art#fan animation#opentoonz#opentoonz animation#digital animation#hobbyist animator#amateur animator#sailor moon#sailor moon oc#sailor senshi#sailor soldier#zodiac soldier: Leo#retro anime#retro anime aesthetic#do NOT ask why I put Leo in the 4th house I don’t remember but it was in the storyboard#music and sound fx sourced from Sailor Moon Classic!#except for 2 specific sounds which come from Tropical Rouge: PreCure ❤️#I’d like to finish this before my birthday#but with less than three weeks before my internship I’d really like to use the rest of June for cosplay and sewing projects#I also have an embroidery commission that I should finish the bulk of before I leave#so this will just have to wait for now
10 notes
·
View notes
Text


a blog for editing resources, including overlays, cutouts, line stickers, psds, tutorials, etc. run by @/grimescum. how to request
please at least skim over everything under the cut. if you dont, i reserve the right to be a little bit of a bitch about it
( ! ) message board –
jan 14 📌 updated tag list!
jan 4 📌 inbox & requests back open!
📌 donate to my ko-fi if you'd like! ♡
( ! ) content – with the exclusion of graphics taken from picsart and occasionally pinterest, i only upload raw, unedited graphics to be used in edits.
– the same generally applies to images of characters; i don't upload cutouts of fanart unless the artist has given permission for their artwork to be reuploaded
– my crediting can be a little wonky at times, but i generally don't credit pictures sourced from large companies such as walmart.
– this blog has no queue, i post whenever i feel like it
( ! ) interaction – spam likes and reblogs are perfectly fine in moderation!! if you're going through an entire tag and liking/reblogging everything you see, i'll block you temporarily
– credit for my work is not necessary, but it is advised to credit the original creators for their work if provided.
– i block freely, mostly according to my main blog's dni. don't be stupid. this also includes r4dqueers and pr0ship.
( ! ) other asks – i read them all! kind comments are part of what keeps me going, so regardless of how quickly i respond to them, know i appreciate every single one deeply.
– you can also ask for a promo!
( ! ) requests – i take requests for finding pngs of or based on whatever you give me, be it a character, prompt, aesthetic, image, etc.
– i'm selective about what i choose to do, so please don't be upset if i decide not to. it's nothing against you personally.
blacklist, media i won't do or will be very picky about: d/smp or related, genshin impact or anything by hoyoverse, kp0p, harry p0tter, p0rn (because of guidelines)
whitelist, media i will do no matter what: any of the fandoms im into!
– i'll also try to find the source of any image you send to me if you can't or don't feel like doing it yourself.
– i have autism, so being as specific as you can helps a ton! there is a difference between edits "based on" and "of" a character to me. also, if you want a certain kind of graphic (ie. a drawn divider rather than an image cutout), please do clarify that
( ! ) tag directory – under construction! a new tagging system is coming soon. for now, please refer to my rentry.
edited by me, fandom, inspo, made by me, op talks, promos, psds, reblogs, resources, tutorials
backgrounds & images, banners/headers, basics, borders (cutouts), borders (drawn), colorable, cutouts, digital scrapbooking, digital stickers, dividers, drawings, fonts, frames (cutouts), frames (drawn), gifs, icons, masks, overlays, patterns, templates/bases, textures
from canva, from flaticon, from google drive, from line, from picmix, from picsart, from pinterest, from pngwing, from roblox
aesthetics
( ! ) miscellaneous links – other links worth putting here.
archive this blog! internet archive (no dl) grab-site (dl) archive bot (dl) httrack (dl) imgdownloader (no dl)
posts 99 resource sites my psds
more resources eros' resources pluto's resources
my resource drive (decode from base64 to get link) aHR0cHM6Ly9kcml2ZS5nb29nbGUuY29tL2RyaXZlL2ZvbGRlcnMvMUxDUGEyV3JnZFpVdHFvNVVPeVZYLTJCWHpJTnVZQVJD
#!! .rblgs#!! .edited by me#!! .inspo#!! .tutorials#!! .psds#!! .op talks#!! .made by me#ℹ️ : masks#ℹ️ : borders (drawn)#ℹ️ : overlays#ℹ️ : cutouts#ℹ️ : digital stickers#ℹ️ : frames (cutouts)#ℹ️ : dividers#🔎 : from pinterest#🔎 : from picsart#🔎 : from canva#🔎 : from line#🔎 : from flaticon#ℹ️ : digital scrapbooking#ℹ️ : textures#❓︎ : text
34 notes
·
View notes
Text
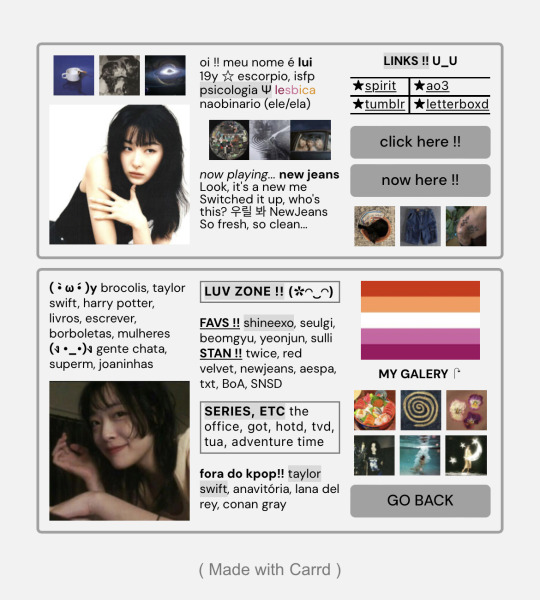
carrd inspo ## simple
#carrd#carrd inspo#kpop carrd#webcore carrd#carrd moodboard#messy locs#caard#card#blue carrd#carrd icons#carrd inspiration#carrd stuff#carrd material#carrd bios#carrd tutorial#carrd.co#carrds#carrd resources#carrd layouts#carrd overlays
152 notes
·
View notes
Text


I said I wasn't going to color this but awh it's like my own personalized color book if I think about it
#ok i was saying. tried to watch coloring ans oainting tutorials several times but they dont make much sense to me. like idgi#im gonna follow my heart... also hate the accidental pink overlay on larkies hair :< we arevery blue coded. but just this once#anyhow this doesnt get any less embarrassing sobss#જ⁀➴sketchbook.
9 notes
·
View notes
Text
my friends were so nice to me and sold me their old ipad for pretty cheap so i could have a bigger screen to do art with
holy shit the last apple product i owned was a shitty ipod nano and these things are not intuitive at all
#i have to??? double press the home button to close any apps#which i onlt figured out after randomly pressing and swiping things#theres just. no basic tutorial on how to use this thing#i cant figure out if theres a page that just shows all my apps or if thats only side swiping to find them#i also cant find the overlay that lets me like. adjust brightness and turn on/off bluetooth wifi etc#jay rambles
7 notes
·
View notes
