#classmethod
Explore tagged Tumblr posts
Visit Tumblr Blog
Explore Tumblr blogs with no restrictions, modern design and the best experience.
Last Seen Tumblr Blogs


Fun Fact
25% of US internet users with an annual income of $80-100K use Tumblr.
Text
0 notes
Link
0 notes
Link
Get graduate-level method actor training online, based on decades of professional acting and teaching experience. The Master Course delivers a complete holistic system of acting, and short courses boost your industry skills - including American accents.
2 notes
·
View notes
Text
cursed by __get__ magic to never get an instance
1 note
·
View note
Photo

JavaScript ES6 syntax part 2. This is the second part of our es6 syntax in our Javascript Quick guide series.It is a continuation of where we left in part 10 of this slides tutorial sets. In this post we discuss the new class feature added in Javascript in ES6.The classes make development of applications in much better way without touching the bare bones of prototype inheritance.Yes,it's a syntactic sugar over the prototype,but we really don't get caught up in the work around to implement OOP features by using the prototype.You actually work the way you do in Java with afew exceptions,but the syntax is almost similar now with the block level scope introduced through let and const variable declarations. This part touches afew areas on classes. Enjoy the reading #javascript #oopinjavascript #es6syntax #objectorientedprogramming #javascriptclasses #javascriptobjects #classexpressions #namedclassexpressions #unnamedclassexpressions #classmethods (at Lilongwe, Malawi) https://www.instagram.com/p/B9U-l9yBDMW/?igshid=18pjttblw6rre
#javascript#oopinjavascript#es6syntax#objectorientedprogramming#javascriptclasses#javascriptobjects#classexpressions#namedclassexpressions#unnamedclassexpressions#classmethods
0 notes
Link
3 notes
·
View notes
Text
0 notes
Text
Python classmethod() Function with Examples
Python classmethod() Function with Examples
In this tutorial we are going to talk about the python classmethod() function with examples. Getting Started Python classmethod() function is another built-in function that transforms a simple function or method into a class method. It is similar to object method in Object Oriented Programming. Syntax of classmethod() Function The syntax of classmethod() function in Python is shown below…

View On WordPress
0 notes
Text
Advanced Python Interview Questions
Besides coding knowledge, hiring managers look at candidates’ ability to answer complex questions and think on their feet. They look for the certainty that developers are agile and will not duplicate functionalities.

Below, we list a few python advanced interview questions and answers that candidates can prepare for interviews.
1. What are virtualenvs?
Answer: Remote Python developers refer to a virtualenv as an isolated environment to develop, run, and debug Python code. You can achieve this by isolating a Python interpreter, together with a set of libraries and settings. Alongside pip, virtualenvs helps developers run and deploy many applications on a single host. Each one contains a Python interpreter version and a separate set of libraries.
2. What are the Wheels and Eggs? What is the difference?
Answer: Wheel and Egg are packaging formats that support the use case of needing an install artefact without building or compilation – otherwise costly in testing and production workflows. Setuptools introduced the Egg format in 2004, while PEP 427 introduced the Wheel format in 2012. Wheel is the current standard for built and binary packaging for Python programming language.
3. What are the usages of nonlocal and global keywords?
Answer: Developers use the nonlocal and global keywords to change the scope of a previously declared variable. Developers use nonlocal to access a variable in a nested function. On the other hand, global makes a previously-declared variable global. It’s a relatively straightforward function.
4. What is the function of self?
Answer: As a variable, self represents the instance of the object to itself. Typically, most object-oriented programming languages pass on this method as a hidden parameter defined by an object. However, in Python programming language, the variable isn’t implied. It is declared and passed explicitly. It is the first argument created in the instance of the class A. Consequently, the parameters to the methods are passed automatically.
5. What is the difference between classmethod and staticmethod?
Answer: Both refer to a class method that can be called without instantiating an object of the class. The only difference lies in their respective signatures.
6. What is GIL? What are the ways to get around it?
Answer: GIL or Global Interpreter Lock is a mechanism Python uses for concurrency. One of its biggest drawbacks is that it locks the interpreter, making concurrent threading difficult. The process can result in major performance losses.
7. What are metaclasses, and when are they used?
Metaprogramming in Python is a vast and intriguing topic. Metaclasses refer to classes for classes. A metaclass can ascertain a common behaviour for many classes – specifically in cases when inheritance will get messy. An example of a metaclass is ABCMeta, which creates abstract classes.
8. What are generator functions?
Generator functions can suspend their execution after returning a value. They resume at a later time and return another value. Use the yield keyword instead of return to make this possible.
9. What are decorators in Python Programming?
Python developers use decorators to modify the behaviours of functions. Decorators come prefixed with the @ symbol and placed right before a function declaration.
10. What is pickling and unpickling in Python?
Pickling is another word for serializing. Pickling is a process that allows you to serialize an object into anything you choose – a string, for instance. The function enables objects to be persisted on storage or sent over the network. On the other hand, unpickling restores the original object from a pickled string.
0 notes
Quote
作ろうとしたもの 対話の機会を作ることで企業カルチャーを強化する シンプルなクラウド社員名簿 日々のステータスを登録可能、健康状態や調子がひと目で分かる 社員同士で感謝を伝え合うことでコミュニケーションを促進 社員が急増しコミュニケーションが課題になってきている20名〜300名程度の中小企業向け 作ろうとしなかったもの 人事労務管理の機能は持たない 人材採用や育成、教育の機能は持たない 直接的なコミュニケーション機能は持たない その他、複雑な機能は持たない 作ったもの メンバー同士が対話するための情報を簡易に入手出来る メンバーが他のメンバーに対して関心を持つきっかけを作る メンバーが他のメンバーに対して関心を持っていることを可視化する 作ったことによる成果 新しいメンバーのことを誰もが簡単に知ることが出来るようになりましたし、新しいメンバーも既存メンバーのことを簡単に知ることが出来るようになりました。全メンバー参加可能なLT大会等のイベントでは、スピーカーが他部署の人でもその人となりを知ることが出来ます。 クラスメソッドでは「誰とでも1on1」という制度があり、部署を跨いだ1on1のリクエストがあるのですが、事前に相手のプロフィールを把握することでスムーズに雑談出来るようになりました。日々のステータス登録によって、その人の体調や調子が把握できるようになりました。��味用のSlackチャンネルでは、会ったことのない他部署の人とも気軽に雑談出来ますし、必要あれば相手のプロフィールを確認することで、相手のことをもっと良く知ることが出来ます。
クラスメソッドが抱えていた組織の悩みを解決したProflly | DevelopersIO
0 notes
Link
0 notes
Text
Favorite tweets
Zennは個人開発を脱却してクラスメソッド社のサービスとなりました。 僕は引き続きZennの開発を続けます。 🐥 ZennとClassmethodhttps://t.co/jpes7Kbdpz
— catnose (@catnose99) February 1, 2021
from http://twitter.com/catnose99 via IFTTT
0 notes
Text
AWS Access Keyを外部に公開してしまった話
こんにちは。テクノロジーセンター・SRE Unitのイ・グンジェです。
今回、AWS Access Keyを誤ってGithubにPushしてしまった事故(?)があり、 それに対する備忘録と再発防止対策についてお話したいと思います。
やらかしたこと
AWS による漏洩通知と対応内容
AWS からの通知後にやったこと
再発防止策としてのgit-secrets導入
git-secrets 基本設定
git-secrets 高度な設定
git-secrets をテストする
まとめ
やらかしたこと
medibaではサービスごとにAWS Accountを分けているため、 複数のAWS 環境が存在しています。
全てのAWS環境にあるEC2の情報を一目で把握したかった私は 全てのAWS環境からEC2の情報を取得するPython Scriptを書くことに決めました。
Boto3 SDKを利用して、EC2情報を取得するScriptを作成した私はテストのため、 テストScriptを作り、AWS Access Keyを書き込んで動作確認をしていました。
作業途中、もっと大きいモニターがあるPCで作業したくなって��� Githubにコードを上げて自由に作業環境を切り替えるのを考えました。
コードを上げるためにGitHub Repositoryを準備し、 .gitignoreファイルに用意してテストScriptは除外されるようにしてからGithubにコードをPushしました。 (テストで書いたScriptにはAWS Access Keyが書き込んでいるため)
しかし、何と。。誤字が入ってしまい、 テストScriptもPushされてAWS Access Key公開されてしまいました。。。!
AWSによる漏洩通知と対応内容
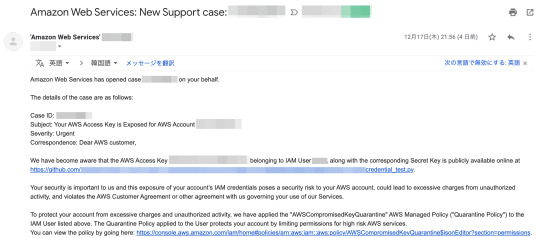
GithubにAccess Keyの情報を上げるバカなことのやったのは12/17 21:55頃。
その後、AWSからAccess Keyが外部に公開されたというメールが届いていました。 メールには不正アクセスによる課金などを防ぐために隔離ポリシーを対象Userに付与したという内容も書いてありました。

CloudTrailからもAWSCompromisedKeyQuarantineポリシー付与のログが確認できて、 UserやRole、EC2インスタンを作成する権限が全部拒否されていました。
さらにこのポリシーは"iam:DetachUserPolicy"を持っているため、 付与されたUserが直接Detachするのもできない状態でした。

また、AWSのサポートチケットがOpenされたとのメールも届いていました。
AWSからの通知後にやったこと
まずはAccess Keyが無効化されているのを確認して削除しました。
そして、公開されてから悪用の行為はなかったのかCloudTrailでログを確認してみました。
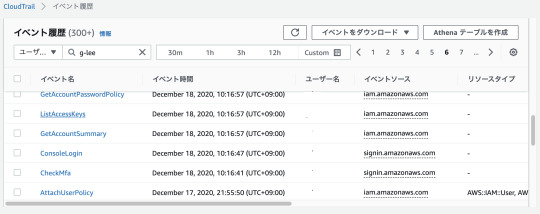
12/17 21:55頃Access Keyの公開が認識され、AWSCompromisedKeyQuarantineポリシーが Attacheされた以降、特にUserとかRoleが作成されてリソースが追加された履歴はありませんでした。 (12/18の履歴は私が挫折して彷徨した履歴です。)
悪用の履歴はなかったため、他のチームメンバーにお願いして AWSCompromisedKeyQuarantineポリシーをDetachし、新しいAccess Keyを作成しました。
再発防止策としてのgit-secrets導入
この事故で迷惑をかけてしまった私は恥ずかしいと思いながら、 今後同じ事故を防ぐためにどのような対策があるか考えてみました。
言うまでもなく当たり前なことですが、コードに直接Access KeyとSecret Access Keyを 書き込まないとか.gitignoreでRepositoryに上げるファイルを制限する��法などがあると思いましたが、 今回の事故のように誤字を入力するなどの人災により.gitignoreの制限が無効化される場合があるため、 もっと確実な方法が必要だと思いました。
その時、優れたスキルを持っていつも色んな情報を共有してくれていたメンバーが git-secretsについて紹介してくれました。(ありがとうございました!)
git-secretsはcommitやcommit messagesをScanして 正規式にMatchされるのパターンがあればcommitをrejectしてくれるツールです。
参考 : git-secrets
また、Classmethodの記事にもgit-secretsを紹介していて、 導入した内容もあったので参考しながらgit-secretsを導入してみました。
git-secrets基本設定
git-secretsをインストール
# brew install git-secrets
git-secret messageをhookするためにgit hookをインストール
# cd /path/to/my/repository # git secrets --install ✓ Installed commit-msg hook to .git/hooks/commit-msg ✓ Installed pre-commit hook to .git/hooks/pre-commit ✓ Installed prepare-commit-msg hook to .git/hooks/prepare-commit-msg
gitの設定にgit-secretsパターンを追加
# git secrets --register-aws # view .git/config [secrets] ★以下のような設定が追加される providers = git secrets --aws-provider patterns = (A3T[A-Z0-9]|AKIA|AGPA|AIDA|AROA|AIPA|ANPA|ANVA|ASIA)[A-Z0-9]{16} patterns = (\"|')?(AWS|aws|Aws)?_?(SECRET|secret|Secret)?_?(ACCESS|access|Access)?_?(KEY|key|Key)(\"|')?\\s*(:|=>|=)\\s*(\"|')?[A-Za-z0-9/\\+=]{40}(\"|')? patterns = (\"|')?(AWS|aws|Aws)?_?(ACCOUNT|account|Account)_?(ID|id|Id)?(\"|')?\\s*(:|=>|=)\\s*(\"|')?[0-9]{4}\\-?[0-9]{4}\\-?[0-9]{4}(\"|')? allowed = AKIAIOSFODNN7EXAMPLE allowed = wJalrXUtnFEMI/K7MDENG/bPxRfiCYEXAMPLEKEY
git-secrets高度な設定
上記の設定方法はrepositoryがあるDirectoryのLocal設定を参照するため、 他のrepositoryはgit-secretsが効かないです。
全てのrepositoryにgit-secretsを適用したい場合は--globalのOptionを付けてGlobal設定から参照できるようにする必要があります。 (これで既存のrepositoryはも��ろん、今後新しくCloneするrepositoryも適用されます。)
# git secrets --register-aws # view .git/config ↓ # git secrets --register-aws --global # view ~/.gitconfig
また、git hookは以下のコマンドでglobal設定しておくと、 新しいrepositoryができたらtemplateDirからhookを持って来るので自動的にhookの設定もできます。
# git secrets --install ~/.git-templates/git-secrets # git config --global init.templateDir ~/.git-templates/git-secrets
最後に、git-secretsの正規式からフィルタリングされたくない文字列がある場合は 以下のようにallowedを追加することで、無視するのもできます。
# git secrets --add --allowed (文字列)
git-secretsをテストする
インストール及び設定が完了して、repository全体をScanしてみたら、 以下のようにパターン分析を通してAccess Keyを見つけてくれました。
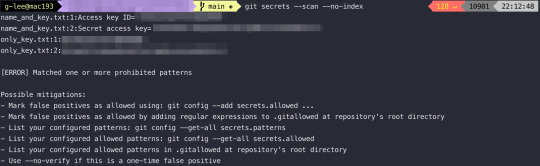
commitしてPushしようとしても以下のようにErrorのメッセージが出力されて、 Commitが拒否されます。
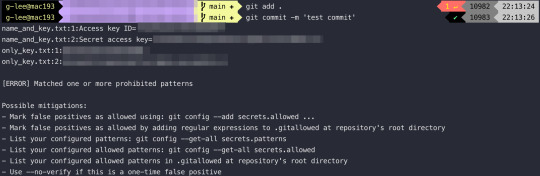
また、Visual Studio Codeでも以下の画像の通りErrorメッセージのModalが出て Commitが拒否されます。 (Sourcetreeではgit-secretsがうまく動かないようなので、別途で対応する必要があります。)
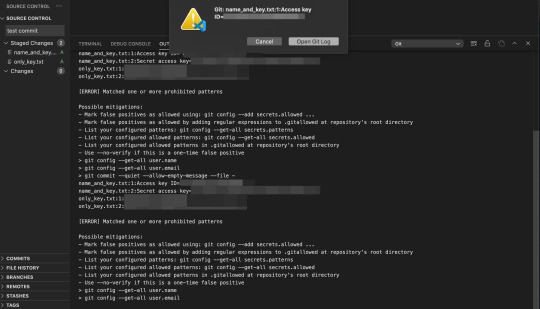
これで、Access Keyの情報が入っているファイルを誤ってGithubに上げようとしても git-secretsがちゃんとScanしてCommitを止めてくれることが確認できました。
これから、気づかずCommitしようとしてもgit-secretsがちゃんと止めてくれますよね。
まとめ
これで、私がAWS Access Keyを誤って公開したことから、 再発防止のためにgit-secretsを導入したことまでのお話をまとめてみました。
何よりもこの事故で驚いたのはAWS側からAccess Keyが外部に公開されたのを すぐに検知してCustomerに通知しつつ、隔離ポリシーを対象Userに付与するまでの対応がとても早かったということです。
GithubにAccess Keyが上がってから1分内で全ての対応が完了されていて、 そのおかげで大きな情報漏れ事故に繋がらず、収束できたと思います。
git-secretsを経験することができたのも楽しかったです。 インストールも思ったより簡単ですし、設定もテンプレートで すぐに追加できるので、誰でもすぐに使えるツールだと思いました。
やはり、個人勉強以外にも障害や事故でも学ぶことがあると思いました。
以上です。 次回は楽しい内容で戻ります。
0 notes
Text
Characteristics of Class, Instance, Object in Python
Python proqramlashdirma dilinde Class'in instance'i, yeni, object'i (qeyd: Mehz Class instance ve Class object Python proqramlashdirma dilinde umumi object yanashmasini nezere almadan, chox cuzi anlamda ferqli menalar kesb edir. Class ozluyunde bir konsept prototipdir, Class object data abstraksiyadir ve real Class copy'dir, hansi ki, main memory'de space allocate edir, Class instance virtual Class copy'dir ve Class'a referance'dir, hansi ki, __new__ method'u vasitesile referance edir.) yaradilanda, ilk novbede
__new__(creator) method-u chagirilir:
1. Onun uchun memory-de area ayrilir.
2. Bu object-in lib-leri, method-lari, __dict__-leri yaradilir.
3. Object-in referance deyeri artirilir.
Elave: __new__ - Class-in static method'dudur. Class-in ozunu temsil edir ve cls.cls parametr-ini teleb edir. Compiler, Class-in (exemplar or instance)-ini yarananda, bu parametri teqdim edir eslinde. Daha deqiq, class chagirilanda, __new__ method-u da chagirilir o an. Python'da __new__ method'unun rolunun yaxshi anlamaqdan otru Java'da bir kod fraqmente nezer salaq:
public class Base { int x = 7;
public static void main(String[] args) { Base myObj = new Base(); System.out.println(myObj.x); } }
Java'nin sintaksisinde explicitly new operatoru, Python'da implicitly __new__ method'u esas rol oynayir.
Eger, class daxilinde __new__ method-u varsa, o __init__ ve diger method-larin calling convection-unu, chagirilish ve ya eksini mueyyen edir. Class-in examplar ve ya instance-ini ele Class-in oz daxilinde super function istifade ederek: instance = super(Superclass, cls).__new__(cls, *args, **kwargs), ya da __new__ method-una direct muraciet ile: instance = object.__new__(cls, *args, **kwargs) create etmek olar.
__new__ minimum 1 argument qebul edir. Bu ise, class-in ozu olur.
Meselen: def __new__(cls, *args, **kwargs): return object.__new__(cls) cls - __init__ method-undaki self kimi parametrdir. Class-in ozunu bildirir.
Python2.2 versiyasina qeder (bu dovr old style'i ehate edir) esasen User defined ve Builtins class'lar ferqlilik teshkil edirdi. Python2.2-den bashlayaraq "object" daxil edilir (bu, new style dovrunun bashlangici idi). Pythonx.x < 2.2-e kimi old style bele idi - class Superclass:, new style ise object getirildiyine gore: class Superclass(object) formasinda. Python2.2-den new style-a daxil idi - 1) Descriptors support: 1) property - set, get, delete, 2) __slots__, 3) staticmethod, classmethod. 2) __new__ - static builtins method, 3) MRO(Method Resolution Order), C3(Linerization), LPO(Local Presedence Order), 4) super - builtins method.
class T(): pass
t = T() print(t)
class T1(object): pass
t1 = T1() print(t1)
Netice: <__main__.T instance at 0x7f9b196505f0> <__main__.T1 object at 0x7f9b1964d790>
Python3-de ise qismen ferqli. Bele ki, Python3-de object-den inheritance-i explicitly qeyd etmeye ehtiyyac yoxdur: class Superclass(object) qeyd edilir, eger,- proyektde Python2 ile uzlashmaya ehtiyyac olacaqsa. Yox eger, proyekt yalniz Python3 uzerinden reallashacaqsa, onda, class Superclass: formasinda da yazila biler. Zaten, Python3-de class Superclass = class Superclass(object):
class T(): pass
t = T() print(t)
class T1(object): pass
t1 = T1() print(t1)
Netice: <__main__.T object at 0x7f0d8c751080> <__main__.T1 object at 0x7f0d8c751128>
object - Python ecosystem-inin fundamentlerinden biridir.
Xususile vurgulayim ki, "her nesne obyektdir" meqami yuxarida xususi qeyd etdiyim Python2.2 fakti ile baglidir. Yeni, her nesne object class-indan inherited olur. Ve, __new__ bu object class-inin method-udur. Buna gore de, bu metod ile yuxarida sadaladigim 3 prosesi icra ede bilirik. __new__ ise ozu de ashagi seviyyeli (low-level) function-lari chagira bilir deye, bu ishleri gore bilir. Sirf bu __new__
method-u ile object class-inin elementleri yaradilir, oturulur ve sonda geri qaytarilir. Ve, mehz onun sayesinde class-in ancaq istenilen sayda instance-i yaradila bilinir. Yeni, limit tetbiq edile bilinir (p.s.: dolayisi ile Singleton pattern'i xatirladir, ancaq 1 instance-dan daha chox teyin etme furseti verir). Ve yaxud, mumkundur ki, bir neche instance eyni yaddash sahesine referance etsin. Ve ya, bir neche instance ferqli yaddash sahelerine referance etsin.
*args(primitive types, list, tuple) - positional (non-keyword) argument-leri, **kwargs(dict) - keyword (named de adlandirilir) argument-leri qebul edir.
Sonra, __init__ method-u (constructor) call olunur.
Ardi ile argument-ler bu method-a oturulur. Class-in (exemplar or instance)-i initialize edilende,
bu method chagirilir. Demeli, class name harda call olunsa, __new__ method-u da call edilir. __init__ method-u ise, __new__ terefinden class-in instance (exemplar)-i return olunaraq,
__init__ method-una self parameter kimi send olunanda, call edilir. __new__-daki "super function" (qeyd. super() - Bes, super() nece ishleyir? Builtins function olan super() Base class-in method-larina access almaq uchun, Base class(Superclass)-in temporary, proxy object-ini return edir. Bundan elave, Base class(Superclass) name-inin explicitly istifade edilmesinin qarshisini alir. Daha chox ashagilarda da qeyd edildiyi kimi polymorphism ve multi-inheritace zamani istifade edilir.) olmadan, __init__ ishe dushmur. Hem __new__, hem de __init__ return edirse, __init__-de error generate edilecek. Chunki, __init__-in vezifesi return etmek deyil de, Class-in yeni yaranmish instance(examplar)-inin cari veziyyetini, state-ini initialize aninda deyishmekden ibaretdir:
class InstanceQuant(object): _instances = [] limit = 3
def __new__(cls, *args): print("cls") if not len(cls._instances) < cls.limit: raise RuntimeError instance = object.__new__(cls) cls._instances.append(instance) # return super(InstanceQuant, cls).__new__(cls) # normalda - super() - # istifade return instance # edilir. Amma, burda # error generate edir. # Chunki, class-in ozunu # return edir, _instance # yox. def __init__(self, r): self.r = r print("self")
def __del__(self): self._instances.remove(self)
a = InstanceQuant(5) b = InstanceQuant(3) c = InstanceQuant(2) d = InstanceQuant(1)
__init__-in initializer method oldugunu "yield" istifade etmekle de, numayish etdirmek olar. Chunki, "yield" bu method'u generatora chevirir. Chox xirda kod numunesinde error generate olunacaq:
class Gen(object): def __init__(self, i): yield i
# Gen(5) g = Gen(5)
Error: Traceback (most recent call last): File "main.py", line 5, in <module> Gen(5) TypeError: __init__() should return None, not 'generator'
En sonda __del__ method-u (destructor) icra olunur.
Umumi metodlara nezer salaq: Construction(creation) & Destruction Compairing Unary
Math: __add__ Math(opposite - ters riyazi): __iadd__ Type change Format
Call: __call__
Context manager: __exit__, __enter__ (red. Elexsus, Context mexanizmleri OS internal proseslerin idare edilmesinde muhum movqe tutur)
Container: __getitem__, __setitem__, __delitem__ Attribute controller: __getattr__, __setattr__, __delattr__
Tebii ki, umumi "object" movzusu Python'da chox muhum, chox daha genish ve chox deqiq analize ehtiyyac duyur.
Esas 3 xasseye:
1) Referance count (for memory management)
2) Type
3) Value
ve, 2 hisseye bolunur: 1) Mutable (list, set, dict, byte array) 2) Immutable (int, float, str, bool, complex, frozenset, tuple) - primitive types (red. bu hisse Java dilinde tamam ferqlidir)
Mutable ve ya immutable yoxlamaq uchun id() ve yaxud is (iki obyektin yaddashdaki location'u check edir) keyword'unden istifade etmishem. int (integer) immutable (deyishmez) oldugu uchun x deyishenine yeni menimsedilen value yeni yaddash erazisine yazilir:
>>> x = 5 >>> id(x) 1704427760 (address) >>> >>> >>> x += 1 >>> id(x) 1704427792 (address) >>>
Yene de, "int type"-da oldugu kimi "str type" da modifikasiya olunanda, yeni object yaradilir ve yeni yaddash erazisine locate olunur:
>>> s = "Tural" >>> id(s) 2131050163424 >>> >>> >>> s += "Jalilov" >>> id(s) 2131050185008 >>>
Bele bir sual ortaya chixir.. Bes, nece olur ki, list kimi obyektler modifikasiya olunsa bele, locate edildiyi yaddash erazisi deyishmez qalir? Chunki, "list" obyekti background'da "+=" emeliyyatini, yeni, builtins math __add__() method'unu __iadd()__ method'u ile evez edir:
__add__(): >>> a = 10 >>> >>> a, b = 10, 11 >>> a.__add__(b) 21 >>>
__iadd__(): >>> l = [1, 2, 3] >>> id(l) >>> 140614678512200
>>> l.append(4) >>> id(l) >>> 140614678512200
Bu, combine method'dur, hansi ki, method'un self parametrini modifikasiya edir ve eyni id'ni return edir. "str, int" ve s. object'ler __iadd__() method'una sahib olmurlar, __add__() => iadd() convert ede bilmirler deye, immutable object'ler adlanirlar. Daha aydin shekilde, primitive type'lara yeni deyer menimsedilende, onlar modifikasiya olunmaq evezine yeni primitive type object yaradilir. Amma, maraqli bir meqam var burda. Python interpretator olan CPython'da -5 ve 256 intervalinda yerleshen integer object'ler Singleton xarakterli olduqlari uchun bele object'lere initialize olunduqlari value'nu yeniden menimsedende, yeni object yaranmir ve ilkin memory'deki location saxlanilir. Singleton olmayan object'lere ise eyni bir value assignment etdikde, memory location'u deyisherek, yeni object create olunur:
>>> x = 5 >>> hex(id(x)) '0x659780f0' >>> >>> x = 5 >>> hex(id(x)) '0x659780f0' >>> >>> >>> y = -3 >>> hex(id(y)) '0x65977ff0' >>> >>> y = -3 >>> hex(id(y)) '0x65977ff0' >>> >>> >>> z = 256 >>> hex(id(z)) '0x6597a050' >>> >>> z = 256 >>> hex(id(z)) '0x6597a050' >>> >>> >>> d = 257 >>> hex(id(d)) '0x1db7d75bef0' # ilkin address >>> >>> d = 257 >>> hex(id(d)) '0x1db7da40310' # sonraki address >>>
Mutable & Immutable object’ler..
Python dilinde Immutable object'leri Mutable object'ler kimi simulyasiya etmek istesek, onlari pointer'ler kimi istifade etmeliyik. Pointer'ler ise Python'da birbasha olaraq, movcud deyiller. Onlari sadece bir neche yolla imitasiya ede ve ya birbash C dilinde yazilmish proqramdan CPython (ctypes) lib'i ile chagira bilerik. ctypes tipli deyishenler declare etmek lazimdir. Ve, "pass by value" ile object'in copy'si uzerinden deyil, real object'in ozu ile emeliyyat aparmaq uhcun "pass by referance" istifade edirem. Bu proseslere deep-dive etmek bir az pedantik gele biler, ancaq chox vacib biliklerdir:
C dilinde:
#include <stdio.h>
void simulate(int *ch) { *ch = 502; }
int main(int argc, char **argv){ int var = 500; printf("var = %d\naddress = %p\n", var, &var); simulate(&var); printf("address = %p\nvar = %d\n", &var, var);
return 0; }
Results: var = 500 address = 0x7ffc1838563c address = 0x7ffc1838563c var = 502
Python dilinde: def simulate(ch): ch[0] = 502
var = [500] print(id(var)) simulate(var) print(var, var[0], id(var[0]), type(var), \ type(var[0]), id(var), sep='\n')
Result: 140600405082696 [502] 502 140600406331280 <class 'list'> <class 'int'> 140600405082696
Python'da C/C++'dan ferqli olaraq, deyishen yoxdur, deyishen adlari var.
1) C dilinde:
int x = 78; Address: 0x7f1 Value: 78
x += 1; Address: 0x7f1 Value: 79
int y = x; Address: 0x7f5 Value: 79
y += 1; Address: 0x7f5 Value: 80
1) Python'da: x = 78
Yuxaridaki simple assingment kodu erseye getirmek uchun background'da 6 etapdan kechir: 1) CPython --> PyObject creat edilir. 2) Bu PyObject uchun typecode int set olunur. 3) Bu PyObject uchun value 78 set olunur. 4) Maraqli meqam, name creat edilir - "x". 5) Bu "x" PyObject'e point edir. 6) PyObject'in referance count'u 1 vahid artir.
Python name (x) ----> PyObject (Type: Integer, Value: 78, Ref. count: 1)
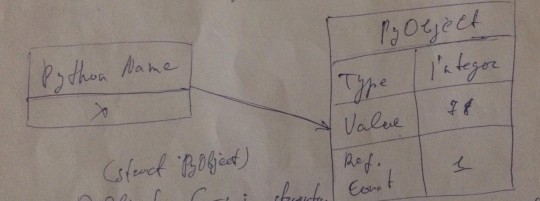
struct PyObject.. Bu PyObject C-nin strukturu kimi mueyyen edilib. Ve, biz Python'da typecode ve ref. count'u call ede bilmirik. Chunki, Python'un C strukturlarina direct access'i yoxdur. Burdan aydin olur ki, Python'da declare/initialize etdiyimiz - "x" deyisheni background'daki PyObject'e point edir. Demek ki, "x" - referance'dir. Birmenali olaraq, Python'da bu "x" hech bir memory address'e direct olaraq, aid deyil. Chunki, PyObject CPython(C implementation)-a aiddir, CPython da oz novbesinde dolayisi ile C-ye aiddir. C-deki "x" ise "statical memory slot"a sahibdir. Python'da deyishene qiymet menimsetme yox, PyObject --> CPython --> C-ye referance var. Vessalam. 2) Python'da: x += 1 (yeni, x = 79)
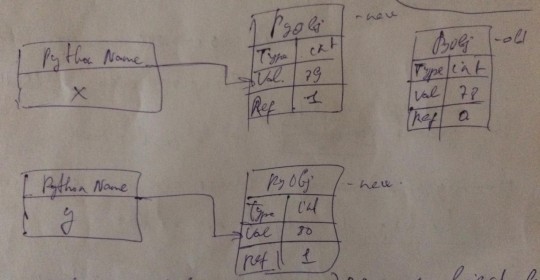
1) new PyObject create edilir. 2) new PyObject uchun typecode int set olunur. 3) new PyObject uchun new value set olunur. 4) x new PyObject'e point edir. 5) new PyObject'in ref. count'u 1 vahid artir. 6) old PyObject'in ref. count'u 1 vahid azalir.
PyObject - OLD (Type: int, Value: 78, Ref. count: 1 => 0) Python name (x) ---> PyObject - NEW (Type: int, Value: 79, Ref. count: 0 => 1)
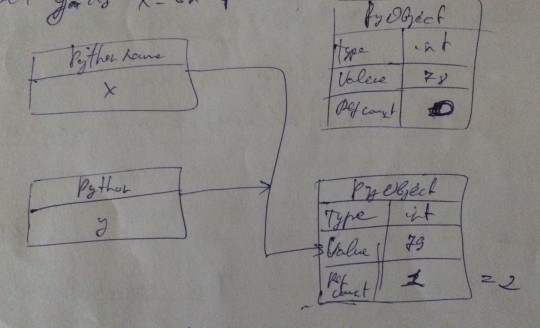
3) Python'da: y = x. Bu halda, y de x'in point etdiyi memory area'ya point edir.
Python name (y) ---> Python name (x) - PyObject (Type: int, Value: 78, Ref. count: 0) ---> PyObject (Type: int, Value: 79, Ref. count: 1 => 2)
>>> y is x >>> True >>> Ancaq, >>> x = 78 >>> y = 77 + 1 >>> y is x >>> True
1) 78 obyekti (PyObject) yaradilir (teyin edilir) 2) x name(x adi - string) 78 deyerine menimsedilir 3) 77 obyekti (PyObject) teyin edilir 4) 1 obyekti teyin edilir 5) 77 ve 1 obyektleri bir yerde add olunur 6) Yeni 78 obyekti teyin teyin edilir 7) y name (y adi - string) 78 deyerine menimsedilir
>>> a = 500 >>> b = 300 + 200 >>> False - bu hadise ancaq REPL-de bash verir. Ferqli IDE'lerde True return edilir. Ferqli IDE bu shertde hemchinin ferqli compiler demekdir. Eger, numune kodu .py file save edib, run etsek, True return olunacaq. Niye? ))))))) CPython compiler ve ya diger compiler'lar "smart compiler"lar qrupuna aiddir. Ve, koda optimization tetbiq edirler. Bu, "peephole optimization" adlanir, hansi ki, "execution step"leri (icra olunma pillerini) yadda saxlayir. Ele kod hisseleri var ki, hem REPL, hem de ferqli compiler'larda True return edir. Bu, "integrated (interned) object"lere goredir. Python "pre-created (onceden)" memory'de object'lerin sub-object (subset)'lerini yaradir ve onlari "global namespace"de saxlayir. Bu subset'lere daxildir: 1) Yuxarida toxunduqum -5 ve 256 araliqi ededler 2) Strings - "_", ASCII herfler, reqemler Bu memory allocating her defe bash verir. Menimce, "x is y" ve "a is b" neticelerinin sebebini yeterince inceledik. Umumiyyetle, "memory address compairing" uchun hashing de istifade etmek olar. Hecmhinin, sys.intern() ile hemishe eyni adrese muraciet etmek olar,- tebii ki, sonda eyni neticeni saxlayirlarsa.

4) Python'da: y += 1 (yeni, y = 80) beraberliyinde novbeleshme, muraciet ve icralarin testi.
PyObject - OLD (Type: int, Value: 78, Ref. count: 0) Python name (x) ---> PyObject - NEW (Type: int, Value: 79, Ref. count: 1) Python name (y) ---> PyObject - NEW (Type: int, Value: 80, Ref. count: 1)
Peephole optimization'un genish terifi:
Compiler-generated instruction'larin kichik set'ine optimizasiya texnikalarinin tetbiq edilmesidir.
Meselen: 1) 3 defe 8x8x8 evezine 8^3
2) a+a evezine left-right shifting
3) index'i 4-e vurub, base address'e elave edib, pointer dereferencing etmek evezine hardware addresing istifade edir.
Assembler level code fraqment'lere nezer yetirek..
No optimizer via 6 instructions:
a = b + c;
----------
MOV b, R0
ADD c, R0
MOV R0, a
d = a + e; ---------- MOV a, R0 ADD e, R0 MOV R0, d
Peephole optimizer via 5 instructions: a = b + c; d = a + e; ---------- MOV b, R0 ADD c, R0 MOV R0, a ADD e, R0 MOV R0, d
Hemchinin, eger compiler register'leri subprogram chagirilanda, stack'de saxlayir (yigir), sonra sondan evvele (LIFO prinsipi) boshaldirsa, bu, "reduntant stack instruction" adlanir. Peephole bu yigma-boshaltma (PUSH-POP) operation'larin tekrarlarini remove edir. Neticede, optimizasiya qazanilir.
Cpython’un Peephole optimizer’inin GitHub repo’sundaki source code’u (https://github.com/python/cpython/blob/master/Python/peephole.c):
/* Peephole optimizations for bytecode compiler. */
Qeyd: bytecode ve s. baresinde novbeti defe planladigim MMU movzusunda yazacagam..
0 notes
Photo

[Raspbian] Raspberry Pi 3に3.2インチLCDを接続する手順(2019年) https://ift.tt/36VobHK
2016年、RaspbianがまだJessieだった頃に同じWaveshare Electronicsの3.2インチLCDをRaspberry Pi 3に接続する手順を書いたが、3年経ち久しぶりに使ってみたところ手順が非常に簡単になっていたので改めて記す。
Waveshare Raspberry Pi LCD Display Module 3.2inch 320*240 TFT Resistive Touch Screen Panel SPI Interface for Any Version of Rapsberry-pi [��行輸入品] AMAZON JP
Raspberry Pi 3 Model B V1.2 (日本製) 国内正規代理店品 AMAZON JP
物理的な接続は2016年の時と変わらないので以下の資料に譲る。
関連資料・記事 [Raspbian] Raspberry Pi 3に3.2インチLCDを接続する手順(2016年)
このLCDをRaspberry Piで使えるようにする手順は同社の製品ページで公開されているので細かい設定などは以下を参照してほしい。
https://www.waveshare.com/wiki/3.2inch_RPi_LCD_(B)
LCDを物理的に接続しただけではOSを起動しても画面が真っ白なままなのは以前と変わらないが、ドライバのインストールと(タッチセンサーの設定を行わず)ひとまずLCDの出力ができればいいのであれば以下を実行するだけでよい。(この設定はHDMIディスプレイを接続するかSSHログインにて行う)
$ git clone https://github.com/waveshare/LCD-show.git $ cd LCD-show $ ./LCD32-show
これで必要なパッケージがインストールされ、LCD出力が有効になる。設定ファイルも作成されるので微調整はこのファイルを編集することで行う。
$ ls -l /usr/share/X11/xorg.conf.d -rw-r--r-- 1 root root 1099 8月 23 2018 10-evdev.conf -rw-r--r-- 1 root root 1350 6月 5 21:49 10-quirks.conf -rw-r--r-- 1 root root 1429 3月 31 2019 40-libinput.conf -rw-r--r-- 1 root root 1099 10月 23 00:39 45-evdev.conf -rwxr-xr-x 1 root root 358 10月 23 00:42 99-calibration.conf -rw-r--r-- 1 root root 647 10月 23 00:42 99-fbturbo.conf
尚、元のHDMI出力に戻したい場合は従来通りLCD32-hdmiを実行する。
$ ./LCD32-hdmi
参考サイト
情報
Raspberry Pi公式サイト
Raspberry Pipedia)
Raspbian技術情報(Make: japan)
Raspberry Pi関連情報 (スイッチサイエンス マガジン)
Raspbian関連情報 (DevelopersIO by Classmethod)
Raspberry Pi関連情報 (isaax)
IT女子のラズベリーパイ入門奮闘記 (Device Plus)
RaspberryPi電子工作入門 (ツール・ラボ)
ラズパイダ
RaspberryPi技術情報 (Qiita)
Raspbian技術情報 (Qiita)
販売
Raspberry Pi Shop by KSY
スイッチサイエンスRaspberry Piコーナー
Phsycial Computing Lab by TechShare
コミュニティ
Japanese Raspberry Pi Users Group
Raspberry Piもくもく会
元記事はこちら
「[Raspbian] Raspberry Pi 3に3.2インチLCDを接続する手順(2019年)」
November 12, 2019 at 02:00PM
0 notes