#click it for a higher quality pic sorry about that!!
Photo

snowbrofight!
heyo @artzom-b i’m your secret santa this year! I hope you like these two goofs havin fun in the snow, drawing this was a blast!
#atsecretsanta#atimers#at#jake the dog#finn the human#artzom-b#aaaa hope you have a happy holiday!!#GEEZ TUMBLR RUINED THE QUALITY#uh#click it for a higher quality pic sorry about that!!#they totally made each others sweaters#squab art
84 notes
·
View notes
Photo


Discredit Part Three! (Click on each pic for something resembling quality!)
Part One---contains translations, podfic, and related works---Part Two
Tagging, credit, and transcript all below the cut 💜
First off, people who specifically asked to see more of this nonsense may God in all Her glory bless you accordingly:
@internet-or-sleep, @just-some-girl-on-the-internet, @readytoocomply, @vocallsama, @fellowshipofthegay, @lucky-leafeon, @alph4centauri, @sumoranges, @diaphanedreams
Aziraphale’s profile pic is courtesy of good old Neil, found here. All others are from Creative Commons.
Sorry it took so long to produce more stupidity. YOU ALL ROCK 🎊🎊🎊 Here, have a messy transcript.
Abdou G.
Have you ever walked in on a conversation and, despite clearly missing the majority of it, feel like you could reconstruct it, word for word if necessary? That happened at Fell’s today. The ‘talk’ had obviously been going on for a while, but I can give you a perfect summary here: rude fuckboy thinks he gets to say who God is, Fell was having none of it.
Best response? Turn around, walk back to your apartment (pro-tip: this only works if you’re just a few blocks away), and change your shirt. I walked back in with my I MET GOD, SHE’S BLACK tee and had the pleasure of seeing Fell do a double-take.
“Yes, thank you, that’s what I’ve been trying to say!”
***
Doug E.
Scout’s honor: I once saw that Crowley dude unhinge his jaw and eat a large pizza in one goddamn bite.
Update: you heathens read about this gay abomination with his dislocated jaw and what you decide to question is whether I was acTUALLY A SCOUT?
***
Mary L.
I came in with my four-year-old last week fully intending to keep him within sight at all times. Yes, I bought one of those kiddie leashes and no, I don’t regret a thing. You try holding down two jobs as a single mom to the bonefide antichrist. I love my boy, but the devil got to him, telling him things like, “Yes, Freddie, permanent marker would look just great on Mum’s only work jacket!”
I said as much to the owner because this mom needs to vent sometimes.
I wish I could give this place a higher rating, but the ownership is frankly terrible. Inconsistent hours, no help when you’re trying to find a book, just basically all around bad customer service, BUT it still gets five stars because when I told the guy I was raising the antichrist?
“Oh yes. I did that myself not too long ago!”
We parents need to support one another. Otherwise the world is going to burn. So here’s a good review for you, Mr. Bookshop Guy. A part of me hopes you’re a better dad than you are a bookseller. The other part? The bigger part? It’s very aware that Ms. Pot here just met Mr. Kettle.
Now if you’ll excuse me, Freddie just got into the flour.
***
Alfred B.
I hereby nominate Mr. Fell as the British Steve Irwin. I’ve never seen anyone handle a red bellied black snake like that. I mean yeah, they’re a chill species overall, but there’s a difference between casually handling a snake and fucking chucking one onto the chair because it’s in your way. (Okay. Maybe Irwin was a little nicer.)
Renee K.
whos steve irwin?
Alfred B.
...How old are you?
Renee K.
15
Alfred B.
You existed on this planet for two years with him and you dare to ask me this? Go boil your head and then use google. Good god.
***
Mark F.
overheard the owner telling his boyfriend that last they met his brother tried to set him on fire? and succeeded?? actually now that I think about it, not sure which brother they were talking about---his brother or boyfriend’s brother--but WHOEVER has the brother needs to... i don’t even know. do something about that? ring the police or go to therapy or SOMETHING. i mean maybe they already have, i’m just an eavesdropping tourist, but the idea of someone setting that bow-tie cutie on fire—DID I MENTION THAT? PERSON ARSON. MURDER—makes my blood boil
***
Shiefa N.
People aren’t joking about overhearing weird conversations here. I walked in on two men (owner and husband? owner and escort?) debating Seven Minutes in Heaven. You know, that stupid kissing game the better looking kids got to play in middle school. It got pretty heated at one point (pun not intended), arguing about whether seven minutes of making out was divine or damning behavior. I hung out long enough to catch the segue into a lust vs. love debate and then had to skedaddle. Nice couple. I support their weird flirting habits.
***
Chang Z.
Is it legal to visit a store for things other then what it sells? I realize that makes me sound druggie or something but I swear I’m dealing with a much healthier addiction. (Ha. Maybe.) I cosplay (yeah, yeah, move along, trolls) and Mr. Fell has an absolute wealth of historical clothing. It’s astounding! I thought they were particularly detailed costumes at first, but no. I’m majoring in Textile and Apparel Studies. I know a naturally worn piece of fabric when I see it. Mr. Fell is always cracking jokes about how he wore this frock in the 19th century, this shirt in the 17th, oh don’t you just love my old vest? (He has... so many vests...) I indulge him because anyone who lets me borrow this stuff for free deserves all my attention and fake laughter.
Yeah. You read right. Artifacts borrowed for free. He’s even let me alter some of the stuff because I’m not exactly his size. Should this stuff be in a museum somewhere? Probably. Am I calling anyone to take my personal cosplay supply away? Noooope.
***
Leah M.
Helping to spread the word here because I’m not sure how much foot traffic this place actually gets.
I pass Fell’s every morning on my way to work and yesterday there was a new sign in the window. This might not seem very interesting to most people on here, but you’ve got to understand that Fell’s never changes. None of it. I’ve lived in Soho since I was a boy and this place has always had the same placard with his insane times listed, same stripped paint on the door he’s never gotten around to fixing, same spiderweb in the corner I absolutely swear. My dad used to pop in there when he was in college and I swear he’s taken me through the stacks, points out books that haven’t moved in 30+ years. It’s nuts and more than a little bit impressive.
So you can imagine my shock when I passed by and saw not one, but four new papers in the front window. They’re drawings and I recommend going and taking a look for yourself. I don’t think I can accurately describe the utter chaos of crayons and glitter that’s displayed there, let alone what it’s trying to depict. A dystopia? The end of the world? If so the apocalypse features a surprising number of dogs.
There’s a fifth paper off to the side, written in Fell’s messy penmanship. It just says, “My god-children drew these!” and if that’s not the cutest things you’ve ever heard get out of my face.
***
Gabriel A.
azirfell
alzaphral
azzzzzirafal
i’m a litttle drunk but azifjkaafha’s place is good he just needs a name easier to spell
***
Aziraphale
Dear Gabriel A,
My partner Crowley told me about this site and the many lovely well-wishes you all have left us here. I have come to express my thanks and to offer a bit of advice. You are hardly the first person to struggle with my name, dear girl! I recommend the following three step process:
A - simple, yes? + zira - a nickname I’ve adopted over the years, easy enough to recall + phale - this is admittedly more difficult as our ending, “phale,” is neither spelled in a way nor presumed to be pronounced like the “fell” sound we end up with. In truth my name is more along the lines of Azz-ear-raf-AE-el, but change is inevitable and you needn’t hear about that transformation, nor the etymology involved in getting “fell” out of “phale.” I say this not because I don’t wish to teach you, but because my partner has reminded me--in a rather rude tone I should add--that this site has a word limit. Suffice to say you should simply memorize the “phale” portion and you shall be, as the expression goes, in tip top shape!
Best regards,
Aziraphale
P.S. Nothing personal, dear boy, but I fear I’m not terribly fond of your name either. I would highly recommend changing it if you’re ever of a mind to do so. Cheerio!
#good omens#ineffable husbands#air conditioning#long post#good omens fic#(apologies for that)#(tried for text post and the quality was totally unreadable)#pgnbri#attempting to tag you here#since tumblr won't let me do it in the post :/
5K notes
·
View notes
Text
CPM REWATCH - SEASON 2 PROLOGUE
I’m sorry I’ve been so busy with work, but I’m going to try to start S2 this week!
If you don’t know what I’m talking about: I’m doing a rewatch where I point out every little Cultural (C) reference, Parallel (P) and Meta (M) thing, as well as tiny snippets in wtFOCK. As a Belgian, I try to catch every little thing in the series to show, explain and amuse you all.
I’ve already done this for season 1: click here.
But first:
THE LEVEL-UP OF SEASON 2
Because not only did season 2 get a way higher budget for the development of the series, as seen by the quality of the shots, the hits on the soundtrack and the improved acting, but also a way bigger team with even more dedicated crew members. However, that’s not the thing I wanted to talk about.
It’s the offline-online strength!
During the entire broadcast of S2 from April until June, they had the most elaborate off- as well as online presence of all the SKAMs I’ve seen. Because they took the series and put the real-time aspect to higher ground. And this payed off, because this is exactly how the show gained popularity in the age bracket they needed to have and let it organically grow for S2 and S3.
Don’t know what I’m talking about? Let me elaborate with a few examples:
Before the start of season 2, they filled high schools hallways and locker rooms with tiny sport backpacks decorated with quotes from S1. This stunt really gained attention of multiple students at the time.

Right before the drop of the very first clip, a Belgian influencer made an insta story where he ‘randomly’ spotted the actors drinking something in the same spot of the first clip, namely the ‘Wasbar’. He even tagged the characters in it and acted all excited about meeting them ‘in real life at that time'.
When Zoë and Jana mentioned they were going to go to the ‘Vegan street festival’ in Antwerp in E1, the actors WERE ACTUALLY THERE. Multiple fans saw them at the location!
Jens had put on his Instagram that he lost his bike during a heavy night out. His telephone number was attached to this lost item though. A fan found this bike, ringed the number and the actor portraying Jens showed up to claim it. They even took a pic together to celebrate!

When Zoë was watching a tv show with her roommate Lisa, it was ‘Temptation Island’, the EXACT episode that aired that night. So the actual one that the viewers saw too.
At the party, Senne pushes out a person called ‘Matis’. He is a Belgian influencer, who had insta stories of this party that he dropped in the same night as the real time clips.
Somewhere during the season, Jana and Zoë went to a concert, which they put on their respective insta story. Eye witnesses claim that the actors were really there that night.
During the exam period, Luca and Amber made tiny exam motivational quotes, which were spread out all over Antwerp. Fans of them found them all around and made pics of it.
At the ending party of S2 were a ton of influencers, who made multiple insta stories of being there at the same time that the clip dropped.
... And so on and so forth.
So to say that their social media game was killing it that season? That’s an understatement if I ever heard one ;)
208 notes
·
View notes
Photo

(Click for higher quality because Tumblr likes to bully me apparently)
The most wholesome kids you ever did meet! I love them SO much!!
You can find a smidge more info about them (and other kids) in This Post!!!
(Please note that their actual ages are not finalized. This is just to give you a general feel/vibe for their ages and age differences)
Some design notes I guess under the cut
Takiyo:
That hoodie is Froppy Merch!
No shoes. Ever. He has the little pink pad things on his feet, and they are super sensitive.
He only wears pastels. Also soft things. Jeans are the only exception. Anything that isn’t soft or denim makes him uncomfortable
His tongue is not like Tsu’s (long and extendable). It’s just a longer-than-average tongue.
He does the Tsu Hand thing a lot (like in the pic)
The hoodie hides it, but he is chubby.
Ezumo:
Thankfully, it’s not out of character of her to wear a long skirt!
She likes summer colors and flowy fabric. Think....... cottage core but with more color.
Her hair color is supposed to be a mix between Tsu’s green and Ochako’s brown hair, and idk if that came across well enough
Tsu does her hair
(fun fact!: She is the only second born child made so far to NOT be wearing anything relating to her parents!)
Tsuki:
While the onesie isn’t Uravity merch, it’s moon/space themed, so I let it get past the sketch phase
Idk if his moon birthmark (around left eye) is Moon Shaped enough, but it’s supposed to be a crescent moon
He will NOT develop the habit of the Tsu hand thing. It’s just a thing he does as a baby
A lil chonky boy
Soft hair
All the kids are shorter than average, and I blame that on their short moms. I’m sorry Takiyo, but you’ll always have to look up to look Actual-Tree-Toshi-Midoriya in the eyes. Unless you float.
#bnha next#bnha fankid#bnha#tsuyuraka#tsuyuraka fankid#is the ship name even tsuyuraka?#I checked that tag and it wasn't all that popular?#Damn what rock am I living under#OH BTW#Takiyo does have autism and his aversion to shoes/socks and non soft clothing was intended to be like a person with autism#being overstimulated#and I really hope I wasn't disrespectful in my depiction of it?#pls tell me if i was#I don't wanna hurt anyone or make them uncomfortable#Takiyo Asui#Ezumo Uraraka#Tsuki Asui#Born And Raised#Mha Born And Raised
10 notes
·
View notes
Text
color icon tutorial
ok i’m not super great at making icons but an anon requested a tutorial for my icons so i will post my process! it’s good for beginners i think (even tho i have been making these icons this way since 2016 lol)
you’ll need:
Photoshop CS5 or higher (I have CS5 which is quite old, I know, but I pirated it many years ago oops)
relatively hq pics to make icons out of
a psd (if you need some, tumblr.com/tagged/psd is what i periodically check for some).
an action (preferably sharpening action, since that is what i use)
a texture if you want
you, yourself, and you, and i guess this tutorial
i’m going to be making this as a beginner’s tutorial so it’s gonna go about as in-depth as one can be! it’s gonna include a lot so feel free to skip a lot of it if you are already pretty well-versed in photoshop or icon-making.
ITS SO LONG IM SO SORRY IT IS SO VERY IN-DEPTH I’VE EXPLAINED EVERY POSSIBLE THING I COULD’VE
but also if you have any questions at all, please let me know. i love teaching people stuff.
example of the icons that i make:

Hi hello welcome
Ok, so first open up Photoshop. I am using CS5.
You will need hq pics of whatever you plan to icon. I do 99% Taylor Swift, so I use taylorpictures.net for all my icon needs. Make sure they are of semi-decent quality, they don’t have to be amazing since we will be shrinking them down to a very small size so much of the quality is gonna disappear anyway but like, make sure you can at least tell the subject from the background distinctly (you’ll see why later).
This is the picture I am using for this tutorial (and will post icons separately):

Open this in ps (File > Open > the picture)
Ok so now it’s the actual tutorial lol
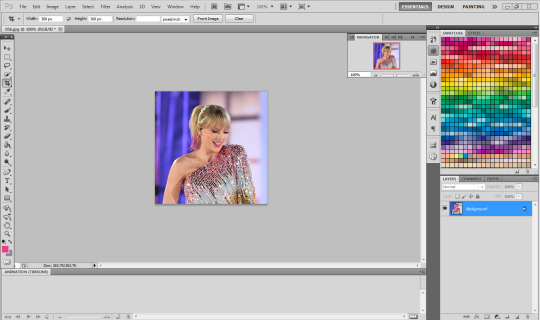
1. Crop the image
We are not going to crop it to 100x100! Select the Crop tool and set the dimensions to 300 px x 300 px--MAKE SURE THAT YOU TYPE IN PX AFTER YOU TYPE IN 300, OR ELSE IT WILL CONVERT TO CM AND THAT WILL NOT WORK FOR THIS!
Next, crop the picture you want as much as you want--as long as you get what you want in the icon. For these kinds of icons, you just want to focus on one item--like Taylor, for example--instead of multiple (not Taylor and her backup dancers since this isn’t what my icons look like and you won’t be able to do that very well on a beginner level). Crop that to a 300x300 px size and click the check mark on the top bar to finalize it.

If your pic is hq enough--meaning a larger picture--it will probably look super small. That’s ok, it’s just proportional to the old picture. Go to the right side bar and select the Navigation tool.
If that tool isn’t there, you will just have to go to Window and select Navigator, and it will bring that up for you.
See where it says 100% in the picture right there? It will likely say something like 25% or whatever if you just cropped it, so change it to 100% which will bring it to full size.
Cool! now it should look like this:
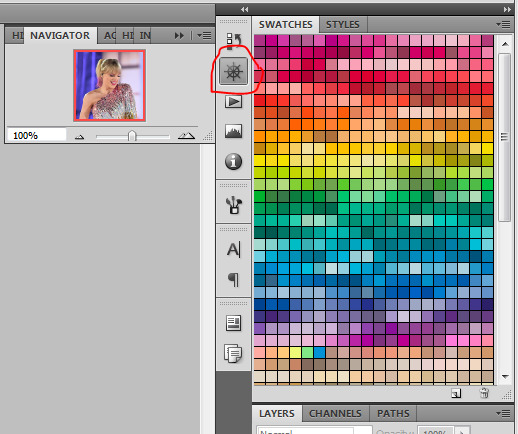
2. Use the Quick Selection Tool

Go to the left sidebar on Photoshop. Depending on which PS you have, it might look different. This is what mine looks like. Regardless, the icon should look relatively the same I believe across all Photoshop versions. If it’s not there, you might want to left click and hold down on some of the icons and see if it is an alternative option (it should be there already--but it is grouped with the Magic Wand Tool just in case).
This tool has three options in the top bar: free select, add, and subtract. Start with the middle option: add.

This will allow you to choose which parts of the picture you want to select to cut out for your icon. You can change the selection brush size, but I always keep it at 3px because it keeps it really precise.
Drag your mouse over the area of the image that you want included in your icon. This tool will automatically choose parts of the image that are similar--for example, Taylor’s blonde hair will like all be selected around the same time, but the pink/blue background will not be, since it can tell that those are starkly different colors and thus two different objects in the picture. It should have a crawling ants moving line around the areas of the picture you want to select. If you go outside of what you want included in your icon, that’s ok! That’s why the subtract option is there. Just select that--to the right of the Add option--and go over what you do NOT want in your icon to get rid of it using the Subtract tool. You might have to go back and forth between those tools in order to get exactly what you want in the final product.
I can’t show you my final outline for Quick Selection since it goes away when I screenshot, but after you’re sure you got what you want in your moving ants line, it’s time to finalize it.
Remember, this tool effectively cuts out the selected portion of the picture from its background.
3. Refine Edge
On the top bar, click the big rectangle button that says Refine Edge. It will bring up a window that looks sort of like this, but I have settings adjusted the way I like:
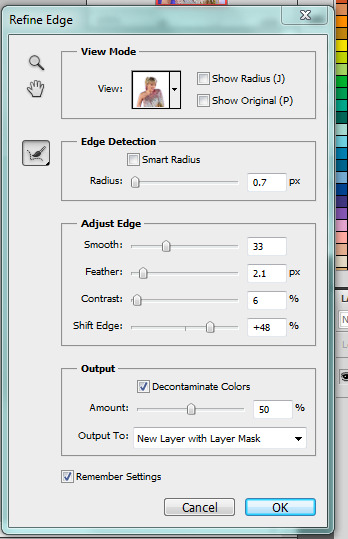
You can change these settings any way you’d like, but I generally stick with this. It’s also okay to mess around with them and see how you feel. If you don’t want to do that, you can just use my settings and edit anything you don’t like later.
Click OK to cut.

This has pretty much removed the background from the picture and only left what we cut out and a transparent background (hence the checkered background--that is space that doesn’t actually exist). You can also see some shadow from the background around her arms and hair, which we can delete out later very easily. That is a result of the settings from Refine Edge, which is why some people choose to lower the Feather bar so that it doesn’t include as much shadow--which is good for many pictures since a lot of these are straight cuts, but this can occasionally cut out part of the icon you want to keep or make it look weird since you want just a little space to mess up when it comes to the Quick Selection Tool.
Bonus step if you want a selective colored icon:
Some people like really vibrant icons that include re-coloring. I’m not very good at it, but what I do (and it sometimes turns out well--this is typically the way people do it, though they are less sloppy than I am) is select a color from the Swatches at the right that is similar to the one that they want to paint over. For example, if I wanted to make Taylor’s hair more yellow/gold and vibrant, I will choose a yellow. Select the Paintbrush tool. On the top bar, the Opacity will likely be set to 100%, which will basically color right over the picture and look weird. Set the opacity to something very light--mine is 20%--and paint over the part that you want to color. Make sure you do this in one stroke--if you paint over her hair with 20% opacity once, let go of the mouse, then go over it again, it’s gonna start building up and becoming more opaque!
You can also completely recolor a picture this way, like if you wanted Taylor to have entirely pink hair, you can use this same method but choose the pink you want instead of a similar yellow. This can be very difficult and tedious, so I don’t typically selective color my icons, though occasionally I do because I love those icons with obnoxiously vibrant colors.
4. Open texture/create new background.
Ok, so I do both of these things depending on the background I want. I have some textures saved such as this that I use for icons:

I didn’t make it--it’s pre-made by another artist on tumblr from whom I downloaded their texture pack. You can make backgrounds like these too, but I’m not very good at them.
SO you can either File > Open one of these pre-made backgrounds/textures, or you can make your own.
In order to do that, you can do File > New and change the settings to width: 100 pixels and height: 100 pixels. Under Background Contents, choose White. That’s very important! You don’t want transparent, it doesn’t help us. That brings up a new window on Photoshop next to the picture we’ve just cut out, just a small white square. You can paint that whatever color you’d like. Use the Paint Bucket tool and choose a color from the Swatches section on the right. This will make the background completely one color. However, if you want a gradient, you can do this several ways, but I do it like this:

Click that, go to Gradient, and mess around with the Gradient options and see how you like the background. Here’s one I made, for example:

Boom! Background for icon. I will use this since I made it for this tutorial so yeah it might not look amazing but here we are.
IF YOU USED THE TEXTURE I JUST POSTED OR YOU KNOW THE TEXTURE YOU ARE USING IS NOT 100x100--THE ONE I POSTED BUT DID NOT MAKE IS 200x200--THEN YOU NEED TO RESIZE IT TO 100x100.
You can do this by going to Image > Image Size and changing the 200 pixels x 200 pixels (or whatever is there) to 100 x 100.
5. Duplicate layer
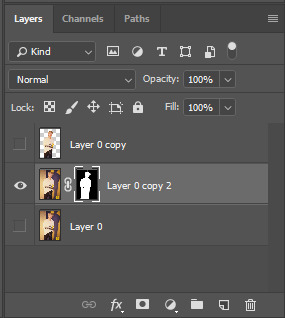
Now it is time to combine these two images we’ve created. Go back to the original picture we worked on--mine is Taylor at the BBMAs--and go to the right sidebar. You should have two copies of this image now: Background and Background Copy. Background Copy is the cut out picture we are using for the icon. Right click on Background Copy and select Duplicate Layer...
This will bring up a window that asks what you wanna do with this layer.

Select the dropdown under Destination. Currently, the Document selected is the image we are already on (my Taylor pic was saved under 056.jpg) but we want to click the dropdown and select the pic that we are using for the background. In my case, it’s titled Untitled-1 since I didn’t change the name. Yours probably is too. Select whatever your background image is saved as and click OK.
Now go to the background image or texture that you just selected--your cutout should be there, but you can probably juuuust barely see it! That’s because your picture is about 3 times bigger than your background.
6. Resize layer
Use the Select tool--the very top icon on the left sidebar--and make sure Show Transform Controls is selected on the top bar. If it’s not, you’ll know--because you won’t be able to resize the image.

The square you are seeing (that isn’t the picture) is the layer we just duplicated onto the background, aka the icon. You’ll want to hold Shift and select the bottom right part of the image to resize to whatever you would like visible in the icon--it could be the entirety of the picture we cut out, or just part of it, if you realize you like how only part of it looks. Either way, you need to hold Shift while you do this, or else the image will NOT stay proportional, and it’ll look all wonky. Hold Shift the entire time you are resizing. This is what mine looks like:

You can see I both resized it and moved it a little to the right--you can use the Select tool to move it, but that might move it way too much since it does it incrementally, you can just use the arrows on your keyboard and move it by pixels which takes longer but is way more precise.
You can still see the shadows from the background on the icon, so select the Eraser tool (if the shadows bother you or you don’t like how it looks) and zoom waaay in. You want to be careful with the Eraser tool! (Also make sure Background Copy is still selected so you don’t accidentally erase the background. If you just have Background Copy selected while you erase, it will only erase whatever is part of that layer, it won’t bother the background).
While zoomed in, erase the pixels that are obviously discolored from the rest of the image. You can zoom in and out to check how you like it as it progresses.

Here is mine after I used the eraser tool on any parts of the image I thought were bad! It should lay on the background naturally.
Now that we’ve figured that out...
7. Sharpen/action
Now is the time to apply an action! Please sharpen your icons. You want them to look good on your blog or others blogs, and in order to do that, you need to sharpen them.
If you already have actions uploaded, cool! If you don’t know how, well, I sure am going very in-depth here so you’re in luck.
Download an action from any photoshop resource (or tumblr.com/tagged/photoshop-action is where I look occasionally). You will have to load them onto your Photoshop now. Click the button that looks like a movie Play icon on the right sidebar. This will bring up the Action list. Photoshop likely has pre-made actions for you, but we don’t use those because I never taught myself how to use those so maybe you can use them, I don’t know. I just use ones I download from Tumblr.
Click that little dropdown menu and click Load Actions...
This should bring up a file opener and you can select the action that you downloaded for this icon. It will download it into Photoshop and will now always be there--you don’t have to load actions every single time you want to use them. If you load them once, they should be there for the rest of forever.
Scroll down to find that action and select it. Now, make sure you still have Background Copy selected. I don’t care about applying an action to the background, just the copy, which is still our image that we cut out. Click the Play button on the Action list--pictured above on the very bottom of the screenshot, next to the Circle and the Folder icon. This will apply the action to the background copy. (Hint: if the Play button isn’t available, it’s probably because your action is in a folder. Click the dropdown of the folder and click the first thing under it--that should be the action and it will apply it).

There it is with the action applied! It’s muuuuch sharper--perhaps a little too sharp, but that’s ok, it won’t look bad on people’s blogs.
8. Add a PSD
To apply a PSD, File > Open and choose the PSD you want to use. I listed above where I find most of my PSDs, just download one you like. You can choose 100 different ones and try it out if you want. I use the same one for everything, by @toxicpsds (I believe it’s #6). This should open a third window with the PSD over a sample image (thanks to the artist!). You just have to select the PSD layer--not the image with it--and Duplicate Layer and put it on the image that we have produced thus far. It is the same process as when we took our cutout and put it on the background. (The PSD is probably under a group--mine says Group 1--so just select the group in its entirety--shift-click it if you need to).

You can tell the background is also lighter. If you don’t want the color of the background affected by the PSD, select Background Copy and the PSD together, right click on one of them, and select Merge Layers. This will put the cutout and the PSD in the same layer, which should take the PSD off of the background and revert it back to the color we had before. However, I really like what the PSD did to the background, so I will keep it this way.
I am finished now with my icon!
9. Save it for Web
To save the icon to be able to post on Tumblr, go to File > Save for Web & Devices, which will bring up a window like this. It might look a little different since I have my settings a certain way, but whatever.
(Sorry this looks weird here, it’s just what happens when I screenshot. I’m not a tech wizard).
Your pre-saved things might look different, but make sure you are saving a a PNG-24 for the best quality. Just make your settings look like this, basically, then click Save.

There she is! All done!
If you have any questions, let me know! I tried to be really specific, but I’m not sure what level people are on Photoshop (probably better than I am) so just ask if I need to clarify anything!
60 notes
·
View notes
Text

hi sweetheart;; first of all i’m really sorry for the delay in answering this question, i was sorta busy today, so thank you for waiting so long! and secondly, i really hope you were looking for a tutorial fnoawiefoawf bc that’s what i’m gonna give you!!
edit: this got fairly long because i included pictures and did my best to explain everything in detail !!! i hope it made sense and that you like it!!
edit edit: also, the ask wouldn’t let me use the read more option so i’m having to do it the hardway :[ sorry about that!
so the process is fairly simple, all you really need is:
photoshop
whatever pic you’re using
so, firstly, open the image in photoshop, and while the image layer is selected, go to ‘Select > Select and Mask’ (or ALT + CTRL + R)

a window like this will open up:
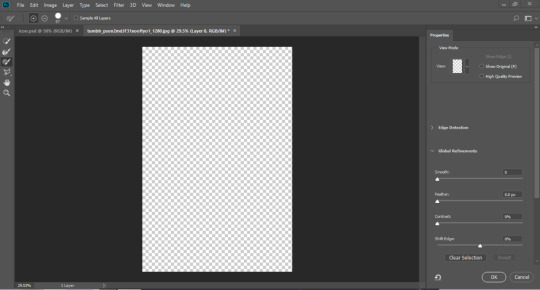
in the dropdown window titled ‘View,’ select whichever one will be easier for you. personally i tend to go with ‘Overlay’ because its the easiest option to distinguish what has been selected and what hasn’t (for me at least.) plus, you can change the colour of the overlay if it’s too hard to see so i find it the most useful!

so now, using the tools on the left, you can mask your object out of the background.

the Quick Selection Tool is great for large areas of the same colour, as it’s a going to find pixels that are largely similar and select those. the Refine Edge Brush Tool is good for areas that are very fine and thin, things like hair can be masked using this. the Brush Tool is much like a paint brush and you can control exactly what you’re masking. the Lasso Tools (both freehand and polygonal ones) are good for large areas that aren’t specific in shape, rather getting a whole area. the Hand Tool is to move around the canvas. and the Zoom Tool is to oiawnefoaneiw well... zoom...
anyway, so i usually use a combination of the quick selection tool + the brush tool. i use the quick selection to get the major areas that i want, and then i use the brush tool to be more precise and specific in my selection.
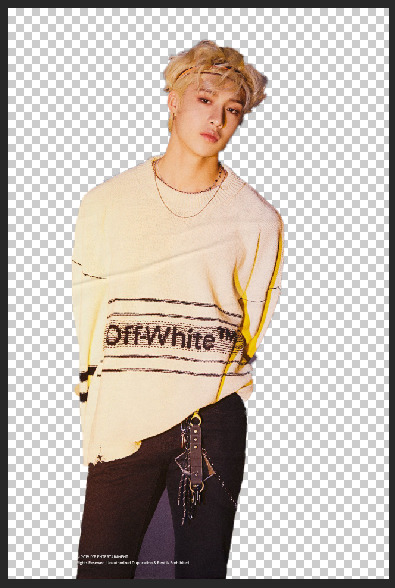
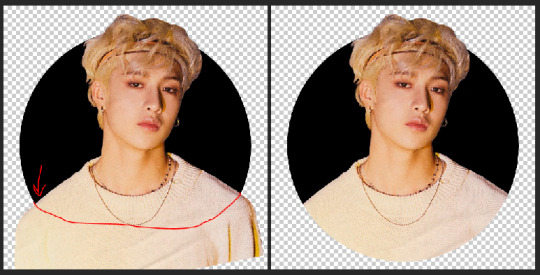
the above image is using just the quick selection tool, it gets the major areas that i want, but as you can see there are certain places (between his legs, his hair, etc) that aren’t very accurate. for the purposes of my icon, i don’t really need anything below his shoulders, so i wouldn’t worry anything there. rather, now i’d use the brush tool to be more accurate with my selection.
(this is fairly rough oaiwnefoainefoawn but you get the basic idea!!!)
ok so now, on the Properties panel on the right, if you scroll down, you can play with the adjustments. i rarely use these because i try to mask my image as carefully as i can so i have a fairly clean and cut image, but if you’d like to you can!

so, with the ‘Output Settings,’ in the dropdown menu ‘Output To:’ i’d either pick: ‘New Layer’, or ‘New Layer with Mask’. the ‘New Layer’ option will simply open up the masked image in a new layer and nothing else. the ‘New Layer with Mask’ option will open up a new version of your image but with a layer mask. a layer mask is simply a cover that goes over the layer and hides parts of the image from being seen. i usually use the second option because it’s easier to find mistakes and fix them, rather than going back and doing your masking all over again! so again its up to you! but if you’re happy with your selection then go ahead and use ‘New Layer’ as the output option. then hit ‘OK’
as you can see, in the layers panel, the first layer is what ‘Output to New Layer’ would look like, whereas the second layer would be ‘Output to New Layer with Mask.’ to keep fixing the mask, you’d just double click on the mask, and that will open up the select and mask panel again!
okay, so now, back to the image, you want to select the area that you’re going to be use for the icon, whether that be the whole image or in this case part of the image. (you can do this step right at the beginning tbh, it’ll save you time if you’re not trying to mask everything perfectly, but i tend to do more of the image than i think i’ll need in case i want to tilt the image or smth!)
using the rectangular marquee tool, i’d select what area i want, and then (making sure you’re on the correct layer) copy that part of the image.

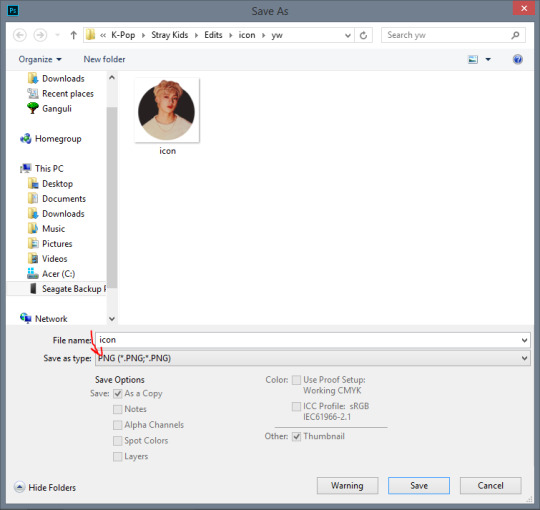
once copied, go ‘File > New’ or ‘CTRL+N’

this panel will open up, and you can chose your specifications from here. i tend to go 500x500pixels but in this case my original image was about 754 pixels so i did that by itself, and made a square as my new canvas. depending on how good quality your image will result in higher or lower amt of pixels, which will in turn give you a different size to work with. so when you have the proportions hit ‘Create’

you’ll get a new blank canvas like this

go ahead and delete the white layer so you’re left with a transparent canvas (you can do this from the creating a new page panel but oaoifnwaoife i never do it i’m Big Stupid..... anyway...
so now, paste the image on this screen and resize as needed.

now, set that layer to invisible by clicking the little eye beside the layer. now, selecting the ‘Elipse Tool,’

click on the screen and you should get a window that looks like this:

click ‘OK’ and this is what your screen should look like
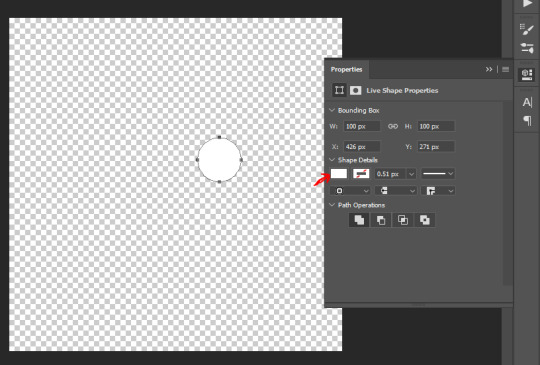
so, you can change the colour of the shape by using the square i’ve pointed to. i changed my colour to black, then centered it using the moving tool. now, while holding the ‘shift’ and ‘alt’ key on your keyboard, drag the transform corners out.
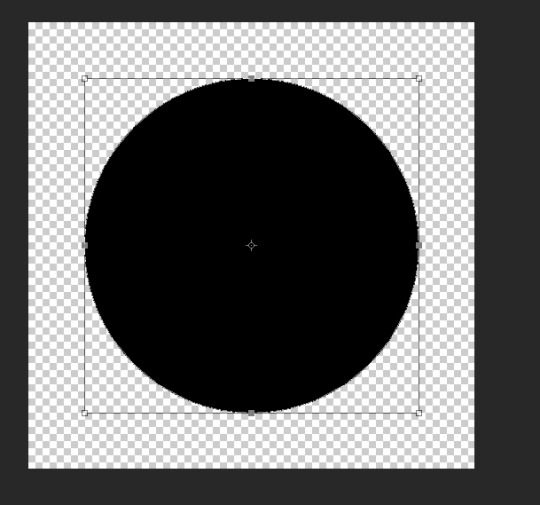
making it as big as you want, but not bigger than the canvas, click the checkmark on the upper right hand corner.

okay, so now, make the hidden layer visible, and make sure everything is centered how you like it.
select your image layer, and hit ‘ctrl + j’, this will duplicate the image in the exact same place. hide the duplicated layer, that’s for later. now, while staying on the visible image, hover over the shape, while holding ‘alt’ on your keyboard. a little downwards arrow and box should appear there while you’re hovering. click on the shape layer while holding alt and what should happen is this:

basically what this does is it makes it so that the only things that are visible from the image layer are whatever area of the layer below it is showing.
anyway, so now, looking back at the duplicated image, make it visible, and erase the bottom part of the image that you don’t want. in my case, its the part of his shirt.
so you can erase as far up as you want, as long as you don’t cut off the part that you want over hanging from the shape.
at this point, your icon is pretty much done! i usually add a colouring on top of the icon to make it more my style and more to my taste!! but that’s not really necessary!

and that’s that! you’ve got an icon! now, when you go to save it, make sure you save it as a PNG rather than a JPG. a png will preserve the transparent background that we made!
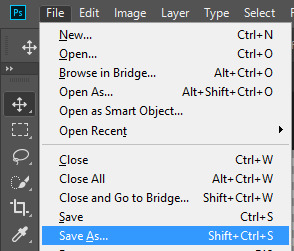
and save! and that’ll give you!! a transparent icon!!!
i really hope this helped/explained it well! sorry that it took me so long and that my tutorial was fairly lengthy, but i wanted to be thorough in my explanation! mwah i hope you have a good day!
#m.tut#long post#sorry abt that anon#idk why the ask wouldn't let me use the read more option?? its weird??
10 notes
·
View notes
Text
How to nicely and smoothly save your DMM stream without a screen capture app but using simply VLC (and Video Download Helper).
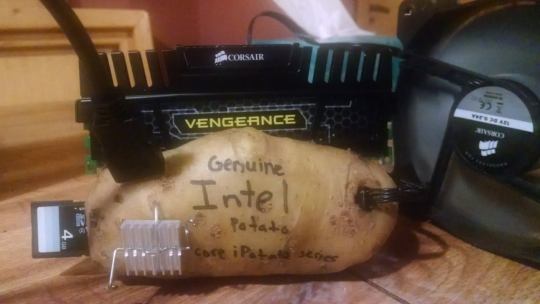
AKA when your computer is a potato
EDIT: DMM recently changed their protocol and that trick ISN’T WORKING anymore (especially if your stream’s url starts with http://tc-video3.dmm.com)...
... but you won’t let that stop you ;)
(Of course, this is all theoretical, since, you know, it’s not technically legal and stuff... so obviously, I’m just posting that out of general, scientific, detached interest XD)
So, as I am found of mentioning, my laptop is a potato. It is over 11 years old, has traveled around the world with me and has somehow survived all the tea and coffee I poured on it through the ages. It is truly a warrior and still allows me to stream HD videos on the net without any problem, like the DMM streams for example (cheaper than dvds, even though it’s fun the get them both and compare the editing XD). Where the troubles start however is when screen recording is involved. The graphic card and processor of my good old potato just can’t handle the pressure of streaming HD video *AND* screen recording it at the same time in a decent quality, whatever the different settings I tried to cajole it with. This was just the line it would not cross and kept sulking when I tried to force Active Presenter on it by getting very hot and handing me over very jerky-hicky out-of-sync recordings.
Since screen recording was a big no no, I tried to remove it from the equation and I thought about tinkering around a bit with VLC since it has a stream recording feature. AND IT WORKED VERY WELL! (theoretically, of course XD)
The only tricky bit is how to find the url of the stream (edit: just made that step easier;)) in order to put it into VLC, so that it can manufacture a nice and smooth recording for you. There are however 2 small downsides: the processing of the video by VLC may be a bit quite very long and you will want to leave your potato alone while it’s dealing with the task.
So, if you’re interested on knowing how to achieve that (out of pure curiosity, of course, nothing else XD), there is how you should proceed.
First, to buy a DMM stream, follow the steps from the excellent guide made by Riku, from 1 to 7. And I will explain the alternative 8th step - how to save the video on your disc without using a screen recording app (with pics!) - under the cut.
You can still try the following steps BUT THE TRICK ISN’T WORKING ANYMORE because DMM changed their streaming protocols
SERIOUSLY, It DOESN’T work anymore!
STEP 8 BIS:
Please read this first: you can follow the rest of the tutorial, however you will get stuck at the end of step 8 bis B and VLC will never actually start recording. The progression line will never actually start progressing. I have received a number of messages from people asking me for help - despite the fact that this post was edited 2 years ago to signal that the trick wasn’t working anymore - because they couldn’t record the stream with VLC. Well, again, I’m sorry but it is perfectly normal because the trick doesn’t work anymore. I have tried to find a way around the problem 2 years ago before throwing in the towel quite quickly once I found an easier way to cook up a decent screen capture recording with my good old potato and figured it was maybe more time-consuming but certainly less of a hassle than digging around in DMM’s code with almost zero computer skills. If I ever come back to this quest of finding a new hack and become successfull, I’ll edit this post. In the meantime, please keep in mind that even if you follow the next steps, you won’t be successful in ripping a DMM stream.
STEP 8 bis A
First, you need to find the URL of the stream. I used to do a trick with Firefox and the web developer console, but it turns out there is a much easiest way to find it with Video Download Helper. Note that if your computer is a new sleek thing, you can try to save the video directly via Video Download Helper (I’ll just call it DH now, for clarity sake, because VDH may be confusing): you have a 1 on 3 chance that the addon will succeed in completing the download. But if you have a potato, the chances drop down to about 1 on 100. That’s why using both DH and VLC may be the safest option.
Before anything else, if you’re not already using it, add the Video Download Helper addon to your browser (it works best with Firefox). You can find it there.
Once you have set up your VPN, bought your stream and gone to your library on DMM.com, open the stream you’re interested in (still hypothetically XD) and start it, just like you would if you were going to simply watch it. Like this one for example
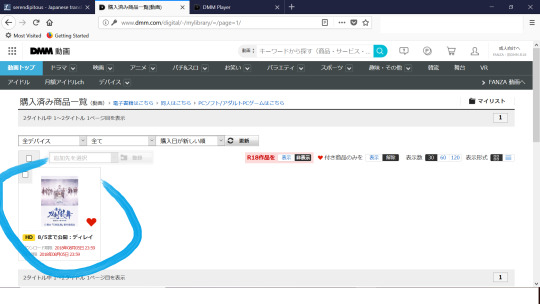
Once you have started the video, look at the top right corner of your browser and you will see the DH icon, 3 little balls, suddenly wearing the colours blue, yellow and red. This means it has detected video(/audio/stuff) flux that it can download.

Then, pause the video and shut down your VPN. (Technically, you can still watch the video and change the quality settings as long as you don’t refresh the page).

Go back to the page where the stream is open and open the menu of DH (the 3 coloured balls) by clicking on it. It will display the list of medias it has detected on the page, like this:

In our present case, those are the different levels of quality you can choose to watch the video in. If you glide over the one you’re interested (but don’t click just right now), you will see a little white arrow appear in a grey box next to it, on the right side. Click on that arrow.
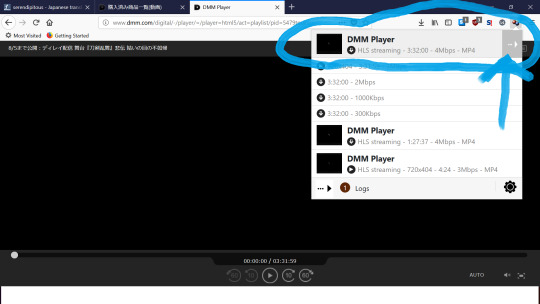
And on the menu that appears, click on the option “Copy the URL”, like this:

Congratulation! You just copied the URL to your video.
Note that if you’re not a potato owner, you may try your chance with downloading directly the file on your disc by choosing one of the 3 first options. Unfortunately, DH doesn’t handle well long heavy videos. But you never know, eh? Might just be lucky this time. If your computer is old and slow, don’t even bother to try...
STEP 8 bis B
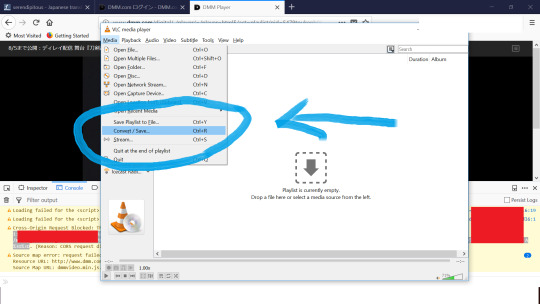
The only part left to do is to record the stream with VLC.
Open VLC and in the menu “Media”, choose “Convert/Save”
Click on “Network”
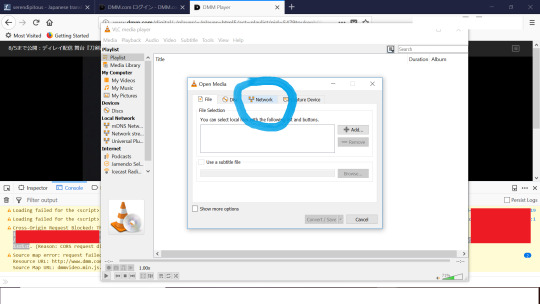
Since VLC is a clever little beast, the URL you just copied should already appear in the url box. If not, simply click right and paste it. Then select “Convert/Save”.
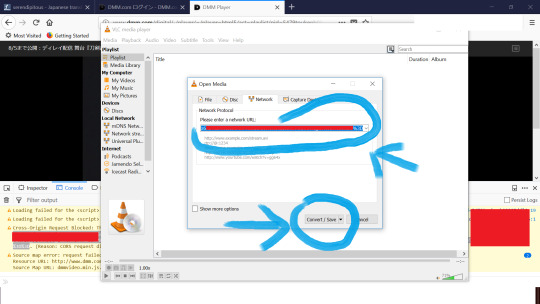
You will get to the following window:

The source is the URL you previously added. If you check “Display the output”, you will get to see the video at the same time VLC is converting it, but I will advise against it if your computer is a potato and if it can’t handle screen capturing, because the process will be dreadfully slow and you will end up with light glitches in the final video if the processor is overwhelmed. And most likely you will only get a glitchy preview anyway.
[Note: At this stage, I also recommend to shut down all the other applications running on your computer, including firefox, to help your little potato to really pour all its strength and power exclusively into the task of getting you that nice video. And before you actually launch the processing of the video, you may elite to do a couple of other optional things to help it further: first, if you have a laptop, make sure to deactivate any energy saving mode and connect your power cable (just don’t trust your battery). Secondly, you may also choose to try and prioritize VLC as a main task (Ctrl+Alt+Delete > Task Manager (Window) > Processes(Windows XP) or Details (Windows 10) > right click on VLC > change the priority > High) the CPU will allocate the most ressources to (and you can switch it back later; the priorities will reset to default anyway when you shut down VLC or when you switch off the computer).]
Then, choose the path for the exit file and create a name for it by clicking on “Browse”. If you know what you’re doing, you can also tinker with the profile, but the default one is really fine too, especially for a trial. When you’re ready, just hit “Start”.
You will arrive at this final window:
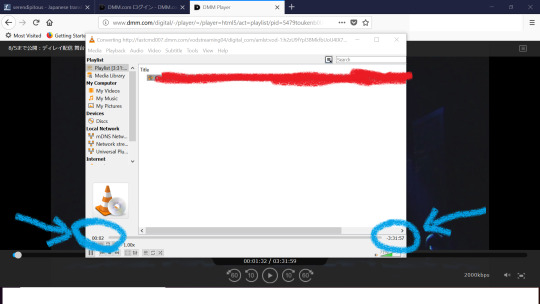
The progression line may flicker for a few seconds in yellow, as VLC is establishing the connection to the url of the stream. When it’s ready to start, you will see appear on the bottom right the complete duration time of the video file and on the bottom left the progression of VLC as it processes it from the beginning to the end. Don’ t touch anything, just let it do its thing until the end; at this stage, your role is over and the rest is up to your potato.
The speed of progression will depend on the speed of your internet connection as well as whether you continue to use you computer to do something else in the meantime or if you let it focus exclusively on the task. The manier the tasks you ask it to deal with at the same time VLC is treating the video, the higher the chances to get some minor glitches in the processed video. If your computer is a smart new thing, watching another video or browsing the internet at the same time may not have much impact on the process. However, show some mercy for your little potato and try to help it by being patient. I had to let mine in peace for 4 hours and a half so that it could process 3 hours and a half of high quality video. Also, if you can use an internet cable instead of the wifi, that may speed things up. And if your potato is a laptop, remember to plug in the power cable (it is unlikely that the battery will hold long enough) and deactivate any energy saving mode.
When the conversion is over, it will look like that.
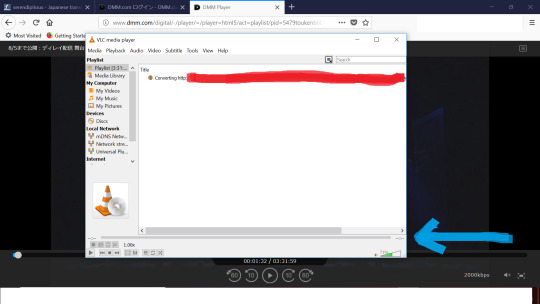
Close VLC, take a big breath and look up the emplacement of the file on your disc. If you chose the default settings, it should appear as a mp4 file (with the audio track already merged in) quite heavy (depending on the quality of the stream that you chose) but with a nice and smooth quality to it.
To give you an example, there is a short clip from the final video (beware of spoilers - but since someone already uploaded the OP song...) from the second highest quality of Tousute Hiden that I may or may not (XD) have gotten after letting my eleven years old potato do his thing for a little over 4 hours (total file size of 4Gb). (Note: Tumblr drastically lowered the video quality, but it’ s still possible to see that the video isn’t jerky)
So, anyone interested in trying out that trick - purely out of scientific curiosity - on, say, Tousute Hiden for example XD, before the end of the delayed stream (in a little over 12 hours), by all means, be curious as hell... theoretically, of course XD
Feel free to ask if you have any questions.
REMINDER: again, please keep in mind that this tutorial doesn’t work anymore because DMM changed their streaming protocols 2 years ago.
148 notes
·
View notes
Text
11.03.2022

Speaking of the ring, I have extremely slender, delicate fingers so I had to tell him to buy me the smallest size… when he wanted me to choose the rings, I thought he was just trying to fix my mood but he was quite serious about it and although I could have designed them myself everything happened so fast that I had to pick something ready. I was very sad and I have cried a lot because I was feeling really despondent and hopeless, everyone was getting married, the thought of dying alone was already killing me from inside, I was the only one who never had a boyfriend, no relationship, who’d never been officially “asked out” or kissed… I don’t want to share the order number because that’s supposed to be confidential and I have concealed the brand name as well because I don’t want to jinx it, I will share it later on… If I would have been able to customise it I would have probably picked Emerald along with diamonds because that’s something which is both royal and vintage, it’s also very timeless and if not that then my second choice would have been a Garnet (because that colour symbolises love, it’s very romantic and it’s a bit more unique, it’s also very 90s… the craze has died down so Garnet hasn’t been in trend lately which makes it all the more special) the only clause - precious stones can cost a fortune and you have to take a lot of care. My mother once lost her ring and I’m not sure which stone she had but it was a part of her set. They also have to “suit” you especially if you are hypersensitive and I’m a bit superstitious when it comes to that. I was always into solitaires, I had an artificial ring when I was in my teens, it’s not like I had taken a celibacy vow but it stood for love and self worth, it also meant loving the right person with all your heart… it was similar to the first ring (I have attached a few images below) when I saw it, it reminded me of innocence, purity & first love, the options on the right were actually not from my preferred brand, I don’t like the polish or the quality, I mean rings that hardly cost INR 1800/- 2500/- dazzle a lot more than this. It depends on the carat… and since we belong to a middle class family, we won’t be able to afford a higher carat so I had to chuck that cuz I already have a Diamond bracelet from Tanishq, the brand is good but it doesn’t sparkle much… the only ones which even have a tad bit of lustre are either in lakhs or they are downright artificial (not all but actual zircons) The one that I’ve chosen is a well known Austrian brand, I love their sparkle and cut. They had one pair ready with a solitaire ring and a plain diamanté band to go along with that, it was a little cheaper but I had my heart set on the Marquise ring and I didn’t want anything in silver, according to me silver looks really beautiful on fairer skin tones, those who are “white as a lily” and gold flatters warmer tones more like Cleopatra who was always clad in the classic Sphinx gold, I wanted Gold in both but the other one was only available in Rose Gold so I chose that and I was determined to get the Marquise cut in Gold because it’s a heritage design and I wanted it in the classic Golden band, I saw their real time pics and you can’t make out much difference, they both look identical and like I said Marquise has to be in gold… I also love those classic minimalist wedding bands, they look so beautiful✨🤍
Love,
Czar 𝒵𝒟.


Thanks Daniyal 🌷 I will get a manicure done at home once I get rid of my cold, I’ll do my own mani, I know which nail polish will look good these beautiful rings, the solitaire ring is still in transit, it will be here soon… he got the first one from the store itself because we didn’t feel like waiting till 12th March, my numerological value is 11 so we thought this date would be more special (auspicious) I am sorry, you know I don’t click photos anymore but as soon as I’ll regain my confidence I will… till then I can either avoid the camera or if the situation demands we will click them but we’ll have to post them privately, I’m yet not ready for the world.

1 note
·
View note
Text

Hey Hi I promise I am not dead lmao- I sorta fell out of Fallout for this entire year at least,, oops
But thanks to the awesome folks over at @artistsoftheapocalypse I am Back into it! So I drew my Fallout 4 ocs. KOA squad finally got a group pic! Click for higher quality ty ty.

A quic behind the scenes pic because I’m certain it was absolute chaos and this was just the best one in a series of much worse photos. And ofc I must made a meme when I draw something that takes me so long x)

More oc info below the cut!
So I know I talked abt Russell (back) a lot but he’s obviously the tanky Big Guy of the group. He’s just so genuine for a kid who grew up in the worst conditions. A huge indestructable puppy. His game is also bugged so often most creatures will not be hostile to him (primarily deathclaws). Not sure if that’s related to his Wasteland Whisperer perk or not since it just happens passively.
Levi (left) is an ex-BOS scribe who is the team Smart Guy. Sort of. Smart Guy and Lancer for sure. He’s got a really complicated relationship with Maxson and he was NOT happy they returned. He’s happy to stay in Sanctuary (i.e., the furthest settlement from the Airport). He builds robots and weapons and sometimes armor. He’s trying to figure out if he has a crush on Russ, Eden, or both. In-game, I’m pretty sure he’s gotten a broken af gun but super low damage resistance. His luck is like, 2, lmao. Every fight is a coin flip and it does not usually go his way.
Eden (front) is the daughter of a powerful mercenary couple. She could’ve followed in her parents footsteps, and for a while, she did. She decided to settle down in Sanctuary as a bartender instead. In-game, her stats are broken to the point where I’m pretty sure her Charisma is like. 14. How did this happen. I *think* it’s her armor and some sort of mod shenanigans. I am choosing to believe she is just so charismatic it just breaks reason. The team leader and heart, though she passes the leader role around to Levi and Russ. Not Vance, though. Sorry.
Vance (right) is the newest member of the KOA. He’s from New York, and since there is almost no lore I’m aware of about the state, I can just decide what it’s like. He’s the son of the Corvega family line (yes, the car manufacterers). He wants to be a journalist :] His job is to stand around looking pretty and he does a great job at it. He is absolute garbage in a fight. His gun of choice is his grandfather’s custom .44. He prefers to use a baseball bat because .44 caliber bullets are Expensive. I only recently discovered a single screenshot of him, but I don’t know if his save file still exists. We Shall See...
#Look at this Photograph...#fallout#fallout 4#fallout oc#Russell Passerini#Eden Kerrigan#Levi Dominev#Vance Corvega
0 notes
Text
Headcanon - Theater Layout
Okay, so, majority of the thing under a cut because there’s pictures galore XD
But here’s a summary:
The Kurukurutei is, in design, presumably heavily inspired by the existing Suehirotei in Shinjuku. The outside/front of the building definitely matches. Interior decor is up to imagination but I like to think the performance hall and stage at least are something similar to the real thing.
The building has three floors
The first floor, with three doors leading out to the sidewalk. There’s two ‘main entrance’ doors leading into the theater room, and one ‘staff entrance’ door leading both upstairs to living quarters, and to the backstage area including dressing room and yard.
The second floor is the “balcony” segment of the theater room. It’s a very tall theater room. Only staff has access to it. There’s also another room located above the dressing room that only those living at the theater have access to.
The third floor is the living space. It has a living room, kitchen, bathroom, and three bedrooms.
I guess there’s also a sort of attic but it doesn’t really count as a fourth floor because it’s kinda low and there’s probably just a ton of random stuff crammed into it.
I tried to rebuild the theater in Sims 3 the way I kinda-sorta imagine it but it had almost zero Japanese furniture and even the pay-for stuff on the official site is kinda useless and lol ain’t nobody got time to mod the game so just pretend there’s a ton more Japanese-looking stuff in the building than the game is willng to offer.
Anyway, picture time! (Click the text links for bigger images):
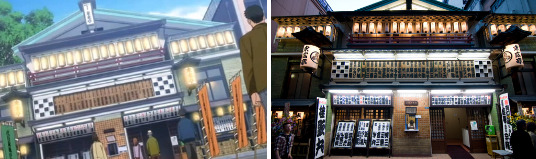
Left is the [ Kurukurutei ] exterior shown in the game, right is a picture of the [ Suehirotei ] in Shinjuku.

A bunch of interior pictures of the theater room. Top three are real photos, bottom three are anime renditions from the anime “Shouwa Genroku Rakugo Shinjuu”, which I actually recommend watching. I remember going in for the sole purpose of learning more about rakugo to better muse Uendo and thinking I’d be bored, only to get hooked after the first episode and binge the entire first season in one afternoon lmao
[ One ] [ Two ] [ Three ]
[ Four ] [ Five ] [ Six ]

Like I said, Sims 3 doesn’t really allow for me to properly re-create existing things, but all things considered [ it’s not too bad ]. Unfortunately I couldn’t take screenshots directly off the computer, so uh. Sorry about photo quality.

I don’t know if the theater has the same fuckton amount of lights everywhere, but I kinda had to add a billion for the sake of being able to SEE.
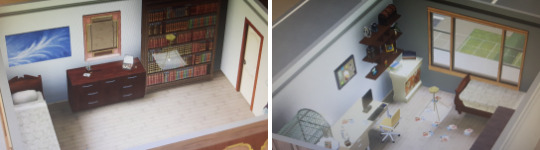
[ This one ] is basically a view of the first floor. You can see the dressing room and the hallway around it on the left, as well as the yard. The stairs in the same hallway lead up to living quarters, and there’s a kinda of dresser-closet-thing in front of the stairs for guests to take their shoes off. (They don’t get a lot of guests, but they do have a few pairs of guest slippers in the racks.)

[ First one ] is a slightly closer look at the front. There’s an empty stripe of brown bricks in the center, but there’s supposed to be a ticket booth there that people can buy their tickets from. The door on the right of the booth is where the audience walks in. The one on the left is locked. And then the left-most door is the staff entrance.
[ Second one ] is just a bit closer up to the seats and the stage. Hard to do in the game but the stage is supposed to be higher up and can have curtains of a sort to close/hide the stage. The wings are tatami mats. You’re meant to take your shoes off before walking on them, and they also have pillows to sit on.
[ Third one ] is really just to show that there’s a bathroom for audience people to go to during performances.

[ The yard ] is meant to have a higher hedge, thank you Sims, but you can see the doghouse previously occupied by Jugemu and the window Simon was looking through during Turnabout Storyteller.
[ The dressing room ] is supposed to have a wooden sliding door instead of a glass one, thank you Sims, but there’s a table in the middle and a fridge in the corner and a TV and a dresser with a very big mirror. The dresser and mirror are actually important since everyone in the Toneido Troupe pays special attention to their appearance before going on-stage. One of the corners has a small shrine/altar that was initially for the first Uendo and his wife, but now also has Taifu’s ashes as part of it.

[ Second floor pic ] where you can see the first floor lamps just hanging in the void because there’s no ceiling and I don’t know if the game understands gravity and physics. I mean there’s literally no floor and they’re just. Hanging there because I wanted them to.
The performance hall balcony can technically be seen from the floor below, but guests are not supposed to be able to see what’s up there and the view is almost always obscured by curtains. I just put a bar there in the Sims but it’s actually from where the lighting and the stage curtains are operated.
Over the dressing room is just a spare room that is almost more of a stroage room. Uendo likes to play piano there. But it also has a few other music instruments in it, and some painting tools, and Uendo’s baseball gear, Geiru’s ice skates, some dog stuff for Jugemu, and a lot of toys and materials for acrobatics that the Troupe used for performances. Right across from that room is the stairs up to the rest of the living space.

[ Third floor ] with living space arrangement.
Upper left is the living room, which is supposed to look a lot more Japanese than the game can do. Next to it, upper right, is the kitchen. Taifu (left) and Geiru (right)’s rooms facing each other, both decently-sized. Lower left is Uendo’s room and lower right is the bathroom. Uendo’s room was never really intended to be a bedroom and Taifu just kind of turned it into that when he was adopted into the residence, which is why it’s much smaller than the other two bedrooms.

[ Living Room A ] [ Living Room B ] [ Kitchen ]
Gin-chan’s cage is pushed up in a corner against the stair rail and kind of hard to notice when coming up the stairs. The extra branch is for when the birds are given permission to fly around the room. The couch has a small table with a phone next to it, and is facing a big TV with stacks of movies and games on the sides. Taifu was a big reader and had a giant bookcase up against the wall.
The kitchen just generally has all the basics-- table, chairs, fridge, sink, oven, stove, dishwater, and a whole bunch of cabinets for storing pots and dishes and non-fridge food. One cabinet is entirely reserved for tea.

[ Taifu’s room ] is very minimalist. (Maybe not quite as much as in the game, but I didn’t really know what to put in there.) I put a bed but it’s actually meant to be a futon. The grey wall is intended to be all sliding doors and just one giant closet with mostly spare futons and blankets and sheets, and only a small section being Taifu’s clothes.
[ Geiru’s room ] is also a bit more full than in the game, but. Her closet space is almost entirely occupied by costumes and colorful outfits. Some of the clothes in there are Uendo’s hoodies that she snagged for herself because they were soft and that he still hasn’t gone back to reclaim. She has a big dresser wth a mirror that contains makeup and lotions and other beauty tools scattered in the drawers. There’s a mermaid statue in the game that Geiru may or may not actually have, but was honestly just put there to show where she keeps an old framed picture of her and her father.
[ Uendo’s ][ room ] is essentially a BIT smaller than in the above images. And a lot messier. Honestly game mechanics CANNOT do the disaster in his room justice. There’s his bed up against the wall/window (it’s a big window), there’s some box thing in the corner which is realistically actually a big pile of unfolded laundry, his desk has a computer on one half and the other half is supposed to be buried under pens and pencils and books and anime/video game figurines, plus more figurines and stuff on the wall shelves, Katsura’s cage in the corner, next to the bed is a big drawer with make-up and juggling tools and blank notebooks and USED notebooks and stacks of unused paper and used paper and color paper and some other random things and a mirror hanging over the drawer and the bookshelf in the corner isn’t supposed to be a bookshelf even though he’d love one and is instead supposed to be a tall-ass closet with ALL the clothes in it, his and Patches’ and Kisegawa’s and the stuffed bunny he got from Geiru as a kid is also hiding in there somewhere. The feather painting hanging over Uendo’s bed is actually supposed to be a small but growing cluster of “posters” from friends.
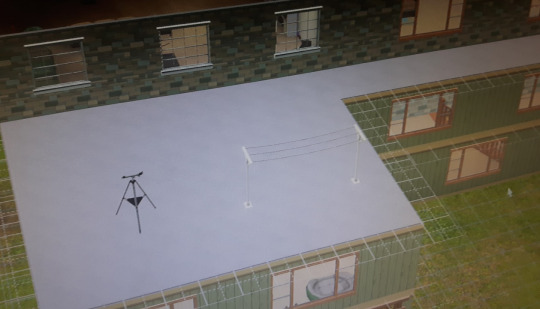
[ The side roof ] doesn’t have any “real” access. It’s a roof and wasn’t made for going on there. But Uendo likes to climb through the windows and lay on it for stargazing. Since Taifu’s death he also moved the laundry lines because going all the way down to the yard for it got annoying and exhausting.
Anyway, there you go. That’s more or less how I imagine the entire Kurukurutei to be.
5 notes
·
View notes
Text
New Post has been published on Myupdatestudio
New Post has been published on https://myupdatestudio.com/tech-qa-quality-tuning-tv-picture-high-quality/
Tech Q&A: Quality-tuning Tv picture high-quality
Q: How do I realize if my Tv is giving me the first-class photograph feasible? I tweaked the settings, but now I suppose it’s worse than before.
Tech Q&A
Tech News
A: In case you’ve already fiddled together with your Tv’s settings, you likely realize that obtaining the proper image high-quality is an artwork. There may be no “widespread” mix of brightness, evaluation, and saturation. Each Tv is distinctive, or even the environment can have an effect on the way you perceive what you see on your screen. So how do you repair this? One word: calibration. There’s an easy way to do that, but you need to know what you’re doing. Click on here to learn how to calibrate your Television for higher photo great.
Forestall webcam spies
Q: I’m freaked out that someone can watch me through my webcam. Can I disconnect it from my laptop?
A: Sure, hackers can damage into your PC, and Yes, people can secret agent on you without your understanding. This is quite terrifying, especially In case you use your PC frequently in, say, your bed room. Many people have taken to covering their webcams with
pieces of tape, making it impossible to peer something worthwhile. but if this low-tech answer doesn’t make you sense any more secure, I wouldn’t blame you for looking to transfer it off. Click right here to discover ways to disable your webcam.
Pleasant websites for tax prep
Q: What’s the first-class web page to apply to do my taxes?
A: As is normally the case with taxes, this is a good query with a complicated answer. Basically, ask yourself how concerned your taxes may be. If you only have one task, you have a steady salary and your corporation withholds profits tax, you they’ll likely get via with a loose carrier. In case you’re self-employed, you pay quarterly taxes and also you’ve itemized masses of charges on a spreadsheet, you’ll probably want something a bit extra state-of-the-art. Click right here to look the best on-line tax preparers.
Apps for the unwell
Q: My husband is ill. Is there an app which can track the meds he’s taking?
A: First of all, I’m sorry to pay attention that, and that I hope his health improves. After a slow decade, the health care industry is, at the end, catching up to the twenty-first century, and now there are a few awesome apps that will help you keep track of medications and dosages. One app even allows you to communicate without delay together with your health practitioner’s office so that you can test in together with your clinical records. Given how expensive infection can be, you may be surprised to look how fairly those apps are priced. Click here for 3 apps that music your scientific history.
VR at the cheap
Q: I would really like to try digital fact apps and games, but I don’t want to waste $800 at the VR goggles. Are there different alternatives?
A: There are minimum methods to reflect consideration on patron VR: On one hand, it’s tough to accept as true with that virtual truth truely exists, and it’s low-cost enough for everyday human beings to apply in their homes. However, $800 is $800, and as you factor out, that’s not chump change. You in all likelihood won’t find any knockoff or general versions of VR but. but one agency found out how to provide you with the VR enjoy the usage of only your cellphone and $15 worth of packing material. Click here to study Google Cardboard.
What questions do you have? Call my country-wide radio display and click on here to locate it on your nearby radio station. You may concentrate on the Kim Komando show on your smartphone, tablet or computer. From buying advice to digital lifestyles problems, Click on here for my free podcasts.
Picture Projects for Visual Novices
A picture is really worth a thousand phrases, however to a visual learner it is really worth so much greater. Connecting the dots for a visible learner can be difficult, but with images, it could be each creative and fun.
here are a few approaches the use of photographs can stimulate your Visible learner or simply ignite creativity in students.
Watch Free Tv
pics Inspire creative Writing
At the beginning of the faculty 12 months, I had college students deliver in a toddler picture for our elegance bulletin board. earlier than putting a photo on board, I had them transfer photos and write an innovative tale on what they believed was occurring within the picture.
For a history lesson, I copied numerous pictures of infantrymen or advertisements from WWII. college students have been assigned writing a poem or other kinds of expressive writing, or giving an oral presentation, explaining the image.
pictures Create magnificence Recollections
When you consider that fifth grade is the end of the elementary years (at the least in my school), I had the students buy a 12 x 12 scrapbook at the beginning of the 12 months. The ultimate Friday of the month we might take the last thirty mins or so to document unique sports or activities that came about for the duration of the month. This not only served as a reminiscence for the students however as a lesson in journal writing.
All through the month, I’d hold onto writing Initiatives, math Projects, and so forth that were completed and stood out from the everyday lessons. college students would specific their mind approximately a selected occasion at the page with pix, unique writings, handouts, flyers, etc. some students became very worried inside the hobby the usage of distinctiveness scissors, papers, die cuts, stickers, and so on. a few saved the pages very simple.
It was super looking each pupil specific him/herself in various ways. by means of the give up of the 12 months, the scrapbook served as both a reminiscence e-book but additionally as a writing portfolio.
snap shots Make stronger the house-to-college Connection
Most mother and father love to look what their toddler is doing in magnificence. some dad and mom might take a seat inside the classroom all day if we’d permit them! But; for those who are not able to volunteer or do not have time to just pop in and spot what goes on, photographs permit them to connect to the college and infant.
More than one years ago, I invested in a smart cellphone – smartest factor I ever did! In much less than a minute, I’m able to photograph unique activities and shoot out an email to all mother and father with a touch “diddy” of what we were doing at the time. To tricky on the picture, I may also ask mother and father to comment or to “critique” the hobby. The responding emails might then be published on our lecture room network board or given to students for his or her scrapbook. (now not all parents reply, however, I’ve had at the least 90% accomplish that. For those students who dad and mom did not reply, I will write some thing to submit on the board).
students love to peer the pix of them “stuck working” and will comment on what they have been doing while the image changed into taken. also, the images I ship function a communique starter on the dinner desk when mom/dad asks “what did you do in school today?” dad and mom can display the photograph and ask students to give an explanation for what was going on.
The out of sophistication activities, Inspire parental involvement and supply a risk for parents to paintings with their infant. It is also first-rate for parents to proportion with a family who might not live close to the child to sense more linked.
pix Simplify difficult instructions
Technological know-how is a tough concern for the Visual learner, as it regularly calls for summary wondering, for a visible learner that could increase beyond the area of imagination and create confusion. To put matters into an angle or extra concrete thinking, I may also use classroom pics.
As an example, I was coaching on light and spectrum. To help illustrate this idea, I assigned a digicam mission. I requested students to take photos of diverse gadgets that suit into particular classes referring to our Science chapter (As an example, shadowing and reflection). the usage of what we talked about in class, college students have been asked the usage of cameras, to find or create situations that met the specified category and take a picture. For shadowing, of course, the scholars had to take an image for the duration of the day. no longer only did they need to take a photo, however, students needed to be aware of positioning, the attitude, and so much extra (brilliant extension to the Science lesson).
After they had been finished, every scholar becomes then requested to broaden their photos, vicinity them in a small picture album (dollar shop range) and using an index card, explain the medical term/idea for the picture positioned in the slot in the back of the photo. Now the students had a fun, creative, and relevant use of the Science principles to which they could talk over with for testing and different classes. This will also be completed reading weather, animal habitats, rocks and minerals, and a lot greater.
images assist in Trouble Fixing
In an earlier blog, I expressed my love for math and math Tasks. using pictures with various math sports and having students write out the steps, arranging sequence, and piecing together Problem puzzle portions, assists in mastering the procedure to tough math equations.
For instance, we have been studying a way to calculate tax on purchases. Because it becomes close to Christmas time, I had the scholars bring in numerous flyers. I asked each pupil to create a Christmas listing and with a given finances, students needed to start their “purchasing”. After looking for absolutely everyone, we listed the stairs to calculating tax together on the board (I took a picture of our steps). the scholars then had to finish a price range chart that showed charge earlier than and after tax.
This task took a few days to finish. I took photographs as students had been at every level of the task. (I.E. Making listing, deciding on gadgets, the usage of calculator or working out Problem by means of hand, filling in budget chart, including tax, and final calculations). I then advanced the photographs (or You could print out if you have photo paper and shade printer) numbered the images, and published on the bulletin board.
students have been then assigned a range of photo and asked to provide an explanation for the strategies to that specific step. This helped them understand the concept and techniques involved in calculating tax, multiplying chances, and additionally, ought to have served as a sequencing lesson. What did we do first, subsequent… and so on?
NFL Playoff Picture
photographs Customize school paintings Education
students love sports and Initiatives that are non-public to their lives or that give the opportunity to proportion more approximately them. My class and I examine collectively The arena In line with Humphrey, a satisfying tale approximately a hamster who joins a fifth-grade classroom. on the cease of the tale, I gave each student a bit publication I created and a tag board hamster to shade and name.
students had been then assigned to journal seven days inside the life in their hamster. They were recommended to take pictures in their hamster in numerous settings and sports. They loved this! I obtained such superb adventures involving my students and their hamsters with pictures! by way of making this venture personal, college students had been more concerned than they could be writing a fashionable e-book record.
0 notes
Last Seen Blogs


