#compressor to restart
Explore tagged Tumblr posts
Visit Tumblr Blog
Explore Tumblr blogs with no restrictions, modern design and the best experience.
Last Seen Tumblr Blogs


Fun Fact
Tumblr is used by 21% of adults online aged 18-29 years.
Text
What are the main parts of chiller?
WHAT IS A CHILLER & HOW DOES IT WORK? | INDUSTRIAL CHILLER.
Chillers consist of four essential components; an evaporator, a compressor, a condenser, and an expansion unit. In addition, every chiller system contains a refrigerant.
A chiller is a vital component in air conditioning and industrial cooling systems, consisting of several key parts that work together to remove heat from a space or process. The main parts of a chiller include the compressor, evaporator, condenser, and expansion valve.
Compressor: This is the heart of the chiller, responsible for compressing the refrigerant gas. It raises the pressure and temperature of the refrigerant, preparing it for the cooling process.
Evaporator: The evaporator absorbs heat from the surrounding environment or a process fluid, causing the refrigerant to evaporate and turn into a low-pressure, low-temperature gas. This chilled gas is then sent to the compressor to restart the cycle.
Condenser: The condenser releases the heat absorbed by the refrigerant in the evaporator. It transforms the high-pressure, high-temperature gas into a high-pressure liquid by dissipating the heat into the air or another cooling medium.
Expansion Valve: This valve regulates the flow of the refrigerant, reducing its pressure and temperature before it enters the evaporator. This process allows the refrigerant to absorb heat efficiently in the evaporator.
These components work in a continuous cycle, facilitating the transfer of heat and maintaining the desired temperature in various applications, from commercial buildings to industrial processes.
#What are the main parts of chiller#chiller#Chillers#compressor chillers systems#compressor to restart#condenser cooling process#evaporator#expansion valv ehigh-temperature#industrial cooling systems#industrial processes#low-temperature#garefrigerant gas#Reynold india#Water Chillers
0 notes
Text


This story is about David Peters and RSO Ed Bethart.
Dave was born to fly. He started collecting airplane pictures at the age of 7, writing to airplane manufacturers for pictures that would cover every inch of his childhood bedroom wall. He wanted to be a pilot, and he did. He became one of the best pilots in the Air Force. He made an impossible situation possible with help from God.
Dave was descending back to Okinawa, Japan, his home base, with only one engine working. Then the other engine blew out. Knowing that the SR 71 glides like a rock, he had to think fast! Dave started to tell Ed to get out (eject).
Then Dave heard a voice …
“You’re OK keep going.” The voice was not in my head.
Ed said he never heard it. I heard it again and I felt calm and I did exactly that. I kept going.
The rest of the story is in Dave’s exact words.
It started with a rocket ride one pass through the Korean DMZ unrefueled. Everything was great until I came out of AB (afterburner) for the descent. Almost immediately the left engine started surging and the compressor stalling with the EGT going way past limits. I told Ed I was going to shut it down. So he went through the checklists and we declared an emergency and requested decent to a precision straight in. We were setting up and not particularly worried because we had done this more than once.
Unfortunately, about 15,000 ft in the decent setting up for a downwind the other engine started surging, and the compressor stalling. Ed made his infamous comment
“Don’t tell me that’s the other engine “.
My answer is, Ed that’s the other engine. So he says what are you going to do?
I said restart the other engine so call approach and tell them we are going visual and get the tower and I’ll talk to them. So I started a pretty steep dive to get enough speed for a restart which I was able to get. The engine was still operating the same way so it wasn’t doing anything but giving us hydraulics for flight controls. I left the other one running for the same purpose. Ed got the tower and I told them we were running out of engines and were visual for a modified straight-in. They cleared us for whatever we needed.
We were doing a little over 500 Kias and turning onto a descending base leg trying to get the speed down to lower the gear.
We kept slowing and I threw the gear down at about 350 Kias. At the same time, the right engine ceased. The gear came part way down so I pulled the emergency release handle and the mains came down and locked but the nose wasn’t down. I was constantly readjusting and trimming to keep the flight controls as close to neutral as possible because I didn’t want any violent movement if everything quit.
That’s when I told Ed” If I say get out… if you say what… you’ll be talking to yourself”.
I kept letting it slow and about 5 miles on the final the nose came down and locked. I felt like we had everything set up well and was geared to keep going. According to the MRS, the second engine quit at 11 seconds on final which at the speed we were traveling was a little over a mile and a half. I think because I kept keeping the trim as close as possible there were not any big changes and windmilling may have been enough. At any rate, we touched down at about 240 Kias popped the chute, and eventually used emergency braking to stop.
Lew Sultze was the first one there with a pickup he backed up under the chine and we exited.
🌟It turned out to be very fortunate that we were able to get it down because it was determined that the cause was faulty fuel hydraulic pumps that failed.
When they looked further they found the same faulty pumps on the other airplane at Kadena, two at Beale, and one at Mildenhall. (By saving the 960 they probably save more lives.)
We received DFC and I was awarded the Koren Koligian Jr trophy which recognizes the most meritorious flight for all US military for the year. This was in 1979.~ David Peters
Introduction and post by Linda Sheffield
@Habubrats71 via X
#sr 71#sr71#sr 71 blackbird#blackbird#aircraft#usaf#lockheed aviation#skunkworks#aviation#mach3+#habu#reconnaissance#cold war aircraft
44 notes
·
View notes
Note
Would you be able to share some of your gif making process/programs you use to make them? They look great! 💕
Omg thank you,,, 🥺💕💖💕 And yes ofc! I'm going to write down everything I can think of about my gif making process but if I forget anything/you have questions about something specific let me know! ✨
(Long post ahead)
Emulators & Recording
I use different emulators and recording programs, depending on the game I want to play/record:
DesMuMe: This is the one I use for DS games, and it comes with a neat “Record AVI” feature under the “File” tab. Just click it, choose a location for the file and click OK (make sure the Compressor is set to “Full frames (No compression)”). Recordings have a limit of 2 minutes/2GB, but when it reaches it, the program will automatically create a new file and keep recording until it reaches 2 minutes, and the process will repeat (the next recordings will have “part_X” in the name file). When you’re done recording, just lick on File > Stop AVI. Also! The recordings will always have the original resolution. My DesMuMe is set to be 2x its size with a gap between the screens, but all recordings are 256x384 pixels with no gap.
VisualBoyAdvance: Like DesMuMe but for GBA games. Also has a recording feature in Tools > Record > Start AVI recording. The resolution of the video will be that of the original game but I think there’s no limit on how long the recording can be. I’d still recommend stopping and restarting the recording every 5 minutes or so.
Other games & OBS Studio: For 3DS games I use Citra, and Dolphin for Wii ones. They both have Recording features but I don’t use them because they create weird files. Instead, I record them with OBS Studio. Open the program, click on "Start Recording" and then on "Stop Recording" when you’re done. Pretty simple, just remember OBS records your screen so obviously if your emulator window is minimized it won’t record it. You can change your OBS settings to only record the emulator window but I’m too lazy to tinker with OBS so I just record the whole screen lol. There’s always a slight loss of quality with OBS. If you’re recording games with 3DS models then it won’t be too noticeable, but I do not recommend using OBS for pixel/pixelated games like Nintendo DS and Game Boy ones.
Misc: Before OBS, I used to use Camtasia Studio 8. Also does the trick, but instead of saving a .mp4 file it creates its own type of file and it requires you to manually export it as a .mp4 (it's a hassle). It has some editing features too, which OBS does not as far as I can tell. Also, besides DesMuMe I have MelonDS. Highly recommend it if you need to use the multiplayer option (to trade pokemons between games for example) and most importantly for the better mic feature (you WON’T get past the Nintendogs tutorial on DesMuMe). Also the 3D model graphics are of higher quality, but it doesn’t have a recording feature so you will have to rely on OBS and as I said it lowers the quality.
As for video file types, both .avi and .mp4 are allowed in Photoshop. However, .mkv (mostly used for TV shows and movie files) is not, so if you want to edit, say, an anime episode in that format you’ll need to convert it to .mp4. I use Format Factory for that, although I think here’s a slight quality loss.
Here's a comparison of a pixel game recorded with OBS vs with DesMuMe. It's tiny but it will have you shaking the screen violently when you notice it.

OBS recording vs. DesMuMe recording
Do not delete or move the video file until you’re done making gifs of it. Even if you save the file as a .psd, you will get an error message if the video file is gone from its original location and you'll have to start over again.
Editing (I)
I exclusively use Photoshop 2020. If you use CSP, GIMP or other editing program you’ll have to find the equivalent features or look at other tutorials, because I’m only familiar with Photoshop. Other PS versions should have either the same or similar features. Here are the steps I usually follow (names might be wrong because my PS is in Spanish “OTL):
Importing: Drag and drop your file into PS. You should have your Timeline window on the bottom part. If you import a .mp4 or .avi file you should get the Video Timeline, which is what we will work with. If you export a .gif you will get the Frame Animation Timeline; in that case you need to convert it to a single timeline. Click on “Convert to Timeline Video”, then select all the layers (click on Layer 1 and then hold Shift+Click on the last layer) and then right-click on the last layer > “Convert to Intelligent Object”. This is what your PS window should look like for both cases:

avi/mp4 file (has a Video Timeline) vs. gif file (has a Frame Animation Timeline)
Cutting and resizing: Often your file will either be the wrong size or have unnecessary parts. To resize your video, go to Image > Image Size (NOT Canvas size) and change the resolution. For good gif quality, the image resolution should always be 540 pixels wide (Tumblr’s image size), height doesn’t really matter. PS will change the height proportionally if you change the width. So, for example, a 1440x1080 video will be 540x405 after the conversion. Similarly, you can crop out parts with the Selection tool + Image > Crop. Making pixel games bigger requires a different method (more on this later).
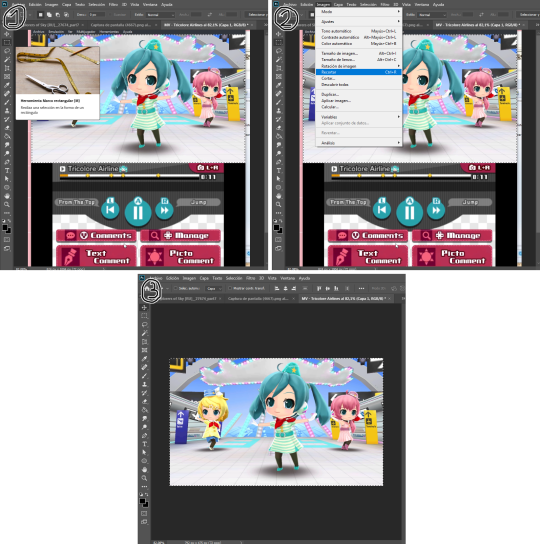
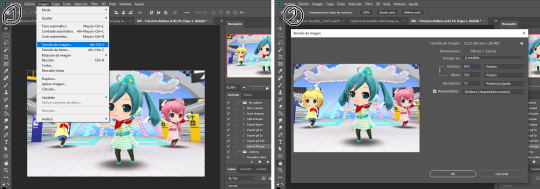
Cropping vs. Resizing
Cutting the timeline: Your gif will likely be too long, or you might need to stitch two parts together. In the Timeline window, move the vertical red line to the part where you want to make the cut. You can precisely move frame by frame with the arrows next to the play button. You can also zoom in and out the timeline with the slider at the bottom. Once you’ve placed the red line on the part where you want to make a cut, click on the scissors. You’ll get two layers – delete the one you don’t need and repeat until your gif is the right length. Similarly, you can click on either end of the timeline and drag it left and right to extend/reduce the length, but it’s less precise. I recommend moving the gif layer out of the video group in the Layer window, especially if you’re going to stitch parts together or add new layers that aren’t Color adjustment layers (like your watermark). If you do so, you’ll notice that each layer occupies a different line in the timeline, while if it’s in a group, it will all be in the same line (this means that all layers will be one after the other, you won’t be able to overlay them).

Cutting the timeline (1-3) + Moving the gif layer out of the video group (4)
Color adjustments: The fun part! You can get hella crazy with this one. If you want to go for really fancy stuff, I recommend checking out @/usergif, they have lots of tutorials and gifsets you can use as inspiration. I am however a simple man and will mostly use the same tools: Sharpen, Hue/Saturation, Gradient Map and Curves.

Soft sharpen in the Filters tab + Curves, Hue/Saturation and Gradient Map in the Layer window
Editing (II)
Can't make a bullet list of a bullet list so here's each adjustment layer explained. Note that this part is very personal so feel free to tinker with the settings for each tool until you get what you like:
Sharpen: Used only with non pixel media, aka for 3D models and series/movies. It makes the image look sharper. You'll notice that the video layer can have two icons: a movie film or a folded paper (in the "Import" section, the Pokémon gif has a movie film icon, while the converted Nintendogs gif has a folded paper icon). If your layer has the former, the sharpen tool will only be applied to one frame. To avoid that, right-click on the layer > Convert to intelligent object. Resizing the image will also do the trick. Filters are always applied to the layer, they don't create a new one (this is what the rest of the following adjustments will do). As for settings, this is what I usually have:
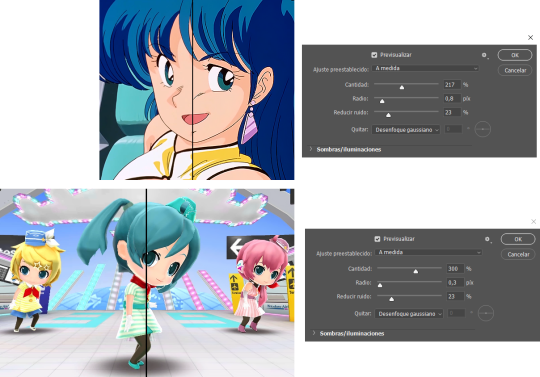
Two types of Sharpen settings (original on the left)
Hue/Saturation: Changes both the global colors and specific hues. To do the latter, open the menu right above all three sliders (by default it's set to "All") and then choose the color you want to change. Be careful! Sometimes you might accidentally edit the wrong hue, for ex a bluish green if you are editing blue hues. If you want to see what parts of the gif you're targeting, set the saturation to the max. Colors play a heavy role on gif size: the more diverse and brighter the color palette, the bigger the file. Gif size will be the ruin of your gif making process, so don't go too overboard with this. More on gif size later, but for now, I recommend "unifying" the color palette (aka making some hues similar).


Two examples of Hue/Saturation adjustments (Original above)
Gradient map: Adds a gradient overlay to the image. When you open the Gradient Map window, click on the gradient and you'll be able to edit it or create a new one. To do so, click on the tiny boxes with colors (only the lower ones, the upper ones won't work), then on the slightly bigger box to change the hue. To add a color, click anywhere below the gradient; to move the colors around, drag the tiny boxes and move them, and to edit the limit between each hue, drag the tiny diamond. The way gradient maps work is by editing the colors from lighter (right) to darker (left). So if you have blue on the right of the gradient, light hues will be blue, and if you have pink on the left of the gradient, dark hues will be pink, with mid tones being a mix of pink and blue (either purple, or bluish purple or pinkish purple). The image will look weird when you add a gradient map, but don't mind that for now. Just create the gradient you want and click OK. Now, select the new layer that has been created and play with the blending modes and the opacity of the layer until you get something you like. For blending modes, I usually go for the ones in the second and third sections. To edit either the Hue/Saturation layer or the Gradient Map one, click on the black and white icons (left to the mask, aka the white box) in the Layer window.
Video showing how Gradient map works


Two examples of Gradient maps, with a readjustment of the Hue/Saturation layer (Original above)
Curves: Edits the light, dark and mid tones. Click any point in the curve/line and then drag it around to see what it does. You can make more than one point in the curve. Afterwards, change the blending mode and the opacity.
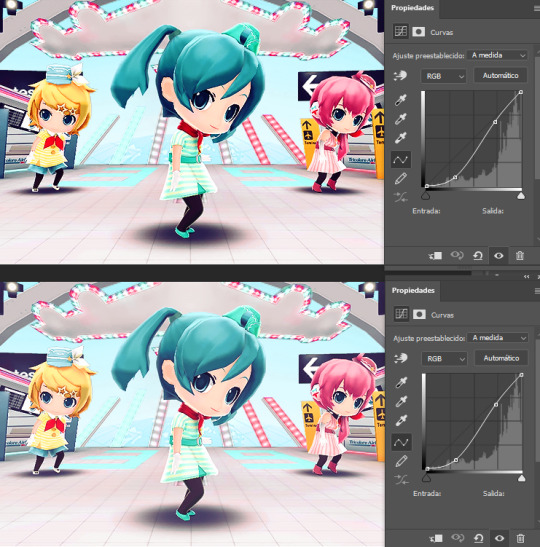
An example of a Curve and the same example with the Curves layer at 40%
Gaussian blur: Sometimes I add a blurry/fuzzy effect to certain gifs. To do so, duplicate the gif layer (right-click > Duplicate layer), then, while selecting the new layer, go to Filters > Gaussian blur and pick a small numer (0,4-1). Click OK, set the blending mode of the new layer to Darken and lower the opacity.


Two examples of images with Gaussian blur applied (Original above)
Watermark: Add a watermark to your image. Click on the Text tool, create a text box, pick the font, the size, the color and the placement, and then click the ✔ button. Change the blending mode and opacity of the text layer. Personally, I have a .png image of my watermark that I just import to the gif and then edit, instead of creating a text box everytime. Regarding watermarks, I get that they are annoying but it's going to be far more annoying when someone reposts your gif without credit or crops the watermark out. Tumblr sucks when it comes to reporting this kind of stuff and you deserve to have your work respected (you've spent time and effort on this!!), so I highly recommend putting a watermark on your gifs. If you want to avoid having someone crop it, put it towards the middle of the image and not in a place that can be edited easily. Also, I usually save gifs without a watermark and add it afterwards.

Red: Danger zone, can get cropped easily. Blue: Also Danger zone, can be edited out. Green: Too obtrusive. Yellow: Perfect place, can't be edited out and it's not on the main focus of the image
Exporting
This is the "hell on earth" part. To export a gif, go to File > Export > Save for Web (Legacy), then once it loads (may take some time), play the gif a couple of times to make sure it looks good and save it. These are my settings:
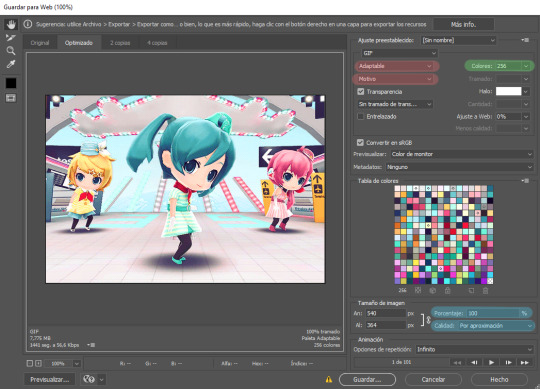
Settings for the Save for Web (Legacy). You'll only need to tinker with the settings on the right.
However, there's one thing to keep in mind: Tumblr has a size limit of 10MB per gif, meaning your gif won't be uploaded if it's larger than that, and you'll be surprised how easily you can surpass that limit. Also, gifs can't be longer than 500 frames, aka 8 seconds (to check the duration of your gif, zoom in in the Timeline Window, you can see the seconds at the top). Here are some pointers regarding gif size:
Pixel games and anime have a smaller size than life-action and 3D models: This is because the former have limited color palettes and the latter has way more colors. For example, Pokémon Mystery Dungeon or Sailor Moon will rarely pose problems, but Arcane, Breaking Bad, Nintendogs or Baldur's Gate 3 will.
The more complex the animation/motion, the bigger the size: This is because complex animations/motions, like a fight, have more unique frames than, say, someone moving their head up and down and nothing else, and that means there's more information to store.
The longer the gif/the bigger the resolution, the bigger the size: Kind of self-explanatory, longer gifs or gifs with big resolutions means more information stored in the file.
Bright and diverse color palettes increase the gif size: As explained in the first point, more colors means more information and thus a bigger file size.
The more it exceeds the limit, the bigger the changes you'll have to make: If it's 10.5MB you can get that number down easily. If it's like 20MB, you might need to cut the gif in half.
How do you solve this? There are a couple of methods:
Make the gif shorter: In the Timeline window, cut parts of your gif until it's short enough. If you don't want to delete certain parts, you can divide your gif in two separate ones.
Make the colors less bright/unify the color palette with an Hue/Saturation layer: If you haven't done this in the editing process and your gif exceeds 10MB, it's time to edit the gif colors.
Reduce the color palette: In the Save for Web (Legacy), you'll see that there's "Colors: 256" on the left (marked in green in the screenshot). 256 is the max amount of colors you can have, but you can reduce it. PS will automatically get rid of colors that have a smaller presence first (for example, in the anime gif above, if I reduced the colors it would get rid of the reds and magentas before the yellows or the blues).
Change the settings in the Save for Web (Legacy) window: Besides the color palette, there's a setting on the right side, marked in red in the screenshot above (the first one). I have it set to "Adaptable", which is the highest setting, but you can change it to "Perceptual", "Selective" or "Restrictive". This will lower the quality and thus the size, but sometimes it might mess up the gif. Similarly, you can change the setting below that one (set to "Motive" in the screenshot) to "Noise", "Difusion" or none at all to change the quality and size.
Optimize the gif: I use ezgif.com for this. Click on "Optimizer", upload your gif, make the Compression level smaller, click on "Optimize" and then save your gif. This will inevitably lower the quality, so I usually don't go lower than 35. Also, try to get your gif right below the 10MB limit, so if a compression level of 20 gets your gif to 9.5MB but a 15 gets it down to 9.9MB, choose 15. ezgif also has other cool features like one to slow down your gif's speed, so check it out!
Don't make gifs of media that causes problems: If you regularly find yourself being frustrated with gifs of X media exceeding the size limit, you might need to find something else. It sucks to think that you might not be able to make gifs of your favourite piece of media, but gif making should be fun, not ruin your day. Of course, it's up to you to decide how much effort you're willing to put on a gif, but don't overexert yourself either.
The Save for Web (Legacy) window is also where you can make your gif bigger in the case of pixel/pixelated games like Pokémon Mystery Dungeon or Nintendogs. In the "Image Size" section, set the quality to "Nearest Neighbor" and the percentage to 200% to double its size (it will be somewhat close to 540 pixels wide). You can make the gif three, four or even more times its size wih this method.
Closing thoughts and results
Managing a gif blog would require a whole new post with some advice so I'll leave that out for now. There are other things I've also left out like actions (highly recommend learning about them) but these are the basics methinks. Again, if you have any questions, my ask box is open ✨
And here are the gifs with a comparison to the original 🎉

Sharpen, Hue/Saturation, Gradient map and Gaussian blur

Sharpen, Hue/Saturation, Gradient map, Curves and Gaussian blur

Hue/Saturation and Gradient Map
#ysiposting#whew this took a while#now if you'll excuse me I'm going back to studying for exams. regrettably
34 notes
·
View notes
Text

Apologies for the long post ahead
(that's why I put under a cut lol)

Where do I begin? My name is Minthe Thalzoh and my mother is an Elf and my Father is an Alien!
Wait! Let me start over, sorta, from the beginning.

My father crash landed his ship in my Mother's backyard, one thing led to another and now they're the loves of each other's lives and married. They moved out to Willow Creek to start a family.
ENTER ME!
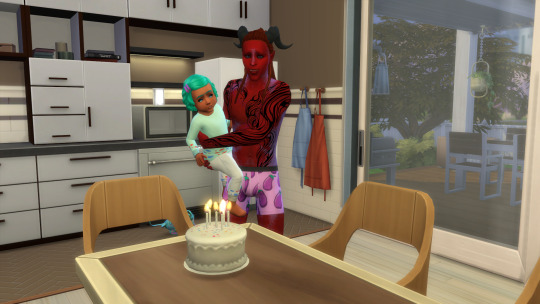
Wasn't I just the cutest little infant!?!
Anyway . . .

My parents knew even then that I was going to be a genius! Though this could have been because of my mixed species genetics. I hit almost every Milestone ahead of the expected timeline and understood and could do a lot more than a "normal" Infant.
Then I became a Toddler!


Not long after, my sister Kaeleen came around and I didn't get as much of my parent's attention, this upset me understandably but I did know that she was smaller and needed more help. I again met all my milestones and sped through all possible toddler skills before my next Lifestage.


As a child I reached the top of my class within a couple of days and worked through two Aspirations. Mom got pregnant again and gave me another sister, Kira, so I helped Kaeleen as best as I could with all her Milestones and Skills. Soon enough it was time for my next birthday.


Father's distress signal was finally answered (took them long enough!) and his world leaders were sending him - and by extension the rest of us - a rescue shuttle to pick us up and bring us back to Unvahiri. I didn't want to go, I was born on this planet and though traveling to another planet did sound like the adventure of a lifetime I made my case to stay. Father agreed as long as I could pass and graduate high school early and get into college before the shuttle got here. Of course I did it! Did you have any doubts? I got into Foxbury for a Distinguished Degree in Physics and I plan to Minor in Robotics. I even got a full ride! My parents set aside a bit of Simoleons for me once I graduate so I can buy a house and start living the Simlander Dream.
I'm sad to have missed meeting my newest sister, Laryse, in person. She was born on the way to Unvahiri, but I get video transmissions from them from time to time. They hope to make it back for when I graduate but I told them not to worry about it and I would try to set up some sort of recording for them. But that was still a long way away, I still have to pass all my classes first. It's a bit lonely right now but at least I was able to sneak my pet, Voxel, into the Dorm. I think the College Board knows he's here but hasn't said anything - yet.
So without further ado I welcome you to a (my) restart of the Not so Berry Challenge

Beginning|Previous|Next
Watcher's notes: I plan for this to be 99.9% all gameplay based but will try to add in a bit of story here and there for fun but I started this save as a de-compressor for Elucea's story which even though I plan different things and randomly write bits for it (not all will I use obvi) it does get rather tiring some days when I do get into that save file (which probably led to my being more in a building/CAS mood for a bit). I want to actually get through a TRUE challenge for once and I've tried the Not So Berry a couple times and abandoned it but through sharing my Glynnans I have made it to Gen 6 so far and don't plan on stopping so maybe by sharing my NSB gameplay I can complete this challenge for once.
Credits (I will try to remember to leave any pose credits when I use them but I can not guarantee that I will remember since I normally Queue out a scene which a good majority of the time takes 5+ posts and then try to remember to add pose credits when I've finished so I do apologize ahead of time when I inevitable forget same as I have been doing for my story with Elucea):
Minthe and Voxel picture - Cat Travels by @bananasplit-sims
Infant Minthe portrait - Happy Christmas by @simmisstrait
Toddler Minthe portrait - Xmas poses 16 by @simmerianne93
Child Minthe portraits - Family Together by @simmireen
Teen Minthe Portraits - Ordris, Kira, and Shreava (parents with infant) are posed with Portrait Poses 14 by Simmerianne93 Minthe and Kaeleen are posed with Stand By Me (redone) by @talentedtrait
Character Card by @stormistargazer
Minthe's portrait in Character card and banner portrait - F. Model Pt. VI by @sciophobis

#ts4#simblr#sims 4 legacy#the sims community#ts4 screenshots#ts4 gameplay#sims 4 screenshots#sims 4 gameplay#sims 4 legacy challenge#Minthe Thalzoh#not so berry#not so berry challenge#not so berry mint#nsb#nsb challenge#the sims 4#not so berry legacy#not so berry gen 1
26 notes
·
View notes
Text
Price: [price_with_discount] (as of [price_update_date] - Details) [ad_1] From the manufacturer Windows AC: Economical & easy to install Capacity 1.5 Ton: Suitable for medium sized rooms (111 to 150 sq.ft) Energy Rating 3 Star: Energy Efficiency Manufacturer Warranty: 5 Year Comprehensive on Product, 10 years on Compressor, 5 years on PCB/ Controller. 100% Copper Condenser Coil: Better cooling and requires low maintenance Key Features: Expandable Inverter Technology, Wireless LCD remote, Defrosting Sensor, Auto Restart Special Features: Auto Fan Speed, Precoated Aluminium Fins Refrigerant Gas: R32 - Environmental Friendly - No Ozone Depletion Potential Item Dimensions & Weight : IDU – 66 cm X 43 cm X 66 cm (w x h x d), 43.5 Kg [ad_2]
0 notes
Text
Can an AC Be Too Powerful for Your Home?

Summary:
While many homeowners believe that a larger AC unit guarantees better cooling, an oversized air conditioner can create problems. It causes short cycling, humidity issues, higher energy bills, and increased wear and tear. There is no solution to an oversized AC, so consult an AC technician for assistance in choosing the right unit for your home.
Introduction
Choosing the right-sized AC for your space is crucial. Many homeowners believe that bigger is better, but that is not always the case. During AC installation, your AC contractor will size your new system to ensure optimal performance. This process has nothing to do with the physical space that your unit occupies, but rather its cooling capacity.
It is essential for your AC to have the cooling capacity to meet your home’s cooling needs. It should be neither undersized nor oversized. It is easy to understand why an undersized AC is bad news, as your system will run constantly and still be unable to provide sufficient comfort for your home.
However, an oversized AC is just as bad. This article examines the risks associated with oversized air conditioners and guides on selecting the correct AC size for your home.
Dangers of Over-Sized Air Conditioners
An air conditioner that is too powerful can create more problems than it solves. Here is how:
1. Short Cycling
Air conditioning systems work on cooling cycles. When your thermostat signals that your space needs cooling, the fans and compressors activate the cooling cycle. An average cooling cycle lasts approximately 15 minutes, depending on the temperature in your house and your thermostat settings. When cooling is achieved, your thermostat signals the AC, and the compressor cycles down.
But an AC that is too powerful throws off the cycling. An oversized AC cools the air so quickly that the thermostat mistakenly thinks the entire house has reached the target temperature. Although the system has not been running long enough to distribute the cool air throughout the house, the cooling cycle cuts off before it can complete. It will take a few minutes for the temperature to rise again and for the thermostat to restart your air conditioner – this happens repeatedly. It is known as short cycling.
Short cycling puts an enormous stress on your AC components, particularly the compressor. It increases the wear and tear on your system and also increases energy consumption, contributing to a higher energy bill. It also affects comfort as cooling will be uneven – the center of the house will be too cold, while the outer parts will be too hot and uncomfortable.
Schedule Our Service Today!
2. Increased Humidity
One of the key roles of your air conditioner is to remove excess moisture from the air. If your AC is oversized, the system will not run enough to complete the full dehumidification cycle. While the temperature drops and the humidity remains high, you are left with a room that feels damp, sticky, and uncomfortable.
Apart from making your home sticky and uncomfortable, high humidity also encourages the growth of mold and mildew, which can damage your home and impact indoor air quality, leading to health complications.
If you notice uneven temperatures or hot spots in your home, contact your air conditioning contractor for assistance. While regular AC maintenance services can marginally increase the efficiency of your system, it is only a stopgap solution.
3. Higher Energy Bills
An oversized air conditioner might seem like the solution to maintaining the perfect temperature in your home. However, the rapid cooling comes with a hefty price. Oversized units turn on and off in short bursts. And each time that happens, the compressor draws a surge of electricity, increasing your energy consumption. This is in contrast to an appropriately sized system that runs longer and in smoother cycles.
Short cycling also increases the strain on your system components, particularly the compressor and blower unit, making them less efficient. When this happens, your system will struggle to keep up, consuming more energy to meet your cooling needs.
Additionally, because the system does not run long enough to remove excess moisture in the air and cool your home evenly, you find yourself manually adjusting the thermostat to achieve a comfortable indoor temperature.
4. Premature Wear and Tear
An oversized air conditioner will accumulate wear and tear simply by operating. Every time you turn on your system, it puts a strain on key components, including the blower motor, fan, and compressor. The strain wears down the components, making them perform inefficiently and eventually break down.
How To Choose the Right AC Size for Your Home?
Choosing the right AC size is crucial for optimal comfort, energy efficiency, and system longevity. Here are some tips from our AC contractor in Orange County.
1. Understanding Cooling Capacity
Air conditioners are typically sized by their BTUs (British Thermal Units), which measure the amount of heat needed to raise the temperature of one pound of water by one degree Fahrenheit. When it comes to cooling, BTU ratings indicate how effectively and efficiently a unit can cool your room without wasting energy or causing excess wear.
If your cooling capacity is too low, your unit will struggle to effectively heat your home, resulting in constant operation and higher energy bills. And if it is too high, it will lead to increased humidity, high energy bills, and premature wear and tear.
Understanding the cooling capacity of your unit and how to calculate BTU is the first step in picking the right AC size for your home.
2. Room Factors to Consider
Most contractors will tell you that calculating the BTU of your AC is not enough. Other factors can directly impact the amount of cooling power you will need. Some of those factors include:
Room Dimensions: The size of the room that needs to be cooled is the most crucial factor to consider when selecting an air conditioner. Larger spaces require units with larger capacities, while smaller rooms require units with smaller capacities.
Number and Size of Windows and Doors: The number of windows and doors in the room will influence the size of the AC you need. Insufficient or poorly sealed openings will allow warm air to enter while letting cool air escape. Additionally, rooms with larger windows will absorb more heat and therefore require a larger unit to maintain comfort.
Insulation Quality: Well-insulated rooms will keep cool air inside, reducing the workload on your comfort systems. If your space is well-insulated, you may need a smaller AC unit; however, if it is poorly insulated, you should opt for a larger unit.
Ceiling Height: Air conditioner BTUs are calculated using a standard 9-foot ceiling. If you have a higher ceiling, that means greater volume, which will affect your air conditioner’s efficiency. Therefore, a room with a ceiling height exceeding 9 feet will require an additional cooling capacity.
3. Heat Load and Occupancy
You should also consider the heat load of your space. The more people you have in a room, the more heat is generated. The typical BTU is calculated with two occupants in mind; each additional occupant raises the cooling demand. Therefore, larger units are often required in spaces where large crowds are anticipated.
Common household appliances, such as ovens, dryers, and computers, also generate heat. This increases the cooling capacity required by an air conditioner.
4. Types of AC
The best type of air conditioning (AC) unit you need for your home depends on the layout of your space. Instead of choosing the most significant or most expensive type available, it is better to have your AC contractor perform the calculations and provide a recommendation.
The most common air conditioning units are:
Central Air Conditioning: Central air conditioning systems are larger, more complex units designed for whole-home operation. They operate with an extensive ductwork system to distribute cool air throughout your entire house.
Ductless Mini-Splits: Split unit ACs are efficient at cooling. While they are more expensive than most models and require installation by an AC contractor, they compensate for this with high cooling performance.
Window Units: These models are perfect for small spaces. They are typically installed by the window and are also very affordable.
Portable Acs: Portable AC units are standalone cooling systems that can be easily plugged into a wall socket and provide instant cooling. You can easily move these units from room to room, and they are efficient in smaller spaces.
Contact Expert AC Contractor Now!
5. Calculating The Right Size and Capacity
To calculate the right size of AC for your home, it is recommended that you consult a professional AC technician. You can also use Manual J Load calculations, which is an HVAC industry standard that considers all room factors, including heat load and climate, for better sizing.
Conclusion
While you might be tempted to get a bigger air conditioner, an oversized AC will do more harm than good to your home. Always check with an AC contractor before making the final decision. The dangers of getting a bigger air conditioning unit include short cycling, increased humidity, higher energy bills, and premature system breakdown.
It’s essential to note that there is no solution to an oversized AC; even AC maintenance services cannot resolve it. And this is why you must get it right the first time. Consult with our AC contractor in Orange County for more information on choosing the right cooling system for your home.
This blog was originally published at https://klondikeair.com/can-ac-be-too-powerful-for-home/
0 notes
Text
Expert Insights Into Cleaning Fridge Coils In Boston, Massachusetts
Understanding Fridge Coils
Understanding fridge coils is important for maintaining the efficiency and longevity of your equipment. These coils play a important position within the cooling course of by dissipating heat extracted top cleaning services Boston MA from inside the fridge. With Out correct care, they can turn out to be clogged with mud and debris, leading to elevated energy consumption and potential breakdowns. In Boston, Massachusetts, the place various temperatures can impact appliance performance, skilled insights into cleansing fridge coils can help owners avoid pricey repairs and guarantee their refrigerators run smoothly.
The Role of Condenser and Evaporator Coils
Understanding fridge coils is crucial for maintaining the effectivity and longevity of your appliance. The performance of a fridge greatly depends on the proper functioning of its condenser and evaporator coils. These coils play a significant position in the cooling course of by transferring heat, which is important for preserving your food fresh and secure.
Condenser Coils: Positioned at the back or backside of the fridge, these coils expel warmth absorbed from the interior. When the refrigerant flows through the condenser coils, it releases heat into the air, allowing it to cool down earlier than it enters the evaporator coils. Evaporator Coils: Located contained in the fridge, these coils take in heat from the interior, thus cooling the air within. The refrigerant inside the evaporator coils absorbs warmth, turning from a liquid to a gasoline, which is then cycled again to the compressor to restart the refrigeration course of.
Keeping these coils clear is important to ensure efficient operation. Mud and particles can accumulate on the coils, forcing the fridge to work tougher, which may lead to increased power consumption and potential breakdowns. Common upkeep, including cleaning the coils, can significantly extend the life of your refrigerator.
Impact of Dirty Coils on Efficiency
Understanding fridge coils is crucial for maintaining the effectivity and longevity of your equipment. These coils play an important role in the refrigeration cycle, permitting warmth to dissipate and preserving the inner temperatures cool. Nevertheless, when these coils accumulate dirt and dirt, their effectivity can considerably decrease, leading to increased power consumption and potential equipment failure.
youtube
Here are some key insights into the impression of soiled coils on effectivity:

Reduced Cooling Efficiency: Dirty coils hinder the warmth exchange course of, causing your refrigerator to work more durable to maintain the desired temperature. Increased Vitality Payments: An appliance that operates less efficiently consumes more electricity, leading to larger utility prices. Shortened Appliance Lifespan: Continuous strain on the system can result in untimely wear and tear, resulting in expensive repairs or replacements. Higher Risk of Breakdowns: Overworked parts can fail unexpectedly, resulting in meals spoilage and inconvenience.
Regular cleansing of your fridge coils can enhance effectivity and extend the life of the appliance, ultimately saving you cash and maintaining your food contemporary.
Frequency of Cleaning Refrigerator Coils
Keeping your refrigerator operating effectively is crucial for maintaining meals fres
0 notes
Text
Top Benefits of Using Inverter Technology in Your Air Conditioning System

With rising temperatures and increasing demand for energy-efficient solutions, more homeowners and businesses are turning to inverter air conditioning systems. Traditional air conditioners, while effective, often consume more electricity and deliver uneven cooling. In contrast, air conditioning inverter technology is transforming the way we cool our homes and offices—offering smarter, quieter, and more sustainable climate control.
But what exactly is inverter technology, and why is it gaining popularity across the globe? In this article, we explore the top benefits of using inverter technology in your air conditioning system and why making the switch could be one of the smartest decisions for your comfort and wallet.
1. Greater Energy Efficiency
The most significant advantage of inverter technology is its ability to reduce energy consumption. Unlike conventional ACs that operate at a fixed speed—constantly switching on and off—inverter ACs adjust compressor speed based on the room’s cooling needs. When the desired temperature is reached, the inverter AC slows down instead of shutting off.
This means less power usage, more consistent cooling, and fewer spikes in electricity bills. Over time, the savings on energy costs can easily offset the higher upfront investment in an inverter model.
2. Faster Cooling Performance
Inverter air conditioners are capable of reaching the desired room temperature much faster than traditional units. When first powered on, the compressor runs at higher speeds to quickly cool the space. Once the temperature is stabilized, it then reduces its speed to maintain the set level efficiently.
This rapid response is especially useful during extremely hot weather when you want to cool your home or office quickly without waiting for the system to catch up.
3. Quieter Operation
One of the often-overlooked benefits of an air conditioning inverter is how quietly it operates. Traditional systems frequently cycle on and off, creating noticeable noise each time the compressor restarts. Inverter models, however, run at a consistent low speed once the set temperature is reached, significantly reducing noise levels.
This makes inverter ACs ideal for bedrooms, study areas, offices, or any other space where silence is golden.
4. Longer Lifespan and Durability
Because inverter air conditioners avoid constant stop-start cycles and operate more smoothly, they experience less wear and tear on internal components, particularly the compressor. This enhances the overall lifespan of the unit, resulting in fewer breakdowns and reduced maintenance costs over time.
With proper care and timely servicing, an inverter AC can outlast its non-inverter counterparts while maintaining peak performance.
5. Consistent and Precise Temperature Control
Inverter technology ensures that the indoor temperature remains steady and comfortable without the frequent temperature fluctuations often experienced with traditional systems. The AC adapts its output based on room conditions, providing precise and even cooling.
This not only increases comfort but also helps avoid overcooling or overheating, which is especially beneficial for environments where sensitive equipment or health conditions require stable temperatures.
6. Environmentally Friendly Choice
With a growing focus on sustainability and reducing carbon footprints, inverter air conditioners stand out as a greener option. Their lower energy consumption directly translates to reduced greenhouse gas emissions, especially when paired with eco-friendly refrigerants like R32 or R410A.
For environmentally conscious consumers and businesses, investing in an inverter AC supports long-term energy conservation goals.
7. Smart Technology Integration
Many modern inverter ACs are compatible with smart home systems, allowing users to control settings remotely via smartphone apps or voice assistants. This convenience not only enhances user experience but also supports better energy management through programmable schedules and remote diagnostics.
Conclusion
Switching to an air conditioning inverter system offers a wealth of benefits—from substantial energy savings and faster cooling to quieter operation and environmental friendliness. While the initial investment may be slightly higher than a traditional AC, the long-term value is undeniable.
As energy costs continue to rise and sustainability becomes a top priority, inverter technology is no longer a luxury—it’s the future of cooling. Whether you're upgrading your home or designing a new workspace, choosing an inverter air conditioner is a step toward smarter, more efficient living.
0 notes
Text
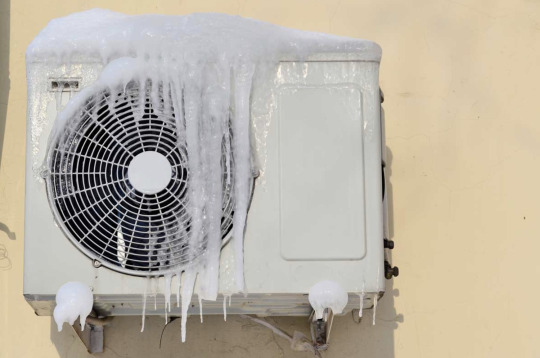
Outdoor AC Unit Submerged: What to Know
Heavy rain, flash floods, or rising groundwater put outdoor AC units at risk of water damage. A submerged condenser unit raises serious concerns, from electrical hazards to system failure. Quick and informed action protects your HVAC system and home from further issues.

Understanding the Risks of a Submerged AC Unit
Water exposure threatens both electrical and mechanical components. Outdoor units are built to withstand rain, but not full submersion. Prolonged contact with water affects performance, safety, and longevity.
Signs of Potential Damage
Circuit breakers tripping frequently
Burnt or musty odor near the unit
Visible corrosion or rust on the housing
Unusual noises during startup or operation
Weak or warm airflow indoors
What to Do First After Submersion
Shut off power at the breaker box before inspecting or attempting to start the unit. Allow the area to drain and dry completely. Do not turn the system back on until a technician confirms it's safe.
Key Steps to Take Immediately
Turn off electricity to the AC unit at the main panel
Visually inspect for debris, mold, or standing water
Check for damage to insulation, wires, and housing
Contact an HVAC professional for a full system evaluation
Take photos for warranty or insurance purposes
Avoid running the unit until it has been serviced
What a Technician Will Inspect
Certified HVAC technicians evaluate both electrical and refrigeration systems. Damage to the compressor, fan motor, and control board is common after flooding. Technicians also check refrigerant levels, drain lines, and internal corrosion.
Prevention Tips for Future Flooding
Install the unit on a raised concrete pad
Improve yard drainage near the unit’s location
Clear vegetation or obstructions that trap water
Consider protective covers during storm season
Understanding how to respond to a submerged system keeps your HVAC unit protected. Taking the right steps prevents further harm and ensures the system operates safely. Homeowners who act quickly limit damage and extend system life.
The most critical thing about an outdoor AC unit submerged: what to know is that water and electricity never mix. Professional inspection and recovery are essential for restoring reliable cooling.
FAQs
Q1: Will a submerged AC unit always need replacement?
Not always. If the damage is minor and addressed quickly, cleaning and part replacement may restore function. A technician’s assessment determines what repairs are necessary.
Q2: How long should I wait before restarting a submerged AC unit?
Wait until a licensed HVAC professional inspects and clears the system for safe operation. Restarting a wet or damaged unit risks further damage or electrical shock.
#flooded AC unit#condenser#HVAC#ac maintenance#ac compressor issue#HVAC guide#AC safety tips#HVAC professional#Outdoor AC
0 notes
Text
AC Stabilizers with Intelligent Protection for Enhanced Performance
Data Vision’s AC Stabilizers are designed to make your air conditioners work at its best even during voltage fluctuations. Using microcontroller based technology, they monitor and regulate voltage levels with precision and prevent damage to the compressor and enhance AC life. Suitable for residential and commercial use, our stabilizers have intelligent features like auto restart, wide input range and short circuit protection.

0 notes
Text
Durable Compressor Pressure Switch for Air Systems
A Compressor Pressure Switch plays a critical role in regulating the pressure levels within air compressor systems. It acts as a control device that automatically starts or stops the compressor motor based on the set pressure thresholds, ensuring both safety and efficiency. Whether used in small-scale workshops or heavy industrial plants, this switch is vital for maintaining consistent air pressure.
How It Works
The compressor pressure switch monitors the air pressure in the tank. When the pressure drops below the minimum setpoint, the switch closes the circuit to activate the motor. Once the pressure reaches the maximum limit, the switch opens the circuit to stop the compressor. This process prevents over-pressurization and ensures the compressor runs only when needed, reducing energy consumption and wear.
Types and Key Features
There are various types of compressor pressure switches available, each designed for specific needs. Some of the key features include:
Adjustable cut-in and cut-out pressure settings
Manual on/off levers with auto-reset options
Integrated unloader valves for smoother restarts
Compatibility with different voltage and current ratings
If you're looking for high-quality and dependable Compressor Pressure Switches, visit Buypneumatics. They offer a wide variety of switches from trusted brands, tailored for diverse industrial and commercial applications. With expert support and fast delivery, Buypneumatics makes it easy to find the perfect solution for your compressor system.
0 notes
Text


SLED
The U-2 pilots didn’t like calling the SR-71 by its proper nickname, so they came up with a derogatory name of their own, calling it the ‘Sled,’” Graham wrote in The Complete Book of the SR-71 Blackbird.
“Being called a sled driver at the Officer’s Club bar usually brought on some disparaging remarks about the U-2!” from the SR crews.
The SR-71 was nicknamed the “Lead Sled” by a few people after Jerry O’Malley (pilot) and Ed Payne (RSO) dropped 60,000 feet over Vietnam in 1968 during the second Blackbird combat sortie. ( they were recovered just fine.)
Please do not call the SR-71 a Sled.
The U2 could glide… SR 71 would drop like a rock.
It was hard to find a despairing statement about the SR 71 but if you’re envious enough, you can come up with one.
There were a few bad apples that encouraged this kind of rival between the two very important Reconnaissance groups the U-2 and the SR-71
So Please disregard the slang word Sled.
SR 71 fell like a rock
The SR glide distance in time from 80,000 feet at Mach 3.2 down to 10,000 feet was 102 nautical miles.
It took slightly over six minutes at the rate of descent.
In other words, it drops like a rock.
Rich Graham, SR-71 Pilot, and genuinely nice guy said attempting an air start at a (air start in the SR 71 lower altitude)was very difficult because your pressure suit was inflating.
What is an air start?
Restarting an "air start" on an SR-71 Blackbird involved manipulating the aircraft's engine controls to re-ignite the J58 engines mid-flight by utilizing the high-pressure air from the engine compressors, essentially "lighting" the fuel mixture again, while carefully managing the aircraft's attitude and speed to maintain stable airflow through the intakes, a process that required significant pilot skill due to the unique characteristics of the aircraft and its engines at high altitudes.
Remember the SR 71’s J 58 engines were air-breathing. The higher, the altitude that you flew the less oxygenated air that you had.
If the SR 71 dropped the pressure suit would inflate, there was hardly any room to move in the Pilot/RSO cockpits, but with an inflated pressure suit, there was less than none.
At 80,000 feet, the atmospheric pressure is significantly lower than at sea level, meaning a pilot would rapidly lose consciousness without a pressurized suit.
But the SR-71 Pilots were the best in the world and if there was a way out, they would find it and they did.
Although the SR 71 could not glide. It still remains to this day (even though it’s been retired for 35 years from the Air Force), the fastest airplane in the world!
I am positive that all of the secrets of the SR 71 operational time have not yet been revealed.
The mysteries still unfold as time marches on. January 4, 2025
Written by Linda Sheffield
@Habubrats71 via X
#sr 71#sr71#sr 71 blackbird#blackbird#aircraft#usaf#lockheed aviation#skunkworks#aviation#mach3+#habu#reconnaissance#cold war aircraft
25 notes
·
View notes
Text
Computer problem are the dumbest shit to look up solutions for. In the last week my pc will cut to a black screen and restart almost randomly. I'm now fairly sure it's a heating issue and I just need to blow out the radiator. For efficiency windows 11 just restarts without throwing an error code. That's a setting you have to turn on.
But every post on the issue is just a mix of bad psu, bad ram, bad cpu or some other expensive issue. At this point it's like looking up medical issues, it's never going to make you feel better.
And I guess fair play to reddit users for not straight up suggesting that you clean out the dust from your case, like that should be common maintenance but, I just thought dust wouldn't be so much of an issue within 6 months. But that radiator is full of dust. So hopefully a quick blow out with a compressor will fix this.
1 note
·
View note
Text
AC Freezing Up in Hamilton? Don’t Sweat the Ice!
Is your air conditioner turning into an ice block? Dynamic Heat and Cool explains why it happens and how to fix it:
🔍 Top Causes:
Dirty Air Filters (Restricted airflow → freezing)
Low Refrigerant (Leaks require professional repair!)
Blocked Vents/Registers (Closed dampers = trapped cold air)
Failing Blower Motor (Weak airflow)
Dirty Evaporator Coils (Reduced heat absorption)
🛠️ Quick Fixes:
→ TURN OFF your AC immediately!
→ Replace clogged filters (Do this monthly!).
→ Open all vents & clear obstructions.
→ Let ice melt completely (24+ hours) before restarting.
⚠️ When to Call Your HVAC Company:
Ice returns after basic fixes
Hissing sounds (refrigerant leak!)
Water damage near the unit
Never DIY refrigerant handling!
"Ignoring ice leads to compressor failure – the costliest AC repair!"
Prevent Future Freezes:
✔️ Schedule seasonal maintenance
✔️ Keep coils/filters clean
✔️ Ensure proper airflow around indoor/outdoor units
Hamiltonians: Trust Dynamic Heat and Cool – your local HVAC Company – for permanent fixes! Same-day emergency service available.
#HVACCompany#ACFreezing#HamiltonACRepair#DynamicHeatAndCool#HVACEmergency#SummerCooling#ACMaintenance#RefrigerantLeak#HVACTips#OntarioHeat#HamiltonHomes#BurlingtonHVAC#HVACLife
0 notes
Text
I haven't been Ena posting lately so i probably should share my thoughts on the whole Ena mannequin thing.
ok so the things Shaman says that Ena agrees with is important imo. the whole she can be in 2 places at once but doesnt have to, she can be at 1 place at 1 time because she would be lost in the other persons mind.
My theory is mannequins are all Enas(not news), sometimes even the Ena we play as. the evidence is the blown up mannequin next to the compressor where we can make the same thing happen to our Ena but we dont have to, regardless the mannequin is still there. But when we do make it happen then she just restarts in the usual spawn, but when we check we see that the cubes from the compressor are still there(meaning it wasnt much of a game mechanic type of reset, the action we did still happened here), but theres still that 1 mannequin. The way i think that works is... weird. those mannequins are all Enas but they can be from different timelines, the compressor event mannequin is one from the possible futures. all those timelines Enas are in the same place, but she can only be in 1 place at 1 time despite being in many places at once. when she goes from 1 mannequin to another she only switches herself, not the whole world's timeline (as we can see from compressor event once again, it still happened as we came back).
for a moment i thought what if the flashback is just us seeing what happens to Ena at that moment as well- or more like happens in the future, where she also is. The hands in the flashback are fallen off (like in her green form from the trailer that we havent seen yet in the game, in a place similar to where we see her green form once again).
thinking about the ending is... im not sure. she seems to get herself out of the mannequin(or the mannequin out of herself, setting herself free. not sure if that makes much difference?). she comes back at the spawn so i guess it the usual..? although you cant ignore what was that damn hand that took the mannequin from the holy code(i wonder if it will be relevant in the future, maybe Ena switching to the mannequin that the hand took?). maybe i missed something about that hand idk.
#also a thing i noticed but not sure where to note- Kane saying how he seen Ena many times in the hub and if its some simpleton event#like. hm?? okay. not sure what to do with that info right now#dream bbq posting#wxv.txt
1 note
·
View note
Text
Price: [price_with_discount] (as of [price_update_date] - Details) [ad_1] Elevate your comfort with the New 2025 Carrier Ester Edge Smart Air conditioners, a perfect companion for modern homes. Engineered to deliver exceptional performance, this AC blends innovative technology with user-friendly features, ensuring a seamless cooling experience tailored to your lifestyle. The standout Flexicool Inverter Technology offers six energy-efficient modes, allowing you to customize cooling based on your preferences while saving power. Additionally,it also provides versatility, adapting effortlessly to different weather conditions and room requirements. Breathing clean air is a breeze with its advanced dual filtration system, featuring a PM 2.5 filter and HD filtration, which effectively remove fine particles and impurities from your indoor air. For added convenience, the Auto Cleanser feature ensures the internal components stay free from dust and bacteria, enhancing both performance and durability. Designed for today’s smart lifestyle, the AC comes with Wi-Fi connectivity, letting you control it via a smartphone or voice assistant. The Smart Energy Display further empowers you to monitor and manage energy consumption effortlessly.Even in extreme temperatures as high as 52⁰C, this air conditioner delivers uninterrupted cooling, making it a reliable solution for scorching summers. With its sleek design and cutting-edge features, the Carrier Ester Edge FXi is your gateway to a healthier, cooler, and smarter home. Split AC with Flexicool inverter Technology : Variable speed compressor which adjusts power depending on heat load | with Flexicool Convertible 6-in-1 inverter technology where user can increase or decrease cooling capacity and saves upto 50%* energy consumption. Capacity: 1 ton. Suitable for small sized rooms (< = 110 square ft.); 380 CFM Air Flow & Ambient Temprature: 52 degree Celsius with 2 way Air Directional Control ;Best in Class Cooling Capacity with 3500 watts and maximum capacity of 4080 Watts Energy Rating: 5 Star - Best in class efficiency | Annual Energy Consumption (as per energy label): 536.2 units, ISEER Value: 5.05 (please refer energy Label on product page or contact brand for more details) Manufacturer Warranty:1 year on product, 5 years on PCB, 10 years on compressor 100% Copper Condenser Coil with Anti- Corrosion Blue Coating: Prevent from rust & Corrosion; Better cooling and requires low maintenance; Uninterrupted Cooling & Maximum Comfort Key Features: Smart-Wifi, Voice Enabled, Smart Energy Display, Flexicool Inverter Compressor; Convertible 6-in-1 cooling; Dual Filtration with HD & PM 2.5 Filter; Insta Cool for Faster Cooling; Hydro Blue Coating for Long Lasting Comfort; Refrigerant Leakage Detector; Auto Cleanser; ADC Sensor Special Features: 4 Fan Speed; Hi Grooved Copper; Stabilizer Free Operation within 135~280 V range; Hidden Display;Dry; Auto ; Follow Me Function; Auto On/Off Timer; Sleep mode; Auto Restart; Intelligent CRF Alert Refrigerant gas: R32 - Environmental friendly - no ozone depletion potential Item Dimensions & Weight: Indoor Unit dimension IDU (W x H x D cms) (80 x 27.5 x 188); Outdoor Unit dimension ODU (W x H x D cms) (79.0 x 54.0 x 27) & IDU Weight 8.3 Kg and ODU Weight 21.7 Kg Included in the box: Indoor Unit, Outdoor Unit, Inter Connecting Copper Pipe of 9.84 feet( 3 Meter), Remote Control, User manual, Warranty Card [ad_2]
0 notes