#constructiontip
Text
Crucial Factors for Choosing the Best Ready-Mix Concrete Supplier
Find out the essential factors you need to consider when selecting the best ready-mix concrete supplier for your construction project. From reliability and experience to quality control measures and customer service, our latest blog post at yourtrc.com provides expert insights to ensure your project's success. Don't miss out on these valuable tips for choosing the right supplier!
3 notes
·
View notes
Text
Streamlining Renovations: From Concept to Completion
Welcome to our in-depth guide on streamlining your renovation projects! In this video, we'll take you through the entire process of home or commercial renovations, from concept to completion. Whether you're planning a small remodel or a full-scale renovation, we’ve got tips and tricks to help you save time, cut costs, and achieve a flawless finish. Watch now to discover how to manage the project efficiently, work with contractors, and keep everything on track for the best results."
#RenovationTips#HomeImprovement#ProjectManagement#Remodeling#ConstructionTips#InteriorDesign#HomeRenovation
1 note
·
View note
Text
📢 New Blog Alert! 🏛️ Dive into "The Essential Guide to Facade Shop Drawings: Why They’re Crucial for Modern Building Projects"
#FacadeDetailing#ShopDrawings#BuildingBlueprints#FacadeEngineering#ArchitecturalDrawings#ProjectSuccess#ConstructionTips#DesignPrecision#BuildingInnovation#FacadePlanning
0 notes
Text

From Plans to Reality: The Importance of Early Builder Engagement in Your Design Journey
Planning a construction project? Timing is everything! Discover why bringing your builder into the mix early can transform your design journey from good to great. Our latest blog post breaks down the benefits of early builder involvement and how it can save you time, money, and stress.
https://www.stonebrookconstructiongroup.com/post/when-to-bring-the-builder-on-why-timing-matters-in-collaborating-with-your-architect
0 notes
Link
How do setbacks impact the value and usability of your property? Setbacks ensure safety, privacy, and aesthetics by regulating the distance between buildings and property lines. They help prevent fire spread, provide space for utilities, and maintain neighborhood harmony. Understanding and navigating setback regulations and applying for exemptions in the Philippines when necessary can significantly enhance your development projects. https://www.ianfulgar.com/architecture/the-best-way-to-get-setback-exemption/ . .
#realestate#propertydevelopment#landowners#setbackexemption#urbanplanning#architecture#developers#constructiontips#propertymanagement#buildingcodes#zoninglaws#realestatetips#landuse#contractors#siteplanning
0 notes
Text
How to Install Temporary Construction Walls: A Step-by-Step Guide

In the world of construction and renovation, flexibility is key. Temporary construction walls are invaluable tools for creating new spaces, improving privacy, or containing work areas during a project. Whether you're a contractor or a DIY enthusiast, knowing how to properly install these walls can make your job easier and more efficient. This step-by-step guide will walk you through the process of installing temporary construction walls, ensuring a smooth and professional finish.
1. Planning and Preparation
1.1 Assess the Area Before you start, assess the area where you plan to install the temporary wall. Measure the space to determine the dimensions of the wall you need. Consider factors such as existing structures, electrical outlets, and any obstacles that might affect the installation.
1.2 Choose the Right Materials Temporary construction walls can be made from various materials, including wood studs, metal studs, drywall, and fabric panels. Choose materials based on the wall’s intended use and the environment. For example, use drywall for a more finished look or fabric panels for easy assembly and disassembly.
1.3 Gather Tools and Supplies You’ll need several tools and supplies for the installation:
Measuring tape
Level
Stud finder (for wooden or metal studs)
Hammer or drill
Screws or nails
Saw (for cutting wood or metal studs)
Drywall (if applicable)
Wall anchors or brackets (for securing the wall)
2. Installing the Frame
2.1 Mark the Wall Placement Use a pencil to mark the outline of the temporary wall on the floor and ceiling. Ensure the markings are level and straight. This will serve as a guide for installing the frame.
2.2 Assemble the Frame Construct the frame of the wall using either wood or metal studs. For wood studs:
Cut the studs to the required length.
Assemble the top and bottom plates, then attach vertical studs between them at regular intervals (typically 16 or 24 inches apart).
For metal studs:
Cut the studs to length.
Use a stud finder to locate existing studs or use wall anchors.
Assemble the top and bottom tracks and insert the vertical studs.
2.3 Secure the Frame Position the frame between the floor and ceiling marks. Use a level to ensure it is straight and adjust as needed. Secure the frame to the floor and ceiling using screws or nails. If you’re attaching to existing structures, use wall anchors or brackets for additional stability.
3. Installing the Wall Panels
3.1 Attach Drywall Panels If using drywall:
Measure and cut the drywall panels to fit the frame.
Place the panels against the frame and secure them with drywall screws or nails.
Ensure the panels are flush with the frame and use a level to check alignment.
3.2 Finish the Drywall
Apply joint compound over the seams and screw holes. Smooth it with a drywall knife.
Once the compound is dry, sand it to a smooth finish.
Apply primer and paint as desired to match the surrounding area.
3.3 Install Fabric or Temporary Panels If using fabric or other temporary panels:
Attach the panels to the frame using appropriate fasteners or clips.
Ensure the panels are taut and secure, and make any necessary adjustments to fit the space.
4. Final Adjustments and Inspections
4.1 Check for Stability Ensure the wall is stable and secure. Test for any wobbling or movement and reinforce the frame if necessary.
4.2 Inspect the Finish For drywall installations, inspect the finish to ensure there are no visible seams or imperfections. For fabric or other materials, check that the panels are properly aligned and attached.
4.3 Address Electrical and Plumbing If the temporary wall intersects with electrical outlets or plumbing, make sure to address these issues. Cover any exposed wires or pipes and ensure they are properly protected.
5. Safety and Maintenance
5.1 Ensure Safety Compliance Check that the temporary wall complies with local building codes and safety regulations. This is especially important for walls that are part of larger renovation or construction projects.
5.2 Regular Maintenance Inspect the wall periodically for any signs of wear or damage. Address any issues promptly to maintain the wall’s integrity and functionality.
Advantages and Disadvantages of Installing Temporary Construction Walls
Advantages
Flexibility and Adaptability
Advantage: Temporary construction walls are highly versatile, allowing for quick reconfiguration of spaces as needed. They are ideal for dividing large areas, creating temporary rooms, or managing work zones without permanent changes.
Cost-Effective Solution
Advantage: Compared to permanent construction, temporary walls are often more affordable. They typically require less material and labor, making them a budget-friendly option for short-term needs.
Ease of Installation and Removal
Advantage: These walls are generally easier to install and dismantle compared to permanent structures. This convenience makes them suitable for projects where flexibility and speed are essential.
Minimal Disruption
Advantage: Installing temporary walls causes minimal disruption to existing structures and spaces. They can be set up quickly with minimal mess, which is beneficial in active work environments or occupied buildings.
Enhanced Privacy and Containment
Advantage: Temporary walls provide effective solutions for creating privacy or containing specific areas, such as work zones or storage spaces. This is especially useful in environments where separation is needed for safety or organizational purposes.
Customization
Advantage: Temporary walls can be customized to fit specific needs, including the use of various materials such as drywall, fabric panels, or modular systems. This allows for tailored solutions based on project requirements.
Disadvantages
Limited Durability
Disadvantage: Temporary construction walls may not be as durable as permanent walls. They can be more susceptible to damage, wear, and tear, which may require regular maintenance or replacement.
Aesthetic Considerations
Disadvantage: Depending on the material used, temporary walls may not offer the same aesthetic appeal as permanent construction. Drywall can be finished to match existing decor, but fabric or modular panels may look less polished.
Building Code Compliance
Disadvantage: Temporary walls must adhere to local building codes and regulations. Ensuring compliance can be challenging, especially if the wall affects structural integrity, safety, or accessibility.
Potential for Insufficient Insulation
Disadvantage: Some temporary walls, particularly those made from lightweight materials like fabric, may not provide adequate insulation or soundproofing. This can impact comfort and noise levels in the enclosed area.
Maintenance and Repair
Disadvantage: While installation is relatively simple, temporary walls may require ongoing maintenance to address issues such as stability, alignment, or wear. Repairing or adjusting these walls can be necessary over time.
Temporary Nature
Disadvantage: As the name implies, temporary walls are designed for short-term use. They are not intended for permanent applications, and their temporary nature may not be suitable for all projects or needs.
Conclusion
Installing temporary construction walls can be a straightforward process if you follow these steps carefully. Proper planning, material selection, and installation techniques are crucial for achieving a professional and durable result. Whether you’re creating new spaces, enhancing privacy, or managing construction areas, temporary walls offer a versatile solution that can adapt to your needs. By following this guide, you’ll be well-equipped to tackle your next project with confidence.
#TemporaryWalls#ConstructionTips#DIYConstruction#InteriorDesign#HomeImprovement#BuildingSolutions#RenovationProject#ConstructionGuide#WallInstallation#TemporaryPartitions#ConstructionAdvice#ModularWalls#TemporaryConstruction#BuildingInnovation#ConstructionHowTo
0 notes
Text
Tackling dewatering issues head-on can make all the difference in your project's success. From dealing with high water tables to managing soil stability, we've got the solutions you need 🚧🔧. Discover expert tips and strategies to overcome the most common dewatering challenges. Let’s keep your project dry and on track! 💪🏗️
For More Information
📲 +91 98415 82888 / +91 98407 11116
🔗 www.prasanthdewatering.com
📧 [email protected]
0 notes
Text
Explore how to manufacture high-quality fly ash bricks with our step-by-step guide. From sourcing materials to the final product, we demystify the process, ensuring efficiency and eco-friendliness. Ideal for builders and entrepreneurs seeking sustainable construction solutions. Explore our blog for comprehensive insights and expert tips.
#FlyAshBricks#ManufacturingProcess#SustainableConstruction#EcoFriendlyBuilding#BuildingMaterials#ConstructionTips
0 notes
Text
Introduction To Helical Piles And Screw Foundations
Looking for a groundbreaking way to build your project's foundation? Look no further than helical piles and screw foundations, brought to you by Rajog Ground Screw, a trusted innovator in New Zealand. Let's dive into what makes these systems so revolutionary and why they're perfect for your next venture.

Picture this: massive screws anchoring your structure deep into the ground, providing unmatched stability. That's the magic of helical piles and screw foundations. These systems consist of a sturdy steel shaft with large screw-shaped plates welded onto it. Using specialized equipment, these piles are screwed into the ground like giant corkscrews, adapting perfectly to your project's specific needs and soil conditions.
So, why are helical piles and screw foundations gaining traction in New Zealand? For starters, they offer lightning-fast installation, saving you time and minimizing disruption to your project schedule. Imagine having your foundation in place in a fraction of the time it takes for traditional methods. Plus, they're incredibly versatile, able to tackle even the trickiest terrains like slopes and rocky soil with ease.
But that's not all – helical piles and screw foundations are also environmentally friendly. With minimal disturbance to the surrounding soil and no need for extensive excavation or concrete pours, they leave a smaller footprint on the environment. And don't underestimate their strength – despite their simple design, these piles boast exceptional load-bearing capacity, making them suitable for everything from decks and patios to entire commercial buildings.
So, where can you use helical piles and screw foundations in New Zealand? The possibilities are endless. Build your dream home on any soil type, construct a sturdy deck for outdoor entertaining, or kickstart your project on challenging sites with ease.n conclusion, helical piles and screw foundations offer a faster, more efficient, and eco-friendly alternative to traditional foundation methods. With their versatility and strength, they're the perfect choice for builders and developers across New Zealand.
#construction#building#architecture#foundation#innovation#sustainability#environment#engineering#homebuilding#DIY#newzealand#landscaping#deckbuilding#constructiontips#greenbuilding#ecofriendly#screwpiles#helicalpiles#constructiontechnology
1 note
·
View note
Text
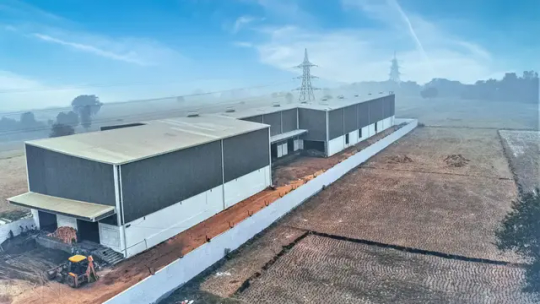
Factors to Consider When Planning Commercial Warehouse Construction
Hey there! So, you’re thinking about building a commercial warehouse? That’s awesome! But before you start dreaming of towering shelves and speedy forklifts, let’s talk about what you need to consider to make this project a smashing success.

Here’s a handy guide to help you navigate the exciting (and sometimes tricky) world of warehouse construction.
1. Pick the Perfect Spot
First things first, where’s your warehouse going to be? Location is key. You want a spot that’s easy for trucks to get in and out of, close to highways, ports, or railways. Don’t forget to check local zoning laws and make sure you have all the utilities you need like water, electricity, and internet.
2. Smart Design and Layout
How you design your warehouse can make a huge difference in how efficiently it operates. Think about the flow of goods from arrival to storage to shipping. A well-planned layout reduces time and effort, making your operations smoother and quicker. Plus, leave some room for future expansion—you never know when you might need more space!
3. Right Size, Right Space
Getting the size right is crucial. Too small, and you’ll be cramped. Too big, and you’re wasting money on space you don’t need. Consider the type of products you’re storing, how much inventory you’ll have, and any special storage needs like climate control for perishable items.
4. Choose Quality Materials
The materials you use can affect everything from durability to maintenance costs. Pre-engineered buildings (PEBs) are a great option—they’re fast to build, cost-effective, and flexible in design. EPACK Prefab, for example, offers high-quality PEBs that can stand up to tough conditions and last for years.
5. Follow the Rules
Construction comes with a lot of rules and regulations. Make sure you’re up to date on local building codes, zoning laws, fire safety regulations, and environmental standards. Working with knowledgeable contractors and consultants can help you avoid legal headaches and costly fines.
6. Embrace Technology
Incorporating the latest technology can make your warehouse operations a breeze. Think about using warehouse management software (WMS), automated storage and retrieval systems (ASRS), and conveyor systems. These tools can save time, reduce errors, and boost productivity.
7. Energy Efficiency
Energy costs can add up quickly, so plan for efficiency from the start. Good insulation, energy-efficient lighting, and HVAC systems can make a big difference. If possible, consider renewable energy options like solar panels. EPACK Prefab offers solutions that can help you save energy and money.
8. Safety and Security First
Keeping your warehouse safe and secure should be a top priority. Install security cameras, alarms, and access control systems to protect your assets. Ensure you have fire suppression systems, adequate lighting, clear signage, and train your employees on safety protocols.
9. Budget Wisely
Budgeting is a critical part of any construction project. Make sure you have a detailed budget that covers everything from land purchase to finishing touches. It’s also smart to have a contingency fund for unexpected expenses. Working with reputable suppliers like EPACK Prefab can help you stick to your budget without sacrificing quality.
10. Project Management is Key
Managing a construction project can be overwhelming. Hiring an experienced project manager can keep everything on track. They’ll coordinate all aspects of the project, from design and permits to construction and inspections, helping to avoid delays and handle any issues that come up.
Conclusion
Building a commercial warehouse is a big deal, but with careful planning, it can be a fantastic investment for your business. By considering location, design, size, materials, regulations, technology, energy efficiency, safety, budgeting, and project management, you’re setting yourself up for success.
And remember, you don’t have to go it alone. Partnering with industry experts like EPACK Prefab can provide the support and quality you need to bring your warehouse vision to life. So get excited, plan smart, and watch your business thrive in your new, efficient, and well-built warehouse. Happy building!
Also Read: PREFAB COMMERCIAL BUILDINGS: THE FUTURE OF COMMERCIAL BUILDING CONSTRUCTION
#PreEngineeredBuildings#PEB#PrefabConstruction#ModularBuildings#FastConstruction#ConstructionTips#CommercialWarehouse#Logistics#ConstructionIndustry#Warehousing
1 note
·
View note
Text
Industrial Shed Construction Cost: Key Factors and Insights
Constructing an industrial shed involves meticulous planning and understanding various cost factors to ensure that the project stays within budget while meeting all functional requirements. In this blog post, we'll explore the key factors influencing industrial shed construction costs and highlight why EPACK Prefab is the top manufacturer and supplier you should consider for your project.
Understanding Industrial Shed Construction Costs
1. Materials
The choice of materials significantly impacts the overall cost of constructing an industrial shed. Common materials include steel, concrete, and prefabricated components. Steel is often preferred for its strength and durability, while prefabricated panels, like those from EPACK Prefab, offer a cost-effective and efficient solution.
2. Design and Size
The design complexity and size of the shed are critical determinants of the cost. A simple, single-story structure will be less expensive than a multi-story shed with intricate designs. The larger the shed, the more materials and labor are required, thus increasing the cost.
3. Labor
Labor costs vary depending on the location and the complexity of the construction. Skilled labor for specialized tasks, such as electrical work and plumbing, will add to the overall expense. Prefabricated solutions from EPACK Prefab can reduce labor costs due to their ease of assembly and faster installation times.
4. Location
The construction site’s location affects the cost in several ways. Remote areas might incur higher transportation costs for materials and labor, while urban areas could have higher land costs and regulatory fees.
5. Foundation and Site Preparation
The type of soil and the condition of the construction site influence foundation costs. A stable, well-prepared site reduces the need for extensive groundwork, lowering the overall expense. Conversely, a site with poor soil conditions or requiring significant grading will increase costs.
Also Read: PEB Industrial Sheds – Are They Better Than Traditional?
Why Choose EPACK Prefab?
Quality and Reliability
EPACK Prefab is renowned for its high-quality prefabricated solutions that meet stringent industry standards. Their products ensure durability, safety, and efficiency, making them a trusted choice for industrial shed construction.
Cost-Effectiveness
Prefabricated components from EPACK Prefab are designed for quick and easy installation, significantly reducing labor costs and construction time. This cost efficiency does not come at the expense of quality, ensuring that you get the best value for your investment.
Customization
EPACK Prefab offers a range of customizable options to meet specific project requirements. Whether you need a simple storage shed or a complex manufacturing facility, their solutions can be tailored to fit your exact needs.
Sustainability
EPACK Prefab is committed to sustainable building practices. Their prefabricated panels and components are designed to minimize waste and reduce environmental impact, aligning with modern sustainability goals.
Conclusion
Understanding the various factors that influence industrial shed construction costs is crucial for effective budgeting and planning. Materials, design, labor, location, and site preparation all play significant roles in determining the final cost. By choosing a reputable manufacturer and supplier like EPACK Prefab, you can ensure a cost-effective, high-quality construction process that meets your specific needs.
For your next industrial shed project, consider the advantages of prefabricated solutions from EPACK Prefab. Their expertise, quality, and cost-efficiency make them the top choice for industrial shed construction.
Visit EPACK Prefab’s website to learn more about their products and how they can help you achieve your construction goals efficiently and economically.
#IndustrialShed#ConstructionCosts#EPACKPrefab#PrefabConstruction#BuildingMaterials#SteelSheds#IndustrialBuilding#CostEffectiveConstruction#PrefabricatedSolutions#ConstructionPlanning#SustainableBuilding#ConstructionTips#QualityConstruction#LaborCosts#SitePreparation
0 notes
Text
Dream Home Construction - The Top 10 No-Nos You Need to Know

Embarking on the journey to construct your dream home is exhilarating, but pitfalls abound. To steer clear of potential mishaps, here are the top 10 no-nos you need to be aware of:
Rushing the Planning Stage: Take your time to plan meticulously; haste leads to costly mistakes.
Ignoring Local Regulations: Ensure compliance with building codes and regulations to avoid legal headaches.
Settling for the Wrong Contractor: Research and vet contractors thoroughly to secure a reliable partner.
Compromising on Quality: Cutting corners on materials or workmanship jeopardizes the integrity of your home.
Overlooking Energy Efficiency: Prioritize sustainability to reduce long-term costs and environmental impact.
Neglecting Future Resale Value: Design with resale in mind to safeguard your investment.
Skimping on Inspections: Professional inspections are crucial to ensure safety and compliance.
Neglecting Outdoor Spaces: Enhance curb appeal and livability by investing in outdoor design.
Rushing the Construction Process: Patience is key to ensuring quality craftsmanship and longevity.
Poor Communication: Maintain open communication with your contractor to avoid misunderstandings and delays.
If you want detailed information about Building Your Dream Home, then read this full article.
#dreamhome#realestate#construction#buildingtips#homebuilding#dreamhouse#constructiontips#homeconstruction#dailydialers
0 notes
Text
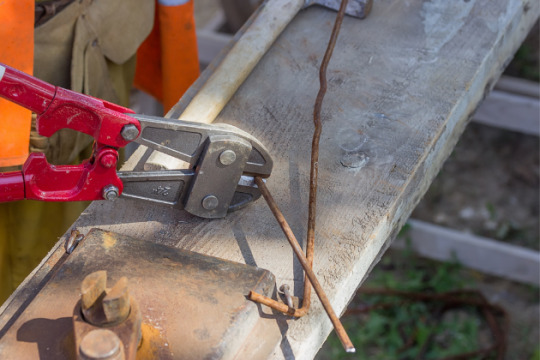
Mastering the Art of Precision Cutting: A Comprehensive Guide on How to Use Bolt Cutters
Bolt cutters are versatile tools that can make light work of cutting through tough materials like chains, bolts, wires, and more. However, mastering the art of using bolt cutters requires more than just brute force—it requires precision, technique, and safety awareness. In this comprehensive guide, we'll walk you through everything you need to know about how to use bolt cutters effectively.
Understanding Bolt Cutters
Before diving into the specifics of using bolt cutters, it's essential to understand their anatomy and capabilities. Bolt cutters consist of two long handles connected by a pivot point, with sharp jaws at the end of one handle. These jaws exert tremendous force when the handles are squeezed together, allowing them to cut through various materials.
Choosing the Right Bolt Cutters
Selecting the right bolt cutters for your needs is crucial for achieving optimal results. Consider factors such as material thickness, handle design, and cutting capacity when choosing your tool. Mini bolt cutters are ideal for tight spaces, while heavy-duty bolt cutters are better suited for thicker materials.
Safety Precautions
Safety should always be a top priority when using any tool, including bolt cutters. Wear protective gear such as gloves and safety goggles to protect yourself from flying debris. Ensure the workpiece is stable and secure before cutting to prevent accidents. Keep your fingers away from the cutting jaws to avoid injuries.
Step-by-Step Guide: How to Use Bolt Cutters
Positioning: Hold the bolt cutters with both hands and position the jaws over the material you intend to cut.
Applying Pressure: Squeeze the handles together with steady pressure, using your body weight if necessary.
Releasing Pressure: Once the material is cut, release the pressure on the handles and remove the bolt cutters from the workpiece.
Inspecting the Cut: Check the cut to ensure it is clean and precise. Make any necessary adjustments if needed.
FAQs About Using Bolt Cutters
Q1: Can bolt cutters cut through hardened steel?
Answer: Yes, bolt cutters can cut through hardened steel, but it depends on the thickness and hardness of the steel. Heavy-duty bolt cutters are recommended for cutting thicker materials.
Q2: How do I maintain bolt cutters for optimal performance?
Answer: Keep the cutting jaws clean and lubricated, and store bolt cutters in a dry environment to prevent rust. Regularly inspect the handles and pivot points for any signs of wear.
Conclusion
Mastering how to use bolt cutters effectively requires practice, patience, and a commitment to safety. By following the guidelines outlined in this comprehensive guide, you can achieve clean and precise cuts in various materials with confidence. Remember to always prioritize safety and choose the right tool for the job. With the right techniques and precautions, you'll be a bolt-cutting pro in no time!
Whether you're a professional tradesperson or a DIY enthusiast, understanding how to use bolt cutters can make your projects more efficient and enjoyable. So grab your bolt cutters and get cutting!
#BoltCutters#DIY#Tools#SafetyFirst#HomeImprovement#PrecisionCutting#ConstructionTips#HandTools#Craftsmanship#ToolGuide#DIYProjects#Workshop#ToolSafety#CuttingTechniques#ToolTips
1 note
·
View note
Text

Choosing the Right Architect for Your Residential Project
Are you planning a home renovation or building your dream house from the ground up? Choosing the right architect is crucial to bringing your vision to life. Our latest blog dives deep into what to consider when selecting an architect, from understanding their design style to ensuring they align with your project goals.
https://www.stonebrookconstructiongroup.com/post/choosing-the-right-architect-for-your-residential-project
0 notes
Text

Building a Strong Foundation: Proper Scaffold Setup and Assembly Techniques
Building a strong foundation for scaffold setup and assembly is essential for ensuring safety and stability on construction sites. Start by carefully planning the layout and placement of the scaffold, considering factors such as ground conditions, load requirements, and access points. Prioritize leveling the ground and using base plates or adjustable legs to provide a stable footing. During assembly, follow manufacturer guidelines and safety regulations, ensuring all components are securely connected and braced.
#ScaffoldSafety#ConstructionSafety#BuildingFoundations#AssemblyTechniques#SafetyFirst#ConstructionTips#WorkSiteSafety#StabilityMatters#SafetyStandards#ProperSetup
0 notes
Text
Waterproofing for New Construction Projects: Ensuring Structural Integrity in Raleigh
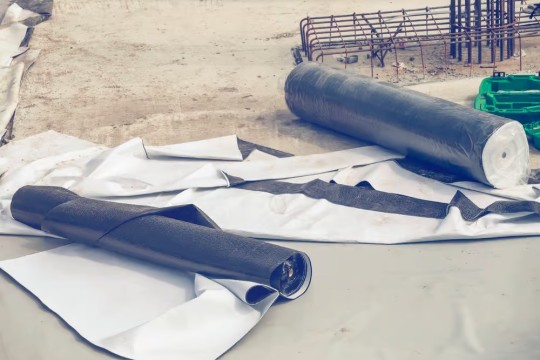
Water damage is a formidable adversary to construction projects, especially in Raleigh, North Carolina, where rainfall and humidity pose significant challenges. In this post, we explore the critical role of waterproofing in new construction projects in Raleigh, emphasizing its importance in preserving the structural integrity and longevity of buildings.
Waterproofing for new construction involves the application of sealants, membranes, and coatings to vulnerable areas like foundations, walls, basements, roofs, and outdoor spaces. Here's why it's indispensable:
Foundation Protection: Waterproofing safeguards against water intrusion, preventing cracks and maintaining the stability of the structure.
Exterior Wall Preservation: Proper waterproofing prevents moisture infiltration, mitigating the risk of mold growth and preserving structural integrity.
Basement Waterproofing: Waterproofing prevents flooding, mold growth, and structural issues in basements.
Roof Leak Prevention: Waterproofing prevents leaks, protecting against interior water damage.
Balcony and Deck Protection: Waterproofing outdoor spaces prevents rot, decay, and safety hazards.
Bathroom and Kitchen Sealant: Waterproofing protects against water infiltration, preventing mold growth and rot.
Window and Door Sealing: Proper sealing prevents water damage to interior finishes.
Crawl Space Encapsulation: Encapsulation prevents moisture-related problems like mold growth.
HVAC System Protection: Sealing HVAC systems prevents moisture intrusion and mold growth.
Investing in new construction waterproofing is crucial in Raleigh, where water-related issues are prevalent. Companies like Raleigh Waterproofing offer expert services to protect properties from water damage. Consult professionals to safeguard your investment and ensure the safety of your property for years to come.
For more information on waterproofing for new construction projects in Raleigh, visit Raleigh Waterproofing.
Remember, proper waterproofing is essential for the longevity and structural integrity of your property.
#Waterproofing#Construction#Raleigh#BuildingProtection#StructuralIntegrity#WaterDamagePrevention#HomeImprovement#BuildingMaintenance#PropertyInvestment#ConstructionTips#WaterproofingExperts#MoldPrevention#HVACProtection#FoundationRepair#RoofMaintenance
0 notes
Last Seen Blogs

iluvhoes123
Just bored, looking for discreet meet ups.

wannabebeaut1ful
WannabeBeautiful

gedebuq
Get your Pawpsicles

rad70s
Lazy Diamond Studded Flunkies

nursanur
NurSanur