#container network interface plugin
Explore tagged Tumblr posts
Visit Tumblr Blog
Explore Tumblr blogs with no restrictions, modern design and the best experience.
Last Seen Tumblr Blogs


Fun Fact
Tumblr Inc. has $15.1M in annual revenue.
Text
Top Django Interview Questions and Answers in 2025

Introduction
If you're aiming for a career in web development, you've probably come across Django, and guess what? It's still going strong in 2025. Whether you're a fresh graduate or an experienced developer eyeing a transition, knowing the top Django interview questions and answers will give you a big edge.
From start-ups to the world's biggest social networking site Instagram, this framework has changed things a lot. It's one of the favorites due to its simplicity, security, and scalability. But with the increasing competition, interviewers have started to pick brains. So let us prepare you with some of the most relevant and updated top Django interview questions and answers that you will need for 2025.
Basics of Django
What is Django?
Django is a high-level Python web framework that lets you rapidly develop secure and maintainable web applications with as little coding as possible. Basically, it follows the "batteries-included" philosophy, which states that user authentication, content management, and database administration are included from the start.
Key Features of Django Framework
MTV architecture (Model-Template-View)
ORM (Object-Relational Mapping)
Admin Interface
Built-in security features
Highly scalable and portable
What Are Django’s Advantages over Other Frameworks?
It's Pythonic-clean and easy to read
Fastest development cycle
Rich documentation
Large community
Tons of third-party packages
Django Interview Questions Asked Quite Often (Beginner Level)
Explain MTV Architecture in Django?
MTV stands for:
Model: It defines what the data structure is.
Template: HTML-like design files.
View: Contains business logic that connects the models and templates.
It's like the way Django interprets Model-View-Controller.
How Does a Request in Django Differs from a Response?
Every HTTP request in Django goes through many processes, that are URL dispatcher, view function, and finally returning an HTTPResponse object. It simply can be thought as a pipeline managing routing, logic, and output.
What Are Models in Django?
Models specify the structure of your database in terms of Python classes; they also act as a bridge between the application and the database using Django's ORM.
Intermediate Questions for Django Interviews
How to Differentiate between a Project and an App?
Project: The entire web application.
App: A component or module within a project (eg., blog, cart, and user).
You can plug many apps into one project.
What Are QuerySets, and How Do They Work?
A queryset is a collection of queries that can be executed against a database to retrieve objects. It is lazy — meaning it will not query the database until the results are explicitly requested.
Advanced Questions for Django Interviews
How are Security Issues (XSS, CSRF, etc.) Handled by Django?
Django has built-in protections against:
CSRF tokens in forms
Auto-escaping of templates in XSS
SQL injection with an ORM
Protection against clickjacking by middleware
What Is Middleware in Django?
Middleware is a framework of hooks into Django's request/response processing. It is a light, low-level plugin system for globally altering Django's input or output. For example, it can be useful for:
Logging requests
Modifying responses
Enforcing authentication
What Are Ways to Enhance Django Application Performance?
Use caching (Redis or Memcached).
Optimize QuerySets.
Minimize template logic.
Compress static files.
Use Django Debug Toolbar for diagnosis.
Real-life Scenario Questions
What Will You Do to Scale a Django App under Heavy Load?
Load balancing.
Caching with Redis.
Use CDNs for serving static/media.
Database indexing optimization.
Perform asynchronous tasks with Celery.
How to Connect Django with Frontend Frameworks like React?
Using Django REST Framework for building APIs.
Serve the React app separately or embed it inside templates.
Handle authorization either through JWT or session-based login.
Which Tools Are Used for Testing in Django?
unittest (built-in)
pytest-django
py for test coverage
factory_boy for test data
Tips to Crack Django Interviews
Practice Coding Daily
Even 30 minutes a day adds up so quickly, and try to focus on real-world projects.
Build Real Projects
Nothing beats practical experience. Try to build a blog, an e-commerce site, or a task manager.
Mock Interviews and Technical Tests
Use a platform like Pramp or Interviewing.io to get a feel for what a real interview will be like.
Conclusion
In 2025, mastering the top Django interview questions and answers can be the very key to opening up your way into a development career. Companies have trusted Django for its speed, security, and scalability, and now, being prepared seems to be your golden ticket. Whether you are brushing up or new to the area, this guide will make you succeed.
At TCCI, we don't just teach computers — we build careers. Join us and take the first step toward a brighter future.
Location: Bopal & Iskcon-Ambli in Ahmedabad, Gujarat
Call now on +91 9825618292
Visit Our Website: http://tccicomputercoaching.com/
Note: This Post was originally published on TCCI - Tririd Computer Coaching Institute and is shared here for educational purposes.
#best computer courses in bopal ahmedabad#computer courses near me#software training in Bopal Ahmedabad#TCCI - Tririd Computer Coaching Institute#top Django interview questions and answers
0 notes
Text
Practical Guide: Debugging Kubernetes Nodes and Managing Docker in Custom Setups
1. Diagnosing Kubernetes Node NotReady Issues Problem: Worker nodes node0 and node1 were stuck in NotReady status. Cause: CNI (Container Network Interface) plugin not initialized. Invalid subnet declaration in 10-bridge.conf (e.g., included hostname/IP instead of CIDR). Fix: Install CNI plugins: wget…
0 notes
Text
OpenShift vs Kubernetes: Key Differences Explained
Kubernetes has become the de facto standard for container orchestration, enabling organizations to manage and scale containerized applications efficiently. However, OpenShift, built on top of Kubernetes, offers additional features that streamline development and deployment. While they share core functionalities, they have distinct differences that impact their usability. In this blog, we explore the key differences between OpenShift and Kubernetes.
1. Core Overview
Kubernetes:
Kubernetes is an open-source container orchestration platform that automates the deployment, scaling, and operation of application containers. It provides the building blocks for containerized workloads but requires additional tools for complete enterprise-level functionality.
OpenShift:
OpenShift is a Kubernetes-based container platform developed by Red Hat. It provides additional features such as a built-in CI/CD pipeline, enhanced security, and developer-friendly tools to simplify Kubernetes management.
2. Installation & Setup
Kubernetes:
Requires manual installation and configuration.
Cluster setup involves configuring multiple components such as kube-apiserver, kube-controller-manager, kube-scheduler, and networking.
Offers flexibility but requires expertise to manage.
OpenShift:
Provides an easier installation process with automated scripts.
Includes a fully integrated web console for management.
Requires Red Hat OpenShift subscriptions for enterprise-grade support.
3. Security & Authentication
Kubernetes:
Security policies and authentication need to be manually configured.
Role-Based Access Control (RBAC) is available but requires additional setup.
OpenShift:
Comes with built-in security features.
Uses Security Context Constraints (SCCs) for enhanced security.
Integrated authentication mechanisms, including OAuth and LDAP support.
4. Networking
Kubernetes:
Uses third-party plugins (e.g., Calico, Flannel, Cilium) for networking.
Network policies must be configured separately.
OpenShift:
Uses Open vSwitch-based SDN by default.
Provides automatic service discovery and routing.
Built-in router and HAProxy-based load balancing.
5. Development & CI/CD Integration
Kubernetes:
Requires third-party tools for CI/CD (e.g., Jenkins, ArgoCD, Tekton).
Developers must integrate CI/CD pipelines manually.
OpenShift:
Comes with built-in CI/CD capabilities via OpenShift Pipelines.
Source-to-Image (S2I) feature allows developers to build images directly from source code.
Supports GitOps methodologies out of the box.
6. User Interface & Management
Kubernetes:
Managed through the command line (kubectl) or third-party UI tools (e.g., Lens, Rancher).
No built-in dashboard; requires separate installation.
OpenShift:
Includes a built-in web console for easier management.
Provides graphical interfaces for monitoring applications, logs, and metrics.
7. Enterprise Support & Cost
Kubernetes:
Open-source and free to use.
Requires skilled teams to manage and maintain infrastructure.
Support is available from third-party providers.
OpenShift:
Requires a Red Hat subscription for enterprise support.
Offers enterprise-grade stability, support, and compliance features.
Managed OpenShift offerings are available via cloud providers (AWS, Azure, GCP).
Conclusion
Both OpenShift and Kubernetes serve as powerful container orchestration platforms. Kubernetes is highly flexible and widely adopted, but it demands expertise for setup and management. OpenShift, on the other hand, simplifies the experience with built-in security, networking, and developer tools, making it a strong choice for enterprises looking for a robust, supported Kubernetes distribution.
Choosing between them depends on your organization's needs: if you seek flexibility and open-source freedom, Kubernetes is ideal; if you prefer an enterprise-ready solution with out-of-the-box tools, OpenShift is the way to go.
For more details click www.hawkstack.com
0 notes
Text
In the dynamic world of data science, staying updated with the latest tools and applications is crucial. These tools not only enhance productivity but also streamline complex workflows, allowing data scientists to focus on deriving insights and making informed decisions. Here’s a comprehensive guide to some of the best tools and apps that every data scientist should have in their arsenal. 1. Jupyter Notebook Jupyter Notebook is an open-source web application that allows you to create and share documents containing live code, equations, visualizations, and narrative text. It supports over 40 programming languages, including Python, R, and Julia. Jupyter is particularly useful for data cleaning and transformation, numerical simulation, statistical modeling, data visualization, and machine learning. Key Features: Interactive output that supports various visualizations. Integration with big data tools like Apache Spark. Extensibility through plugins and extensions. 2. Anaconda Anaconda is a distribution of Python and R for scientific computing and data science. It simplifies package management and deployment, making it easier to manage libraries and dependencies. Anaconda includes popular data science packages and tools, such as Jupyter, pandas, and scikit-learn. Key Features: Conda package manager for seamless installation and management of packages. Anaconda Navigator, a graphical interface to manage environments and launch applications. Built-in Jupyter and RStudio for comprehensive data analysis and visualization. 3. TensorFlow TensorFlow is an open-source machine learning library developed by Google. It is widely used for building and training neural networks, with a focus on deep learning. TensorFlow offers flexible deployment options and extensive support for various platforms, including desktops, mobile devices, and servers. Key Features: High-level APIs such as Keras for easy model building. TensorFlow Serving for deploying machine learning models in production environments. TensorBoard for visualizing the training process and metrics. 4. Tableau Tableau is a powerful data visualization tool that helps data scientists and analysts to see and understand their data. It allows users to create a wide range of visualizations to interactively explore and analyze data. Tableau supports various data sources, including spreadsheets, databases, and cloud services. Key Features: Drag-and-drop interface for creating interactive dashboards. Real-time collaboration and sharing capabilities. Extensive library of visualization types and customization options. 5. PyCharm PyCharm is an Integrated Development Environment (IDE) for Python, developed by JetBrains. It provides a robust environment for coding, debugging, and testing Python applications. PyCharm is particularly useful for data scientists working with Python-based data analysis and machine learning projects. Key Features: Intelligent code editor with code completion and error highlighting. Integrated tools for debugging, testing, and version control. Support for Jupyter Notebook integration. 6. Apache Spark Apache Spark is an open-source distributed computing system that provides an interface for programming entire clusters with implicit data parallelism and fault tolerance. Spark is known for its speed and efficiency in processing large-scale data, making it a popular choice for big data analytics. Key Features: In-memory computing capabilities for faster data processing. Support for SQL queries, streaming data, and machine learning. Integration with Hadoop and other big data tools. 7. GitHub GitHub is a web-based platform used for version control and collaborative software development. It is essential for data scientists to manage their codebase, collaborate with team members, and track changes efficiently. GitHub also provides hosting for software development and a collaborative environment through its Git repositories.
Key Features: Branching and merging for parallel development. Issue tracking and project management tools. Integration with CI/CD pipelines for automated testing and deployment. 8. RStudio RStudio is an IDE for R, a programming language widely used for statistical computing and graphics. RStudio provides a user-friendly interface to work with R and supports a wide range of statistical and graphical techniques. Key Features: Code editor with syntax highlighting and code completion. Integrated tools for plotting, history, and workspace management. Support for R Markdown for creating dynamic reports. 9. Docker Docker is a platform for developing, shipping, and running applications in containers. Containers allow data scientists to package their applications and dependencies into a single, portable unit that can run consistently across different computing environments. Key Features: Isolation of applications and dependencies. Scalability and flexibility in deploying applications. Support for Docker Compose to manage multi-container applications. 10. KNIME KNIME (Konstanz Information Miner) is an open-source data analytics, reporting, and integration platform. It is designed to provide a comprehensive solution for data preprocessing, analysis, and visualization through a modular, workflow-based approach. Key Features: Drag-and-drop interface for creating data workflows. Integration with various data sources and machine learning libraries. Community extensions for additional functionalities. Conclusion Equipping yourself with the right tools and apps can significantly enhance your productivity and efficiency as a data scientist. From data cleaning and visualization to machine learning and deployment, these tools cover a wide spectrum of data science needs. Staying updated with these essential tools will not only streamline your workflow but also help you stay ahead in the ever-evolving field of data science.
0 notes
Text
Master Ansible: Automation & DevOps with Real Projects
1. Introduction
Ansible is a powerful open-source tool used for IT automation, configuration management, and application deployment. In the realm of DevOps, automation is crucial for streamlining operations, reducing errors, and speeding up processes. This article delves into the world of Ansible, exploring its capabilities and demonstrating how it can transform your DevOps practices through real-world projects.
2. Getting Started with Ansible
Ansible Installation To get started with Ansible, you first need to install it. Ansible is available for various operating systems, including Linux, macOS, and Windows. Installation is straightforward, typically involving a simple command like pip install ansible for Python environments. Once installed, you can verify the installation with ansible --version.
Basic Commands and Concepts Ansible uses simple, human-readable YAML files for automation, making it accessible even to those new to coding. The primary components include inventory files, playbooks, modules, and plugins. An inventory file lists all the hosts you want to manage, while playbooks define the tasks to execute on those hosts.
3. Core Components of Ansible
Inventory Files Inventory files are a cornerstone of Ansible’s architecture. They define the hosts and groups of hosts on which Ansible commands, modules, and playbooks operate. These files can be static or dynamic, allowing for flexible management of environments.
Playbooks Playbooks are YAML files that contain a series of tasks to be executed on managed nodes. They are the heart of Ansible’s configuration management, enabling users to describe the desired state of their systems.
Modules and Plugins Modules are reusable, standalone scripts that perform specific tasks such as installing packages or managing services. Plugins extend Ansible’s functionality, providing additional capabilities like logging, caching, and connection management.
4. Ansible Configuration Management
Managing Files and Directories Ansible makes it easy to manage files and directories across multiple systems. You can use the copy module to transfer files, the template module to manage configuration files, and the file module to manage permissions and ownership.
Automating User Management User management is a common task in system administration. With Ansible, you can automate the creation, deletion, and modification of user accounts and groups, ensuring consistent user management across your infrastructure.
5. Ansible for Application Deployment
Deploying Web Applications Ansible excels at deploying web applications. You can automate the deployment of entire web stacks, including web servers, application servers, and databases. Playbooks can handle everything from installing necessary packages to configuring services and deploying code.
Managing Dependencies Managing dependencies is crucial for successful application deployment. Ansible can automate the installation of dependencies, ensuring that all required packages and libraries are available on the target systems.
6. Network Automation with Ansible
Configuring Network Devices Ansible’s network automation capabilities allow you to configure routers, switches, firewalls, and other network devices. Using modules designed for network management, you can automate tasks like interface configuration, VLAN management, and firmware updates.
Automating Network Security Security is a top priority in network management. Ansible can automate the configuration of security policies, firewalls, and intrusion detection systems, helping to protect your network from threats.
7. Ansible Roles and Galaxy
Creating and Using Roles Roles are a powerful way to organize and reuse Ansible code. By structuring your playbooks into roles, you can simplify your automation tasks and make your code more modular and maintainable.
Sharing Roles with Ansible Galaxy Ansible Galaxy is a community hub for sharing Ansible roles. It allows you to find and reuse roles created by others, accelerating your automation projects and promoting best practices.
8. Advanced Ansible Techniques
Ansible Vault for Secrets Ansible Vault is a feature that allows you to securely store and manage sensitive data, such as passwords and API keys. By encrypting this information, Ansible Vault helps protect your sensitive data from unauthorized access.
Using Conditionals and Loops Conditionals and loops in Ansible playbooks enable more dynamic and flexible automation. You can use conditionals to execute tasks based on certain conditions and loops to perform repetitive tasks efficiently.
9. Real-World Ansible Projects
Automating CI/CD Pipelines Continuous Integration and Continuous Deployment (CI/CD) are key components of modern DevOps practices. Ansible can automate the entire CI/CD pipeline, from code integration and testing to deployment and monitoring, ensuring fast and reliable software delivery.
Infrastructure as Code with Ansible Infrastructure as Code (IaC) is a methodology for managing and provisioning computing infrastructure through machine-readable scripts. Ansible supports IaC by enabling the automation of infrastructure setup, configuration, and management.
10. Integrating Ansible with Other Tools
Ansible and Jenkins Jenkins is a popular open-source automation server used for building, testing, and deploying software. Ansible can be integrated with Jenkins to automate post-build deployment tasks, making it a powerful addition to the CI/CD workflow.
Ansible and Kubernetes Kubernetes is a container orchestration platform that automates the deployment, scaling, and management of containerized applications. Ansible can be used to manage Kubernetes clusters, automate application deployment, and handle configuration management.
11. Troubleshooting Ansible
Common Errors and Solutions Even with its simplicity, Ansible can encounter errors during playbook execution. Common issues include syntax errors in YAML files, missing modules, and incorrect inventory configurations. Knowing how to troubleshoot these errors is essential for smooth automation.
Debugging Playbooks Ansible provides several debugging tools and strategies, such as the -v flag for verbose output and the debug module for printing variables and task outputs. These tools help identify and resolve issues in your playbooks.
12. Security and Compliance with Ansible
Automating Security Patches Keeping systems up to date with the latest security patches is crucial for maintaining security. Ansible can automate the patch management process, ensuring that all systems are consistently updated and secure.
Compliance Checks Compliance with industry standards and regulations is a vital aspect of IT management. Ansible can automate compliance checks, providing reports and remediations to ensure your systems meet required standards.
13. Ansible Best Practices
Writing Readable Playbooks Readable playbooks are easier to maintain and troubleshoot. Using descriptive names for tasks, organizing your playbooks into roles, and including comments can make your Ansible code more understandable and maintainable.
Version Control and Collaboration Version control systems like Git are essential for managing changes to your Ansible codebase. They facilitate collaboration among team members, allow for version tracking, and help avoid conflicts.
14. Future of Ansible in DevOps
Emerging Trends As DevOps practices evolve, Ansible continues to adapt and grow. Emerging trends include increased focus on security automation, integration with AI and machine learning for smarter automation, and expanded support for hybrid and multi-cloud environments.
0 notes
Text
Top 5 Container Management Software Of 2024

Container Management Software is essential for businesses aiming to efficiently manage their applications across various environments. As the market for this technology is projected to grow significantly, here’s a look at the top five Container Management Software solutions for 2024:
Portainer: Established in 2017, Portainer is known for its easy-to-use interface supporting Docker, Kubernetes, and Swarm. It offers features like real-time monitoring and role-based access control, making it suitable for both cloud and on-premises environments.
Amazon Elastic Container Service (ECS): This AWS service simplifies deploying and managing containerized applications, integrating seamlessly with other AWS tools. It supports features like automatic load balancing and serverless management through AWS Fargate.
Docker: Since 2010, Docker has been a pioneer in containerization. It provides tools for building, shipping, and running applications within containers, including Docker Engine and Docker Compose. Docker Swarm enables cluster management and scaling.
DigitalOcean Kubernetes: Known for its user-friendly approach, DigitalOcean’s Kubernetes offering helps manage containerized applications with automated updates and monitoring. It integrates well with other DigitalOcean services.
Kubernetes: Developed by Google and now managed by CNCF, Kubernetes is a leading tool for managing containerized applications with features like automatic scaling and load balancing. It supports customizations and various networking plugins.
Conclusion: Selecting the right Container Management Software is crucial for optimizing your deployment processes and scaling applications efficiently. Choose a solution that meets your business’s specific needs and enhances your digital capabilities.
0 notes
Text
Best 12 WordPress Plugins to Think About for 2024
Within a short period after its introduction in 2003, WordPress has become the most widely used content management system (CMS) currently available on the market. A significant portion of its appeal can be attributed to the infamously simple user interface as well as the endless customization opportunities. The enormous community is another factor that has contributed to WordPress's continued success over the past nearly twenty years.
Because it is an open-source project, devout supporters and contributors actively participate in the development of new themes and plugins that enable all of us to construct a website that is genuinely one of a kind. As of this now, the official WordPress repository contains a little less than 60,000 plugins, and new ones are being added every other week.

Best WordPress plugins to think about for 2024-
In this article, we take a look at some of the best WordPress plugins that are just getting started in the year 2024. These WordPress plugins provide a glimpse into the future of website management by boosting the performance and security of your website, as well as providing sophisticated features and functionality.
Jetpack
Jetpack by Automattic makes the claim that it will assist you in enhancing your website in three essential areas: search engine optimization, speed, and security. Jetpack appears to be doing something right, as evidenced by the fact that it has more than 5 million active installations to date. It comes with a downtime monitoring tool that notifies you if your website becomes inaccessible, which is just one of the many features that are packed full of incredibly useful capabilities.
Moreover, it has the capability to provide notifications in the event that someone is attempting to brute-force their way into your website. Jetpack comes equipped with its own spam filtering features, and premium packages also include robust backup solutions. Every user receives a free content delivery network (CDN) service, which improves both the availability of the site and its overall performance.
Yoast
Ranking for search engine optimization will be of the utmost importance, regardless of whether you are using your WordPress account as a content management system (CMS) to document and publish items, or if you are using it to promote a local business or establish an independent shop from the ground up. Yoast is likely the most well-known and well-established search engine optimization (SEO) plugin for WordPress.
It assists content writers in distinguishing between post titles, page titles, and headings, so allowing for the greatest possible amount of keywords to be hit. It is convenient that it is offered in a free format; however, the paid version may be more advantageous to some businesses because it provides additional support for various types of content, such as news and video, as well as suggestions for things like constructing internal linking and redirecting URLs to assist in avoiding the negative impact of 404 errors.
WooCommerce
By a significant margin, WooCommerce is the most widely used e-commerce platform for WordPress. WooCommerce is able to attract users due to a number of important aspects. Compared to other platforms of this kind, the app is, on the one hand, considerably simpler to install and operate than other similar platforms.
The fact that you are able to manage your online store through the dashboard of WordPress, which is all too familiar, is another factor that contributes significantly to the popularity of WooCommerce. The vast community of users and developers that backs the WooCommerce project is another advantage of using WooCommerce today. Not only are you able to receive support with technical questions, but you are also guaranteed to have the opportunity to download plugins and themes on a consistent basis.
Dashify for WooCommerce
E-commerce business owners can benefit from using Dashify, which is yet another WordPress plugin that comes in useful. Because it works with the WooCommerce plugin, it provides users with the opportunity to view and update orders placed through an online store from a sophisticated dashboard. Therefore, if you are searching for a dashboard that is both more visually appealing and more user-friendly in order to handle your WooCommerce orders, then the Dashify plugin can be the most suitable option for you.
WPForms
WPForms, the next plugin on our list, likewise features a drag-and-drop interface because it is at the core of its functionality. Developing forms that consumers are able to engage with is of utmost significance in this day and age, and WPForms is perhaps the most straightforward method for doing this task.
Regardless of whether you want to construct a contact form, encourage your visitors to sign up for a newsletter, or collect signups for a cause, WPForms is there to help you achieve all of these goals. It features a user interface that is easy to understand and offers an almost infinite number of settings.
Yoast SEO
When it comes to gaining recognition from search engines, the Yoast SEO plugin for WordPress is one of the most potent weapons that can be utilized. By using Yoast, you can ensure that search engines are aware of the content of your website immediately. In addition to providing you with advice on how to make your content more search engine optimization (SEO) friendly, the plugin also offers keyword and link optimization tools, which are available on all levels.
Sucuri Security
Sucuri is an excellent choice for comprehensive protection because it avoids the need to install various plugins that are comparable to one another. However, in comparison to other competitors, it appears to be quite pricey. You can anticipate a variety of safeguards, including firewalls, monitoring, and detection, as well as security against spamming in search engine optimization.
It is able to handle other types of jobs as well, such as performance improvements and optimization, which helps it to represent greater value for money if you are seeking for these other kinds of products. This is why we give it a rating.
Wordfence Security
Wordfence Security, which is managed by a committed group of professionals conducts malware scanning on a regular basis and investigate new forms of malicious software as well as methods by which hackers can break into WordPress websites.
They make use of this information to develop specialized safeguards and warning indicators in order to prevent these attacks from causing harm before they even occur. In order to assist you in maintaining the security of your website, the Wordfence Security team will constantly update these safeguards and communicate them to you in real time when they have been updated.
Jetpack AI Assistant
In the process of making a blog post, composing a headline, or generating a form or table, it might be difficult to locate the appropriate phrases to use. Jetpack AI Assistant is now available. This premium plugin enables you to generate a wide variety of material in a short amount of time, ranging from headlines to whole posts. The necessity to transition between different platforms and programs is eliminated as a result of its seamless integration as a block within the WordPress.com editor.
WPML
One of the most widely used plugins for WordPress websites that support several languages is called WPML. It provides integration with more than forty languages right out of the box, and it provides simple management choices for all of them. Not only is automatic translation accessible for your content, but it is also available for the URLs and meta descriptions, both of which are quite vital for your search engine optimization efforts. It is not possible to obtain a free version of WPML because it is a premium software.
Shared Counts
The Shared Counts plugin is an extremely useful tool because it enables visitors to share your material on many social networking platforms. In addition, you have the ability to place buttons for sharing and liking on Facebook, Twitter, Pinterest, and LinkedIn. Shared Counts even provides you with the ability to determine the total number of times a specific website has been shared across all social media platforms. The control panel can be found within the dashboard of your WordPress account, and it is about as straightforward as everything else. This plugin is entirely free to use and complies with all of the GDPR regulations.
Elementor
Users who are interested in easily creating and designing a website should find the Elementor plugin to be the ideal answer. Using WordPress, Elementor is a website builder that you may use. The drag-and-drop interface that it provides for designing websites is integrated into your WordPress dashboard, and it allows you to customize websites. Even if you have no prior knowledge, you may develop a design that looks professional by making use of a variety of templates, blocks, and widgets offered by the program. The fact that Elementor has 5,000 five-star user evaluations and 5 million active installs is evidence that it is doing an excellent job of what it was designed to do. The free version of Elementor is a plugin that is open-source; nevertheless, the amount of widgets and templates that are available to you is rather restricted on the free version.
Conclusion-
Keeping up with WordPress plugin advancements can help you keep your organization competitive and relevant. Using only necessary plugins and testing to keep your website performing at its best. If you think you can't manage and update plugins, consider outsourcing software support. If you need a security plugin to protect your website from brute-force attacks or a performance plugin to keep it running smoothly, you can find one. In other words, WordPress has so many plugins that you will never run out of ways to improve your website. Remember not to overuse plugins.

Dollar2host Dollar2host.com We provide expert Webhosting services for your desired needs Facebook Twitter Instagram YouTube
0 notes
Text
An Ultimate Guide to Unraid OS NAS

Network Attached Storage (NAS) has become an essential component for both home and small business (SMB) environments. With the need for data accessibility, backup, and storage scalability, a reliable NAS system is indispensable. Among the various NAS solutions available, Unraid OS stands out due to its versatility, user-friendly interface, and robust feature set. This guide will explore what Unraid OS is, the advantages of using an Unraid OS NAS, and provide a detailed look at the LincPlus Unraid OS NAS, along with a step-by-step guide on how to use it.
What is Unraid?
Unraid is a Linux-based operating system designed to provide an easy-to-use and flexible platform for building and managing a NAS. Unlike traditional RAID systems, Unraid allows you to mix and match drives of different sizes, which can be added to the array as needed. This makes it an ideal choice for users who want to expand their storage capabilities over time without being constrained by identical drive requirements.
Key Features of Unraid:
Flexibility: Add any number of drives, of any size, and mix and match them in your array.
Simplicity: Easy-to-use web interface for managing your storage, VMs, and Docker containers.
Protection: Offers parity-based protection to safeguard against drive failures.
Scalability: Easily expand your storage by adding more drives.
Virtualization: Run virtual machines (VMs) directly from the NAS.
Docker Support: Host Docker containers to expand functionality with apps like Plex, Nextcloud, and more.
Unraid OS NAS
An Unraid OS NAS leverages the power of the Unraid operating system to provide a versatile and high-performance storage solution. This type of NAS is suitable for both home users who need a media server and small businesses requiring reliable storage for critical data.
Advantages of Unraid OS NAS:
Cost-Effective: Use off-the-shelf hardware and avoid the high costs of pre-built NAS systems.
Customizable: Build a NAS that fits your specific needs, whether it's for media streaming, data backup, or running applications.
Performance: Optimized for speed and efficiency, especially with 2.5GbE connectivity, ensuring fast data transfer rates.
User-Friendly: The intuitive web interface makes it easy for anyone to set up and manage.
Community Support: A large, active community provides a wealth of knowledge and assistance.
LincPlus Unraid OS NAS
One of the top choices for an Unraid OS NAS is the LincPlus NAS. This device offers an excellent balance of performance, features, and affordability, making it ideal for both home and SMB users.
Specifications:
Feature
Specification
CPU
Intel Celeron N5105
RAM
16GB DDR4
Storage
Supports up to 6 drives (HDD/SSD)
Network
2.5GbE port
Ports
USB 3.0, HDMI, and more
OS
Unraid OS pre-installed
How to Use the LincPlus Unraid OS NAS:
Setup and Installation:
Unbox the LincPlus NAS and connect it to your network using the 2.5GbE ports.
Attach your storage drives (HDDs or SSDs).
Power on the NAS and connect to it via a web browser using the provided IP address.
Initial Configuration:
Log in to the Unraid web interface.
Configure your array by adding your drives. Unraid will offer options for setting up parity drives for data protection.
Format the drives as required and start the array.
Adding Storage:
You can add additional drives to the array at any time. Unraid will incorporate them into the array and adjust parity as needed.
Mix and match drives of different sizes to maximize your storage efficiency.
Setting Up Shares:
Create user shares for different types of data (e.g., media, backups, documents).
Configure access permissions and set up network sharing (SMB, NFS, AFP).
Installing Applications:
Use the built-in Docker support to install applications like Plex, Nextcloud, or any other Docker container.
Alternatively, use the Community Applications plugin to browse and install from a wide range of available apps.
Running Virtual Machines:
Utilize the virtualization features to run VMs directly on the NAS.
Allocate CPU, RAM, and storage resources as needed for your VMs.
Backup and Maintenance:
Set up automated backups to ensure your data is protected.
Regularly check the health of your drives using the SMART monitoring tools built into Unraid.
Keep the Unraid OS updated to benefit from the latest features and security patches.
Conclusion
An Unraid OS NAS, particularly the LincPlus Unraid OS NAS, offers a powerful, flexible, and cost-effective solution for both home and SMB users. With its robust feature set, including 2.5GbE connectivity, easy scalability, and support for Docker and VMs, it stands out as an excellent choice for those looking to build a versatile and high-performance NAS system. By following the setup and usage guidelines, users can maximize the potential of their Unraid OS NAS, ensuring reliable and efficient data storage and management.
Additional Resources:
Unraid Official Website
By leveraging the capabilities of Unraid and the LincPlus NAS, you can build a storage solution that meets your unique needs, whether for personal use or to support your small business operations.
FAQ: Unraid OS NAS
What is Unraid OS and how does it differ from traditional RAID?
Answer: Unraid OS is a Linux-based operating system designed specifically for managing NAS devices. Unlike traditional RAID, Unraid allows you to use drives of different sizes and types in the same array. You can add new drives to expand your storage at any time, without needing to rebuild the array or match the sizes of existing drives. This flexibility makes Unraid ideal for users who plan to expand their storage over time.
What are the hardware requirements for running Unraid OS on a NAS?
Answer: To run Unraid OS, you'll need a 64-bit capable processor (x86_64), at least 2GB of RAM (though 4GB or more is recommended), and a USB flash drive of at least 1GB to boot the OS. The LincPlus Unraid OS NAS, for instance, comes with an Intel Celeron J4125 processor and 8GB of DDR4 RAM, which provides ample performance for most home and small business applications. Additionally, having 2.5GbE network ports enhances data transfer speeds.
Can I use different sizes and types of drives in my Unraid NAS?
Answer: Yes, one of the key advantages of Unraid is its ability to mix and match different sizes and types of drives within the same array. This flexibility allows you to maximize your storage capacity and easily expand your system over time without the need for drives to be identical. You can start with a few drives and add more as needed, making Unraid a cost-effective and scalable solution.
How do I ensure my data is protected on an Unraid NAS?
Answer: Unraid offers several methods to protect your data:
Parity Protection: By configuring one or two drives as parity drives, Unraid can recover data from a failed drive.
Automated Backups: Set up regular backups using plugins or Docker applications to ensure your data is always backed up.
SMART Monitoring: Utilize the SMART monitoring tools in Unraid to regularly check the health of your drives and receive alerts about potential issues.
Redundancy: Keep multiple copies of important data across different drives or even in different locations to prevent data loss from hardware failures.
source:
https://www.lincplustech.com/blogs/news/unraid-os-nas-guide
0 notes
Text
OpenShift vs Kubernetes: A Detailed Comparison

When it comes to managing and organizing containerized applications there are two platforms that have emerged. Kubernetes and OpenShift. Both platforms share the goal of simplifying deployment, scaling and operational aspects of application containers. However there are differences between them. This article offers a comparison of OpenShift vs Kubernetes highlighting their features, variations and ideal use cases.
What is Kubernetes? Kubernetes (often referred to as K8s) is an open source platform designed for orchestrating containers. It automates tasks such as deploying, scaling and managing containerized applications. Originally developed by Google and later donated to the Cloud Native Computing Foundation (CNCF) Kubernetes has now become the accepted industry standard for container management.
Key Features of Kubernetes Pods: Within the Kubernetes ecosystem, pods serve as the units for deploying applications. They encapsulate one or multiple containers.
Service Discovery and Load Balancing: With Kubernetes containers can be exposed through DNS names or IP addresses. Additionally it has the capability to distribute network traffic across instances in case a container experiences traffic.
Storage Orchestration: The platform seamlessly integrates with storage systems such as on premises or public cloud providers based on user preferences.
Automated. Rollbacks: Kubernetes facilitates rolling updates while also providing a mechanism to revert back to versions when necessary.
What is OpenShift? OpenShift, developed by Red Hat, is a container platform based on Kubernetes that provides an approach to creating, deploying and managing applications in a cloud environment. It enhances the capabilities of Kubernetes by incorporating features and tools that contribute to an integrated and user-friendly platform.
Key Features of OpenShift Tools for Developers and Operations: OpenShift offers an array of tools that cater to the needs of both developers and system administrators.
Enterprise Level Security: It incorporates security features that make it suitable for industries with regulations.
Seamless Developer Experience: OpenShift includes a built in integration/ deployment (CI/CD) pipeline, source to image (S2I) functionality, as well as support for various development frameworks.
Service Mesh and Serverless Capabilities: It supports integration with Istio based service mesh. Offers Knative, for serverless application development.
Comparison; OpenShift, vs Kubernetes 1. Installation and Setup: Kubernetes can be set up manually. Using tools such as kubeadm, Minikube or Kubespray.
OpenShift offers an installer that simplifies the setup process for complex enterprise environments.
2. User Interface: Kubernetes primarily relies on the command line interface although it does provide a web based dashboard.
OpenShift features a comprehensive and user-friendly web console.
3. Security: Kubernetes provides security features and relies on third party tools for advanced security requirements.
OpenShift offers enhanced security with built in features like Security Enhanced Linux (SELinux) and stricter default policies.
4. CI/CD Integration: Kubernetes requires tools for CI/CD integration.
OpenShift has an integrated CI/CD pipeline making it more convenient for DevOps practices.
5. Pricing: Kubernetes is open source. Requires investment in infrastructure and expertise.
OpenShift is a product with subscription based pricing.
6. Community and Support; Kubernetes has a community, with support.
OpenShift is backed by Red Hat with enterprise level support.
7. Extensibility: Kubernetes: It has an ecosystem of plugins and add ons making it highly adaptable.
OpenShift:It builds upon Kubernetes. Brings its own set of tools and features.
Use Cases Kubernetes:
It is well suited for organizations seeking a container orchestration platform, with community support.
It works best for businesses that possess the technical know-how to effectively manage and scale Kubernetes clusters.
OpenShift:
It serves as a choice for enterprises that require a container solution accompanied by integrated developer tools and enhanced security measures.
Particularly favored by regulated industries like finance and healthcare where security and compliance are of utmost importance.
Conclusion Both Kubernetes and OpenShift offer capabilities for container orchestration. While Kubernetes offers flexibility along with a community, OpenShift presents an integrated enterprise-ready solution. Upgrading Kubernetes from version 1.21 to 1.22 involves upgrading the control plane and worker nodes separately. By following the steps outlined in this guide, you can ensure a smooth and error-free upgrade process. The selection between the two depends on the requirements, expertise, and organizational context.
Example Code Snippet: Deploying an App on Kubernetes
apiVersion: v1
kind: Pod
metadata:
name: myapp-pod
labels:
app: myapp
spec:
containers:
- name: myapp-container
image: myapp:1.0 This YAML file is an example of deploying a simple application on Kubernetes. It defines a Pod with a single container running ‘myapp’.
In conclusion, both OpenShift vs Kubernetes offer robust solutions for container orchestration, each with its unique strengths and use cases. The choice between them should be based on organizational requirements, infrastructure, and the level of desired security and integration.
0 notes
Text
does proton vpn block youtube ads
🔒🌍✨ Get 3 Months FREE VPN - Secure & Private Internet Access Worldwide! Click Here ✨🌍🔒
does proton vpn block youtube ads
ProtonVPN ad blocking feature
ProtonVPN, a reputable player in the VPN market, offers a robust ad blocking feature as part of its service. This feature not only enhances user experience but also bolsters privacy and security.
Ad blocking is a crucial aspect of online browsing, as it prevents intrusive advertisements from cluttering web pages and potentially compromising user data. ProtonVPN's ad blocking feature efficiently blocks ads at the network level, meaning that ads are filtered out before they even reach the user's device. This ensures a smoother browsing experience, faster loading times, and reduced bandwidth consumption.
One of the significant advantages of ProtonVPN's ad blocking feature is its contribution to user privacy. By blocking ads, the VPN helps prevent third-party trackers from monitoring users' online activities. This is particularly important in an era where online privacy is increasingly under threat.
Moreover, ad blocking also enhances security by mitigating the risk of malvertising - malicious advertisements that may contain malware or lead to phishing scams. By blocking potentially harmful ads, ProtonVPN helps users browse the internet more safely.
ProtonVPN's ad blocking feature is available across its various subscription plans, making it accessible to a wide range of users. Whether you're using the free plan or the premium tiers, you can enjoy the benefits of ad-free browsing with ProtonVPN.
In conclusion, ProtonVPN's ad blocking feature is a valuable addition to its suite of privacy and security tools. By effectively blocking ads at the network level, ProtonVPN enhances user experience, protects privacy, and strengthens security, making it a compelling choice for those seeking a reliable VPN service.
YouTube ad blocking on ProtonVPN
YouTube ad blocking on ProtonVPN offers users a seamless way to enjoy their favorite videos without interruptions. ProtonVPN is a popular virtual private network (VPN) service known for its strong privacy and security features. By employing a VPN like ProtonVPN, users can protect their online activities and data from prying eyes while also gaining access to region-restricted content.
One of the standout features of ProtonVPN is its ad blocking capability, especially on YouTube. Ads on YouTube can be disruptive, affecting the viewing experience and consuming valuable data. With YouTube ad blocking on ProtonVPN, users can enjoy ad-free content, leading to a more pleasant and uninterrupted watching experience.
ProtonVPN achieves ad blocking on YouTube by blocking known ad servers and domains at the network level. This means that users do not have to rely on browser extensions or plugins to remove ads manually. The ad blocking feature is integrated into the VPN service itself, making it a hassle-free solution for those looking to eliminate ads while browsing YouTube.
In addition to ad blocking, ProtonVPN offers a range of other features, such as strong encryption, a strict no-logs policy, and high-speed servers. With its user-friendly interface and affordable pricing plans, ProtonVPN is a top choice for those seeking a reliable VPN service with comprehensive ad blocking capabilities.
Overall, YouTube ad blocking on ProtonVPN provides a convenient and effective solution for users who want to enhance their viewing experience on the popular video-sharing platform. By combining privacy and security features with ad blocking functionality, ProtonVPN offers a holistic solution for users looking to maximize their online privacy and freedom.
ProtonVPN restrictions on YouTube ads
ProtonVPN, a popular virtual private network (VPN) service, has recently imposed restrictions on YouTube ads to ensure the safety and privacy of its users. This move comes as part of ProtonVPN’s commitment to maintaining high standards of user security and data protection.
By limiting the appearance of ads on YouTube, ProtonVPN aims to minimize the exposure of its users to potentially harmful or invasive content. YouTube ads are known to collect user data and track online behavior, which can compromise privacy and expose sensitive information to third parties. With the restriction in place, ProtonVPN users can browse YouTube with peace of mind, knowing that their data is secure and their privacy is protected.
These restrictions on YouTube ads highlight ProtonVPN’s dedication to upholding its core values of transparency, security, and user trust. By taking proactive measures to limit potential risks and vulnerabilities, ProtonVPN sets itself apart as a VPN provider that prioritizes user privacy above all else.
While some users may find these restrictions on YouTube ads inconvenient, the ultimate goal is to create a safer and more secure online environment for all ProtonVPN users. By safeguarding user data and protecting privacy, ProtonVPN continues to demonstrate its leadership in the VPN industry and its unwavering commitment to customer satisfaction.
ProtonVPN ad blocker for YouTube
ProtonVPN, a renowned name in the realm of online privacy and security, has introduced an innovative feature – the ad blocker for YouTube. This addition comes as a response to the increasing concerns about intrusive advertisements and tracking mechanisms present on the popular video-sharing platform.
The ad blocker, seamlessly integrated into ProtonVPN's suite of privacy tools, offers users a hassle-free experience while watching YouTube videos. By blocking ads at the network level, it prevents them from ever reaching the user's device, thus enhancing both privacy and user experience.
One of the primary advantages of ProtonVPN's ad blocker for YouTube is its ability to eliminate not only traditional video ads but also those pesky banner ads and sponsored content that often clutter the YouTube interface. This results in a cleaner and more enjoyable viewing experience, free from distractions and interruptions.
Furthermore, the ad blocker enhances user privacy by blocking tracking scripts employed by advertisers to monitor user behavior and preferences. By preventing these scripts from loading, ProtonVPN helps users maintain their anonymity and protect their personal information from being harvested for targeted advertising purposes.
In addition to safeguarding privacy and enhancing user experience, ProtonVPN's ad blocker for YouTube also contributes to faster video loading times and reduced data consumption. By eliminating the need to load and display resource-intensive advertisements, users can enjoy smoother playback and conserve bandwidth, especially on mobile devices or slower internet connections.
Overall, ProtonVPN's ad blocker for YouTube is a valuable addition to the arsenal of tools aimed at enhancing online privacy and security. By empowering users to take control of their browsing experience and protect their personal data, ProtonVPN continues to demonstrate its commitment to providing innovative solutions in the ever-evolving landscape of digital privacy.
Impact of ProtonVPN on YouTube ad display
ProtonVPN is a popular Virtual Private Network (VPN) service known for its strong focus on user privacy and security. When it comes to the impact of ProtonVPN on YouTube ad display, there are several key aspects to consider.
First and foremost, using ProtonVPN while browsing YouTube can help enhance user privacy and security. By encrypting internet traffic and masking IP addresses, ProtonVPN helps users shield their online activities from prying eyes, including advertisers on YouTube. This can lead to a more personalized and less intrusive ad experience for users, as their true location and browsing history are kept private.
Moreover, ProtonVPN can also impact the geo-restriction of YouTube ads. By allowing users to connect to servers in different countries, ProtonVPN enables them to access content that may be restricted in their region. This means that users can potentially see different ads on YouTube based on the virtual location they choose with ProtonVPN, opening up new advertising opportunities for businesses targeting specific regions or demographics.
Additionally, ProtonVPN's focus on security means that users are less vulnerable to online threats such as malware or phishing attacks that may originate from malicious ads on YouTube. This can result in a safer and more enjoyable browsing experience for users, as they can focus on the content they want to watch without worrying about potential security risks.
In conclusion, the impact of ProtonVPN on YouTube ad display is significant in terms of enhancing user privacy, enabling access to geo-restricted content, and improving overall online security. By using ProtonVPN, YouTube users can enjoy a more personalized and secure ad experience while exploring the vast array of content available on the platform.
0 notes
Text
Are you ready to unlock a world of entertainment on your PS4? Imagine streaming your favorite IPTV channels directly to your gaming console, enhancing your viewing experience like never before. With Plex, it's possible! Follow our step-by-step guide to set up Plex on your PS4 and enjoy seamless IPTV streaming. Are you up for the challenge? Key Takeaways: Learn how to set up Plex on your PS4 for IPTV streaming Discover the benefits of using Plex as a media server program Integrate IPTV channels into Plex on your PS4 Optimize your settings for the best IPTV streaming experience Explore troubleshooting tips and enhance your viewing experience with Plex plugins and addons Introduction to Plex and its Benefits Plex is a versatile media playback system that revolutionizes the way you access and enjoy your favorite movies, TV shows, music, and photos. With Plex, you can create your personal media server, the Plex Media Server, on your PC, and effortlessly stream your media content across various devices connected to your home network. By installing the Plex Media Server and adding your media libraries, Plex provides a seamless and user-friendly experience, allowing you to access and stream your media from anywhere and at any time. Whether you're at home or on the go, Plex offers centralized control and easy sharing, ensuring that your media is always at your fingertips. Here are some key benefits of using Plex: Centralized Control: Plex allows you to organize and manage your media libraries in one place, making it convenient to access your favorite content wherever you are. Effortless Streaming: With Plex, you can stream your media on various devices, such as smartphones, tablets, smart TVs, and streaming devices, ensuring that you never miss a moment of your favorite shows or songs. User-Friendly Interface: Plex offers an intuitive and user-friendly interface that makes it easy to navigate through your media libraries, find what you want to watch or listen to, and discover new content. Content Tracking: Plex keeps track of your viewing history, allowing you to pick up where you left off and easily resume watching your favorite movies or TV shows. Home Network Streaming: Plex seamlessly integrates with your home network, enabling you to access and stream your media content from any device connected to your network, eliminating the need for physical media or external storage. With Plex, you can truly take control of your media and create a personalized streaming experience that caters to your preferences. Say goodbye to the limitations of physical media and enjoy the convenience of streaming your favorite content with Plex. Setting Up Plex for IPTV Streaming on PS4 To enjoy IPTV streaming on your PS4 using Plex, you need to follow a few simple steps. Here's a detailed guide on setting up Plex for IPTV streaming on your PS4. Step 1: Download and Install Plex Media Server To begin, download and install the Plex Media Server on your PC. Plex Media Server acts as a central hub that organizes and streams your media content to devices connected to your network. Step 2: Create a Plex Account After installing Plex Media Server, create a Plex account. This account will be used to sign in to Plex and access your media libraries. Step 3: Download and Install the IPTV Plugin for Plex Next, download the IPTV plugin for Plex from a reliable source. Once downloaded, install the plugin in the appropriate folder on your PC. Step 4: Configure the Plugin After installing the IPTV plugin, you need to configure it. Edit the plugin's file and add your M3U playlist, which contains the URLs of your desired IPTV channels. Step 5: Launch Plex on Your PS4 and Sign In Once you have completed the previous steps, you're ready to launch Plex on your PS4. Sign in to your Plex account on the PS4 app to start enjoying IPTV streaming. Following this guide will allow you to set up Plex on your PS4 for IPTV streaming, unlocking a wide variety of channels and enhancing your streaming experience.
With Plex and the IPTV plugin, you can enjoy seamless streaming of IPTV channels directly on your PS4. Stream your favorite shows, movies, and live TV channels right from your home network. "Setting up Plex for IPTV streaming on your PS4 is quick and easy. By following the steps outlined above, you'll be able to enjoy a vast selection of IPTV channels on your PS4 in no time." - Mark Thompson, Streaming Enthusiast Integrating IPTV Channels into Plex on PS4 Once you have successfully set up Plex with the IPTV plugin, you can seamlessly integrate IPTV channels into the Plex app on your PS4. By connecting your PS4 to your home network, the Plex app will automatically detect the server and display your IPTV channels, ready to be played and streamed directly on your console. With this integration, you can enjoy a wide range of IPTV channels right at your fingertips. Whether you're into news, sports, movies, or TV shows, Plex gives you access to a vast library of content to cater to your interests and entertainment preferences. Easy Navigation and Convenient Streaming Using the Plex app on your PS4, you can easily navigate through the available IPTV channels. The user-friendly interface allows for smooth browsing and quick access to your favorite content. Simply browse through the list of channels, select what you want to watch, and enjoy high-quality streaming directly on your PS4. With Plex's versatile playback options, you can pause, rewind, or fast forward through your IPTV channels, giving you complete control over your viewing experience. Plus, Plex supports various media formats, ensuring compatibility and seamless playback across different channels. Experience the convenience of having all your IPTV channels integrated into the Plex app on your PS4. Enjoy your favorite shows and movies without the need for multiple apps or switching between devices—it's all right there, accessible and streaming smoothly. To enhance your IPTV experience, you can take advantage of Plex's features, such as creating personalized playlists or utilizing the search function to quickly find specific channels or content. Explore the capabilities of Plex on your PS4 and discover new ways to elevate your entertainment. Benefits Description Centralized Streaming Access and stream all your IPTV channels in one place User-Friendly Interface Easily navigate through the channels and find the content you want High-Quality Streaming Enjoy smooth playback and excellent video and audio quality Versatile Playback Options Pause, rewind, or fast forward through your favorite IPTV channels Additional Features Create playlists, search for specific channels or content, and more By integrating IPTV channels into the Plex app on your PS4, you can streamline your entertainment experience, eliminating the need for multiple apps or devices. Enjoy the convenience, versatility, and quality of IPTV streaming directly on your gaming console with Plex. Best Settings for IPTV Streaming on PS4 with Plex To enhance your IPTV viewing experience on PS4 with Plex, it's important to optimize the settings. By adjusting the Plex app settings on your PS4, you can ensure smooth streaming and high-quality playback. Here are some key settings you should consider: Select the Appropriate Streaming Quality: Choose the streaming quality that suits your internet connection and device capabilities. Opting for a higher quality may result in better visual experience, but a stable internet connection is essential. Conversely, if you have limited bandwidth, selecting a lower streaming quality can prevent buffering issues. Enable Subtitles if Desired: If you prefer watching IPTV channels with subtitles, make sure to enable this feature in the Plex app settings. This can enhance your understanding and enjoyment of foreign-language programs. Customize the Interface: Personalize the Plex app interface on your PS4 for easier navigation and accessing your favorite content. You can
customize the layout, organize channels, and arrange media libraries based on your preferences. Exploring the various settings options within the Plex app allows you to tailor your IPTV streaming experience to your liking. Optimize the settings, and enjoy a seamless and immersive IPTV streaming experience on your PS4. Example Table: Recommended Streaming Quality Settings IPTV Streaming Quality Resolution Bandwidth Requirement SD (Standard Definition) 480p 2 Mbps HD (High Definition) 720p 5 Mbps FHD (Full High Definition) 1080p 10 Mbps UHD (Ultra High Definition) 4K 25 Mbps Troubleshooting Plex IPTV Setup on PS4 Setting up Plex for IPTV streaming on your PS4 is a straightforward process, but you may encounter some issues along the way. The following troubleshooting steps can help you overcome common problems and ensure a smooth streaming experience. Check Plex Server: Ensure that the Plex Media Server is running properly on your PC. This involves verifying that the server software is up to date and running in the background. Verify Network Connections: Make sure that your PS4 and PC are connected to the same network. Check that both devices have stable internet connections and are properly configured for communication. Verify M3U Playlist: Double-check that the M3U playlist is correctly configured within the Plex Media Server. Ensure that all necessary settings, such as the server IP address and port, are accurately entered. Restart Devices: Sometimes, a simple restart of your PS4, PC, and router can resolve connectivity issues. Try powering off and restarting all devices involved in the streaming setup. Seek Community Support: If the troubleshooting steps mentioned above do not resolve your issues, consider seeking assistance from the Plex community. The Plex forums and online support communities can provide valuable insights and solutions for common problems. By following these troubleshooting guidelines and seeking support when needed, you can overcome any obstacles that may arise during your Plex IPTV setup on PS4. Remember to double-check your settings, ensure adequate network connectivity, and explore community resources for additional guidance. Enhancing Viewing Experience with Plex IPTV Plugins and Addons for PS4 One of the great features of Plex is its compatibility with plugins and addons that can enhance your viewing experience. These Plex IPTV plugins and PS4 addons provide additional functionalities, expanding the range of channels and features available for your entertainment. By exploring the Plex plugin library, you can discover new ways to elevate your IPTV streaming on PS4 and make the most of your Plex setup. Let's explore some of the popular plugins and addons that can enhance your viewing experience: 1. EPG Guide Plugin The EPG (Electronic Program Guide) plugin is a valuable addition to your Plex setup, offering a comprehensive and user-friendly program guide for IPTV channels. With this plugin, you can easily browse through the schedule of upcoming shows, view program details, and set reminders for your favorite programs. The EPG guide ensures that you never miss out on your preferred content and allows for efficient planning of your viewing schedule. 2. Parental Control Addon Plex offers a built-in parental control feature, but you can further enhance it with the help of addons specifically designed for PS4. These addons provide additional layers of security and customization options, allowing you to restrict access to certain channels or content based on age ratings or content categories. With the parental control addon, you can create a safe and age-appropriate viewing environment for your family. 3. Customized Playlist Plugin With the customized playlist plugin, you can create and manage personalized playlists of your favorite IPTV channels or specific content categories. This allows for easy access to your preferred content and simplifies navigation through your extensive channel list.
Whether you want to create a playlist of sports channels, news channels, or a mix of your favorite shows, the customized playlist plugin gives you the flexibility to curate your own entertainment experience. 4. Subtitles Addon If you prefer to watch IPTV content with subtitles, the subtitles addon is a must-have. This addon enables the display of subtitles for supported channels and programs, enhancing accessibility and ensuring that you don't miss out on any important dialogues or details. You can customize the appearance of subtitles, such as font size and color, to suit your preferences. By incorporating these Plex IPTV plugins and PS4 addons, you can unlock additional functionalities and tailor your viewing experience according to your preferences. Whether it's accessing a detailed program guide, imposing parental controls, creating customized playlists, or adding subtitles, these plugins and addons offer a range of options to enhance your IPTV streaming on PS4. Plugin/Addon Functionality EPG Guide Plugin Provides a comprehensive program guide for IPTV channels Parental Control Addon Enhances parental control features, allowing for customized restrictions Customized Playlist Plugin Enables the creation and management of personalized playlists Subtitles Addon Displays subtitles for supported channels and programs By utilizing these plugins and addons, you can maximize the potential of your Plex IPTV setup and transform your PS4 into a versatile entertainment hub. Whether you're looking for a seamless program guide, enhanced parental controls, personalized playlists, or subtitles, Plex offers a wide range of options to enhance your viewing experience. Tips for Streaming Quality for IPTV on PS4 with Plex Streaming IPTV on your PS4 with Plex offers a world of entertainment at your fingertips. To enhance your viewing experience, here are some valuable tips to optimize the streaming quality: 1. Use a Wired Network Connection For optimal stability and consistent performance, connect your PS4 to the network using a wired Ethernet connection rather than relying on Wi-Fi. This ensures minimal interference and maximizes your network bandwidth for smoother streaming. 2. Ensure a Fast and Reliable Internet Connection Streaming IPTV requires a fast and reliable internet connection. Maintain a high-speed internet plan with sufficient bandwidth to support uninterrupted streaming. Poor internet speeds can result in buffering and poor video quality. 3. Optimize Your Home Network Setup Optimize your home network for the best streaming experience. Place your router in a central location to minimize signal drop-off and interference. Reduce network congestion by limiting the number of devices connected to your network while streaming IPTV on your PS4. 4. Adjust Streaming Quality Settings in the Plex App The Plex app on your PS4 allows you to customize the streaming quality settings to suit your preferences and network capabilities. Choose an appropriate streaming bitrate that balances both quality and bandwidth usage. Lower bitrates may sacrifice video quality, while higher bitrates may require faster internet speeds. 5. Configure Transcoding Settings, if Needed Transcoding is the process of converting media files into playable formats for different devices. Plex supports transcoding to ensure compatibility across devices. However, transcoding can impact streaming quality and may require significant processing power. Adjust the transcoding settings in Plex to prioritize streaming quality or device compatibility, depending on your specific requirements. 6. Regularly Update Plex and PS4 Firmware Keeping both your Plex media server and PS4 firmware up to date ensures optimal performance and compatibility. Regular updates often include bug fixes, performance improvements, and new features that can enhance the streaming quality and overall user experience. By following these tips and optimizing your streaming settings, you can enjoy a seamless IPTV streaming experience on your PS4 with Plex.
Unlock the full potential of your entertainment library and immerse yourself in a wide range of IPTV channels and content. Tips for Streaming Quality Optimization Use a wired network connection for better stability Ensure a fast and reliable internet connection Optimize your home network setup Adjust streaming quality settings in the Plex app Configure transcoding settings, if needed Regularly update Plex and PS4 firmware Conclusion By following the step-by-step guide and utilizing the features and plugins offered by Plex, you can enjoy IPTV streaming on your PS4 with ease. The Plex IPTV setup on PS4 provides a user-friendly interface and centralized control, allowing you to seamlessly stream your favorite IPTV channels. With Plex, you have the flexibility to customize your viewing experience through various plugins and addons, enhancing your entertainment options. Furthermore, the tips for optimizing streaming quality on PS4 with Plex ensure a smooth and uninterrupted viewing experience. By following the troubleshooting steps, you can overcome any issues that may arise during the setup process. Plex offers an all-in-one solution for IPTV streaming, providing convenience, flexibility, and exceptional playback quality. Unlock the world of IPTV on your PS4 by leveraging Plex's capabilities. Enjoy a wide range of IPTV channels and customize your viewing experience to suit your preferences. Whether you're a sports enthusiast, a movie lover, or a music aficionado, Plex on PS4 enables you to elevate your entertainment experience with its seamless integration and user-friendly interface. Stream IPTV content like never before and immerse yourself in a truly remarkable viewing experience. Check these resources: How To Install IPTV On Your Nvidia Shield TV - Digitalizard Quick & Easy IPTV Installation for Firestick (2024) SIPTV How to Install IPTV Smarters Pro on FAQ How do I set up Plex for IPTV streaming on my PS4? To set up Plex for IPTV streaming on your PS4, you need to download and install the Plex Media Server on your PC. After creating a Plex account, download the IPTV plugin for Plex and install it in the appropriate folder. Configure the plugin by editing a file and adding your M3U playlist. Launch Plex on your PS4, sign in to your account, and start watching IPTV channels. How can I integrate IPTV channels into Plex on my PS4? After setting up Plex with the IPTV plugin, connect your PS4 to your home network. The Plex app on your PS4 will recognize the server and display your IPTV channels for streaming. You can easily navigate through the channels and enjoy your favorite content directly on your PS4. What are the best settings for IPTV streaming on PS4 with Plex? To optimize your IPTV streaming experience on PS4 with Plex, adjust the app settings. Select the appropriate streaming quality, enable subtitles if desired, and customize the interface for easier navigation. Exploring the various settings options allows you to tailor your IPTV streaming experience to your preferences. What should I do if I encounter issues during my Plex IPTV setup on PS4? If you encounter issues during your Plex IPTV setup on PS4, follow these troubleshooting steps: ensure the Plex server is running properly on your PC, check network connections, and verify that the M3U playlist is correctly configured. Seek support from the Plex community for further assistance. Are there any plugins or addons available for Plex on PS4 to enhance the viewing experience? Yes, there are various IPTV-related plugins and addons available for Plex on PS4. These plugins and addons expand the range of channels and offer additional functionalities, such as EPG (Electronic Program Guide), parental controls, and customized playlists. Explore the Plex plugin library to discover new ways to enhance your IPTV streaming on PS4. How can I optimize streaming quality for IPTV on PS4 with Plex? To ensure the best streaming
quality for IPTV on PS4 with Plex, use a wired network connection for better stability, have a fast and reliable internet connection, optimize your home network setup, and adjust the streaming quality settings within the Plex app. These tips will help you optimize your streaming experience and enjoy smooth playback of IPTV channels on your PS4.
0 notes
Text
New Data Revealed: CI/CD Explained! Foster Agile Development with DVOPS!_over 20,000 uses monthly!
RoamNook - CI/CD Blog
What is CI/CD? Continuous Integration and Continuous Delivery Explained
Continuous integration (CI) and continuous delivery (CD), also known as CI/CD, embodies a culture and set of operating principles and practices that application development teams use to deliver code changes both more frequently and more reliably.
CI/CD Defined
Continuous integration is a coding philosophy and set of practices that drive development teams to frequently implement small code changes and check them in to a version control repository. Most modern applications require developing code using a variety of platforms and tools, so teams need a consistent mechanism to integrate and validate changes. Continuous integration establishes an automated way to build, package, and test their applications. Having a consistent integration process encourages developers to commit code changes more frequently, which leads to better collaboration and code quality.
Automating the CI/CD Pipeline
CI/CD tools help store the environment-specific parameters that must be packaged with each delivery. CI/CD automation then makes any necessary service calls to web servers, databases, and other services that need restarting. It can also execute other procedures following deployment.
How Continuous Integration Improves Collaboration and Code Quality
Continuous integration is a development philosophy backed by process mechanics and automation. When practicing continuous integration, developers commit their code into the version control repository frequently; most teams have a standard of committing code at least daily. The rationale is that it’s easier to identify defects and other software quality issues on smaller code differentials than on larger ones developed over an extensive period. In addition, when developers work on shorter commit cycles, it is less likely that multiple developers will edit the same code and require a merge when committing.
Stages in the Continuous Delivery Pipeline
Continuous delivery is the automation that pushes applications to one or more delivery environments. Development teams typically have several environments to stage application changes for testing and review. A devops engineer uses a CI/CD tool such as Jenkins, CircleCI, AWS CodeBuild, Azure DevOps, Atlassian Bamboo, Argo CD, Buddy, Drone, or Travis CI to automate the steps and provide reporting.
CI/CD Tools and Plugins
CI/CD tools typically support a marketplace of plugins. For example, Jenkins lists more than 1,800 plugins that support integration with third-party platforms, user interface, administration, source code management, and build management.
CI/CD with Kubernetes and Serverless Architectures
Many teams operating CI/CD pipelines in cloud environments also use containers such as Docker and orchestration systems such as Kubernetes. Containers allow for packaging and shipping applications in a standard, portable way. Containers make it easy to scale up or tear down environments with variable workloads.
Next Generation CI/CD Applications
There are many advanced areas for CI/CD pipeline development and management. Some notable ones include MLOps, synthetic data generation, AIOps platforms, microservices, network configuration, embedded systems, database changes, IoT, and AR/VR.
Conclusion
Continuous integration and continuous delivery play a crucial role in modern software development. By automating code integration and delivery, CI/CD enables development teams to deliver code changes more frequently and with higher quality. It improves collaboration, code quality, and the overall software development process. Implementing CI/CD pipelines using the right tools and practices, such as Kubernetes and serverless architectures, can further enhance the efficiency and scalability of software delivery. As an innovative technology company, RoamNook is dedicated to providing IT consultation, custom software development, and digital marketing services to help businesses fuel their digital growth through the adoption of CI/CD practices. Contact us today to learn more about how RoamNook can support your organization's journey towards continuous integration and continuous delivery.
Sponsored by RoamNook
Source: https://www.infoworld.com/article/3271126/what-is-cicd-continuous-integration-and-continuous-delivery-explained.html&sa=U&ved=2ahUKEwi4yuin5ZuFAxV1EVkFHY_9AYUQxfQBegQIBBAC&usg=AOvVaw28UskNK53wD5h8LzvVlec9
0 notes
Text
Which is better for Kubernetes calico or flannel
Which is better for Kubernetes calico or flannel CNI network ? In Kubernetes, you have several options for Container Network Interface (CNI) plugins to manage cluster networking. What is CNI in Kubernetes ? A Container Network Interface (CNI) plugin in Kubernetes is a tool that offers a simplified approach to networking. It provides administrators with greater control over network…
View On WordPress
0 notes
Text
Retina: Kubernetes Network Observability platform
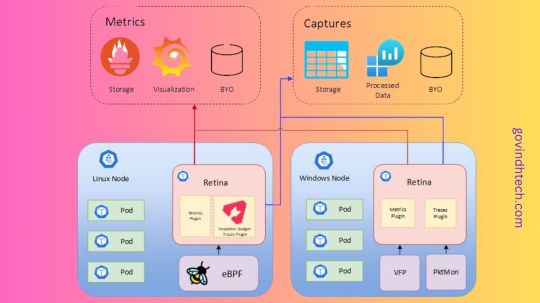
Kubernetes Network Observability
The Retina platform, which is cloud-native and allows Kubernetes users, administrators, and developers to visualize, observe, debug, and analyze Kubernetes workload traffic regardless of the Container Network Interface (CNI), operating system (OS), or cloud, is being released by the Microsoft Azure Container Networking team with great excitement. They are thrilled to make Retina available as an open-source repository that supports networking scenarios relating to DevOps and SecOps for your Kubernetes clusters. They cordially urge the open-source community to collaborate with us on future innovations.
Microsoft AI technology is shown in photography, which foretells a student’s likelihood of dropping out of school in order to support teachers proactively.
A framework for cloud-native container networking observability
Cloud native technologies such as Kubernetes have simplified the process of developing mobile apps. Simultaneously, a lot of apps have grown in complexity, making cloud management them harder and harder. Network-related observability, troubleshooting, and debugging have become harder when businesses create cloud-native apps made up of linked services and then deploy them to several public clouds in addition to their own infrastructure.
Retina aims to provide actionable network insights, such as how containerized micro-services interact, in a non-intrusive manner without requiring changes to the applications themselves, thanks to the extended Berkley Packet Filter (eBPF). Retina will emphasize application developers’ experience in a new way, democratizing network observability and debugging. Retina relieves developers of the burden of having to manage the intricate details of the underlying network architecture and transformations by giving them easy tools to monitor and debug their apps for problems like packet loss and latency.
They are eager to expand on this partnership and interact with more communities, as well as to strengthen their good community experience with eBPF and Cilium. We think that by making Retina available to the community, Azure will be able to gain from well-informed criticism, creative suggestions, and teamwork that will help us improve and broaden Retina’s capabilities.
Retina capabilities and solutions
Azure discovered significant gaps in network monitoring, or the gathering of network metrics and traces from Kubernetes clusters, by utilizing our vast expertise administering several container networking services for the Azure Kubernetes Service (AKS). Retina is a state-of-the-art solution that bridges these gaps by addressing the intricate problems associated with maintaining and sustaining Kubernetes networks. It offers site- and infrastructure-reliability engineers thorough understanding of cluster networking. Additionally, Retina offers comprehensive traffic analysis inside the framework of Kubernetes, converting measurements into network flow logs or the industry-standard Prometheus.
The usability and adaptability of existing open-source solutions are typically limited by their close coupling to certain CNIs, OSs, or data planes. Retina is a useful complement to any current toolkit as it was created to be a highly flexible, adaptive, and extendable framework of plugins that can function flawlessly with any CNI, OS, or cloud provider. Supporting both Linux and Windows data planes, Retina maintains a small memory and CPU footprint on the cluster, this is true even at scale while meeting the various demands of infrastructure- and site-reliability engineers. Azure can quickly modify and customize Retina to suit new use cases without relying on any particular CNI, OS, or data plane because to its pluggability design ethos.Image credit to Azure
Deep network traffic insights, including Layer 4 (L4) measurements, DNS metrics, and distributed packet captures, are one of Retina’s primary features. The Kubernetes app model is completely integrated, providing pod-level data along with comprehensive context. It provides node-level metrics (like forward, drop, Transmission Control Protocol (TCP), User Datagram Protocol (UDP), and Linux utility) and pod-level metrics (like basic metrics, DNS, and API server latency) with actionable networking observability data that is emitted into industry-standard Prometheus metrics.
Label-driven distributed packet captures in Retina let users choose what, where, and from whom to collect packets. It also offers sophisticated debugging tools and historical context for network flow logs, which improve network troubleshooting and performance optimization.
Azure’s plans for the retina
Many businesses use several clouds and want solutions that function well on Microsoft Azure as well as other clouds and on-premises. From the start, Retina is multi-cloud and open-source. They want to educate the larger cloud-native community about their expertise and ambition for Kubernetes networking observability by making Retina open-sourced. Through cooperation with other developers and organizations who have similar experiences and aspirations in this industry, we hope that Retina will continue to grow and expand.
Extensibility has always been important in architecture and will continue to be so. With Retina, data gathering is extensible, making it simple for users to add additional metrics and insights. Additionally, it provides flexibility in exporters, allowing users to interact with other tools and monitoring systems. Because of its adaptability to various use cases and circumstances, Retina is a strong and flexible platform for Kubernetes networking observability.
Finally, Azure will see Retina as a platform that everyone can use to contribute, expand, and develop, eventually leading to the creation of a reliable, well-thought-out, all-inclusive solution for Kubernetes networking observability.
Overview of Retina
Retina: What Is It?
Retina is an open-source, cloud-independent Kubernetes Network Observability platform that supports compliance, DevOps, and SecOps use cases. It serves as a single portal for cluster network administrators, cluster security administrators, and devops engineers to monitor the security and health of applications and networks.
Retina gathers telemetry that is configurable and can be exported to various storage platforms (like Prometheus, Azure Monitor, and other vendors) and displayed in many ways (like Grafana, Azure Log Analytics, and other vendors).
Features
Network Observability platform for Kubernetes workloads based on eBPF.
Both configurable and on-demand.
Industry-standard Prometheus metrics that are actionable.
Simplified Packet Captures for In-depth Analysis.
Multi-OS support (such as Windows, Linux, and Azure Linux) and independence from cloud providers.
For what reason is Retina?
With Retina, you can keep an eye on your clusters and look into network problems whenever you choose. Here are a few situations where Retina excels, reducing trouble spots and research time.
Examining: Troubleshooting Network Connectivity
Why are my Pods no longer able to interact with one another? A typical inquiry takes a lot of time and entails doing packet captures, which need access to each node, identification of the nodes involved, running of tcpdump commands, and exporting of the data from each node.
With only one CLI command or CRD/YAML file, you can use Retina to automate this procedure. It can:
Perform captures on every Node that is home to the relevant Pods.
Upload the output from every Node to a storage blob.
Keeping an eye on the network Actionable insights are supported by Health Retina via Grafana dashboards, Prometheus alerts, and other features. As an example, you can:
Track lost connections inside a namespace.
Notify me when production DNS error rates increase.
Assess the scalability of your application while monitoring variations in API Server latency.
Should a Pod begin to transmit excessive amounts of traffic, notify your security team.
Metrics and captures are the two forms of telemetry that Retina employs.
Metrics Retina metrics provide ongoing observation of:
Traffic moving in and out
Packets dropped
TCP/UDP
DNS
API Server latency
Statistics for nodes and interfaces
Retina offers the two
Advanced/Pod-Level metrics (if enabled) and
Basic metrics (default, Node-Level metrics).
Takes Pictures
Network traffic and information for the designated Nodes/Pods are recorded in a Retina capture.
The ability to output captures to numerous destinations is available on demand. See Captures for more details.
Read more on govindhtech.com
0 notes