#cosplay log
Explore tagged Tumblr posts
Visit Tumblr Blog
Explore Tumblr blogs with no restrictions, modern design and the best experience.
Last Seen Tumblr Blogs


Fun Fact
The Tumblr office adopted Tommy, an 11-year-old Pomeranian.
Text
Hat!

Still needs to gez sewn to the brim, but so far, so good (don't look at the back though, it's a mess)
It was very much a "trust the process" kibd of deal, it did not look like a hat for the longest time -

It is very much giving waffle cone tho, so I'm pleased
Off to more patchwork today!
11 notes
·
View notes
Text
Zelda EOW cosplay log: circlet
After giving up on the staff, which was already another means for me to take a break from sewing, I got started drafting the circlet
I had some Eva foam from another cosplay ish project that didn’t go very well due to inexperience, so that seemed the most logical choice. I forgot how annoying it is cutting Eva foam though… the “headband” part was easy since I could use my rotary cutter, except the length I needed was longer than my ruler, so there’s a wobbly bit from where I had to scoot my ruler. Didn’t feel like cutting out another piece, so it’ll have to do ¯\_(ツ)_/¯
Studied some screenshots and Sketched out the gem and metalwork bits on paper to get an idea of relative sizing between all the pieces. That damn pvc conduit ended up coming in handy here—I pressed down onto the foam and traced the indent for the gem. Cutting the crescents was realllly fiddly bc I was using scissors. But idk if I could’ve gotten those curves otherwise with an xacto knife
Only on the smaller bits did I think to transfer my sketch onto the foam instead of eyeballing it. My “transfer” method was poking pins along the outline into the foam, kinda like for pumpkin carving. Nice and clear and easy to follow with the scissors without having to worry about painting over anything

I thought I read somewhere that Eva foam can be sandpapered ? So I tried doing that to fix the uneven edges. Idr what grit level sandpaper I used. I mostly used a nail file board actually lol
Somehow I lost my circle gem piece, so I had to cut another one out and sand that :/ I don’t have proper primer so i figured I’d just spray a little modpodge on it to give me a workable surface to paint on. It didn’t occur to me that the pieces were so small that they’d fly off bc of the aerosol blast, so I had to find those in the dark ground bc I keep forgetting to tell the landlady that the outdoor lightbulb is out
I ended up mostly kinda mopping up the modpodge that was left on the parchment paper to get it nice and covered. Then I remembered I should grab a scrap to prime for when I test out paints. Was smart enough to hold the foam with a clothespin so no more glue would get on my hand. A day later It does kinda look like a nice subtle topcoat on my nails though :3 let it dry overnight so I could play some hades 2 and bc I didn’t want to fiddle with mixing paints at like 10pm
The next evening I tested out the paints. At the store I’d been between one metallic red shade and another, and I’d gotten the one that hadn’t seemed Too bright red. This was a mistake. It’s indeed a lovely garnet color, but that’s not quite light or red enough for this. Mixed with a little red looked pretty good. The gold metallic was perfect straight out of the bottle
Also tested whether to use black or white as a base coat. Going with white to keep things brighter

✨The next day ✨
Got my base coat of white on

(Using some weird Catholic local newspaper that some lady who lived here before me still has delivered to catch the mess lol)
First coat of gold. Probably should’ve made sure my sponge was fully dry before painting on the gold… I’m using makeup sponges since they’re denser than the sponge brushes I got for cheap a while ago. Repeating to myself Trust the Process Trust the Process so I don’t get neurotic about how sloppy it looks rn….

Okay yeah second coat is looking a lil better. Added a Little more red to the mix for the gem. I like how the shade looked overall, and especially layered over the other. I dont need another coat on the gem but def will for the gold stuff

Third coat, now we’re talkin. That’s good enough for the crescent pieces, but I think I’ll give the band another coat tomorrow. Testing my gloss sealant on the back of one of the smaller crescents after putting the first coat on the gem to see how that looks

Im planning on using satin modpodge finish though bc it’s an aerosol spray and bc I think that’d contrast nicely and subtly with the glossy. But the glossy is a normal spray bottle, and I wasn’t careful the first time I used it so it got clogged…I usually borrow the spray top from something else, but it’s not the same diameter as the bottleneck so I have to hold it weird :/ I should just buy a replacement nozzle fjsjdhd. But since the pieces are so small I’m just unscrewing the nozzle, taking it out and letting a few drops of sealer fall onto a plastic lid from something or another, then dabbing it on with a sponge
Now that I’m more like Live blogging and not posting about stuff I’ve already done I think I’ll end the post here lol
2 notes
·
View notes
Text
and what if I make a hornet cosplay...
6 notes
·
View notes
Text


Yukari Takeba Persona 3 Cosplay Log
I'll just compile these in a post 🫠🫠🫠
Honestly, this costume quite rushed because there's a lot things happenned on these 2 months back yet I have to finish it for last weekend photoshoot session(it was the "Cosplayer Curse" after all)
I rly want to finish her outer jacket, choker(yes, I rushed to made one and it broke in the midst of photoshoot fml), and both her weapon and evoker as well later on. Might change her skirt as well since it was too short on me..
#cosplay pic#cosplay#persona 3#persona 3 cosplay#yukari takeba#yukari takeba persona 3#yukari takeba cosplay#cosplay making portfolio#wig making portfolio#cosplay portfolio#cosplay log
2 notes
·
View notes
Text
Tem Cosplay
So I signed up to be in an Undertale cosplay group for Momocon! The con starts tomorrow and I haven’t started on it other than ordering the wig and makeup required. I’m making a budget-friendly Tem cosplay in a short amount of time. Here’s how :)
0 notes
Text


this is how it feels to be a phannie in ur mid twenties
#me cosplaying as a real person with an office job#then i remember im gay#and log onto youtube.com#dan and phil#phan#dip and pip#phil lester#daniel howell#danisnotonfire#amazingphil#dan howell#dan and phil games#danandphilgames#dnp#danandphil
448 notes
·
View notes
Text

SURPRISE!!! my secret sebastian cosplay for the concert today! 🐸💜
#stardew valley#sdv sebastian#stardew valley cosplay#cosplay#my face#sprouts log#this was the trial run from katsucon!!#im in him rn but no wig til the show :3c#ive loved this game for so long and im FINALLY COSPLAYING IT T__T
1K notes
·
View notes
Text
another pic of me showing off a sweater I really liked and was happy about

25 notes
·
View notes
Text


today's maomao shoot was a success!!! ₍^. .^₎⟆
spent my entire week prepping (and stressing) for this shoot so i would've been rly bummed out if we had to postpone the shoot bc of bad weather. while we could not avoid the destiny that was bestowed upon us by the weather forecast, we were, fortunately, able to get quite a few shots before the rain came down.
big thanks to luwi for being my photographer (fujifilm filters let's gOOO), and koko for helping out (and being extra phone photographer HAHAH)!! ♡
#log#i've been sick since fri but i'm doing my best!!!#also this is the first time i bought a secondhand cos from carousell?? and it's not too bad#styling the wig was a whole project on its own tho#maomao#apothecary diaries#kusuriya no hitorigoto#cosplay
35 notes
·
View notes
Text


Long time no see 😭. Trying to get back in the swing of making build logs!
Here’s my progress on my Wei Wuxian bracers!! I’m still embroidering the eyelets on one of them but don’t tell anyone- I got too excited and wanted to take pics of the one I’d finished lol.
Explanation of pics/steps below the cut!
Pics 1-2: reference art from donghua official art of Wei wuxians bracers.
Pic 3: making a duct tape and plastic wrap pattern for the hand cover part of my bracers.
Pic 4: making a mockup to check the fit (really glad I did it was entirely too big for my arm initially b/c the base pattern I used was one size).
Pic 5: After ironing on interfacing and sewing right sides together so I can have neat seams on the outside before sewing on my bias tape on the remaining raw edges.
Pic 6: bias tape pinning hell
Pic 7: punching the holes for the eyelets
Pic 8: adding the eyelets
Pic 9: finished “front”/over view of my bracers (using mo’s LWJ fabric as a backdrop lol)
Pic 10: finished back view of bracers after hand embroidering every eyelet 😭 ft the chenqing I made!
35 notes
·
View notes
Text
I made it out of patchwork hell!!

Also evened out the cape

Aaand attached the trim

Now I just need to close the trim ar the bottom and the cape will be doone! Put it all together on the bed to hype myself up and I'm so pleased

He's so close to being done aaaahhh
Gonna topstitch the trim closed today and sand/heatshape/glue the soul jam. Wanted to get that done yesterday, but it was rainy all day and I really don't want to sand foam inside... it's still raining now, but it's supposed to stop in the afternoon, so hopefully the balcony will be dry afte work.
What I still need to do after that:
- seal, prime and paint the soul jam
- hem the base dress
- hand sew all the coat pieces to the stole thing
- hand sew snaps to attach the stole/coat to the poncho, close the stole and attach the soul jam
- hand sew the lining in the hat, add in some ribbon loops so the hat can be pinned to the wig easily
... not too bad, just a bit of painting and hand sewing. And bc that's too easy, I'll try to get my mstching white lily cosplay wearable until friday :)
#we'll see how that goes#thursday is a holiday and we're not leaving until noon on friday#so it miiight be possible?#i am determined#cosplay log#project: pure vanilla#cookie run kingdom#pure vanilla cookie
7 notes
·
View notes
Text
Zelda EOW cosplay log: cape detail
Was originally planning on taking a work from home day last week to free up some time to work on it, but then I remembered I still need to print off the rest of the cape pattern and also make and print a pattern for the geometric detail on the back. Once I printed all that off at work and did some Actual work at work I decided to make it a half day, heehee
A smarter or braver person probably could have eyeballed the geometric thingy but I am not that person 💖 so I used my work computer the other day after hours to make it in illustrator lol
I had to look at some screenshots I’d taken of a view angles of the cloak, and I forgot it’s really more of a Cape. I’ll most likely have to modify the pattern a lot to make it narrower but shouldn’t be a problem (famous last words). I measured the widest part of the cloak pattern—or where I Guessed it would be bc I hadn’t printed off the last few pages of the pattern…then I did a quick and dirty measurement of my shoulders (I know I wrote it down Somewhere, a while ago when I did my first Clothes sewing from scratch but Idr where I put it) and loosely wrapped measuring tape between my pinkies and held my arms at my sides to see roughlyyy what the max width would be, based on the like “reference points” of character model
Once I had that I upscaled the design in illustrator to what would be Actual Size. Before I’d actually made the pattern, when I was still assuming it was a very wide cloak, I thought the “strips” could be like 3 inches wide bc that seemed like a nice width (person who isn’t good at envisioning measurements). Obviously that wasn’t doable, so I just doubled the size of the design in illus to make the strips 1 inch, which was too big to fit on printer paper, so then I dicked around trying to figure out how to like Slice the design to put it onto multiple pages like ppl making sewing patterns do
I’m not sure how I want to cut out/assemble the design… I bought fleece in another color, so I plan on just sewing it onto the cape like an appliqué. But idk if I should like cut it all out as one piece (well, two technically bc one of the swirlies of the design isn’t connected) or if I should just cut out lengths of strips and place them next to each other?
Reddit provides 💄 <- that was supposed to be the hands together emoji but yknow this is more fun. The answerer mentioned I could sew the design on and Then cut it out, but I don’t have duckbill scissors :/ but the other explanations they laid out for options was helpful bc it reminded me I’d bought fabric glue stick for this purpose lol
{update} I am not going to bother with the swirly actually bc I was very worn out from all the hustle and bustle of making this project 🫡
0 notes
Text
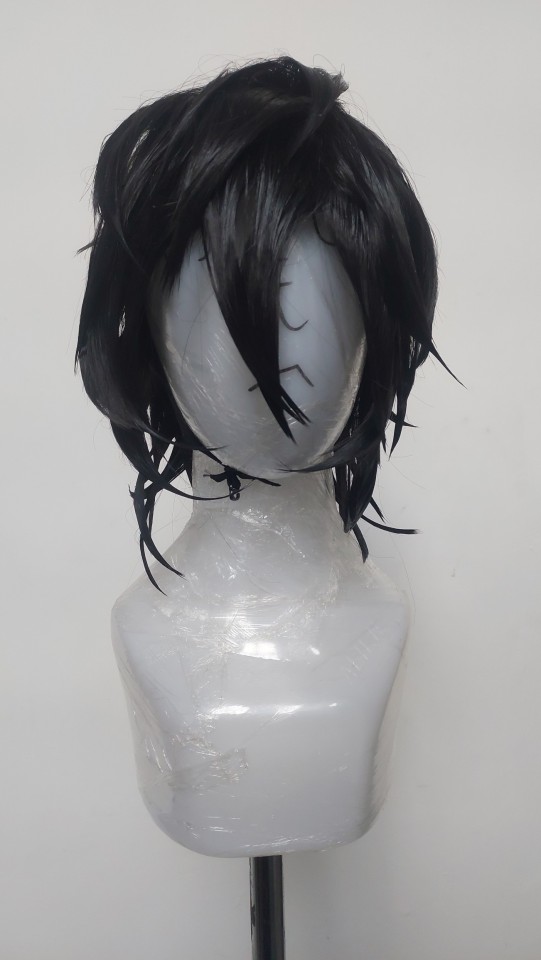
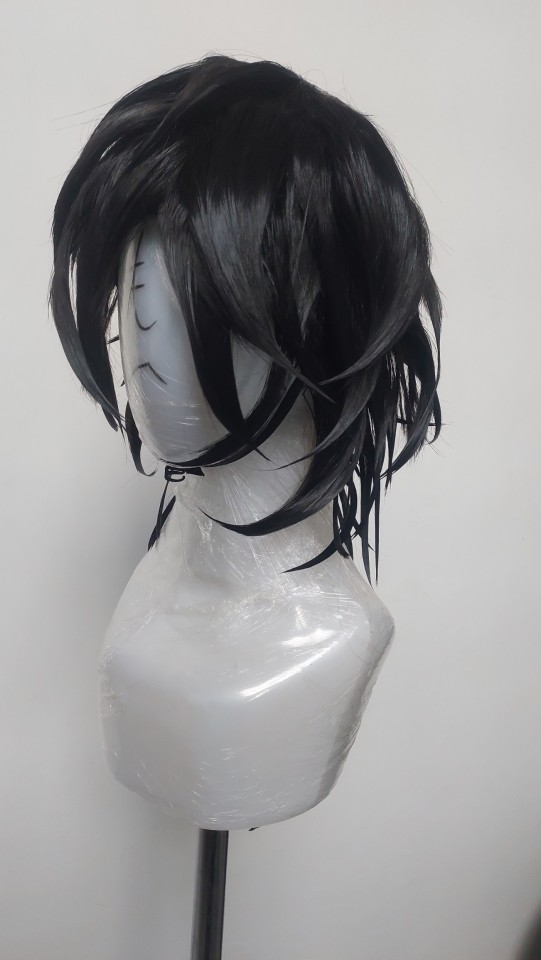

Kagenou Cid Wig Commission
A friend of mine commissioned me to style his wig. A bit rushed, but works.....kinda?
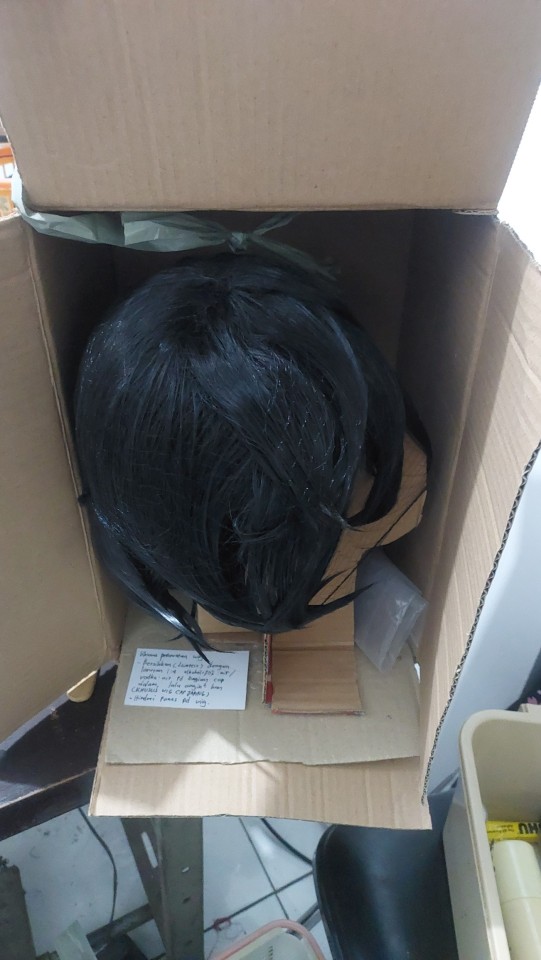
I even had to make a special box just to carry it around since the plastic wrap didn't fit.
I find it a bit difficult to work with cheaper wig(I used the cheapest option due to my own friend request.....I usually asked my clients to provide themselves their own wig to style), but still works! I just had to work around with less heat since cheap wig doesn't really stand heat that much, compared to other wigs.
#wig making portfolio#cid kagenou#the eminence in shadow#the eminence in shadow cosplay#anime cosplay#cosplay#oshigoto#cosplay log
5 notes
·
View notes
Text
Actively disturbed by the fact Dan and Phil are t'hy'la (Vulcan word used to indicate people with a close bond; essentially translates to a combination friend, brother, and lover. Used most often to reference the characters Kirk and Spock as something like soulmates or spouses)
#dan and phil#dan and phil games#daniel howell#dan howell#phil lester#amazing phil#posts that would send william shatner into a rage (envy?) coma#ranch metaphor#I cant believe we have an actual pair of t'hy'la in the real world in the year of our Lord 2024#or the closest equivalent two humans can be in reality#they're soulmates your honor#the aziracrow/ineffable husbands cosplay has been living in my head rent free since Halloween#going to the live show after ten years of being a phan is an experience unlike any other#it's the opposite of what i felt when i logged into tumblr dot com in November of 2020 and got body slammed by destiel one final time#literally never have two people been more *gestures at them* than these two are#i know it sounds like a shipping thing but its not#whether theyre together or not has no baring on the fact that they're literally t'hy'la#and i know what some of yall are thinking#how would it not matter if lover is a part of the translation#ask kirk and spock#something are just#more than words can describe#phan#i meant bearing but I've added too many tags to go back now#my point is our labels are irrelevant even this one#it's about the two people themselves#star trek#star trek tos#t'hy'la
49 notes
·
View notes
Text


Figured I never took a moment to really show off the layers in Sonic's head!
Sonic's head is around a 30cm diameter sphere of upholstery foam with a lycra liner and a piece of sintra cut to shape for the eyes. There's velcro to attach 3 fans (an intake for outside air, an exhaust to circulate the stale air out, and a forehead one for comfort), and a pocket next the top-back of the head to fit a powerbank for the fans. They're easily removeable so the head can be safely washed by hand. I've also got a donut-shaped upholstery foam cushion as padding to stabilize the head once the fans are installed! It's removable for washing and it conveniently creates a large empty space for all the wires and the powerbank to get crammed into.
It's not a perfect setup (the fans don't help quite enough, but with such an enclosed head it's hard to tell if it could ever be made more comfortable) but it's serviceable enough!
#Sonic the Hedgehog#Sonic Cosplay#Sonic#STH Sonic#Cosplay#Fursuit#Fursuit Maker#Original Content#Cosplay Build Log#I covered it quickly in the full build log but I didn't take the time to show it in layers!#I guess I could use stronger fans! But they're already pretty dang loud and I'd rather hear better than sweat a little less
11 notes
·
View notes
Text

I'M GOING TO HEAR STARDEW VALLEY MUSIC LIVE IN CONCERT
#sprouts log#stardew valley#screaming crying etc etc etc#time to think about freebies and a potential sebastian cosplay!!!#i've always wanted to attend a video game orchestra#AND FOR MY FIRST ONE TO BE FROM ONE OF MY FAVORITE GAMES EVER???
534 notes
·
View notes