#crud php mysql bootstrap download
Explore tagged Tumblr posts
Visit Tumblr Blog
Explore Tumblr blogs with no restrictions, modern design and the best experience.
Last Seen Tumblr Blogs


Fun Fact
Tumblr has been banned in Indonesia for providing people with access to pornographic content.
Text
Cicool Nulled Script 3.4.4

Cicool Nulled Script – The Ultimate Page, Form, and CRUD Generator Looking for a powerful tool to simplify your web development process? Cicool Nulled Script is the perfect solution for developers and businesses who want to create dynamic websites and robust backend systems effortlessly. This all-in-one generator makes it easy to build forms, pages, and RESTful APIs without writing complex code. Best of all, you can download Cicool Nulled Script for free right here! What is Cicool Nulled Script? Cicool Nulled Script is a comprehensive CRUD and form generator that allows users to create powerful backend systems quickly. Whether you're building an admin dashboard, a data management platform, or an API-based application, Cicool simplifies every step of the process. It’s designed for developers who want to save time while ensuring flexibility and control over their projects. Technical Specifications Script Type: PHP (CodeIgniter Framework) Database Support: MySQL Frontend Technology: Bootstrap and jQuery API Support: RESTful API Generator Form Builder: Drag-and-drop interface Version Compatibility: PHP 5.6 or higher Features and Benefits of Cicool Nulled Script With a wide range of premium features, Cicool Nulled Script stands out as a must-have tool for web developers and freelancers: 1. Intuitive CRUD Generator Create database-driven applications with ease. Cicool automates the process of building Create, Read, Update, and Delete (CRUD) functionalities without writing a single line of code. 2. Drag-and-Drop Form Builder Design beautiful forms in minutes using the drag-and-drop form builder. Add text fields, checkboxes, file uploads, and more with just a few clicks. 3. Powerful REST API Generator Automatically generate RESTful APIs from your database tables. It’s perfect for mobile apps and modern single-page applications (SPAs) that require API integration. 4. Responsive Page Builder Create mobile-friendly pages using the built-in page builder. Customize layouts, sections, and content blocks without touching any HTML or CSS. 5. Multi-language Support Reach a broader audience with built-in multi-language capabilities, making your application ready for international users. 6. Secure and Fast Cicool is built on the reliable CodeIgniter framework, ensuring high performance, stability, and security out of the box. Popular Use Cases Admin Dashboards: Quickly build powerful backend panels for web applications. Lead Management Systems: Collect and manage client information using custom forms. API-Driven Apps: Seamlessly create RESTful APIs for mobile or SPA integrations. Custom CMS: Design your own content management system without starting from scratch. Installation Guide Getting started with Cicool is simple: Download the nulled script from our website. Upload the files to your web server. Configure the config.php and database.php files with your server details. Run the installation wizard from your browser. Start building CRUD, forms, and APIs with ease! FAQs – Cicool Nulled Script Is Cicool Nulled Script safe to use? Yes, the script has been tested and is free from malicious code. However, we recommend installing it on a test server before deploying it to a live site. Can I use it for commercial projects? Yes, you can use Cicool Nulled Script for both personal and commercial purposes without any licensing restrictions. Do I need to know coding? No, Cicool is designed for both developers and non-developers. The intuitive interface allows you to create everything visually. Is support available? While official support is not available for nulled versions, our community forum and user documentation can help guide you through any issues. Download Cicool Nulled Script Today If you're searching for a versatile and user-friendly script that can handle everything from CRUD operations to API generation, look no further than Cicool Unlock its full potential for free and supercharge your development workflow now.
Need more essential tools? Check out WP-Optimize Premium nulled for advanced WordPress optimization features. Also, don’t miss the7 NULLED for stunning WordPress themes tailored for every niche.
0 notes
Text
Crud PHP MySQL Bootstrap Example Tutorial
Crud PHP MySQL Bootstrap Example Tutorial. Here you will learn how you can create a crud application in PHP with MySQL and bootstrap from scratch (step by step). This tutorial shows you how you can create crud (create, read, update, delete) in PHP with MySQL and bootstrap.
This is a very simple and easy example for creating crud (create, read, update, delete) application in PHP with MySQL and…
View On WordPress
#crud php mysql#crud php mysql android studio#crud php mysql bootstrap#crud php mysql bootstrap download#crud php mysql example#crud php mysql github#crud php mysql tutorial#crud php mysqli#crud php mysqli malasngoding#crud php mysqli pdf
0 notes
Text
CRUD generator with Codeigniter Web Development
As we have seen the importance of Codeigniter development let's move forward to how to build a dynamic web app with CRUD generator and API builder with the help of codeigniter development company.
In the wave of modernization, the development of software facilities is at its peak. The basis of designing web-based data management reveals the fact that it insights crisp data management procedures.
The ideation of web-based data production needs the proficient expertise of expert hands. Next, it streamlines the well functioning of data. The technical minds are skilled at gaining programming knowledge. Next, learning and developing the latest web technologies is on the trend.
CRUD Generator and API Builder Pro is the most prominent database application. The formation of a particular software Development demands the complex structure and volume of data.
Users can find the numerous relevancy of the data management tool in customizing needs, based on program applications. However, it is an independent web tool based on database records. Several e-commerce websites are in the hunt for developing a remarkable platform to create, update, and delete an account or item.
The listed highlight features of the CRUD Generator and API Builder are:
CRUD generator with forms
Build CRUD with Codeigniter standard
Listing with record with searching ith paging
PHP & MYSQL
HTML5, Bootstrap, CSS3
Cross browse compatible
Fully responsive admin panel
Google Login
Secure/PDO/hashed
Module setting
Ban IP address
Add a new table to the database
Edit table
Add new, edit, delete record
Add, edit, delete user
CMS pages
Bootstrap & JQuery
Well documented
Great support
Reports
Role and permission
Let's have a look at some of the significant features of codeigniter development company
Login with Google
User can use their Google account to sign up and log in. It should save your signing up time and can give access with a few clicks.
Admin Dashboard
The admin dashboard of your codeigniter development services should display all the highlights in the left section. User can click on any of them get more information. For example, if the user wants to go to the User Management page, all they need to do is to click on a single button.
The Dashboard also should display a number of users and CMSs on the top of the side with a Weekly Added User Graph. user can see it in a full screen and also download PNG, JPG, PDF, or SVG vector image. The user just needs to click on the menu button on the right of the Weekly Added User Graph. The Footer section on the dashboard pages should list the last five logged in users and the last five registered users with their names, email, and active/inactive status.
User Management:
The user management page should display all the users with all the details such as names, emails, birth dates, last login details, active/inactive status. Let the Admin can add a new user by clicking on add user. Also, the admin can remove any user by clicking on the delete button. Admin can edit the user details by clicking on the edit button presented at the far right side of each user entry. Also, the admin should be able to import and export CSV and CSV format in this section.
#top#best#codeigniter#development#companies india#company#usa#uk#canada#hire#dedicated#web developer#software#cms
0 notes
Link
Learn PHP MYSQL by building 5 Projects including PHP Regular Expressions & CMS | Become a Full Stack Back-End Developer.
What you’ll learn
All PHP Fundamentals and Building Blocks with practical implementation in Projects
Form Validation with most Secure way using Regular Expressions
Making web pages dynamic with the variety of PHP Techniques
Employee Management System CRUD Application in PHP From Scartch
Complete CMS ( Content Management System) with Admin-Panel
Getting Started with Bootstrap 4 FrameWork from scratch without using any Bootstrap Template
Using PHP Sessions in a more sophisticated way and pass information easily on different modules of Project
Stunning Blog with Commenting functionality
Powerful Web Forms which will be Free of Hack
Build Professional CRUD
CMS Based Projects
Full Coding Exercises
Login Logout Admin System
Tips / Tricks
Sending Email using PHP
Bootstrap 4.2.1
PDO
URL Tracking
Security Techniques on Public pages
Font Awsome
Requirements
No Knowledge required of PHP. This course will teach students everything about PHP from Scratch
Basic HTML
PC of-course 🙂
Description
Have you ever wonder why their are so many PHP Mysql Courses but they offer very little practical skills. Even though if you search on Udemy the longest course will only offer 1 big projects. Sometimes its difficult for beginners to understand the long project right after learning basics due to lack of practice.Furthermore, big courses just give presentation to projects they never ever let students see their actual content. For example the basic videos, Free starter content etc. However this course is Scam-Free course. Students can watch more than 2 hour of initial content free of cost to decide weather to buy this course or not.
This course is designed in more logical way from easy to complex modules step by step. Here is description of the course
Road Map:
Building Blocks Fundamentals 5 Hour 30 mints of Content
Projects:
Regular Expressions 25 mints
Complete Contact Form + Email 1 Hour of Content
Dynamic Web Pages (Directory Project) 1 Hour of Content
CMS Based Employee Management CRUD 2 Hour + 30 minutes of Content
CMS + Admin Panel with Stunning blog + FREE Bootstrap 4.2.1 12 Hour of Content
This course will focus on all the Fundamentals , Building blocks and Advance Concepts of PHP in complete details which are essentials for beginners. In this Course students will build project after every section to see the real world representation of PHP.
Bonuses:
Getting Started with Bootstrap 4 FrameWork from scratch without using any Bootstrap Template
Latest Bootstrap 4.2.1 Essentials Practically in a Project
Using PHP Sessions in a more sophisticated way and pass information easily on different modules of Project
Full Coding Exercises
Login Logout Admin System
Tips / Tricks
Code Re-usability
Strong Security Techniques on Public Pages
PDO layer for Database Operations
Enhancing UI UX in admin Panel so that the Admin can manage the different Components of CMS / Blog easily
Enhancing UI UX in Public Panel so that the Public / Users can easily interact with the different Functionalities of Blog easily.
Using PHP Sessions in a more sophisticated way and pass information easily on different modules of Project
Login Logout Admin System
URL Tracking
Font Awesome
PHP 5.6 and 7 Supports
Admin Info Update
This course offers you a 30 Days Money Back Guarantee, in case if the course does not meet your expectations you can get a full re-fund immediately . Also i will answer all of your questions on top priority.
Now if you want to learn PHP and start your professional career, Take this course now
——————————————————————————————————————–
This course is for complete beginners and for those who want to build projects in PHP.
———————————————————————–
Who this course is for:
Complete Beginners
PHP Aspirants
Designers who want to Start Back-End Programming
College Students
Created by Jazeb Akram Last updated 2/2019 English English [Auto-generated]
Size: 7.79 GB
Download Now
https://ift.tt/2u8dj8T.
The post The Complete PHP MYSQL Professional Course with 5 Projects appeared first on Free Course Lab.
0 notes
Text
The role importance of Bootstrap 4 dashboard
Bootstrap 4 dashboard
Admin templates have a goliath undertaking to finish regarding the designing of user interfaces of the backend of any web application. In all reality, you are destined to go over pre-built pages that are integrated with the web application. The pre-built pages are depended with the main commitment of content and user management not forgetting maintenance of a website. A few years sooner, individuals didn't put an epic degree of focus on the structure for admin dashboard as they are only pertinent to the back end. For any condition, things seem to have taken a substitute heading in case we are to go with their growing popularity.
With an extraordinarily coordinated admin structure, you are destined to administer your website without encountering any problems whatsoever. You ought to for any condition graph that you will require the help of a professional in case you are to pull this off sensibly. No mammoth stupor we in a short range period have differing bootstrap admin templates you can download online. In setting on these templates you are going to find it clear in getting your applications disconnected through. To hitter a bootstrap 4 generator, you should guarantee you are working with the most tip top.
If you are needing the best bootstrap 4-dashboard generator, by then it is incredibly fitting that you rely on PHP CRUD generator. By integrity of this principal generator, you can have the option to deal with a full scale bootstrap 4 generator with PHP CRUD operations from your MySQL database. To improve it much you can use the best tools available in making the sorts of progress depending on the kind of data you select.
What makes Bootstrap 4 dashboard worth relying upon is the see that you can customize it to suite your desires. Notwithstanding whether you need settled tables, custom labels or even withdrew through labels then you can have the option to make it without going through a ton. For you to squash correspondingly as can be ordinary, opt to consider the PHP CRUD online demo. This demo offers access to both the CRUD PHP MySQL builder and Bootstrap dashboard with CRUD operations. To find out about PHP CRUD generator, you should visit their official website. Luckily, you can do this at a particular time you find appealing as long as you are associated with the internet. For more information, look at this link.
0 notes
Link
Envato Tuts+ Code http://j.mp/2CZd6IK
In this article, we’re going to review PDO CRUD—a form builder and database management tool. PDO CRUD helps you build forms for your database tables with just a few lines of code, making it quick and easy to bootstrap a database application.
There are plenty of extensions available for database abstraction and specifically CRUD (create, read, update, and delete) generation for PHP and MySQL. And of course, you’ll also find commercial options that provide ready-to-use features and extended support. In the case of commercial options, you can also expect quality code, bug fixes, and new enhancements.
Today, we’re going to discuss the PDO CRUD tool, available at CodeCanyon for purchase at a very reasonable price. It’s a complete CRUD builder tool which allows you to build applications just by providing database tables and writing a few lines of code.
It works with multiple database back-ends, including MySQL, Postgres, and SQLite. In this article, we’ll see how to use PDO CRUD to build a CRUD system with the MySQL database back-end.
Installation and Configuration
In this section, we’ll see how to install and configure the PDO CRUD tool once you’ve purchased and downloaded it from CodeCanyon.
As soon as you purchase it, you’ll be able to download the zip file. Extract it, and you will find the directory with the main plugin code: PDOCrud/script. Copy this directory to your PHP application.
For example, if your project is configured at /web/demo-app/public_html, you should copy the script directory to /web/demo-app/public_html/script.
Next, you need to enter your database back-end details in the configuration file. The configuration file is located at /web/demo-app/public_html/script/config/config.php. Open that file in your favorite text editor and change the following details in that file.
$config["script_url"] = "http://my-demo-app"; /************************ database ************************/ //Set the host name to connect for database $config["hostname"] = "localhost"; //Set the database name $config["database"] = "demo_app_db"; //Set the username for database access $config["username"] = "demo_app"; //Set the pwd for the database user $config["password"] = "demo_app"; //Set the database type to be used $config["dbtype"] = "mysql"
As you can see, the details are self-explanatory. The $config["script_url"] is set to the URL which you use to access your site.
Once you’ve saved the database details, you’re ready to use the PDO CRUD tool. In our example, we’ll create two MySQL tables that hold employee and department data.
employees: holds employee information
department: holds department information
Open your database management tool and run the following commands to create tables as we’ve just discussed above. I use PhpMyAdmin to work with the MySQL database back-end.
Firstly, let’s create the department table.
CREATE TABLE `department` ( `id` int(11) UNSIGNED NOT NULL AUTO_INCREMENT PRIMARY KEY, `department_name` varchar(255) NOT NULL DEFAULT '' ) ENGINE=MyISAM DEFAULT CHARSET=utf8;
Next, we’ll create the employee table.
CREATE TABLE `employee` ( `id` int(12) UNSIGNED NOT NULL AUTO_INCREMENT PRIMARY KEY, `dept_id` int(11) UNSIGNED NOT NULL, `first_name` varchar(255) NOT NULL DEFAULT '', `last_name` varchar(255) NOT NULL DEFAULT '', `email` varchar(255) NOT NULL DEFAULT '', `phone` varchar(255) NOT NULL DEFAULT '' ) ENGINE=MyISAM DEFAULT CHARSET=utf8;
As you can see, we’ve used the dept_id column in the employee table, which holds the id of the corresponding department stored in the department table.
Once you’ve created the tables in your database, we’re ready to build a CRUD application interface using the PDO CRUD tool!
How to Set Up Basic CRUD
In this section, we’ll see how you can set up a basic CRUD interface using the PDO CRUD tool by writing just a few lines of code.
The Department Table
We’ll start with the department table.
Let’s create department.php with the following contents. If your document root is /web/demo-app/public_html/, create the department.php file at /web/demo-app/public_html/department.php. Recall that we’ve already copied the script directory to /web/demo-app/public_html/script.
<?php require_once "script/pdocrud.php"; $pdocrud = new PDOCrud(); echo $pdocrud->dbTable("department")->render();
And now, if you point your browser to the department.php file, you should see something like this:
Phew! With just two lines of code, you have a ready-to-use CRUD UI which allows you to perform all the necessary create, read, update, and delete actions on your model. Not to mention that the default listing view itself contains a lot of features, including:
search
built-in pagination
print
export records to CSV, PDF or Excel format
bulk delete operation
sorting by columns
Click on the Add button on the right-hand side, and it’ll open the form to add a department record.
Let’s add a few records using the Add button and see how it looks.
As you can see, this is a pretty light-weight and neat interface. With almost no effort, we’ve built a CRUD for the department model! Next, we’ll see how to do the same for the employee table.
The Employee Table
In this section, we’ll see how to build a CRUD for the employee table. Let’s create employee.php with the following contents.
<?php require_once "script/pdocrud.php"; $pdocrud = new PDOCrud(); echo $pdocrud->dbTable("employee")->render();
It's pretty much the same code as last time; we just need to change the name of the table. If you click on the Add button, it also brings you a nice form which allows you to add the employee record.
You might have spotted one problem: the Dept id field is a text field, but it would be better as a drop-down containing the name of the departments. Let’s see how to achieve this.
<?php require_once "script/pdocrud.php"; $pdocrud = new PDOCrud(); // get departments $data = $pdocrud->getPDOModelObj()->select("department"); $options = array(); foreach($data as $record) { $options[$record['id']] = $record['department_name']; } // change the type of the dept_id field from textfield to select dropdown $pdocrud->fieldTypes("dept_id", "select"); $pdocrud->fieldDataBinding("dept_id", $options, "", "","array"); echo $pdocrud->dbTable("employee")->render();
In this code, we've accessed the department table through PDO CRUD so that we can associate the department name with the department ids. Then, we've updated the binding options for the department id field so that it will render as a dropdown (select) list.
Now, click on the Add button to see how it looks! You should see the Dept Id field is now converted to a dropdown!
Let’s add a few employee records and see how the employee listing looks:
That looks nice! But we have another small issue here: you can see that the Dept id column shows the ID of the department, and it would be nice to display the actual department name instead. Let’s find out how to achieve this!
Let’s revise the code of employee.php with the following contents.
<?php require_once "script/pdocrud.php"; $pdocrud = new PDOCrud(); // change the type of the dept_id field from textfield to select dropdown $data = $pdocrud->getPDOModelObj()->select("department"); $options = array(); foreach($data as $record) { $options[$record['id']] = $record['department_name']; } $pdocrud->fieldTypes("dept_id", "select"); $pdocrud->fieldDataBinding("dept_id", $options, "", "","array"); $pdocrud->crudTableCol(array("first_name","last_name", "department_name", "email","phone")); $pdocrud->joinTable("department", "employee.dept_id = department.id", "INNER JOIN"); echo $pdocrud->dbTable("employee")->render();
Here, we've created a join between the employee and department tables with $pdocrud->joinTable, and then told PDO CRUD to render only the employee name, department name, and contact info with $pdocrud->crudTableCol.
And with that change, the employee listing should look like this:
As you can see, the PDO CRUD script is pretty flexible and allows you every possible option to customize your UI.
So far, we’ve discussed how to set up a basic CRUD interface. We’ll see a few more options that you could use to enhance and customize your CRUD UI in the next section.
Customization Options
In this section, we’ll see a few customization options provided by the PDO CRUD tool. Of course, it’s not possible to go through all the options since the PDO CRUD tool provides much more than we could cover in a single article, but I’ll try to highlight a couple of important ones.
Inline Edit
Inline editing is one of the most important features, allowing you to edit a record quickly on the listing page itself. Let’s see how to enable it for the department listing page.
Let’s revise the department.php script as shown in the following snippet.
<?php require_once "script/pdocrud.php"; $pdocrud = new PDOCrud(); $pdocrud->setSettings("inlineEditbtn", true); echo $pdocrud->dbTable("department")->render();
As you can see, we’ve just enabled the inlineEditbtn setting, and the inline editing feature is there right away!
This is a really handy feature which allows you to edit records on the fly!
Filters
As you might have noticed, the department listing page already provides a free text search to filter records. However, you may want to add your own custom filters to improve the search feature. That’s what exactly the Filters option provides as it allows you to build custom filters!
We’ll use the employee.php for this feature as it’s the perfect demonstration use-case. On the employee listing page, we’re displaying the department name for each employee record, so let’s build a department filter which allows you to filter records by the department name.
Go ahead and revise your employee.php as shown in the following snippet.
<?php require_once "script/pdocrud.php"; $pdocrud = new PDOCrud(); $data = $pdocrud->getPDOModelObj()->select("department"); $options = array(); foreach($data as $record) { $options[$record['id']] = $record['department_name']; } $pdocrud->fieldTypes("dept_id", "select");//change state to select dropdown $pdocrud->fieldDataBinding("dept_id", $options, "", "","array");//add data using array in select dropdown $pdocrud->crudTableCol(array("first_name","last_name", "department_name", "email","phone")); $pdocrud->joinTable("department", "employee.dept_id = department.id", "INNER JOIN"); $pdocrud->addFilter("department_filter", "Department", "dept_id", "dropdown"); $pdocrud->setFilterSource("department_filter", $options, "", "", "array"); echo $pdocrud->dbTable("employee")->render();
We’ve just added two lines, with calls to addFilter and setFilterSource, and with that, the employee list looks like the following:
Isn’t that cool? With just two lines of code, you’ve added your custom filter!
Image Uploads
This is a must-have feature should you wish to set up file uploads in your forms. With just a single line of code, you can convert a regular field to a file-upload field, as shown in the following snippet.
I'll assume that you have a profile_image field in your employee table, and that you’re ready to convert it to a file-upload field!
<?php require_once "script/pdocrud.php"; $pdocrud = new PDOCrud(); $pdocrud->fieldTypes("profile_image", "image"); echo $pdocrud->dbTable("employee")->render();
That's it! Users will now be able to upload an image to the profile_image field.
CAPTCHA
Nowadays, if you want to save your site from spamming, CAPTCHA verification is an essential feature. The PDO CRUD tool already provides a couple of options to choose from.
It provides two options: CAPTCHA and ReCAPTCHA. If you select the CAPTCHA option, it presents a mathematical puzzle for the user to solve. On the other hand, if you select the ReCAPTCHA option, it presents a famous I’m not a robot puzzle!
If you want to add a simple CAPTCHA puzzle, you need to add the following line before you render your CRUD.
$pdocrud->formAddCaptcha("captcha");
On the other hand, if you prefer ReCAPTCHA, you can achieve the same by using the following snippet.
$pdocrud->recaptcha("your-site-key","site-secret");
You just need to replace the your-site-key and site-secret arguments with valid credentials from Google.
So far, we’ve discussed options that enhance the functionality of your application. Next, we’ll see how you could alter the skin and thus the look and feel of your application.
Skins
If you don’t like the default skin, you have a couple of options to choose from. The PDO CRUD tool provides dark, fair, green and advanced skins as other options to choose from.
For example, the following listing is based on the green theme.
It looks nice, doesn't it?
Pure Bootstrap
Although the default skin already supports responsive layouts, the PDO CRUD tool also supports Bootstrap library integration!
You need to use the following snippet should you wish to build your layout using the Bootstrap library.
<?php require_once "script/pdocrud.php"; $pdocrud = new PDOCrud(false, "pure", "pure"); echo $pdocrud->dbTable("department")->render();
And here’s what it looks like:
Conclusion
Today, we reviewed the PDO CRUD advanced database form builder and data management tool available at CodeCanyon. This is a CRUD application interface builder tool at its core. It provides a variety of customization options that cover almost everything a CRUD system requires.
As I said earlier, it’s really difficult to cover everything the PDO CRUD tool provides in a single article, but hopefully the official documentation should give you some insight into its comprehensive features.
I hope you’re convinced that the PDO CRUD tool is powerful enough to fulfill your requirements and allows you to get rid of the repetitive work you have to do every time you want to set up a CRUD in your application. Although it’s a commercial plugin, I believe it’s reasonably priced considering the plethora of features it provides.
If you have any suggestions or comments, feel free to use the feed below and I’ll be happy to engage in a conversation!
http://j.mp/2TFLhdX via Envato Tuts+ Code URL : http://j.mp/2etecmc
0 notes
Photo

https://semicolon.codes/crud-angular-js-php-mysql/
CRUD Operations using Angular JS in PHP MYSQL (With Source Code)
CRUD Operations using Angular JS in PHP MYSQL Overview
CRUD means create , read ,update and delete. With Angular js and PHP MySQL, this project was developed to perform basic CRUD functionality. Here, you are allow to perform CRUD operations on the data below on the table and manage the data with different crud operations in the table.
In order to work, you need to first extract the zip into htdocs folder in xammp. After, create a web database in order to store the data from the website.You can use Xammp software which provides virtual local MySQL database. So, create a database in the phpmyadmin and name it ‘angular’.
Now after creating the database, perform following queries on the database you just created.
CREATE TABLE `members` ( `memid` int(11) NOT NULL AUTO_INCREMENT, `firstname` varchar(30) NOT NULL, `lastname` varchar(30) NOT NULL, `address` text NOT NULL, PRIMARY KEY(`memid`) ) ENGINE=InnoDB DEFAULT CHARSET=latin1;
Reminder, this project uses CDN Bootstrap framework which only works online so check out for internet connection.
So, after the database process is finished. You need to start a localhost server. You can use Xammp. Just fire up the apache server and type ‘localhost/project_name’ in the browser.
Modules in the project:
Index.html : The main homepage of the project where we place all of the dependencies.
app.js : This is the main script made on angular js
memberService.js : This module handles the member and request.
homeController.js : The controller for the home.
addController.js : This module works as adding the data in html.
editController.js : This module is for editing the data.
deleteController.js : This module is for deleting the data.
home.html : Our main index view.
add.html : This consist of add form.
delete.html : This consist of delete form.
edit.html: This consist of edit form.
Download link of the project is below:
Download will be unlocked as soon as you complete small task below:
angularcrud.zip
9.31 KB
jQuery(function()jQuery('.link-btn a.wpdm-download-link img').after('<img class="lazy lazy-hidden" src="data:image/gif;base64,R0lGODlhAQABAIAAAAAAAP///yH5BAEAAAAALAAAAAABAAEAAAIBRAA7" data-lazy-type="image" data-lazy-src="https://semicolon.codes/wp-content/plugins/wpdm-download-button/images/03.png" alt="" /><noscript><img class="lazy lazy-hidden" src="data:image/gif;base64,R0lGODlhAQABAIAAAAAAAP///yH5BAEAAAAALAAAAAABAAEAAAIBRAA7" data-lazy-type="image" data-lazy-src="https://semicolon.codes/wp-content/plugins/wpdm-download-button/images/03.png" alt="" /><noscript><img src="https://semicolon.codes/wp-content/plugins/wpdm-download-button/images/03.png" alt="" />');jQuery('.link-btn a.wpdm-download-link img').remove(););
0 notes
Photo
New Post has been published on https://programmingbiters.com/codeigniter-3-crudcreate-read-update-and-delete-using-jquery-ajax-bootstrap-models-and-mysql/
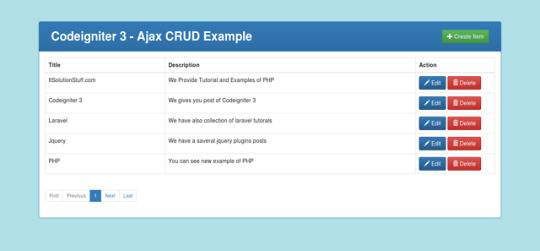
Codeigniter 3 - CRUD(Create, Read, Update and Delete) using JQuery Ajax, Bootstrap, Models and MySQL
CRUD is a basic step of any Core Language or framework. CRUD stand for Create Read Update and Delete. So in this post we will learn insert update delete in codeigniter using jquery Ajax. I gave you example from scratch so if you don’t know about Codeigniter 3 then no issue. You have to just follow simple step.There are listed bellow step you have to follow:
1)Download Fresh Codeigniter 3
2)Create Database and Configuration
3)Add Route
4)Create Controller
5)Update View
6)Create JS File
In this example i used several jquery Plugin for fire Ajax, Ajax pagination, Bootstrap, Bootstrap Validation, notification as listed bellow.
Jquery
Bootstrap
twbsPagination js
Validator JS(Bootstrap form validation example with demo using validator.js plugin)
toastr JS(Jquery notification popup box example using toastr JS plugin with demo)
After complete this c.r.u.d. application example you will be find preview as like bellow preview scheenshot:
Preview:
Step 1: Download Fresh Codeigniter 3
In First step we will download fresh version of Codeigniter 3, so if you haven’t download yet then download from here : Download Codeigniter 3.
After Download successfully, extract clean new Codeigniter 3 application.
Step 2: Create Database and Configuration
In this step we will create new database “test” and add new table “items” in test database. You can use following SQL Query for create “items” table. So let’s create using bellow sql query:
item table:
CREATE TABLE IF NOT EXISTS `items` ( `id` int(10) unsigned NOT NULL AUTO_INCREMENT, `title` varchar(255) COLLATE utf8_unicode_ci NOT NULL, `description` text COLLATE utf8_unicode_ci NOT NULL, PRIMARY KEY (`id`) ) ENGINE=InnoDB DEFAULT CHARSET=utf8 COLLATE=utf8_unicode_ci AUTO_INCREMENT=16 ;
After create database and table successfully, we have to configuration of database in our Codeigniter 3 application, so open database.php file and add your database name, username and password.
application/config/database.php
<?php defined('BASEPATH') OR exit('No direct script access allowed'); $active_group = 'default'; $query_builder = TRUE; $db['default'] = array( 'dsn' => '', 'hostname' => 'localhost', 'username' => 'root', 'password' => 'root', 'database' => 'test', 'dbdriver' => 'mysqli', 'dbprefix' => '', 'pconnect' => FALSE, 'db_debug' => (ENVIRONMENT !== 'production'), 'cache_on' => FALSE, 'cachedir' => '', 'char_set' => 'utf8', 'dbcollat' => 'utf8_general_ci', 'swap_pre' => '', 'encrypt' => FALSE, 'compress' => FALSE, 'stricton' => FALSE, 'failover' => array(), 'save_queries' => TRUE );
Step 3: Add Route
In this step you have to add some route in your route file. So first we will create route for items modules for lists, create, edit, update and delete.so put the bellow content in route file:
application/config/routes.php
<?php defined('BASEPATH') OR exit('No direct script access allowed'); $route['default_controller'] = 'welcome'; $route['404_override'] = ''; $route['translate_uri_dashes'] = FALSE; $route['items'] = "items/index"; $route['itemsCreate']['post'] = "items/store"; $route['itemsEdit/(:any)'] = "items/edit/$1"; $route['itemsUpdate/(:any)']['put'] = "items/update/$1"; $route['itemsDelete/(:any)']['delete'] = "items/delete/$1";
Step 4: Create Controller
Ok, now first we have to create one new controller api method listing, create, edit, update and delete. so create Items.php file in this path application/controllers/Items.php and put bellow code in this file:
application/controllers/Items.php
<?php defined('BASEPATH') OR exit('No direct script access allowed'); class Items extends CI_Controller /** * Get All Data from this method. * * @return Response */ public function index() $this->load->database(); if(!empty($this->input->get("search"))) $this->db->like('title', $this->input->get("search")); $this->db->or_like('description', $this->input->get("search")); $this->db->limit(5, ($this->input->get("page",1) - 1) * 5); $query = $this->db->get("items"); $data['data'] = $query->result(); $data['total'] = $this->db->count_all("items"); echo json_encode($data); /** * Store Data from this method. * * @return Response */ public function store() $this->load->database(); $insert = $this->input->post(); $this->db->insert('items', $insert); $id = $this->db->insert_id(); $q = $this->db->get_where('items', array('id' => $id)); echo json_encode($q->row()); /** * Edit Data from this method. * * @return Response */ public function edit($id) $this->load->database(); $q = $this->db->get_where('items', array('id' => $id)); echo json_encode($q->row()); /** * Update Data from this method. * * @return Response */ public function update($id) $this->load->database(); $insert = $this->input->post(); $this->db->where('id', $id); $this->db->update('items', $insert); $q = $this->db->get_where('items', array('id' => $id)); echo json_encode($insert); /** * Delete Data from this method. * * @return Response */ public function delete($id) $this->load->database(); $this->db->where('id', $id); $this->db->delete('items'); echo json_encode(['success'=>true]);
Step 5: Update View
In this step we will update view file of welcome_message.php. In this file we will write code of insert update delete and also include bootstrap, jquery, toastr and twbsPagination. So let’s update following file:
application/views/welcome_message.php
<!DOCTYPE html> <html> <head> <title>Codeigniter 3 - Ajax CRUD Example</title> <link rel="stylesheet" type="text/css" href="https://cdnjs.cloudflare.com/ajax/libs/twitter-bootstrap/4.0.0-alpha/css/bootstrap.css"> </head> <body> <div class="container"> <div class="row"> <div class="col-lg-12 margin-tb"> <div class="pull-left"> <h2>Codeigniter 3 - Ajax CRUD Example</h2> </div> <div class="pull-right"> <button type="button" class="btn btn-success" data-toggle="modal" data-target="#create-item"> Create Item</button> </div> </div> </div> <table class="table table-bordered"> <thead> <tr> <th>Title</th> <th>Description</th> <th width="200px">Action</th> </tr> </thead> <tbody> </tbody> </table> <ul id="pagination" class="pagination-sm"></ul> <!-- Create Item Modal --> <div class="modal fade" id="create-item" tabindex="-1" role="dialog" aria-labelledby="myModalLabel"> <div class="modal-dialog" role="document"> <div class="modal-content"> <div class="modal-header"> <button type="button" class="close" data-dismiss="modal" aria-label="Close"><span aria-hidden="true">×</span></button> <h4 class="modal-title" id="myModalLabel">Create Item</h4> </div> <div class="modal-body"> <form data-toggle="validator" action="items/store" method="POST"> <div class="form-group"> <label class="control-label" for="title">Title:</label> <input type="text" name="title" class="form-control" data-error="Please enter title." required /> <div class="help-block with-errors"></div> </div> <div class="form-group"> <label class="control-label" for="title">Description:</label> <textarea name="description" class="form-control" data-error="Please enter description." required></textarea> <div class="help-block with-errors"></div> </div> <div class="form-group"> <button type="submit" class="btn crud-submit btn-success">Submit</button> </div> </form> </div> </div> </div> </div> <!-- Edit Item Modal --> <div class="modal fade" id="edit-item" tabindex="-1" role="dialog" aria-labelledby="myModalLabel"> <div class="modal-dialog" role="document"> <div class="modal-content"> <div class="modal-header"> <button type="button" class="close" data-dismiss="modal" aria-label="Close"><span aria-hidden="true">×</span></button> <h4 class="modal-title" id="myModalLabel">Edit Item</h4> </div> <div class="modal-body"> <form data-toggle="validator" action="" method="put"> <div class="form-group"> <label class="control-label" for="title">Title:</label> <input type="text" name="title" class="form-control" data-error="Please enter title." required /> <div class="help-block with-errors"></div> </div> <div class="form-group"> <label class="control-label" for="title">Description:</label> <textarea name="description" class="form-control" data-error="Please enter description." required></textarea> <div class="help-block with-errors"></div> </div> <div class="form-group"> <button type="submit" class="btn btn-success crud-submit-edit">Submit</button> </div> </form> </div> </div> </div> </div> </div> <script type="text/javascript" src="https://cdnjs.cloudflare.com/ajax/libs/jquery/3.1.0/jquery.js"></script> <script type="text/javascript" src="https://cdnjs.cloudflare.com/ajax/libs/twitter-bootstrap/4.0.0-alpha/js/bootstrap.min.js"></script> <script type="text/javascript" src="https://cdnjs.cloudflare.com/ajax/libs/twbs-pagination/1.3.1/jquery.twbsPagination.min.js"></script> <script src="https://cdnjs.cloudflare.com/ajax/libs/1000hz-bootstrap-validator/0.11.5/validator.min.js"></script> <script type="text/javascript" src="http://cdnjs.cloudflare.com/ajax/libs/toastr.js/latest/js/toastr.min.js"></script> <link href="//cdnjs.cloudflare.com/ajax/libs/toastr.js/latest/css/toastr.min.css" rel="stylesheet"> <script type="text/javascript"> var url = "items"; </script> <script src="http://itsolutionstuff.com/js/item-ajax.js"></script> </body> </html>
Step 6: Create JS File
In this last step we will make new folder js on your root directory and create new file item-ajax.js on that folder. In item-ajax.js file we write all code of CRUD JS that will manage listing, insert, update, delete and pagination. So let’s create new file and put following code:
js/item-ajax.js
var page = 1; var current_page = 1; var total_page = 0; var is_ajax_fire = 0; manageData(); /* manage data list */ function manageData() $.ajax( dataType: 'json', url: url, data: page:page ).done(function(data) total_page = data.total % 5; current_page = page; $('#pagination').twbsPagination( totalPages: total_page, visiblePages: current_page, onPageClick: function (event, pageL) page = pageL; if(is_ajax_fire != 0) getPageData(); ); manageRow(data.data); is_ajax_fire = 1; ); /* Get Page Data*/ function getPageData() $.ajax( dataType: 'json', url: url, data: page:page ).done(function(data) manageRow(data.data); ); /* Add new Item table row */ function manageRow(data) var rows = ''; $.each( data, function( key, value ) rows = rows + '<tr>'; rows = rows + '<td>'+value.title+'</td>'; rows = rows + '<td>'+value.description+'</td>'; rows = rows + '<td data-id="'+value.id+'">'; rows = rows + '<button data-toggle="modal" data-target="#edit-item" class="btn btn-primary edit-item">Edit</button> '; rows = rows + '<button class="btn btn-danger remove-item">Delete</button>'; rows = rows + '</td>'; rows = rows + '</tr>'; ); $("tbody").html(rows); /* Create new Item */ $(".crud-submit").click(function(e) e.preventDefault(); var form_action = $("#create-item").find("form").attr("action"); var title = $("#create-item").find("input[name='title']").val(); var description = $("#create-item").find("textarea[name='description']").val(); $.ajax( dataType: 'json', type:'POST', url: form_action, data:title:title, description:description ).done(function(data) getPageData(); $(".modal").modal('hide'); toastr.success('Item Created Successfully.', 'Success Alert', timeOut: 5000); ); ); /* Remove Item */ $("body").on("click",".remove-item",function() var id = $(this).parent("td").data('id'); var c_obj = $(this).parents("tr"); $.ajax( dataType: 'json', type:'delete', url: url + '/' + id, ).done(function(data) c_obj.remove(); toastr.success('Item Deleted Successfully.', 'Success Alert', timeOut: 5000); getPageData(); ); ); /* Edit Item */ $("body").on("click",".edit-item",function() var id = $(this).parent("td").data('id'); var title = $(this).parent("td").prev("td").prev("td").text(); var description = $(this).parent("td").prev("td").text(); $("#edit-item").find("input[name='title']").val(title); $("#edit-item").find("textarea[name='description']").val(description); $("#edit-item").find("form").attr("action",url + '/update/' + id); ); /* Updated new Item */ $(".crud-submit-edit").click(function(e) e.preventDefault(); var form_action = $("#edit-item").find("form").attr("action"); var title = $("#edit-item").find("input[name='title']").val(); var description = $("#edit-item").find("textarea[name='description']").val(); $.ajax( dataType: 'json', type:'POST', url: form_action, data:title:title, description:description ).done(function(data) getPageData(); $(".modal").modal('hide'); toastr.success('Item Updated Successfully.', 'Success Alert', timeOut: 5000); ); );
Ok, now we are ready to run our CRUD Application example. So let’s run bellow command on your root directory for quick run:
php -S localhost:8000
Now you can open bellow URL on your browser:
http://localhost:8000/
قالب وردپرس
0 notes
Text
jQuery Drag and Drop Plugins To Use In Your Websites
How often did you find yourself in the situation of needing jQuery drag and drop plugins? Lately, I’m sure it happened more often than not.
They’ve become indispensable in certain projects. They are allowing you to move files from your computer to a website by just dragging and dropping.
In this article you’ll find jQuery drag and drop plugins that you can integrate in your pages. The plugins that are added below will add a ton of functionality to your site.
jQuery Filer
Simple HTML5 File Uploader, a plugin tool for jQuery which change completely File Input and make it with multiple file selection, drag&drop support, different validations, thumbnails, icons, instant upload, print-screen upload and many other features and options.
Pep
Pep was built out of a need for kinetic drag support for both mobile and desktop devices (click & drag). It uses the best of jQuery’s animate functions along with CSS3 animations to bring full-blown kinetic drag that works on all HTML5-ready devices.
Pep has built-in support for custom start, stop, rest, and drag events, constraining objects to their parent or the window, a debugger, and the ability to customize your own kinetic easing functions.
Dropzone.js
Dropzone.js could be a light-weight weight JavaScript library for jQuery that turns Associate in Nursing hypertext mark-up language component into a dropzone. this suggests that a user will drag and drop a file onto it, and also the file gets uploaded to the server via Ajax. It supports image previews and shows nice progress bars.
HyperModel
Related model design plugin, It works with jQuery well. You can drag and swap each of grids and properties.
Dragarrange
A Basic jQuery library to arrange/order DOM elements by dragging.This plugin doesn’t require any CSS change, just call the function on elements you want to be arranged, and you are done.
Table-dragger
Table-dragger is a minimalist plain Javascript library for building reorderable drag-and-drop table.
Features:
Super easy to set up
Cellspacing, cellpadding, col and colgroup in account
Able to sort columns or rows at the same time
Smooth animation when sort
No bloated dependencies
Touch events
Rich Functional List
RFL is a jQuery cards plugin built with good UX in mind. It’s responsive, touch-compatible, and integrates well with other jQuery plugins. Everything you could want to build modern card apps.
Drop Uploader
Drop Uploader plugin is allows you easily convert default file input field in your form to powerful Drag & Drop area, that supports multiple file uploading, file type validation and errors handling. No need to customize your existing form HTML code, just include plugin files and JS code snippet and turn it on.
Features:
Easy to use
One & Multiple Files Uploading
File Type Validation
File Browse and Drag&Drop Methods Supported
Works with native input file field
PHP File Uploading Script included
LobiList
LobiList is jQuery plugin for todo lists. Supports drag & drop of todos. Multiple lists with different colors.
Features:
Multiple list support
Different styles
Drag & drop list
Drag & drop todos
Ajax configuration urls for todo CRUD
Checkboxes to mark/unmark todo as done
Powerful event management
formBuilder
A jQuery plugin for drag and drop form creation.To start building forms with this plugin call formBuilder() on the textarea you would like to make your editor. FormBuilder takes a number of options and is translatable.
Fsortable
fsortable is a fixed layout sortable plugin for jQuery UI.There’s some necessary markup you need to use to let fsortable know about your layout. Since it assumes your sortable has a fixed capacity you need to tell it how many items it can hold. It takes that information from the HTML itself by counting the number of items in your sortable and the number of empty positions.
LobiPanel
LobiPanel is jquery plugin for bootstrap panels. It extends panels with several common and useful functions which does not come by default.
DropArea
A jQuery plugin which makes an easy and intuitive area for upload files through drag and drop or select methods.
Sortable
Sortable — is a JavaScript library for reorderable drag-and-drop lists on modern browsers and touch devices. No jQuery. Supports Meteor, AngularJS, React, Polymer, Knockout and any CSS library, e.g. Bootstrap.
jQuery Azexo Composer WYSIWYG
jQuery drag and drop HTML builder, compile Bootstrap based HTML and JS initialization code for third party JS libraries
List of features
Integrated front end content slider visual builder
Integrated front end Impress JS presentation visual builder
Integrated front end grid visual builder
Every element can be animated via CSS3 engine (on appear, on hover, on click)
Every element can be animated via JS animations engine with real time timeline and scroll timeline (with easy to understand visual builder + parallax wizard to make parallax effect by few clicks)
Every element have base CSS settings editor
If you have JS skills you can create (via very easy API) any number of your custom elements which will be integrated into Azexo Composer page builder and will support all features listed above
jQuery File Uploader
jQuery plugin to drag and drop files, including Ajax upload and progress bar. The idea for this plugin is to keep it very simple. Basic JavaScript / jQuery knowledge is necessary to use this plugin.
Nestable
Nestable is an interactive hierarchical list. You can drag & drop to rearrange the order. It even works well on touch-screens.
jDashboard
jDashboard could be a jQuery Drag And Drop Plugins that provides you a simple thanks to produce a dynamic gizmo space. The widgets will simply be re-arranged and collapsed/expanded, and therefore the layout is saved either in a very MySQL info, or with HTML5 native storage (falling back to mistreatment cookies) thus your users don’t ought to begin over after they return to their dashboard.
FileAPI
FileAPI could be a set of javascript tools for operating with files. Multiupload, drag’n’drop and chunked file transfer. Images: crop, size and automobile orientation by EXIF.
Gridster.js
Gridster could be a jQuery Drag And Drop Plugin that enables building intuitive draggable layouts from components spanning multiple columns. you’ll even dynamically add and take away components from the grid. it’s on par with sliced bread, or presumably higher.
Onebyone Slider
The OneByOne Slider could be a light-weight, responsive & bedded jQuery plugin you’ll use to show your image and text one by one. The CSS3 animation is driven byAnimate.css. It’s mobile friendly, that support wipe left/right on your bit device like iPhone & iPad. you’ll drag and drop to navigate along with your mouse too.
TableDnD
TableDnD could be a jQuery Drag And Drop Plugins that merely adds drag & dropfunctionality to tables. This TableDnD plugin permits the user to reorder rows inside a table, {for example|for instance|as Associate in Nursing example} if they represent an ordered list . Individual rows are often marked as non-draggable and/or non-droppable.
If you liked this article about jQuery drag and drop plugins, you should check out these articles as well:
jQuery Pagination Plugins To Download
jQuery Form Plugins To Use In Your Websites (84 Options)
jQuery Bootstrap Plugins (51 Great Examples)
The post jQuery Drag and Drop Plugins To Use In Your Websites appeared first on Design your way.
from Web Development & Designing http://www.designyourway.net/blog/resources/jquery-drag-and-drop-plugins/
0 notes
Text
How to Build a Lyrics Website with Laravel Scout and Algolia
Laravel Scout is a driver-based library for adding full-text search to Eloquent models. If you're not familiar with Laravel or Eloquent models in general, we have a good premium course available here.
In this tutorial, we will create a minimal lyrics web site using Laravel Scout and Algolia. To do so, we need a CRUD app to work with our data, and a search interface to let users search through the content. However, instead of creating the full app from scratch, let's just install the finished CRUD app that we've created for this tutorial.
Algolia is a hosted search engine API, providing us with all the tools and resources we'll ever need to create products with awesome search capabilities.
By the end of the tutorial, we'll have a product like this:
Bootstrapping the Application
I assume you already have your development environment up and running. However, If you need a good development environment to get into action right away, you should use Homestead Improved.
Stranger to Vagrant? Read this. Want to go more in depth? Buy our book on PHP Environments!
Feel free to skip this part if you already have a similar application or you have enough experience to build one relatively quickly.
CRUD Application
The most convenient way to download the pre-built CRUD project is to clone it:
git clone [email protected]:lavary/lyrics-crud.git coolyrics cd coolyrics composer install
Setting Up the Database
Now, let's create a MySQL database. The settings below apply to the Homestead Improved environment mentioned above. Change as needed.
mysql -h localhost -u homestead -psecret mysql> CREATE DATABASE lyrics
After the database has been created, we make a copy of .env.example (located in our project's root directory) and name it .env. This is where we put our database credentials:
#... DB_CONNECTION=mysql DB_HOST=127.0.0.1 DB_PORT=3306 DB_DATABASE=lyrics DB_USERNAME=root DB_PASSWORD=password # ...
Again, apply to your own preferences as needed.
Now, we run the migration command to create the tables:
php artisan migrate
Filling Up the Database with Sample Data
A lyrics website contains information about musicians and their work, and, of course, their songs' lyrics. To make a bare minimum data structure, we have created only two Eloquent models for this project, namely Artist and Song. The Artist model has a one-to-many relationship with the the Song model. This means each artist can have many songs and each song belongs to an artist in our database.
Before moving forward to the next section, you may go ahead and insert a few records into the database, starting with your favorite artists and then adding a few songs for each.
This is what we have so far:
You can also use the SQL file included with the project files and dump it into your database with the following command:
mysql -h localhost -u {USERNAME} -p{PASSWORD} lyrics < /path/to/the/sql/file
You can also import the file by using your favorite MySQL management application, like Sequel Pro, MySQL Workbench or PHPMyAdmin.
Installing Scout
Let's continue by installing Scout:
composer require laravel/scout
Then, we add the service provider to $providers in the config/app.php file:
Laravel\Scout\ScoutServiceProvider::class,
Now we need to generate the Scout's configuration file using the publish:config artisan command:
php artisan vendor:publish --provider="Laravel\Scout\ScoutServiceProvider"
As a result, a configuration file named scout.php is generated inside the config directory. We'll edit this file later.
To make a data model searchable, we need to use the Laravel\Scout\Searchable trait inside the respective model class. That's the Song model in our case:
<?php namespace App; use Illuminate\Database\Eloquent\Model; use Laravel\Scout\Searchable; class Song extends Model { use Searchable; protected $fillable = ['title', 'album', 'lyrics', 'youtube_link']; public function artist() { return $this->belongsTo('App\Artist'); } }
Setting Up Algolia
As planned, we'll use Algolia as our search engine API.
First, let's create an account to obtain our application ID. Scout requires Application ID and Admin API Key to operate. After the registration is complete, we can find our credentials under API Keys in the left menu.
Now, we open the config/scout.php configuration file and put our credentials there:
<?php 'algolia' => [ 'id' => env('ALGOLIA_APP_ID', ''), 'secret' => env('ALGOLIA_SECRET', ''), ],
It's a good practice to keep the keys in .env and load them into scout.php using the env() or getenv() functions.
To use the Algolia's API, we need to install Algolia's SDK for PHP, which is also available as a Composer package:
composer require algolia/algoliasearch-client-php
Indexing Our Data
At this point, we need to create our index on Algolia. Each record in the index is a schema-less JSON object (each one represents a record in our database) with a set of attributes that can be used for searching, displaying, ranking and filtering data.
Rather than indexing the whole record, we only need to index the data needed for the above operations. This helps keep our index clean and optimized.
Apart from that, the index is not a relational database, meaning when searching through the index, we cannot use complex where clauses or SQL joins. To work around this limitation, we should define a custom structure for our index records. On the other hand, we should join all the needed tables, preparing a customized JSON object before indexing.
To do this, we override the toSearchableArray() method in the Song model (this method is added to the class by the Laravel\Scout\Searchable trait). By default, the toSearchableArray() method returns the $this->toArray() output as our index object (when sending the index record to Algolia), whereas we need additional data, like artist's name, genres and the image URL, which reside in another table - the artists table.
Here's how we do it:
<?php namespace App; use Illuminate\Database\Eloquent\Model; use Laravel\Scout\Searchable; class Song extends Model { use Searchable; protected $fillable = ['title', 'album', 'lyrics', 'youtube_link']; public function toSearchableArray() { $genres = array_map(function($item) { return trim($item); }, explode(',', $this->artist->genres)); return array_merge( $this->toArray(), ['artist' => $this->artist->name, 'photo' => $this->artist->photo, 'genres' => $genres]); } public function artist() { return $this->belongsTo('App\Artist'); } }
Since the genres field may contain a comma-separated value in our database (it has a simple text field in our CRUD app), we separate genres using explode. Then, we iterate over the results, stripping off any unwanted spaces before and after each part - using the map() function:
<?php // ... $genres = array_map(function($item) { return trim($item); }, explode(',', $this->artist->genres)); // ...
Finally, we merge the output of $this->toArray() with our desired attributes, returning the final array.
<?php // ... return array_merge( $this->toArray(), ['artist' => $this->artist->name, 'photo' => $this->artist->photo, 'genres' => $genres]); // ...
Why do we need to index a randomly generated string like image URL you may be wondering. We'll get to this shortly.
For the existing records in the database, we can import the index at once with the scout:import artisan command, like this:
php artisan scout:import "App\Song"
When the indexing process is completed, we can see the index on Algolia by going to Indices and choosing our index name from the drop-down menu:
Indexing is not a one-off task. After the initial import, the index needs to be kept in sync with the database. Since we're using Scout, everything is already taken care of. From now on, any time a record is inserted, updated, or deleted from the database, the respective index record will be affected accordingly - thanks to Laravel's model observers.
To learn more about how Scout manages the indexing process, have a look at the documentation.
Configuring Algolia
The next thing to do is to configure our Algolia index for optimal operation. These settings can be modified either from the dashboard or programmatically using Algolia's API.
The most important configuration options are the Searchable attributes and the Custom Ranking Attributes.
The Searchable attributes setting defines which record attributes are used for searching. The order of these attributes also matters as those at the top are considered more important and control the ranking.
The Custom Ranking Attributes option indicates the popularity of each record which also affects the ranking. They can be anything from the number of likes, views, downloads, to comments. That said, we need to include this information in the index.
Algolia comes with plenty of configuration options. Going through each setting is beyond the scope of this tutorial. To learn more about the configuration options, you should have a look at Algolia's FAQ on configuration and relevance.
Continue reading %How to Build a Lyrics Website with Laravel Scout and Algolia%
via SitePoint http://ift.tt/2tN6fxD
0 notes
Text
PHP CRUD Generator Nulled Script 2.3.1

Download PHP CRUD Generator Nulled Script for Free Looking for a powerful and intuitive way to generate PHP CRUD applications without writing endless lines of code? The PHP CRUD Generator Nulled Script is your go-to solution. This dynamic tool allows developers and non-developers alike to generate responsive, professional-grade PHP admin panels within minutes — completely free. What is PHP CRUD Generator Nulled Script? The PHP CRUD Generator Nulled Script is a premium tool designed to automate the creation of Create, Read, Update, and Delete (CRUD) functionalities in PHP projects. Whether you're building a back-office dashboard, managing databases, or creating dynamic web apps, this script simplifies your workflow by offering a visual interface that connects directly to your MySQL database. And now, thanks to the nulled version, you can enjoy all premium features without spending a dime. Technical Specifications Language Support: PHP 7.x and PHP 8.x Database: MySQL and MariaDB compatibility Framework Independent: Works with plain PHP or any framework Installation: One-click setup wizard Responsive: Bootstrap-based admin panel Key Features and Benefits 1. Visual CRUD Interface The script allows you to visually build CRUD operations using an intuitive UI. No coding is needed — simply select tables, define relationships, and generate ready-to-use PHP code instantly. 2. Time-Saving Automation Save hours of development time by letting the PHP CRUD Generator automate repetitive coding tasks. Focus on your app's logic while the tool handles the backend scaffolding. 3. Fully Customizable Output The generated code is clean, modular, and fully editable. You can tweak it to match your specific requirements or integrate it into your existing projects seamlessly. 4. Advanced Filters and Search Each generated CRUD interface comes equipped with advanced filtering, sorting, and search features to make data management a breeze. 5. Secure and Reliable While the script is nulled, it retains all security features found in the original version. You can trust it to manage your data efficiently and securely. Common Use Cases Admin dashboards for small to medium businesses Inventory and stock management systems Customer relationship management tools Educational portals and student record systems Personal or freelance PHP projects How to Install PHP CRUD Generator Nulled Script Installing the nulled version of PHP CRUD Generator is straightforward: Download the PHP CRUD Generator Nulled Script from our website. Extract the zip file and upload the contents to your server directory. Open your browser and navigate to the setup URL. Follow the step-by-step installation wizard and connect to your MySQL database. Select tables, configure settings, and generate your CRUD panels instantly. That’s it! Your admin panel is ready to use with full create, read, update, and delete capabilities. Frequently Asked Questions (FAQs) Is it safe to use the PHP CRUD Generator Nulled Script? Yes, the nulled script offered on our site is tested and free from malware. However, we recommend using it only for educational or personal projects unless you have appropriate licensing for commercial deployment. Can I use this script on multiple projects? Absolutely. The nulled version removes usage limitations, allowing you to implement it across as many projects as you like. Is technical support available? Support is not included with nulled versions. For troubleshooting, refer to community forums or consider purchasing the official version for full support. Does it work with the latest PHP version? Yes, the script is compatible with the latest PHP releases including PHP 8.x, ensuring seamless performance and security. Why Download From Us? Our platform offers high-quality, pre-tested nulled tools for developers. Not only do we provide the PHP CRUD Generator for free, but we also offer exclusive access to other top-rated tools like iThemes Security Pro NULLED, ensuring you get the best resources under one roof.
Need themes too? Check out the latest Enfold NULLED theme to build a stunning front end for your next project. Final Thoughts The PHP CRUD Generator Nulled Script is a game-changer for developers seeking efficiency, flexibility, and powerful admin capabilities. Download it now from our site and streamline your PHP development with ease — no extra cost, no hidden fees, just powerful performance for free.
0 notes
Text
71% off #Build Ajax Web Apps with Laravel 5.2, Bootsrap and jQuery- $10
Learn how to build Real Life Projects with Laravel 5.2 PHP Framework, Bootstrap and jQuery AJAX
All Levels, – Video: 5 hours, 42 lectures
Average rating 4.5/5 (4.5)
Course requirements:
You should already be familiar with HTML, Javascript and PHP Basic understanding of Bootstrap CSS Framework Download and Install PHP & MySQL Download and Install Text editor like Sublime Text, Atom, Bracket, etc
Course description:
UPDATED as of June 2016
Learn how to build real life projects using Laravel, one of the most popular PHP framework today. Its has clean and beautiful syntax and make web development a joy.
This is a Laravel Practical Training and during this course we are going to build real life Ajax Web Apps with Laravel 5.2, Bootstrap and jQuery:
1. Simple Contact Manager Application (Published)
In this first project we are going to lean how to do things like:
Create new contact Edit and delete existing contact Basic pagination and custom pagination Upload the contact photo Filtering contacts data by selected contact group Search the contacts Play with jQuery auto complete Perform server side validation by AJAX Saving data with AJAX Authentication and Authorization And much more
2. AJAX Todo App (Published)
In this second project we are going to learn how to:
AJAX CRUD for manage Todo Lists AJAX CRUD for manage tasks of a list Nested routes And much more
3. Blog (Still in development)
In this third project we are going to lean how to do things like:
Manage Posts Manage Categories Manage Tags ACL and much more
The course will help you learn:
How to use php artisan to generate database migration, database seeder, controller, model, policies, Request How to use Laravel routing How to use Query Builder and Eloquent ORM How to work with Validation and AJAX validation How to use Laravel Blade Templating Engine
Full details Over 2 hours of content Use the artisan command line to make web developement easy and fast Build dynamic web app with effectively you’ll have a solid foundation, and be ready to use Laravel for deploying your web applications Anyone who want to learn how to build high quality, secure and maintainable web apps Developers who want to improve their skill or get a better one Anyone who love to learn web development
Reviews:
“Muito bom!!!” (Anderson Silva)
“So far so good” (Udemy User)
“It is ok on windows, but on linux it does work but without cache.” (Romel Vera)
About Instructor:
Eding Muhamad Saprudin
Eding Muhamad is a full-stack developer from Indonesia and have degrees in Computer Science. He mainly works with PHP and builds web apps with PHP frameworks like Codeigniter, Yii and Laravel, as well as Ruby Framework with Ruby on Rails. Eding is also love teaching. He teaching about object oriented programming with java, data structure and Algorithm with C++, Web programming with PHP in his college as well.
Instructor Other Courses:
Kursus Lengkap Laravel 5 – Membangun 3 aplikasi web …………………………………………………………… Eding Muhamad Saprudin coupons Development course coupon Udemy Development course coupon Web Development course coupon Udemy Web Development course coupon course coupon coupon coupons
The post 71% off #Build Ajax Web Apps with Laravel 5.2, Bootsrap and jQuery- $10 appeared first on Udemy Cupón.
from http://www.xpresslearn.com/udemy/coupon/71-off-build-ajax-web-apps-with-laravel-5-2-bootsrap-and-jquery-10/
0 notes
Text
Know more about CRUD operations in PHP
CRUD operations in PHP
Admin templates have a goliath undertaking to finish regarding the designing of user interfaces of the backend of any web application. In all reality, you are destined to go over pre-built pages that are integrated with the web application. The pre-built pages are depended with the main responsibility of content and user management not forgetting maintenance of a website. A couple of years sooner, individuals didn't put a colossal level of spotlight on the strategy for admin dashboard as they are just pertinent to the back end. For any condition, things appear to have taken a substitute heading in the event that we are to go with their growing popularity.
With an extraordinarily coordinated admin structure, you are destined to administer your website without encountering any problems at all. You should for any condition review that you will require the assistance of a professional on the off chance that you are to pull this off reasonably. No mammoth trance we in a short range period have differing bootstrap admin templates you can download online. In setting on these templates you are going to find it clear in getting your applications isolated through. To mistreat a bootstrap 4 generator, you should promise you are working with the most tip top.
On the off chance that you are needing the best bootstrap 4-dashboard generator, by then it is incredibly fitting that you depend upon PHP CRUD generator. By integrity of this fundamental generator, you can have the option to take care of a full scale bootstrap 4 generator with PHP CRUD operations from your MySQL database. To improve it much you can utilize the best tools available in making the sorts of progress depending on the kind of data you select.
What makes Bootstrap 4 dashboard worth relying upon is the see that you can customize it to suite your desires. Notwithstanding whether you need settled tables, custom labels or even separated through labels then you can have the option to make it without going through a great deal. For you to crush correspondingly as can be ordinary, opt to evaluate the PHP CRUD online demo. This demo offers access to both the CRUD PHP MySQL builder and Bootstrap dashboard with CRUD operations. To find out about PHP CRUD generator, you should visit their official website. Fortunately, you can do this at a specific time you find appealing as long as you are related with the internet. For more information, read this link.
0 notes
Text
90% off #Build Ajax Web Apps with Laravel 5.2, Bootstrap and jQuery – $10
Learn how to build Real Life Projects with Laravel 5.2 PHP Framework, Bootstrap and jQuery AJAX
All Levels, – 5 hours, 42 lectures
Average rating 4.5/5 (4.5 (93 ratings) Instead of using a simple lifetime average, Udemy calculates a course’s star rating by considering a number of different factors such as the number of ratings, the age of ratings, and the likelihood of fraudulent ratings.)
Course requirements:
You should already be familiar with HTML, Javascript and PHP Basic understanding of Bootstrap CSS Framework Download and Install PHP & MySQL Download and Install Text editor like Sublime Text, Atom, Bracket, etc
Course description:
UPDATED as of June 2016
Learn how to build real life projects using Laravel, one of the most popular PHP framework today. Its has clean and beautiful syntax and make web development a joy.
This is a Laravel Practical Training and during this course we are going to build real life Ajax Web Apps with Laravel 5.2, Bootstrap and jQuery:
1. Simple Contact Manager Application (Published)
In this first project we are going to lean how to do things like:
Create new contact Edit and delete existing contact Basic pagination and custom pagination Upload the contact photo Filtering contacts data by selected contact group Search the contacts Play with jQuery auto complete Perform server side validation by AJAX Saving data with AJAX Authentication and Authorization And much more
2. AJAX Todo App (Published)
In this second project we are going to learn how to:
AJAX CRUD for manage Todo Lists AJAX CRUD for manage tasks of a list Nested routes And much more
The course will help you learn:
How to use php artisan to generate database migration, database seeder, controller, model, policies, Request How to use Laravel routing How to use Query Builder and Eloquent ORM How to work with Validation and AJAX validation How to use Laravel Blade Templating Engine
Full details Over 2 hours of content Use the artisan command line to make web developement easy and fast Build dynamic web app with effectively you’ll have a solid foundation, and be ready to use Laravel for deploying your web applications Anyone who want to learn how to build high quality, secure and maintainable web apps Developers who want to improve their skill or get a better one Anyone who love to learn web development
Reviews:
“Highly recommend it + Good projects, cover lots of stuff + Professor has solid knowledge of the subject + Professor respond all doubts in no time and always with clear answers” (Vinicius Cedro Cavalcanti)
“Good course! but some topic can be more detailed.” (Jason)
“Curso bem estruturado e com as opções que se repetem em vários programas. Didática legal e bons recursos.” (Fernando Batista)
About Instructor:
Eding Muhamad Saprudin
Eding Muhamad is a full-stack developer from Indonesia and have degrees in Computer Science. He mainly works with PHP and builds web apps with PHP frameworks like Codeigniter, Yii and Laravel, as well as Ruby Framework with Ruby on Rails. Eding is also love teaching. He teaching about object oriented programming with java, data structure and Algorithm with C++, Web programming with PHP in his college as well.
Instructor Other Courses:
Build Amazing Blog + CMS with Laravel 5.x & AdminLTE Eding Muhamad Saprudin, Full-stack Web Developer and Instructor (0) $10 $25 Membuat Blog & CMS dengan Laravel 5.x Kursus Lengkap Laravel 5 – Membangun 3 aplikasi web …………………………………………………………… Eding Muhamad Saprudin coupons Development course coupon Udemy Development course coupon Web Development course coupon Udemy Web Development course coupon Build Ajax Web Apps with Laravel 5.2, Bootstrap and jQuery Build Ajax Web Apps with Laravel 5.2, Bootstrap and jQuery course coupon Build Ajax Web Apps with Laravel 5.2, Bootstrap and jQuery coupon coupons
The post 90% off #Build Ajax Web Apps with Laravel 5.2, Bootstrap and jQuery – $10 appeared first on Course Tag.
from Course Tag http://coursetag.com/udemy/coupon/90-off-build-ajax-web-apps-with-laravel-5-2-bootstrap-and-jquery-10/ from Course Tag https://coursetagcom.tumblr.com/post/158230159973
0 notes
Text
The significance of CRUD Web Application
Admin template are epic as they help in making the UI of the backend of a web application. A fundamental piece of the time, the pre-amassed pages are reliably consolidated with the web application whose standard point is doing backend endeavors like keeping up the website, client and content management to give a few models. From the most dependable beginning stage, there was little exertion set in the designing of admin dashboard since they are utilized for the back end. Notwithstanding, things appear to have taken another course right now.
When having a well-designed admin template, it will demonstrate easy in administering your website. This isn't something that you can draw off sensibly without having the major learning. It is in like way that we genuinely have a ton of bootstrap admin templates that you can download online. With these templates, you won't need to experience a ton before setting up your application. In any case, only one out of each odd bootstrap 4 generator that you go over online is going to offer the help that you need. You should consequently check for the best there is in the event that you are to play out your duties hassle free.
In the event that you are checking for the best bootstrap 4 dashboard generator, by then you should look no more far away than PHPCG. This astonishing generator makes it head for your to build an unafraid bootstrap 4 generator with PHP CRUD operations from your MySQL database. What make it on an especially focal level all the all the all the all the what's moreover stunning is the way wherein that you can utilize the best contraptions open in uncovering the redesigns relying on the kind of data you select. Among the most wearisome mechanical aggregates that you can utilize consolidate select lists, date 7 time pickers, rich content administrator to make reference to a couple.
The basic thing about Bootstrap 4 dashboard is that you can transform it as required. Ousting whether you need course with organized groupings, nested tables or even custom names, by then you can pull it off possibly without experiencing any difficulties at all. To get the best there is you ought to consider concentrating the PHP CRUD online demo that offers access to the two bits of the application for example the Crud PHP MySQL builder and the Bootstrap dashboard with CRUD operations. This development will go far in promising you find two or three systems concerning the instrument before you can at long last find the opportunity to utilize it.
With PHPCG, you will never need to program the district of your website admin panel normally like the case in a veritable number of other CRUD PHP applications. This is in light of the way that their CRUD PHP MySQL code generator makes all CRUD operations in PHP without in a general sense coding them. To get the services of PHPCG, you should visit their official website at whatever inspiration driving the day. Here you are set to get all of information that you have to know. For the individuals who have any questions then you can on a unimaginably key level leave them a message utilizing their online system.
0 notes
Photo
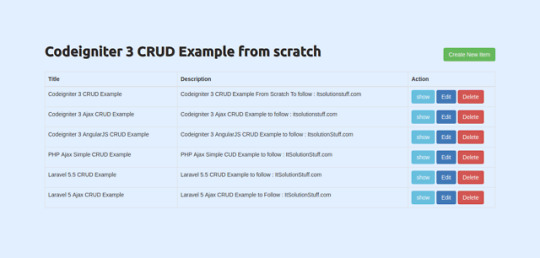
New Post has been published on https://programmingbiters.com/codeigniter-3-basic-crud-application-with-mysql-example-with-demo/
Codeigniter 3 - Basic CRUD application with MySQL Example with Demo
This tutorial will help to create simple CRUD (Create Read Update Delete) Operation application using MySQL Database with validation. As we know well we always require to create basic CRUD module for products, items etc using mysql database. It is primary requirement for any web application. So in this example i will explain example of add, edit and delete record using codeigniter 3 and mysql database. I am extending this tutorial and will add functionality to insert update delete record from mysql database with demo.Here i explain step by step process to create listing, add, edit and delete record using Codeigniter 3. You have to simple follow bellow few step to create basic CRUD application in codeigniter application.
There are listed bellow step you have to follow:
1) Download Codeigniter 3
2) Make Database and Configuration
3) Create Routes
4) Add ItemCRUD Controller
5) Create ItemCRUD Model
6) Create View Files
End of the example of this example you will get full CRUD app like as bellow screenshot.
Preview:
Step 1: Download Codeigniter 3
In this step we will download version of Codeigniter 3, so if you haven’t download yet then download from here : Download Codeigniter 3.
After Download successfully, extract clean new Codeigniter 3 application.
Step 2: Make Database and Configuration
In second step we will create new database “test” and add new table “items” in test database. You can use following SQL Query for create “items” table. So let’s create using bellow SQL query:
items table:
CREATE TABLE IF NOT EXISTS `items` ( `id` int(10) unsigned NOT NULL AUTO_INCREMENT, `title` varchar(255) COLLATE utf8_unicode_ci NOT NULL, `description` text COLLATE utf8_unicode_ci NOT NULL, PRIMARY KEY (`id`) ) ENGINE=InnoDB DEFAULT CHARSET=utf8 COLLATE=utf8_unicode_ci AUTO_INCREMENT=16 ;
After create database and table successfully, we have to configuration of database in our Codeigniter 3 application, so open database.php file and add your database name, username and password.
application/config/database.php
<?php defined('BASEPATH') OR exit('No direct script access allowed'); $active_group = 'default'; $query_builder = TRUE; $db['default'] = array( 'dsn' => '', 'hostname' => 'localhost', 'username' => 'root', 'password' => 'root', 'database' => 'test', 'dbdriver' => 'mysqli', 'dbprefix' => '', 'pconnect' => FALSE, 'db_debug' => (ENVIRONMENT !== 'production'), 'cache_on' => FALSE, 'cachedir' => '', 'char_set' => 'utf8', 'dbcollat' => 'utf8_general_ci', 'swap_pre' => '', 'encrypt' => FALSE, 'compress' => FALSE, 'stricton' => FALSE, 'failover' => array(), 'save_queries' => TRUE );
Step 3: Create Routes
Here, we have to add some routes in your route file. So first we will create routes for itemCRUD modules for lists, create, edit, update and delete. so put the bellow content in route file:
application/config/routes.php
<?php defined('BASEPATH') OR exit('No direct script access allowed'); $route['default_controller'] = 'welcome'; $route['404_override'] = ''; $route['translate_uri_dashes'] = FALSE; $route['itemCRUD'] = "itemCRUD/index"; $route['itemCRUD/(:num)'] = "itemCRUD/show/$1"; $route['itemCRUDCreate']['post'] = "itemCRUD/store"; $route['itemCRUDEdit/(:any)'] = "itemCRUD/edit/$1"; $route['itemCRUDUpdate/(:any)']['put'] = "itemCRUD/update/$1"; $route['itemCRUDDelete/(:any)']['delete'] = "itemCRUD/delete/$1";
Step 4: Add ItemCRUD Controller
Ok In this step, we will create one new controller ItemCRUD with method listing, create, edit, update and delete. so create ItemCRUD.php file in this path application/controllers/ItemCRUD.php and put bellow code in this file:
application/controllers/ItemCRUD.php
<?php defined('BASEPATH') OR exit('No direct script access allowed'); class ItemCRUD extends CI_Controller public $itemCRUD; /** * Get All Data from this method. * * @return Response */ public function __construct() parent::__construct(); $this->load->library('form_validation'); $this->load->library('session'); $this->load->model('ItemCRUDModel'); $this->itemCRUD = new ItemCRUDModel; /** * Display Data this method. * * @return Response */ public function index() $data['data'] = $this->itemCRUD->get_itemCRUD(); $this->load->view('theme/header'); $this->load->view('itemCRUD/list',$data); $this->load->view('theme/footer'); /** * Show Details this method. * * @return Response */ public function show($id) $item = $this->itemCRUD->find_item($id); $this->load->view('theme/header'); $this->load->view('itemCRUD/show',array('item'=>$item)); $this->load->view('theme/footer'); /** * Create from display on this method. * * @return Response */ public function create() $this->load->view('theme/header'); $this->load->view('itemCRUD/create'); $this->load->view('theme/footer'); /** * Store Data from this method. * * @return Response */ public function store() $this->form_validation->set_rules('title', 'Title', 'required'); $this->form_validation->set_rules('description', 'Description', 'required'); if ($this->form_validation->run() == FALSE) $this->session->set_flashdata('errors', validation_errors()); redirect(base_url('itemCRUD/create')); else $this->itemCRUD->insert_item(); redirect(base_url('itemCRUD')); /** * Edit Data from this method. * * @return Response */ public function edit($id) $item = $this->itemCRUD->find_item($id); $this->load->view('theme/header'); $this->load->view('itemCRUD/edit',array('item'=>$item)); $this->load->view('theme/footer'); /** * Update Data from this method. * * @return Response */ public function update($id) $this->form_validation->set_rules('title', 'Title', 'required'); $this->form_validation->set_rules('description', 'Description', 'required'); if ($this->form_validation->run() == FALSE) $this->session->set_flashdata('errors', validation_errors()); redirect(base_url('itemCRUD/edit/'.$id)); else $this->itemCRUD->update_item($id); redirect(base_url('itemCRUD')); /** * Delete Data from this method. * * @return Response */ public function delete($id) $item = $this->itemCRUD->delete_item($id); redirect(base_url('itemCRUD'));
Step 5: Create ItemCRUD Model
In this step, we have to create ItemCRUD model for write database logic, here we will write database logic to fetch all data, insert new record, update and delete. So you have to create new ItemCRUD.php in models folder.
application/models/ItemCRUD.php
<?php class ItemCRUDModel extends CI_Model public function get_itemCRUD() if(!empty($this->input->get("search"))) $this->db->like('title', $this->input->get("search")); $this->db->or_like('description', $this->input->get("search")); $query = $this->db->get("items"); return $query->result(); public function insert_item() $data = array( 'title' => $this->input->post('title'), 'description' => $this->input->post('description') ); return $this->db->insert('items', $data); public function update_item($id) $data=array( 'title' => $this->input->post('title'), 'description'=> $this->input->post('description') ); if($id==0) return $this->db->insert('items',$data); else $this->db->where('id',$id); return $this->db->update('items',$data); public function find_item($id) return $this->db->get_where('items', array('id' => $id))->row(); public function delete_item($id) return $this->db->delete('items', array('id' => $id)); ?>
Step 6: Create View Files
now we move in last step. In this step we have to create just php view files. So mainly we have to create layout file and then create new folder “itemCRUD” then create blade files of crud app. So finally you have to create following bellow view file:
1) header.php
2) footer.php
3) list.php
4) create.php
5) show.php
6) edit.php
So let’s just create following file and put bellow code.
application/views/theme/header.php
<!DOCTYPE html> <html> <head> <title>Basic Crud operation in Codeigniter 3</title> <link rel="stylesheet" href="https://maxcdn.bootstrapcdn.com/bootstrap/3.3.7/css/bootstrap.min.css" /> </head> <body> <div class="container">
application/views/theme/footer.php
</div> </body> </html>
application/views/itemCRUD/list.php
<div class="row"> <div class="col-lg-12 margin-tb"> <div class="pull-left"> <h2>Codeigniter 3 CRUD Example from scratch</h2> </div> <div class="pull-right"> <a class="btn btn-success" href="<?php echo base_url('itemCRUD/create') ?>"> Create New Item</a> </div> </div> </div> <table class="table table-bordered"> <thead> <tr> <th>Title</th> <th>Description</th> <th width="220px">Action</th> </tr> </thead> <tbody> <?php foreach ($data as $item) ?> <tr> <td><?php echo $item->title; ?></td> <td><?php echo $item->description; ?></td> <td> <form method="DELETE" action="<?php echo base_url('itemCRUD/delete/'.$item->id);?>"> <a class="btn btn-info" href="<?php echo base_url('itemCRUD/'.$item->id) ?>"> show</a> <a class="btn btn-primary" href="<?php echo base_url('itemCRUD/edit/'.$item->id) ?>"> Edit</a> <button type="submit" class="btn btn-danger"> Delete</button> </form> </td> </tr> <?php ?> </tbody> </table>
application/views/itemCRUD/create.php
<div class="row"> <div class="col-lg-12 margin-tb"> <div class="pull-left"> <h2>Add New Item</h2> </div> <div class="pull-right"> <a class="btn btn-primary" href="<?php echo base_url('itemCRUD');?>"> Back</a> </div> </div> </div> <form method="post" action="<?php echo base_url('itemCRUDCreate');?>"> <?php if ($this->session->flashdata('errors')) echo '<div class="alert alert-danger">'; echo $this->session->flashdata('errors'); echo "</div>"; ?> <div class="row"> <div class="col-xs-12 col-sm-12 col-md-12"> <div class="form-group"> <strong>Title:</strong> <input type="text" name="title" class="form-control"> </div> </div> <div class="col-xs-12 col-sm-12 col-md-12"> <div class="form-group"> <strong>Description:</strong> <textarea name="description" class="form-control"></textarea> </div> </div> <div class="col-xs-12 col-sm-12 col-md-12 text-center"> <button type="submit" class="btn btn-primary">Submit</button> </div> </div> </form>
application/views/itemCRUD/show.php
<div class="row"> <div class="col-lg-12 margin-tb"> <div class="pull-left"> <h2> Show Item</h2> </div> <div class="pull-right"> <a class="btn btn-primary" href="<?php echo base_url('itemCRUD');?>"> Back</a> </div> </div> </div> <div class="row"> <div class="col-xs-12 col-sm-12 col-md-12"> <div class="form-group"> <strong>Title:</strong> <?php echo $item->title; ?> </div> </div> <div class="col-xs-12 col-sm-12 col-md-12"> <div class="form-group"> <strong>Description:</strong> <?php echo $item->description; ?> </div> </div> </div>
application/views/itemCRUD/edit.php
<div class="row"> <div class="col-lg-12 margin-tb"> <div class="pull-left"> <h2>Edit Item</h2> </div> <div class="pull-right"> <a class="btn btn-primary" href="<?php echo base_url('itemCRUD');?>"> Back</a> </div> </div> </div> <form method="post" action="<?php echo base_url('itemCRUD/update/'.$item->id);?>"> <?php if ($this->session->flashdata('errors')) echo '<div class="alert alert-danger">'; echo $this->session->flashdata('errors'); echo "</div>"; ?> <div class="row"> <div class="col-xs-12 col-sm-12 col-md-12"> <div class="form-group"> <strong>Title:</strong> <input type="text" name="title" class="form-control" value="<?php echo $item->title; ?>"> </div> </div> <div class="col-xs-12 col-sm-12 col-md-12"> <div class="form-group"> <strong>Description:</strong> <textarea name="description" class="form-control"><?php echo $item->description; ?></textarea> </div> </div> <div class="col-xs-12 col-sm-12 col-md-12 text-center"> <button type="submit" class="btn btn-primary">Submit</button> </div> </div> </form>
Ok, now we are ready to run our CRUD Application example. So let’s run bellow command on your root directory for quick run:
php -S localhost:8000
Now you can open bellow URL on your browser:
http://localhost:8000/
If you are run using localhost:800 then you have to set base url in config:
application/config/config.php
$config[‘base_url’] = ‘http://localhost:8000’;
قالب وردپرس
0 notes