
Don't wanna be here? Send us removal request.
Statistics
We looked inside some of the posts by semicoloncoder-blog and here's what we found interesting.
Average Info
Notes Per Post
1
Likes Per Post
1
Reblog Per Post
0
Reply Per Post
0
Time Between Posts
13 days
Number of Posts By Type
Photo
17
Last Seen Tumblr Blogs


Fun Fact
Tumblr was named as a finalist in Lead411’s New York City Hot 125 in Aug 2010.
Photo

https://semicolon.codes/missile-game-in-javascript/
Missile Game in JavaScript [With Source Code]
Missile Game in JavaScript with source code
Missile Game is a challenging arcade game where you are controlling a missile to tackle the obstacles in-front of you inside a tunnel like space. This game is all written in JavaScript.
This game has a very abstract look in it with no color and black and white 3d graphics which look very smooth and nice. The game has levels where each level passes the speed of the missile increases. The game also show a nice little FPS Bar on the top left corner just in case.
Download link of game is below
missile_game.zip
Download 39.26 KB
jQuery(function()jQuery('.link-btn a.wpdm-download-link img').after('Download');jQuery('.link-btn a.wpdm-download-link img').remove(););
0 notes
Photo

https://semicolon.codes/hexgl-space-racing-javascript-game-with-source-codes/
HexGL Space Racing Javascript Game [ With Source Codes ]
HexGL Space Racing JavaScript Game
HexGL is a game made with HTML5 and pure JavaScript language with OpenGL ES 2.0 to perform 2D and 3D rendering in an HTML canvas in browsers that support it without the use of plug-ins. So, JavaScript Browser games consist of control code written in JavaScript and shader code (GLSL) that is executed on a computer’s Graphics Processing Unit.
Furthermore, HexGL is a single player high speed space racing game. This game is coded to play in browser with localhost server. This futuristic racing game can be played offline with decent low specs computers and laptops. The game has options to set graphics from low to high so your computer wont have hard time rendering game. There is touch and motion control for tablet devices , gamepad options, leap motion controller and keyboard controls for computers.
Hence, Technologies used:
WebGL
Javascript
CoffeeScript
Three JS
Leap Motion
Now, Step to install the game:
First, Download the game with the given link below.
Extract the zip file with winrar, 7-zip or other choice of extractor.
Now go to the game folder, and start localhost server.
Open the browser with localhost with corresponding port.
Download link is below:
HexGL.zip
Download 0.00 KB
jQuery(function()jQuery('.link-btn a.wpdm-download-link img').after('Download');jQuery('.link-btn a.wpdm-download-link img').remove(););
0 notes
Photo

https://semicolon.codes/chat-application-php-codeigniter-mysql/
Chat Application PHP Codeigniter MySQL [With Source Code]
Chat Application PHP Codeigniter MySQL
The chat application with php, codeigniter and mysql allows user to chat internet using same platform. This project is created using codeignter which is a powerful PHP framework with a very small footprint, built for developers who need a simple and elegant toolkit to create full-featured web. PHP on ther other hand is server side scripting language powering upto more than 70% of website today.Hence, most popular CMS available in the public called WordPress is built with PHP.
Check out codeigniter docs here.
Chat application uses real-time chat functionality using AJAX request chat feed from the php controller. AJAX request are continuously send to receive any new chat feed. Other than that, the web application provides user login authentication, user management, profile management and other small features. User are categorized into different roles such as client , vender and admin. As you login, you can chat with different user available to you.
Furthermore, chat is generally fast, user can chat to different user simultaneously and users can also upload file to chat so that other user can access to the attached file directly from the chat section. UI Design is quite simple and straight forward. Management user as admin. Default user are listed while you see the login section of this application.
Steps to use the project:
Download the project from the link below
Extract to htdocs folder if you are using xammp or www if wammp.
Create database in phpmyadmin mysql server and import the database file from import section.
Start your localhost apache server or any other server
Go to browser and load project url ‘localhost/project_folder_name’ or ‘localhost:**/project_name’ if you are using port different from default port 80.
Note: Change the config[‘base_url’] = ‘localhost/project_folder_name’ in application/config/config.php if you are using different folder name. Database connection config file is also in ‘application/config/database.php’. Change the database config file to your matching database credentials.
Dowload link is listed below:
chat_app_ci.zip
Download 0.00 KB
jQuery(function()jQuery('.link-btn a.wpdm-download-link img').after('Download');jQuery('.link-btn a.wpdm-download-link img').remove(););
0 notes
Photo

https://semicolon.codes/codeigniter-task-management-app-mysql/
Codeigniter Task Management App MySQL [ With Project Files ]
CodeIgniter Task Management App MySQL
Codeiginter Task Management App is codeIgniter based web application which lets you create various projects and their task for each user. Whole app is made using codeIgniter PHP framework which is a powerful open source PHP framework. Hence, CodeIgniter is a powerful PHP framework with a very small footprint, built for developers who need a simple and elegant toolkit to create full-featured web applications.
More info on codeigniter here.
Learn codeiginter more using codeignter’s own user guide.
Here in this web app we can manage our own projects, create their task and set their due date, set task as active and complete. A web based app that controls the task you are going to do in the future. So, as a user when you register you are provided with set of input fields of details which we have to enter. Then user can simple began to create new project with their own tasks. When multiple users register, each user will only their own projects which they created themselves not others. So, this separates mixing project of user and user can have their own set of projects and task specific to them.
Features of this Web App:
Create User , login user and register new users.
Dashboard with Recent set of projects and tasks created.
Create , delete , edit projects as you want for each individual users.
Create , delete , edit tasks for each set of project.
Set tasks with due date and Status as Active and Complete Task.
Made with Mobile friendly framework (Bootstrap).
Clean Toast Notification feature with Toastr.
Steps to use the project:
Extract and unzip the project file.
Copy the project folder into localhost server folder like “htdocs” for Xampp or “www” for Wampp.
After that create a database with name “codeigniter_db” in phpmyadmin.
Import the sql file inside the project folder which with name “Database File” into the newly created database.
The project Folder name will be “ci” and if you want to change the name of the project folder then make sure to change config.php which is inside application > config >config.php ( Set $[‘base_url’] = “http://localhost/new_project_name”.
Launch the project in browser by typing “localhost/ci” or “localhost/new_project_name”.
Admin Details:
username : sanish
pass: sanish123
Download Links is Below:
ciApp.zip
Download 3.57 MB
jQuery(function()jQuery('.link-btn a.wpdm-download-link img').after('Download');jQuery('.link-btn a.wpdm-download-link img').remove(););
0 notes
Photo

https://semicolon.codes/super-flash-light-android-studio/
Super Flash Light Android Studio App [ With Project Files]
Super Flash Light App Android Studio
Super Flash light is a minimal flash light application developed using Android Studio. Hence, The controls and very easy and simple to use. Simple , fast and bright. The app is written in JAVA Programming Language with Android Studio IDE. Android studio is an official Integrated Developement Environment (IDE) specially for development of Android Apps. It has got lot of build in developer tools and powerful source code editer and enhanced features for productivity in building apps.
On the other hand, the Super Flash has two different flash modes. One using the rear camera flash and second the screen itself. As you can see, on the image above. So, There are two buttons on the screen that switches between these modes.
Details on SuperFlash
Furthermore, the app checks if your device support flash light feature in startup. If not then the app will show alert and will exit. Hence, you should test this app in real smart phone, not android emulator as emulator doesn’t have flash feature.The permission request dialog is also shown on first start if device supports flash feature. So , to turn on the flash light, the controls are pretty simple. Click on the lightning button on the screen to turn on the flash and click again to turn off. You will also see that the color of lightning changes to yellow when flash is on and black when it is off.
To Get Started with the App:
Download the zip file from the link below.
Unzip using 7zip or winrar to a folder.
Open Android Studio and Click on File option to open the projects.
Locate the folder you just unzipped “Super Flash Folder”.
Wait for sometime to build the project.
If you get any error, it because of missing build tool and dependency for current SDK. You can locate the error and fix it by installing them.
Download link is Below:
SuperFlashAndroid.zip
Download 12.63 MB
jQuery(function()jQuery('.link-btn a.wpdm-download-link img').after('Download');jQuery('.link-btn a.wpdm-download-link img').remove(););
1 note
·
View note
Photo

https://semicolon.codes/notepad-clone-csharp-winforms/
Notepad Clone C# Winforms [With Source Codes]
Notepad Clone in C#
Notepad clone is replica of original notepad in windows. This clone made using C# Winforms which is a graphical inteface application programming interface (API) included in C# .Net Framework. Winforms is a library that lets you create GUI application using C#. Therefore, the notepad clone program lets you write note, save notes and open then as usaal notepad would do. So, there are some difference from original notepad such as logo, bit of style and layout.
Features of the notepad clone:
File – create, read ,delete, save print and page setup.
Edit – undo, cut, copy, paste, find , replace, go to line number and others.
Format – Wordwarp, fonts setting.
Other – view and help tabs.
Hence, the clone is very much similar the original one besides small details and featues that makes the original original. This is just a project to replicate the notepad program and the clone seems to turnout pretty well. Here’s the download link of the file so you can see the project files by yourself. Link is below:
notepadC#winforms.zip
Download 1.48 MB
jQuery(function()jQuery('.link-btn a.wpdm-download-link img').after('Download');jQuery('.link-btn a.wpdm-download-link img').remove(););
0 notes
Photo
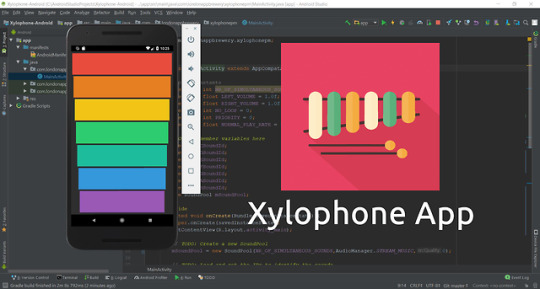
https://semicolon.codes/xylophone-app-android-studio-java/
Xylophone App Android Studio Java [With Project Files]
Xylophone App Android Studio Java
Xylophone is a musical instrument that plays by striking wooden bar on mallets. This feature is now available in app as android smartphone can simulate the same sound effect. This xylophone app is made using Android Stuido which is IDE android app development software by google. The app is very simple and easy to use. Just press the color buttons to play high quality xylophone sounds. All the project files are includes in the download link below. So, you can check out the actual project is built.
Inside Overview
Hence, this app mainly uses a library provided by Android Studio IDE itself called SoundPool. SoundPool object simply contains collection sample sounds which can be loaded into memory inside from resource apk. In addition, SoundPool provides low-latency playback and simultanous number of playback which is not available in Audio Manager.
Furthermore, the features that SoundPool Library provides:
Limit the number of simulateously sounds plays.
Feature to control left and right volume.
Loop feature
Priority management(SoundPool will automatically stop previously sounds based on priority)
Control on playback speed rate.
Example of SoundPool Object:
// TODO: Create a new SoundPool
//Constants private final int NR_OF_SIMULTANEOUS_SOUNDS = 7; private final float LEFT_VOLUME = 1.0f; private final float RIGHT_VOLUME = 1.0f; private final int NO_LOOP = 0; private final int PRIORITY = 0; private final float NORMAL_PLAY_RATE = 1.0f; //declare new soundpool object with parameters mSoundPool = new SoundPool(NR_OF_SIMULTANEOUS_SOUNDS,AudioManager.STREAM_MUSIC,0);
//Define the soundpool object's sound from resources mCSoundId = mSoundPool.load(getApplicationContext(),R.raw.note1_c,1);
// Trigger the SoundPool Object sound mSoundPool.play(mCSoundId, LEFT_VOLUME, RIGHT_VOLUME, PRIORITY,NO_LOOP, NORMAL_PLAY_RATE);
Thus, SoundPool is effective when playing multiple sounds at same time.Therefore, You can find out the SoundPool Objects method ,constructor and other in here. Also, You can get the project in the link down below:
xlylophoneAndroid.zip
Download 0.00 KB
jQuery(function()jQuery('.link-btn a.wpdm-download-link img').after('Download');jQuery('.link-btn a.wpdm-download-link img').remove(););
0 notes
Photo
https://semicolon.codes/weather-app-android-studio-java/
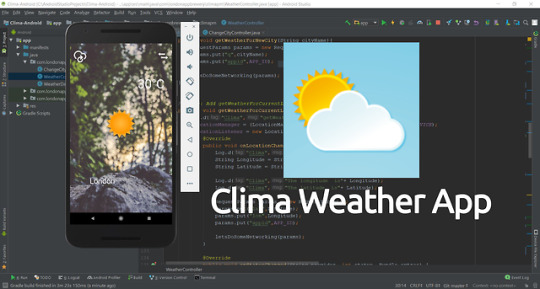
Weather App Android Studio Java [With Project Files]

Weather App Android Studio with Project Files
This weather app is an android studio project developed using java programming language. Android studio is android app development environment offically created by google. This software provides whole set of tool kits and environment which makes the app development process more efficient , easy and reliable. This software is used by professional developer all around the work and the good part is its free of cost. So, you get to use the software which is used by pro app developers.
Short Overview on what App does:
Clima weather app is a simple weather forecast app that uses api to get json the openweather.org website. The openweather website is a weather forecast website and allows user to integrate weather apis into your app. These api requries to send parameters to get the weather data which is usually in json format. The data can be fetched using api’s given by the openwaeather website itself by which we can send parameters to get weather data. However, to get access to api. you have to sign in and request for app_key to openweather.org website.
In my case, i used longitude and latitude and city name as parameter for api to get the result from the open weather database. The app displays current temperature and weather status in image as weather forecast for specifice city. When the app starts, user will get a toast message “”fetching location” which get your current longitude and latitude data and send those params to get weather for your current area.
Things to remeber while learning this app tutorial:
Insert uses-permission to AndroidManifest.xml file to get internet, gps address and cell tower location. These permission are mandatory to the project. Hence, internet permissions allows app to use interner, access fine location allows device to use GPS location and access coarse location allows ap to use cell network location.
<uses-permission android:name="android.permission.INTERNET" /> <uses-permission android:name="android.permission.ACCESS_FINE_LOCATION" /> <uses-permission android:name="android.permission.ACCESS_COARSE_LOCATION" />
XML layout for Main Weather Activity: This activity xml file contains a textview for location name and temperature, image for weather details , image button for changing city.
<?xml version="1.0" encoding="utf-8"?> <android.support.constraint.ConstraintLayout xmlns:android="http://schemas.android.com/apk/res/android" xmlns:app="http://schemas.android.com/apk/res-auto" xmlns:tools="http://schemas.android.com/tools" android:id="@+id/relativeLayout" android:layout_width="match_parent" android:layout_height="match_parent" android:background="@drawable/weather_background" tools:context="com.londonappbrewery.climapm.WeatherController"> <TextView android:id="@+id/locationTV" android:layout_width="wrap_content" android:layout_height="wrap_content" android:shadowColor="@android:color/background_dark" android:shadowDx="1" android:shadowDy="1" android:shadowRadius="4" android:text="@string/default_location" android:textAppearance="?android:attr/textAppearanceLarge" android:textColor="@color/white" android:textSize="30sp" app:layout_constraintBottom_toBottomOf="parent" app:layout_constraintEnd_toEndOf="parent" app:layout_constraintHorizontal_bias="0.258" app:layout_constraintStart_toStartOf="parent" app:layout_constraintTop_toBottomOf="@+id/weatherSymbolIV" app:layout_constraintVertical_bias="0.572" /> <TextView android:id="@+id/tempTV" android:layout_width="wrap_content" android:layout_height="wrap_content" android:layout_marginBottom="8dp" android:layout_marginEnd="16dp" android:layout_marginLeft="8dp" android:layout_marginRight="16dp" android:layout_marginStart="8dp" android:layout_marginTop="8dp" android:shadowColor="@color/black" android:text="@string/default_temp" android:textAppearance="?android:attr/textAppearanceLarge" android:textColor="@color/white" android:textSize="50sp" app:layout_constraintBottom_toBottomOf="parent" app:layout_constraintEnd_toEndOf="parent" app:layout_constraintHorizontal_bias="0.948" app:layout_constraintStart_toStartOf="parent" app:layout_constraintTop_toTopOf="parent" app:layout_constraintVertical_bias="0.201" /> <ImageButton android:id="@+id/changeCityButton" android:layout_width="40dp" android:layout_height="60dp" android:layout_marginEnd="16dp" android:layout_marginRight="16dp" android:layout_marginTop="20dp" android:background="@null" android:contentDescription="@string/change_city_description" android:scaleType="fitCenter" android:src="@drawable/change_city_symbol_small" app:layout_constraintEnd_toEndOf="parent" app:layout_constraintTop_toTopOf="parent" /> <ImageView android:id="@+id/weatherSymbolIV" android:layout_width="wrap_content" android:layout_height="wrap_content" android:layout_marginBottom="8dp" android:layout_marginTop="8dp" android:contentDescription="@string/weather_description" android:src="@drawable/dunno" app:layout_constraintBottom_toBottomOf="parent" app:layout_constraintEnd_toEndOf="parent" app:layout_constraintStart_toStartOf="parent" app:layout_constraintTop_toTopOf="parent" app:layout_constraintVertical_bias="0.473" /> <ImageButton android:id="@+id/refresh" android:layout_width="50dp" android:layout_height="50dp" android:layout_marginLeft="16dp" android:layout_marginStart="16dp" android:layout_marginTop="28dp" android:background="@android:color/transparent" android:scaleType="fitCenter" app:layout_constraintStart_toStartOf="parent" app:layout_constraintTop_toTopOf="parent" app:srcCompat="@drawable/cloud_refresh" /> </android.support.constraint.ConstraintLayout>
XML Layout for Change City Activity: An edittext where you type city name and it will intent to main class.
<?xml version="1.0" encoding="utf-8"?> <android.support.constraint.ConstraintLayout xmlns:android="http://schemas.android.com/apk/res/android" xmlns:app="http://schemas.android.com/apk/res-auto" xmlns:tools="http://schemas.android.com/tools" android:id="@+id/relativeLayout2" android:layout_width="match_parent" android:layout_height="match_parent" android:background="@drawable/city_background" android:paddingBottom="@dimen/activity_vertical_margin" android:paddingLeft="@dimen/activity_horizontal_margin" android:paddingRight="@dimen/activity_horizontal_margin" android:paddingTop="@dimen/activity_vertical_margin"> <ImageButton android:id="@+id/backButton" android:layout_width="30dp" android:layout_height="50dp" android:background="@null" android:contentDescription="@string/back_button_description" android:scaleType="fitCenter" android:src="@drawable/left" app:layout_constraintLeft_toLeftOf="parent" app:layout_constraintStart_toStartOf="parent" app:layout_constraintTop_toTopOf="parent" /> <EditText android:id="@+id/queryET" android:layout_width="match_parent" android:layout_height="50dp" android:layout_marginBottom="8dp" android:layout_marginTop="8dp" android:background="@color/white" android:gravity="center_vertical|center_horizontal" android:hint="@string/default_query" android:imeOptions="actionGo" android:inputType="textAutoCorrect" android:textColor="@color/black" android:textSize="24sp" app:layout_constraintBottom_toBottomOf="parent" app:layout_constraintLeft_toLeftOf="parent" app:layout_constraintRight_toRightOf="parent" app:layout_constraintTop_toTopOf="parent" app:layout_constraintVertical_bias="0.541" /> <TextView android:id="@+id/getWeatherTV" android:layout_width="wrap_content" android:layout_height="wrap_content" android:layout_marginTop="8dp" android:shadowColor="@android:color/background_dark" android:shadowDx="1" android:shadowDy="1" android:shadowRadius="4" android:text="@string/get_weather" android:textAppearance="@style/TextAppearance.AppCompat" android:textColor="@color/white" android:textSize="36sp" app:layout_constraintBottom_toTopOf="@+id/queryET" app:layout_constraintHorizontal_bias="0.503" app:layout_constraintLeft_toLeftOf="parent" app:layout_constraintRight_toRightOf="parent" app:layout_constraintTop_toTopOf="parent" app:layout_constraintVertical_bias="0.811" /> </android.support.constraint.ConstraintLayout>
Main WeatherController Activity Java Code: This activity has most of the codes and logic. The activity fetches the json data and show to the screen depending upon data.
package com.londonappbrewery.climapm; import android.Manifest; import android.content.Context; import android.content.Intent; import android.content.pm.PackageManager; import android.location.Location; import android.location.LocationListener; import android.location.LocationManager; import android.os.Bundle; import android.support.annotation.NonNull; import android.support.v4.app.ActivityCompat; import android.support.v7.app.AppCompatActivity; import android.util.Log; import android.view.View; import android.widget.ImageButton; import android.widget.ImageView; import android.widget.TextView; import android.widget.Toast; import com.loopj.android.http.AsyncHttpClient; import com.loopj.android.http.JsonHttpResponseHandler; import com.loopj.android.http.RequestParams; import org.json.JSONObject; import cz.msebera.android.httpclient.Header; public class WeatherController extends AppCompatActivity // Constants: final int REQUEST_CODE = 123; final String WEATHER_URL = "http://api.openweathermap.org/data/2.5/weather"; // App ID to use OpenWeather data final String APP_ID = "passte_your_app_key/id"; // Time between location updates (5000 milliseconds or 5 seconds) final long MIN_TIME = 5000; // Distance between location updates (1000m or 1km) final float MIN_DISTANCE = 1000; // TODO: Set LOCATION_PROVIDER here: final String LOCATION_PROVIDER = LocationManager.NETWORK_PROVIDER; // Member Variables: TextView mCityLabel; ImageView mWeatherImage; TextView mTemperatureLabel; // TODO: Declare a LocationManager and a LocationListener here: LocationManager mLocationManager; LocationListener mLocationListener; @Override protected void onCreate(Bundle savedInstanceState) super.onCreate(savedInstanceState); setContentView(R.layout.weather_controller_layout); // Linking the elements in the layout to Java code mCityLabel = findViewById(R.id.locationTV); mWeatherImage = findViewById(R.id.weatherSymbolIV); mTemperatureLabel = findViewById(R.id.tempTV); ImageButton changeCityButton = findViewById(R.id.changeCityButton); ImageButton refreshWeather = findViewById(R.id.refresh); // TODO: Add an OnClickListener to the changeCityButton here: changeCityButton.setOnClickListener(new View.OnClickListener() @Override public void onClick(View v) Intent changeCity = new Intent(getApplicationContext(), ChangeCityController.class); startActivity(changeCity); ); refreshWeather.setOnClickListener(new View.OnClickListener() @Override public void onClick(View v) Toast.makeText(getApplicationContext(), "Refetching..",Toast.LENGTH_LONG).show(); onResume(); ); // TODO: Add onResume() here: @Override protected void onResume() super.onResume(); Log.d("Clima","onResume() is started"); Intent cityData = getIntent(); String cityName = cityData.getStringExtra("City"); if(cityName != null) getWeatherForNewCity(cityName); else getWeatherForCurrentLocation(); // TODO: Add getWeatherForNewCity(String city) here: public void getWeatherForNewCity(String cityName) RequestParams params = new RequestParams(); params.put("q",cityName); params.put("appid",APP_ID); letsDoSomeNetworking(params); // TODO: Add getWeatherForCurrentLocation() here: private void getWeatherForCurrentLocation() Log.d("Clima","getWeatherForCurrentLocation()"); mLocationManager = (LocationManager) getSystemService(Context.LOCATION_SERVICE); mLocationListener = new LocationListener() @Override public void onLocationChanged(Location location) Log.d("Clima","onLocationChanged() is started"); String Longitude = String.valueOf(location.getLongitude()); String Latitude = String.valueOf(location.getLatitude()); Log.d("Clima","The longitude is"+ Longitude); Log.d("Clima","The latitude is"+ Latitude); RequestParams params = new RequestParams(); params.put("lat",Latitude); params.put("lon",Longitude); params.put("appid",APP_ID); letsDoSomeNetworking(params); @Override public void onStatusChanged(String provider, int status, Bundle extras) @Override public void onProviderEnabled(String provider) @Override public void onProviderDisabled(String provider) Log.d("Clima","onProviderDisabled() is called"); ; if (ActivityCompat.checkSelfPermission(this, Manifest.permission.ACCESS_COARSE_LOCATION) != PackageManager.PERMISSION_GRANTED && ActivityCompat.checkSelfPermission(this, Manifest.permission.ACCESS_FINE_LOCATION) != PackageManager.PERMISSION_GRANTED) // TODO: Consider calling // ActivityCompat#requestPermissions // here to request the missing permissions, and then overriding // public void onRequestPermissionsResult(int requestCode, String[] permissions, // int[] grantResults) // to handle the case where the user grants the permission. See the documentation // for ActivityCompat#requestPermissions for more details. ActivityCompat.requestPermissions(this, new String[]Manifest.permission.ACCESS_FINE_LOCATION, REQUEST_CODE); return; mLocationManager.requestLocationUpdates(LOCATION_PROVIDER, MIN_TIME, MIN_DISTANCE, mLocationListener); @Override public void onRequestPermissionsResult(int requestCode, @NonNull String[] permissions, @NonNull int[] grantResults) super.onRequestPermissionsResult(requestCode, permissions, grantResults); if(requestCode == REQUEST_CODE) grantResults[0]== PackageManager.PERMISSION_GRANTED) Log.d("Clima","Permission Granted"); getWeatherForCurrentLocation(); else Log.d("Clima","Permsission Denied"); // TODO: Add letsDoSomeNetworking(RequestParams params) here public void letsDoSomeNetworking(RequestParams params) AsyncHttpClient client = new AsyncHttpClient(); client.get(WEATHER_URL, params, new JsonHttpResponseHandler() @Override public void onSuccess(int statusCode, Header[] header, JSONObject response) Log.d("Clima","Success"+response.toString()); WeatherDataModel weatherdata = WeatherDataModel.fromJSON(response); updateUI(weatherdata); Toast.makeText(WeatherController.this, "Location Fetched", Toast.LENGTH_SHORT).show(); @Override public void onFailure(int statuscode, Header[] header, Throwable e , JSONObject response) Log.d("Clima","Status code"+statuscode); Log.d("Clima","Fail"+e.toString()); Toast.makeText(WeatherController.this, "Invalid Location", Toast.LENGTH_SHORT).show(); getWeatherForCurrentLocation(); ); // TODO: Add updateUI() here: public void updateUI(WeatherDataModel data) mTemperatureLabel.setText(data.getTemperature()); mCityLabel.setText(data.getCity()); int resourceId = getResources().getIdentifier(data.getIconName(),"drawable",getPackageName()); mWeatherImage.setImageResource(resourceId); // TODO: Add onPause() here: @Override protected void onPause() super.onPause(); if(mLocationManager != null) mLocationManager.removeUpdates(mLocationListener);
WeatherData Model Class: This activity_class get weather json data from the main activity, creates an object of json data and returns it.
package com.londonappbrewery.climapm; import org.json.JSONException; import org.json.JSONObject; public class WeatherDataModel // TODO: Declare the member variables here private String mTemperature; private int condition; private String mCity; private String mIconName; // TODO: Create a WeatherDataModel from a JSON: public static WeatherDataModel fromJSON(JSONObject jsonObject) try WeatherDataModel weatherdata = new WeatherDataModel(); weatherdata.mCity = jsonObject.getString("name"); weatherdata.condition = jsonObject.getJSONArray("weather").getJSONObject(0).getInt("id"); weatherdata.mIconName = updateWeatherIcon(weatherdata.condition); double temp = jsonObject.getJSONObject("main").getDouble("temp") - 273.15; int roundValue = (int) Math.rint(temp); weatherdata.mTemperature = (""+roundValue); return weatherdata; catch(JSONException e) e.printStackTrace(); return null; // TODO: Uncomment to this to get the weather image name from the condition: private static String updateWeatherIcon(int condition) if (condition >= 0 && condition < 300) return "tstorm1"; else if (condition >= 300 && condition < 500) return "light_rain"; else if (condition >= 500 && condition < 600) return "shower3"; else if (condition >= 600 && condition <= 700) return "snow4"; else if (condition >= 701 && condition <= 771) return "fog"; else if (condition >= 772 && condition < 800) return "tstorm3"; else if (condition == 800) return "sunny"; else if (condition >= 801 && condition <= 804) return "cloudy2"; else if (condition >= 900 && condition <= 902) return "tstorm3"; else if (condition == 903) return "snow5"; else if (condition == 904) return "sunny"; else if (condition >= 905 && condition <= 1000) return "tstorm3"; return "dunno"; // TODO: Create getter methods for temperature, city, and icon name: public String getTemperature() return mTemperature +"°C"; public String getCity() return mCity; public String getIconName() return mIconName;
Change City Controller Class:
package com.londonappbrewery.climapm; import android.content.Intent; import android.support.v7.app.AppCompatActivity; import android.os.Bundle; import android.view.KeyEvent; import android.view.View; import android.widget.EditText; import android.widget.ImageButton; import android.widget.TextView; public class ChangeCityController extends AppCompatActivity @Override protected void onCreate(Bundle savedInstanceState) super.onCreate(savedInstanceState); setContentView(R.layout.change_city_layout); final EditText edittext = findViewById(R.id.queryET); ImageButton imageButton = findViewById(R.id.backButton); imageButton.setOnClickListener(new View.OnClickListener() @Override public void onClick(View v) finish(); ); edittext.setOnEditorActionListener(new TextView.OnEditorActionListener() @Override public boolean onEditorAction(TextView v, int actionId, KeyEvent event) String city = edittext.getText().toString(); Intent goToMainActivity = new Intent(getApplicationContext(),WeatherController.class); goToMainActivity.putExtra("City",city); startActivity(goToMainActivity); return false; );
Conclusion
Basically, this is a simple weather app which you can use your self or use it as a project. So, you also can download the project source files from link down below of you want to take a look at the project.

Please follow and like us:

0 notes
Photo

https://semicolon.codes/3d-infinite-runner-game-unity-3d/
3D Infinite Runner Game Unity 3D (With Source Code)

3D Infinite Runner Game Unity 3D Overview
3D Infinite runner game is 3d game developed using unity engine.The idea of game is much like temple run where you run in an endless path. The player can runs through a infinite path or rotated path with obstacles in front of them. There are also sandwich points which player can gain on getting sandwich or other food lying in the path.
Link of assets in the project:
Allsort Candy
Max Aventure Model
Campfire Pack
Download link is below:

Please follow and like us:

0 notes
Photo

https://semicolon.codes/online-food-ordering-system-php-mysql-with-source-files/
Online Food Ordering System PHP MYSQL (With Source Files)

Online Food Ordering System PHP MYSQL Overview
Online food ordering system is a web-based application developed using PHP and MYSQL. This online based application basically allows customer to order food online from wherever they want by providing their residential details. Customers order food from home and the order gets to system to be informed to the employees. This type of system speeds the ordering process making convenient for both customer and the employee staff.
Screenshot of Ordering Process:
Hence, the system starts with login and registration. If you already have an account then you can simply login with you credential. Otherwise, you ca register of you are new on the system. After the authentication process, user is welcomed with system dashboard board which display recently added menus. User can modify those items on the dashboard.
Some of the main features of the food ordering system are below:
Login/register: As mentioned above, user can simply login and register on the system to identify their presence and for security purposes too.
Modify/Update Menu: Admin users can update and modify the menu details on the dashboard as well as in the order section. The update section provides there columns that can modified. Name, price and availability.
Customer Order: As an ordering system, customer can order their meal/food online using their phones or laptops. They pick up certain food, certain quantity and place their order by providing valid details for order. Customer can also choose cash on delivery or credit.
View Orders and Menus: The system allows user to display all the menus information and order placed by customer. The order status can also be cancelled, waiting to be delivered and delivered.
List and Modify Tickets: User is also able to manage and modify all the tickets from the customer.
Steps to use the project:
First, extract the zip file.
Copy the folder into C://xampp/htdocs’ folder. (Install xampp if you dont have one)
Start MySQL server in xampp. and open phpmyadmin.
Create database with name ‘food’ and import the SQL file in the project folder.
Then, start Apache server and type ‘localhost/project_name’ on your browser. (rename project_name with name of the project folder).
So, Login details are in the SQL user table.
Download link is here:

Please follow and like us:

0 notes
Photo

https://semicolon.codes/simple-car-race-simulator-unity-3d/
Simple Car Race Simulator Unity 3D( With Source Files)

Simple Car Race Simulator Unity 3D Overview
Simple Car Race Game developed in Unity 3d engine with endless road generator. The C# scripts in the unity allows you to generate a straight path for car race games.
Hence, C# is a open-source high level programming language with strong typing, imperative, object-oriented and functional programming language. C# is very popular cause its relatively easy to learn and commonly used for alternative to java programming language. C# is mostly used for making app and softwares.
Besides, Unity 3D is very popular game development engine. This software allows users to create high quality 2D and 3D game with built-in unity features to comparatively short period of time. So, this software is great for those who are the phase of learning game development.
Screenshot of car race game in unity 3d workspace panel:
The screenshot above shows the project in the unity 3d work panel. The project includes all assets, prefabs and animations. Some of the audio elements are missing but that manageable.
In addition, The project uses simple modular street kit which is package of 18 moudlar low-ploy models. These models can easily be placed together to build road.
– Straight Roads – Curved Roads – Intersections
Download link is below:

Please follow and like us:

0 notes
Photo

https://semicolon.codes/super-mario-unity-3d/
Super Mario Unity 3D Game Project (With Source File)

Super Mario Unity 3D Overview
Super Mario is a 2D platform game which was developed and released back in 1985. This game was so successful so they kept developing new Mario titles. This game has sold almost 40 millions copies around the world making it one of the best selling games in the old days.
In the game Super Mario, player takes the role of the character called Mario. He also has a brother Luigi which is controlled by second player in the multiplayer game mode. The main goal is to go through mushroom kingdom and survive the deadly Bower’s forces and save the princess. In the world of Mario bros, you basically jump on enemy squishing them and collect coins to get lives.
Player Mario can also smash brick around simply jumping below them to get hidden coins and rare items. The player start with certain amount of lives. If you die, you restart on the same level. There are also hidden bricks on the game which will give you extra lives. Player dies or turn to mini Mario if he touches enemy , fall into pit or run out of time. If player loses all of its lives, the game ends.
Screenshot of the Unity 3D workspace panel:
So , the image above show the Super Mario project in unity 3d workspace. Therefore, this unity recreation of super Mario is almost very close of the original game. It has pretty accurate presentation of the game itself from design effects, particles to transitions and animations. The controls are w,s, and d corresponding to up,down,left and right. Space Bar to jump and z to shoot fireballs.
Steps to use the project:
First, download and extract the zip file into your hard drive.
Open Unity 3D and click on open project button.
Then, Locate the project folder in your HDD.
Finally, Wait for project to import and build all the assets in the game.
Download link is Below:

Please follow and like us:

0 notes
Photo

https://semicolon.codes/fifa-football-game-unity-3d/
FIFA Football Game Unity 3D (With Source Files)

FIFA Football Game Unity 3D Overview
Fifa Football is a 3D unity game developed using unity engine. The project games uses C# programming language as primary language. C# is very popular open-source high level programming language with strong typing, imperative and innovative features. Besides, Unity 3D is a cool Game development environment which allows you to build high quality 2d and 3d game from a base. Unity 3d provides a game developer with all the tools required to development game in short period of time.
Hence, The above image shows the real-time gameplay in unity 3d live gameplay panel. Basically, this game allows you to control player like in real football game where you pass the ball. shoot, tackle and throw. There are eleven player in each team. You can choose the name of your own team. The control scheme is pretty much like FIFA from ps2 consoles.
All the assets, prefabs, material and animations are included in the project folder. So, you don’t have to build them before playing. This game is just a simple match between two team where you play with AI opponent each time. The goal score counter, team flag and name is the top of the display. After each game finishes, you spawn in a new game. So, That’s pretty much about the project.
Therefore, For those unity developer learning out there, this project can be just right to give a try. Its got all files in it, so you can try to build a clone one from the scratch to really stretch your unity 3d development experience.
Steps to use the Project:
First, Download the project zip file and extract it using winrar.
Open Unity 3d and click on open project.
Locate the Project folder and select the project.
Wait For some time while unity import all the assets and build the project.
Download link is Below:

Please follow and like us:

0 notes
Photo

https://semicolon.codes/hospital-management-system-project-in-node-js/
Hospital Management System Project in Node JS (With Source Code)
Hospital Management System Project in Node JS Overview
Hospital Management System Project in Node JS is a web-based designed to manage hospital services, rooms, staffs and patients. This project provides a solution for hospital staff/employee to manage centralized data in much more effective manner. Hence, This allow employee to record data and retrieve them in real time with very less hassle.
However, This project uses JavaScript with Node JS framework which is open source, cross-platform Java run-time environment that execute the JavaScript in back-end server side.
Screenshots:
Main features:
Dashboard: Dashboard is on the main features of this application. To get to the dashboard, first you need to login with valid login credentials. So, This section basically allows admin to get all the information related to patients, room, patients, numbers of rooms, patients that are waiting etc. Therefore, A quick overview of data in the hospital management system.
Add Patient : This section allows admin user to add new patients with their type of disease. The application has features to automatically calculate the rate of disease. So, This helps patients to be treated by their doctor in possible time. To add detail, basically admin inputs series of patients information like first last name, date of birth, hospital number , and type of disease he has.
System setting: The system setting panel allows admin to add new disease, remove disease, user , rooms and patients. This section is of more importance in the system. This allows admin to control over the main hospital management system components that system relies on. These basic data are main part of the system, without which this application is not usuable.
Login Details:
Username: admin
Password: admin
Steps to use the project:
First, Download and extract the zip file in your hard drive.
Install node JS from here if you don’t have one.
Open terminal in your operating system and change the directory to the path of the project.
Then, ype ‘npm install’ to install all the dependencies required for application.
Now type ‘node app.js’ to start the local node server. This server will be live on port 3000.
Finally, Open Browser and type ‘localhost:3000’ to start the app.
Download link is below:
hosiptalmgmtnodejs.zip
0.00 KB
jQuery(function()jQuery('.link-btn a.wpdm-download-link img').after('<img src="https://semicolon.codes/wp-content/plugins/wpdm-download-button/images/03.png" alt="" />');jQuery('.link-btn a.wpdm-download-link img').remove(););
Please follow and like us:
0 notes
Photo
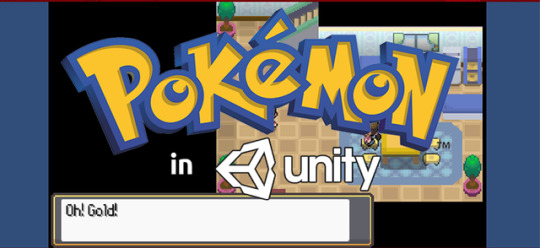
https://semicolon.codes/pokemon-gameboy-in-unity-3d/
Pokemon Gameboy in Unity 3D (With Source Files)
Pokemon Gameboy in Unity 3D Overview
The Retro Classic Role Playing Game Pokemon Gameboy Unity is now available in Unity 3D as a project. This RPG game is developed by company called freak in japan on Nintendo Platform. Pokemon is one of the best selling games in the history of the Nintendo handheld game console such as Gameboy Advance. The first Pokemon was game released back in 2002. They were Pokemon Sapphire and Ruby and they went to sell 16 millions of copies worldwide.
Screenshot of Gameplay:
The unity verison of this games replicates almost all compoenents of the real pokemon game. But, still some of the small things may be missed out during the process. The image above show the main menu of the game where you continue your progress or play new game.
Hence, in the game you wake up in your room as a guy or a girl depending upon what you choose first in the intro. Then, you move down stairs and talk with your mom. She says you bunch of things about your rival partner and to meet him/her. As you meet your rival, you pretty much talk about pokemon journey where you go to professor lab in town to get your pokemon. Professor let’s you choose one of three pokemon. One of grass type, water type and fire type .
That’s like same in all pokemon game. Your rival choose the opposite type pokemon. Then, you get to battle your rival for first time as he asks you. Them, you go on to unfold your pokemon journey to next level where you meet new guys, get new pokemon, defeats gym leader and face villians. So, That’s the whole story pretty much.
Steps to use the project:
Download the zip file below and extract into your hard drive.
Open unity 3d.
Click on Open Project, and locate the directory of the downloaded file.
Note: Most of the inner game components are outdated.So, recommended to update and build the project.
This process might take a while. So, after that enjoy.
Download link is Below:
Download will be unlocked as soon as you complete small task below:
pokemonunity.zip
0.00 KB
jQuery(function()jQuery('.link-btn a.wpdm-download-link img').after('<img src="https://semicolon.codes/wp-content/plugins/wpdm-download-button/images/03.png" alt="" />');jQuery('.link-btn a.wpdm-download-link img').remove(););
Please follow and like us:
0 notes
Photo

https://semicolon.codes/library-management-system-php-mysql/
Library Management System in PHP MYSQL (With Source Code)
Library Management System in PHP MYSQL Overview
Library Management System PHP MYSQL is a web-based browser application developed using core PHP with MYSQL database. This project uses PHP MYSQL on the back-end and Bootstrap framework design on the front-end user interface for clean and responsiveness.
The project is a management system which provides flexible use of record storing , manipulating data and providing relative information to make best library decisions.
Basically,In this Library Management system user can store record of borrowers, students, books borrowed, date record and a nice presentation of chart in the admin panel to provide rich set of data to the admin user.
From, the student’s perspective he/she can register/login their records and simply borrow a book using online method system. Therefore, This provides student more enhanced experience in borrowing book from the library.
So, the given image above shows the record of student who borrow the books by their student ID. The side navigation provides simple and clean switch between different aspects of the system.In addition, Admin are also allowed to view student details , book details, borrower details and even perform CRUD operations (create, read, update and delete). The transaction tab on the left basically shows all the event that happens inside the system. Likewise, the basic navigation should be clear to the user.
Main features of the system:
Clean and Responsive Web design with Bootstrap Framework.
Dynamic Aspect of Website with PHP MYSQL Database
Admin Panel with rich set of options and features.
Basic CRUD operations and management system.
Event Record and Transaction Feature.
Steps to use the project:
Extract the folder into “C://xammp/htdocs/” folder or wherever the xampp is installed.
Now, create a database in PHPMYADMIN using localhost Xampp MYSQL server and name it “libsystem”.
Then, inside the database import the .sql file from the database folder and execute the scripts.
Run Xampp Apache server and Open Browser.
Finally, type “localhost/project_folder” . Rename the project_folder with the name of the actual project you get below in the download link.
Download link is below:
Download will be unlock as you complete small task below.
libraryPHP.zip
0.00 KB
jQuery(function()jQuery('.link-btn a.wpdm-download-link img').after('<img src="https://semicolon.codes/wp-content/plugins/wpdm-download-button/images/03.png" alt="" />');jQuery('.link-btn a.wpdm-download-link img').remove(););
Please follow and like us:
0 notes
Photo

https://semicolon.codes/bus-reservation-system-c-plus/
Bus Reservation System in C++ (With Source Files)
Bus Reservation System in C++ Overview
Bus reservation system is C++ project developed using C++ programming language and DevC++ IDE. This project provides a solution to tedious traditional hand booking system. Mostly, all ticketing and booking system uses digital system and softwares these days. These softwares and programs excellent management system in digital form which is farther more safe and sound than traditional. Switching to digital method will not only help the customers but overall system performance.
Hence, The programming language used to develop this program is C++ which is general purpose programming language. Its has features like object-oriented , generic and imperative while also providing services fo low memory manipulation.
The image above show the major basic features in the program:
Install: This command basically added new product like Bus in context to this program. To add record, user has to input series of details to fully add a functional bus record into the system along with some validations.
Reservations: Reservations command adds new bus reservations record on the system. Again, a bunch of input has to be given and validated to in order to store the record.
Show: This show command display all the record along with their details like id, name , bus , departure time, arrival time and more in a list on the screen. For this, bus number is required to display the corresponding list.
Buses Available: This command provides details of all the buses that hasn’t been indexed or reserved by a customer.
Exit: This command simply terminates the program.
Hence, to choose the command above in the numbered list. There is a text “Enter your choice” and a blinking cursor where you type the corresponding number to the command. Then, you press enter to execute them. The whole process is command line interface which is a bit downside. Therefore, this type of project is perfect for students in the learning phase of C++ programming,
Skills used: C++ Programming
Compiler/IDE; DevC++
Download link is below:
Complete small task below to unlock the download.
busreservationC++.zip
4.00 KB
jQuery(function()jQuery('.link-btn a.wpdm-download-link img').after('<img src="https://semicolon.codes/wp-content/plugins/wpdm-download-button/images/03.png" alt="" />');jQuery('.link-btn a.wpdm-download-link img').remove(););
Please follow and like us:
0 notes